


IMPORTANT SAFEGUARDS
When using your camera, the specific cautionary notices in the owner's manual should always be observed and complied with, as well as basic precautions, including the following:
1.Read and understand all instructions.
2.Close supervision is necessary when the camera is used by or near children. Do not leave the camera unattended while in use.
3.Do not operate the camera if it has been dropped or damaged - until it has been examined by an authorized Minolta service facility.
4.To protect against electrical shock hazards, do not immerse the camera in water or other liquids while the camera's back cover is open. Also do not open the back cover while in or under the water, or while the camera is wet.
5.To reduce the risk of electric shock, do not disassemble this camera, but take it to an authorized Minolta service facility when some service or repair work is required. Incorrect reassembly can cause electric shock when the camera is subsequently used.
This manual created and owned by www.butkus.org/chinon and should only be located there.
SAVE THESE INSTRUCTIONS
2 Your new Minolta Weathermatic-A is the ideal do-anything, go-anywhere photographic traveling companion. It is just as at home in a backpack on top of a mountain or skiing down one as it is at the beach or around the pool.
Its rugged watertight construction and 110 format conveniences, such as drop-in cartridge film loading, built-in electronic flash, and compact size makes taking quality photos simple and easy in even the most adverse conditions.
Please read this manual carefully all the way through and follow the simple instructions for the best results and longest service with your camera. Then keep it for later reference as needed.
|
|
|
|
4 CONTENTS |
|
|
|
NAMES OF PARTS |
8 |
||
SUMMARY OF OPERATION |
12 |
||
PREPARATION AND BASICS |
16 |
||
Opening and closing |
16 |
||
the back cover |
|
|
|
Installing the battery |
25 |
||
Checking the battery |
28 |
||
Loading and advancing film |
30 |
||
Viewfinder |
36 |
||
Focusing |
38 |
||
TAKING PICTURES (WITH |
45 |
||
EXISTING |
|
|
|
LIGHT) |
|
|
|
FLASH PICTURES |
50 |
||
UNLOADING THE FILM |
55 |
||
|
|
|
|
|
|
|
|
USING YOUR |
|
|
|
WEATHERMATIC-A |
|
|
|
IN VARIOUS WEATHER |
|
|
|
CON |
|
|
|
DITIONS AND PICTURE |
|
|
|
TAKING |
|
|
|
SITUATIONS |
57 |
On or near the water |
57 |
At the beach |
58 |
In rain, mist or fog |
59 |
In snow and cold weather |
59 |
TAKING PICTURES |
60 |
UNDERWATER . |
60 |
Focusing |
61 |
Tips for taking pictures |
75 |
underwater... |
75 |
ACCESSORIES |
78 |
Sportsfinder |
82 |
MAINTENANCE OF O- |
90 |
RING |
100 |
TECHNICAL DETAILS |
|
TROUBLE-SHOOTING |
|
GUIDE |
|
CARE AND STORAGE |
|
This manual created and |
|
owned by www.butkus.org/ |
|
chinon and should only be |
|
located there. |
|
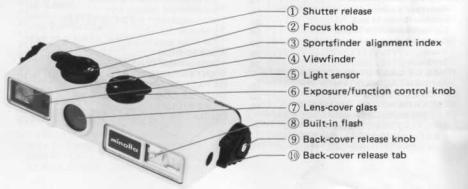
8 NAMES OF PARTS |
|

12 SUMMARY OF OPERATION
1.Make sure camera is completely clean and dry.
2.Lift back-cover release tabs, twist backcover release knobs and open back cover (p.
This manual created and owned by www.butkus.org/chinon and should only be located there.
3.After installing and checking battery (p. 25), insert film cartridge (p. 30), and press back cover securely into place and lock it (P. 22).
4.Operate film advance lever repeatedly until first exposure locks in place and the lever will not move (p. 32).
5.Check and/or clean lens cover glass and set focus for your subject (p. 38).
6.Look through eyepiece and compose subject in viewfinder (p. 36). Depress shutter release slightly; if red lamp in finder lights at * sun symbol, turn control to (cloud image) cloud symbol. If it lights at cloud symbol, turn to r' flash symbol and take picture within flash range when lamp begins to pulsate (p. 50). Always squeeze shutter release smoothly.
This manual created and owned by www.butkus.org/chinon and should only be located

there.
PREPARATION AND BASICS
Opening and closing the back cover IMPORTANT INSTRUCTIONS FOR PROPER USE OF THIS CAMERA
The back cover of your Weathermatic-A is equipped with an O-ring that forms a watertight seal when the cover is properly fitted to the camera body. This enables the camera to be used under conditions (such as rain, snow, and in or underwater) where use of conventional cameras is either not recommended or impossible.
IT IS OF UTMOST IMPORTANCE TO ALWAYS BE SURE YOUR WEATHER- MATIC-A IS COMPLETELY CLEAN AND DRY BEFORE OPENING THE BACK COVER. ALSO THAT THE BACK COVER'S O-RING IS CLEAN AND IN GOOD CONDITION BEFORE THE BACK COVER IS CLOSED BY DOING THIS YOU WILL OBTAIN THE FULL SERVICE LIFE INTENDED FOR THIS SEAL.
This manual created and owned by www.butkus.org/chinon and should only be located there.
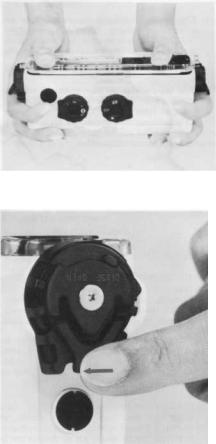
Ouverture et fermeture du dos du boitier Opening the back cover
1. Hold the camera with the back cover facing you and lift the back-cover release tabs on both back-cover release knobs. Then turn both back-cover release knobs counterclockwise in the direction of the arrows until the back cover opens.
This manual created and owned by www.butkus.org/chinon and should only be located there.
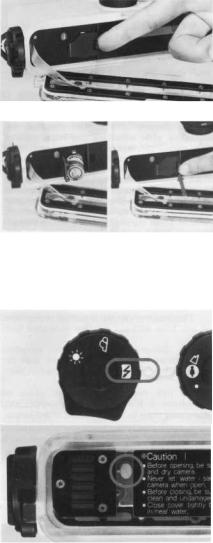
2. Lift the back cover away from the camera body. You can let the back cover hang
from the back-cover connector strap or remove it completely for cleaning by disengaging the strap from the pin on the back cover.
Be sure never to crease or twist the connector strap.
ONCE THE BACK COVER IS OPEN THE CAMERA IS NO LONGER WATERTIGHT AND MAY BE DAMAGED IF WATER OR SAND ENTERS THE CAMERA.
Closing the back cover
1. Make sure that the inside lip of the camera body and back cover's O-ring are clean and wiped by a soft clean cloth and that the back-cover release knobs are at "OPEN". Then align the back cover with the camera body.
2. Press both ends of the back cover with your thumbs as shown. Then, with the palm of your hand, press down on the center of the cover to assure a proper seal.
3. Turn the back-cover release knobs in the direction of the arrows all the way to " CLOSE" and push the back-cover release tab's locking pins into the holes in the knobs. This manual created and owned by www.butkus.org/chinon and should only be located there.
Be sure the back cover is attached to the connector strap before closing. Installing the battery
Your camera's built-in flash and exposure warning system are powered by one 1.5v AA-(penlight) size alkaline-manganese (Eveready E91 or equivalent), sealed carbonzinc or nickel-cadmium battery.
To install this:
1. With the back cover open, lift the battery-chamber cover as shown.
The battery can be installed or replaced at any time without damage to loaded film. 2. Insert a battery as specified with the plus end out as indicated inside the chamber, then close and latch the cover.
28 Checking the battery
The battery should be checked immediately after installing and from time to time thereafter, especially before starting on trips or taking especially important pictures. To do this, turn on the built-in flash by moving the exposure/function control knob to the flash symbol. If the finder/monitor lamp lights and begins to pulsate in approximately 10 seconds, the battery is serviceable. If these signals do not light within 30 seconds make sure a fresh battery is properly inserted or replace an exhausted battery as soon as it is convenient. To save battery power, be sure to turn the exposure/ function control knob to either the sun or cloud symbol after checking the battery.
This manual created and owned by www.butkus.org/chinon and should only be located there.
• For taking pictures without battery, see the note on page 48. Loading and advancing film
1. With the back cover open, lift the tab near the finder eyepiece as shown to open the film-chamber cover.
 Loading...