


Minolta Co., Ltd. |
3-13, 2-Chome, Azuchi-Machi, Chuo-Ku, Osaka 541-8556, Japan |
Minolta GmbH |
Kurt-Fischer-Strasse 50, D-22923 Ahrensburg, Germany |
Minolta France S.A. |
365 Route de Saint-Germain, F-78420 Carrieres-Sur-Seine, France |
Minolta (UK) Limited |
7 Tanners Drive, Blakelands, Milton Keynes, MK14 5BU, England |
Minolta Austria Ges. m.b.H. |
Amalienstrasse 59-61, A-1131 Wien, Austria |
Minolta Camera Benelux B.V. |
Zonnebaan 39, P.O. Box 6000, NL-3600 HA Maarssen, The Netherlands |
Belgium Branch |
Prins Boundewijnlaan 1, B-2550 Kontich, Belgium |
Minolta (Schweiz) AG |
Riedstrasse 6, CH-8953 Dietikon, Switzerland |
Minolta Svenska AB |
Albygatan 114, S-171 54 Solna, Sweden |
Finland Branch |
Niittykatu 6 PL 37, SF-02201 Espoo, Finland |
Minolta Portugal Limitada |
Av. do Brasil 33-A, P-1700 Lisboa, Portugal |
Minolta Corporation |
|
Head Office |
101 Williams Drive, Ramsey, New Jersey 07446, U.S.A. |
Los Angeles Branch |
11150 Hope Street Cypress, CA 90630, U.S.A. |
Minolta Canada Inc. |
|
Head Office |
369 Britannia Road East, Mississauga, Ontario L4Z 2H5, Canada |
Vancouver Branch |
230-3771 Jacombs Road, Richmond, B.C. V6V 2L9, Canada |
Minolta Hong Kong Limited |
Room 208, 2/F, Eastern Center, 1065 King’s Road, Quarry Bay, Hong Kong |
Minolta Singapore (Pte) Ltd. |
10, Teban Gardens Crescent, Singapore 608923 |
Shanghai Minolta Optical |
|
Products Co., Ltd. |
368 Minolta Road, Songjiang, Shanghai, China |
9222-2218-31 NI-B909 |
©1999 Minolta Co., Ltd. under the Berne Convention and |
Universal Copyright Convention |
E INSTRUCTION MANUAL
Thank you for purchasing the Minolta Vectis 2000. The Vectis 2000 is an easy to operate lens shutter camera from Minolta’s line of Advanced Photo System™ cameras. Your camera features Drop-in Loading, a 22.5 - 45mm zoom lens, and a wide focus frame. The sleek and compact design gives the Vectis 2000 a sophisticated appearance suitable for any occasion. This manual is designed to help you understand the operation of your camera and its functions. Please familiarize yourself with the names of the controls and their locations on the camera, then read this manual thoroughly.
* Advanced Photo System™ is a trademark of the five system developing companies.
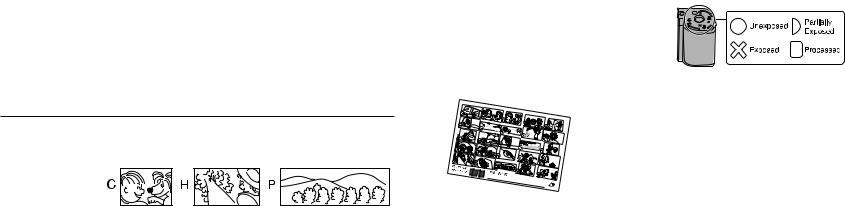
Advantages of the Advanced Photo System
New print formats…
Classic C print, wider H print, and panorama P print formats are available with Advanced Photo System cameras.
Easier to load…
Advanced Photo System cameras use the new IX240 type film. This new film features Drop-in Loading to make loading your camera simple, the first time, every time. Indicators on the cassette tell you and your camera if the film is unexposed, partially exposed, exposed, or processed.
…
your prints in the format you photofinishers will return your System film in its original cassette
. To order reprints, simply choose want from the index print. No more negatives to find the right frame.
1

TABLE OF CONTENTS |
|
FOR PROPER AND SAFE USE ..................................................................... |
4 |
NAMES OF PARTS......................................................................................... |
6 |
QUICK OPERATION ..................................................................................... |
10 |
BASIC OPERATION |
|
Attaching the Strap................................................................................... |
13 |
Installing the Battery................................................................................. |
14 |
Checking the Battery Power..................................................................... |
15 |
Loading Film............................................................................................. |
17 |
Full-Auto Operation .................................................................................. |
22 |
For Closer Subjects.................................................................................. |
26 |
Close-framing Guide (C and H formats)............................................ |
27 |
Special Focusing Situations ..................................................................... |
28 |
Focus Hold ............................................................................................... |
29 |
Rewinding the Film................................................................................... |
31 |
Processing................................................................................................ |
34 |
2
USING THE BUILT-IN FLASH |
|
Selecting the Flash Mode......................................................................... |
36 |
Flash Range ............................................................................................. |
37 |
Red-eye Reduction................................................................................... |
38 |
Fill Flash ................................................................................................... |
39 |
Flash Cancel ............................................................................................ |
40 |
Night Portrait ............................................................................................ |
41 |
Landscape/Night View.............................................................................. |
42 |
ADDITIONAL FEATURES |
|
Date Imprinting ......................................................................................... |
44 |
Title Imprinting .......................................................................................... |
50 |
Self-timer .................................................................................................. |
58 |
Remote Control (Sold Separately) ........................................................... |
60 |
APPENDIX |
|
Lab Services............................................................................................. |
66 |
Caring For Your Camera .......................................................................... |
68 |
Technical Details ...................................................................................... |
74 |
3

FOR PROPER AND SAFE USE
Read and understand all warnings and cautions before using this product.
 WARNING
Batteries may become hot or explode due to improper use.
•Use only the batteries specified in this instruction manual.
•Do not install the batteries with the polarity (+/–) reversed.
•Do not subject batteries to fire or high temperatures.
•Do not attempt to recharge, short, or disassemble.
•Follow local codes for battery disposal. Tape over lithium battery contacts before disposal.
Use caution, accidents may occur when using this product near young children.
Keep batteries or things that could be swallowed away from young children. Contact a doctor immediately if an object is swallowed.
4
Immediately remove the batteries and discontinue use if...
•the product is dropped or subjected to an impact in which the interior is exposed.
•the product emits a strange smell, heat, or smoke.
Do not disassemble. Electric shock may occur if a high voltage circuit inside the product is touched. Take your camera to a Minolta Service Facility when repairs are required.
 CAUTION
The lens retracts when the camera is turned off or Auto Power Off is activated. Touching the lens barrel while it is retracting may cause injury.
5
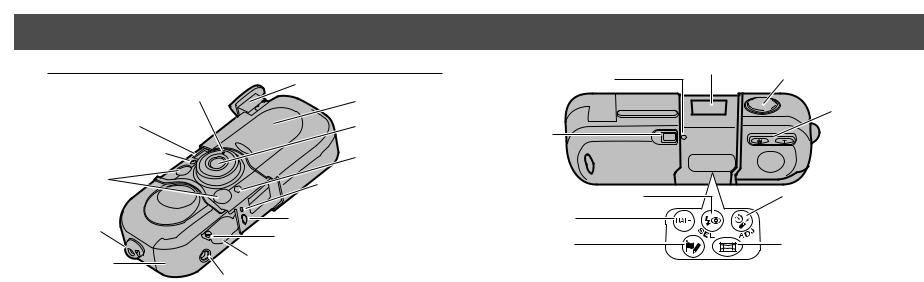
NAMES OF PARTS
Camera Body
*- Do not touch
Self-timer/Remote-control lamp*
Viewfinder window*
Remote-control receiver*
AF windows*
Strap eyelet (13)
Film chamber
6
Flash* (35)
Lens cover
Lens*
Meter window*
Manual-rewind button (33)
Film-chamber release (19)
Battery-chamber lock (14)
Battery chamber (14)
Tripod socket
|
Data panel |
Ready lamp (green) (9) |
Shutter-release button |
Zoom
buttons (24)
Viewfinder*
Flash-mode (36)/Select button |
Self-timer (58)/ |
|
Date button (44) |
Remote-control (60)/ |
|
Adjust button |
||
|
||
Title button (51) |
Format button (22) |
For information on specific parts, refer to the page numbers shown in parenthesis.
7
NAMES OF PARTS - CONT’D
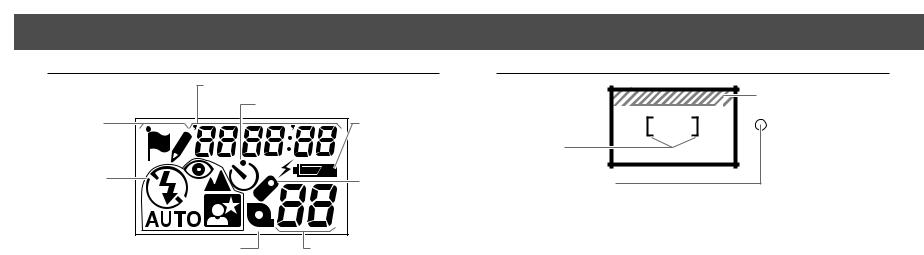
Data Panel
Title/Date/Time/ISO/Format display
Self-timer indicator (58)
Title marks |
Battery-condition |
|
(50-56) |
indicator (15) |
|
Flash-mode |
Remote-control |
|
indicators (36) |
||
indicator (60) |
||
|
||
Cassette mark |
Frame counter |
• Only the necessary indicators will appear in the data panel.
8
Viewfinder |
Close-framing guide (27) |
Focus frame |
Ready lamp (green) (25)
With the shutter-release button pressed partway down -
Glows: |
Camera is ready |
Blinks quickly: |
Subject is too close (shutter is locked) |
Blinks slowly: |
Camera shake warning |
Off: |
Flash is charging |
9

QUICK OPERATION
1.Insert the battery |
2.Open the lens |
3.Select the print |
4.Frame the |
5.Center your |
6.Press the |
(p.14). |
cover to turn the |
format (p. 22). |
subject as |
subject in the |
shutter-release |
|
camera on, then |
|
desired (p. 24). |
focus frame |
button all-the- |
|
insert the film |
|
W |
(p. 24). |
way down to |
|
(p. 17). |
|
|
|
take the picture |
|
|
|
T |
|
(p. 25). |
|
|
|
|
|
|
10 |
|
|
|
|
11 |
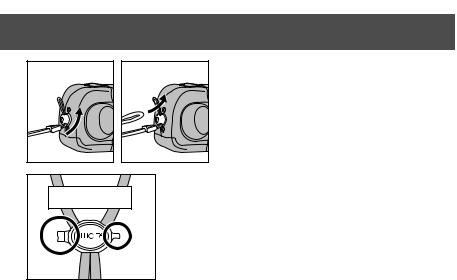
ATTACHING THE STRAP
Attach the strap as shown.
BASIC OPERATION
Button keys
•Button keys are included on the strap. Use the bigger key to turn the battery-chamber lock, smaller key to push the manual-rewind button.
12 |
13 |
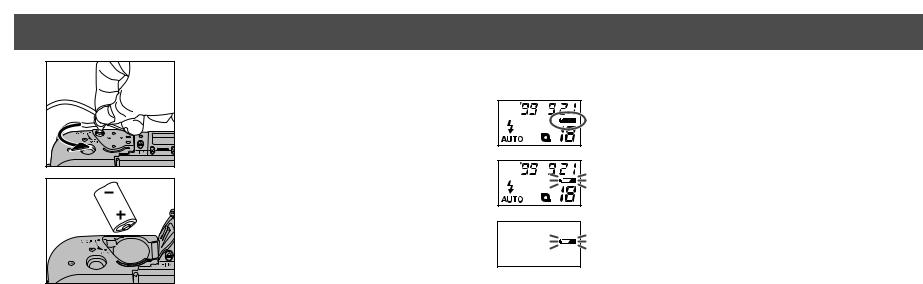
INSTALLING THE BATTERY |
CHECKING THE BATTERY POWER |
Your camera uses one 3-volt CR-2 lithium battery to supply power for all camera operations.
1.Turn the camera upside down, then open the battery chamber as shown, using the bigger button key.
14 |
2.Insert the battery into the chamber as indicated by the + and – marks.
3.Close the battery chamber, then turn
the lock until it stops at CLOSE.
•After installing a new battery, reset the date and time (p. 46).
Each time the lens cover is opened, a symbol will appear in the data panel to indicate the power status of the battery.
Briefly appears. Power is sufficient for all camera operations.
Power is sufficient, but the battery must be replaced soon.
Replace the battery. The shutter will lock until the battery is replaced.
Continued on following page.
15

CHECKING THE BATTERY POWER - CONT’D
•If no display appears, replace the battery or check that it is inserted correctly.
•Auto Power Off: The data panel will shut off and the lens will retract if the camera is not operated for more than eight minutes. Press the shutter-release button partway down, or press either zoom button to resume operation.
•Do not obstruct the lens while it is retracting.
16
LOADING FILM
Your camera uses IX240 type film designed for use in Advanced Photo System cameras.
•Your camera’s automatic transport system loads the film, sets the film speed, and advances the film after each exposure.
•Use film from ISO25-3200. Your camera will automatically set the proper ISO.
•After loading, the film chamber cannot be opened until rewind has been initiated.
•DEP, Double Exposure Prevention, prevents the camera from accepting exposed film.
•This camera will only load film with the  mark current.
Continued on following page.
17
LOADING FILM - CONT’D
Visual Exposure Indicators
•The current VEI has a white indicator behind it.
VEI MEANING
UNEXPOSED
PARTIALLY EXPOSED
EXPOSED
PROCESSED
18 |
1.Open the lens cover to turn the camera on.
•The built-in flash pops up and the lens extends.
2.Turn the camera upside down, then press the film-chamber release. The film-chamber door will open partway.
•OPEn will appear and  will blink in the data panel.
3.Insert the cassette into the film chamber with the VEI on top.
•Do not use force when opening the filmchamber door.
Continued on following page.
19

LOADING FILM - CONT’D
4.Press the film-chamber door closed until it clicks.
• |
The data panel will display the cassette mark |
|
|
and the film’s ISO, then the number of frames |
|
|
remaining on the roll 1 . |
|
• |
After the film is loaded, pressing the film- |
|
|
chamber release will display the film’s ISO in |
|
1 |
the data panel 2 . The display will disappear |
|
2 seconds after the finger is released. |
||
|
||
2 |
|
|
20 |
|
If 0 blinks in the data panel, press the filmchamber release, open the chamber, then remove the film.
-If the film’s current VEI is  , insert a new roll of film.
-If a partially exposed roll of film was loaded into this camera, the VEI has been changed from  to
to  .
.
-If a processed roll of film was loaded into this camera, the VEI has been changed from  to
to  .
.
-If the film’s current VEI is  , remove the film, remove and reinsert the battery, then reload the film. If the film will not load, contact the nearest authorized Minolta Service Facility.
21
 Loading...