


DRV-830
GPS Integrated Dashboard Camera
INSTRUCTION MANUAL
© 2018 JVC KENWOOD Corporation |
B5A-2175-11 (E) |

Contents
Drive Recorder Function Guide.......................... |
4 |
About the setup function....................................... |
4 |
About the recording functions........................... |
4 |
Setting the microphone sound during |
|
recording........................................................................... |
6 |
Accessories................................................................. |
7 |
Precautions for Use.................................................. |
8 |
Precautions and notices.......................................... |
8 |
Caring for your device............................................... |
8 |
Precautions for installation.................................. |
10 |
Precautions for use................................................... |
11 |
Cleaning the device................................................ |
11 |
If you notice a problem with the device.... |
11 |
How to Install.......................................................... |
12 |
Installation Procedure............................................ |
12 |
How to Wire............................................................. |
14 |
Part Names and Functions................................. |
15 |
Before Using the Driving Support |
|
Functions................................................................. |
17 |
Adjust according to the vehicle....................... |
17 |
Before Using............................................................ |
19 |
Inserting and ejecting SD cards....................... |
19 |
Turning the power on and off.......................... |
19 |
Turning the power on and off manually.... |
19 |
Formatting SD cards............................................... |
19 |
Recording when the power is on................... |
21 |
Parked recording when the power is off.... |
23 |
Recording................................................................. |
24 |
Recording manually (manual recording)... |
24 |
Returning to normal recording........................ |
24 |
Taking photos (still image recording).......... |
24 |
Taking photos automatically............................. |
24 |
Indicators on the recording screen............... |
25 |
Shortcut menu........................................................... |
25 |
Playback................................................................... |
26 |
Playing files................................................................... |
26 |
Indicators on the playback screen................. |
27 |
Protecting Files...................................................... |
28 |
Protecting Files........................................................... |
28 |
Canceling file protection...................................... |
28 |
Deleting Files.......................................................... |
29 |
Deleting Files............................................................... |
29 |
Configuring the Settings.................................... |
31 |
Operating using the menu................................. |
31 |
Setting the date and time................................... |
36 |
Using the Viewer Software................................ |
37 |
Installing the software........................................... |
37 |
Playing files................................................................... |
37 |
Outputting still pictures from the |
|
images............................................................................. |
40 |
Outputting travel information.......................... |
40 |
Backing up files.......................................................... |
40 |
Troubleshooting.................................................... |
41 |
Appendix................................................................. |
44 |
Folder/file structure................................................. |
45 |
KENWOOD DRIVE REVIEWER operating |
|
environment................................................................ |
45 |
Recording time........................................................... |
46 |
Number of recordable files................................. |
46 |
Main Specifications.............................................. |
47 |
Important Notice Concerning the |
|
Software................................................................... |
48 |
zThe screen images and operation examples in this document were created for explaining the operating procedures. There may be screen images that differ from the actual screens or examples of operations not actually performed.
zThe latest instruction manual, firmware update information, etc., are available at the JVC KENWOOD website. Please visit the following website. http://www.kenwood.com/cs/ce/
Disclaimer
zPlease note that JVC KENWOOD shall not be responsible for any damages suffered by the customer or a third party as a result of
incorrectly using this product, a failure during use of this product, or other trouble, or due to the use of this product, unless such liability is acknowledged by law.
Copyrights
zRecorded video, image, and audio content cannot be used for other than personal enjoyment without the consent of the copyright holder as specified in the Copyright Act.
zPlease note that the recording of an event such as a show, performance, or exhibition may be restricted even when doing so for personal enjoyment.
2 |
3 |
Dashboard camera Function Guide
This dashboard camera records videos and still pictures and stores them
on the microSD card (hereafter referred to as “SD card”). P. 19 Be sure to insert the SD card into SD card slot 1 before using the camera.
SD card slot 2 is extend storage capacity for normal recording data.
About the setup function
The setup menu is displayed the first time the camera's power is turned on.
Follow the instructions on the menu screen to configure the settings and complete the basic setup related to installation. The settings can also be configured in the same way using the setup function from the MENU settings. ( P. 31)
About the recording functions
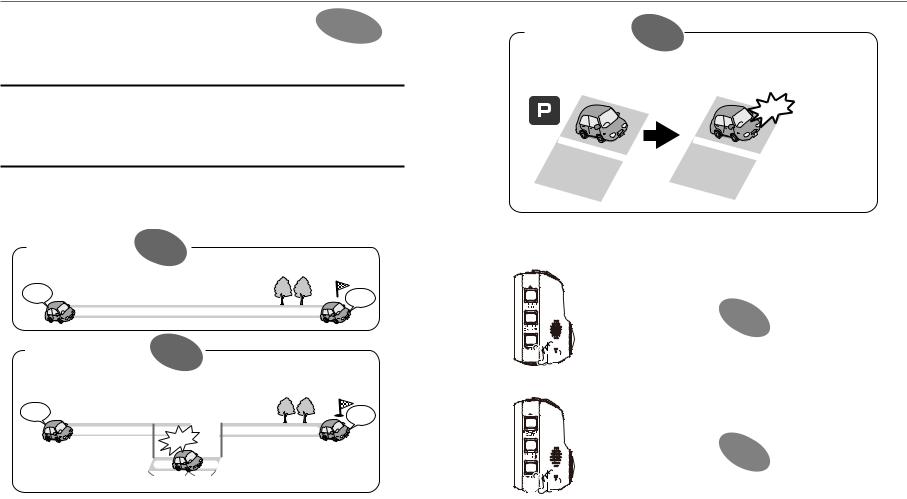
The camera can record images while you are driving (when the camera's power is on) (normal recording).
Furthermore, the camera can record images before and after major impacts to the vehicle or directly after impacts while the vehicle is running or parked (event recording/parked recording).
Continuous recording P. 21
Recording is performed all the time, from when the power is turned on until it is turned o .
Go |
Arrival |
|
|
|
Continuous recording |
Event recording |
P. 21 |
When the camera detects an impact, the mode switches from continuous recording to event recording, and the video le of the time before and after the impact was detected is saved.
Go |
Event recording (for approximately 25 seconds) |
Arrival |
|
|
|||
|
Continuous recording |
Continuous recording |
|
|
Impact |
|
|
|
|
The time for recording after the |
|
|
|
impact is detected can be changed. |
|
|
Approximately 10 seconds before impact |
Approximately 15 seconds after impact |
|
Parked recording |
P. 23 |
When the vehicle is parked, in a parking lot or elsewhere, and the engine key is turned o , the parked recording function is set to standby, and recording starts if an impact to the vehicle is detected.
Parked recording function Standby |
Parked recording starts |
|
Impact |
The CA-DR100 power cable for Dashcam (optional
accessory) is required to enable the parked recording function.
* When there was an impact between the start time (when you left the vehicle) and the stop time (when you got into the vehicle), recording is not possible.
Other recording functions
Still image recording: When the [ ] button is pressed during recording, the image being recorded is stored as a still image.
P. 22
Automatic still image capture: When the [ ]button is pressed and held for over 1 second during recording, the set number of still images is captured automatically at a specific interval.
P. 22


 (over 1 second)
4 |
5 |
Dashboard camera Function Guide
Manual recording: Images can be stored in a manual recording folder separate from the normal recording folder by pressing the [REC] button during continuous recording.
P. 22
Changing the resolution (recording quality)
The resolution (recording quality) can be selected from among the following: “1280×720 (HDR)”, “1920×1080 (HDR) (setting upon purchase)”, “2304×1296 (HDR)” and “2560×1440 (HDR)”. ( P. 33) For a rough estimate of the recording time and number of recordable files, see Page 46 .
Overwriting recorded files
zWhen“Overwrite”is set to“ON”, the old files are overwritten in the event recording, manual recording and parked recording modes. ( P. 32) Back up (copy) any necessary files on a computer, etc. When set to “OFF”, recording is no longer possible once the maximum number of recorded files for that size of SD card is reached. ( P. 46) You are notified of this by a warning sound, a warning message and an indicator. Upon purchase, overwriting is set to “OFF” for event recording and manual recording, “ON” for parked recording.
zOverwriting cannot be switched on and off for continuous recording or still image recording. When there is no more recordable space, old files are overwritten.
Setting the microphone sound during recording
It is possible to set whether or not to record the sound of the microphone during recording by pressing the [ ] button. Upon purchase, this is set to “ON”. The setting switches between “ON”and “OFF” each time the button is pressed. When set to “ON”, the MIC indicator lights green.
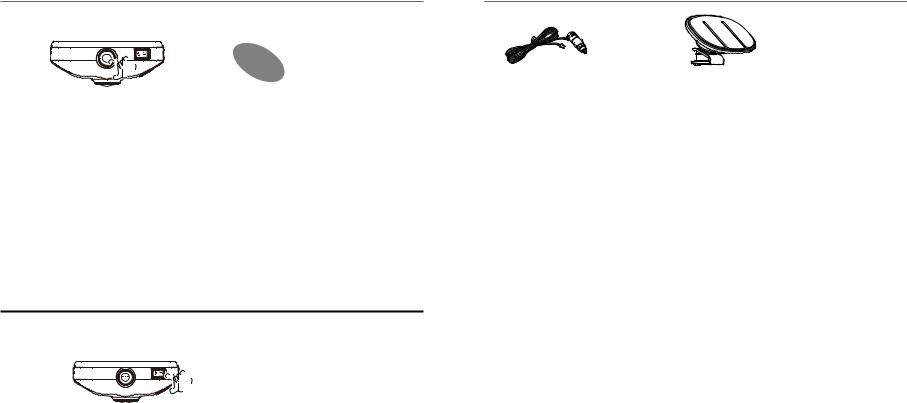
Accessories
|
|
Cigarette lighter plug cord (4 m) × 1 |
Mount bracket × 1 |
6 |
7 |

Precautions for Use
Precautions and notices
Warning! Do not operate the device while driving. Using this product does not change the requirement for a driver to take full responsibility for his or her behavior. This responsibility includes observing all traffic rules and regulations in order to avoid accidents, personal injury or property damage.
zFor your own safety, do not operate the controls of the product while driving.
zA window mount is needed when using the recorder in a car. Make sure that you place the recorder in an appropriate place, so as not to obstruct the driver's view or deployment of airbags.
zMake sure that no object is blocking the camera lens and no reflective material is placed near the lens. Please keep the lens clean.
zIf the car's windscreen is tinted with a coating, this may impact the recording quality.
zConnect the charger to a proper power source. The voltage requirements are found on the product case and/or packaging.
•Do not use the charger if the cord becomes damaged.
•Do not attempt to service the unit. There are no serviceable parts inside. Replace the unit if it is damaged or exposed to excess moisture.
Caring for your device
Taking good care of your device will ensure trouble-free operation and reduce the risk of damage.
zKeep your device away from excessive moisture and extreme temperatures.
zAvoid exposing your device to direct sunlight or strong ultraviolet light for extended periods of time.
zDo not place anything on top of your device or drop objects on your device.
zDo not drop your device or subject it to severe shock.
zDo not subject your device to sudden and severe temperature changes. This could cause moisture condensation inside the unit, which could damage your device. In the event of moisture condensation, allow the device to dry out completely before use.
zThe screen surface can easily be scratched. Avoid touching it with sharp objects. Nonadhesive generic screen protectors designed specifically for use on portable devices with LCD panels may be used to help protect the screen from minor scratches.
zNever clean your device with the power on. Use a soft, lint-free cloth to wipe the screen and the exterior of your device.
zDo not use paper towels to clean the screen.
zNever attempt to disassemble, repair or make any modifications to your device.
Disassembly, modification or any attempt at repair could cause damage to your device and even bodily injury or property damage and will void any warranty.
zDo not store or carry flammable liquids, gases or explosive materials in the same compartment as your device, its parts or accessories.
zTo discourage theft, do not leave the device and accessories in plain view in an unattended vehicle.
zOverheating may damage the device.
Information on Disposal of Old Electrical and Electronic Equipment and Batteries (applicable for countries that have adopted separate waste collection systems)
Products and batteries with the symbol (crossed-out wheeled bin) cannot be disposed of as household waste.
Old electrical and electronic equipment and batteries should be recycled at a facility capable of handling these items and their waste by products.
Contact your local authority for details in locating a recycle facility nearest to you.
Proper recycling and waste disposal will help conserve resources while preventing detrimental effects on our health and the environment.
Notice: The sign “Pb” below the symbol for batteries indicates that this battery contains lead.
8 |
9 |

Precautions for Use
Precautions for installation
zInstall the device in a position where it will not block the front view of the driver (position where hidden by the rear-view mirror).
zInstall the device so that it is within the wiping range of the wiper.
zInstall the device in a position where it will not interfere with the movement of the rear-view mirror.
zTake care not to install the device over the vehicle inspection sticker or other sticker.
zTake care not to install the device where it will interfere with driving or airbag operation.
zWhen installing the device in a vehicle equipped with a driving support system, check the instruction manual of the vehicle and then select an installation location that will not interfere with the driving support system.
zIf the device is installed incorrectly, event recording or parked recording may not work correctly. Refer to “How to Install” for the loosening of fixing knob, installation orientation, installation angle, and other information and then install the device correctly.( P. 12)
zDo not install the device near a digital terrestrial television antenna or an electrical component. Doing so may reduce television receiver sensitivity or cause flickering and noise.
zUse a commercially available cleaning cloth or the like to wipe off all dirt and grease on the mounting surface and then fix the mount base in place. If the device is re-affixed or mounted using, for example, general-purpose double-sided tape, the adhesion strength may weaken and cause the device to fall.
zAfter mounting the device, leave it for 24 hours before use to enable the mounting strength of the mount bracket to improve. Failing to do so may result in the adhesion of the mount bracket becoming weak and the device falling.
zFix the cord in place with tape or the like so that it does not interfere with driving.
Precautions for use
zDo not block the camera lens, get dirt on it, or place a reflective object near it.
zWhen LED traffic lights are recorded, video in which they appear to be flickering or flashing may be recorded. JVC KENWOOD assumes no responsibility with regard to the distinguishing or recording of traffic lights.
zIf coating is used on the windshield of the vehicle, recording quality may be affected.
zThere is no guarantee that the device can record video in all conditions.
Cleaning the device
zWhen the device is dirty, wipe it with a dry silicone cloth or other soft cloth. If the device is very dirty, remove the dirt with a cloth with neutral cleaner on it then wipe off the cleaner. Wiping the device with a hard cloth or using a volatile substance such as thinner or alcohol may cause scratches, deformation, deterioration or other damage.
zWhen the lens is dirty, gently wipe it with a soft cloth dampened with water. Rubbing the lens strongly with a dry cloth may cause scratches.
If you notice a problem with the device
If you notice a problem with the device, first refer to “Troubleshooting” P. 41and check whether there is a way to resolve the problem.
If the device does not return to normal, turn off the power of the device and then contact your dealer or nearest JVC KENWOOD service center.
10 |
11 |

HowtotoInstall
Installation Procedure
Check that the vehicle is parked on a level surface.
1. Attach the device to the mount bracket. (accessory)
Insert the mount bracket into the bracket attachment part of the device and attach it to the device.
Mount bracket
Camera 
 lens side
5. Adjust the device's mount angle, then fasten it.
When adjusting the mount angle, check that the camera's field of vision is parallel to a flat ground surface and that the sky to ground ratio is equal.
There is a spirit level at [MENU] – [System settings] – [Mouting support tools] – [Level].
( P. 34)
Use it to help adjustment of the mount angle. Adjust the angle so that the moving circle is as close as possible to the center of the screen.
Windshield
2. Determine where to mount the device.
Determine the mounting position in reference to “Recommended installation position”.
3. Clean the mounting surface and then affix the device to the windshield.
Use a commercially available cleaning cloth or the like to wipe off all dirt and grease on the mounting surface. Peel off the release paper of the double-sided tape on the mount bracket and push the bracket against the windscreen to affix it in place. Leave the device for 24 hours before using it to enable the mounting strength of the mount bracket to improve.
Release paper
4. Perform the cord wiring work.
Refer to “How to Wire” and perform the wiring work.( P. 14)
Rear-view mirror
•The “Adjust according to the vehicle” adjustments must be made in order to use the driving support functions. ( P. 17) Do this in a flat place with a line-of-sight distance of approximately 200 meters.
Recommended installation position
zInstall the device in a position where it will not block the front view of the driver (position where hidden by the rear-view mirror).
zInstall the device so that it is within the wiping range of the wiper.
zMounting the device to the center of the windshield behind the rear-view mirror will facilitate optimal
video recording. |
Recommended installation position |
Outside |
Windshield |
Ceramic |
vehicle |
|
part |
Doublesided |
|
|
tape |
|
|
|
|
Clip |
Inside |
Rearview |
Power cord |
vehicle |
mirror |
*Fix the power cord in place with commercially available soft tape or the like.
Front pillar cover
Soft tape*
Power cord
Power cord
Front pillar
 CAUTION
When passing the power cord through the front pillar or another part, observe the points below when performing the wiring work.
zWire the power cord farther forward or farther rearward than the airbag so that it does not interfere with the airbag.
zIn the case of a vehicle in which the front pillar cover is fixed in place with special clips or the like, the clips may need to be replaced after you remove the front pillar cover. For how to remove the front pillar cover, the availability of replacement parts and other information, contact the vehicle dealer.
zFix the power cord in place with commercially available soft tape or the like so that it does not interfere with driving.
12 |
13 |
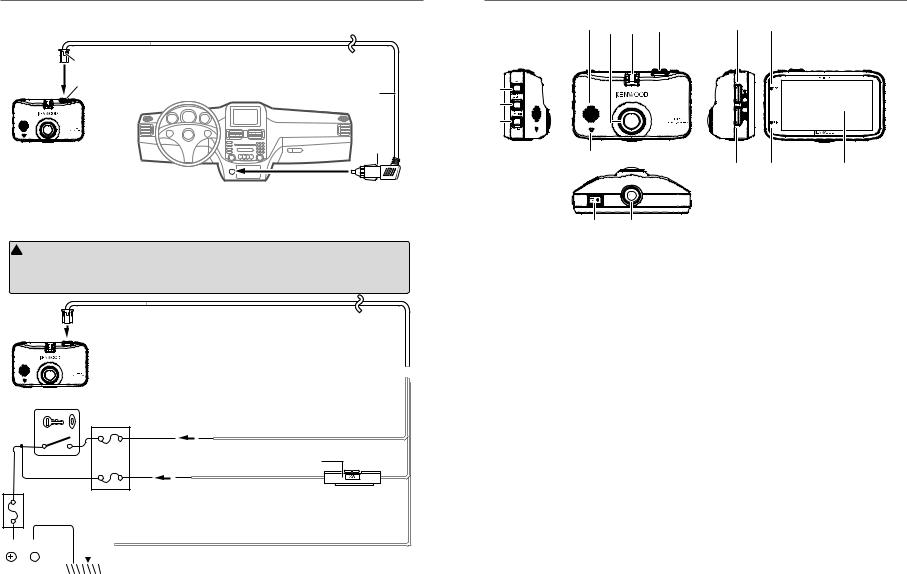
How to Wire
Connecting the cigarette lighter plug cord (accessory)
Dashboard Camera
Connect the cigarette lighter plug to the cigarette lighter socket.
Use the Power Cable for Dashcam; CA-DR100 (optional accessory)
 CAUTION
Before performing the connection work, first check that the engine key is removed and then be sure to disconnect the negative terminal of the battery to prevent a short-circuit accident.
Connect the Dashboard Camera and power cord.
Open the power cord connector terminal’s cover and connect the power cord.  After connecting the power cord, close the cover.
Dashboard Camera
Engine key switch
Accessory power supply Fuse
ACC |
BATT |
Battery cord (Yellow)
Cord length (3.5 m) 
Accessory cord (Red)
Connect to a power supply that can be turned on and off with the switch.
Fuse (2 A)
Main fuse |
Connect to a power supply with a voltage that is always applied regardless |
|
of whether or not the engine key is on or off at a point after the power has |
|
passed through the main fuse. |
|
|
|
|
|
|
|
|
|
|
|
|
|
|
|
|
|
|
|
|
|
|
|
|
Ground cord (Black) |
|
|
|
|
|
|
|
|
|
|
|
|
Connect to a metal part of the vehicle (part of the chassis with an electrical |
|
Battery |
|
|
|
|
|
|
||||||
|
|
GND |
connection to the negative side of the power supply). |
|||||||||
|
|
|
|
|
|
|
||||||
|
|
|
|
|
|
|
|
|
||||
Part Names and Functions
4 |
3 |
2 |
1 |
5 |
|
|
|
6 |
|
|
|
7 |
|
|
|
8 |
|
|
|
%$
! |
@ |
# |
9 0
1Power cord connector terminal
Connect the included cigarette lighter plug cord or the CA-DR100 power cable for Dashcam (optional accessory).
2Bracket attachment part
Mount the included mount bracket.
3Camera lens
4Speaker
Outputs audio guidance, warning sounds and the audio when files are played.
5 /SHORTCUT button
z When pressed while the menu is displayed,
moves to the previous item.
zWhen pressed while recording, displays the shortcut menu.
zWhen pressed and held while recording, switches the recording mode (normal/low frame rate). P. 33)
zWhen pressed during playback, plays the previous file.
zFast-reverses when pressed and held during playback, slow-reverses when pressed and held while paused. Switches to playback when the button is released while fast-reversing, to pause when released during slow-reverse playback.
14 |
15 |
 Loading...