


 Loading...
Quick Reference Guide
This Quick Reference Guide will assist you in finding the information you’re looking for.
GENERAL INFORMATION |
j |
|
|
MAINTENANCE AND ADJUSTMENT |
j |
|
|
TROUBLESHOOTING GUIDE |
j |
|
|
TUNING |
j |
|
|
STORAGE |
j |
A Table of Contents is included after the Foreword.
IMPORTANT INFORMATION
•This vehicle is designed for the operator only, no passengers.
•This vehicle is a competition model only and was not manufactured for use on public streets, roads or highways.
•The use of this vehicle should be limited to participation in sanctioned competition events upon a closed course.
•This vehicle should not be used for general off-road recreational riding.
•Read owner’s manual.
Whenever you see the symbols shown below, heed their instructions! Always follow safe operating and maintenance practices.
 DANGER
DANGER indicates a hazardous situation which, if not avoided, will result in death or serious injury.
 WARNING
WARNING indicates a hazardous situation which, if not avoided, could result in death or serious injury.
NOTICE
NOTICE is used to address practices not related to personal injury.
NOTE
○NOTE indicates information that may help or guide you in the operation or service of the vehicle.
IMPORTANT NOTICE
THIS VEHICLE IS A COMPETITION MODEL ONLY AND WAS NOT MANUFACTURED FOR, NOR SHOULD IT BE USED ON, PUBLIC STREETS, ROADS, OR HIGHWAYS. THE USE OF THIS VEHICLE SHOULD BE LIMITED TO PARTICIPATION IN SANCTIONED COMPETITION EVENTS UPON A CLOSED COURSE. THIS VEHICLE SHOULD NOT BE USED FOR GENERAL OFF-ROAD RECREATIONAL RIDING. READ OWNER’S MANUAL.
 WARNING
THIS VEHICLE SHOULD NOT BE USED FOR GENERAL OFF-ROAD RECREATIONAL RIDING.
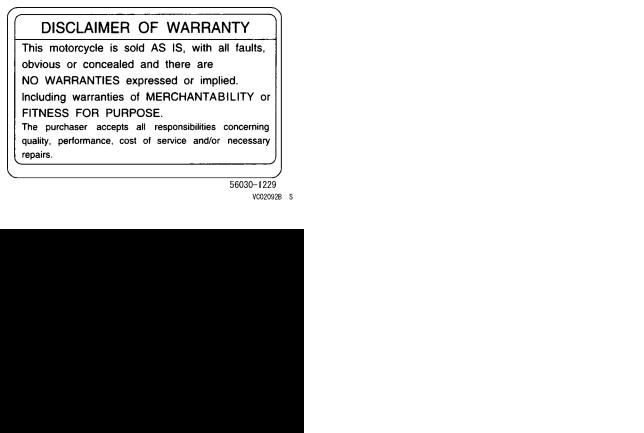
DISCLAIMER OF WARRANTY
This motorcycle is sold AS IS, with all faults, obvious or concealed and there are NO WARRANTIES, expressed or implied. Including warranties of MERCHANTABILITY or FITNESS FOR PURPOSE.
The purchaser accepts all responsibilities concerning quality, performance, cost of service and/or necessary repairs.

Motorcycle Noise Emission Control Information
This motorcycle is designed for closed course competition use only. It does not conform to U.S. EPA motorcycle noise standards.
NOTICE
Off-road motorcycling is a wonderful sport, and we hope you will enjoy it to the fullest. However, if improperly conducted, this sport has the potential to cause environmental problems as well as conflicts with other people. Responsible use of your off-road motorcycle will ensure that these problems and conflicts do not occur. TO PROTECT THE FUTURE OF YOUR SPORT, MAKE SURE YOU USE YOUR MOTORCYCLE LEGALLY, SHOW CONCERN FOR THE ENVIRONMENT, AND RESPECT THE RIGHTS OF OTHER PEOPLE.
 WARNING
The engine exhaust from this product contains chemicals known to the State of California to cause cancer, birth defects or other reproductive harm.
FOREWORD
Congratulations on your choosing this Kawasaki motorcycle. Your new motorcycle is the product of Kawasaki’s advanced engineering, exhaustive testing, and continuous striving for a superior lightweight, high-performance machine with superb handling and stability for racing and sporting use.
Your new KX is a highly tuned competition machine for participation in racing events. As with any mechanical device, proper care and maintenance are important for trouble-free operation and top performance. This manual is written to enable you to keep your KX properly tuned and adjusted.
Due to improvements in design and performance made during production, in some cases there may be minor discrepancies between the actual vehicle and the illustrations and text in this manual.
KAWASAKI HEAVY INDUSTRIES, LTD.
Motorcycle & Engine Company
© 2014 Kawasaki Heavy Industries, Ltd. |
Feb. 14, 2014. (1) |

TABLE OF CONTENTS
SPECIFICATIONS............................................ |
8 |
GENERAL INFORMATION.............................. |
11 |
Location of Labels ......................................... |
11 |
Location of Parts ........................................... |
16 |
Side Stand..................................................... |
19 |
Fuel ............................................................... |
20 |
Fuel Requirement:...................................... |
21 |
Kick Pedal ..................................................... |
23 |
Starting the Engine........................................ |
23 |
Launch Control Mode .................................... |
25 |
DFI Setting Data Selection ............................ |
26 |
Shifting Gears................................................ |
27 |
Stopping the Motorcycle................................ |
28 |
Stopping the Engine ...................................... |
28 |
Break-In......................................................... |
29 |
Daily Pre-Ride Checks .................................. |
30 |
After-Race Checks ........................................ |
32 |
MAINTENANCE AND ADJUSTMENT............. |
33 |
Periodic Maintenance Chart .......................... |
33 |
Engine Oil...................................................... |
38 |
Cooling System ............................................. |
43 |
Spark Plug..................................................... |
47 |
Air Cleaner .................................................... |
54 |
Throttle Cable................................................ |
60 |
Throttle Body Assy ........................................ |
61 |
Clutch ............................................................ |
72 |
Valve Clearance ............................................ |
79 |
Exhaust System ............................................ |
84 |
Rear Axle Nut ................................................ |
88 |
Drive Chain.................................................... |
89 |
Adjustable Ergonomics.................................. |
94 |
Footpeg ......................................................... |
96 |
Brakes ........................................................... |
98 |
Steering ......................................................... |
101 |
Front Suspension .......................................... |
104 |
Rear Suspension (UNI-TRAK®)..................... |
154 |
Wheels .......................................................... |
160 |
Hoses Inspection........................................... |
162 |
Tightening Torques of Nuts and Bolts............ |
163 |
Cleaning Your Motorcycle.............................. |
167 |
Lubrication..................................................... |
169 |
DFI Self-Diagnosis ....................................... |
172 |
TROUBLESHOOTING GUIDE......................... |
179 |
TUNING............................................................ |
186 |
Suspension.................................................... |
186 |
Gearing.......................................................... |
192 |
Special Care According to Track Conditions . 193 |
|
OPTIONAL PARTS .......................................... |
194 |
PRE-RACE CHECKS AND AFTER-RACE |
|
MAINTENANCE............................................ |
195 |
STORAGE........................................................ |
197 |
Before Storage .............................................. |
197 |
After Storage ................................................. |
198 |
ENVIRONMENTAL PROTECTION.................. |
199 |
WIRING DIAGRAM.......................................... |
200 |
8 SPECIFICATIONS
|
SPECIFICATIONS |
|
DIMENSIONS |
|
|
|
|
|
Overall Length |
2 170 mm (85.43 in.) |
|
Overall Width |
820 mm (32.3 in.) |
|
Overall Height |
1 270 mm (50.00 in.) |
|
Wheelbase |
1 475 mm (58.07 in.) |
|
Road Clearance |
330 mm (13.0 in.) |
|
Curb Mass |
106.0 kg (233.7 lb) |
|
Fuel Tank Capacity |
6.1 L (1.6 US gal) |
|
ENGINE |
|
|
Type |
4-stroke, DOHC, single-cylinder, liquid-cooled |
|
Bore × Stroke |
77.0 × 53.6 mm (3.03 × 2.11 in.) |
|
Displacement |
249 cm³ (15.2 cu in.) |
|
Compression Ratio |
13.8:1 |
|
Fuel System |
FI (Fuel Injection) |
|
Starting System |
Primary kick |
|
Ignition System |
Digital DC-CDI |
|
Ignition Timing |
4° BTDC @2 000 r/min (rpm) |
|
Lubrication System |
Forced lubrication (semi-dry sump) |
|
Spark Plug |
NGK CPR8EB-9 |
|
Spark Plug Terminal |
Solid-post |
|
|
SPECIFICATIONS 9 |
TRANSMISSION |
|
Transmission Type |
5-speed, constant mesh, return shift |
Clutch Type |
Wet, multi disc |
Driving System |
Chain drive |
Gear Ratio: |
|
1st |
2.142 (30/14) |
2nd |
1.750 (28/16) |
3rd |
1.444 (26/18) |
4th |
1.235 (21/17) |
5th |
1.045 (23/22) |
Primary Reduction Ratio |
3.350 (67/20) |
Final Reduction Ratio |
3.846 (50/13) |
Overall Drive Ratio |
13.470 at Top gear |
Engine Oil: |
|
Type |
API SG, SH, SJ, SL or SM with JASO MA, MA1 or MA2 |
Viscosity |
SAE 10W-40 |
Capacity |
1.0 L (1.1 US qt) |
FRAME |
|
Type |
Tubular, semi-double cradle |
Steering Angle |
42° to either side |
Caster |
28.7° |
Trail |
126.4 mm (4.98 in.) |
10 SPECIFICATIONS |
|
Tire Size/Type: |
|
Front |
80/100-21 51M/DUNLOP MX51FA |
Rear |
100/90-19 57M/DUNLOP MX51 |
Rim Size: |
|
Front |
21 × 1.60 |
Rear |
19 × 1.85 |
Suspension: |
|
Front |
Telescopic fork (upside-down) |
Rear |
New Uni-trak® swingarm |
Front Suspension Travel |
315 mm (12.4 in.) |
Rear Wheel Travel |
310 mm (12.2 in.) |
Front Fork Oil: |
|
Type |
Kawasaki Fork Oil SS19 |
Amount (Left Front Fork): |
|
Cylinder Unit |
330 mL (11.2 US oz.) |
Outer Tube |
300 mL (10.1 US oz.) |
Amount (Right Front Fork) |
223 mL (7.54 US oz.) |
BRAKES |
|
Type: |
|
Front |
Single disc |
Rear |
Single disc |
Specifications are subject to change without notice.
GENERAL INFORMATION 11
|
|
|
|
|
|
j |
|
GENERAL INFORMATION |
|
|
|||
|
|
|
|
|||
|
|
|
|
|
|
|
|
|
|
|
|
|
|
Location of Labels |
|
|
|
|
|
|
All warning labels which are on your vehicle are |
|
|
|
|
|
|
repeated here. Read labels on your vehicle and un- |
|
|
|
|
|
|
derstand them thoroughly. They contain information |
|
|
|
|
|
|
which is important for your safety and the safety of |
|
|
|
|
|
|
anyone else who may operate your vehicle. There- |
|
|
|
|
|
|
fore, it is very important that all warning labels be on |
|
|
|
|
|
|
your vehicle in the locations shown. If any label is |
|
|
|
|
|
|
missing, damaged, or worn, get a replacement from |
|
|
|
|
|
|
your Kawasaki dealer and install it in the correct po- |
|
|
|
|
|
|
sition. |
|
|
|
|
|
|
NOTE |
|
|
|
|
|
|
|
1. Brake Fluid (Front) |
|
||||
○The sample warning labels in this section have |
|
|
||||
|
|
|
|
|
||
part numbers to help you and your dealer obtain |
|
|
|
|
|
|
the correct replacement. |
|
|
|
|
|
|

12 GENERAL INFORMATION
 j
j
2. Brake Fluid (Rear)
3. Radiator Cap Danger
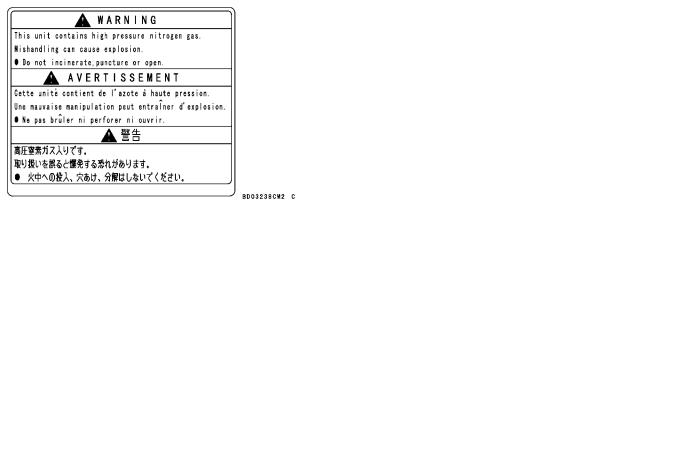
4. Rear Shock Absorber Warning
GENERAL INFORMATION 13
j
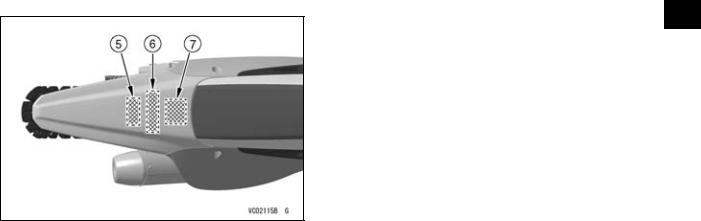
5.Noise Emission Control Information
6.Important Information
7.Disclaimer of Warranty
14 GENERAL INFORMATION
j |
1) |
3) |
|
|
|
|
2) |
4) |
|
|
|
|
|
|
|
GENERAL INFORMATION 15
5) |
7) |
|
j |
|
|
|
|||
|
|
|
|
|
|
|
|
|
|
6)
16 GENERAL INFORMATION
 j
j
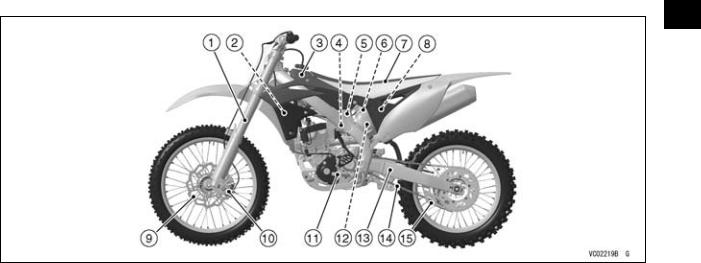
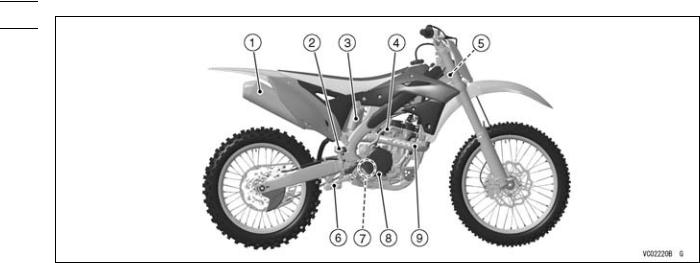
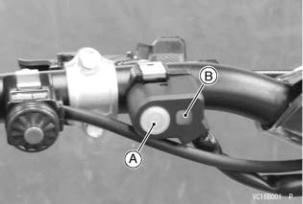
Location of Parts
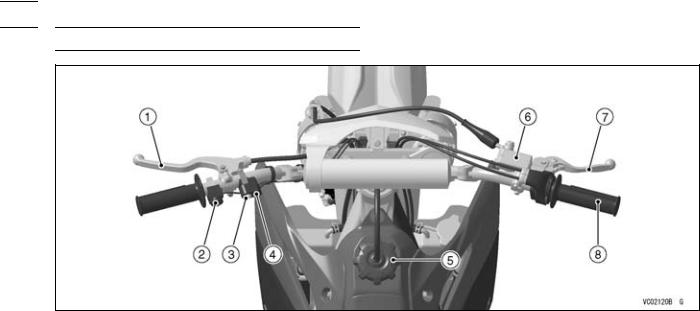
1. |
Clutch Lever |
4. |
Orange Launch Control |
6. |
Front Brake Fluid Reservoir |
2. |
Engine Stop Button |
|
Mode/FI Warning Indicator |
7. |
Front Brake Lever |
3. |
Launch Control Mode |
|
Light |
8. |
Throttle Grip |
|
Button |
5. |
Fuel Tank Cap |
|
|
GENERAL INFORMATION 17
j
1. |
Front Fork |
6. |
Upstream Injector |
11. |
Shift Pedal |
2. |
Radiator |
7. |
Seat |
12. |
Rear Shock Absorber |
3. |
Fuel Tank |
8. |
Air Cleaner Element |
13. |
Swingarm |
4. |
Throttle Body Assy |
9. |
Brake Disc |
14. |
Drive Chain |
5. |
Downstream Injector |
10. |
Brake Caliper |
15. |
Chain Guide |
18 GENERAL INFORMATION
 j
j
1. |
Muffler |
6. |
Uni-Trak® Tie-Rod and Rocker Arm |
2. |
Rear Brake Fluid Reservoir |
7. |
Oil Level Inspection Window |
3. |
Rear Shock Absorber Gas Reservoir |
8. |
Rear Brake Pedal |
4. |
Kick Pedal |
9. |
Exhaust Pipe |
5. |
DFI Setting Data Selection Connector |
|
|

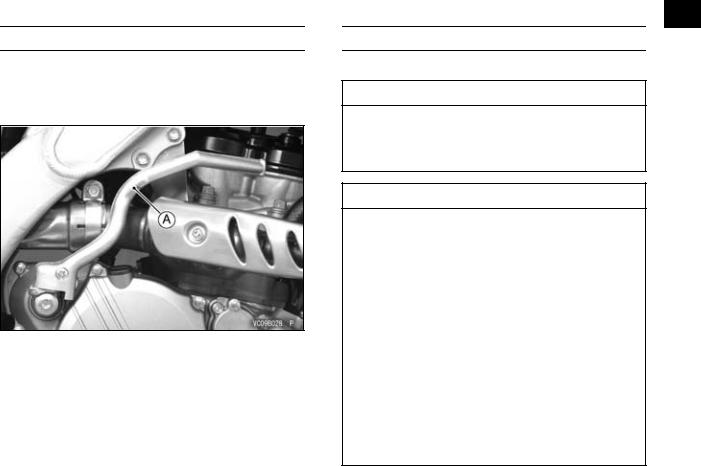
Side Stand
To install the side stand, insert its flat end into the rear axle as shown in the figure.
GENERAL INFORMATION 19
NOTE |
j |
|
○Support the motorcycle with a suitable stand to perform maintenance or adjustment procedures.
A.Side Stand
B.Rear Axle
 WARNING
Riding with the side stand can cause a crash resulting in injury. Do not start the engine or attempt to ride the motorcycle when the side stand is installed.
20 GENERAL INFORMATION
 j
j
Fuel
This Kawasaki KX has a 4-stroke engine that requires a gasoline.
The capacity of the fuel tank is 6.1 L (1.6 US gal). To open the fuel tank cap, disconnect the breather hose from the hole in the steering stem, and turn the tank cap counterclockwise.
Avoid filling the tank in the rain or where heavy dust is blowing so that the fuel does not get contaminated.
A. Tank Cap
B. Fuel Tank
C. Top Level
D. Filler Neck
A.Fuel Tank Cap
B.Breather Hose

 WARNING
Gasoline is extremely flammable and can be explosive under certain conditions. Always stop the engine and do not smoke. Make sure the area is well-ventilated and free from any source of flame or sparks; this includes any appliance with a pilot light. Never fill the tank so the fuel level rises into the filler neck. If the tank is overfilled, heat may cause the fuel to expand and overflow through the vents in the tank cap. After refueling, make sure the fuel tank cap is closed securely. If gasoline is spilled on the fuel tank, wipe it off immediately.
Fuel Requirement:
Fuel Type
Use clean, fresh unleaded gasoline with a minimum Antiknock Index of 90. The Antiknock Index is posted on service station pumps in the U.S.A. The octane rating of a gasoline is a measure of its resistance to detonation or “knocking”. The Antiknock Index is an average of the Research Octane Number (RON) and the Motor Octane Number (MON) as shown in the table below.
Octane Rating Method |
Minimum |
|||
Rating |
||||
|
|
|||
Antiknock Index |
(RON + MON) |
90 |
|
|
2 |
|
|||
|
|
|
||
GENERAL INFORMATION 21
|
|
j |
NOTICE |
|
|
|
|
|
If engine “knocking” or “pinging” occurs, |
|
|
use a different brand of gasoline of a higher |
|
|
octane rating. |
|
|
If this condition is allowed to continue it can |
|
|
lead to severe engine damage. |
|
|
Gasoline quality is important. Fuels of low |
|
|
quality or not meeting standard industry |
|
|
specifications may result in unsatisfactory |
|
|
performance. Operating problems that result |
|
|
from the use of poor quality or nonrecom- |
|
|
mended fuel may not be covered under your |
|
|
warranty. |
|
|
Fuels Containing Oxygenates
Gasoline frequently contains oxygenates (alcohols and ethers) especially in areas of the U.S. and Canada which are required to sell such reformulated fuels as part of a strategy to reduce exhaust emissions.
The types and volume of fuel oxygenates approved for use in unleaded gasoline by the U.S. Environmental Protection Agency include a broad range of alcohols and ethers, but only two components have seen any significant level of commercial use.
Gasoline/Alcohol Blends - Gasoline containing up to 10% ethanol (alcohol produced from agricultural products such as corn), also known as “gasohol” is approved for use.

22 GENERAL INFORMATION
j |
|
|
|
|
|
|
NOTICE |
|
|
|
|
|
|
Avoid using blends of unleaded gasoline and |
|
|
methanol (wood alcohol) whenever possible, |
|
|
and never use “gasohol” containing more |
|
|
than 5% methanol. Fuel system damage and |
|
|
performance problems may result. |
|
|
Gasoline/Ether Blends - The most common ether |
|
|
is methyl tertiary butyl ether (MTBE). You may use |
|
|
gasoline containing up to 15% MTBE. |
|
|
NOTE |
|
|
○Other oxygenates approved for use in unleaded |
|
|
gasoline include TAME (up to 16.7%) and ETBE |
|
|
(up to 17.2%). Fuel containing these oxygenates |
can also be used in your Kawasaki.
NOTICE
Never use gasoline with an octane rating lower than the minimum specified by Kawasaki.
Never use “gasohol” with more than 10% ethanol, or more than 5% methanol. Gasoline containing methanol must also be blended with cosolvents and corrosion inhibitors.
Certain ingredients of gasoline may cause paint fading or damage. Be extra careful not to spill gasoline or gasoline oxygenate blends during refueling.
When not operating your Kawasaki for 30 to 60 days, mix a fuel stabilizer (such as STA-BIL) with the gasoline in the fuel tank. Fuel stabilizer additives inhibit oxidation of the fuel which minimizes gummy deposits.
Never store this product with “gasohol” in the fuel system. Before storage it is recommended that you drain all fuel from the fuel system. See the Storage section in this manual.
Kick Pedal
This motorcycle is equipped with a primary kick starting system. When the clutch lever is pulled, the motorcycle can be started with the transmission in any gear.
A. Kick Pedal
GENERAL INFORMATION 23
j
Starting the Engine
• Shift the transmission into neutral.
 WARNING
Riding with the side stand can cause a crash resulting in injury. Do not start the engine or attempt to ride the motorcycle when the side stand is installed.
NOTICE
This motorcycle is designed for competition use only. Therefore, the radiator does not incorporate a coolant reserve tank or cooling fan. Prolonged idling of the engine with no airflow through the radiator can cause coolant loss and engine overheating resulting in possible engine damage. Any riding conditions that increase engine temperature will further reduce idling time before coolant loss occurs. These conditions include high ambient temperature, sandy or muddy terrain, or other conditions causing high engine loads at low speeds. Furthermore, warming the engine up excessively before operation, or leaving idling with the hot engine temperature after operation results in the engine overheating, too.
24 GENERAL INFORMATION
j |
|
When engine is cold - |
When engine is already warm or restarts - |
|
|||
|
|
• Pull out the idle adjusting screw/choke knob. |
• Kick the engine over, leaving the throttle closed |
|
|
|
without using the idle adjusting screw/choke knob. |
|
|
|
|
|
|
|
NOTE |
|
|
|
○If the engine fails starting, open the throttle fully |
|
|
|
and depress the kick pedal slowly about 4 5 |
|
|
|
times to clear too rich fuel mixtures in the engine. |
|
|
|
Then, kick the engine over, leaving the throttle |
|
|
|
closed. |
|
|
|
|
A.Idle Adjusting Screw/Choke Knob
•Find the kick pedal position around the top so that the resistance to depress the kick pedal is fully felt by pushing down the kick pedal slowly.
•Kick the engine over, leaving the throttle closed.
NOTE
○When the clutch lever is pulled, the motorcycle can be started with the transmission in any gear.
•Even after the engine has started, do not push back immediately the idle adjusting screw/choke knob until the engine is thoroughly warmed up.
GENERAL INFORMATION 25
|
|
• When shifting into 3rd, the system is deactivated |
j |
|
Launch Control Mode |
|
|
||
|
automatically. |
|
||
The launch control mode can be used to adjust ig- |
|
|
|
|
|
|
|
|
|
nition timing to help riders get better starts on slip- |
|
|
|
|
pery terrain. |
|
|
|
|
The system’s effectiveness is dependent on rider |
|
|
|
|
skill, technique and terrain conditions. |
|
|
|
|
Launch Control Mode Setting |
|
|
|
|
• The launch control mode can be set when the en- |
|
|
|
|
gine is running and in neutral, 1st or 2nd gear. |
|
|
|
|
When activated, it only functions in 1st and 2nd |
|
|
|
|
gear. |
|
|
|
|
• When pushing the launch control mode button for |
|
|
|
|
over two seconds, the orange launch control mode |
|
|
|
|
indicator light will blink to indicate the system is |
|
|
|
|
operating. |
|
A. Launch Control Mode Button |
|
|
|
|
B. Orange Launch Control Mode/FI Warning |
|
|
|
|
Indicator Light |
|
|
26 GENERAL INFORMATION
 j
j
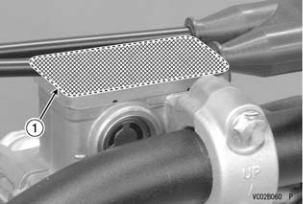
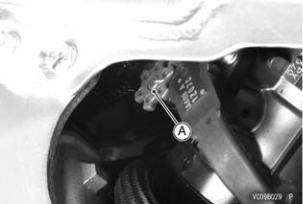
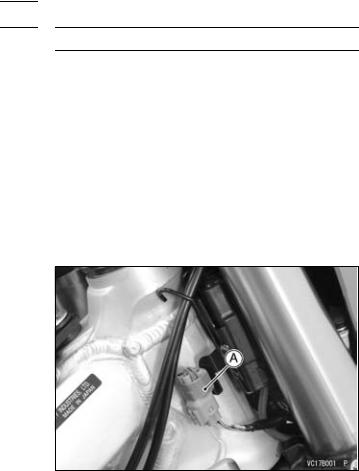
DFI Setting Data Selection
Three DFI settings are available to suit various track conditions. They are easily activated by changing the wiring connector on the side of the frame when the engine is stopped.
Track Condition |
Connector Color |
Soft |
White |
Standard |
Green |
Hard |
Black |
•Change the connector on the right front of the frame to suit the track condition with the engine stopped.
NOTE
○If the connector is changed while the engine is running, the DFI setting does not change.
○The ECU is set to the standard track condition when operated without a connector. However, always have one of the three connectors attached when riding to prevent dust and mud from accumulating in the connector harness.
○The KX FI calibration kit (Part No. 99999-0394) can be used for changing the DFI setting.
A. Connector
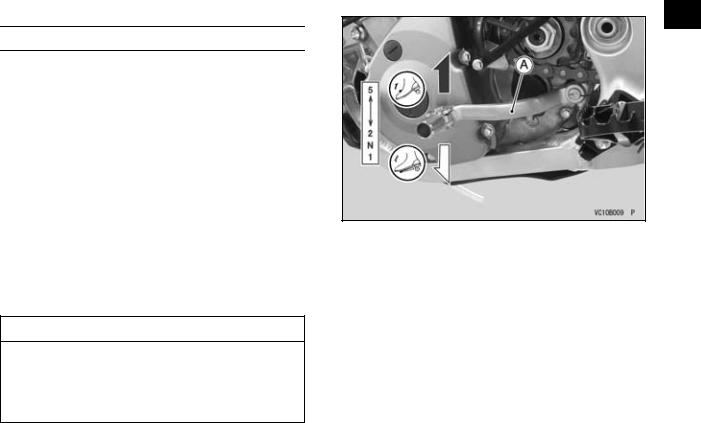
Shifting Gears
This motorcycle is equipped with a 5-speed “return shift” transmission. The neutral is located halfway between 1st and 2nd gear. “Return shift” means that when shifting up or down, each gear must be engaged before the next higher or lower gear may be selected.
•To engage first gear from the neutral position, pull in the clutch lever and push down on the shift pedal, gently release the clutch lever, then release the shift pedal.
•To shift up to the next gear, pull in the clutch lever, lift the shift pedal with your toes, gently release the clutch lever, and then release the shift pedal.
•To shift down to the next gear, pull in the clutch lever, push the shift pedal down as far as it will go, gently release the clutch lever, then release the shift pedal.
NOTICE
When changing gears, press firmly on the shift pedal to ensure proper shifting. Careless, incomplete shifting can cause the transmission to jump out of gear and lead to engine damage.
GENERAL INFORMATION 27
j
A. Shift Pedal
28 GENERAL INFORMATION
 j
j
Stopping the Motorcycle
For maximum deceleration, close the throttle and apply both front and rear brakes. Pull in the clutch lever as the motorcycle comes to a stop. Independent use of the front or rear brake may be advantageous in certain circumstances. Shift down progressively to ensure good engine response at all speeds.
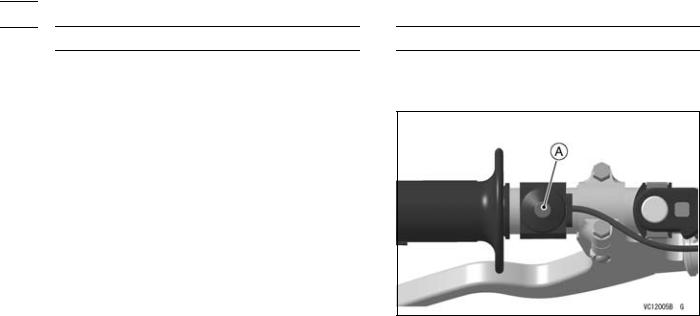
Stopping the Engine
•Shift the transmission into the neutral position.
•Close the throttle completely and push the engine stop button.
A. Engine Stop Button
Break-In
A brief break-in procedure must be carried out to obtain the proper operating clearances in the engine and transmission, which are necessary for performance and reliability.
NOTICE
For the first hour or 20 km (12 mile) of operation, run the engine at low and moderate engine speeds. See details below.
Break in the engine as follows.
1.Start the engine and let it idle until it is thoroughly warmed up.
2.Ride the motorcycle for about 20 minutes within 1/2 throttle opening.
3.Stop and let the engine cool completely. Be sure to check the tightness of nuts and bolts, oil leakage, coolant leakage and any irregularities.
4.Start the engine and ride the motorcycle for about 40 minutes within 3/4 throttle opening.
GENERAL INFORMATION 29
j
5. Stop and let the engine cool completely. Be sure to fully check the tightness of nuts and bolts, oil leakage, and any irregularities, especially, each cable elongation, brake play, chain slack and spoke tightness.
6. Change the engine oil, oil filter and front fork/rear shock absorber oil to the new one.
7. After the break-in procedure has been properly carried out, the motorcycle is ready for regular operation. Using the proper riding skills and techniques and avoiding recklessly high engine speeds will keep the engine trouble-free.
NOTICE
When any following parts have been replaced, the same break-in procedure as the new motorcycle must be carried out for one hour or 20 km (12 mile):
Cylinder, Piston, Piston pin, Piston ring, Valve, Valve lifter, Camshaft, Crankshaft, Mission gear, etc.
Loading...