


 Loading...
Quick Reference Guide
This Quick Reference Guide will assist you in finding the information you’re looking for.
GENERAL INFORMATION |
j |
|
|
MAINTENANCE AND ADJUSTMENT |
j |
|
|
TROUBLESHOOTING GUIDE |
j |
|
|
STORAGE |
j |
A Table of Contents is included after the Foreword.

IMPORTANT INFORMATION
•This vehicle is designed for the operator only, no passengers.
•This vehicle is an off-road motorcycle only and was not manufactured for use on public streets, roads or highways.
•Respect the environment and the rights of other people.
•Read owner’s manual.
Whenever you see the symbols shown below, heed their instructions! Always follow safe operating and maintenance practices.
 DANGER
DANGER indicates a hazardous situation which, if not avoided, will result in death or serious injury.
 WARNING
WARNING indicates a hazardous situation which, if not avoided, could result in death or serious injury.
NOTICE
NOTICE is used to address practices not related to personal injury.
NOTE
○NOTE indicates information that may help or guide you in the operation or service of the vehicle.

IMPORTANT
Off-road motorcycling is a wonderful sport, and we hope you will enjoy it to the fullest. However, if improperly conducted, this sport has the potential to cause environmental problems as well as conflicts with other people.
Responsible use of your off-road motorcycle will ensure that these problems and conflicts do not occur. TO PROTECT THE FUTURE OF YOUR SPORT, MAKE SURE YOU USE YOUR MOTORCYCLE LEGALLY, SHOW CONCERN FOR THE ENVIRONMENT, AND RESPECT THE RIGHTS OF OTHER PEOPLE.
 WARNING
•THIS VEHICLE IS AN OFF-ROAD VEHICLE ONLY AND WAS NOT MANUFACTURED FOR USE ON PUBLIC STREETS, ROADS, OR HIGH-WAYS.
•USE YOUR BIKE LEGALLY.
•RESPECT THE ENVIRONMENT AND THE RIGHTS OF OTHER REOPLE.
FOREWORD
We wish to thank you for choosing this Kawasaki Motorcycle. It is the end product of Kawasaki’s advanced engineering, exhaustive testing, and continuous striving for superior reliability, and performance. By giving your motorcycle the proper care and maintenance outlined in this manual, you will be helping to ensure it a long, trouble-free life.
Before starting to ride your motorcycle, please read this manual thoroughly in order to know your motorcycle’s capabilities, its limitations, and above all, how to operate it safety.
Due to improvements in design and performance made during production, in some cases there may be minor discrepancies between the actual vehicle and the illustrations and text in this manual.
KAWASAKI HEAVY INDUSTRIES, LTD.
Motorcycle & Engine Company
©2014 Kawasaki Heavy Industries, Ltd. |
Feb. 22, 2014. (1) |

TABLE OF CONTENTS
SPECIFICATIONS............................................ |
7 |
GENERAL INFORMATION.............................. |
10 |
Location of Labels ......................................... |
10 |
Location of Parts ........................................... |
16 |
Side Stand..................................................... |
19 |
Fuel ............................................................... |
19 |
Fuel Requirements: .................................... |
19 |
Filling the Tank: .......................................... |
20 |
Fuel Tap:..................................................... |
21 |
Meter Unit...................................................... |
23 |
Speedometer:............................................. |
23 |
Odometer: .................................................. |
23 |
Clock: ......................................................... |
23 |
Trip Meter: .................................................. |
24 |
Engine Stop Button ....................................... |
25 |
Kick Pedal ..................................................... |
26 |
Starter Button ................................................ |
26 |
Starting the Engine........................................ |
27 |
Moving Off ..................................................... |
30 |
Shifting Gears................................................ |
30 |
Stopping the Motorcycle................................ |
31 |
Stopping the Engine ...................................... |
32 |
Break-In......................................................... |
32 |
Daily Pre-Ride Checks .................................. |
34 |
After-Race Checks ........................................ |
36 |
MAINTENANCE AND ADJUSTMENT............. |
37 |
Periodic Maintenance Chart .......................... |
37 |
Engine Oil...................................................... |
42 |
Cooling System ............................................. |
47 |
Spark Plug..................................................... |
52 |
Air Cleaner .................................................... |
54 |
Throttle Cable................................................ |
59 |
Carburetor ..................................................... |
61 |
Clutch ............................................................ |
62 |
Hot Starter Cable........................................... |
69 |
Valve Clearance ............................................ |
69 |
Spark Arrester (Brazil model only) ................ |
75 |
Drive Chain.................................................... |
77 |
Handlebar...................................................... |
83 |
Brakes ........................................................... |
85 |
Steering ......................................................... |
89 |
Front Suspension .......................................... |
91 |
Rear Suspension (UNI-TRAK®)..................... |
119 |
Wheels .......................................................... |
123 |
Hoses Inspection........................................... |
126 |
Headlight ....................................................... |
127 |
Battery ........................................................... |
127 |
Fuse .............................................................. |
130 |
Tightening Torques of Nuts and Bolts............ |
132 |
Cleaning Your Motorcycle.............................. |
137 |
Lubrication..................................................... |
139 |
TROUBLESHOOTING GUIDE......................... |
143 |
STORAGE........................................................ |
151 |
Before Storage .............................................. |
151 |
After Storage ................................................. |
152 |
ENVIRONMENTAL PROTECTION.................. |
153 |
WIRING DIAGRAM .......................................... |
154 |
SPECIFICATIONS 7
|
SPECIFICATIONS |
|
DIMENSIONS |
|
|
|
|
|
Overall length |
2 175 mm (85.6 in.) |
|
Overall width |
820 mm (32.3 in.) |
|
Overall height |
1 250 mm (49.2 in.) |
|
Wheelbase |
1 480 mm (58.3 in.) |
|
Road clearance |
315 mm (12.4 in.) |
|
Curb mass |
126 kg (278 lb) |
|
Fuel tank capacity |
8 L (2.1 US gal) |
|
ENGINE |
|
|
Type |
DOHC, 4-valve, single-cylinder, 4-stroke, liquid-cooled |
|
Bore × stroke |
96.0 × 62.1 mm (3.8 × 2.4 in.) |
|
Displacement |
449 cm³ (27.4 cu in.) |
|
Compression ratio |
12.0 : 1 |
|
Carburetor |
KEIHIN FCR-MX40 |
|
Starting system |
Electric, Primary kick |
|
Ignition system |
CDI |
|
Ignition timing |
10.2° BTDC @1 800 r/min (rpm) |
|
Lubrication system |
Forced Lubrication (semi dry sump) |
|
Spark plug |
NGK CPR8EB-9 |
|
Spark plug terminal |
Solid-post |
|
8 SPECIFICATIONS
TRANSMISSION
Transmission type Clutch type
Drive system Gear ratios:
1st gear 2nd gear 3rd gear 4th gear 5th gear
Primary reduction ratio Final reduction ratio Overall ratio (top gear) Engine oil:
Capacity Type
Coolant Capacity
FRAME
Type
Steering angle Caster
Trail
5-speed, constant-mesh, return shift Wet, multi disc
Chain drive
2.167 (26/12)
1.533 (23/15)
1.188 (19/16)
0.950 (19/20)
0.810 (17/21)
2.727 (60/22)
3.846 (50/13)
8.492
1.3 L (1.4 US qt)
API SG, SH, SJ, SL or SM with JASO MA, MA1 or MA2 SAE 10W-40
1.1 L (1.2 US qt)
Semi-double cradle 42° to either side 28°
122 mm (4.8 in.)
Tire size, type: Front
Rear Rim size: Front Rear
Suspension: Front Rear
Front suspension travel Rear wheel travel Front fork oil:
Type
Amount (per fork leg) : Inner Damper Inner/Outer Tubes
BRAKES
Type (Front & Rear)
ELECTRICAL EQUIPMENT
Battery Headlight
SPECIFICATIONS 9
80/100-21 M/C51P, BRIDGESTONE ED03 120/90-18 M/C65P, BRIDGESTONE ED04
21 × 1.60
18 × 2.15
Upside-down telescopic fork New Uni-trak® swingarm 305 mm (12.0 in.)
315 mm (12.4 in.)
Kawasaki Fork Oil KHL15-10
189 mL (6.4 US oz)
335 mL (11.3 US oz)
Disc
12 V 6 Ah
12 V 35 W
Specifications are subject to change without notice and may not apply to every country.
10 GENERAL INFORMATION
j |
|
|
|
|
|
|
|
|
|
|
|
|
|
|
|
GENERAL INFORMATION |
|
|||
|
|
|
|
|||
|
|
|||||
|
|
|
|
|
|
|
|
|
|
|
|
|
|
|
|
Location of Labels |
|
|
|
|
|
|
All warning labels which are on your vehicle are |
|
|
|
|
|
|
repeated here. Read labels on your vehicle and un- |
|
|
|
|
|
|
derstand them thoroughly. They contain information |
|
|
|
|
|
|
which is important for your safety and the safety of |
|
|
|
|
|
|
anyone else who may operate your vehicle. There- |
|
|
|
|
|
|
fore, it is very important that all warning labels be on |
|
|
|
|
|
|
your vehicle in the locations shown. If any label is |
|
|
|
|
|
|
missing, damaged, or worn, get a replacement from |
|
|
|
|
|
|
your Kawasaki dealer and install it in the correct po- |
|
|
|
|
|
|
sition. |
|
|
|
|
|
|
NOTE |
|
|
|
|
|
|
|
1. Brake Fluid (Front) |
|
||
|
|
○The sample warning labels in this section have |
|
|
||
|
|
|
|
|
||
|
|
part numbers to help you and your dealer obtain |
|
|
|
|
|
|
the correct replacement. |
|
|
|
|

GENERAL INFORMATION 11
j
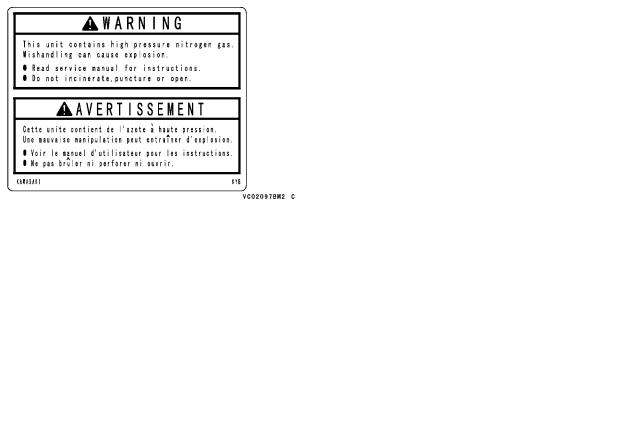
2.Brake Fluid (Rear)
3.Radiator Cap Danger
4.Rear Shock Absorber Warning

12 GENERAL INFORMATION
 j
j
5. Battery Poison/Danger
6. Important Information
GENERAL INFORMATION 13
1) |
3) |
j |
|
|
|
|
2) |
4) |
|
|
|
|
|
|
|

14 GENERAL INFORMATION
j |
4) Brazil model |
5) Brazil model |
|
|
|
|
5) |
6) |
|
|
|
|
|
|
|

GENERAL INFORMATION 15
j
6) Brazil model

16 GENERAL INFORMATION
 j
j
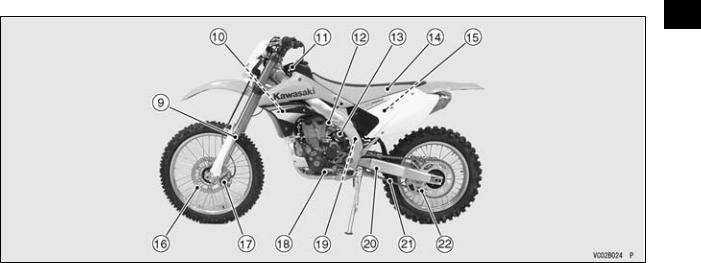
Location of Parts
1. |
Clutch Lever |
4. |
Meter Unit |
7. |
Throttle Grip |
2. |
Engine Stop Button |
5. |
Front Brake Fluid Reservoir |
8. |
Starter Button |
3. |
Hot Starter Lever |
6. |
Front Brake Lever |
9. |
Fuel Tank Cap |
GENERAL INFORMATION 17
j
9. |
Front Fork |
14. |
Seat |
19. |
Rear Shock Absorber |
10. |
Radiator |
15. |
Air Cleaner Element |
20. |
Swingarm |
11. |
Fuel Tank |
16. |
Brake Disc |
21. |
Drive Chain |
12. |
Fuel Tap |
17. |
Brake Caliper |
22. |
Chain Guide |
13. |
Carburetor |
18. |
Shift Pedal |
|
|

18 GENERAL INFORMATION
 j
j
23. |
Silencer |
28. |
Uni-Trak® Tie Rod and Rocker Arm |
24. |
Rear Brake Fluid Reservoir |
29. |
Rear Brake Pedal |
25. |
Rear Shock Absorber Gas Reservoir |
30. |
Kick Pedal |
26. |
Battery |
31. |
Engine Oil Level Inspection Window |
27. |
Fuse |
32. |
Exhaust Pipe |

Side Stand
The motorcycle is equipped with a side stand.
A. Side Stand
Whenever the side stand is used, make it a practice to kick the fully up before sitting on the motorcycle.
 WARNING
Riding with the side stand down could cause an accident resulting in serious injury or death. Always be sure the side stand is fully raised before riding.
GENERAL INFORMATION 19
j
Fuel
Fuel Requirements:
Your Kawasaki engine is designed to use only unleaded gasoline with a minimum octane rating shown below. Never use gasoline with an octane rating lower than the minimum specified by Kawasaki to prevent severe engine damage.
The octane rating of a gasoline is a measure of its resistance to detonation or “knocking”. The term commonly used to describe a gasoline’s octane rating is the Research Octane Number (RON).
NOTICE
If engine “knocking” or “pinging” occurs, use a different brand of gasoline of a higher octane rating. If this condition is allowed to continue, it can lead to severe engine damage. Gasoline quality is important. Fuels of low quality or not meeting standard industry specifications may result in unsatisfactory performance.
Fuel Type and Octane Rating
(Except for Brazil Specification)
Use clean, fresh unleaded gasoline with an octane rating equal to or higher than that shown in the table.
20 GENERAL INFORMATION
j |
|
|
|
|
|
|
|
|
Fuel Type |
Unleaded Gasoline |
|
|
|
||
|
|
Ethanol Content |
E10 or less |
|
|
Minimum Octane |
Research Octane Number |
|
|
(RON) |
|
|
|
Rating |
|
|
|
95 |
|
|
|
|
NOTICE
Do not use any fuel that contains more ethanol or other oxygenates than specified for E10 fuel* in this vehicle. Damage to the engine and fuel system, or engine starting and/or performance problems may result from the use of improper fuel.
*E10 means fuel containing up to 10% ethanol.
(For Brazil Specification)
Use clean, fresh unleaded gasoline with an Antiknock Index equal to or higher than that shown in the table.
The Antiknock Index is posted on service station pumps. The Antiknock Index is an average of the Research Octane Number (RON) and the Motor Octane Number (MON) as shown in the table.
Fuel Type |
Unleaded Gasoline |
||
Ethanol |
E25 |
|
|
Content |
|
|
|
|
|
|
|
Minimum |
Antiknock |
(RON + MON) |
|
Index |
2 |
|
|
Octane Rating |
90 |
|
|
|
|
|
|
NOTICE
Do not use any fuel that contains more ethanol or other oxygenates than specified for E25 fuel* in this vehicle. Damage to the engine and fuel system, or engine starting and/or performance problems may result from the use of improper fuel.
*E25 means fuel containing up to 25% ethanol.
Filling the Tank:
Avoid filling the tank in the rain or where heavy dust is blowing so that the fuel does not get contaminated.

A.Tank Cap
B.Fuel Tank
C.Top Level
D.Filler Neck
GENERAL INFORMATION 21
j
WARNING
Gasoline is extremely flammable and can be explosive under certain conditions. Always stop the engine and do not smoke. Make sure the area is well ventilated and free from any source of flame or sparks; this includes any appliance with a pilot light. Never fill the tank so the fuel level rises into the filler neck. If the tank is overfilled, heat may cause the fuel to expand and overflow through the vents in the tank cap. After refueling, make sure the fuel tank cap is closed securely. If gasoline is spilled on the fuel tank, wipe it off immediately.
NOTICE
Certain ingredients in gasoline may cause paint fading or damage. Be extra careful not to spill gasoline or gasoline oxygenates blends during refueling.
Fuel Tap:
The fuel tap has three position: OFF, ON, and RES (reserve). For normal operation, turn the fuel tap lever to the ON position. If the fuel runs out with the tap in the ON position, the last approximately 0.7 L (0.18 US gal) of usable fuel remains can be used by turning the tap lever to the RES position.

22 GENERAL INFORMATION
 j
j
 WARNING
Practice operating the fuel tap with the motorcycle stopped. To prevent an accident you should be able to operate the fuel tap while riding without taking your eyes off the road. Be careful not to touch the hot engine while operating the fuel tap.
A.Fuel Tap
B.ON Position
C.OFF Position
D.RES Position
Turn the fuel tap lever to the OFF position when the fuel tank is removed for maintenance and adjustments or the motorcycle is stored for a long time.
NOTE
○Since riding distance is limited when on RES, refuel at the earliest opportunity.
○Make certain that the fuel tap lever is turned to ON (not RES), after filling up the fuel tank.

Meter Unit
In the meter instruments face are the speedometer, odometer/clock, and trip meter. Pushing the odometer/clock (ODO/CLOCK) mode button shifts the display in the odometer/clock through the two modes; odometer and clock. Pushing the trip meter A/B (Trip A/B) mode button shifts the display in the trip meter through the two modes; trip A and B. When starting the engine, all segments come on for three seconds, then the clock or meters operate normally depending on the mode selected.
GENERAL INFORMATION 23
j
Speedometer:
The speedometer shows the speed of the vehicle.
Odometer:
The odometer shows the total distance in the kilometers (mph) that the vehicle has been ridden. The meter cannot be reset.
NOTE
○The date is maintained even if the battery is disconnected,
○When the figures come to 999999, they are stopped and locked.
A.Speedometer
B.Trip Meter A/B
C.Clock/Odometer
D.ODO/CLOCK Mode Button
E.TRIP A/B Mode Button
Clock:
To adjust hours and minutes:
•Push the ODO/CLOCK mode button to display the clock.

24 GENERAL INFORMATION
j |
• Push the ODO/CLOCK mode button while holding |
|
|
||
|
the TRIP A/B mode button. Both the hour and |
|
|
minute displays start flashing. |
•Again push the TRIP A/B mode button. When only the hour display flashes, push the ODO/CLOCK mode button to advance the hours.
•Push the TRIP A/B mode button. The hour display stops flashing and the minute display starts flashing. Push the ODO/CLOCK mode button to advance the minutes.
•Push the TRIP A/B mode button. Both the hour and minute displays start flashing again.
•Push the ODO/CLOCK mode button. The displays stop flashing and the clock starts working.
NOTE
○Pushing the ODO/CLOCK mode button momentarily advances the hour or minute step by step. Pushing and holding the button advance the hour or minute continuously.
○When the battery is disconnected, the clock resets to 1:00, and starts working again when the battery is connected.
Trip Meter:
The trip meter shows the distance in kilometers traveled since it was last reset to zero.
TRIP A: 0.0 999.9
TRIP B: 0 9999
To reset the trip meter:
1.Push the TRIP A/B button and hold it in.
2.After two seconds the figure display turns to 0.0 (TRIP A) or 0 (TRIP B), and then starts counting when the vehicle is operated. The meter counts until it is next reset.
NOTE
○When the trip meter is reset while the vehicle is stopped, it starts counting as soon as the vehicle starts moving.
○When the figures come to 999.9 (TRIP A) or 9999 (TRIP B) when the vehicle is running, they turn back to 0.0 or 0 and start counting again.

○When the battery is disconnected, the meter display resets to 0.0 or 0.
GENERAL INFORMATION 25
j
Engine Stop Button
The engine stop button is located on the left side of the handlebar. For ordinary engine stoppage and, if some emergency requires stopping the engine, press the button until the engine stops.
A. Engine Stop Button

26 GENERAL INFORMATION
 j
j
Kick Pedal |
|
Starter Button |
This motorcycle has a kick pedal.
This motorcycle has the starter button. The starter button operates the electric starter when the clutch lever pulled in.
A. Kick Pedal
A. Starter Button

Starting the Engine
•Shift the transmission into neutral.
•Turn the fuel tap lever to the ON position.
A.Fuel Tap
B.ON Position
 WARNING
Riding with the side stand in the down position can cause a crash resulting in injury. Do not start the engine or attempt to ride the motorcycle when the side stand is down.
GENERAL INFORMATION 27
|
|
j |
NOTICE |
|
|
|
|
|
This motorcycle’s radiator does not incorpo- |
|
|
rate cooling fan. Prolonged idling of the en- |
|
|
gine with no airflow through the radiator can |
|
|
cause coolant loss and engine overheating |
|
|
resulting in possible engine damage. Any |
|
|
riding conditions that increase engine tem- |
|
|
perature will further reduce idling time be- |
|
|
fore coolant loss occurs. These conditions |
|
|
include high ambient temperature, sandy or |
|
|
muddy terrain, or other conditions causing |
|
|
high engine loads at low speeds. Further- |
|
|
more, warming the engine up excessively be- |
|
|
fore operation, or leaving idling with the hot |
|
|
engine temperature after operation results in |
|
|
the engine overheating, too. |
|
|
NOTE |
|
|
○Do not repeatedly operate the throttle with the en- |
|
|
gine starting, stopping and idling. The accelerator |
|
|
pump may foul the spark plugs with excess fuel. |
|
|

28 GENERAL INFORMATION
j |
|
When engine is cold- |
the resistance to depress the kick pedal is fully felt |
|
|||
|
|
• Pull out the choke knob. |
by pushing down the kick pedal slowly. |
|
|
|
○When the clutch lever is pulled, the motorcycle can |
|
|
|
be started with the transmission in any gear. |
|
|
|
|
A.Choke Knob
•Leaving the throttle completely closed, push the starter button or kick the engine over until the engine starts.
NOTE
○When using the starter button for starting the engine, make sure that the clutch lever is pulled in.
○When using the kick pedal for starting the engine, find the kick pedal position around the top so that
A.Starter Button
B.Kick Pedal
•Even after the engine has started, do not push back immediately the choke knob until the engine is thoroughly warmed up.

When engine is already warm or restarts-
• Pull the hot starter lever on the clutch lever.
|
GENERAL INFORMATION 29 |
|||
|
|
|
|
j |
Engine |
Hot Starter |
Choke Knob |
|
|
|
|
|||
Condition |
Lever |
|
||
|
|
|
||
Already |
Pull in (ON) |
Push back (OFF) |
|
|
Warm |
|
|
||
|
|
|
|
|
Restarting |
Pull in (ON) |
Push back (OFF) |
|
|
after falling |
|
|||
|
|
|
|
|
Cold |
No use (OFF) |
Use (ON) |
|
|
A.Hot Starter Lever
•Kick the engine over or push the starter button, leaving the throttle closed without using the choke knob.
•Return the hot starter lever back immediately after the engine starts.
NOTE
○If the engine fails starting, open the throttle fully and depress the kick pedal slowly about 4 5 times to clear too rich fuel mixtures in the engine. Then, kick the engine over or push the starter button, leaving the throttle closed with the hot starter lever pulled in.
• Hottable.starter lever or choke knob is used as following
Loading...