

Page 1

KD-X342BT / KD-X341BT
DIGITAL MEDIA RECEIVER
INSTRUCTION MANUAL
RÉCEPTEUR MULTIMÉDIA NUMÉRIQUE
MANUEL D’INSTRUCTIONS
DIGITAL-MEDIA-RECEIVER
BEDIENUNGSANLEITUNG
ЦИФРОВОЙ МУЛЬТИМЕДИЙНЫЙ РЕСИВЕР
ИHCTPУKЦИЯ ПO ЭKCПЛУATAЦИИ
ENGLISH
FRANÇAIS
DEUTSCH
РУCCKИЙ
B5A-1360-00 [E]
Page 2

Information on Disposal of Old Electrical and Electronic Equipment and Batteries (applicable
for countries that have adopted separate waste collection systems)
Products and batteries with the symbol (crossed-out wheeled bin) cannot be disposed as household waste.
Old electrical and electronic equipment and batteries should be recycled at a facility capable of handling
these items and their waste byproducts.
Contact your local authority for details in locating a recycle facility nearest to you. Proper recycling and
waste disposal will help conserve resources whilst preventing detrimental effects on our health and the
environment.
Notice: The sign “Pb” below the symbol for batteries indicates that this battery contains lead.
Information sur l’élimination des anciens équipements électriques et électroniques et piles
électriques (applicable dans les pays qui ont adopté des systèmes de collecte sélective)
Les produits et piles électriques sur lesquels le pictogramme (poubelle barrée) est apposé ne peuvent pas
être éliminés comme ordures ménagères.
Les anciens équipements électriques et électroniques et piles électriques doivent être recyclés sur des sites
capables de traiter ces produits et leurs déchets.
Contactez vos autorités locales pour connaître le site de recyclage le plus proche. Un recyclage adapté et
l’élimination des déchets aideront à conserver les ressources et à nous préserver des leurs effets nocifs sur
notre santé et sur l’environnement.
Remarque: Le symbole “Pb“ ci-dessous sur des piles électrique indique que cette pile contient du plomb.
Entsorgung von gebrauchten elektrischen und elektronischen Geräten und Batterien
(anzuwenden in Ländern mit einem separaten Sammelsystem für solche Geräte)
Das Symbol (durchgestrichene Mülltonne) auf dem Produkt oder seiner Verpackung weist darauf hin, dass
dieses Produkt nicht als normaler Haushaltsabfall behandelt werden darf, sondern an einer Annahmestelle
für das Recycling von elektrischen und elektronischen Geräten und batterien abgegeben werden muss.
Durch Ihren Beitrag zur korrekten Entsorgung dieses Produktes schützen Sie die Umwelt und die
Gesundheit Ihrer Mitmenschen.
Unsachgemässe oder falsche Entsorgung gefährden Umwelt und Gesundheit. Weitere Informationen
über das Recycling dieses Produktes erhalten Sie von Ihrer Gemeinde oder den kommunalen
Entsorgungsbetrieben.
Achtung: Das Zeichen „Pb“ unter dem Symbol fur Batterien zeigt an, dass diese Batterie Blei enthalt.
Дата изготовления (месяц/год) находится на этикетке устройства.
В соответствии с Законом Российской Федерации “О защите прав потребителей” срок службы
(годности) данного товара “по истечении которого он может представлять опасность для жизни,
здоровья потребителя, причинять вред его имуществу или окружающей среде” составляет семь (7)
лет со дня производства.
Дополнительные косметические материалы к данному товару, поставляемые вместе с ним, могут
храниться в течение двух (2) лет со дня его производства.
Срок службы (годности), кроме срока хранения дополнительных косметических материалов,
упомянутых в предыдущих двух пунктах, не затрагивает никаких других прав потребителя, в
частности, гарантийного обслуживания JVC, которое он может получить в соответствии с законом о
правах потребителя или других законов, связанных с ним.
Условия хранения:
Температура: от –30°C до +85°C
Влажность: от 0% до 90%
For Israel
i
Page 3

• Microsoft and Windows Media are either registered trademarks or trademarks of Microsoft Corporation
in the United States and/or other countries.
• “Made for iPod,” and “Made for iPhone” mean that an electronic accessory has been designed to
connect specifically to iPod, or iPhone, respectively, and has been certified by the developer to meet
Apple performance standards. Apple is not responsible for the operation of this device or its compliance
with safety and regulatory standards. Please note that the use of this accessory with iPod or iPhone may
affect wireless performance.
• iPhone, iPod, iPod classic, iPod nano, and iPod touch are trademarks of Apple Inc., registered in the U.S.
and other countries.
• Lightning is a trademark of Apple Inc.
• Android is trademark of Google Inc.
• The Bluetooth® word mark and logos are registered trademarks owned by Bluetooth SIG, Inc. and any
use of such marks by JVC KENWOOD Corporation is under license. Other trademarks and trade names are
those of their respective owners.
libFLAC
Copyright (C) 2000,2001,2002,2003,2004,2005,2006,2007,2008,2009 Josh Coalson
Redistribution and use in source and binary forms, with or without modification, are permitted provided that
the following conditions are met:
- Redistributions of source code must retain the above copyright notice, this list of conditions and the
following disclaimer.
- Redistributions in binary form must reproduce the above copyright notice, this list of conditions and the
following disclaimer in the documentation and/or other materials provided with the distribution.
- Neither the name of the Xiph.org Foundation nor the names of its contributors may be used to endorse
or promote products derived from this software without specific prior written permission.
THIS SOFTWARE IS PROVIDED BY THE COPYRIGHT HOLDERS AND CONTRIBUTORS “AS IS” AND ANY EXPRESS OR
IMPLIED WARRANTIES, INCLUDING, BUT NOT LIMITED TO, THE IMPLIED WARRANTIES OF MERCHANTABILITY
AND FITNESS FOR A PARTICULAR PURPOSE ARE DISCLAIMED. IN NO EVENT SHALL THE FOUNDATION OR
CONTRIBUTORS BE LIABLE FOR ANY DIRECT, INDIRECT, INCIDENTAL, SPECIAL, EXEMPLARY, OR CONSEQUENTIAL
DAMAGES (INCLUDING, BUT NOT LIMITED TO, PROCUREMENT OF SUBSTITUTE GOODS OR SERVICES; LOSS OF
USE, DATA, OR PROFITS; OR BUSINESS INTERRUPTION) HOWEVER CAUSED AND ON ANY THEORY OF LIABILITY,
WHETHER IN CONTRACT, STRICT LIABILITY, OR TORT (INCLUDING NEGLIGENCE OR OTHERWISE) ARISING IN ANY
WAY OUT OF THE USE OF THIS SOFTWARE, EVEN IF ADVISED OF THE POSSIBILITY OF SUCH DAMAGE.
ii
Page 4

Declaration of Conformity with regard to the RE Directive 2014/53/EU
Declaration of Conformity with regard to the RoHS Directive 2011/65/EU
Manufacturer:
JVC KENWOOD Corporation
3-12, Moriya-cho, Kanagawa-ku, Yokohama-shi, Kanagawa, 221-0022, Japan
EU Representative:
JVC Technical Services Europe GmbH
Konrad-Adenauer-Allee 1-11, D-61118 Bad Vilbel, Germany
Déclaration de conformité se rapportant à la directive RE 2014/53/EU
Déclaration de conformité se rapportant à la directive RoHS 2011/65/EU
Fabricant:
JVC KENWOOD Corporation
3-12, Moriya-cho, Kanagawa-ku, Yokohama-shi, Kanagawa, 221-0022, Japan
Représentants dans l’UE:
JVC Technical Services Europe GmbH
Konrad-Adenauer-Allee 1-11, D-61118 Bad Vilbel, Germany
Konformitätserklärung in Bezug auf die RE-Vorschrift 2014/53/EU
Konformitätserklärung in Bezug auf die RoHS-Vorschrift 2011/65/EU
Hersteller:
JVC KENWOOD Corporation
3-12, Moriya-cho, Kanagawa-ku, Yokohama-shi, Kanagawa, 221-0022, Japan
EU-Vertreter:
JVC Technical Services Europe GmbH
Konrad-Adenauer-Allee 1-11, D-61118 Bad Vilbel, Germany
Декларация соответствия относительно Директивы RE 2014/53/EU
Декларация соответствия относительно Директивы RoHS 2011/65/EU
Производитель:
JVC KENWOOD Corporation
3-12, Moriya-cho, Kanagawa-ku, Yokohama-shi, Kanagawa, 221-0022, Japan
Представительство в ЕС:
JVC Technical Services Europe GmbH
Konrad-Adenauer-Allee 1-11, D-61118 Bad Vilbel, Germany
iii
English
Hereby, JVCKENWOOD declares that the radio
equipment “KD-X342BT/KD-X341BT” is in compliance
with Directive 2014/53/EU.
The full text of the EU declaration of conformity is
available at the following internet address:
http://www.jvc.net/cs/car/eudoc/
Français
Par la présente, JVCKENWOOD déclare que
l’équipement radio « KD-X342BT/KD-X341BT » est
conforme à la directive 2014/53/UE.
L’intégralité de la déclaration de conformité UE est
disponible à l’adresse Internet suivante :
http://www.jvc.net/cs/car/eudoc/
Deutsch
Hiermit erklärt JVCKENWOOD, dass das Funkgerät
“KD-X342BT/KD-X341BT” der Richtlinie 2014/53/EU
entspricht.
Der volle Text der EU-Konformitätserklärung steht
unter der folgenden Internetadresse zur Verfügung:
http://www.jvc.net/cs/car/eudoc/
Nederlands
Hierbij verklaart JVCKENWOOD dat de radioapparatuur
“KD-X342BT/KD-X341BT” in overeenstemming is met
Richtlijn 2014/53/EU.
De volledige tekst van de EU-verklaring van
overeenstemming is te vinden op het volgende
internetadres:
http://www.jvc.net/cs/car/eudoc/
Italiano
Con la presente, JVCKENWOOD dichiara che
l΄apparecchio radio “KD-X342BT/KD-X341BT” è
conforme alla Direttiva 2014/53/UE.
Il testo integrale della dichiarazione di conformità UE è
disponibile al seguente indirizzo internet:
http://www.jvc.net/cs/car/eudoc/
Español
Por la presente, JVCKENWOOD declara que el equipo
de radio “KD-X342BT/KD-X341BT” cumple la Directiva
2014/53/EU.
El texto completo de la declaración de conformidad
con la UE está disponible en la siguiente dirección de
internet:
http://www.jvc.net/cs/car/eudoc/
Português
Deste modo, a JVCKENWOOD declara que o
equipamento de rádio “KD-X342BT/KD-X341BT” está
em conformidade com a Diretiva 2014/53/UE.
O texto integral da declaração de conformidade da UE
está disponível no seguinte endereço de internet:
http://www.jvc.net/cs/car/eudoc/
Polska
Niniejszym, JVCKENWOOD deklaruje, że sprzęt radiowy
“KD-X342BT/KD-X341BT” jest zgodny z dyrektywą
2014/53/UE.
Pełny tekst deklaracji zgodności EU jest dostępny pod
adresem:
http://www.jvc.net/cs/car/eudoc/
Český
Společnost JVCKENWOOD tímto prohlašuje, že rádiové
zařízení “KD-X342BT/KD-X341BT” splňuje podmínky
směrnice 2014/53/EU.
Plný text EU prohlášení o shodě je dostupný na
následující internetové adrese:
http://www.jvc.net/cs/car/eudoc/
Magyar
JVCKENWOOD ezennel kijelenti, hogy a
„KD-X342BT/KD-X341BT“ rádióberendezés megfelel a
2014/53/EU irányelvnek.
Az EU konformitási nyilatkozat teljes szövege az alábbi
weboldalon érhető el:
http://www.jvc.net/cs/car/eudoc/
Page 5

Svenska
Härmed försäkrar JVCKENWOOD att
radioutrustningen “KD-X342BT/KD-X341BT” är i
enlighet med direktiv 2014/53/EU.
Den fullständiga texten av EU-försäkran
om överensstämmelse finns på följande
Internetadress :
http://www.jvc.net/cs/car/eudoc/
Suomi
JVCKENWOOD julistaa täten, että radiolaite
“KD-X342BT/KD-X341BT” on direktiivin
2014/53/EU mukainen.
EU-vaatimustenmukaisuusvakuutusvaatimus
löytyy kokonaisuudessaan seuraavasta internetosoitteesta:
http://www.jvc.net/cs/car/eudoc/
Slovensko
S tem JVCKENWOOD izjavlja, da je radijska oprema
»KD-X342BT/KD-X341BT« v skladu z Direktivo
2014/53/EU.
Celotno besedilo direktive EU o skladnosti je
dostopno na tem spletnem naslovu:
http://www.jvc.net/cs/car/eudoc/
Slovensky
Spoločnosť JVCKENWOOD týmto vyhlasuje, že
rádiové zariadenie „KD-X342BT/KD-X341BT“
vyhovuje smernici 2014/53/EÚ.
Celý text EÚ vyhlásenia o zhode nájdete na
nasledovnej internetovej adrese:
http://www.jvc.net/cs/car/eudoc/
Dansk
Herved erklærer JVCKENWOOD, at radioudstyret
“KD-X342BT/KD-X341BT” er i overensstemmelse
med Direktiv 2014/53/EU.
EU-overensstemmelseserklæringens fulde ordlyd
er tilgængelig på følgende internetadresse:
http://www.jvc.net/cs/car/eudoc/
Ελληνικά
Με το παρόν, η JVCKENWOOD δηλώνει ότι ο
ραδιοεξοπλισμός «KD-X342BT/KD-X341BT»
συμμορφώνεται με την Οδηγία 2014/53/ΕΕ.
Το πλήρες κείμενο της δήλωσης συμμόρφωσης
της ΕΕ είναι διαθέσιμο στην ακόλουθη διεύθυνση
στο διαδίκτυο:
http://www.jvc.net/cs/car/eudoc/
Eesti
Käesolevaga JVCKENWOOD kinnitab, et
„KD-X342BT/KD-X341BT“ raadiovarustus on
vastavuses direktiiviga 2014/53/EL.
ELi vastavusdeklaratsiooni terviktekst on
kättesaadav järgmisel internetiaadressil:
http://www.jvc.net/cs/car/eudoc/
Latviešu
JVCKENWOOD ar šo deklarē, ka radio aparatūra
„KD-X342BT/KD-X341BT” atbilst direktīvas
2014/53/ES prasībām.
Pilns ES atbilstības deklarācijas teksts ir pieejams
šādā tīmekļa adresē:
http://www.jvc.net/cs/car/eudoc/
Lietuviškai
Šiuo JVCKENWOOD pažymi, kad radijo įranga
„KD-X342BT/KD-X341BT“ atitinka 2014/53/EB
direktyvos reikalavimus.
Visą EB direktyvos atitikties deklaracijos tekstą
galite rasti šiuo internetiniu adresu:
http://www.jvc.net/cs/car/eudoc/
Malti
B’dan, JVCKENWOOD jiddikjara li t-tagħmir tarradju “KD-X342BT/KD-X341BT” huwa konformi
mad-Direttiva 2014/53/UE.
It-test kollu tad-dikjarazzjoni ta’ konformità huwa
disponibbli fl-indirizz intranet li ġej:
http://www.jvc.net/cs/car/eudoc/
HRVATSKI / SRPSKI JEZIK
JVCKENWOOD ovim izjavljuje da je radio oprema
“KD-X342BT/KD-X341BT” u skladu s Direktivom
2014/53/EU.
Cjeloviti tekst deklaracije Europske unije o
usklađenosti dostupan je na sljedećoj internet
adresi:
http://www.jvc.net/cs/car/eudoc/
ROMÂNĂ
Prin prezenta, JVCKENWOOD declară că
echipamentul radio “KD-X342BT/KD-X341BT” este
în conformitate cu Directiva 2014/53/UE.
Textul integral al declarației de conformitate UE este
disponibil la urmatoarea adresă de internet:
http://www.jvc.net/cs/car/eudoc/
БЪЛГАРСКИ
С настоящото JVCKENWOOD декларира, че
радиооборудването на “KD-X342BT/KD-X341BT” е
в съответствие с Директива 2014/53/ЕС.
Пълният текст на ЕС декларацията за
съответствие е достъпен на следния интернет
адрес:
http://www.jvc.net/cs/car/eudoc/
Turkish
Burada, JVCKENWOOD “KD-X342BT/KD-X341BT”
radyo ekipmanının 2014/53/AB Direktifine uygun
olduğunu bildirir.
AB uyumluluk deklarasyonunun tam metni
aşağıdaki internet adresinde mevcuttur.
http://www.jvc.net/cs/car/eudoc/
Русский
JVCKENWOOD настоящим заявляет, что
радиооборудование «KD-X342BT/KD-X341BT»
соответствует Директиве 2014/53/EU.
Полный текст декларации соответствия
ЕС доступен по следующему адресу в сети
Интернет:
http://www.jvc.net/cs/car/eudoc/
Українська
Таким чином, компанія JVCKENWOOD заявляє,
що радіообладнання «KD-X342BT/KD-X341BT»
відповідає Директиві 2014/53/EU.
Повний текст декларації про відповідність ЄС
можна знайти в Інтернеті за такою адресою:
http://www.jvc.net/cs/car/eudoc/
iv
Page 6
CONTENTS BEFORE USE
BEFORE USE 2
BASICS 3
GETTING STARTED 4
1 Cancel the demonstration
2 Set the clock and date
3 Set the basic settings
RADIO 5
USB/iPod/ANDROID 7
BLUETOOTH® 9
AUX 16
AUDIO SETTINGS 16
DISPLAY SETTINGS 21
REFERENCES 22
Maintenance
More information
TROUBLESHOOTING 24
INSTALLATION/
CONNECTION 25
SPECIFICATIONS 28
IMPORTANT
• To ensure proper use, please read through this manual before using this product. It is especially important
that you read and observe Warning and Caution in this manual.
• Please keep the manual in a safe and accessible place for future reference.
Warning
• Do not operate any function that takes your attention away from safe driving.
Caution
Volume setting:
• Adjust the volume so that you can hear sounds outside the car to prevent accidents.
• Lower the volume before playing digital sources to avoid damaging the speakers by the sudden increase of
the output level.
General:
• Avoid using the external device if it might hinder safe driving.
• Make sure all important data has been backed up. We shall bear no responsibility for any loss of recorded
data.
• Never put or leave any metallic objects (such as coins or metal tools) inside the unit, to prevent a short
circuit.
How to read this manual
• Operations are explained mainly using buttons on the faceplate of
• English indications are used for the purpose of explanation. You can select the display language from the
menu.
( 5)
•
•
[XX]
( XX)
indicates the selected items.
indicates references are available on the stated page.
KD-X342BT
.
2
ENGLISH
Page 7
BASICS
Faceplate
Attach
Volume knob
Detach button
To On the faceplate
Turn on the power
Adjust the volume Turn the volume knob.
Select a source
Change the display information
Press
• Press and hold to turn off the power.
Press the volume knob to mute the sound or pause playback.
• Press again to cancel.
• Press
• Press
Press
.
repeatedly.
, then turn the volume knob within 2 seconds.
repeatedly.
( 23)
Display window
Detach
How to reset
ENGLISH
3
Page 8
GETTING STARTED
1
Cancel the demonstration
When you turn on the power for the first time (or
[YES]
), the display shows: “CANCEL DEMO” “PRESS” “VOLUME KNOB”
1 Press the volume knob.
[YES]
is selected for the initial setup.
2 Press the volume knob again.
“DEMO OFF” appears.
2
Set the clock and date
1
Press and hold .
2 Turn the volume knob to select
To adjust the clock
3 Turn the volume knob to select
[CLOCK]
[CLOCK ADJUST]
4 Turn the volume knob to make the settings, then press the knob.
Hour
5 Turn the volume knob to select
6 Turn the volume knob to select
To set the date
7 Turn the volume knob to select
Minute
[CLOCK FORMAT]
[12H]
[DATE SET]
8 Turn the volume knob to make the settings, then press the knob.
Day
Month Year
9 Press to exit.
To return to the previous setting item, press .
[FACTORY RESET]
, then press the knob.
, then press the knob.
, then press the knob.
or
[24H]
, then press the knob.
, then press the knob.
is set to
3
Set the basic settings
1
Press and hold .
2 Turn the volume knob to select an item (see the following table),
then press the knob.
3 Repeat step 2 until the desired item is selected or activated.
4 Press to exit.
To return to the previous setting item, press .
Default:
SYSTEM
KEY BEEP
SOURCE SELECT
AM SRC
BUILT-IN AUX
F/W UPDATE
UPDATE SYSTEM
F/W UP xxxx
FACTORY RESET YES
*
Not displayed when the corresponding source is selected.
(Not applicable when 3-way crossover is selected.)
ON
:Activates the keypress tone.;
*
ON
:Enables AM in source selection.;
*
ON
:Enables AUX in source selection.;
YES
:Starts upgrading the firmware.;
NO
:Cancels (upgrading is not activated).
For details on how to update the firmware, see:
<http://www.jvc.net/cs/car/>.
:Resets the settings to default (except the stored station).;
NO
:Cancels.
OFF
:Deactivates.
OFF
OFF
:Disables.
:Disables.
( 5)
( 16)
XX
4
ENGLISH
Page 9
GETTING STARTED RADIO
CLOCK
TIME SYNC
CLOCK DISPLAY ON
ENGLISH
РУССКИЙ
ESPANOL
ON
:The clock time is automatically set using the
Clock Time (CT) data in FM Radio Data System
signal.;
OFF
:Cancels.
:The clock time is shown on the display even
when the unit is turned off.;
Select the display language for menu and music
information if applicable.
By default,
ENGLISH
is selected.
OFF
:Cancels.
“ST” lights up when receiving an FM stereo broadcast with sufficient signal strength.
Search for a station
1
Press repeatedly to select FM or AM.
2 Press to search for a station automatically.
(or)
Press and hold until “M” flashes, then press repeatedly to search for a station
manually.
Settings in memory
You can store up to 18 stations for FM and 6 stations for AM.
Store a station
While listening to a station....
Press and hold one of the number buttons (1 to 6).
(or)
1 Press and hold the volume knob until “PRESETMODE” flashes.
2 Turn the volume knob to select a preset number, then press the knob.
The preset number flashes and “MEMORY” appears.
Select a stored station
Press one of the number buttons (1to6).
(or)
1 Press .
2 Turn the volume knob to select a preset number, then press the knob.
ENGLISH
5
Page 10
RADIO
Other settings
1
Press and hold .
2 Turn the volume knob to select an item
(
see the following table),
then press the knob.
3 Repeat step 2 until the desired item is selected/activated or follow
the instructions stated on the selected item.
4 Press to exit.
To return to the previous setting item, press .
Default:
TUNER SETTING
RADIO TIMER
Turns on the radio at a specific time regardless of the current source.
1 ONCE/DAILY/WEEKLY/OFF
:Select how often the timer will be turned
on.
2 FM/AM
:Select the band.
3 01
to 18 (for FM)/01 to 06 (for AM):Select the preset station.
4
Set the activation day
“
M
” lights up when complete.
1
*
and time.
Radio Timer will not activate for the following cases.
•
The unit is turned off.
•
[OFF]
SSM
is selected for
AM is selected.
SSM 01–06/SSM 07–12/SSM 13–18
( 4)
[AM SRC]
in
[SOURCE SELECT]
: Automatically presets up to 18
after Radio Timer for
stations for FM. “SSM” stops flashing when the first 6 stations are stored.
Select
LOCAL SEEK ON
SSM 07–12/SSM 13–18
:Searches only FM stations with good reception.;
•
Settings made are applicable only to the selected source/station. Once you
to store the following 12 stations.
OFF
:Cancels.
change the source/station, you need to make the settings again.
1
*
Selectable only when
[ONCE]
or
[WEEKLY]
is selected in step 1.
IF BAND AUTO
:Increases the tuner selectivity to reduce interference noises from
adjacent FM stations. (Stereo effect may be lost.);
WIDE
interference noises from adjacent FM stations, but sound quality will not be
degraded and the stereo effect will remain.
MONO SET ON
NEWS SET
REGIONAL
XX
AF SET
2
*
:Improves the FM reception, but the stereo effect will be lost.;
OFF
:Cancels.
2
*
ON
:The unit will temporarily switch to News Programme if available.;
OFF
:Cancels.
2
*
ON
: Switches to another station only in the specific region using the “AF”
control.;
OFF
:Cancels.
ON
: Automatically searches for another station broadcasting the same
program in the same Radio Data System network with better reception
2
*
TI
PTY SEARCH
when the current reception is poor.;
ON
: Allows the unit to temporarily switch to Traffic Information if available
(“TI” lights up). ;
2
*
Select a PTY code (see below).
OFF
:Cancels.
OFF
: Cancels.
If there is a station broadcasting a program of the same PTY code as you
have selected, that station is tuned in.
2
*
Only for FM source.
PTY code
NEWS, AFFAIRS, INFO, SPORT, EDUCATE, DRAMA, CULTURE, SCIENCE, VARIED, POP
M
(music),
ROCK M
(music),
EASY M
(music),
LIGHT M
M
(music),
WEATHER, FINANCE, CHILDREN, SOCIAL, RELIGION, PHONE IN, TRAVEL
LEISURE, JAZZ, COUNTRY, NATION M
(music),
(music),
OLDIES, FOLK M
(music),
:Subjects to
CLASSICS, OTHER
,
DOCUMENT
6
ENGLISH
Page 11
USB/iPod/ANDROID
Start playback
The source changes automatically and
playback starts.
USB input terminal
USB
1
*
USB 2.0 cable
(commercially available)
iPod/iPhone
Accessory of the
iPod/iPhone
ANDROID
Micro USB 2.0 cable
(commercially available)
1
*
2
*
1
*
To On the faceplate
3
Reverse/Fast-forward
Select a file Press
Select a folder
Repeat play
*
Random play
1
*
Do not leave the cable inside the car when not using.
2
*
When connecting an Android device, “Press [VIEW] to install JVC MUSIC PLAY APP” is shown. Follow the instructions to install the
*
Press and hold .
.
4
*
5
5
*
Press .
Press repeatedly.
TRACK REPEAT/FOLDER REPEAT/ALL REPEAT
ONE REPEAT/ALL REPEAT/REPEAT OFF
: iPod or ANDROID
Press repeatedly.
FOLDER RANDOM/ALL RANDOM/RANDOM OFF
SONG RANDOM/ALL RANDOM/RANDOM OFF
: MP3/WMA/AAC/WAV/FLAC file
: MP3/WMA/AAC/WAV/FLAC file
: iPod or ANDROID
application. You can also install the latest version of JVC MUSIC PLAY application on your Android device before connecting. For
more information, visit <http://www.jvc.net/cs/car/>.
3
*
For ANDROID: Applicable only when
4
*
Only for MP3/WMA/AAC/WAV/FLAC files. This does not work for iPod/ANDROID.
5
*
For iPod/ANDROID: Applicable only when
[AUTO MODE]
is selected.
[HEAD MODE]/[AUTO MODE]
( 8)
is selected.
( 8)
ENGLISH
7
Page 12

USB/iPod/ANDROID
Select control mode
While in iPodUSB source, press repeatedly.
HEAD MODE
IPHONE MODE
While in ANDROID source, press repeatedly.
AUTO MODE
AUDIO MODE
: Control iPod from this unit.
: Control iPod using the iPod itself. However, you can still
play/pause or file skip from this unit.
: Control Android device from this unit via JVC MUSIC PLAY
application installed in the Android device.
: Control Android device using the Android device itself via
other media player applications installed in the Android
device. However, you can still play/pause or file skip from
this unit.
Select music drive
While in USB source, press repeatedly.
Stored songs in the following drive will be played back.
• Selected internal or external memory of a smartphone (Mass Storage
Class).
• Selected drive of a multiple drives device.
Settings to use JVC Remote application
JVC Remote application is designed to control the JVC car receiver’s
operations from the iPhone/iPod (via USB input terminal).
Preparation:
Install the latest version of JVC Remote application on your device before
connecting. For more information, visit <http://www.jvc.net/cs/car/>.
You can make the settings in the same way as connection via Bluetooth.
( 15)
Select a file from a folder/list
For iPod/ANDROID, applicable only when
selected.
[HEAD MODE]/[AUTO MODE]
is
1 Press .
2 Turn the volume knob to select a folder/list, then press the knob.
3 Turn the volume knob to select a file, then press the knob.
Quick search
If you have many files, you can search through them quickly.
Turn the volume knob quickly to browse through the list quickly.
Alphabet search
You can search for a file according to the first character.
For iPodUSB source
Press
desired character (A to Z, 0to9, OTHERS).
• Select “OTHERS” if the first character is other than AtoZ, 0to9.
For ANDROID source
(applicable only for USB and ANDROID source)
(applicable only for iPod USB and ANDROID source)
or turn the volume knob quickly to select the
1 Press to enter character search.
2 Turn the volume knob to select the desired character.
^A^ : Upper case letters (A to Z)
_A_ : Lower case letters (a to z)
-0- : Numbers (0 to 9)
-OTHERS- : Character other than AtoZ, 0to9
3 Press the volume knob to start searching.
• To return to the previous setting item, press
• To cancel, press and hold
.
.
8
ENGLISH
Page 13
BLUETOOTH®
BLUETOOTH — Connection
Supported Bluetooth profiles
– Hands-Free Profile (HFP)
– Advanced Audio Distribution Profile (A2DP)
– Audio/Video Remote Control Profile (AVRCP)
– Serial Port Profile (SPP)
– Phonebook Access Profile (PBAP)
Supported Bluetooth codecs
– Sub Band Codec (SBC)
– Advanced Audio Coding (AAC)
Connect the microphone
Rear panel
Microphone (supplied)
Microphone input jack
Adjust the microphone
angle
Secure using cord clamps
(not supplied) if necessary.
Pair and connect a Bluetooth device for the first time
1
Press to turn on the unit.
2 Search and select “KD-X3 BT” on the Bluetooth device.
“BTPAIRING” flashes on the display.
• For some Bluetooth devices, you may need to enter the Personal Identification Number
(PIN) code immediately after searching.
3 Perform (A) or (B) depending on what appears on the display.
For some Bluetooth devices, pairing sequence may vary from the steps described below.
(A) “[Device Name]”
“XXXXXX” “VOL–YES” “BACK–NO”
“XXXXXX” is a 6-digit passkey randomly generated during each pairing.
Ensure that the passkeys appear on the unit and Bluetooth device are the same.
Press the volume knob to confirm the passkey.
Operate the Bluetooth device to confirm the passkey.
(B) “[Device Name]”
Press the volume knob to start pairing.
• If “PAIRING” “PIN 0000” scrolls on the display, enter the PIN code “0000” into the
Bluetooth device.
• If only “PAIRING” appears, operate the Bluetooth device to confirm pairing.
“PAIRING COMPLETED” appears when pairing is completed and “ ” will light up when the
Bluetooth connection is established.
• This unit supports Secure Simple Pairing (SSP).
• Up to five devices can be registered (paired) in total.
• Once the pairing is completed, the Bluetooth device will remain registered in the unit even if
you reset the unit. To delete the paired device,
• A maximum of two Bluetooth phones and one Bluetooth audio device can be connected at
any time.
However, while in BT AUDIO source, you can connect to five Bluetooth audio devices and
switch between these five devices.
• Some Bluetooth devices may not automatically connect to the unit after pairing. Connect the
device to the unit manually.
• Refer to the instruction manual of the Bluetooth device for more information.
You can change to a desired PIN code before pairing.
“VOL–YES” “BACK–NO”
13, [DEVICE DELETE]
( 14)
( 13)
.
ENGLISH
9
Page 14

BLUETOOTH®
Auto Pairing
When you connect the iPhone/iPod touch/
Android device to the USB input terminal,
pairing request (via Bluetooth) is automatically
activated.
Press the volume knob to pair once you have
confirmed the device name.
Automatic pairing request is activated only if:
– Bluetooth function of the connected devcie is
turned on.
–
[AUTO PAIRING]
– JVC MUSIC PLAY application is installed on
the Android device
selected
( 8)
is set to
.
[ON]. ( 13)
( 7)
and
[AUTO MODE]
is
BLUETOOTH — Mobile phone
Receive a call
When there is an incoming call:
• The buttons will blink in the blinking pattern you have selected in
• The unit answers the call automatically if
During a call:
• The buttons stop blinking.
• If you turn off the unit or detach the faceplate, the Bluetooth connection is disconnected.
The following operations may differ or not available depending on the connected phone.
To On the faceplate
First incoming call...
Answer a call
Reject a call
End a call
Press
Press and hold
Press and hold
[AUTO ANSWER]
or the volume knob.
is set to a selected time.
or the volume knob.
or the volume knob.
[RING ILLUMI]. ( 11)
( 11)
10
ENGLISH
Page 15

BLUETOOTH®
To On the faceplate
While talking on the first incoming call...
Answer another incoming
call and hold the current
call
Reject another incoming
call
While having two active calls...
End current call and
activate held call
Swap between the current
call and held call
Adjust the phone volume
[00]
to
[35]
(Default:
[15]
Switch between hands-free
and private talk modes
1
*
This adjustment will not affect the volume of the other sources.
2
*
Operations may vary according to the connected Bluetooth device.
Improve the voice quality
While talking on the phone....
1 Press and hold .
2 Turn the volume knob to select an item
press the knob.
3 Repeat step 2 until the desired item is selected or activated.
4 Press to exit.
To return to the previous setting item, press .
Press
or the volume knob.
Press and hold
Press and hold
Press
1
*
Turn the volume knob during a call.
.
)
Press during a call.
2
*
(
see the following table), then
or the volume knob.
or the volume knob.
Default:
MIC GAIN LEVEL –10
to
LEVEL +10(LEVEL –04
):The sensitivity of the
microphone increases as the number increased.
NR LEVEL LEVEL –05
to
LEVEL +05(LEVEL 00
):Adjust the noise reduction
level until the least noise is being heard during a phone conversation.
ECHO CANCEL LEVEL –05
to
LEVEL +05(LEVEL 00
):Adjust the echo cancellation
delay time until the least echo is being heard during a phone
conversation.
Make the settings for receiving a call
Press to enter Bluetooth mode.
1
2 Turn the volume knob to select an item (see the following
table), then press the knob.
3 Repeat step 2 until the desired item is selected or activated.
To return to the previous setting item, press .
Default:
SETTINGS
AUTO ANSWER
RING ILLUMI BLINK 01
01 SEC
to
30 SEC
:The unit answers incoming call automatically in
the selected time (in seconds).;
to
BLINK 05(BLINK 02
OFF
:Cancels.
): Selects the blinking pattern
for the buttons as notification when there is an incoming call.;
OFF
:Cancels.
XX
XX
ENGLISH
11
Page 16
BLUETOOTH®
Make a call
You can make a call from the call history, phonebook, or dialing the number. Call by
voice is also possible if your mobile phone has the feature.
1 Press to enter Bluetooth mode.
“(First device name)” appears.
• If two Bluetooth phones are connected, press again to switch to another
phone.
“(Second device name)” appears.
2 Turn the volume knob to select an item (see the following table), then press the
knob.
3 Repeat step 2 until the desired item is selected/activated or follow the instructions
stated on the selected item.
To return to the previous setting item, press
RECENT CALL
PHONEBOOK
DIAL NUMBER1 Turn the volume knob to select a number (0 to 9) or character ( , #, +).
VOICE
12
(Applicable only if the phone supports PBAP.)
1
Press the volume knob to select a name or a phone number.
• “<” indicates call received, “>“ indicates call made, “M” indicates call missed.
• “NO HISTORY” appears if there is no recorded call history or call number.
2
Press the volume knob to call.
(Applicable only if the phone supports PBAP.)
1
Press to select the desired letter (A to Z, 0to9, and OTHERS).
• “OTHERS” appears if the first character is other than Ato Z, 0 to 9.
2
Turn the volume knob to select a name, then press the knob.
3
Turn the volume knob to select a phone number, then press the knob to call.
•
The phonebook of the connected phone is automatically transferred to the unit when pairing.
•
This unit can display only non-accent letters. (Accent letters such as “Ú” is showns as “U”.)
2
Press to move the entry position.
Repeat steps
3
Press the volume knob to call.
Speak the name of the contact you want to call or the voice command to control the phone
functions. (
1
and 2 until you finish entering the phone number.
Make a call using voice recognition
ENGLISH
.
)
Make a call using voice recognition
Press and hold to activate the connected
1
phone.
2 Speak the name of the contact you want to call or
the voice command to control the phone functions.
• Supported Voice Recognition features vary for each
phone. Refer to the instruction manual of the connected
phone for details.
• This unit also supports the intelligent personal assistant
function of iPhone.
Settings in memory
Store a contact in memory
You can store up to 6 contacts into the number buttons
(1 to 6).
1 Press to enter Bluetooth mode.
2 Turn the volume knob to select
[PHONEBOOK]
or
[DIAL NUMBER]
[RECENT CALL]
, then press the knob.
,
3 Turn the volume knob to select a contact or enter a
phone number.
If a contact is selected, press the volume knob to show
the phone number.
4 Press and hold one of the number buttons (1 to 6).
“MEMORY P(selected preset number)” appears when
the contact is stored.
To erase a contact from the preset memory, select
[DIAL NUMBER]
in step 2 and store a blank number.
Make a call from memory
Press to enter Bluetooth mode.
1
2 Press one of the number buttons (1 to 6).
3 Press the volume knob to call.
“NO PRESET” appears if there is no contact stored.
Page 17
BLUETOOTH®
Bluetooth mode settings
1
Press and hold .
2 Turn the volume knob to select an item
(
see the following table), then press the knob.
3 Repeat step 2 until the desired item is selected/activated or follow the instructions
stated on the selected item.
4 Press to exit.
To return to the previous setting item, press .
Default:
BT MODE
PHONE SELECT
AUDIO SELECT
DEVICE DELETE1 Turn the volume knob to select a device to delete, then press the knob.
PIN CODE EDIT
(0000)
RECONNECT ON
AUTO PAIRING ON
INITIALIZE YES
INFORMATION MYBTNAME
*
You can only connect a maximum of two Bluetooth phones and one Bluetooth audio device at any time.
*
Selects the phone or audio device to connect or disconnect.
“
” appears in front of the device name when connected.
*
“
” appears in front of the current playback audio device.
2
Turn the volume knob to select
Changes the PIN code (up to 6 digits).
1
Turn the volume knob to select a number.
2
Press to move the entry position.
Repeat steps
3
Press the volume knob to confirm.
:The unit automatically reconnect when the last connected Bluetooth device is within range.;
OFF
:Cancels.
:The unit automatically pair supported Bluetooth device (iPhone/iPod touch/Android device)
when it is connected through USB input terminal.Depending on the operating system of the
connected device, this function may not work. ;
:Initializes all the Bluetooth settings (including stored pairing, phonebook, and etc.).;
NO
:Cancels.
MYADDRESS
1
and 2 until you finish entering the PIN code.
: Displays the unit name (“KD-X3 BT”).;
: Shows address of this unit.
[YES]
or
[NO]
, then press the knob.
OFF
:Cancels.
Bluetooth compatibility check mode
You can check the connectivity of the supported
profile between the Bluetooth device and the unit.
• Make sure there is no Bluetooth device paired.
1 Press and hold .
“BLUETOOTH”
“SEARCH NOW USING PHONE”
scrolls on the display.
XX
2 Search and select “KD-X3 BT” on the Bluetooth
device within 3minutes.
“CHECK MODE” appears.
“PIN IS 0000”
3 Perform (A), (B) or (C) depending on what
appears on the display.
(A) “PAIRING”
Ensure that the same passkey appears on the
unit and Bluetooth device, then operate the
Bluetooth device to confirm the passkey.
(B) “PAIRING”
the Bluetooth device.
(C) “PAIRING”: Operate the Bluetooth device to
confirm pairing.
After pairing is successful, “PAIRING OK”
Name]” appears and Bluetooth compatibility check
starts.
If “CONNECT NOW USING PHONE” appears, operate
the Bluetooth device to allow phonebook access to
continue.
“TESTING” flashes on the display.
“XXXXXX” (6-digit passkey):
“PIN IS 0000”: Enter “0000” on
“[Device
ENGLISH
13
Page 18
BLUETOOTH®
The connectivity result flashes on the display.
“PAIRING OK” and/or “HANDS-FREEOK”*
or “AUD.STREAMOK”*
2
and/or “PBAP OK”*3 :
Compatible
1
*
Compatible with Hands-Free Profile (HFP)
2
*
Compatible with Advanced Audio Distribution Profile (A2DP)
3
*
Compatible with Phonebook Access profile (PBAP)
After 30 seconds, “PAIRING DELETED” appears to
indicate that pairing has been deleted, and the
unit exits check mode.
• To cancel, press and hold
the power, then turn on the power again.
1
and/
to turn off
BLUETOOTH — Audio
While in BT AUDIO source, you
can connect to five Bluetooth
audio devices and switch
between these five devices.
Audio player via Bluetooth
1
Press repeatedly to select BTAUDIO.
2 Operate the Bluetooth audio player to start playback.
To On the faceplate
Playback/pause Press the volume knob.
Select group or folder Press
Reverse skip/Forward skip Press
Reverse/Fast-forward Press and hold
Repeat play Press
.
.
.
repeatedly.
TRACK REPEAT, ALL REPEAT, REPEAT OFF
Random play
Press
repeatedly.
GROUP RANDOM, ALL RANDOM, RANDOM OFF
Select a file from a folder/list Refer to “Select a file from a folder/list” on page 8.
Switch between connected
Press 5.
*
Bluetooth audio devices
*
Pressing the “Play” key on the connected device itself also causes switching of sound output from the device.
Operations and display indications may differ according to their availability on the connected
device.
14
ENGLISH
Page 19
BLUETOOTH®
Settings to use JVC Remote application
JVC Remote application is designed to control the JVC car receiver’s
operations from the iPhone/iPod (via Bluetooth or via USB input terminal)
or Android smartphone (via Bluetooth).
Preparation:
Install the latest version of JVC Remote application on your device before
connecting. For more information, visit <http://www.jvc.net/cs/car/>.
1 Press and hold .
2 Turn the volume knob to select an item
then press the knob.
(
see the following table),
3 Repeat step 2 until the desired item is selected or activated.
4 Press to exit.
To return to the previous setting item, press .
Default:
REMOTE APP
SELECT
IOS YES
ANDROID YES
ANDROID LIST*:Selects the Android smartphone to use from the list.
*
Displayed only when
Select the device (IOS or ANDROID) to use the application.
:Selects iPhone/iPod to use the application via Bluetooth or connected
via USB input terminal.;
If IOS is selected, select iPod BT source (or iPod USB if your iPhone/iPod is
connected via USB input terminal) to activate the application.
•
The connectivity of the application will be interrupted or disconnected if:
– You change from iPod BT source to any playback source connected via
the USB input terminal.
– You change from iPod USB source to iPod BT source.
:Selects Android smartphone to use the application via Bluetooth.;
NO
:Cancels.
[ANDROID]
of
NO
[SELECT]
:Cancels.
is set to
[YES]
.
STATUS
Shows the status of the selected device.
IOS CONNECTED
connected via Bluetooth or USB input terminal.
IOS NOT CONNECTED
ANDROID CONNECTED
smartphone connected via Bluetooth.
ANDROID NOT CONNECTED
application.
: You are able to use the application using the iPhone/iPod
: No IOS device is connected to use the application.
: You are able to use the application using the Android
: No Android device is connected to use the
Listen to iPhone/iPod via Bluetooth
You can listen to the songs on the iPhone/iPod via Bluetooth on this unit.
Press repeatedly to select iPodBT.
• You can operate the iPod/iPhone in the same way as iPod/iPhone via
USB input terminal.
• If you plug in an iPhone/iPod to the USB input terminal while listening
XX
to iPodBT source, the source automatically change to iPodUSB.
Press
Bluetooth.
( 7)
to select iPodBT if the device is still connected via
ENGLISH
15
Page 20
AUX
Use a portable audio player
1
Connect a portable audio player (commercially available).
3.5mm stereo mini plug with “L” shaped connector
(commercially available)
Auxiliary input jack
2 Select
[ON]
for
[BUILT-IN AUX]
3 Press repeatedly to select AUX.
4 Turn on the portable audio player and start playback.
Use a 3-core plug head stereo mini plug for optimum audio
output.
16
ENGLISH
Portable audio player
in
[SOURCE SELECT]. ( 4)
AUDIO SETTINGS
Select a preset equalizer
Press repeatedly.
(or)
Press
Preset equalizer
FLAT
(default),
CLASSICAL
• Drive equalizer (
audio signal to reduce the noise heard from outside the car or running
noise of the tyres.
Store your own sound settings
1
Press and hold to enter EASY EQ setting.
2 Turn the volume knob to select an item, then press the knob.
Refer to
• To return to the previous setting item, press .
• To exit, press
Other settings
1
Press and hold .
2 Turn the volume knob to select an item
3 Repeat step 2 until the desired item is selected/activated or follow
the instructions stated on the selected item.
4 Press to exit.
To return to the previous setting item, press .
, then turn the volume knob within 5seconds.
:
DRVN 3, DRVN 2, DRVN 1, HARD ROCK, HIP HOP, JAZZ, POP, R&B, USER
DRVN 3/DRVN 2/DRVN 1
[EASY EQ] ( 17)
for setting and the result is stored to
.
) boosts specific frequencies in the
[USER]
( 17)
, then press the knob.
.
,
Page 21
AUDIO SETTINGS
Default:
EQ SETTING
PRESET EQ
EASY EQ
PRO EQ
62.5HZ
LEVEL –09
(Before making an adjustment, select the source you want to adjust.)
ON
100HZ/160HZ/250HZ/400HZ/630HZ/1KHZ/1.6KHZ/2.5KHZ/4KHZ/6.3KHZ/10KHZ
16kHZ
LEVEL –09
(Before making an adjustment, select the source you want to adjust.)
Q FACTOR 1.35/1.50/2.00
AUDIO CONTROL
BASS BOOST
Select a preset equalizer suitable to the music genre.
•
Select
[USER]
to use the settings made in
FLAT/DRVN 3/DRVN 2/DRVN 1/HARD ROCK/HIP HOP/JAZZ/POP
R&B/USER/CLASSICAL
Adjust your own sound settings.
•
The settings are stored to
•
The settings made may affect the current settings of
1*2
*
SUB.W SP
: 00to
1*3
*
SUB.W
BASS
MID
TRE
:
:
:
:
[USER]
.
+06
(Default:
–50
to
+10
LVL–09
to
LVL+09
to
to
LVL+09
LVL+09
LVL–09
LVL–09
Adjust your own sound settings.
•
The settings are stored to
•
The settings made may affect the current settings of
to
LEVEL +09 (LEVEL 00
:Turns on the extended bass.;
to
LEVEL +09 (LEVEL 00):
[USER]
.
): Adjusts the level to memorize for each source.
OFF
:Cancels.
Adjusts the level to memorize for each source.
:Adjust the quality factor.
LEVEL +01
to
LEVEL +05
OFF
:Cancels.
: Selects your preferred bass boost level.;
[EASY EQ]
or
[PRO EQ]
[PRO EQ]
03
00
LVL 00
LVL 00
LVL 00
[EASY EQ]
XX
LOUDNESS LEVEL 01/LEVEL 02
balanced sound at low volume.;
1
SUB.W LEVEL
*
SPK-OUT
.
/
PRE-OUT
:Boosts low or high frequencies to produce a well-
OFF
:Cancels
2
*
(Not applicable when 3-way crossover is selected.)
SUB.W 00
to
SUB.W +06(SUB.W +03
output level of the subwoofer connected via speaker
lead.
( 27)
3
*
SUB.W –50
to
SUB.W +10(SUB.W 00
):Adjusts the
):Adjusts
the output level of the subwoofer connected to the
.
SUBWOOFER
3
*
SET
)
FADER
ON
(Not applicable when 3-way crossover is selected.)
POSITION R15
lineout terminals (SW or REAR/SW) through an external
amplifier.
( 27)
: Turns on the subwoofer output.;
to
POSITION F15(POSITION 00
OFF
:Cancels.
):Adjusts the front
and rear speaker output balance.
4
*
.
BALANCE
VOLUMEADJUST LEVEL –15
POSITION L15
to
POSITION R15(POSITION 00
right speaker output balance.
to
LEVEL +06(LEVEL 00
):Adjusts the left and
):Preset the initial volume level
of each source (compared to the FM volume level). Before adjustment,
select the source you want to adjust.
AMPGAIN LOWPOWER
/
the maximum power of each speaker is less than 50W to prevent
damaging the speakers.);
:Limits the maximum volume level to 25. (Select if
HIGH POWER
:The maximum volume level
is 35.
1
*
Displayed only when
2
*
For 2-way crossover: Displayed only when
( 18)
3
*
For 2-way crossover: Displayed only when
[SUB.W/SUB.W]. ( 18)
4
*
This adjustment will not affect the subwoofer output.
[SUBWOOFER SET]
is set to
[ON]
[SPK/PRE OUT]
[SPK/PRE OUT]
.
is set to
is set to
[SUB.W/SUB.W]
[REAR/SUB.W]
.
or
ENGLISH
17
Page 22
AUDIO SETTINGS
SPK/PREOUT
SPEAKER SIZE
X ' OVER
DTA SETTINGS
CAR SETTINGS
X ' OVER TYPE Caution
2-WAY
3-WAY
SOUND EFFECT
SPACE ENHANCE
SND RESPONSE LEVEL1/LEVEL2/LEVEL3
SOUND LIFT LOW/MIDDLE/HIGH
VOL LINK EQ ON
K2 TECHNOLOGY
(Not applicable when 3-way crossover is selected.)
Depending on the speaker connection method, select the appropriate
setting to get the desired output. (
Depending on the crossover type you have selected (
2-way crossover or 3-way crossover setting items will be shown.
(
19, Crossover settings
By default, 2-way crossover type is selected.
For settings,
avoid the sudden increase or decrease of the output level.
(Displayed only when
YES
(Displayed only when
YES
(Not applicable for TUNER source.)
SMALL/MEDIUM/LARGE
OFF
OFF
speakers.;
or running noise of the tyres.;
(Not applicable for TUNER source and AUX source.)
ON
20, Digital Time Alignment settings
: Adjust the volume before changing the
:Selects two way crossover type.;
:Selects three way crossover type.; NO:Cancels.
:Cancels.
:Cancels.
: Virtually adjust the sound position heard from the
OFF
:Cancels.
:Boosts the frequency to reduce the noise heard from outside the car
:Improve the sound quality of compressed music.;
Speaker output settings
[X ' OVER TYPE]
)
.
[X ' OVER TYPE]
[3-WAY]
is selected)
NO
:Cancels.
[2-WAY]
is selected)
: Virtually enhances the sound space.;
: Virtually makes the sound more realistic.;
OFF
:Cancels.
OFF
:Cancels.
Speaker output settings
)
(Applicable only if [X ' OVER TYPE] is set to [2-WAY])
Select the output setting for the speakers
),
speaker connection method.
[SPK/PRE OUT]
[SPK/PRE OUT]
, based on the
Connection via lineout terminals
For connections through an external amplifier.
to
Setting on
[SPK/PRE OUT]
REAR/REAR
REAR/SUB.W
SUB.W/SUB.W
Front speakers output Rear speakers output
(default) Front speakers output Subwoofer output
Front speakers output Subwoofer output
Audio signal through lineout terminal
FRONT REAR/SW
( 27)
Connection via speaker leads
For connections without using an external amplifier. However, with this
settings you can also enjoy the subwoofer output.
Setting on
[SPK/PRE OUT]
REAR/REAR
REAR/SUB.W
SUB.W/SUB.W
If
[SUB.W/SUB.W]
–
[120HZ]
–
[POSITION R02]
R15]
to
is selected:
is selected in
is selected in
[POSITION 00]
.
Audio signal through rear speaker lead
L (left) R (right)
Rear speakers output Rear speakers output
Rear speakers output Rear speakers output
Subwoofer output (Mute)
[SUBWOOFER LPF]
and
[FADER]
and selectable range is
[THROUGH]
( 27)
is not available.
[POSITION
18
ENGLISH
Page 23
AUDIO SETTINGS
Crossover settings
Below are the available setting items for 2-way crossover and 3-way
crossover.
Caution
Select a crossover type according to how the speakers are connected.
( 27)
If you select a wrong type:
• The speakers may damage.
• The output sound level may be extremely high or low.
SPEAKER SIZE
Selects according to the connected speaker size for optimum
performance.
•
The frequency and slope settings are automatically set for the
crossover of the selected speaker.
•
When 2-way crossover is selected, if
[FRONT], [REAR]
and
[SUBWOOFER]
[NONE]
for
[SPEAKER SIZE]
is selected for
, the
[X ‘ OVER]
[TWEETER]
setting
of the selected speaker is not available.
•
When 3-way crossover is selected, if
[SPEAKER SIZE]
X ‘ OVER
, the
(crossover)
[X ‘ OVER]
setting of
• [FRQ]/[F-HPF FRQ]/[R-HPF FRQ]/[SW LPF FRQ]/[HPF FRQ]/[LPF FRQ]
[NONE]
[WOOFER]
is selected for
is not available.
[WOOFER]
: Adjusts
the crossover frequency for the selected speakers (high pass filter or
low pass filter).
If
[THROUGH]
• [SLOPE]/[F-HPF SLOPE]/[R-HPF SLOPE]/[SW LPF SLOPE]/[HPF SLOPE]
[LPF SLOPE]:
Selectable only if a setting other than
is selected, all signals are sent to the selected speakers.
/
Adjusts the crossover slope.
[THROUGH]
is selected for the
crossover frequency.
• [SW LPF PHASE]/[PHASE]:
Selects the phase of the speaker output to be
in line with the other speaker output.
•
[GAIN LEFT]/[GAIN RIGHT]/[F-HPF GAIN]/[R-HPF GAIN]/[SW LPF GAIN]/[GAIN]:
Adjusts the output volume of the selected speaker.
2-way crossover setting items
SPEAKER SIZE
FRONT SIZE
1
*
REAR
SUBWOOFER
*2*
X ' OVER
TWEETER FRQ
of
FRONT HPF F-HPF FRQ
of
1
*
REAR HPF
SUBWOOFER
3
*2*
LPF
1
2
3
*
*
*
,
,
:
( 20)
8CM/10CM/12CM/13CM/16CM/17CM/18CM/4×6
5×7/6×8/6×9/7×10
TWEETER
SMALL/MIDDLE/LARGE/NONE
(not connected)
8CM/10CM/12CM/13CM/16CM/17CM/18CM/4×6/5×7/6×8/6×9
7×10/NONE
3
16CM/20CM/25CM/30CM/38CM OVER/NONE
(not connected)
(not connected)
1KHZ/1.6KHZ/2.5KHZ/4KHZ/5KHZ/6.3KHZ/8KHZ
10KHZ/12.5KHZ
GAIN LEFT
GAIN RIGHT
–08DB
–08DB
to
00DB
to
00DB
30HZ/40HZ/50HZ/60HZ/70HZ/80HZ/90HZ/100HZ
120HZ/150HZ/180HZ/220HZ/250HZ/THROUGH
F-HPF SLOPE
F-HPF GAIN
–06DB/–12DB/–18DB/–24DB
–08DB
to
00DB
R-HPF FRQ 30HZ/40HZ/50HZ/60HZ/70HZ/80HZ/90HZ/100HZ
120HZ/150HZ/180HZ/220HZ/250HZ/THROUGH
R-HPF SLOPE
R-HPF GAIN
–06DB/–12DB/–18DB/–24DB
–08DB
to
00DB
SW LPF FRQ 30HZ/40HZ/50HZ/60HZ/70HZ/80HZ/90HZ/100HZ
120HZ/150HZ/180HZ/220HZ/250HZ/THROUGH
SW LPF SLOPE
SW LPF PHASE
SW LPF GAIN –08DB
–06DB/–12DB/–18DB/–24DB
REVERSE
(180°)/
NORMAL
(0°)
to
00DB
ENGLISH
/
/
/
/
/
/
19
Page 24
AUDIO SETTINGS
3-way crossover setting items
SPEAKER SIZE
TWEETER
MID RANGE
WOOFER
SMALL/MIDDLE/LARGE
8CM/10CM/12CM/13CM/16CM/17CM/18CM/4×6/5×7/6×8/6×9
3
*
16CM/20CM/25CM/30CM/38CM OVER/NONE
X ' OVER
TWEETER HPF FRQ
1KHZ/1.6KHZ/2.5KHZ/4KHZ/5KHZ/6.3KHZ/8KHZ/10KHZ
12.5KHZ
SLOPE
PHASE
–06DB/–12DB
REVERSE
GAIN –08DB
MID RANGE HPF FRQ
30HZ/40HZ/50HZ/60HZ/70HZ/80HZ/90HZ/100HZ/120HZ
150HZ/180HZ/220HZ/250HZ/THROUGH
HPF SLOPE
LPF FRQ
–06DB/–12DB
1KHZ/1.6KHZ/2.5KHZ/4KHZ/5KHZ/6.3KHZ/8KHZ/10KHZ
12.5KHZ/THROUGH
LPF SLOPE
PHASE
–06DB/–12DB
REVERSE
GAIN –08DB
3
*
WOOFER
LPF FRQ 30HZ/40HZ/50HZ/60HZ/70HZ/80HZ/90HZ/100HZ/120HZ
150HZ/180HZ/220HZ/250HZ/THROUGH
SLOPE
PHASE
–06DB/–12DB
REVERSE
GAIN –08DB
1
*
Displayed only when
2
*
Displayed only when
3
*
Displayed only when
[SPK/PRE OUT]
[SPK/PRE OUT]
[SUBWOOFER SET]
to
to
to
is set to
is set to
is set to
(180°)/
NORMAL
00DB
(180°)/
NORMAL
00DB
(180°)/
NORMAL
00DB
[REAR/REAR]
[REAR/SUB.W]
[ON]. ( 17)
(not connected)
(0°)
(0°)
(0°)
or
[REAR/SUB.W]. ( 18)
or
[SUB.W/SUB.W]. ( 18)
Digital Time Alignment settings
Digital Time Alignment sets the delay time of the speaker output to
create a more suitable environment for your vehicle.
• For more information,
[GAIN] of [DTA SETTINGS]
21, Determining the value for [DISTANCE] and
.
DTA SETTINGS
POSITION
/
DISTANCE
GAIN
/
DTA RESET YES
/
CAR SETTINGS
*
1
*
Selects your listening position (reference point).
ALL
:Not compensating;
FRONT LEFT
•
[FRONT ALL]
to
[2-WAY]. ( 18)
1
0CM
to
610CM
–8DB
to
0DB
FRONT RIGHT:
:Front left seat;
is displayed only when
:Fine adjust the distance to compensate.
:Fine adjust the output volume of the selected
speaker.
:Resets the settings (
selected
[POSITION]
[DISTANCE]
to default.; NO:Cancels.
Identify your car type and rear speaker location in order to
make the adjustment for
[DTA SETTINGS]
FRONT ALL
Front right seat;
:Front seat
[X ' OVER TYPE]
and
CAR TYPE COMPACT/FULL SIZE CAR/WAGON/MINIVAN/SUV
MINIVAN(LONG)
:Selects the type of vehicle.;
compensating.
2
/
R-SP LOCATION
*
Selects the location of the rear speakers in your vehicle to
calculate the furthest distance from the listening position
selected (reference point).
•
DOOR/REAR DECK
is selected as
[WAGON]
•
2ND ROW/3RD ROW
selected as
1
2
*
*
,
:
( 21)
:Selectable only when
[OFF], [COMPACT], [FULL SIZE CAR]
or
[SUV]
.
:Selectable only when
[MINIVAN]
or
[MINIVAN(LONG)]
[GAIN]
.
OFF:
[CAR TYPE]
[CAR TYPE]
is set
) of the
/
Not
,
is
.
20
ENGLISH
Page 25

AUDIO SETTINGS
Determining the value for [DISTANCE] and [GAIN] of [DTA SETTINGS]
If you specify the distance from the center of the
currently set listening position to every speaker,
the delay time will be automatically computed
and set.
1
Determine the center of the currently set
listening position as the reference point.
2
Measure the distances from the reference
point to the speakers.
3
Calculate the differences between the
distance of the furthest speaker (rear
speaker) and other speakers.
4
Set the
[DISTANCE]
individual speakers.
5
Adjust
[GAIN]
Example: When
listening position
1
*
Before making an adjustment, select the speaker:
When 2-way crossover is selected:
FRONT LEFT/FRONT RIGHT/REAR LEFT/REAR RIGHT/SUBWOOFER:
[REAR LEFT], [REAR RIGHT]
[NONE]
is selected for
When 3-way crossover is selected:
TWEETER LEFT/TWEETER RIGHT/MID LEFT/MID RIGHT/WOOFER:
[WOOFER]
is selectable only if a setting other than
[SPEAKER SIZE]. ( 20)
2
*
Displayed only when
[NONE]
is selected for [
and
[REAR]
and
[X ' OVER TYPE]
REAR
] of
[SUBWOOFER]
[SUBWOOFER]
[SPEAKER SIZE]. ( 19)
is selectable only if a setting other than
of
[NONE]
is set to
[2-WAY] ( 18)
calculated in step 3 for
for individual speakers.
[FRONT ALL]
[SPEAKER SIZE]. ( 19)
is selected for
and if a setting other than
is selected as the
[WOOFER]
DISPLAY SETTINGS
1 Press and hold .
2 Turn the volume knob to select an item (see the following table),
then press the knob.
3 Repeat step 2 until the desired item is selected/activated or follow
the instructions stated on the selected item.
4 Press to exit.
To return to the previous setting item, press .
DISPLAY
DIMMER
of
1
*
The illumination control wire connection is required.
Dim the illumination.
OFF
:Dimmer is turned off. Brightness changes to
ON
:Dimmer is turned on. Brightness changes to
(
22, [BRIGHTNESS]
DIMMER TIME
1
Turn the volume knob to adjust the
2
Turn the volume knob to adjust the
(Default:
DIMMER AUTO
on the car headlights.
)
:Set the dimmer on and off time.
[ON]: 18:00
;
[OFF]: 6:00
:Dimmer turns on and off automatically when you turn off or
1
*
[DAY]
[NIGHT]
[ON]
time, then press the knob.
[OFF]
time, then press the knob.
)
( 27)
setting.
setting.
Default:
XX
ENGLISH
21
Page 26

DISPLAY SETTINGS
BRIGHTNESS
TEXT SCROLL
2
*
Some characters or symbols will not be shown correctly (or will be blanked).
Set the brightness for day and night separately.
2
*
1 DAY/NIGHT
2
Select a zone.
3 LEVEL 00
(Default:
SCROLL ONCE
SCROLL AUTO
SCROLL OFF
:Select day or night.
( 21)
to
LEVEL 31
: Set the brightness level.
BUTTON ZONE
DISP ZONE
:
:Scrolls the display information once.;
:Repeats scrolling at 5-second intervals.;
:Cancels.
:
DAY:LEVEL 25
DAY:LEVEL 31
;
NIGHT:LEVEL 09
;
NIGHT:LEVEL 12
REFERENCES
Maintenance
Cleaning the unit
Wipe off dirt on the faceplate with a dry silicone or soft cloth.
Cleaning the connector
Detach the faceplate and clean the connector
)
gently with a cotton swab, being careful not to
damage the connector.
More information
For: – Latest firmware updates and latest compatible item list
– JVC original application
– Any other latest information
Visit <http://www.jvc.net/cs/car/>.
Playable files
•
For detailed information and notes about the playable audio files, visit
<http://www.jvc.net/cs/car/>.
•
Playable audio file: MP3 (.mp3), WMA (.wma), AAC (.aac), WAV (.wav), FLAC (.flac)
•
Playable USB device file system: FAT12, FAT16, FAT32
Even when audio files comply with the standards listed above, playback may be impossible
depending on the types or conditions of media or device.
The AAC (.m4a) file in a USB device encoded by iTunes cannot be played on this unit.
About USB devices
•
You cannot connect a USB device via a USB hub.
•
Connecting a cable whose total length is longer than 5m may result in abnormal playback.
•
This unit cannot recognize a USB device whose rating is other than 5V and exceeds 1.5A.
About iPod/iPhone
•
Via USB input terminal:
Made for
– iPod touch (5th and 6th generation)
– iPod nano (7th generation)
– iPhone 4S, 5, 5S, 5C, 6, 6 Plus, 6S, 6S Plus, SE
Connector (on the reverse
side of the faceplate)
22
ENGLISH
Page 27
REFERENCES
•
Via Bluetooth:
Made for
– iPod touch (5th and 6th generation)
– iPhone 4S, 5, 5S, 5C, 6, 6 Plus, 6S, 6S Plus, SE
• It is not possible to browse video files on the “Videos” menu in
• The song order displayed on the selection menu of this unit may differ from that of the
iPod/iPhone.
•
Depending on the version of the operating system of the iPod/iPhone, some functions
may not operate on this unit.
About Android device
•
This unit supports Android OS 4.1 and above.
•
Some Android devices (with OS4.1 and above) may not fully support Android Open
Accessory (AOA)2.0.
•
If the Android device supports both mass storage class device and AOA2.0, this unit
always playback via AOA2.0 as priority.
About Bluetooth
•
Depending on the Bluetooth version of the device, some Bluetooth devices may not be
able to connect to this unit.
•
This unit may not work with some Bluetooth devices.
•
Signal conditions vary, depending on the surroundings.
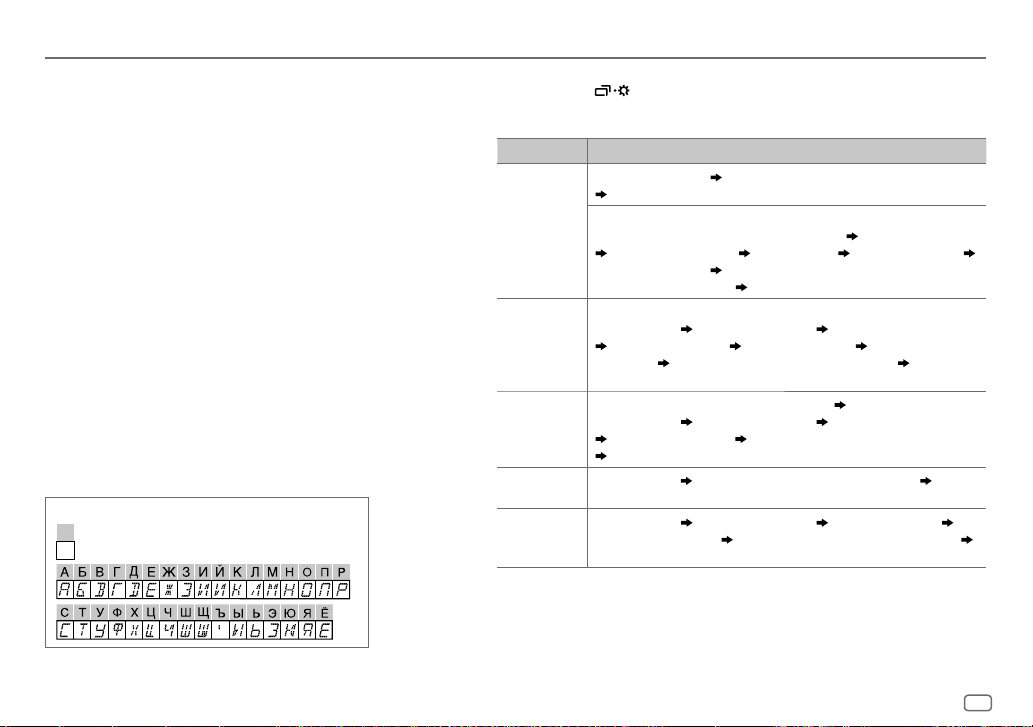
Available Cyrillic letters
Available characters
Display indications
[HEAD MODE]
.
Change the display information
Each time you press , the display information changes.
•
If the information is unavailable or not recorded, “NO TEXT”, “NO NAME”, or other information (eg.
station name) appears.
Source name Display information
FM
or
AM
USB (For MP3/WMA/AAC/WAV/FLAC files)
iPod USB/
iPod BT
ANDROID
AUX
BT AUDIO
*
The brightness of the illumination changes and synchronises with the music.
Frequency (Date/Clock) Frequency (Date/Clock) with music synchronisation*
(back to the beginning)
(For FM Radio Data System stations only)
Station name (PS)/Program type (PTY) (Date/Clock) Radiotext (Date/Clock)
Radiotext+ (Radio text+) Song title (Artist) Song title (Date/Clock)
Frequency (Date/Clock)
with music synchronisation
Song title (Artist) Song title (Album name) Song title (Date/Clock)
File name (Folder name) File name (Date/Clock) Playing time
(Date/Clock)
(backtothebeginning)
When
[HEAD MODE]/[AUTO MODE]
Song title (Artist)
or
Playing time (Date/Clock) Song title (Artist) with music synchronisation*
(backtothebeginning)
AUX (Date/Clock) AUX (Date/Clock) with music synchronisation* (back to
the beginning)
Song title (Artist) Song title (Album name) Song title (Date/Clock)
Playing time (Date/Clock)
(back to the beginning)
Station name (PS)/Program type (PTY) (Date/Clock)
*
(back to the beginning)
Song title (Artist) with music synchronisation*
is selected
Song title (Album name) Song title (Date/Clock)
Song title (Artist) with music synchronisation*
( 8)
:
ENGLISH
23
Page 28
TROUBLESHOOTING
Symptom Remedy
Sound cannot be heard.
“MISWIRING CHECK
WIRING THEN PWR ON”
appears.
General
“PROTECTING SEND
SERVICE” appears.
Source cannot be selected.
•
Radio reception is poor.
•
Static noise while
Radio
listening to the radio.
Playback order is not as
intended.
Elapsed playing time is not
correct.
“NOT SUPPORT” appears
and file skips.
“READING” keeps flashing.• Do not use too many hierarchical levels and folders.
“UNSUPPORTED DEVICE”
USB/iPod
appears.
“UNRESPONSIVE DEVICE”
appears.
“USB HUB IS NOT
SUPPORTED” appears.
“CANNOT PLAY” appears.
24
ENGLISH
•
Adjust the volume to the optimum level.
•
Check the cords and connections.
Turn the power off, then check to be sure the terminals
of the speaker wires are insulated properly. Turn the
power on again.
Send the unit to the nearest service center.
Check the
[SOURCE SELECT]
Connect the antenna firmly.
The playback order is determined by the file name
This depends on the recording process earlier.
Check whether the file is a playable format.
•
Reattach the USB device.
•
Check whether the connected device is compatible with
this unit and ensure the file systems are in supported
formats.
( 22, 23)
•
Reattach the device.
Make sure the device is not malfunction and reattach
the device.
This unit cannot support a USB device connected via a
USB hub.
Connect a USB device that contains playable audio files.
setting.
( 4)
( 22)
Symptom Remedy
The iPod/iPhone does not
turn on or does not work
“LOADING” appears when
you enter search mode by
pressing
USB/iPod
Correct characters are not
displayed.
•
Sound cannot be heard
during playback.
•
Sound output only from
the Android device.
Cannot playback at
[
AUTO MODE
ANDROID
“NO DEVICE” or “READING”
keeps flashing.
Playback is intermittent or
sound skips.
“CANNOT PLAY”
.
].
•
Check the connection between this unit and iPod/
iPhone.
•
Detach and reset the iPod/iPhone using hard reset.
This unit is still preparing the iPod/iPhone music list. It
may take some time to load, try again later.
•
This unit can only display uppercase letters, numbers,
and a limited number of symbols.
•
Depending on the display language you have selected
( 5)
•
Reconnect the Android device.
•
If in [
AUDIO MODE
application on the Android device and start playback.
•
If in [
AUDIO MODE
application or use another media player application.
•
Restart the Android device.
•
If this does not solve the problem, the connected Android
device is unable to route the audio signal to unit.
•
Make sure JVC MUSIC PLAY APP is installed on the
Android device.
•
Reconnect the Android device and select the appropriate
control mode.
•
If this does not solve the problem, the connected Android
device does not support [
•
Switch off the developer options on the Android device.
•
Reconnect the Android device.
•
If this does not solve the problem, the connected Android
device does not support [
Turn off the power saving mode on the Android device.
•
Make sure Android device contains playable audio files.
•
Reconnect the Android device.
•
Restart the Android device.
, some characters may not be displayed correctly.
], launch any media player
], relaunch the current media player
( 23)
( 7)
( 8)
AUTO MODE
AUTO MODE
].
].
( 23)
( 23)
Page 29
TROUBLESHOOTING INSTALLATION/CONNECTION
Symptom Remedy
No Bluetooth device is
detected.
Pairing cannot be made.• Make sure you have entered the same PIN code to both
Echo or noise occurs.
Phone sound quality
is poor
Sound is being
interrupted or skipped
during playback of a
Bluetooth audio player.
Bluetooth®
The connected Bluetooth
audio player cannot be
controlled.
“PLEASE WAIT”
“NOT SUPPORT”
“ERROR”
“H/W ERROR”
If you still have troubles, reset the unit.
•
Search from the Bluetooth device again.
•
Reset the unit.
the unit and Bluetooth device.
•
Delete pairing information from both the unit and the
Bluetooth device, then perform pairing again.
•
Adjust the microphone unit’s position.
•
Check the
•
Reduce the distance between the unit and the Bluetooth
device.
•
Move the car to a place where you can get a better signal
reception.
•
Reduce the distance between the unit and the Bluetooth
audio player.
•
Turn off, then turn on the unit and try to connect again.
•
Other Bluetooth devices might be trying to connect to the
unit.
•
Check whether the connected Bluetooth audio player
supports Audio/Video Remote Control Profile (AVRCP).
(Refer to the instructions of your audio player.)
•
Disconnect and connect the Bluetooth player again.
The unit is preparing to use the Bluetooth function. If the
message does not disappear, turn off and turn on the unit,
then connect the device again.
The connected phone does not support Voice Recognition
feature.
Try the operation again. If “ERROR” appears again, check if
the device supports the function you have tried.
Reset the unit and try the operation again. If “H/W ERROR”
appears again, consult your nearest service center.
( 3)
[ECHO CANCEL]
setting.
( 9)
( 11)
( 3)
( 9)
Warning
•
The unit can only be used with a 12V DC power supply, negative ground.
•
Disconnect the battery’s negative terminal before wiring and mounting.
•
Do not connect Battery wire (yellow) and Ignition wire (red) to the car chassis or Ground wire
(black) to prevent a short circuit.
•
Insulate unconnected wires with vinyl tape to prevent a short circuit.
•
Be sure to ground this unit to the car’s chassis again after installation.
Caution
•
For safety’s sake, leave wiring and mounting to professionals. Consult the car audio dealer.
•
Install this unit in the console of your vehicle. Do not touch the metal parts of this unit during
and shortly after use of the unit. Metal parts such as the heat sink and enclosure become hot.
•
Do not connect the wires of speakers to the car chassis or Ground wire (black), or connect
them in parallel.
•
Connect speakers with a maximum power of more than 50W. If the maximum power of
the speakers is lower than 50W, change the
speakers.
( 17)
•
Mount the unit at an angle of less than 30º.
•
If your vehicle wiring harness does not have the ignition terminal, connect Ignition wire (red)
to the terminal on the vehicle’s fuse box which provides 12 V DC power supply and is turned
on and off by the ignition key.
•
Keep all cables away from heat dissipate metal parts.
•
After the unit is installed, check whether the brake lamps, blinkers, wipers, etc. on the car are
working properly.
•
If the fuse blows, first make sure the wires are not touching car’s chassis, then replace the old
fuse with one that has the same rating.
[AMP GAIN]
setting to avoid damaging the
Basic procedure
1
Remove the key from the ignition switch, then disconnect the terminal of the car
battery.
2
Connect the wires properly.
See Wiring connection.
3
Install the unit to your car.
See Installing the unit (in-dash mounting).
4
Connect the terminal of the car battery.
5
Press to turn on the power.
6
Detach the faceplate and reset the unit.
( 27)
( 26)
( 3)
ENGLISH
25
Page 30
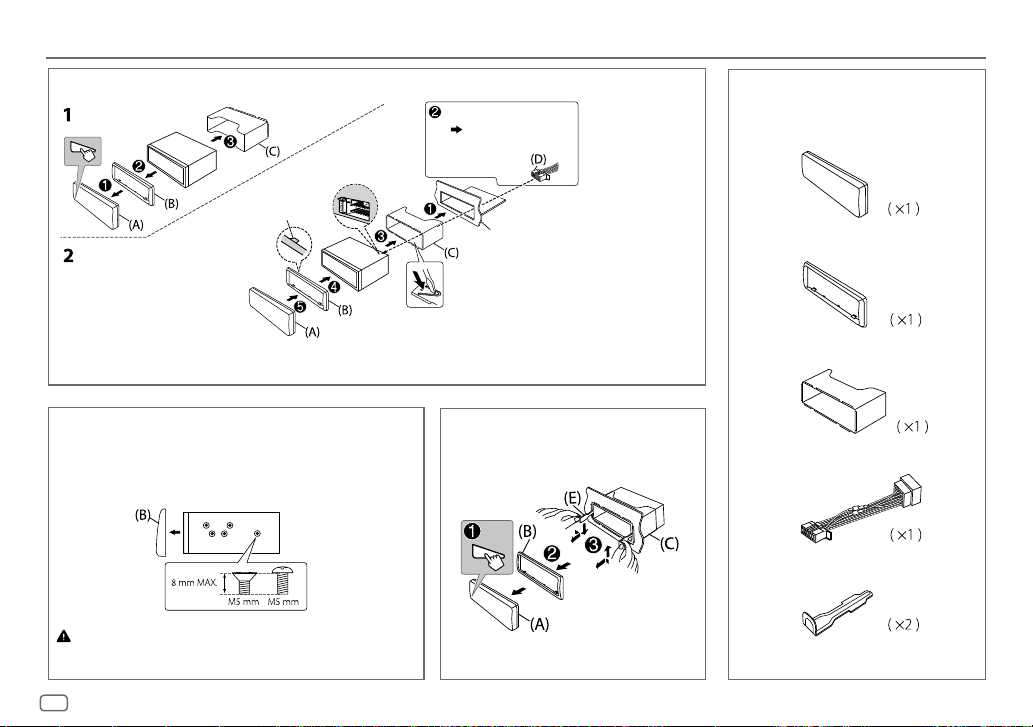
INSTALLATION/CONNECTION
Installing the unit (in-dash mounting)
Hook on the top side
Orientate the trim
plate as illustrated
before fitting.
When installing without the mounting sleeve
1
Remove the mounting sleeve and trim plate from the unit.
2
Align the holes in the unit (on both sides) with the vehicle
mounting bracket and secure the unit with screws (commercially
available).
Use only the specified screws. Using wrong screws might damage the
unit.
Do the required wiring.
( 27)
Dashboard of
your car
Bend the appropriate tabs to
hold the sleeve firmly in place.
How to remove the unit
Part list for installation
(A)
Faceplate
(B)
Trim plate
(C)
Mounting sleeve
(D)
Wiring harness
(E)
Extraction key
26
ENGLISH
Page 31

INSTALLATION/CONNECTION
Wiring connection
Front/Rear/Subwoofer output
For 3-way crossover: Mid Range/Woofer output
When connecting to an external
amplifier, connect its ground wire to the
car’s chassis to avoid damaging the unit.
Connecting the ISO connectors on some VW/
Audi or Opel (Vauxhall) automobiles
You may need to modify the wiring of the supplied
wiring harness as illustrated below.
Ignition wire
A7 (Red)
Vehicle
A4 (Yellow)
Default wiring
If your car does not have an ISO terminal
We recommend installing the unit with a commercially
available custom wiring harness specific for your car and
leave this job to professionals for your safety. Consult
your car audio dealer.
(Red)
Battery wire
(Yellow)
Unit
Fuse (10A)
Yellow (Battery wire)
Red (Ignition wire)
Red (A7)
Yellow (A4)
ISO connectors
Light blue/yellow
(Steering remote
control wire)
*
Microphone input jack
Antenna terminal
To the steering wheel remote control adapter
Pin Color and function
A4 Yellow : Battery
A5 Blue/White : Power control (12V
A6 Orange/white : Car light control switch
A7 Red : Ignition (ACC)
A8 Black : Earth (ground) connection
B1
B2
B3
B4
B5
B6
B7
B8
]
Purple
Purple/black
]
Gray
Gray/black
White
]
White/black
]
Green
Green/black
You can also connect a subwoofer speaker directly without an external
subwoofer amplifier. For setting,
: Rear speaker (right)
For 3-way crossover: Tweeter (right)
[
: Front speaker (right)
For 3-way crossover: Mid range speaker (right)
[
: Front speaker (left)
For 3-way crossover: Mid range speaker (left)
[
: Rear speaker (left)
For 3-way crossover: Tweeter (left)
[
( 9)
350mA)
*
18
.
ENGLISH
27
Page 32

SPECIFICATIONS
Subject to change without notice.
Frequency Range 87.5MHz — 108.0MHz (50kHz step)
FM
Usable Sensitivity (S/N=26dB) 0.71μV/75Ω (8.2dBf)
Quieting Sensitivity
(DINS/N=46dB)
Frequency Response (±3dB) 30Hz — 15kHz
Signal-to-Noise Ratio (MONO) 64dB
Tuner
Stereo Separation (1kHz) 40dB
Frequency Range 531kHz — 1611kHz (9kHz step)
AM
(MW)
Usable Sensitivity (S/N=20dB) 28.2μV (29dBμ)
Frequency Range 153kHz — 279kHz (9kHz step)
AM
(LW)
Usable Sensitivity (S/N=20dB) 50μV (33.9dBμ)
USB Standard USB1.1, USB2.0 (Full speed)
Compatible Devices Mass storage class
File System FAT12/16/32
Maximum Supply Current DC5V
D/A Converter 24 Bit
Frequency Response (±1dB) 20Hz — 20kHz
Signal-to-Noise Ratio (1kHz) 105dB
USB
Dynamic Range 90dB
Channel Separation 85dB
MP3 Decode Compliant with MPEG-1/2 Audio Layer-3
WMA Decode Compliant with Windows Media Audio
AAC Decode AAC-LC “.aac” files
WAV Decode RIFF waveform Audio Format (Linear PCM only)
FLAC Decode FLAC files, up to 24 bit/48 kHz
2.0μV/75Ω
1.5A
Frequency Response (±3dB) 20Hz—20kHz
Input Maximum Voltage 1000mV
Auxiliary
Input Impedance 30kΩ
Version Bluetooth 3.0
Frequency Range 2.402 GHz — 2.480 GHz
Output Power +4 dBm (MAX), 0 dBm (AVE) Power Class 2
Maximum Communication Range Line of sight approx. 10 m (32.8 ft)
Pairing SSP (Secure Simple Pairing)
Bluetooth
Profile HFP1.6 (Hands-Free Profile)
Maximum Output Power 50W×4 or
Full Bandwidth Power
(at less than 1% THD)
Audio
Speaker Impedance 4Ω—8Ω
Preout Level/Load (USB) 4000mV/10kΩ load
Preout Impedance ≤600Ω
Operating Voltage
(10.5V—16V allowable)
Maximum Current Consumption 10A
Operating Temperature Range –10°C — +60°C
General
Installation Size (W×H×D) 182mm×53mm×114mm
Net Weight (includes Trimplate,
Mounting Sleeve)
A2DP (Advanced Audio Distribution Profile)
AVRCP1.5 (Audio/Video Remote Control Profile)
PBAP (Phonebook Access Profile)
SPP (Serial Port Profile)
50W×2 + 50W×1 (Subwoofer = 4Ω)
22W×4
14.4V
0.6k
g
28
ENGLISH
Page 33

Page 34

TABLE DES MATIERES
AVANT L’UTILISATION 2
FONCTIONNEMENT DE BASE 3
PRISE EN MAIN 4
1 Annulez la démonstration
2 Réglez l’horloge et la date
3 Faites les réglages de base
RADIO 5
USB/iPod/ANDROID 7
BLUETOOTH® 9
AUX 16
RÉGLAGES AUDIO 16
RÉGLAGES D’AFFICHAGE 21
RÉFÉRENCES 22
Entretien
Plus d’informations
GUIDE DE DÉPANNAGE 24
INSTALLATION/
RACCORDEMENT 25
SPÉCIFICATIONS 28
AVANT L’UTILISATION
IMPORTANTES
•
Pour utiliser correctement l’appareil, veuillez ce manuel complément avant de l’utiliser. Il est particulièrement important que
vous lisiez et acceptiez les avertissements et les précautions de ce manuel.
•
Veuillez garder ce manuel dans un endroit sûr et accessible pour une utilisation future.
Avertissement
•
N’utilisez aucune fonction qui risque de vous distraire de la conduite sure de votre véhicule.
Précautions
Réglage du volume:
•
Ajustez le volume de façon à pouvoir entendre les sons extérieurs à la voiture afin d’éviter tout risque d’accident.
•
Réduisez le volume avant de reproduire des sources numériques afin d’éviter d’endommager les enceintes par la soudaine
augmentation du niveau de sortie.
Généralités:
•
Éviter d’utiliser le périphérique extérieur s’il peut gêner une conduite en toute sécurité.
•
Assurez-vous que toutes les données importantes ont été sauvegardées. Nous ne pouvons pas être tenu responsable pour toute
perte des données enregistrées.
•
Veuillez faire en sorte de ne jamais mettre ou laisser d’objets métalliques (tels que des pièces ou des outils) dans l’appareil, afin
d’éviter tout risque de court-circuit.
Comment lire ce manuel
•
Les opérations sont expliquées principalement en utilisant les touches de la façade du
•
Les indications en anglais sont utilisées dans un but explicatif. Vous pouvez choisir la langue d’affichage à partir du menu.
( 5)
•
[XX]
indique les éléments choisis.
•
( XX)
indique que des références sont disponibles aux page citées.
KD-X342BT
.
2
FRANÇAIS
Page 35

FONCTIONNEMENT DE BASE
Façade
Attachez
Bouton de volume
Touche de détachement
Pour Sur la façade
Mettez l’appareil sous tension
Ajustez le volume
Sélectionner la source
Changez l’information sur l’affichage
Appuyez sur .
•
Maintenez la touche enfoncée pour mettre l’appareil hors tension.
Tournez le bouton de volume.
Appuyez sur le bouton de volume pour couper le son ou mettre la lecture en pause.
•
Appuyez une nouvelle fois pour annuler.
•
Appuyez répétitivement sur .
•
Appuyez sur , puis tournez le bouton de volume avant 2 secondes.
Appuyez répétitivement sur .
Fenêtre d’affichage
( 23)
Détachez
Comment réinitialiser
FRANÇAIS
3
Page 36

PRISE EN MAIN
1
Annulez la démonstration
Quand vous mettez l’appareil sous tension pour la première fois (ou que
est réglé sur
1 Appuyez sur le bouton de volume.
2 Appuyez de nouveau sur le bouton de volume.
“DEMO OFF” apparaît.
1
2
Pour ajuster l’horloge
3 Tournez le bouton de volume pour choisir
4 Tournez le bouton de volume pour faire les réglages, puis appuyez sur le
Heure Minute
5 Tournez le bouton de volume pour choisir
6 Tournez le bouton de volume pour choisir
Pour régler la date
7 Tournez le bouton de volume pour choisir
8 Tournez le bouton de volume pour faire les réglages, puis appuyez sur le
Jour Mois Année
9 Appuyez sur pour quitter.
Pour retourner à l’option de réglage précédente, appuyez sur .
4
[YES]
), l’affichage montre: “CANCEL DEMO” “PRESS” “VOLUME KNOB”
[YES]
est choisi pour le réglage initial.
2
Réglez l’horloge et la date
Maintenez enfoncée .
Tournez le bouton de volume pour choisir
le bouton.
bouton.
le bouton.
le bouton.
bouton.
bouton.
FRANÇAIS
[CLOCK]
, puis appuyez sur le bouton.
[CLOCK ADJUST]
[CLOCK FORMAT]
[12H]
ou
[DATE SET]
[FACTORY RESET]
, puis appuyez sur
, puis appuyez sur
[24H]
, puis appuyez sur
, puis appuyez sur le
3
Faites les réglages de base
1
Maintenez enfoncée .
2 Tournez le bouton de volume pour sélectionner un élément (voir le
tableau suivant), puis appuyez sur le bouton.
3 Répétez l’étape 2 jusqu’à ce que l’élément souhaité soit sélectionné
ou activé.
4 Appuyez sur pour quitter.
Pour retourner à l’option de réglage précédente, appuyez sur .
SYSTEM
KEY BEEP
(Non applicable quand la transition 3 voies est sélectionnée.)
ON
:Met en service la tonalité des touches.;
OFF
:Met hors service la fonction.
SOURCE SELECT
*
AM SRC
BUILT-IN AUX
ON
:Met en service AM dans la sélection de la source.;
*
ON
:Met en service AUX dans la sélection de la source.;
OFF
OFF
:Hors service.
:Hors service.
F/W UPDATE
UPDATE SYSTEM
F/W UP xxxx
FACTORY RESET YES
*
Pas d’affichage quand la source correspondante est sélectionnée.
YES
:Démarrer la mise à niveau du micrologiciel.;
NO
:Annulation (la mise à niveau n’est pas activée).
Pour en savoir plus sur la mise à niveau du micrologiciel, référez-vous à:
<http://www.jvc.net/cs/car/>.
:Réinitialise les réglages aux valeurs par défaut (sauf la station mémorisée).;
NO
:Annulation.
Défaut:
( 5)
( 16)
XX
Page 37

PRISE EN MAIN RADIO
CLOCK
TIME SYNC
CLOCK DISPLAY ON
ENGLISH
РУССКИЙ
ESPANOL
ON
:L’horloge est réglée automatiquement à l’aide des
données d’horloge (CT) comprises dans les données du signal
FM Radio Data System.;
:L’horloge apparaît sur l’affichage même quand
l’appareil est hors tension.;
Sélectionnez la langue d’affichage pour le menu et
l’information sur le morceau si elle est disponible.
Par défaut,
ENGLISH
OFF
:Annulation.
OFF
:Annulation.
est sélectionné.
“ST” s’allume lors de la réception d’une émission FM stéréo avec un signal suffisamment fort.
Recherchez une station
1
Appuyez répétitivemenent sur pour sélectionner FM ou AM.
2 Appuyez sur pour rechercher une station automatiquement.
(ou)
Maintenez en enfoncé jusqu’à ce que “M” clignote, puis appuyez répétitive ment
dessus pour rechercher une station manuellement.
Réglages en mémoire
Vous pouvez mémoriser un maximum de 18 stations pour FM et de 6 stations pour AM.
Mémorisez une station
Pendant l’écoute d’une station....
Maintenez pressée une des touches numériques (1 à 6).
(ou)
1 Maintenez enfoncé le bouton de volume jusqu’à ce que “PRESETMODE” clignote.
2 Tournez le bouton de volume pour choisir un numéro de préréglage, puis appuyez sur le
bouton.
Le numéro de préréglage clignote et “MEMORY” apparaît.
Sélectionnez une station mémorisée
Appuyez sur l’une des touches numériques (1à6).
(ou)
1 Appuyez sur .
2 Tournez le bouton de volume pour choisir un numéro de préréglage, puis appuyez sur le
bouton.
FRANÇAIS
5
Page 38

RADIO
Autres paramètres
1
Maintenez enfoncée .
2 Tournez le bouton de volume pour sélectionner un élément
tableau suivant
3 Répétez l’étape 2 jusqu’à ce que l’élément souhaité soit sélectionné/
activé ou suivez les instructions données pour l’élément sélectionné.
4 Appuyez sur pour quitter.
Pour retourner à l’option de réglage précédente, appuyez sur .
)
, puis appuyez sur le bouton.
(
voir le
Défaut:
TUNER SETTING
RADIO TIMER
SSM
LOCAL SEEK ON
1
*
Sélectionnable uniquement quand
Met la radio sous tension à une heure spécifique quelle que soit la source actuelle.
1
ONCE/DAILY/WEEKLY/OFF
minuterie.
2
FM/AM
:Choisissez la bande.
3
01
à 18 (pour FM)/01 à 06 (pour AM):Sélectionnez la station préréglée.
4
Réglez l’heure et le jour
“
M
” s’allume quand le réglage est terminé.
La minuterie de radio ne se met pas en service dans les cas suivants.
•
L’appareil est mis hors tension.
•
[OFF]
est sélectionné pour
la minuterie de radio pour AM.
SSM 01–06/SSM 07–12/SSM 13–18
18 stations pour FM. “SSM” s’arrête de clignoter quand les 6 premières stations sont mémorisées.
Sélectionnez
SSM 07–12/SSM 13–18
:Recherche uniquement les stations FM avec une bonne réception.;
•
Les réglages réalisés sont applicables uniquement à la source/station sélectionnée. Si vous
changez la source/station, vous devez refaire les réglages.
[ONCE]
:Sélectionnez la fréquence de mise en service de la
1
*
de mise en service.
[AM SRC]
dans
( 4)
ou
[SOURCE SELECT]
: Prérègle automatiquement un maximum de
pour mémoriser les 12 stations suivantes.
[WEEKLY]
est choisi à l’étape 1.
après la sélection de
OFF
:Annulation.
IF BAND AUTO
MONO SET ON
2
*
NEWS SET
2
*
REGIONAL
XX
AF SET
2
*
TI
2
*
PTY SEARCH
2
*
Uniquement pour la source FM.
Code PTY
NEWS, AFFAIRS, INFO, SPORT, EDUCATE, DRAMA, CULTURE, SCIENCE, VARIED, POP
M
(musique),
OTHER M
(musique),
TRAVEL, LEISURE, JAZZ, COUNTRY, NATION M
DOCUMENT
:Augmente la sélectivité du tuner pour réduire les interférences des stations FM
adjacentes. (L’effet stéréo peut être perdu.);
adjacentes, mais la qualité du son n’est pas dégradée et l’effet stéréo est conservé.
:Améliore la réception FM mais l’effet stéréo sera perdu.;
ON
:L’appareil commute temporairement sur le programme d’information s’il est disponible.;
OFF
:Annulation.
ON
: Commute sur une autre station uniquement dans la région spécifiée, à l’aide de la
commande “AF”.;
ON
même réseau Radio Data System mais qui possède une meilleure réception quand la réception
actuelle est mauvaise.;
ON
sont disponibles (“TI” s’allume). ;
2
*
Sélectionnez un code PTY (voir ci-dessous).
S’il y a une station diffusant un programme du code PTY que vous avez choisi, la station est
accordée.
ROCK M
OFF
:Annulation.
: Recherche automatiquement une autre station diffusant le même programme dans le
OFF
: Permet à l’appareil de commuter temporairement sur les informations routières si elles
(musique),
WEATHER, FINANCE, CHILDREN, SOCIAL, RELIGION, PHONE IN
EASY M
: Annulation.
OFF
:Annulation.
(musique),
(musique),
WIDE
:Il y a des interférences des stations FM
LIGHT M
(musique),
OLDIES, FOLK M
OFF
:Annulation.
CLASSICS
(musique),
,
,
6
FRANÇAIS
Page 39

USB/iPod/ANDROID
Démarrez la lecture
La source change automatiquement et le lecture
démarre.
Prise d’entrée USB
USB
Câble USB 2.0
(en vente dans le commerce)
1
*
iPod/iPhone
Accessoire du
1
*
iPod/iPhone
2
ANDROID
Câble Micro USB 2.0
(en vente dans le commerce)
*
1
*
Pour Sur la faç ade
Recherche rapide vers
l’arrière/vers l’avant
Sélectionnez un fichier
Sélectionnez un dossier
Répéter la lecture
Lecture aléatoire
1
*
Ne laissez pas le câble à l’intérieur de la voiture quand il n’est pas utilisé.
2
*
Lors de la connexion d’un périphérique Android, “Press [VIEW] to install JVC MUSIC PLAY APP” apparaît. Suivez les instructions pour
installer l’application. Vous pouvez aussi intaller la dernière version de l’application JVC MUSIC PLAY sur votre périphérique Android avant
la connexion. Pour plus d’informations, consultez <http://www.jvc.net/cs/car/>.
3
*
Pour ANDROID: Fonctionne uniquement quand
4
*
Uniquement pour les fichiers MP3/WMA/AAC/WAV/FLAC. Cela ne fonctionne pas pour l’iPod/ANDROID.
5
*
Pour iPod/ANDROID: Fonctionne uniquement quand
*
Maintenez enfoncée .
3
*
Appuyez sur
4
*
Appuyez sur .
5
*
Appuyez répétitivement sur .
TRACK REPEAT/FOLDER REPEAT/ALL REPEAT
ONE REPEAT/ALL REPEAT/REPEAT OFF
5
Appuyez répétitivement sur .
FOLDER RANDOM/ALL RANDOM/RANDOM OFF
SONG RANDOM/ALL RANDOM/RANDOM OFF
[AUTO MODE]
[HEAD MODE]/[AUTO MODE]
.
est sélectionné.
: Fichier MP3/WMA/AAC/WAV/FLAC
: iPod ou ANDROID
: Fichier MP3/WMA/AAC/WAV/FLAC
: iPod ou ANDROID
( 8)
est sélectionné.
( 8)
FRANÇAIS
7
Page 40

USB/iPod/ANDROID
Sélectionnez le mode de commande
Quand la source est iPodUSB, appuyez répétitivement sur .
HEAD MODE
IPHONE MODE
Quand la source est ANDROID, appuyez répétitivement sur .
AUTO MODE
AUDIO MODE
: Commande l’iPod à partir de cet appareil.
: Commande l’iPod en utilisant l’iPod lui-même. Cependant, vous pouvez
encore utiliser la lecture/pause ou le saut de fichier de cet appareil.
: Commandez le périphérique Android à partir de cet appareil via
l’application JVC MUSIC PLAY installée sur le périphérique Android.
: Commandez le périphérique Android en utilisant le périphérique
Android lui-même via une autre application multimédia installée sur
le périphérique Android. Cependant, vous pouvez encore utiliser la
lecture/pause ou le saut de fichier de cet appareil.
Sélectionnez le lecteur de musique
Quand la source est USB, appuyez répétitivement sur .
Les morceaux mémorisés dans le lecture suivant seront lus.
•
Mémoire sélectionnée interne ou externe d’un smartphone (Mass Storage Class).
•
Lecteur sélectionné parmi plusieurs lecteurs.
Réglages pour utiliser JVC Remote application
L’application JVC Remote est conçue pour commander l’autoradio JVC à partir de
l’iPhone/iPod (via la prise d’entrée USB).
Préparation:
Installez la dernière version de l’application JVC Remote sur votre périphérique avant la
connexion. Pour plus d’informations, consultez <http://www.jvc.net/cs/car/>.
Vous pouvez réaliser les réglages de la même façon que la connexion via Bluetooth.
( 15)
Sélectionnez un fichier à partir d’un dossier/liste
Pour iPod/ANDROID, applicable uniquement quand
sélectionné.
1 Appuyez sur .
2 Tournez le bouton de volume pour sélectionner un dossier/liste, puis
appuyez sur le bouton.
3 Tournez le bouton de volume pour choisir un fichier, puis appuyez sur le
bouton.
Recherche rapide
ANDROID)
Si vous avez beaucoup de fichiers, vous pouvez effectuer une recherche rapide
parmi eux.
Tournez rapidement le bouton de volume pour parcourir la liste
rapidement.
Recherche alphabétique
USB et ANDROID)
Vous pouvez rechercher un fichier en fonction du premier caractère.
Pour la source iPod USB
Appuyez sur ou tournez le bouton de volume rapidement
pour sélectionner le caractère souhaité (A à Z, 0à9, OTHERS).
•
Sélectionnez “OTHERS” si le premier caractère est autre que AàZ, 0à9.
Pour la source ANDROID
1 Appuyez sur pour entrer en recherche de caractères.
2 Tournez le bouton de volume pour sélectionner le caractère
souhaité.
^A^ : Lettres majuscules (A à Z)
_A_ : Lettres minuscules (a à z)
-0- : Nombres (0 à 9)
-OTHERS- : Caractères autre que A à Z, 0 à 9
3 Appuyez sur le bouton de volume pour démarrer la recherche.
•
Pour retourner à l’option de réglage précédente, appuyez sur .
•
Pour annuler, maintenez enfoncée .
(applicable uniquement pour la source USB et
(applicable uniquement pour la source iPod
[HEAD MODE]/[AUTO MODE]
est
8
FRANÇAIS
Page 41

BLUETOOTH®
BLUETOOTH — Connexion
Profiles Bluetooth pris en charge
–
Hands-Free Profile — Profile mains libres (HFP)
–
Advanced Audio Distribution Profile — Profile de
distribution audio avancé (A2DP)
–
Audio/Video Remote Control Profile — Profile de
télécommande audio/vidéo (AVRCP)
–
Serial Port Profile — Profile de port série (SPP)
–
Phonebook Access Profile — Profile d’accès au répertoire
d’adresses (PBAP)
Codecs Bluetooth pris en charge
–
Codec Sous-bande (SBC)
–
Codage audio avancé (AAC)
Connectez le microphone
Panneau arrière
Microphone (fourni)
Prise d’entrée du microphone
Ajustez l’angle du microphone
Fixez si nécessaire en utilisant des
serre-câbles (non fourni).
Faites le pairage et connectez un périphérique Bluetooth pour la première fois
1
Appuyez sur pour mettre l’appareil sous tension.
2 Cherchez et sélectionnez “KD-X3 BT” sur le périphérique Bluetooth.
“BTPAIRING” clignote sur l’affichage.
• Pour certains périphériques Bluetooth, il se peut que vous ayez besoin d’entrer le code PIN (numéro
d’identification personnel) immédiatement après la recherche.
3 Réalisez (A) ou (B) en fonction de ce qui apparait sur l’affichage.
Pour certains périphériques Bluetooth, la séquence de pairage peut varier en fonction des étapes décrites
ci-dessous.
(A) “[Nom du périphérique]” “XXXXXX” “ VOL–YES” “BACK–NO”
“XXXXXX” est un code à 6 chiffres généré aléatoirement pendant chaque pairage.
Assurez-vous que les codes qui apparaissent sur l’appareil et le périphérique Bluetooth sont les
(B) “[Nom du périphérique]” “VOL–YES” “BACK–NO”
Appuyez sur le bouton de volume pour démarrer le pairage.
• Si seul “PAIRING” apparaît, utilisez le périphérique Bluetooth pour confirmer le pairage.
“PAIRING COMPLETED” apparaît quand le pairage est terminé et “
établie.
•
•
•
•
•
•
mêmes.
Appuyez sur le bouton de volume pour valider le code.
Utilisez le périphérique Bluetooth pour valider le code.
• Si “PAIRING” “PIN 0000” défile sur l’affichage, entrez le code PIN “0000” sur le périphérique
Bluetooth.
Vous pouvez choisir le code PIN souhaité avant le pairage.
Cet appareil prend en charge le Pairage simple sécurisé (SSP).
Un maximum de cinq appareils peuvent être enregistrés (appariés) en tout.
Une fois que le pairage est termine, le périphérique Bluetooth reste enregistré sur l’appareil même si vous
réinitialisez l’appareil. Pour supprimer un périphérique apparié,
Un maximum de deux téléphones Bluetooth et un périphérique audio Bluetooth peuvent être connecté en
même temps.
Cependant, quand la source est BT AUDIO, vous pouvez vous connecter à cinq périphériques audio Bluetooth et
commuter parmi ces cinq périphériques.
Certains périphériques Bluetooth peuvent ne pas se connecter automatiquement au système après le pairage.
Connectez le périphérique à l’appareil manuellement.
Référez-vous au manuel d’instructions de votre périphérique Bluetooth pour en savoir plus.
( 14)
( 13)
” s’allume quand la connexion Bluetooth est
13, [DEVICE DELETE]
.
FRANÇAIS
9
Page 42

BLUETOOTH®
Pairage automatique
Quand vous connectez un périphérique iPhone/iPod
touch/Android à la prise d’entrée USB, la demande de
pairage (via Bluetooth) est activée automatiquement.
Appuyez sur le bouton de volume pour faire le
pairage une fois que vous avez validé le nom de
périphérique.
La demande de pairage automatique est activée
uniquement si:
–
La fonction Bluetooth du périphérique connecté est
activée.
–
[AUTO PAIRING]
–
L’application JVC MUSIC PLAY est installée sur le
périphérique Android
sélectionné
est réglé sur
( 8)
.
( 7)
[ON]. ( 13)
et
[AUTO MODE]
est
BLUETOOTH — Téléphone portable
Réception d’un appel
Quand il y a un appel entrant:
•
Les touches clignotent de la façon que vous avez sélectionnée dans
•
L’appareil répond automatiquement à l’appel si
Pendant un appel:
•
Les touches s’arrêtent de clignoter.
•
Si vous mettez hors tension l’appareil ou détachez la façade, la connexion Bluetooth est déconnectée.
Les opérations suivantes peuvent différer ou peuvent ne pas être disponibles en fonction du téléphone connecté.
[AUTO ANSWER]
[RING ILLUMI]. ( 11)
sur une heure sélectionnée.
( 11)
Pour Sur la façade
Premier appel entrant...
Répondre à un appel
Refuser un appel
Fin d’un appel
Appuyez sur
Maintenez enfoncé
Maintenez enfoncé
ou sur le bouton de volume.
ou le bouton de volume.
ou le bouton de volume.
10
FRANÇAIS
Page 43

BLUETOOTH®
Pour Sur la façade
Pendant que vous parlez pour le premier appel entrant...
Répondez à un autre appel
entrant et mettez en attente
l’appel actuel
Refusez un autre appel
entrant
Quand vous avez deux appels actifs...
Terminez l’appel actuel et
activez l’appel en attente
Commutez entre l’appel
actuel et l’appel en attente
Ajustez le volume du
téléphone
[00]
Commute entre le mode
mains libres et le mode de
conversation privée
1
*
2
*
1
*
à
[35]
(Défaut:
[15]
)
2
*
Cet ajustement n’affecte pas le volume des autres sources.
Les opérations peuvent différer en fonction du périphérique Bluetooth connecté.
Amélioration de la qualité des voix
Quand vous parlez au téléphone....
1 Maintenez enfoncée .
2 Tournez le bouton de volume pour sélectionner un élément
suivant
)
3 Répétez l’étape 2 jusqu’à ce que l’élément souhaité soit sélectionné ou
4 Appuyez sur pour quitter.
Pour retourner à l’option de réglage précédente, appuyez sur .
, puis appuyez sur le bouton.
activé.
Appuyez sur
volume.
Maintenez enfoncé
volume.
Maintenez enfoncé
volume.
Appuyez sur
Tournez le bouton de volume pendant un
appel.
Appuyez sur pendant un appel.
ou sur le bouton de
ou le bouton de
ou le bouton de
.
(
voir le tableau
Défaut:
MIC GAIN LEVEL –10
NR LEVEL LEVEL –05
ECHO CANCEL LEVEL –05
à
augmente quand le numéro augmente.
bruit jusqu’à ce qu’un minimum de bruit soit entendu pendant une conversation
téléphonique.
de l’écho jusqu’à ce que le dernier écho est entendu pendant une conversation
téléphonique.
LEVEL +10(LEVEL –04
à
LEVEL +05(LEVEL 00
à
LEVEL +05(LEVEL 00
):La sensibilité du microphone
):Ajustez le niveau de réduction de
):Ajustez le temps de retard d’annulation
Réalise les réglages de réception d’un appel
Appuyez sur pour entrer en mode Bluetooth.
1
2 Tournez le bouton de volume pour sélectionner un élément (voir le
tableau suivant), puis appuyez sur le bouton.
3 Répétez l’étape 2 jusqu’à ce que l’élément souhaité soit sélectionné
ou activé.
Pour retourner à l’option de réglage précédente, appuyez sur .
Défaut:
SETTINGS
AUTO ANSWER
RING ILLUMI BLINK 01
01 SEC à30 SEC
pendant le temps sélectionné (secondes).;
touches pour la notification quand il y a un appel entrant.;
:L’appareil répond au téléphone entrant automatiquement
à
BLINK 05(BLINK 02
OFF
:Annulation.
): Sélectionne le mode de clignotement des
OFF
:Annulation.
XX
XX
FRANÇAIS
11
Page 44

BLUETOOTH®
Faire un appel
Vous pouvez faire un appel à partir de l’historique, du répertoire d’adresses ou composer le numéro. Un
appel par commande vocale est possible si votre téléphone portable possède cette fonction.
1 Appuyez sur pour entrer en mode Bluetooth.
“(Nom du premier périphérique)” apparaît.
• Si deux téléphones Bluetooth sont connectés, appuyez de nouveau sur pour connecter sur
un autre téléphone.
“(Nom du deuxième périphérique)” apparaît.
2 Tournez le bouton de volume pour sélectionner un élément (voir le tableau suivant),
puis appuyez sur le bouton.
3 Répétez l’étape 2 jusqu’à ce que l’élément souhaité soit sélectionné/activé ou suivez les
instructions données pour l’élément sélectionné.
Pour retourner à l’option de réglage précédente, appuyez sur .
RECENT CALL
PHONEBOOK
DIAL NUMBER
VOICE
(Applicable uniquement quand le téléphone prend en charge PBAP.)
1
Appuyez sur le bouton de volume pour sélectionner un nom ou un numéro de téléphone.
• “<” indique l’appel reçu, “>” indique un appel passé, “M” indique un appel manqué.
• “NO HISTORY” apparaît s’il n’y a pas d’historique d’appels enregistré ou de numéro d’appel.
2
Appuyez sur le bouton de volume pour appeler.
(Applicable uniquement quand le téléphone prend en charge PBAP.)
1
Appuyez sur pour choisir la lettre souhaitée (A à Z, 0à9, et OTHERS).
• “OTHERS” apparaît si le premier caractère est autre que Aà Z, 0 à 9.
2
Tournez le bouton de volume pour choisir un nom, puis appuyez sur le bouton.
3
Tournez le bouton de volume pour choisir un numéro de téléphone, puis appuyez sur le bouton pour appeler.
•
Le répertoire d’adresse du téléphone connecté est transféré automatiquement sur l’appareil lors du pairage.
•
Cet appareil peut uniquement afficher les lettres non accentuées. (Les lettres accentuées telles que “Ú” sont affichées
comme “U”.)
1
Tournez le bouton de volume pour sélectionner un numéro (0 à 9) ou un caractère ( , #, +).
2
Appuyez sur pour déplacer la position d’entrée.
Répétez les étapes
3
Appuyez sur le bouton de volume pour appeler.
Dites le nom du contact que vous souhaitez appeler ou la commande vocale pour commander les fonctions du téléphone.
(
Faites au appel en utilisant la reconnaissance vocale
1
et 2 jusqu’à ce que vous terminiez d’entrer le numéro de téléphone.
)
Faites au appel en utilisant la reconnaissance
vocale
1
Maintenez pressé pour activer le téléphone
connecté.
2 Dites le nom du contact que vous souhaitez appeler ou
la commande vocale pour commander les fonctions du
téléphone.
•
Les fonctions de reconnaissance vocale prises en charge varient
pour chaque téléphone. Référez-vous au mode d’emploi du
téléphone connecté pour les détails.
•
L’appareil prend aussi en charge la fonction d’assistant personnel
intelligent de l’iPhone.
Réglages en mémoire
Stockage d’un contact en mémoire
Vous pouvez mémoriser un maximum de 6 contacts sur les touches
numériques (
1 Appuyez sur pour entrer en mode Bluetooth.
2 Tournez le bouton de volume pour choisir
3 Tournez le bouton de volume pour sélectionner un
Si un contact est sélectionné, appuyez sur le bouton de volume
4 Maintenez pressée une des touches numériques (1 à 6).
“MEMORY P(numéro préréglé sélectionné)” apparaît quand les
Pour supprimer un contact de la mémoire préréglée, choisissez
[DIAL NUMBER]
1
à 6).
[PHONEBOOK]
bouton.
contact ou entrez un numéro de téléphone.
pour afficher le numéro de téléphone.
contacts sont mémorisés.
ou
[DIAL NUMBER]
à l’étape 2 et mémorisé un numéro vide.
, puis appuyez sur le
[RECENT CALL]
Pour passer un appel à partir de la mémoire
Appuyez sur pour entrer en mode Bluetooth.
1
2 Appuyez sur l’une des touches numériques (1 à 6).
3 Appuyez sur le bouton de volume pour appeler.
“NO PRESET” apparaît s’il n’y a pas de contact mémorisé.
,
12
FRANÇAIS
Page 45

BLUETOOTH®
Réglages du mode Bluetooth
1
Maintenez enfoncée .
2 Tournez le bouton de volume pour sélectionner un élément
appuyez sur le bouton.
3 Répétez l’étape 2 jusqu’à ce que l’élément souhaité soit sélectionné/activé ou suivez les
instructions données pour l’élément sélectionné.
4 Appuyez sur pour quitter.
Pour retourner à l’option de réglage précédente, appuyez sur .
(
voir le tableau suivant), puis
Défaut:
BT MODE
PHONE SELECT
AUDIO SELECT
DEVICE DELETE
PIN CODE EDIT
(0000)
RECONNECT ON
AUTO PAIRING ON
INITIALIZE YES
INFORMATION MY BT NAME
*
Vous pouvez connecter un maximum de deux téléphones Bluetooth et un périphérique audio Bluetooth en même temps.
*
Permet de sélectionner le téléphone ou le périphérique audio à connecter ou déconnecter.
“
” apparaît devant le nom de l’appareil quand il est connecté.
*
“
” apparaît devant le périphérique de lecture audio actuel.
1
Tournez le bouton de volume pour choisir le périphérique à supprimer, puis appuyez sur le bouton.
2
Tournez le bouton de volume pour choisir
Change le code PIN (6 chiffres maximum).
1
Tournez le bouton de volume pour sélectionner un numéro.
2
Appuyez sur pour déplacer la position d’entrée.
Répétez les étapes
3
Appuyez sur le bouton de volume pour valider.
:L’appareil se reconnecte automatiquement quand le dernier périphérique Bluetooth connecté est dans la plage.;
OFF
:Annulation.
:L’appareil apparie automatiquement le périphérique Bluetooth pris en charge (iPhone/iPod touch/périphérique
Android) quand il est connecté par la prise d’entrée USB.En fonction du système d’exploitation du périphérique connecté, il
se peut que cette fonction ne fonctionne pas. ;
:Initialise tous les réglages Bluetooth (y compris le pairage mémorisé, le répertoire téléphonique, etc.).;
NO
:Annulation.
MY ADDRESS
1
et 2 jusqu’à ce que le code PIN soit entré complètement.
: Affiche le nom de l’appareil (“KD-X3 BT”).;
: Affiche l’adresse de cet appareil.
[YES]
OFF
ou
[NO]
, puis appuyez sur le bouton.
:Annulation.
Mode de vérification de la compatibilité
Bluetooth
Vous pouvez vérifier la connectivité du profile pris en charge
entre le périphérique Bluetooth et l’appareil.
•
Assurez-vous qu’il n’y aucun périphérique Bluetooth apparié.
1 Maintenez enfoncée .
“BLUETOOTH” “CHECK MODE” apparaît. “SEARCH NOW
USING PHONE”
2 Cherchez et sélectionnez “KD-X3 BT” sur le
XX
périphérique Bluetooth avant 3 minutes.
3 Réalisez (A), (B) ou (C) en fonction de ce qui apparait
sur l’affichage.
(A) “PAIRING” “XXXXXX” (code de 6 chiffres)
Assurez-vous que le même code apparaît sur
l’appareil et le périphérique Bluetooth, puis utilisez le
périphérique Bluetooth pour valider le code.
(B) “PAIRING” “PIN IS 0000”
périphérique Bluetooth.
(C) “PAIRING”
valider le pairage.
Quand le pairage a réussi, “PAIRING OK”
périphérique]” apparaît et la vérification de la compatibilité
Bluetooth démarre.
Si “CONNECT NOW USING PHONE” apparaît, utilisez le
périphérique Bluetooth pour autoriser l’accès au répertoire
d’adresse et continuer.
“TESTING” clignote sur l’affichage.
“PIN IS 0000” défile sur l’affichage.
: Entrez “0000” sur le
: Utilisez le périphérique Bluetooth pour
“[Nom du
:
FRANÇAIS
13
Page 46

BLUETOOTH®
Le résultat de la connectivité clignote sur
l’affichage.
“PAIRING OK” et/ou “HANDS-FREEOK”
STREAMOK”
1
*
2
*
3
*
Après 30 secondes, “PAIRING DELETED” apparaît pour
indiquer que le pairage a été supprimé, et l’appareil qui le
mode de vérification.
•
2
*
Compatible avec le Profile mains libres (HFP)
Compatible avec le Profile de distribution audio avancé (A2DP)
Compatible avec le Profile d’accès au répertoire d’adresses (PBAP)
Pour annuler, maintenez pressée pour
mettre l’appareil hors tension, puis mettez de nouveau
l’appareil sous tension.
et/ou “PBAP OK”
1
*
et/ou “AUD.
3
*
: Compatible
BLUETOOTH — Audio
Quand la source est BT AUDIO,
vous pouvez vous connecter à cinq
périphériques audio Bluetooth
et commuter parmi ces cinq
périphériques.
Lecteur audio via Bluetooth
1
Appuyez répétitivement sur pour sélectionner BTAUDIO.
2 Commandez le lecture audio Bluetooth pour démarrer la lecture.
Pour Sur la façade
Lecture/pause Appuyez sur le bouton de volume.
Choisissez un groupe ou un
dossier
Saut vers l’arrière/saut vers
l’avant
Recherche rapide vers l’arrière/
vers l’avant
Lecture répétée Appuyez répétitivement sur
Appuyez sur
Appuyez sur
Maintenez enfoncée
.
.
.
.
TRACK REPEAT, ALL REPEAT, REPEAT OFF
Lecture aléatoire
Appuyez répétitivement sur
.
GROUP RANDOM, ALL RANDOM, RANDOM OFF
Sélectionnez un fichier à partir
d’un dossier/liste
Commutation entre les
périphériques audio Bluetooth
*
Appuyer sur la touche “Play” directement sur le périphérique connecté permet aussi de commuter sur la sortie sonore du périphérique.
Les opérations et les indications de l’affichage peuvent différer en fonction de leur disponibilité sur le périphérique
connecté.
Reportez-vous à “Sélectionnez un fichier à partir d’un dossier/liste” à la page 8.
Appuyez sur
*
5.
14
FRANÇAIS
Page 47

BLUETOOTH®
Réglages pour utiliser JVC Remote application
L’application JVC Remote est conçue pour commander l’autoradio JVC à partir de
l’iPhone/iPod (via Bluetooth ou via la prise d’entrée USB) ou le smartphone Android (via
Bluetooth).
Préparation:
Installez la dernière version de l’application JVC Remote sur votre périphérique avant la
connexion. Pour plus d’informations, consultez <http://www.jvc.net/cs/car/>.
1 Maintenez enfoncée .
2 Tournez le bouton de volume pour sélectionner un élément
tableau suivant
3 Répétez l’étape 2 jusqu’à ce que l’élément souhaité soit sélectionné ou
activé.
4 Appuyez sur pour quitter.
Pour retourner à l’option de réglage précédente, appuyez sur .
)
, puis appuyez sur le bouton.
(
voir le
Défaut:
XX
REMOTE APP
SELECT
IOS YES
ANDROID YES
ANDROID LIST
*
Affiché uniquement quand
Sélectionnez le périphérique (IOS ou ANDROID) pour utiliser l’application.
:Sélectionnez iPhone/iPod pour utiliser l’application via Bluetooth ou connecté via la prise
d’entrée USB.;
NO
Si IOS est sélectionné, sélectionnez la source iPod BT (pour iPod USB si votre iPhone/iPod est
connecté via la prise d’entrée USB) pour activer l’application.
•
La connectivité del’application est interrompue ou déconnectée si :
– Vous changez la source de iPod BT à n’importe quelle source de lecture connectée via la
– Vous passez de la source iPod USB a la source iPod BT.
NO
*
:Sélectionnez le smartphone Android à utiliser dans la liste.
:Annulation.
prise d’entrée USB.
:Sélectionnez le smartphone Android pour utiliser l’application via Bluetooth.;
:Annulation.
[ANDROID]
de
[SELECT]
est réglé sur
[YES]
.
STATUS
Montre l’état du périphérique sélectionné.
IOS CONNECTED
Bluetooth ou par la prise d’entrée USB.
IOS NOT CONNECTED
ANDROID CONNECTED
connecté via Bluetooth.
ANDROID NOT CONNECTED
l’application.
: Vous pouvez utiliser l’application à l’aide de l’iPhone/iPod connecté via
: Aucun périphérique IOS n’est connecté pour utiliser l’application.
: Vous pouvez utiliser l’application à l’aide du smartphone Android
: Aucun périphérique Android n’est connecté pour utiliser
Écoute de l’iPhone/iPod via Bluetooth
Vous pouvez écouter des morceaux sur l’iPhone/iPod via le Bluetooth de cet appareil.
Appuyez répétitivement sur pour sélectionner iPodBT.
•
Vous pouvez commander iPod/iPhone de la même façon que iPod/iPhone via prise
d’entrée USB.
•
Si vous branchez un iPhone/iPod sur la prise d’entrée USB pendant l’écoute
d’une source iPodBT, la source change automatiquement sur iPod USB. Appuyez
Bluetooth.
( 7)
pour sélectionner iPodBT si le périphérique est toujours connecté via
FRANÇAIS
15
Page 48

AUX
Utilisation d’un lecteur audio portable
1
Connectez un lecteur audio portable (en vente dans le commerce).
Mini fiche stéréo de 3,5 mm avec connecteur en forme de “L”
(en vente dans le commerce)
Prise d’entrée auxiliaire
2 Sélectionnez
3 Appuyez répétitivement sur pour sélectionner AUX.
4 Mettez sous tension le lecteur audio portable et démarrez la lecture.
16
[ON]
pour
[BUILT-IN AUX]
Utilisez une mini fiche stéréo munie d’une fiche à 3 connecteurs pour
obtenir une sortie audio optimum.
FRANÇAIS
Lecteur audio portable
dans
[SOURCE SELECT]. ( 4)
RÉGLAGES AUDIO
Choisissez un égaliseur préréglé
Appuyez répétitivement sur .
(ou)
Appuyez sur
Égaliseur préréglé
FLAT
(défaut),
CLASSICAL
•
L’égaliseur Drive (
du signal audio pour réduire le bruit entendu de l’extérieur de la voiture ou le bruit
roulement des pneus.
DRVN 3, DRVN 2, DRVN 1, HARD ROCK, HIP HOP, JAZZ, POP, R&B, USER
Mémorisez vos propres ajustements sonores
1
Maintenez pressé pour accéder au réglage EASY EQ.
2 Tournez le bouton de volume pour choisir un élément, puis appuyez sur
le bouton.
Reportez-vous à
[USER]
.
•
Pour retourner à l’option de réglage précédente, appuyez sur .
•
Pour quitter, appuyez sur .
Autres paramètres
1
Maintenez enfoncée .
2 Tournez le bouton de volume pour choisir un élément
appuyez sur le bouton.
3 Répétez l’étape 2 jusqu’à ce que l’élément souhaité soit sélectionné/
activé ou suivez les instructions données pour l’élément sélectionné.
4 Appuyez sur pour quitter.
Pour retourner à l’option de réglage précédente, appuyez sur .
, puis tournez le bouton de volume avant 5 secondes.
:
DRVN 3/DRVN 2/DRVN 1
[EASY EQ] ( 17)
) accentue des fréquences spécifiques
pour le réglage et le réglage est mémorisé dans
( 17)
,
, puis
Page 49

RÉGLAGES AUDIO
EQ SETTING
PRESET EQ
EASY EQ
PRO EQ
62.5HZ
LEVEL –09
réaliser un ajustement, choisissez la source que vous souhaitez ajuster.)
ON
100HZ/160HZ/250HZ/400HZ/630HZ/1KHZ/1.6KHZ/2.5KHZ/4KHZ/6.3KHZ/10KHZ
16KHZ
LEVEL –09
(Avant de réaliser un ajustement, choisissez la source que vous souhaitez ajuster.)
Q FACTOR 1.35/1.50/2.00
AUDIO CONTROL
BASS BOOST
Sélectionne un égaliseur préréglé adapté à votre genre de musique.
•
Sélectionnez
[USER]
FLAT/DRVN 3/DRVN 2/DRVN 1/HARD ROCK/HIP HOP/JAZZ/POP/R&B
USER/CLASSICAL
Ajustez vos propres ajustements sonores.
•
Les réglages sont mémorisés dans
•
Les réglages réalisés peuvent affecter les réglages actuels de
SUB.W SP
*1*
SUB.W
BASS
:
MID
:
TRE
:
Ajustez vos propres ajustements sonores.
•
Les réglages sont mémorisés dans
•
Les réglages réalisés peuvent affecter les réglages actuels de
à
LEVEL +09 (LEVEL 00
:Met en service les graves étendus.;
à
LEVEL +09 (LEVEL 00):
LEVEL +01
OFF
:Annulation.
pour utiliser les réglages réalisés dans
[USER]
.
2
*1*
:
00
à
+06
3
:
:Règle le facteur de qualité.
à
LEVEL +05
(Défaut:
–50
à
+10 00
LVL–09
à
LVL+09 LVL 00
LVL–09
à
LVL+09 LVL 00
LVL–09
à
LVL+09 LVL 00
[USER]
.
): Réglez le niveau à mémoriser pour chaque source. (Avant de
OFF
:Annulation.
Réglez le niveau à mémoriser pour chaque source.
: Choisit votre niveau préféré d’accentuation des graves.;
[EASY EQ]
[PRO EQ]
[EASY EQ]
ou
.
03
.
Défaut:
[PRO EQ]
)
/
XX
LOUDNESS LEVEL 01/LEVEL 02
SUB.W LEVEL
.
/
SUBWOOFER
3
*
SET
FADER
*
BALANCE
VOLUME ADJUST LEVEL –15
AMP GAIN LOW POWER
1
*
Affiché uniquement quand
2
*
Pour la transition 2 voies: Affiché uniquement quand
[SUB.W/SUB.W]. ( 18)
3
*
Pour la transition 2 voies: Affiché uniquement quand
[REAR/SUB.W]
4
*
L’ajustement ne peut pas affecter la sortie du caisson de grave.
plus équilibré aux faibles niveaux de volume.;
1
*
4
2
*
SPK-OUT
3
*
PRE-OUT
ON
: Met en service la sortie du caisson de grave.;
(Non applicable quand la transition 3 voies est sélectionnée.)
POSITION R15
des enceintes avant et arrière.
POSITION L15
des enceintes gauche et droite.
à
chaque source (en comparaison avec le niveau de volume FM). Avant un ajustement,
choisissez la source que vous souhaitez ajuster.
maximum de chaque enceinte est inférieure à 50 W pour éviter tout dommage des
enceintes.);
LEVEL +06(LEVEL 00
:Limite le volume maximum à 25. (Choisissez ce réglage si la puissance
HIGH POWER
[SUBWOOFER SET]
ou
[SUB.W/SUB.W]. ( 18)
:Accentue les basses ou hautes fréquences pour produire un son
(Non applicable quand la transition 3 voies est sélectionnée.)
SUB.W 00
sortie du caisson de grave connecté par le câble d’enceinte.
SUB.W –50
sortie du caisson de grave connecté aux prises de sortie de ligne
(SW ou REAR/SW) via un amplificateur extérieur.
à
POSITION F15(POSITION 00
à
POSITION R15(POSITION 00
:Le niveau de volume maximum est de 35.
OFF
:Annulation
à
SUB.W +06(SUB.W +03
à
SUB.W +10(SUB.W 00
OFF
:Annulation.
):Préréglez le niveau de volume initial de
est réglé sur
[ON]
[SPK/PRE OUT]
[SPK/PRE OUT]
.
est réglé sur
est réglé sur
):Ajuste le niveau de
( 27)
):Ajuste le niveau de
( 27)
):Règle la balance de sortie
):Règle la balance de sortie
FRANÇAIS
17
Page 50

RÉGLAGES AUDIO
SPK/PRE OUT
SPEAKER SIZE
X ’ OVER
DTA SETTINGS
CAR SETTINGS
X ’ OVER TYPE Précautions
2-WAY
3-WAY
(Non applicable quand la transition 3 voies est sélectionnée.)
En fonction de la méthode de connexion des enceintes, sélectionner le réglage approprié
pour obtenir la sortie souhaitée. (
En fonction du type de transition que vous avez sélectionné (
options de réglage pour transition 2 voies ou transition 3 voies apparaîtront.
(
19, Réglages de transition
Par défaut, le type de transition 2 voies est sélectionné.
Pour les réglages,
l’augmentation ou la diminution soudaine du niveau de sortie.
(Affiché uniquement quand
YES
:Sélectionne le type de transition deux voies.; NO:Annulation.
(Affiché uniquement quand
YES
:Sélectionne le type de transition trois voies.; NO:Annulation.
20, Réglages de l’alignement temporel numérique
: Ajustez le volume avant de changer le
SOUND EFFECT
SPACE ENHANCE
(Ne s’applique pas à la source TUNER.)
SMALL/MEDIUM/LARGE
SND RESPONSE LEVEL1/LEVEL2/LEVEL3
SOUND LIFT LO W/MIDDLE/HIGH
VOL LINK EQ ON
K2 TECHNOLOGY
enceintes.;
:Accentue la fréquence pour réduire le bruit entendu de l’extérieur de la voiture ou le
bruit roulement des pneus.;
(Ne s’applique pas à la source TUNER et à la source AUX.)
ON
:Pour améliorer la qualité du son de la musique compressée.;
: Ajuste virtuellement la position sonore entendue par les
OFF
:Annulation.
Réglages de sortie d’enceinte
)
[X ’ OVER TYPE]
[3-WAY]
est sélectionné)
[2-WAY]
est sélectionné)
: Améliore virtuellement l’espace sonore.;
: Rend virtuellement le son plus réaliste.;
OFF
:Annulation.
)
[X ’ OVER TYPE]
pour éviter
OFF
OFF
:Annulation.
OFF
:Annulation.
), les
:Annulation.
Réglages de sortie d’enceinte
[SPK/PRE OUT]
(Applicable uniquement si [X ’ OVER TYPE] est réglé sur [2-WAY])
Sélectionnez le réglage de sortie pour les enceintes
méthode de connexion des enceintes.
[SPK/PRE OUT]
Connexion via les prises de sortie de ligne
Pour les connexions via un amplificateur extérieur.
.
Réglage sur
[SPK/PRE OUT]
REAR/REAR
REAR/SUB.W
SUB.W/SUB.W
(défaut)
Sortie des enceintes avant Sortie des enceintes arrière
Sortie des enceintes avant Sortie de caisson de grave
Sortie des enceintes avant Sortie de caisson de grave
FRONT REAR/SW
( 27)
Signal audio via la prise de sortie de ligne
Connexion via les câbles d’enceinte
Pour les connexions sans utiliser un amplificateur extérieur. Cependant, avec ces
réglages vous pouvez aussi profiter de la sortie du caisson de grave.
Réglage sur
[SPK/PRE OUT]
REAR/REAR
REAR/SUB.W
SUB.W/SUB.W
[SUB.W/SUB.W]
Si
–
[120HZ]
est sélectionné dans
disponible.
–
[POSITION R02]
[POSITION R15]
Sortie des enceintes arrière Sortie des enceintes arrière
Sortie des enceintes arrière Sortie des enceintes arrière
Sortie de caisson de grave (Sourdine)
est sélectionné:
est sélectionné dans
à
[POSITION 00]
Signal audio via le fil de l’enceinte arrière
L (gauche) R (droite)
[SUBWOOFER LPF]
.
et
[THROUGH]
[FADER]
et la plage sélectionnable est de
n’est pas
, sur la base de la
( 27)
18
FRANÇAIS
Page 51

RÉGLAGES AUDIO
Réglages de transition
Voici les options de réglage disponibles pour la transition 2 voies et la transition
3 voies.
Précautions
Sélectionnez un type de transition en fonction de la connexion de vos enceintes.
( 27)
Si vous sélectionnez une mauvais type:
•
Les enceintes peuvent être endommagées.
•
Le niveau sonore de sortie peut être extrêmement élevé ou faible.
SPEAKER SIZE
La sélection est faite en fonction de la taille de l’enceinte connectée permettant
d’obtenir les performances optimales.
•
Les réglages de la fréquence et de la pente sont réalisés automatiquement pour la
transition de l’enceinte sélectionnée.
•
Quand l’option de transition 2 voies est sélectionnée, si
pour
[TWEETER]
de
réglage
[X ’ OVER]
•
Quand l’option de transition 3 voies est sélectionnée, si
pour
[WOOFER]
disponible.
X ’ OVER (transition)
• [FRQ]/[F-HPF FRQ]/[R-HPF FRQ]/[SW LPF FRQ]/[HPF FRQ]/[LPF FRQ]
fréquence de transition pour les enceintes sélectionnées (filtre passe haut ou filtre
passe bas).
Si
[THROUGH]
sélectionnées.
• [SLOPE]/[F-HPF SLOPE]/[R-HPF SLOPE]/[SW LPF SLOPE]/[HPF SLOPE]/[LPF SLOPE]:
Ajuste la pente de transition.
Peut être uniquement sélectionné si un réglage autre que
pour la fréquence de transition.
• [SW LPF PHASE]/[PHASE]:
synchroniser avec la sortie des autres enceintes.
•
[GAIN LEFT]/[GAIN RIGHT]/[F-HPF GAIN]/[R-HPF GAIN]/[SW LPF GAIN]/[GAIN]:
Ajuste le volume de sortie de l’enceinte sélectionnée.
[FRONT], [REAR]
de l’enceinte sélectionnée n’est pas disponible.
de
[SPEAKER SIZE]
est sélectionné, tous les signaux sont envoyés aux enceintes
et
[SUBWOOFER]
, le réglage
Sélectionne la phase de la sortie de l’enceinte à
[X ’ OVER]
[NONE]
pour
[NONE]
de
[THROUGH]
est sélectionné
[SPEAKER SIZE]
est sélectionné
[WOOFER]
n’est pas
: Ajuste la
est choisi
, le
Options de réglage de la transition 2 voies
SPEAKER SIZE
FRONT SIZE
TWEETER
1
*
REAR
SUBWOOFER
8CM/10CM/12CM/13CM/16CM/17CM/18CM/4×6/5×7/6×8/6×9
7×10/NONE
3
*2*
16CM/20CM/25CM/30CM/38CM OVER/NONE
8CM/10CM/12CM/13CM/16CM/17CM/18CM/4×6
5×7/6×8/6×9/7×10
SMALL/MIDDLE/LARGE/NONE
(non connecté)
X ’ OVER
TWEETER FRQ
GAIN LEFT
GAIN RIGHT
FRONT HPF F-HPF FRQ
F-HPF SLOPE
F-HPF GAIN
1
*
REAR HPF
R-HPF FRQ 30HZ/40HZ/50HZ/60HZ/70HZ/80HZ/90HZ/100HZ
R-HPF SLOPE
R-HPF GAIN
SUBWOOFER
3
*2*
LPF
SW LPF FRQ 30HZ/40HZ/50HZ/60HZ/70HZ/80HZ/90HZ/100HZ
SW LPF SLOPE
SW LPF PHASE
SW LPF GAIN –08DB
1
2
3
*
*
*
,
,
:
( 20)
1KHZ/1.6KHZ/2.5KHZ/4KHZ/5KHZ/6.3KHZ/8KHZ
10KHZ/12.5KHZ
–08DB
à
00DB
–08DB
à
00DB
30HZ/40HZ/50HZ/60HZ/70HZ/80HZ/90HZ/100HZ
120HZ/150HZ/180HZ/220HZ/250HZ/THROUGH
–06DB/–12DB/–18DB/–24DB
–08DB
à
00DB
120HZ/150HZ/180HZ/220HZ/250HZ/THROUGH
–06DB/–12DB/–18DB/–24DB
–08DB
à
00DB
120HZ/150HZ/180HZ/220HZ/250HZ/THROUGH
–06DB/–12DB/–18DB/–24DB
REVERSE
(180°)/
à
00DB
NORMAL
/
(non connecté)
/
(non connecté)
/
/
/
/
(0°)
FRANÇAIS
19
Page 52

RÉGLAGES AUDIO
Options de réglage de la transition 3 voies
SPEAKER SIZE
TWEETER
MID RANGE
WOOFER
SMALL/MIDDLE/LARGE
8CM/10CM/12CM/13CM/16CM/17CM/18CM/4×6/5×7/6×8/6×9
3
*
16CM/20CM/25CM/30CM/38CM OVER/NONE
X ’ OVER
TWEETER HPF FRQ
SLOPE
PHASE
GAIN –08DB
MID RANGE HPF FRQ
HPF SLOPE
LPF FRQ
LPF SLOPE
PHASE
GAIN –08DB
3
*
WOOFER
LPF FRQ 30HZ/40HZ/50HZ/60HZ/70HZ/80HZ/90HZ/100HZ/120HZ
SLOPE
PHASE
GAIN –08DB
1
*
Affiché uniquement quand
2
*
Affiché uniquement quand
( 18)
3
*
Affiché uniquement quand
1KHZ/1.6KHZ/2.5KHZ/4KHZ/5KHZ/6.3KHZ/8KHZ/10KHZ
12.5KHZ
–06DB/–12DB
REVERSE
(180°)/
NORMAL
à
00DB
30HZ/40HZ/50HZ/60HZ/70HZ/80HZ/90HZ/100HZ/120HZ
150HZ/180HZ/220HZ/250HZ/THROUGH
–06DB/–12DB
1KHZ/1.6KHZ/2.5KHZ/4KHZ/5KHZ/6.3KHZ/8KHZ/10KHZ
12.5KHZ/THROUGH
–06DB/–12DB
REVERSE
(180°)/
NORMAL
à
00DB
150HZ/180HZ/220HZ/250HZ/THROUGH
–06DB/–12DB
REVERSE
(180°)/
NORMAL
à
00DB
[SPK/PRE OUT]
[SPK/PRE OUT]
[SUBWOOFER SET]
est réglé sur
est réglé sur
est réglé sur
(non connecté)
(0°)
(0°)
(0°)
[REAR/REAR]
[REAR/SUB.W]
[ON]. ( 17)
ou
[REAR/SUB.W]. ( 18)
ou
[SUB.W/SUB.W]
Réglages de l’alignement temporel numérique
L’alignement temporel numérique règle la temporisation de la sortie d’enceinte
pour créer un environnement qui convient mieux à votre véhicule.
•
Pour plus d’informations,
[GAIN] de [DTA SETTINGS]
21, Déterminez la valeur pour [DISTANCE] et
.
DTA SETTINGS
POSITION
/
*
DISTANCE
1
*
GAIN
/
DTA RESET YES
CAR SETTINGS
/
CAR TYPE COMPACT/FULL SIZE CAR/WAGON/MINIVAN/SUV
R-SP LOCATION
/
1
2
*
*
,
:
.
( 21)
Sélectionne votre position d’écoute (point de référence).
ALL
:Sans compensation;
FRONT LEFT
•
[FRONT ALL]
réglé sur
1
0CM
à
610CM
–8DB
à
0DB
sélectionnée.
:Réinitialise les réglages (
[POSITION]
Identifiez votre type de voiture et l’emplacement des enceintes arrière afin de
réaliser les ajustement pour
MINIVAN(LONG)
compensation.
2
*
Sélectionne l’emplacement des enceintes arrières de votre véhicule pour
calculer la distance la plus loin de la position d’écoute sélectionnée (point
de référence).
•
DOOR/REAR DECK
TYPE]
est sélectionné pour
CAR], [WAGON]
•
2ND ROW/3RD ROW
TYPE]
est sélectionné pour
FRONT RIGHT
:Siège avant gauche;
est affiché uniquement quand
[2-WAY]. ( 18)
:Ajuste avec précision la distance de compensation.
:Ajuste avec précision le volume de sortie de l’enceinte
sélectionné au réglages par défaut.; NO:Annulation.
FRONT ALL
[DISTANCE]
[DTA SETTINGS]
:Sélectionne le type de véhicule.;
:Sélectionnable uniquement quand
[OFF], [COMPACT], [FULL SIZE
ou
[SUV]
.
:Sélectionnable uniquement quand
[MINIVAN]
: Siège avant droit;
:Siège avant
[X ’ OVER TYPE]
et
[GAIN]
) du réglage
.
OFF
ou
[MINIVAN(LONG)]
: Sans
[CAR
/
[CAR
est
.
20
FRANÇAIS
Page 53

RÉGLAGES AUDIO
Déterminez la valeur pour [DISTANCE] et [GAIN] de [DTA SETTINGS]
Si vous spécifiez la distance à partir du centre de la positon
d’écoute actuellement réglée sur n’importe quel réglage, la
temporisation est calculée automatiquement et réglée.
1
Détermine le centre de la position d’écoute actuellement
réglée comme point de référence.
2
Mesure la distance entre la position de référence et les
enceintes.
3
Calcule la différence entre la distance de l’enceinte la plus
loin (enceinte arrière) et les autres enceintes.
4
Règle
[DISTANCE]
enceintes individuelles.
5
Ajuste
Exemple: Quand
position d’écoute
1
*
Avant de réaliser un ajustement, choisissez l’enceinte:
Quand la transition 2 voies est sélectionnée:
FRONT LEFT/FRONT RIGHT/REAR LEFT/REAR RIGHT/SUBWOOFER:
[REAR LEFT], [REAR RIGHT]
réglage que
[NONE]
( 19)
Quand la transition 3 voies est sélectionnée:
TWEETER LEFT/TWEETER RIGHT/MID LEFT/MID RIGHT/WOOFER:
[WOOFER]
est sélectionnable uniquement si un autre réglage que
[WOOFER]
de
2
*
Affiché uniquement quand
que
[SPEAKER SIZE]. ( 20)
[NONE]
est sélectionné pour
et
est sélectionné pour
[SUBWOOFER]
[X ’ OVER TYPE]
[REAR]
est sélectionnable uniquement si un autre
[REAR]
et
est réglé sur
de
[SPEAKER SIZE]. ( 19)
calculé à l’étape 3 pour les
[GAIN]
pour les enceintes individuelles.
[FRONT ALL]
[SUBWOOFER]
[NONE]
[2-WAY] ( 18)
de
est sélectionné comme
[SPEAKER SIZE]
est sélectionné pour
et si un autre réglage
RÉGLAGES D’AFFICHAGE
1 Maintenez enfoncée .
2 Tournez le bouton de volume pour sélectionner un élément (voir le
tableau suivant), puis appuyez sur le bouton.
3 Répétez l’étape 2 jusqu’à ce que l’élément souhaité soit sélectionné/
activé ou suivez les instructions données pour l’élément sélectionné.
4 Appuyez sur pour quitter.
Pour retourner à l’option de réglage précédente, appuyez sur .
DISPLAY
DIMMER
.
1
*
La connexion du fil de commande de l’éclairage est requise.
Assombrit l’éclairage.
OFF
:Le gradateur est désactivé. La luminosité change sur le réglage
ON
:Le gradateur est activé. La luminosité change sur le réglage
(
22,
[BRIGHTNESS]
DIMMER TIME
1
Tournez le bouton de volume pour régler l’heure de mise en service
le bouton.
2
Tournez le bouton de volume pour régler l’heure de mise en service
le bouton.
(Défaut:
[ON]: 18:00
DIMMER AUTO
ou allumez les feux de la voiture.
)
:Réglez l’heure de mise en et hors service du gradateur.
;
[OFF]: 6:00
:Le gradateur est activé et désactivé automatiquement quand vous éteignez
)
1
*
( 27)
[DAY]
[NIGHT]
[ON]
[OFF]
Défaut:
.
.
, puis appuyez sur
, puis appuyez sur
XX
FRANÇAIS
21
Page 54

RÉGLAGES D’AFFICHAGE
BRIGHTNESS
TEXT SCROLL
2
*
Certains caractères ou symboles n’apparaissent pas correctement (ou un blanc apparaît à leur
place).
Réglez la luminosité séparément pour le jour et la nuit.
2
*
1 DAY/NIGHT
2
Choisissez une zone.
3 LEVEL 00
SCROLL ONCE
SCROLL AUTO
SCROLL OFF
:Choisissez le jour ou la nuit.
( 21)
à
LEVEL 31
(Défaut:
: Réglez le niveau de luminosité.
BUTTON ZONE
DISP ZONE
:
:Fait défiler une fois les informations de l’affichage.;
:Répète le défilement à 5 secondes d’intervalle.;
:Annulation.
:
DAY:LEVEL 25
DAY:LEVEL 31
;
NIGHT:LEVEL 09
;
NIGHT:LEVEL 12
RÉFÉRENCES
Entretien
Nettoyage de l’appareil
Essuyez la saleté de la façade avec un chiffon sec au silicone ou un chiffon doux.
Nettoyage du connecteur
Détachez la façade et nettoyez le connecteur à l’aide d’un coton
)
tige en faisant attention de ne pas endommager le connecteur.
Connecteur (sur la face arrière
Plus d’informations
Pour: – Les dernières mise à jour du micrologiciel et la liste de compatibilité la plus récente
– Application originale JVC
– Autres informations récentes
Consultez <http://www.jvc.net/cs/car/>.
Fichiers pouvant être lus
•
Pour des informations détaillées et des remarques sur les fichiers audio compatibles, reportez-vous à
<http://www.jvc.net/cs/car/>.
•
Fichier audio reproductible: MP3 (.mp3), WMA (.wma), AAC (.aac), WAV (.wav), FLAC (.flac)
•
Systèmes de fichier de périphérique USB compatibles: FAT12, FAT16, FAT32
Même quand les fichiers audio sont conformes aux normes établies ci-dessus, il est possible que la lecture ne soit pas
possible suivant le type ou les conditions du support ou périphérique.
Un fichier AAC (.m4a) dans un périphérique USB codé par iTunes ne peut pas être lu sur cet appareil.
À propos des périphériques USB
•
Vous ne pouvez pas connecter un périphérique USB via un hub USB.
•
La connexion d’un câble dont la longueur totale dépasse 5 m peut avoir pour conséquence un fonctionnement
anormal de la lecture.
•
Cet appareil ne peut pas reconnaître les périphériques USB dont l’alimentation n’est pas de 5 V et dépasse 1,5A.
À propos de l’iPod/iPhone
•
Via la prise d’entrée USB:
Made for
– iPod touch (5th et 6th generation)
– iPod nano (7th generation)
– iPhone 4S, 5, 5S, 5C, 6, 6 Plus, 6S, 6S Plus, SE
de la façade)
22
FRANÇAIS
Page 55

RÉFÉRENCES
•
Via Bluetooth:
Made for
– iPod touch (5th et 6th generation)
– iPhone 4S, 5, 5S, 5C, 6, 6 Plus, 6S, 6S Plus, SE
•
Il n’est pas possible de parcourir les fichiers vidéo sur le menu “Videos” en mode
•
L’ordre des morceaux affichés sur le menu de sélection de cet appareil peut être différent de celui de iPod/
iPhone.
•
En fonction de la version du système d’exploitation de l’iPod/iPhone, certaines fonctions peuvent ne pas être
utilisables sur cet appareil.
À propos du périphérique Android
•
Cet appareil prend en charge Android OS 4.1 et ultérieur.
•
Certains périphériques Android (avec OS 4.1 et ultérieur) peuvent ne pas prendre en charge complétement
Android Open Accessory (AOA) 2.0.
•
Si le périphérique Android prend en charge à la fois le protocole mass storage class et AOA 2.0, cet appareil
utilise toujours en priorité la lecture via AOA 2.0.
À propos de Bluetooth
•
En fonction de la version Bluetooth du périphérique, il se peut que certains périphériques Bluetooth ne
puissent pas être connectés à cet appareil.
•
Cet appareil peut ne pas fonctionner avec certains périphériques Bluetooth.
•
La condition du signal varie en fonction de l’environnement.
Lettres cyrilliques disponibles
Caractères disponibles
Indications sur l’affichage
[HEAD MODE]
.
Changez l’information sur l’affichage
Chaque fois que vous appuyez sur , les informations affichées changent.
•
Si aucune information n’est disponible ou si aucune information n’est enregistrée, “NO TEXT”, “NO NAME”, ou une autre
information (par ex. le nom de la station) apparaît.
Nom de la
Informations sur l’affichage
source
FM
ou
AM
USB (Pour les fichiers MP3/WMA/AAC/WAV/FLAC)
iPod USB/
iPod BT
ANDROID
AUX
BT AUDIO
*
La luminosité de l’éclairage change et est synchronisée avec la musique.
Fréquence (Date/Horloge) Fréquence (Date/Horloge) avec la synchronisation de la musique*
(retour au début)
(Pour les stations FM Radio Data System uniquement)
Nom de la station (PS)/Type de programme (PTY) (Date/Horloge) Radio texte (Date/Horloge)
Radio texte+ (Radio texte+)
Fréquence (Date/Horloge)
avec la synchronisation de la musique
Titre de morceau (Artiste) Titre de morceau (Nom de l’album) Titre de morceau (Date/Horloge)
Nom de fichier (Nom de dossier) Nom de fichier (Date/Horloge) Durée de lecture (Date/
Horloge)
Titre de morceau (Artiste) avec la synchronisation de la musique* (retour au début)
Quand
[HEAD MODE]/[AUTO MODE]
Titre de morceau (Artiste)
ou
Durée de lecture (Date/Horloge) Titre de morceau (Artiste) avec la synchronisation de la
*
musique
(retour au début)
AUX (Date/Horloge) AUX (Date/Horloge) avec la synchronisation de la musique*
(retour au début)
Titre de morceau (Artiste) Titre de morceau (Nom de l’album) Titre de morceau (Date/Horloge)
Durée de lecture (Date/Horloge) Titre de morceau (Artiste) avec la synchronisation de la
*
musique
(retour au début)
Titre de morceau (Artiste) Titre de morceau (Date/Horloge)
Nom de la station (PS)/Type de programme (PTY) (Date/Horloge)
*
(retour au début)
Titre de morceau (Nom de l’album) Titre de morceau (Date/Horloge)
est sélectionné
( 8)
:
FRANÇAIS
23
Page 56

GUIDE DE DÉPANNAGE
Symptôme Remède
Le son ne peut pas être entendu.
“MISWIRING CHECK WIRING THEN
PWR ON” apparaît.
Généralités
“PROTECTING SEND SERVICE”
apparaît.
Vous ne pouvez pas choisir la
source.
•
La réception radio est
mauvaise.
Radio
•
Bruit statique pendant l’écoute
de la radio.
L’ordre de lecture n’est pas celui
que vous pensiez.
La durée de lecture écoulée n’est
pascorrecte.
“NOT SUPPORT” apparaît et la
fichier est sautée.
“READING” clignote sur.
“UNSUPPORTED DEVICE” apparaît.
USB/iPod
“UNRESPONSIVE DEVICE” apparaît.
“USB HUB IS NOT SUPPORTED”
apparaît.
“CANNOT PLAY” apparaît.
•
Ajustez le volume sur le niveau optimum.
•
Vérifiez les cordons et les connexions.
Mettez l’appareil hors tension, puis assurez-vous que les prises des
câbles d’enceinte sont correctement isolées. Mettez de nouveau
l’appareil sous tension.
Envoyez l’appareil au centre de service le plus proche.
Cochez le réglage
Connectez l’antenne solidement.
L’ordre de lecture est déterminé par le nom du fichier
Cela dépend du processus d’enregistrement utilisé.
Vérifiez si la fichier est dans un format compatible.
•
N’utilisez pas trop de niveaux de hiérarchie et de dossiers.
•
Reconnectez le USB périphérique.
•
Vérifiez si le périphérique connecté est compatible avec cet appareil et
assurez-vous que le système de fichiers est dans un format compatible.
( 22, 23)
•
Reconnectez le périphérique.
Assurez-vous que le périphérique n’est pas défaillant et reconnectez-le.
Cet appareil ne peut pas prendre en charge un périphérique USB
connectez via un hub USB.
Connectez un périphérique USB qui contient des fichiers audio
compatibles.
[SOURCE SELECT]. ( 4)
( 22)
Symptôme Remède
iPod/iPhone ne peut pas être mis
sous tension ou ne fonctionne pas
“LOADING” apparaît quand vous
entrez en mode de recherche en
appuyant sur
USB/iPod
Les caractères corrects ne sont
pas affichés.
•
Aucun son ne peut être
entendu pendant la lecture.
•
Le son sort uniquement du
périphérique Android.
Lecture impossible en mode
[
AUTO MODE
ANDROID
“NO DEVICE” ou “READING”
clignote sur.
La lecture est intermittente ou
le son saute.
“CANNOT PLAY”
].
•
Vérifiez la connexion entre cet appareil et l’iPod/iPhone.
•
Détachez et réinitialisez l’iPod/iPhone en utilisant un réinitialisation
matérielle.
Cet appareil continue de préparer la liste des morceaux de l’iPod/
.
iPhone. Le chargement des données peut être long, essayez de nouveau
plus tard.
•
Cet appareil peut uniquement afficher les lettres majuscules, les chiffres
et un nombre limité de symboles.
•
En fonction de la langue d’affichage que vous avez choisie
certains caractères peuvent ne pas être affichés correctement.
•
Reconnectez le périphérique Android.
•
En mode [
multimédia sur le périphérique Android et démarrez la lecture.
•
En mode [
actuelle ou utilisez une autre application multimédia.
•
Redémarrez le périphérique Android.
•
Si cela ne résout pas le problème, c’est que le périphérique Android
connecté ne peut pas diriger le signal audio sur l’appareil.
•
Assurez-vous que JVC MUSIC PLAY APP est installé sur le périphérique
Android.
•
Reconnectez le périphérique Android et sélectionnez le mode de
commande approprié.
•
Si cela ne résout pas le problème, c’est que le périphérique Android
connecté ne prend pas en charge [
•
Déactivez les options développeur sur le périphérique Android.
•
Reconnectez le périphérique Android.
•
Si cela ne résout pas le problème, c’est que le périphérique Android
connecté ne prend pas en charge [
Déactivez le mode d’économie d’énergie sur le périphérique Android.
•
Assurez-vous que le périphérique Android contient des fichiers audio
compatibles.
•
Reconnectez le périphérique Android.
•
Redémarrez le périphérique Android.
AUDIO MODE
AUDIO MODE
( 7)
], lancez n’importe quelle application
], relancez l’application multimédia
( 8)
AUTO MODE
AUTO MODE
].
].
( 23)
( 23)
( 5)
( 23)
,
24
FRANÇAIS
Page 57

GUIDE DE DÉPANNAGE INSTALLATION/RACCORDEMENT
Symptôme Remède
Aucun périphérique Bluetooth
n’est détecté.
Le pairage ne peut pas être
réalisé.
Il y a un écho ou du bruit.
Le son du téléphone est de
mauvaise qualité
Le son est interrompu ou saute
pendant la lecture d’un lecteur
audio Bluetooth.
Bluetooth®
Le lecteur audio Bluetooth
connecté ne peut pas être
commandé.
“PLEASE WAIT”
“NOT SUPPORT”
“ERROR”
“H/W ERROR”
Si vous avez toujours des problème, réinitialisez l’appareil.
•
Faites de nouveau une recherche à partir du périphérique Bluetooth.
•
Réinitialisez l’appareil.
•
Assurez-vous que vous avez entré le même code PIN pour l’appareil et le
périphérique Bluetooth.
•
Supprimez les informations de pairage pour cet appareil et le
périphérique Bluetooth, puis effectuez de nouveau le pairage.
•
Ajustez la position du microphone.
•
Cochez le réglage
•
Réduisez la distance entre cet appareil et le périphérique Bluetooth.
•
Déplacez la voiture dans un endroit où vous pouvez obtenir un meilleur
signal de réception.
•
Réduisez la distance entre cet appareil et le lecteur audio Bluetooth.
•
Mettez cet appareil hors tension, puis de nouveau sous tension et essayez
de nouveau de connecter l’appareil.
•
D’autres périphériques Bluetooth peuvent être en train de se connecter à
l’appareil.
•
Vérifiez si le lecteur audio Bluetooth connecté prend en charge AVRCP
(Audio/Video Remote Control Profile). (Référez-vous aux instructions de
votre lecteur audio.)
•
Déconnectez et reconnectez à nouveau le lecteur Bluetooth.
L’appareil se prépare pour utiliser la fonction Bluetooth. Si le message
ne disparaît pas, mettez l’appareil hors tension puis sous tension, puis
connecter de nouveau le périphérique.
Le téléphone connecté ne prend pas en charge la fonction de
reconnaissance vocale.
Essayez de nouveau l’opération. Si “ERROR” apparaît de nouveau, vérifiez
si l’appareil extérieur prend en charge la fonction que vous avez essayée.
Réinitialiser l’appareil et essayez de nouveau l’opération. Si “H/W ERROR”
apparaît de nouveau, consultez le centre de service le plus proche.
( 3)
[ECHO CANCEL]. ( 11)
( 9)
( 3)
( 9)
Avertissement
•
L’appareil peut uniquement être utilisé avec une alimentation de 12 V CC, à masse négative.
•
Déconnectez la borne négative de la batterie avant le câblage et le montage.
•
Ne connectez pas le fil de batterie (jaune) et le fil d’allumage (rouge) au châssis de la voiture ou au fil de masse (noir)
pour éviter les courts-circuits.
•
Isolez les fils non connectés avec du ruban adhésif pour éviter les courts-circuits.
•
Assurez-vous de raccorder de nouveau la mise à la masse de cet appareil au châssis de la voiture après l’installation.
Précautions
•
Pour des raison de sécurité, laissez le travail de câblage et de montage des professionnels. Consultez votre revendeur
autoradio.
•
Installez cet appareil dans la console de votre véhicule. Ne touchez pas les parties métalliques de cet appareil
pendant ou juste après son utilisation. Les parties métalliques, comme le dissipateur de chaleur et le boîtier,
deviennent chaudes.
•
Ne connectez pas les fils des l’enceintes au châssis de la voiture, au fil de masse (noir) ou en parallèle.
•
Connectez des enceintes avec une puissance maximum de plus de 50 W. Si la puissance maximum des enceintes est
inférieure à 50W, changez le réglage
•
Montez l’appareil avec un angle de moins de 30º.
•
Si le faisceau de fils de votre véhicule ne possède pas de borne d’allumage, connectez le fil d’allumage (rouge) à la
borne du boîtier de fusible de votre véhicule qui offre une alimentation de 12 V CC et qui se met en et hors service
avec la clé de contact.
•
Gardez tous les câbles à l’écart des dissipateurs thermiques.
•
Après avoir installé l’appareil, vérifiez si les lampes de frein, les indicateurs, les clignotants, etc. de la voiture
fonctionnent correctement.
•
Si un fusible saute, assurez-vous d’abord que les câbles ne touches pas le châssis de la voiture puis remplacez le vieux
fusible par un nouveau de même valeur.
Procédure de base
1
Retirez la clé de contact, puis déconnectez la borne de la batterie de la voiture.
2
Connectez les fils correctement.
Reportez-vous à Connexions.
3
Installez l’appareil dans votre voiture.
Reportez-vous à Installation de l’appareil (montage encastré).
4
Connectez la borne de la batterie de la voiture.
5
Appuyez sur pour mettre l’appareil sous tension.
6
Détachez la façade et réinitialisez l’appareil.
( 27)
[AMP GAIN]
pour éviter d’endommager les enceintes.
( 26)
( 3)
( 17)
FRANÇAIS
25
Page 58

INSTALLATION/RACCORDEMENT
Installation de l’appareil (montage encastré)
Crochet sur le côté supérieur
Orientez la plaque de
garniture de la façon
illustrée avant la
fixation.
Tordez les languettes appropriées pour
maintenir le manchon en place.
Lors d’une installation sans manchon de montage
1
Retirez le manchon de montage et la plaque d’assemblage de l’appareil.
2
Alignez les entailles de l’appareil (des deux côtés) avec le support de montage du
véhicule et fixez l’appareil avec les vis (en vente dans le commerce).
N’utiliser que les vis spécifiés. L’utilisation de vis incorrects peut endommager l’appareil.
Réalisez les connexions
nécessaires.
( 27)
Tableau de bord de votre
voiture
Comment retirer l’appareil
Liste des pièces pour l’installation
(A)
Façade
(B)
Plaque d’assemblage
(C)
Manchon de montage
(D)
Faisceau de fils
(E)
Clé d’extraction
26
FRANÇAIS
Page 59

INSTALLATION/RACCORDEMENT
Connexions
Lors de la connexion à un amplificateur extérieur,
connectez son fil de masse au châssis de la voiture
pour éviter d’endommager l’appareil.
Connexion des connecteurs ISO sur certaines
voitures VW/Audi ou Opel (Vauxhall)
Vous aurez peut-être besoin de modifier le câblage du faisceau de fils
fourni comme montré sur l’illustration ci-dessous.
Câble d’allumage
A7 (Rouge)
Véhicule
A4 (Jaune)
Câblage par défaut
Si votre voiture ne possède pas de prise ISO
Nous recommandons d’installer l’appareil en utilisant un harnais de
câblage en vente dans le commerce recommandé spécifiquement
pour votre voiture et, pour votre sécurité, de laisser ce travail a des
professionnels. Consultez votre revendeur autoradio.
(Rouge)
Appareil
Câble de
batterie (Jaune)
Sortie avant/arrière/caisson de grave
Pour la transition 3 voies: Sortie de l’enceinte des médiums/graves
Fusible (10 A)
Jaune (Câble de batterie)
Rouge (Câble d’allumage)
Rouge (A7)
Jaune (A4)
Connecteurs ISO
Bleu clair/jaune
(Fil de télécommande de volant)
Prise d’entrée du microphone
Borne de l’antenne
À l’adaptateur de télécommande volant
( 9)
Broche Couleur et fonction
Jaune : Pile
A4
Bleu/Blanc : Commande d’alimentation (12V 350mA)
A5
Orange/blanc : Éclairage de la voiture
A6
Rouge : Allumage (ACC)
A7
Noir : Connexion à la terre (masse)
A8
B1
Violet
]
B2
Violet/noir
B3
Gris
]
B4
Gris/noir
B5
Blanc
]
B6
Blanc/noir
B7
Ver t
]
B8
Vert/noir
*
Vous pouvez aussi connecter directement un caisson de grave sans amplificateur de caisson
de grave extérieur. Pour les réglages,
: Enceinte arrière (droite)
Pour la transition 3 voies: Enceinte des aigus (droite)
[
: Enceinte avant (droite)
Pour la transition 3 voies: Enceinte des médiums (droite)
[
: Enceinte avant (gauche)
Pour la transition 3 voies: Enceinte des médiums (gauche)
[
: Enceinte arrière (gauche)
Pour la transition 3 voies: Enceinte des aigus (gauche)
[
18
*
.
FRANÇAIS
27
Page 60

SPÉCIFICATIONS
Sujet à changement sans notification.
Plage de fréquences 87,5MHz — 108,0MHz (pas de 50kHz)
FM
Sensibilité utilisable (S/B = 26dB) 0,71V/75 (8,2dBf )
Seuil de sensibilité (DINS/N=46dB) 2,0 V/75 Ω
Réponse en fréquence (±3 dB) 30Hz — 15kHz
Taux de Signal/Bruit (MONO) 64 dB
Tuner
Séparation stéréo (1 kHz) 40 dB
Plage de fréquences 531kHz — 1611kHz (pas de 9kHz)
AM
(PO)
Sensibilité utilisable (S/B = 20dB) 28,2V (29dB)
Plage de fréquences 153kHz — 279kHz (pas de 9kHz)
AM
(GO)
Sensibilité utilisable (S/B = 20dB) 50V (33,9dB)
Standard USB USB1.1, USB2.0 (Vitesse maximale)
Périphériques compatibles À mémoire de grande capacité
Système de fichiers FAT12/16/32
Courant d’alimentation maximum CC5 V
Convertisseur D/A 24 Bit
Réponse en fréquence (±1 dB) 20 Hz — 20 kHz
Taux de Signal/Bruit (1 kHz) 105 dB
USB
Gamme dynamique 90 dB
Séparation des canaux 85 dB
Décodage MP3 Compatible avec le format MPEG-1/2 Audio Layer-3
Décodeur WMA Compatible Windows Media Audio
Décode AAC Fichiers AAC-LC “.aac”
Décodeur WAV Format audio de forme d’onde RIFF (PCM linéaire
Décodeur FLAC Fichiers FLAC jusqu’à 24 bits/48 kHz
1,5A
uniquement)
Réponse en fréquence (±3 dB) 20Hz—20kHz
Tension maximum d’entrée 1000 mV
Auxiliaire
Impédance d’entrée 30k
Version Bluetooth 3.0
Plage de fréquences 2,402 GHz — 2,480 GHz
Puissance de sortie +4 dBm (MAX), 0 dBm (AVE) Power Class 2
Portée de communication maximale Ligne de vue approximative 10 m (32,8 ft)
Pairage SSP (Profile simple sécurisé)
Profile HFP1.6 (Hands-Free Profile — Profile mains libres)
Bluetooth
Puissance de sortie maximum 50W×4 ou
Pleine Puissance de Largeur de Bande
(avec moins de 1% DHT)
Audio
Impédance d’enceinte 4—8
Niveau de préamplification/charge (USB) 4000mV/10k en charge
Impédance du préamplificateur ≤600
Tension de fonctionnement
(10,5 V — 16V admissible)
Consommation de courant maximale 10A
Gamme de température de fonctionnement –10°C — +60°C
Généralités
Dimensions d’installation (L × H × P) 182 mm×53 mm×114mm
Poids net (y compris la plaque d’assemblage et
le manchon de montage)
A2DP (Advanced Audio Distribution Profile — Profile de
distribution audio avancé)
AVRCP1.5 (Audio/Video Remote Control Profile — Profile de
télécommande audio/vidéo)
PBAP (Phonebook Access Profile — Profile d’accès au
répertoire d’adresses)
SPP (Serial Port Profile — Profile de port série)
50W×2 + 50W×1 (Caisson de grave = 4)
22W×4
14,4V
0,6kg
28
FRANÇAIS
Page 61

Page 62

INHALT VOR DER INBETRIEBNAHME
VOR DER INBETRIEBNAHME 2
GRUNDLAGEN 3
ERSTE SCHRITTE 4
1 Brechen Sie die Demonstration ab
2 Stellen Sie die Uhrzeit und das
Datum ein
3 Einstellen der grundlegenden
Einstellungen
RADIO 5
USB/iPod/ANDROID 7
BLUETOOTH® 9
AUX 16
AUDIOEINSTELLUNGEN 16
DISPLAY-EINSTELLUNGEN 21
ZUR BEZUGNAHME 22
Wartung
Weitere Informationen
FEHLERSUCHE 24
EINBAU/ANSCHLUSS 25
TECHNISCHE DATEN 28
WICHTIG
•
Um richtige Verwendung sicherzustellen, lesen Sie die Bedienungsanleitung vor der Verwendung des Produkts sorgfältig durch.
Es ist besonders wichtig, dass Sie die als Warnung und Vorsicht gekennzeichneten Hinweise in dieser Anleitung lesen und
beachten.
•
Bitte bewahren Sie die Anleitung an sicherer Stelle und griffbereit zum Nachschlagen auf.
Warnung
•
Bedienen Sie keine Funktion, die Ihre Aufmerksamkeit vom Straßenverkehr ablenkt.
Vorsicht
Lautstärkeeinstellung:
•
Stellen Sie die Lautstärke so ein, dass Sie immer noch Geräusche von außerhalb des Fahrzeugs hören können, um Unfälle zu
vermeiden.
•
Senken Sie die Lautstärke vor dem Abspielen digitaler Tonquellen, um Beschädigung der Lautsprecher durch plötzliche
Tonspitzen zu vermeiden.
Allgemeines:
•
Vermeiden Sie Verwendung des externen Geräts, wenn dieses das sichere Fahren behindern kann.
•
Stellen Sie sicher, dass alle wichtigen Daten gesichert sind. Wir übernehmen keine Haftung für jeglichen Verlust
aufgenommener Daten.
•
Stellen Sie sicher, dass keine Metallgegenstände (wie etwa Münzen oder Werkzeuge) ins Innere des Geräts gelangen und
Kurzschlüsse verursachen.
Wie Sie diese Anleitung lesen
•
Die Bedienung wird im Wesentlichen anhand der Tasten auf der Frontblende des
•
Englischsprachige Anzeigen werden zur Erklärung verwendet. Sie können die Anzeigesprache im Menü wählen.
•
[XX]
zeigt die gewählten Punkte an.
•
( XX)
zeigt an, das Bezugsinformationen auf der angegebenen Seitennummer vorhanden sind.
KD-X342BT
erläutert.
( 5)
2
DEUTSCH
Page 63

GRUNDLAGEN
Frontblende
Anbringen
Lautstärke-Regler
Abnehmen-Taste
Zum Auf der Frontblende
Einschalten
Einstellen der Lautstärke
Quelle auswählen
Ändern der Display-Information
Drücken Sie .
•
Zum Ausschalten halten Sie die Taste gedrückt.
Drehen Sie den Lautstärke-Regler.
Drücken Sie den Lautstärke-Regler zum Stummschalten des Tons oder zum Pausieren der Wiedergabe.
•
Zum Abbrechen drücken Sie die Taste erneut.
•
Drücken Sie wiederholt.
•
Drücken Sie , und drehen Sie dann den Lautstärke-Regler innerhalb von 2 Sekunden.
Drücken Sie wiederholt.
( 23)
Displayfenster
Abnehmen
Rücksetzen
DEUTSCH
3
Page 64

ERSTE SCHRITTE
1
Brechen Sie die Demonstration ab
Beim ersten Einschalten des Geräts (oder wenn
erscheint Folgendes im Display: “CANCEL DEMO”
1 Drücken Sie den Lautstärke-Regler.
[YES]
ist für das ursprüngliche Setup gewählt.
2 Drücken Sie den Lautstärke-Regler erneut.
“DEMO OFF” erscheint.
2
Stellen Sie die Uhrzeit und das Datum ein
1
Halten Sie gedrückt.
2 Drehen Sie den Lautstärke-Regler zum Wählen von
dann den Regler.
Zum Einstellen der Uhr
3 Drehen Sie den Lautstärke-Regler zum Wählen von
drücken Sie dann den Regler.
4 Drehen Sie den Lautstärke-Regler, um die Einstellungen vorzunehmen, und
drücken Sie dann den Regler.
Stunde Minute
5 Drehen Sie den Lautstärke-Regler zum Wählen von
drücken Sie dann den Regler.
6 Drehen Sie den Lautstärke-Regler zum Wählen von
drücken Sie dann den Regler.
Zum Einstellen des Datums
7 Drehen Sie den Lautstärke-Regler zum Wählen von
Sie dann den Regler.
8 Drehen Sie den Lautstärke-Regler, um die Einstellungen vorzunehmen, und
drücken Sie dann den Regler.
Tag Monat Jahr
9 Drücken Sie zum Beenden.
Zum Zurückschalten zum vorherigen Einstellelement drücken Sie .
4
DEUTSCH
[FACTORY RESET]
“PRESS” “VOLUME KNOB”
auf
[CLOCK]
[CLOCK ADJUST]
[CLOCK FORMAT]
[12H]
[DATE SET]
[YES]
gestellt ist),
, und drücken Sie
, und
, und
oder
[24H]
, und
, und drücken
3
Einstellen der grundlegenden Einstellungen
1
Halten Sie gedrückt.
2 Drehen Sie den Lautstärke-Regler, um einen Gegenstand zu treffen
(siehe folgende Tabelle), und drücken Sie dann den Regler.
3 Wiederholen Sie Schritt 2, bis der gewünschte Gegenstand gewählt
oder aktiviert ist.
4 Drücken Sie zum Beenden.
Zum Zurückschalten zum vorherigen Einstellelement drücken Sie .
Standard:
SYSTEM
KEY BEEP
(Nicht anwendbar, wenn 3-Wege-Übergang gewählt ist.)
ON
:Aktiviert den Tastenberührungston.;
OFF
:Deaktiviert.
SOURCE SELECT
*
AM SRC
BUILT-IN AUX
ON
:Aktiviert Sie AM in der Quellenwahl.;
*
ON
:Aktiviert Sie AUX in der Quellenwahl.;
OFF
OFF
:Deaktiviert.
:Deaktiviert.
( 5)
( 16)
F/W UPDATE
UPDATE SYSTEM
F/W UP xxxx
FACTORY RESET YES
*
Nicht angezeigt, wenn die entsprechende Quelle gewählt ist.
YES
:Startet die Aktualisierung der Firmware.;
NO
:Hebt auf (Aktualisierung wird nicht ausgeführt).
Einzelheiten darüber, wie Sie die Firmware aktualisieren können, siehe:
<http://www.jvc.net/cs/car/>.
:Setzt die Einstellungen auf Standardwerte zurück (ausgenommen gespeicherte
Sender).;
NO
:Hebt auf.
XX
Page 65

ERSTE SCHRITTE RADIO
CLOCK
TIME SYNC
CLOCK DISPLAY ON
ENGLISH
РУССКИЙ
ESPANOL
ON
:Die Uhrzeit wird automatisch mit den Uhrzeit-Daten
(CT) im -Daten (Uhrzeit) im FM (UKW) Radio Data System
eingestellt.;
OFF
:Hebt auf.
:Die Uhrzeit wird im Display angezeigt, auch wenn das
Gerät ausgeschaltet wird.;
Wählen Sie die Anzeigesprache für das Menü und die MusikInformation, wo zutreffend.
Als Standard ist
ENGLISH
OFF
:Hebt auf.
ausgewählt.
“ST” leuchtet auf, wenn eine UKW-Stereosendung mit ausreichender Signalstärke empfangen wird.
Suche nach einem Sender
1
Drücken Sie wiederholt, um FM (UKW) oder AM zu wählen.
2 Drücken Sie , um einen Sender automatisch zu suchen.
(oder)
Halten Sie gedrückt, bis “M” blinkt, und drücken Sie die Taste dann wiederholt, um
einen Sender manuell zu suchen.
Einstellungen im Speicher
Sie können bis zu 18 Sender für FM (UKW) und 6 Sender für AM speichern.
Speichern eines Senders
Während des Hörens eines Senders....
Halten Sie eine der Zifferntasten (1bis 6) gedrückt.
(oder)
1 Halten Sie den Lautstärke-Regler gedrückt, bis “PRESETMODE” blinkt.
2 Drehen Sie den Lautstärke-Regler zum Wählen einer Festsendernummer, und drücken Sie
dann den Regler.
Die Festsendernummer blinkt, und “MEMORY” erscheint.
Wählen Sie einen gespeicherten Sender aus
Drücken Sie eine der Zifferntasten (1bis6).
(oder)
1 Drücken Sie .
2 Drehen Sie den Lautstärke-Regler zum Wählen einer Festsendernummer, und drücken Sie
dann den Regler.
DEUTSCH
5
Page 66

RADIO
Andere Einstellungen
1
Halten Sie gedrückt.
2 Drehen Sie den Lautstärke-Regler, um einen Gegenstand zu treffen
(
siehe folgende Tabelle), und drücken Sie dann den Regler.
3 Wiederholen Sie Schritt 2, bis der gewünschte Gegenstand gewählt/
aktiviert ist, oder folgen Sie den Anweisungen auf dem gewählten
Gegenstand.
4 Drücken Sie zum Beenden.
Zum Zurückschalten zum vorherigen Einstellelement drücken Sie .
Standard:
TUNER SETTING
RADIO TIMER
SSM
LOCAL SEEK ON
1
*
Nur wählbar, wenn
Schaltet das Radio zu einer spezifischen Zeit ein, ungeachtet der aktuellen Quelle.
1
ONCE/DAILY/WEEKLY/OFF
2
FM/AM
:Wählen Sie das Frequenzband.
3
01
bis 18 (für FM)/ 01 bis 06 (für AM):Wählen Sie den Festsender.
4
Stellen Sie den Tag
“
M
” leuchtet auf, wenn der Vorgang fertig ist.
Radio Timer wird in den folgenden Fällen nicht aktiviert.
•
Das Gerät ist ausgeschaltet.
•
[OFF]
gewählt wurde.
SSM 01–06/SSM 07–12/SSM 13–18
18Sendern für FM (UKW). “SSM” hört zu blinken auf, wenn die ersten 6 Sender gespeichert sind.
Wählen Sie
:Sucht nur FM (UKW)-Sender mit gutem Empfang.;
•
Die vorgenommenen Einstellungen gelten nur für die gewählte Quelle/den gewählten
Sender. Wenn Sie die Quelle/den Sender gewechselt haben, müssen Sie die Einstellungen
erneut vornehmen.
[ONCE]
*
ist für
[AM SRC]
( 4)
SSM 07–12/SSM 13–18
oder
[WEEKLY]
:Wählen Sie, wie oft der Timer eingeschaltet wird.
1
und die Zeit der Aktivierung ein.
in
[SOURCE SELECT]
: Automatische Voreinstellung von bis zu
zum Speichern der folgenden 12 Sender.
OFF
in Schritt 1 gewählt wurde.
gewählt, nachdem Radio Timer für AM
:Hebt auf.
IF BAND AUTO
MONO SET ON
2
*
NEWS SET
2
*
REGIONAL
XX
AF SET
2
*
TI
2
*
PTY SEARCH
2
*
Nur für FM (UKW)-Quelle.
PTY-Code
NEWS, AFFAIRS, INFO, SPORT, EDUCATE, DRAMA, CULTURE, SCIENCE, VARIED, POP
M
(Musik),
ROCK M
M
(Musik),
WEATHER, FINANCE, CHILDREN, SOCIAL, RELIGION, PHONE IN, TRAVEL
LEISURE, JAZZ, COUNTRY, NATION M
:Steigert die Tuner-Empfindlichkeit, um Störgeräusche von benachbarten FM (UKW)Sendern zu verringern. (Stereo-Effekt kann verlorengehen).;
benachbarten FM (UKW)-Sendern ausgesetzt, aber die Klangqualität wird nicht verringert,
und der Stereoeffekt wird bewahrt.
:Verbessert den FM (UKW)-Empfang, aber der Stereoeffekt geht verloren.;
ON
:Das Gerät schaltet kurzzeitig auf das Nachrichtenprogramm, falls verfügbar.;
OFF
:Hebt auf.
ON
: Schaltet auf einen anderen Sender in der spezifischen Region nur mit der “AF”-
Steuerung.;
OFF
:Hebt auf.
ON
: Sucht automatisch einen anderen Sender auf, der das gleiche Programm im gleichen
Radio Data System-Netzwerk sendet und einen besseren Empfang aufweist, falls der aktuelle
Empfang schlecht ist.;
ON
: Erlaubt es, das Gerät kurzzeitig auf Verkehrsinformation schalten, wenn verfügbar (“TI”
leuchtet auf). ;
2
*
Wählen Sie einen PTY-Code (siehe unten).
Wenn ein Sender eine Sendung mit dem PTY-Code ausstrahlt, den Sie gewählt haben, wird
dieser Sender eingestellt.
(Musik),
OFF
EASY M
OFF
:Hebt auf.
(Musik),
(Musik),
: Hebt auf.
LIGHT M
(Musik),
OLDIES, FOLK M
CLASSICS, OTHER
(Musik),
WIDE
:Ist Interferenz von
OFF
DOCUMENT
:Hebt auf.
,
6
DEUTSCH
Page 67

USB/iPod/ANDROID
Starten Sie die Wiedergabe
Die Quelle schaltet automatisch um, und die
Wiedergabe startet.
USB-Eingangsterminal
USB
USB 2.0-Kabel
(im Handel erhältlich)
1
*
iPod/iPhone
Zubehör beim
1
*
iPod/iPhone
2
ANDROID
Micro-USB 2.0-Kabel
(im Handel erhältlich)
*
Zum Auf der Frontblende
3
*
Vorspulen/Rückspulen
Auswählen einer Datei
Auswählen eines
4
*
Ordners
Wiederholte
Wiedergabe
Zufallswiedergabe
1
*
Lassen Sie bei Nichtgebrauch nicht das Kabel im Auto liegen.
2
*
1
*
Wenn ein Android-Gerät angeschlossen wird, wird “Press [VIEW] to install JVC MUSIC PLAY APP” angezeigt. Gehen Sie zur Installation der
Anwendung gemäß den Anweisungen vor. Sie können auch vor dem Verbinden die neueste Version der JVC MUSIC PLAY-Anwendung auf
Ihrem Android-Gerät installieren. Für die neueste Information besuchen Sie <http://www.jvc.net/cs/car/>.
3
*
Bei ANDROID: Trifft nur zu, wenn
4
*
Nur für MP3/WMA/AAC/WAV/FLAC-Dateien. Dies funktioniert nicht bei iPod/ANDROID.
5
*
Bei iPod/ANDROID: Trifft nur zu, wenn
5
*
Halten Sie gedrückt.
Drücken Sie
Drücken Sie .
Drücken Sie wiederholt.
TRACK REPEAT/FOLDER REPEAT/ALL REPEAT
ONE REPEAT/ALL REPEAT/REPEAT OFF
5
*
Drücken Sie wiederholt.
FOLDER RANDOM/ALL RANDOM/RANDOM OFF
SONG RANDOM/ALL RANDOM/RANDOM OFF
[AUTO MODE]
gewählt ist.
[HEAD MODE]/[AUTO MODE]
( 8)
.
: MP3/WMA/AAC/WAV/FLAC-Datei
: iPod oder ANDROID
: MP3/WMA/AAC/WAV/FLAC-Datei
: iPod oder ANDROID
gewählt ist.
( 8)
DEUTSCH
7
Page 68

USB/iPod/ANDROID
Wählen Sie den Steuermodus
Während iPodUSB als Quelle gewählt ist, drücken Sie
wiederholt.
HEAD MODE
IPHONE MODE
Während ANDROID als Quelle gewählt ist, drücken Sie
wiederholt.
AUTO MODE
AUDIO MODE
: Steuern Sie den iPod von dieser Einheit.
: Steuern Sie den iPod mit dem iPod selber. Sie können aber weiterhin
Wiedergabe/Pause oder Datei-Überspringen von dieser Einheit steuern.
: Steuern Sie das Android-Gerät von dieser Einheit über die im Android-
Gerät installierte Anwendung JVC MUSIC PLAY.
: Steuern Sie das Android-Gerät vom Android-Gerät selber über andere
im Android-Gerät installierte Media-Player-Anwendungen. Sie können
aber weiterhin Wiedergabe/Pause oder Datei-Überspringen von dieser
Einheit steuern.
Wählen Sie das Musiklaufwerk
Während USB als Quelle gewählt ist, drücken Sie wiederholt.
Im folgenden Laufwerk gespeicherte Titel werden abgespielt.
•
Wählen Sie internen oder externen Speicher für ein Smartphone
(Massenspeicherklasse).
•
Gewähltes Laufwerk bei Gerät mit mehreren Laufwerken.
Einstellungen zur Verwendung der JVC Remote-Anwendung
JVC Remote-Anwendung ist darauf ausgelegt, die Bedienung des JVC Auto-Receivers
vom iPhone/iPod (über USB-Eingang).
Vorbereitung:
Installieren Sie vor dem Verbinden die neueste Version der JVC Remote-Anwendung auf
Ihrem Gerät. Für die neueste Information besuchen Sie <http://www.jvc.net/cs/car/>.
Sie können die Einstellungen auf gleiche Weise vornehmen wie bei Verbindung über
Bluetooth.
( 15)
Auswählen einer Datei aus einem Ordner/einer Liste
Beim iPod/ANDROID nur gültig, wenn
1 Drücken Sie .
2 Drehen Sie den Lautstärke-Regler zum Wählen eines Ordners/einer Liste,
und drücken Sie dann den Regler.
3 Drehen Sie den Lautstärke-Regler zum Wählen einer Datei, und drücken
Sie dann den Regler.
Schnellsuche
Wenn Sie viele Dateien haben, können Sie diese schnell durchsuchen.
Drehen Sie den Lautstärke-Regler schnell, um die Liste schnell zu
durchsuchen.
Alphabetische Suche
Sie können eine Datei anhand des Anfangsbuchstabens suchen.
Für iPod USB-Quelle
Drücken Sie oder drehen Sie den Lautstärke-Regler schnell,
um das gewünschte Zeichen (A bis Z, 0 bis 9, OTHERS) zu wählen.
•
Wählen Sie “OTHERS”, wenn das erste Zeichen nicht AbisZ, 0bis9 ist.
Für ANDROID-Quelle
1 Drücken Sie , um auf Zeichensuche zu schalten.
2 Drehen Sie den Lautstärke-Regler zum Wählen des gewünschten
Buchstabens.
^A^ : Großbuchstaben (A bis Z)
_A_ : Kleinbuchstaben (a bis z)
-0- : Zahlen (0 bis 9)
-OTHERS- : Andere Zeichen als die Buchstaben A bis Z oder die Zahlen 0
bis 9
3 Drücken Sie den Lautstärke-Regler zum Starten der Suche.
•
Zum Zurückschalten zum vorherigen Einstellelement drücken Sie .
•
Zum Abbrechen halten Sie gedrückt.
(gilt nur für USB und ANDROID-Quelle)
[HEAD MODE]/[AUTO MODE]
gewählt ist.
(gilt nur für iPod USB und ANDROID-Quelle)
8
DEUTSCH
Page 69

BLUETOOTH®
BLUETOOTH — Verbindung
Unterstützte Bluetooth-Profile
–
Hands-Free Profile (HFP)
–
Advanced Audio Distribution Profile (A2DP)
–
Audio/Video Remote Control Profile (AVRCP)
–
Serial Port Profile (SPP)
–
Phonebook Access Profile (PBAP)
Unterstützte Bluetooth-Codecs
–
Sub-Band-Codec (SBC)
–
Erweiterte Audio-Codierung (AAC)
Schließen das Mikrofon an
Geräterückseite
Mikrofon (mitgeliefert)
Mikrofoneingangsbuchse
Stellen Sie den
Mikrofonwinkel ein
Sichern Sie das Kabel mit Kabelklemmen
(nicht mitgeliefert), wenn erforderlich.
Zum erstmaligen Registrieren und Anschließen eines Bluetooth-Geräts
1
Drücken Sie , um die Einheit einzuschalten.
2 Suchen und wählen Sie “KD-X3 BT” am Bluetooth-Gerät.
“BTPAIRING” blinkt im Display.
• Bei einigen Bluetooth-Geräten müssen Sie möglicherweise den PIN-Code (Personal Identification Number)
sofort nach der Suche eingeben.
3 Führen Sie (A) oder (B) aus, je nachdem was im Display erscheint.
Bei manchen Bluetooth-Geräten kann sich die Pairing-Sequenz von den unten beschriebenen Schritten
unterscheiden.
(A) “[Gerätename]” “XXXXXX” “ VOL–YES” “BACK–NO”
“XXXXXX” ist ein 6-stelliger Passkey, der bei jedem Pairing zufällig erzeugt wird.
Stellen Sie sicher, dass die Passkeys an der Einheit und am Bluetooth-Gerät übereinstimmen.
Drücken Sie den Lautstärke-Regler zum Bestätigen des Passkeys.
Bedienen Sie das Bluetooth-Gerät, um den Passkey zu bestätigen.
(B) “[Gerätename]” “VOL–YES” “BACK–NO”
Drücken Sie den Lautstärke-Regler zum Starten des Pairing-Vorgangs.
• Wenn “PAIRING” “PIN 0000” durch das Display läuft, geben Sie den PIN-Code “0000” im BluetoothGerät ein.
• Wenn nur “PAIRING” erscheint, bedienen Sie das Bluetooth-Gerät, um das Pairing zu bestätigen.
“PAIRING COMPLETED” erscheint, wenn das Pairing fertig ist, und “
hergestellt ist.
•
Diese Einheit unterstützt Secure Simple Pairing (SSP).
•
Bis zu fünf Geräte können insgesamt registriert (gepairt) werden.
•
Wenn das Pairing ausgeführt ist, bleibt das Bluetooth-Gerät in der Einheit registriert, auch wenn Sie die Einheit
zurücksetzen. Zum Löschen des gekoppelten Geräts,
•
Es können maximal zwei Bluetooth-Telefone und ein Bluetooth-Audiogerät zur Zeit angeschlossen werden.
Während BT AUDIO als Quelle eingestellt ist, können Sie die Verbindung zu fünf Bluetooth-Audiogeräten
herstellen und zwischen diesen Geräten umschalten.
•
Manche Bluetooth-Geräte können nicht in der Lage sein, nach dem Pairing die Verbindung automatisch
herzustellen. Schließen Sie das Gerät manuell an die Einheit an.
•
Weitere Information siehe Bedienungsanleitung Ihres Bluetooth-Geräts.
Sie können vor dem Pairing auf einen PIN-Code Ihrer Wahl wechseln.
” leuchtet auf, wenn die Bluetooth-Verbindung
13, [DEVICE DELETE]
( 14)
( 13)
.
DEUTSCH
9
Page 70

BLUETOOTH®
Auto Pairing
Wenn Sie Ihr iPhone/iPod touch/Android-Gerät an
den USB-Eingang anschließen, wird automatisch eine
Pairing-Anforderung (über Bluetooth) aktiviert.
Drücken Sie den Lautstärke-Regler einmal zum
Pairing, nachdem Sie den Gerätenamen bestätigt
haben.
Automatische Pairing-Anforderung wird nur aktiviert,
wenn:
–
Die Bluetooth-Funktion des angeschlossenen Geräts
eingeschaltet ist.
–
[AUTO PAIRING]
–
Die JVC MUSIC PLAY-Anwendung wird auf dem
Android-Gerät
gewählt
( 8)
auf
[ON]
( 7)
installiert, und
.
gestellt ist.
( 13)
[AUTO MODE]
wird
BLUETOOTH — Handy
Empfangen Sie einen Ruf
Wenn ein Ruf empfangen wird:
•
Die Tasten blinken in dem Blinkmuster, das Sie in
•
Das Gerät nimmt automatisch den Ruf entgegen, wenn
Während eines Rufs:
•
Die Tasten hören zu blinken auf.
•
Falls Sie das Gerät ausschalten oder die Frontblende abnehmen, wird die Bluetooth-Verbindung getrennt.
Die folgenden Bedienungsvorgänge sind je nach dem angeschlossenen Telefon möglicherweise nicht verfügbar.
[RING ILLUMI]
[AUTO ANSWER]
gewählt haben.
( 11)
auf eine gewählte Zeit gestellt ist.
( 11)
Zum Auf der Frontblende
Erster ankommender Anrufe...
Nehmen Sie einen Ruf
entgegen
Weisen Sie einen Ruf ab
Einen Anruf beenden
Drücken
Halten Sie
Halten Sie
oder den Lautstärke-Regler.
oder den Lautstärke-Regler gedrückt.
oder den Lautstärke-Regler gedrückt.
10
DEUTSCH
Page 71

BLUETOOTH®
Zum Auf der Frontblende
Während des Sprechens beim ersten ankommenden Anruf...
Einen anderen
ankommenden Anruf
entgegennehmen und den
aktuellen Anruf halten
Einen anderen
ankommenden Anruf
abweisen
Bei zwei aktiven Anrufen...
Aktuellen Anruf beenden
und gehaltenen Anruf
aktivieren
Umschalten zwischen
aktuellem Anruf und
gehaltenem Anruf
Stellen Sie die
Telefonlautstärke ein
[00]
bis
[35]
(Standard:
Umschalten zwischen
Freisprech- und
Privatgespräch-Modi
1
*
Diese Einstellung hat keine Auswirkung auf den Lautstärkepegel der anderen Quellen.
2
*
Die Bedienung kann je nach dem angeschlossenen Bluetooth-Gerät unterschiedlich sein.
1
*
[15]
2
*
Verbessern Sie die Sprachqualität
Während am Telefon gesprochen wird....
1 Halten Sie gedrückt.
2 Drehen Sie den Lautstärke-Regler, um einen Gegenstand zu treffen
folgende Tabelle
3 Wiederholen Sie Schritt 2, bis der gewünschte Gegenstand gewählt oder
aktiviert ist.
4 Drücken Sie zum Beenden.
Zum Zurückschalten zum vorherigen Einstellelement drücken Sie .
)
, und drücken Sie dann den Regler.
Drücken
Halten Sie
gedrückt.
Halten Sie
gedrückt.
Drücken Sie
Drehen Sie den Lautstärke-Regler während
eines Anrufs.
)
Drücken Sie während eines Anrufs.
oder den Lautstärke-Regler.
oder den Lautstärke-Regler
oder den Lautstärke-Regler
.
(
siehe
Standard:
MIC GAIN LEVEL –10
NR LEVEL LEVEL –05
ECHO CANCEL LEVEL –05
bis
nimmt mit höherer Zahl zu.
Rauschunterdrückungspegel an, bis das geringste Rauschen bei einem Telefongespräch
gehört wird.
Echo-Löschung an, bis das letzte Echo bei einem Telefongespräch gehört wird.
LEVEL +10(LEVEL –04
bis
LEVEL +05(LEVEL 00
bis
LEVEL +05(LEVEL 00
):Die Empfindlichkeit des Mikrofons
):Passen Sie den
):Passen Sie die Verzögerungszeit für die
Nehmen Sie die Einstellungen zum Empfang eines Anrufs
vor
1
Drücken Sie , um auf Bluetooth-Modus zu schalten.
2 Drehen Sie den Lautstärke-Regler, um einen Gegenstand zu treffen
(siehe folgende Tabelle), und drücken Sie dann den Regler.
3 Wiederholen Sie Schritt 2, bis der gewünschte Gegenstand gewählt
oder aktiviert ist.
Zum Zurückschalten zum vorherigen Einstellelement drücken Sie .
Standard:
SETTINGS
AUTO ANSWER
RING ILLUMI BLINK 01
01 SEC
bis
30 SEC
innerhalb der gewählten Zeit entgegen (in Sekunden).;
für die Tasten, wenn ein Ruf empfangen wird.;
:Die Einheit nimmt den ankommenden Ruf automatisch
bis
BLINK 05(BLINK 02
): Wählt das Benachrichtigungs-Blinkmuster
OFF
:Hebt auf.
OFF
:Hebt auf.
DEUTSCH
XX
XX
11
Page 72

BLUETOOTH®
Tätigen Sie einen Ruf
Sie können einen Ruf von der Ruf-Historie, dem Telefonbuch oder durch Wählen der Telefonnummer
tätigen. Ruf durch Sprachbefehl ist auch möglich, wenn Ihr Handy dieses Merkmal hat.
1 Drücken Sie , um auf Bluetooth-Modus zu schalten.
"(Name des ersten Geräts)" erscheint.
• Wenn zwei Bluetooth-Telefone angeschlossen sind, drücken Sie erneut, um auf das andere
Telefon umzuschalten.
"(Name des zweiten Geräts)" erscheint.
2 Drehen Sie den Lautstärke-Regler, um einen Gegenstand zu treffen (siehe folgende
Tabelle), und drücken Sie dann den Regler.
3 Wiederholen Sie Schritt 2, bis der gewünschte Gegenstand gewählt/aktiviert ist, oder
folgen Sie den Anweisungen auf dem gewählten Gegenstand.
Zum Zurückschalten zum vorherigen Einstellelement drücken Sie .
RECENT CALL
PHONEBOOK
DIAL NUMBER
VOICE
12
(Nur gültig, wenn das Telefon PBAP unterstützt.)
1
Drücken Sie den Lautstärke-Regler zum Wählen eines Namens oder einer Telefonnummer.
• “<” zeigt einen empfangenen Anruf an, “>” zeigt einen getätigten Anruf an, “M” zeigt einen verpassten Anruf an.
• “NO HISTORY” erscheint, wenn kein aufgezeichneter Ruf-Verlauf oder eine Rufnummer vorhanden ist.
2
Drücken Sie den Lautstärke-Regler zum Anrufen.
(Nur gültig, wenn das Telefon PBAP unterstützt.)
1
Drücken Sie , um den gewünschten Buchstaben zu wählen (AbisZ, 0bis9, und OTHERS).
• “OTHERS” erscheint, wenn das erste Zeichen nicht A bis Z, 0 bis 9 ist.
2
Drehen Sie den Lautstärke-Regler zum Wählen eines Namens, und drücken Sie dann den Regler.
3
Drehen Sie den Lautstärke-Regler zum Wählen einer Telefonnummer, und drücken Sie dann den Regler zum
Anrufen.
•
Das Telefonbuch des angeschlossenen Telefons wird automatisch beim Pairing zur Einheit übertragen.
•
Dieses Gerät kann nur Buchstaben ohne Umlaute oder Akzentzeichen anzeigen. (Buchstaben mit Akzentzeichen wie
“Ú” werden als “U” angezeigt.)
1
Drehen Sie den Lautstärke-Regler zum Wählen einer Nummer (0 bis 9) oder eines Zeichens ( , #, +).
2
Drücken Sie , um die Eingabeposition zu verschieben.
Wiederholen Sie Schritt
3
Drücken Sie den Lautstärke-Regler zum Anrufen.
Sprechen Sie den Namen des anzurufenden Kontakts oder den Sprachbefehl deutlich, um die Telefonfunktionen zu
steuern. (
Einen Ruf mit Spracherkennung tätigen
1
und 2, bis die Eingabe der Telefonnummer beendet ist.
)
DEUTSCH
Einen Ruf mit Spracherkennung tätigen
Halten Sie gedrückt, um das angeschlossene
1
Telefon zu aktivieren.
2 Sprechen Sie den Namen des anzurufenden
Kontakts oder den Sprachbefehl deutlich, um die
Telefonfunktionen zu steuern.
•
Unterstützte Spracherkennungsmerkmale können sich je nach
Telefon unterscheiden. Einzelheiten siehe Bedienungsanleitung
des angeschlossenen Telefons.
•
Diese Einheit unterstützt auch die Funktion “intelligenter
persönlicher Assistent” des iPhone.
Einstellungen im Speicher
Speichern Sie einen Kontakt im Speicher
Sie können bis zu 6 Kontakte unter den Nummerntasten (1 bis 6)
speichern.
1 Drücken Sie , um auf Bluetooth-Modus zu
schalten.
2 Drehen Sie den Lautstärke-Regler zum Wählen von
[RECENT CALL], [PHONEBOOK]
drücken Sie dann den Regler.
3 Drehen Sie den Lautstärke-Regler zum Wählen eines
Kontakts oder zum Eingeben einer Telefonnummer.
Wenn ein Kontakt gewählt wird, drücken Sie den Lautstärke-
Regler zur Anzeige der Telefonnummer.
4 Halten Sie eine der Zifferntasten (1bis 6) gedrückt.
“MEMORY P(gewählte Festsendernummer)” erscheint, wenn der
Kontakt gespeichert ist.
Zum Löschen eines Kontakts aus dem Festspeicher wählen Sie
[DIAL NUMBER]
in Schritt 2 und speichern Sie eine leere Nummer.
oder
[DIAL NUMBER]
, und
Einen Ruf aus dem Speicher tätigen
Drücken Sie , um auf Bluetooth-Modus zu
1
schalten.
2 Drücken Sie eine der Zifferntasten (1bis 6).
3 Drücken Sie den Lautstärke-Regler zum Anrufen.
“NO PRESET” erscheint, wenn kein Kontakt gespeichert ist.
Page 73

BLUETOOTH®
Bluetooth-Modus-Einstellungen
1
Halten Sie gedrückt.
2 Drehen Sie den Lautstärke-Regler, um einen Gegenstand zu treffen
und drücken Sie dann den Regler.
3 Wiederholen Sie Schritt 2, bis der gewünschte Gegenstand gewählt/aktiviert ist, oder folgen
Sie den Anweisungen auf dem gewählten Gegenstand.
4 Drücken Sie zum Beenden.
Zum Zurückschalten zum vorherigen Einstellelement drücken Sie .
(
siehe folgende Tabelle),
Standard:
BT MODE
PHONE SELECT
AUDIO SELECT
DEVICE DELETE
PIN CODE EDIT
(0000)
RECONNECT ON
AUTO PAIRING ON
INITIALIZE YES
INFORMATION MY BT NAME
*
Sie können maximal zwei Bluetooth-Telefone und ein Bluetooth-Audiogerät zur Zeit anschließen.
*
Wählt das Telefon oder Audiogerät zum Anschließen oder Abtrennen.
“
” erscheint vor dem Gerätenamen, wenn angeschlossen.
*
“
” erscheint vor dem aktuellen Wiedergabe-Audiogerät.
1
Drehen Sie den Lautstärke-Regler zum Wählen eines Geräts zum Löschen, und drücken Sie dann den Regler.
2
Drehen Sie den Lautstärke-Regler zum Wählen von
Ändert den PIN-Code (bis zu 6 Stellen).
1
Drehen Sie den Lautstärke-Regler zum Wählen einer Nummer.
2
Drücken Sie , um die Eingabeposition zu verschieben.
Wiederholen Sie Schritt
3
Drücken Sie den Lautstärke-Regler zum Bestätigen.
:Die Einheit stellt die Verbindung automatisch neu her, wenn das zuletzt angeschlossene Bluetooth-Gerät innerhalb
der Reichweite ist.;
:Die Einheit führt automatisch Pairing mit dem unterstützten Bluetooth-Gerät aus (iPhone/iPod touch/Android-Gerät),
wenn sie über die USB-Eingangsklemme verbunden wird.Je nach dem Betriebssystem des angeschlossenen Geräts
arbeitet diese Funktion möglicherweise nicht. ;
:Initialisiert alle Bluetooth-Einstellungen (einschließlich gespeichertes Pairing, Telefonbuch usw.).; NO:Hebt auf.
MY ADDRESS
1
und 2, bis die Eingabe des PIN-Codes beendet ist.
OFF
:Hebt auf.
: Zeigt den Namen der Einheit an (“KD-X3 BT”).;
: Zeigt die Adresse dieser Einheit.
OFF
[YES]
:Hebt auf.
oder
[NO]
, und drücken Sie dann den Regler.
Prüfmodus für Bluetooth-Kompatibilität
Sie können die Konnektivität des unterstützten Profils zwischen
dem Bluetooth-Gerät und der Einheit prüfen.
•
Stellen Sie sicher, dass kein Bluetooth-Gerät gekoppelt ist.
1 Halten Sie gedrückt.
“BLUETOOTH” “CHECK MODE” erscheint. “SEARCH NOW
USING PHONE”
2 Suchen und wählen Sie “KD-X3 BT” am Bluetooth-
Gerät innerhalb von 3 Minuten.
XX
3 Führen Sie (A), (B) oder (C) aus, je nachdem was im
Display erscheint.
(A) “PAIRING” “XXXXXX” (6-stelliger Passkey)
Stellen Sie sicher, dass der gleiche Passkey auf der
Einheit und auf dem Bluetooth-Gerät erscheint, und
bedienen Sie dann das Bluetooth-Gerät, um den
Passkey zu bestätigen.
(B) “PAIRING” “PIN IS 0000”
Bluetooth-Gerät ein.
(C) “PAIRING”
Pairing zu bestätigen.
Nachdem das Pairing erfolgreich ausgeführt ist, erscheint
“PAIRING OK”
Kompatibilität beginnt.
Wenn “CONNECT NOW USING PHONE” erscheint, bedienen Sie
das Bluetooth-Gerät, um Telefonbuch-Zugriff zu erlauben, um
fortzufahren.
“TESTING” blinkt im Display.
“PIN IS 0000” scrollt durch das Display.
: Geben Sie “0000” auf dem
: Bedienen Sie das Bluetooth-Gerät, um das
“[Gerätename]”, und die Prüfung der Bluetooth-
:
DEUTSCH
13
Page 74

BLUETOOTH®
Das Konnektivitätsergebnis blinkt im Display.
“PAIRING OK” und/oder “HANDS-FREEOK”
“AUD.STREAMOK”
1
*
Kompatibel mit Hands-Free Profile (HFP)
2
*
Kompatibel mit Advanced Audio Distribution Profile (A2DP)
3
*
Kompatibel mit Phonebook Access Profile (PBAP)
Nach 30 Sekunden erscheint “PAIRING DELETED”, um
anzuzeigen, dass Pairing gelöscht wurde, und die Einheit
beendet den Prüfmodus.
•
Zum Abbrechen halten Sie gedrückt, um
die Stromversorgung auszuschalten, und schalten Sie
dann die Stromversorgung erneut ein.
2
*
und/oder “PBAP OK”
1
*
und/oder
3
*
: Kompatibel
BLUETOOTH — Audio
Während BT AUDIO als Quelle
eingestellt ist, können Sie die
Verbindung zu fünf BluetoothAudiogeräten herstellen und
zwischen diesen Geräten
umschalten.
Audioplayer über Bluetooth
1
Drücken Sie wiederholt zum Wählen von BTAUDIO.
2 Bedienen Sie den Bluetooth-Audioplayer zum Starten der Wiedergabe.
Zum Auf der Frontblende
Wiedergabe/Pause Drücken Sie den Lautstärke-Regler.
Wählen Sie die Gruppe oder
den Ordner
Rückwärts-Sprung/VorwärtsSprung
Vorspulen/Rückspulen
Wiederholte Wiedergabe Drücken Sie
Drücken Sie
Drücken Sie
Halten Sie
.
.
gedrückt.
wiederholt.
TRACK REPEAT, ALL REPEAT, REPEAT OFF
Zufallswiedergabe
Drücken Sie
wiederholt.
GROUP RANDOM, ALL RANDOM, RANDOM OFF
Auswählen einer Datei aus
einem Ordner/einer Liste
Umschalten zwischen
angeschlossenen BluetoothAudiogeräten
*
Durch Drücken der “Play”-Taste am angeschlossenen Gerät selber wird ebenfalls die Tonausgabe vom Gerät umgeschaltet.
Die Bedienungen und Displayanzeigen unterscheiden möglicherweise sich je nach Verfügbarkeit auf dem
angeschlossenen Gerät.
Siehe “Auswählen einer Datei aus einem Ordner/einer Liste” auf Seite 8.
Drücken Sie
*
5.
14
DEUTSCH
Page 75

BLUETOOTH®
Einstellungen zur Verwendung der JVC Remote-Anwendung
JVC Remote-Anwendung ist darauf ausgelegt, die Bedienung des JVC Auto-Receivers
vom iPhone/iPod (über Bluetooth oder über USB-Eingang) oder Android-Smartphone
(über Bluetooth) auszuführen.
Vorbereitung:
Installieren Sie vor dem Verbinden die neueste Version der JVC Remote-Anwendung auf
Ihrem Gerät. Für die neueste Information besuchen Sie <http://www.jvc.net/cs/car/>.
1 Halten Sie gedrückt.
2 Drehen Sie den Lautstärke-Regler, um einen Gegenstand zu treffen
(
siehe folgende Tabelle), und drücken Sie dann den Regler.
3 Wiederholen Sie Schritt 2, bis der gewünschte Gegenstand gewählt
oder aktiviert ist.
4 Drücken Sie zum Beenden.
Zum Zurückschalten zum vorherigen Einstellelement drücken Sie .
XX
Standard:
REMOTE APP
SELECT
IOS YES
ANDROID YES
ANDROID LIST
*
Wird nur angezeigt, wenn
Wählen Sie das Gerät (IOS oder ANDROID), das die Anwendung ausführen soll.
:Wählt das über Bluetooth oder USB-Eingang angeschlossene iPhone/iPod, das die
Anwendung ausführen soll.;
Wenn IOS gewählt ist, wählen Sie iPod BT Quelle (oder iPod USB, wenn Ihr iPhone/iPod über
USB-Eingang angeschlossen ist) zum Aktivieren der Anwendung.
•
Die Konnektivität der Anwendung wird unterbrochen oder abgetrennt, wenn:
– Sie von der iPod BT-Quelle auf eine andere Wiedergabequelle umschalten, die über den
USB-Eingang angeschlossen ist.
– Sie können von iPod USB-Quelle auf iPod BT-Quelle umschalten.
:Wählt das Android-Smartphone zur Verwendung der Anwendung über Bluetooth.;
NO
:Hebt auf.
*
:Wählt das Android-Smartphone zur Verwendung aus der Liste.
[ANDROID]
unter
NO
:Hebt auf.
[SELECT]
auf
[YES]
gestellt ist.
STATUS
Zeigt den Status des gewählten Geräts.
IOS CONNECTED
angeschlossenen iPhone/iPod verwenden.
IOS NOT CONNECTED
ANDROID CONNECTED
angeschlossenen Android-Smartphone verwenden.
ANDROID NOT CONNECTED
angeschlossen.
: Sie können die Anwendung mit dem über Bluetooth oder USB-Eingang
: Kein IOS-Gerät ist zur Verwendung der Anwendung angeschlossen.
: Sie können die Anwendung mit dem über Bluetooth
: Kein Android-Gerät ist zur Verwendung der Anwendung
Hören von iPhone/iPod über Bluetooth
Sie können die Titel auf dem iPhone/iPod über Bluetooth auf dieser Einheit hören.
Drücken Sie wiederholt zum Wählen von iPodBT.
•
Sie können das iPod/iPhone auf gleiche Weise wie iPod/iPhone über USB-Eingang
bedienen.
•
( 7)
Wenn Sie ein iPhone/iPod an den USB-Eingang anschließen, während Sie die iPod
BT-Quelle hören, schaltet die Quelle automatisch auf iPod USB um. Drücken Sie
angeschlossen ist.
, um iPod BT zu wählen wenn das Gerät immer noch über Bluetooth
DEUTSCH
15
Page 76

AUX
Verwendung eines tragbaren Audioplayers
1
Schließen Sie einen tragbaren Audioplayer (im Handel erhältlich) an.
3,5-mm-Stereo-Ministecker mit “L”-förmigem Anschluss
(im Handel erhältlich)
Auxiliary-Eingabebuchse
2 Wählen Sie
3 Drücken Sie wiederholt zum Wählen von AUX.
4 Schalten Sie den tragbaren Audioplayer ein und starten Sie die
Wiedergabe.
16
[ON]
für
[BUILT-IN AUX]
Verwenden Sie einen 3-adrigen Stereo-Ministecker für optimale
Audioausgabe.
DEUTSCH
Tragbarer Audioplayer
in
[SOURCE SELECT]. ( 4)
AUDIOEINSTELLUNGEN
Wählen Sie einen Vorwahl-Equalizer
Drücken Sie wiederholt.
(oder)
Drücken Sie
von 5 Sekunden.
Vorwahl-Equalizer
FLAT
(Standard),
CLASSICAL
•
Der Drive-Equalizer
Störgeräusche von außerhalb des Fahrzeugs oder Laufgeräusche der Reifen zu verringern.
Speichern Ihre eigenen Klangeinstellungen
1
Halten Sie gedrückt, um auf EASY EQ-Suche zu schalten.
2 Drehen Sie den Lautstärke-Regler zum Wählen eines Gegenstands, und
drücken Sie dann den Regler.
Siehe
[EASY EQ] ( 17)
[USER]
gespeichert.
•
Zum Zurückschalten zum vorherigen Einstellelement drücken Sie .
•
Zum Beenden drücken Sie .
Andere Einstellungen
1
Halten Sie gedrückt.
2 Drehen Sie den Lautstärke-Regler zum Wählen eines Gegenstands
und drücken Sie dann den Regler.
3 Wiederholen Sie Schritt 2, bis der gewünschte Gegenstand gewählt/aktiviert
ist, oder folgen Sie den Anweisungen auf dem gewählten Gegenstand.
4 Drücken Sie zum Beenden.
Zum Zurückschalten zum vorherigen Einstellelement drücken Sie .
, und drehen Sie dann den Lautstärke-Regler innerhalb
:
DRVN 3, DRVN 2, DRVN 1, HARD ROCK, HIP HOP, JAZZ, POP, R&B, USER
(
DRVN 3/DRVN 2/DRVN 1
bezüglich der Einstellung, und das Ergebnis wird unter
)
hebt spezifische Frequenzen an, um
( 17)
,
,
Page 77

AUDIOEINSTELLUNGEN
EQ SETTING
PRESET EQ
EASY EQ
PRO EQ
62.5HZ
LEVEL –09
eine Einstellung vornehmen, wählen Sie eine anzupassende Quelle aus.)
ON
100HZ/160HZ/250HZ/400HZ/630HZ/1KHZ/1.6KHZ/2.5KHZ/4KHZ/6.3KHZ/10KHZ
16KHZ
LEVEL –09
(Bevor Sie eine Einstellung vornehmen, wählen Sie eine anzupassende Quelle aus.)
Q FACTOR 1.35/1.50/2.00
AUDIO CONTROL
BASS BOOST
Wählt einen Vorwahl-Equalizer, der für das Musikgenre geeignet ist.
•
Wählen Sie
[USER]
, um die in
[EASY EQ]
oder
Einstellungen zu verwenden.
FLAT/DRVN 3/DRVN 2/DRVN 1/HARD ROCK/HIP HOP/JAZZ/POP/R&B
USER/CLASSICAL
Justieren Ihre eigenen Klangeinstellungen.
•
Diese Einstellungen werden unter
•
Die vorgenommenen Einstellungen können die aktuellen Einstellungen von
beeinflussen.
2
*1*
SUB.W SP
SUB.W
BASS
MID
TRE
Justieren Ihre eigenen Klangeinstellungen.
•
Diese Einstellungen werden unter
•
Die vorgenommenen Einstellungen können die aktuellen Einstellungen von
beeinflussen.
bis
LEVEL +09 (LEVEL 00
:Schaltet den erweiterten Bass ein.;
bis
LEVEL +09 (LEVEL 00):
LEVEL +01
OFF
*1*
:
:
:
:Hebt auf.
3
:
bis
:
:Den Qualitätsfaktor einstellen.
LEVEL +05
[USER]
00
bis
+06
–50
bis
+10 00
LVL–09
bis
LVL–09
bis
LVL–09
bis
[USER]
): Stellt den Pegel zum Speichern für jede Quelle ein. (Bevor Sie
OFF
:Hebt auf.
Stellt den Pegel zum Speichern für jede Quelle ein.
: Wählt Ihren bevorzugten Bass-Boost-Pegel.;
[PRO EQ]
gespeichert.
(Standard:
LVL+09 LVL 00
LVL+09 LVL 00
LVL+09 LVL 00
gespeichert.
vorgenommenen
Standard:
[PRO EQ]
03
)
[EASY EQ]
XX
LOUDNESS LEVEL 01/LEVEL 02
SUB.W LEVEL
/
SUBWOOFER
3
*
SET
FADER
4
*
BALANCE
VOLUME ADJUST LEVEL –15
AMP GAIN LOW POWER
/
1
*
Wird nur angezeigt, wenn
2
*
Für 2-Wege-Übergang: Wird nur angezeigt, wenn
gestellt ist.
3
*
4
*
( 18)
Für 2-Wege-Übergang: Wird nur angezeigt, wenn
[SUB.W/SUB.W]
Die Einstellung kann nicht den Subwoofer-Ausgang beeinflussen.
Klangwirkung auch bei niedriger Lautstärke zu erhalten.;
1
*
SPK-OUT
PRE-OUT
ON
: Schaltet den Subwoofer-Ausgang ein.;
(Nicht anwendbar, wenn 3-Wege-Übergang gewählt ist.)
POSITION R15
Ausgangsbalance zwischen vorderen und hinteren Lautsprechern ein.
POSITION L15
Ausgangsbalance zwischen linken und rechten Lautsprechern ein.
anfänglichen Lautstärkepegels für jede Quelle (in Bezug auf den FM (UKW)Lautstärkepegel) vor. Vor der Einstellung wählen Sie eine anzupassende Quelle aus.
wenn die Maximalleistung jedes Lautsprechers weniger als 50 W beträgt, um Schäden an
den Lautsprechern zu verhindern).;
ist 35.
[SUBWOOFER SET]
gestellt ist.
:Verstärkt niedrige oder hohe Frequenzen, um eine gute
2
*
(Nicht anwendbar, wenn 3-Wege-Übergang gewählt ist.)
SUB.W 00
bis
Ausgangspegel des über Lautsprecherleitung angeschlossenen
Subwoofers ein.
3
*
SUB.W –50
Ausgangspegel des an die Line-Out-Anschlüsse (SW oder REAR/
SW) über einen externen Verstärker angeschlossenen Subwoofers
ein.
bis
bis
bis
LEVEL +06(LEVEL 00
:Beschränkt den maximalen Lautstärkepegel auf 25. (Wählen Sie dies,
SUB.W +06(SUB.W +03
( 27)
bis
SUB.W +10(SUB.W 00
( 27)
POSITION F15(POSITION 00
POSITION R15(POSITION 00
HIGH POWER
auf
[ON]
gestellt ist.
[SPK/PRE OUT]
( 18)
[SPK/PRE OUT]
OFF
:Hebt auf
OFF
:Hebt auf.
):Stellen Sie die
):Stellen Sie die
):Nehmen Sie die Vorwahl des
:Der maximale Lautstärkepegel
auf
[SUB.W/SUB.W]
auf
[REAR/SUB.W]
):Stellt den
):Stellt den
oder
DEUTSCH
17
Page 78

AUDIOEINSTELLUNGEN
SPK/PRE OUT
SPEAKER SIZE
X ' OVER
DTA SETTINGS
CAR SETTINGS
X ' OVER TYPE Vorsicht
2-WAY
3-WAY
(Nicht anwendbar, wenn 3-Wege-Übergang gewählt ist.)
Wählen Sie je nach der Art des Lautsprecheranschlusses die geeignete
Einstellung, um den gewünschten Ausgang zu erhalten. (
Ausgangseinstellungen
Je nach dem gewählten Übergangstyp (
2-Wege-Übergang oder 3-Wege-Übergang gezeigt.
(
19, Übergangseinstellungen
Als Standard ist der 2-Wege-Übergangstyp gewählt.
Für Einstellungen,
wird, um plötzliche Schwankungen im Ausgangspegel zu vermeiden.
(Wird nur angezeigt, wenn
YES
:Wählt den Zwei-Wege-Übergangstyp.; NO:Hebt auf.
(Wird nur angezeigt, wenn
YES
:Wählt den Drei-Wege-Übergangstyp.; NO:Hebt auf.
20, Einstellungen der digitalen Zeitanpassung
: Passen Sie die Lautstärke an, bevor der Punkt
SOUND EFFECT
SPACE ENHANCE
SND RESPONSE LEVEL1/LEVEL2/LEVEL3
SOUND LIFT LO W/MIDDLE/HIGH
VOL LINK EQ ON
K2 TECHNOLOGY
(Gilt nicht für TUNER-Quelle.)
SMALL/MEDIUM/LARGE
OFF
:Hebt auf.
OFF
:Hebt auf.
ein.;
OFF
:Hebt die Frequenz an, um Störgeräusche von außerhalb des Fahrzeugs oder
Laufgeräusche der Reifen zu verringern.;
(Gilt nicht für TUNER-Quelle und AUX-Quelle.)
ON
:Verbessern Sie die Klangqualität von komprimierter Musik.;
: Stellt die von den Lautsprechern gehörte Klangposition virtuell
:Hebt auf.
)
[X ' OVER TYPE]
)
Lautsprecher-
) werden die Einstellpunkte
[X ' OVER TYPE]
[3-WAY]
gewählt ist)
[2-WAY]
gewählt ist)
: Erlaubt virtuelle Verbesserung des Klangraums.;
: Lässt den Klang virtuell realistischer wirken.;
OFF
:Hebt auf.
OFF
:Hebt auf.
geändert
Lautsprecher-Ausgangseinstellungen
[SPK/PRE OUT]
(Gilt nur wenn [X ' OVER TYPE] auf [2-WAY] gestellt ist)
Wählen Sie die Ausgangseinstellung für die Lautsprecher
auf der Art des Lautsprecheranschlusses.
[SPK/PRE OUT],
Anschluss über Line-Out-Buchsen
Für Verbindungen über einen externen Verstärker.
.
Einstellung auf
[SPK/PRE OUT]
REAR/REAR
REAR/SUB.W
SUB.W/SUB.W
(Standard)
Vorderer Lautsprecherausgang Hinterer Lautsprecherausgang
Vorderer Lautsprecherausgang Subwoofer-Ausgang
Vorderer Lautsprecherausgang Subwoofer-Ausgang
FRONT REAR/SW
( 27)
Audiosignal über Line-Out-Anschluss
Anschluss über Lautsprecherkabel
Für Verbindungen ohne externen Verstärker. Mit diesen Einstellungen können Sie
aber auch den Subwoofer-Ausgang genießen.
Einstellung auf
[SPK/PRE OUT]
REAR/REAR
REAR/SUB.W
SUB.W/SUB.W
[SUB.W/SUB.W]
Wenn
–
[120HZ]
Verfügung.
–
[POSITION R02]
[POSITION 00]
ist in
Hinterer Lautsprecherausgang Hinterer Lautsprecherausgang
Hinterer Lautsprecherausgang Hinterer Lautsprecherausgang
Subwoofer-Ausgang (Stummschaltung)
gewählt ist:
[SUBWOOFER LPF]
ist in
.
gewählt, und
[FADER]
gewählt, und der Wahlbereich ist
( 27)
Audiosignal über hintere Lautsprecherleitung
L (links) R (rechts)
[THROUGH]
steht nicht zur
basierend
[POSITION R15]
bis
18
DEUTSCH
Page 79

AUDIOEINSTELLUNGEN
Übergangseinstellungen
Im Folgenden werden die verfügbaren Einstellpunkte für 2-Wege-Übergang und
3-Wege-Übergang gezeigt.
Vorsicht
Wählen Sie einen Übergangstyp entsprechend der Art des Anschlusses der
Lautsprecher.
Wenn Sie einen falschen Typ wählen:
•
Die Lautsprecher können beschädigt werden.
•
Der Ausgangstonpegel kann sehr hoch oder niedrig sein.
SPEAKER SIZE
Wählt entsprechend der Größe der angeschlossenen Lautsprecher für optimale
Leistung.
•
Die Einstellungen für Frequenz und Flanke werden automatisch für die
Übergangseinstellung des gewählten Lautsprechers übernommen.
•
Wenn 2-Wege-Übergang gewählt ist und
[REAR]
[X ‘ OVER]
•
Wenn 3-Wege-Übergang gewählt ist, wenn
SIZE]
Verfügung.
X ‘ OVER (Übergang)
• [FRQ]/[F-HPF FRQ]/[R-HPF FRQ]/[SW LPF FRQ]/[HPF FRQ]/[LPF FRQ]
Übergangsfrequenz für die gewählten Lautsprecher an (Hochpassfilter oder
Tiefpassfilter).
Wenn
Lautsprechern gesendet.
• [SLOPE]/[F-HPF SLOPE]/[R-HPF SLOPE]/[SW LPF SLOPE]/[HPF SLOPE]/[LPF SLOPE]:
Passt die Stellt die Übergangsflanke an.
Nur wählbar, wenn eine andere Einstellung als
Übergangsfrequenz gewählt ist.
• [SW LPF PHASE]/[PHASE]:
dem anderen Lautsprecherausgang entspricht.
•
[GAIN LEFT]/[GAIN RIGHT]/[F-HPF GAIN]/[R-HPF GAIN]/[SW LPF GAIN]/[GAIN]:
Passt die Ausgangslautstärke des gewählten Lautsprechers an.
( 27)
und
[SUBWOOFER]
des gewählten Lautsprechers nicht zur Verfügung.
gewählt ist, steht die Einstellung
[THROUGH]
für
gewählt ist, werden alle Signale zu den gewählten
[SPEAKER SIZE]
[X’OVER]
[NONE]
gewählt ist, steht die Einstellung
[NONE]
von
[THROUGH]
Wählt die Phase des Lautsprecherausgangs so, dass sie
für
[TWEETER]
für
[WOOFER]
[WOOFER]
für die
von
[FRONT]
von
[SPEAKER
nicht zur
: Passt die
,
Einstellpunkte für 2-Wege-Übergang
SPEAKER SIZE
FRONT SIZE
TWEETER
1
*
REAR
SUBWOOFER
8CM/10CM/12CM/13CM/16CM/17CM/18CM/4×6/5×7/6×8/6×9
7×10/NONE
3
*2*
16CM/20CM/25CM/30CM/38CM OVER/NONE
8CM/10CM/12CM/13CM/16CM/17CM/18CM/4×6
5×7/6×8/6×9/7×10
SMALL/MIDDLE/LARGE/NONE
(nicht angeschlossen)
X ' OVER
TWEETER FRQ
GAIN LEFT
GAIN RIGHT
FRONT HPF F-HPF FRQ
F-HPF SLOPE
F-HPF GAIN
1
*
REAR HPF
R-HPF FRQ 30HZ/40HZ/50HZ/60HZ/70HZ/80HZ/90HZ/100HZ
R-HPF SLOPE
R-HPF GAIN
SUBWOOFER
3
*2*
LPF
SW LPF FRQ 30HZ/40HZ/50HZ/60HZ/70HZ/80HZ/90HZ/100HZ
SW LPF SLOPE
SW LPF PHASE
1KHZ/1.6KHZ/2.5KHZ/4KHZ/5KHZ/6.3KHZ/8KHZ
10KHZ/12.5KHZ
–08DB
–08DB
30HZ/40HZ/50HZ/60HZ/70HZ/80HZ/90HZ/100HZ
120HZ/150HZ/180HZ/220HZ/250HZ/THROUGH
–06DB/–12DB/–18DB/–24DB
–08DB
120HZ/150HZ/180HZ/220HZ/250HZ/THROUGH
–06DB/–12DB/–18DB/–24DB
–08DB
120HZ/150HZ/180HZ/220HZ/250HZ/THROUGH
–06DB/–12DB/–18DB/–24DB
REVERSE
SW LPF GAIN –08DB
1
2
3
*
*
*
,
,
:
( 20)
bis
bis
bis
bis
bis
00DB
00DB
00DB
00DB
(180°)/
00DB
NORMAL
/
(nicht angeschlossen)
/
(nicht angeschlossen)
/
/
/
/
(0°)
DEUTSCH
19
Page 80

AUDIOEINSTELLUNGEN
Einstellpunkte für 3-Wege-Übergang
SPEAKER SIZE
TWEETER
MID RANGE
WOOFER
SMALL/MIDDLE/LARGE
8CM/10CM/12CM/13CM/16CM/17CM/18CM/4×6/5×7/6×8/6×9
3
*
16CM/20CM/25CM/30CM/38CM OVER/NONE
(nicht angeschlossen)
X ' OVER
TWEETER HPF FRQ
SLOPE
PHASE
GAIN –08DB
MID RANGE HPF FRQ
HPF SLOPE
LPF FRQ
LPF SLOPE
PHASE
GAIN –08DB
3
*
WOOFER
LPF FRQ 30HZ/40HZ/50HZ/60HZ/70HZ/80HZ/90HZ/100HZ/120HZ
SLOPE
PHASE
GAIN –08DB
1
*
Wird nur angezeigt, wenn [SPK/PRE OUT] auf [REAR/REAR] oder [REAR/SUB.W] gestellt ist.
2
*
Wird nur angezeigt, wenn [SPK/PRE OUT] auf [REAR/SUB.W] oder [SUB.W/SUB.W] gestellt ist.
( 18)
3
*
Wird nur angezeigt, wenn [SUBWOOFER SET] auf [ON] gestellt ist.
1KHZ/1.6KHZ/2.5KHZ/4KHZ/5KHZ/6.3KHZ/8KHZ/10KHZ
12.5KHZ
–06DB/–12DB
REVERSE
(180°)/
NORMAL
(0°)
bis
00DB
30HZ/40HZ/50HZ/60HZ/70HZ/80HZ/90HZ/100HZ/120HZ
150HZ/180HZ/220HZ/250HZ/THROUGH
–06DB/–12DB
1KHZ/1.6KHZ/2.5KHZ/4KHZ/5KHZ/6.3KHZ/8KHZ/10KHZ
12.5KHZ/THROUGH
–06DB/–12DB
REVERSE
(180°)/
NORMAL
(0°)
bis
00DB
150HZ/180HZ/220HZ/250HZ/THROUGH
–06DB/–12DB
REVERSE
(180°)/
NORMAL
(0°)
bis
00DB
( 17)
( 18)
Einstellungen der digitalen Zeitanpassung
Die digitale Zeitanpassung stellt die Verzögerungszeit des Lautsprecherausgangs
ein, um eine geeignetere Umgebung für Ihr Fahrzeug zu erzeugen.
•
Für die weitere Informationen,
und [GAIN] unter [DTA SETTINGS]
21, Bestimmen des Werts für [DISTANCE]
.
DTA SETTINGS
POSITION
/
*
DISTANCE
1
*
GAIN
/
DTA RESET YES
CAR SETTINGS
/
CAR TYPE COMPACT/FULL SIZE CAR/WAGON/MINIVAN/SUV
R-SP LOCATION
/
1
2
*
*
,
:
( 21)
Wählt Ihre Hörposition (Bezugspunkt).
ALL
:Keine Kompensation;
FRONT LEFT
•
[FRONT ALL]
[2-WAY]
1
0CM
bis
610CM
–8DB
bis
0DB
gewählten Lautsprechers vor.
:Setzt die Einstellungen (
[POSITION]
Identifizieren Sie Ihren Fahrzeugtyp und die Lage der hinteren Lautsprecher,
um die Anpassung für
MINIVAN(LONG)
Kompensation.
2
*
Wählt die Lage der hinteren Lautsprecher in Ihrem Fahrzeug, um
den weitesten Abstand von der gewählten Hörposition zu berechnen
(Bezugspunkt).
•
DOOR/REAR DECK
[COMPACT], [FULL SIZE CAR], [WAGON]
gewählt ist.
•
2ND ROW/3RD ROW
[MINIVAN]
FRONT RIGHT
:Vorderer linker Sitz;
wird nur angezeigt, wenn
gestellt ist.
:Stellen Sie den auszugleichenden Abstand fein ein.
:Nehmen Sie Anpassung der Ausgangslautstärke des
auf Standardwerte zurück.; NO:Hebt auf.
oder
FRONT ALL
( 18)
[DISTANCE]
[DTA SETTINGS]
:Wählt den Typ des Fahrzeugs.;
:Nur wählbar, wenn
[MINIVAN(LONG)]
vorzunehmen.
:Nur wählbar, wenn
: Vorderer rechter Sitz;
:Vorderer Sitz
[X ' OVER TYPE]
und
[GAIN]
[CAR TYPE]
[CAR TYPE]
gewählt ist.
) der gewählten
OFF
: Keine
oder
[SUV]
als
/
auf
[OFF]
als
,
20
DEUTSCH
Page 81

AUDIOEINSTELLUNGEN
Bestimmen des Werts für [DISTANCE] und [GAIN] unter [DTA SETTINGS]
Wenn Sie den Abstand von der Mitte der momentan
eingestellten Hörposition zu jedem Lautsprecher festlegen,
wird die Verzögerungszeit automatisch berechnet und
eingestellt.
1
Bestimmen Sie die Mitte der momentan eingestellten
Hörposition als Bezugspunkt.
2
Messen Sie den Abstand vom Bezugspunkt zu den
Lautsprechern.
3
Berechnen Sie die Unterschiede zwischen dem Abstand
des am weitesten entfernten Lautsprechers (hinteren
Lautsprechers) und anderen Lautsprechern.
4
Stellen Sie den in Schritt 3 für die einzelnen
Lautsprecher berechneten Wert für
5
Stellen Sie
[GAIN]
Beispiel: Wenn
1
*
Bevor Sie eine Einstellung vornehmen, wählen Sie den Lautsprecher aus:
Wenn 2-Wege-Übergang gewählt ist:
FRONT LEFT/FRONT RIGHT/REAR LEFT/REAR RIGHT/SUBWOOFER:
[REAR LEFT], [REAR RIGHT]
Einstellung als
( 19)
Wenn 3-Wege-Übergang gewählt ist:
TWEETER LEFT/TWEETER RIGHT/MID LEFT/MID RIGHT/WOOFER:
[WOOFER]
[SPEAKER SIZE]
2
*
Wird nur angezeigt, wenn
Einstellung als
[NONE]
ist nur wählbar, wenn eine andere Einstellung als
gewählt ist.
[NONE]
und
für
[REAR]
( 20)
[X ' OVER TYPE]
für
[REAR]
[SUBWOOFER]
und
[SUBWOOFER]
auf
unter
[SPEAKER SIZE]
[2-WAY] ( 18)
für einzelne Lautsprecher ein.
[FRONT ALL]
ist nur wählbar, wenn eine andere
unter
als Hörposition gewählt ist
[SPEAKER SIZE]
[NONE]
und
[WOOFER]
gestellt ist und eine andere
gewählt ist.
( 19)
[DISTANCE]
gewählt ist.
unter
DISPLAY-EINSTELLUNGEN
1 Halten Sie gedrückt.
2 Drehen Sie den Lautstärke-Regler, um einen Gegenstand zu treffen
(siehe folgende Tabelle), und drücken Sie dann den Regler.
3 Wiederholen Sie Schritt 2, bis der gewünschte Gegenstand gewählt/
aktiviert ist, oder folgen Sie den Anweisungen auf dem gewählten
ein.
Gegenstand.
4 Drücken Sie zum Beenden.
Zum Zurückschalten zum vorherigen Einstellelement drücken Sie .
DISPLAY
DIMMER
1
*
Die Steuerleitungsverbindung für Beleuchtung ist erforderlich.
Blenden Sie die Beleuchtung ab.
OFF
:Die Abblendung ist ausgeschaltet. Die Helligkeit wechselt auf
ON
:Die Abblendung ist eingeschaltet. Die Helligkeit wechselt auf
(
22,
[BRIGHTNESS]
DIMMER TIME
1
Drehen Sie den Lautstärke-Regler zum Einstellen der Einschaltzeit
dann den Regler.
2
Drehen Sie den Lautstärke-Regler zum Einstellen der Einschaltzeit
dann den Regler.
(Standard:
DIMMER AUTO
Autoscheinwerfer ein- oder ausschalten.
)
:Stellen Sie die Anfangs- und Endzeit für die Abblendfunktion ein.
[ON]: 18:00
;
[OFF]: 6:00
:Die Abblendung schaltet automatisch ein und aus, wenn Sie die
)
1
*
( 27)
[DAY]
[NIGHT]
[ON]
[OFF]
Standard:
-Einstellung um.
-Einstellung um.
, und drücken Sie
, und drücken Sie
XX
DEUTSCH
21
Page 82

DISPLAY-EINSTELLUNGEN
BRIGHTNESS
TEXT SCROLL
2
*
Manche Zeichen oder Symbole werden nicht richtig angezeigt (oder werden ausgeblendet).
Stellen Sie die Helligkeit für Tag und Nacht separat ein.
1 DAY/NIGHT
2
Wählen Sie eine Zone.
3 LEVEL 00
2
*
SCROLL ONCE
das Scrollen in 5-Sekunden-Intervallen.;
:Wählen Sie Tag oder Nacht.
( 21)
bis
(Standard:
LEVEL 31
BUTTON ZONE
DISP ZONE
:Scrollt die Display-Information einmal.;
: Stellen Sie den Helligkeitspegel ein.
:
:
DAY:LEVEL 25
DAY:LEVEL 31
SCROLL OFF
;
NIGHT:LEVEL 09
;
NIGHT:LEVEL 12
SCROLL AUTO
:Hebt auf.
)
:Wiederholt
ZUR BEZUGNAHME
Wartung
Reinigung des Geräts
Wischen Sie die Frontblende mit einem trockenen Silikonlappen oder weichen Lappen sauber.
Reinigung des Steckverbinders
Die Frontblende abnehmen und den Anschluss sanft mit einem
Wattetupfer oder Lappen reinigen, wobei darauf geachtet
werden muss, die Anschlusskontakte nicht zu beschädigen.
Weitere Informationen
Bei: – Neuste Firmware-Aktualisierungen und eine Liste der neuesten kompatiblen Artikel
– JVC-Originalanwendung
– Jegliche neuesten Informationen
Besuchen Sie <http://www.jvc.net/cs/car/>.
Abspielbare Dateien
•
Für detaillierte Information und Hinweise über abspielbare Audiodateien besuchen Sie
<http://www.jvc.net/cs/car/>.
•
Wiederzugebende Audiodateien: MP3 (.mp3), WMA (.wma), AAC (.aac), WAV (.wav), FLAC (.flac)
•
Mögliche Dateisysteme auf USB-Geräten: FAT12, FAT16, FAT32
Auch wenn Audiodateien den oben aufgeführten Standards entsprechen, kann das Abspielen unter Umständen auf
Grund von Typ oder Zustand der Medien bzw. Geräte nicht möglich sein.
Die AAC (.m4a)-Datei in einem USB-Gerät eine von iTunes codierte kann nicht auf diesem Gerät abgespielt werden.
Wissenswertes über USB-Geräte
•
Sie können ein USB-Gerät nicht über einen USB-Hub anschließen.
•
Der Anschluss eines Kabels mit einer Gesamtlänge von mehr als 5 m kann eine fehlerhafte Wiedergabe verursachen.
•
Diese Einheit kann nicht ein USB-Gerät mit einer anderen Bewertung als 5 V und mehr als 1,5A erkennen.
Wissenswertes über iPod/iPhone
•
Über USB-Eingangsterminal:
Made for
– iPod touch (5th und 6th generation)
– iPod nano (7th generation)
– iPhone 4S, 5, 5S, 5C, 6, 6 Plus, 6S, 6S Plus, SE
Anschluss (an der Rückseite der
Frontblende)
22
DEUTSCH
Page 83

ZUR BEZUGNAHME
•
Über Bluetooth:
Made for
– iPod touch (5th und 6th generation)
– iPhone 4S, 5, 5S, 5C, 6, 6 Plus, 6S, 6S Plus, SE
•
Es ist nicht möglich, Videodateien im Menü “Videos” in
•
Die Song-Reihenfolge, die im gewählten Menü dieser Einheit erscheint, kann sich vom iPod/iPhone
unterscheiden.
•
Je nach der Version des Betriebssystems des iPod/iPhone sind einige Funktionen möglicherweise nicht
verfügbar.
Wissenswertes über Android-Geräte
•
Diese Einheit unterstützt Android OS 4.1 und höher.
•
Manche Android-Geräte (mit OS 4.1 und höher) unterstützen möglicherweise Android Open Accessory (AOA)
2.0 nicht vollständig.
•
Wenn das Android-Gerät sowohl Massenspeicherklasse-Gerät als auch AOA 2.0 unterstützt, hat diese Einheit
immer Wiedergabe über AOA 2.0 als Vorrang.
Über Bluetooth
•
Je nach Bluetooth-Version des Geräts lassen sich manche Bluetooth-Geräte möglicherweise nicht an diese
Einheit anschließen.
•
Diese Einheit arbeitet u.U. nicht mit bestimmten Bluetooth-Geräten.
•
Die Signalbedingungen sind je nach Umgebung unterschiedlich.
Verfügbare kyrillische Buchstaben
Verfügbares Zeichen
Displayanzeigen
[HEAD MODE]
zu durchsuchen.
Ändern der Display-Information
Jedesmal, wenn Sie drücken, wechselt die Anzeige-Information.
•
Wenn die Information nicht verfügbar oder nicht aufgezeichnet ist, erscheint “NO TEXT”, “NO NAME” oder andere Information
(z.B. Sendername).
Quellenname Display-Information
FM
oder
AM
Frequenz (Datum/Uhrzeit) Frequenz (Datum/Uhrzeit) mit Musiksynchronisation*
(zurück zum Anfang)
(Nur für Radio Data System-FM (UKW)-Sender)
Sendername (PS)/Programmtyp (PTY) (Datum/Uhrzeit) Radiotext (Datum/Uhrzeit)
Radiotext+ (Radiotext+) Songtitel (Interpret) Songtitel (Datum/Uhrzeit)
Frequenz (Datum/Uhrzeit)
Musiksynchronisation
USB (Für MP3/WMA/AAC/WAV/FLAC-Datei)
iPod USB/
iPod BT
ANDROID
AUX
BT AUDIO
*
Die Helligkeit der Beleuchtung wechselt und wird mit der Musik synchronisiert.
Songtitel (Interpret) Songtitel (Albumname) Songtitel (Datum/Uhrzeit) Dateiname
(Ordnername)
mit Musiksynchronisation
Wenn
[HEAD MODE]/[AUTO MODE]
Songtitel (Interpret)
oder
(Datum/Uhrzeit)
AUX (Datum/Uhrzeit) AUX (Datum/Uhrzeit) mit Musiksynchronisation* (zurück zum Anfang)
Songtitel (Interpret) Songtitel (Albumname) Songtitel (Datum/Uhrzeit) Spielzeit
(Datum/Uhrzeit)
Sendername (PS)/Programmtyp (PTY) (Datum/Uhrzeit) mit
*
(zurück zum Anfang)
Dateiname (Datum/Uhrzeit) Spielzeit (Datum/Uhrzeit) Songtitel (Interpret)
*
(zurück zum Anfang)
Songtitel (Albumname) Songtitel (Datum/Uhrzeit) Spielzeit
Songtitel (Interpret) mit Musiksynchronisation* (zurück zum Anfang)
Songtitel (Interpret) mit Musiksynchronisation* (zurück zum Anfang)
ausgewählt ist
( 8)
:
DEUTSCH
23
Page 84

FEHLERSUCHE
Symptom Abhilfe
Es wird kein Ton gehört.
“MISWIRING CHECK WIRING THEN
PWR ON” erscheint.
Allgemeines
“PROTECTING SEND SERVICE”
erscheint.
Quelle kann nicht gewählt
werden.
•
Der Radioempfang ist schlecht.
•
Statikrauschen beim
Radio
Radiohören.
Die Wiedergabereihenfolge ist
nicht wie gewünscht.
Verflossene Spielzeit ist nicht
richtig.
“NOT SUPPORT” erscheint, und
Dateien werden übersprungen.
“READING” blinkt weiter.
“UNSUPPORTED DEVICE” erscheint.
USB/iPod
“UNRESPONSIVE DEVICE”
erscheint.
“USB HUB IS NOT SUPPORTED”
erscheint.
“CANNOT PLAY” erscheint.
24
DEUTSCH
•
Die Lautstärke auf den optimalen Pegel einstellen.
•
Prüfen Sie die Kabel und Verbindungen.
Schalten Sie die Stromversorgung aus, und prüfen Sie, ob die
Klemmen der Lautsprecherdrähte richtig isoliert sind. Schalten Sie die
Stromversorgung wieder ein.
Reichen Sie die Einheit beim nächsten Kundendienstzentrum ein.
Prüfen Sie die Einstellung
Schließen Sie das Antennenkabel fest an.
Die Wiedergabereihenfolge wird durch den Dateinamen
Dies hängt von dem vorherigen Aufnahmevorgang ab.
Prüfen Sie, ob die Datei ein abspielbares Format hat.
•
Verwenden Sie nicht zu viele Hierarchie-Ebenen und Ordner.
•
Bringen Sie das USB Gerät wieder an.
•
Prüfen Sie, ob das angeschlossene Gerät kompatibel mit diesem Gerät
ist, und stellen Sie sicher, dass die Dateisysteme die unterstützten
Formate haben.
•
Bringen Sie das Gerät wieder an.
Stellen Sie sicher, dass das Gerät nicht eine Fehlfunktion aufweist, und
bringen Sie das Gerät wieder an.
Diese Einheit nicht kann ein USB-Gerät unterstützen, das über einen
USB-Hub angeschlossen ist.
Schließen Sie ein USB-Gerät an, das abspielbare Audiodateien enthält.
[SOURCE SELECT]. ( 4)
( 22, 23)
( 22)
Symptom Abhilfe
Der iPod/iPhone schaltet nicht
ein oder funktioniert nicht
“LOADING” erscheint, wenn Sie
durch Drücken von
den Suchmodus schalten.
USB/iPod
Richtige Zeichen werden nicht
angezeigt.
•
Bei Wiedergabe wird kein Ton
gehört.
•
Ton wird nur vom AndroidGerät ausgegeben.
Bei [
AUTO MODE
Wiedergabe unmöglich.
ANDROID
“NO DEVICE” oder “READING”
blinkt weiter.
Die Wiedergabe ist
unterbrochen oder es treten
Aussetzer im Ton auf.
“CANNOT PLAY”
] ist
•
Prüfen Sie die Verbindung zwischen diesem Gerät und dem iPod/
iPhone.
•
Nehmen Sie das iPod/iPhone ab und setzen es mit Hard Reset zurück.
Die Einheit bereitet die iPod/iPhone-Musikliste vor. Das Laden kann
auf
eine gewisse Zeit dauern, wiederholen Sie den Vorgang später.
•
Dieses Gerät kann nur Großbuchstaben, Zahlen und eine begrenzte
Anzahl von Symbolen anzeigen.
•
Je nach der Anzeigesprache, die Sie gewählt haben
bestimmte Buchstaben möglicherweise nicht richtig angezeigt werden.
•
Verbinden Sie das Android-Gerät neu.
•
Während der [
Media Player Anwendung auf dem Android-Gerät und starten Sie die
Wiedergabe.
•
Während der [
Media Player Anwendung erneut oder verwenden Sie eine andere
Media Player Anwendung.
•
Starten Sie das Android-Gerät neu.
•
Wenn dadurch das Problem nicht gelöst wird, kann das angeschlossene
Android-Gerät nicht das Audiosignal zur Einheit leiten.
•
Stellen Sie sicher, dass JVC MUSIC PLAY APP im Android-Gerät installiert
ist.
( 7)
•
Schließen Sie das Android-Gerät erneut an und wählen Sie den
geeigneten Steuermodus.
•
Wenn das Problem dadurch nicht gelöst wird, unterstützt das
verbundene Android-Gerät nicht [
•
Schalten Sie die Entwickler-Optionen am Android-Gerät aus.
•
Verbinden Sie das Android-Gerät neu.
•
Wenn das Problem dadurch nicht gelöst wird, unterstützt das
verbundene Android-Gerät nicht [
Schalten Sie den Stromsparmodus am Android-Gerät aus.
•
Achten Sie darauf, dass das Android-Gerät abspielbare Audiodateien
enthält.
•
Verbinden Sie das Android-Gerät neu.
•
Starten Sie das Android-Gerät neu.
AUDIO MODE
AUDIO MODE
( 8)
( 5)
, können
] eingestellt ist, starten Sie eine
] eingestellt ist, starten Sie die aktuelle
( 23)
AUTO MODE
AUTO MODE
].
( 23)
].
( 23)
Page 85

FEHLERSUCHE EINBAU/ANSCHLUSS
Symptom Abhilfe
Kein Bluetooth-Gerät ist
erkannt.
Pairing kann nicht ausgeführt
werden.
Echo oder Rauschen tritt auf.
Die Telefon-Tonqualität ist
schlecht
Der Ton wird unterbrochen
oder weist bei Wiedergabe von
einem Bluetooth-Audioplayer
Aussetzer auf.
Bluetooth®
Der angeschlossene BluetoothAudioplayer kann nicht
gesteuert werden.
“PLEASE WAIT”
“NOT SUPPORT”
“ERROR”
“H/W ERROR”
•
Suchen Sie erneut vom Bluetooth-Gerät.
•
Setzen Sie das Gerät zurück.
•
Stellen Sie sicher, dass Sie den gleichen PIN-Code für die Einheit und das
Bluetooth-Gerät eingegeben haben.
•
Löschen Sie Pairing-Information sowohl von der Einheit als auch dem
Bluetooth-Gerät, und führen Sie dann das Pairing erneut aus.
•
Justieren Sie die Mikrofoneinheit-Position.
•
Prüfen Sie die
•
Verringern Sie den Abstand zwischen der Einheit und dem BluetoothGerät.
•
Bewegen Sie das Fahrzeug zu einem Ort, wo ein besseres Signal
empfangen wird.
•
Verringern Sie den Abstand zwischen dem Gerät und dem BluetoothAudioplayer.
•
Schalten Sie die Einheit aus und wieder ein, und versuchen Sie erneut,
die Verbindung herzustellen.
•
Andere Bluetooth-Geräte versuchen möglicherweise, die Verbindung zur
Einheit herzustellen.
•
Prüfen Sie, ob der angeschlossene Bluetooth-Audioplayer das Audio/
Video Remote Control Profile (AVRCP) unterstützt. (Siehe auch
Bedienungsanleitung Ihres Audioplayers.)
•
Trennen Sie den Bluetooth-Player ab und schließen ihn erneut an.
Die Einheit bereitet die Verwendung der Bluetooth-Funktion vor. Wenn
die Meldung nicht verschwindet, schalten sie aus und wieder ein, und
schließen dann das Gerät erneut an.
Das angeschlossene Telefon unterstützt nicht das
Spracherkennungssystem.
Wiederholen Sie die Bedienung. Wenn “ERROR” erneut erscheint, prüfen
Sie, ob das Gerät die probierte Funktion unterstützt.
Setzen Sie die Einheit zurück und probieren Sie den Vorgang erneut. Falls
“H/W ERROR” erneut erscheint, wenden Sie sich an den Kundendienst.
( 3)
[ECHO CANCEL]
( 9)
-Einstellung.
( 11)
( 9)
Warnung
•
Das Gerät kann nur bei 12 V DC-Versorgung mit negativer Masse eingebaut werden.
•
Trennen Sie den negativen Batterieanschluss vor der Verkabelung und Befestigung ab.
•
Schließen Sie nicht das Batteriekabel (gelb) das Zündkabel (rot) an der Fahrzeugkarosserie oder dem Massekabel
(schwarz) an, um einen Kurzschluss zu vermeiden.
•
Isolieren Sie nicht angeschlossene Kabel mit Vinylband, um einen Kurzschluss zu vermeiden.
•
Sicherstellen, daß das Gerät nach dem Einbau a Chassis des Fahrzeugs geerdet wird.
Vorsicht
•
Überlassen Sie aus Sicherheitsgründen die Arbeiten zur Montage und Verkabelung ausgewiesenem Fachpersonal.
Lassen Sie sich vom Autoradiohändler beraten.
•
Montieren Sie dieses Gerät in der Konsole Ihres Fahrzeugs. Keine Metallteile dieses Geräts bei und kurz nach der
Verwendung des Geräts berühren. Metallteile wie der Kühlkörper und das Gehäuse werden heiß.
•
Verbinden Sie nicht die -Drähte von Lautsprechern mit der Karosserie, dem Massekabel (schwarz) oder schließen
sie parallel an.
•
Schließen Sie Lautsprecher mit einer Maximalleistung von mehr als 50 W an. Wenn die Maximalleistung der
Lautsprecher unter 50 W ist, ändern Sie die Einstellung von
vermeiden.
( 17)
•
Montieren Sie das Gerät mit einem Winkel von weniger als 30°.
•
Wenn Ihr Fahrzeugkabelbaum nicht die Zündklemme hat, verbinden Sie das Zündkabel (rot) mit der Klemme am
Sicherungskasten des Fahrzeugs, die 12 V DC-Versorgung bietet und durch den Zündschlüssel ein- und ausgeschaltet
wird.
•
Halten Sie alle Kabel von hitzeableitenden Metallteilen fern.
•
Überprüfen Sie nach der Montage des Geräts, ob die Bremslichter, Blinker, Scheibenwischer usw. ordnungsgemäß
funktionieren.
•
Wenn die Sicherung durchbrennt, überprüfen Sie zuerst, dass die Drähte nicht die Karosserie berühren, und ersetzen
Sie dann die durchgebrannte Sicherung durch eine neue Sicherung mit der gleichen Nenngröße.
Grundlegendes Verfahren
1
Ziehen Sie den Schlüssel aus dem Zündschloss, und trennen Sie dann den -Klemme der Autobatterie ab.
2
Schließen Sie die Kabel richtig an.
Siehe Verdrahtungsanschluss.
3
Bauen Sie das Autoradio in Ihrem Fahrzeug ein.
Siehe Einbau der Einheit (Einbau im Armaturenbrett).
4
Schließen Sie die -Klemme der Autobatterie an.
5
Drücken Sie zum Einschalten.
6
Nehmen Sie die Frontblende ab und setzen Sie das Gerät.
( 27)
[AMP GAIN]
( 26)
, um Beschädigung der Lautsprecher zu
( 3)
Wenn Sie weiterhin Probleme haben, führen Sie einen Reset aus.
( 3)
DEUTSCH
25
Page 86

EINBAU/ANSCHLUSS
Einbau der Einheit (Einbau im Armaturenbrett)
Haken auf der Oberseite
Richten Sie den Frontrahmen
vor dem Anbringen aus, wie
in der Abbildung gezeigt.
Die geeigneten Zapfen biegen, um die
Manschette sicher festzuhalten.
Beim Einbau des Geräts ohne Einbauhalterung
1
Nehmen Sie die Einbauhalterung und den Frontrahmen vom Gerät ab.
2
Richten Sie die Öffnungen am Gerät (an beiden Seiten) mit der
Befestigungskonsole am Fahrzeug aus und sichern Sie das Gerät mit Schrauben (im
Handel erhältlich).
Verwenden Sie nur die vorgeschriebenen Schrauben. Durch Verwendung falscher
Schrauben kann das Gerät beschädigt werden.
Führen Sie die erforderliche
Verkabelung aus.
( 27)
Armaturenbrett Ihres
Autos
Entfernen der Einheit
Teileliste für den Einbau
(A)
Frontblende
(B)
Frontrahmen
(C)
Einbauhalterung
(D)
Kabelbaum
(E)
Ausziehschlüssel
26
DEUTSCH
Page 87

EINBAU/ANSCHLUSS
Verdrahtungsanschluss
Vorderer/Hinterer/Subwoofer-Ausgang
Für 3-Wege-Übergang: Mitteltöner/Tieftöner-Ausgang
Bei Anschluss an einen externen Verstärker
schließen Sie dessen Massedraht an der
Autokarosserie an, um Beschädigung des Geräts
zu vermeiden.
Sicherung (10 A)
Anschluss des ISO-Anschlusses an manche VW/
Audi oder Opel (Vauxhall) Automobile
Sie müssen möglicherweise die Verkabelung des mitgelieferten
Kabelbaums modifizieren, wie unten gezeigt.
A7 (Rot)
Fahrzeug
A4 (Gelb)
Standardverkabelung
Wenn Ihr Fahrzeug KEINEN ISO-Anschluss hat
Wir empfehlen, die Einheit mit einem im Handel erhältlichen, für Ihr
Fahrzeug ausgelegten Kabelbaum zu installieren und diese Arbeit zur
Ihrer eigenen Sicherheit von qualifizierten Fachleuten ausführen zu
lassen. Lassen Sie sich von Ihrem Autoradiohändler beraten.
Zündkabel (Rot)
Gerät
Batteriekabel
(Gelb)
Gelb (Batteriekabel)
Rot (Zündkabel)
Rot (A7)
Gelb (A4)
ISO-Anschlüsse
Antennenanschluss
Hellblau/Gelb
(Lekungs-Fernbedienungskabel)
Stift Farbe und Funktion
A4 Gelb : B atterie
A5 Blau/Weiß : Stromsteuerung (12V
A6 Orangefarben/Weiß : Auto-Lichtreglerschalter
A7 Rot : Zündung (ACC)
A8 Schwarz : Erdungsanschluss (Masse)
B1
]
Lila
B2
Lila/Schwarz
B3
Grau
B4
Grau/Schwarz
B5
Weiß
B6
Weiß/Schwarz
B7
Grün
B8
Grün/Schwarz
*
Sie können auch einen Subwoofer-Lautsprecher direkt ohne einen externen SubwooferVerstärker anschließen. Für Einstellung,
[
]
[
]
]
Mikrofoneingangsbuchse
Zum Lenkrad-Fernbedienungsadapter
: Hinterer Lautsprecher (rechts)
Für 3-Wege-Übergang: Hochtöner (rechts)
: Vorderer Lautsprecher (rechts)
Für 3-Wege-Übergang: Mitteltöner (rechts)
: Vorderer Lautsprecher (links)
Für 3-Wege-Übergang: Mitteltöner (links)
[
: Hinterer Lautsprecher (links)
Für 3-Wege-Übergang: Hochtöner (links)
[
18
.
( 9)
350mA)
*
DEUTSCH
27
Page 88

TECHNISCHE DATEN
Änderungen ohne Vorankündigung bleiben vorbehalten.
Frequenzbereich 87,5MHz — 108,0MHz (50-kHz-Raster)
FM
Empfindlichkeit
(Rauschabstand = 26dB)
Empfindlichkeitsschwelle
(DIN S/N = 46 dB)
Frequenzgang (±3 dB) 30Hz — 15kHz
Signal-Rauschabstand (MONO) 64 dB
Tuner
Kanaltrennung (1 kHz) 40 dB
Frequenzbereich 531 kHz — 1 611 kHz (9-kHz-Raster)
AM
(MW)
Empfindlichkeit
(Rauschabstand = 20dB)
Frequenzbereich 153kHz — 279kHz (9-kHz-Raster)
AM
(LW)
Empfindlichkeit
(Rauschabstand = 20dB)
USB Standard USB1.1, USB2.0 (Höchstgeschwindigkeit)
Kompatible Geräte Massenspeichergerät
Dateisystem FAT12/16/32
Maximaler Versorgungsstrom DC 5 V
D/A-Wandler 24 Bit
Frequenzgang (±1 dB) 20Hz — 20kHz
Signal-Rauschabstand (1 kHz) 105 dB
USB
Dynamikbereich 90 dB
Kanaltrennung 85 dB
MP3-Decodierung Unterstützt MPEG-1/2 Audio Layer-3
WMA-Decodierung Unterstützt Windows Media Audio
AAC-Decodierung AAC-LC “.aac”-Dateien
WAV-Decodierung RIFF-Wellenform-Audioformat (nur Linear PCM)
FLAC-Decodierung FLAC-Dateien, bis zu 24 bit/ 48 kHz
0,71V/75 (8,2dBf)
2,0 V/75 Ω
28,2V (29dB)
50V (33,9dB)
1,5A
Frequenzgang (±3 dB) 20Hz — 20kHz
Maximaler Spannungseingang 1 000mV
Auxiliary
Eingangsimpedanz 30k
Version Bluetooth 3.0
Frequenzbereich 2,402 GHz — 2,480 GHz
Ausgangsleistung +4 dBm (MAX), 0 dBm (AVE) Leistungsklasse 2
Maximaler Kommunikationsbereich Sichtlinie ca. 10 m (32,8 ft)
Pairing SSP (Secure Simple Pairing)
Bluetooth
Profil HFP1.6 (Hands-Free Profile)
Maximale Ausgangsleistung 50W×4 oder
Volle Bandbreitenleistung
(bei weniger als 1% Klirrfaktor)
Audio
Lautsprecherimpedanz 4—8
Vorverstärkerpegel/Last (USB) 4000mV/10 k Last
Vorverstärkungsimpedanz ≤600
Betriebsspannung
(10,5 V — 16 V zulässig)
Maximale Stromaufnahme 10A
Betriebstemperaturbereich –10°C — +60°C
Allgemeines
Einbaumaße (B × H × T) 182mm×53mm×114mm
Nettogewicht (einschließlich Frontrahmen,
Einbauhalterung)
A2DP (Advanced Audio Distribution Profile)
AVRCP1.5 (Audio/Video Remote Control Profile)
PBAP (Phonebook Access Profile)
SPP (Serial Port Profile)
50W × 2 + 50W × 1 (Subwoofer = 4 )
22W×4
14,4V
0,6kg
28
DEUTSCH
Page 89

Page 90

CОДЕРЖАНИЕ ПОДГОТОВКА К ЭКСПЛУАТАЦИИ
ПОДГОТОВКА К
ЭКСПЛУАТАЦИИ 2
ОСНОВНЫЕ СВЕДЕНИЯ 3
НАЧАЛО ЭКСПЛУАТАЦИИ 4
1 Отмена демонстрации
2 Установка часов и даты
3 Задание базовых настроек
РАДИОПРИЕМНИК 5
USB/iPod/ANDROID 7
BLUETOOTH® 9
AUX 16
ЗВУКОВЫЕ НАСТРОЙКИ 16
НАСТРОЙКИ ДИСПЛЕЯ 21
СПРАВОЧНЫЕ МАТЕРИАЛЫ 22
Обслуживание
Дополнительная информация
УСТРАНЕНИЕ ПРОБЛЕМ 24
УСТАНОВКА И
ПОДКЛЮЧЕНИЕ 25
ТЕХНИЧЕСКИЕ
ХАРАКТЕРИСТИКИ 28
ВАЖНО
•
В целях обеспечения надлежащей эксплуатации, пожалуйста, перед тем как приступить к эксплуатации данного изделия,
внимательно прочтите настоящее руководство. Особенно важно, чтобы вы прочли и соблюдали все указания в данном
руководстве, отмеченные словами Предупреждение и Внимание.
•
Пожалуйста, держите данное руководство в надежном и доступном месте для обращения к нему за справками в
будущем.
Предупреждение
•
Не используйте функции, которые отвлекают внимание и мешают безопасному вождению.
Внимание
Настройка громкости:
•
Отрегулируйте громкость таким образом, чтобы слышать звуки за пределами автомобиля для предотвращения аварий.
•
Уменьшите громкость перед воспроизведением, чтобы предотвратить повреждение динамиков из-за внезапного
повышения уровня громкости на выходе.
Общие характеристики:
•
Не используйте внешние устройства, если это может отрицательно повлиять на безопасность движения.
•
Убедитесь в том, что созданы резервные копии всех важных данных. Мы не несем ответственность за потерю записанных
данных.
•
Никогда не оставляйте металлические предметы (например, монеты или металлические инструменты) внутри устройства
во избежание коротких замыканий.
Как пользоваться данным руководством
•
Операции объясняются в основном с использованием кнопок на передней панели модели
•
В объяснительных целях используются индикации на английском языке. Вы можете выбрать язык отображения из
меню.
( 5)
•
•
[XX]
( XX)
обозначает выбранные элементы.
означает, что материалы доступны на указанной странице.
KD-X342BT
.
2
РУССКИЙ
Page 91

ОСНОВНЫЕ СВЕДЕНИЯ
Передняя панель
Прикрепление
Ручка регулировки громкости
Кнопка отсоединения
Задача На передней панели
Включение питания
Настройка громкости
Выберите источник
Изменение отображаемой
информации
Нажмите кнопку .
•
Нажмите и удерживайте нажатой, чтобы отключить питание.
Поверните ручку регулировки громкости.
Нажмите ручку регулировки громкости, чтобы выключить звук или приостановить воспроизведение.
•
Нажмите кнопку еще раз, чтобы отменить действие.
•
Нажмите кнопку несколько раз.
•
Нажмите кнопку , затем поверните ручку регулировки громкости в течение 2 секунд.
Нажмите кнопку несколько раз.
( 23)
Дисплей
Отсоединение
Порядок сброса
РУССКИЙ
3
Page 92

НАЧАЛО ЭКСПЛУАТАЦИИ
1
Отмена демонстрации
При первом включении питания (или если для параметра
установлено значение
“CANCEL DEMO”
1 Нажмите ручку регулировки громкости.
В качестве начальной настройки выбрано значение
2 Нажмите ручку регулировки громкости еще раз.
Отображается надпись “DEMO OFF”.
2
Установка часов и даты
Нажмите и удерживайте нажатой кнопку .
1
2 Поверните ручку регулировки громкости для выбора элемента
а затем нажмите ее.
Чтобы настроить часы
3 Поверните ручку регулировки громкости для выбора элемента
[CLOCK ADJUST]
4 Поворачивайте ручку регулировки громкости, чтобы выбрать
значения параметров, а затем нажмите ее.
Час Минута
5 Поверните ручку регулировки громкости для выбора элемента
[CLOCK FORMAT]
6 Поверните ручку регулировки громкости для выбора
затем нажмите ее.
Чтобы установить дату
7 Поверните ручку регулировки громкости для выбора элемента
[DATE SET]
8 Поворачивайте ручку регулировки громкости, чтобы выбрать
значения параметров, а затем нажмите ее.
День Месяц Го д
9 Нажмите для выхода.
Для возврата к предыдущему элементу настройки нажмите кнопку .
4
РУССКИЙ
[YES]
) на дисплее отображается следующая информация:
“PRESS” “VOLUME KNOB”
, а затем нажмите ее.
, а затем нажмите ее.
, а затем нажмите ее.
[FACTORY RESET]
[YES]
.
[12H]
или
[CLOCK]
[24H]
3
Задание базовых настроек
1
Нажмите и удерживайте нажатой кнопку .
2 Чтобы выбрать элемент, поверните ручку регулировки громкости
(см. следующую таблицу), затем нажмите ее.
3 Повторяйте действие 2 до тех пор, пока не будет выбран или
активирован необходимый элемент.
4 Нажмите для выхода.
Для возврата к предыдущему элементу настройки нажмите кнопку .
По умолчанию:
SYSTEM
KEY BEEP
(Не применимо, когда выбран 3-полосный кроссовер.)
ON
:Включение звука нажатия кнопки.;
OFF
:Выключение.
SOURCE SELECT
*
,
AM SRC
BUILT-IN AUX
F/W UPDATE
ON
:Включение варианта AM при выборе источника.;
*
ON
:Включение варианта AUX при выборе источника.;
OFF
:Отключение.
OFF
UPDATE SYSTEM
F/W UP xxxx
FACTORY RESET YES
, а
*
Не отображается, если выбран соответствующий источник.
YES
:Запуск обновления встроенного программного обеспечения.;
NO
:Отмена (обновление не запущено).
Подробнее об обновлении встроенного программного обеспечения см.:
<http://www.jvc.net/cs/car/>.
:Сброс всех настроек на значения по умолчанию (кроме сохраненных
радиостанций).;
NO
:Отмена.
:Отключение.
XX
( 5)
( 16)
Page 93

НАЧАЛО ЭКСПЛУАТАЦИИ РАДИОПРИЕМНИК
CLOCK
TIME SYNC
CLOCK DISPLAY ON
ENGLISH
РУССКИЙ
ESPANOL
ON
:Время часов автоматически настраивается с
помощью данных времени на часах (CT) в сигнале FM
Radio Data System.;
:Даже в выключенном состоянии на дисплее
отображается текущее время.;
Выберите язык отображения для меню и в применимых
случаях информации о музыке.
По умолчанию выбрано значение
OFF
:Отмена.
OFF
ENGLISH
:Отмена.
.
Индикатор “ST” загорается при приеме стереосигнала FM-трансляции достаточного уровня.
Поиск радиостанции
1
Нажмите кнопку несколько раз для выбора FM или AM.
2 Нажмите кнопку для автоматического поиска радиостанции.
(или)
Нажмите и удерживайте нажатой кнопку , пока символ “M” не начнет мигать,
затем нажмите несколько раз для поиска радиостанции вручную.
Настройки в памяти
Можно сохранять до 18 радиостанций FM и 6 радиостанций AM.
Сохранение радиостанции
При прослушивании радиостанции....
Нажмите и удерживайте нажатой одну из нумерованных кнопок (1–6).
(или)
1 Нажмите и удерживайте нажатой ручку регулировки громкости, пока не замигает текст
“PRESETMODE”.
2 Поверните ручку регулировки громкости для выбора запрограммированного номера, а
затем нажмите ручку.
Запрограммированный номер мигает, и отображается надпись “MEMORY”.
Выбор сохраненной радиостанции
Нажмите одну из нумерованных кнопок (1–6).
(или)
1 Нажмите кнопку .
2 Поверните ручку регулировки громкости для выбора запрограммированного номера, а
затем нажмите ручку.
РУССКИЙ
5
Page 94

РАДИОПРИЕМНИК
Другие настройки
1
Нажмите и удерживайте нажатой кнопку .
2 Чтобы выбрать элемент, поверните ручку регулировки громкости
(
см. следующую таблицу), затем нажмите ее.
3 Повторяйте действие 2 до тех пор, пока не будет выбран/
активирован желаемый элемент, или следуйте инструкциям,
приведенным для выбранного элемента.
4 Нажмите для выхода.
Для возврата к предыдущему элементу настройки нажмите кнопку .
По умолчанию:
TUNER SETTING
RADIO TIMER
SSM
LOCAL SEEK ON
1
*
Доступно для выбора, только когда в действии 1 выбран параметр
Включение радио в определенное время независимо от текущего источника.
1
ONCE/DAILY/WEEKLY/OFF
2
FM/AM
:Выбор диапазона частот.
3
01
до 18 (для FM)/01 до 06 (для AM):Выбор запрограммированной радиостанции.
1
4
Установка дня
“
M
Таймер радио не будет включен в следующих с лучаях.
•
Устройство выключено.
•
Значение
таймера радио для AM.
SSM 01–06/SSM 07–12/SSM 13–18
радиостанций FM. Текст “SSM” перестает мигать после сохранения первых 6 радиостанций.
Выберите
OFF
•
Выполняемые настройки применяются только к выбранному источнику/радиостанции.
После переключения источника/радиостанции, нас тройки требуется выполнить еще
раз.
*
” загорается после завершения.
и времени включения.
[OFF]
выбрано для
SSM 07–12/SSM 13–18
:Поиск только радиостанций FM-диапазона с хорошим качеством приема.;
:Отмена.
:Выбор частоты включения таймера.
[AM SRC]
в меню
( 4)
[SOURCE SELECT]
: Автоматическое программирование до 18
для сохранения следующих 12 радиостанций.
[ONCE]
или
после выбора
[WEEKLY]
IF BAND AUTO
MONO SET ON
2
*
NEWS SET
2
*
REGIONAL
XX
2
*
AF SET
2
*
TI
PTY SEARCH
2
*
Только для источника FM.
Код PTY
NEWS, AFFAIRS, INFO, SPORT, EDUCATE, DRAMA, CULTURE, SCIENCE, VARIED, POP M
(музыка),
ROCK M
M
(музыка),
LEISURE, JAZZ, COUNTRY, NATION M
.
:Повышение избирательности тюнера для устранения интерференционных
помех от соседних FM-радиостанций. (Сопровождается потерей стереоэффекта.);
WIDE
:Могут возникать интерференционные помехи от соседних FM-радиостанций, но
при этом качество звучания не будет ухудшаться и стереоэффект будет сохраняться.
:Улучшение качества приема в FM-диапазоне (при этом стереоэффект может быть
утрачен).;
OFF
:Отмена.
ON
:Устройство временно переключается на программу новостей, если она доступна.;
OFF
:Отмена.
ON
: Переключение на другую станцию только в определенном регионе с помощью
элемента управления “AF”.;
ON
: Автоматический поиск другой станции, транслирующей эту же программу в данной
сети Radio Data System с более высоким качеством приема, если текущее качество
приема является неудовлетворительным.;
ON
: Позволяет устройству временно переключаться в режим приема сообщений о
движении на дорогах, когда эти сообщения доступны (загорается индикатор “TI”). ;
OFF
:Отмена.
2
*
Выберите код PTY (см. ниже).
Если есть радиостанция, передающая в эфир программу того же кода PTY, что был
выбран, осуществляется настройка на эту радиостанцию.
(музыка),
WEATHER, FINANCE, CHILDREN, SOCIAL, RELIGION, PHONE IN, TRAVEL
EASY M
OFF
:Отмена.
(музыка),
(музыка),
OFF
: Отмена.
LIGHT M
(музыка),
OLDIES, FOLK M
(музыка),
CLASSICS, OTHER
DOCUMENT
,
6
РУССКИЙ
Page 95

USB/iPod/ANDROID
Начало воспроизведения
Происходит автоматическая смена источника, и
начинается воспроизведение.
Входной USB-разъем
USB
1
Кабель USB 2.0
(имеется в продаже)
*
iPod/iPhone
Аксессуар устройства
1
*
iPod/iPhone
ANDROID
Кабель Micro USB 2.0
(имеется в продаже)
*
Задача На передней панели
Перемотка назад или
3
*
вперед
Выбор файла
4
Выбор папки
Воспроизведение в
режиме повтора
Воспроизведение в
2
1
*
случайном порядке
1
*
Не оставляйте кабель в автомобиле, когда он не используется.
2
*
При подключении устройства Android отобразится “Press [VIEW] to install JVC MUSIC PLAY APP”. Следуйте инструкциям на экране,
чтобы установить приложение. Вы также можете установить последнюю версию приложения JVC MUSIC PLAY на ваше устройство
Android до его подключения. Для получения дополнительной информации посетите <http://www.jvc.net/cs/car/>.
3
*
Для ANDROID: Применимо, только если выбрано
4
*
Только для файлов MP3/WMA/AAC/WAV/FLAC. Эта функция не работают для устройства iPod/ANDROID.
5
*
Для iPod/ANDROID: Применимо, только если выбрано
*
*
Нажмите и удерживайте нажатой кнопку .
Нажмите кнопку
Нажмите кнопку .
Нажмите кнопку несколько раз.
5
TRACK REPEAT/FOLDER REPEAT/ALL REPEAT
ONE REPEAT/ALL REPEAT/REPEAT OFF
Нажмите кнопку несколько раз.
5
*
FOLDER RANDOM/ALL RANDOM/RANDOM OFF
SONG RANDOM/ALL RANDOM/RANDOM OFF
.
: iPod или ANDROID
[AUTO MODE]. ( 8)
[HEAD MODE]/[AUTO MODE]. ( 8)
: Файл MP3/WMA/AAC/WAV/FLAC
: Файл MP3/WMA/AAC/WAV/FLAC
: iPod или ANDROID
РУССКИЙ
7
Page 96

USB/iPod/ANDROID
Выбор режима управления
Когда источником является iPod USB, последовательно нажимайте
HEAD MODE
IPHONE MODE
Когда источником является ANDROID, последовательно нажимайте
AUTO MODE
AUDIO MODE
.
: Управление устройством iPod с данного устройства.
: Управление устройством iPod с самого iPod. Однако вы по-
прежнему можете запускать воспроизведение/ставить на паузу или
пропускать файлы с данного устройства.
.
: Управление устройством Android с данного устройства через
приложение JVC MUSIC PLAY, установленное на устройстве Android.
: Управление устройством Android с помощью самого устройства
Android через другие программные медиаплееры, установленные
на устройстве Android. Однако вы по-прежнему можете запускать
воспроизведение/ставить на паузу или пропускать файлы с данного
устройства
.
Выбор музыкального диска
Когда источником является USB, последовательно нажимайте
Будут воспроизводиться песни, сохраненные на следующем диске.
•
Выбранная внутренняя или внешняя память смартфона (запоминающее
устройство большой емкости).
•
Выбранный привод устройства с несколькими дисками.
.
Настройки для использования приложения JVC Remote
Приложение JVC Remote предназначено для управления операциями
автомобильного приемника JVC с устройства iPhone/iPod (через входной
USB-разъем).
Подготовка:
Установите последнюю версию приложения JVC Remote на ваше устройство
до его подключения. Для получения дополнительной информации посетите
<http://www.jvc.net/cs/car/>.
Вы можете выполнить настройки таким же образом, как соединение через
Bluetooth.
( 15)
8
РУССКИЙ
Выбор файла из папки/списка
Для iPod/ANDROID применимо, только когда выбрано
1 Нажмите кнопку .
2 Поверните ручку регулировки громкости для выбора папки/списка,
а затем нажмите ее.
3 Поверните ручку регулировки громкости для выбора файла, а затем
нажмите ее.
Быстрый поиск
Если у вас имеется большое количество файлов, вы можете выполнить
быстрый поиск по ним.
Для быстрого просмотра списка быстро поворачивайте ручку
регулировки громкости.
Поиск по алфавиту
ANDROID)
Вы можете выполнить поиск файла по первому символу в имени.
Для источника iPod USB
Нажмите или быстро поверните ручку регулировки
громкости, чтобы выбрать желаемый символ (A–Z, 0–9, OTHERS).
•
Выберите “OTHERS”, если первый символ отличается от A–Z, 0–9.
Для источника ANDROID
1 Нажмите для перехода к поиску по символу.
2 Поверните ручку регулировки громкости для выбора
желаемого символа.
^A^ : Буквы верхнего регистра (A–Z)
_A_ : Буквы нижнего регистра (a–z)
-0- : Цифры (0–9)
-OTHERS- : Символ, отличный от A–Z и 0–9
3 Нажмите ручку регулировки громкости, чтобы запустить
поиск.
•
Для возврата к предыдущему элементу настройки нажмите кнопку .
•
Для отмены нажмите и удерживайте нажатой кнопку .
(применимо только для источника USB и ANDROID)
(применимо только для источника iPod USB и
[HEAD MODE]/[AUTO MODE]
.
Page 97

BLUETOOTH®
BLUETOOTH — Подключение
Поддерживаемые профили Bluetooth
–
Hands-Free Profile — профиль громкой связи (HFP)
–
Advanced Audio Distribution Profile — профиль
расширенного распространения звука (A2DP)
–
Audio/Video Remote Control Profile — профиль
удаленного управления звуком и видеоизображением
(AVRCP)
–
Serial Port Profile — профиль последовательного порта
(SPP)
–
Phonebook Access Profile — профиль доступа к
телефонной книге (PBAP)
Поддерживаемые кодеки Bluetooth
–
Sub Band Codec (SBC)
–
Advanced Audio Coding (AAC)
Подключение микрофона
Задняя панель
Микрофон (входит в
комплект поставки)
Входной разъем
микрофона
Настройка угла микрофона
При необходимости закрепите с
помощью зажимов шнура
(не входят в комплект поставки).
Сопряжение и подключение устройства Bluetooth в первый раз
1
Для включения устройства нажмите .
2 На устройстве Bluetooth найдите и выберите “KD-X3 BT”.
На дисплее мигает надпись “BTPAIRING”.
• Для некоторых устройств Bluetooth может потребоваться ввод персонального идентификационного
кода (PIN) непосредственно после поиска.
3 В зависимости от отображаемых на экране данных, выполните действие (A) или (B).
Некоторые устройства Bluetooth могут иметь процедуру сопряжения, которая отличается от указанной
ниже.
(A) “[Имя устройства]” “XXXXXX” “ VOL–YES” “BACK–NO”
“XXXXXX” — это ключ дост упа, состоящий из 6 цифр, который случайным образом формируется во
время каждого сопряжения.
Убедитесь, что ключи доступа, отображающиеся на данном устройстве и устройстве Bluetooth,
(B) “[Имя устройства]” “VOL–YES” “BACK–NO”
Нажмите ручку регулировки громкости, чтобы запустить сопряжение.
• Если отображается только сообщение “PAIRING”, с помощью устройства Bluetooth подтвердите
Сообщение “PAIRING COMPLETED” отображается при завершении сопряжения, а при установке соединения
Bluetooth загорается символ “
•
•
•
•
•
•
одинаковы.
Нажмите ручку регулировки громкости для подтверждения ключа доступа.
Используйте устройство Bluetooth для подтверждения ключа доступа.
• При прокрутке на экране сообщения “PAIRING” “PIN 0000” введите PIN-код “0000” на
устройстве Bluetooth.
Перед сопряжением можно установить нужный PIN-код.
сопряжение.
”.
Данное устройство поддерживает SSP (Secure Simple Pairing).
Всего можно зарегистрировать (выполнить сопряжение) до пяти устройств.
После сопряжения устройство Bluetooth останется зарегистрированным в устройстве даже при сбросе его
настроек. Чтобы удалить сопряженное устройство,
Одновременно могут быть подключены не более двух телефонов Bluetooth и одно аудиоустройство
Bluetooth.
Однако в режиме источника BT AUDIO вы можете подключать до пяти аудиоустройств Bluetooth и
переключать между этими пятью устройствами.
Некоторые устройства Bluetooth могут автоматически выполнять подключение после сопряжения.
Подключите такое устройство вручную.
Подробные сведения см. в руководстве устройства Bluetooth.
13, [DEVICE DELETE]
( 14)
( 13)
.
РУССКИЙ
9
Page 98

BLUETOOTH®
Автоматическое сопряжение
При подсоединении устройства iPhone/iPod touch/
Android к входному USB-разъему автоматически
wактивируется запрос на сопряжение (через
Bluetooth).
Нажмите ручку регулировки громкости для
сопряжения после того, как подтвердите имя
устройства.
Автоматически запрос на сопряжение активируется
только при условии, что:
–
Функция Bluetooth подсоединенного устройства
включена.
–
Для параметра
значение
–
Приложение JVC MUSIC PLAY установлено на
устройстве Android
[AUTO MODE] ( 8)
[AUTO PAIRING]
[ON]. ( 13)
( 7)
и выбрана опция
.
установлено
BLUETOOTH — Мобильный телефон
Прием вызова
При поступлении входящего вызова:
•
Кнопки будут мигать в соответствии с шаблоном мигания, выбранным вами в
•
Устройство отвечает на вызов автоматически, если для параметра
время.
( 11)
Во время вызова:
•
Кнопки прекращают мигать.
•
Если вы отключите устройство или отсоедините переднюю панель, соединение Bluetooth будет разорвано.
Следующие операции могут отличаться или быть недоступными в зависимости от подключенного телефона.
[AUTO ANSWER]
[RING ILLUMI]. ( 11)
установлено выбранное
Задача На передней панели
Первый входящий вызов...
Ответ на вызов
Отклонение вызова
Завершение вызова
Нажмите
Нажмите и удерживайте
Нажмите и удерживайте
или ручку регулировки громкости.
или ручку регулировки громкости.
или ручку регулировки громкости.
10
РУССКИЙ
Page 99

BLUETOOTH®
Задача На передней панели
Во время разговора при первом входящем вызове...
Ответ на другой входящий
вызов и удержание
текущего вызова
Отклонение другого
входящего вызова
При наличии двух активных вызовов...
Завершение текущего
вызова и активация
удерживаемого вызова
Переключение между
текущим вызовом и
удерживаемым вызовом
Настройка громкости
телефона
(По умолчанию:
Переключение между
режимами громкой связи и
частного разговора
1
*
2
*
1
*
[00]
–
[35]
[15]
)
2
*
Эта настройка не влияет на уровень громкости других источников.
Набор доступных функциональных возможностей зависит от подключенного устройства
Bluetooth.
Улучшение качества голосовой связи
Во время разговора по телефону....
1 Нажмите и удерживайте нажатой кнопку .
2 Чтобы выбрать элемент, поверните ручку регулировки громкости
(
см. следующую таблицу), затем нажмите ее.
3 Повторяйте действие 2 до тех пор, пока не будет выбран или
активирован необходимый элемент.
4 Нажмите для выхода.
Для возврата к предыдущему элементу настройки нажмите кнопку .
Нажмите
громкости.
Нажмите и удерживайте
регулировки громкости.
Нажмите и удерживайте
регулировки громкости.
Нажмите кнопку
Во время вызова поверните ручку
регулировки громкости.
Во время вызова нажмите .
или ручку регулировки
или ручку
или ручку
.
По умолчанию:
MIC GAIN
NR LEVEL
ECHO CANCELОт LEVEL –05
От
LEVEL –10
до
увеличивается с увеличением числа.
От
LEVEL –05
подавления шума, пока шум не будет минимальным во время телефонного
разговора.
эхоподавления, пока эхо не будет минимальным во время телефонного
разговора.
LEVEL +10(LEVEL –04
до
LEVEL +05(LEVEL 00
до
LEVEL +05(LEVEL 00
):Чувствительность микрофона
):Настраивайте уровень
):Настраивайте задержку
Выполнение настроек для приема вызовов
Нажмите для включения режима Bluetooth.
1
2 Чтобы выбрать элемент, поверните ручку регулировки
громкости (см. следующую таблицу), затем нажмите ее.
3 Повторяйте действие 2 до тех пор, пока не будет выбран или
активирован необходимый элемент.
Для возврата к предыдущему элементу настройки нажмите кнопку .
По умолчанию:
SETTINGS
AUTO ANSWER
RING ILLUMI
От
01 SEC
до
30 SEC
через выбранное время (в секундах).;
От
BLINK 01
оповещения при входящем вызове.;
:Устройство автоматически отвечает на входящий вызов
до
BLINK 05(BLINK 02
OFF
:Отмена.
): Выбор шаблона мигания кнопок для
OFF
:Отмена.
РУССКИЙ
XX
XX
11
Page 100

BLUETOOTH®
Выполнение вызова
Вы можете выполнять вызов из истории вызовов, из телефонной книги или через набор номера.
Вызов по голосовой команде также возможен, если ваш мобильный телефон поддерживает эту
функцию.
1 Нажмите для включения режима Bluetooth.
Отобразится “(Имя первого устройства)”.
• Если подключены два телефона Bluetooth, нажмите еще раз, чтобы переключить на
другой телефон.
Отобразится “(Имя второго устройства)”.
2 Чтобы выбрать элемент, поверните ручку регулировки громкости (см. следующую
таблицу), затем нажмите ее.
3 Повторяйте действие 2 до тех пор, пока не будет выбран/активирован желаемый
элемент, или следуйте инструкциям, приведенным для выбранного элемента.
Для возврата к предыдущему элементу настройки нажмите кнопку .
RECENT CALL
PHONEBOOK
DIAL NUMBER
VOICE
12
(Применимо, только если телефон поддерживает PBAP.)
1
Нажмите ручку регулировки громкости для выбора имени или номера телефона.
• “<” указывает на входящий вызов, “>” указывает на исходящий вызов, а “M” указывает на пропущенный
вызов.
• При отсутствии записей в журнале вызовов или номеров вызовов отображается сообщение “NO HISTORY”.
2
Нажмите ручку регулировки громкости, чтобы выполнить вызов.
(Применимо, только если телефон поддерживает PBAP.)
1
Нажмите для выбора нужного знака (A–Z, 0–9 и OTHERS).
• “OTHERS” отображается, если первый символ отличается от A–Z, 0–9.
2
Поверните ручку регулировки громкости для выбора имени, а затем нажмите ручку.
3
Поверните ручку регулировки громкости для выбора номера телефона, а затем нажмите ее для вызова.
•
При сопряжении телефонная книга подключенного телефона автоматически передается на устройство.
•
Данное устройство может отображать только неакцентированные буквы. (Акцентированные буквы, такие как
“Ú”, будут отображаться как “U”.)
1
Поверните ручку регулировки громкости и выберите число (от 0 до 9) или символ ( , #, +).
2
Нажмите д ля переноса позиции ввода.
Повторяйте действия
3
Нажмите ручку регулировки громкости, чтобы выполнить вызов.
Произнесите имя контакта, которому нужно позвонить, или голосовую команду для управления функциями
телефона. (
1
и 2 до тех пор, пока не завершите ввод номера телефона.
Выполнение вызова с помощью распознавания голоса
РУССКИЙ
)
Выполнение вызова с помощью
распознавания голоса
Нажмите и удерживайте для активации
1
подсоединенного телефона.
2 Произнесите имя контакта, которому нужно
позвонить, или голосовую команду для управления
функциями телефона.
•
Поддерживаемые функции распознавания голоса зависят
от телефона. Подробные сведения см. в руководстве
подключенного телефона.
•
Это устройство также поддерживает функцию
интеллектуального личного помощника iPhone.
Настройки в памяти
Сохранение контакта в памяти
Вы можете сохранить до 6 контактов под нумерованными
1–6
кнопками (
1 Нажмите для включения режима Bluetooth.
2 Поверните ручку регулировки громкости для выбора
[RECENT CALL], [PHONEBOOK]
нажмите ее.
3 Поверните ручку регулировки громкости для выбора
контакта или ввода номера телефона.
Если контакт выбран, нажмите ручку регулировки громкости
для отображения номера телефона.
4 Нажмите и удерживайте нажатой одну из
нумерованных кнопок (
После сохранения контакта отображается сообщение
“MEMORY P(выбранный запрограммированный номер)”.
Чтобы удалить контакт из памяти, в действии
[DIAL NUMBER]
).
или
[DIAL NUMBER]
1–6).
и сохраните пустой номер.
2
выберите
, а затем
Выполнение вызова из памяти
Нажмите для включения режима Bluetooth.
1
2 Нажмите одну из нумерованных кнопок (1–6).
3 Нажмите ручку регулировки громкости, чтобы
выполнить вызов.
При отсутствии сохраненных в памяти контактов
отображается сообщение “NO PRESET”.
 Loading...