


Operation & Safety, Service &
Maintenance & Illustrated Parts
Manual Supplement
JLG
LOAD
SENSING
SYSTEM
Boom Lift Products
P/N
3124287
July 24, 2013


INTRODUCTION
SECTION A. INTRODUCTION - MAINTENANCE SAFETY
PRECAUTIONS
AGENERAL
This section contains the general safety precautions
which must be observed during maintenance of the aerial
platform. It is of utmost importance that maintenance personnel pay strict attention to these warnings and precautions to avoid possible injury to themselves or others, or
damage to the equipment. A maintenance program must
be followed to ensure that the machine is safe to operate.
MODIFICATION OF THE MACHINE WITHOUT CERTIFICATION BY
A RESPONSIBLE AUTHORITY THAT THE MACHINE IS AT LEAST
AS SAFE AS ORIGINALLY MANUFACTURED, IS A SAFETY VIOLATION.
The specific precautions to be observed during maintenance are inserted at the appropriate point in the manual.
These precautions are, for the most part, those that apply
when servicing hydraulic and larger machine component
parts.
Your safety, and that of others, is the first consideration
when engaging in the maintenance of equipment. Always
be conscious of weight. Never attempt to move heavy
parts without the aid of a mechanical device. Do not allow
heavy objects to rest in an unstable position. When raising
a portion of the equipment, ensure that adequate support
is provided.
SINCE THE MACHINE MANUFACTURER HAS NO DIRECT CONTROL OVER THE FIELD INSPECTION AND MAINTENANCE,
SAFETY IN THIS AREA IS THE RESPONSIBILITY OF THE OWNER/
OPERATOR.
B HYDRAULIC SYSTEM SAFETY
It should be noted that the machines hydraulic systems
operate at extremely high, potentially dangerous pressures. Every effort should be made to relieve any system
pressure prior to disconnecting or removing any portion of
the system.
CMAINTENANCE
FAILURE TO COMPLY WITH SAFETY PRECAUTIONS LISTED IN
THIS SECTION MAY RESULT IN MACHINE DAMAGE, PERSONNEL
INJURY OR DEATH AND IS A SAFETY VIOLATION.
• REMOVE ALL RINGS, WATCHES AND JEWELRY
WHEN PERFORMING ANY MAINTENANCE.
• DO NOT WEAR LONG HAIR UNRESTRAINED, OR
LOOSE-FITTING CLOTHING AND NECKTIES WHICH
ARE APT TO BECOME CAUGHT ON OR ENTANGLED
IN EQUIPMENT.
• OBSERVE AND OBEY ALL WARNINGS AND CAUTIONS ON MACHINE AND IN SERVICE MANUAL.
• KEEP OIL, GREASE, WATER, ETC. WIPED FROM
STANDING SURFACES AND HAND HOLDS.
• NEVER WORK UNDER AN ELEVATED BOOM UNTIL
BOOM HAS BEEN SAFELY RESTRAINED FROM ANY
MOVEMENT BY BLOCKING OR OVERHEAD SLING,
OR BOOM SAFETY PROP HAS BEEN ENGAGED.
• BEFORE MAKING ADJUSTMENTS, LUBRICATING OR
PERFORMING ANY OTHER MAINTENANCE, SHUT
OFF ALL POWER CONTROLS.
• BATTERY SHOULD ALWAYS BE DISCONNECTEDDURING REPLACEMENT OF ELECTRICAL COMPONENTS.
• KEEP ALL SUPPORT EQUIPMENT AND ATTACHMENTS STOWED IN THEIR PROPER PLACE.
• USE ONLY APPROVED, NONFLAMMABLE CLEANING
SOLVENTS.
3124287 – JLG Lift – A-1

INTRODUCTION
REVISON LOG
Original Issue - March 25, 2003
Revised - April 10, 2003
Revised - June 6, 2003
Revised - March 1, 2004
Revised - October 15, 2004
Revised - November 1, 2004
Revised - July 15, 2006
Revised - June 4, 2010
Revised - March 31, 2011
Revised - March 1, 2012
Revised - August 11, 2012
Revised - January 23, 2013
Revised - July 24, 2013
A-2 – JLG Lift – 3124287

TABLE OF CONTENTS
TABLE OF CONTENTS
SUBJECT - SECTION, PARAGRAPH PAGE NO.
SECTION A - INTRODUCTION - MAINTENANCE SAFETY PRECAUTIONS
A General . . . . . . . . . . . . . . . . . . . . . . . . . . . . . . . . . . . . . . . . . . . . . . . . . . . . . . . . . . . . . . . . . . . . . . A-1
B Hydraulic System Safety . . . . . . . . . . . . . . . . . . . . . . . . . . . . . . . . . . . . . . . . . . . . . . . . . . . . . . . . . A-1
C Maintenance . . . . . . . . . . . . . . . . . . . . . . . . . . . . . . . . . . . . . . . . . . . . . . . . . . . . . . . . . . . . . . . . . . A-1
SECTION 1 - OPERATION
1.1 Introduction & Operation. . . . . . . . . . . . . . . . . . . . . . . . . . . . . . . . . . . . . . . . . . . . . . . . . . . . . . . . .1-1
1.2 Connecting the JLG Control System Analyzer . . . . . . . . . . . . . . . . . . . . . . . . . . . . . . . . . . . . . . . .1-1
1.3 Using the Analyzer . . . . . . . . . . . . . . . . . . . . . . . . . . . . . . . . . . . . . . . . . . . . . . . . . . . . . . . . . . . . .1-2
1.4 Changing Access Level Using the Analyzer . . . . . . . . . . . . . . . . . . . . . . . . . . . . . . . . . . . . . . . . . .1-2
1.5 Viewing & Adjusting Parameters Using the Hand Held Analyzer. . . . . . . . . . . . . . . . . . . . . . . . . .1-3
1.6 Help Menu & Fault Codes . . . . . . . . . . . . . . . . . . . . . . . . . . . . . . . . . . . . . . . . . . . . . . . . . . . . . . . .1-4
1.7 Diagnostic Menu . . . . . . . . . . . . . . . . . . . . . . . . . . . . . . . . . . . . . . . . . . . . . . . . . . . . . . . . . . . . . . .1-5
1.8 Personalities Menu . . . . . . . . . . . . . . . . . . . . . . . . . . . . . . . . . . . . . . . . . . . . . . . . . . . . . . . . . . . . . 1-7
1.9 Machine Setup Menu . . . . . . . . . . . . . . . . . . . . . . . . . . . . . . . . . . . . . . . . . . . . . . . . . . . . . . . . . . .1-8
1.10 Calibration Menu . . . . . . . . . . . . . . . . . . . . . . . . . . . . . . . . . . . . . . . . . . . . . . . . . . . . . . . . . . . . . . .1-8
1.11 JLG Accessories, Including Workstation in the SkyTM . . . . . . . . . . . . . . . . . . . . . . . . . . . . . . . . . 1-11
JLG Approved Accessories (Except SkyGlazier) . . . . . . . . . . . . . . . . . . . . . . . . . . . . . . . . . 1-11
SkyGlazier Accessory . . . . . . . . . . . . . . . . . . . . . . . . . . . . . . . . . . . . . . . . . . . . . . . . . . . . . . 1-11
SECTION 2 - SERVICE - ENGINE POWERED BOOM LIFTS
2.1 Description . . . . . . . . . . . . . . . . . . . . . . . . . . . . . . . . . . . . . . . . . . . . . . . . . . . . . . . . . . . . . . . . . . .2-1
2.2 Installation . . . . . . . . . . . . . . . . . . . . . . . . . . . . . . . . . . . . . . . . . . . . . . . . . . . . . . . . . . . . . . . . . . . .2-1
2.3 Calibration . . . . . . . . . . . . . . . . . . . . . . . . . . . . . . . . . . . . . . . . . . . . . . . . . . . . . . . . . . . . . . . . . . . .2-8
Procedure . . . . . . . . . . . . . . . . . . . . . . . . . . . . . . . . . . . . . . . . . . . . . . . . . . . . . . . . . . . . . . . 2-8
Testing & Evaluation . . . . . . . . . . . . . . . . . . . . . . . . . . . . . . . . . . . . . . . . . . . . . . . . . . . . . . . 2-8
2.4 Troubleshooting . . . . . . . . . . . . . . . . . . . . . . . . . . . . . . . . . . . . . . . . . . . . . . . . . . . . . . . . . . . . . . .2-10
SECTION 3 - SERVICE - ELECTRIC POWERED BOOM LIFTS
3.1 Description . . . . . . . . . . . . . . . . . . . . . . . . . . . . . . . . . . . . . . . . . . . . . . . . . . . . . . . . . . . . . . . . . . .3-1
3.2 Installation . . . . . . . . . . . . . . . . . . . . . . . . . . . . . . . . . . . . . . . . . . . . . . . . . . . . . . . . . . . . . . . . . . . .3-1
3.3 Calibration . . . . . . . . . . . . . . . . . . . . . . . . . . . . . . . . . . . . . . . . . . . . . . . . . . . . . . . . . . . . . . . . . . . .3-7
Procedure . . . . . . . . . . . . . . . . . . . . . . . . . . . . . . . . . . . . . . . . . . . . . . . . . . . . . . . . . . . . . . . 3-7
Testing & Evaluation . . . . . . . . . . . . . . . . . . . . . . . . . . . . . . . . . . . . . . . . . . . . . . . . . . . . . . . 3-8
3.4 Troubleshooting . . . . . . . . . . . . . . . . . . . . . . . . . . . . . . . . . . . . . . . . . . . . . . . . . . . . . . . . . . . . . . .3-9
SECTION 4 - PARTS
3124287 – JLG Lift – i

TABLE OF CONTENTS (Continued)
ii – JLG Lift – 3124287

TABLE OF CONTENTS
LIST OF FIGURES
FIGURE NO. TITLE PAGE NO.
1-1. LSS Module Analyzer Flow Chart . . . . . . . . . . . . . . . . . . . . . . . . . . . . . . . . . . . . . . . . . . . . . . . . . .1-10
2-1. Load Sensing System Installation (Sheet 1 of 2) . . . . . . . . . . . . . . . . . . . . . . . . . . . . . . . . . . . . . .2-2
2-2. Load Sensing System Installation (Sheet 2 of 2) . . . . . . . . . . . . . . . . . . . . . . . . . . . . . . . . . . . . . .2-3
2-3. LSS Module Load Cell Connector Pinout (J5, J6, J7, J8) . . . . . . . . . . . . . . . . . . . . . . . . . . . . . . .2-16
2-4. Wiring Diagram . . . . . . . . . . . . . . . . . . . . . . . . . . . . . . . . . . . . . . . . . . . . . . . . . . . . . . . . . . . . . . . .2-17
3-1. Load Sensing System Installation (Sheet 1 of 2) . . . . . . . . . . . . . . . . . . . . . . . . . . . . . . . . . . . . . .3-2
3-2. Load Sensing System Installation (Sheet 2 of 2) . . . . . . . . . . . . . . . . . . . . . . . . . . . . . . . . . . . . . .3-3
3-3. LSS Module Load Cell Connector Pinout (J5, J6, J7, J8) . . . . . . . . . . . . . . . . . . . . . . . . . . . . . . .3-15
3-4. Wiring Diagram . . . . . . . . . . . . . . . . . . . . . . . . . . . . . . . . . . . . . . . . . . . . . . . . . . . . . . . . . . . . . . . .3-16
4-1. Platform Support & Load Sensing Installation . . . . . . . . . . . . . . . . . . . . . . . . . . . . . . . . . . . . . . .4-2
4-2. Load Sensing Electrical Components . . . . . . . . . . . . . . . . . . . . . . . . . . . . . . . . . . . . . . . . . . . . . .4-8
3124287 – JLG Lift – iii

TABLE OF CONTENTS (Continued)
iv – JLG Lift – 3124287

TABLE OF CONTENTS
LIST OF TABLES
TABLE NO. TITLE PAGE NO.
1-1 LSS Fault Codes . . . . . . . . . . . . . . . . . . . . . . . . . . . . . . . . . . . . . . . . . . . . . . . . . . . . . . . . . . . . . . .1-4
1-2 Diagnostic Menu Descriptions . . . . . . . . . . . . . . . . . . . . . . . . . . . . . . . . . . . . . . . . . . . . . . . . . . . . 1-5
1-3 Personality Parameters . . . . . . . . . . . . . . . . . . . . . . . . . . . . . . . . . . . . . . . . . . . . . . . . . . . . . . . . . .1-7
1-4 Machine Setup Menu . . . . . . . . . . . . . . . . . . . . . . . . . . . . . . . . . . . . . . . . . . . . . . . . . . . . . . . . . . .1-8
2-1 LSS Troubleshooting Chart - General. . . . . . . . . . . . . . . . . . . . . . . . . . . . . . . . . . . . . . . . . . . . . . .2-10
2-2 LSS Troubleshooting Chart - Calibration . . . . . . . . . . . . . . . . . . . . . . . . . . . . . . . . . . . . . . . . . . . .2-11
2-3 LSS Troubleshooting Chart - Measurement Performance . . . . . . . . . . . . . . . . . . . . . . . . . . . . . . .2-12
2-4 LSS Troubleshooting Chart - Host System Functionality . . . . . . . . . . . . . . . . . . . . . . . . . . . . . . . .2-14
2-5 LSS Module System Interface Connector - Power & Digital (J1 - Grey) . . . . . . . . . . . . . . . . . . . .2-16
2-6 LSS Module System Interface Connector – Communication (J1 - Black) . . . . . . . . . . . . . . . . . . .2-16
2-7 LSS Module Load Cell Connector Pinout (J5, J6, J7, J8) . . . . . . . . . . . . . . . . . . . . . . . . . . . . . . . 2-16
3-1 LSS Troubleshooting Chart - General. . . . . . . . . . . . . . . . . . . . . . . . . . . . . . . . . . . . . . . . . . . . . . .3-9
3-2 LSS Troubleshooting Chart - Calibration . . . . . . . . . . . . . . . . . . . . . . . . . . . . . . . . . . . . . . . . . . . .3-10
3-3 LSS Troubleshooting Chart - Measurement Performance . . . . . . . . . . . . . . . . . . . . . . . . . . . . . . .3-11
3-4 LSS Troubleshooting Chart - Host System Functionality . . . . . . . . . . . . . . . . . . . . . . . . . . . . . . . .3-13
3-5 LSS Module System Interface Connector - Power & Digital (J1 - Grey) . . . . . . . . . . . . . . . . . . . .3-15
3-6 LSS Module System Interface Connector – Communication (J1 - Black) . . . . . . . . . . . . . . . . . . .3-15
3-7 LSS Module Load Cell Connector Pinout (J5, J6, J7, J8) . . . . . . . . . . . . . . . . . . . . . . . . . . . . . . . 3-15
3124287 – JLG Lift – v

TABLE OF CONTENTS (Continued)
vi – JLG Lift – 3124287
SECTION 1. OPERATION
SECTION 1 - OPERATION
NOTE: This manual is intended as a supplement to the indi-
vidual machine’s Operators and Safety Manual.
1.1 INTRODUCTION & OPERATION
NOTE: It is the responsibility of the owner/user/operator/les-
sor/lessee to read & understand this manual and the
machine Operators & Safety Manual and to prevent
overloading the platform. Do not operate a machine
with a disconnected or inoperative Load Sensing
System.
The JLG-designed Load Sensing System (LSS) measures
platform load via four sensors mounted between the platform and support structure. If the actual platform load
exceeds the selected Rated Load, the following will occur:
1. The Overload Visual Warning Indicator
will flash at the selected control position
(platform or ground).
2. The Platform and Ground Alarms will
sound 5 seconds On, and 2 seconds Off.
3. All normal movement will be prevented from the
platform control position (optional - ground control
functions may be prevented).
4. Further movement is permitted by:
a. Removing the excess platform load until actual
platform load is less than Rated Load.
b. Operation of the overriding emergency system
(Auxiliary Power Unit).
c. By an authorized person at the ground control
position (optional - ground control functions
may be prevented).
Calibration of the Load Sensing System is performed by
connecting the JLG Analyzer (Analyzer Kit, JLG part no.
2901443), to the Load Sensing System Module. All calibration procedures are menu driven through the use of
the Analyzer. Note that Load Sensing System has an independent Analyzer connection located near the module.
1.2 CONNECTING THE JLG CONTROL SYSTEM ANALYZER
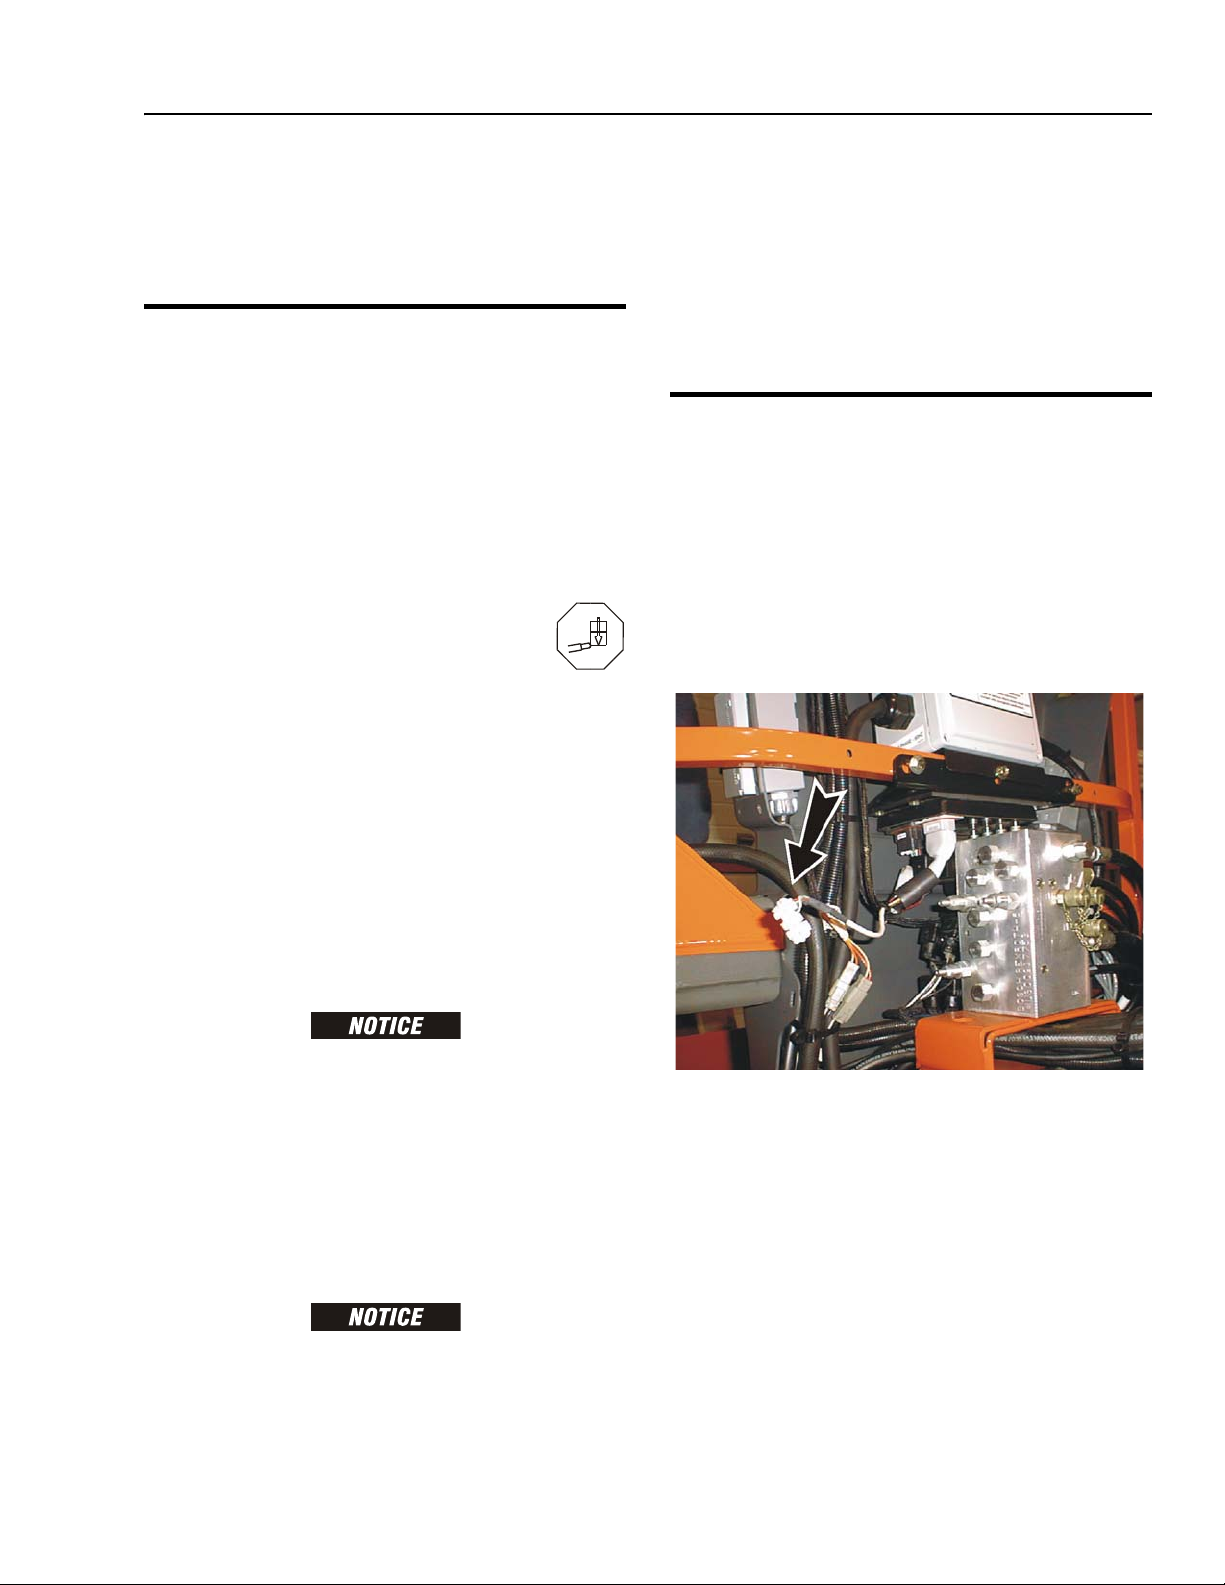
1. Connect the cable supplied with the analyzer, to the
LSS control module located in the platform and connect the remaining end of the cable to the analyzer.
NOTE: Do not confuse the Host Control System and LSS
Module’s Analyzer Connections.
The cable (shown below) has a four pin connector at
each end of the cable; the cable cannot be connected backwards.
THE LOAD SENSING SYSTEM MUST BE CALIBRATED WHEN ONE
OR MORE OF THE FOLLOWING CONDITIONS OCCUR:
a. LSS System initial installation
b. LSS Module replacement
c. LSS Sensor removal or replacement
d. Addition or removal of certain platform mounted
accessories. (Refer to Calibration in Section 2)
e. Platform is removed, replaced, repaired or
shows evidence of impact.
THE LOAD SENSING SYSTEM REQUIRES PERIODIC FUNCTION
VERIFICATION NOT TO EXCEED 6 MONTHS FROM PREVIOUS
VERIFICATION. REFER TO TESTING & EVALUATION IN SECTION
2.
2. Power up the Control System by turning the key to
the platform or ground position and pulling both
emergency stop buttons on.
3124287 – JLG Lift – 1-1

SECTION 1 - OPERATION
1.3 USING THE ANALYZER
With the machine power on and the analyzer connected
properly, the analyzer will display the following:
HELP:
PRESS ENTER
At this point, using the RIGHT and LEFT arrow keys, you
can move between the top level menu items. To select a
displayed menu item, press ENTER. To cancel a selected
menu item, press ESC.; then you will be able to scroll
using the right and left arrow keys to select a different
menu item.
The top level menus are as follows:
HELP
DIAGNOSTICS
ACCESS LEVEL
PERSONALITIES
MACHINE SETUP
CALIBRATIONS
If you press ENTER at the HELP: PRESS ENTER display
and there are no faults, the Analyzer will display EVERY-
THING OK. In the event of a fault, the Analyzer will display
OVERLOADED.
If ENTER is pressed again, the Analyzer will display
LOGGED HELP, a record of the last 16 faults. Use the left
and right arrow keys to scroll through the fault log. To
return to the top level menu, press the ESC key twice.
When a top level menu entry is selected, a new set of
menu items will be displayed as in the following.
DIAGNOSTICS:
PLTLOAD
PLTGROS
OVERLOADED?
CELL 1
CELL 2
CELL 3
CELL 4
SYSTEM
VERSIONS
Pressing ENTER while viewing any of the above menu
entries will display additional sub-menus. Typically, the
sub-menu is where parameter information is displayed or
changed. Refer to Figure 1-1., LSS Module Analyzer Flow
Chart for menu layout. You may only view Personality settings while in Access Level 2. Access Level 1 is required to
change Personality settings and calibrate.
The ESC key may be used to leave a sub-menu at any
time.
1.4 CHANGING ACCESS LEVEL USING THE ANALYZER
When the analyzer is first connected, you will be in Access
Level 2 which enables you to only view most settings
which cannot be changed until you enter a password to
advance to a lower level. This ensures that a setting cannot be accidentally altered. To change the Access Level,
the correct password must be entered. To enter the password, scroll to the ACCESS LEVEL menu. For example:
MENU:
ACCESS LEVEL 2
Press ENTER to select the ACCESS LEVEL menu.
Using the UP or DOWN arrow keys, enter the first digit of
the password, 3.
1-2 – JLG Lift – 3124287

SECTION 1 - OPERATION
Then using the RIGHT arrow key, position the cursor to
the right one space to enter the second digit of the password.
Use the UP or DOWN arrow key to enter the second digit
of the password which is 33271.
Continue using the arrow keys until all the remaining digits
of the password is shown.
Once the correct password is displayed, press ENTER.
The Access Level should display the following, if the password was entered correctly:
1.5 VIEWING & ADJUSTING PARAMETERS USING THE HAND HELD ANALYZER
Once you have entered Access Level 1 and a personality
item is selected, press the UP or DOWN arrow keys to
adjust its value, for example:
MENU:
ACCESS LEVEL 1
Repeat the above steps if the correct Access Level is not
displayed or you can not adjust the personality settings.
PERSONALITIES:
OVR DEBNCE 3.0s
There will be a minimum and maximum for the value to
ensure efficient operation. The Value will not increase if
the UP arrow is pressed when at the maximum value nor
will the value decrease if the DOWN arrow is pressed and
the value is at the minimum value for any particular personality. If the value does not change when pressing the
up and down arrows, check the Access Level to ensure
you are at Access Level 1.
3124287 – JLG Lift – 1-3

SECTION 1 - OPERATION
1.6 HELP MENU & FAULT CODES
The Help Menu is a troubleshooting tool to communicate
detected System Faults to the technician. The following
table documents the Faults for the Load Sensing System.
To access the Help Menu, use the LEFT and RIGHT arrow
keys to select HELP: PRESS ENTER from the Top Level
Menu. Press the ENTER key to view the menu.
When accessing the Help Menu, the JLG Analyzer will display EVERYTHING OK if the platform is not overloaded
Table 1-1. LSS Fault Codes
Help/Logged
Message
Everything OK LED ON The "Normal" Help Message
<MIN CAL Calibration attempt Unsuccessful, Empty Pla tform appears to weigh too little. Improper Model Selection (Machine Setup)
>MAX CAL Calibration attempt Unsuccessful, Empty Pla tform appears to weigh too much. This situation has the same root causes as
BATT TOO LOW 4/1 Incoming Supply Voltage <9.0 Vdc. The control system’s battery voltage is too low due to excess ive electrical load or dis-
BATT TOO HIGH 4/4 Incoming Supply Voltage >34.0 Vdc. The control system’s battery voltage is too high. This may be due to over-charging or
CELL #1 ERROR 8/1 Cell #1’s Bridge <2V, >3V, or could not read Cell #1’s Internal Memory. This situation indicates damage to the sensor or its
CELL #2 ERROR 8/2 Cell #2’s Bridge <2V, >3V, or could not read Cell #2’s Internal Memory. This situation indicates damage to the sensor or its
CELL #3 ERROR 8/3 Cell #3’s Bridge <2V, >3V, or could not read Cell #3’s Internal Memory. This situation indicates damage to the sensor or its
CELL #4 ERROR 8/4 Cell #4’s Bridge <2V, >3V, or could not read Cell #4’s Internal Memory. This situation indicates damage to the sensor or its
WATCHDOG RST 9/1 Microprocessor’s Watchdog Timer Triggered. This is an indication that the LSS Module has been exposed to excessi ve
EEPROM ERROR 9/2 Memory used to retain Personality/Machine Setup/Calibration has been corrupted an d must be reset by verifying all entries
NO CAL 9/3 Calibration has not been successfully completed. A ne w LSS Module will display this message until properly calibrated.
INTERNAL ERR 9/9 Pin excitation <4.25 V. The sensors may be excessively loading the excitation supply, or the LSS Module may have hard-
Flash
Code
may cause the LSS Module to expect the wrong Empty Platform Weight. This als o may be caused by a damaged sensor or
associated wiring. Finally, this condition may occur if mechanical interference between the platform and support structure
exists (all weight must transfer throug h sensors).
the "<MIN CAL" Fault Message.
charge.
improper charger operation.
wiring.
wiring.
wiring.
wiring.
electrical noise, or has experienced a hardware difficulty.
and re-calibrating.
ware difficulty.
High Side Driver Error. The load attached to OUT1 or OUT2 is shorted to battery or ground and has been d etected by the LSS
module.
DRDY Interrupt from A/D missing. Thi s may indicate an LSS Module hardware difficulty.
and no difficulties are detected. Otherwise, the JLG Analyzer will display OVERLOADED.
In the event of difficulty, the user can press ENTER again
to display Logged Help, which is a record of the last 16
Fault Messages. The following table lists each Help/
Logged Message, the Flash Code (for each Fault, the
module will flash the two-digit code on its LED) triggered
by the Fault, and a Description of the Situation (cause).
Description of Situation
1-4 – JLG Lift – 3124287

SECTION 1 - OPERATION
1.7 DIAGNOSTIC MENU
The Diagnostic Menu is another troubleshooting tool for
the Load Sensing System. Sensor and status information
is presented in real-time for the technician. Several submenus exist to organize the data.
Note that the Diagnostic Menu changes based on MODEL
Parameter in the Machine Setup Menu (some displays are
suppressed). The information presented in the following
table will be proper when MODEL=BOOM LIFT (refer to
Machine Setup Menu).
Table 1-2. Diagnostic Menu Descriptions
Diagnostics Menu
(Displayed on Analyzer 1
CELL 1:
CELL 2:
CELL 3:
CELL 4:
SYSTEM:
st
Line)
Parameter (Displayed
on Analyzer 2
nd
Line)
PLTLOAD +XXXX LBS or Kg Displays (Total Measured Force — Empty Platform Cali-
PLTGROS +XXXX LBS or Kg Displays Total Measured Force (Sum of Cells 1 thru 4
OVERLOADED? Yes / No Displays Current LSS Module Overload Status
LOAD +XXXX LBS or Kg Displays Calibrated Cell Reading in Current Units
RDG +
INPUT +
LOAD +XXXX LBS or Kg Displays Calibrated Cell Reading in Current Units
RDG +
INPUT +XX.XXXX mV Displays Cell Reading in mV
LOAD +XXXX LBS or Kg Displays Calibrated Cell Reading in Current Units
RDG +XX.XXXX mV/V Displays Cell Reading in mV/V
INPUT +
LOAD +XXXX LBS or Kg Displays Calibrated Cell Reading in Current Units
RDG +
INPUT +
OVLOAD STAT OFF / ON State of Overload Status Digital Output
WARNING OFF / ON St ate of Warning Digital Output
750# CAPACITY OFF / ON St ate of Digital Input #1
1000# CAPACITY OFF / ON St ate of Digital Input #2
BATTERY XX.XX V Displays Current Battery Voltage
EXCITE X.XXXX V Displays Load Cell Excitation Voltage
TEMP +
To access the Diagnostic Menu, use the LEFT and RIGHT
Arrow keys to select DIAGNOSTICS from the Top Level
Menu. Press the ENTER key to view the menu.
Press the LEFT and RIGHT Arrow keys to view the displays and select the various sub-menus (CELL 1, CELL 2,
etc.). To access a sub-menu, press the ENTER key. Once
in a sub-menu, press the LEFT and RIGHT Arrow keys to
view the various displays (just like a Top Level menu). To
exit a sub-menu, press the ESC key.
The table below details the structure of the Diagnostic
Menu, and describes the meaning of each piece of information presented.
Parameter Value
(Displayed on Analyzer 2
nd
Description
Line)
bration)
LOAD)
XX.XXXX mV/V Displays Cell Reading in mV/V
XX.XXXX mV Displays Cell Reading in mV
XX.XXXX mV/V Displays Cell Reading in mV/V
XX.XXXX mV Displays Cell Reading in mV
XX.XXXX mV/V Displays Cell Reading in mV/V
XX.XXXX mV Displays Cell Reading in mV
XXX.X Deg C Display the Temperature Sensed by the LSS Module
3124287 – JLG Lift – 1-5

SECTION 1 - OPERATION
Table 1-2. Diagnostic Menu Descriptions
Diagnostics Menu
(Displayed on Analyzer 1
VERSIONS:
st
Line)
Parameter (Displayed
nd
on Analyzer 2
Line)
Parameter Value
(Displayed on Analyzer 2
Line)
nd
Description
SOFTWARE PX.XX Displays LSS Module Software Version
HARDWARE X Display LSS Module Hardware Revision
ANALYZER VX.XXXX Displays Analyzer Software Version
1-6 – JLG Lift – 3124287

SECTION 1 - OPERATION
1.8 PERSONALITIES MENU
The Personalities Menu is used to adjust aspects of the
Load Sensing System’s operation. A FACTORY sub-menu
exists for access to unit-specific calibration information
determined during the manufacturing process, should the
need arise.
DO NOT TAMPER WITH THE PARAMETERS WITHIN THE FACTORY SUB-MENU. THESE FACTORS ARE NOT ADJUSTED FOR
NORMAL CALIBRATION. CONSULT THE FACTORY TO RESTORE
THESE PARAMETERS (REFERENCE THE LSS MODULE’S UNIQUE
SERIAL NUMBER).
Table 1-3. Personality Parameters
Submenu
(Displayed on
Analyzer 1st Line)
OVERLD XXXX LBS (or KGS) 550 LBS Displays/adjusts the Overload limit for this AWP*
OVERLD2 XXXX LBS (or KGS) 825 LBS Displays/adjusts an Alternate Overload limit for this AWP*
OVERLD3 XXXX LBS (or KGS) 1100LBS Displays/adjusts an Alternate Overload limit for this AWP*
ACC’Y XXXX LBS (OR KGS) 0 LBS Displays/adjusts a de-rating for Accessories*
OVR DBNCE X S 3 Sec Displays/adjusts the de-bounce delay before an overload.
OVR HOLD X S 5 Sec Displays/adjusts the minimum delay before an overload can be
CAP SEL DLY X S 1 Sec Displays/adjusts the delay before a Capacity Select Digital Input is
FACTORY:
#1 GAIN X.XXXX Displays/calibrates the LSS Module analog channel gain.
#1 ZERO +X.XXXX mV Displa ys/calibrates the LSS Module analog channel offset.
#2 GAIN X.XXXX
#2 ZERO +X.XXXX mV
#3 GAIN X.XXXX Displays/calibrates the LSS Module analog channel gain.
#3 ZERO +X.XXXX mV
#4 GAIN X.XXXX
#4 ZERO +X.XXXX mV
EXC GAIN X.XXXX
TEMP OFFS +XXX.X Displays/calibrates the LSS Module’s internal temp sensor.
* Refer to JLG Workstation in the Sky Accessories™ in Section 2.
Parameter
(Displayed on Analyzer 2
Line)
nd
Default
Values
Note that the Personalities Menu changes based on
MODEL Parameter in the Machine Setup Menu (some displays are suppressed). The information presented below
will be proper when MODEL=BOOM LIFT (refer to
Machine Setup Menu).
To access the Personalities Menu, use the LEFT and
RIGHT Arrow keys to select PERSONALITIES from the Top
Level Menu. Press the ENTER key to view the menu.
Press the LEFT and RIGHT Arrow keys to view the displays.
The following table details the structure of the Personalities Menu, and describes the meaning of each parameter.
Description
released.
regarded.
Displays/calibrates the LSS Module analog channel gain.
Displays/calibrates the LSS Module analog channel offset.
Displays/calibrates the LSS Module analog channel offset.
Displays/calibrates the LSS Module analog channel gain.
Displays/calibrates the LSS Module analog channel offset.
Displays/calibrates the LSS Module excitation measu rement gain.
3124287 – JLG Lift – 1-7

SECTION 1 - OPERATION
1.9 MACHINE SETUP MENU
The Machine Setup Menu is used to configure the Load
Sensing System for application on a particular JLG model,
and select the desired force units (i.e. pounds or kilograms). In addition, the technician can trigger the LSS
Module to restore Defaults to all Personalities Parameters
by changing the MODEL to any other selection, and then
re-selecting BOOM LIFT.
Note that Diagnostics and Personalities Menus change
based on MODEL Parameter (some displays are suppressed).
To access the Machine Setup Menu, use the LEFT and
RIGHT Arrow keys to select MACHINE SETUP from the
Top Level Menu. Press the ENTER key to view the menu.
Press the LEFT and RIGHT Arrow keys to view the displays.
The following table details the structure of the Machine
Setup Menu, and describes the meaning of each parameter.
Table 1-4. Machine Setup Menu
Parameter
(Displayed on
Analyzer 2
Line)
MODEL: = BOOM LIFT
UNITS: =LBS
nd
Analyzer 2
=4069LE
=3369LE
=500RTS
=260MRT
=Kg
Parameter Value
(Displayed on
nd
Line)
Description
Displays/adjusts Model Selection. Must be set to BOOM LIFT
for this application.
Displays/adjusts global force
units
1.10 CALIBRATION MENU
The Calibration Menu is used to zero the Empty Platform
weight.
To access the Calibration Menu, use the LEFT and RIGHT
Arrow keys to select CALIBRATION from the Top Level
Menu. Press the ENTER key to view the menu.
NOTE: The Calibration Menu is not available in Access
Level 2.
Upon entry to the Calibration Menu, the LSS Module shall
communicate to the Analyzer:
CALIBRATE:
YES:ENTER, NO:ESC
Pressing the ESC key will return the user to the top level
menu and not disturb the prior calibration information.
Pressing the ENTER key will confirm that the platform is
empty (except for factory-installed options outside the
Rated Load). The LSS Module will calculate the total of all
load cell readings and ensure that the total is greater than
1-8 – JLG Lift – 3124287

SECTION 1 - OPERATION
90 lbs. (41 kg), but less than 550 lbs.(250 kg). If successful, the Analyzer will show the following:
CALIBRATE:
COMPLETE
If the empty platform weight is greater than 550 lbs.(250
kg), the calibration attempt will be unsuccessful and the
Analyzer will show the following:
CALIBRATE:
> MAX CAL
If the empty platform weight is less than 90 lbs. (41 kg),
the calibration attempt will be unsuccessful and the Analyzer will show the following:
CALIBRATE:
< MIN CAL
3124287 – JLG Lift – 1-9

SECTION 1 - OPERATION
Figure 1-1. LSS Module Analyzer Flow Chart
1-10 – JLG Lift – 3124287

SECTION 1 - OPERATION
1.11 JLG ACCESSORIES, INCLUDING
WORKSTATION IN THE SKY
The Load Sensing System must be configured for proper
operation with JLG approved Accessories. Calibration of
the Load Sensing System can be performed with the
Accessory mounted in the platform.
TM
JLG Approved Accessories (Except SkyGlazier)
A platform-mounted accessory slightly reduces the
amount of load that can be carried before the vehicle
becomes overloaded. This extra load must be accounted
for to enable the accessory to be mounted during Calibration.
A De-Rating is provided for JLG Sky Accessories via decal
and/or the JLG Workstation in the Sky
ual. This De-Rating must be entered into the LSS Module’s ACC’Y Personality to cause the system to accurately
indicate overload (by the De-Rating factor).
Example: Consider the case of the JLG SkyWelder (SkyCutter) with a De-Rating of 70LBS (32KG). Without De-Rating, the Load Sensing System will declare Overload at
550LBS (250KG) in the 500LBS Capacity Zone (110% of
500LBS) and at 1100LBS (499KG) in the 1000LBS Capacity Zone (110% of 1000LBS). When the De-Rating for SkyWelder (SkyCutter) is entered into the ACC’Y Personality,
the LSS will declare Overload 70LBS (32KG) earlier
(480LBS or 218KG in the 500LBS Capacity Zone;
1030LBS or 467KG in the 1000LBS Capacity Zone).
Procedurally, the Accessory should be mounted to the
platform and the LSS Module’s ACC’Y Personality should
be set using the guidelines above. Calibration should be
performed as outlined in this manual. During Testing &
Evaluation, it should be noted that the LSS will declare
Overload with less platform load (by the amount of the DeRating).
TM
Accessory Man-
SkyGlazier Accessory
This Accessory does not have a simple De-Rating since it
has different impact on the 500LBS and 1000LBS Capacity Zones (Moment limits in 1000# Zone).
SKYGLAZIER (BASE ONLY)
When not using the SkyGlazier, recommended JLG vehicles can safely carry the SkyGlazier’s Base without impact
on normal capacity ratings.
Procedurally, mount the SkyGlazier’s Base but not the
Tray. Set the LSS Module’s Personalities according to the
table below and perform a Calibration.
Personality Setting
OVERLD 550LBS (249KG)
OVERLD3 1100LBS (499KG)
ACC’Y 0LBS (0KG)
SKYGLAZIER (BASE & TRAY)
When using the SkyGlazier, recommended JLG vehicles
can carry 400LBS (181KG) in the 500LBS Capacity Zone
(Total Platform Weight with Tray Installed), and 750LBS
(340KG) in the 1000LBS Capacity Zone (Total Platform
Weight with Tray Installed).
Procedurally, mount the SkyGlazier’s Base but not the
Tray. Set the LSS Module’s Personalities according to the
table below and perform a Calibration.
Personality Setting
OVERLD 450LBS (204KG)
OVERLD3 800LBS (363KG)
ACC’Y 0LBS ( 0KG)
3124287 – JLG Lift – 1-11

SECTION 1 - OPERATION
NOTES:
1-12 – JLG Lift – 3124287

SECTION 2 - SERVICE - ENGINE POWERED BOOM LIFTS
SECTION 2. SERVICE - ENGINE POWERED BOOM LIFTS
This section is for servicing 400 Series, 450/510 Series,
600A Series, 600S Series, 800A Series, 800S Series,
1250AJP, & 1200/1350 Series Boom Lifts
2.1 DESCRIPTION
The system consists of the LSS Module, four Shear Beam
Load Cells (sensors), Wire Harness, and various brackets
and fasteners. The LSS Module is mounted in the platform
on a bracket beneath the console box (above the rotator).
The Shear Beam Load Cells mount between the platform
and the support structure in such a way that all support
force for the platform is applied through them (for measurement). The four Shear Beam Load Cells plug directly
into the LSS Module. The Wire Harness connects the LSS
Module to the Host Control System.
2.2 INSTALLATION
1. Loosen the Fasteners that secure the Platform to the
Support Structure. Maneuver the platform above a
pair of saw-horses or other adequate supporting
device capable of supporting up to 350lbs.(160 kg).
Position the platform to a comfortable height.
Loosen but do not remove the four 1/2 inch Shank
(3/4 inch Head) Hex Bolts that secure the platform to
the support.
2. Separate the Platform and Support Structure.
tly lower the platform onto the saw-horses or supporting device (using the Auxiliary Power Unit from
Ground Control). Remove the fasteners that secure
the platform to the support structure and discard the
fasteners (new fasteners must be used for installation since all are torqued to specification).
3. Mount the Shear Beam Load Cells to the Support
Structure. Carefully examine the detail on Figure 2-
2., Load Sensing System Installation (Sheet 2 of 2)
that shows how the components are placed onto the
platform support structure. Place one of the Shear
Beam Load Cells on top of the support structure
with the Orientation Arrow pointing downward
(groove near the single mounting hole upward).
Gen-
3124287 – JLG Lift – 2-1

SECTION 2 - SERVICE - ENGINE POWERED BOOM LIFTS
Figure 2-1. Load Sensing System Installation (Sheet 1 of 2)
1. Guard
2. Load Cell Assembly
3. Mounting Bracket
4. LSS Module
5 . S hi e ld
2-2 – JLG Lift – 3124287

Figure 2-2. Load Sensing System Installation (Sheet 2 of 2)
1 . C ap s cr e w
2 . N ut
3. Spacer Bushing
4. Load Cell
5 . W as he r
6. Load Cell Guard
DE TA IL A
1. Cable Clamp
2. Button Head Screw
3. Nut
4 . W as he r
5. Load Cell Wire Channel
6. Load Cell Shield
7. Button Head Screw
8 . W as he r
DE TA IL B
1. Load Cell
2. Front Mounting Plate
on P la t fo rm S up p or t
3. Load Cell Guard Bracket
4 . W as he r
5 . N ut
SECTION 2 - SERVICE - ENGINE POWERED BOOM LIFTS
3124287 – JLG Lift – 2-3

SECTION 2 - SERVICE - ENGINE POWERED BOOM LIFTS
Insert the two 1/2 inch Shank (3/4 inch Head) Hex
Bolts from above.
4. Install the Wire Channels to the Support Structure.
Install the Load Cell Guard Bracket (2 Left and 2
Right) and Washers below the support structure and
secure the Hex Lock Nuts but do not completely
tighten (all fasteners will be fully tightened in a subsequent step after alignment to minimize off-axis
stress on the sensors).
The channels mount to the Load Cell Guard Brackets and provide protection for the wiring beneath the
platform. Mount the channels as shown on Figure 2-
1., Load Sensing System Installation (Sheet 1 of 2)
and Figure 2-2., Load Sensing System Installation
(Sheet 2 of 2). The large opening is positioned
toward the rear of the platform and provides clearance for the sensor’s cable exit. The open part of the
channel faces inward (away from the sensor).
Install the remaining three Shear Beam Load Cells in
the same fashion. Label each sensor’s connector to
avoid confusion in a subsequent step (Front-Left,
Front-Right, Rear-Left, Rear-Right).
2-4 – JLG Lift – 3124287

SECTION 2 - SERVICE - ENGINE POWERED BOOM LIFTS
Route the rear sensor wiring through the large opening in the channel. An additional shield is supplied
for the two Rear Shear Beam Load Cells (to cover
the sensor’s cable exit). Mount the cable clamps
inside the channel (3 small clamps per side) to properly retain the wiring within the channel. During this
step, pull all four Shear Beam Load Cell wires
through the channels toward the LSS Module
mounting location. Excess wire length should not be
allowed to hang below the platform (it will be bundled near the LSS Module).
5. Mount the Platform to the Shear Beam Load Cells.
Carefully maneuver the platform support structure
toward the platform (using the Auxiliary Power Unit
from Ground Control). Make final adjustments by
sliding the platform on the saw-horses or barrels.
Ensure that sensor wiring is not damaged during
this step. Study the Installation Drawing’s detail
regarding how components are placed. From below,
insert the 5/8 inch Shank bolts (15/16” Head) with
washers that mount the Platform to the Shear Beam
Load Cells. Place the spacer bushing on top of the
Shear Beam Load Cells (between the platform and
sensor), with the beveled feature toward the sensor.
Secure the Hex Lock Nut on top of the platform but
do not completely tighten.
6. Torque all Fasteners to Specification.
that the platform is resting completely on the platform support structure (adjust using the Auxiliary
Power Unit from Ground Control). Torque the two
1/2 inch Shank (3/4 inch Head) bolts between the
platform support structure and the Shear Beam
Load Cell to 75ft-lbs (105 Nm) (do all four sensors),
ensuring that the access holes in the Load Cell
Guard Brackets for the 5/8 inch Shank bolts remain
aligned. Next, torque the 5/8 inch Shank (15/16 inch
Head) between the platform and Shear Beam Load
Cell to 50 ft-lbs (68 Nm) (do all four sensors).
7. Mount the LSS Module to the Platform.
LSS Module to the bracket with the hardware
described in the Installation Drawing. Next, mount
the assembly to the platform mid-rail (drill mid-rail if
necessary).
First, ensure
Secure the
3124287 – JLG Lift – 2-5

SECTION 2 - SERVICE - ENGINE POWERED BOOM LIFTS
8. Install the Shear Beam Load Cell Connections.
Locate the connector from the Rear-Right Shear
Beam Load Cell (orientation from the normal operator’s position while using platform control console).
Install the Rear-Right connector into the LSS Module’s J8 by carefully rotating the molded portion of
the connector until the keys align, and then tightening the knurled barrel. Tighten it first by hand (avoid
cross-threading), and then carefully secure it with a
small pair of locking pliers. The connector must be
secured in this fashion to compress its O-ring seal
and assure moisture resistance, but must not be
over-tightened such that it damages the LSS Module. Install the Rear-Left into J7, the Front-Right into
J6, and the Front-Left into J5. Neatly bundle the
excess wire using wire ties so it can be stowed in the
region below the LSS Module mounting location.
Ensure that the excess wire length stays within the
platform envelope and does not interfere with
hydraulic hose movement at the rotator.
position Deutsch connector into J1 on the LSS Module (System Interface – Power & Digital).
Route the harness from the Grey 12-position
Deutsch connector into the Platform Console Box
via a strain relief connector.
9. Wire the Load Sensing System to the Host Control
System. Ensure that the Host Control System is
powered-down by depressing the EMS at the
Ground Control station. From the wire harness provided, insert the Black 12-position Deutsch connector into J2 on the LSS Module (System Interface –
Communication) to install the JLG Analyzer connection. For single capacity vehicles, do not connect the
Red/Yellow wire. For dual capacity vehicles, remove
the orange contact wedge from the Grey 12-position
Deutsch connector and insert the Red/Yellow wire
into Socket 9 for vehicles with 500LB / 750LB (230kg
/ 340kg) Rated Loads or Socket 8 for vehicles with
500LB / 1000LB (230kg / 450kg) Rated Loads.
Replace the orange contact wedge, install sealing
plugs in the unused sockets, and insert the Grey 12-
Terminate the four harness wires inside the Platform
Console Box according to the Wiring Diagram for
the Load Sensing System. Match the wire colors and
2-6 – JLG Lift – 3124287

SECTION 2 - SERVICE - ENGINE POWERED BOOM LIFTS
numbers from the LSS harness to those of the Host
Control System.
10. Install the Overload Lamp at Ground Control if necessary. Open the Main Terminal Box and ensure that
the Overload Lamp is installed in the Indicator Panel.
Alternately, observe the Ground Control's Indicator Panel for the Overload
Symbol during Power-Up with the Keyswitch in the Ground position. If it is
present, skip this step in the procedure. To install the
Overload Lamp, first review the AMP Connector section of the vehicle's Service Manual for detailed
instructions regarding the connector system.
Next, mount the lamp by inserting it into
the opening behind the Overload Symbol
and rotating it until it locks. Route the
lamp's Brown/White and Black wires from
the door toward the Ground Module's J4 connector
and secure with wire ties. Remove the J4 Connector
(Blue) from the Ground Module by releasing the
locking tab with a 3/16 inch (4.8mm) wide screw-
driver blade. Pry the red wedge lock to the open
position for contact loading, but do not remove it.
Remove the sealing plugs with a small pair of pliers
by rotating them back and forth during removal.
Insert the Brown/White wire into J4-14 (lamp output),
and the Black into J4-32 (ground). (If J4-32 is
already used, connect the Black wire to the ground
on the last indicator lamp in the chain.) Close the red
wedge lock by squeezing it uniformly inward. Install
the J4 connector back into the Ground Module and
ensure that the locking tab clicks into position.
11. Setup the Host Control System to enable the Load
Sensing System. Power-up the Host Control System
by resetting the EMS at the Ground Control station.
Plug the JLG Analyzer into the Host Control System’s Analyzer Connection at the Ground or Platform (do not confuse the Host Control System and
LSS Module’s Analyzer Connections).
3124287 – JLG Lift – 2-7

SECTION 2 - SERVICE - ENGINE POWERED BOOM LIFTS
Enter the Access Level 1 Password (33271). Next,
proceed to the MACHINE SETUP, LOAD sub-menu
and select “2=CUTOUT PLT”. Press the RIGHT
ARROW to view the MACHINE SETUP, LOAD TYPE
sub-menu. Set it to “1=4 UNDER BASKET” to select
the Load Sensing System with four Shear Beam
Load Cells beneath the platform. At this point, it is
likely that the Host Control System’s Visual and
Audible Warnings for the Load Sensing System will
be active (since the LSS Module is un-calibrated).
12. Perform a Calibration of the Load Sensing System.
Refer to the Calibration procedure in this manual to
prepare the Load Sensing System for use.
2.3 CALIBRATION
Procedure
1. Plug the JLG Analyzer into the LSS Module and
enter the Access Level 1 Password. Do not confuse
the Host Control System and LSS Module’s Analyzer
Connections. The Host Control System’s connection
is mounted beneath the Platform Console Box, and
the LSS Module’s connection hangs from a short
harness near the module. Proceed to the ACCESS
LEVEL menu and enter the Access Level 1 Password (33271).
2. Level the Platform.
mately level for calibration. Level the platform from
Ground Control (if necessary) to within +
3. Configure the LSS Module for Boom Lift mode and
Desired Units. Proceed to the LSS Module’s
MACHINE SETUP, MODEL sub-menu and select
“MODEL=BOOM LIFT”. Press the RIGHT ARROW to
view the Units Selection. Select “UNITS=LBS” for
platform load measurement in Pounds, and
“UNITS=KG” for measurement in Kilograms.
4. Remove everything except JLG Accessories from
the Platform. Empty the platform to allow the Load
Sensing System to record its weight during calibration. All tools, debris, and customer-installed devices
shall be removed. Permanently-fixed JLG Accessories shall remain and their contribution toward Rated
Load will be accounted for in the next step.
The platform should be approxi-
5 degrees.
5. Configure the LSS Module for JLG Accessories.
contribution of each permanently-fixed JLG Accessory toward Rated Load must be determined. JLG
Accessories are decaled with their effective contribution toward Rated Load. If this decal is missing, reference the appropriate manual for the JLG
Accessory or consult the table within this manual.
Once determined, the contributions of all permanently-fixed JLG Accessories mounted in the platform of the vehicle shall be added together and
entered in the Analyzer’s PERSONALITIES, ACC’Y
display (using the proper units).
6. Execute a Calibration via the JLG Analyzer.
to the Analyzer’s CALIBRATION top level menu and
press ENTER. Press ESC to abort a calibration or
ENTER to calibrate (tare). If successful, the Analyzer
will display “COMPLETE”. If unsuccessful, a message will be displayed that will help lead to a resolution (reference the Troubleshooting section of this
manual). Press ESC to return to the top level menu.
The
Proceed
Te s t i n g & E v al u at i o n
Refer to the Troubleshooting section of this manual if the
Load Sensing System fails to meet these guidelines.
1. Plug the JLG Analyzer into the LSS Module.
confuse the Host Control System and LSS Module’s
Analyzer Connections. The Host Control System’s
connection is mounted beneath the Platform Console Box, and the LSS Module’s connection hangs
from a short harness near the module.
2. Level the Platform.
mately level for analysis, or the guidelines below will
not be applicable. Level the platform from Ground
Control (if necessary) to within +
3. Observe the Empty Platform Weight.
DIAGNOSTICS, PLTLOAD sub-menu and observe
the measured platform load. All tools, debris, and
customer-installed devices shall be removed during
evaluation. Ideally, the PLTLOAD should be zero but
can vary +
should be stable and should not vary by more than
2lbs (±1kg) (unless there is heavy influence from
+
wind or vibration).
The platform should be approxi-
5 degrees.
Proceed to the
15lbs (± 7kg). Further, the reading
Do not
2-8 – JLG Lift – 3124287

SECTION 2 - SERVICE - ENGINE POWERED BOOM LIFTS
4. Use the Technician’s Weight to Evaluate. The technician should enter the platform and record the PLTLOAD reading while standing in the center of the
platform, and then each corner. The average of the
readings should be the estimated weight of the technician. The range of the readings should be no more
than 20lbs (9kg) (max PLTLOAD reading – min PLTLOAD reading).
5. Confirm Host Control System Warnings and Interlocks. Using the vehicle’s keyswitch, select Platform
Mode and power-up. Start the vehicle’s engine and
ensure that all controls are functional and the Load
Sensing System’s Overload Visual and Audible
Warnings are not active. Simulate an Overload by
unplugging the Shear Beam Load Cell connected to
J5 on the LSS Module (the most easily accessed).
The Overload Visual Warning should flash, and the
Audible Warning (at Platform and Ground) should
sound for 5 seconds On, and 2 seconds Off. With
the engine running, all control should be prevented.
Cycle the Platform EMS to stop the engine and then
power-up again. The Overload Visual and Audible
Warning should continue. Confirm that controls are
responsive when using the Auxiliary Power Unit for
emergency movement. Install the disconnected
Shear Beam Load Cell back in J5 on the LSS Module. The Overload Visual and Audible Warnings
should cease and normal control function should
return. Switch the vehicle’s keyswitch to Ground
Mode and repeat the above procedure. The Overload Visual Warning at the Ground Controls should
flash, and the Audible Warning (at Platform and
Ground) should sound for 5 seconds On, 2 seconds
Off. However, the controls should remain functional
when using the engine and the Auxiliary Power Unit
(if the Host Controls System’s MACHINE SETUP,
LOAD is set to “2=CUTOUT PLT”. If set to “3=CUTOUT ALL”, then Ground Controls will be prevented
when using the engine as in the platform). Re-fit the
Shear Beam Load Cell to J5 on the LSS Module and
carefully tighten by hand, and then with a small pair
of locking pliers to seat the O-ring seal.
6. Confirm Host Control System Capacity Indication
(optional for vehicles with Dual Capacity Ratings).
For vehicles equipped with a Capacity Select switch
on the Platform Console Box, it is necessary to
examine an additional interface between the Load
Sensing System and the Host Control System.
Using the vehicle keyswitch, select Platform Mode
and power-up. If necessary, put the boom in the
transport position (completely stowed) and center
the Jib Plus (if equipped). Place the Capacity Select
switch in the 500lbs (230kg)position and ensure that
the proper indicator illuminates on the Platform Console Box. Plug the JLG Analyzer into the LSS Module’s Analyzer connection and proceed to the
DIAGNOSTICS, SYSTEM submenu. Ensure that the
750# (340kg) CAPACITY and 1000# (450kg)
CAPACITY displays indicate OFF. Place the Capacity
Select switch in the 750lbs/1000lbs (340kg/450kg)
position (if so equipped) and ensure that the proper
indicator illuminates on the Platform Console Box
(but does not flash). For vehicles with 750lbs
(340kg) capacity, ensure that the 750# (340kg)
CAPACITY display indicates ON but the 1000#
(450kg) CAPACITY indicates OFF. For vehicles with
1000lbs capacity, ensure that the 750# (340kg)
CAPACITY display indicates OFF but the 1000#
CAPACITY indicates ON.
7. Confirm Load Sensing System Performance with
Calibrated Weights. Operate the vehicle from
Ground Control and place the boom in the transport
position (fully stowed) for safety. Plug the JLG Analyzer into the LSS Module’s connection and proceed
to the DIAGNOSTICS, PLTLOAD display. Place
500lbs (230kg) in the platform and ensure that PLTLOAD is with +
Capacity vehicles, do the same for the alternate
capacity (750LBS or 1000LBS [340kg or 450kg]).
5% of the actual weight. For Dual
3124287 – JLG Lift – 2-9

SECTION 2 - SERVICE - ENGINE POWERED BOOM LIFTS
2.4 TROUBLESHOOTING
The following tables are furnished to provide possible resolutions for common difficulties. Difficulties are classified
as General, Calibration, Measurement Performance, and
Host System Functionality.
Table 2-1. LSS Troubleshooting Chart - General
Difficulty Possible Resolution
JLG Analyzer does not display
“HELP: PRESS ENTER” when
connected to LSS Module’s
connection, but the module’s
LED is lit or flashing.
LED on LSS Module does not
light.
The JLG Analyzer is failing to communicate with the LSS Module, but the LSS Module is
powered (indicated by module’s LED). Investigate JLG Analyzer serial communication and
power supply connections.
1. If the Analyzer displays “CONNECTING…” or “CONNECTION ERROR” after a short
interval, examine the Analyzer harness on J2. J2-2 should connect to Pin 3 on the
Analyzer, and J2-11 should connect to Pin 2.
2. If the Analyzer does not display anything (and there is no backlighting), examine the
Analyzer’s power supply. Remove the harness connection from J2 and ensure that
J2-1 has approximately 12V, and J2-12 is 0V. The harness should connect J2-1 to Pin
1 on the Analyzer, and J2-12 to Pin 4 on the Analyzer.
3. The JLG Analyzer is suspect. Substitute to determine cause of failure.
4. The LSS Module is suspect. Substitute to determine cause of failure.
The LSS Module is un-powered, a short exists, or the device is damaged.
1. LSS Module’s power supply is improper. Check for the presence of approximately
12V on J1-1, and 0V on J1-2. The module’s power supply comes from the Platform
Console Box. Use to the Wiring Diagram to trace the conductors to their source.
2. There is a short circuit on the reference voltage present on J5-J8. Unplug the connectors one at a time and observe if the module begins to function after a particular
connection is removed. If so, carefully inspect the wiring between the module and
that sensor.
3. There is a short circuit on the pre-regulated supply for the JLG Analyzer present on
J2-1. Unplug J2’s connector and observe whether the module begins to function. If
so, examine the Analyzer harness for defect.
4. The LSS Module is suspect. Substitute to determine cause of failure.
2-10 – JLG Lift – 3124287

Difficulty Possible Resolution
JLG Analyzer displays
“<MIN CAL” after attempt is
made to Calibrate.
JLG Analyzer displays “>MAX
CAL” after attempt is made to
Calibrate.
SECTION 2 - SERVICE - ENGINE POWERED BOOM LIFTS
Table 2-2. LSS Troubleshooting Chart - Calibration
The LSS Module expected the empty platform to weight more for calibration.
1. The platform is resting on the ground or another obstruction during calibration. The
platform’s weight must be transferred through the Shear Beam Load Cells and into
the support structure for an accurate calibration.
2. The wrong Model Selection was made under the LSS Module’s MACHINE SETUP,
MODEL. This should be set to “MODEL=BOOM LIFT”. Improper selection may lead
the LSS Module to expect different empty platform weights.
3. One or more shear beams are improperly mounted (there is interference between
the platform and support structure) or upside down. Refer to the Installation portion
of this manual to resolve the issue.
4. The calibration difficulty may be a result of a Measurement Performance issue.
Review the Possible Resolutions under that category.
The LSS Module expects the empty platform to weigh less for calibration.
1. Tools, debris, or customer-installed accessories have not been removed before calibration. The LSS Module must tare an empty platform and its optional JLG Accessories.
2. The wrong Model Selection was made under the LSS Module’s MACHINE SETUP,
MODEL. This should be set to “MODEL=BOOM LIFT”. Improper selection may lead
the LSS Module to expect different empty platform weights.
3. One or more shear beams are improperly mounted (there is interference between
the platform and support structure) or upside down. Refer to the Installation portion
of this manual to resolve the issue.
4. The calibration difficulty may be a result of a Measurement Performance issue.
Review the Possible Resolutions under that category.
3124287 – JLG Lift – 2-11

SECTION 2 - SERVICE - ENGINE POWERED BOOM LIFTS
Table 2-3. LSS Troubleshooting Chart - Measurement Performance
Difficulty Possible Resolution
Empty Platform Weight (DIAGNOSTICS, PLTLOAD) is not
within +
Platform Load readings (DIAGNOTICS, PLTLOAD) are unstable by more than +2lbs (±1kg)
(without the influence of vibration or wind).
There are large variations in
Platform Load (DIAGNOSTICS, PLTLOAD) based on the
location of the load. Tolerance
to variations is 20lbs for an
evaluation using the technician’s weight, and +
Rated Load when using calibrated weights.
(continued)
15lbs (±7kg) of zero.
or
or
5% of
The LSS Module is unable to properly measure the platform weight.
1. One of the Shear Beam Load Cells is not properly plugged into the LSS Module.
Since the connectors seal with an O-ring and are located in a crowded area, it is possible that the connectors are threaded together, but poor electrical contact is made.
Attempt to wiggle the molded portion of each connector on J5-J8. If properly tightened, the molded portion should not move. Also, examined each Shear Beam Load
Cell’s readings via the JLG Analyzer. Proceed to the DIAGNOSTICS, CELL 1-4, LOAD
displays and determine if the readings are reasonable. Note that it is possible to have
only two sensors carrying all of the platform load due to fit between the platform and
support structure (this is normal).
2. Wiring leading to one of the Shear Beam Load Cells is damaged. Examine each sensor’s reading using the JLG Analyzer. Proceed to the DIAGNOSTICS, CELL 1-4,
LOAD displays and determine if the readings are reasonable and responsive to slight
downward pressure above the sensor being viewed. Carefully inspect sensor wiring
where it passes through cable clamps for signs of damage. Inspect wiring where
damage to the channel is apparent. If damage to the sensor’s cordset is found,
replace the appropriate Shear Beam Load Cell since the cordset is not serviceable
(connector is molded for moisture resistance; cordset is soldered into sensor
beneath welded stainless steel cover).
3. One of the Shear Beam Load Cells was not assembled properly during installation.
Examine each sensor’s reading using the JLG Analyzer. Proceed to the DIAGNOSTICS, CELL 1-4, LOAD displays and determine if the readings are reasonable. It is
often helpful to apply slight downward pressure above the sensor being examined
and observe that its output increases (increasing force measurement; decreasing
means the sensor is mounted upside-down). Compare the order of assembly to the
detail on the Installation Drawing and ensure that the only contact between the platform and the support is through the sensor bodies (nothing else touches except
wires). Re-assemble according to print if necessary.
(continued)
2-12 – JLG Lift – 3124287

Table 2-3. LSS Troubleshooting Chart - Measurement Performance
Difficulty Possible Resolution
Empty Platform Weight (DIAGNOSTICS, PLTLOAD) is not
within +
Platform Load readings (DIAGNOTICS, PLTLOAD) are unstable by more than +2lbs (±1kg)
(without the influence of vibration or wind).
There are large variations in
Platform Load (DIAGNOSTICS, PLTLOAD) based on the
location of the load. Tolerance
to variations is 20lbs for an
evaluation using the technician’s weight, and +
Rated Load when using calibrated weights.
15lbs (±7kg) of zero.
or
or
5% of
SECTION 2 - SERVICE - ENGINE POWERED BOOM LIFTS
4. Improper procedure was used when tightening the fasteners for the Shear Beam
Load Cells. Failure to regard the notes in the Installation guide can result in large offaxis forces on the sensors (which disturb the primary measurement axis readings).
Loosen all fasteners and sequentially torque them as recommended in the Installation guide (new fasteners are recommended to achieve proper torque).
5. Damage to the platform or support structure has occurred or one of the components
is out-of-tolerance (not planar). When the fasteners are torqued to specification, the
sensors are disturbed by large off-axis forces (which disturb the primary measurement axis readings). Loosen all fasteners and observe whether the platform or support were drawn-up by the fasteners (they should both be planar and match up
accurately). Resolution is to replace the damaged or faulty component. Watch for
Shear Beam Load Cell damage (yield) as a result of this difficulty.
6. One of the Shear Beam Load Cells is contaminated by debris or moisture. Examine
each sensor’s reading using the JLG Analyzer. Proceed to the DIAGNOSTICS, CELL
1-4, LOAD displays and determine if the readings are reasonable and stable (not
changing by more than +
Lack of measurement stability is a key indication of contamination. Unplug the
appropriate connector (J5 is CELL 1, J6 is CELL 2, J7 is CELL 3, and J8 is CELL 4)
and inspect for dirt or moisture. Look carefully into the female connector on the sensor’s cordset for evidence of contamination. Debris should be brushed away with a
soft bristle brush (do not introduce any cleaners as they will leave conductive residue). Moisture should be allowed to evaporate or accelerated with a heat-gun (use
low heat and be carefully to not melt connector materials). Moisture intrusion into the
molded portion of the connector (capillary action into the wire bundle) or the Shear
Beam Load Cell itself will require replacement of the sensor.
7. One of the Shear Beam Load Cells has been mechanically damaged (yielded). Any
Shear Beam Load Cell that is physically deformed or has damage to one of the stainless steel covers should be replaced immediately. It is also possible to have invisible
mechanical damage resulting from an extreme overload (>6000lbs [>2722kg]). This
can be detected by removing all fasteners that mount the platform and supporting
the platform on two saw-horses or barrels (no weight resting on the Shear Beam
Load Cells). Examine each sensor’s reading using the JLG Analyzer. Proceed to the
DIAGNOSTICS, CELL 1-4, LOAD displays and observe whether the unloaded sensors read with +
sive force when physically unloaded.
8. The LSS Module is suspect. Interchange the Shear Beam Load Cell connections (J5J8) and observe the results via the JLG Analyzer. Proceed to the DIAGNOSTICS,
CELL 1-4, LOAD displays and observe the readings. If the problem seems to remain
with a particular sensor, carefully re-examine the issues above. If the problems
seems to remain with a particular LSS Module channel, substitute another module.
15lbs (±7kg) of zero (individually). Replace sensors that read exces-
2lbs (±1kg) (without the influence of vibration or wind).
3124287 – JLG Lift – 2-13

SECTION 2 - SERVICE - ENGINE POWERED BOOM LIFTS
Table 2-4. LSS Troubleshooting Chart - Host System Functionality
Difficulty Possible Resolution
The Visual and Audible Overload Warnings fail to sound
when platform is loaded
beyond Rated Load, or when
simulated by unplugging a
Shear Beam Load Cell from the
LSS Module. Controls remain
functional at Platform and
Ground Control positions.
The Visual and Audible Overload Warnings sound even
when the platform is empty.
Controls are prevented in the
same manner as when overloaded.
The Host Control System is failing to regard the overload signal from the LSS Module, or
the signal is shorted.
1. The Load Sensing System must be enabled within the Host Control System. Plug
the JLG Analyzer into the Host Control System, enter the Access Level 1 password
(33271), and examine the MACHINE SETUP, LOAD sub-menu. The selection
“2=CUTOUT PLT” should be displayed for European Community compliance (platform controls prevented during overload, ground controls remain operational). In
country- or customer-specific circumstance, the selection “3=CUTOUT ALL” is used
(platform and ground controls prevented during overload).
2. The signal between the LSS Module and the Host Control System is shorted. The
Platform Module’s J1-20 is an input, and it connected to the J1-5 output on the LSS
Module To examine the status of this signal, plug the JLG Analyzer into the Host
Control System, enter the Access Level 1 password (33271), and examine the
DIAGNOSTICS, SYSTEM, LOAD display. The display will indicate “OK” when the
Platform Module’s input is energized (approximately 12V), and “OVERLOADED”
when it is de-energized (0V). Refer to the Wiring Diagram for Load Sensing System
for details
3. Observe the LSS Module’s assessment of overload using the JLG Analyzer plugged
into the LSS Module’s connection. Proceed to the DIAGNOSTICS, OVERLOADED?
display. The display should indicate “OVERLOADED? N” when the platform is
empty, and “OVERLOADED? Y” when the platform is overloaded. If the assessment
is improper, the difficulty may be a result of a General or Measurement Performance
issue. Review the Possible Resolutions under those categories.
4. If the LSS Module’s J1-5 Output does not appears to coincide with the DIAGNOSTICS, OVERLOADED? display, then the LSS Module is suspect. Substitute to determine cause of failure.
The LSS Module is un-powered, un-calibrated, or is experiencing a Measurement Performance difficulty. Alternately, the Host Control System is not receiving the proper signal from
the LSS Module.
1. Ensure that the LSS Module is powered. The LSS Module’s LED will be lit or flash if
the module is powered. If not, ensure that approximately 12V is present between J11 and J1-2 on the LSS Module (J1-1 is positive). Trace the Ignition and Ground supply wires into the Platform Console Box’s Wiring Harness using the Wiring Diagram
to locate the difficulty.
2. Plug a JLG Analyzer into the LSS Module’s connection and ensure that the Host
Control System is powered-up. When HELP:PRESS ENTER is displayed, press the
ENTER key on the Analyzer. If “EVERYTHING OK” is displayed, it is probable that
the Overload Signal from the LSS Module is not reaching the Host Control System.
This signal is present on LSS Module’s J1-5 and is approximately 12V normally, and
0V during an overload. This signal eventually reaches the Platform Module’s J1-20.
Refer to the Wiring Diagram for wire color, number, and terminal information.
3. If the Analyzer displayed “OVERLOADED” in the previous step, press the ENTER
key again. If “NO CAL” is displayed, the Load Sensing System has not been properly calibrated. Refer to the Calibration portion of this manual.
4. If another fault is displayed, refer to the portion of this manual that describes Fault
Messages and their causes.
5. The difficulty may be a result of a Measurement Performance issue. Review the Possible Resolutions under those categories.
2-14 – JLG Lift – 3124287

Table 2-4. LSS Troubleshooting Chart - Host System Functionality
Difficulty Possible Resolution
The Ground Audible Warning
fails to sound, but the Platform
Audible Warning sounds properly.
Controls remain functional at
the Ground Control position
during an overload, or when
simulated by unplugging a
Shear Beam from the LSS
Module. The Control at the
Platform Control position are
prevented when using the
engine, but not when using the
Auxiliary Power Unit.
When the Capacity Select
switch is set for 750lbs/1000lbs
(340kg/450kg), Visual and
Audible Overload Warnings
sound and controls are prevented when the platform is
loaded beyond 500lbs (230kg).
Alternately, the Visual and
Audible Overload Warnings do
not sound and controls are not
prevented when the platform is
loaded beyond 500lbs (230kg)
but the Capacity Select switch
is set for 500lbs (230kg). (Dual
Capacity vehicles only).
SECTION 2 - SERVICE - ENGINE POWERED BOOM LIFTS
The Host Control System’s Ground Alarm is missing or improperly installed. Verify that the
device is mounted. Verify wiring from the Main Terminal Box and Ground Module according
to the proper Host Control System documentation. The Ground Alarm is energized from J227 on the Ground Module (approximately 12V). Ensure that the ground termination is
proper (0V).
The Host Control System is configured to prevent platform controls only in the event of
overload (as required for EN280 compliance). Alternately, the Host Control System can be
configured to prevent ground and platform controls for country- or customer-specific circumstances.
Plug the JLG Analyzer into the LSS Module’s connection and enter the Access Level 1
password (33271). Proceed to the MACHINE SETUP, LOAD sub-menu. Set this parameter
to “2=CUTOUT PLT” to prevent platform controls in the event of overload. Set this parameter to “3=CUTOUT ALL” to prevent platform and ground controls in the event of overload.
There is a malfunction associated with the Capacity Select signal between the Host Control
System and LSS Module. This signal is controlled by the Host Control System and is an
input to the LSS Module. When the Capacity Select switch is set to 500lbs (230kg), this signal is de-energized (0V). The signal is energized (12V) when the Capacity Select switch is
set to 750lbs/1000lbs (340kg/450kg). This signal will be connected to J1-8 on the LSS Module for vehicles that carry up to 750lbs (340kg), and J1-9 for vehicles that carry up to
1000lbs (450kg).
1. Observe operation of the Platform Console Box’s Capacity Indicator Lamps. Place
the boom in the transport position (fully stowed) and center the Jib Plus (if
equipped) to enable selection of both capacities. Set the keyswitch to the Platform
position and power-up. When the Capacity Select switch on the Platform Console
Box is in the 500lbs (230kg) position, ensure that the 500lbs (230kg) Indicator Lamp
is lit. When the Capacity Select switch is in the 750lbs/1000lbs (340kg/450kg) position, ensure that the 750lbs/1000lbs (340kg/450kg) Indicator Lamp is lit. If either
does not occur, ensure that J1-21 on the Platform Module is de-energized (0V)
when the Capacity Select switch is in the 500lbs (230kg) position, and energized
(12V) when the switch is in the 750lbs/1000lbs (340kg/450kg) position. Ensure that
J2-12 on the Platform Module is energized (12V) when the Capacity Select switch is
in the 500LBS position. Ensure that J2-13 on the Platform Module is energized
(12V) when the Capacity Select switch is in the 750lbs/1000lbs (340kg/450kg) position. Finally, is may be necessary to consult documentation for the Host Control
System to determine if another safety interlock is preventing the vehicle from entering the 750lbs/1000lbs (340kg/450kg) mode.
2. Remove the J1 (Grey) connector from the LSS Module and measure voltage on this
signal (J1-8 for 750lbs [340kg] or J1-9 for 1000lbs [450kg]). Plug the JLG Analyzer
into the LSS Module’s connection and proceed to DIAGNOSTICS, SYSTEM. The
750# CAPACITY display will indicate “ON” when J1-8 is energized (12V) and “OFF”
when J1-8 is de-energized (0V). The 1000# (450kg) CAPACITY display will indicate
“ON” when J1-9 is energized (12V) and “OFF” when J1-9 is de-energized (0V). If the
LSS Module fails to respond properly to signals on J1-8 or J1-9, then the LSS Module is suspect (substitute to determine cause of failure).
3124287 – JLG Lift – 2-15

SECTION 2 - SERVICE - ENGINE POWERED BOOM LIFTS
Figure 2-3. LSS Module Load Cell Connector
Pinout (J5, J6, J7, J8)
NOTE: Physical connector as viewed looking into the
cable end
Table 2-7. LSS Module Load Cell Connector Pinout (J5,
Table 2-5. LSS Module System Interface Connector -
Power & Digital (J1 - Grey)
Pin Signal Description
1 VBAT Po sitive Power Supply from Host Control System
(12-24V)
2 GND Negative Power Supply from Host Control Sy stem
(0V)
3 GND-2 Connects to GND
4N/CUnused
5 DO1 Overload Indicator Ou tput (Normal=VBAT / Over-
load=0V)
6 DO2 Warning Indicator Output (Normal=0V / Over-
loaded=VBAT for 5 Sec, 0V for 2 Sec)
7DI3Unused
8 DI 2 Select OV ERLD3 Personality Rating (No=0V /
Yes =V BA T)
9 DI 1 Select OV ERLD2 Personality Rating (No=0V /
Yes =V BA T)
10 GND-2 Connects to GND
11 VBAT-2 Connects to VBAT
12 VBAT-2 Connects to VBAT
Pin Signal Description
1 + Signal Positive Sensor Output (approx. 2.5V)
2 Cal Clock Serial Clock to Sensor’s Integrated Memory
3 - Excitation Negative Sensor Supply Voltage (approx. 0V)
4 +Excitation Positive Sensor Supply Voltage (approx. 5V)
5 - Signal Negative Sensor Output (approx. 2.5V)
6 Cal Data Serial Data from Sensor’s Integral Memory
J6, J7, J8)
Table 2-6. LSS Module System Interface Connector –
Communication (J1 - Black)
Pin Signal Description
1 APWR Pre-Regulated Supply for JLG Analyzer (Analyzer
Pin 1; approx. 12V)
2 TX RS-232 for JLG Analyzer (Analyzer Pin 3)
3 TRP1 120 Ohm CANbus Terminator
4 CANH-1 CANbus Interface High
5 CANS-1 CANbus Shield Termination (Not same as GND)
6 CANH-2 Connects to CANH-1
7 CANL-2 Connects to CANL-1
8 CANS-2 Connects to CANS-1
9 CANL-1 CANbus Interface Low
10 TRP2 120 Ohm CANbus Terminator
11 RX RS-232 for JLG Analyzer (Analyzer Pin 2)
12 GND Ground for JLG Analyzer (Anal yzer Pin 4)
2-16 – JLG Lift – 3124287

SECTION 2 - SERVICE - ENGINE POWERED BOOM LIFTS
4933278 F
4933289 A
(
ANA
LYZ
E
R
C
ONNECTOR)
SOCKE
T
10S
OCK
E
T
1
1 GREENSO
CKE
T 1
2 B
LACK/SHIE
L
D
S
OCKET 1 R
EDSOC
K
E
T
3
W
H
ITE
S
O
C
KET 2 GREEN
S
OCKET 4 BLA
CK/SHIELD
P
I
N
1
+
SIGNALP
I
N
2
CAL CLOCKPI
N
3
-
EX
CIT
ATIONPI
N
4 + EX
CITATIO
NPI
N 5 - SIGNA
LPI
N
7
CAL DAT
A
BLACK
ORN/RED 49-100 J4-14
PLATFORM
OVERLOAD
LAMP
LOCATED IN GROUND CONTROL BOX
J8
REAR RIGHT
LOAD C ELL
J7
REAR LEFT
LOAD CE LL
J6
FRONT RIGHT
LOAD C ELL
J5
FRONT LEFT
LOAD C ELL
V+ BATT
PLATFORM CONSOLE BOX
(EIM OUTPUT)
J1 GRAY
J1 GRAY
E300A/AJ/AJP - E/M400AJ/AJP
E/M450A/AJ - E/M600/J/JP
150HAX - 400S - 450A/AJ
450A/AJ Series II
510AJ - 600S/SC/SJ/SJC
660SJ/SJC - 800A/AJ
800S/SJ - 1200SJP
1250AJP - 1350SJP
1500SJ
OR
J2 BLACK
J3-4
INSTALL INTO
(PIN 14) OF 15
POSITION
MATE-N-LOCK
1000#/750KG
1000# CAPACITY LIGHT
750# CAPACITY LIGHT
RED/YEL 54-3-1
YEL/RED 2-37 TO (PIN 15)
15 POSITION MATE-N-LOCK
BLACK J1-4
LED BOARD
TERMINAL STRIP IS LOCATED ON THE
LEFT SIDE OF THE CONSOLE BOX BOTTOM.
TERMINAL STRIP IS LOCATED ON T HE
LEFT SIDE OF THE CONSOLE BOX BOTTOM.
(CAPACITIY INPUT)
(GROUND)
1
2
3
4
5
6
J2-25 BLACK
J2-13 RED/YEL 54-3
SOCKET 2 WHT/BLK 58-8
SOCKET 5 BRN/WHT 47-9
SOCKET 8
SOCKET 9
SOCKET 3
SOCKET 6
SOCKET 10
SOCKET 11
SOCKET 12
SOCKET 4
SOCKET 1 WHT/RED 57-5
WHT/BLK 58-8
BRN/WHT 47-9
12345
6
WHT/RED 57-5
PLATFORM POWER MODULE
J2
1
1
2
2
53364
J7
J8
WHT/RED 57-5
WHT/RED 57-5
WHT/BLK 58-8
BRN/WHT 47-9
SOCKET 1 RED
SOCKET 2 WHITE
SOCKET 3
SOCKET 4
SOCKET 5
SOCKET 6
SOCKET 4
SOCKET 4
SOCKET 1 YEL/RED 2-36
SOCKET 2 BLACK
SOCKET 5 YEL/RED 2-37
SOCKET 8 RED/YEL 54-2-1
SOCKET 9 RED/YEL 54-2-1
SOCKET 3
SOCKET 6
SOCKET 10
SOCKET 11
SOCKET 12
SOCKET 4
J1 GREY
J2 BLACK
REAR LEFT
LOAD P IN (RL)
FRONT LEFT
LOAD PIN (FL)
FRONT RIGHT
LOAD PIN (FR)
REAR RIGHT
LOAD PIN (RR)
J1 NOTE
INSTALL RED/YEL 54-2-1 INTO SOCKET 8 FOR 1000LB CA PACITY.
INSTALL RED/YEL 54-2-1 INTO SOCKET 9 FOR 750LB CA PACITY.
NOTE: RED/YEL 54-2-1 NOT REQUIRED ON 500LB C APACITY
MACHINES. PLEASE INSTALL ONE WIRE CAP (4460121)
ON THE RED/YEL 54-2-1 WIRE AT THE J1 CONNECTOR.
ALWAYS INSTALL THE OTHER END OF THIS WIRE TO
TERMINAL STRIP IN #1 POSITION .
INSTALL RED/YEL 54-2-1 FROM SOCKET 9 TO TO S OCKET 12 FOR
400S WITH 750 LB CAPACITY
Figure 2-4. Wiring Diagram
3124287 – JLG Lift – 2-17

SECTION 2 - SERVICE - ENGINE POWERED BOOM LIFTS
NOTES:
2-18 – JLG Lift – 3124287

SECTION 3 - SERVICE - ELECTRIC POWERED BOOM LIFTS
SECTION 3. SERVICE - ELECTRIC POWERED BOOM LIFTS
This section is for servicing E300 Series, E/M400 Series,
E/M450 Series, & E/M600 Series Boom Lifts
3.1 DESCRIPTION
The system consists of the LSS Module, four Shear Beam
Load Cells (sensors), Wire Harness, and various brackets
and fasteners. The LSS Module is mounted in the platform
on a bracket beneath the console box (above the rotator).
The Shear Beam Load Cells mount between the platform
and the support structure in such a way that all support
force for the platform is applied through them (for measurement). The four Shear Beam Load Cells plug directly
into the LSS Module. The Wire Harness connects the LSS
Module to the Host Control System.
3.2 INSTALLATION
1. Loosen the Fasteners that secure the Platform to the
Support Structure. Maneuver the platform above a
pair of saw-horses or other adequate supporting
device capable of supporting up to 350lbs.(160 kg).
Position the platform to a comfortable height.
Loosen but do not remove the four 1/2 inch Shank
(3/4 inch Head) Hex Bolts that secure the platform to
the support.
2. Separate the Platform and Support Structure.
tly lower the platform onto the saw-horses or supporting device (from Ground Control). Remove the
fasteners that secure the platform to the support
structure and discard the fasteners (new fasteners
must be used for installation since all are torqued to
specification).
3. Mount the Shear Beam Load Cells to the Support
Structure. Carefully examine the detail on Figure 3-
2., Load Sensing System Installation (Sheet 2 of 2)
that shows how the components are placed onto the
platform support structure. Place one of the Shear
Beam Load Cells on top of the support structure
with the Orientation Arrow pointing downward
(groove near the single mounting hole upward).
Gen-
3124287 – JLG Lift – 3-1

SECTION 3 - SERVICE - ELECTRIC POWERED BOOM LIFTS
Figure 3-1. Load Sensing System Installation (Sheet 1 of 2)
1. Guard
2. Load Cell Assembly
3. Mounting Bracket
4. LSS Module
5 . S hi e ld
3-2 – JLG Lift – 3124287

Figure 3-2. Load Sensing System Installation (Sheet 2 of 2)
1 . C ap s cr e w
2 . N ut
3. Spacer Bushing
4. Load Cell
5 . W as he r
6. Load Cell Guard
DE TA IL A
1. Cable Clamp
2. Button Head Screw
3. Nut
4 . W as he r
5. Load Cell Wire Channel
6. Load Cell Shield
7. Button Head Screw
8 . W as he r
DE TA IL B
1. Load Cell
2. Front Mounting Plate
on P la t fo rm S up p or t
3. Load Cell Guard Bracket
4 . W as he r
5 . N ut
SECTION 3 - SERVICE - ELECTRIC POWERED BOOM LIFTS
3124287 – JLG Lift – 3-3

SECTION 3 - SERVICE - ELECTRIC POWERED BOOM LIFTS
Insert the two 1/2 inch Shank (3/4 inch Head) Hex
Bolts from above.
4. Install the Wire Channels to the Support Structure.
The channels mount to the Load Cell Guard Brack-
Install the Load Cell Guard Bracket (2 Left and 2
Right) and Washers below the support structure and
secure the Hex Lock Nuts but do not completely
tighten (all fasteners will be fully tightened in a subsequent step after alignment to minimize off-axis
stress on the sensors).
ets and provide protection for the wiring beneath the
platform. Mount the channels as shown on Figure 3-
1., Load Sensing System Installation (Sheet 1 of 2)
and Figure 3-2., Load Sensing System Installation
(Sheet 2 of 2). The large opening is positioned
toward the rear of the platform and provides clearance for the sensor’s cable exit. The open part of the
channel faces inward (away from the sensor).
Install the remaining three Shear Beam Load Cells in
the same fashion. Label each sensor’s connector to
avoid confusion in a subsequent step (Front-Left,
Front-Right, Rear-Left, Rear-Right).
3-4 – JLG Lift – 3124287

SECTION 3 - SERVICE - ELECTRIC POWERED BOOM LIFTS
Route the rear sensor wiring through the large opening in the channel. An additional shield is supplied
for the two Rear Shear Beam Load Cells (to cover
the sensor’s cable exit). Mount the cable clamps
inside the channel (3 small clamps per side) to properly retain the wiring within the channel.
During this step, pull all four Shear Beam Load Cell
wires through the channels toward the LSS Module
mounting location. Excess wire length should not be
allowed to hang below the platform (it will be bundled near the LSS Module).
feature toward the sensor. Secure the Hex Lock Nut
on top of the platform but do not completely tighten.
6. Torque all Fasteners to Specification.
that the platform is resting completely on the platform support structure (adjust using the Ground
Control). Torque the two 1/2 inch Shank (3/4 inch
Head) bolts between the platform support structure
and the Shear Beam Load Cell to 75ft-lbs (105 Nm)
(do all four sensors), ensuring that the access holes
in the Load Cell Guard Brackets for the 5/8 inch
Shank bolts remain aligned. Next, torque the 5/8
inch Shank (15/16 inch Head) between the platform
and Shear Beam Load Cell to 50 ft-lbs (68 Nm) (do
all four sensors).
7. Mount the LSS Module to the Platform.
LSS Module to the bracket with the hardware
described in the Installation Drawing. Next, mount
the assembly to the platform mid-rail (drill mid-rail if
necessary).
First, ensure
Secure the
5. Mount the Platform to the Shear Beam Load Cells.
Carefully maneuver the platform support structure
toward the platform (from Ground Control). Make
final adjustments by sliding the platform on the sawhorses or barrels. Ensure that sensor wiring is not
damaged during this step. Study the Installation
Drawing’s detail regarding how components are
placed. From below, insert the 5/8 inch Shank bolts
(15/16” Head) with washers that mount the Platform
to the Shear Beam Load Cells. Place the spacer
bushing on top of the Shear Beam Load Cells
(between the platform and sensor), with the beveled
3124287 – JLG Lift – 3-5

SECTION 3 - SERVICE - ELECTRIC POWERED BOOM LIFTS
8. Install the Shear Beam Load Cell Connections.
Locate the connector from the Rear-Right Shear
Beam Load Cell (orientation from the normal operator’s position while using platform control console).
Install the Rear-Right connector into the LSS Module’s J8 by carefully rotating the molded portion of
the connector until the keys align, and then tightening the knurled barrel. Tighten it first by hand (avoid
cross-threading), and then carefully secure it with a
small pair of locking pliers. The connector must be
secured in this fashion to compress its O-ring seal
and assure moisture resistance, but must not be
over-tightened such that it damages the LSS Module. Install the Rear-Left into J7, the Front-Right into
J6, and the Front-Left into J5. Neatly bundle the
excess wire using wire ties so it can be stowed in the
region below the LSS Module mounting location.
Ensure that the excess wire length stays within the
platform envelope and does not interfere with
hydraulic hose movement at the rotator.
Install a strain relief connector into the platform box
and route the harness from the Grey 12-position
Deutsch connector into the Platform Console Box.
Route the wires under the module. Terminate the
three harness wires inside the Platform Console Box
according to the Wiring Diagram for the Load Sensing System. Match the wire colors and numbers
from the LSS harness to those of the Host Control
System.
9. Wire the Load Sensing System to the Host Control
System. Ensure that the Host Control System is
powered-down by depressing the EMS at the
Ground Control station. From the wire harness provided, insert the Black 12-position Deutsch connector into J2 on the LSS Module (System Interface –
Communication) to install the JLG Analyzer connection. Plug the Deutsch connector into J1 on the LSS
Module (System Interface – Power & Digital).
10. Setup the Host Control System to enable the Load
Sensing System. Power-up the Host Control System
by resetting the EMS at the Ground Control station.
Plug the JLG Analyzer into the Host Control System’s Analyzer Connection at the Ground or Plat-
3-6 – JLG Lift – 3124287

SECTION 3 - SERVICE - ELECTRIC POWERED BOOM LIFTS
form (do not confuse the Host Control System and
LSS Module’s Analyzer Connections).
Enter the Access Level 1 Password (33271). Next,
proceed to the MACHINE SETUP, LOAD sub-menu
and select “2=CUTOUT PLT”. Press the RIGHT
ARROW to view the MACHINE SETUP, LOAD TYPE
sub-menu. Set it to “1=4 UNDER BASKET” to select
the Load Sensing System with four Shear Beam
Load Cells beneath the platform. At this point, it is
likely that the Host Control System’s Visual and
Audible Warnings for the Load Sensing System will
be active (since the LSS Module is un-calibrated).
11. Perform a Calibration of the Load Sensing System.
Refer to the Calibration procedure in this manual to
prepare the Load Sensing System for use.
3.3 CALIBRATION
Procedure
1. Plug the JLG Analyzer into the LSS Module and
enter the Access Level 1 Password. Do not confuse
the Host Control System and LSS Module’s Analyzer
Connections. The Host Control System’s connection
is mounted beneath the Platform Console Box, and
the LSS Module’s connection hangs from a short
harness near the module. Proceed to the ACCESS
LEVEL menu and enter the Access Level 1 Password (33271).
2. Level the Platform.
mately level for calibration. Level the platform from
Ground Control (if necessary) to within +
3. Configure the LSS Module for Boom Lift mode and
Desired Units. Proceed to the LSS Module’s
MACHINE SETUP, MODEL sub-menu and select
“MODEL=BOOM LIFT”. Press the RIGHT ARROW to
view the Units Selection. Select “UNITS=LBS” for
platform load measurement in Pounds, and
“UNITS=KG” for measurement in Kilograms.
4. Remove everything except JLG Accessories from
the Platform. Empty the platform to allow the Load
Sensing System to record its weight during calibration. All tools, debris, and customer-installed devices
shall be removed. Permanently-fixed JLG Accessories shall remain and their contribution toward Rated
Load will be accounted for in the next step.
5. Configure the LSS Module for JLG Accessories.
contribution of each permanently-fixed JLG Accessory toward Rated Load must be determined. JLG
Accessories are decaled with their effective contribution toward Rated Load. If this decal is missing, reference the appropriate manual for the JLG
Accessory or consult the table within this manual.
Once determined, the contributions of all permanently-fixed JLG Accessories mounted in the platform of the vehicle shall be added together and
entered in the Analyzer’s PERSONALITIES, ACC’Y
display (using the proper units).
6. Execute a Calibration via the JLG Analyzer.
to the Analyzer’s CALIBRATION top level menu and
press ENTER. Press ESC to abort a calibration or
ENTER to calibrate (tare). If successful, the Analyzer
will display “COMPLETE”. If unsuccessful, a message will be displayed that will help lead to a resolution (reference the Troubleshooting section of this
manual). Press ESC to return to the top level menu.
The platform should be approxi-
5 degrees.
The
Proceed
3124287 – JLG Lift – 3-7

SECTION 3 - SERVICE - ELECTRIC POWERED BOOM LIFTS
Te s t i n g & E v al u at i o n
Refer to the Troubleshooting section of this manual if the
Load Sensing System fails to meet these guidelines.
1. Plug the JLG Analyzer into the LSS Module.
confuse the Host Control System and LSS Module’s
Analyzer Connections. The Host Control System’s
connection is mounted beneath the Platform Console Box, and the LSS Module’s connection hangs
from a short harness near the module.
2. Level the Platform.
mately level for analysis, or the guidelines below will
not be applicable. Level the platform from Ground
Control (if necessary) to within +
3. Observe the Empty Platform Weight.
DIAGNOSTICS, PLTLOAD sub-menu and observe
the measured platform load. All tools, debris, and
customer-installed devices shall be removed during
evaluation. Ideally, the PLTLOAD should be zero but
can vary +
should be stable and should not vary by more than
2lbs (±1kg) (unless there is heavy influence from
+
wind or vibration).
4. Use the Technician’s Weight to Evaluate.
cian should enter the platform and record the PLTLOAD reading while standing in the center of the
platform, and then each corner. The average of the
readings should be the estimated weight of the technician. The range of the readings should be no more
than 20lbs (9kg) (max PLTLOAD reading – min PLTLOAD reading).
The platform should be approxi-
5 degrees.
Proceed to the
15lbs (± 7kg). Further, the reading
Do not
The techni-
5. Confirm Host Control System Warnings and Interlocks. Using the vehicle’s keyswitch, select Platform
Mode and power-up. Ensure that all controls are
functional and the Load Sensing System’s Overload
Visual and Audible Warnings are not active. Simulate an Overload by unplugging the Shear Beam
Load Cell connected to J5 on the LSS Module (the
most easily accessed). The Overload Visual Warning
in the platform should flash, and the Audible Warning (at Platform and Ground) should sound for 5
seconds On, and 2 seconds Off. All controls should
be prevented. Install the disconnected Shear Beam
Load Cell back in J5 on the LSS Module. The Overload Visual and Audible Warnings should cease and
normal control function should return. Switch the
vehicle’s keyswitch to Ground Mode and repeat the
above procedure. The Overload Visual Warning at
the Ground Controls should flash, and the Audible
Warning (at Platform and Ground) should sound for
5 seconds On, 2 seconds Off. However, the controls
should remain functional (if the Host Controls System’s MACHINE SETUP, LOAD is set to “2=CUTOUT
PLT”. If set to “3=CUTOUT ALL”, then Ground Controls will be prevented as in the platform). Re-fit the
Shear Beam Load Cell to J5 on the LSS Module and
carefully tighten by hand, and then with a small pair
of locking pliers to seat the O-ring seal.
6. Confirm Load Sensing System Performance with
Calibrated Weights. Operate the vehicle from
Ground Control and place the boom in the transport
position (fully stowed) for safety. Plug the JLG Analyzer into the LSS Module’s connection and proceed
to the DIAGNOSTICS, PLTLOAD display. Place
500lbs (230kg) in the platform and ensure that PLTLOAD is with +
5% of the actual weight.
3-8 – JLG Lift – 3124287

SECTION 3 - SERVICE - ELECTRIC POWERED BOOM LIFTS
3.4 TROUBLESHOOTING
The following tables are furnished to provide possible resolutions for common difficulties. Difficulties are classified
as General, Calibration, Measurement Performance, and
Host System Functionality.
Table 3-1. LSS Troubleshooting Chart - General
Difficulty Possible Resolution
JLG Analyzer does not display
“HELP: PRESS ENTER” when
connected to LSS Module’s
connection, but the module’s
LED is lit or flashing.
LED on LSS Module does not
light.
The JLG Analyzer is failing to communicate with the LSS Module, but the LSS Module is
powered (indicated by module’s LED). Investigate JLG Analyzer serial communication and
power supply connections.
1. If the Analyzer displays “CONNECTING…” or “CONNECTION ERROR” after a short
interval, examine the Analyzer harness on J2. J2-2 should connect to Pin 3 on the
Analyzer, and J2-11 should connect to Pin 2.
2. If the Analyzer does not display anything (and there is no backlighting), examine the
Analyzer’s power supply. Remove the harness connection from J2 and ensure that
J2-1 has approximately 12V, and J2-12 is 0V. The harness should connect J2-1 to Pin
1 on the Analyzer, and J2-12 to Pin 4 on the Analyzer.
3. The JLG Analyzer is suspect. Substitute to determine cause of failure.
4. The LSS Module is suspect. Substitute to determine cause of failure.
The LSS Module is un-powered, a short exists, or the device is damaged.
1. LSS Module’s power supply is improper. Check for the presence of approximately
12V on J1-1, and 0V on J1-2. The module’s power supply comes from the Platform
Console Box. Use to the Wiring Diagram to trace the conductors to their source.
2. There is a short circuit on the reference voltage present on J5-J8. Unplug the connectors one at a time and observe if the module begins to function after a particular
connection is removed. If so, carefully inspect the wiring between the module and
that sensor.
3. There is a short circuit on the pre-regulated supply for the JLG Analyzer present on
J2-1. Unplug J2’s connector and observe whether the module begins to function. If
so, examine the Analyzer harness for defect.
4. The LSS Module is suspect. Substitute to determine cause of failure.
3124287 – JLG Lift – 3-9

SECTION 3 - SERVICE - ELECTRIC POWERED BOOM LIFTS
Table 3-2. LSS Troubleshooting Chart - Calibration
Difficulty Possible Resolution
JLG Analyzer displays
“<MIN CAL” after attempt is
made to Calibrate.
JLG Analyzer displays “>MAX
CAL” after attempt is made to
Calibrate.
The LSS Module expected the empty platform to weight more for calibration.
1. The platform is resting on the ground or another obstruction during calibration. The
platform’s weight must be transferred through the Shear Beam Load Cells and into
the support structure for an accurate calibration.
2. The wrong Model Selection was made under the LSS Module’s MACHINE SETUP,
MODEL. This should be set to “MODEL=BOOM LIFT”. Improper selection may lead
the LSS Module to expect different empty platform weights.
3. One or more shear beams are improperly mounted (there is interference between
the platform and support structure) or upside down. Refer to the Installation portion
of this manual to resolve the issue.
4. The calibration difficulty may be a result of a Measurement Performance issue.
Review the Possible Resolutions under that category.
The LSS Module expects the empty platform to weigh less for calibration.
1. Tools, debris, or customer-installed accessories have not been removed before calibration. The LSS Module must tare an empty platform and its optional JLG Accessories.
2. The wrong Model Selection was made under the LSS Module’s MACHINE SETUP,
MODEL. This should be set to “MODEL=BOOM LIFT”. Improper selection may lead
the LSS Module to expect different empty platform weights.
3. One or more shear beams are improperly mounted (there is interference between
the platform and support structure) or upside down. Refer to the Installation portion
of this manual to resolve the issue.
4. The calibration difficulty may be a result of a Measurement Performance issue.
Review the Possible Resolutions under that category.
3-10 – JLG Lift – 3124287

Table 3-3. LSS Troubleshooting Chart - Measurement Performance
Difficulty Possible Resolution
Empty Platform Weight (DIAGNOSTICS, PLTLOAD) is not
within +
Platform Load readings (DIAGNOTICS, PLTLOAD) are unstable by more than +2lbs (±1kg)
(without the influence of vibration or wind).
There are large variations in
Platform Load (DIAGNOSTICS, PLTLOAD) based on the
location of the load. Tolerance
to variations is 20lbs for an
evaluation using the technician’s weight, and +
Rated Load when using calibrated weights.
(continued)
15lbs (±7kg) of zero.
or
or
5% of
SECTION 3 - SERVICE - ELECTRIC POWERED BOOM LIFTS
The LSS Module is unable to properly measure the platform weight.
1. One of the Shear Beam Load Cells is not properly plugged into the LSS Module.
Since the connectors seal with an O-ring and are located in a crowded area, it is possible that the connectors are threaded together, but poor electrical contact is made.
Attempt to wiggle the molded portion of each connector on J5-J8. If properly tightened, the molded portion should not move. Also, examined each Shear Beam Load
Cell’s readings via the JLG Analyzer. Proceed to the DIAGNOSTICS, CELL 1-4, LOAD
displays and determine if the readings are reasonable. Note that it is possible to have
only two sensors carrying all of the platform load due to fit between the platform and
support structure (this is normal).
2. Wiring leading to one of the Shear Beam Load Cells is damaged. Examine each sensor’s reading using the JLG Analyzer. Proceed to the DIAGNOSTICS, CELL 1-4,
LOAD displays and determine if the readings are reasonable and responsive to slight
downward pressure above the sensor being viewed. Carefully inspect sensor wiring
where it passes through cable clamps for signs of damage. Inspect wiring where
damage to the channel is apparent. If damage to the sensor’s cordset is found,
replace the appropriate Shear Beam Load Cell since the cordset is not serviceable
(connector is molded for moisture resistance; cordset is soldered into sensor
beneath welded stainless steel cover).
3. One of the Shear Beam Load Cells was not assembled properly during installation.
Examine each sensor’s reading using the JLG Analyzer. Proceed to the DIAGNOSTICS, CELL 1-4, LOAD displays and determine if the readings are reasonable. It is
often helpful to apply slight downward pressure above the sensor being examined
and observe that its output increases (increasing force measurement; decreasing
means the sensor is mounted upside-down). Compare the order of assembly to the
detail on the Installation Drawing and ensure that the only contact between the platform and the support is through the sensor bodies (nothing else touches except
wires). Re-assemble according to print if necessary.
(continued)
3124287 – JLG Lift – 3-11

SECTION 3 - SERVICE - ELECTRIC POWERED BOOM LIFTS
Table 3-3. LSS Troubleshooting Chart - Measurement Performance
Difficulty Possible Resolution
Empty Platform Weight (DIAGNOSTICS, PLTLOAD) is not
within +
Platform Load readings (DIAGNOTICS, PLTLOAD) are unstable by more than +2lbs (±1kg)
(without the influence of vibration or wind).
There are large variations in
Platform Load (DIAGNOSTICS, PLTLOAD) based on the
location of the load. Tolerance
to variations is 20lbs for an
evaluation using the technician’s weight, and +
Rated Load when using calibrated weights.
15lbs (±7kg) of zero.
or
or
5% of
4. Improper procedure was used when tightening the fasteners for the Shear Beam
Load Cells. Failure to regard the notes in the Installation guide can result in large offaxis forces on the sensors (which disturb the primary measurement axis readings).
Loosen all fasteners and sequentially torque them as recommended in the Installation guide (new fasteners are recommended to achieve proper torque).
5. Damage to the platform or support structure has occurred or one of the components
is out-of-tolerance (not planar). When the fasteners are torqued to specification, the
sensors are disturbed by large off-axis forces (which disturb the primary measurement axis readings). Loosen all fasteners and observe whether the platform or support were drawn-up by the fasteners (they should both be planar and match up
accurately). Resolution is to replace the damaged or faulty component. Watch for
Shear Beam Load Cell damage (yield) as a result of this difficulty.
6. One of the Shear Beam Load Cells is contaminated by debris or moisture. Examine
each sensor’s reading using the JLG Analyzer. Proceed to the DIAGNOSTICS, CELL
1-4, LOAD displays and determine if the readings are reasonable and stable (not
changing by more than +
Lack of measurement stability is a key indication of contamination. Unplug the
appropriate connector (J5 is CELL 1, J6 is CELL 2, J7 is CELL 3, and J8 is CELL 4)
and inspect for dirt or moisture. Look carefully into the female connector on the sensor’s cordset for evidence of contamination. Debris should be brushed away with a
soft bristle brush (do not introduce any cleaners as they will leave conductive residue). Moisture should be allowed to evaporate or accelerated with a heat-gun (use
low heat and be carefully to not melt connector materials). Moisture intrusion into the
molded portion of the connector (capillary action into the wire bundle) or the Shear
Beam Load Cell itself will require replacement of the sensor.
7. One of the Shear Beam Load Cells has been mechanically damaged (yielded). Any
Shear Beam Load Cell that is physically deformed or has damage to one of the stainless steel covers should be replaced immediately. It is also possible to have invisible
mechanical damage resulting from an extreme overload (>6000lbs [>2722kg]). This
can be detected by removing all fasteners that mount the platform and supporting
the platform on two saw-horses or barrels (no weight resting on the Shear Beam
Load Cells). Examine each sensor’s reading using the JLG Analyzer. Proceed to the
DIAGNOSTICS, CELL 1-4, LOAD displays and observe whether the unloaded sensors read with +
sive force when physically unloaded.
8. The LSS Module is suspect. Interchange the Shear Beam Load Cell connections (J5J8) and observe the results via the JLG Analyzer. Proceed to the DIAGNOSTICS,
CELL 1-4, LOAD displays and observe the readings. If the problem seems to remain
with a particular sensor, carefully re-examine the issues above. If the problems
seems to remain with a particular LSS Module channel, substitute another module.
15lbs (±7kg) of zero (individually). Replace sensors that read exces-
2lbs (±1kg) (without the influence of vibration or wind).
3-12 – JLG Lift – 3124287

Table 3-4. LSS Troubleshooting Chart - Host System Functionality
Difficulty Possible Resolution
The Visual and Audible Overload Warnings fail to sound
when platform is loaded
beyond Rated Load, or when
simulated by unplugging a
Shear Beam Load Cell from the
LSS Module. Controls remain
functional at Platform and
Ground Control positions.
The Visual and Audible Overload Warnings sound even
when the platform is empty.
Controls are prevented in the
same manner as when overloaded.
SECTION 3 - SERVICE - ELECTRIC POWERED BOOM LIFTS
The Host Control System is failing to regard the overload signal from the LSS Module, or
the signal is shorted.
1. The Load Sensing System must be enabled within the Host Control System. Plug
the JLG Analyzer into the Host Control System, enter the Access Level 1 password
(33271), and examine the MACHINE SETUP, LOAD sub-menu. The selection
“2=CUTOUT PLT” should be displayed for European Community compliance (platform controls prevented during overload, ground controls remain operational). In
country- or customer-specific circumstance, the selection “3=CUTOUT ALL” is used
(platform and ground controls prevented during overload).
2. The signal between the LSS Module and the Host Control System is shorted. The
Platform Module’s J8-6 is an input, and it connected to the J1-5 output on the LSS
Module To examine the status of this signal, plug the JLG Analyzer into the Host
Control System, enter the Access Level 1 password (33271), and examine the
DIAGNOSTICS, LOAD display. The display will indicate “OK” when the Platform
Module’s input is energized (approximately 12V), and “OVERLOADED” when it is
de-energized (0V). Refer to the Wiring Diagram for Load Sensing System for details
3. Observe the LSS Module’s assessment of overload using the JLG Analyzer plugged
into the LSS Module’s connection. Proceed to the DIAGNOSTICS, OVERLOADED?
display. The display should indicate “OVERLOADED? N” when the platform is
empty, and “OVERLOADED? Y” when the platform is overloaded. If the assessment
is improper, the difficulty may be a result of a General or Measurement Performance
issue. Review the Possible Resolutions under those categories.
4. If the LSS Module’s J1-5 Output does not appears to coincide with the DIAGNOSTICS, OVERLOADED? display, then the LSS Module is suspect. Substitute to determine cause of failure.
The LSS Module is un-powered, un-calibrated, or is experiencing a Measurement Performance difficulty. Alternately, the Host Control System is not receiving the proper signal from
the LSS Module.
1. Ensure that the LSS Module is powered. The LSS Module’s LED will be lit or flash if
the module is powered. If not, ensure that approximately 12V is present between J11 and J1-2 on the LSS Module (J1-1 is positive). Trace the Ignition and Ground supply wires into the Platform Console Box’s Wiring Harness using the Wiring Diagram
to locate the difficulty.
2. Plug a JLG Analyzer into the LSS Module’s connection and ensure that the Host
Control System is powered-up. When HELP:PRESS ENTER is displayed, press the
ENTER key on the Analyzer. If “EVERYTHING OK” is displayed, it is probable that
the Overload Signal from the LSS Module is not reaching the Host Control System.
This signal is present on LSS Module’s J1-5 and is approximately 12V normally, and
0V during an overload. This signal eventually reaches the Platform Module’s J8-6.
Refer to the Wiring Diagram for wire color, number, and terminal information.
3. If the Analyzer displayed “OVERLOADED” in the previous step, press the ENTER
key again. If “NO CAL” is displayed, the Load Sensing System has not been properly calibrated. Refer to the Calibration portion of this manual.
4. If another fault is displayed, refer to the portion of this manual that describes Fault
Messages and their causes.
5. The difficulty may be a result of a Measurement Performance issue. Review the Possible Resolutions under those categories.
3124287 – JLG Lift – 3-13

SECTION 3 - SERVICE - ELECTRIC POWERED BOOM LIFTS
Table 3-4. LSS Troubleshooting Chart - Host System Functionality
Difficulty Possible Resolution
The Ground Audible Warning
fails to sound, but the Platform
Audible Warning sounds properly.
Controls remain functional at
the Ground Control position
during an overload, or when
simulated by unplugging a
Shear Beam from the LSS
Module. The Control at the
Platform Control position are
prevented when using the
engine, but not when using the
Auxiliary Power Unit.
The Host Control System’s Ground Alarm is missing or improperly installed. Verify that the
device is mounted. Verify wiring from the Main Terminal Box and Ground Module according
to the proper Host Control System documentation. The Ground Alarm is energized from
J11-1 on the Ground Module (approximately 12V). Ensure that the ground termination is
proper (0V).
The Host Control System is configured to prevent platform controls only in the event of
overload (as required for EN280 compliance). Alternately, the Host Control System can be
configured to prevent ground and platform controls for country- or customer-specific circumstances.
Plug the JLG Analyzer into the LSS Module’s connection and enter the Access Level 1
password (33271). Proceed to the MACHINE SETUP, LOAD sub-menu. Set this parameter
to “2=CUTOUT PLT” to prevent platform controls in the event of overload. Set this parameter to “3=CUTOUT ALL” to prevent platform and ground controls in the event of overload.
3-14 – JLG Lift – 3124287

SECTION 3 - SERVICE - ELECTRIC POWERED BOOM LIFTS
Figure 3-3. LSS Module Load Cell Connector
Pinout (J5, J6, J7, J8)
NOTE: Physical connector as viewed looking into the
cable end
Table 3-5. LSS Module System Interface Connector -
Power & Digital (J1 - Grey)
Pin Signal Description
1 VBAT Po sitive Power Supply from Host Control System
(12-24V)
2 GND Negative Power Supply from Host Cont rol System
(0V)
3 GND-2 Connects to GND
4N/CUnused
5 DO1 Overload Indicator Ou tput (Normal=VBAT / Over-
load=0V)
6 DO2 Warning Indicator Output (Normal=0V / Over-
loaded=VBAT for 5 Sec, 0V for 2 Sec)
7DI3Unused
8 DI 2 Select OV ERLD3 Personality Rating (No=0V /
Yes =V BA T)
9 DI 1 Select OV ERLD2 Personality Rating (No=0V /
Yes =V BA T)
10 GND-2 C onnects to GND
11 VBAT-2 Connects to VBAT
12 VBAT-2 Connects to VBAT
Table 3-7. LSS Module Load Cell Connector Pinout (J5,
J6, J7, J8)
Pin Signal Description
1 + Signal Positive Sensor Output (approx. 2.5V)
2 Cal Clock Serial Clock to Sensor’s Integrated Memory
3 - Excitation Negative Sensor Supply Voltage (approx. 0V)
4 +Excitation Positive Sensor Supply Voltage (approx. 5V)
5 - Signal Negative Sensor Output (approx. 2.5V)
6 Cal Data Serial Data from Sensor’s Integral Memory
Table 3-6. LSS Module System Interface Connector –
Communication (J1 - Black)
Pin Signal Description
1 APWR Pre-Regulated Supply for JLG Analyzer (Analyzer
Pin 1; approx. 12V)
2 TX RS-232 for JLG Analyzer (Analyzer Pin 3)
3 TRP1 120 Ohm CANbus Terminator
4 CANH-1 CANbus Interface High
5 CANS-1 CANbus Shield Termination (Not same as GND)
6 CANH-2 Connects to CANH-1
7 CANL-2 Connects to CANL-1
8 CANS-2 Connects to CANS-1
9 CANL-1 CANbus Interface Low
10 TRP2 120 Ohm CANbus Terminator
11 RX RS-232 for JLG Analyzer (Analyzer Pin 2)
12 GND Ground for JLG Analyzer (Anal yzer Pin 4)
3124287 – JLG Lift – 3-15

SECTION 3 - SERVICE - ELECTRIC POWERED BOOM LIFTS
4933278 F
4933289 A
(ANALYZER C
O
N
N
E
CTOR)
S
OCKET 10SOCKE
T 1
1 GREEN
SOC
KET 1
2 BLACK/SHIEL
D
SOC
K
E
T
1 R
E
DSOCK
E
T
3 WHI
T
E
S
OCKET
2
G
R
EEN
SOCKE
T 4
BLACK/SHIEL
D
PIN 1
+
SIGNALPIN 2 CAL CLOCK
PIN 3 -
EX
C
ITATIONPI
N
4
+ EXCITATIONPIN 5 - SIGNALP
I
N
7
CAL DAT
A
BLACK
ORN/RED 49-100 J4-14
PLATFORM
OVERLOAD
LAMP
LOCATED IN GROUND CONTROL BOX
J8
REAR RIGHT
LOAD C ELL
J7
REAR LEFT
LOAD C ELL
J6
FRONT RIGHT
LOAD C ELL
J5
FRONT LEFT
LOAD C ELL
V+ BATT
PLATFORM CONSOLE BOX
(EIM OUTPUT)
J1 GRAY
J1 GRAY
E300A/AJ/AJP - E/M400AJ/AJP
E/M450A/AJ - E/M600/J/JP
150HAX - 400S - 450A/AJ
450A/AJ Series II
510AJ - 600S/SC/SJ/SJC
660SJ/SJC - 800A/AJ
800S/SJ - 1200SJP
1250AJP - 1350SJP
1500SJ
OR
J2 BLACK
J3-4
INSTALL INTO
(PIN 14) OF 15
POSITION
MATE-N-LOCK
1000#/750KG
1000# CAPACITY LIGHT
750# CAPACITY LIGHT
RED/YEL 54 -3-1
YEL/RED 2-37 TO (PIN 15)
15 POSITION MATE-N-LOCK
BLACK J1-4
LED BOARD
TERMINAL STRIP IS LOCATED ON THE
LEFT SIDE OF THE CONSOLE BOX BOTTOM.
TERMINAL STRIP IS LOCATED ON TH E
LEFT SIDE OF THE CONSOLE BOX BOTTOM.
(CAPACITIY INPUT)
(GROUND)
1
2
3
4
5
6
J2-25 BLACK
J2-13 RED/YEL 54-3
SOCKET 2 WHT/BLK 58-8
SOCKET 5 BRN/WHT 47-9
SOCKET 8
SOCKET 9
SOCKET 3
SOCKET 6
SOCKET 10
SOCKET 11
SOCKET 12
SOCKET 4
SOCKET 1 WHT/RED 57-5
WHT/BLK 58-8
BRN/WHT 47-9
1
2
3
4
5
6
WHT/RED 57-5
PLATFORM POWER MODULE
J2
1
1
2
2
53364
J7
J8
WHT/RED 57-5
WHT/RED 57-5
WHT/BLK 58-8
BRN/WHT 47-9
SOCKET 1 RED
SOCKET 2 WHITE
SOCKET 3
SOCKET 4
SOCKET 5
SOCKET 6
SOCKET 4
SOCKET 4
SOCKET 1 YEL/RED 2-36
SOCKET 2 BLACK
SOCKET 5 YEL/RED 2-37
SOCKET 8 RED/YEL 54-2-1
SOCKET 9 RED/YEL 54-2-1
SOCKET 3
SOCKET 6
SOCKET 10
SOCKET 11
SOCKET 12
SOCKET 4
J1 GREY
J2 BLACK
REAR LEFT
LOAD PIN (R L)
FRONT LEFT
LOAD PIN (F L)
FRONT RIGHT
LOAD PIN (F R)
REAR RIGHT
LOAD PIN (RR)
J1 NOTE
INSTALL RED/YEL 54-2-1 INTO SOCKET 8 FOR 1000LB CAPACITY.
INSTALL RED/YEL 54-2-1 INTO SOCKET 9 FOR 750LB CAPACITY.
NOTE: RED/YEL 54-2-1 NOT REQUIRED ON 500 LB CAPACITY
MACHINES. PLEASE INSTALL ONE WIRE CAP (4460121)
ON THE RED/YEL 54-2-1 WIRE AT THE J1 CONNECTOR.
ALWAYS INSTALL THE OTHER END OF THIS WIRE TO
TERMINAL STRIP IN #1 PO SITION.
INSTALL RED/YEL 54-2-1 FROM SOCKET 9 TO TO SOCKET 12 FOR
400S WITH 750 LB CAPACITY
Figure 3-4. Wiring Diagram
3-16 – JLG Lift – 3124287

SECTION 4. PARTS
TABLE OF CONTENTS
FIgure Description Page
4-1 PLATFORM SUPPORT AND LOAD SENSING INSTALLATION . . . . . . . . . . . . . . . . . . . . . . . . 4-2
4-2 LOAD SENSING ELECTRICAL COMPONENTS . . . . . . . . . . . . . . . . . . . . . . . . . . . . . . . . . . . 4-8
3124287 – JLG Lift – 4-1

105
117
121
130
106
122
131
104
121
128
107
134
123
134
111
112
RIGHT SIDE
LEFT SIDE
103
116
121
128
103
116
121
128
11
115
132
115
112
112
110
109
111
135
119
114
124
136
113A
118
108
126
125
129
DESIGN B
OR
DESIGN A
113B
140
105
117
121
130
106
122
131
104
121
128
107
134
123
134
111
112
RIGHT SIDE
LEFT SIDE
103
116
121
128
103
116
121
128
111
115
132
115
112
112
110
109
111
135
119
114
124
136
113A
118
108
126
125
129
DESIGN B
OR
DESIGN A
113B
140
Figure 4-1. Platform Support & Load Sensing Installation
4-2 – JLG Lift – 3124287

.
FIG & ITEM # PART NUMBER DESCRIPTION QTY. REV.
SUPPORT & LOAD SENSING SYSTEM INSTALLATION Ref.
0272704 E300A/AJ/AJP, E/M400AJP and E/M450AJ Ref. K
1001108604 E/M400A/AJ and E/M450A Ref. B
0273125 E/M600/A/AJ Ref. J
1001118888 340AJ Ref. C
1001146158 18RS/24RS Ref. D
0272703 400S, 460SJ, 450A/AJ Series II, 510AJ, 600SC/SJC,
Ref. N
660SJC, 601S, 740A/AJ, 800A/AJ, 800S, 860SJ, 1100SB,
1200SJP, 1250AJP & 1350SJP
0272703 600A/AJ, 600S/SJ, 660SJ (USA Built Machines) Ref. N
1001115099 600A/AJ, 600S/SJ, 660SJ (China Built Machines) Ref. A
0275574 680S Ref. B
1001120607 1500SJ Ref. A
0272384 Machines with SkyGlazier Option except 1500SJ (< 2007) Ref. H
0272703 Machines with SkyGlazier Option except 1500SJ (2008 >) Ref. N
1001120607 1500SJ with SkyGlazier Option Ref. A
101 Not Used
102 0100048 Grease, Dielectric (Not Shown) A/R
103 Bolt Options: 6
0630407 Capscrew 1/4”-20NC x 5/8”
0641405 Bolt 1/4”-20NC x 5/8”
0760608 Bolt M6 x 16mm
104 Bolt Options: 3
0641406 Bolt 1/4”-20NC x 3/4”
0641416 Bolt 1/4”-20NC x 2”
0760618 Bolt M6 x 50mm
105 Bolt Options: 1
0641405 Bolt 1/4”-20NC x 5/8”
0641407 Bolt 1/4”-20NC x 7/8”
3941406 Screw 1/4” x 3/4” 7
0760610 Bolt M6 x 20mm
106 0641516 Bolt 5/16”-18NC x 1” 3
107 Bolt Options:
0641822 All Except 18RS, 24RS, 680S & 340AJ (Bolt 1/2-13NC x
8
2 3/4”)
680S
0641822 Front (Bolt 1/2-13NC x 2 3/4’) 4
0641820 Rear (Bolt 1/2-13NC x 2 1/2”) 4
0701222 18RS, 24RS & 340AJ (Bolt M12 x 70mm) 8
108 Bolt Options: 4
0642024 Bolt 5/8-11NC x 3”
0642034 Bolt 5/8”-11NC x 4 1/4”
0701624 Bolt M16 x 80mm 8
109 Bolt Options: 8
0681608 Bolt 3/8”-16NC x 1” (Grade 8)
0771012 Bolt M10 x 25mm (Grade 10.9)
110 Flatwasher Options: 8
4891600 Flatwasher 3/8” Hardened
5241000 Flatwasher M10 Hardened
3124287 – JLG Lift – 4-3

FIG & ITEM # PART NUMBER DESCRIPTION QTY. REV.
111 Guard, Load Cell (Right) Options:
0902920 All Except 680S & 340AJ 2
680S
3576904 Front 1
3577017 Rear 1
1001118910 340AJ 2
1001146213 18RS & 24RS 2
112 Guard, Load Cell (Left) Options:
0902919 All Except 680S & 340AJ 2
680S
3576903 Front 1
3576931 Rear 1
1001118909 340AJ 2
1001146214 18RS & 24RS 2
113 Bracket, Module Mounting Options: 1
113A 0902894 Design A
113B 1001113483 Design B
114 0962450 Bushing, Spacer 4
4812300 Flatwasher M16 (18RS, 24RS & 340AJ Only)
115 Channel, Wire Options: 2
1271538 All Except 680S
1271651 680S
116 1320136 Clamp A/R
117 1320224 Clamp A/R
118 Electronic Interface Module Options
(Note: Machine must be recalibrated when replaced):
1600350 USA Built Machines Prior to S/N 0300076525
1600387 USA Built Machines S/N 0300076525 to Present
1600387 Belgium, China & Romanian Built Machines
119 2420202 Load Cell Assembly (See Figure 4-2 for Breakdown) 4
120 Not Used
121 Locknut Options: A/R
3311405 Locknut 1/4”-20NC
3290605 Locknut M6
122 3311508 Nut, Flanged 5/16”-18NC 3
123 Locknut Options: 8
3311805 Locknut 1/2”-13NC
3291205 Locknut M12
124 Locknut Options: 4
3312005 Locknut 5/8”-11NC
3291605 Locknut M16
125 Hardware Options: A/R
3900283 Screw, Button Head 3/8”-16NC x 3/4”
8310643 Screw, Button Head M8 x 25mm (Grade 10.9)
0760808 Bolt M8 x 16mm
1001118274 Nut, Retainer M8
126 4061054 Shield 2
127 4240033 Tie-Strap (Not Shown) A/R
1
4-4 – JLG Lift – 3124287

FIG & ITEM # PART NUMBER DESCRIPTION QTY. REV.
128 Flatwasher Options: A/R
4711400 Flatwasher 1/4” Thin
4811700 Flatwasher M6
129 Flatwasher Options: 4
4711600 Flatwasher 3/8” Thin
4811900 Flatwasher M8
130 Flatwasher Options: A/R
4751400 Flatwasher 1/4” Thick
4811700 Flatwasher M6
4811702 Flatwasher M6 (18RS & 24RS Only)
131 4751500 Flatwasher 5/16” Thick 3
132 Platform Support Weldment Options: 1
Machines without Glazier Option:
4846608 E300A/AJ/AJP, 340AJ, E/M400A/AJ/AJP &
E/M450A/AJ
4846573 400S, 460SJ, 450A/AJ Series II, 510AJ, 600SC/SJC,
660SJC, 601S, 740A/AJ, 800A/AJ, 800S, 860SJ,
1100SB, 1200SJP, 1250AJP, 1350SJP & 1500SJ
4846573 600A/AJ, 600S/SJ, 660SJ (USA Built Machines)
(Note: S/N starts with 03xxxxxxxx)
1001113465 600A/AJ, 600S/SJ, 660SJ (China Built Machines)
(Note: S/N starts with B3xxxxxxxx)
4341327 680S
1001149734 18RS & 24RS
Machines with Glazier Option:
4846651 Machines with SkyGlazier Option (< 2007)
4846573 Machines with SkyGlazier Option (2008 >)
133 Not Used
134 Flatwasher Options: 8
4891800 Flatwasher 1/2” Hardened
5241200 Flatwasher M12 Hardened
135 Flatwasher Options: A/R
4892000 Flatwasher 5/8” Hardened
5241600 Flatwasher M16 Hardened
136 Harness Options (See Figure 4-2 for Breakdown) 1
4922916 EIM Power Harness (E300A/AJ/AJP, E/M400A/AJ/AJP,
E/M450A/AJ & E/M600/A/AJ)
4922917 Platform Analyzer Harness (E300A/AJ/AJP, E/M400A/AJ/
AJP, E/M450A/AJ & E/M600/A/AJ)
1001120371 EIM Power Harness (E340AJ)
4922869 EIM Power Harness (400S, 460SJ, 450A/AJ Series II,
510AJ, 600A/AJ, 600S/SJ, 600SC/SCJ, 601S, 660SJ,
660SCJ, 680S, 740A, 800A/AJ, 800S, 860SJ, 1100SB,
1200SJP, 1250AJP, 1350SJP & SkyGlazier)
1001120608 EIM Power Harness (1500SJ)
1001150197 EIM Power Harness (18RS & 24RS)
1001150159 Platform Box Connector Harness (18RS & 24RS) (Not
Shown)
137 1061020 Cable, Load Cell Harness Extension (680S Only - Not
Shown)
138 4460225 Terminal Plug - 6 Position (400A & 450A Only - Not
Shown - Located Inside Platform Control Console on J8)
2
1
3124287 – JLG Lift – 4-5

FIG & ITEM # PART NUMBER DESCRIPTION QTY. REV.
139 Not Used
140 2540038 Grommet (All Models Except E300A/AJ/AJP, E/M400A/AJ/
AJP and E/M450A/AJ)
1
4-6 – JLG Lift – 3124287

FIG & ITEM # PART NUMBER DESCRIPTION QTY. REV.
3124287 – JLG Lift – 4-7

Figure 4-2. Load Sensing Electrical Components
J2
J1
J5
J8
J6
J7
115910
11
7
6
12
13814
14A
14B
14C
2
2
3
3
3
3
4
J5
J7
J6
J8
2
1
4-8 – JLG Lift – 3124287

.
FIG & ITEM # PART NUMBER DESCRIPTION QTY. REV.
LOAD SENSING ELECTRICAL COMPONENTS Ref.
0100048 Grease, Dielectric (Not Shown) A/R
1 2420202 Cell Load & Harness Assembly 4 A
2 Not Available Harness, Load Cell (1 per Assembly) 4
3 Not Available Connector, Strain Relief (1 per Assembly) 4
4 Not Available Receptacle, Female (1 per Assembly) 4
5 EIM Power Harness Options: A/R
4922916 EIM Power Harness (E300A/AJ/AJP, E/M400A/AJ/AJP,
E/M450A/AJ and E/M600/A/AJ)
(Note: Analyzer Harness must be ordered separately.)
4922869 EIM Power Harness (400S, 460SJ, 450A/AJ Series II,
510AJ, 600A/AJ, 600S/SJ, 600SC/SCJ, 601S, 660SJ,
660SCJ, 680S, 740A, 800A/AJ, 800S, 860SJ, 1100SB,
1200SJP, 1250AJP, 1350SJP & SkyGlazier)
(Note: Analyzer Harness included in EIM Harness.)
1001120371 EIM Power Harness (E340AJ) B
1001120608 EIM Power Harness (1500SJ) A
1001150197 EIM Power Harness (18RS & 24RS) A
6 4460933 Plug, Male - 12 Position (Gray) (J1) 1
0840055 Boot 1
4460465 Socket, Female A/R
4460466 Plug, Hole A/R
7 4460836 Plug, Male - 12 Position (Black) (J2) 1
0840055 Boot 1
4460465 Socket, Female A/R
4460944 Socket, Female (18RS & 24RS Only) A/R
4460466 Plug, Hole A/R
8 4460226 Pin, Male (All Machines except 1500SJ) 2
9 1001120631 Connector M12 Male (1500SJ Only) 1
4460944 Socket, Female (1500SJ Only) 4
10 Platform Analyzer Harness Options:
4922917 Platform Analyzer Harness (E300A/AJ/AJP, E/M400A/AJ/
12/A
AJP, E/M450A/AJ and E/M600/A/AJ)
(Note: NOT part of p/n 4922916. Order separately.)
4922705 Platform Analyzer Harness (400S, 460SJ, 450A/AJ Series
11/A
II, 510AJ, 600A/AJ, 600S/SJ, 600SC/SCJ, 601S, 660SJ,
660SCJ, 740A, 800A/AJ, 800S, 860SJ, 1100SB, 1200SJP,
1250AJP & 1350SJP)
(Note: Included with p/n 4922869)
Not Available Platform Analyzer Harness (340AJ & 1500SJ)
1
(Note: See Model Specific Parts Manual)
11 4460465 Socket, Female 4
4460761 Housing, 4 Position 1
12 4460227 Pin, Male 4
13 Connector , Strain Relief Options: 4 A
4460428 Connector (All Machines except 1500SJ)
1001108122 Connector, Tee (1500SJ Only)
2/B
E
3124287 – JLG Lift – 4-9

FIG & ITEM # PART NUMBER DESCRIPTION QTY. REV.
14 Harness, Platform Box Connector (18RS & 24RS Only) 1 A
14A 1001119020 Connector, Buss Bar 1
4460933 Plug, Male - 12 Position (Gray) 1
4460944 Socket, Female A/R
4460466 Plug, Hole A/R
14B 4460539 Plug, Male - 3 Position 1
4460944 Socket, Female 3
14C 4460536 Receptacle, Female - 3 Position 1
4460943 Pin, Male 3
4933289 EIM LOAD CELL TO PLATFORM CONTROL BOX WIRING
DIAGRAM COMPONENTS (E300A/AJ/AJP, E/M400A/AJ/AJP,
E/M450A/AJ & E/M600/A/AJ ONLY)
101 4460007 Strip, Terminal (Not Shown - Located in Platform Console Box)
(Electric Machines Only - Not Shown)
102 to 105 Not Used
106 4922930 EIM Load Cell To Platform Control Box Terminal Strip
Harness (Not Shown)
4460326 Plug, Male - 3 Position (To J2 on Platform Power Module) 1
4460226 Socket, Female 2
4460227 Pin, Male 1
4460464 Pin, Male 1
Ref. 1/A
1
12/B
4-10 – JLG Lift – 3124287


McConnellsburg PA. 17233-9533
3124287
JLG Worldwide Locations
Corporate Office
JLG Industries, Inc.
1 JLG Drive
USA
(717) 485-5161
(717) 485-6417
JLG Industries (Australia)
P.O. Box 5119
11 Bolwarra Road
Port Macquarie
N.S.W. 2444
Australia
+61 2 65 811111
+61 2 65 813058
JLG Deutschland GmbH
Max-Planck-Str. 21
D - 27721 Ritterhude - Ihlpohl
Germany
+49 (0)421 69 350 20
+49 (0)421 69 350 45
Plataformas Elevadoras
JLG Iberica, S.L.
Trapadella, 2
P.I. Castellbisbal Sur
08755 Castellbisbal, Barcelona
Spain
+34 93 772 4700
+34 93 771 1762
JLG Latino Americana Ltda.
Rua Eng. Carlos Stevenson,
80-Suite 71
13092-310 Campinas-SP
Brazil
+55 19 3295 0407
+55 19 3295 1025
JLG Equipment Services Ltd.
Rm 1107 Landmark North
39 Lung Sum Avenue
Sheung Shui N. T.
Hong Kong
(852) 2639 5783
(852) 2639 5797
JLG Sverige AB
Enkopingsvagen 150
Box 704
SE - 176 27 Jarfalla
Sweden
+46 (0)850 659 500
+46 (0)850 659 534
www.jlg.com
JLG Industries (UK) Ltd
Bentley House
Bentley Avenue
Middleton
Greater Manchester
M24 2GP - England
+44 (0)161 654 1000
+44 (0)161 654 1001
JLG Industries (Italia) s.r.l.
Via Po. 22
20010 Pregnana Milanese - MI
Italy
+39 029 359 5210
+39 029 359 5845
JLG France SAS
Z.I. de Baulieu
47400 Fauillet
France
+33 (0)5 53 88 31 70
+33 (0)5 53 88 31 79
Oshkosh-JLG Singapore
Technology Equipment Pte
Ltd
29 Tuas Ave 4,
Jurong Industrial Estate
Singapore, 639379
+65-6591 9030
+65-6591 9031
 Loading...