


BLU-RAY DISC™ PLAYER
DBS-30.3
Instruction Manual
WARNING:
TO REDUCE THE RISK OF FIRE OR ELECTRIC SHOCK, DO NOT EXPOSE THIS APPARATUS TO RAIN OR MOISTURE.
CAUTION:
TO REDUCE THE RISK OF ELECTRIC SHOCK, DO NOT REMOVE COVER (OR BACK). NO USER-SERVICEABLE PARTS INSIDE. REFER SERVICING TO QUALIFIED SERVICE PERSONNEL.
CAUTION |
AVIS |
RISK OF ELECTRIC SHOCK |
RISQUE DE CHOC ELECTRIQUE |
DO NOT OPEN |
NE PAS OUVRIR |
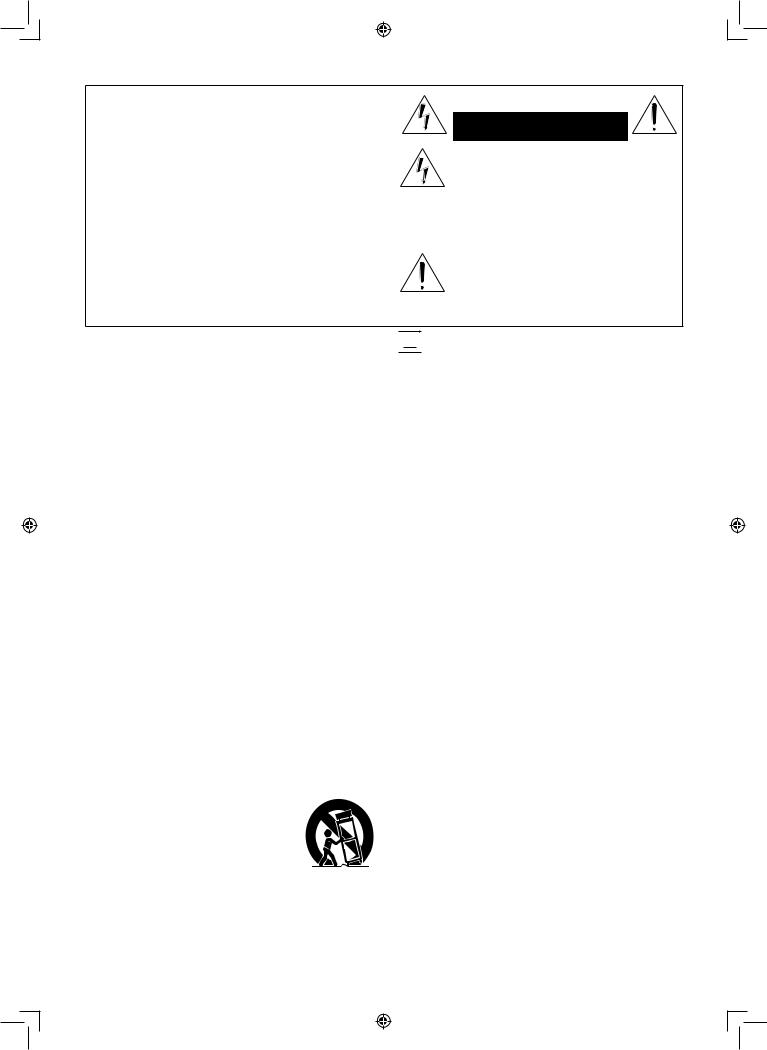
The lightning flash with arrowhead symbol, within an equilateral triangle, is intended to alert the user to the presence of uninsulated “dangerous voltage” within the product’s enclosure that may be of sufficient magnitude to constitute a risk of electric shock to persons.
The exclamation point within an equilateral triangle is intended to alert the user to the presence of important operating and maintenance (servicing) instructions in the literature accompanying the appliance.
The important note and rating are located on the rear or bottom of the cabinet.


 The symbol for CLASS ll (Double Insulation)
Important Safety Instructions
1.Read these instructions.
2.Keep these instructions.
3.Heed all warnings.
4.Follow all instructions.
5.Do not use this apparatus near water.
6.Clean only with dry cloth.
7.Do not block any ventilation openings. Install in accordance with the manufacturer’s instructions.
8.Do not install near any heat sources such as radiators, heat registers, stoves, or other apparatus (including amplifiers) that produce heat.
9.Do not defeat the safety purpose of the polarized or grounding-type plug. A polarized plug has two blades with one wider than the other. A grounding type plug has two blades and a third grounding prong. The wide blade or the third prong are provided for your safety. If the provided plug does not fit into your outlet, consult an electrician for replacement of the obsolete outlet.
10.Protect the power cord from being walked on or pinched particularly at plugs, convenience receptacles, and the point where they exit from the apparatus.
11.Only use attachments / accessories specified by the manufacturer.
12.Use only with the cart, stand,
tripod, bracket, or table specified by the manufacturer, or sold with the apparatus. When a cart is used, use caution when moving the
cart / apparatus combination to avoid injury from tip-over.
13.Unplug this apparatus during lightning storms or when unused for long periods of time.
2
14.Refer all servicing to qualified service personnel. Servicing is required when the apparatus has been damaged in any way, such as power-supply cord or plug is damaged, liquid has been spilled or objects have fallen into the apparatus, the apparatus has been exposed to rain or moisture, does not operate normally, or has been dropped.
15.Damage Requiring Service
Unplug the apparatus from the wall outlet and refer servicing to qualified service personnel under the following conditions:
A.When the power-supply cord or plug is damaged,
B.If liquid has been spilled, or objects have fallen into the apparatus,
C.If the apparatus has been exposed to rain or water,
D.If the apparatus does not operate normally by following the operating instructions. Adjust only those controls that are covered by the operating instructions as an improper adjustment of other controls may result in damage and will often require extensive work by a qualified technician to restore the apparatus to its normal operation,
E.If the apparatus has been dropped or damaged in any way, and
F.When the apparatus exhibits a distinct change in performance this indicates a need for service.
16.Object and Liquid Entry
Never push objects of any kind into the apparatus through openings as they may touch dangerous voltage points or short-out parts that could result in a fire or electric shock.
The apparatus shall not be exposed to dripping or splashing and no objects filled with liquids, such as vases shall be placed on the apparatus.
Don’t put candles or other burning objects on top of this unit.
EN
17.Batteries
Always consider the environmental issues and follow local regulations when disposing of batteries.
18.If you install the apparatus in a built-in installation, such as a bookcase or rack, ensure that there is adequate ventilation.
Leave 20 cm (8”) of free space at the top and sides and 10 cm (4”) at the rear. The rear edge of the shelf or board above the apparatus shall be set 10 cm (4”) away from the rear panel or wall, creating a flue-like gap for warm air to escape.
19.Slots and openings in the cabinet at the sides and underneath are provided for ventilation. To ensure reliable operation and to protect the unit from overheating, these openings must not be blocked or covered. Avoid installation in enclosed spaces such as bookcases unless suitable ventilation is provided.
Precautions
Do not place the unit on the furniture that is capable of being tilted by a child and an adult leaning, pulling,
standing or climbing on it. A falling unit can cause serious injury or even death.
1.Recording Copyright—Unless it’s for personal use only, recording copyrighted material is illegal without the permission of the copyright holder.
2.AC Fuse—The AC fuse inside the unit is not userserviceable. If you cannot turn on the unit, contact the dealer from whom you purchased this unit.
3.Care—Occasionally you should dust the unit all over with a soft cloth. For stubborn stains, use a soft cloth dampened with a weak solution of mild detergent and water. Dry the unit immediately afterwards with a clean cloth. Don’t use abrasive cloths, thinners, alcohol, or other chemical solvents, because they may damage the finish or remove the panel lettering.
4.Power WARNING
BEFORE PLUGGING IN THE UNIT FOR THE FIRST TIME, READ THE FOLLOWING SECTION CAREFULLY.
AC outlet voltages vary from country to country. Make sure that the voltage in your area meets the voltage requirements printed on the unit’s rear panel (AC 120 V, 60 Hz).
The power cord plug is used to disconnect this unit from the AC power source. Make sure that the plug is readily operable (easily accessible) at all times. Pressing the [ON/STANDBY] button to select Standby mode does not fully disconnect from AC power source. If you do not intend to use the unit for an extended period, remove the power cord from the AC outlet.
5.Preventing Hearing Loss Caution
Excessive sound pressure from earphones and headphones can cause hearing loss.
6.Batteries and Heat Exposure Warning
Batteries (battery pack or batteries installed) shall not be exposed to excessive heat as sunshine, fire or the like.
7.Never Touch this Unit with Wet Hands—Never handle this unit or its power cord while your hands are wet or damp. If water or any other liquid gets inside this unit, have it checked by the dealer from whom you purchased this unit.
8.Handling Notes
•If you need to transport this unit, use the original packaging to pack it how it was when you originally bought it.
•Do not leave rubber or plastic items on this unit for a long time, because they may leave marks on the case.
•This unit’s top and rear panels may get warm after prolonged use. This is normal.
•If you do not use this unit for a long time, it may not work properly the next time you turn it on, so be sure to use it occasionally.
•When you’ve finished using this unit, remove all discs and turn off the power.
9.Installing this Unit
•Install this unit in a well-ventilated location.
•Ensure that there’s adequate ventilation all around this unit, especially if it’s installed in an audio rack. If the ventilation is inadequate, the unit may overheat, leading to malfunction.
•Do not expose this unit to direct sunlight or heat sources, because its internal temperature may rise, shortening the life of the optical pickup.
•Avoid damp and dusty places, and places subject to vibrations from loudspeakers.
•Never put the unit on top of, or directly above a loud-speaker.
•Install this unit horizontally. Never use it on its side or on a sloping surface, because it may cause a malfunction.
•If you install this unit near a TV, radio, or VCR, the picture and sound quality may be affected. If this occurs, move this unit away from the TV, radio, or VCR.
10.To Obtain a Clear Picture—This unit is a hightech, precision device. If the lens on the optical pickup, or the disc drive mechanism becomes dirty or worn, the picture quality may be affected. To maintain the best picture quality, we recommend regular inspection and maintenance (cleaning or worn part replacement). every 1,000 hours of use depending on the operating environment. Contact the dealer from whom you purchased this unit for details.
EN |
3 |
||
|
|
|
|
|
|
|
|
|
|
|
|
11.Moisture Condensation
Moisture condensation may damage this unit.
Read the following carefully:
Moisture may condense on the lens of the optical pickup, one of the most important parts inside this unit.
•Moisture condensation can occur in the following situations:
–The unit is moved from a cold place to a warm place.
–A heater is turned on, or cold air from an air conditioner is hitting the unit.
–In the summer, when this unit is moved from an air conditioned room to a hot and humid place.
–The unit is used in a humid place.
•Do not use this unit when there’s the possibility of moisture condensation occurring. Doing so may
damage your discs and certain parts inside this unit.
If condensation does occur, unplug the power cord and leave the unit for two to three hours in the room temperature.
12.Region Codes—The Blu-ray Disc™ / DVD standard uses region codes to control how discs can be played around the world, the world being divided into three regions (Blu-ray Disc™) or six regions (DVD). This unit will only play Blu-ray Disc™ / DVD discs that
match its region code, which can be found on its rear panel (  ,
,  ).
).
13.About this Manual—This manual explains how to use all of this unit’s functions. Although the Blu-ray Disc™ / DVD standard offers many special features, not all discs use them all, so depending on the disc being played, this unit may not respond to certain functions. See the disc’s sleeve notes for supported features.
Never use a gas duster on this unit.
The gas trapped inside of this unit may cause ignition and explosion.
LASER SAFETY
This apparatus is classified as a CLASS 1 LASER PRODUCT. This apparatus employs a laser. Only a qualified service person should remove the cover or attempt to service this apparatus, due to possible eye injury.
CAUTION: Use of controls or adjustments or performance of procedures other than those specified herein may result in hazardous radiation exposure.
1.This unit is a CLASS 1 LASER PRODUCT and employs a laser inside the cabinet.
2.To prevent the laser from being exposed, do not remove the cover. Refer servicing to qualified personnel.
For U.S. Models
FCC Information for User FCC WARNING:
The user changes or modifications not expressly approved by the party responsible for compliance could void the user’s authority to operate the equipment.
NOTE:
This equipment has been tested and found to comply with the limits for a Class B digital device, pursuant to Part 15 of the FCC Rules. These limits are designed to provide reasonable protection against harmful interference in a residential installation.
This equipment generates, uses and can radiate radio frequency energy and, if not installed and used in accordance with the instructions, may cause harmful interference to radio communications. However, there is no guarantee that interference will not occur in a
particular installation. If this equipment does cause harmful interference to radio or television reception, which can be determined by turning the equipment off and on, the user is encouraged to try to correct the interference by one or more of the following measures:
•Reorient or relocate the receiving antenna.
•Increase the separation between the equipment and receiver.
•Connect the equipment into an outlet on a circuit different from that to which the receiver is connected.
•Consult the dealer or an experienced radio / TV technician for help.
For Canadian Models
NOTE: THIS CLASS B DIGITAL APPARATUS COMPLIES WITH CANADIAN ICES-003.
Modèle pour les Canadien
REMARQUE: CET APPAREIL NUMÉRIQUE DE LA CLASSE B EST CONFORME À LA NORME NMB-003 DU CANADA.
4 |
|
|
|
|
EN |
|
|
|
|
||
|
|
|
|
|
|
|
|
|
|
|
|
|
|
|
|
|
|
MISE EN GARDE:
POUR RÉDUIRE LE RISQUE D'INCENDIE OU DE CHOC ÉLECTRIQUE, NE PAS EXPOSER CET APPAREIL À LA PLUIE OU À L'HUMIDITÉ.
ATTENTION:
POUR RÉDUIRE LE RISQUE DE CHOC ÉLECTRIQUE, NE PAS ENLEVER LE COUVERCLE (OU LE PANNEAU ARRIÈRE). L'INTÉRIEUR NE COMPORTE AUCUNE PIÈCE POUVANT ÊTRE RÉPARÉE PAR L'UTILISATEUR. CONFIER TOUTE RÉPARATION À DU PERSONNEL QUALIFIÉ.
CAUTION |
AVIS |
RISK OF ELECTRIC SHOCK |
RISQUE DE CHOC ELECTRIQUE |
DO NOT OPEN |
NE PAS OUVRIR |
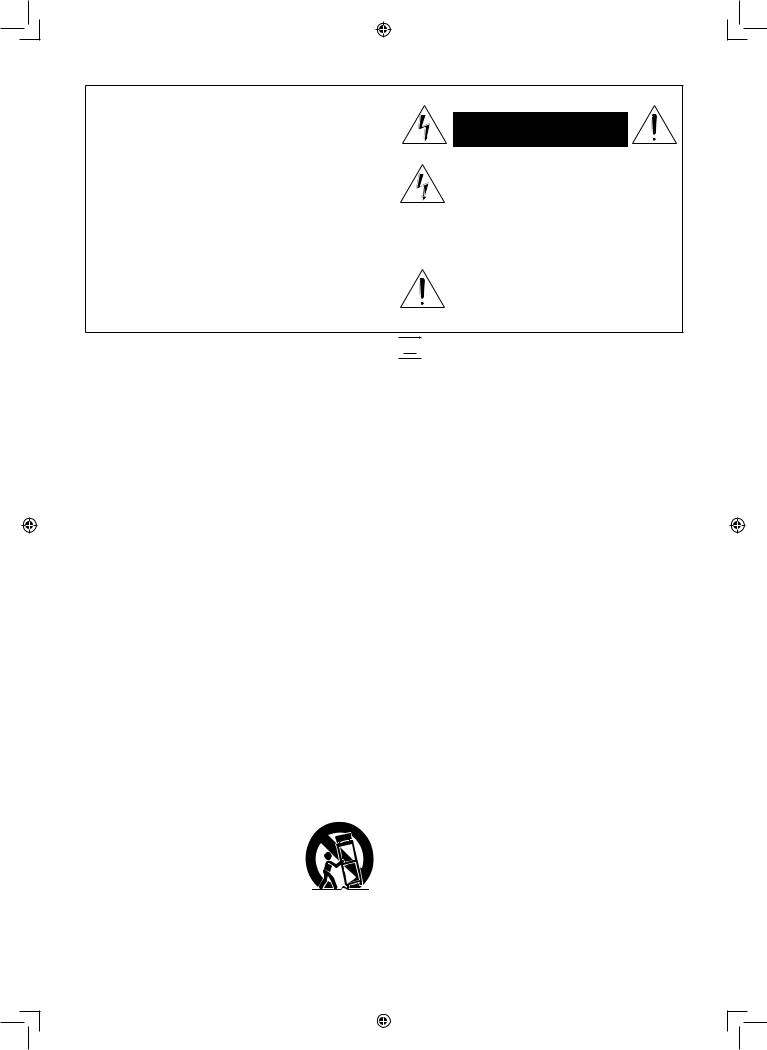
Le symbole représentant un éclair terminé par une pointe de flèche à l'intérieur d'un triangle équilateral a pour but d'alerter l'utilisateur
à la présence d'une « tension dangereuse » non isolée, à l'intérieur du boîtier du produit, qui peut être d'une magnitude suffisante pour constituer un risque de choc électrique.
Le point d'exclamation à l'intérieur d'un triangle équilatéral a pour but d'avertir l'utilisateur
que la documentation accompagnant l'appareil contient des instructions importantes sur l'utilisation et l'entretien (réparations).
La remarque importante et le niveau de classification sont situés à l'arrière ou à la base du boîtier.


 Le symbole pour CLASSE ll (isolation double)
Consignes de sécurité importantes
1.Veuillez lire ces instructions.
2.Conservez ces instructions.
3.Tenez compte de tous les avertissements.
4.Suivez toutes les instructions.
5.N’utilisez pas cet appareil à proximité d’une source d’eau.
6.Nettoyez uniquement avec un tissu sec.
7.Ne bloquez pas les ouvertures de ventilation. Installez en suivant les instructions du fabricant.
8.N’installez pas l’appareil à proximité de sources de chaleur telles que radiateurs, bouches de chauffage, poêles ou autres appareils (y compris amplificateurs) qui produisent de la chaleur.
9.Ne supprimez pas la fonction de sécurité des fiches polarisées ou des fiches de mise à terre. Une fiche polarisée possède deux broches dont l’une est plus large que l’autre. Une fiche de mise à terre possède deux broches, ainsi qu’un troisième élément, un ergot de mise à terre. La large broche ou le troisième élément, l’ergot, sont installés pour votre sécurité.
Si la fiche fournie ne s’engage pas correctement dans votre prise, veuillez consulter un électricien pour qu’il effectue le remplacement de l’ancienne prise.
10.Évitez de marcher sur le cordon d’alimentation ou de le pincer, en particulier au niveau des fiches, des socles de prises d’alimentation et du point de sortie de l’appareil.
11.Utilisez uniquement les fixations / accessoires spécifiés par le fabricant.
12.Utilisez uniquement le chariot, le
support, le trépied, la platine de fixation ou la tablette spécifiée par le fabricant
ou vendue avec l’appareil. Quand un chariot est utilisé, prenez toutes les précautions nécessaires lors du
déplacement du module chariot - appareil afin d’éviter le renversement et les blessures subséquentes.
13.Débranchez cet appareil pendant les orages électriques ou s’il n’est pas utilisé sur de longues périodes de temps.
14.Confiez toute réparation à un personnel qualifié. Une réparation est nécessaire lorsque l’appareil a été endommagé d’une manière quelconque, par exemple, lorsque le cordon d’alimentation électrique ou la fiche ont été endommagés, quand du liquide s’est répandu dessus ou si des objets sont tombés dans l’appareil, lorsque l’appareil a été exposé à la pluie ou
àl’humidité, ne fonctionne pas normalement ou s’il a fait une chute.
15.Dommages nécessitant une réparation Débranchez l'appareil de la prise murale et confiezle en réparation à du personnel qualifié dans les situations suivantes :
A.Lorsque le cordon d'alimentation ou la fiche sont endommagés,
B.Si du liquide a été renversé, ou si des objets sont tombés sur l'appareil,
C.Si l'appareil a été exposé à la pluie ou à l'eau,
D.Si l'appareil ne fonctionne pas normalement en suivant le mode d'emploi. Ne réglez que les commandes mentionnées par le mode d'emploi, car un réglage inapproprié des autres commandes peut entraîner des dommages qui requièrent souvent beaucoup de travail de la part d'un technicien qualifié pour rétablir l'appareil à son fonctionnement normal,
E.Si l'appareil est tombé ou a été endommagé d'une manière quelconque,
F.L'appareil dont la performance baisse de façon marquée doit être réparé.
16.Pénétration par du liquide ou des objets
Ne poussez jamais d'objets d'aucune sorte dans l'appareil par les ouvertures, car ils peuvent entrer en contact avec des points de tension dangereux ou provoquer des courts-circuits pouvant entraîner un incendie ou un choc électrique.
L'appareil ne doit pas être exposé à des égouttements ou à des éclaboussures, et aucun objet rempli de liquide, tel un vase, ne doit être placé sur l'appareil. Ne placez aucune bougie ni aucun autre objet en ignition sur le dessus de l'unité.
FR |
5 |
||
|
|
|
|
|
|
|
|
|
|
|
|
17.Piles
Prenez toujours en considération les aspects environnementaux, et respectez les règlements locaux lorsque vous mettez les piles au rebut.
18.Si vous installez l'appareil à l'intérieur d'une bibliothèque ou d'une armoire, assurez-vous que la ventilation est adéquate.
Laissez 20 cm (8 po) d'espace libre en haut et sur les côtés, et 10 cm (4 po) à l'arrière. La bordure arrière de la tablette ou de la planche au-dessus de l'appareil doit être éloignée de 10 cm (4 po) du panneau arrière ou du mur, de manière à créer un espace semblable à un conduit d'échappement de l'air chaud.
19.L'armoire doit être pourvue d'ouvertures et de fentes de ventilation sur les côtés et en dessous. Afin d'assurer un fonctionnement fiable de l'appareil et pour l'empêcher de surchauffer, ces ouvertures ne doivent pas être bloquées ou couvertes. Évitez d'installer l'appareil dans des espaces clos comme les bibliothèques, sauf s'ils bénéficient d'une ventilation appropriée.
Mesures de précaution
Ne placez pas cet appareil sur un meuble qui pourrait être renversé par un enfant ou un adulte qui pourrait s’y appuyer, le tirer ou monter dessus. La chute de l’appareil peut causer des blessures graves ou même la mort.
1.Enregistrement protégé par droit d'auteur—À moins de le faire pour son usage personnel seulement, il est illégal d'enregistrer du contenu protégé par des droits d'auteur sans la permission du détenteur du copyright.
2.Fusible c. a.—Le fusible c. a. à l'intérieur de l'appareil ne peut être réparé par l'utilisateur. Si vous ne pouvez pas allumer l'appareil, communiquez avec le détaillant auprès de qui vous avez acheté cet appareil.
3.Entretien—Il est recommandé d'épousseter l'appareil de temps à autre avec un chiffon doux. Pour les taches tenaces, utilisez un chiffon doux humecté d'un solution très diluée de détergent doux et d'eau. Séchez l'appareil immédiatement après en l'essuyant avec
un chiffon doux. N'utilisez pas de chiffons abrasifs, de diluants, d'alcool ou d'autres solvants chimiques, car ils risquent d'endommager le fini et d'enlever les inscriptions sur le panneau.
4.Alimentation AVERTISSEMENT
AVANT DE BRANCHER L'APPAREIL POUR LA PREMIÈRE FOIS, LISEZ ATTENTIVEMENT LA SECTION SUIVANTE.
Les tensions c. a. varient d'un pays à l'autre. Assurez-vous que la tension dans votre secteur est conforme aux exigences de tension imprimées sur le panneau arrière de l'appareil (120 V c. a., 60 Hz).
La fiche du cordon d'alimentation est utilisée pour débrancher cet appareil de la source de courant c. a. Assurez-vous que la fiche est rapidement utilisable (facilement accessible) en tout temps.
Le fait d'appuyer sur la touche [ON/STANDBY] pour sélectionner le mode de veille ne déconnecte pas complètement l'appareil de la source d'alimentation c. a. Si vous ne prévoyez pas utiliser l'appareil pendant une période prolongée, débranchez le cordon d'alimentation de la prise de courant c. a.
6
5.Prévention de la perte d'acuité auditive Attention
Une pression acoustique excessive provenant des oreillettes et des écouteurs peut causer une perte d'acuité auditive.
6.Exposition des piles à la chaleur Avertissement
Les piles (bloc-piles ou piles installées) ne doivent pas être exposées à une source de chaleur excessive, comme le soleil, le feu ou d'autres sources similaires.
7.Ne jamais toucher avec les mains mouillées—
Ne manipulez jamais cet appareil ou son cordon d'alimentation lorsque vos mains sont mouillées ou humides. Si de l'eau ou un autre liquide pénètre
àl'intérieur de l'appareil, faites-le inspecter par le détaillant auprès de qui vous avez acheté cet appareil.
8.Remarques concernant la manutention
•Si vous devez transporter l'appareil, utilisez le carton d'emballage original pour qu'il soit emballé de la même manière que lorsque vous l'avez acheté.
•Ne laissez aucun article en caoutchouc ou en plastique sur cet appareil pour une période prolongée, car ils peuvent laisser des marques sur le boîtier.
•Les panneaux avant et arrière de l'appareil peuvent devenir chauds après une utilisation prolongée. C'est normal.
•Si vous n'utilisez pas cet appareil durant une période prolongée, il risque de ne pas fonctionner
correctement lorsque vous le remettrez sous tension; assurez-vous donc de l'utiliser de temps à autre.
•Lorsque vous cessez d'utilisez l'appareil, enlevez tous les disques et éteignez l'appareil.
9.Installation de l'appareil
•Installez cet appareil dans un endroit bien ventilé.
•Assurez-vous qu'il y ait une ventilation adéquate tout autour de cette unité, particulièrement si elle est installée dans un bâti audio. Une ventilation inadéquate entraînera une surchauffe de l'appareil pouvant causer une défaillance.
•N'exposez pas cet appareil aux rayons directs du soleil ou à des sources de chaleur, car sa température interne peut augmenter, et abréger
ainsi la durée de vie de la tête de lecture optique.
•Évitez les endroits humides et poussiéreux, et les endroits vulnérables aux vibrations en provenance des haut-parleurs.
•Ne mettez jamais l'appareil sur un haut-parleur ou directement au-dessus.
•Installez cet appareil à l'horizontale. Ne l'utilisez jamais sur le côté ou sur une surface inclinée, car cela peut entraîner une défaillance.
•Si vous installez cet appareil près d'un téléviseur, d'une radio ou d'un VCR, la qualité de l'image et du son peut être compromise. Si cela se produit, éloignez l'appareil du téléviseur, de la radio ou du VCR.
10.Pour obtenir une image claire—Cet appareil est un dispositif de précision à haute technicité. Si la
lentille sur la tête de lecture optique, ou le mécanisme d'entraînement du disque deviennent encrassés ou usés, la qualité de l'image peut en souffrir. Pour maintenir une image de la meilleure qualité, nous recommandons une inspection et un entretien périodiques (nettoyage et remplacement des pièces usées) toutes les 1 000 heures d'utilisation selon l'environnement d'utilisation. Pour plus de détails, communiquez avec le détaillant auprès de qui vous avez acheté cet appareil.
FR
11.Condensation de l'humidité
La condensation de l'humidité peut endommager cet appareil.
Lisez attentivement ce qui suit :
L'humidité peut se condenser sur la lentille de la tête de lecture optique, l'une des pièces les plus importantes de cet appareil.
•Il peut y avoir condensation de l'humidité dans les situations suivantes :
–L’appareil est transporté d’un lieu chaud dans un lieu froid.
–Un radiateur est allumé, ou l'air froid d'un climatiseur atteint l'appareil.
–En été, lorsque l'appareil est déplacé d'une pièce climatisée à une pièce chaude et humide.
–L'appareil est utilisé dans un endroit humide.
•N'utilisez pas cet appareil lorsqu'il y a possibilité de condensation de l'humidité. Sinon, vous risquez d'endommager vos disques ou certaines pièces à l'intérieur de l'appareil.
S'il y a condensation, débranchez le cordon d'alimentation et laissez l'appareil débranché pendant deux à trois heures à la température de la pièce.
12.Codes de régions—La norme Blu-ray Disc™ / DVD utilise des codes de régions pour contrôler la manière dont les disques sont lus partout dans le monde, le monde étant divisé en trois régions (Blu-ray Disc™) ou six régions (DVD). Cet appareil ne peut lire que les disques Blu-ray Disc™ / DVD qui correspondent à son
code de région indiqué sur le panneau arrière ( 

 ,
,  ).
).
13.À propos de ce manuel—Ce manuel décrit comment utiliser toutes les fonctions de l'appareil. Bien que la norme Blu-ray Disc™ / DVD offre de nombreuses fonctions spéciales, elles ne sont pas toutes utilisées par tous les disques; ainsi, selon le disque en lecture, il est possible que certaines
fonctions ne soient pas opérationnelles. Consultez les notes sur la pochette du disque pour les fonctions prises en charge.
Le gaz emprisonné dans l'appareil pourrait s'enflammer et causer une explosion.
Ne pas utiliser de produit de dépoussiérage au gaz sur cet appareil.
FR
SÉCURITÉ CONCERNANT LE LASER
Cet appareil est classé comme un PRODUIT LASER DE CLASSE 1.
Cet appareil utilise un laser. Seul un employé qualifié devrait ouvrir le couvercle ou tenter de réparer cet appareil puisque le laser peut endommager la vue.
ATTENTION: L’utilisation de commandes, l’ajustement ou l’exécution de procédures autres que celles spécifiées dans ce guide peuvent entraîner le risque d’exposition à des radiations dangereuses.
1.Cet appareil est un PRODUIT LASER DE CLASSE 1, et utilise un laser à l'intérieur du boîtier.
2.Pour empêcher toute exposition du laser, ne retirez pas le couvercle. Confiez les réparations à du personnel qualifié.
Pour les modèles des États-Unis
Information de la FCC à l'intention de l'utilisateur MISE EN GARDE DE LA FCC (FEDERAL COMMUNICATIONS COMMISSION) :
Les changements ou modifications effectués par l'utilisateur sans approbation de la partie responsable de la conformité peuvent invalider l'autorité de l'utilisateur à utiliser l'équipement.
REMARQUE :
Cet appareil a été testé et respecte les limitations prévues pour un dispositif numérique de classe B selon la réglementation de l’article 15 de la FCC. Ces limitations sont conçues dans le but de fournir une protection raisonnable contre de l’interférence nuisible à l’intérieur d’un établissement résidentiel.
Cet appareil génère et utilise et peut émettre de l’énergie de fréquence radio et, s’il n’est pas installé et utilisé selon les directives, peut causer de l’interférence nuisible pour les communications radio. Cependant, il est possible
que de l‘interférence soit présente dans une installation précise. Si cet appareil cause de l’interférence nuisible pour la réception radio ou télé, interférence qui peut être vérifiée en allumant et en éteignant l’appareil, l’utilisateur devrait tenter d’éliminer l’interférence par les moyens suivants :
•Réorienter ou relocaliser l’antenne de réception.
•Augmenter la distance entre l’appareil et le récepteur.
•Brancher l’appareil dans une prise située sur un circuit différent de celui du récepteur.
•Consulter le détaillant ou un technicien radio / TV d'expérience.
Pour les modèles canadiens
REMARQUE : CET APPAREIL NUMÉRIQUE DE LA CLASSE B EST CONFORME À LA NORME NMB-003 DU CANADA.
7

1.SUPPLIED ACCESSORIES
•Remote Control
•Batteries (AA, 1.5V × 2)
•Audio / video cables
•AC cord
•Instruction Manual
■ Note about Recycling
•This unit’s packaging materials are recyclable and can be reused. Please dispose of any materials in accordance with your local recycling regulations.
•Batteries should never be thrown away or incinerated but disposed of in accordance with your local regulations concerning chemical wastes.
■ Maintenance
Servicing
•Please refer to relevant topics on “TROUBLESHOOTING” on page 47 before returning the product.
•If this unit becomes inoperative, do not try to correct the problem by yourself. There are no userserviceable parts inside. Turn the unit to the standby mode, unplug the power plug, and contact the dealer from whom you purchased this unit.
Disc handling
•For best results, keep your discs clean. Fingerprints and dust can affect the sound and picture quality and should be removed as follows. Using a clean, soft cloth, wipe from the center outwards, as shown. Never wipe in a circular direction.
•To remove stubborn dust or dirt, wipe the disc with a damp, soft cloth, and then dry it with a dry cloth.
•Never use solvent-based cleaning fluids, such as thinner or benzine, commercially available cleaners, or antistatic sprays intended for vinyl records, because they may damage the disc.
IR signal check
•If the remote control is not working properly, you can use a digital camera (including a cellular phone with built-in camera) to see if it is sending out an infrared signal.
With a digital camera (including built-in cell phone cameras): Point a digital camera towards the remote control. Push any button on the remote control and look through the digital camera. If the infrared light appears through the camera, the remote control is working.
Copyright
•It is forbidden by law to copy, broadcast, show, broadcast on cable, play in public, or rent copyrighted material without permission. Commercial BD-video/ DVD-video discs are copy-protected, and any recordings made from these discs will be distorted. This item incorporates copy protection technology that is protected by U.S. patents and other intellectual property rights of Rovi Corporation. Reverse engineering and disassembly are prohibited.
Note about AC cord
•Use only the supplied AC cord.
•Do not use the supplied AC cord to other units.
8 |
|
|
EN |
|
|
|
|
|
|
|
|
|
|
|
|

2.TRADEMARK INFORMATION
Manufactured under license from Dolby Laboratories. “Dolby” and the double-D symbol are trademarks of Dolby Laboratories.
DLNA®, the DLNA Logo and DLNA CERTIFIED® are trademarks, service marks, or certification marks of the Digital Living Network Alliance.
Windows Media and the Windows logo are trademarks or registered trademarks of Microsoft Corporation in the United States and/or other countries.
Manufactured under license under U.S. Patent #’s: 5,451,942; 5,956,674; 5,974,380; 5,978,762; 6,226,616; 6,487,535; 7,392,195; 7,272,567; 7,333,929; 7,212,872 & other U.S. and worldwide patents issued & pending. DTS and the Symbol are registered trademarks, & DTS-HD, DTS-HD Master Audio | Essential and the DTS logos are trademarks of DTS, Inc. Product includes software. © DTS, Inc. All Rights Reserved.
HDMI, the HDMI Logo, and High-Definition Multimedia Interface are trademarks or registered trademarks of HDMI Licensing LLC in the United States and other countries.
“x.v.Color” and “x.v.Color” logo are trademarks of Sony Corporation.
Java and all Java based trademarks and logos are trademarks or registered trademarks of Oracle and/or its affiliates.
“AVCHD” and the “AVCHD” logo are trademarks of Panasonic Corporation and Sony Corporation.
Blu-ray Disc™, Blu-ray™, Blu-ray 3D™, BD-Live™, BONUSVIEW™, and the logos are trademarks of the Blu-ray Disc Association.
is a trademark of DVD Format/Logo Licensing Corporation.
EN |
9 |
||
|
|
|
|
|
|
|
|
|
|
|
|

CONTENTS
Important Safety Instructions ....................................... |
2 |
||
|
|
||
Consignes de sécurité importantes............................. |
5 |
||
|
|
|
|
1. |
SUPPLIED ACCESSORIES....................................... |
8 |
|
|
|
|
|
2. |
TRADEMARK INFORMATION............................ |
9 |
|
|
|
|
|
3. |
FEATURES................................................................ |
11 |
|
|
3.1 |
Features ..................................................................... |
11 |
|
3.2 |
Symbols Used in this Manual ................................ |
12 |
|
|
|
|
4. |
FUNCTIONAL OVERVIEW................................. |
13 |
|
|
4.1 |
Front Panel................................................................ |
13 |
|
4.2 |
Rear Panel ................................................................. |
13 |
|
4.3 |
Remote Control ...................................................... |
13 |
|
4.4 |
Front Panel Display ................................................. |
15 |
|
4.5 |
Guide to On-Screen Display ................................ |
16 |
|
|
|
|
5. |
CONNECTIONS.................................................... |
17 |
|
5.1Standard Video +
|
Standard Audio Connection ................................. |
17 |
5.2 |
Component Video + |
|
|
Standard Audio Connection ................................. |
17 |
5.3 |
HDMI Video / Audio Connection ....................... |
18 |
5.4 |
Connection to an Audio System ......................... |
18 |
5.5 |
Connection to the Network ................................ |
22 |
5.6 |
Connecting the AC Cord...................................... |
22 |
6. BEFORE YOU START ........................................... |
23 |
|
6.1Finding the Viewing Channel /
|
|
Source on Your TV................................................. |
23 |
|
|
|
|
7. |
INFORMATION ON PLAYBACK...................... |
24 |
|
|
7.1 |
Information on Playback ........................................ |
24 |
|
7.2 |
Guide to File List ..................................................... |
26 |
|
7.3 |
How to Insert a Disc.............................................. |
26 |
|
|
|
|
8. |
BASIC PLAYBACK ................................................. |
27 |
|
|
8.1 |
Playing Back a Disc.................................................. |
27 |
|
8.2 |
Playing Back a Blu-ray 3D™ Disc........................ |
28 |
|
8.3 |
Playing Back a USB Flash Drive............................ |
28 |
8.4Playing Back Movie / Music /
Photo from DLNA Certified Home Media
Servers ....................................................................... |
29 |
8.5 Using the Title / Disc / Pop-up Menu................. |
30 |
10
9. SPECIAL PLAYBACK............................................. |
|
31 |
|
9.1 |
Fast Forward / Fast Reverse................................. |
|
31 |
9.2 |
Slow Forward Playback .......................................... |
|
31 |
9.3 |
Step by Step Playback............................................. |
|
31 |
9.4 |
Repeat Playback ....................................................... |
|
32 |
9.5 |
A-B Repeat................................................................ |
|
32 |
9.6 |
Slide Show ................................................................. |
|
32 |
9.7 |
PiP (BONUSVIEW™) Setting............................... |
|
33 |
9.8 |
Enjoying BD-Live™ Discs Using Internet |
.......... 33 |
|
9.9 |
Title / Chapter Search............................................ |
|
34 |
9.10 |
Track Search............................................................. |
|
34 |
9.11 |
Time Search .............................................................. |
|
34 |
9.12 |
Switching Subtitles................................................... |
|
35 |
9.13 |
Switching Audio Soundtrack................................. |
|
35 |
9.14 |
Switching Camera Angles ...................................... |
|
36 |
9.15 |
Adjusting the Picture .............................................. |
|
36 |
10. LIST OF SETTINGS................................................ |
|
37 |
|
11. SETUPS...................................................................... |
|
40 |
|
11.1 |
Network Connection............................................. |
|
40 |
11.2 |
HDMI CEC................................................................ |
|
42 |
11.3 |
Video Resolution ..................................................... |
|
43 |
11.4 |
Parental ...................................................................... |
|
44 |
11.5 |
Software Update...................................................... |
|
45 |
11.6 |
Initialize ...................................................................... |
|
46 |
12. TROUBLESHOOTING.......................................... |
|
47 |
|
13. GLOSSARY............................................................... |
|
50 |
|
14. LANGUAGE CODE LIST ..................................... |
|
52 |
|
15. SPECIFICATIONS................................................... |
|
53 |
|
16. IMPORTANT HEALTH AND SAFETY |
|
||
INFORMATION FOR 3D TELEVISIONS.......... |
54 |
||
OPEN SOURCE LICENSE ........................ |
end of book |
||
EN
3.FEATURES
3.1Features
Blu-ray Disc™
You can enjoy Blu-ray Disc™ which is capable of storing five times more data than a conventional DVD.
Playing back Blu-ray 3D™ Disc
This unit can play back Blu-ray 3D™ discs which contain stereoscopic 3D video. In order to enjoy 3D video, connect this unit to a 3D capable TV using a 3D compatible HDMI cable.
BD-Java
With some Blu-ray™ discs which support Java applications, you can enjoy the interactive functions such as games or interactive menus.
DVD upscaling for enhanced picture quality
Your current DVD will look even better than before thanks to video upscaling. Upscaling will increase the resolution of standard definition DVD to high definition up to 1080p over an HDMI connection. The picture will be less jagged and more realistic for a near high definition experience.
Enjoy your content on different kinds of media
Full backwards compatibility with DVD, CD and USB flash drive ensures that you can continue to enjoy your current audio-video collection. Additionally, you can enjoy AVCHD / MP3 / WMA / JPEG files.
Listen to rich multi-channel surround sound
Multi-channel surround sound, which realizes real-to-life sound and makes you feel that you are really there.
Easy and simple connection to your HDTV via HDMI
Connect this unit to your HDTV with one single HDMI (High-Definition Multimedia Interface) cable. It is
recommended to use a High Speed HDMI cable for better compatibility. The high definition video output signal will be transferred to your HDTV without conversion to analog signals, so you will get excellent picture and sound quality, completely free from noise. Thanks to other multiple outputs, you can also easily connect to your home theater system or amplifier.
HDMI CEC (Consumer Electronics Control)
This unit supports HDMI CEC, which allows integrated system control over HDMI and is part of the HDMI standard. This function may not work properly on some devices.
PiP (BONUSVIEW™)
Some BD-videos have the PiP function which enables you to display the secondary video in the primary video. You can call up the secondary video by pressing [PIP] whenever the scene contains the secondary video.
BD-Live™
BD-Live™ (BD-ROM version 2 Profile 2.0) that allows interactive functions to be used when this unit is connected to the Internet in addition to the
BONUSVIEW™ function. The various functions differ depending on the disc.
Pop-up menu
Some BD-videos have a pop-up menu which is a navigation menu that can be called up and be operated on the TV screen without interrupting playback. You can call up the pop-up menu by pressing [Pop Up Menu / Menu]. Contents in the pop-up menu vary depending on the disc.
HDMI Deep Color
Deep Color reduces posterization (color banding) effect of the playback image.
HDMI 1080p/24 output (Blu-ray Disc™ only)
This unit is equipped with the feature which can provide smooth movement during playback of film originated material with the frame rate of 24 frames per second with progressive. (Available only when the display device is connected by an HDMI cable.) Refer to “Video Resolution” on page 43.
Playing back contents from a USB flash drive
You can play back MP3 / WMA / JPEG files stored in a USB flash drive. BD-ROM Profile 2.0 (BD-Live™) and Profile 1.1 discs sometimes store picture-in-picture commentary, subtitles or other extras in the USB flash drive for use during playback with the BD-video.
EN |
11 |
||
|
|
|
|
|
|
|
|
|
|
|
|
Playing back AVCHD files
This unit supports playback of AVCHD format files (new format for high definition video camcorders) recorded on disc. Your high definition personal archive is playable in HD quality.
x.v.Color
This unit supports playback of video contents on discs recorded with “x.v.Color” technology. To watch this video content with the “x.v.Color” space, a TV or other display device supporting both video image reproduction using “x.v.Color” standard and capability of manual switching of its color space setting is required. Please refer to the owner’s manual of your display device for further information.
Enjoy contents stored on DLNA certified home media servers
This unit is a DLNA certified media player that can play movie, music and photo files stored on DLNA certified home media servers connected to your home network.
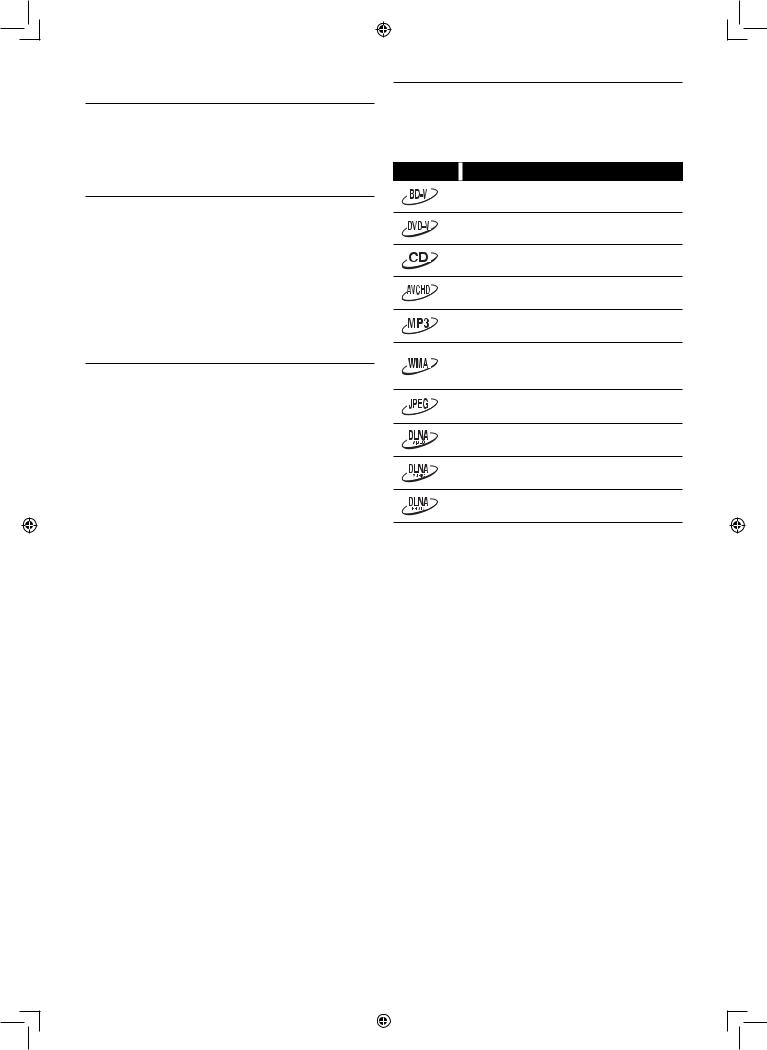
3.2Symbols Used in this Manual
To specify which media type each function is applicable to, we put the following symbols at the beginning of each item to operate.
Symbol Description
Description refers to BD-video
Description refers to DVD-video
Description refers to audio CD / DTS-CD
Description refers to DVD-RW/-R with AVCHD files
Description refers to BD-RE/-R, DVD-RW/-R,
CD-RW/-R and USB flash drive with MP3 files
Description refers to BD-RE/-R, DVD-RW/-R,
CD-RW/-R and USB flash drive with Windows
Media™ Audio files
Description refers to BD-RE/-R, DVD-RW/-R,
CD-RW/-R and USB flash drive with JPEG files
Description refers to movie files in the DLNA home server
Description refers to music files in the DLNA home server
Description refers to photo files in the DLNA home server
If you do not find any of the symbols listed above under the function heading, the operation is applicable to all media.
12 |
|
|
EN |
|
|
|
|
|
|
|
|
|
|
|
|
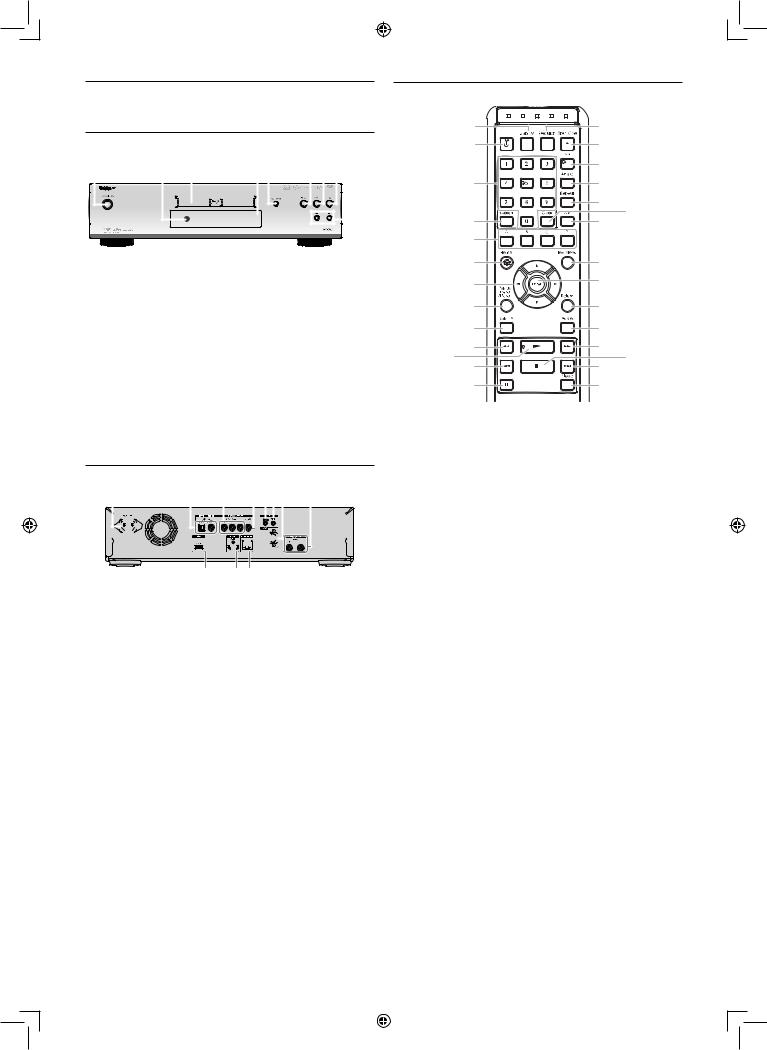
4. FUNCTIONAL OVERVIEW 4.3 Remote Control
4.1Front Panel
1 |
2 |
3 |
|
4 5* |
6 |
7 |
8* |
9 |
|||||||||||||||||||
|
|
|
|
|
|
|
|
|
|
|
|
|
|
|
|
|
|
|
|
|
|
|
|
|
|
|
|
|
|
|
|
|
|
|
|
|
|
|
|
|
|
|
|
|
|
|
|
|
|
|
|
|
|
|
|
|
|
|
|
|
|
|
|
|
|
|
|
|
|
|
|
|
|
|
|
|
|
|
|
|
|
|
|
|
|
|
|
|
|
|
|
|
|
|
|
|
|
|
|
|
|
|
|
|
|
|
|
|
|
|
|
|
|
|
|
|
|
|
|
|
|
|
|
|
|
|
|
|
|
|
|
|
|
|
|
|
|
|
|
|
|
|
|
|
|
|
|
|
|
|
|
|
|
|
|
|
|
|
|
|
|
|
|
|
|
|
|
|
|
|
|
|
|
|
|
|
|
|
|
|
|
|
|
|
|
|
|
|
|
|
|
|
|
|
|
*The unit can also be turned on by pressing these buttons.
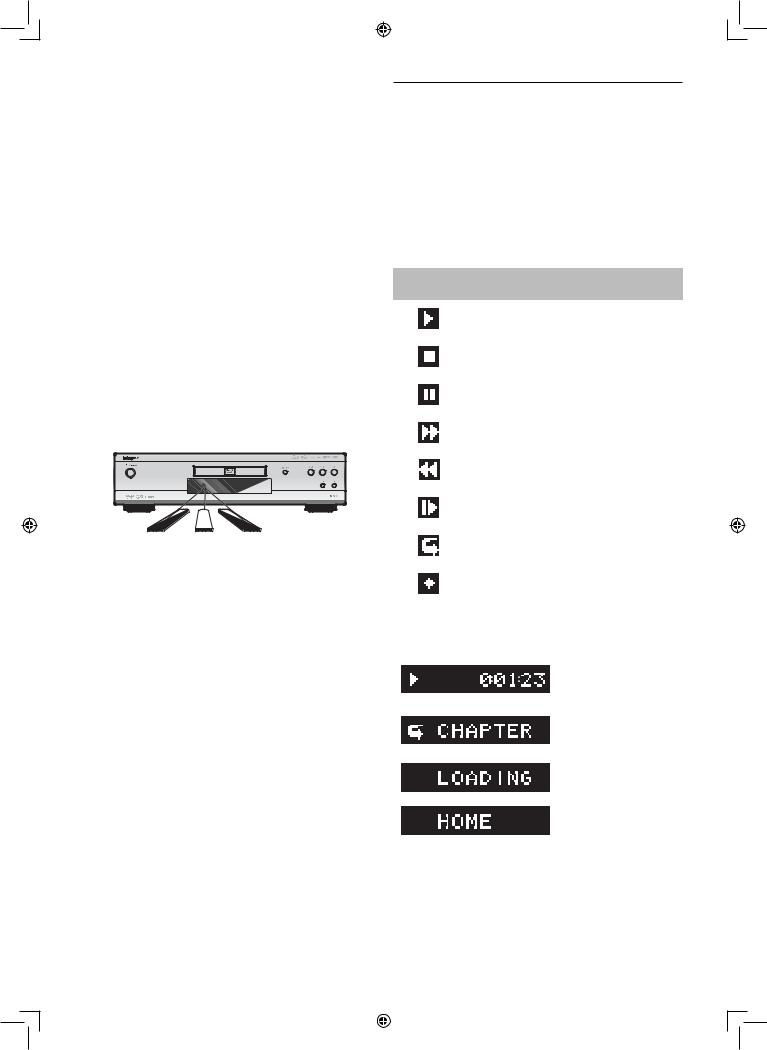
1. . On / Standby button
2.Infrared sensor window
3.Disc tray
4.Display
5.Open / Close button*
6.Pause button
7.Stop button
8.Play button*
9.H / G (skip down / up) buttons
4.2Rear Panel
1 |
|
2 |
3 |
|
|
|
|
4 5 6 7 |
8 |
|||||||||||||||
|
|
|
|
|
|
|
|
|
|
|
|
|
|
|
|
|
|
|
|
|
|
|
|
|
|
|
|
|
|
|
|
|
|
|
|
|
|
|
|
|
|
|
|
|
|
|
|
|
|
|
|
|
|
|
|
|
|
|
|
|
|
|
|
|
|
|
|
|
|
|
|
|
|
|
|
|
|
|
|
|
|
|
|
|
|
|
|
|
|
|
|
|
|
|
|
|
|
|
|
|
|
|
|
|
|
|
|
|
|
|
|
|
|
|
|
|
|
|
|
|
|
|
|
|
|
|
|
|
|
|
|
|
|
|
|
|
|
|
|
|
|
|
|
|
|
|
|
|
|
|
|
|
|
|
|
|
|
|
|
|
|
|
|
|
|
|
|
|
|
|
|
|
|
|
11 |
10 9 |
1.AC INLET terminal
2.AUDIO OUTPUT (DIGITAL OPTICAL / COAXIAL) jacks
3.VIDEO OUTPUT (COMPONENT) jacks
4.VIDEO OUTPUT (VIDEO) jack
5.IR IN jack
6.IR OUT jack
7.CONTROL CONNECTOR (RS-232)
8.AUDIO OUTPUT (ANALOG L / R) jacks
9.ETHERNET terminal
10.HDMI OUT jack
11.USB input
CCaution
•Do not touch the inner pins of the jacks on the rear panel. Electrostatic discharge may cause permanent damage to the unit.
•This unit does not have an RF modulator.
•Do not connect any device other than USB flash drive, USB card reader or USB hub into USB input. (e.g. PC, external HDD, MP3 player, digital camera, keyboard, mouse, etc.)
|
1 |
14 |
|
|
2 |
15* |
|
|
|
16 |
|
|
3 |
17 |
|
|
|
18 |
19 |
|
4 |
20 |
|
|
|
||
|
5 |
|
|
|
6 |
21 |
|
|
7 |
22 |
|
|
|
|
|
|
8 |
23 |
|
|
9 |
24 |
|
11* |
10 |
25 |
26 |
12 |
27 |
||
|
13 |
28 |
|
*The unit can also be turned on by pressing these buttons.
1.Display button
•Press to display the on-screen display menu.
2. . (on/standby) button
•Press to turn on the unit, or to turn the unit into the standby mode. (To completely shut down the unit, you must unplug the AC power cord.)
3.Number buttons
•Press to select a chapter during playback.
•Press to enter numbers in the input field.
4.Search button
•Press to display the search menu.
5.A / B / C / D buttons
•Press to activate shortcut keys on some BD-video functions.
•When file list / thumbnail list is shown, press to switch between pages.
6.Home  button
•Press to display the home menu.
7.Î/ï/Í/Æ buttons
•Press to select items or settings.
8.Pop Up Menu / Menu button Blu-ray Disc™:
•Press to display the pop-up menu.
DVD:
•Press to display the disc menu.
9.Subtitle button
•Press to select subtitles on a disc.
EN |
13 |
||
|
|
|
|
|
|
|
|
|
|
|
|
10.¢ (reverse) button
•During playback, press to fast reverse the playback.
11.ÆB (play) button*
•Press to start playback or resume playback.
12.H (skip) button
•During playback, press once to return to the beginning of the current title, chapter, track or file.
•During playback, press twice to return to the previous title, chapter, track or file.
•During the JPEG playback, press to return to the previous file.
13.(pause) button
•Press to pause playback.
14.Resolution button
•Press to set the HDMI output mode.
15.Open / Close fl button*
•Press to open or close the disc tray.
16.PIP button
•Press to switch picture in picture feature on/off (only applicable to BD-video which supports the PiP (BONUSVIEW™) function).
17.Angle button
•Press to access various camera angles on the disc.
18.Repeat button
•Press to select repeat modes.
19.Clear button
•Press to clear the information once entered.
•Press to cancel the A point which was set in A-B repeat mode.
20.A-B button
•Press to play back a defined section between point A and B repeatedly.
21.Top Menu button Blu-ray Disc™:
•Press to display the top menu.
DVD:
•Press to display the title menu.
22.Enter button
•Press to confirm or select menu items.
23.Return button
•Press to return to the previously displayed menu or screen function.
24.Audio button
•Press to select the audio channel (such as audio languages) on a disc.
25.∫ (forward) button
•During playback, press to fast forward the playback.
•In pause mode, press to slow forward the playback.
26.Ê (stop) button
•Press to stop playback.
27.G (skip) button
•During playback, press to skip to the next chapter, track or file.
•When playback is in pause mode, press to forward the playback picture by picture.
28.Mode button
•During playback, press to display the play menu.
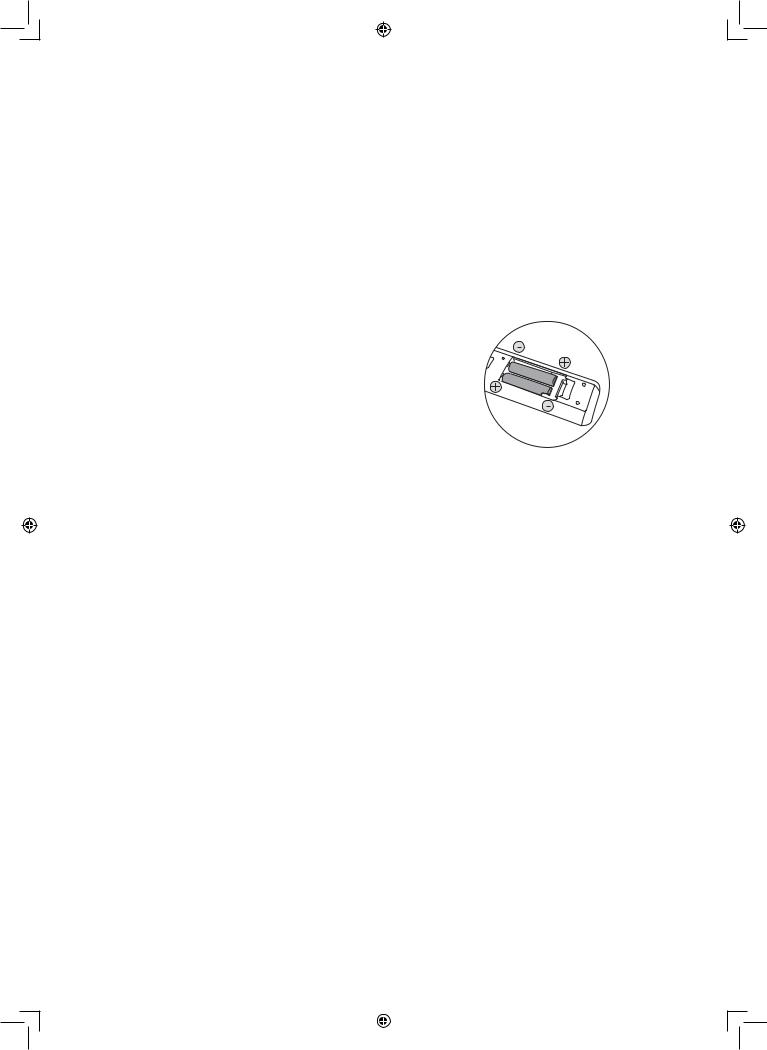
■Installing the Batteries in the Remote Control
Install 2 AA (1.5V) batteries matching the polarity indicated inside battery compartment of the remote control.
CCaution
Incorrect use of batteries can result in hazards such as leakage and bursting. Please observe the following:
•Do not mix alkaline, standard (carbon-zinc), or rechargeable (ni-cad, ni-mh, etc) batteries.
•Do not mix new and old batteries together.
•Do not use different kinds of batteries together. Although they may look similar, different batteries may have different voltages.
•Make sure that the + and - ends of each battery match the indications in the battery compartment.
•Remove batteries from battery compartment, when the remote is not going to be used for a month or more.
•When disposing of used batteries, please comply with governmental regulations or environmental public rules that apply in your country or area.
•Do not recharge, short-circuit, heat, burn or disassemble batteries.
14 |
|
|
EN |
|
|
|
|
|
|
|
|
|
|
|
|
■ Using the Remote Control
Remote Control Usage Guidelines:
•Make sure that there are no obstacles between the remote control and the infrared sensor window on the unit.
•Remote operation may become unreliable if strong sunlight or fluorescent light is shining on the infrared sensor window of the unit.
•Remote controls of different devices can interfere with each other. Avoid using a remote controls of another device which is located close to the unit.
•Replace the batteries when you notice a fall-off in the operating range of the remote control.
•The maximum operable ranges from the unit are as follows.
–Line of sight: approx. 23 feet (7 m)
–Either side of the center: approx. 16 feet (5 m) within 30°
–Above:
approx. 16 feet (5 m) within 15°
–Below:
approx. 10 feet (3 m) within 30°
30˚  30˚
30˚
4.4Front Panel Display
1 |
2 |
|
||||||
|
|
|
|
|
|
|
|
|
|
|
|
|
|
|
|
|
|
|
|
|
|
|
|
|
|
|
|
|
|
|
|
|
|
|
|
|
|
|
|
|
|
|
|
|
*Brightness of the display can be adjusted. Refer to “Panel Display” in “LIST OF SETTINGS” on page 39.
1.Displays playback status icon. Refer to the table below.
2.Displays various kinds of information such as title number, elapsed time, repeat mode, etc.
Playback Status |
Mode |
||
|
Icon |
||
|
|
||
|
|
|
Playback is in progress |
|
|
|
|
|
|
|
|
|
|
|
|
|
|
|
Stop mode |
|
|
|
|
|
|
|
|
|
|
|
|
|
|
|
Pause mode |
|
|
|
|
|
|
|
|
|
|
|
|
|
|
|
Fast forward mode |
|
|
|
|
|
|
|
|
|
|
|
|
|
|
|
Fast reverse mode |
|
|
|
|
|
|
|
|
|
|
|
Slow forward mode |
|
|
|
|
|
|
|
|
|
|
|
|
|
|
|
Appears while repeat function is set |
|
|
|
|
|
|
|
|
|
|
|
|
|
|
|
Appears when DLNA home media server is |
|
|
|
|
|
|
|
active |
|
|
|
|
Example of Display Message
Title is being played back. Indicating the current title number and the elapsed time.
Current chapter is in chapter repeat mode.
Loading a disc, USB flash drive or USB card reader.
Home menu is displayed.
EN |
15 |
||
|
|
|
|
|
|
|
|
|
|
|
|

4.5Guide to On-Screen Display
■ Home Menu
When you turn on the unit, home menu will appear automatically. Otherwise, press [Home  ].
].
Disc
“Disc” |
: Initiates playback of inserted disc, displays a list |
|
of tracks / files or the media filter menu |
“USB” |
: Displays a list of tracks / files on the connected |
USB flash drive or the media filter menu “Home Network” : To access the home network server (DLNA)
“Settings” |
: To access the setup menu |
■ Setup Menu
1 |
|
|
|
Picture Control |
Memory1 |
|
|
2 |
|
|
|
|
|
||||
|
|
Video Out |
TV Aspect |
16:9 Wide |
|
|
||
|
|
|
|
|
||||
|
|
|
Audio Out |
Component Output |
480i |
|
|
|
|
|
|
HDMI |
Progressive Mode |
Auto |
|
|
|
|
|
|
Playback |
Still Mode |
Auto |
|
|
|
|
|
|
Network |
|
|
|
|
|
|
|
|
Others |
|
|
|
|
|
|
|
|
|
|
|
|
|
|
1.Category
2.Menus / Options
■Play Menu
:Displays options for the highlighted item on the left whenever available.
During playback, press [Mode] to display the play menu. e.g.) Blu-ray Disc™
Search
Audio
Subtitle
Repeat
Picture Control
Angle
16 |
|
|
EN |
|
|
|
|
|
|
|
|
|
|
|
|

5.CONNECTIONS
5.1Standard Video + Standard Audio Connection
(Supports only 480i resolution.)
Video cable (supplied)
Audio cable (supplied)
VIDEO IN
Your TV
 L
L
AUDIO IN

 R
R
•Connect this unit directly to the TV. If the audio / video cables are connected to a VCR then the pictures may be distorted due to the copyright protection system.
5.2Component Video + Standard Audio Connection
(Supports up to 1080i(*1) resolution.)
Your TV
COMPONENT
VIDEO IN
Y
Component video cable (not supplied) |
PB/CB |
|
PR/CR |
L
AUDIO IN
Audio cable (supplied)
R
(*1) 1080i : Outputs video data with a frame rate of 30 frames per second.
•When playing back a BD-video, video output is up to 480i resolution.
DNote
•Due to the current Copyright Protection System, Pictures may not be Output when a Video cable is connected. To solve this connect this unit directly to the TV with an HDMI cable.
EN |
17 |
||
|
|
|
|
|
|
|
|
|
|
|
|
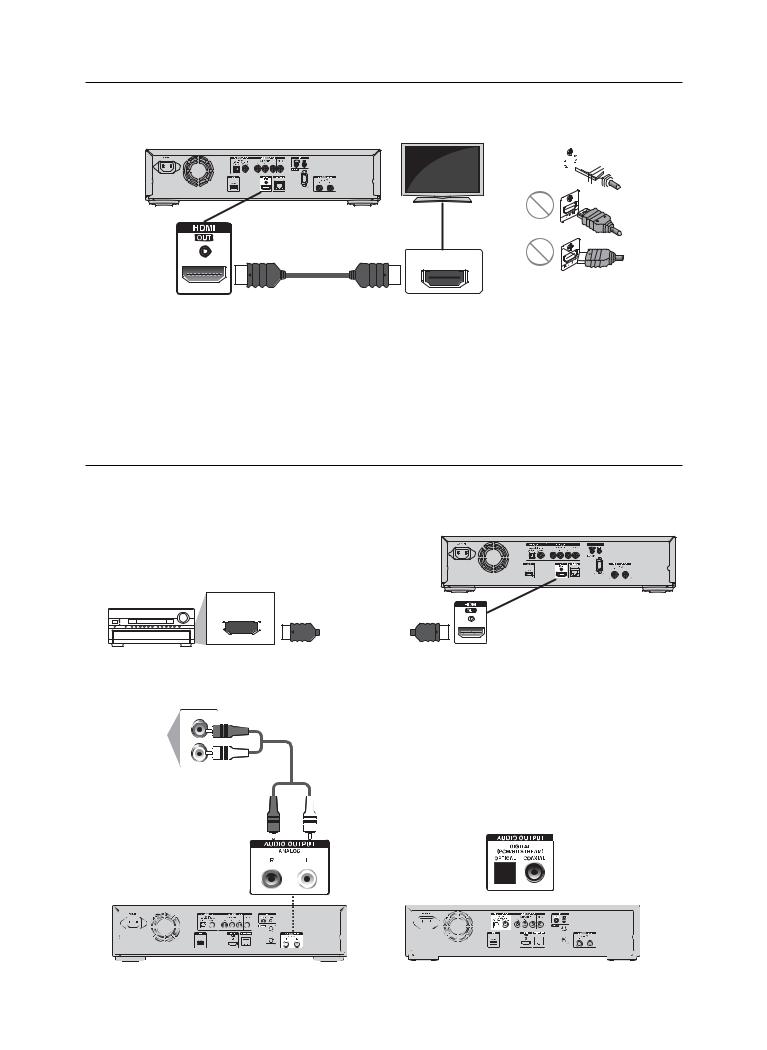
5.3HDMI Video / Audio Connection
(Supports up to 1080i(*1), 1080p(*2), 1080p/24(*3) resolution.)
Your TV


HDMI cable (not supplied)
HDMI IN
No analog audio connection required.
(*1)
(*2)
(*3)
1080i : Outputs video data with a frame rate of 30 frames per second. 1080p : Outputs video data with a frame rate of 60 frames per second. 1080p/24 : Outputs video data with a frame rate of 24 frames per second.
•Do not tilt the connector when inserting it into the HDMI jack, and make sure the shapes of the jack and the connector are matched.
•When connected to an HDCP incompatible display device, the picture will not be displayed properly.
•Use an HDMI cable with the HDMI logo (a certified HDMI cable) for this connection.
High Speed HDMI cable (also known as HDMI category 2 cable) is recommended for better compatibility.
•To enjoy Blu-ray 3D™ video, connect this unit to a 3D capable TV using a 3D compatible HDMI cable.
5.4Connection to an Audio System
•When you change the connections, all devices should be turned off.
•When making connections with external devices, please refer to their user manuals for additional setup help.
■ HDMI Audio Connection
AV receiver/amplifier with an HDMI input jack
HDMI IN |
|
HDMI cable (not supplied) |
||||||||||||||
|
|
|
|
|
|
|
|
|
|
|
|
|
|
|
|
|
|
|
|
|
|
|
|
|
|
|
|
|
|
|
|
|
|
■ 2-Channel Analog Audio Connection
Stereo system with analog audio input jacks
AUDIO IN |
Audio cable |
||||||||||||
R |
|
|
|
|
|
|
(supplied) |
||||||
|
|
|
|
|
|
||||||||
|
|
|
|
|
|
|
|
|
|
|
|
||
L |
|
|
|
|
|
|
|
|
|
|
|
|
|
|
|
|
|
|
|
|
|
|
|
|
|
|
|
|
|
|
|
|
|
|
|
|
|
|
|
|
|
|
|
|
|
|
|
|
|
|
|
|
|
|
|
|
|
|
|
|
|
|
|
|
|
|
|
|
|
|
|
|
|
|
|
|
|
|
|
|
|
|
|
|
|
|
|
|
|
|
|
|
|
|
|
|
|
|
|
|
|
|
|
|
|
|
|
|
|
|
|
|
|
|
|
|
|
|
|
|
|
|
|
|
|
|
|
|
|
|
|
|
|
|
|
|
|
|
|
■ Digital Audio Connection
AV receiver / amplifier with a digital audio optical /coaxial input jack
DIGITAL AUDIO INPUT |
|
DIGITAL AUDIO INPUT |
||||
OPTICAL |
|
COAXIAL |
||||
|
|
|
|
|
|
|
|
|
|
|
|
|
|
|
|
|
|
|
|
|
|
|
|
|
|
|
|
|
|
|
|
|
|
|
Digital audio |
|
|
|
Digital audio |
||||
optical cable |
|
|
|
|||||
(not supplied) |
|
|
|
coaxial cable |
||||
|
|
|
|
|
|
|
|
(not supplied) |
|
|
|
|
|
|
|
|
|
|
|
|
|
|
|
|
|
|
18 |
|
|
EN |
|
|
|
|
|
|
|
|
|
|
|
|

■ Audio Output from AUDIO OUTPUT (DIGITAL OPTICAL / COAXIAL) jacks
|
“Digital Output” |
“Bitstream” |
“LPCM” |
||
|
setting → |
||||
|
|
|
|
|
|
|
|
|
|
|
|
|
“BD Audio Mode” |
“HD Audio Output” |
“Mix Audio Output” |
“HD Audio Output” |
“Mix Audio Output” |
|
setting → |
||||
|
|
|
|
|
|
Media |
Audio Source |
Which audio format can be output depends on the compatibility of the connected |
|||
↓ |
↓ |
device. |
|
|
|
|
Dolby Digital |
Dolby Digital |
DownMix 2ch LPCM |
|
|
|
|
|
|
|
|
|
Dolby Digital Plus |
Dolby Digital |
DownMix 2ch LPCM*1 |
DownMix 2ch LPCM*2 |
|
BD-video |
Dolby TrueHD |
Dolby Digital |
DownMix 2ch LPCM*3 |
DownMix 2ch LPCM*4 |
|
DTS® |
DTS® |
DownMix 2ch LPCM |
|
||
|
|
||||
|
DTS-HD® |
DTS® |
DownMix 2ch LPCM*1 |
DownMix 2ch LPCM*5 |
|
|
LPCM |
DownMix 2ch LPCM |
DownMix 2ch LPCM |
|
|
|
|
|
|
|
|
|
Dolby Digital |
Dolby Digital |
DownMix 2ch LPCM |
|
|
|
|
|
|
|
|
DVD-video |
DTS® |
DTS® |
DownMix 2ch LPCM |
|
|
|
LPCM |
2ch LPCM |
2ch LPCM |
|
|
|
|
|
|
|
|
DTS-CD |
DTS® |
DTS® |
DownMix 2ch LPCM |
|
|
AVCHD |
Dolby Digital |
Dolby Digital |
DownMix 2ch LPCM |
|
|
|
|
|
|
|
|
LPCM |
DownMix 2ch LPCM |
DownMix 2ch LPCM |
|
||
|
|
||||
Audio CD |
LPCM |
2ch LPCM |
2ch LPCM |
|
|
|
|
|
|
|
|
MP3 |
MP3 |
2ch LPCM |
2ch LPCM |
|
|
|
|
|
|
|
|
Windows Media™ Audio |
WMA |
2ch LPCM |
2ch LPCM |
|
|
|
|
|
|
|
|
|
Dolby Digital |
Dolby Digital |
DownMix 2ch LPCM |
|
|
|
|
|
|
|
|
DLNA Video |
MP2 |
2ch LPCM |
2ch LPCM |
|
|
|
|
|
|
|
|
|
LPCM |
DownMix 2ch LPCM |
DownMix 2ch LPCM |
|
|
|
|
|
|
|
|
DLNA Music |
MP3 / WMA / LPCM |
2ch LPCM |
2ch LPCM |
|
|
|
|
|
|
|
|
*1) Fully decoded.
*2) Only the independent substream is decoded.
*3) Dolby TrueHD stream is decoded.
*4) Only the Dolby Digital substream is decoded.
*5) Only the core substream is decoded.
DNote
•When playing back a BD-video which only contains the primary audio, the audio output will be the same case as “HD Audio Output” even if “BD Audio Mode” is set to “Mix Audio Output”.
EN |
19 |
||
|
|
|
|
|
|
|
|
|
|
|
|
■ Audio Output from HDMI OUT jack
|
“Audio Output” |
“Bitstream” |
“LPCM” |
“Off” |
||
|
setting → |
|||||
|
|
|
|
|
|
|
|
|
|
|
|
|
|
|
“BD Audio Mode” |
“HD Audio Output” |
“Mix Audio Output” |
“HD Audio Output” |
“Mix Audio Output” |
Regardless |
|
setting → |
|
|
|
|
|
Media |
Audio Source |
Which audio format can be output depends on the compatibility of the connected |
||||
↓ |
↓ |
device. |
|
|
|
|
|
Dolby Digital |
Dolby Digital |
|
Multi LPCM |
|
Mute |
|
Dolby Digital Plus |
Dolby Digital Plus |
Dolby Digital |
Multi LPCM*1 |
Multi LPCM*2 |
Mute |
BD-video |
Dolby TrueHD |
Dolby TrueHD |
Dolby Digital |
Multi LPCM*3 |
Multi LPCM*4 |
Mute |
DTS® |
DTS® |
|
Multi LPCM |
|
Mute |
|
|
|
|
||||
|
DTS-HD® |
DTS-HD® |
DTS® |
Multi LPCM*1 |
Multi LPCM*5 |
Mute |
|
LPCM |
Multi LPCM |
|
Multi LPCM |
|
Mute |
|
|
|
|
|
|
|
|
Dolby Digital |
Dolby Digital |
|
Multi LPCM |
|
Mute |
|
|
|
|
|
|
|
DVD-video |
DTS® |
DTS® |
|
Multi LPCM |
|
Mute |
|
LPCM |
2ch LPCM |
|
2ch LPCM |
|
Mute |
|
|
|
|
|
|
|
DTS-CD |
DTS® |
DTS® |
|
Multi LPCM |
|
Mute |
AVCHD |
Dolby Digital |
Dolby Digital |
|
Multi LPCM |
|
Mute |
|
|
|
|
|
|
|
LPCM |
Multi LPCM |
|
Multi LPCM |
|
Mute |
|
|
|
|
||||
|
|
|
|
|
|
|
Audio CD |
LPCM |
2ch LPCM |
|
2ch LPCM |
|
Mute |
MP3 |
MP3 |
2ch LPCM |
|
2ch LPCM |
|
Mute |
|
|
|
|
|
|
|
Windows Media™ Audio |
WMA |
2ch LPCM |
|
2ch LPCM |
|
Mute |
|
|
|
|
|
|
|
|
Dolby Digital |
Dolby Digital |
|
Multi LPCM |
|
Mute |
|
|
|
|
|
|
|
DLNA Video |
MP2 |
2ch LPCM |
|
2ch LPCM |
|
Mute |
|
|
|
|
|
|
|
|
LPCM |
Multi LPCM |
|
Multi LPCM |
|
Mute |
|
|
|
|
|
|
|
DLNA Music |
MP3 / WMA / LPCM |
2ch LPCM |
|
2ch LPCM |
|
Mute |
|
|
|
|
|
|
|
*1) Fully decoded.
*2) Only the independent substream is decoded.
*3) Dolby TrueHD stream is decoded.
*4) Only the Dolby Digital substream is decoded.
*5) Only the core substream is decoded.
DNote
•If the connected device is not compatible with the HDMI BITSTREAM, audio will be output as multi LPCM or 2-channel down-mixed LPCM depending on the capability of the connected device even if you select “Bitstream” in “Audio Output” setting.
•When playing back a BD-video which only contains the primary audio, the audio output will be the same case as “HD Audio Output” even if the “BD Audio Mode” is set to “Mix Audio Output”.
20 |
|
|
EN |
|
|
|
|
|
|
|
|
|
|
|
|
 Loading...