


THP 641 W/IX/I EE
 English
Operating Instructions
HOB
Contents
Operating Instructions,1 Warnings,3 Assistance,7
Description of the appliance,8 Installation,10
Start-up and use,12 Precautions and tips,12 Maintenance and care,13 Troubleshooting,13
 Eesti keeles
Kasutusjuhend
KEEDUPLAAT
Sisukord
Kasutusjuhend,1
Hoiatused,3
Klienditugi,7 Seadme kirjeldus,8 Paigaldamine,14
Käitamine ja kasutamine,17 Ettevaatusabinõud ja soovitused,17 Hooldus,18
Veaotsing,18
 Lietuvių k.
Naudojimo instrukcijos
HOB
Turinys
Naudojimo instrukcijos,1
Įspėjimai,4
Pagalba,7
Prietaiso aprašymas,8 Montavimas,19
Įjungimas ir naudojimas,22 Atsargumo priemonės ir patarimai,22 Techninė priežiūra,23
Gedimų šalinimas,23
 Latviešu valoda
Lietošanas instrukcija
PLĪTS VIRSMA
Cuprins
Lietošanas instrukcija,1
Brīdinājumi,4
Palīdzība,7 Ierīces apraksts,8 Ierīkošana,24
Ieslēgšana un lietošana,27 Piesardzības pasākumi un ieteikumi,27 Tehniskā apkope un kopšana,28 Traucējumu novēršana,28
 Česky
Česky
Pokyny pro použití
VARNÁ DESKA
Obsah
Pokyny pro použití,1 Upozornění,5 Servisní služba,7 Popis zařízení,9
Instalace,29
Uvedení do činnosti a použití,32 Opatření a rady,32
Údržba a péče,33
Identifikace a řešení problémů,33

 Slovensky
Návod na použitie
VARNÁ DOSKA
Obsah
Návod na použitie,2 Upozornenia,5 Servisná služba,7 Popis zariadenia,9
Inštalácia,34
Uvedenie do činnosti a použitie,37
Opatrenia a rady,37
Údržba a starostlivosť,38 Identifikácia a riešenie problémov,38
 Română
Instrucţiuni de utilizare
PLITA
Sumar
Instrucţiuni de utilizare,2 Avertizări,6
Asistenţă ,7
Descrierea aparatului,9 Instalarea,39
Pornirea şi folosirea,42
Precauţii şi sfaturi,42 Întreţinere,43 Anomalii şi remedii,43
 Українська
Інструкція по використанню
ВАРИЛЬНА ПОВЕРХНЯ
Зміст
Інструкція по використанню,2 Запобіжні заходи,6 Допомога,7 Опис приладу,9 Установка,44
Ввімкнення і використання,47 Запобіжні заходи та поради,47 Обслуговування та догляд,48 Усунення несправностей,48
Warnings
WARNING: The appliance and its accessible parts become hot during use. Care should be taken to avoidtouchingheatingelements.Childrenlessthan8 years of age shall be kept away unless continuously supervised. This appliance can be used by children aged from 8 years and above and persons with reduced physical, sensory or mental capabilities or lack of experience and knowledge if they have been given supervision or instruction concerning use of the applianceinasafewayandunderstandthehazards involved. Children shall not play with the appliance. Cleaning and user maintenance shall not be made by children without supervision.
WARNING: Unattended cooking on a hob with fat or oilcanbedangerousandmayresultinfire.NEVER try to extinguish a fire with water, but switch off the appliance and then cover flame e.g. with a lid or a fire blanket.
WARNING:Dangeroffire:donotstoreitemsonthe cooking surfaces.
Never use steam cleaners or pressure cleaners on the appliance.
Remove any liquid from the lid before opening it. Do not close the glass cover (if present) when the gas burners or electric hotplates are still hot.
The appliance is not intended to be operated by means of an external timer or separate remote control system.
CAUTION: the use of inappropriate hob guards can cause accidents.
Hoiatused
HOIATUS: sisselülitatud seade ja selle juurdepääsetavad osad muutuvad kasutamise ajal kuumaks. Olge ettevaatlik ja vältige kontakti kütteelementidega. Alla 8-aastased lapsed tuleb hoida seadmest eemal, v.a. juhul, kui neile on tagatud pidev järelevalve. Vanemad kui 8-aastased lapsed ja isikud, kellel on vähenenud füüsilised või vaimsed võimed või vähesed kogemused ja oskused, võivad seda seadet kasutada juhul, kui on tagatud nende järelevalve ning neile on antud juhised seadme ohutuks kasutamiseks ja nad mõistavad seadme kasutamisest tulenevaid ohte. Lapsed ei tohi seadmega mängida. Lapsed võivad seadet puhastada ja hooldada ainult järelevalve all.
HOIATUS: rasvas või õlis küpseva toidu jätmine keeduplaadile järelevalveta on ohtlik ja võib põhjustada tulekahju. Tulekahju kustutamiseks ÄRGE kasutage vett, vaid lülitage seade välja ja seejärel katke leek näiteks kaane või tuletekiga.
HOIATUS: Tuleoht: ärge hoidke keeduplaatidel mingeid esemeid.
Ärge kasutage seadme puhastamiseks auruega survepuhastusseadmeid.
Enne kaane avamist eemaldage sellele kogunenud vedelik. Ärge sulgege klaaskaant (kui on olemas), kui gaasipõletid või elektrilised keeduplaadid on veel kuumad.
Seade ei ole mõeldud kasutamiseks koos välise taimeri ega eraldiseisva kaugjuhtimissüsteemiga.
TÄHELEPANU: valede keeduplaadipiirete kasutamine võib põhjustada õnnetusi.
3

|
|
|
|
|
|
|
|
|
|
|
|
Įspėjimai |
Brīdinājumi |
||
ĮSPĖJIMAS! Prietaisas ir jo pasiekiamos dalys naudojant įkaista. Būkite atsargūs, neprisilieskite prie įkaitusių prietaiso dalių. Jaunesni nei 8 metų vaikai gali būti prileidžiami prie prietaiso tik jei juos prižiūri suaugusieji. Vyresni nei 8 metų vaikai ir asmenys, turintys fizinių, jutimo ar psichinių sutrikimų arba nepakankamai žinių ar patirties, šiuo prietaisu gali naudotis tik tuomet, jei jie prižiūrimi arba instruktuojami, kaip saugiai naudoti prietaisą, ir supranta kylančias grėsmes. Vaikams turi būti draudžiamažaistisuprietaisu.Neprižiūrimivaikaitaip patnegalivalytiprietaisoaratliktijopriežiūrosdarbų.
ĮSPĖJIMAS! Ant įjungtos viryklės palikti indai su riebalais ar aliejumi gali sukelti gaisrą. NIEKADA nebandykite liepsnos gesinti vandeniu – išjunkite prietaisą ir kuo nors uždenkite liepsną, pavyzdžiui, dangčiu arba priešgaisriniu apklotu.
ĮSPĖJIMAS!Gaisropavojus–antviryklėsnelaikykite jokių daiktų.
Niekuometnevalykiteprietaisogariniaisarslėginiais valikliais.
Priešatidarydamigaubtąnuojonuvalykiteskysčius. Neuždenkite stiklinio dangčio (jei sumontuotas), kol neatvėso dujiniai degikliai arba elektrinė kaitlentė.
Prietaisasnevaldomasišoriniulaikmačiuarbaatskira nuotoline valdymo sistema.
ATSARGIAI!Netinkamųviryklėsapsaugųnaudojimas gali sukelti nelaimingą atsitikimą.
BRĪDINĀJUMS! Ierīce un tās atklātās daļas lietošanas laikā stipri sakarst. Nepieskarieties sakarsušajāmierīcesdaļām.Bērni,kuriirjaunākipar astoņiemgadiem,drīkstatrastiesierīcestuvumātikai stingrāpieaugušouzraudzībā.Ierīcidrīkstlietotbērni, kuriirsasniegušiastoņugaduvecumu,betpersonas ar ierobežotām fiziskajām, maņu vai garīgajām spējām un personas, kurām nav ierīces lietošanas pieredzes vai nepieciešamo zināšanu, - tikai tad, ja tās tiek uzraudzītas vai ir atbilstoši informētas par ierīces drošu lietošanu un iespējamajiem riskiem. Bērni nedrīkst rotaļāties ar ierīci. Bērni nedrīkst bez uzraudzības tīrīt ierīci un veikt tās apkopi.
BRĪDINĀJUMS! Atstājot uz ieslēgtas plīts virsmas pannu ar taukiem vai eļļu, varat radīt ugunsgrēka risku.NEKĀDĀGADĪJUMĀnemēģinietdzēstuguni ar ūdeni, bet izslēdziet plīti un nosedziet liesmu ar vāku vai nedegošu pārsegu.
BRĪDINĀJUMS! Aizdegšanās risks: neglabājiet priekšmetus uz plīts virsmas.
Ierīci nedrīkst tīrīt ar tvaika vai augstspiediena tīrītājiem.
Pirms pārsega atvēršanas notīriet no tā visu šķidrumu.Jagāzesdegļivaielektriskāssildvirsmas joprojāmirkarstas,stiklapārsegu(jatādsir)nedrīkst aizvērt.
Iekārtunavparedzētslietotkopāarārējotaimerivai atsevišķu tālvadības ierīci.
UZMANĪBU! Neatbilstošu plīts virsmas aizsargu lietošana var izraisīt nelaimes gadījumus.
4

Upozornění
UPOZORNĚNÍ:Totozařízeníajehopřístupnéčásti dosahují během použití velmi vysoké teploty. Je třebadávatpozorazabránitstykustopnýmičlánky. Udržujte děti mladší 8 let vdostatečné vzdálenosti, pokudnejsoupodneustálýmdohledem.Totozařízení mohou používat děti od 8 let a osoby se sníženými fyzickými,senzorickýmineboduševnímischopnostmi nebo osoby bez zkušeností a znalostí, které se nacházejí pod náležitým dohledem nebo které byly poučeny ohledně použití zařízení bezpečným způsobemakterésiuvědomujísouvisejícínebezpečí. Dětisinesmíhrátsezařízením.Dětinesmíprovádět operace čištění a údržby bez dohledu.
UPOZORNĚNÍ: Ponechání sporáku s ohřívanými tuky a oleji může být nebezpe-čné a může způsobit požár.NIKDY není třeba hasit plamen/požár vodou, ale je nutné vypnout zařízení a zakrýt plamen například víkem nebo hydrofobní dekou.
VAROVÁNÍ: Nebezpečí požáru, nenechávejte nic na vaření.
Nikdy nepoužívejte k čištění zařízení vyso-kotlaký parní čistič.
Před otevřením krytu setřete případné kapaliny, které se na něm nacházejí. Neza-vírejte skleněný kryt (je-li součástí) sještě teplými plynovými hořáky nebo elektrickou plotnou.
Přístroj není určen k uvedení do provozu pomocí externího časovače nebo samostatného systému dálkového ovládání.
UPOZORNNÍ: Použití nevhodných ochran varné desky može zposobit nehody.
Upozornenia
VÝSTRAHA: Zariadenie a jeho prístupné časti sa môžu počas použitia ohriať. Dávajte pozor, aby ste sa nedotkli horúcich častí. Deti mladšie ako 8 rokov musia byť udržiavané v bezpečnej vzdialenosti, alebo musia byť nepretržite pod dohľadom. Toto zariadenie môžu používať deti nad 8 rokov a osoby s obmedzenými fyzickými, zmyslovými alebo duševnými schopnosťami, alebo s nedostatočnými skúsenosťami, len ak sú pod dohľadom, alebo ak bolináležitepoučenéohľadnebezpečnéhopoužitia zariadenia a ak pochopili možné nebezpečenstvá. Deti sa nesmú so zariadením hrať. Čistenie a údržbu zverenú užívateľovi nesmú vykonávať deti bez dohľadu.
VÝSTRAHA:Nepozornosťprivarenínavarnejdoske s tukomaleboolejommôžebyťnebezpečnáamôže spôsobiť požiar. NIKDY sa nepokúšajte hasiť oheň vodou, ale vypnite zariadenie a prikryte plamene, napr. vekom alebo hasiacou utierkou.
VÝSTRAHA:Nebezpečenstvopožiaru!Nenechávajte predmety na varných povrchoch.
VÝSTRAHA:Keďjesklokeramickýpovrchprasknutý, vypnitezariadenie,abynedošlokzásahuelektrickým prúdom.
Nikdy nepoužívajte na čistenie zariadenia parný alebo vysokotlakový čistič.
Pred otvorením veka z neho odstráňte všetky tekutiny.Nezatvárajtesklenenýkryt(akjesúčasťou), keď sú horáky alebo elektrické platne ešte teplé.
Zariadenieniejevhodnénaovládanieprostredníctvom externýchčasovačovalebosamostatnéhosystému diaľkového riadenia.
UPOZORNENIE: použitie nevhodných ochranných krytov varnej dosky môže spôsobiť nehodu.
5

|
|
|
|
|
|
|
|
|
|
|
|
Avertizări |
Запобіжні заходи |
||
ATENŢIE:Acestaparatşipărţilesaleaccesibiledevin foarte calde în timpul folosirii.Trebuie să fiţi atenţi şi să nu atingeţi elementele de încălzire. Îndepărtaţi copiiisub8anidacănusuntsupravegheaţicontinuu. Acest aparat poate fi utilizat de copiii de peste 8 ani şi de persoane cu capacităţi fizice, senzoriale sau mentale reduse sau fără experienţă şi cunoştinţe dacă se află sub o supraveghere corespunzătoare sau dacă au fost instruiţi cu privire la folosirea aparatului în mod sigur şi dacă îşi dau seama de pericolele corelate. Copiii nu trebuie să se joace cu aparatul.Operaţiuniledecurăţareşideîntreţinerenu trebuie să fie efectuate de copii fără supraveghere.
ATENŢIE: Lăsarea unui aragaz nesupravegheat cu grăsimişiuleiuripoatefipericuloasăşipoateprovoca un incendiu. Nu trebuie NICIODATĂ să încercaţi să stingeţi o flacără/incendiu cu apă, ci trebuie să stingeţi aparatul şi să acoperiţi flacăra, de exemplu cu un capac sau cu o pătură ignifugă.
ATENŢIE: Risc de incendiu: nu lăsaţi obiecte pe suprafeţele de gătit.
Nu folosiţi niciodată aparate cu aburi sau sub presiune pentru a curăţa aparatul.
Eliminaţieventualelereziduuridelichiddepecapac, înaintedea-ldeschide.Nuînchideţicapaculdinsticlă (dacă este prezent) cu arzătoarele de gaz sau plita electrică încă calde.
Aparatulnutrebuiepusînfuncţiuneprinintermediul unui temporizator extern sau al unui sistem separat de comandă la distanţă.
ATENŢIE:folosireaunorprotecţiinecorespunzătoare ale plitei poate provoca accidente.
УВАГА: Під час роботи цей прилад, а також його доступні частини нагріваються до високих температур. Слід бути особливо обережними, щоб не торкатися нагрівальних елементів. Діти вікомдо8роківмаютьзнаходитисянанебезпечній відстанівідприладу,якщонеможливозабезпечити постійний контроль над ними. Дозволяється користування цим приладом дітьми віком від 8 років,атакожособамизобмеженимифізичними, сенсорнимиаборозумовимиможливостямиабо особами без належного досвіду і знань, якщо вони перебувають під постійним контролем або проінструктовані щодо правил з небезпечного користування приладу і усвідомлюють ступені ризику.Недозволяйтедітямгратисязприладом. Операції з очищення і догляду не повинні виконуватися дітьми без належного контролю.
УВАГА:Небезпечнозалишатибезнаглядуплити з жиром або олією, тому що це може призвести допожежі.НІВЯКОМУРАЗІ несліднамагатися погасити полум’я/пожежу водою. Необхідно вимкнути прилад і накрити полум’я, наприклад, кришкою або вогнетривким покривалом.
УВАГА: Небезпека пожежі: не залишайте речі на варильних поверхнях.
Забороняється використання апаратів для очищення парою або високим тиском.
Витрітьнасуховсінаявнінакришцірідини,перш ніж відкрити її. Не закривайте скляну кришку (якщо вона наявна), якщо газові пальники або електричні конфорки залишаються нагрітими.
Непередбаченоувімкненняприладузадопомогою зовнішнього таймеру або окремої системи дистанційного керування.
УВАГА: використання невідповідних захисних пристроївварильноїповерхніможепризвестидо нещасних випадків.
6

Assistance
Communicating:
•Type of trouble
•Appliance model (Mod.)
•Serial number (S/N)
This information is found on the data plate located on the appliance and/or on the packaging.
Servisná služba
Keď sa obrátite na servisnú službu, oznámte:
•typ poruchy,
•model zariadenia (Mod.),
•výrobné číslo (S/N).
Tieto informácie sa nachádzajú na identifikačnom štítku, umiestnenom na zariadení a/alebo na obale.
Klienditugi
Hoidke käepärast järgmised andmed:
•tüüpi anomaalia
•seadme mudel (Mod.)
•seerianumber (S/N)
Need andmed leiate seadme andmeplaadilt ja/või pakendilt.
Pagalba
Informacija:
•tipas anomalija
•prietaiso modelis (Mod.)
•Serijos numeris (S/N)
Šią informaciją rasite duomenų plokštelėje, kuri yra ant prietaiso ir (arba) pakuotės.
Asistenţă
Comunicaţi:
•tipul de anomalie;
•modelul maşinii (Mod.);
•numărul de serie (S/N).
Acesteinformaţiise găsescpeplăcuţa decaracteristicidinfrigider,înpartea de jos, în stânga.
Допомога
Повідомити:
•тип несправності;
•модель приладу (Mod.)
•cерійний номер (S/N)
Ці дані знаходяться на табличці з даними на самому приладі.
Palīdzība
Paziņojums:
•tipa anomālija
•ierīces modelis (Mod.)
•sērijas numurs (S/N)
Šīinformācijairnorādītauztehniskodatuplāksnītes,kaspiestiprinātaierīcei un/vai tās iepakojumam.
Servisní služba
Když se obrátíte na servisní službu, oznamte:
•typ poruchy,
•model zařízení (Mod.),
•výrobní číslo (S/N).
Tytoinformacesenacházejínaidentifikačnímštítku,umístěnémnazařízení, a/nebo na obalu.
7

|
|
|
|
|
|
|
|
|
|
|
|
|
|
|
|
|
|
|
|
|
Description of the appliance |
Prietaiso aprašymas |
|||||
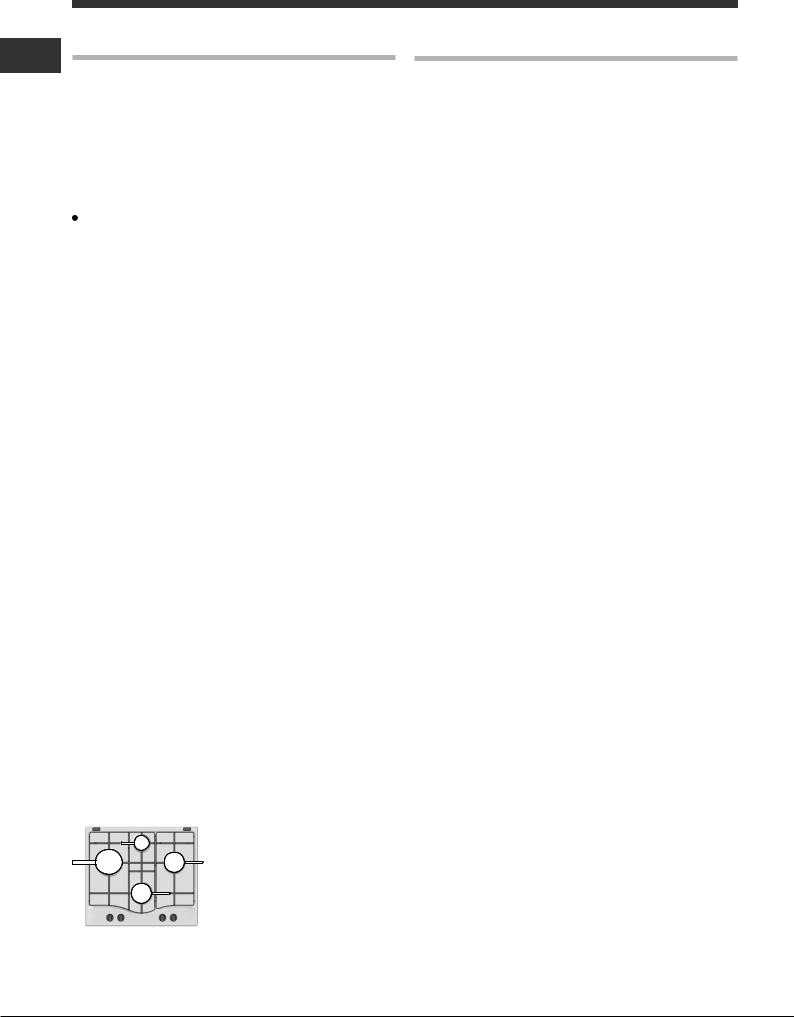
Overall view |
Bendras vaizdas |
|||||
1. |
Support Grid for COOKWARE |
1. |
GAMINIMO INDOlaikančiosios grotelės |
|||
2. |
GAS BURNERS |
2. |
DUJŲ DEGIKLIAI |
|||
3. |
Control Knobs for GAS BURNERS |
3. |
DUJINIŲ DEGIKLIŲvaldymo rankenėlės |
|||
4. |
Ignition for GAS BURNERS |
4. |
DUJINIŲ DEGIKLIŲuždegimo funkcija |
|||
5. |
SAFETYDEVICES |
5. |
SAUGOS ĮTAISAI |
|||
• |
GASBURNERSdifferinsizeandpower.Usethediameterofthecookware |
• DUJINIAI DEGIKLIAI skiriasi dydžiu ir galia. Naudokite tokio skersmens |
||||
|
to choose the most appropriate burner to cook with. |
|
gaminimo indus, kurie geriausiai tinka tam tikram degikliui. |
|||
• |
Control Knobs for GAS BURNERSfor flame adjustment. |
• DUJINIŲ DEGIKLIŲvaldymo rankenėlės liepsnai reguliuoti. |
||||
• |
GASBURNERIGNITIONenablesaspecificburnertobelitautomatically. |
• |
DUJINIO DEGIKLIO UŽDEGIMO FUNKCIJA suteikia galimybę |
|||
• |
SAFETY DEVICE stops the gas flow if the flame is accidentally |
|
automatiškai uždegti tam tikrą degiklį. |
|||
|
extinguished. |
• APSAUGINISĮTAISASsustabdodujųsrautą,jeiliepsnanetyčiaužgęsta. |
||||
|
|
|
|
|
|
|
|
|
|
|
|
|
|
Seadme kirjeldus |
Ierīces apraksts |
||
Ülevaade |
Vispārīga informācija |
||
1. |
Rest KEEDUNÕU JAOKS |
1. |
GATAVOŠANAS TRAUKUbalsta režģis |
2. |
GAASIPÕLETID |
2. |
GĀZES DEGĻI |
3. |
GAASIPÕLETITE REGULEERIMISE NUPUD |
3. |
GĀZES DEGĻUvadības slēdži |
4. |
GAASIPÕLETITE SÜÜTENUPP |
4. |
AizdedzesGĀZES DEGĻIEM |
5. |
OHUTUSSEADISED |
5. |
DROŠĪBAS IERĪCES |
• GAASIPÕLETIDonerineva suuruse ja võimsusega.Kasutage põleti jaoks |
• GĀZES DEGĻIEM ir dažādi izmēri un jauda. Gatavojot izvēlieties |
||
|
kõige sobivama läbimõõduga keedunõud. |
|
gatavošanas trauka diametram atbilstošāko degli. |
• GAASIPÕLETITE REGULEERIMISE NUPUDleegi reguleerimiseks. |
• GĀZES DEGĻUvadības slēdži liesmas regulēšanai. |
||
• GAASIPÕLETI SÜÜTENUPP võimaldab vastava põleti automaatselt |
• GĀZES DEGĻAAIZDEDZEļauj automātiski aizdedzināt īpašu degli. |
||
|
süüdata. |
• DROŠĪBASIERĪCEapturgāzesplūsmu,jaliesmatieknejaušinodzēsta. |
|
• OHUTUSSEADISseiskab gaasivoolu, kui leek peaks juhuslikult kustuma. |
|
|
|
1
5
2
4
3
8

|
|
|
|
|
|
|
|
|
|
|
|
|
|
|
|
|
|
|
|
|
|
|
|
Popis zařízení |
Descrierea aparatului |
||||||
Celkový pohled |
Vedere de ansamblu |
||||||
1. |
Opěrná mřížka proHRNCE |
1. |
Grătare de sprijin pentruRECIPIENTELE DE COACERE |
||||
2. |
PLYNOVÉ HOŘÁKY |
2. |
ARZĂTOARE PE GAZ |
||||
3. |
Otočné ovládače proPLYNOVÉ HOŘÁKY |
3. |
Selectoare de comandă aleARZĂTOARELOR PE GAZ |
||||
4. |
Zapalování proPLYNOVÉ HOŘÁKY |
4. |
Dispozitiv de aprindere alARZĂTOARELOR PE GAZ |
||||
5. |
BEZPEČNOSTNÍ PRVKY |
5. |
DISPOZITIV DE SIGURANŢĂ |
||||
• JednotlivéPLYNOVÉHOŘÁKYsevzájemnělišívelikostíavýkonem.Na |
• |
ARZĂTOARELE PE GAZsunt de diferite dimensiunişi puteri.Alegeţi-le |
|||||
|
základě průměru použitých hrnců zvolte nejvhodnější hořák pro vaření v |
|
|
pe cele adecvate diametruluirecipientului utilizat. |
|||
|
těchto hrncích. |
• |
SelectoareledecomandăaleARZĂTOARELORPEGAZşisuntfolosite |
||||
• Otočné ovladače pro PLYNOVÉ HOŘÁKY slouží k nastavení velikosti |
|
|
pentrureglarea flăcării. |
||||
|
plamene. |
• |
DispozitivuldeaprinderealARZĂTOARELORPEGAZpermiteaprinderea |
||||
• ZAPÁLENÍPLYNOVÉHOHOŘÁKUaktivujespecifickýhořákzaúčelem |
|
|
automată a arzătoaruluiprestabilit. |
||||
|
jeho automatického zapálení. |
• |
DISPOZITIVULDESIGURANŢĂesteutilizatîncazulstingeriiaccidentale |
||||
• BEZPEČNOSTNÍ PRVEK slouží k zastavení průtoku plynu v případě |
|
|
a flăcării, împiedicândscurgerile de gaz. |
||||
|
náhodného zhašení plamene. |
|
|
|
|
|
|
|
|
|
|
|
|
|
|
Popis zariadenia
Celkový pohľad
1.Oporná mriežka preHRNCE
2.PLYNOVÉ HORÁKY
3.Otočné ovládače prePLYNOVÉ HORÁKY
4.Zapaľovanie prePLYNOVÉ HORÁKY
5.BEZPEČNOSTNÉ PRVKY
•JednotlivéPLYNOVÉHORÁKYsanavzájomlíšiaveľkosťouavýkonom. Na základe priemeru použitých hrncov zvoľte najvhodnejší horák pre varenie v týchto hrncoch.
•OtočnéovládačeprePLYNOVÉHORÁKY slúžiananastavenieveľkosti plameňa.
•ZAPAĽOVAČ PLYNOVÉHO HORÁKA umožňuje automaticky zapáliť daný horák.
•BEZPEČNOSTNÝ PRVOKslúži na zastavenie prietoku plynu v prípade náhodného zhasnutia plameňa.
Опис приладу
Загальний вигляд
1.Підтримуюча Решітка дляПОСУДУ
2.ГАЗОВІ ПАЛЬНИКИ
3.Ручки управлінняГАЗОВИХ ПАЛЬНИКІВ
4.Запалювання дляГАЗОВИХ ПАЛЬНИКІВ
5.ПРИСТРОЇ БЕЗПЕКИ
•ГАЗОВІ ПАЛЬНИКИ відрізняються за розмірами тапотужністю. Використовуйтедляприготуванняїжіпосудздіаметромувідповідності до розміру найбільшпідходящого пальника.
•ГАЗОВИMИПАЛЬНИКAMИполум’я
•ЗапалюваннядляГАЗОВИХПАЛЬНИКІВ дозволяють,привключенні, запалювати конкретні пальники автоматично.
•ПРИСТРІЙ БЕЗПЕКИ зупиняє потік газу, якщо полум’явипадково гасне.
1
5
2
4
3
9

GB Installation
!Before operating your new appliance please read this instruction booklet carefully. It contains important information for safe use, installation and care of the appliance.
!Please keep these operating instructions for future reference. Pass them on to possible new owners of the appliance.
!After unpacking the hob, make sure that it has not been damaged during transport. In the event of problems, contact the dealer or your nearest Aftersales Service.
!Keep packaging material out of the reach of children . Disposed it according to the rules for separate waste collection (see Precautions and tips).
!Theappliancemustbeinstalledbyaqualifiedprofessionalaccordingtothe instructions provided. Incorrect installation may cause harm to people and animals or may damage property.
!The appliance must be disconnected from the power supply before carrying out any installation work.
!These instructions are only valid for the countries whose symbols is given on the data plate (under the hob).
• Before installation, make sure that:
-The local gas delivery conditions (nature and pressure) are compatible with the settings of the hob (see the rating plate and injector table).
-The outer surfaces of the furniture or appliances adjacent to the hob are heat resistant according to local regulations.
-This appliance is not connected to a fume exhaust device. It shall be installed in accordance with current installation regulations. Particular attention shall be given to the relevant requirements regarding ventilation.
-Combustionproductsaredischargedoutdoorsthroughspecifichoodsor wall and/or window mounted electrical fans.
•Intensive and prolonged use of the appliance may necessitate supplemental ventilation, e.g. opening a window or increasing the power of the air intake system (if present).
Fitting the appliance
The following precautions must be taken when installing the hob:
|
A |
|
750mm |
B |
B |
|
50mm |
100mm |
|
NOTE: Ifthedistance“A”betweenthewallcabinetsisbetween600mmand 730 mm, the height “B” must be a minimum of 530 mm. If the distance “A” between the wall cabinets is greater than the width of the hob, the height “B” must be a minimum of 400 mm.
In case of installation of a hood above the hob, please refer to the hood instructions fot the correct distance.
•This product can be embedded in a worktop 20 to 50 mm thick.
•Ifthereisnoovenbeneaththehob,insertaseparatorpanelthathasa surfaceatleastequaltotheopeningintheworksurface.Thispanel, that has to close completely the cutout in order to avoid any contact with the bottom part of the hob, must be positioned at a maximum distance of 150 mm below the upper surface of the work surface but, in no case less than 20 mm from the bottom of the hob. In the case that you intend to install an oven beneath the hob, make sure that it is manufactured by Whirlpool and equipped with a cooling system.Themanufacturerdeclinesallliabilityifanotherbrandoven is installed beneath the hob.
•After having cleaned the perimeter surface, apply the supplied gasket to the hob as shown in the figure.
Position the hob in the worktop opening made respecting the dimensions indicated in the Instruction.
NOTE:the powersupplycablemustbelong enoughtopermititsupward extraction.
To securethehob, use the brackets(A)provided withit.Fitthe brackets into the relevant bores shown by the arrow and fasten them by means of their screws in accordance with the thickness of the worktop (see the following figures).
Top 20 mm |
Top 30-50 mm |
Electrical connection
! This operation must be performed by a qualified technician.
Hobs equipped with a three-pole power supply cable are designed to operate with alternating current at the voltage and frequency indicated on the data plate (this is located on the lower part of the appliance).
The earth wire in the cable has a green and yellow cover. If the appliance is to be installed above a built-in electric oven, the electrical connection of the hob and the oven must be carried out separately, both for electrical safety
purposes and to make extracting the oven easier.
Connecting the supply cable to the mains
Install a standardised plug corresponding to the load indicated on the data plate.
The appliance must be directly connected to the mains using an omnipolar circuit-breaker with a minimum contact opening of 3 mm installed between the appliance and the mains.
The circuit-breaker must be suitable for the charge indicated and must comply with current electrical regulations (the earthing wire must not be interrupted by the circuit-breaker). The supply cable must not come into contact with surfaces with temperatures higher than 50°C.
10
! The installer must ensure that the correct electrical connection has been made and that it is compliant with safety regulations.
Before connecting to the power supply, make sure that:
•the appliance is earthed and the plug is compliant with the law.
•the socket can withstand the maximum power of the appliance, which is indicated on the data plate.
•the voltage is in the range between the values indicated on the data plate.
•the socket is compatible with the plug of the appliance. If the socket is incompatible with the plug, ask an authorised technician to replace it. Do not use extension cords or multiple sockets.
!Once the appliance has been installed, the power supply cable and the electrical socket must be easily accessible.
!The cable must not be bent or compressed.
!The cable must be checked regularly and replaced by authorised technicians only (see Assistance).
!The manufacturer declines any liability should these safety measures not be observed.
Gas connection
! This operation must be performed by a qualified technician.
The appliance should be connected to the main gas supply or to a gas cylinder in compliance with current national regulations. Before carrying out the connection, make sure the cooker is compatible with the gas supply you wish to use. If this is not the case, follow the instructions indicated in the paragraph “Adapting to different types of gas.”
When using liquid gas from a cylinder, install a pressure regulator which complies with current national regulations.
! Check that the pressure of the gas supply is consistent with the values indicatedinTable1(“Burnerandnozzlespecifications”).Thiswillensurethe safe operation and longevity of your appliance while maintaining efficient energy consumption.
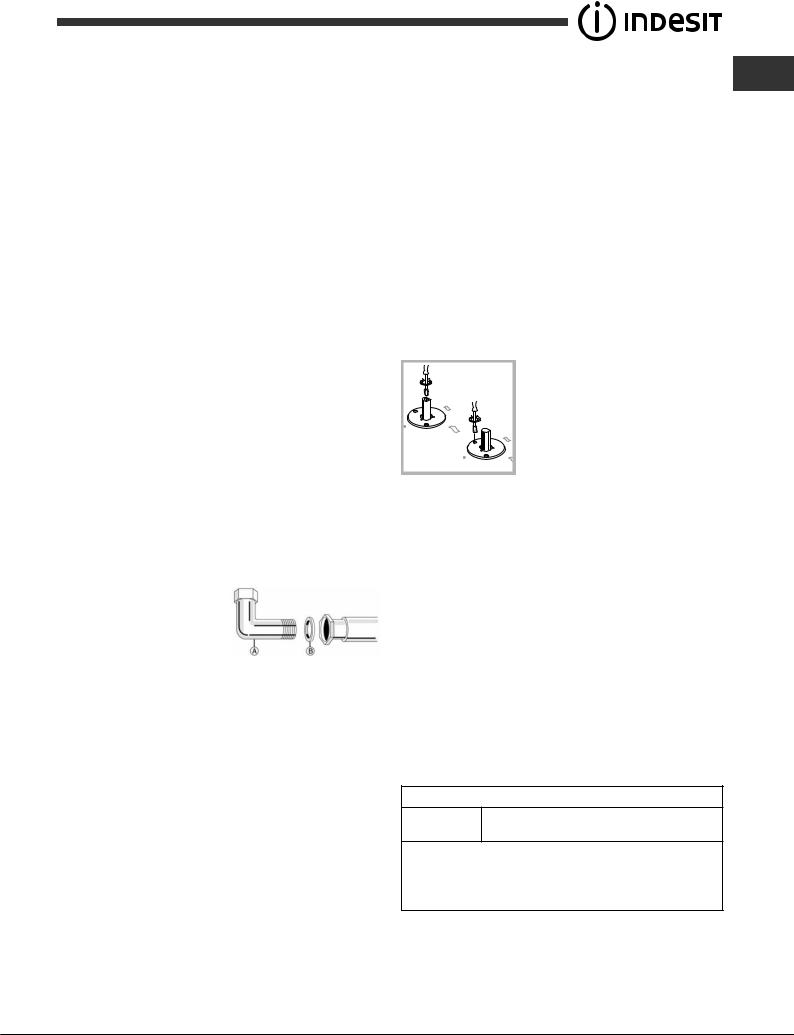
•The connection of the hob to the gas pipe network or gas cylinder must be made by means of a rigid copper or steel pipe with fittings complying with local regulations, or
by means of a continuous-surface stainless steel hose complying with local regulations. Interpose gasket (B) in the elbow connection.The maximum length of the hose is 2 m.
•FOR BELGIUM ONLY: It is necessary to replace the elbow connection (A) on the appliance, with the one supplied (if present).
IMPORTANT:ifastainlesssteelhoseisused,itmustbeinstalledsoas not to touch any mobile part of the furniture. It must pass through an area where there are no obstructions and where it is possible to inspect it on all its length.
•After connection to the gas supply, check for leaks with soapy water. Light up the burners and turn the knobs from max position  to minimum position
  to check flame stability.
Adapting to different types of gas |
GB |
! This operation must be performed by a qualified technician. |
To adapt the hob to a different type of gas other than default type (indicated on the rating plate at the base of the hob or on the packaging), the burner nozzles should be replaced as follows:
1.Remove the hob grids and slide the burners off their seats.
2.Unscrewthenozzlesusingasocketspanneroftheappropriatesize,and replace them with nozzles for the new type of gas (see table 1 “Burner and nozzle characteristics”).
3.Reassemble the parts following the above procedure in the reverse order.
4.Once this procedure is finished, replace the old rating sticker with one indicating the new type of gas used. Sticker are available from any of our Service Centres.
•Adjusting the burners’primary air
Does not require adjusting.
•Setting the burners to minimum
To ensure that the minimum setting is correctly adjusted, remove the knob and proceed as follows:
1. Adjust the adjustment screw, which is positioned in or next to the tap pin, until the
flame is small but steady:
• tighten screw to reduce the flame height;
• loosenscrewtoincreasetheflameheight;
The adjustment must be performed with the tap in minimum gas setting position.
2.Having adjusted the flame to the required low setting, while the burner is alight, quickly change the position of the knob from minimum to maximum and vice versa several times, checking that the flame does not go out.
3.Someapplianceshaveasafetydevice(thermocouple)fitted.Ifthedevice fails to work when the burners are set to the low flame setting, increase this low flame setting using the adjusting screw.
4.Once the adjustment has been made, replace the seals on the by-passes using sealing wax or a similar substance.
!If the appliance is connected to liquid gas, the regulation screw must be fastened as tightly as possible.
!Once this procedure is finished, replace the old rating sticker with one indicating the new type of gas used. Stickers are available from any of our Service Centres.
!Should the gas pressure used be different (or vary slightly) from the recommended pressure, a suitable pressure regulator must be fitted to the inlet pipe (in order to comply with current national regulations).
DATA PLATE
Electrical |
see data plate |
connections |
ECODESIGN
This appliance conforms to the EU Regulation no. 66/2014 implementing Directive 2009/125/EC.
standard EN 30-2-1
Burner and nozzle specification
Refer to the injector table of you Country
11
GB Start-up and use
! The position of the corresponding gas burner is shown on every knob.
Gas burners
Each burner can be adjusted to one of the following settings using the corresponding control knob:
●Off
 Maximum
Minimum
To light one of the burners, hold a lit match or lighter near the burner and, at the same time, press down and turn the corresponding knob anti-clockwise to the maximum setting.
Since the burner is fitted with a safety device, the knob should be pressed for approximately 2-3 seconds to allow the automatic device keeping the flame alight to heat up.
Models are equipped with an ignition button incorporated into the control knob. If this is the case, the ignitor is present, but not the button. To light a burner, simply press the corresponding knob all the way in and then turn it in the counter-clockwise direction to the “High” setting, keeping it pressed in until the burner lights.
! If a flame is accidentally extinguished, turn off the control knob and wait for at least 1 minute before trying to relight it.
To switch off the burner, turn the knob in a clockwise direction until it stops
(when reaches the “●” position).
Practical advice on using the burners
To ensure the burners operate efficiently:
•Use appropriate cookware for each burner (see table) so that the flames do not extend beyond the bottom of the cookware.
•Always use cookware with a flat base and a cover.
•When the contents ofthepanreachboilingpoint, turntheknobto minimum.
Burner |
Ø Cookware diameter (cm) |
|
|
Semi Rapid (S) |
16 - 24 |
|
|
Auxiliary (A) |
8 - 14 |
|
|
Mini Wok (MW) |
24 - 26 |
|
|
To identify the type of burner, refer to the designs in the section entitled, “Burner and Nozzle Specifications”.
•For maximum stability, always make sure that the pan supports are correctly fitted and that each pan is placed centrally over the burner.
•Pan handles should be positioned in line with one of the support bars on the pan support grid.
•Pan handle should be positioned so not to protrude beyond the front edge
of the hob.
The more variable aspect in terms of pan stability can often be the pan itself, (or the positioning of that pan during use).
Well balanced pans, with flat bases that
are placed centrally over the burner, with the pan handles aligned with one of the support fingers obviously offer the
greatest stability.
Precautions and tips
! This appliance has been designed and manufactured in compliance with international safety standards. The following warnings are provided for safety reasons and must be read carefully.
General safety
•This is a class 3 built-in appliance.
•Gas appliances require regular air exchange to maintain efficient operation.Wheninstallingthehob,followtheinstructionsprovided in the paragraph on “Positioning” the appliance.
•These instructions are only valid for the countries whose symbols appear in the manual and on the serial number plate.
•The appliance was designed for domestic use inside the home and is not intended for commercial or industrial use.
•The appliance must not be installed outdoors, even in covered areas. It is extremely dangerous to leave the appliance exposed to rain and storms.
•Do not touch the appliance with bare feet or with wet or damp hands and feet.
•Theappliancemustbeusedbyadultsonlyforthepreparationoffood, inaccordancewiththeinstructionsoutlinedinthisbooklet.Anyother useoftheappliance(e.g.forheatingtheroom)constitutesimproper use and is dangerous. The manufacturer may not be held liable for any damage resulting from improper, incorrect and unreasonable use of the appliance.
•Ensure that the power supply cables of other electrical appliances do not come into contact with the hot parts of the oven.
•The openings used for ventilation and dispersion of heat must never be covered.
•Alwaysmakesuretheknobsareinthe“●”/“○” position when the appliance is not in use.
•Whenunplugging the appliance always pullthe plug fromthe mains socket, do not pull on the cable.
•Nevercarryoutanycleaningormaintenanceworkwithouthavingdetached the plug from the mains.
•Incaseofmalfunction,undernocircumstancesshouldyouattempttorepair the appliance yourself. Repairs carried out by inexperienced persons may cause injury or further malfunctioning of the appliance. Contact a Service Centre (see Assistance).
•Do not close the glass cover (if present) when the gas burners or electric hotplates are still hot.
•The appliance should not be operated by people (including children) with reduced physical, sensory or mental capacities, by inexperienced individuals or by anyone who is not familiar with the product. These individuals should, at the very least, be supervised by someone who assumes responsibility for their safety or receive preliminary instructions relating to the operation of the appliance.
•Do not let children play with the appliance.
•Theapplianceisnotintendedtobeoperatedbymeansofanexternal timer or separate remote-control system.
Disposal
•When disposing of packaging material: observe local legislation so that the packaging may be reused.
•The European Directive 2012/19/EU on Waste Electrical and Electronic
Equipment (WEEE), requires that old household electrical appliances must not be disposed of in the normal unsorted municipal waste stream. Old appliances must be collected separately in order to optimise the recovery and recycling of the materials they contain and reduce the impact on human health and the environment.The crossed out “wheeled bin” symbol on the product reminds you of your obligation, that when you dispose of the appliance it must be separately collected.
12

Consumers should contact their local authority or retailer for information concerning the correct disposal of their old appliance.
Respecting and conserving the environment
•Cookyourfoodinclosedpotsorpanswithwell-fittinglidsanduseaslittle water as possible. Cooking with the lid off will greatly increase energy consumption.
•Use purely flat pots and pans.
•If you are cooking something that takes a long time, it’s worth using a pressure cooker, which is twice as fast and saves a third of the energy.
Maintenance and care
Switching the appliance off
Disconnect your appliance from the electricity supply before carrying out any work on it.
Cleaning the hob surface
•All the enamelled and glass parts should be cleaned with warm water and neutral solution.
•Stainless steel surfaces may be stained by calcareous water or aggressive detergents if left in contact for too long.Any food spills (water, sauce, coffee, etc.) should be wiped away before they dry.
•Clean with warm water and neutral detergent, and then dry with a soft clothorchamois.Removebaked-ondirtwithspecificcleanersforstainless steel surfaces.
•Clean stainless steel only with soft cloth or sponge.
•Do not use abrasive or corrosive products, chlorine-based cleaners or pan scourers.
•Do not use steam cleaning appliances.
•Do not use flammable products.
•Do not leave acid or alkaline substances, such as vinegar, mustard, salt, sugar or lemon juice on the hob.
Cleaning the hob parts
•Clean the enamelled and glass parts only with soft cloth or sponge.
•Grids, burner caps and burners can be removed to be cleaned.
•Clean them by hand with warm water and non-abrasive detergent, removing any food residues and checking that none of the burner openings is clogged.
•Rinse and dry.
•Refit burners and burner caps correctly in the respective housings.
•When replacing the grids, make sure that the panstand area is aligned with the burner.
•Models equipped with electrical ignition plugs and safety device require thorough cleaning of the plug end in order to ensure correct operation. Check these items frequently, and if necessary, clean them with a damp cloth. Any baked-on food should be removed with a toothpick or needle.
! Toavoiddamagingtheelectricignitiondevice,donotuseitwhenthe burners are not in their housing.
Gas tap maintenance
Over time, the taps may become jammed or difficult to turn. If this happens, the tap must be replaced.
!Thisproceduremustbeperformedbyaqualifiedtechnicianauthorised by the manufacturer.
Troubleshooting |
|
|
|
GB |
|||
|
|||
|
|
|
It may happen that the appliance does not function properly or at all. Before calling the service centre for assistance, check if anything can be done. First, check to see that there are no interruptions in the gas and electrical supplies, and, in particular, that the gas valves for the mains are open.
The burner does not light or the flame is not even around the burner.
Check whether:
•The gas holes on the burner are clogged.
•All the movable parts that make up the burner are mounted correctly.
•There are draughts near the appliance.
The flame dies in models with a safety device.
Check to make sure that:
•You pressed the knob all the way in.
•You keep the knob pressed in long enough to activate the safety device.
•The gas holes are not blocked in the area corresponding to the safety device.
The burner does not remain lit when set to minimum.
Check to make sure that:
•The gas holes are not blocked.
•There are no draughts near the appliance.
•The minimum setting has been adjusted properly.
The cookware is unstable.
Check to make sure that:
•The bottom of the cookware is perfectly flat.
•The cookware is positioned correctly at the centre of the burner.
•The pan support grids have been positioned correctly.
13

EEPaigaldamine
!Enne uue seadmega töötamist palun lugege hoolikalt käesolev juhend läbi. See sisaldab olulist teavet selle kohta, kuidas seadet paigaldada, ohutult kasutada ja hooldada.
!Palun hoidke kasutusjuhend alles edaspidi konsulteerimiseks. Omaniku vahetumise korral andke juhend edasi uutele omanikele.
!Pärast pliidiplaadi pakendist väljavõtmist kontrollige, et see ei ole transpordi käigus kannatada saanud. Probleemide korral võtke ühendust edasimüüja või lähima klienditeenindusega.
!Hoidke pakkematerjal lastele kättesaamatus kohas. Kõrvaldage pakkematerjal prügisorteerimise eeskirjade kohaselt (vt Ettevaatusabinõud ja nõuanded).
!Seade tuleb lasta paigaldada vajaliku väljaõppega spetsialistil kaasapandud juhendi järgi. Ebaõige paigaldusega võivad kaasneda vigastused inimestele ja loomadele või varalised kahjustused.
!Enne igasuguseid paigaldustöid tuleb seade vooluvõrgust lahti ühendada.
!Need juhised on kehtivad ainult riikides, mille sümbolid on esitatud andmeplaadil (pliidiplaadi all).
• Enne paigaldamist veenduge, et:
-Kohalikud gaasitarnetingimused (gaasi liik ja rõhk) on pliidiplaadi seadistustega kokkusobivad (vt tehniliste andmete plaat ja pihustitabel).
-Seadme kõrval asuva mööbli või teiste seadmete välispinnad on kuumuskindlad vastavalt kohalikele eeskirjadele.
-Kuna see seade ei ole ühendatud suitsu väljalaskeseadmega, tuleb see paigaldada vastavalt kehtivatele paigalduseeskirjadele. Erilist tähelepanu tuleb pöörata asjaomastele ventilatsiooninõuetele.
-Põlemissaadused väljutatakse ruumist spetsiaalsete tõmbekappide või seinale ja/või aknale paigaldatud elektriventilaatorite abil.
•Seadme intensiivse ja pikaajalise kasutamise korral võib vajalik olla täiendav ventilatsioon, näiteks avada aken või tagada tõhusam ventilatsioon, reguleerides juba olemasoleva sundventilatsiooni suurema võimsuse peale.
Seadme paigutamine
Keeduplaadi paigaldamisel tuleb järgida allpool toodud ohutusnõudeid:
|
A |
|
750mm |
B |
B |
|
50mm |
100mm |
|
MÄRKUS: Kui vahekaugus “A” seinakappide vahel on 600–730 mm, peab kõrgus“B”olemavähemalt530mm.Kuivahekaugus“A”seinakappidevahel on suurem kui pliidiplaadi laius, peab kõrgus “B” olema vähemalt 400 mm.
Pliidiplaadi kohale tõmbekapi paigaldamise korral vaadake palun õiget vahekaugust tõmbekapi paigaldusjuhendist.
•Antudtoodetsaabintegreerida20kuni50mmpaksutööpinnasisse.
•Kui pliidiplaadi all ei ole ahju, sisestage eraldustahvel, mille pindala on vähemalt võrdne tööpinda tehtud avausega. Selline tahvel, mis peab väljalõike pliidiplaadi põhjaga kokkupuutumise vältimiseks täielikult kinni katma, tuleb paigutada tööpinna ülemisest pinnast vähemalt150mmallapoole,kuidmittemingiljuhulpliidiplaadipõhjale lähemale kui 20 mm. Juhul, kui soovite paigaldada pliidiplaadi alla ahju,veendugeetseeoleksvalmistatudWhirlpoolipooltjavarustatud jahutussüsteemiga.Tootjalükkabtagasiigasugusevastutusemõne teise kaubamärgi ahju paigaldamisel pliidiplaadi alla.
•Pärast ümbrispinna puhastamist kinnitage pliidile joonisel näidatud moel tihend.
Pärast puhastamist ümbermõõt pinda, kohaldatakse kaasasolev tihend pliidiplaat, nagu on näidatud joonisel.
MÄRKUS: toitekaabel peab olema piisavalt pikk, et võimaldada selle ülespoole kaevandamise.
Et kindlustada pliit, kasutada sulgudes (A) sätestatud ta. Kinnitage Sulgudes asjakohasteksavadestnooleganäidatudsuunasjakinnitageabilneidaccordan kruvid sisse paksus tööpind (vt järgmised arvud).
Top 20 mm |
Top 30-50 mm |
Elektriühendused
! Elektriühendused peavad vastama kohalike eeskirjade nõudmistele.
Kolmesoonelise kaabliga varustatud keeduplaadid on mõeldud kasutamiseks vahelduvvooluga, mille pinge ja sagedus on märgitud seadme andmeplaadile (asub seadme alumisel osal).
L |
Kaabli maandusjuhtmel on roheline-kollane |
|
Maandus |
ümbris. Kui paigaldate seadme sisseehitatud |
|
elektriahju peale, peavad keeduplaadi ja |
||
(kollane/roheline) |
||
Zero |
ahju ühendused olema eraldi tehtud, seda |
|
nii ohutuse tagamiseks kui ahju hõlpsamaks |
||
|
vahetamiseks.
Toitekaabli ühendamine vooluvõrku
Monteerige andmesildil näidatud koormust taluv pistik toitekaabli külge. Otse elektrivõrku ühendades paigaldage seadme ja elektrivõrgu vahele mitmepooluseline lüliti, mille kontaktide vahe on vähemalt 3 mm. See lüliti peab taluma nõutud koormust ning vastama kehtivatele elektrieeskirjadele (lüliti ei tohi katkestada maandusjuhet). Toitekaabel ei tohi kokku puutuda pindadega, mille temperatuur on üle 50° C.
14
! Seadme paigaldaja peab tagama, et elektriühendused on õigesti tehtud ja et need vastavad ohutusnõuetele.
Enne seadme ühendamist toitevõrku kontrollige, kas
•seade on maandatud ja vastab kehtivatele nõuetele;
•pistik talub seadme andmeplaadile märgitud maksimumkoormust;
•pinge vastab seadme andmeplaadile märgitud väärtustevahemikule;
•pistikupesa vastab seadme pistikule. Kui pistikupesa ei vasta pistikule, pöörduge kvalifitseeritud elektriku poole, kes selle välja vahetab. Ärge kasutage pikendusjuhet ega harukarpe.
!Pärast pliidi paigaldamist peavad toitekaabel ja pistikupesa olema kergesti juurdepääsetavad.
!Kaabel ei tohi olla keerdus ega muljutud.
!Laske kvalifitseeritud elektrikul kaablit regulaarselt kontrollida ja vajadusel välja vahetada (vt osa "Klienditugi").
!Nende ohutusnõuete eiramisel ei võta tootja endale mingit vastutust.
Gaasiühendus
! Elektriühendused peavad vastama kohalike eeskirjade nõudmistele.
Seadme ühendamisel gaasitorustiku või -ballooniga tuleb järgida kehtivaid siseriiklikke eeskirju. Enne ühenduste tegemist kontrollige, kas keeduplaat ühildub gaasi tüübiga, mida plaanite kasutada. Vastasel juhul vt osas "Keeduplaadi reguleerimine kasutamiseks erinevat tüüpi gaasidega".
Kui ühendate pliidi vedelgaasiballooniga, siis tuleb paigaldada siseriiklike õigusaktide nõuetele vastav reduktor.
! Kontrollige, kas gaasi rõhk vastab tabelis nr. 1 „Põletite ja düüside andmed” toodud andmetele . Nii on tagatud seadme ohutu ja pikaajaline talitlus ning samas madal energiakulu.
•Pliidi ja gaasitrassi või gaasiballooni vaheline ühendus tuleb teostada jäiga vaskvõi terastoruga, mille liitmikud vastavad kohalikele eeskirjadele, või kohalikele eeskirjadele vastava pidevpinnaga
roostevabast terasest voolikuga.Asetage põlvühenduse vahele tihend (B). Vooliku maksimaalne kogupikkus on 2 m.
•AINULT BELGIA: Seadmel olev põlvühendus (A) tuleb asendada kaasasoleva ühendusega (kui on olemas).
NB! roostevabast terasest vooliku kasutamisel tuleb see paigaldada selliselt, et oleks välditud igasuguseid liikuvaid mööbliosasid. Voolik tuleb juhtida läbi piirkonna, kus puuduvad takistused ja võimalik on jälgida voolikut kogu selle pikkuses.
•Pärast gaasivarustuse ühendamist kontrollige seebivett kasutades võimalike lekete olemasolu. Süüdake põletid ja pöörake nupud leegi stabiilsuse kontrollimiseks maksimaalsest asendist  dminimaalsesse asendisse
  .
.
Pliidi reguleerimine erinevat tüüpi gaasidega kasutamiseks
! Elektriühendused peavad vastama kohalike eeskirjade nõudmistele. EE
Keeduplaadi reguleerimiseks erinevat tüüpi gaasidega kasutamiseks (vt seadme alumisele osale paigaldatud andmeplaadilt või pakendilt) vahetage põletite düüsid. Selleks toimige järgmiselt:
1.Eemaldage restid ja võtke põletid pesadest välja;
2.Keerake pihustid toruvõtmega sobiva suurusega abil düüsid välja ja asendage need uue gaasitüübi jaoks sobilike düüsidega (vt tabel 1 „Põletite ja düüside andmed”);
3.Pange kõik osad vastupidises järjekorras tagasi;
4.Kui see on tehtud, vahetage vana andmesilt uue vastu, millele on märgitud uue gaasi tüüp. Sildid on saadaval kõigis teeninduskeskustes.
•Õhu juurdevoolu reguleerimine põletitesse Ei ole vaja reguleerida.
•Põletite leegi reguleerimine minimaalsele tasemele
Selleks, et minimaalse seadistus oleks õigesti reguleeritud, eemaldage nupp ja tegutsege järgmiselt:
1. Võtke nupp ära ja reguleerige seadekruvi, mis asub reguleerimisvardas või selle kõrval nii, et leek on väike, kuid püsiv:
• pingutage kruvi leegi kõrguse
vähendamiseks (–);
• vabastage kruvi leegi kõrguse
suurendamiseks (+).
Reguleerimise ajal peab kraan olema minimaalses gaasiseadistuse asendis.
2.Pärast leegi reguleerimist veenduge, et leek ei kustu, kui keerate nupu kiiresti mitu korda järjest maksimaalsest asendist minimaalsesse ja vastupidi.
3.Mõnele seadmele on paigaldatud kaitseseadis (termoelement). Kui põleti leek on seatud minimaalsele tasemele ja seade ei tööta, suurendage leeki seadekruvi abil.
4.Pärast reguleerimist asendage möödavoolutihendid. Kasutage selleks tihendusvaha või sarnast ainet.
!Kui seade on ühendatud vedelgaasiga, keerake seadekruvi võimalikult tugevalt kinni.
!Kui see on tehtud, vahetage vana andmesilt uue vastu, millele on märgitud uue gaasi tüüp. Sildid on saadaval kõigis teeninduskeskustes.
!Kui gaasi rõhk erineb (kas või veidi) soovituslikust rõhust, paigaldage sisselasketorule sobiv surveregulaator (et seade vastaks kehtivatele riiklikele eeskirjadele).
ANDMEPLAAT
Elektriühend vt andmeplaadilt used
ECO-DISAIN
See seade on vastavuses EL määrus nr. 66/2014 täiendus direktiivile 2009/125/EC.
EN 30-2-1 määrus
15
 Loading...