


Instructions for use

ENGLISH |
Instructions for use |
Page 3 |
2

INDEX |
|
Chapter 1: INSTALLATION.................................................................................................. |
4 |
1.1. INSTALLING SINGLE APPLIANCE................................................................................................................. |
4 |
1.2. INSTALLING TWO APPLIANCES.................................................................................................................... |
4 |
1.3.ADJUST DOORS (IF AVAILABLE).................................................................................................................. |
4 |
Chapter 2: FUNCTIONS....................................................................................................... |
5 |
2.1. SMART DISPLAY*............................................................................................................................................ |
5 |
2.2.ON/STAND BY ................................................................................................................................................. |
5 |
2.3.BLACK OUT ALARM ................................................................................................................................................................................................ |
5 |
2.4. TEMPERATURE ALARM.................................................................................................................................. |
5 |
2.5. DOOR OPEN ALARM....................................................................................................................................... |
5 |
2.6. PARTY MODE* ................................................................................................................................................. |
6 |
2.7. SHOCK FREEZE* ............................................................................................................................................ |
6 |
2.8. FAST FREEZE* ................................................................................................................................................ |
6 |
2.9.ECO NIGHT FUNCTION (NIGHT TIME RATE) *............................................................................................. |
7 |
2.10. FREEZE CONTROL*...................................................................................................................................... |
7 |
2.11. AUTOMATIC NO FROST................................................................................................................................ |
7 |
2.12. ICE MATE*...................................................................................................................................................... |
8 |
2.13. LED LIGHT SYSTEM*.................................................................................................................................... |
8 |
Chapter 3: USE.................................................................................................................... |
8 |
3.1. HOW TO INCREASE FREEZER STORAGE CAPACITY.................................................................................. |
8 |
3.2. NOTES.............................................................................................................................................................. |
8 |
Chapter 4: FOOD-STORAGE TIPS...................................................................................... |
9 |
4.1. STORAGE TIME OF FROZEN FOODS............................................................................................................ |
9 |
4.2. TIPS FOR FREEZING AND STORING FRESH FOOD................................................................................. |
10 |
4.3. USING ICE PACKS*...................................................................................................................................... |
10 |
4.4. FROZEN FOOD: SHOPPING TIPS................................................................................................................ |
10 |
Chapter 5: FUNCTIONAL SOUNDS.................................................................................. |
11 |
Chapter 6: RECOMMENDATION IN CASE OF NO USE OF THE APPLIANCE............... |
12 |
6.1.ABSENCE / VACATION................................................................................................................................. |
12 |
6.2.MOVING......................................................................................................................................................... |
12 |
6.3. POWER FAILURE.......................................................................................................................................... |
12 |
Chapter 7: MAINTENANCE AND CLEANING................................................................... |
12 |
Chapter 8: TROUBLESHOOTING GUIDE......................................................................... |
13 |
8.1.BEFORE CONTACTING AFTER-SALES SERVICE….................................................................................. |
13 |
8.2. FAILURES...................................................................................................................................................... |
14 |
Chapter 9: AFTER-SALES SERVICE................................................................................ |
14 |
Others: |
|
REVERSE DOOR SWING (VERSION_1)............................................................................................................ |
15 |
REVERSE DOOR SWING (VERSION_2)............................................................................................................ |
17 |
REMOVING/INSERT THE FREEZER INTERIOR................................................................................................. |
19 |
NOTE:
The instructions apply to several models, so there may be differences. Sections which only apply to certain appliances are indicated with an asterisk (*).
Functions which are dedicated specially for your already bought model of product you will find in QUICK START GUIDE.
3

1. INSTALLATION
1.1. INSTALLING SINGLE APPLIANCE
To guarantee adequate ventilation, leave a space on both sides and above the appliance.
The distance between the rear of the appliance and the wall behind the appliance should be at least 50mm.
A reduction of this space will increase the Energy consumption of product.
1.2. INSTALLING TWO APPLIANCES
During installing the freezer 1 and the fridge 2 together ensure that the freezer is located on the left and the fridge on the right (as shown on the drawing). Left side of refrigerator is equipped with special device in order to avoid condensation problems between appliances.
We recommended installing two appliances together
using the linking-kit 3 (as shown on the drawing).You can buy it in Service.
1.3.ADJUST DOORS (IF AVAILABLE)
To level the doors using the adjustable lower hinge (select models)
If the refrigerator door is lower than the freezer door, raise the refrigerator door by turning the adjustment screw counterclockwise using a M10 wrench.
If the freezer door is lower than the refrigerator door, raise the freezer door by turning the adjustment screw counterclockwise using a M10 wrench.
50mm
50mm
5 ma |
x |
|
|
mm |
|
*Available on selected models only. Please check on the QUICK START GUIDE if this function is actually available on your model.
4

2. FUNCTIONS
2.1. SMART DISPLAY*
This function can be used to save energy. Please follow the instructions contained in the Quick Start Guide to activate/deactivate the function. Two seconds after activation of the Smart Display, the display goes off.
To adjust the temperature or use other functions, it is necessary to activate the display by pressing any
button. After about 15 seconds without performing any action, the display goes off again. When function is deactivated the normal display is restored. The Smart Display is automatically disabled after a power failure. Remember that this function does not disconnect the appliance from the power supply, but only reduce the energy consumed by external display.
Note: The declared appliance energy consumption refers to operation with the Smart Display function activated. This function is available only on the model with User Interface on the door.
2.2.ON/STAND BY 
This function turns On/Stand-by the freezer compartments. To put the product in Stand-by, press &
hold the On/Stand-by button  for 3 seconds. When the appliance is in Stand-by, the light inside the freezer compartment does not work. Remember that this operation does not disconnect the appliance from the power supply. To switch the appliance On again, simply
press the On/Stand-By button  .
.
2.3.BLACK OUT ALARM 
After a power blackout, your product is designed to automatically monitor the temperature in the freezer when electricity is resupplied. If the temperature in the freezer rises above freezing level, the Black Out
indicator  turns on, the Alarm indicator
  blinks and the acoustical alarm sounds when electricity is resupplied.
To reset the alarm press the Stop Alarm button  just once.
In case of Black Out Alarm, the following actions are recommended:
•If the food in the freezer is unfrozen but still cold, all the food in the freezer should be eaten within the next 24 hours.
•If the food in the freezer is frozen, this indicates the food was thawed and then refrozen when electricity was re-supplied which degrades taste, quality
and nutritional value and also could be unsafe. It is recommended to not consume the food but to dispose of the entire content of the freezer. The
Black Out Alarm is designed to provide guidance on food quality in the freezer in the event of electricity black out. This system does not guarantee food quality or safety and consumers are advised to use their own judgment in evaluating food quality in freezer compartment.
2.4. TEMPERATURE ALARM
The acoustic alarm sounds and temperature indicator (°C) blinks. The alarm is activated when:
•The appliance is connected to the power supply after prolonged disuse
•The freezer compartment temperature is too high
•The quantity of fresh foods loaded into the freezer exceeds that indicated on the rating plate
•The freezer door has been left open for a long time. To mute the alarm buzzer press Stop Alarm button
 just once. The Alarm indicator
  is automatically turned-off as soon as the freezer compartment reaches a temperature below -10°C and the temperature set indicator (°C) stop blinking and shows the chosen setting.
2.5. DOOR OPEN ALARM
The Alarm icon  lights up blinking and the acoustic alarm sounds. The alarm is activated when the door is left open for more than 2 minutes. To disengage the door alarm close the door, or press once Stop Alarm button
  to mute the acoustic alarm.
*Available on selected models only. Please check on the QUICK START GUIDE if this function is actually available on your model.
5

2.6. PARTY MODE* 
Use this function to chill drinks inside the freezer compartment. 30 minutes after selection (the time required to chill a 0.75 l bottle without the glass breaking), the symbol flashes, an acoustic alarm sounds: remove the bottle from the freezer compartment and press the Stop Alarm button to disable the alarm.
Important: do not leave the bottle inside the freezer compartment longer than the time necessary for chilling.
2.7. SHOCK FREEZE* 
The “Shock Freeze” compartment is specifically designed to freeze up to 2 kg of fresh food extremely quickly. The ultra-fast “Shock Freeze” function minimizes the formation of ice crystals inside the food as it freezes, thus ensuring it is of the best possible quality when defrosted prior to consumption. When the “Shock Freeze” function is not active, the compartment can be used as normal for traditional freezing or for the storage of already frozen foods.
Note: When the Shock Freeze function is active you may hear a humming sound. This is absolutely normal and is caused by airflow that permits optimum cold distribution inside compartment.
Activating and deactivating the “Shock Freeze” function:
1.Make sure at least 12 hours have passed since the last time the “Shock Freeze” function was
activated (if at all). Do not activate the function more frequently than once every 12 hours.
2.Make sure that the “Fast Freeze” function is not active: “Shock Freeze” and “Fast Freeze” functions cannot be active together at the same time.
3.Empty the “Shock Freeze” compartment.
4.Activate the “Shock Freeze” function by briefly
touching the button on the control panel: the icon lights up and the fans on the bottom of the compartment come on, increasing the flow of cold air and accelerating the freezing process as a result.
5.Place the food to be frozen inside the compartment, a few centimeters (min. 2 cm) away from the fans on the back of the compartment, so that cold air can circulate.
6.To achieve maximum freezing speed, we recommend not to deactivate the “Shock Freeze” function until its automatic deactivation, keeping closed the door.
7.The “Shock Freeze” function is automatically deactivated 4-5 hours after its activation: the
indicator switches off and the fans are deactivated. The “Shock Freeze” function may nevertheless be switched off at any time as desired,
by briefly pressing the button on the control panel: the indicator
 switches off and the fans are deactivated.
Attention:
•Incompatibility with the “Fast Freeze” function
To guarantee optimal performance, the “Shock Freeze” and “Fast Freeze” functions cannot be used at the same time. Therefore, if the “Fast Freeze” function has been already engaged, it has to be disengaged first to activate the “Shock Freeze” function (and vice-versa).
•If the fans in the Shock Freeze compartment do
not start working
After the “Shock Freeze” function has been activated, it
may happen that the indicator lights up as expected, but the fans do not start working. This is normal and means that freezer defrosting is in progress. At the end of the defrosting phase (maximum duration: 1.5 hours), the fans will automatically start working and the “Shock Freeze” process will begin as normal.
• If the indicator |
does not light up |
If, after the button |
is pressed, the icon lights |
up: in this case the |
button has been pressed for |
too long. To activate the “Shock Freeze” function, first
deactivate the Fast Freeze function (holding the 

button for 3 seconds, then briefly touch the button, without keeping it pressed for more than 1 second.
2.8. FAST FREEZE* 

The amount of fresh food (in kg) that can be frozen in 24 hours is indicated on the appliance rating plate.
This function can be used for optimum appliance performance, 24 hours before placing fresh food in the freezer Please follow the instructions contained in the Quick Start Guide to activate/deactivate the function. After placing fresh food in the freezer, 24 hours on Fast Freeze function is generally sufficient; After 50 hours the Fast Freeze function automatically deactivates.
Attention:
In order to save energy, when freezing small amounts of food, the fast freeze function can be deactivated after a few hours.
•Incompatibility with the “Shock Freeze” function
To guarantee optimal performance, the “Shock Freeze” and “Fast Freeze” functions cannot be used at the same time. Therefore, if the “Fast Freeze” function has been already engaged, it has to be disengaged first to activate the “Shock Freeze” function (and vice-versa).
*Available on selected models only. Please check on the QUICK START GUIDE if this function is actually available on your model.
6

2.9. ECO NIGHT FUNCTION 
(NIGHT TIME RATE) *
The Eco Night function enables appliance energy consumption to be concentrated in the reduced rate hours (generally at night), when electricity is readily available and costs less than during the daytime (only in countries that utilise a time based multi-rate system - check energy rates with the local electricity company). To activate the function, press the button 
 at the reduced rate start time (depending on the specific rates plan). For example, if the reduced rate starts at
8 p.m., press the button 
 at that time. When the Eco Night indicator
 is ON, the function is ON. Once the function is activated, the appliance automatically adapts energy consumption according to the time selected, i.e. consuming less energy during the day than at night.
IMPORTANT: To operate properly, the function must be on during the night and day. The function remains on until deactivated (or it is deactivated in case of a power failure or appliance switch-off). To deactivate the function, press the button 
 again. When the Eco Night indicator
 is OFF, the function is OFF.
Note: The declared appliance energy consumption refers to operation with the Eco Night function deactivated.
2.10. FREEZE CONTROL*
Freeze Control is an advanced technology that reduces temperature fluctuations in the whole freezer compartment to minimum, thanks to an innovative air
system, totally independent from the fridge. Freeze burns are significantly reduced and food preserves its original quality and color.
To activate the Freeze Control choose the function from the menu, set to >ON< and press OK button to confirm the selection. To deactivate this function repeat the same procedure setting to >OFF<.
The function works properly in a defined range of temperature: between -22°C and -24°C.
When the function is engaged and the current temperature in the freezer is set to the warmer set point than -22°C, the temperature is automatically set to -22°C to match the working range.
If the function is engaged and the user modify the freezer temperature out of the working range, the function is automatically switched off.
In case of Fast freezing is engaged, the function “Freeze control” is inhibited until the Fast Freezing function switched off.
2.11. AUTOMATIC NO FROST
This product is designed to defrost automatically according to conditions of use and ambient humidity. No Frost freezers provide chilled air circulation around the storage areas and prevent the formation of ice, thereby completely eliminating the need for defrosting.
Frozen items don’t stick to the walls, labeling stays legible and storage space remains neat and clear.
*Available on selected models only. Please check on the QUICK START GUIDE if this function is actually available on your model.
7
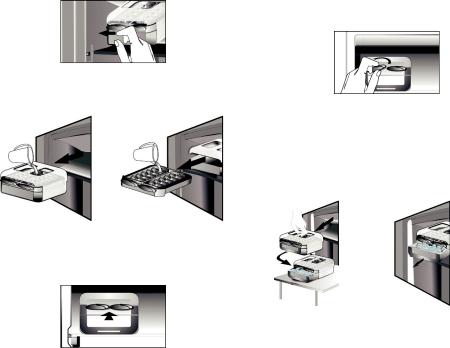
2.12. ICE MATE*
HOW TO MAKE ICE CUBES
You can remove the ice cube tray by pulling it towards you.
WARNING: fill with potable water only (maximum level = 2/3 of the overall capacity).
or
Place again the Ice Mate in freezer compartment, or reinsert the ice cube tray within the Ice Mate. Take care not to spill water.
Wait until the ice cubes are formed (it is recommended to wait for about 4 hours).
NOTE: Ice Mate is removable. It can be placed in horizontal position anywhere in the freezer
compartment or taken out of the appliance when icemaking is not required.
HOW TO TAKE ICE CUBES
Make sure that the storage bin is in place under the ice tray. If not, slide into place.
Twist one of levers firmly in the clockwise direction until the tray twists slightly. The ice cubes fall into the
storage bin.
Repeat Step 2 for the other half of the tray, if necessary. To get ice, slightly lift up the storage bin and pull it towards you.
NOTE: if you prefer, you can remove the entire Ice Mate from the appliance, to take the ice cubes
wherever is convenient for you (for example: directly on the table).
or
2.13. LED LIGHT SYSTEM*
The light system inside the freezer compartment uses LEDs light, allowing a better lightning as well as very low energy consumption. If the LED light system does not work, please contact the Service to replace it.
3. USE
3.1. HOW TO INCREASE FREEZER STORAGE CAPACITY
You can increase storage capacity in the freezer compartment by:
•removing the baskets / flaps* to allow the storage of big products.
•placing the food products directly on the freezer shelves.
•removing the Ice Mate*.
•removing bottle rack*.
3.2. NOTES
•Do not block the air outlet area (on the back wall inside the product) with food products.
•If the freezer is provided with a flap, it is possible to maximize the storage volume by removing the flap.
•All shelves, flaps and pull-out baskets are removable.
•The internal temperatures of the appliance may be affected by the ambient temperature, frequency of door opening, as well as location of the appliance. Temperature setting should take into consideration these factors.
•Unless otherwise specified the appliance accessories are not dishwasher safe.
*Available on selected models only. Please check on the QUICK START GUIDE if this function is actually available on your model.
8
 Loading...