


5SER S 'UIDE
 K E E P I N G T H E W O R L D S E W I N G
Downloaded from www.Manualslib.com manuals search engine
This houshold sewing machine is designed to comply with IEC/EN 60335-2-28 and UL1594
IMPORTANT SAFETY INSTRUCTIONS
When using an electrical appliance, basic safety precautions should always be followed, including the following:
Read all instructions before using this household sewing machine.
DANGER - To reduce the risk of electric shock:
•A sewing machine should never be left unattended when plugged in. Always unplug this sewing machine from the electric outlet immediately after using and before cleaning.
•Always unplug before relamping. Replace bulb with same type rated 5 Watt.
WARNING - To reduce the risk of burns, fire, electric shock, or injury to persons:
•Do not allow to be used as a toy. Close attention is necessary when this sewing machine is used by or near children or infirm persons.
•Use this sewing machine only for its intended use as described in this manual. Use only attachments recommended by the manufacturer as contained in this manual.
•Never operate this sewing machine if it has a damaged cord or plug, if it is not working properly, if it has been dropped or damaged, or dropped into water. Return the sewing machine to the nearest authorised dealer or service center for examination, repair, electrical or mechanical adjustment.
•Never operate the sewing machine with any air openings blocked. Keep ventilation openings of the sewing machine and foot controller free from the accumulation of lint, dust, and loose cloth.
•Keep fingers away from all moving parts. Special care is required around the Sewing machine needle.
•Always use the proper needle plate. The wrong plate can cause the needle to break.
•Do not use bent needles.
•Do not pull or push fabric while stitching. It may deflect the needle causing it to break.
•Switch the sewing machine off (“0”) when making any adjustment in the needle area, such as threading needle, changing needle, threading bobbin, or changing presser foot, etc.
•Always unplug the sewing machine from the electrical outlet when removing covers, lubricating, or when making any other user servicing adjustments mentioned in the instruction manual.
•Never drop or insert any object into any opening.
•Do not use outdoors.
•Do not operate where aerosol (spray) products are being used or where oxygen is being administrated.
•To disconnect, turn all controls to the off (“0”) position, then remove plug from outlet.
•Do not unplug by pulling on cord. To unplug, grasp the plug, not the cord.
•Hold plug when rewinding into cord reel. Do not allow plug to whip when rewinding.
SAVE THESE INSTRUCTIONS
Downloaded from www.Manualslib.com manuals search engine
Table of Contents
Learn your Scandinavia 400 4-14
Overview |
|
4 |
Unpacking |
|
5 |
Packing away after sewing |
|
5 |
Connecting the foot control |
|
6 |
Connecting to the power supply |
6 |
|
Accessories |
|
7 |
Spool pin |
|
8 |
Threading the upper thread |
|
9 |
Threading for twin needle |
|
10 |
Bobbin winding |
|
11 |
Threading lower thread |
|
12 |
Thread tension |
|
12 |
Lowering the feed teeth |
|
13 |
Changing the presser foot |
|
14 |
Presser foot pressure |
|
14 |
Presser foot lever |
|
14 |
Changing the needle |
|
14 |
Functions and Infodisplay |
15-24 |
|
Infodisplay |
|
16 |
Stitch selection |
|
19 |
Functions / Embroidery |
|
20 |
Memory |
|
20 |
Programming |
|
21 |
Mirror images |
|
23 |
Darning and taper satin stitches |
|
24 |
Embroidery |
25-36 |
|
Embroidery Accessories |
|
26 |
Removing the Embroidery unit |
|
26 |
Connecting the Embroidery unit |
26 |
|
Embroidery Foot U |
|
27-28 |
Get started |
|
29 |
Embroidery hoop |
|
30 |
Using the Embroidery template |
|
31 |
Sewing embroideries |
|
32 |
Function buttons - embroidery |
|
34 |
Color information/ |
|
|
Language setting |
|
36 |
Sewing |
37-56 |
Stitch table |
38-39 |
Straight stitch |
40 |
Gathering with straight stitch |
40 |
25 Needle Positions |
41 |
Sewing zippers |
42 |
Reinforced straight stitch |
43 |
Stretch stitch |
43 |
Zigzag |
43 |
Lace edging |
44 |
Three-step zigzag |
45 |
Overcasting |
45 |
Sewing terry cloth |
45 |
Buttonholes |
46 |
Buttonhole sensor foot |
47 |
Buttonhole knife/Seam ripper |
48 |
Sewing buttons |
48 |
Flatlock |
49 |
Blind hem |
50 |
Bridging stitch |
51 |
Seam and overcast |
51 |
Darning stitch |
52 |
Automatic taper stitch |
52 |
Decorative stitches |
53 |
Quilting |
54 |
Applique |
54 |
Pictogram |
55 |
Sewing hints |
56 |
Free arm |
56 |
Jeans hem |
56 |
Sewing on belt loops |
56 |
Care of your |
|
Scandinavia 400 |
57-61 |
Changing the light bulb |
58 |
Care of the Machine |
59 |
Trouble shooting |
60-61 |
Index |
62 |
Downloaded from www.Manualslib.com manuals search engine

Learn your Scandinavia 400
Overview
21
|
1 |
|
|
|
|
|
|
|
|
|
|
|
|
22 |
||
|
|
|
|
|
|
|
|
|
|
|
|
|
||||
|
|
|
|
|
|
|
|
|
|
|
|
|
|
|||
|
2 |
|
|
|
|
|
|
|
|
|
|
|
|
23 |
||
|
|
|
|
|
|
|
|
|
|
|
|
|
||||
|
3 |
|
|
|
|
|
|
|
|
|
|
|
|
|||
|
|
|
|
|
|
|
|
|
|
|
|
|
||||
|
|
|
|
|
|
|
|
|
|
|
|
|
24 |
|||
|
4 |
|
|
|
|
|
|
|
|
|
|
|
|
|||
|
|
|
|
|
|
|
|
|
|
|
|
|
|
|
25 |
|
|
|
|
|
|
|
|
|
|
|
|
|
|
|
|
|
|
|
|
|
|
|
|
|
17 |
18 |
19 |
20 |
||||||
|
|
|
|
|
|
|
|
|||||||||
|
|
|
|
|
|
|
|
|
|
|||||||
|
5 |
|
|
|
|
|
16 |
|
|
|
|
26 |
||||
|
|
|
|
|
|
15 |
|
|
|
|
27 |
|||||
|
6 |
|
|
|
|
|
|
|
|
|
||||||
|
|
|
|
|
|
14 |
|
|
|
|
|
|
|
|||
|
7 |
|
|
|
|
|
|
|
|
|
28 |
|||||
|
8 |
|
|
|
|
|
13 |
|
|
|
|
29 |
||||
|
|
|
|
|
|
|
|
|
|
|
|
|
||||
|
9 |
|
|
|
|
|
|
|
|
|
|
|
|
30 |
||
|
10 |
|
|
|
|
|
|
|
|
|
|
|
|
|||
|
|
|
|
|
|
|
|
|
|
|
|
|
31 |
|||
|
11 |
|
|
|
|
|
12 |
|
|
|
|
|||||
|
|
|
|
|
|
|
|
|
|
|
|
|
||||
|
|
|
|
|
|
|
|
|
|
|
|
|
|
|
|
|
1. |
Lid |
|
|
|
|
|
|
23. |
Thread cutter for bobbin winding |
|||||||
2. |
Thread take-up lever |
|
|
|
|
|
|
24. |
Handwheel |
|||||||
3. |
Presser foot pressure dial |
|
|
|
|
|
|
25. |
Bobbin spindle, Bobbin stop |
|||||||
4. |
Thread guide |
|
|
|
|
|
|
26. |
Infodisplay |
|||||||
5. |
Buttonhole sensor socket |
|
|
|
|
|
|
27. |
Function buttons |
|||||||
6. |
Light |
|
|
|
|
|
|
28. |
Function buttons Embroidery |
|||||||
7. |
Needle bar |
|
|
|
|
|
|
29. |
Stitch selection buttons |
|||||||
8. |
Presser foot |
|
|
|
|
|
|
30. |
Embroidery card slot |
|||||||
9. |
Free arm |
|
|
|
|
|
|
31. |
Main power switch, |
|||||||
10. Bobbin cover |
|
|
|
|
|
|
32. |
Connection to power supply |
||||||||
11. Base plate |
|
|
|
|
|
|
Presser foot lever |
|||||||||
12. Drop feed dial |
|
|
|
|
|
|
33. |
Thread cutter |
||||||||
13. Needle plate |
|
|
|
|
|
|
34. |
Embroidery unit socket |
||||||||
14.Presser bar and presser foot ankle
15.Needle clamp screw
16. |
Thread tension discs |
|
33 |
|
|
||||
|
32 |
|||
17. |
|
|
|
|
Thread tension indicator |
|
|||
|
|
|||
18.Thread guide for bobbin winding
19.Spool pin
20.Spool holders
21. |
Recess for additional spool pin |
34 |
22. |
Quick Info |
|
4
Downloaded from www.Manualslib.com manuals search engine

Learn your Scandinavia 400
Embroidery Unit
35.Embroidery arm
36.Embroidery Hoop attachment
37.Embroidery unit socket
38.Release button
35
36
37
38
Unpacking
1.Place the machine on the table or cabinet, remove the packaging.
2.Remove the side parts of the packing material and the foot control.
3.The machine is delivered with a soft plastic cover, an accessory bag, a main cord and a foot control cord. There is also a test kit for embroidery and a bag containing embroidery accessories (see page 26).
4.Wipe the machine, particularly around the needle and needle plate to remove any soil before sewing.
Packing away after sewing
1.Unplug the cords from the wall socket and the machine.Wind the cords around your hand and place the foot control cord in the foot control storage space. Place the foot control as illustrated. Lower the presser foot. Remove the embroidery card.
2.Slide the cover over the machine. Place the main cord in the pocket of the cover. There is also space provided for the operating manual, the embroidery accessories and the other accessories.
Some fabrics have a lot of excess dye which can cause discoloration on other fabric but also on your sewing machine. This discoloring may be very difÀcult or impossible to remove.
Fleece and denim fabric in especially red and blue often contain a lot of excess dye.
If you suspect that your fabric/ready- to-wear garment contains a lot of excess dye, always pre-wash it before sewing/embroidering to avoid the discoloring.
Downloaded from www.Manualslib.com manuals search engine |
5 |
|
|
|
|
Learn your Scandinavia 400
Connecting the foot control
Among the accessories you will Ànd the foot control cord and the main cord.
1.Place the foot control on its narrow side. Fit the plug into the socket inside the foot control compartment.
2.Push it Àrmly to make sure it is properly connected. This operation is only necessary the very Àrst time you are going to use the machine.
3.To correctly turn away the cord, place it into the slot, see picture.
Note: Before plugging in, check to ensure that the foot control is of "type FR4".
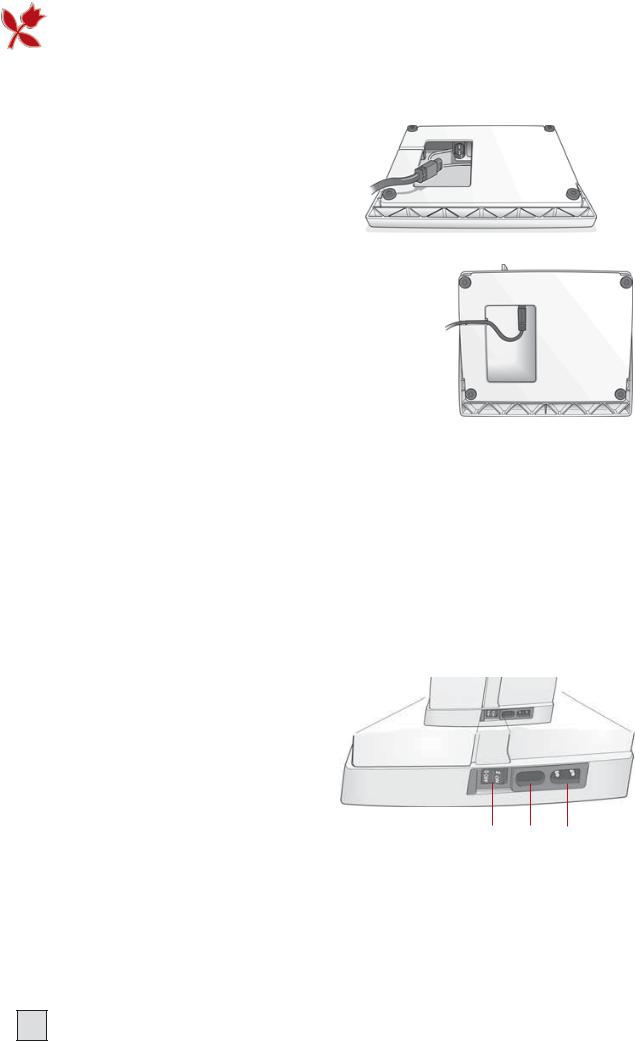
Connecting to the power supply
On the underside of the machine you will Ànd information about the power supply (V) and the frequency (Hz). Check the power supply setting in the machine to ensure that this agrees with the main supply before you connect the machine.
1.Connect the foot control cord to the Àrst socket on the bottom right side of the machine.
2.Connect the main cord to the back socket on the bottom right side of the machine.
3.When you press the power switch, both the machine and the light
are switched on. |
3 |
1 |
2 |
|
For the USA and Canada
This Sewing Machine has a polarized plug (one blade wider than the other). To reduce the risk of electric shock, this plug is intended to Àt in a polarized outlet only one way. If the plug does not Àt fully in the outlet, reverse the plug. If it still does not Àt, contact a qualiÀed electrician to install the proper outlet. Do not modify the plug in any way.
6
Downloaded from www.Manualslib.com manuals search engine

Accessories
You will Ànd a number of accessories included with your sewing machine. Learn to use them on the following pages of this User's Guide.
1.Embroidery accessories (see page 26)
2.Needles
3.Bobbins
4.Pictogram Pen
5.Brush
6.Stitch plate opener
(to be attached to the brush)
7.Light bulb remover
8.Clearance plate
9.Screwdriver
10.Vertical spool pin
11.Presser foot ankle
12.Seam ripper
13.Thread net
14.Presser foot A
15.Presser foot B
16.Presser foot C
17.Presser foot D
18.Presser foot E
19.Presser foot J
20.Sensor Buttonhole Foot
Learn your Scandinavia 400
1.
2. |
4. |
3.
5.
7.
6.
8.
10.
13.
9.
12.11.
15. 
14. |
16. |
|
18. 


17. |
19. |
|
20. 


|
|
|
|
|
|
|
|
|
|
|
|
|
|
|
|
|
|
|
|
|
|
|
|
Downloaded from www.Manualslib.com manuals search engine |
7 |
||||
|
|||||
|
|
|
|
|
|
Learn your Scandinavia 400
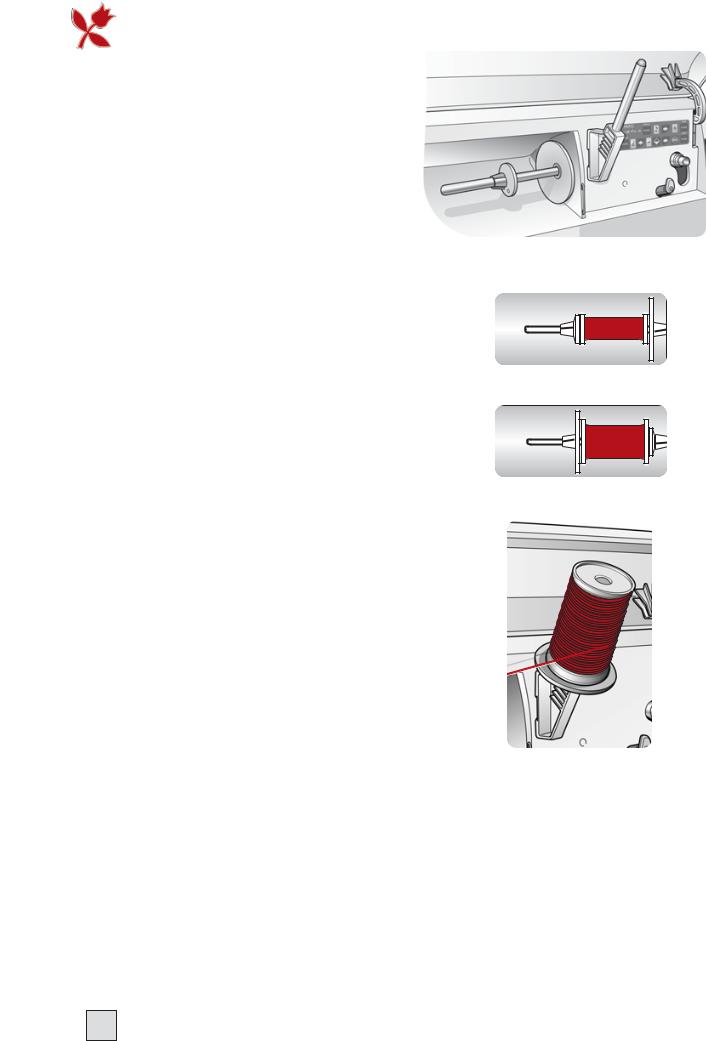
Spool pin
The machine has spool pins suitable for all types of thread. The main spool pin (a) is horizontal - the thread reels off the stationary spool. Place the spool so that the thread reels counterclockwise.
There are two spool holders on the spool pin. With narrow thread spools, the small holder (b) is placed in front of the thread. If you use large thread spools, the large holder (c) is placed in front of the thread. Slide the correct size spool holder in place so the Áat side is pressed Àrmly against the spool, with no space between spool holder and spool.
There is also a separate vertical spool pin (d) to be attached onto the machine. The Àngers on the extra spool pin Àt into the two holes to the right of the Àxed spool pin. Push downward to snap in place. The large spool holder (c) is placed under the thread. This spool pin is used when
winding a bobbin from a second spool of thread or for a second spool when sewing with a twin needle.
a b c d
c
d
8
Downloaded from www.Manualslib.com manuals search engine

Learn your Scandinavia 400
Threading the upper thread
!Turn off the main switch.
Make sure the presser foot is raised |
|
|
|
|
|
|
|
|
and the needle is in the up position. |
|
4 |
2 |
a |
1 |
|
|
|
1. |
Pull the spool pin out. Place the |
|
|
b |
|
|
|
|
|
|
|
|
|
|
|||
|
thread on the spool pin and the |
|
|
|
|
|
|
|
|
|
|
|
|
|
|
|
|
|
spool holder on the spool pin as |
|
|
|
|
|
|
|
|
|
|
|
|
|
|
|
|
|
described. Push the spool pin back |
7 |
3 |
|
|
|
|
|
|
in. |
|
|
|
|
|
|
|
2. |
Bring the thread in the direction of |
|
5 |
|
|
|
|
|
|
the arrow under the thread guide |
|
6 |
|
|
|
|
|
|
|
|
|
|
|
|
||
|
(a) and over the thread guide (b). |
|
|
|
|
|
|
|
|
|
|
|
|
|
|
||
3.Bring the thread down between the thread tension discs.
4.Continue threading by drawing the thread from the right into the slot on the take-up lever.
5.Thread last guide just above needle.
6.The needle is threaded from front to back. The white on the presser foot ankle makes it easy to see the eye of the needle.
7.Place thread under the presser foot and into the thread cutter where it is cut.
Upper thread warning
If the upper thread breaks or if thread spool runs out, the machine stops and gives a signal. The symbol 
is Áashing on the display. If thread breaks: Re-thread the machine. The symbol goes out. If thread spool runs out: Remove your work and the bobbin. Re-thread the machine. Replace the bobbin and restart.
Downloaded from www.Manualslib.com manuals search engine |
9 |
|
|
|
|

Learn your Scandinavia 400
Threading for twin needle
!Turn off the main switch.
Make sure the presser foot is raised and the needle is in the up position
1.Insert a twin needle (optional accessory).
2.Wind a bobbin with the thread you are going to use as the second upper thread.
3.Thread the machine as described and check to ensure that the thread lies between the inner thread tension discs, outside the lowest thread guide. Thread left needle.
4.Attach the extra spool pin onto the machine. Place a spool holder under the thread.
5.Place the bobbin with the second thread on the spool pin.
6.Thread the machine as before but this thread should lie between the outer thread tension discs, outside the lowest thread guide. Thread right needle.
10
Downloaded from www.Manualslib.com manuals search engine
Bobbin winding from the needle
Make sure that the presser foot is up and the needle is in the highest position.
Note! Do not use a plastic presser foot when bobbin winding.
1.Place your empty bobbin with the small mark  outwards on the bobbin spindle on the front of the machine.
2.Pull the thread from the needle under the presser foot and to the right over the thread guide (c).
3.Start from above and wind a few turns of thread around the bobbin. Cut off the thread on the thread cutter (d).
4.Bring the bobbin spindle down. Press the foot control. When the bobbin winding is Ànished, the bobbin will stop automatically. Remove the bobbin, cut off the thread and bring the bobbin spindle up.
Learn your Scandinavia 400
 d
d
c
Note! We do not recommend winding specialty threads such as clear nylon or other stretchy threads through the needle. Instead see "Bobbin winding - vertical spool pin" below.
Bobbin winding - vertical spool pin
1. Place an empty bobbin with the mark outwards on the bobbin spindle on the front of the machine.
2.Place the large spool holder under the thread on the spool pin.
3.Bring the thread under the thread guide (a) and over thread guide (b), then around thread guide (c) as illustrated.
4.From above wind a few turns of thread around the bobbin and into the cutter.
b a c
5. Bring the bobbin spindle down. Press the foot control. When the bobbin winding is Ànished, the bobbin will stop automatically. Remove the bobbin, cut off the thread and bring the bobbin spindle up.
Downloaded from www.Manualslib.com manuals search engine |
11 |
|
|
|
|
Learn your Scandinavia 400
Threading lower thread
!Turn off the main switch.
1.Open the cover by slightly pulling it towards you and take it away.
2.Place the bobbin in the bobbin case with the mark  facing upward and the thread to the left of the bobbin. The bobbin will then rotate counter clockwise when pulling the thread.
3.Hold the bobbin and pull the thread to the right passing (a).
4.Hold the thread tight and pull it to the left so that the thread falls correctly into the tension spring.
Continue threading around (b) and to the right of the thread cutter (c).
Replace the cover and slide it into position. Then pull the thread to the left to cut it.
1
10 15
2
3 |
4 |
b |
|
|
|
|
|
a |
2 |
c |
1 |
Top thread tension
The thread tension is adjusted automatically when you select a stitch or an embroidery. This is shown by the thread tension indicator being reset.
Do not turn this dial manually!
You can adjust the thread tension by pressing the
buttons, see page 18. Using the button (-) you decrease the tension and using the button (+) you increase the tension. The adjustment affects all stitches and will remain until the machine is turned off or until changed manually.
Normal thread tension is 4.
When selecting buttonholes and decorative stitches and for embroidery the thread tension is reduced automatically.
When topstitching with a heavy thread in thick fabric, increase the tension to 7-9.
When the machine is turned on, the tension is set to normal automatically.
12
Downloaded from www.Manualslib.com manuals search engine

Correct and incorrect thread tension
To understand the correct thread tension, sew a few sample stitches at different settings.
Adjust tension only with the function buttons (see page 18). Do not turn dial.
1.Begin with a tension that is too loose, i.e. set at "1". The lower thread will lie straight and the upper thread will be drawn down on the underside.
2.If you set the tension at the highest number, the opposite will occur, and the seam may pucker.
3.When thread tension is correctly set the threads interlock in the middle of both layers of material or, in the case of decorative stitches, on the underside.
Lowering the feed teeth
The feed teeth are lowered automatically when the embroidery unit is in place.
When removing the embroidery unit, the feed teeth will raise as you start to sew.
The feed teeth are lowered when you turn the dial to the left to  . Turn the dial to the right to
  if you wish to raise the feed teeth. The feed teeth will not come up until you begin to sew.
Lower the feed teeth for sewing buttons and for free motion quilting and embroidery.
By lowering the feed teeth it is easier to get thick garments under the presser foot. Do not forget to raise the feed teeth before starting to sew.
Learn your Scandinavia 400
1
2
3
Note! Make a few tests on a scrap piece of the material you are going to sew and check the tension.
Downloaded from www.Manualslib.com manuals search engine |
13 |
|
|
|
|

Learn your Scandinavia 400
Changing the presser foot |
1 |
2 |
|
!Turn off the main switch.
1.Make sure that the needle is in the
highest position. Pull the presser foot down and towards you.
2.Line up the cross pin on the foot between the spring and the presser foot ankle. Press back until the foot snaps into place.
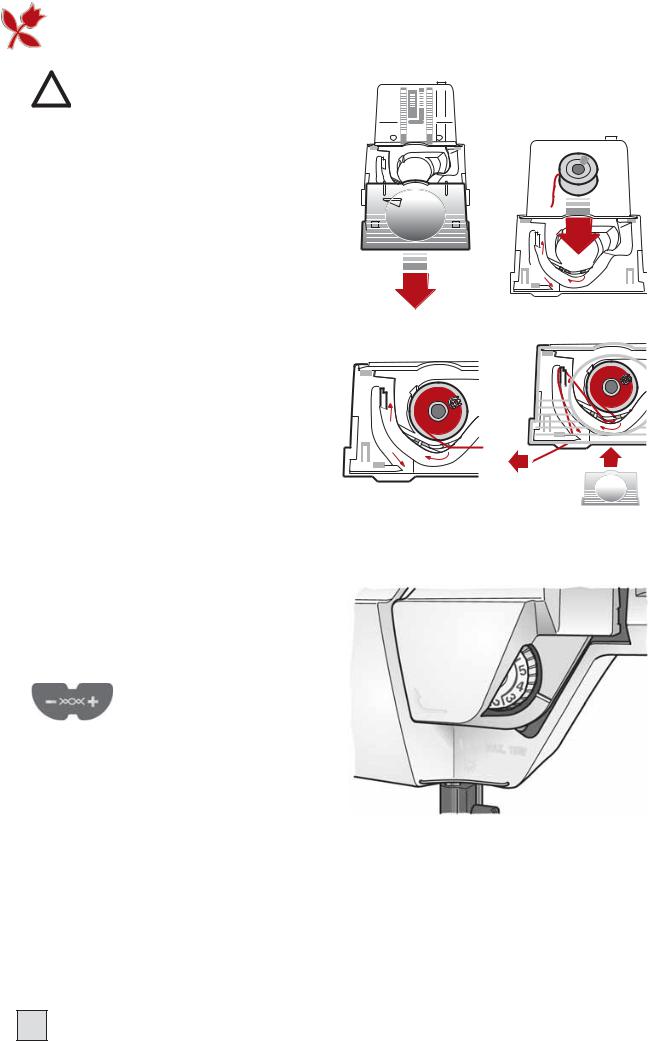
Presser foot pressure (a)
The presser foot pressure is adjusted
with the dial on the front of the a machine. Normal setting is 4. The higher
the number the more pressure on the fabric. Knit and lightweight fabrics should be sewn with less pressure, 3-2.
Presser foot lever (b)
The presser foot is raised and lowered |
|
with the presser foot lever. The presser |
|
foot must be lowered when sewing. |
|
The machine will not start if the |
b |
presser foot is in the raised position. |
|
By raising the presser foot lever as far as it goes and holding it there, the lift height of the presser foot can be increased to place thick fabric and to slide on or remove hoop.
Changing the needle
!Turn off the main switch.
1. Loosen the screw in the needle clamp.
2. Remove the needle.
3. Push up the new needle with the Áat side away from you until it will go no further.
4. Tighten the screw properly.
Always use needles of system 130/705H.
14
Downloaded from www.Manualslib.com manuals search engine

FUNCTIONS AND INFODISPLAY
Downloaded from www.Manualslib.com manuals search engine

Functions and InfoDisplay
Functions and Infodisplay
Needle stop
This button sets whether the needle stops up or down in the
material when you lift your foot from the foot control and stop sewing. Point the arrow upwards - the needle will stop in the up position. When you touch the button so that the arrow points downward, the machine will stop with the needle in the material.
You can also regulate the needle stop position with the foot control. To raise or lower the needle after stopping, lightly tap the foot control.
When sewing embroideries only the up position can be used.
Sewing speed
Use the SPEED button to set the three different maximum
speeds. The machine will sew at different maximum speeds when the foot control is fully depressed. For slower speeds within the range simply press the foot control less.
When Embroidery position is set, only the slowest speed can be
selected.
All stitches in the machine have a preset maximum speed at which they can be sewn. When you select a stitch the machine automatically sets the correct maximum speed.
Reverse
Your machine sews backwards when this button is pressed. The machine sews forward
when the button is released. The longest stitch length when reverse feeding is 3 mm.
For permanent reverse, press the button twice in quick succession before starting to sew. An arrow
to the top left on the display indicates reverse sewing. To sew forward again, press the button once more.
The reverse button is also used when starting and stopping the Embroidery unit, (the foot control can
also be used).
16
Downloaded from www.Manualslib.com manuals search engine

Stitch length
When you select a stitch, the machine will automatically set the best stitch length which will be indicated by numbers on the
Infodisplay. You can change the stitch length by pressing either the (+) or (-) button. Certain stitches have a limited stitch length. Not active in REP position.
When sewing embroideries the length can be set between 2 and 6
to change size of embroidery.
STOP
The STOP button is used to Ànish a stitch. i.e. the machine fastens the thread and stops automatically when the stitch
has been completed. The symbol
on the display indicates that STOP is selected. STOP is cancelled when you press the button again or by selecting a new stitch.
The button has the same function both in NORM and REP position.
(See "Satin taper...", page 24, STOP, page 23.
Embroidery sewing without thread color change, see page 34.
Mirror image
You can mirror a stitch by using the buttons  , mirror image side to side and
  , mirror image end to end. The symbols will be
displayed.
When sewing embroideries only mirror image side to side can be
used.
Functions and InfoDisplay
Stitch width
When you select a stitch, the machine automatically sets the best stitch width which is displayed with numbers on the
Infodisplay. You can change the stitch width by pressing the (+) or (-) button. The width can be adjusted between
0 and 6 mm. Not active in REP position.
When sewing embroideries the width can be set between 2 and 6,
to change size of embroidery.
MENU - Selected group of stitches
Your machine has three menus - one for stitches, two for letters.
Your choice is displayed when you have pressed the MENU button to select stitches , outline block letters  or script letters . The stitch number or the selected letter will also be displayed.
When sewing embroideries the menu number will be displayed to
the upper right.
FUNC - Selected function
When you turn on the machine, the selected function displays
NORM. Touch the FUNC button to PROG for programming. If you touch the button again, REP = repeat will be displayed to sew your programmed stitches. After a third touch, NORM is displayed again.
Not used when sewing embroideries.
Downloaded from www.Manualslib.com manuals search engine |
17 |
|
|
|
|

Functions and InfoDisplay
Functions and Infodisplay
Memory - position
These buttons are used to advance or return within
a memory, when entering or checking stitches. See page 20.
Thread tension - adjustment
Use these buttons to adjust the thread tension
manually. The adjustment affects all stitches and will remain until the machine is turned off.
CLR - Deleting stitches
This button is used while in PROG if you wish to delete
what you have programmed. See page 24.
After Ànishing your embroidery sewing, touch the CLR button.
The embroidery arm returns to ready position.
Memory - number
The machine has 4 different program memories. Each
memory will hold up to 55 stitches or letters. The button is used to advance to the memory required in PROG or REP. The number is shown on the display to the upper right. See page 20.
Not used when sewing embroideries.
Buttonhole sensor foot
When you plug the buttonhole sensor foot into the machine and place the white Àeld of the measurement wheel against the white mark, the symbol
 will show brightly on the display. See page 47.
Recommended presser foot
The letter shows which presser foot is correct for the stitch you have selected. The corresponding letter is on the presser foot.
18
Downloaded from www.Manualslib.com manuals search engine

Functions and InfoDisplay
Stitch selection
When you turn on the machine without having the embroidery unit connected, it always selects straight stitch and the number 1 as well as is displayed. The machine has one menu of stitches shown on the selection buttons with white symbols and two menus of letters shown in black symbols.
With the MENU button you select which menu you wish to
sew.
The selected menu will be displayed, for stitches,  or
or  for letters.
To the very right on the Infodisplay the number of the selected stitch or the selected letter is displayed.
When the embroidery unit is connected only the numbers of
the selection buttons are used. In the Embroidery booklet each embroidery has a number.
Downloaded from www.Manualslib.com manuals search engine |
19 |
|
|
|
|

Functions and InfoDisplay
Functions / Embroidery
Positioning
These buttons allow you to move the embroidery in four directions.
Rotation
Touch this button once and your embroidery will rotate a quarter
of a turn.
Stitch advance
These buttons allow you to step stitch by stitch forward
(+) or backward (-) within your embroidery.
Color advance
Many of the embroideries have color changes. These buttons allow you to step forward (+)
or backward (-) to the beginning of each thread color change.
Check size
This button allows you to step from one corner to another
within your embroidery to check the Ànished size of your design.
When your embroidery is Ànished, touch this button. The
embroidery arm returns to parking position. The embroidery unit can now be removed. Read more about embroidery sewing on page 32-36.
MEMORY
The machine has 4 different program memories. Each memory holds up to 55 stitches or letters. You can combine any stitches/letters you wish with the exception of stitches 8-12.
When selecting PROG or REP, the memory you last used will be displayed. Your machine will
remember what you have programmed even when it is switched off.
Use the buttons marked with arrows to advance or return within the memory, to the right and
to the left. These buttons are used in PROG position when programming and in REP if you wish to check what is programmed or if you wish to start sewing a few stitches into the program.
20
Downloaded from www.Manualslib.com manuals search engine
 Loading...