


Manual
Operating
3600 Viking
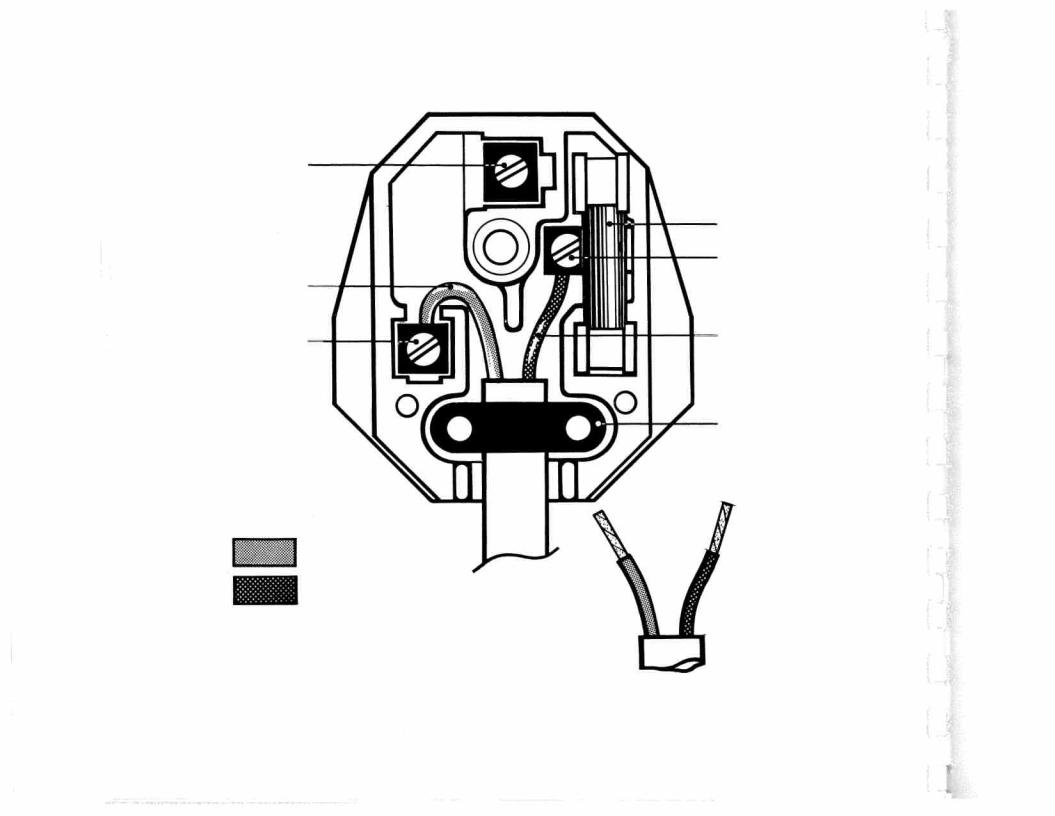
WIRING INSTRUCTIONS
Only for the British market! When changing plug wiring should be effected according to the instruction below.
N
THE WIRES IN THIS MAINS LEAD ARE COLOURED IN ACCORDANCE WITH THE FOLLOWING CODE:
Blue |
Neutral |
Brown : Live
Trim 2 cores |
r32mm |
|
same length |
||
|
r
1’
r
I—
1’
1’
[1
1’
Fitted with3 AMP fuse
to booklet, this prepared have We
this operate to how know you let
make to how and machine sewing
possibilities sewing its
all of
use
get will
you that sure quite are We
your with hours pleasant many
you that and machine sewing new
obtaining in successful be will
results
fine many
AB HUSQVARNA
|
10 |
32 |
6 6 |
5 |
34 |
4 |
14 |
34 |
14 |
27 |
16 |
33 |
27 27 |
9 |
14 |
15 |
16 |
16 |
18 |
13 |
6 |
11 |
10 |
7 |
13 |
22 |
34 |
12 |
7 |
17 |
22 |
15 |
|
||||||||||||||||||||||||||||||||
|
|
— |
|
|
|
|
|
|
|
|
|
|
|
|
|
|
— |
|
|
|
|
— — |
|
|
|
|
|
|
|
|
|
|
— |
|
|
|
|
|
|
|
|
|
— |
|
|
|
|
|
|
|
|
|
|
|
|
|
|
|
|||||||
|
|
|
|
|
|
|
|
|
|
|
|
|
|
|
|
|
|
|
|
|
|
|
|
|
|
|
|
|
|
12 |
|
|
|
|
|
|
|
|
|
12 |
|
|
|
|
|
|
|
|
|
|
|
|
|
|
|
||||||||||
|
|
|
|
|
|
|
|
|
|
|
|
|
|
|
|
26 |
|
|
|
|
16 16 |
|
|
|
|
|
|
|
|
|
|
|
|
|
|
|
|
|
|
|
|
|
|
|
|
|
|
|
|
|
|
|
|
|
|
||||||||||
|
|
31 |
|
|
|
|
|
|
|
|
|
|
|
|
|
|
|
|
|
|
|
|
|
|
|
|
|
|
|
|
|
|
|
|
|
|
|
|
|
|
|
|
|
|
|
|
|
|
|
|
|
|
|
|
|||||||||||
|
|
|
|
|
|
|
|
|
|
|
|
|
|
|
|
|
|
|
|
|
|
|
|
|
|
|
|
|
|
|
|
|
|
|
|
|
|
|
|
|
|
|
|
|
|
|
|
|
|
|
|
|
|
|
|
|
|
||||||||
|
|
|
|
|
|
|
|
|
|
|
|
|
|
|
|
|
|
|
|
|
|
|
|
|
|
|
|
|
|
|
|
|
|
|
|
|
|
|
|
|
|
|
|
|
|
|
|
|
|
|
|
|
|
|
|
|
|
|
|
|
|
||||
|
|
|
|
|
|
|
|
|
|
|
|
|
|
|
|
|
|
|
|
|
|
|
|
|
|
|
|
|
|
|
|
|
|
|
|
|
|
|
|
|
|
|
|
|
|
|
|
|
|
|
|
|
|
|
|
|
|
|
|
|
|
|
|
||
|
|
|
|
|
|
|
|
|
|
|
|
outlet |
|
|
|
|
|
|
|
|
|
|
|
|
|
|
|
|
|
|
|
|
|
|
|
|
|
|
|
|
|
|
|
|
|
|
|
|
|
|
|
|
|
|
|
|
|
|
|
|
|
|
|
|
|
|
|
|
|
|
|
|
|
|
|
machine |
power |
|
|
|
|
|
|
|
stitching) |
|
|
|
|
|
|
|
|
changing |
|
|
|
|
|
|
|
|
|
|
|
|
|
|
|
|
|
|
|
|
|
|
|
|
|
|
|
|
|
|
|
|
|
|
|||
|
|
|
|
|
|
|
|
|
|
the |
|
|
|
|
|
|
|
|
|
|
|
|
|
|
|
|
|
|
|
|
|
|
|
|
|
|
|
|
|
|
|
|
|
|
|
|
|
|
|
|
|
|
|
|
|
|
|
|
|
||||||
|
|
|
|
|
|
|
|
|
|
the |
to |
|
away |
|
|
|
|
|
|
|
|
|
|
|
|
|
|
|
|
|
|
|
|
|
|
|
|
|
|
|
|
|
|
|
|
|
|
|
|
|
threading |
|
|
|
|
|
|
|
|||||||
|
threading |
|
|
|
|
|
|
|
|
|
|
|
|
|
(reverse |
|
|
|
|
|
|
|
|
|
|
|
|
|
|
|
|
|
|
|
|
|
thread |
thread |
|
|
|
|
machine |
|
|
|
|
|
|
|
|
|
|||||||||||||
|
|
|
|
|
|
|
|
|
unpacking |
machine |
(regular) |
foot |
buttonholes |
|
|
|
of |
|
|
|
|
foot, |
|
|
|
|
|
|
|
|
|
|
|
|
|
|
|
zag |
tension |
|
|
step |
|
|
|
||||||||||||||||||||
|
hints |
|
|
|
thread |
|
machine |
|
|
|
stitch |
|
|
|
|
|
stitching |
|
|
|
|
|
|
|
|
|
|
|
stitching |
|
|
|
|||||||||||||||||||||||||||||||||
|
|
changing |
|
|
feeding |
|
|
|
|
|
|
|
presser |
dial |
|
stitching |
|
|
|
|
|
|
|
lower |
upper |
|
|
|
|
|
|
- |
|
|
|
||||||||||||||||||||||||||||||
|
|
|
the |
|
|
|
|
|
|
|
|
|
|
|
|
|
|
|
|
|
zig |
the |
|
|
|
|
|
||||||||||||||||||||||||||||||||||||||
|
thread, |
|
|
|
|
|
|
|
|
presser |
|
|
|
|
|
setting |
(hook) |
|
selector |
|
|
|
|
|
cutter |
|
|
|
|
tension |
- |
|
|
thread |
|
thread, |
three |
|
|
|
|||||||||||||||||||||||||
|
|
|
|
|
|
|
|
|
|
|
|
|
|
|
|
|
|
|
|
|
|
|
|
|
|
|
|
|
|
|
|
||||||||||||||||||||||||||||||||||
|
|
|
|
|
|
|
|
|
|
|
|
|
|
|
|
|
|
|
|
|
|
|
|
|
|
|
|
|
|
|
|
|
|
||||||||||||||||||||||||||||||||
|
|
|
|
and |
|
and |
in |
foot |
the |
|
|
|
|
|
|
|
|
|
|
|
|
|
|
|
|
|
|
|
|
foot |
|
||||||||||||||||||||||||||||||||||
|
|
Maintenance |
|
|
|
|
|
|
|
|
|
|
|
|
|
|
Reinforced |
|
|
|
|
|
|
the |
|
|
|
|
|
|
|
|
|
|
|
Tensions |
|
|
|
|
Threading |
Threading |
|
|
|
|
Unpacking |
|
|
|
|
|
|
|
|
|
|||||||||
|
Lower |
|
Needle, |
Needle |
Open |
Packing |
Plugging |
Presser |
Putting |
Regular |
|
Reverse |
|
Seam |
|
Seams, |
Shuttle |
|
Snap |
Stitch |
Stitch |
Straight |
|
Stretch |
|
Thread |
|
Thread |
Thread |
Three |
Upper |
|
Upper |
Zig |
Zig |
Zipper |
|
||||||||||||||||||||||||||||
|
|
|
|
|
Selecting |
|
|
|
|
|
|
||||||||||||||||||||||||||||||||||||||||||||||||||||||
|
|
|
|
|
|
|
|
|
|
|
|
|
|
|
|
|
|
|
|
|
|
|
|
|
|
|
|
|
|
|
|
|
|
|
|
|
|
|
|
|
|
|
|
|
|
|
|
|
|
|
step |
|
|
|
|
|
|
zag |
zag, |
|
|
|
|||
|
|
|
|
|
|
|
|
|
|
|
|
|
|
|
|
|
|
|
|
|
|
|
|
|
|
|
|
|
|
|
- |
|
|
|
|
|
|
|
|
|
|
|
|
|
|
|
|
|
|
|
|
|
|
|
|
|
|
|
|
|
|
||||
|
|
|
|
|
|
|
|
|
|
|
|
|
|
|
|
|
|
|
|
|
|
|
|
|
|
|
|
|
|
|
|
|
|
|
|
|
|
|
|
|
|
|
|
|
|
|
|
|
|
|
|
|
|
|
|
|
|
- |
- |
|
|
|
|||
|
|
|
|
|
|
|
|
|
|
|
|
|
|
|
|
|
|
|
|
|
|
|
|
|
|
|
|
|
|
|
|
|
|
|
|
|
|
|
|
|
|
|
|
|
|
|
|
|
|
|
|
|
|
|
|
|
|
|
|
|
|
||||
|
33 |
19 |
|
20 |
|
21 |
10 |
8 |
25 |
27 |
|
28 |
|
30 |
|
30 |
|
6 |
|
14 |
|
6 |
|
30 |
|
4 |
|
4 |
|
33 |
29 |
29 |
|
29 |
|
23 |
|
21 |
|
|
5 |
|
30 |
|
15 |
|
4 |
|
5 |
|
9 |
|
10 |
|
20 |
|
4 |
|
15 |
|
11 |
12 |
|||
|
|
|
|
|
|
|
|
|
|
|
|
|
|
|
|
|
|
|
|
|
|
|
|
|
|
|
|
|
|
|
|
|
|
|
|
|
|
|
|||||||||||||||||||||||||||
|
|
|
|
|
|
|
|
|
|
|
|
|
|
|
|
|
|
|
|
|
|
|
|
|
|
|
|
|
|
|
|
|
|
|
|
|
|
|
|
||||||||||||||||||||||||||
|
|
|
— |
|
|
|
|
|
|
|
|
|
|
|
|
|
|
|
|
|
|
|
|
|
|
|
|
|
|
|
|
|
|
|
|
|
|
|
|
|
|
|
|
||||||||||||||||||||||
|
|
|
|
|
|
|
|
|
|
|
— |
— |
|
|
|
|
|
|
|
|
|
|
|
|
|
|
|
|
|
|
|
|
|
|
|
|
|
|
|
|
|
|
|
|
|
|
|
|
|
|
|
|
|
|
|
|
|
|
|
|
|
|
|
|
|
|
|
|
|
|
|
|
|
|
|
|
7 |
24 |
26 |
|
|
|
|
|
|
|
|
|
|
|
|
|
|
|
|
|
|
|
|
|
|
|
|
|
|
|
|
|
|
|
|
|
|
|
|
|
|
|
|
|
|
|
|
|
|
|
|
|
|
|
|
|
. |
|
|
|
|
|
|
|
|
|
|
|
|
|
|
|
|
|
|
|
|
|
|
|
|
|
|
|
|
to |
|
|
|
|
|
|
|
|
|
|
|
|
|
|
|
|
|
|
|
|
|
|
|
|
|
|
|
|
|
|
|
|
|
||
|
|
|
|
|
|
|
|
|
|
|
|
|
|
|
|
|
|
|
|
|
|
|
|
|
|
|
|
|
|
|
outlet |
|
|
|
|
|
|
|
|
|
|
|
|
|
|
|
|
|
|
|
|
|
|
|
|
|
|
|
|
|
|
|
|
|
|
|
|
|
|
|
|
|
|
|
|
|
|
|
|
|
|
|
|
|
|
|
|
|
foot |
|
|
|
|
|
|
power |
|
|
|
|
|
|
|
|
|
|
|
|
|
|
|
|
|
|
|
|
|
|
|
|
|
|
|
|
|
|
|
|
|
||
|
|
|
|
|
|
|
|
|
|
|
|
|
|
|
|
|
|
|
|
|
|
|
|
|
|
|
|
|
the |
|
|
|
|
|
|
|
|
hem) |
|
|
|
|
|
|
|
|
|
|
|
|
|
|
|
|
|
|
|
|
|
|
|
||||
|
|
|
|
|
|
|
|
|
|
|
|
|
|
|
|
|
|
|
|
|
|
|
presser |
thread |
|
|
|
control |
box |
|
|
|
|
|
|
|
|
|
|
|
|
|
|
|
|
|
|
|
|
|
(hlindstitch) |
|
|
|
|
up |
|
||||||||
|
|
|
|
|
|
|
|
|
|
|
|
|
|
|
|
|
|
|
|
|
|
|
|
|
|
|
|
|
|
|
|
|
|
|
|
|
|
|
|
|
|
|
|
|
|
|
|
|
|
|
|
|
|
||||||||||||
|
contents |
general |
|
|
|
|
|
|
|
|
|
|
|
|
|
|
|
|
|
|
|
|
machine |
|
|
|
|
|
|
(blind |
|
|
|
|
|
|
|
|
|
|
|
|
|
case |
|
|
|
|
|
||||||||||||||||
|
|
|
|
|
|
|
|
|
|
|
reinforced |
|
|
machine |
bulb |
needle |
on |
and |
|
|
|
foot |
accessory |
|
|
|
|
stitch |
|
|
|
cleaning |
lowering |
|
|
|
|
|
|
bobbin |
|
|
switch |
dog |
bringing |
tension |
|||||||||||||||||||
|
|
|
|
|
|
elastic |
|
|
|
|
|
snap |
|
|
|
|
|
|
|
|
|
|
|
|
|
|
|
|
|
|
|
|
|||||||||||||||||||||||||||||||||
|
|
|
|
|
|
|
|
|
|
|
|
|
knife |
light |
|
|
|
|
|
|
|
|
|
|
|
|
|
|
table |
|
|
|
|
|
|
|
|
|
|
|
|||||||||||||||||||||||||
|
|
|
|
|
|
hem |
|
|
|
|
|
|
|
|
|
the |
the |
|
|
|
|
|
|
|
|
|
|
|
|
|
|
|
|
|
|
|
light |
the |
|
|
|||||||||||||||||||||||||
|
|
|
|
|
|
|
|
|
case |
winding |
|
|
|
|
the |
|
|
|
|
- |
of |
|
|
|
|
|
|
|
|
|
|
stockings |
- |
blindstitch |
|
|
dog, |
dog, |
control |
arm |
(shuttle) |
|
|
|
|
and |
|
|
|
|
|||||||||||||||
INDEX |
box, |
Blindstitching, Blidstitch |
Blindstitch, Bobbin |
Bobbin Buttonholes Buttonholes, |
Buttonhole |
|
|
the |
the |
the |
needle |
|
|
Connecting Connecting |
of |
foot |
action |
|
|
|
Extension |
|
|
|
|
|
|
|
|
|
|
of |
hem |
|
|
Lowering |
thread, |
thread |
|||||||||||||||||||||||||||
Accessory |
Care |
Changing Changing |
Changing Choice |
Cleaning |
Contents Darning Darning |
Darning |
Double |
Elastic |
Feed |
Feed |
Foot |
Free |
Hook Insertion Invisible |
Light |
Lower |
Lower |
|||||||||||||||||||||||||||||||||||||||||||||||||
|
|
|
|
|
|
|
|
|
|
|
|
|
|
|
|
|
of |
|
|
|
|
|
|
|
|
|
|
|
|
|
|
|
|
|
|
|
|
|
|
|
|
|
|
|
|
|
|
|
|
|
|
|
|
|
|
|
|
|
|
|
|
|
|
|
|
2
3
|
table |
|
|
|
arm |
spindle |
||
button |
extension |
|
|
|
|
|||
pin |
scale |
selector |
wheel |
winding |
winding |
|||
for |
||||||||
Reverse |
||||||||
Pattern |
|
Bobbin |
Bobbin |
|||||
Spool |
Stitch |
Hand |
||||||
Stud |
||||||||
. . . . |
. . . . |
|||||||
24 |
25 |
26 |
27 |
|||||
28 |
29 |
30 |
31 |
|||||
|
|
|
|
|||||
|
|
|
|
|
screw |
|
plate) |
||
cover |
|
lifter |
|
|
|
(needle |
|
||
|
|
|
clamp |
|
|
||||
case |
plate |
foot |
bar |
bar |
|
plate |
arm |
||
Bobbin |
Presser |
Presser |
Needle |
Needle |
Needle |
||||
Throat |
|||||||||
Base |
|||||||||
Free |
|||||||||
. . . |
. . |
|
|
|
|
||||
12 |
13 |
14 |
. . . . |
||||||
15 |
16 |
||||||||
|
|
|
|
|
17 |
18 |
19 |
20 |
|
|
|
|
|
|
|
|
|
||
|
disc lever scale dial |
thread |
|
guide |
|
|
|||
guide |
with |
|
|
|
|||||
|
up |
|
|
|
|
||||
|
- |
|
|
|
|
|
|
||
|
tension |
tension tension |
guide |
spring |
thread |
foot |
|
||
thread |
Thread |
take |
dog |
||||||
Thread |
Thread Thread |
Thread |
|
Presser |
|||||
take |
Front |
||||||||
Top |
Feed |
||||||||
|
|
|
|
|
up |
|
|
|
|
|
|
|
|
|
- |
|
|
|
|
. |
. . |
. . . |
|
|
|
|
|||
1 |
|
|
|
|
|||||
2 |
3 |
|
. |
. . |
|||||
4 5 |
6 |
|
|||||||
|
|
|
|
|
|
7 |
8 |
9 |
|
|
|
|
|
|
|
|
|||
button feed Drop
. 21
case Bobbin
. 10
scale length Stitch
. 22
(book) Shuttle
. 11
dial length Stitch
. 23
L
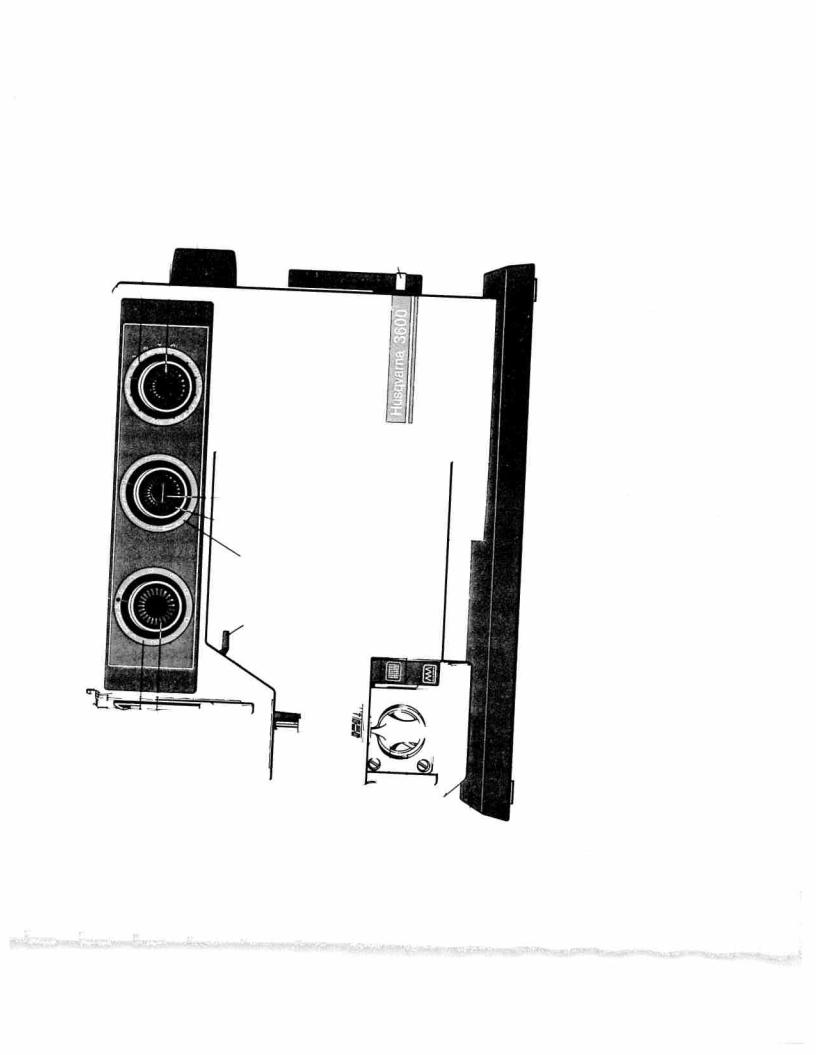
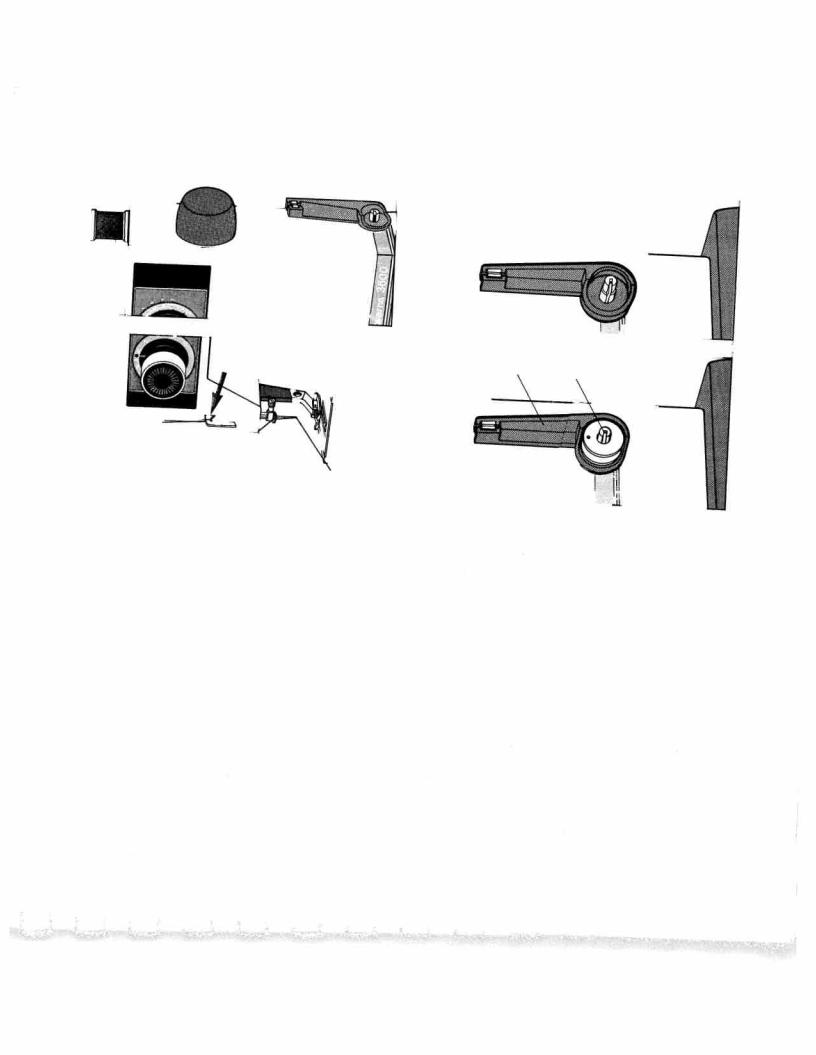
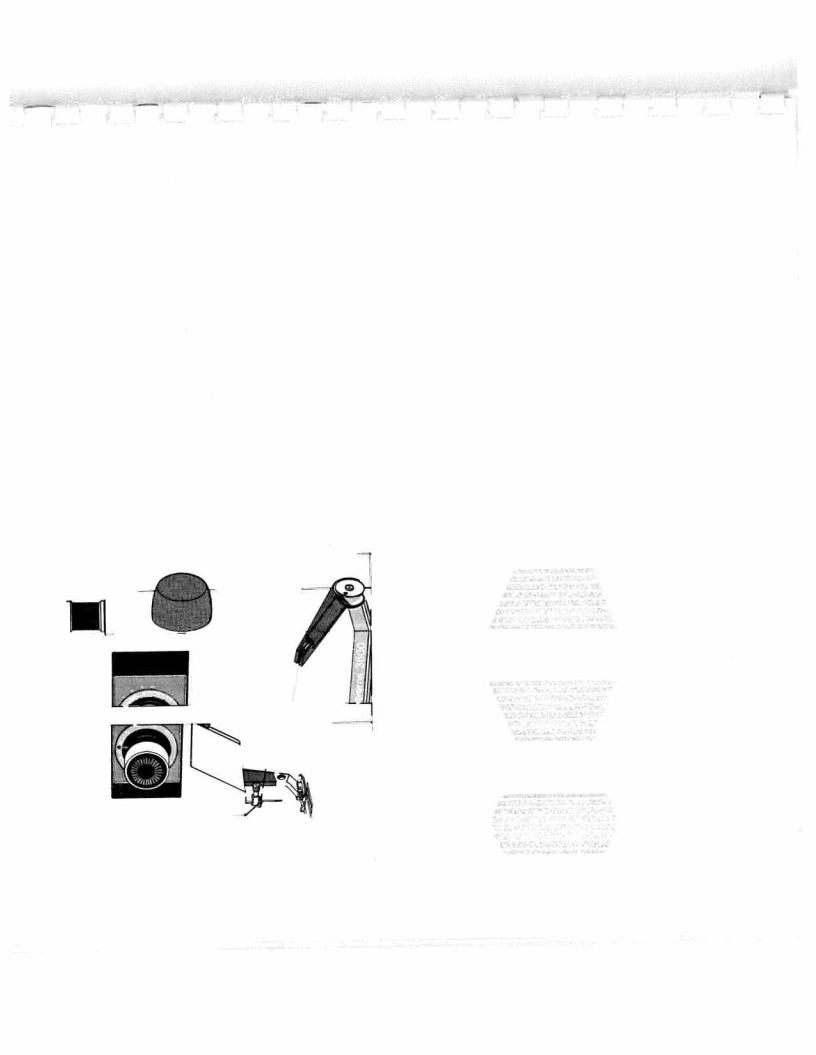
Connecting the foot control
Pull the lead out of the foot control and place the control under the table. Insert the foot control plug into the socket, A, at the back of the machine.
Connection to wall outlet
The machine’s voltage is given on a plate, B, at the back of the machine. Ensure that the wall outlet voltage is the same as that of the machine. Then connect the machine to the proper wall outlet.
Lighting
The switch, C, for the light is also at the back of the machine. For changing the light bulb see page 30.
F
4
arm Free
|
|
|
|
|
|
arm |
The |
cuffs |
|
and |
||||
|
|
|
|
|
free |
. |
|
socks |
||||||
|
|
|
|
|
parts |
and |
|
|
||||||
|
|
|
|
the |
|
|
||||||||
|
|
|
|
these |
|
collars |
|
|
darn |
|||||
|
|
|
onto |
|
|
|
||||||||
|
|
|
in |
|
attach |
|
|
or |
||||||
|
|
|
drawn |
|
patch |
|
|
|
|
|||||
|
|
|
|
|
|
|
clothes, |
|||||||
|
|
|
|
|
to |
|
||||||||
|
|
|
to |
|
|
|||||||||
|
|
be |
|
|
easier |
|
||||||||
|
|
|
or |
|
children’s |
|
||||||||
|
|
|
|
|
|
|
||||||||
|
can |
|
|
mend |
much |
|
|
|||||||
|
|
|
|
|
|
|
|
|||||||
|
|
|
|
|
|
|
|
|
|
|||||
|
sleeves |
|
|
|
to |
|
|
|
|
. |
||||
|
|
|
|
|
sew, |
it |
small |
|
|
machine |
||||
|
|
|
|
|
|
|
|
|||||||
and |
|
to |
makes |
|
|
the |
||||||||
|
sew |
|
|
|||||||||||
legs |
|
easy |
also |
|
|
|
||||||||
|
|
|
|
on |
||||||||||
|
|
as |
|
|
||||||||||
|
it |
|
|
stockings |
||||||||||
Trouser |
|
|
|
|
||||||||||
|
|
free |
|
|
|
|||||||||
|
|
making |
|
|
as |
|
|
|||||||
|
|
|
|
|
|
|
arm |
well |
|
|
|
|
||
|
|
|
|
|
|
|
|
|
|
|
|
|
||
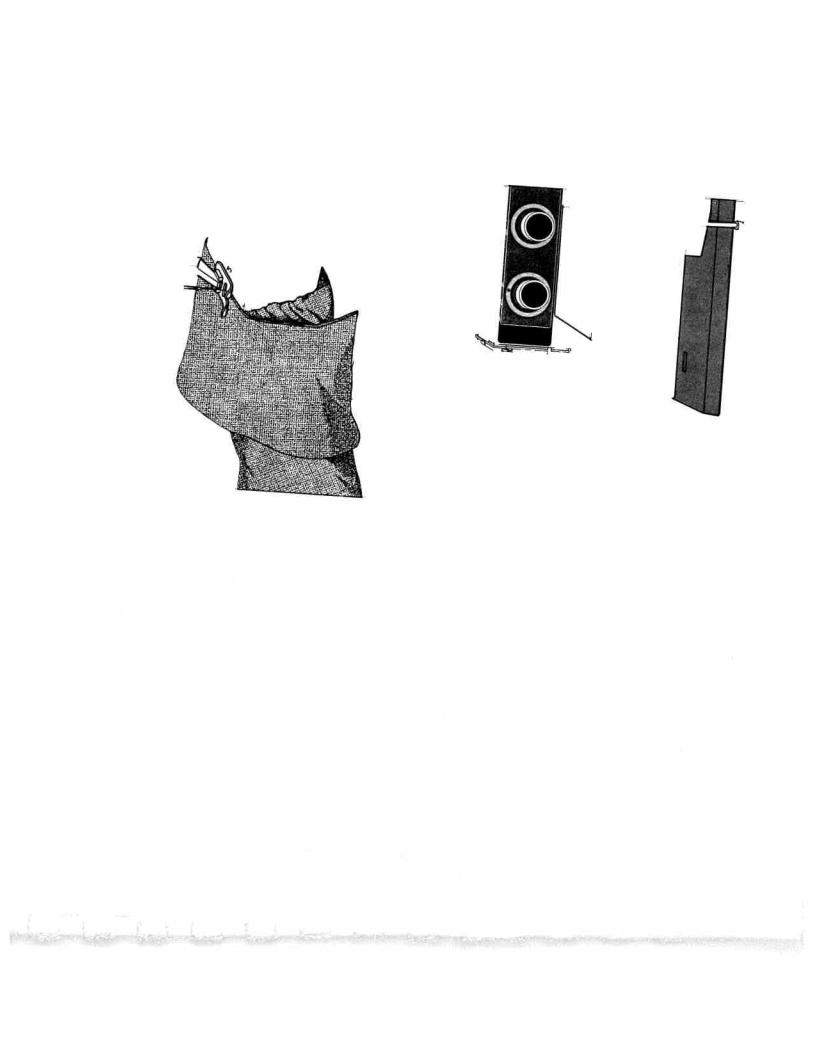
5
|
|
extension |
|
|
|
which |
arm |
|
|
|||
|
|
|
|
|
|
|
|
|
. |
. |
||
|
|
|
|
|
|
|
|
|
|
|
|
|
|
|
the |
|
|
|
table |
|
free |
|
lowered |
||
|
|
|
|
|
|
|
|
|||||
|
|
|
|
|
|
the |
|
be |
||||
|
|
|
|
|
extension |
|
|
|
||||
|
|
attach |
|
|
|
|
|
on |
|
should |
||
|
|
surface, |
|
|
the |
|
studs |
which |
|
|||
|
|
|
|
corresponding |
|
|
||||||
|
working |
|
underneath |
|
leg |
|
||||||
|
|
|
|
|
|
|||||||
table |
|
|
|
|
|
|
support |
|
|
|||
|
|
|
|
|
onto |
|
|
|
||||
a |
|
|
|
|
|
extra |
|
|
||||
|
larger |
grooves |
|
|
|
|
|
|
|
|
||
Extension |
need |
|
|
fitted |
|
|
an |
|
|
|
||
|
two |
|
|
|
|
|
|
|
||||
|
you |
|
|
be |
|
|
also |
|
|
|
||
|
|
are |
|
|
|
|
|
|
||||
|
|
|
|
is |
|
|
|
|||||
|
|
|
|
|
|
|
|
|
||||
|
When |
table |
There |
|
should |
|
|
|
|
|||
|
|
. |
|
|
|
|
|
There |
|
|
|
|
|
|
|
|
|
|
|
|
|
|
|
||
Sewing |
Coloured |
|
|
Embroidery |
|
thread |
sewing |
Silk |
Synthetic |
thread or |
Needle |
English |
thread |
thread |
thread |
Darning |
No. |
No. |
No. |
|
|
thread |
|
60 |
|
|
|
60 |
70 |
50-60 |
26 |
100/3 |
1) |
40—50 |
80 |
|
|||||
40—50 |
26 |
100/3 |
|
30—50 |
90 |
40 |
|
|
|
20 |
100 |
30 |
|
|
|
|
110 |
30 |
|
|
|
|
120 |
‘) Synthetic threads are not generally numbered.
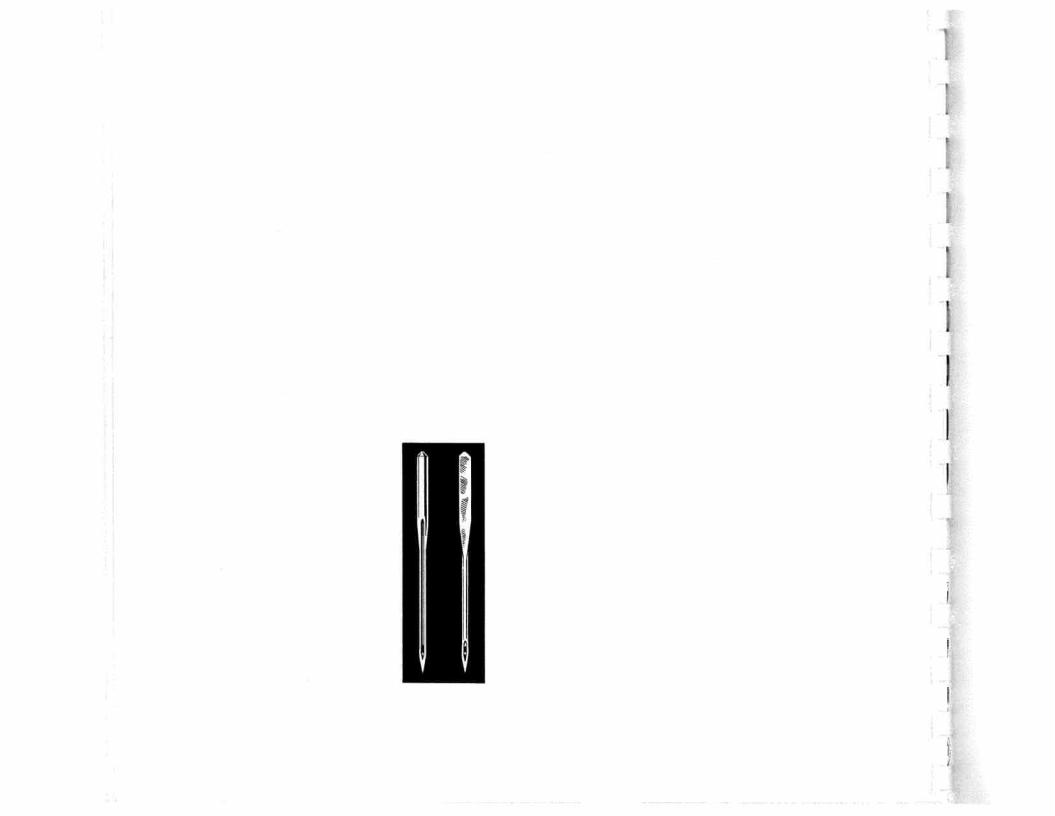
Needle and thread
Mercerized cotton thread as well as synthetic thread is used for every kind of fabric.
No. 30—50 embroidery or darning thread gives among other things fine buttonholes and nice top stitching. As the name implies, it is of course also used for embroidery and darning. You will find a picture of a needle on the inside of the shuttle door. The needle system has number 705 H. Use only needles marked in this way. The machine is fitted with needle No. 80. You will also find a number of extra needles of various sizes in the accessory box.
With regard to the size of needle, it may be generally said that No. 80—90 can be used for most fabrics. For a finer thread and for sheer and tightly woven fabrics a finer needle should be used.
For very heavy and stiff fabrics a coarse needle must be used. The higher the number, the coarser the needle. The sizes of thread and needle to be used are shown on the table.
Changing the needle
Loosen the needle clamp screw and remove the needle which is to be changed. When you insert the new needle, turn the flat side away from you and push the needle up into the needle socket as far as the stop. Tighten the screw so that the needle is held firmly.
L
I
I
6
thread upper the Threading
|
|
until |
|
1, |
|
the |
|
the |
Now |
|
from |
|
|
|
|
|
|
the |
|||||||
|
|
|
|
|
|
|
|
|
|
|
|
|
|
||||||||||||
|
|
|
|
|
pin, |
|
|
|
|
|
|
|
|
|
|||||||||||
|
|
you |
|
|
of |
|
between |
|
|
|
|
|
|
|
Thread |
||||||||||
|
|
|
|
|
. |
|
|
|
|
|
|
|
|
|
|||||||||||
|
|
|
spool |
|
|
|
|
|
|
|
|
|
|
|
|||||||||||
|
|
|
|
|
|
|
|
|
|
|
|
|
|
|
|
|
|||||||||
|
|
|
|
|
|
|
|
rear |
|
|
|
|
4 |
|
thread |
|
|
|
|
|
|
|
|||
|
|
|
|
|
|
|
|
|
|
|
|
guide, |
|
|
. |
|
|
|
|||||||
|
|
|
|
|
|
|
|
the |
|
|
|
|
|
|
|
|
|
|
|
||||||
|
|
toward |
|
|
|
|
|
|
|
|
|
|
|
|
|
|
|
|
5 |
|
|
|
|||
|
|
the |
|
|
on |
|
front |
|
|
|
|
|
|
lever, |
|
. |
|||||||||
|
|
|
|
|
|
|
thread |
the |
|
|
|
|
|
guide, |
|||||||||||
|
|
|
|
|
|
2, |
|
the |
- |
|
|
||||||||||||||
|
handwheel |
|
out |
|
|
|
|
|
|||||||||||||||||
|
|
|
|
|
|
|
|
|
|
|
|
up |
|
|
|
|
|||||||||
|
|
|
|
guide, |
|
|
|
|
|
|
|
|
|
|
|
|
|
||||||||
|
|
Pull |
|
|
|
to |
the |
drawing |
|
take |
|
ihread |
|||||||||||||
|
|
|
|
|
|
|
|
|
|
|
|||||||||||||||
|
|
|
|
|
|
|
|
|
|
|
|
|
|
||||||||||||
|
|
|
. |
. |
|
|
thread |
|
|
|
|
|
|
|
|
|
|
|
|||||||
|
|
|
pin |
|
|
|
|
|
|
|
|
thread |
|
|
|
|
|
||||||||
the |
position |
thread |
|
|
|
|
around |
|
|
|
|
|
black |
||||||||||||
the |
|
the |
by |
|
|
||||||||||||||||||||
Turn |
|
the |
|
||||||||||||||||||||||
|
|
|
highest |
|
on |
|
draw |
|
down |
threading |
|
|
|
|
|
|
|||||||||
|
|
|
|
|
|
|
|
|
|
|
|
|
|
|
|||||||||||
|
|
|
|
|
|
into |
|
|
|
|
|
behind |
front |
||||||||||||
|
|
|
|
|
|
|
and |
|
|
|
|
||||||||||||||
|
|
|
its |
of |
|
|
|
|
|
|
|
|
|
|
|||||||||||
. |
|
|
|
thread |
|
the |
|
|
|
|
|
|
|
|
|
on |
|
|
|
|
|
||||
foot |
|
|
|
|
|
|
Then |
|
|
|
|
|
|
slot |
|
|
|
|
the |
||||||
presser |
|
at |
spool |
thread |
|
3, |
|
|
|
the |
|
thread |
|
||||||||||||
|
arm, |
|
|
|
the |
|
|
|
|||||||||||||||||
|
|
|
|
|
|
|
from |
||||||||||||||||||
|
|
|
|
|
|
|
|
|
|
|
|
|
|
|
|
|
|
|
|
|
|
||||
|
|
|
|
|
|
|
|
|
|
|
discs, |
|
|
|
in |
|
|
|
|
|
|
||||
|
|
|
is |
|
|
|
|
|
|
|
|
|
|
|
|
|
|
|
|
|
|||||
|
|
|
|
|
|
|
|
|
|
|
|
|
|
left |
|
|
|
|
|
|
|||||
|
|
|
|
|
|
|
|
|
|
|
|
|
|
|
|
|
|
|
|
|
|
|
|
||
the |
|
|
needle |
|
the |
the |
“upper” |
|
tension |
|
continue |
|
- |
the |
|
7, |
|||||||||
|
|
|
|
|
|
|
|
|
|
|
|||||||||||||||
|
|
|
|
|
|
|
|
|
|
|
|
|
|
||||||||||||
Raise |
|
the |
|
place |
|
|
|
right |
|
|
needle, |
||||||||||||||
|
|
Slide |
|
|
|
|
Draw |
|
|
||||||||||||||||
|
|
|
|
|
|
|
|
|
|
|
|
|
|
|
|
|
- |
|
|
|
|
|
|
||
|
|
|
|
|
|
|
|
|
|
|
|
|
|
|
|
|
to |
|
|
|
|
|
|
||
7
|
|
|
|
|
an |
|
best |
|
|
Husqvarna |
|
|
|
Other |
|
|
of |
|
bobbin |
|
bobbin |
||
|
|
|
|
|
|
|
|
|
|
|
|
|
|
|
|
||||||||
|
|
|
|
|
Take |
|
|
|
|
|
|
|
|
|
construction |
|
|
||||||
|
|
|
|
|
|
|
the |
|
|
|
|
|
. |
|
|
|
|
||||||
|
|
|
|
|
|
|
|
|
|
|
the |
|
|
|
|
|
|
||||||
|
|
|
|
. |
|
get |
|
|
|
|
|
hole |
|
|
|
|
|
the |
|
the |
|||
|
|
|
|
stops |
|
to |
|
only |
|
|
|
|
|
|
|
|
|
Turn |
|
onto |
|||
|
|
|
it |
|
order |
|
|
in |
|
the |
|
|
|||||||||||
|
|
|
until |
|
use |
|
|
. |
bobbin |
||||||||||||||
|
|
|
|
|
|
|
|
|
|
|
|||||||||||||
|
|
|
. |
|
grooves |
|
|
|
|
||||||||||||||
|
|
|
In |
|
|
|
|
due |
hole |
|
|
||||||||||||
|
|
|
|
|
|
|
|
|
winding, |
|
|
|
|
to |
|
|
|
|
|||||
|
|
you |
box |
|
|
|
|
|
|
|
|
a |
the |
||||||||||
|
|
|
|
|
|
|
|
|
|
|
|
|
|||||||||||
|
|
|
|
|
|
|
|
|
|
|
|
|
|
|
|
|
|
|
|
||||
|
|
|
|
|
accessory |
|
|
|
|
three |
used, |
|
is |
||||||||||
|
|
|
|
|
|
|
|
|
|
|
|
||||||||||||
|
|
|
|
|
|
|
|
|
|
|
|
|
|
||||||||||
|
|
|
|
|
|
|
|
have |
|
|
and |
||||||||||||
|
towards |
|
|
|
bobbin |
|
|
|
|
be |
|
there |
slide |
||||||||||
|
|
|
|
|
|
|
|
|
|
|
|
|
|
|
|||||||||
|
|
|
|
|
|
|
|
|
|
|
|
. |
bobbin |
|
|
|
|||||||
|
|
|
|
|
|
|
|
|
|
|
|
|
|
|
|
|
|
||||||
winding |
A, |
the |
when |
|
which |
|
cannot |
|
device |
outwards |
|
||||||||||||
|
|
|
|
|
|||||||||||||||||||
|
arm, |
|
from |
|
|
|
bobbins |
|
|
winding |
the |
|
|||||||||||
|
|
|
|
|
|
|
|
|
|
||||||||||||||
|
|
|
|
bobbins, |
|
|
|
|
|
|
|
||||||||||||
|
|
|
result |
|
|
|
|
|
|
|
|
|
|||||||||||
|
spool |
|
|
|
|
|
|
|
|
|
|
|
|
||||||||||
|
|
|
|
|
|
|
|
|
|
|
side |
hole |
|
||||||||||
|
|
|
|
|
|
|
|
|
|
|
|
B |
|||||||||||
Bobbin |
|
|
|
|
bobbin |
|
|
|
|
|
|
|
|
|
|
|
|
|
of |
|
|
|
|
|
|
|
|
|
possible |
|
|
|
|
|
|
of |
|
|
bobbin |
one |
|
|
. |
||||
|
Pull |
|
|
|
empty |
|
|
|
|
plastic |
|
|
types |
|
|
the |
On |
with |
|
spindle, |
|||
|
the |
|
|
|
|
|
|
|
|
|
|
|
|
|
|
|
|
|
|
the |
|
||
|
|
|
|
|
|
|
|
|
|
|
|
|
|
|
|
|
|
|
|
|
|
||
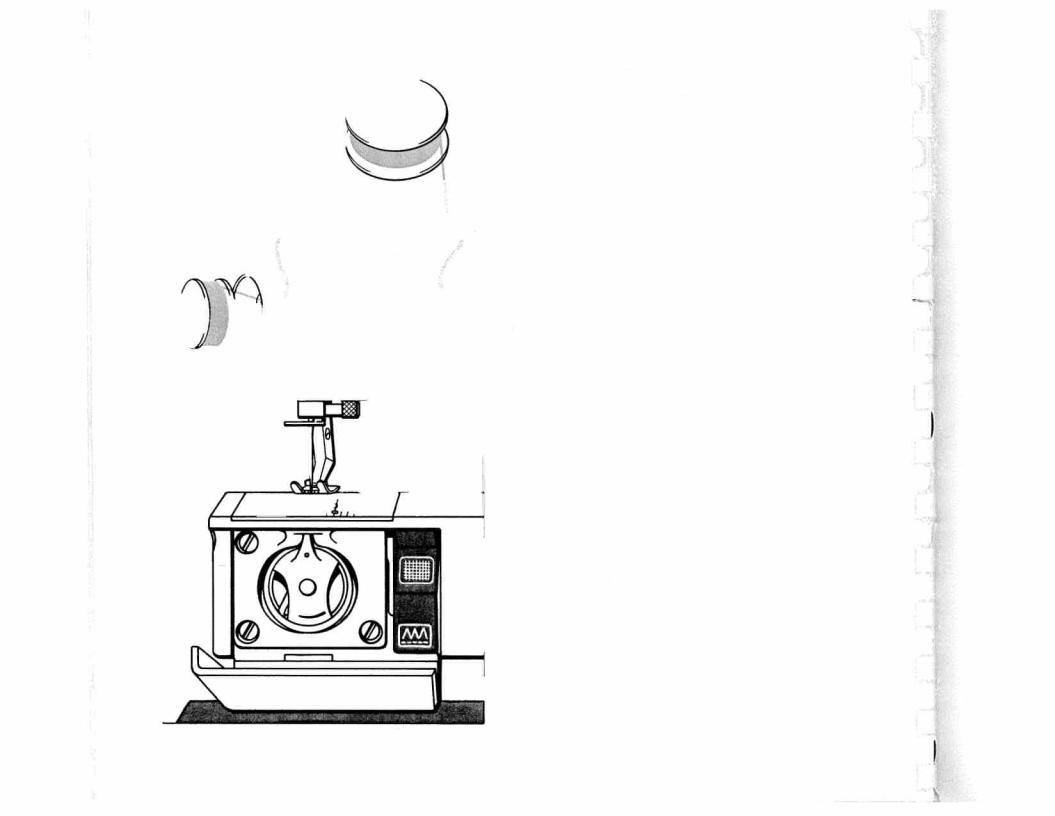
).(cont windingBobbin
thread black the from directly bobbin the wind can You
the between and slot the through thread the Draw
. guide
It
. arm
winding bobbin the of top the in discs tension/guide
. little
a tension thread the reduce to desirable be might
- anti
an in bobbin the around times few a thread the Wind
you while thread the of end the Hold
. direction
clockwise
as soon as thread the Release
. control
foot the down press
completely is bobbin the before winding Stop
. starts
winding
. below
I
. fig
in as filled,
incorrect and Correct see unevenly, winding is machine
the If
. winding
bobbin
the to arm the Return
. thread
the Cut
. bobbin
the Remove
. position
upright
L
winding |
|
|
bobbin |
. |
|
incorrect |
bobbin |
|
wound |
||
|
||
and |
correctly |
|
a |
||
Correct |
shows |
|
Fig |
||
|
1 |
|
|
. |
1mm
. Ca
a
L
3
2
1
8
9
2, |
the |
. |
|||
|
|
||||
fig |
|
|
|
even |
|
. |
|
move |
|
|
|
in |
|
|
becomes |
|
|
|
|
|
|
||
as |
|
screwdriver, |
|
|
|
unevenly |
|
|
winding |
|
|
winding |
|
the |
|
|
|
|
|
the |
|
||
|
|
|
|
||
|
|
of |
|
|
|
is |
|
|
until |
|
|
|
aid |
|
|
||
|
|
|
|
|
|
bobbin |
|
the |
|
left |
|
|
|
|
|
||
the |
|
with |
|
the |
. |
|
|
|
|||
|
|
|
|
||
that |
|
A |
|
to |
screw |
|
|
|
|||
|
|
|
|
||
|
|
slightly |
|
||
notice |
screw |
the |
|||
loosen |
|
|
Tighten |
||
If |
screw |
||||
you |
|
|
|
|
|
is |
the |
|
|
||
bobbin |
. |
||||
move |
|
||||
|
correct, |
|
even |
||
the |
|
becomes |
|
||
|
|
|
|
||
if |
|
|
|
|
|
see |
If |
|
winding |
|
|
to |
is |
|
|
|
|
this |
|
|
|
||
check |
|
|
|
||
. |
|
the |
|
||
3, |
spindle |
|
until |
|
|
|
|
|
|
||
. |
|
|
|
|
|
fig |
the |
|
right |
|
|
like |
|
|
|||
on |
|
|
|||
|
|
|
|||
looks |
|
the |
|
||
in |
|
. |
|||
winding |
pressed |
to |
screw |
||
|
slightly |
the |
|||
If properly |
|||||
|
|
||||
screw |
Tighten |
||||
the |
|
|
|
|
|
case bobbin the Removing
free |
so |
The |
de |
be |
|||||
the |
finger |
. |
is |
will |
|||||
|
|
|
|
||||||
|
|
|
|
|
|
||||
on |
index |
|
case |
latch |
bobbin |
|
|||
|
bobbin |
|
|
||||||
recess |
cover |
|
|
|
the |
|
|
|
|
|
. |
|
|
|
|
|
|
|
|
small |
shuttle |
and |
|
the |
|
as |
|
the |
|
|
|
|
|
|
|||||
|
|
|
|
|
|
||||
thumb |
|
|
long |
|
catch, |
|
|||
|
out |
|
|
|
|||||
|
|
|
|
|
|||||
a |
the |
|
draw |
|
as |
|
|
||
is |
the |
|
|
|
|
the |
|
||
|
|
|
case |
|
|
||||
|
|
|
|
|
|
||||
There |
of |
|
and |
|
|
|
|||
with |
|
|
|
release |
|
||||
|
opening |
|
|
the |
|
|
|||
. |
|
depressed |
|
|
|
||||
|
|
|
|
|
|||||
cover |
|
case |
|
|
|
in |
|
you |
|
|
|
|
|
|
|
|
|||
|
|
|
|
|
|
|
|
||
shuttle |
the |
bobbin |
|
|
|
remain |
|
|
|
facilitate |
is |
|
When |
|
|||||
|
the |
|
|
|
|
|
|||
the |
|
|
latch |
will |
. |
. |
|||
|
Grasp |
|
|
bobbin |
released |
||||
Open |
arm |
that |
pressed |
||||||
|
to |
|
the |
|
|
|
|
|
|
Threading
the lower
thread
When the bobbin is wound, place it in its case with the hole upwards The thread is then running as shown in the fig.
S
Slide the thread into the slot on the edge of the bobbin case. Pull the thread in under the tension spring. Check that the bobbin rotates in the direction of the arrow when the thread is pulled.
Si
Insertion of the bobbin case
Push the bobbin case onto the spindle of the shuttle (hook) so that the projection of the bobbin case fits in the notch at the top of the shuttle cover. Press on the bobbin case slightly to be sure it is latched onto the spindle of the shuttle. Let the thread hang. Shut the door.
10
 Loading...