

Page 1

HP NetServer E 45
User Guide
HP Part Number 5965-2489
Printed August 1997
Page 2

Notice
The information contained in this document is subject to change without notice.
Hewlett-Packard makes no warranty of any kind with regard to this
material, including, but not limited to, the implied warranties of
merchantability and fitness for a particular purpose. Hewlett-Packard shall
not be liable for errors contained herein or for incidental or consequential
damages in connection with the furnishing, performance, or use of this material.
Hewlett-Packard assumes no responsibility for the use or reliability of its software
on equipment that is not furnished by Hewlett-Packard.
This document contains proprietary information that is protected by copyright.
All rights are reserved. No part of this document may be photocopied,
reproduced, or translated to another language without the prior written consent of
Hewlett-Packard Company.
Windows® is a registered trademark of Microsoft in the U.S. and other countries.
CompuServe™ is a U.S. trademark of CompuServe, Inc.
NetWare® and IntranetWare®are registered trademarks of Novell, Inc.
SCO™ is a trademark of The Santa Cruz Operation, Inc.
Hewlett-Packard Company
Network Server Division
Technical Communication / MS 53U-FJ
5301 Stevens Creek Boulevard
P.O. Box 58059
Santa Clara, CA 95052-8059 USA
© Copyright 1997, Hewlett-Packard Company.
Audience Assumptions
The user guide is for the person who installs, administers, and troubleshoots
LAN servers. Hewlett-Packard Company assumes you are qualified in the
servicing of computer equipment and trained in recognizing hazards in products
with hazardous energy levels.
ii
Page 3

Contents
1 Installation Overview ...................................................................................1
Verify Contents..............................................................................................1
View the README File..................................................................................1
Remove the Cover.........................................................................................2
Install Additional Memory...............................................................................4
Install Additional PCI and ISA Boards ............................................................5
Install Additional Mass Storage Devices.........................................................6
Configure the HP NetServer ..........................................................................6
2 HP NetServer Navigator...............................................................................7
Contents of the HP NetServer Navigator CD-ROM ........................................7
README File ............................................................................................7
Configuration Assistant..............................................................................7
HP Management Solutions.........................................................................9
HP NetServer Utilities..............................................................................10
Change User Preferences........................................................................10
3 HP Information Assistant...........................................................................11
Information Assistant Overview....................................................................11
Using HP NetServer Information Assistant...................................................11
Getting Help.............................................................................................11
Finding Information..................................................................................12
Copying and Printing Information.............................................................13
Installing HP Information Assistant Software................................................13
Installing from the CD-ROM.....................................................................14
4 Accessories................................................................................................15
Installing Accessories...................................................................................15
Installing IDE Devices..............................................................................15
Installing an Additional IDE CD-ROM Drive .............................................16
Installing an IDE Hard Disk Drive In a Front Shelf....................................17
Installing an IDE Hard Disk Drive in a Rear Shelf.....................................18
Configuring ISA Non-Plug-and-Play Boards.............................................20
5 Troubleshooting ........................................................................................23
Troubleshooting Tools..................................................................................23
iii
Page 4

Common Installation Problems ....................................................................23
If the System Will Not Power On..............................................................24
Troubleshooting Sequence.......................................................................24
Error Messages............................................................................................25
No Error Messages Displayed..................................................................25
Clearing the CMOS Configuration............................................................27
Hardware Problems .....................................................................................29
The Display Does Not Work.....................................................................29
The Keyboard or Mouse Does Not Work..................................................30
The CD-ROM Drive Does Not Work.........................................................30
The Hard Disk Drive Does Not Work........................................................30
Password Problems .....................................................................................31
You Have Forgotten the Passwords.........................................................31
Battery Problems.........................................................................................32
To Install a Replacement Battery.............................................................32
You Can’t Start the Setup Program..............................................................33
A Specifications............................................................................................35
Environment................................................................................................35
Weight and Dimensions...............................................................................36
Power Supply Specifications........................................................................36
B Regulatory Information.............................................................................37
Notice for USA.............................................................................................37
FCC Radio Frequency Emissions Statements..........................................37
CD-ROM..................................................................................................38
Notice for Canada: DOC Requirements.......................................................39
Battery.....................................................................................................39
Notice for EU:..............................................................................................39
Radio Frequency Emissions Warning for Accessories..............................39
Notice for Finland: Laser Safety Statement.................................................41
Notice for Germany......................................................................................41
Noise Declaration and Ergonomics ..........................................................41
Laser Safety Statement ...........................................................................41
Notice for Japan:..........................................................................................42
VCCI Statement, HP NetServer E 45.......................................................42
Notice for Korea: RFI Statement.................................................................43
Notice for Mexico: Hardware Warranty Statement.......................................43
iv
Page 5

Notice for UK: General Approval.................................................................45
C Warranty and Software License................................................................47
Hardware Product Limited Warranty ............................................................47
Software Product Limited Warranty..............................................................47
Hewlett-Packard Utility Software..............................................................47
Third-Party Software Products.................................................................47
Hardware Accessories Limited Warranty......................................................48
Hewlett-Packard Hardware Accessories...................................................48
Third-Party Hardware Products................................................................48
Limitation of Warranty..................................................................................49
Limitation of Liability and Remedies.........................................................49
Customer Responsibilities............................................................................50
Obtaining Warranty Service.........................................................................51
Customer Replacement Part....................................................................51
Return to HP/Reseller..............................................................................51
On-site.....................................................................................................52
HP NetServer Limited Warranty Coverage...................................................53
Technical Support........................................................................................53
U.S. and Canada .....................................................................................54
Europe.....................................................................................................54
Other Countries .......................................................................................55
Self-Help Tools............................................................................................55
Supplemental Warranty Service and Support...............................................55
Software Product Limited Warranty..............................................................56
HP Software Product License Agreement.....................................................58
HP NetServer Warranty Frequently-Asked Questions..................................60
D Service and Support..................................................................................67
System Design, Integration, and Support.....................................................67
Information and Support When You Need It.................................................67
HP NetServer Navigator Release History and Status Report........................68
HP NetServer Navigator CD-ROM Subscription Service..............................69
HP NetServer Navigator ..............................................................................70
CompuServe Discussion Forum and Library ................................................70
World Wide Web and Internet FTP..............................................................71
Bulletin Board System..................................................................................71
Automated Fax............................................................................................72
v
Page 6

HP NetServer Support News........................................................................72
Telephone Support.......................................................................................73
Obtaining HP Repair and Telephone Support...............................................7 3
Ordering HP Cables, Drive Trays, and Technical Publications .....................75
Telephone Ordering Information ..............................................................75
Contacting HP Regional Headquarters.........................................................76
Joining CompuServe....................................................................................76
Index...............................................................................................................79
vi
Page 7

1 Installation Overview
This chapter contains simplified setup information about your HP NetServer
E 45. For complete setup instructions, consult the HP NetServer E 45 Installation
Road Map.
Verify Contents
Unpack and verify the contents of the shipping box against the Contents
Checklist included with your NetServer. If anything is missing or damaged,
contact your reseller.
View the README File
1. Press the power-on button. Open the NetServer front door and press the
CD-ROM drive eject button. Place the HP NetServer Navigator CD-ROM
in the drive and press the eject button again to close the drive. Turn the
power off, wait 10 seconds and turn the power on again. If the system fails
to boot, follow the diagnostic instructions on the screen.
2. Go to the Navigator Main Menu. If the language needs to be changed,
select "Set Preferences."
3. Select "README File." The README file contains the latest
information to help you install your HP NetServer. Read it carefully before
beginning your installation.
You can now boot the Navigator CD-ROM and run Diagnostic Assistant
if you want to verify system operation as shipped.
4. If you are installing additional hardware, such as memory, accessory
boards, or mass storage devices, you will need to remove the cover. Go to
"Remove the Cover."
If you are not installing additional hardware, go to "Configure the HP
NetServer."
1
Page 8

Chapter 1 Installation Overview
Remove the Cover
If you are installing options, you will need to remove the cover. To install
options, you will need a flat 1/4-inch screwdriver and T15 TORX® driver; you
do not need tools to remove the cover.
WARNING Before removing the cover, always disconnect the power cord
and unplug telephone cables. Disconnect the power cord to
avoid exposure to high energy levels that may cause burns
when parts are short-circuited by metal objects such as tools
or jewelry. Disconnect telephone cables to avoid exposure to
shock hazard from telephone ringing voltages.
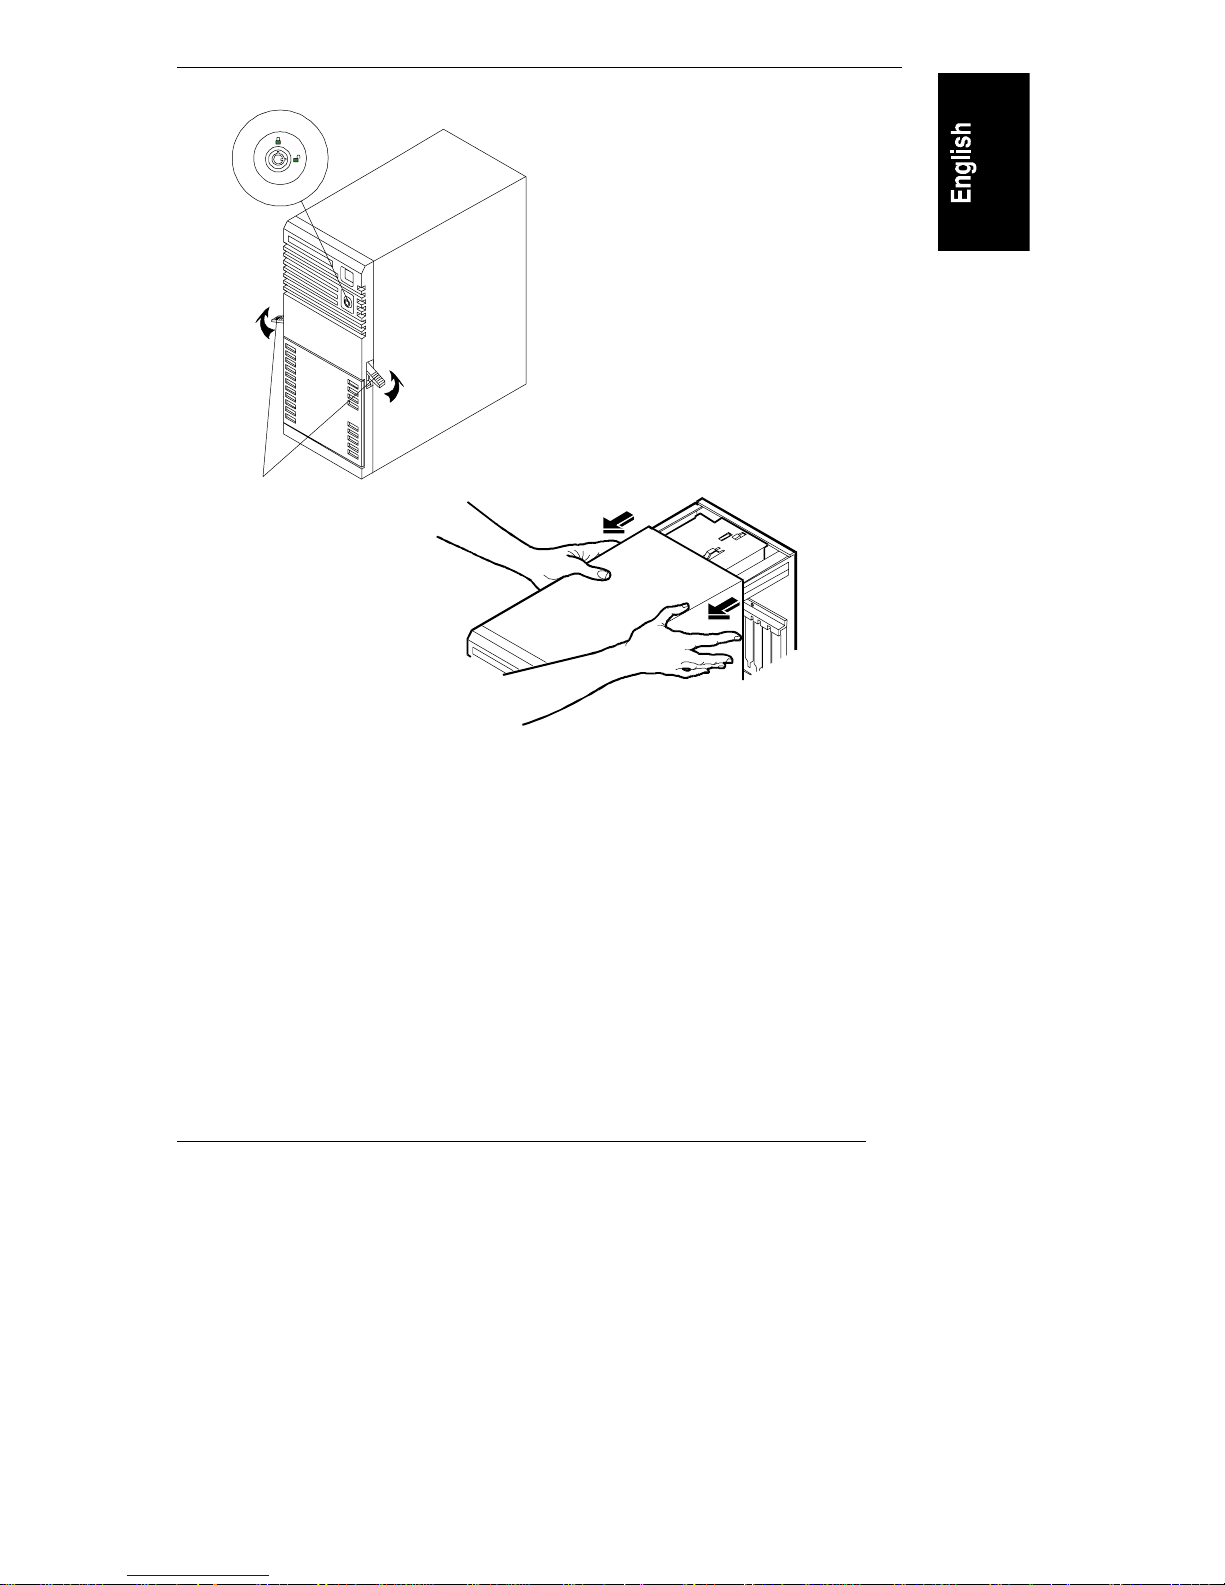
To remove the cover:
1. Turn off the NetServer and disconnect the power cord.
2. Unlock the cover: To unlock the cover, use the key in the key bag located
on the rear of the NetServer.
3. Release the latches: Lift up the two release latches on the sides of the front
bezel.
4. Remove the NetServer cover. Place your hands on the top of the cover,
one along each edge (see Figure 1-1). While applying downward pressure,
pull the cover sharply forward to release it and then slide it forward and
off the NetServer.
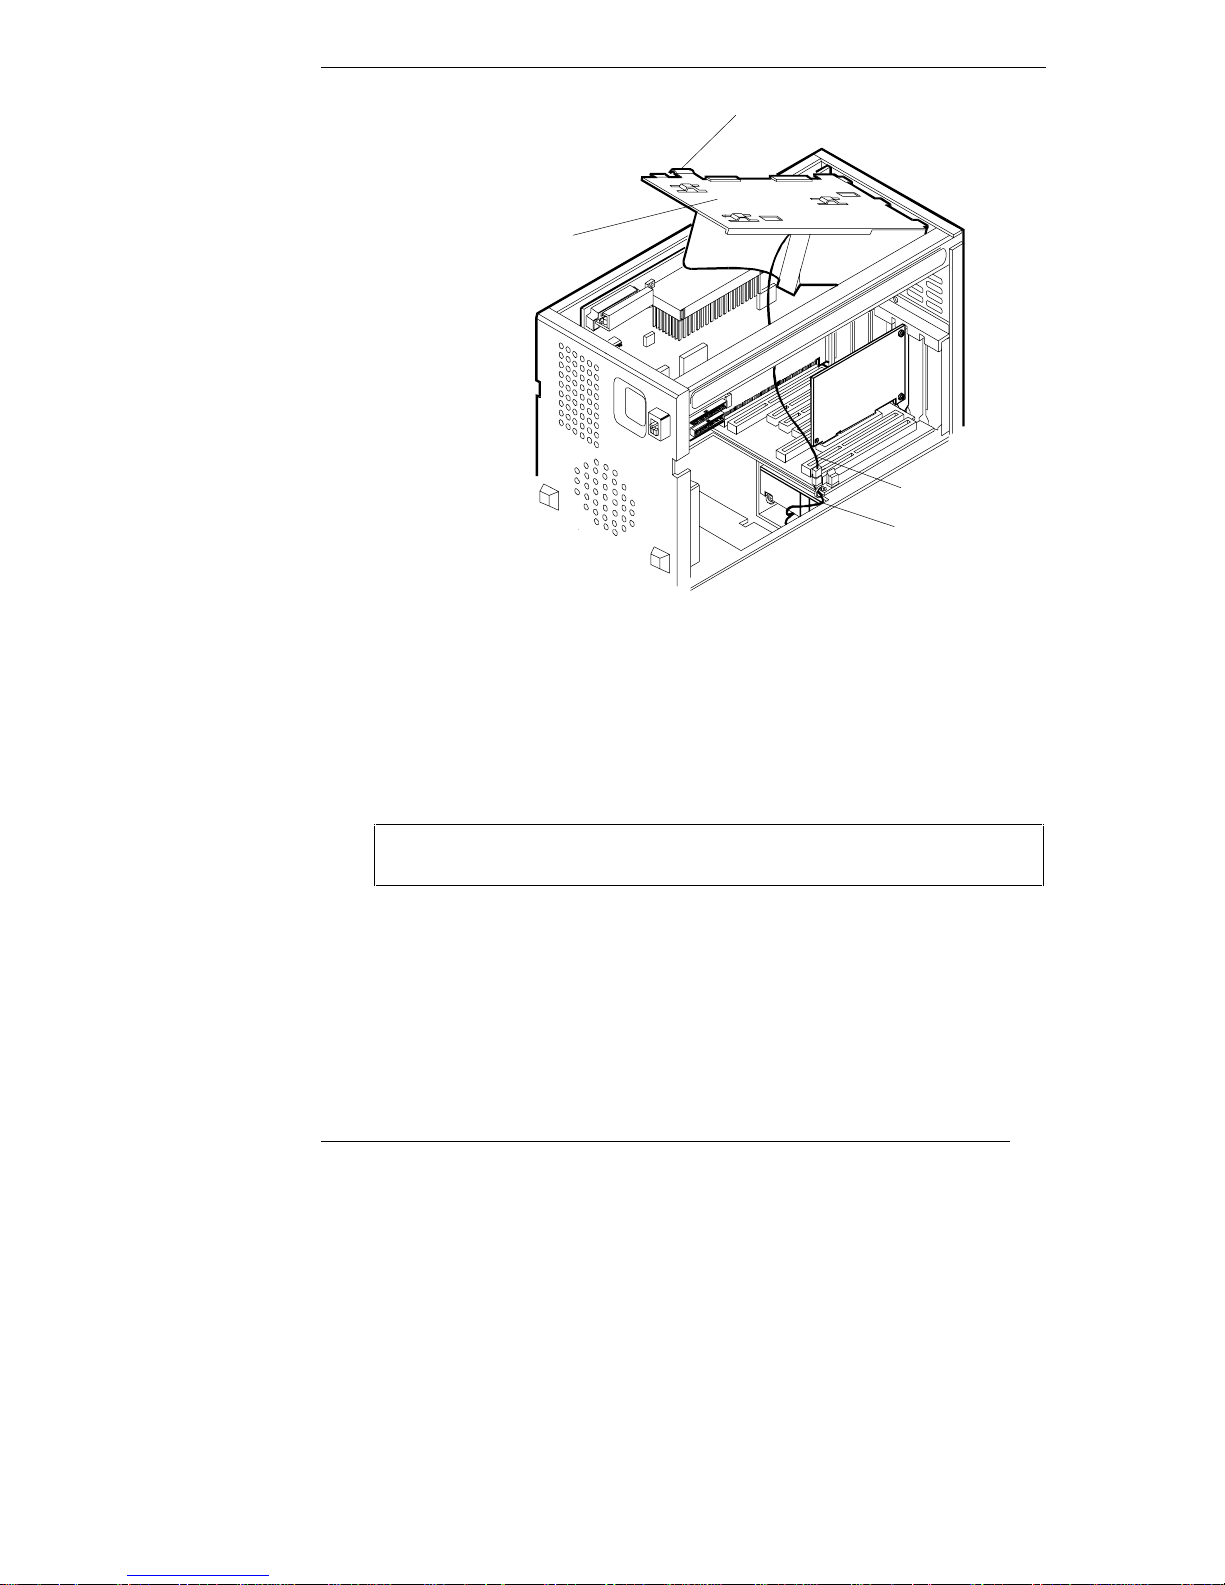
5. Remove the cooling duct/cover.
◊ Unplug the fan cable from the power supply harness.
◊ Lift up on the front of the duct/cover until the hook is free of the slot,
as shown in Figure 1-2.
◊ Gently pull the duct/cover toward the front of the NetServer and lift it
up and out of the chassis.
2
Page 9
Chapter 1 Installation Overview
Key lock
Cover
Release
Latches
Figure 1-1. Unlocking and Opening the NetServer
3
Page 10
Chapter 1 Installation Overview
Hook
Cooling duct/cover
Fan cable
Power supply harness
Figure 1-2. Removing the Cooling Duct/Cover
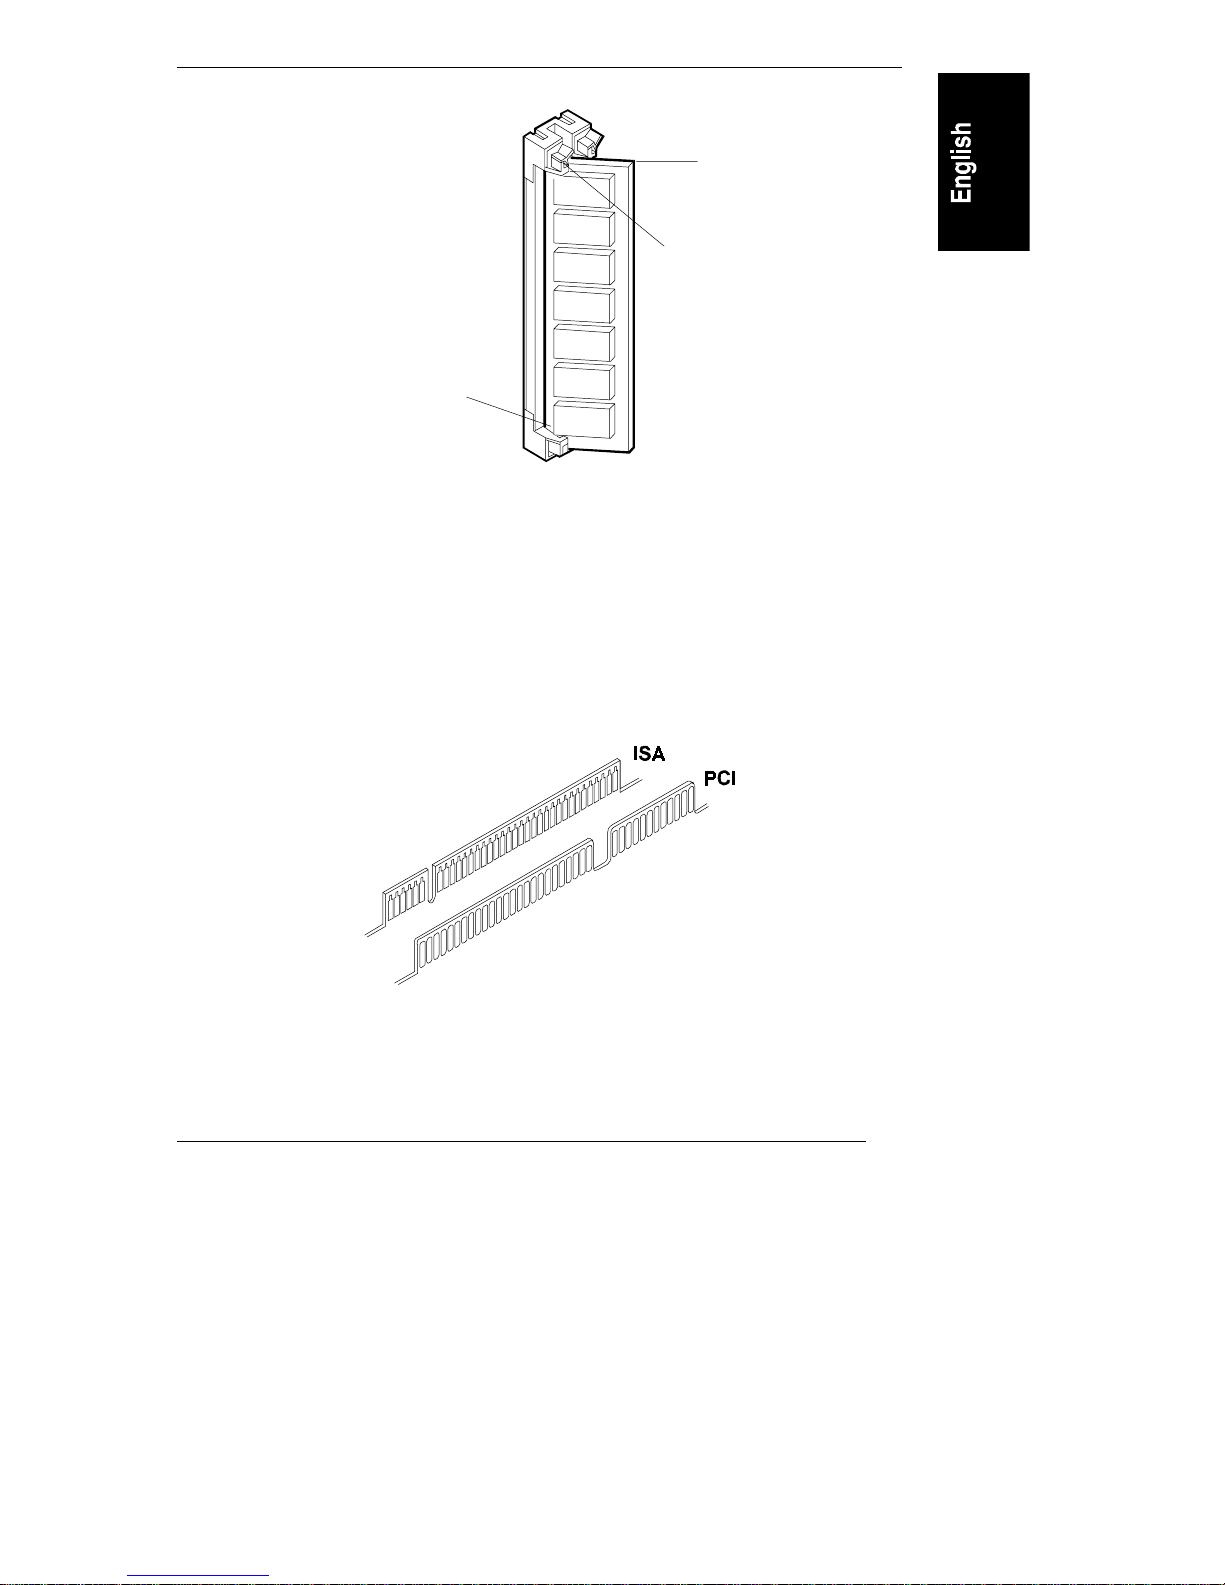
Install Additiona l Memory
Use HP SIMMs listed on the Technical Information Label on the side of the
chassis.
CAUTION Wear a wrist strap and use a static-dissipating work surface
connected to the chassis when handling components.
1. Align the notched corner on the SIMM with the key on the end of the slot
and insert the SIMM at a 45-degree angle, as shown in Figure 1-3.
2. Pivot the SIMM to the 90-degree angle until the retaining clips on both
sides snap into place.
3. If the cooling duct/cover was removed, replace it before replacing the
NetServer cover.
4
Page 11
Chapter 1 Installation Overview
45°
90°
Notch
Figure 1-3. Installing a SIMM
Install Additiona l PCI and ISA Boards
Install all adapter boards at this time.
For a list of boards HP has tested and the README file with the latest
configuration information, view the tested products list located on the Navigator
CD-ROM.
Boards can be identified by the shape of their connectors:
Figure 1-4. Connector Identification
5
Page 12

Chapter 1 Installation Overview
Install Additional Mass Storage Devices
If you are installing an IDE drive or internal SCSI devices in certain
configurations, you may need additional cables or adapters. For part numbers for
HP cables, adapters, and trays, and configuration information, see Information
Assistant on the Navigator CD-ROM. For new products, you can use Order
Assistant on the HP web site at this URL:
www.hp.com/go/netserver
Configure the HP NetServer
1. Reassemble the HP NetServer and connect the power cord.
2. If you have installed ISA non-Plug-and-Play adapter boards, you must
now allocate memory resources to each of these boards. Refer to the
"Installing ISA Non-Plug-and-Play Boards" in Chapter 4, "Accessories"
for instructions.
3. Turn on the HP NetServer and monitor.
4. Insert the CD-ROM into the CD-ROM drive now, turn off power to the
NetServer, wait 10 seconds, and turn it back on. The NetServer will boot
from the Navigator CD-ROM.
If the NetServer fails to boot, follow the directions displayed on the
screen.
5. Go to the Navigator Main Menu and select “Configuration Assistant."
Follow the instructions in Configuration Assistant to continue your NetServer
installation.
6
Page 13

2 HP NetServer Navigator
Contents of the HP NetServer Navigator CD-ROM
The main menu of NetServer Navigator directs you to modules where you can
perform configuration tasks or access online system documentation. The
following is a description of the contents of the CD-ROM as accessed from the
Main Menu.
README File
This file includes the most recent information that was not available at the time
that the installation documentation was printed. It is important to check this file
before proceeding with the installation.
Configuration Assistan t
Configuration Assistant guides you through the steps necessary to configure
the NetServer. Three methods of configuration are available: Express, Custom,
and Replicate.
Express configuration is the preferred method to configure your HP NetServer
since it leads you through the configuration process in sequence and offers you
default selections. An Express configuration includes the following steps:
• Update System BIOS: This step appears if Configuration Assistant
detects that a newer version of the BIOS is available on the Navigator
CD-ROM. You must update your BIOS to the new version if you want to
continue in Express mode.
• Install NOS: Choose the NOS and the install mode:
◊ Install NOS (automated mode): In automatic NOS install mode, if
you are installing certain versions of Novell NetWare / IntranetWare
or Microsoft Windows NT Server, HP’s automated installation process
guides you through the NOS installation and configures your hard disk
drive and NOS according to certain preset parameters.
or
◊ Install NOS manually: If you did not choose automated NOS install
mode, you will configure the NetServer by manually making choices,
and creating NOS-specific driver diskettes. You will need to print and
read the custom-installation instructions.
7
Page 14

Chapter 2 HP NetServer Navigator
∗ Print and Read Instructions: You must print out the NOS
installation instructions and follow them to manually install the
NOS.
∗ Create Drivers Diskette: If you choose to install the NOS with
the vendor-supplied installation utility included with the NOS
software, you will create a customized diskette containing HP
drivers and configuration files that you will need when you install
the NOS.
• Show Configured Cards: This step shows configured PCI boards and
Plug-and-Play ISA boards.
• Configure Disk Array: If you have an external HP disk array, you must
configure it with the disk array utility.
• Install Utility Partition: This step creates an 8 MB utility partition on the
server hard disk where Navigator will copy the Diagnostic Assistant,
BIOS Update Utility and other utilities.
• Execute Card Utilities: When Navigator finds installed boards for which
there are additional configuration utilities on the CD-ROM, the
configuration utilities are executed automatically to complete the
configuration of the boards.
In Custom Configuration, you can perform the above configuration steps in
any order. Select Custom if you are experienced in NetServer configuration and
have a preferred sequence of steps or prefer to configure your system one
component at a time. The Custom Configuration allows you to manually
choose these options:
• Install NOS: Choose the NOS and the install mode:
◊ Install NOS (automated mode): In automatic NOS install mode, if
you are installing certain versions of Novell NetWare / IntranetWare
or Microsoft Windows NT Server, HP’s automated installation process
guides you through the NOS installation and configures your hard disk
drive and NOS according to certain preset parameters.
or
◊ Install NOS manually: If you did not choose automated NOS install
mode, you will configure the NetServer by manually making choices,
and creating NOS-specific driver diskettes. You will need to print and
read the custom-installation instructions.
8
Page 15

Chapter 2 HP NetServer Navigator
∗ Print and Read Instructions: You must print out the NOS
installation instructions and follow them to manually install the
NOS.
∗ Create Drivers Diskette: If you choose to install the NOS with
the vendor-supplied installation utility included with the NOS
software, you will create a customized diskette containing HP
drivers and configuration files that you will need when you install
the NOS.
In Replicate Configuration, you can save a copy of your current system
configuration or load a previously saved configuration. This method saves time
when configuring multiple, identical systems.
HP Management Solutions
HP Management Solutions contains demonstrations of software available on the
HP NetServer Navigator CD-ROM.
HP Information Assistant is included on the Navigator CD-ROM. Information
Assistant is a tool to help you locate information about installing, managing and
servicing your HP NetServer.
HP Support Anywhere is included on the Navigator CD-ROM. HP Support
Anywhere is for managing the many features of your HP NetServer. The software
is customizable and contains easy-to-use troubleshooting tools.
Some of the features of HP Support Anywhere include:
• Alerts can be viewed using a web browser or via the Auto Alert feature
• Disk capacity threshold alert
• SCSI controller and device failure notification
• Predictive disk problem warning backed by HP proactive warranty
replacement
• PC LAN adapter board performance statistics, configuration, and problem
information
• Critical server information, such as the BIOS version, ISA and PCI slot
contents, serial and parallel ports, and security status can be viewed using
a web browser
9
Page 16

Chapter 2 HP NetServer Navigator
HP NetServer Utilities
HP NetServer Utilities takes you to a menu where you can directly execute
utilities such as the following:
• Diagnostic Assistant: An easy-to-use hardware diagnostic for system
verification, burn-in, and rapid troubleshooting
• Diskette Library: Allows you to conveniently generate any flexible
diskette available on the NetServer Navigator CD-ROM. For example, you
can create the following diskettes: BIOS Update, NOS Drivers, and
Diagnostic Assistant.
Change User P referen ces
Change User Preferences lets you change the language and the system date
and time.
10
Page 17

3 HP Information Assistant
Information Assistant Overview
The Navigator CD-ROM contains the HP Information Assistant. HP Information
Assistant provides a quick and efficient means to locate information about
installing, managing and servicing your HP NetServer. It has complete
documentation on the HP NetServer and accessories; important information on
your NOS; and reference information, such as functional descriptions and
technical papers to help you better understand your HP NetServer and make
choices compatible with your network.
The following section briefly describes the functionality of Information Assistant.
The final section describes how Information Assistant can be read or installed on
other systems.
Using HP NetServer Information A ssistant
Information Assistant has many features that help you quickly find the
information you need. The following is a brief description of these features. To
understand how to use each function, use the Information Assistant help system.
Boot the HP Network Navigator CD-ROM on the NetServer and run Information
Assistant, or install Information Assistant as an application program on a
Windows client machine (see "Installing HP Information Assistant Software,"
below).
Getting Help
The Help button displays the help system for Information
Assistant. The Information Assistant help system explains how
to use Information Assistant to find the information you need.
11
Page 18
Chapter 3 HP Information Assistant
Finding I n forma tion
Information Assistant provides you with many ways of navigating through its
topics and locating information. For example, you can:
Select a topic from the Map. Displays a window with an
outline of every module, and topic in the Information
Assistant for the selected product. The Map enables you to
view the contents of the Information Assistant in outline
view, and then select a topic to view.
Search for a word or phrase using Search. Search
performs full-text searches for topic text that not only takes
you to the topic found, but highlights the word or words
found by the search. You can use search operators such as
AND, OR, NOT, and NEAR to further narrow your search.
Select a topic from the Accessory and Reference
Documents. Reference modules are arranged by subject, not
by task. The Reference Button list shows reference
documents available for the selected product.
Select a Task button. Each button represents a task you can
perform, and each task contains multiple topics.
12
Go to a topic with Previous button. Displays the previous
topic in a module.
Go to a topic with Next button. Displays the next topic in a
module.
Go to a previously viewed topic with Back button.
Displays the previous topic viewed. Clicking this button
more than once backtracks through topics in the order that
you viewed them.
Page 19

Chapter 3 HP Information Assistant
You can also navigate between topics using hot spots, and revisit recent topics
using the History button. For example:
• Jump to other topics. Click on hot spots in graphics and text that link to
other topics or to more information about the current topic. Hot spot text
appears as bold green text. Hot spots on graphics are identified by moving
the pointer over the graphic. When you point to a hot spot, the pointer
changes to a hand.
• Return to any previously viewed topic by choosing History from the
Topic menu. As you view topics, Information Assistant keeps a record of
where you have been. The History button displays a list of the topics you
have viewed, starting with the most recent. Select any topic from this list
to return to it.
Copyin g and Pr in ting I nfor mati on
You can copy topic text in Information Assistant for use in other applications,
such as word processors, by copying text onto the Windows Clipboard and
pasting the text into any Windows application.
To print topics in Information Assistant, use one of the print options on the File
drop-down menu. You can choose to print the current topic or all of the topics in
a product book.
With the Mark for Print command, you can choose to mark either the currently
displayed topic or all the topics in the group to which the current topic belongs.
Then use the Print Marked Topics option to print out all marked topics as
a group.
After selecting the print option, a Print Setup box or Print dialog box appears. In
the Print dialog box, you can choose from several options: number of copies to
print, collate, print quality (dots per inch, and print to a file.) In the Print Setup
box, you can select a printer, the page orientation, and the type or source of paper
on which to print.
Installing HP Information Assistant Software
HP Information Assistant runs on an HP Vectra or other PC running Windows
3.1 and above, Windows 95 or Windows NT. HP Information Assistant can be
installed from the Navigator CD-ROM.
The installation program gives you the option of accessing the data files from
your hard disk or from the CD-ROM. The default is to access the data files from
13
Page 20

Chapter 3 HP Information Assistant
the CD-ROM. You can copy the data files to your hard disk to improve access
time, but this could take up a significant amount of disk space.
Installing from the CD-ROM
To install HP Information Assistant onto a Windows PC from the Navigator
CD-ROM, perform these steps:
1. Turn on your computer and CD-ROM drive.
2. Run Windows and display the Program Manager.
3. Insert the HP NetServer Navigator CD-ROM into the CD-ROM drive.
4. From Program Manager, select the File menu and choose Run.
5. At the command prompt, type the following:
drive: \infoasst\setup
where drive is the letter of the CD-ROM drive.
6. Follow the instructions that appear on your screen.
In Program Manager, the Setup Program creates a new program group called HP
NetServer Information Assistant, with an icon for running the application.
14
Page 21

4 Accessories
Installing Accessories
This chapter deals with installing those accessories not covered by the
installation road map for your HP NetServer E 45. If you are installing SCSI
mass storage devices, PCI accessory boards, or ISA Plug-and-Play accessory
boards, consult the road map. The following accessories are discussed in this
chapter:
• IDE CD-ROM drive
• IDE hard disk drive.
• ISA non-Plug-and-Play accessory boards
Installing I DE Dev ices
The HP NetServer E 45 chassis contains six mass-storage shelves. The front four
shelves (shelves 1–4) allow for the installation of a 3.5" flexible disk drive and
three 3.5" or 5.25" mass storage devices. The rear shelves (shelves 5 and 6) allow
for the installation of two 3.5" mass storage devices. An IDE CD-ROM drive is
installed in shelf 2 below the floppy disk drive in shelf 1.
IDE Jumpers
Each IDE device has a jumper labeled "MA" (master), "SL" (slave), and "CS”
(cable select).This three-position jumper determines whether the device is to
function as a master device or a slave device.
• If you want the device to function as the master or slave device,
determined by which connector on the cable the device is connected to
(master connector or slave connector), set the jumper to "CS.” The
location of the IDE device on the cable will determine the function of the
device (as master or slave) when the jumper is set to "CS.” If the device
is connected to the master connector (the connector closest to the system
board) it will function as the IDE master device. If the device is
connected to the slave connector (the connector at the end of the cable) it
will function as the IDE slave device.
15
Page 22

Chapter 4 Accessories
NOTE Whenever adding devices to, or changing the location of
devices on the IDE cable, set the jumper to "CS" on all devices
connected to the cable.
• If you want the device to be the master device on this cable, set the jumper
to "MA.” No matter what connector on the cable the device is connected
to, it will function as the IDE master device.
• Likewise, if you want the device to be the slave device on the cable, set the
jumper to "SL.” No matter what connector on the cable the device is
connected to, it will function as the IDE slave device.
IDE Cabling
There is one IDE cable supplied with your HP NetServer. It plugs into the
connector on the system board labeled "Secondary IDE Channel" (the lower
connector). There are two device connectors on the cable. The first device
connector is connected to the preinstalled IDE CD-ROM drive. The second
device connector can be used for an additional IDE CD-ROM drive. Whichever
device is connected to the first device connector (not at the end of the cable) is
the “master”, and the device connected to the second device connector (at the end
of the cable) is the “slave.”
NOTE Do not connect an IDE hard disk to the same cable that is
connected to the preinstalled CD-ROM drive. This may result
in degraded performance of the hard disk.
If you want to install an IDE hard disk, you will need to purchase an extra IDE
cable and connect it to the connector on the system board labeled "Primary IDE
Channel" (the upper connector). Connect the first device connector on the cable
(not the connector at the end of the cable) to the hard disk drive.
Installing an A dditional IDE CD-ROM Driv e
Use these instructions to install an additional IDE CD-ROM drive.
1. Backup your hard disk drive(s).
2. If necessary, shut down the network operating system.
3. Turn off the server and display and disconnect all external cables and
power cords.
16
Page 23

Chapter 4 Accessories
4. Read the documentation included with the accessory for any special
handling or installation instructions.
WARNING Before removing the cover, always disconnect the power cord
and unplug telephone cables. Disconnect the power cord to
avoid exposure to high energy levels that may cause burns
when parts are short-circuited by metal objects such as tools
or jewelry. Disconnect telephone cables to avoid exposure to
shock hazard from telephone ringing voltages.
5. Remove the NetServer cover.
CAUTION Wear a wrist strap and use a static-dissipating work surface
connected to the chassis when handling components.
6. Remove the mass storage tray from one of the empty front shelves. Save
the screws for reuse.
7. If the CD-ROM is not an HP accessory, attach the mounting rails to the
CD-ROM with the screws provided.
8. Slide the drive completely into the shelf.
9. Connect the power and data cables to the rear of the drive (the connectors
are shaped to go in one way only). See “IDE Cabling” for more
information about which connectors to use.
10. Secure the drive in position using the screws removed from the mass
storage tray in step 6.
11. To allow access to the drive, remove the corresponding shelf filler panel
from inside the front bezel.
12. Replace the cover, external cables, and power cords.
Installing an IDE Har d Disk Drive I n a Fr ont Shelf
NOTE If your new hard disk drive already has a mounting tray
attached, you must remove it before you can install the drive
in your NetServer.
17
Page 24

Chapter 4 Accessories
Use these instructions to install an additional hard disk drive.
1. Backup the system.
2. If necessary, shut down the network operating system.
3. Turn off the server and display and disconnect all external cables and
power cords.
4. Read the documentation included with the accessory for any special
handling or installation instructions.
5. Remove the NetServer cover.
6. Refer to the drive’s manuals to see if you must set jumpers or if there is a
special installation procedure to follow.
7. Remove the mass storage tray from one of the empty front shelves.
8. Place the drive in the tray and secure it using the screws provided.
CAUTION Do not use any size screw other than ¼-inch (6.5 mm) long,
6-32 machine screws to attach the hard disk drive to the tray.
Using any other size screw may result in permanent damage
to the disk drive.
9. Slide the tray into the shelf with the connector sockets at the rear, until
the screw holes on the tray align with the holes in the chassis.
10. Secure the tray to the chassis using the two screws provided with the
drive.
11. Connect the power and data cables to the rear of the drive. The connectors
are shaped to fit one way only. See “IDE Cabling” for more information
about which connectors to use.
12. Replace the NetServer cover, external cables, and power cord.
Installing an I DE Har d Disk Drive in a Rear Shelf
NOTE If your new hard disk drive already has a mounting tray
attached, you must remove it before you can install the drive in
your NetServer.
18
Page 25

Chapter 4 Accessories
Use these instructions to install an additional hard disk drive.
1. Backup your hard disk drive(s).
2. If necessary, shut down the network operating system.
3. Turn off the server and display and disconnect all external cables and
power cords.
4. Read the documentation included with the accessory for any special
handling or installation instructions.
5. Remove the NetServer cover.
6. Refer to the drive’s manuals to see if you must set jumpers or if there is a
special installation procedure to follow.
7. Remove the rear cooling fan from the rear of the chassis.
8. Pass the drive through the shelf with the connectors toward the NetServer
front, until the screw holes on the drive align with the holes in the chassis.
9. Secure it to the computer using the four ¼" screws provided with the
drive, two screws in each side (using screws other than those provided
may cause damage to the device). Replace the rear cooling fan.
CAUTION Do not use any size screw other than ¼-inch (6.5 mm) long,
6-32 machine screws to attach the hard disk drive to the tray.
Using any other size screw may result in permanent damage
to the disk drive.
10. Connect the power and data cables to the rear of the drive. The connectors
are keyed to fit one way only. See “IDE Cabling” for more information
about which connectors to use.
11. Replace the cover.
19
Page 26

Chapter 4 Accessories
Configuring ISA Non-Plug-and-Play Boards
If you installed any ISA non-Plug-and-Play accessory boards, such as certain
modem boards, network interface boards, or multi-port boards in a NetServer,
you will need to allocate system resources for each of these boards using the
Setup utility.
1. Read the documentation for each accessory board and determine what
system resources it requires. These resources may include memory range,
I/O port range, DMA channel, and interrupt (IRQ) level. For some
resources there may be one value, or several values from which you may
select by configuring jumpers or switches on the board. A board may not
require resources from all of these categories. If the documentation for the
board does not reference some of these resources, they may not be
required, and need not be reserved.
CAUTION Different boards cannot use the same resources. If two boards
require any of the same resources, reconfigure one of the
boards (via switches or jumpers on the board) so that the
boards have different resource requirements.
2. Turn on power to the HP NetServer and display monitor.
3. When you see the message "F2 = Setup" on the display monitor, press the
F2 function key.
4. When the Setup screen is displayed, use the left and right arrow keys to
select the Configuration menu.
5. Use the down arrow key to select the ISA Non-Plug-and-Play Board
option from the menu, and press the Enter key.
6. Use the down arrow key to select the Memory Resources option from the
menu, and press the Enter key.
7. Use the up and down keys to select the memory block that corresponds to
the memory range required for the ISA board you are installing, and press
the F7 or F8 key to reserve that block. If the memory range required for a
board spans two or more blocks shown on the screen, reserve all blocks
required by the board. If the memory range required for the board is less
than one block, select the whole block that contains the range.
20
Page 27

Chapter 4 Accessories
NOTE Boards may share a reserved memory block as long as each
board uses a unique memory address range within the block.
No two boards may use the same memory address range.
Reserve memory blocks for all remaining ISA non-Plug-and-Play boards
you are installing.
8. Press the Escape key to return to the ISA Non-Plug-and-Play Boards
menu.
9. Use the down arrow key to select the DMA Resources option from the
menu, and press the Enter key.
10. Use the up and down keys to select the DMA channel that corresponds to
the DMA channel required for the ISA board you are installing, and press
the F7 or F8 key to reserve that DMA channel. Reserve all DMA channels
needed for the board.
NOTE Each board must use unique DMA channel(s). No two boards
may use the same DMA channel(s).
Reserve DMA channels for all remaining ISA non-Plug-and-Play boards
you are installing.
11. Press the Escape key to return to the ISA Non-Plug-and-Play Boards
menu.
12. Use the down arrow key to select the I/O Port Resources option from the
menu, and press the Enter key.
13. Use the up and down keys to select the I/O port block that corresponds to
the I/O port range required by the board you are installing, and press the
F7 or F8 key to reserve that block. If the I/O port range required for the
board span two or more blocks shown on the screen, reserve all blocks
required by the board. If the I/O port range required for the board are less
than one block, select the whole block that contains the range.
NOTE Boards may share a reserved I/O port block as long as each
board uses a unique I/O port range within the block. No two
boards may use the same I/O port range.
Reserve I/O port blocks for all remaining ISA non-Plug-and-Play boards
you are installing.
21
Page 28

Chapter 4 Accessories
14. Press the Escape key to return to the ISA Non-Plug-and-Play Boards.
15. Use the down arrow key to select the Interrupt Resources option from the
menu, and press the Enter key.
16. Use the up and down keys to select the IRQ that corresponds to the IRQ
required for the board you are installing, and press the F7 or F8 key to
reserve that IRQ. Reserve all IRQs needed for the board.
NOTE Each board must use a unique IRQ. No two boards may use
the same IRQ.
Reserve IRQs for all remaining ISA non-Plug-and-Play boards you are
installing.
17. Press the Escape key several times to exit the Setup utility. When the Save
Changes and Exit dialog displays on the screen, press the Enter key. The
NetServer will reboot.
22
Page 29

5 Troubleshooting
Troubleshooting Tools
If you are having problems installing your HP NetServer, there are a number of
different tools available for troubleshooting:
• HP NetServer Information Assistant contains the following tools:
◊◊ Troubleshooting Information
◊◊ Part Information
◊◊ List of Error Messages and Beep Error Messages
• Navigator CD-ROM contains NetServer Utilities. At the Main Menu,
select “Access NetServer Utilities” to use the following tools:
◊◊ HP Diagnostic Assistant Utility: An easy-to-use hardware diagnostic
for system verification, burn-in, and rapid troubleshooting. The
Diagnostic Assistant is also located on a flexible disk mounted inside
your HP NetServer cabinet in a plastic pouch.
◊◊ Diskette Library: Enables you to conveniently generate any flexible
diskette available on the NetServer Navigator CD-ROM. For example,
you can create the following diskettes: BIOS Update, NOS Drivers,
and Diagnostic Assistant.
Common Installation Problems
The following sections contain general procedures to help you locate installation
problems. If you need assistance, it is recommended that you contact your reseller
first. If you need to get assistance from Hewlett-Packard, refer to Appendix D for
information on service and support.
23
Page 30

Chapter 5 Troubleshooting
WARNING Before removing the cover, always disconnect the power cord
and unplug telephone cables. Disconnect telephone cables to
avoid exposure to shock hazard from telephone ringing
voltages. Disconnect the power cord to avoid exposure to
high energy levels that may cause burns when parts are shortcircuited by metal objects such as tools or jewelry.
If the Sy stem Will Not Power On
Follow these steps if the power/activity light does not light green after you press
the power-on button:
1. Check to ensure that all cables and power cords are firmly plugged into
their proper receptacles.
2. Check that the voltage switch is set to the correct setting for your country.
3. If the server is plugged into a switched multiple-outlet box, make sure the
switch on the outlet box is turned on.
4. Plug a different electrical device (such as a printer) into the power outlet,
and turn it on to check if the fault is with the power supply.
Troubleshootin g Sequen ce
To troubleshoot an installation problem, do the following:
• First make sure that the system is configured properly. Most system
problems are the result of incorrect system and SCSI subsystem
configurations.
• If it is a network-related error, determine if the server has enough memory
and hard disk drive capacity. Consult your network operating
system manual.
• Verify that all cables and boards are securely plugged into their
appropriate connectors or slots.
• Remove all added options and always change one thing, and only one
thing, at a time.
NOTE If the NetServer has a large amount of memory installed, it
may take 30 seconds for the first screen to display.
24
Page 31

Chapter 5 Troubleshooting
If it is a hardware error, follow these steps:
1. Log users off the LAN and power down the server. Remove the NetServer
cover.
WARNING Before removing the cover, always unplug telephone cables
and disconnect the power cord. Unplug telephone cables to
avoid exposure to shock hazard from telephone ringing
voltages. Disconnect the power cord to avoid exposure to high
energy levels that may cause burns when parts are shortcircuited by metal objects such as tools or jewelry.
2. Simplify the HP NetServer configuration to the minimum required: a
monitor, one flexible disk drive, one CD-ROM drive, one hard disk drive,
keyboard, mouse, and NIC. Remove all third-party options, and reinstall
one at a time, checking the system after each installation.
3. Boot the system. If the system does not function, refer to the following
procedures. If you get an error message, see the section “Error Messages,”
below.
4. If the system still will not boot, clear the CMOS memory and reboot (see
"Clearing the CMOS Configuration,").
Error Messages
If you get a POST error message, press Enter (View System Error) to get a more
detailed explanation and a possible solution.
No Error M essages Displayed
General Checks
1. All external cables and power cables are firmly plugged in.
2. The power outlet is working.
3. The computer and display are turned on. (The power-on indicator should
be illuminated).
4. The display’s contrast and brightness settings are correct.
5. All internal cables are properly connected and all boards firmly seated.
25
Page 32

Chapter 5 Troubleshooting
6. Check that the system board is fully seated in the backplane slot and that
the retaining latch at the top of the system board is fully lowered.
7. Check that the CPU module is fully seated in its socket on the system
board.
8. Check that the voltage regulator module (VRM) is fully seated in its
socket on the system board (see technical reference label for location of
VRM).
After Installing an Accessory
1. Turn off the display, the computer, and any external devices.
2. Unplug all cables from the power outlet.
3. Remove the cover.
4. Check the following:
◊◊ If you have installed an accessory board, check that the board is
firmly seated in its slot and that any switches or jumpers on the
accessory board are properly set. (Refer to the manuals that came with
each board).
◊◊ Check all internal cabling and connections.
◊◊ If you have changed any switches on the system board, check that they
are properly set.
5. Replace the cover and connect all cables.
6. Turn on the display and computer.
7. If the NetServer still does not work:
◊◊ Repeat steps 1, 2, and 3 of this section.
◊◊ Remove all accessories, except the primary boot hard disk drive.
◊◊ Replace the cover and connect all cables.
◊◊ Turn on the display and the computer.
◊◊ If the NetServer now works, replace the boards and accessories one at
a time to determine which one is causing the problem.
26
Page 33

Chapter 5 Troubleshooting
If a Power-On System Hardware Test Error Message Appears
If an error occurs during the power-on system hardware test (when the NetServer
starts) details of the error are displayed. Follow the instructions on the screen.
It is recommended that you correct the error before proceeding, even if the
NetServer appears to start successfully.
If the NetServer starts, but the power-on system hardware test still reports an
error message, clear the CMOS memory, as described below.
Clearing the CMOS Con figuration
You may need to clear the CMOS configuration if the configuration has been
corrupted by a program, or if incorrect settings made in the Setup program have
made the display unreadable.
To clear the configuration:
1. Turn off power to the NetServer and remove the cover and the cooling
duct/cover.
2. Move switch 6 on the system board (labeled "Clear CMOS") to the closed
position.
3. Turn on power to the NetServer. A message displays indicating that the
configuration has been cleared.
4. Turn off power to the NetServer.
5. Return switch 6 on the system board to the open position.
6. Replace the cooling duct/cover and the cover.
7. Turn on power to the NetServer. The message
Incorrect PC Configuration
Option ROM error
is displayed.
8. Press [F2] to run the Setup program when <F2=Setup> appears.
9. Make any configuration changes that are required.
10. Choose the Exit option and save the changes to save the configuration and
exit the Setup program.
27
Page 34

Chapter 5 Troubleshooting
Power-On System Hardware Test Error Messages
There are two kinds of error messages that may prevent the NetServer from
booting. These are:
• Messages in reverse video (black text on white background). Press the
Return key to see a definition of the message and what action to take to
remedy the problem.
• Power-on system hardware test errors. These display in normal video
(white text on black background).
The following table describes these errors and the corrective action you may take
to remedy the problem:
Message
Operating system
not found
Corrective Action
Check whether the drive from which you are booting has
the power and SCSI flat cables connected. Verify that the
SCSI cable is securely plugged into the SCSI controller
board.
Check that the boot device is enabled in the Start-up
center under the Security menu of the Setup program. If
the problem persists, contact your HP support
organization.
Verify that the boot device has an operating system
installed.
Monitor type does
not match CMOS
- Run SETUP
Press [F2] to run the Setup utility, then choose the Exit
option and save the changes to set the correct monitor
configuration. Exit the Setup utility and reboot the
system.
Keyboard error Check that the keyboard is connected to the correct
connector (not the mouse connector) at the rear of the
system.
Replace the keyboard. If the problem persists, contact
your HP support organization.
Mouse error Check that the mouse is connected to the correct
connector (not the keyboard connector) at the rear of the
system.
Replace the mouse. If the problem persists, contact your
HP support organization.
28
Page 35

Chapter 5 Troubleshooting
Message Corrective Action
System CMOS
checksum bad run Setup
Press [F2] to run Setup. Change settings as required.
Choose the Exit option and save the changes to save the
new settings. Exit Setup and reboot the system.
If no message appears but the system stops after the power-on system hardware
test, check that main memory SIMMs are correctly installed.
If a NetServer configuration error is reported during the startup routine, clear the
CMOS memory as described under “Clearing the CMOS Configuration,” and
restart the NetServer.
Hardware Problems
This section describes what to do if you have problems with your display, mass
storage devices, printer, accessory boards, keyboard, or mouse.
The Display Does Not Work
NOTE If the NetServer has a large amount of memory installed, it
may take 30 seconds for the first screen to display.
1. If nothing is displayed on the screen, but the computer starts and the
keyboard, disk drives, and other peripheral devices seem to operate
properly:
◊◊ Check that the monitor is plugged in and power is turned on.
◊◊ Check that the brightness and contrast controls of the display are
properly set.
◊◊ Check that the display video cable is securely connected to the
computer.
◊◊ Turn off the display and computer and unplug them from the power
outlet. Disconnect the video cable from the computer and examine the
video cable connector pins to see if they are bent. If they are, carefully
straighten them.
◊◊ If you have manually configured any accessories, check that each does
not use the same I/O address as the integrated video interface (03B0h
to 03DFh). Refer to the documentation supplied with the accessory for
more information.
29
Page 36

Chapter 5 Troubleshooting
2. If the display image does not align with the screen (usually after you have
changed resolutions), use the display’s controls to center the image. Refer
to the display manual for information about the controls.
3. If the screens generated by the applications do not look right, check the
application manual to find out which video standard is required. Also
check your display manual to find out which refresh rate is required. If
you can read the screen, use the Display option in the Windows Control
Panel to change the refresh rate, otherwise use the Setup program.
4. If the screen goes blank after Windows has booted, contact your HP
support organization.
The Keyboard or M ouse Does Not Wor k
1. Check that the keyboard and mouse are connected to the correct sockets.
Refer to the I/O panel label on the rear panel of the NetServer.
2. Check that the mouse is correctly defined in the Windows Control Panel.
3. Clean the mouse ball and rollers using a lint-free cloth.
The CD-ROM Drive Does Not Work
1. Check that a CD is inserted in the drive.
2. Check that the power and data cables are correctly connected to
the device.
3. Check that the CD-ROM is configured correctly in the Startup Center
menu located under the Security menu in the Setup program.
4. If you intend to boot from the CD, make sure that option is enabled in the
Setup program.
5. For further information, see your CD-ROM documentation.
The Hard Disk Drive D oes Not Work
If error messages display on the monitor indicating a hard disk failure, perform
these checks:
1. Verify that the power cable is securely connected to the drive, and that
the flat cable is securely connected to the drive and to the SCSI
controller board.
30
Page 37

Chapter 5 Troubleshooting
2. Check that all SCSI devices have unique IDs. Refer to the installation
road map or the Technical Reference Label on the inside of the system for
more details on setting SCSI IDs.
Password Problems
You Hav e Forgotten the P asswords
If you have forgotten the User or Administrator password, you can reset them.
The User password can be reset if you know the Administrator password, and the
Administrator password can only be reset by a switch on the system board.
User Password
If you have forgotten the User password, but the Administrator password is set
and known, perform the following steps:
1. Restart the NetServer.
2. During the boot process, press [F2] to start the Setup program.
3. Enter the Administrator password then access the Setup program menu.
4. From the User Password menu, select "Set User Password" option.
5. Set the User password. Enter the Administrator password as the old
password. (This will replace the old, forgotten password).
6. Choose the Exit option and save the changes to save the new password.
Administrator Password
If you have forgotten the Administrator password, your NetServer will function
normally, but you will not be able to change the system configuration settings
(including User password) in the Setup program. To reset the Administrator
password:
1. Turn off power to the NetServer.
2. Remove the cover and the cooling duct/cover.
3. Move switch 7 on the system board (labeled "Clear Password") to the
closed position.
4. Turn on power to the NetServer and allow it to complete its startup
routine. The old passwords (both User and Administrator) will be erased.
31
Page 38

Chapter 5 Troubleshooting
5. Turn off power to the NetServer.
6. Return switch 7 on the system board to the open position.
7. Replace the cooling duct/cover and the NetServer cover.
8. Turn on power to the NetServer and allow it to complete its startup
routine.
9. If you wish to set passwords again, after the power-on system hardware
test has completed, press [F2] to start the Setup program.
10. Set the new password(s).
11. Choose the Exit option and save the changes to save the new password(s).
Battery Problems
If your HP NetServer repeatedly loses its configuration or the CPU clock stops,
you should replace the battery or install an external battery (an external battery
with a 5 year lifespan is available from HP, order 1420-0513 from your
authorized reseller).
WARNING There is a danger of explosion if the battery is incorrectly
installed. For your safety, never attempt to recharge,
disassemble, or burn the old battery. Replace only with the
same or equivalent type recommended by the manufacturer.
Dispose of used batteries according to the manufacturer’s
instructions.
To Install a Replacement Batter y
1. Turn off power to the NetServer.
2. Remove the NetServer cover and the cooling duct/cover.
3. Remove the existing battery.
32
Page 39

Chapter 5 Troubleshooting
BatterySystem Board
Figure 5-1. Battery on System Board
4. Insert the new battery with the positive sign (+) facing out, and ensure
that it is seated completely. Make sure that the retaining clip is in place,
and holds the battery firmly.
5. Replace the cooling duct/cover and the NetServer cover.
You Can’t Start the Setup Program
This may be due to the copy of the NetServer’s configuration in memory being
corrupted by a program, in which case you will need to erase this bad
configuration. See “Clearing the CMOS Configuration.”
33
Page 40

Page 41

A Specifications
The specifications listed below can vary if you install a mass storage device in
your server that has more stringent environmental limits. Make sure that the
operating environment for your server is suitable for all the mass storage devices
that you are using.
Environment
Temperature
Operating
Non-operating –40° to +70° C (–40° to +158° F)
Humidity (noncondensing)
Operating 20% to 80% relative humidity
Non-operating 8% to 90% relative humidity
Altitude
Operating 3,046 m (10,000 ft)
Non-operating 12,200 m (40,000 ft)
5° to 35° C (41° to 95° F)
Maximum Air Conditioning Load
Less than 430 KCal (1700 BTU)
Minimum Clearance
Front 1 m (39 inches)
Sides 5 cm (2 inches)
Top 5 cm (2 inches)
Back 15 cm (6 inches)
35
Page 42

Appendix A Specifications
Weight and Dimensions
System Processing Unit (SPU)
Height 445 mm (17.5 in)
Width 191 mm (7.5 in)
Depth 451 mm (17.75 in)
Weight 14 kg (30.8 lb). Weight excludes monitor and
keyboard.
System footprint
Keyboard
Height 35 mm (1.4 in)
Width 467 mm (18.4 in)
Depth 198 mm (7.8 in)
Weight 1.9 kg (4.2 lb)
Cable Length
Keyboard cable 2 m (6.6 ft)
0.08 m
2
(0.9 ft2)
Power Supply
Power input and output specifications
Power supply input voltage 100 to 127 VAC ~ 5 A at 50/60 Hz
Power supply output 200 W continuous maximum
36
200 to 240 VAC ~ 2.85 A at 50/60 Hz
Manual switching between 115 and 230 V
224 W peak
Page 43

B Regulatory Information
Notice for USA
FCC Radio Frequ ency Emission s Statem ents
Class B Product Statement
This equipment has been tested and found to comply with the limits for a Class B
digital device, pursuant to Part 15 of the FCC Rules. These limits are designed to
provide reasonable protection against harmful interference in a residential
installation. This equipment generates and uses, and can radiate radio frequency
energy and, if not installed and used in accordance with the instructions, may
cause harmful interference to radio communications. However, there is no
guarantee that interference will not occur in a particular installation. If this
equipment does cause harmful interference to radio or television reception, which
can be determined by turning the equipment off and on, the user is encouraged to
correct the interference by one or more of the following measures:
• Reorient or relocate the receiving antenna.
• Increase the separation between the equipment and the receiver.
• Connect the equipment into an outlet on a circuit different from that to
which the receiver is connected.
• Consult the dealer or an experienced radio/television technician for help.
Hewlett-Packard’s system certification tests were conducted with HP-supported
peripheral devices and HP shielded cables, such as those you receive with your
computer. Changes or modifications not expressly approved by Hewlett-Packard
could void the user’s authority to operate the equipment. Cables used with this
device must be properly shielded to comply with the requirements of the FCC.
Class A Product Statement: Warning for A ccessories
Installation and use of a Class A accessory (such as a network interface board)
creates a system that meets the requirements for industrial and commercial
environments. This equipment has been tested and found to comply with the
limits for Class A digital devices, pursuant to Part 15 of the FCC Rules. These
limits are designed to provide reasonable protection against harmful interference
37
Page 44

Appendix B Regulatory Information
when the equipment is operated in a commercial environment. This equipment
generates, uses, and can radiate radio frequency energy and, if not installed and
used in accordance with the instructions manual, may cause harmful interference
to radio communications. Operation of this equipment in a residential area is
likely to cause harmful interference in which case the user is required to correct
the interference at their own expense.
CD-ROM
The following information applies only to servers with factory-installed drives.
CD-ROM Electrical Safety Statement
WARNING To prevent fire or shock hazard, do not expose the unit to
rain or moisture.
To avoid electrical shock, do not open the cabinet. Refer
servicing to qualified personnel only.
CD-ROM Laser Safety Statements
38
CAUTION This CD-ROM mass storage system contains a laser system
and is classified as a “Class-1 Laser Product” under a U.S.
Department of Health and Human Services (DHHS)
Radiation Performance standard according to the Radiation
Control for Health and Safety Act of 1968.
To ensure proper use of this product, please read this
instruction manual carefully and retain for future reference.
Should the unit ever require maintenance, contact an
authorized service location.
CAUTION Use of controls, adjustments or the performance procedures
other than those specified herein may result in hazardous
radiation exposure. To prevent direct exposure to laser beam,
do not try to open the enclosure.
Page 45

Appendix B Regulatory Information
Notice for Canada: DOC Requirements
This Class B digital apparatus meets all requirements of the Canadian
Interference-Causing Equipment Regulations.
Cet appareil numérique de la classe B respecte toutes les exigences du Règlement
sur le matériel brouilleur du Canada.
Battery
This product uses a lithium battery.
WARNING Danger of explosion if battery is incorrectly replaced.
Replace only with the same or equivalent type recommended
by the manufacturer. Dispose of used batteries according to
the manufacturer's instructions.
AVERTISSEMENT Il y a danger d'explosion s'il y a remplacement incorrect
de la batterie.
Remplacer uniquement avec une batterie du même type
ou d'un type équivalent recommandé par le constructeur.
Mettre au rebut les batteries usagées conformément aux
instructions du fabricant.
Notice for EU:
Radio Frequen cy E missions W arn ing for A ccessor ies
This product has been found to comply with CISPR 22 Class B EMC emission
limits. Installation and use of a Class A accessory creates a system that meets the
requirements for industrial and commercial environments. However, in a
domestic environment, this product may cause radio interference, in which case
the user may be required to take adequate measures.
39
Page 46

Appendix B Regulatory Information
DECLARATION OF CONFORMITY
according to ISO/IEC Guide 22 and EN 45014
Manufacturer’s Name: Hewlett-Packard Company
Manufacturer’s Address: 5301 Stevens Creek Blvd.
declares, that the product
Product Name: Network Server
Model Number(s): HP NetServer E 45
Product Options: All
conforms to the following Product Specifications:
Safety: IEC 950: 1991 + A1, A2, A3 / EN 60950: 1992 + A1, A2, A3
EMC: CISPR 22: 1993 / EN 55022; 1994 - Class B
EN 50082-1: 1992 - Generic Immunity
IEC 801-2: 1991, 4 kV CD, 8 kV AD
IEC 801-3: 1984, 3V/m
IEC 801-4: 1988, 0.5 kV Signal Lines, 1 kV Power Lines
FCC Title 47 CFR, Part 15, Class B
Supplementary Information:
1) The product was tested in a typical configuration with Hewlett-Packard peripherals.
2) Models were configured with a network interface board and shielded twisted-pair data cable.
3) The product complies with Part 15 of the FCC rules. Operation is subject to the following two conditions:
• This device may not cause harmful interference, and
• This device must accept any interference received, including interference that may cause
undesired operation.
The product herewith complies with the requirements of the following directives and carries the CE marking
accordingly:
- EMC Directive 89/336/EEC
- Low Voltage Directive 73/23/EEC
Santa Clara, CA 95052 USA
Santa Clara, September 5, 1997
Nigel Marrion / Quality Manager
North American Contact:
Hewlett-Packard Company Product Regulations Manager
3000 Hanover Street
Palo Alto, CA 94304
415-857-1501
European Contact: Your local Hewlett-Packard Sales and Service Office or Hewlett-Packard GmbH,
Department ZQ / Standards Europe, Herrenberger Straße 130, D-7030 Böblingen (FAX: + 49-7031-143143)
40
Page 47

Appendix B Regulatory Information
Notice for Finland: Laser Safety Statement
LASERTURVALLISUUS
LUOKAN 1 LASERLAITE
KLASS 1 LASER APPARAT
HP NetServer E 45 - verkkopalvelimeen voidaan asentaa lisävarusteena
laitteensisainen CD-ROM-lukulaite, joka on laserlaite.
Kyseinen CD-ROM-lukulaite on käyttäjän kannalta turvallinen luokan 1
laserlaite. Normaalissa käytössä lukulaitteen suojakotelo estää laseräteen pääsyn
laiteen ulkopuolelle. Laitteen turvallisuusluokka omn määritetty standardin EN
60825 (1991) mukaisesti.
Notice for Germany
Noise Declaration an d Ergon omics
LpA < 45 dB (A)
am Arbeitsplatz (operator position)
normaler Betrieb (normal position)
nach DIN 45635 T. 19 (per ISO 7779)
This product has not been evaluated for compliance with the ZH1/618 ergonomic
requirements.
Laser Safety S tatement
VORSICHT Diese Gerät enthält ein Laser-System und ist als “LASER
PRODUKT DER KLASSE 1” klassifiziert. Für den richtigen
Gebrauch dieses Modells die Bedienungsanleitung sorgfältig
durchlesen und als Referenz aufbewahren. Falls Probleme mit
diesem Modell aufreten, die nächste “authorisierte ServicesVerrtetung” benachrichtigen. Um einen direkten Kontakt mit
dem Laserstrahl zu vermeiden, soll das Gehäuse nicht
geöffnet werden.
41
Page 48

Appendix B Regulatory Information
VORSICHT Die Verwendung von anderen Steuerungen oder
Einstellungen oder das Durchführen von anderen Vorgängen
als in der Bedienungsanleitung beschrieben kann gefährliche
Strahlenexpositionen zur Folge haben.
CLASS 1
LASER
This CD-ROM Drive Unit is classified as a CLASS 1
LASER PRODUCT.
PRODUCT
LASSER
KLASSE 1
The CLASS 1 LASER PRODUCT label is located on
the top of the drive.
PRODUKT
Bei diesem CD-ROM-Laufwerk CDU56S handelt es
sich um ein Laser-Produkt der Klasse 1. Ein
entsprechender Aufkelber mit der Beschriftung LASER
KLASSE 1 PRODUKT befindet sich der Obersiete des
Geräts.
Notice for Japan:
VCCI S tatement, HP NetServ er E 45
(Translation)
This equipment is in the Class B category information technology equipment
based on the rules of Voluntary Control Council For Interference by Information
Technology Equipment (VCCI). Although aimed for residential area operation,
radio interference may be caused when used near a radio or TV receiver. Read
the instructions for correct operation.
42
Page 49

Appendix B Regulatory Information
Notice for Korea: RFI Statement
(Translation)
User Guide (Class A)
Please note that this equipment has been approved for business purposes with
regard to electromagnetic interference. If purchased in error for use in a
residential area, you may wish to exchange the equipment where you
purchased it.
Notice for Mexico: Hardware Warranty Statement
This warranty statement applies only to sales in Mexico.
Póliza de Garantía
Hewlett-Packard de México, S. A. de C. V. con domicilios en:
Guadalajara, Jalisco
Montemorelos No. 299
Fracc. Loma Bonita, 45060
Tel. 669 95 00
México, D.F.
Prolongación Reforma No. 470
Col. Lomas de Sta. Fe, 01210
Delegación Alvaro Obregón
Tel. 326 46 00
Garantiza este producto por el término de treinta y seis meses en todas sus partes
y mano de obra contra cualquier defecto de fabricación y funcionamiento a partir
de la fecha de entrega al consumidor final. En el caso de productos que requieran
de enseñanza o adiestramiento en su manejo o en su instalación, a partir de la
fecha en que hubiese quedado operando normalmente el producto después de su
instalación en el domicilio que señale el consumidor.
Monterrey, Nvo. León
Calz. Del Valle O. No. 409
4º Piso, Col. Del Valle
Garza García, 76030
Tel. 378 42 40
43
Page 50

Appendix B Regulatory Information
CONDICIONES
1. Centros de Servicio, Refacciones y Partes:
Para hacer efectiva esta garantía, no podrán exigirse mayores requisitos que
la presentación de esta póliza junta con el producto en el lugar donde fue
adquirido o en cualquiera de los centros de servicio ubicados en los
domicilios de la parte superior de esta hoja, mismos en los que se pueden
adquirir refacciones y partes.
2. Cobertura:
La Empresa se compromete a reparar o cambiar el producto, así como las
piezas y componentes defectuosos del mismo, sin ningún cargo para el
consumidor. Los gastos de transportación que se deriven de su cumplimiento
serán cubiertos por Hewlett-Packard de México, S. A. de C. V.
3. Tiempo de Reparación:
El tiempo de reparación en ningún caso será mayor a treinta días contados a
partir de la recepción del producto en cualquiera de los sitios en donde
pueda hacerse efectiva la garantía.
4. Limitaciones:
Esta garantía no es válida en los siguientes casos:
A. Cuando el producto ha sido utilizado en condiciones distintas a las
normales.
B. Cuando el producto no ha sido operado de acuerdo con el instructivo
de uso en idioma Español proporcionado.
C. Cuando el producto ha sido alterado o reparado por personas no
autorizadas por Hewlett-Packard de México, S.A. de C. V.
Producto Marca Modelo
No.de Serie Nombre del Distribu id o r
Direcc ión : ( Calle ,Número, Colonia o Poblado, Delegació no Mu n i c i pi o )
C.P. Ciudad. Estado
Fechade entrega o instalación
44
Teléfono
Page 51

Appendix B Regulatory Information
Notas
El consumidor podrá solicitar que se haga efectiva la garantía ante la propia casa
comercial donde adquirió el producto.
En caso de que la presente garantía se extraviara, el consumidor puede recurrir a
su proveedor para que se le expida otra póliza de garantía, previa presentación de
la nota de compra o factura respectiva.
Notice for UK: General Approval
The HP NetServer E45 are approved under approval number NS/G/
1234/J/100003 for indirect connection to Public Telecommunication Systems in
the UK.
45
Page 52

Page 53

C Warranty and Software License
Hardware Product Limited Warranty
HP warrants this hardware product against defects in materials and
workmanship, under normal use, for the period specified in the HP NetServer
Limited Warranty Table section below. The warranty commences on receipt of
this product by Customer from HP or an Authorized HP Reseller (hereafter
referred to as "Reseller"). Some newly-manufactured products may contain
remanufactured parts equivalent to new in performance.
If HP or Reseller receives notice of such defects during the warranty period, HP
or Reseller will either, at its option, repair or replace products that prove to be
defective. Repair or replacement will be performed by HP or Reseller, at its
option, at Customer's premises or "On-site", by the Return-to-HP/Reseller
process, or by use of the Customer Replacement Part process.
Replacement parts assume the remaining warranty of the parts they replace.
Replacement parts are new or equivalent to new. When service involves the
exchange of an HP NetServer or a part, all removed parts, in their entirety,
become the property of HP and must be returned to HP. The replacement part
becomes Customer's property.
HP or Reseller will restore the warranted hardware product to factory original
hardware functionality. Customer is responsible for restoring any Network
Operating System, applications, or data. Should HP or Reseller be unable to
repair or replace the product within a reasonable amount of time, Customer's
alternate remedy shall be a refund of the purchase price upon return of the
hardware product.
Software Product Limited Warranty
Hewlett-Packard Utility Software
HP utility software is covered by the HP Software Product Limited Warranty.
Third-Party Software Products
HP does not warrant the form or content of third-party software or documentation
that is distributed by HP, such as Network Operating Systems or applications and
47
Page 54

Appendix C Warranty and Software License
HP provides such products "As Is.” Third-party software may be warranted in
accordance with the third-party warranty statement accompanying the product.
On-site visits caused by third-party software products are subject to standard perincident travel and labor charges.
Hardware Accessories Limited Warranty
Hewlett-Packard Har dware A ccessories
HP warrants this HP NetServer Hardware Accessory against defects in material
and workmanship, under normal use, for the period specified in the HP
NetServer Limited Warranty Table section below. The warranty commences on
receipt of this product by Customer from HP or Reseller. If HP or Reseller
receives notice of such defects during the warranty period, HP or Reseller will
either, at its option, repair or replace products that prove to be defective.
An HP NetServer Hardware Accessory is an HP hardware product, specifically
designated for use with HP NetServers, that is added on or integrated into an HP
NetServer in order to provide higher performance, capacity, or increased
capability; and is listed as a product in HP's Corporate Price List. Upon
installation inside an HP NetServer, the HP NetServer Hardware Accessory
carries a one-year Return-to-HP warranty or the remainder of the warranty period
for the original HP NetServer in which it is installed, whichever is longer.
Should HP or Reseller be unable to repair or replace the hardware accessory
within a reasonable amount of time, Customer's alternate remedy shall be a
refund of the purchase price upon return of the hardware accessory product.
HP/Colorado Memory Systems internal tape drives are not covered by this
warranty--they are covered under a replacement warranty included with the
product.
HP products external to the system processor unit, such as external storage
subsystems, printers, or other peripherals, are covered by the applicable warranty
for those products.
Third-Party Hardware Products
HP does not warrant third-party hardware products. Third-party hardware
products may be warranted in accordance with the third-party warranty statement
accompanying the product. On-site visits caused by third-party hardware
products--whether internal to the HP NetServer system processor unit (such as
48
Page 55

Appendix C Warranty and Software License
non-HP SIMMs) or external to the system processor unit (such as LAN cabling)-are subject to standard per-incident travel and labor charges.
Limitation of Warranty
HP does not warrant uninterrupted or error-free operation of an HP NetServer.
This warranty extends only to the original owner and is not transferable.
Consumables, such as batteries, have no warranty.
The above warranties shall not apply to products from which serial numbers have
been removed or to defects resulting from misuse (including operation of HP
NetServers without covers and incorrect input voltage), unauthorized
modification, operation or storage outside the environmental specifications for
the product, in-transit damage, improper maintenance, or defects resulting from
use of third-party software, accessories, media, supplies, consumables, or such
items not designed for use with the product.
HP makes no other express warranty, whether written or oral, with respect
to this product. Any implied warranty or merchantability or fitness is
limited to the one-year duration of this written warranty. Some states or
provinces do not allow limitations on how long an implied warranty lasts, so
the above limitation or exclusion may not apply to you.
This warranty gives you specific legal rights. You may also have other rights
that vary from state to state or province to province.
Limitation of Liability and Remedies
In no event will HP or its affiliates, subcontractors, or suppliers be liable for any
of the following:
1. Damages for loss of data, or software restoration;
2. Damages relating to Customer's procurement of substitute products or
services (i.e., "cost of cover");
3. Incidental, special, or consequential damages (including lost profits, loss
of use, Customer downtime, cost of data recovery/re-creation), even if HP
is informed of their possibility;
4. Third-party claims against Customer for losses or damages.
HP NetServers are not specifically designed, manufactured or intended for sale as
parts, components or assemblies for the planning, construction, maintenance, or
direct operation of a nuclear facility. Customer is solely liable if Products or
49
Page 56

Appendix C Warranty and Software License
Support purchased by Customer are used for these applications. Customer will
indemnify and hold HP harmless from all loss, damage, expense or liability in
connection with such use.
To the extent HP is held legally liable to Customer, HP's liability is limited to:
1. Damages for bodily injury; and
2. Direct damages to tangible property up to a limit of $100,000 or the
purchase price of the specific product that caused such damage.
The remedies in these HP Terms and Conditions of Sale and Service are
Customer's sole and exclusive remedies.
Customer R espons ibilities
Customer is responsible for the following:
1. Where applicable, before service is provided-a. Having the HP NetServer's system administrator available for
consultation with HP or Reseller;
b. Running HP-supplied configuration and diagnostics programs or
following the problem determination, problem analysis, and service
request procedures that HP or Reseller provides;
c. Securing all proprietary and confidential information;
d. Securing all programs and data;
e. Maintaining a procedure external to the products for reconstruction of
lost or altered files, data, or programs;
f. Informing HP or Reseller of changes in location of the HP NetServer;
and
g. Obtaining any necessary licenses or permits with regard to information
provided to HP or Reseller;
2. Travel and labor charges for on-site repairs caused by third-party
hardware or software;
3. Loss of, or damage to, an HP NetServer in transit when Customer is
responsible for the transportation charges.
For on-site service, Customer must provide the following:
1. Access to the product,
50
Page 57

Appendix C Warranty and Software License
2. Adequate working space and facilities within a reasonable distance of the
product,
3. Access to and use of all information and facilities determined necessary by
HP or Reseller to service the product, and
4. Operating supplies and consumables such as Customer would use during
normal operation.
When service is being performed on-site, an authorized representative of
Customer must be present at all times. Customer must state if the product is
being used in an environment that poses a potential health hazard to repair
personnel. HP or Reseller may refuse to provide on-site service if HP or Reseller
determines, in its sole discretion, that such product is located in an environment
which poses a potential health hazard to service personnel. HP or Reseller may
require that the product be maintained by Customer personnel under direct HP or
Reseller supervision.
Obtaining Warranty Service
To obtain warranty service, Customer must contact HP or Reseller. The customer
must be prepared to provide the product model number and serial number and
may be required to provide dated proof of purchase.
Depending on the product, warranty repair or replacement may be provided, at
HP or Reseller's sole discretion, at Customer's location or "On-site", by the
Return-to-HP/Reseller process, or by use of the Customer Replacement Part
process.
Customer R eplacement P art
Customer replaceable parts, such as the keyboard, mouse, and selected other
products, may be serviced through expedited part shipment. In this event, HP will
prepay shipping charges, duty, and taxes; provide telephone assistance on
replacement of the component; and pay shipping charges, duty, and taxes for
part(s) to be returned to HP.
Return to HP/Reseller
If on-site warranty service is not applicable, the product must be returned to a
service facility designated by HP or Reseller. Customer must enclose a copy of a
document proving date of purchase. Customer shall prepay shipping charges (and
shall pay all duty and taxes) for products returned to HP or Reseller for warranty
51
Page 58

Appendix C Warranty and Software License
service. HP or Reseller shall pay for return of products to Customer except for
products returned to Customer in another country.
On-site
Response time for HP on-site service in an HP Service Travel Area is normally
next business day (excluding HP holidays) and during normal business hours for
HP Travel Zones 1-3 (generally 100 miles or 160 Km from the HP office).
Response time is second business day for Zones 4 and 5 (200 miles, 320 Km);
third business day for Zone 6 (300 miles, 480 Km); and negotiated beyond Zone
6. Additional information is available in The HP Service and Support Travel and
Office Directory, available from any HP Sales and Service Office.
On-site service for this product is restricted or unavailable in certain locations. In
HP Excluded Travel Areas--areas where geographical obstacles, undeveloped
roads, or unsuitable public transportation prohibit routine travel--service is
provided on a negotiated basis at extra charge.
Travel restrictions and response time for Reseller is defined by the participating
reseller.
On-site service is limited to products that remain in the country of original
Customer purchase from HP or Reseller. Outside the country of original
purchase, on-site warranty service is available only by prior arrangement either
through purchase of the product at HP's International Price, with the destination
specified at time of order, or through purchase of a service contract from the HP
Subsidiary or Distributor in the destination country. Otherwise, the product must
be returned by Customer to the country of original purchase for service.
HP may provide Customer Replacement Parts in lieu of on-site services.
Consult the purchase documents for the product or consult directly with HP or
Reseller in the country of purchase if you have any questions concerning your
warranty terms and conditions.
52
Page 59

Appendix C Warranty and Software License
HP NetServer Limited Warranty Coverage
Warranty Coverage Periods
Product Year 1 Year 2 Year 3
On-site
On-site
RHP
1
On-site On-site
1
1
1
2
n/a n/a
On-site
n/a
On-site
n/a
HP NetServer L Series On-site
HP NetServer E Series On-site
HP internal accessories
(i.e. HP hard disk, HP memory)
Purchased with NetServer L
Series
Purchased with NetServer E
Series
HP internal accessories
purchased separately
HP External Accessories
On-site
1
On-site On-site
(i.e. HP Storage System/6)
RHP = Return-to-HP/Reseller
1 For all instances of “On-site” coverage, HP may provide a Customer
Replacement Part in lieu of on-site services.
2 HP NetServer Hardware Accessories, purchased separately after the initial
server purchase, carry the longer of a one year Return-to-HP/Reseller warranty
or the remaining warranty of the original HP NetServer in which it is
installed.
Technical Support
During the warranty period, telephone technical support is available to assist
with setup, configuration, startup, and troubleshooting of your hardware product.
Prior to calling HP or Reseller, please follow this checklist. This will allow HP or
Reseller to assist you more quickly and efficiently.
1. Consult the documentation provided with your product to assure that your
system features are properly configured.
53
Page 60

Appendix C Warranty and Software License
2. Execute the diagnostics provided and record the information. Consult the
accompanying documentation for instructions.
3. Record the following information:
• Product model name and number
• Product serial number
• Applicable error messages from system or diagnostics
• Applicable hardware driver revision levels
• Add-on boards or hardware
• Third-party hardware or software
• Operating system type and revision level
U.S. and Canada
For hardware service and telephone support, contact either:
• A participating Reseller
or
• HP Customer Support Center (Colorado): 970-635-1000
Europe
For hardware service and telephone support, contact either:
• A participating Reseller
or
• HP Customer Support Center (Netherlands):
Austria: 0660 6386
Belgium (Dutch): 02 626 8806
Belgium (French): 02 626 8807
Denmark: 3929 4099
Finland: 02 03 47 288
France: 01 43 62 3434
Germany: 0180 525 8143
Ireland: 01 662 5525
54
Page 61

Appendix C Warranty and Software License
Italy: 02 2 641 0350
Netherlands: 020 6068751
Norway: 22 11 6299
Portugal: 01 441 7199
Spain: 902 321 123
Sweden: 08 619 2170
Switzerland: 084 880 1111
United Kingdom: 0171 512 5202
International (English): 44 171 512 5202
Other Countries
For hardware service, contact your local Reseller or HP sales office. For
telephone support, contact your Reseller.
Self-Help Tools
Extensive technical information, product updates, and interactive forums are
available 24 hours a day, 7 days a week. More detailed information regarding
these tools may be obtained at HP's home page on the Internet World Wide Web.
Bulletin Board Service: 1-208-344-1691
Internet World Wide Web: http: //www.hp.com:
80/netserver/support/news_main.html
Internet FTP Server: ftp: //ftp.hp.com/pub/servers
HP Forum on CompuServe: GO HPPC
Fax Retrieval System: 800-333-1917 (U.S.)
208-344-4809 (outside U.S.)
Audio Tips: 800-333-1917 (U.S.)
208-344-4809 (outside U.S.)
Supplemental Warranty Service and Support
Enhanced hardware warranty services, such as after-hour or weekend coverage,
faster response time, and service in an HP Excluded Travel Area, may be
available from HP or Reseller at additional charge.
55
Page 62

Appendix C Warranty and Software License
To complement HP's hardware warranty services, network and software support
services such as
• "Bundled" per-incident network support,
• Annual network support, and
• Annual network support and server application support
are available to provide a total hardware and software solution. These services
are available from HP or Reseller at additional charge.
Software Product Limited Warranty
The HP Software Product Limited Warranty will govern all Software which is
provided to you (including Microsoft software) as part of the HP computer
product. This HP Product Limited Warranty will supersede any non-HP software
warranty terms that may be found in any documentation or other materials
contained in the computer product packaging.
Ninety-Day Limited Software Warranty. HP warrants for a period of NINETY
(90) DAYS from the date of the purchase that the software product will execute
its programming instructions when all files are properly installed. HP does not
warrant that the software will be uninterrupted or error free. In the event that this
software product fails to execute its programming instructions during the
warranty period, Customer's remedy shall be a refund or repair. Should HP be
unable to replace the media within a reasonable amount of time, Customer's
alternate remedy shall be a refund of the purchase price upon return of the
product and all copies.
Removable Media (If supplied). HP warrants the removable media, if supplied,
upon which this product is recorded to be free from defects in materials and
workmanship under normal use for a period of NINETY (90) DAYS from the
date of purchase. In the event the media proves to be defective during the
warranty period, Customer's remedy shall be to return the media to HP for
replacement. Should HP be unable to replace the media within a reasonable
amount of time, Customer's alternate remedy shall be a refund of the purchase
price upon return of the product and destruction of all other nonremovable media
copies of the software product.
Notice of Warranty Claims. Customer must notify HP in writing of any
warranty claim not later than thirty (30) days after the expiration of the warranty
period.
56
Page 63

Appendix C Warranty and Software License
Limitation of Warranty. HP makes no other express warranty, whether written
or oral with respect to this product. Any implied warranty of merchantability or
fitness for a particular purpose is limited to the 90-day duration of this written
warranty. Some states or provinces do not allow limitations on how long an
implied warranty lasts, so the above limitation or exclusion may not apply to you.
This warranty gives specific legal rights, and you may also have other rights
which vary from state to state, or province to province.
Limitation of Liability and Remedies. THE REMEDIES PROVIDED ABOVE
ARE CUSTOMER'S SOLE AND EXCLUSIVE REMEDIES. IN NO EVENT
SHALL HP BE LIABLE FOR ANY DIRECT, INDIRECT, SPECIAL,
INCIDENTAL OR CONSEQUENTIAL DAMAGES (INCLUDING LOST
PROFIT) WHETHER BASED ON WARRANTY, CONTRACT, TORT OR
ANY OTHER LEGAL THEORY. Some states or provinces do not allow
the exclusion or limitation of incidental or consequential damages, so the above
limitation or exclusion may not apply to you.
Obtaining Warranty Service. Warranty service may be obtained from the
nearest HP sales office or other location indicated in the owner s manual or
service booklet.
Consumer transactions in Australia and the United Kingdom: The disclaimers
and limitations above shall not apply and shall not affect the statutory rights of a
Consumer.
ATTENTION: USE OF THE SOFTWARE IS SUBJECT TO THE HP
SOFTWARE LICENSE TERMS SET FORTH BELOW. USING THE
SOFTWARE INDICATES YOUR ACCEPTANCE OF THESE LICENSE
TERMS. IF YOU DO NOT ACCEPT THESE LICENSE TERMS, YOU MAY
RETURN THE SOFTWARE FOR A FULL REFUND. IF THE SOFTWARE IS
BUNDLED WITH ANOTHER PRODUCT, YOU MAY RETURN THE ENTIRE
UNUSED PRODUCT FOR A FULL REFUND.
The HP Software Product License Agreement will govern all Software which is
provided to you with the exception of Microsoft Software. Microsoft Products are
licensed to you under the Microsoft End User License Agreement (EULA)
contained in the Microsoft documentation.
57
Page 64

Appendix C Warranty and Software License
HP Software Product License A greement
The following License Terms govern your use of the accompanying Software
unless you have a separate signed agreement with HP.
License Grant. HP grants you a license to Use one copy of the Software. "Use"
means storing, loading, installing, executing or displaying the Software. You
may not modify the Software or disable any licensing or control features of the
Software. If the Software is licensed for "concurrent use", you may not allow
more than the maximum number of authorized users to Use the Software
concurrently.
Ownership. The Software is owned and copyrighted by HP or its third party
suppliers. Your license confers no title to, or ownership in, the Software and is
not a sale of any rights in the Software. HP's third party suppliers may protect
their rights in the event of any violation of these License Terms.
Copies and Adaptations. You may only make copies or adaptations of the
Software for archival purposes or when copying or adaptation is an essential step
in the authorized Use of the Software. You must reproduce all copyright notices
in the original Software on all copies or adaptations. You may not copy the
Software onto any public network.
If your Computer was shipped with a Recovery CD, (i) the Recovery CD
and/or Support Utility software may be used only for restoring the hard disk of
the HP computer system with which the Recovery CD originally was provided,
and (ii) if separate EULA(s) are included with your Computer for any other MS
products which are included on the Recovery CD, those MS products are subject
to the terms of their respective EULA(s).
No Disassembly or Decryption. You may not disassemble or decompile the
Software unless HP's prior written consent is obtained. In some jurisdictions,
HP's consent may not be required for limited disassembly or decompilation. Upon
request, you will provide HP with reasonably detailed information regarding any
disassembly or decompilation. You may not decrypt the Software unless
decryption is a necessary part of the operation of the Software.
Transfer. Your license will automatically terminate upon any transfer of the
Software. Upon transfer, you must deliver the Software, including any copies and
related documentation, to the transferee. The transferee must accept these
License Terms as a condition to the transfer.
58
Page 65

Appendix C Warranty and Software License
Termination. HP may terminate your license upon notice for failure to comply
with any of these License Terms. Upon termination, you must immediately
destroy the Software, together with all copies, adaptations and merged portions in
any form.
Export Requirements. You may not export or re-export the Software or any
copy or adaptation in violation of any applicable laws or regulations.
U.S. Government Restricted Rights. The Software and any accompanying
documentation have been developed entirely at private expense. They are
delivered and licensed as "commercial computer software" as defined in DFARS
252.227-7013 (Oct 1988), DFARS 252.211-7015 (May 1991) or DFARS
252.227-7014 (Jun 1995), as a "commercial item" as defined in FAR 2.101(a), or
as "Restricted computer software" as defined in FAR 52.227-19 (Jun 1987)(or
any equivalent agency regulation or contract clause), whichever is applicable.
You have only those rights provided for such Software and any accompanying
documentation by the applicable FAR or DFARS clause or the HP standard
software agreement for the product involved.
59
Page 66

Appendix C Warranty and Software License
HP NetServer Warranty Frequently-Asked
Questions
Q: What is the intention of the HP NetServer Warranty?
A: The HP NetServer Warranty is intended to protect you from any defects in
workmanship or materials of the hardware product for a period of time
after your purchase. Though some limited technical support is available
during the warranty period to assist you with installation and setup, the
HP NetServer Warranty is NOT a substitute for network or server
application support services to assist you during normal operation of your
HP NetServer.
Q: When does the warranty begin?
A: HP's warranty begins when you receive your HP NetServer.
Q: What is the warranty on HP hardware add-ons to the HP NetServer?
A: There are two scenarios to consider here: whether the HP NetServer
Hardware Accessory was purchased with the HP NetServer; or separately
at some later date. If the HP NetServer Hardware Accessory was
purchased with the server, then the accessory can take on the warranty of
the server, except as noted in the warranty statement. If the accessory was
purchased after the initial server purchase, then the accessory has a one
year Return-to-HP/Reseller warranty, OR assumes the remaining warranty
of the original HP NetServer in which it is installed, whichever is longer.
Q: What are some examples of HP NetServer Hardware Accessories that
would qualify?
A: Accessories that are specifically designed to be used with HP NetServers,
such as HP memory modules, HP disk drives, and HP processor upgrade
kits, that are integrated into the system processor unit are some examples
of accessories that qualify. Additionally, these accessories must be listed
as products on HP's Corporate Price List.
Q: What about HP Printers or HP External Storage Subsystems?
A: Accessories or peripherals, external to the HP NetServer system processor
unit, carry their own warranty. Check the documentation accompanying
the product for additional information.
60
Page 67

Appendix C Warranty and Software License
Q: Will adding third-party memory or disk drives void the warranty?
A: Adding third-party memory or disk drives does not void the warranty.
However, there are some implications when you need technical support.
For example, when the memory used may relate to the problem you are
experiencing, you will be asked to remove the third-party memory to
confirm the problem still exists before a service provider is dispatched. HP
does not cover on-site visits caused by third-party products, whether
internal or external to the HP NetServer system processor unit.
Q: What is not covered by this limited warranty?
A: The following are some examples of items that are not covered:
◊◊ Product purchased from anyone other than HP or an Authorized HP
Reseller;
◊◊ Consumables such as batteries;
◊◊ Software products, except for HP-developed utility software;
◊◊ Routine cleaning, or normal cosmetic and mechanical wear;
◊◊ Damage from misuse, abuse, or neglect;
◊◊ Damage from use outside the product's usage or storage parameters;
◊◊ Damage from use of parts not manufactured or sold by HP;
◊◊ Damage from modification or incorporation into other products;
◊◊ Damage from repair or replacement of warranted parts by other than
HP or an Authorized Service Provider;
◊◊ Damage to or loss of any programs, data, or removable storage media.
Q: How will my HP NetServer be serviced during the warranty period?
A: Depending on the component needing repair or replacement, HP or your
reseller will select one of three options for servicing your HP NetServer.
Service will be provided at your premises or "on-site", by the Return-to-
HP/Reseller process, or by the Customer Replacement Part process.
Q: What is the Customer Replacement Part process?
A: HP NetServer components, such as the keyboard, mouse, and selected
other components, can be sent directly to you to replace at your
convenience. HP will prepay shipping charges, duty, and taxes; provide
telephone assistance on replacement of the component; and pay shipping
charges, duty, and taxes for components to be returned to HP.
61
Page 68

Appendix C Warranty and Software License
Q: What is the response time for on-site warranty service?
A: The standard response time for on-site warranty service is end of next
business day. All response commitments are based on commercially
reasonable efforts by HP and HP Authorized Service Providers.
Q: Can I keep the defective part that is being replaced?
A: No. All removed parts, in their entirety, become the property of HP. The
replacement part then becomes your property.
Q: What is the warranty on the replacement part?
A: The replacement part assumes the remaining warranty of the part it
replaces.
Q: Are product upgrades, such as new drivers or BIOS, eligible for on-site
warranty service?
A: Product upgrades, such as new revisions of drivers or BIOS, are not
eligible for on-site services under warranty. Self-help tools, described later
in this document, are available for you to download drivers at the
recommendation of HP or your reseller support representative. If you need
professional services to assist you with upgrades, contact your reseller or
HP.
Q: If I have a hardware failure, how will my HP NetServer be restored?
A: HP or your reseller will restore your HP NetServer to factory original
hardware functionality. You are responsible for restoring any Network
Operating System, applications, or data. Therefore, it is important that
you back up your software and data, and keep them in a secure location in
case you need to reconstruct lost or altered files, data, or programs.
62
Page 69

Appendix C Warranty and Software License
Q: What are my options if I want network or server application software
support?
A: Network or server application software support services are available to
complement the HP NetServer Warranty. Examples of these services
include:
◊◊ Per-incident bundled (5-pack or 10-pack) network support,
◊◊ Annual network support, and
◊◊ Annual network support and server application support.
Additionally, these services can be customized to your business
requirements (standard hours or 7x24 coverage) to provide a total
hardware and software solution. These services are available from HP or
an Authorized HP Reseller at additional charge.
Q: What are my responsibilities during warranty?
A: Your responsibilities, before service is provided under warranty, include
the following:
a. Have the HP NetServer system administrator available for consultation
with HP or your reseller support representative; and
b. Run HP-supplied configuration and diagnostics programs or follow the
problem determination, problem analysis, and service request
procedures that HP or your reseller support representative provides.
c. In many cases, your problem can be resolved over the telephone or the
problem can be further isolated so that the correct parts are identified
if on-site service is necessary.
Q: Where can I find warranty documentation?
A: The HP NetServer is packaged with warranty and service information that
details the warranty terms and conditions. The warranty and service
information is the legal warranty document and contains information on
your warranty coverage type and length.
Q: What can I do to optimize the reliability of my system and the integrity of
my data?
A: For maximum system reliability and data integrity, here are some
recommendations:
a. Ensure that all HP NetServer covers, panels, and board retainers are in
place to provide proper airflow whether the system is free-standing,
rack-mounted, or being shipped;
63
Page 70

Appendix C Warranty and Software License
b. Establish and practice back-up procedures for your data and programs
to minimize any disruptions to your business in case of a hardware
failure; and
c. Use current driver and software revision levels to optimize your server
environment.
Q: Is the warranty still valid if I ship my HP NetServer to another location
within my company?
A: The warranty is valid as long as the HP NetServer remains in the country
where you purchased it. When shipping or transporting an HP NetServer,
use proper care in packaging and securing the unit. Any damages will be
your responsibility that you will have to address with your transportation
carrier.
Q: If I sell my HP NetServer during the warranty period, is the warranty
transferable to the new owner?
A: No, the warranty only applies to the original owner.
Q: How do I obtain technical support?
A: During the warranty period, telephone technical support is available to
assist with setup, configuration, startup, and troubleshooting of your
hardware product. For a listing of support telephone numbers and other
support services, see Appendix D, "Service and Support" in this User
Guide.
Q: What information do I need to provide when I call for technical support?
A: To enable HP to assist you more quickly and efficiently, please follow this
checklist:
a. Consult the documentation provided with your product to assure that
your system features are properly configured.
b. Execute the diagnostics provided and record the information. Consult
the accompanying documentation for instructions.
c. Record the following information:
∗ Product model name and number
∗ Product serial number
∗ Applicable error messages from system or diagnostics
∗ Applicable hardware driver revision levels
64
Page 71

Appendix C Warranty and Software License
∗ Add-on boards or hardware
∗ Third-party hardware or software
∗ Operating system type and revision level
Q: How can I track changes that could affect the operation of my HP
NetServer?
A: Many customers have found it extremely useful to keep a system log. This
could be a simple binder with a log of when hardware, software, and
firmware changes are made, copies of proof of purchase documents for
the HP NetServer and all accessories, and copies of key configuration
files. The ongoing investment of a few minutes to document changes will
enable HP or your reseller to assist you more quickly and efficiently.
Q: What can I do to stay current on product updates or enhancements to my
server?
A: Self-help tools are available that enable you to obtain technical
information, download product updates, or participate in interactive
forums with other HP NetServer customers. These tools are available for
you to use 24 hours a day, 7 days a week. More detailed information
regarding these tools may be obtained at the HP home page on the Internet
World Wide Web.
Bulletin Board Service: 1-208-344-1691
Internet World Wide Web: http: //www.hp.com:
80/netserver/support/news_main.html
Internet FTP Server: ftp: //ftp.hp.com/pub/servers
HP Forum on CompuServe: GO HPPC
Fax Retrieval System: 800-333-1917 (U.S.)
208-344-4809 (outside U.S.)
Audio Tips: 800-333-1917 (U.S.)
208-344-4809 (outside U.S.)
Q: What kind of warranty upgrades are available?
A: If your business environment requires coverage after business hours, 24
hours a day, or faster response time, enhanced hardware warranty services
are available from HP or an Authorized HP Reseller at an additional
charge.
65
Page 72

Page 73

D Service and Support
System Design, Integration, and Support
The hardware, utility software, and any operating system or environment
software supplied by Hewlett-Packard provide an enhanced, industry-standard
base. A network operating system, utilities, and application software have been
added to create your complete system.
The most effective source of system and software support is the organization that
designed and configured your complete system. This can be a reseller, a
consultant, or your company’s information systems department.
The organization that worked with you to define your application and
configuration—including hardware or software not supplied by HP—knows your
unique operating procedures and can provide local, personal, and uniquely
responsive support.
Your Authorized HP Reseller is backed by special HP resources; your company’s
information systems department is normally backed by a Response Center
telephone support contract from HP.
If you have designed and configured the system yourself, you are filling the role
of reseller, consultant, or information systems department yourself—and you
must work with the different hardware and software manufacturers to obtain
assistance. Refer to each manufacturer’s documentation for information on
obtaining telephone support, repair service, World Wide Web, Internet FTP,
BBS, and/or automated fax support. If you are performing system integration, we
recommend that you subscribe to CompuServe, as described later in this
appendix.
For topics that require on-site visits or continuing contact, such as network
design, performance tuning, and mainframe communication, paid consulting is
available from value-added resellers, independent consultants, and HP’s
Professional Services Organization.
Information and Support When You Need It
Hewlett-Packard offers a complete set of support and information sources—each
discussed in this appendix:
• Navigator release history and status report
67
Page 74

Appendix D Service and Support
• HP NetServer Information Assistant
• CompuServe discussion forum and library
• World Wide Web and Internet FTP
• Bulletin Board System
• Automated Fax
• HP Repair and Telephone Support
HP provides a complete communications program to help you keep up to date
with your HP NetServer:
• HP NetServer Support News
• Navigator CD-ROM Subscription
This appendix also covers the following:
• Ordering HP cables, drive trays, and manuals
• Contacting HP’s Regional Headquarters
• Joining CompuServe
HP NetServer Navigator Release History
and Status Report
To ensure that you have the latest versions of the software, obtain the current
Navigator CD-ROM release history. The release history is updated for each new
release of the CD-ROM.
The release history briefly describes the following for each release:
• Major changes to the Navigator CD-ROM that were made for that release
• Version number
• Release date
• Part number of the Navigator CD-ROM
• Document number
The status report for your specific HP Navigator CD-ROM describes in detail any
software updates between this version of the CD-ROM and the previous version.
68
Page 75

Appendix D Service and Support
To obtain a release history or a status report, you will need one of these
document numbers:
• Release history: document number is 6005
• Status report: The number is different for each status report. Each version
of the Navigator CD-ROM has a four-digit document number printed on
the disk.
You can obtain the release history and status report for your CD-ROM in one of
these ways:
• Internet WWW:
http: //www.hp.com:
80/netserver/support/news_main.html
• Internet FTP:
ftp: //ftp.hp.com/pub/servers
logon: anonymous
password: <your e-mail address>
cd nsnavcd
get 6005.txt
• BBS:
Call (208) 344-1691
download document 6005.txt from the NSNAVCD library
• CompuServe:
GO HPPC
download document 6005.txt from the NetServer library
• Fax:
Call HP’s fax system at (1 800) 333-1917.
Outside the U.S. and Canada, call (1 208) 344-4809 from your fax machine.
Request document number 6005.
HP NetServer Navigator CD-ROM
Subscription Service
Subscribe to the HP NetServer Navigator CD-ROM Subscription Service to
automatically receive CD-ROM updates. The subscription service issues up to
12 releases per year.
69
Page 76

Appendix D Service and Support
The updates include the following:
• Updates to your system software, such as BIOS and driver upgrades
• Enhancements to server management tools
For a subscription form and subscription rates see:
• Internet WWW: http: //www.hp.com:
80/netserver/support/news_main.html
• BBS: Call (208) 344-1691
• Fax: Call HP’s fax system at (1 800) 333-1917. Outside the U.S. and
Canada, call (1 208) 344-4809 from your fax machine.
HP NetServer Navigator
The HP NetServer Navigator is an information retrieval system for quick access
to information on HP NetServers and accessories, NOS installation and tuning,
and product service and support.
The HP NetServer Information Assistant gives you access to technical and
product information while you are installing and configuring your HP NetServer
using the HP Configuration Assistant. It is also installable from the Navigator
CD-ROM for information retrieval from any PC running Microsoft Windows 3.1,
Windows for Workgroups 3.11, or Windows NT.
The HP NetServer Information Assistant uses advanced hypertext techniques to
make the information easily accessible.
For subscription information on the Navigator CD-ROM, obtain ordering
instructions from the library at the HPPC forum on CompuServe, via HP’s World
Wide Web home page, or from HP’s automated fax system. Each of these
services is described elsewhere in this appendix.
CompuServe Discussion Forum and Library
CompuServe, the worldwide electronic information utility, provides support,
technical data, and updated software drivers for the products of over 900
hardware and software manufacturers, including Hewlett-Packard.
With a CompuServe account, you post your question publicly in a managed,
focused forum dedicated to one manufacturer or topic. People who regularly visit
that forum read your question and reply within a day or two. If the topic is
70
Page 77

Appendix D Service and Support
complex or controversial, an electronic discussion may start among several
people—providing you with a group consensus.
HP products are covered on CompuServe in forums operated by independent
consultants. The NetServer section of the HPPC forum is visited regularly by HP
employees and a group of knowledgeable and friendly NetServer users. Libraries
are maintained that contain newsletters, technical articles, drivers, and other
software modules. Enter “GO HPPC” to reach the HP Systems Forum.
There are CompuServe forums covering most hardware and software
manufacturers. In addition to the HPPC forum, some other forums of interest
to HP NetServer owners include those for Banyan
HP Peripherals, Lotus
and Sybase
®
.
®
, Microsoft Windows NT®, Novell®, Oracle®, SCO,
®
, IBM® OS/2, Intel,
See “Joining CompuServe,” at the end of this appendix, to open a CompuServe
account (with a free introductory membership and free usage credit).
World Wide Web and Internet FTP
HP has a home page on the Internet World Wide Web specifically for the HP
NetServer
http: //www.hp.com:
80/netserver/support/news_main.html
You can also download NetServer files from HP via Internet FTP by entering the
following:
address: ftp: //ftp.hp.com/pub/servers
logon: anonymous
password: <your e-mail address>
Bulletin Board System
The HP NetServer Support BBS is for downloading only. Messages containing
support questions may be left in the HPPC forum on CompuServe.
The HP NetServer Support BBS has eight lines. The telecommunications
specifications are:
• 300/1200/2400/9600/14400 baud
• 103/212/V22bis/HST/V32/V32bis/V42 bis/MNP standards
71
Page 78

Appendix D Service and Support
• No parity, 8 data bits, 1 stop bit (N,8,1)
• ASCII, XMODEM, 1K-XMODEM, YMODEM, YMODEM-G,
YMODEM-batch, ZMODEM, KERMIT, and Super KERMIT file
transfer protocols
Call (208) 344-1691 to connect to the HP NetServer Support BBS.
A utomated Fax
HP’s automated fax system contains full product data sheets, price guides, and a
subset of the HP NetServer support information.
In the U.S., call (800) 333-1917 from a push button tone phone to request that an
index of available documents be sent to your fax machine. Call again to select the
documents that you want transmitted.
Outside the U.S. and Canada, call (208) 344-4809 from your fax machine. Use
the handset and touch-tone keyboard on your fax machine to request an index of
available documents. After you have made your choice, you are instructed to
press START on your fax machine and hang up the handset. The telephone
connection is maintained and used to send the fax to your machine. Call again
from your fax machine to select the documents that you want transmitted to you.
If you are using a fax modem instead of a fax machine, this process works only if
your fax software provides a START command.
HP NetServer Support News
HP NetServer Support News is an electronic newsletter dedicated to bringing you
late-breaking product and support information on HP NetServer products. This
newsletter is published once a month.
HP NetServer Support News can be obtained in several ways:
• From the library of the HPPC forum on CompuServe
• Via HP’s World Wide Web home page
• Via Internet FTP
• From HP’s Bulletin Board System
Each of these electronic sources is described in this appendix.
72
Page 79

Appendix D Service and Support
The most convenient way to keep up-to-date is to visit the HPPC forum on
CompuServe regularly. Issues of HP NetServer Support News are posted in the
forum as they come out—part of the ongoing seminar on HP NetServer systems.
Telephone Support
During the warranty period, telephone technical support is available to assist you
with setup, configuration, startup, and troubleshooting of your HP hardware
product.
Telephone support is generally available from the manufacturers and resellers of
the various non-HP hardware and software components. Refer to the product
documentation or your reseller for additional information.
Assistance with additional functions such as system design, operating system
upgrades, or performance optimization—and assistance with other technical
areas, such as cabling, non-HP hardware, or multiple operating system
environments—is available from Hewlett-Packard, resellers, or consultants at
additional charge. For example, HP offers LAN Support Service, or
Comprehensive Network Support Service with a 7-day, 24-hour option for
network operating systems and multi-vendor hardware. Contact your local HP
office for details.
Obtaining HP Repair and Telephone Support
Appendix C, “Warranty and Software License” gives details of the hardware
warranty—including which HP products are covered, travel limitations, charges
for non-HP-caused service calls, etc.
Please refer to Chapter 5 “Troubleshooting” for the steps to follow before calling
for service.
Prior to calling for support, record this information:
• Product model name and number
• Product serial number
• Applicable error messages from system or diagnostics
• Applicable hardware driver revision levels
• Add-on boards or hardware installed
• Third-party hardware or software
• Operating system type and revision level
73
Page 80

Appendix D Service and Support
For hardware repair or telephone support in the U.S. and Canada, contact either:
• Participating Service Authorized HP Personal Computer Reseller
or
• HP Customer Support Center (Colorado) (970) 635-1000 from 6 AM to
8 PM Mountain Time on Monday through Friday and from 9 AM to 3 PM
Mountain Time on Saturday
For hardware repair or telephone support in Europe, contact either:
• Participating Service Authorized HP Personal Computer Reseller
or
• HP Customer Support Center (Netherlands):
Austria: 0660 6386
Belgium (Dutch): 02 626 8806
Belgium (French): 02 626 8807
Denmark: 3929 4099
Finland: 02 03 47 288
France: 01 43 62 3434
Germany: 0180 525 8143
Ireland: 01 662 5525
Italy: 02 2 641 0350
Netherlands: 020 6068751
Norway: 22 11 6299
Portugal: 01 441 7199
Spain: 902 321 123
Sweden: 08 619 2170
Switzerland: 084 880 1111
United Kingdom: 0171 512 5202
International (English): 44 171 512 5202
Other countries. For hardware service, contact your local reseller or HP office.
For telephone support, contact your authorized HP reseller.
74
Page 81

Appendix D Service and Support
Ordering HP Cables, Drive Trays, and
Technical Publications
If you need more technical information, Hewlett-Packard publishes other
references that you can order from HP, such as the HP NetServer Product Line
Service Handbook.
Service information and reference documents, such as the Dealer Configuration
File Creation Guide (CFG), are also available in Information Assistant on the
Navigator CD-ROM.
Telephone Order ing I nfor mation
U.S.
• To identify a part or manual: automated fax (800) 333-1917;
voice (916) 783-0804.
• To order with a credit card: (800) 227-8164.
Canada
• Call (800) 387-3154.
• Also available for part or manual identification: automated fax
(800) 333-1917; voice (916) 783-0804.
Latin America
• Call your local HP office or (305) 267-4220 (Miami).
• Also available for part or manual identification: call (208) 344-4809 from
your fax machine; voice (916) 783-0804.
Other Countries
• Call your local HP office.
• Also available for part or manual identification: call (208) 344-4809 from
your fax machine; voice (916) 783-0804.
75
Page 82

Appendix D Service and Support
Contacting HP Regional Headquarters
Should you need to contact Hewlett-Packard, check your local telephone directory
for the HP Sales and Service Office near you. If you cannot locate an HP office,
contact one of the Worldwide HP Marketing Headquarters listed here:
Asia/Pacific Headquarters
Hewlett-Packard Asia Pacific Ltd.
17-21/F Shell Tower, Times Sq.
1 Matheson Street, Causeway Bay
Hong Kong
Phone: (+852) 599-7777
Fax: (+852) 506-9261
Europe/Middle East/Africa
Hewlett-Packard S.A.
150, route du Nant-d’Avril
1217 Meyrin 2/Geneva
Switzerland
Phone: (+41 22) 780-8111
Fax: (+41 22) 780-8542
Latin America Headquarters
Hewlett-Packard Company
Waterford Building, 9th Floor
5200 Blue Lagoon
Miami, FL 33126, USA
Phone: (+1 305) 267-4220
Fax: (+1 305) 267-4247
Joining CompuServe
To open a CompuServe account or to obtain information on access numbers and
charges in your country, you can purchase a CompuServe startup kit at a
computer software reseller or you can contact CompuServe directly.
Mention “Representative 133” to receive a free introductory membership with a
free usage credit.
CompuServe
P.O. Box 20212
Columbus, Ohio 43220 USA
(1 800) 524-3388
Direct: (1 614) 529-1349
Fax: (1 614)529-1610
CompuServe Europe
Postfach 11 69
82001 Unterbaching/Muenchen Germany
Freephone: 0130-37-32
Direct: (+49 89) 66-535-111
Fax: (+49 89) 66-535-242
CompuServe also has offices and agents in the following countries:
• Argentina—CompuServe S.A., Buenos Aires
• Australia/NZ—CompuServe Pacific, Fujitsu Australia, Chatswood NSW
76
Page 83

Appendix D Service and Support
• Chile—ChilePac, Santiago
• France—CompuServe SARL, Rueil
• Hong Kong—CompuServe Hong Kong, Motorola AirCommunications
• Hungary—CompuServe Hungary, Middle Europe Network, Budapest
• Israel—CompuServe Israel, Trendline Info. Comm., Tel Aviv
• Japan—NIFTY Corporation, Tokyo
• Mexico—CompuServe Mexico, Infoacces S.A. de C.V., Mexico City
• South Africa—CompuServe Africa, Lynnwood Ridge
• South Korea—ATEL Co. , Seoul
• Taiwan—TTN-Serve, Taiwan Telecomm, Taipei
• United Kingdom—CompuServe Ltd., Bristol
• Venezuela—CompuServe C.A. Venezuela, Caracas
From elsewhere, call CompuServe in the U.S. at (614) 529-1349.
Fax: (614) 529-1610.
77
Page 84

Page 85

Index
A
accessories
installing, 15
accessory boards
ISA
installing, 5
non-Plug-and-Play
configuring for E 40, 20
Plug-and-Play, 7
PCI, 7
installing, 5
automated FAX help system, 72
B
battery, 32
BBS
HP support bulletin board, 70, 71, 72
C
cables, 17, 18, 19
CD-ROM drive
installing, 16
troubleshooting, 30
CMOS memory
clearing, 27
CompuServe, 70
configuration
custom configuration, 8
ISA non-Plug-and-Play boards
E 40, 20
connector identification, 5
cover
removing, replacing, 1
unlocking, 1
D
data cable, 17, 18, 19
display
troubleshooting, 29
E
environmental specifications, 35
error messages, 25, 27, 28
F
FAX help systems, 72
forgotten password(s), 31
G
getting help, 67
H
hard disk drive
IDE, 18
installing, 17, 18
troubleshooting, 30
hardware problems, 29
hardware repair
warranty information for, 47
help
CompuServe, 70, 76
FAX systems for, 72
from Hewlett-Packard, 76
HP PC support bulletin board, 70,
71, 72
Internet, 71
release history, 68
repairs, 73
status report, 68
Support News newsletter, 72
system and software support, 67
system documentation, 70
telephone support, 73
I
IDE drives, 15
Information Assistant
copy, 13
features, 11
79
Page 86

Index
finding information, 12
getting help, 11
installation, 13
printing, 13
using, 11
installing, 15
Installing adapter boards, 6
Installing mass storage devices, 6
installing memory, 4
interference, 37
ISA
non-Plug-and-Play boards
configuring for E 40, 20
K
keyboard
troubleshooting, 30
M
mass storage device, 15
messages, 28
mounting tray, 18, 19
mouse
troubleshooting, 30
N
Navigator CD-ROM
changing date and time, 9
Configuration Assistant, 7
contents, 7
Management Solutions, 9
release history, 68
status report, 68
Subscription Service, 69
Support Anywhere, 9
utilities, 9
P
password
setting, 31
power cable, 17, 18, 19
power-on system hardware test, 27, 28
problems
battery, 32
CD-ROM drive, 30
keyboard, 30
mouse, 30
password(s), 31
R
README file, 1, 7
regulatory information, 37
removing the cover, 1
S
Setup program, 33
software
support for, 67
specifications, 35
support
BBS, 71
FAX, 72
Internet, 71
release history, 68
status report, 68
Support News newsletter, 72
system, 67
telephone, 73
Support Anywhere, 9
T
telephone support, 73
troubleshooting
basics, 23
error messages, 25
finding the problem, 24
tools, 23
U
utilities, 9
Diagnostic Assistant, 9
W
warranty information
for hardware, 47
weight and dimensions, 36
80
 Loading...