

Page 1
EN
Installation Guide
LaserJet Enterprise M506
M506n M506dn
ZHCN
安装指南
ID
Panduan Penginstalan
JA
設置ガイド
KO
설치 설명서
TH
ZHTW
安裝指南
VI
www.hp.com/support/ljM506
Page 2
1
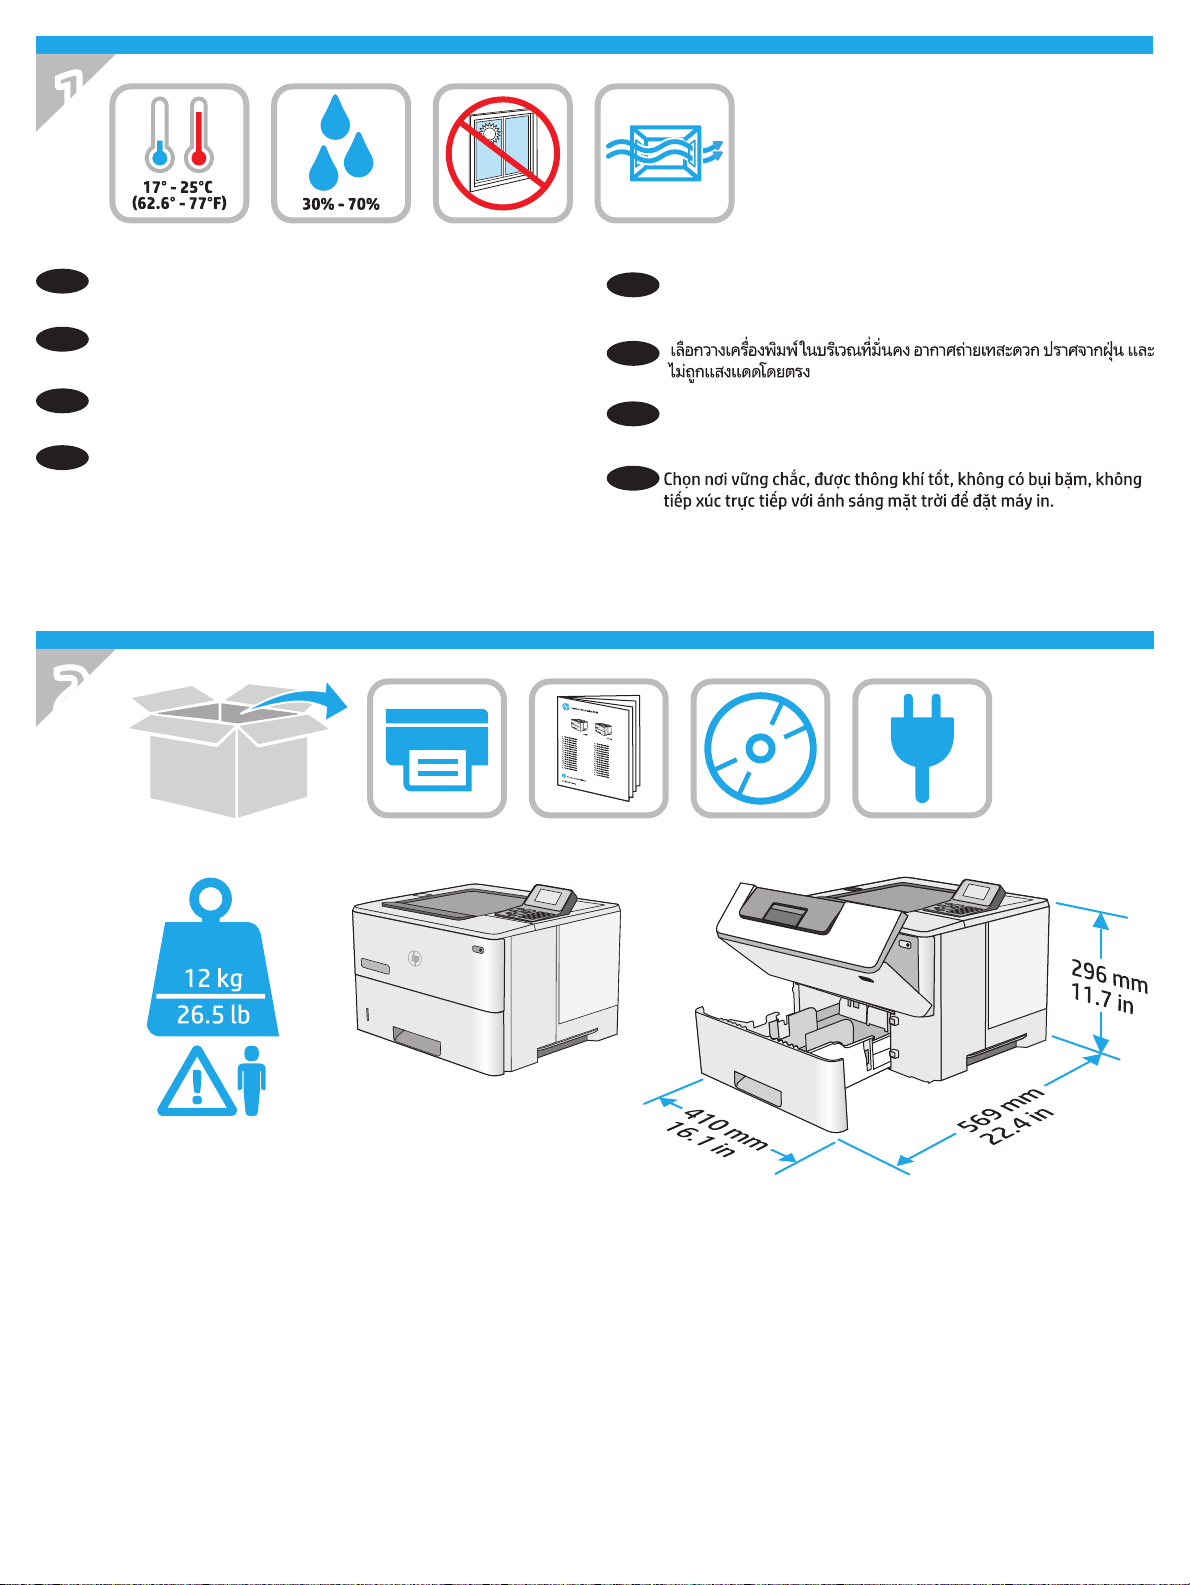
Select a sturdy, well-ventilated, dust-free area, away from direct
EN
sunlight to position the printer.
ZHCN
选择一个稳固、通风良好、无尘且远离日光直射
的区域放置打印机。
Untuk meletakkan printer, pilih tempat yang kokoh, berventilasi
ID
baik, bebas debu, dan jauh dari sinar matahari langsung.
プリンタの設置場所には、直射日光を避け、通気がよく埃の
JA
少ない、しっかりした場所を選んでください。
직사광선을 피해 바닥이 단단하고 환기가 잘 되며 먼지가 없는
KO
장소를 선택하여 프린터를 내려 놓습니다.
TH
ZHTW
請選擇一個平整穩固、通風良好且沒有灰塵的區域放置本印表
機,並避免陽光直射。
VI
2
M506n
M506dn
1
Page 3
3
EN
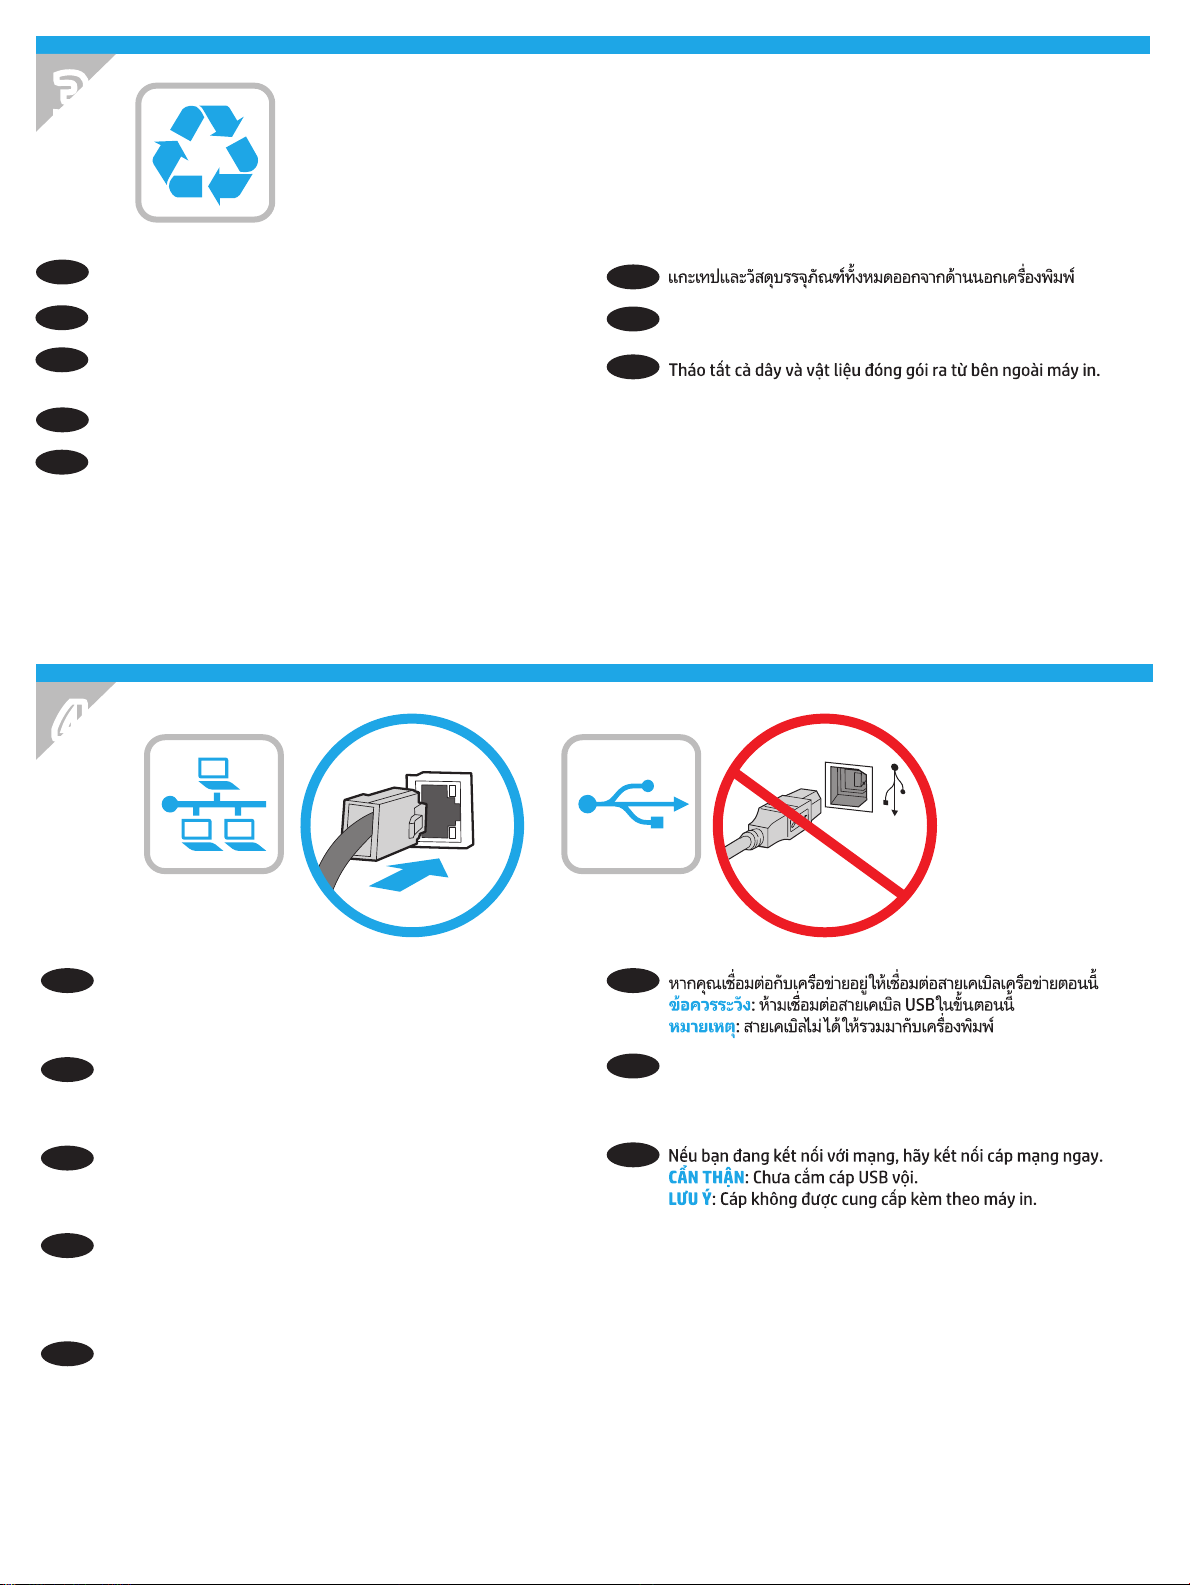
Remove all tape and packing material from outside the printer.
从打印机外部取下所有胶带和包装材料。
ZHCN
Lepas semua perekat dan materi kemasan dari bagian
ID
luarprinter.
プリンタ外部のテープと梱包材をすべて取り除きます。
JA
프린터 겉면의 테이프와 포장재를 모두 벗겨냅니다.
KO
TH
ZHTW
移除印表機外的所有膠帶與包裝材料。
VI
4
If you are connecting to a network, connect the network cable
EN
now. CAUTION: Do not connect the USB cable now.
NOTE: The cable is not included with the printer.
如果要连接到网络,则现在连接网络电缆。
ZHCN
注意:现在请勿连接 USB 电缆。
注:打印机未随附该电缆。
Jika Anda menyambung ke jaringan, sambungkan kabel jaringan
ID
sekarang. PERHATIAN: Jangan sambungkan kabel USB sekarang.
CATATA N: Kabel tidak disertakan dengan printer.
ネットワークに接続している場合は、ネットワーク ケーブ
JA
ルを接続します。注意:この時点では、USB ケーブルを接
続しないでください。
注記: このケーブルはプリンタに付属していません。
TH
如果您要連接至網路,請立即連接網路纜線。注意: 請勿現
ZHTW
在連接 USB 纜線。
附註:印表機並未隨附此纜線。
VI
네트워크에 연결하려면 지금 네트워크 케이블을 연결합니다.
KO
주의: 아직 USB 케이블을 연결하지 마십시오.
참고: 케이블은 프린터에 포함되어 있지 않습니다.
2
Page 4
5
EN
5.1
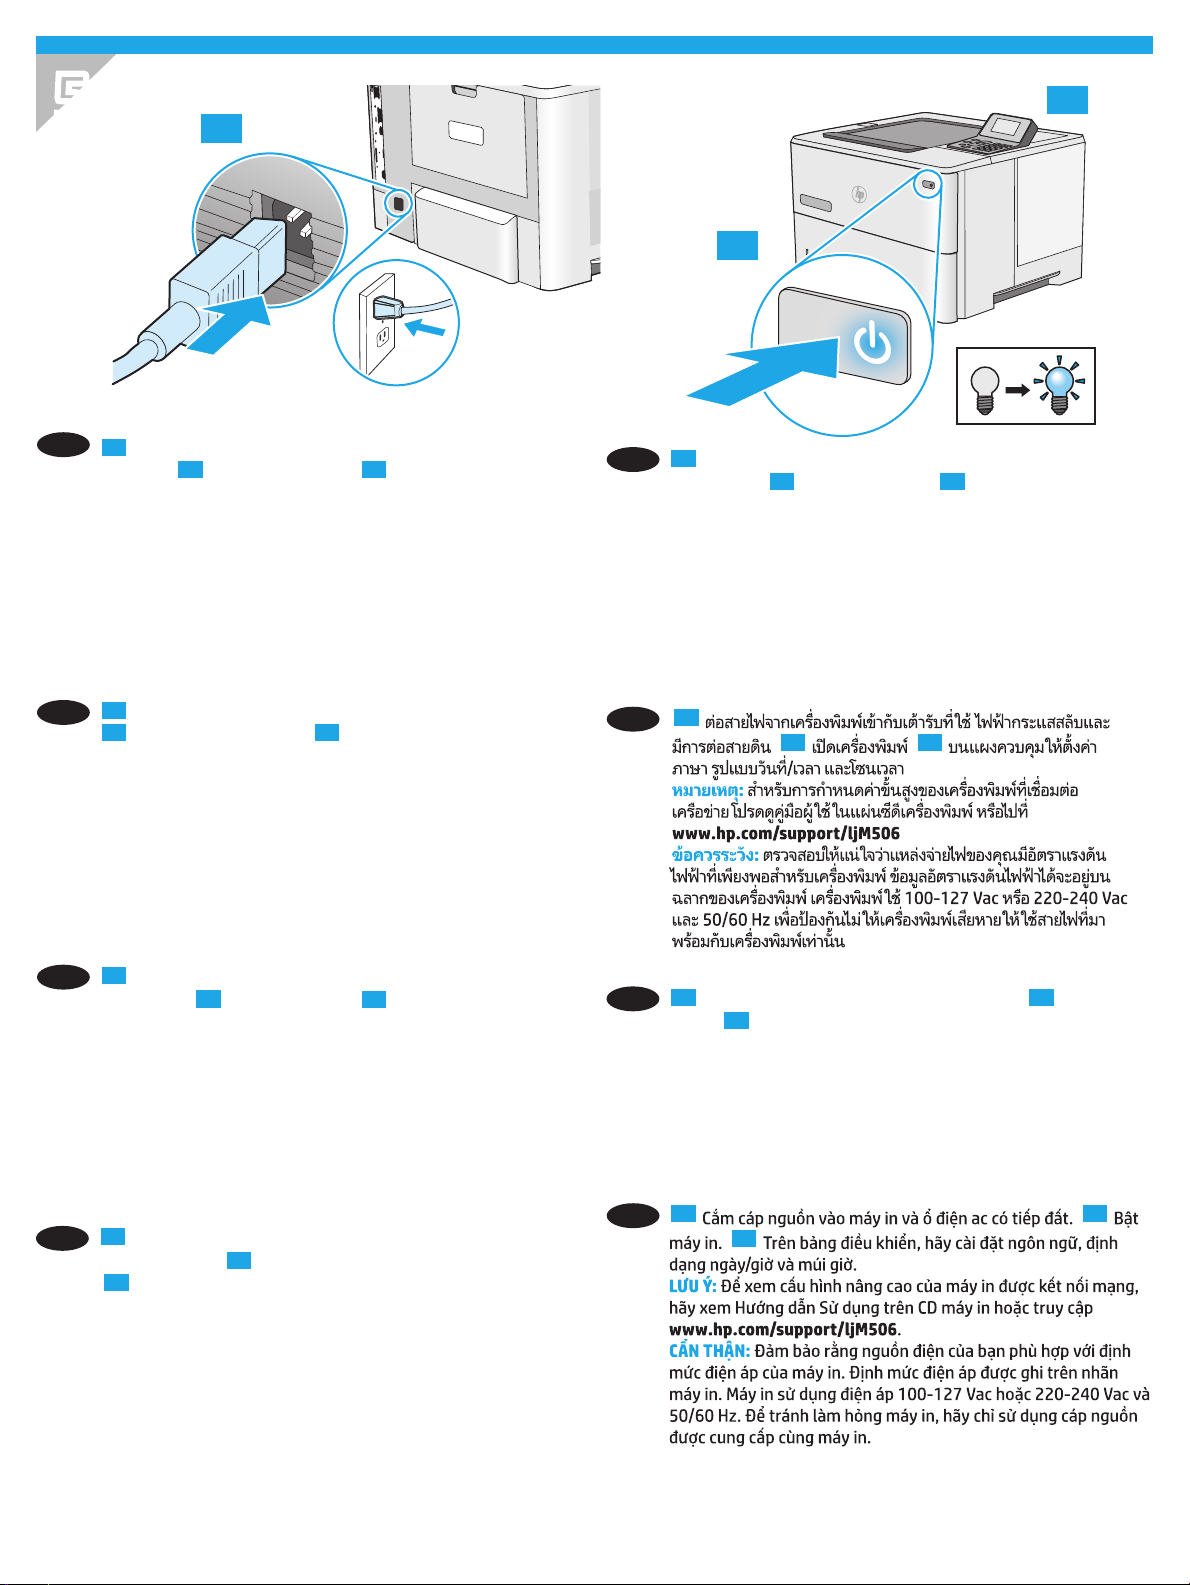
Connect the power cable between the printer and a grounded
ac outlet.
the language, the date/time format, and the time zone.
NOTE: For advanced conguration of network-connected
printers, see the User Guide on the printer CD or go to
www.hp.com/support/ljM506.
CAUTION: Make sure your power source is adequate for the
printer voltage rating. The voltage rating is on the printer label.
The printer uses either 100-127 Vac or 220-240 Vac and
50/60 Hz. To prevent damage to the printer, use only the power
cable that is provided with the printer.
5.1
5.2
Turn on the printer.
5.3
On the control panel, set
5.2
5.1
KO
전원 케이블을 프린터와 접지된 AC 콘센트 사이에
연결합니다.
시간 형식 및 시간대를 설정합니다.
참고: 네트워크에 연결된 프린터의 고급 구성에 대해서는 프린터
CD의 사용 설명서를 참조하거나 www.hp.com/support/ljM506
으로 이동하십시오.
주의: 콘센트의 전압이 프린터 전압에 맞는지 확인합니다.
전압은 프린터 라벨에 나와 있습니다. 프린터에는 100~127V AC
또는 220~240V AC 및 50/60Hz를 사용합니다. 프린터의 손상을
방지하려면 프린터와 함께 제공된 전원 케이블만 사용하십시오.
5.2
프린터를 켭니다.
5.3
제어판에서 언어, 날짜/
5.3
5.1
ZHCN
用电源线连接打印机与接地的交流电源插座。
5.2
打开打印机电源。
5.3
在控制面板上,设置语
言、日期/时间格式和时区。
注:要对联网打印机进行高级配置,请参阅打印
机 CD 上的《用户指南》或访问
www.hp.com/support/ljM506。
注意:确保电源符合打印机的额定电压要求。额
定电压标注在打印机标签上。 打印机使用
100-127 伏(交流)或 220-240 伏(交流)电
压,频率为 50/60 赫兹。为防止损坏打印机,请
仅使用打印机随附的电源线。
5.1
ID
JA
Sambungkan kabel daya antara printer dan stopkontak AC
yang diarde.
bahasa, format tanggal/waktu, dan zona waktu.
CATATA N: Untuk kongurasi lanjutan printer yang tersambung
ke jaringan, lihat Panduan Pengguna di CD printer atau kunjungi
www.hp.com/support/ljM506.
PERHATIAN: Pastikan catu daya telah memadai untuk tingkat
tegangan printer. Tingkat tegangan tercantum pada label printer.
Printer menggunakan 100-127 Vac atau 220-240 Vac dan
50/60 Hz. Untuk mencegah kerusakan pada printer, gunakan
hanya kabel daya yang disertakan dengan printer.
5.1
電源ケーブルで、プリンタをアース付き AC コンセント
に接続します。
5.3
コントロール パネルで、言語、日付/時刻の形式、タイ
ムゾーンを設定します。
注記:ネットワーク接続プリンタの高度な設定については、
プリンタ CD に収録されているユーザー ガイドを参照する
か、www.hp.com/support/ljM506 にアクセスしてください。
注意:使用する電源が、プリンタの定格電圧に適している
か確認してください。定格電圧は、プリンタのラベルに記
載されています。プリンタで使用する電圧は 100~127VAC
または 220~240VAC、周波数は 50/60Hz です。プリンタの
損傷を防ぐため、プリンタに付属の電源ケーブル以外は使
用しないでください。
5.2
Hidupkan printer.
5.2
プリンタの電源をオンにします。
Di panel kontrol, atur
5.3
5.1
TH
5.2 5.3
5.1
ZHTW
VI
使用電源線連接印表機及接地的 AC 插座。
5.3
電源。
附註: 若要進行網路連線印表機的進階設定,請參閱印表機
光碟中的使用指南,或前往 www.hp.com/support/ljM506。
注意: 確定電源適合本印表機的電壓額定值。電壓額定值請
見印表機標籤。本印表機使用 100-127 Vac 或
220-240 Vac,50/60 Hz。為了避免印表機損壞,請僅使用印
表機隨附的電源線。
5.1 5.2
在控制面板上設定語言、日期/時間格式與時區。
5.3
5.2
開啟印表機
3
Page 5
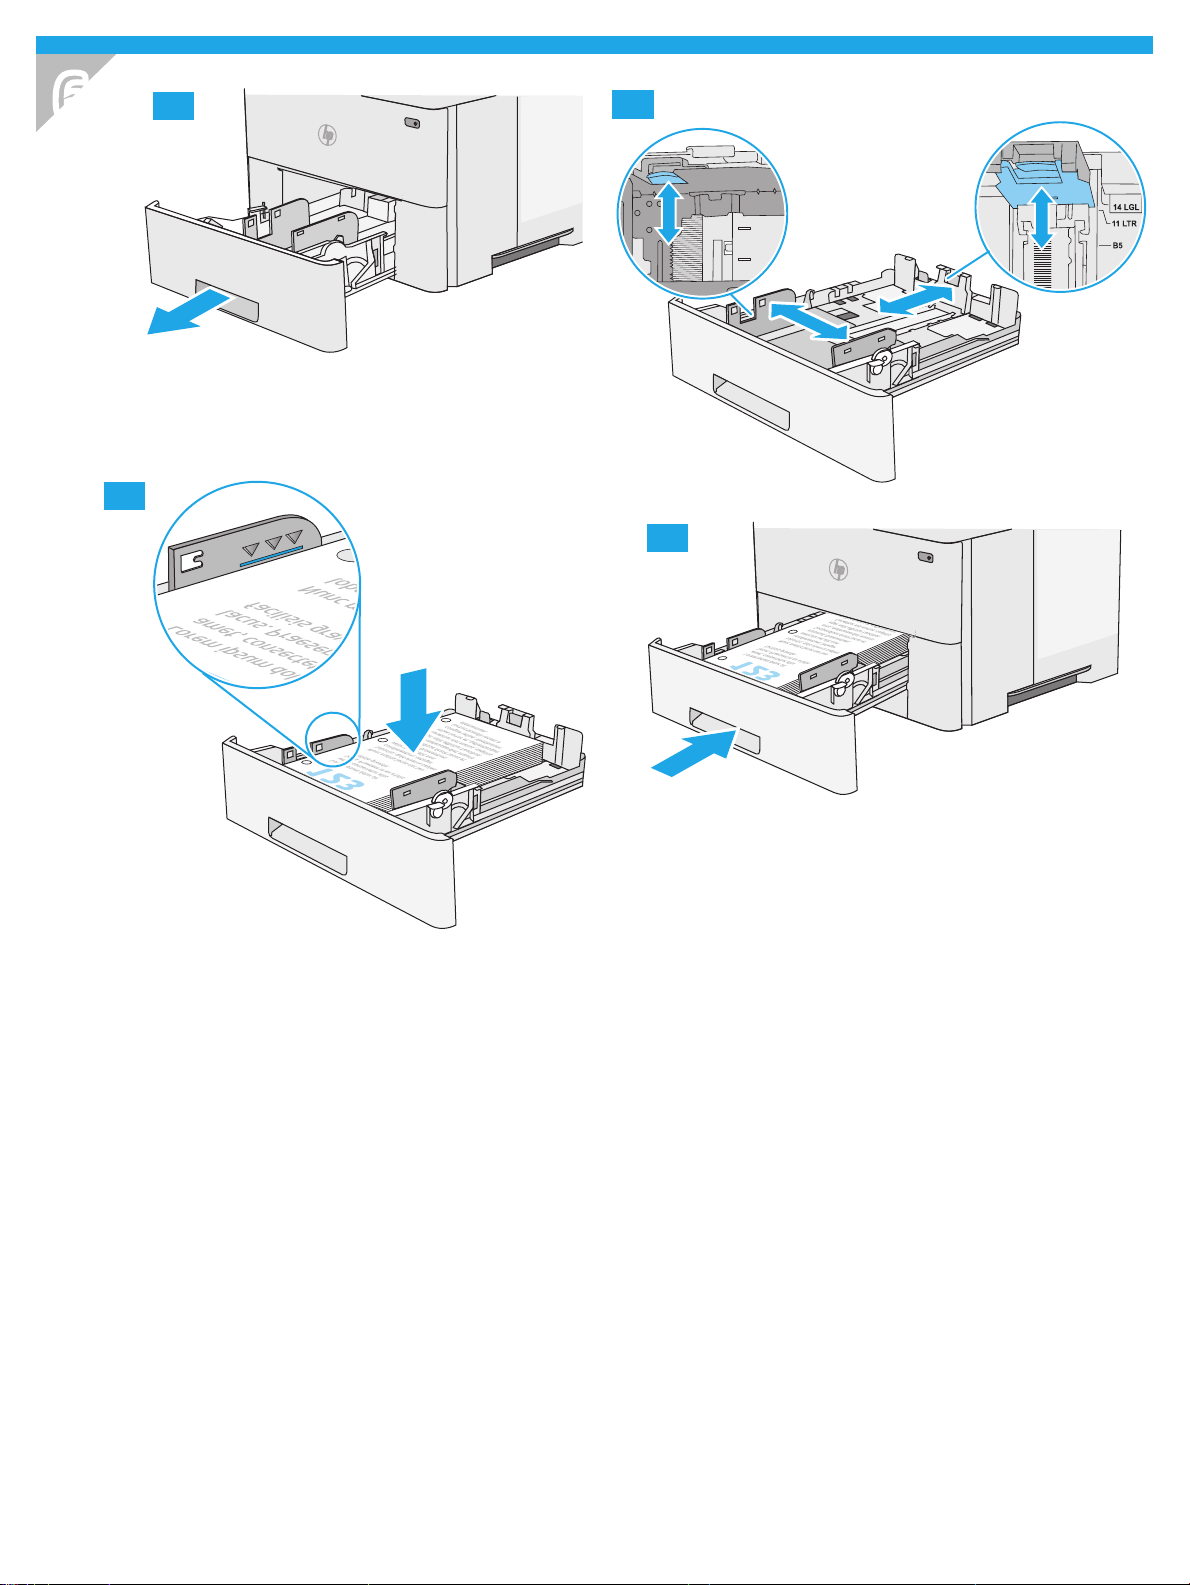
6
6.3
6.1
6.2
6.4
4
Page 6

7
Windows: Do not connect the USB cable until prompted during
EN
the software installation in the next step. If the network cable
was connected in Step 4, proceed to Step 8.
Mac: Connect the USB cable now.
NOTE: The cable is not included with the printer.
ZHCN
Windows:直到软件安装过程的下一步中出现提
示后,再连接 USB 电缆。如果在第 4 步连接了网
络电缆,则转到第 8 步。
Mac:现在连接 USB 电缆。
注:打印机未随附该电缆。
Windows: Jangan sambungkan kabel USB hingga diminta
ID
saat penginstalan perangkat lunak berlangsung pada langkah
berikutnya. Jika kabel jaringan tersambung dalam Langkah 4,
lanjutkan ke Langkah 8.
Mac: Sambungkan kabel USB sekarang.
CATATA N: Kabel tidak disertakan dengan printer.
Windows: 次の手順でソフトウェアのインストール中にメッ
JA
セージが表示されるまで、USB ケーブルを接続しないでくだ
さい。手順 4. でネットワーク ケーブルを接続している場合
は、手順 8. に進みます。
Mac: USB ケーブルを接続します。
注記: このケーブルはプリンタに付属していません。
Windows: 다음 단계에서 소프트웨어를 설치하는 동안 메시지가
KO
나타날 때까지 USB 케이블을 연결하지 마십시오. 4단계에서
네트워크 케이블을 연결한 경우, 8단계로 진행합니다.
Mac: USB 케이블을 지금 연결하십시오.
참고: 케이블은 프린터에 포함되어 있지 않습니다.
TH
Windows: 請勿連接 USB 纜線,直到下一步驟中的軟體安裝
ZHTW
期間出現提示。如果已在步驟 4 連接網路纜線,請繼續進行
步驟 8。
Mac: 立即連接 USB 纜線。
附註: 印表機並未隨附此纜線。
VI
5
Page 7

8
EN Download or locate the driver software installation les
Method 1: Download from HP Easy Start (Windows and OS X)
1. Go to 123.hp.com/laserjet and click Download.
2. Follow the onscreen instructions to download and launch the
installation le.
3. Follow the onscreen instructions to run the software
installation.
Method 2: Download from Product Support Web Site (Windows
and OS X)
1. Go to www.hp.com/support/ljM506.
2. Select software and drivers.
3. Download the software for your printer model and operating
system.
4. Launch the installation le by clicking on the .exe or .zip le as
necessary.
Method 3: Install from the printer CD (Windows only)
Follow the on-screen instructions. See the Install Notes le
on the product CD for more specic software installation
instructions.
Method 4: IT managed setup (Windows only)
Visit hp.com/go/upd to download and install the HP Universal
Print Driver.
NOTE: The default driver for OS X is the Apple AirPrint driver. To
install the full-featured HP driver for OS X, when adding a printer,
from the drop-down list of printers select the appropriate HP
driver depending on the model.
For a USB connection with the printer specic HP PCL.6
32-bit driver and Windows XP or Windows Vista, perform the
following additional steps after the software installation:
1. Make sure the printer is turned on and connected to the
computer.
2. Open the Windows Start menu, and then click Devices and
Printers (or Printers and Faxes for XP).
3. Right-click the name of this printer, and select Printer
Properties (or Properties for XP).
4. Click the Device Settings tab.
5. Click the Installable Options section.
6. In the drop-down box next to Printer Hard Disk, select
Installed. NOTE: This hard-disk setting applies even if an
optional hard disk is not installed. The printer comes with an
embedded multi-media controller instead of a hard disk. An
optional hard disk is available.
7. In the drop-down box next to Job Storage, select Automatic.
8. In the drop-down box next to Mopier Mode, select Enabled.
9. In the drop-down box next to Device Type, select
Monochrome.
NOTE: Windows XP with a USB connection: Bidirectional
communication is not available. Do not select Update Now.
If Update Now is selected, a delay of several minutes occurs
while the driver tries to connect and eventually times out.
ZHCN
下载或找到驱动程序软件安装文件
方法 1:从 HP Easy Start 下载(Windows 和 OS X)
1. 请转至 123.hp.com/laserjet,然后单击
“下载”(Download)。
2. 按屏幕上的说明下载并启动安装文件。
3. 按屏幕上的说明运行软件安装。
方法 2:从产品支持网站下载(Windows 和 OS X)
1. 转至 www.hp.com/support/ljM506。
2. 单击软件和驱动程序。
3. 下载用于您的打印机型号和操作系统的软件。
4. 通过按需单击 .exe 或 .zip 文件,启动安装文
件。
方法 3:从打印机 CD 安装(仅限 Windows)
按照屏幕上的说明进行操作。有关更具体的软件
安装说明,请参阅产品 CD 上的安装说明文件。
方法 4:IT 管理设置(仅限 Windows)
访问 hp.com/go/upd 以下载并安装 HP 通用打印驱
动程序。
注:适用于 OS X 的默认驱动程序是 Apple AirPrint
驱动程序。要安装完整版适用于 OS X 的 HP 驱动
程序,请在添加打印机时,根据型号从打印机下
拉列表中选择适当的 HP 驱动程序。
对于 USB 连接配合打印机特有的 HP PCL.6 32 位
驱动程序和 Windows XP 或 Windows Vista 的情
况,在软件安装之后执行以下其他步骤:
1. 确保打印机已打开电源并连接到计算机。
2. 打开 Windows 开始菜单,然后单击设备和打印
机(在 XP 中单击打印机和传真)。
3. 右键单击本打印机的名称,然后选择打印机属
性(在 XP 中单击属性)。
4. 单击设备设置标签。
5. 单击可安装选项部分。
6. 在打印机硬盘旁的下拉框中,选择已安装。
注:即使未安装可选硬盘,此硬盘设置也适
用。打印机内置一个多媒体控制器而非硬盘。
可购买可选硬盘。
7. 在作业存储旁的下拉框中,选择自动。
8. 在 Mopier 模式旁的下拉框中,选择已启用。
9. 在设备类型旁的下拉框中,选择黑白。
注:Windows XP 配合 USB 连接:无法进行双向
通信。请勿选择立即更新。
如果选择了立即更新,则驱动程序在尝试连接时
将停顿数分钟并最终超时。
6
Page 8

ID Mengunduh atau menemukan le instalasi perangkat lunak
driver
Metode 1: Mengunduh dari HP Easy Start (Windows dan OS X)
1. Kunjungi 123.hp.com/laserjet dan klik Unduh (Download).
2. Ikuti petunjuk di layar untuk mengunduh dan menjalankan le
instalasi.
3. Ikuti petunjuk di layar untuk menjalankan instalasi perangkat
lunak.
Metode 2: Mengunduh dari Situs Web Dukungan Produk
(Windows dan OS X)
1. Kunjungi www.hp.com/support/ljM506.
2. Pilih perangkat lunak dan driver.
3. Unduh perangkat lunak untuk model printer dan sistem
operasi Anda.
4. Jalankan le instalasi dengan mengklik le .exe atau .zip bila
perlu.
Metode 3: Menginstal dari CD printer (hanya Windows)
Ikuti petunjuk di layar. Lihat le Catatan Instalasi di CD produk
untuk petunjuk instalasi perangkat lunak yang lebih spesik.
Metode 4: Pengaturan yang dikelola TI (hanya Windows)
Kunjungi hp.com/go/upd untuk mengunduh dan menginstal
HPUniversal Print Driver.
CATATA N: Driver default untuk OS X adalah driver Apple AirPrint.
Untuk menginstal driver HP dengan tur lengkap untuk OS X,
saat menambahkan printer, dari daftar drop-down printer, pilih
driver HP yang sesuai, tergantung pada model.
Untuk koneksi USB dengan driver HP PCL.6 32-bit khusus
printer dan Windows XP atau Windows Vista, lakukan langkah
tambahan berikut ini setelah instalasi perangkat lunak:
1. Pastikan printer telah dihidupkan dan terhubung ke komputer.
2. Buka menu Windows Start (Mulai Windows), lalu klik Devices
and Printers (Perangkat dan Printer) (atau Printers and Faxes
(Printer dan Faks) untuk XP).
3. Klik kanan nama printer ini, lalu pilih Printer Properties
(Properti Printer) (atau Properties (Properti) untuk XP).
4. Klik tab Device Settings (Pengaturan Perangkat).
5. Klik bagian Installable Options (Opsi yang Dapat Diinstal).
6. Dalam kotak drop-down di sebelah Printer Hard Disk (Hard
Disk Printer), pilih Installed (Diinstal). C ATATAN: Pengaturan
hard-disk ini berlaku meskipun hard disk opsional tidak
diinstal. Printer dilengkapi pengontrol multimedia tertanam,
bukan hard disk. Hard disk opsional juga tersedia.
7. Dalam kotak drop-down di sebelah Job Storage (Penyimpanan
Tugas), pilih Automatic (Otomatis).
8. Dalam kotak drop-down di sebelah Mopier Mode (Mode
Mopier), pilih Enabled (Diaktifkan).
9. Dalam kotak drop-down di sebelah Device Type (Jenis
Perangkat), pilih Monochrome (Monokrom).
CATATA N: Windows XP dengan koneksi USB: Komunikasi
dua arah tidak tersedia. Jangan pilih Update Now (Perbarui
Sekarang).
Jika Update Now (Perbarui Sekarang) dipilih, akan terjadi
penundaan selama beberapa menit selagi driver mencoba
terhubung dan kemungkinan batas waktu akan habis.
ドライバ ソフトウェアのインストール ファイルをダウンロ
JA
ードする、または見つける
方法1: HP Easy Start からのダウンロード (Windows および
OS X)
1. 123.hp.com/laserjet にアクセスし、[ダウンロード] をクリック
します。
2. 画面の指示に従って、インストール ファイルをダウンロードし、
実行します。
3. 画面の指示に従って、ソフトウェアのインストールを実行しま
す。
方法2: 製品サポート Web サイトからのダウンロード
(Windows および OS X)
1. www.hp.com/support/ljM506 にアクセスします。
2. ソフトウェアとドライバを選択します。
3. お使いのプリンタ モデルとオペレーティング システムに適した
ソフトウェアをダウンロードします。
4. 必要に応じて .exe ファイルまたは .zip ファイルをクリックし、イ
ンストール ファイルを実行します。
方法3: プリンタの CD からのインストール (Windows のみ)
画面の指示に従って実行してください。 特定のソフトウェアの詳
細なインストール手順については、プリンタ CD のインストール メ
モ ファイルを参照してください。
方法4: IT 管理の設定 (Windows のみ)
hp.com/go/upd にアクセスし、HP Universal Print Driver をダウン
ロードしてインストールします。
注記: OS X のデフォルト ドライバは、Apple AirPrint ドライバで
す。 フル機能の OS X 用 HP ドライバをインストールするには、プ
リンタを追加するときに、プリンタのドロップダウン リストからお使
いのモデルに応じた適切な HP ドライバを選択します。
プリンタ固有の HP PCL.6 32 ビット ドライバと Windows XP
または Windows Vista を USB で接続する場合は、ソフトウェ
アをインストールした後、以下の追加手順を実行します。
1. プリンタに電源が入っていることと、プリンタがコンピュータに
接続されていることを確認します。
2. Windows のスタート メニューを開き、[デバイスとプリンタ
ー] (XP の場合は [プリンタと FAX]) をクリックします。
3. このプリンタの名前を右クリックし、[プリンターのプロパテ
ィ] (XP の場合は [プロパティ]) を選択します。
4. [デバイスの設定] タブをクリックします。
5. [インストール可能なオプション] セクションをクリックしま
す。
6. [Printer Hard Disk] (プリンタ ハード ディスク) の隣にあるドロ
ップダウン ボックスから [取り付け済み] を選択します。
注記:このハード ディスク設定は、オプションのハード ディス
クが取り付けられていない場合も適用されます。 プリンタに
は、ハード ディスクではなく組み込みのマルチメディア コント
ローラが搭載されています。 オプションのハード ディスクも使
用可能です。
7. [ジョブ保存] の隣にあるドロップダウン ボックスから [自動]
を選択します。
8. [Mopier Mode] (Mopier モード) の隣にあるドロップダウン ボッ
クスから [有効] を選択します。
9. [デバイスのタイプ] の隣にあるドロップダウン ボックスから
[モノクロ] を選択します。
注記: USB 接続を行う Windows XP: 双方向通信は使用できま
せん。 [今すぐ更新] は選択しないでください。
[今すぐ更新] が選択されている場合、ドライバが接続を試みて
タイムアウトになるまでの間、数分間の遅延が発生します。
7
Page 9

KO 드라이버 소프트웨어 설치 파일 다운로드 또는 찾기
방법 1: HP Easy Start에서 다운로드 (Windows 및 OS X)
1. 123.hp.com/laserjet로 이동한 후 다운로드를 클릭합니다.
2. 화면의 지시에 따라 설치 파일을 다운로드하고 실행합니다.
3. 화면의 지시에 따라 소프트웨어 설치를 실행합니다.
방법 2: 제품 지원 웹 사이트에서 다운로드(Windows 및 OS X)
1. www.hp.com/support/ljM506으로 이동하십시오.
2. 소프트웨어 및 드라이버를 선택합니다.
3. 해당 프린터 모델 및 운영 체제에 해당하는 소프트웨어를
다운로드합니다.
4. 필요에 따라 .exe 또는 .zip 파일을 클릭하여 설치 파일을
실행합니다.
방법 3: 프린터 CD에서 설치 (Windows만 해당)
화면의 지시에 따릅니다. 특정 소프트웨어 설치 지침에 대한
자세한 내용은 제품 CD의 설치 참고 사항 파일을 참조하십시오.
방법 4: IT 관리 설정(Windows만 해당)
HP UPD(Universal Print Driver)를 다운로드하고 설치하려면
hp.com/go/upd를 방문하십시오.
참고: OS X의 기본 드라이버는 Apple AirPrint 드라이버입니다.
전체 기능을 지원하는 OS X용 HP 드라이버를 설치하려면, 프린터
추가 시 프린터 드롭다운 목록에서 해당 모델에 맞는 적합한 HP
드라이버를 선택하십시오.
프린터별 HP PCL.6 32비트 드라이버 및 Windows XP 또는
Windows Vista를 사용하는 USB 연결의 경우, 소프트웨어 설치 후
다음의 추가 단계를 수행합니다.
1. 프린터가 켜져 있고 컴퓨터에 연결되어 있는지 확인합니다.
2. Windows 시작 메뉴를 열고 장치 및 프린터(XP의 경우 프린터
및 팩스)를 클릭합니다.
3. 해당 프린터의 이름을 마우스 오른쪽 버튼으로 클릭한 다음
프린터 속성(XP의 경우 속성)을 선택합니다.
4. 장치 설정 탭을 클릭합니다.
5. 설치 가능한 옵션 영역을 클릭합니다.
6. 프린터 하드 디스크 옆에 있는 드롭다운 상자에서 설치됨을
선택합니다. 참고: 이 하드 디스크 설정은 옵션 하드 디스크가
설치되지 않은 경우에도 적용됩니다. 프린터는 하드 디스크
대신 내장형 다중 용지 컨트롤러와 함께 제공됩니다. 옵션 하드
디스크도 사용 가능합니다.
7. 작업 저장 옆에 있는 드롭다운 상자에서 자동을 선택합니다.
8. 모피어 모드 옆에 있는 드롭다운 상자에서 활성을 선택합니다.
9. 장치 유형 옆의 드롭다운 상자에서 흑백을 선택합니다.
참고: Windows XP의 USB 연결: 양방향 통신을 사용할 수
없습니다. 지금 업데이트를 선택하지 마십시오.
지금 업데이트를 선택하는 경우, 드라이버가 연결을 시도하는 데
몇 분 정도 지연되며, 결국 시간 초과가 발생합니다.
ดาวน์โหลดหรือระบุตำาแหน่งไฟล์การติดต
TH
่
วิธีท
1: ดาวน์โหลดจาก HP Easy Start (Windows และ OS X)
ี
่
1. ไปท
123.hp.com/laserjet และคลิก ดาวน์โหลด (Download)
ี
2. ทำาตามคำาแนะนำาบนหน้าจอเพ
3. ทำาตามคำาแนะนำาบนหน้าจอเพ
่
วิธีท
2: ดาวน์โหลดจากเว็บไซต์สนับสนุนเคร
ี
่
1. ไปท
www.hp.com/support/ljM506.
ี
2. เลือก software (ซอฟต์แวร์) และ drivers( ไดรเวอร์)
3. ดาวน์โหลดซอฟต์แวร์สำาหรับร
4. เปิดไฟล์การติดต
่
วิธีท
3: ติดต
ี
ทำาตามคำาแนะนำาบนหน้าจอ โปรดดูไฟล์หมายเหตุการติดต
่
เคร
องพิมพ์สำาหรับคำาแนะนำาการติดต
ื
่
วิธีท
4: การต
ี
่
ไปท
hp.com/go/upd เพ
ี
Driver
หมายเหตุ: ไดรเวอร์เร
้
การติดต
งไดรเวอร์ HP สำาหรับ OS X ท
ั
่
เคร
องพิมพ์ จากรายการดรอปดาวน์ของเคร
ื
เหมาะสมโดยข
สำาหรับการเช
และ Windows XP หรือ Windows Vista ให้ทำาข
้
การติดต
งซอฟต์แวร์:
ั
1. ตรวจสอบว่าเคร
2. เปิดเมนู เร
และเคร
สำาหรับ XP)
3. คลิกขวาท
่
เคร
องพิมพ์) (หรือ Properties (คุณสมบัติ) สำาหรับ XP)
ื
่
4. คลิกท
แท็บ Device Settings (การต
ี
่
5. คลิกท
ส่วน Installable Options (ตัวเลือกท
ี
6. ในช่องดรอปดาวน์ Printer Hard Disk (ฮาร์ดดิสก์เคร
Installed (ติดต
่
กรณีท
ี
มัลติมีเดียแบบงแทนฮาร์ดดิสก์ ฮาร์ดดิสก์เสริมมีวางจำาหน่าย
7. ในช่องดรอปดาวน์ข้าง Job Storage (ท
(อัตโนมัติ)
องดรอปดาวน์ข้าง Mopier Mode (โหมด Mopier) ให้เลือก Enabled
8. ในช
่
(เปิดใช้งาน)
9. ในช่องดรอปดาวน์ข้าง Device Type (ประเภทอุปกรณ์) ให้เลือก
Monochrome (ขาวดำา)
หมายเหตุ: Windows XP พร้อมการเช
ทิศทาง ห้ามเลือก ปรับปรุงเด
หากเลือก อัปเดตทันที จะเกิดความล่าช้าหลายนาทีขณะท
่
เช
อมต่อและหมดเวลาในท
ื
้
งโดยคลิกไฟล์ .exe หรือ .zip ตามจำาเป็น
ั
้
งจากซีดีเคร
ั
่
้
งค่าท
มีการจัดการ IT (Windows เท่าน
ั
ี
่
มต้นสำาหรับ OS X คือไดรเวอร์ Apple AirPrint ใน
ิ
้
ู
นอย
กับร
ึ
่
่
อมต่อ USB กับไดรเวอร์ HP PCL.6 32 บิตเฉพาะเคร
ื
่
องพิมพ์เปิดอย
ื
่
ม ของ Windows และคลิก Devices and Printers (อุปกรณ
ิ
่
องพิมพ์) (หรือ Printers and Faxes (เคร
ื
่
่
่
อเคร
องพิมพ์ แล้วเลือก Printer Properties (คุณสมบัติของ
ช
ื
ื
ี
้
งแล้ว) หมายเหตุ: การต
ั
ไม่ได้ติดต
้
งฮาร์ดดิสก์เสริม เคร
ั
่
อดาวน์โหลดและเปิดไฟล์การติดต
ื
่
อเรียกใช้การติดต
ื
ุ
นเคร
่
่
องพิมพ์ (Windows เท่าน
ื
่
อดาวน์โหลดและติดต
ื
ุ
น
่
ู
และเช
่
๋
้
ยวน
ี
ี
่
สุด
ี
้
งซอฟต์แวร์ไดรเวอร
ั
งซอฟต์แวร
ั
่
องพิมพ์ (Windows และ OS X)
ื
่
องพิมพ์และระบบปฏิบัติการของคุณ
ื
้
งซอฟต์แวร์โดยเฉพาะ
ั
้
ง HP Universal Print
ั
่
มีคุณสมบัติเต็มรูปแบบ ในขณะเพ
ี
่
องพิมพ์ ให้เลือกไดรเวอร์ HP ท
ื
่
อมต่อกับคอมพิวเตอร์แล้ว
ื
้
งค่าอุปกรณ์)
ั
่
สามารถติดต
ี
้
งค่าฮาร์ดดิสก์น
ั
่
องพิมพ์มาพร้อมกับตัวควบคุม
ื
่
จัดเก็บงาน) ให้เลือก Automatic
ี
่
อมต่อ USB: ไม่มีการส
ื
้
้
นตอนต่อไปน
ั
่
องพิมพ์และโทรสาร)
์
้
น)
ั
้
งในแผ่นซีด
ั
้
น)
ั
ื
้
งได้)
ั
่
องพิมพ์) ให้เลือก
ื
้
ใช้ได้แม้ใน
ี
่
ื
อสารแบบสอง
่
ไดรเวอร์พยายาม
ี
้
หลังจาก
ี
์
้
ง
ั
ี
่
องพิมพ
ื
่
ม
ิ
่
ี
์
์
8
Page 10

下載或找出驅動程式軟體安裝檔
ZHTW
方法 1: 從 HP Easy Start 下載(Windows 和 OS X)
1. 請前往 123.hp.com/laserjet,然後按一下「下載」。
2. 依照螢幕上的指示下載並啟動安裝檔。
3. 依照螢幕上的指示執行軟體安裝。
方法 2: 從產品支援網站下載(Windows 和 OS X)
1. 前往 www.hp.com/support/ljM506。
2. 選擇「軟體和驅動程式」。
3. 下載適用於您印表機型號和作業系統的軟體。
4. 視需要按一下 .exe 或 .zip 檔案以啟動安裝檔。
方法 3: 從印表機光碟安裝 (僅限 Windows)
依照螢幕上的指示進行。 請參閱產品光碟中的安裝注意事項
檔案,以進一步瞭解特定的軟體安裝說明。
方法 4: IT 管理設定(僅限 Windows)
造訪 hp.com/go/upd,下載並安裝 HP 通用列印驅動程式。
附註: OS X 的預設驅動程式是 Apple AirPrint 驅動程式。 若
要安裝適用於 OS X 且功能完整的 HP 驅動程式,新增印表機
時,請根據型號從印表機下拉式清單中選擇適當的 HP 驅動程
式。
如果是 USB 連線搭配印表機專用 HP PCL.6 32 位元驅動程式和
Windows XP 或 Windows Vista,請在安裝軟體後執行下列額
外步驟:
1. 請確定印表機電源已打開,且已連接至電腦。
2. 開啟 Windows 開始功能表,然後按一下裝置和印表機(如
果是 XP,則是印表機和傳真)。
3. 用滑鼠右鍵按一下本印表機的名稱,然後選擇印表機內容
(如果是 XP,則是內容)。
4. 按一下裝置設定標籤。
5. 按一下可安裝的選項區段。
6. 在印表機硬碟旁邊的下拉式方塊中,選擇已安裝。 附註:
即使未安裝選購的硬碟,這項硬碟設定仍會套用。 本印表
機隨附內嵌式多媒體控制器而非硬碟。 您也可以使用選購
的硬碟。
7. 在工作儲存旁邊的下拉式方塊中,選擇自動。
8. 在多份原件列印模式旁邊的下拉式方塊中,選擇已啟用。
9. 在裝置類型旁邊的下拉式方塊中,選擇單色。
附註: Windows XP 搭配 USB 連線: 無法使用雙向通訊。 請
勿選擇立即更新。
如果選擇立即更新,就會在驅動程式嘗試連接時發生幾分鐘
的延遲,最終造成逾時。
Tải xuống hoặc tìm các tệp cài đặt phần mềm của trình điều
VI
khiển
Phương pháp 1: Tải xuống từ HP Easy Start (Windows và OS X)
1. Truy cập vào 123.hp.com/laserjet và nhấp Tải xuống
(Download).
2. Thực hiện theo các hướng dẫn trên màn hình để tải xuống và
khởi chạy tệp cài đặt.
3. Thực hiện theo các hướng dẫn trên màn hình để chạy cài đặt
phần mềm.
Phương pháp 2: Tải xuống từ Trang Web Hỗ Trợ Sản Phẩm
(Windows và OS X)
1. Truy cập www.hp.com/support/ljM506.
2. Chọn software and drivers (phần mềm và trình điều khiển).
3. Tải phần mềm xuống cho kiểu máy in và hệ điều hành của bạn.
4. Khởi động tệp cài đặt bằng cách nhấp vào tệp .exe hoặc .zip
nếu cần.
Phương pháp 3: Cài đặt từ CD máy in (chỉ cho Windows)
Làm theo hướng dẫn trên màn hình. Xem tệp Lưu ý Cài đặt trên CD
sản phẩm để biết hướng dẫn cài đặt phần mềm cụ thể hơn.
Phương pháp 4: Thiết lập được quản lý bởi CNTT (chỉ cho
Windows)
Truy cập hp.com/go/upd để tải xuống và cài đặt trình điều khiển
HP Universal Print Driver.
LƯU Ý: Trình điều khiển mặc định cho OS X là trình điều khiển
Apple AirPrint. Để cài đặt trình điều khiển HP đầy đủ tính năng cho
OS X, khi thêm máy in, từ danh sách máy in thả xuống, chọn trình
điều khiển HP thích hợp tùy theo kiểu máy.
Đối với kết nối USB có trình điều khiển HP PCL.6 32 bit dành
riêng cho máy in và Windows XP hoặc Windows Vista, hãy thực
hiện thêm các bước dưới đây sau khi cài đặt phần mềm:
1. Đảm bảo máy in được bật và được kết nối với máy tính.
2. Mở menu Windows Start (Bắt đầu) của Windows, sau đó nhấp
vào Devices and Printers (Thiết bị và Máy in) (hoặc Printers
and Faxes (Máy in và Fax) đối với XP).
3. Nhấp chuột phải vào tên máy in này và chọn Printer Properties
(Thuộc tính Máy in) (hoặc Properties (Thuộc tính) đối với XP).
4. Nhấp vào tab Device Settings (Cài đặt Thiết bị).
5. Nhấp vào phần Installable Options (Tùy chọn Có thể Cài đặt).
6. Trong hộp thả xuống bên cạnh Printer Hard Disk (Đĩa Cứng
Máy in), chọn Installed (Đã cài đặt). LƯU Ý: Cài đặt đĩa cứng này
được áp dụng ngay cả khi đĩa cứng tùy chọn chưa được cài đặt.
Máy in đi kèm với trình điều khiển đa phương tiện nhúng thay vì
đĩa cứng. Có sẵn đĩa cứng tùy chọn.
7. Trong hộp thả xuống bên cạnh Job Storage (Bộ nhớ Lệnh in),
chọn Automatic (Tự động).
8. Trong hộp thả xuống bên cạnh Mopier Mode (Chế độ Mopier),
chọn Enabled (Đã bật).
9. Trong hộp thả xuống bên cạnh Device Type (Loại Thiết bị),
chọn Monochrome (Đơn sắc).
LƯU Ý: Windows XP với kết nối USB: Giao tiếp hai chiều không
khả dụng. Không chọn Update Now (Cập nhật Ngay).
Nếu Cập nhật Bây giờ được chọn, bạn sẽ thấy có một thời gian trễ
khoảng vài phút khi trình điều khiển cố gắng kết nối và hết thời
gian chờ.
9
Page 11

9
Set up HP ePrint via email
EN
Use HP ePrint via email to print documents by sending them as
an email attachment to the printer’s email address from any
email enabled device, even from devices that are not on the same
network.
NOTE: The printer might require a rmware update to use
this feature.
To use HP ePrint via email, the printer must meet these
requirements:
• The printer must be connected to a wired or wireless network
and have Internet access.
• HP Web Services must be enabled on the printer, and
the printer must be registered with HP Connected or
HP ePrint Center.
Enable HP Web Services
1. Open the HP Embedded Web Server (EWS):
a. View the control-panel display to see the IP address.
b. Open a Web browser, and in the address line, type the
IP address or host name exactly as it displays on the
printer control panel. Press the Enter key on the computer
keyboard. The EWS opens.
NOTE: If the Web browser displays a There is a problem
with this website’s security certicate message when
attempting to open the EWS, click Continue to this website
(not recommended). Choosing Continue to this website (not
recommended) will not harm the computer while navigating
within the EWS for the HP printer.
2. Click the HP Web Services tab.
3. Select the option to enable Web Services.
NOTE: Enabling Web Services might take several minutes.
4. Go to www.hpconnected.com or www.hp.com/go/eprintcenter
to create an HP ePrint account and complete the setup process.
ZHCN
设置通过电子邮件的 HP ePrint
使用通过电子邮件的 HP ePrint 打印文档只需从任
何支持电子邮件的设备(甚至可从不在同一网络
上的设备)将这些文档作为电子邮件附件发送到
产品的电子邮件地址即可。
注:打印机可能需要更新固件才能使用此功能。
要使用通过电子邮件的 HP ePrint,打印机必须满
足以下这些要求:
• 打印机必须连接到有线或无线网络并可访问
Internet。
• 必须在打印机上启用 HP Web 服务,
并且必须将打印机注册到 HP Connected
或 HP ePrint Center。
启用 HP Web 服务
1. 打开 HP 内嵌式 Web 服务器 (EWS):
a. 查看控制面板显示屏以查看该 IP 地址。
b.
打开 Web 浏览器,在地址行中键入在打印机
控制面板上显示的准确 IP 地址或主机名。按
计算机键盘上的 Enter 键。随后将打开 EWS。
注 :如果在尝试打开 EWS 时 Web 浏览器显示此
网站的安全证书有问题消息,请单击继续浏览
此网站(不推荐)。在 HP 打印机的 EWS 中导航
时,选择继续浏览此网站(不推荐) 不会对计算
机造成伤害。
2. 单击 HP Web 服务选项卡。
3. 选择启用 Web 服务的选项。
注:启用 Web 服务可能耗时几分钟。
4. 访问 www.hpconnected.com 或
www.hp.com/go/eprintcenter 以创建
HP ePrint 帐户并完成设置过程。
10
Page 12

Mengkongurasi HP ePrint via email
ID
Gunakan HP ePrint via email untuk mencetak dokumen dengan
mengirimnya sebagai lampiran ke alamat email printer dari
perangkat apa pun yang mendukung email, bahkan dari
perangkat di jaringan yang berbeda.
CATATA N: Printer mungkin memerlukan pembaruan rmware
untuk menggunakan tur ini.
Untuk menggunakan HP ePrint via email, printer harus memenuhi
persyaratan ini:
• Printer harus disambungkan ke jaringan berkabel atau
nirkabel dan memiliki akses Internet.
• HPWeb Services harus diaktifkan di printer ini dan printer
harus terdaftar di HPConnected atau HP ePrint Center.
Mengaktifkan HP Web Services
1. Buka HP Embedded Web Server (EWS):
a. Lihat tampilan panel kontrol untuk melihat alamat IP.
b. Buka browser web, lalu di baris alamat, ketik alamat IP atau
nama host persis seperti yang ditampilkan di panel kontrol
printer. Tekan tombol Enter pada keyboard komputer.
EWSakan terbuka.
CATATA N: Jika browser Web menampilkan pesan Thereis
a problem with this website’s security certicate
(Terjadi masalah dengan sertikat keamanan situs
web ini) saat mencoba membuka EWS, klik Continue to
this website (notrecommended) (Lanjutkan ke situs
web ini (tidak disarankan)). Memilih Continue to this
website (notrecommended) (Lanjutkan ke situs web ini
(tidakdisarankan)) tidak akan membahayakan komputer
saatmenavigasi dalam EWS untuk printer HP.
2. Klik tab HP Web Services (Layanan Web HP).
3. Tentukan pilihan untuk mengaktifkan Web Services
(LayananWeb).
CATATA N: Pengaktifan Web Services (Layanan Web) mungkin
berlangsung beberapa menit.
4. Kunjungi www.hpconnected.com atau
www.hp.com/go/eprintcenter untuk membuat akun
HP ePrint dan menyelesaikan proses pengaturan.
HP ePrint (電子メール使用) のセットアップ
JA
HP ePrint (電子メール使用) を使用すると、同じネットワーク
に接続されていないデバイスを含むあらゆる電子メール対
応デバイスから、プリンタの電子メール アドレスに電子メ
ールの添付ファイルとして文書を送信し、印刷できます。
注記: この機能を使用するには、プリンタでファームウェ
アの更新が必要な場合があります。
HP ePrint (電子メール使用) を使用するには、プリンタが次の
要件を満たしている必要があります。
• プリンタが有線ネットワークかワイヤレス ネットワー
クに接続されていて、インターネットにアクセスでき
る必要があります。
• プリンタで HP Web サービスを有効にする必要があり
ます。また、プリンタが HP Connected または HP ePrint
Center に登録されている必要があります。
HP Web サービスの有効化
1. HP 内蔵 Web サーバ (EWS) を開きます。
a. コントロール パネル ディスプレイを表示して、IP アド
レスを確認します。
b. Web ブラウザを開き、プリンタのコントロール パネルに
表示されているものと同じ IP アドレスまたはホスト名を
アドレス バーに正確に入力します。コンピュータのキー
ボードの Enter キーを押します。EWS が開きます。
注 記 :EWS を開こうとしたときに Web ブラウザに「この
Web サイトのセキュリティ証明書に問題があります」とい
うメッセージが表示された場合、[このサイトの閲覧を続
行する (推奨されません)] をクリックします。[このサイト
の閲覧を続行する (推奨されません)] を選択しても、HP プ
リンタの EWS 内を参照している限り、コンピュータに害
はありません。
2. [HP Web サービス] タブをクリックします。
3. Web サービスを有効にするオプションを選択します。
注記: Web サービスを有効にするのに数分かかる場合があ
ります。
4. www.hpconnected.com または www.hp.com/go/eprintcenter
にアクセスして、HP ePrint アカウントを作成し、セット
アップ手順を完了します。
11
이메일을 통한 HP ePrint 설정
KO
이메일을 통한 HP ePrint를 사용하면 장치가 동일한 네트워크
상에 없어도 이메일을 사용할 수 있는 모든 장치에서 프린터의
이메일 주소로 문서를 첨부 파일로 전송하여 인쇄할 수 있습니다.
참고: 이 기능을 사용하려면 프린터의 펌웨어를 업데이트해야 할
수 있습니다.
이메일을 통한 HP ePrint를 사용하려면 프린터가 다음 요구
사항을 충족해야 합니다.
• 프린터가 유선 또는 무선 네트워크에 연결되어 있고
인터넷에 접속되어야 합니다.
• 프린터에서 HP 웹 서비스가 활성화되어 있어야 하며,
HP Connected 또는 HP ePrint Center에 프린터가 등록되어
있어야 합니다.
HP 웹 서비스 활성화
1. HP EWS(Embedded Web Server)를 엽니다.
a. IP 주소를 보려면 제어판 디스플레이를 확인합니다.
b. 웹 브라우저를 열고 주소 표시줄에 프린터 제어판에
표시되는 IP 주소 또는 호스트 이름을 정확히 입력합니다.
컴퓨터 키보드에서 Enter 키를 누릅니다. EWS가 열립니다.
참 고 : EWS를 열 때 웹 브라우저에서 "이 웹 사이트의 보안
인증서에 문제가 있습니다"라는 메세지를 표시하면 "이 웹
사이트를 계속 탐색합니다(권장하지 않음)"을 클릭하십시오. "
이 웹 사이트를 계속 탐색합니다(권장하지 않음)"을 선택해도
HP 프린터에 대한 EWS를 탐색하는 동안에는 컴퓨터에 문제가
발생하지 않습니다.
2. HP 웹 서비스 탭을 클릭합니다.
3. 옵션을 선택하여 웹 서비스를 활성화합니다.
참고: 웹 서비스를 활성화하는 데 몇 분 정도 소요될 수 있습니다.
4. www.hpconnected.com 또는 www.hp.com/go/eprintcenter
로 이동하여 HP ePrint 계정을 만들고 이메일 설정 과정을
통해 ePrint를 완료합니다.
TH
Page 13

設定 HP ePrint via email
ZHTW
使用 HP ePrint via email,您只要在任何具備電子郵件功能的
裝置上,將文件當做電子郵件附件傳送至印表機的電子郵件
地址即可列印該文件,即使您使用的裝置不在同一個網路上
也沒問題。
附註: 印表機可能需要韌體更新才能使用此功能。
若要使用 HP ePrint via email,印表機必須符合以下要求:
• 印表機必須連接至有線或無線網路,並且可以存取網際
網路。
• 印表機必須啟用 HP Web 服務,而且印表機必須向
HP Connected 或 HP ePrint Center 註冊。
啟用 HP Web 服務
1. 開啟 HP Embedded Web Server (EWS):
a. 檢視控制面板顯示幕以查看 IP 位址。
b. 開啟網頁瀏覽器,然後在位址列中輸入印表機控制面板
上顯示的 IP 位址或主機名稱。按下電腦鍵盤上的 Enter
鍵。EWS 隨即開啟。
附 註 :若嘗試開啟 EWS 時,網頁瀏覽器顯示此網站的安全
性憑證有問題訊息,請按一下繼續瀏覽此網站(不建議)。
在 HP 印表機的 EWS 內瀏覽時,選擇繼續瀏覽此網站
(不建議)將不會對電腦造成任何傷害。
2. 按一下 HP Web 服務標籤。
3. 選擇啟用 Web 服務的選項。
附註: 啟用 Web 服務可能需要幾分鐘的時間。
4. 前往 www.hpconnected.com 或 www.hp.com/go/eprintcenter
以建立 HP ePrint 帳戶並完成設定程序。
VI
12
Page 14

10
EN
For more information, see the User Guide on the printer CD or go
to www.hp.com/support/ljM506. Press the Help button on the
printer control panel to access Help topics.
ZHCN
有关详细信息,请参阅打印机 CD 上的《用户指
南》或访问 www.hp.com/support/ljM506。
按打印机控制面板上的“帮助”按钮以访问帮助
主题。
ID
Untuk informasi lebih lanjut, lihat Panduan Pengguna di CD
printer atau kunjungi www.hp.com/support/ljM506. Tekan
tombol Help (Bantuan) pada panel kontrol printer untuk
mengakses topik Help (Bantuan).
JA
詳細については、プリンタ CD に収録されているユーザー ガ
イドを参照するか、www.hp.com/support/ljM506 を参照して
ください。プリンタのコントロール パネル上の [ヘルプ] ボ
タンを押すと、ヘルプ トピックにアクセスできます。
KO
자세한 내용은 프린터 CD의 사용 설명서를 참조하거나
www.hp.com/support/ljM506으로 이동하십시오. 도움말 항목을
이용하려면 프린터 제어판의 도움말 버튼을 누르십시오.
TH
如需詳細資訊,請參閱印表機光碟中的使用指南,或前往
ZHTW
www.hp.com/support/ljM506。按下印表機控制面板上的
「說明」按鈕以存取「說明」主題。
VI
13
Page 15

14
Page 16

*
*
)$
www.hp.com
© 2015 Copyright HP Development Company, L.P.
Reproduction, adaptation or translation without prior written permission
is prohibited, except as allowed under the copyright laws.
The information contained herein is subject to change without notice.
The only warranties for HP products and services are set forth in the
express warranty statements accompanying such products and services.
Nothing herein should be construed as constituting an
additional warranty. HP shall not be liable for technical or editorial
errors or omissions contained herein.
Edition 1, 12/2015
FCC Regulations
This equipment has been tested and found to comply with the limits
for a Class A digital device, pursuant to Part 15 of the FCC rules. These
limits are designed to provide reasonable protection against harmful
interference in a residential installation. This equipment generates, uses,
and can radiate radio frequency energy, and if not installed and used in
accordance with the instruction manual, may cause harmful interference
to radio communications. Operation of this equipment in a residential
area is likely to cause harmful interference in which case the user will be
required to correct the interference at his own expense.
NOTE: Any changes or modifications to the printer that are not
expressly approved by HP could void the user’s authority to operate
this equipment. Use of a shielded interface cable is required to
comply with the Class A limits of Part 15 of FCC rules.
© 2015 Copyright HP Development Company, L.P.
未经事先书面许可,严禁进行任何形式的复制、
改编或翻译,除非版权法另有规定。
此处包含的信息如有更改,恕不另行通知。
HP 产品和服务的所有保修事项已在产品和服务
所附带的保修声明中列出。本文档中的任何内容均不
应理解为构成 任何额外保证。HP 对本文档中出现的技
术错误、 编辑错误或遗漏之处概不负责。
2015 年 12 月,第 1 版
FCC 规则
本设备经测试,确认符合 FCC 规则第 15 部分有关
A 类数字设备的限制规定。 这些限制旨在为防止住宅
安装中的有害干扰提供合理保护。本设备会产生、
使用并可能辐射射频能量;如果不按照说明手册进行
安装和使用,可能会对无线电通信造成有害干扰。
在住宅区使用本设备可能会产生有害干扰,
排除此类干扰所需的费用应由用户自行承担。
注:未经 HP 公司的明确同意而擅自更改或 改装本打印
机,用户将失去操作 此设备的权力。根据 FCC 规则第
15 部分的 A 类设备的限制规定,用户必须使用屏蔽的
接口电缆。
Trademark Credits
Windows®, Windows® XP, Windows Vista®, Windows® 7, Windows® 8,
and Windows Server® are trademarks of the Microsoft Group of
companies.
*F2A68-90993
*F2A68-90993
商标说明
Windows®、Windows® XP、Windows Vista®、
Windows® 7、Windows® 8 和 Windows Server®
是 Microsoft 集团公司的商标。
 Loading...