

Page 1
HP LaserJet MFP Upgrade
Kit for HP LaserJet 8000
and 8100 Printers
Contents
How to
navigate
(C4166A)
Index
User Guide
Use of this electronic document indicates that you accept the Copyright and License ter ms.
Copyright 2002 Hewlett-Packard Company
Page 2

2
Copyright and License
Copyright Hewlett-Packard Company
2002
All Right Reserved. Except as allowed by
copyright laws or herein, reproduction,
adaptation, or translation without prior
written permission is prohibited.
A user of an HP LaserJet 8000 or 8100
printer is granted a license to: a) print
hard copies of this Upgrade Kit User
Guide for PERSONAL, INTERNAL or
COMPANY use subject to the restriction
not to sell, re-sell or otherwise distribute
the hard copies; and b) place an
electronic copy of this user guide on a
network server provided access to the
electronic copy is limited to PERSONAL,
INTERNAL users of the LaserJet 8000 or
8100 printer.
Reorder part Number
C4166-60001
Second Edition, February 2002
Warranty
The information contained in this
document is subject to change without
notice.
Hewlett-Packard makes no warranty of
any kind with respect to this information.
HEWLETT-PACKARD SPECIFICALLY
DISCLAIMS THE IMPLIED WARRANTY
OF MERCHANTABILITY AND FITNESS
FOR A PARTICULAR PURPOSE.
Hewlett-P ac kard shall not be liab le f o r any
direct, indirect, incidental, consequential,
or other damage alleged in connection
with the furnishing or use of this
information.
Page 3

3
Trademark Credits
PostScript is a trademark of Adobe
Systems Incorporated which may be
registered in cer tain jurisdictions.
Arial, Monotype, and Times New Roman
are U.S. registered trademarks of the
Monotype Corporation.
CompuServe is a U.S. trademark of
CompuServe, Inc.
Helvetica, Palatino, Times, and Times
Roman are trademarks of Linotype AG
and/or its subsidiaries in the U.S. and
other countries.
Microsoft, MS Windows, Windows, and
Windows NT are U.S. registered
trademarks of Microsoft Corporation.
TrueType is a U.S. trademark of Apple
Computer, Inc.
NERGY STAR
E
is a U.S. registered service
mark of the U.S. EPA.
Page 4

4
HP Customer Care
Thank you for your purchase. Along with your product, you receive a variety of
suppor t services from Hewlett-Packard and our support par tners. These
services are designed to give you the results you need, quickly and
professionally.
HP LaserJet MFP Upgrade Installation Support
U.S.A. only: 208-323-2551
Outside U.S.A.: Call the desired support ser vice for your country or region as
listed on pages 5
through 12.
Page 5

5
Online Services:
For 24-hour access to information over your modem, we suggest these
services:
World Wide Web
Printer drivers, updated HP printer software, plus product and support
information may be obtained from the following URLs:
in the U.S. http://www.hp.com
in Europe http://www2.hp.com
Printer drivers may be obtained from the following sites:
in Japan ftp://www.jpn.hp.com/drivers/
in Korea http://www.hp.co.kr
in Taiwan http://www.hp.com.tw
or the local driver website http://www.dds.com.tw
Page 6

6
Obtaining software utilities and electronic information:
For U.S. and Canada:
Phone:
(661) 257-5565
Fax :
(661) 257-6995
Mail:
HP Distribution Center
24730 Ave. Rockefeller
Valencia, CA 91355
U.S.A.
Continued on next page.
Page 7

7
For Asia-Pacific Countries/Regions:
Contact Mentor Media at (65) 740-4477 (Hong Kong SAR, Indonesia, Philippines,
Malaysia, or Singapore). For Korea, call (82) (2) 3270-0805 or
(82) (2) 3270-0893.
For Australia, New Zealand, and India:
For Australia and New Zealand, call (61) (2) 565-6099. For India, call
(91) (11) 682-6035.
For European English:
For U.K., call (44) (142) 986-5511. For Ireland and outside U.K., call
(44) (142) 986-5511.
HP direct ordering for accessories or supplies:
Call (800) 538-8787 (U.S.) or (800) 387-3154 (Canada).
Page 8

8
HP Support Assistant compact disc:
This support tool offers a comprehensive online information system designed
to provide technical and product information on HP products. To subscribe to
this quarter ly ser vice in the U.S. or Canada, call (800) 457-1762. In Hong
Kong SAR, Indonesia, Malaysia, or Singapore, call Fulfill Plus at (65) 740-4477.
HP Service Information:
To locate HP-Authorized Dealers, call (800) 243-9816 (U.S.) or (800) 387-3867
(Canada).
HP Service Agreements:
Call (800) 835-4747 (U.S.) or (800) 268-1221 (Canada). For extended service,
call (800) 446-0522.
Page 9

9
Customer support options worldwide
Customer Support and Product Repair Assistance for
the U.S. and Canada
Call (208) 323-2551 Monday through Friday from 6 am to 6 pm, (Mountain
Time) free of charge during the warranty period. However, your standard longdistance phone charges still apply. Have your system nearby and your serial
number ready when calling.
If you know your printer needs repair, call (800) 243-9816 to locate your
nearest HP-Authorized service provider, or call (208) 323-2551 for HP
centralized service dispatch.
Post-warranty telephone assistance is available to answer your product
questions. Call (900) 555-1500 ($2.50* per minute, U.S. only) or call
(800) 999-1148 ($25* per call, Visa or MasterCard, U.S. and Canada) Monday
through Friday from 6 am to 6 pm (Mountain Time).
you connect with a support technician. *Prices subject to change.
Charges begin only when
Page 10

10
European Customer Support Center Language and
In-Country/Region Options Available
Open Monday through Friday 8:30–18:00 CET
HP provides a free telephone support ser vice during the warranty period. By
calling a telephone number listed below, you will be connected to a responsive
team waiting to help you. If you require support after your warranty has
expired, you can receive support for a f ee through the same telephone number.
The fee is charged on a per-incident basis. When calling HP, have the following
information ready: product name and serial number, date of purchase, and
description of the problem.
English Ireland: (353) (1) 662-5525
U.K.: (44) (171) 512-5202
International: (44) (171) 512-5202
Dutch Belgium: (32) (2) 626-8806
Netherlands: (31) (20) 606-8751
French France: (33) (01) 43-62-3434
Belgium: (32) (2) 626-8807
Switzerland: (41) (84) 880-1111
German Germany: (49) (180) 525-8143
Austria: (43) (1) 0660-6386
Norwegian Norway: (47) 2211-6299
Danish Denmark: (45) 3929-4099
Continued on next page.
Page 11

11
Finnish Finland: (358) (9) 0203-47288
Swedish Sweden: (46) (8) 619-2170
Italian Italy: (39) (2) 264-10350
Spanish Spain: (34) (90) 232-1123
Por tuguese Por tugal: (351) (1) 441-7199
In-country/region support numbers
Argentina 787-8080
Australia (61) (3) 272-8000
Brazil 022-829-6612
Canada (208) 323-2551
China (86) (10) 65053888-5959
Chile 800-360999
Czech Republic (42) (2) 471-7321
Greece (30) (1) 689-6411
Hong Kong SAR
Hungary (36) (1) 343-0310
India (91) (11) 682-6035
Continued on next page.
(852) 800-96-7729
(91) (11) 682-6069
Page 12

12
Indonesia (62) (21) 350-3408
Korea (82) (2) 3270-0700
Korea outside Seoul (82) (080) 999-0700
Japan (81) (3) 3335-8333
Malaysia (60) (3) 295-2566
Mexico (Mexico City) 01 800-22147
Mexico (outside Mexico City) 01 800-90529
New Zealand (64) (9) 356-6640
Philippines (63) (2) 894-1451
Poland (48) (22) 37-5065
Por tugal (351) (1) 301-7330
Russia (7) (95) 923-5001
Singapore (65) 272-5300
Taiwan (886) (02) 717-0055
Thailand +66 (0) 2 661-4011
Turkey (90) (1) 224-5925
Page 13

Contents
13
Introduction
Navigation Features . . . . . . . . . . . . . 16
Text Conventions . . . . . . . . . . . . . . . 17
Additional Features of Acrobat Reader. 18
Tips for Use . . . . . . . . . . . . . . . . . . 20
1 HP Digital Copy
Overview. . . . . . . . . . . . . . . . . . . . . . 21
HP Digital Copy Installation . . . . . . . . . . 22
Installation Checklist . . . . . . . . . . . 22
Step 1. Locate HP Digital Copy Parts. . 23
Step 2. Prepare Printer and
HP Digital Copy Location. . . . . . . . . . 24
Step 3. Install the HP Digital Copy. . . . 29
Step 4. Test HP Digital Copy Operation 40
Troubleshoot the HP Digital Copy . . . . 42
HP Digital Copy Operating Instructions . . 43
HP Digital Copy Features
and Benefits . . . . . . . . . . . . . . . . . 43
HP Digital Copy Control Panel . . . . . . 44
HP Digital Copy Settings . . . . . . . . . . 59
Loading documents into the Automatic
Document Feeder . . . . . . . . . . . . . . 61
Loading documents onto the Flatbed . . 63
Loading documents larger than the
Document Board . . . . . . . . . . . . . . . 64
Reading a page from a thick book. . . . 65
Paper Specifications. . . . . . . . . . . . . 66
Document Quality . . . . . . . . . . . . . . 67
HP Digital Copy Maintenance. . . . . . . . . 69
Clean the Document Cover, the
Document Holder, and the
Flatbed Glass . . . . . . . . . . . . . . . . 69
Cleaning the Automatic
Document Feeder . . . . . . . . . . . . . . 70
Pad and Roller Maintenance . . . . . 72
HP Digital Copy Problem Solving . . . . . . 73
Temporary Error . . . . . . . . . . . . . . . 74
Equipment Error . . . . . . . . . . . . . . . 75
HP Digital Copy Warranty . . . . . . . . . . . 76
2 HP Digital Sender Module
Overview . . . . . . . . . . . . . . . . . . . . . 77
Page 14

14
Appendix A Regulatory Information
Overview. . . . . . . . . . . . . . . . . . . . . . 78
Declaration of Conformity . . . . . . . . 79
FCC Regulations . . . . . . . . . . . . . . 82
Canadian DOC Regulations . . . . . . . . 84
VCCI Statement (Japan) . . . . . . . . 84
Korean EMI statement . . . . . . . . . . 85
Page 15

Introduction 15
Introduction
This section explains some of the features of this online user guide as well as
tips and tricks to help you use it to its greatest potential. It provides an
overview of the following information:
Navigation Features
Text Conventions
Additional Features of Acrobat Reader
Tips for Use
Additional features can be accessed through your Acrobat Reader menus and
toolbars.
Page 16

Introduction 16
Navigation Features
Button Button Name Function
Page Up and Down
Arrows
Table of Contents Icon This Table of Contents Icon calls up the table of
Introduction Icon The Introduction Icon calls up this introduction to
Index Icon The Index Icon calls up the online user guide text
The Page Up and Down arrows allow you to scroll
page-by-page through the online user guide. The
Page Up arrow allows you to go back one page,
while the Page Down arrow allows you to move
forward one page.
contents for the online user guide.
the guide.
index. The index entries are linked to their related
topics.
Page 17

Introduction 17
Text Conventions
Some text is formatted differently to indicate specific meanings or functions.
Below is a table that defines the different text formats and what they indicate.
Text Format Style Meaning or Function
EY CAP
K
This format is used to represent buttons on the printer, as well as
keys on the computer keyboard.
Hypertext
DISPLAY PANEL This format is used to indicate text that is displayed on the control
Input This format indicates that the text is typed by the user at a
This format is used to indicate that the text is linked to another
page of the document. Clicking on the underlined text takes you
to that page. Sometimes, a page number and section heading are
included in the blue underlined text, but any text formatted this way
indicates the presence of a link.
panel.
command prompt or into a dialog box.
Page 18

Introduction 18
Additional Features of Acrobat Reader
In addition to the navigation buttons provided on the right side of the page,
Adobe Acrobat Reader has a number of other features that you may find
useful.
Button Button Name Function
Actual Size This button sets the document view to the page’s actual
size.
Fit Page This button changes the document view so the page fits
in the window.
Fit Visible Width This button changes the document view so the visible
content and page width fit in the window.
Pag e On l y This button displays the page only with no bookmarks or
thumbnails.
Page 19

Introduction 19
Button Button Name Function
Page With
Bookmarks
Page With
Thumbnails
Back This button allows you to go to the previous link or to
Find This button calls up the Find dialog.
Zoom This button allows you to change the page size.
This button displays the page and bookmarks to the
different sections of the document in a window to the left
of the screen.
This button displays the page and small images of each
page in a window to the left of the screen.
undo your last change.
Page 20

Introduction 20
Tips for Use
Use bookmarks to navigate between chapters.
When reading large amounts of text, turn off bookmarks and change the page
view to full screen.
Use the find function under the Tools menu to find specific terms.
To print this document - For best quality and quickest printing, always print
using a compatible PostScript Level 2 emulation printer driver.
Page 21

Chapter 1 HP Digital Copy 21
HP Digital Copy
1
Overview
The HP Digital Copy provides you with basic copy module features.
Overview
Continued on next page.
Page 22

Chapter 1 HP Digital Copy 22
HP Digital Copy Installation
Installation Checklist
This section will help you install and set up the new HP Digital Copy (Model
C4230A). For proper installation, please complete each section in order.
Unpack the HP Digital Copy (steps 1-2)
Install the HP Digital Copy (step 3)
Test HP Digital Copy operation (step 4)
WARNING! The HP Digital Copy is heavy. Two people should move it.
HP Digital Copy Installation
Page 23
Chapter 1 HP Digital Copy 23
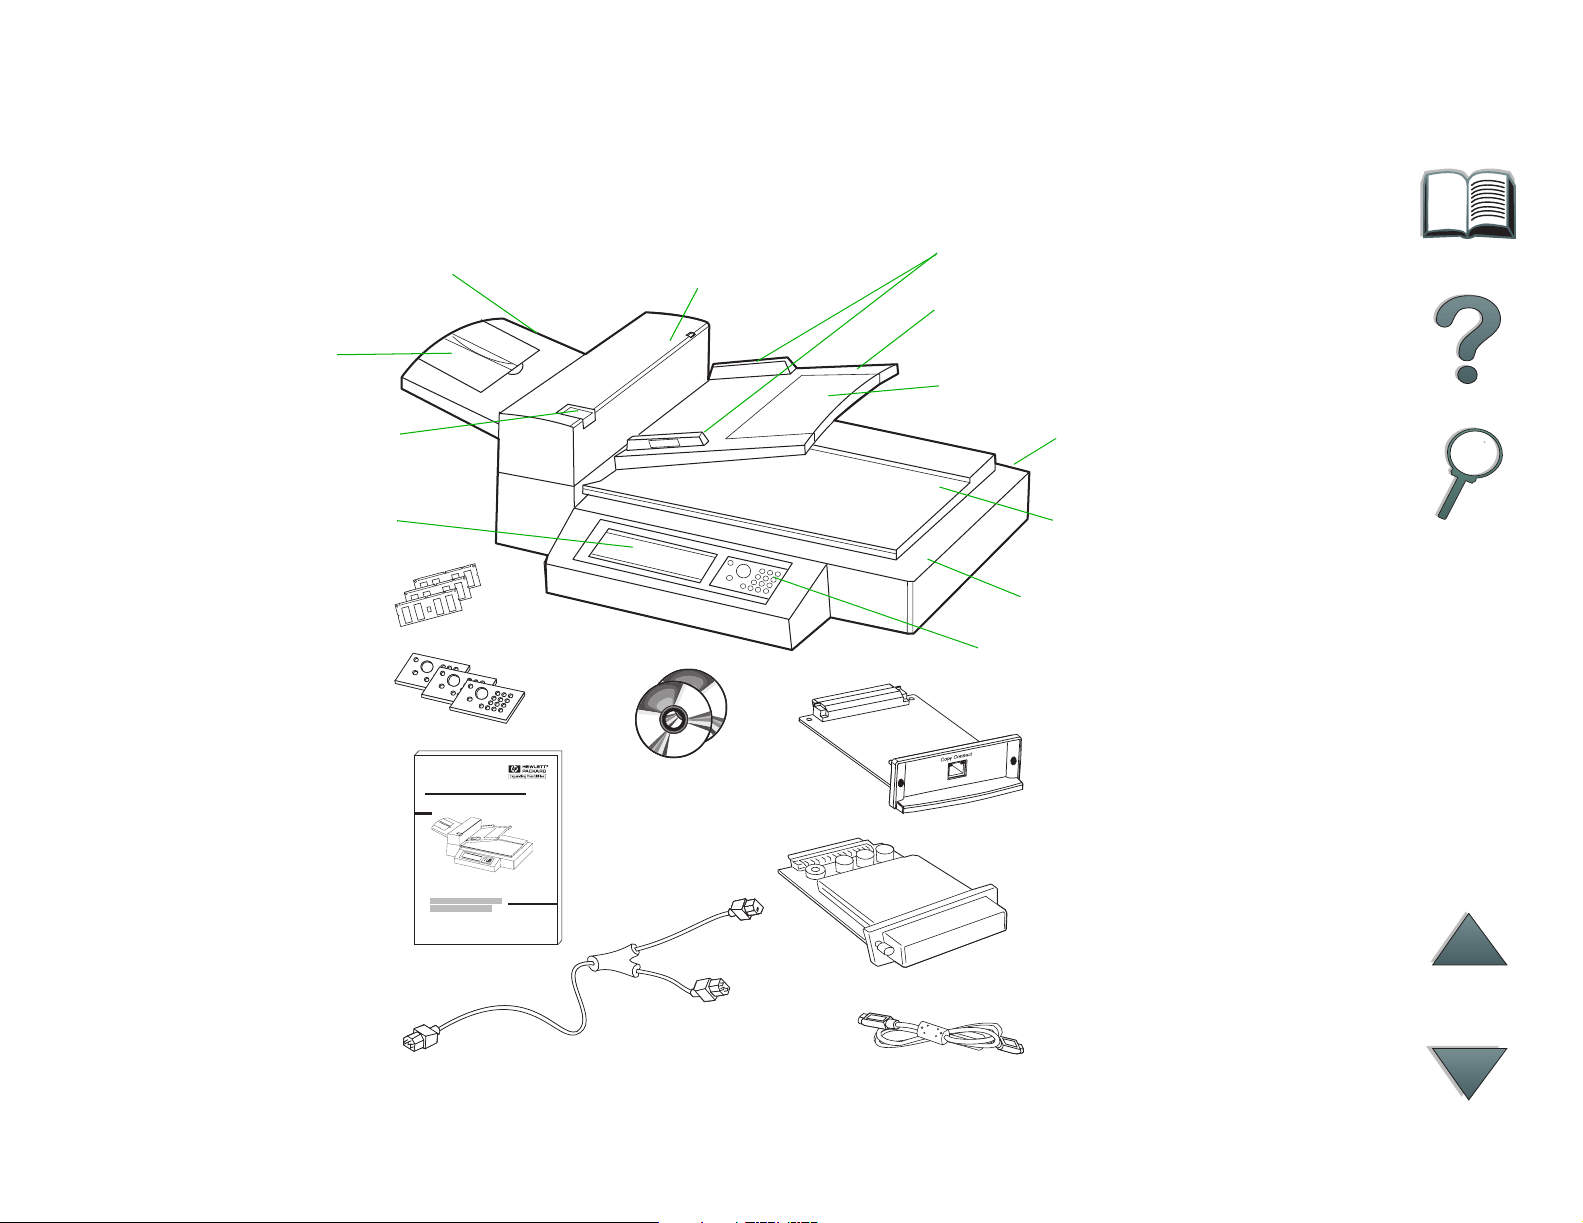
Step 1. Locate HP Digital Copy Parts
Automatic document
feeder output bin
Extension
Automatic document
feeder lever
Graphical display panel
32 MB memory
DIMM and 2
firmware DIMMS
Control panel
overlays
Installation
guide
Automatic
document feeder
HP Digital Sender
Module CD and
HP LaserJet MFP
Upgrade Kit CD
Paper guides
Automatic document
feeder input tray
Extension
Power switch
(rear)
Document cover and
holding pad
Flatbed
Control panel
Copy Connect EIO Board
Y power cord
HP Digital Copy Installation
Hard disk accessory
Copy Connect Cable
Page 24
Chapter 1 HP Digital Copy 24
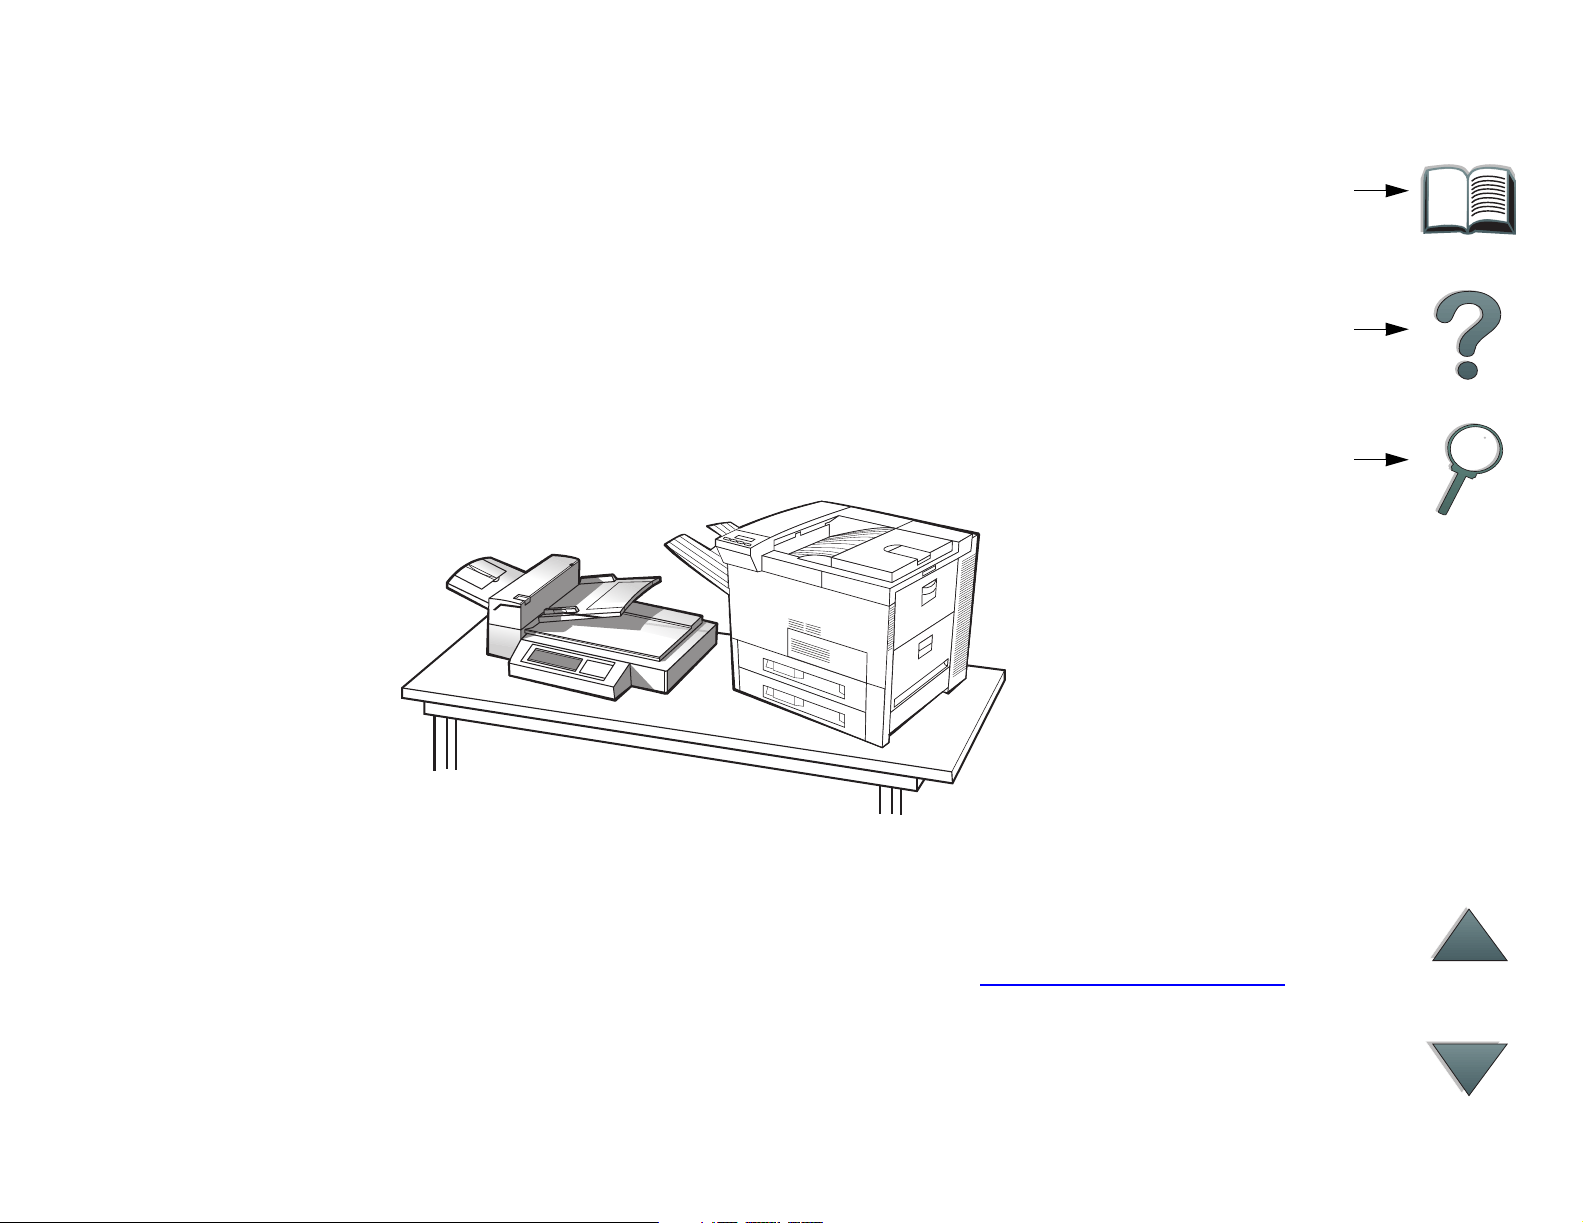
Step 2. Prepare Printer and HP Digital Copy Location
HP Digital Copy Installation
View with HP Digital Copy
on tabletop
Page 25
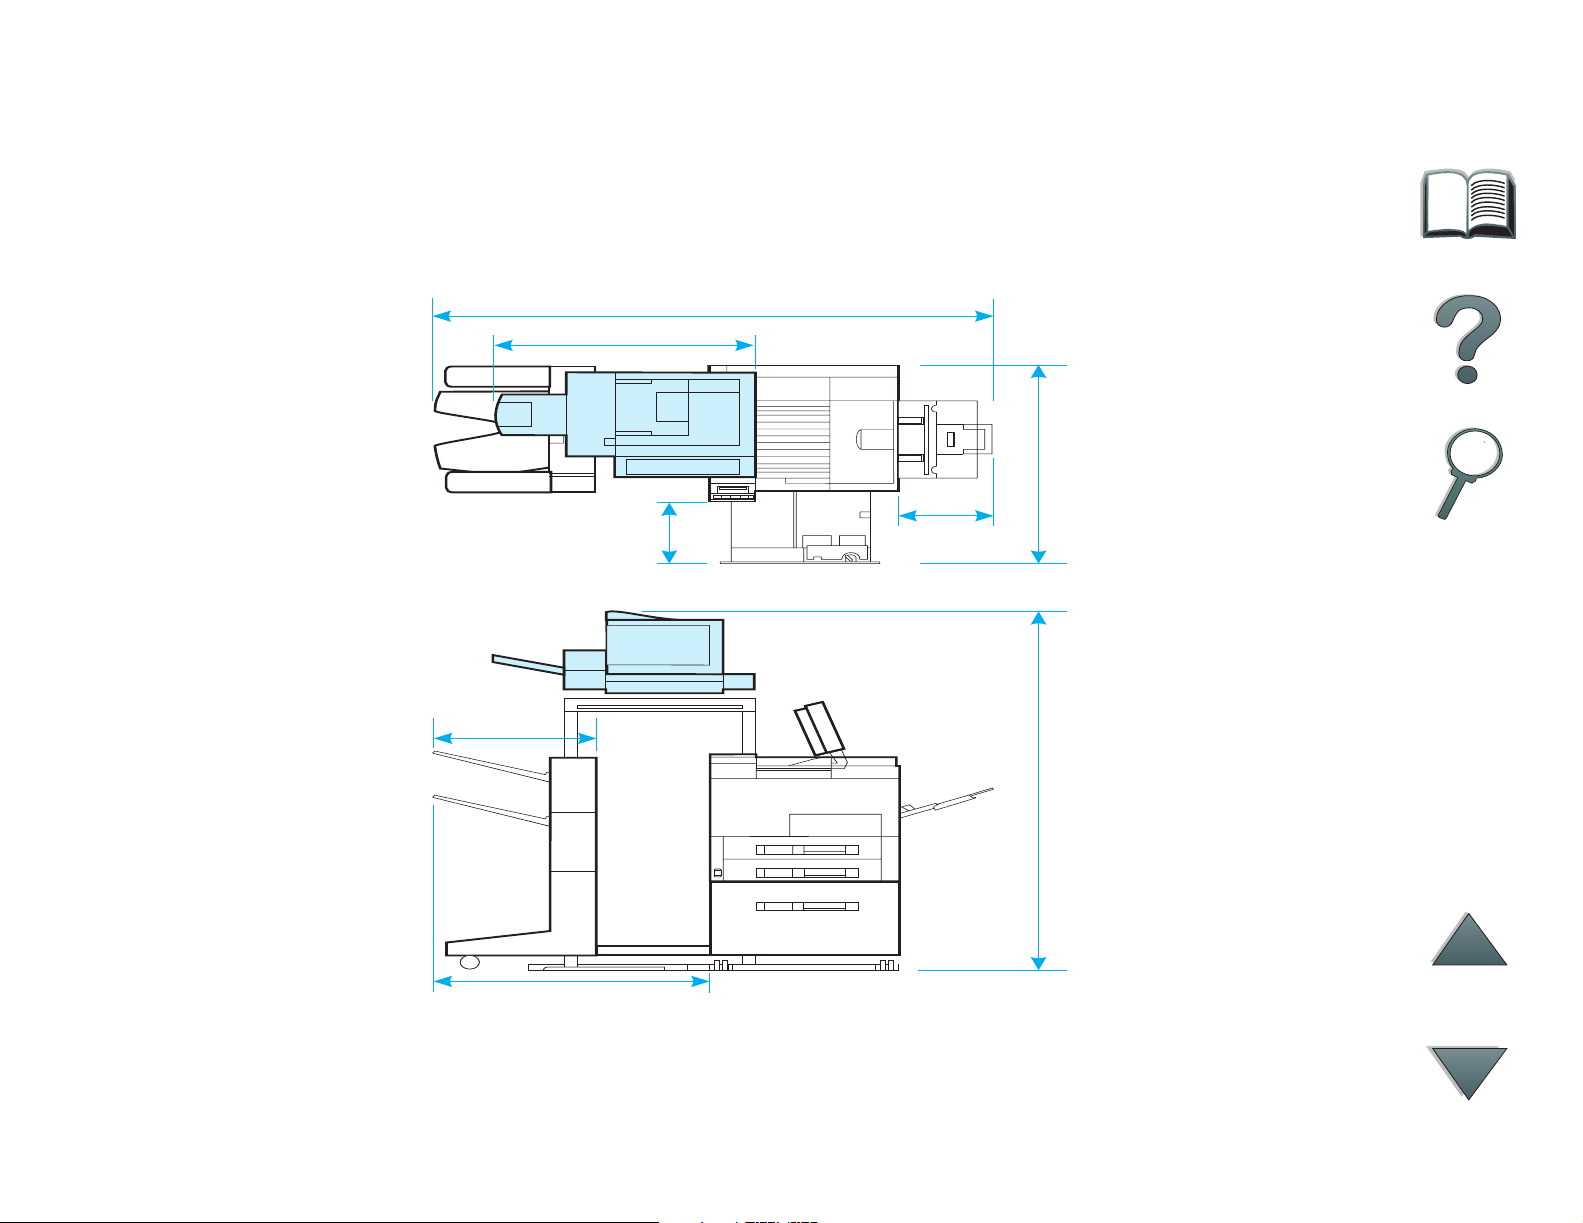
Chapter 1 HP Digital Copy 25
73 in. (1854 mm)
43 in. (1092 mm)
35 in. (889 mm)
14.5 in.
(368 mm)
11 in.
(279 mm)
64 in. (1626 mm)
19.5 in. (495 mm)
33 in. (838 mm)
HP Digital Copy Installation
Top and Side Views
(shown with optional
accessories)
Page 26

Chapter 1 HP Digital Copy 26
Location requirements for the HP Digital Copy
A sturdy, level surface for placement of the printer and HP Digital Copy.
Space allowance (see the graphic on page 25
HP Digital Copy.
A well-ventilated room.
Relative humidity: 20% to 80%.
Room temperature: 50° to 91° F (10° to 32.5° C).
A stable environment with no abrupt temperature or humidity changes.
No exposure to chemicals or direct sunlight.
One dedicated 15 amp power outlet.
Note Be sure to leave enough space to completely extend the optional output
accessory away from the printer.
) around the printer and
HP Digital Copy Installation
Page 27

Chapter 1 HP Digital Copy 27
Installation Specifications
Item Specification
Dimensions (mm) Width:
43 in. (1092 mm)
Weight 49 lb. (22 kg)
Input power Voltage 100 to 127 Vac,
200 to 240 Vac
+10%/-10%
Phases Single Phase
Frequency 50Hz or 60 Hz
+2%/4%
Power
consumption
100 Watts or less
Depth:
26 in. (660)
Height:
22 in.
(559 mm)
HP Digital Copy Installation
Page 28

Chapter 1 HP Digital Copy 28
Item Specification
Environmental
condition
Device status Operating Not Operating
Temperature 50° F to 91° F
(10° C to 32.5° C)
Humidity 20% to 80% RH
(no condensation)
-4° F to 122° F
(-20° C to 50° C)
15% to 90% RH
(no condensation)
HP Digital Copy Installation
Page 29

Chapter 1 HP Digital Copy 29
Step 3. Install the HP Digital Copy
1
Install the HP Digital Copy on the
Optional HP Digital Copy Stand
For detailed instructions on setting up the
HP Digital Copy Stand, see the installation
guide that came with the stand.
1 Place the HP Digital Copy Stand near the
desired location.
Note
Be sure to leave space for the installation of the
accessories. See the graphic on page 25
dimensions.
It is also important to leave space between the
for
stand and the desired location to allow access
to the cables during installation.
To use the HP Digital Copy Stand, you must
have installed a 2000-sheet Input Tray or a
2 x 500-sheet Input Tray.
Continued on next page.
HP Digital Copy Installation
Page 30

3
2
4
Chapter 1 HP Digital Copy 30
WARNING!
Use caution when completing the following steps.
Once you place the HP Digital Copy on the stand,
bumping or moving may cause it to tip. The printer
must be moved into position immediately after
installation of the HP Digital Copy is complete.
2 With one other person, lift the HP Digital Copy
and align it with the screws on the HP Digital
Copy Stand.
3 With a flathead screwdriver, screw the HP Digital
Copy onto the stand.
CAUTION
Operating the HP Digital Copy with the shipping lock
in place might damage the device.
It is important that you perform steps 4 and 5.
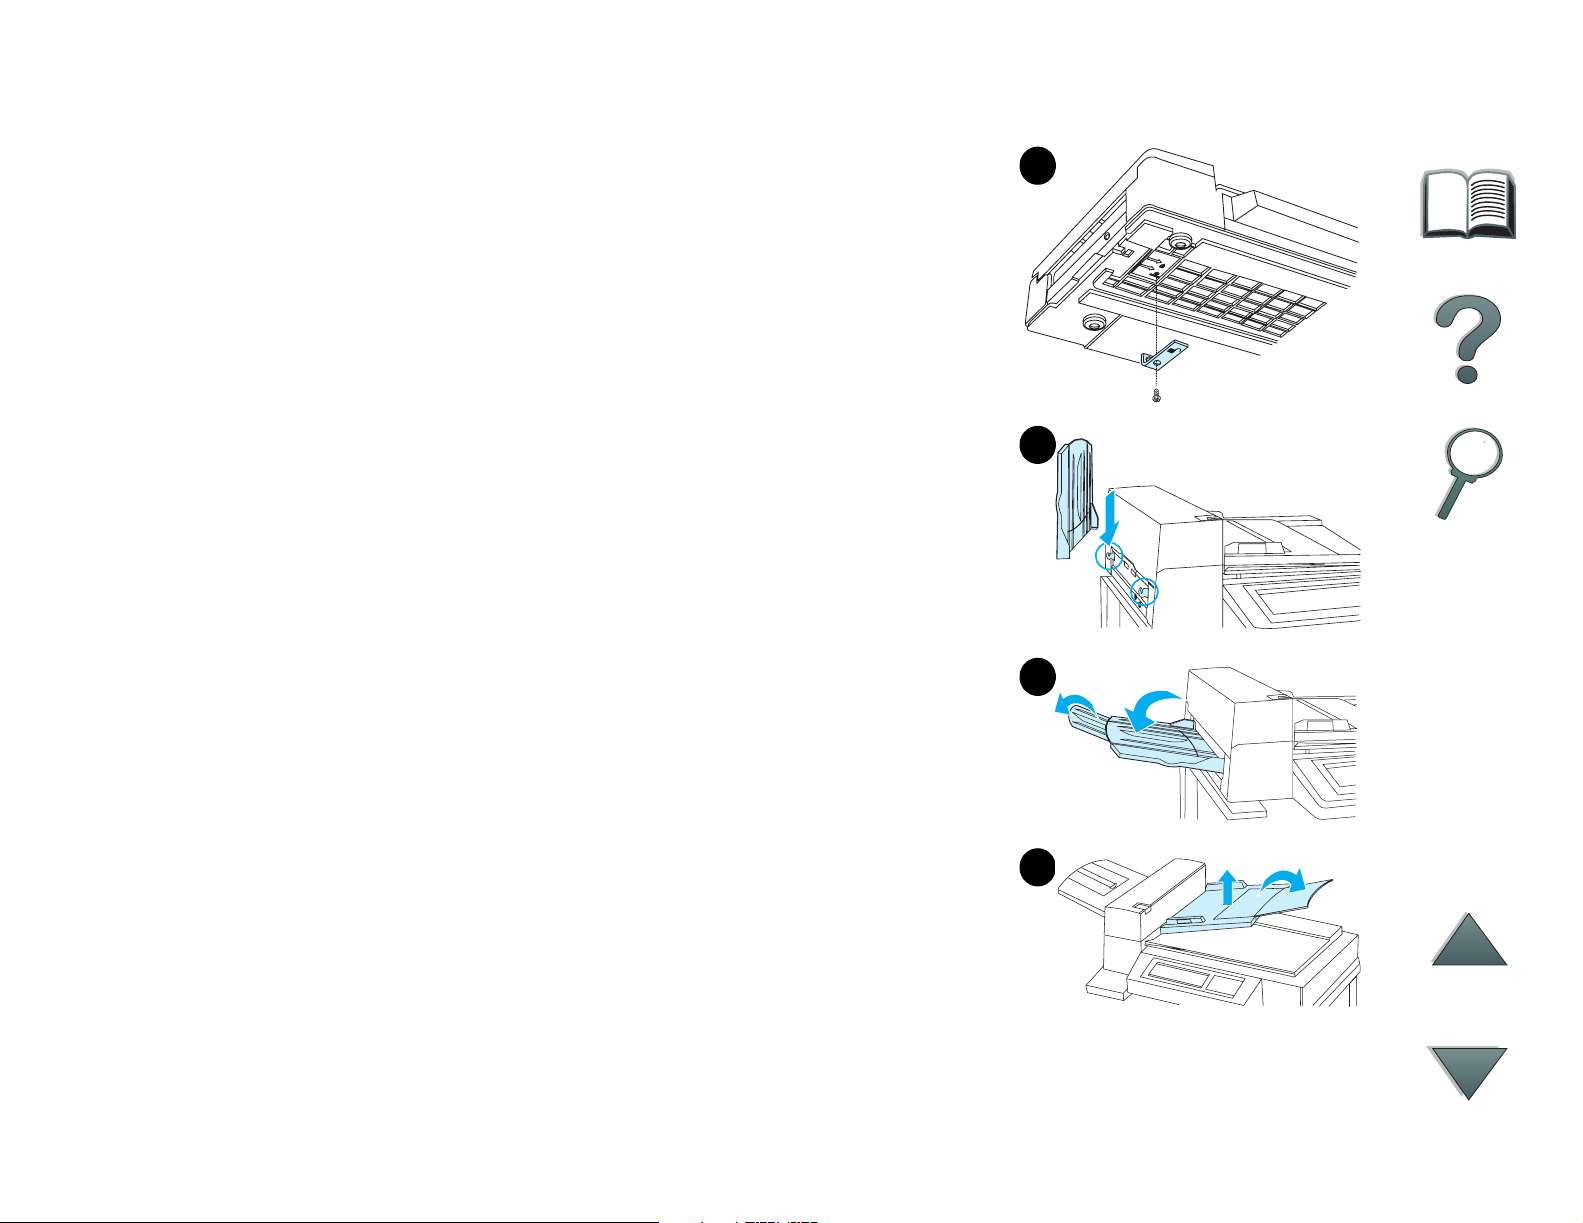
4 Unscrew and remove the shipping lock.
Continued on next page.
HP Digital Copy Installation
Page 31
Chapter 1 HP Digital Copy 31
5 Rotate the shipping lock and reinsert it into the
HP Digital Copy in the unlocked position (this
shipping lock is necessary for future moves).
6 To install the output bin, hold the bin vertically
(as shown) and push down to attach the bin to
the metal guides.
7 Pull the output bin down. For longer paper, flip
the bin extension out as shown.
8 Lift the input tray up to lock it into place. For
longer paper, flip the tray extension out as
shown.
5
6
7
HP Digital Copy Installation
8
Page 32

Chapter 1 HP Digital Copy 32
Install the Printer on the Optional
Input Accessory
For detailed instructions on installing the printer
onto the optional input accessory, see the
installation guide that comes with the accessory.
1
1 Roll the Printer onto the Optional HP Digital
Copy Stand (gently rock the printer back and
forth as you push it onto the stand).
2 When the printer is in place, lock the wheels
and rotate the levelers up or down to stabilize
the printer.
HP Digital Copy Installation
rear view
2
front view
Page 33

Chapter 1 HP Digital Copy 33
Install the Optional Output Accessory
Note For detailed information on installing the optional output accessor y, see
the installation guide that came with the accessory.
1 Roll the optional output accessory onto the HP Digital Copy Stand.
Note Be sure to properly align the mounting bracket as you roll the optional
output accessory onto the HP Digital Copy Stand.
2 After the front two rollers are on the base of the HP Digital Copy Stand,
attach the mounting bracket.
3 Roll the optional output accessory toward the printer until it clicks into
place.
Continued on next page.
HP Digital Copy Installation
Page 34

Chapter 1 HP Digital Copy 34
mounting bracket
Note When locating the stand, be sure to leave enough space to completely
extend the optional output accessory away from the printer. (See page 25
for dimensions.)
HP Digital Copy Installation
Page 35

Chapter 1 HP Digital Copy 35
Install the Copy Connect EIO Board
CAUTION Make sure that the printer is turned off.
Insert the Copy Connect EIO Board that came with the HP Digital Copy into an
open EIO slot on the printer. (Use the screws that are in the existing EIO cover
to install the Copy Connect EIO Board.)
Note If a cover is on the open slot, use a screwdriver to remove the two screws .
Remove the cover and install the Copy Connect EIO Board.
HP Digital Copy Installation
Page 36

Chapter 1 HP Digital Copy 36
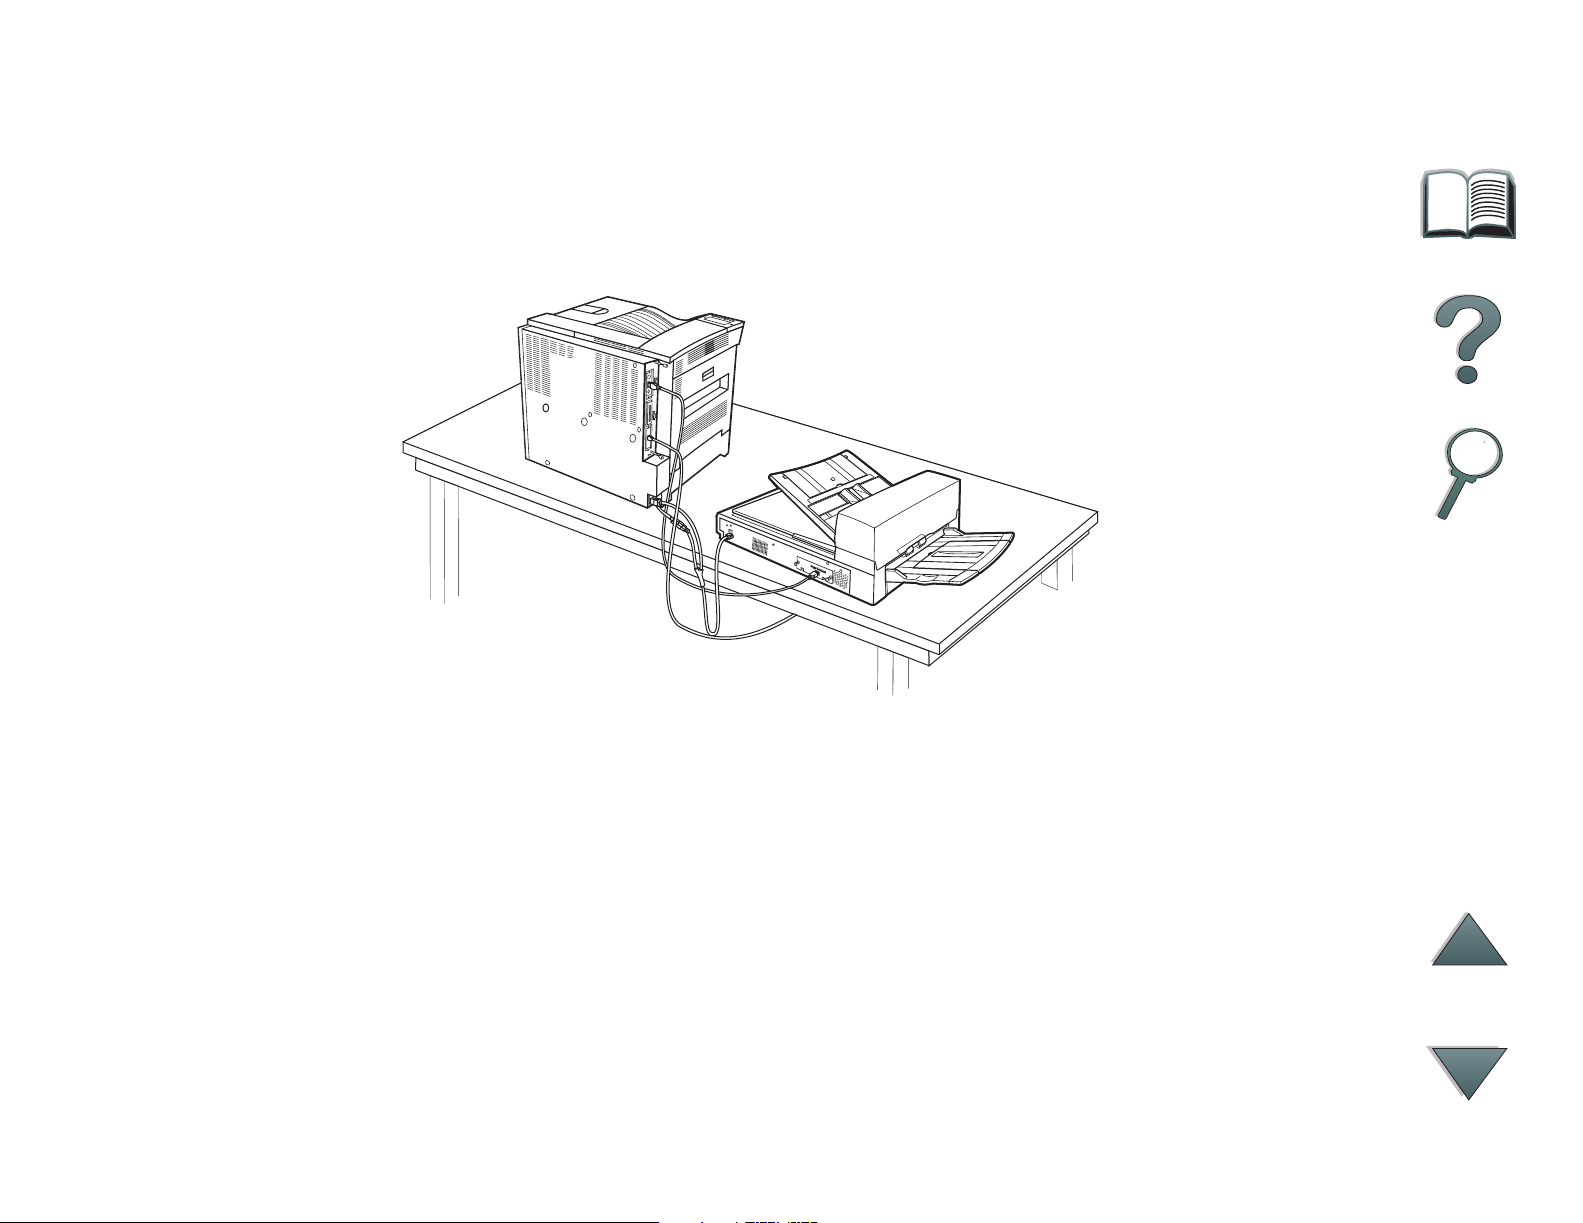
Install the Copy Connect Cable
1 Plug the Copy Connect cable into the HP Digital Copy (A).
Note The icon on the cable should be facing up.
2 Plug the other end of the Copy Connect cable into the Copy Connect EIO
Board (B). (The HP logo facing as shown.)
3 If you have a copy stand, wrap the excess cable as shown in the graphic on
the next page (C).
A
B
Continued on next page.
HP Digital Copy Installation
View with HP Digital Copy
on tabletop
Page 37

Chapter 1 HP Digital Copy 37
A
B
C
View with HP Digital Copy Stand
(shown with optional accessories)
HP Digital Copy Installation
Page 38

Chapter 1 HP Digital Copy 38
1
Install the Y Power Cord
CAUTION
Turn off the printer and make sure the HP Digital
Copy power switch is in the off position before
you install the Y power cord.
2
main
short
1 Plug the main end of the Y power cord into
the HP Digital Copy.
2 Unplug the power cord from the printer.
Plug the power cord into the short end of
the Y power cord.
3 Plug the long end of the Y power cord into
the printer.
long
3
HP Digital Copy Installation
Page 39

Chapter 1 HP Digital Copy 39
1
Install the Control Panel Overlay
1 Choose the control panel overlay printed with
your language.
2 Press the overlay in place on the
HP Digital Copy control panel until it clicks.
3 To remove the control panel overlay, inser t a
screwdriver into the slot on the left side of the
overlay.
Note
The language that appears on the HP Digital
Copy display is customized through the language
selected on the printer. If the printer language is
set to a language other than those offered by the
HP Digital Copy, then the HP Digital Copy will
default to English.
2
3
HP Digital Copy Installation
Page 40

Chapter 1 HP Digital Copy 40
Step 4. Test HP Digital Copy Operation
1 Turn on the printer. When READY displays, turn on the HP Digital Copy.
2 The HP Digital Copy displays the HP logo followed by icons that illustrate
the different initialization phases.
Performing
self tests
Attempting to
make copy
connection
Downloading
copy resources
Initializing copy
module
3 The HP Digital Copy displays READY TO COPY when it has finished
initialization.
Note The green LED lights up on the START button to show that the
HP Digital Copy is ready to copy (see page 56
). If there is a problem
getting to the READY TO COPY state with the HP Digital Copy, see page 42
or call your service provider.
Continued on next page.
HP Digital Copy Installation
Page 41

Chapter 1 HP Digital Copy 41
4 Load the original document face down into the automatic document feeder
or place it on the flatbed of the HP Digital Copy (see pages 61
and 63), and
select the desired number of copies. A green LED lights up on the
automatic document feeder cover to show that you have properly inser ted
the documents into the feeder.
TART
5 Press the S
button on the display panel to star t copying.
Note The original document will come out in the HP Digital Copy output bin when
using the automatic document feeder or will remain on the flatbed of the
HP Digital Copy. Output copies will be printed on the printer and will be
located in the printer output bin.
HP Digital Copy Installation
Page 42

Chapter 1 HP Digital Copy 42
Troubleshoot the HP Digital Copy
Note For detailed information on troubleshooting, see HP Digital Copy Problem
Solving on page 73.
Problem Recommended Action
No power Check that all power cords are connected correctly.
Failed initialization
or
No copy
Check that the printer is turned on.
Check that the Copy Connect EIO Board is installed
correctly.
Check that the Copy Connect EIO cable is connected
correctly.
HP Digital Copy Installation
Page 43

Chapter 1 HP Digital Copy 43
HP Digital Copy Operating Instructions
This section shows you how to use the HP Digital Copy and many of its
advanced features.
HP Digital Copy Features and Benefits
Auto/Photo/Text modes
Job Interrupt (at copy boundaries)
N-up layout (printing multiple pages per sheet)
Operator attendance animations (for example, paper jam recovery)
Auto-configure to printer settings
Copy books
Custom stapling
Power Save
One pass duplex scanning
HP Digital Copy Operating Instructions
Page 44
Chapter 1 HP Digital Copy 44
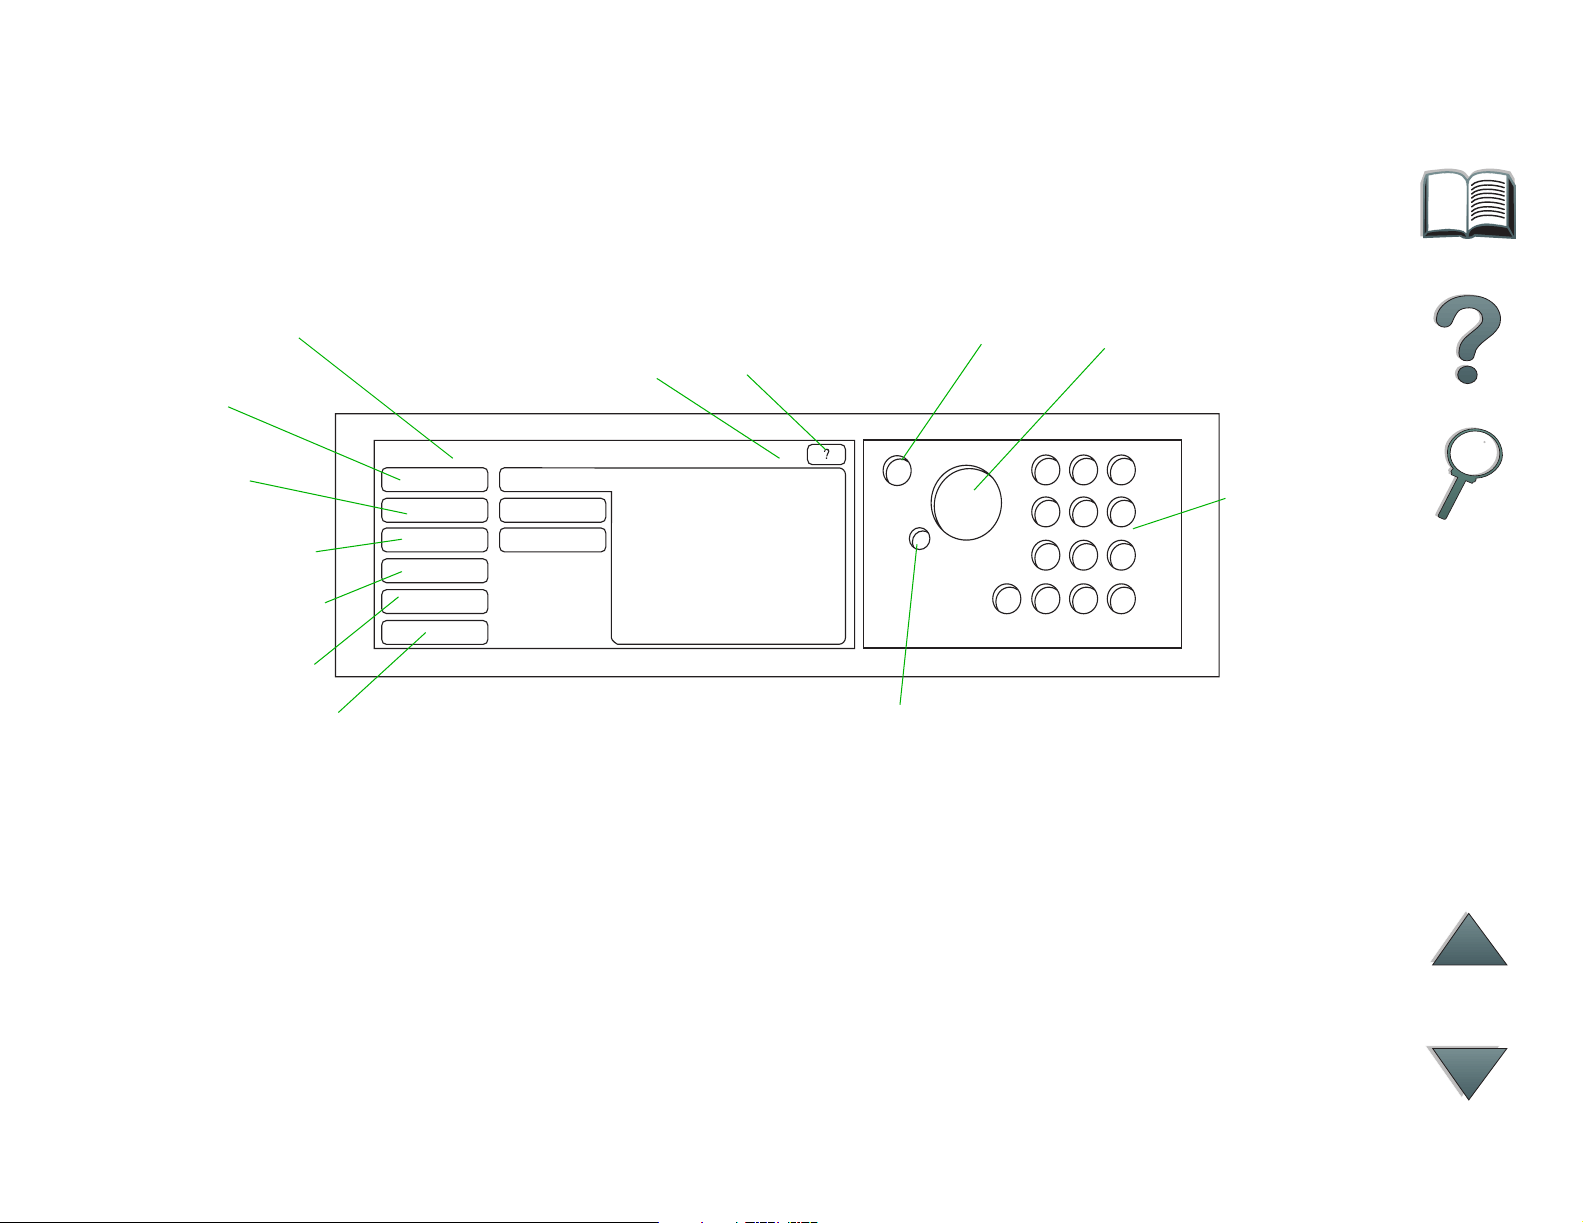
HP Digital Copy Control Panel
Control Panel Layout and Display Settings
Device Status
Message
Paper
Reduce/
Enlarge
2-sided/N-up
Output/Staple
Copy Quality
More Features
Number of
Copies
Help
Reset
1
Stop
StartContext-sensitive
Numerical
Keypad
HP Digital Copy Operating Instructions
Page 45

Chapter 1 HP Digital Copy 45
Status Bar
The Status Bar displays the current:
device status message
number of copies selected
context-sensitive help button
device status message The READY TO COPY, COPYING, or ACCEPTING COPY JOBS message
is displayed. ACCEPTING COPY JOBS indicates that the printer
is busy. You can configure the next copy job when the
printer is busy.
number of copies
selected
context-sensitive help
button
HP Digital Copy Operating Instructions
The current number of copies selected for the copy job is
displayed. This setting defaults to 1.
This button remains present on the control panel display
unless an error is displayed. When selected, a help topic
related to the current control panel message appears.
Page 46

Chapter 1 HP Digital Copy 46
Menu Tabs
Menu Tabs allow access to any of the HP Digital Copy settings. Each tab shows related
job settings. Select OK or Exit to make changes as you move from tab to tab. Press OK
to exit the menu tabs and star t a copy job. Press Exit to return to the default display tab.
You can also select Start to begin a copy job before exiting the menu tabs.
Menu tabs
paper tab
reduce/enlarge tab
2-sided/N-up tab
output/staple tab
copy quality tab
book copy tab
job binding tab
configuration tab
about tab
HP Digital Copy Operating Instructions
Page 47

Chapter 1 HP Digital Copy 47
Menu Tabs (continued)
paper tab Allows you to choose output paper for the copy job based on
size, tray, or type.
Size - Shows the current size selected. When a selection is
made, the Tray list will update automatically.
Tray - Shows the current tray selected. If the selected
paper size is currently installed in multiple trays, the Tray
selection text will highlight AUTOMATIC. This indicates that
the printer will make the tray selection based on its autoselection criteria. If the selected paper size is located in
only one tray, the location will be shown by the list text.
When a selection is made, the Size and Type will update
automatically.
Note
If you choose a paper type that is not already loaded in the
printer, the printer will prompt you to load Tray 1 with the
correct paper before the job is printed.
HP Digital Copy Operating Instructions
Page 48

Chapter 1 HP Digital Copy 48
Menu Tabs (continued)
reduce/enlarge tab Allows you to enlarge or shrink the size of the document.
Allows you to choose the paper size for your original
document and specify a different size for the copy. For
example, copying from A4 to letter. You may also specify the
output paper size and then choose a scaling percent to
reduce or enlarge a region of the source document. You may
choose to copy a full-bleed page onto the printable region of
the output paper.
You are presented with the following controls for selecting
the desired paper scaling percent:
Reduce/Enlarge - Shows input-to-output paper sizes. When
a size is selected, the proper scaling percent for the
currently selected input and output paper sizes is
displayed.
Percent - Shows the current page scaling percent.
HP Digital Copy Operating Instructions
Page 49

Chapter 1 HP Digital Copy 49
Menu Tabs (continued)
reduce/enlarge tab
(continued)
Custom Media Reduction - This setting allows you to switch
between the standard/enlargement settings and the
custom mode. This allows you to choose your original
and copy document sizes independently.
When the Custom Media Reduction box is checked, you
can select a paper size under the Original list for your
original document and then select the paper size in the
Copy list for the size you want to copy. The percent text
box automatically calculates page scaling percent.
When the Custom Media Reduction box is unchecked,
you may select from a list of standard reduction or
enlargement settings, such as Letter (LTR) to Legal (LGL).
Also, you may select the Manual setting in order to adjust
the scaling percent by hand. When Manual is selected you
may increase or decrease the scaling percent by one
percent increments. You may reduce a document by up to
25 percent or enlarge a document by up to 200 percent.
When you have chosen Manual, you may also choose the
size of your original document. The copier will reduce that
document by the percent you have selected.
HP Digital Copy Operating Instructions
Page 50

Chapter 1 HP Digital Copy 50
Menu Tabs (continued)
reduce/enlarge tab
(continued)
Shrink Page to Printable Region - This setting allows you to
adjust the page scaling percent. This allows you to copy a
full-bleed page onto the printable region of the currently
selected output paper size. There are limits to how far out
to the edge of the page the printer can print. If you are
copying a page that has printing all the way out to the
edges (full bleed), then checking this box will cause the
image to be reduced slightly so that the entire edge-toedge image may print within the printable region of the
output paper.
HP Digital Copy Operating Instructions
Page 51

Chapter 1 HP Digital Copy 51
Menu Tabs (continued)
2-sided/N-up tab This tab has four controls for setting up the options and a
preview image that graphically illustrates the current
settings.
2-sided Copying - Shows the currently selected 2-sided
mode. Choose the two-sided mode you need. The preview
image will update to display your choice.
Flip Pages Up - This setting is active if the you choose to
copy onto both sides of the output paper. By default, the
pages of the two-sided binding are flipped to the left, like a
book, when viewed from the backside of the job. When this
setting is checked, the pages are bound, appearing flipped
up when viewed from the backside of the job. The preview
image will update to display your choice.
N-up Copying - Shows the currently selected number of
input pages to be printed on each output page. Choose the
number of input pages needed to print on each output
page. The preview image will update to display your
choice.
Print Page Borders - This setting is active when you select
two or more pages for each sheet. When checked, page
borders will print around each page image on the output
page. The preview image will update to display your
choice.
HP Digital Copy Operating Instructions
Page 52

Chapter 1 HP Digital Copy 52
Menu Tabs (continued)
output/staple tab You can configure the output and stapling options using the
two main controls on this tab.
Output Bin - Shows the currently selected output bin.
Choose which bin the copy job will be delivered to. If the
output bin is set to the stapling bin and a stapling option is
selected, then changing the output bin to another location
will turn off the stapling option.
Stapling - Allows you to choose stapling options. The
number of options displayed will depend on the stapling
device installed. If you select an option to have the output
stapled, then the Output Bin setting will change to display
that stapling can only take place in the staple bin.
copy quality tab Copy Mode - You may change the copy quality settings
from this tab. There are three settings to choose from in
Copy Mode:
Auto - This is the default mode.
Photo - This mode is optimized for photo clarity.
Text - This mode is optimized for text sharpness.
Brightness - You may change the brightness setting from
this tab. Press the left or right arrow to increase or
decrease the brightness level as indicated by the slider.
There are five settings for brightness.
HP Digital Copy Operating Instructions
Page 53

Chapter 1 HP Digital Copy 53
Menu Tabs (continued)
book copy tab Allows you to make a copy of an open book with a single
page of output for each page of the book. Align the spine of
the book with the book markings on the flatbed paper guides.
Follow the prompts provided on the control panel when
using this mode.
You can copy multiple pages from a book and bind them
together as one job. See the job binding tab description for
more information.
job binding tab Takes multiple copies from the flatbed and binds them
together as one job. All other copy settings, such as stapling
and number of copies, will be applied to the bound job.
Follow the prompts provided on the control panel when
using this mode.
configuration tab Provides configuration settings for the HP Digital Copy.
For example:
Allows you to turn on or off the audible key feedback.
Allows you to adjust the control panel display contrast.
HP Digital Copy Operating Instructions
Page 54

Chapter 1 HP Digital Copy 54
Menu Tabs (continued)
about tab Used to find available help topics.
Displays:
system version information
current page counts for the flatbed and automatic
document feeder
number of pages until the next required service
Context-sensitive Help
Press the to enter the HP Digital Copy help system. Follow the prompts provided in
the help system to find quick descriptions of HP Digital Copy features and functions.
HP Digital Copy Operating Instructions
Page 55

Chapter 1 HP Digital Copy 55
Default Configurations
If the HP Digital Copy is idle and unattended for one minute, the HP Digital Copy settings
will return to the default configuration. Press the Reset key on the control panel to return
all of the HP Digital Copy settings to the default configuration.
The setting changes that you make will remain for one minute before they reset to a
default setting. For example, if you walk up to the HP Digital Copy and press the 5 key,
the number of copies selected will be set to five. If you do not make any other setting
changes and do not initiate a job by pressing the Start key within one minute, then the
number of copies selected will automatically return to one.
After a copy job is completed, the current settings will not change until after another
minute expires. This makes it possible to set up the HP Digital Copy settings in a
particular manner only once for a number of jobs.
Note:
The post-job timeout period will be shor ter than the idle timeout period.
HP Digital Copy Operating Instructions
Page 56

Chapter 1 HP Digital Copy 56
Button/LED Functions
Paper Sensor LED
RESET
START
Keys 0-9
HP Digital Copy Operating Instructions
STOP
C
Start Button LED
Page 57

Chapter 1 HP Digital Copy 57
Name of the
button and LED
Button 0-9 Use to enter the number of copies you desire.
RESET Resets all of the copier settings to the default
START Begins a copy job or continues a copy job that
STOP Stops a copy job.
C Clears the number of copies setting. (Does not
Function
May also be used periodically to enter a
numerical value.
values.
has been interrupted because of an error.
clear the other copy module settings.)
LED Paper Sensor
LED
Start Button LED See Star t Button LED
Continued on next page.
HP Digital Copy Operating Instructions
Illuminates when paper is aligned correctly in the
automatic document feeder.
description of this LED.
on page 58 for a detailed
Page 58

Chapter 1 HP Digital Copy 58
Start Button LED
LED\State On Flashing Slow Flashing Fast
Green The copy module is
ready to make copies.
Amber The copy module has a
critical error. Turn the
printer and copy module
off, and then turn the
printer and copy module
on.
Note When the copy module is in Po wer Sav e mode , the back light of the displa y
panel will be turned off and the Start LED (green) will flash at a slow rate
to indicate that the system is turned on. To br ing the system out of Power
Save mode, place paper in the automatic document feeder, press any key
on the numerical keypad, or touch the touchscreen.
The copy module is in
Power Save mode.
The copy module has an
error and requires
attention.
The copy module is
making copies.
The copy module has
an error that requires
attention from your
service provider.
HP Digital Copy Operating Instructions
Page 59

Chapter 1 HP Digital Copy 59
HP Digital Copy Settings
Feature Description Default
Number of copies 1 to 999 1
Paper Source Select Selection of paper tray
Selection by paper size
Collation Collated
Grouped (uncollated)
Stapled
Select output bin
Reduce/Enlarge 50% to 200% in 1% increments
Support standard presets, such as
Legal to Letter.
Auto-select (any tray)
Letter/A4
Plain
Collated
100%
HP Digital Copy Operating Instructions
Page 60

Chapter 1 HP Digital Copy 60
Feature Description Default
Copy quality auto, text, photo auto
Duplex 1-1, 1-2, 2-1, 2-2
If the printer does not have a
duplexer installed, then 1-2 and 2-2
are not available.
N-up 1-up, 2-up, 4-up
2-up documents will be rotated.
Book copy Copies an open book with a single
page of output for each page of the
book.
Brightness 5 levels (2 lighter, normal, 2 darker) Normal
1-1
1-up
Not selected
HP Digital Copy Operating Instructions
Page 61

Chapter 1 HP Digital Copy 61
Loading documents into the Automatic Document Feeder
1 Pull up on the automatic document feeder
input tray (A) and place the bar (B) in
operating position.
2 Square up and inser t paper face down into
the input tray. Only load paper up to the line
indicator on the paper guide.
Note
The system will exit Power Save when you place
the document into the automatic document
feeder.
The LED will light up when paper is loaded
correctly.
Remove paper clips and staples. Flatten the
staple holes.
1
A
B
2
3
3 If the document size exceeds A4 or Letter
size, extend the input tray and output bin by
flipping out the extensions.
Continued on next page.
HP Digital Copy Operating Instructions
Page 62

Chapter 1 HP Digital Copy 62
4 Set the guides so that there is a little amount
of clearance between the side edges and the
guides. Adjust the guides to the document
size.
Note
Squeeze the guide lever to free the guides.
Load documents so that the thickness is less
than 0.32 inches (8 mm).
Set the guides so that they touch the document
sides.
5 After a document is copied, remove the
original from the HP Digital Copy and the
copy from the printer output bin.
4
5
HP Digital Copy Operating Instructions
Page 63

Chapter 1 HP Digital Copy 63
Loading documents onto the Flatbed
1
1 Open the document cover.
2 Place the document face down and align the
top left with the reference mark. Slowly close
TART
the document cover and press S
.
2
HP Digital Copy Operating Instructions
Page 64

Chapter 1 HP Digital Copy 64
2
1
Loading documents larger than the Document Board
1 Open the document cover about 80°.
Remove the cover b y unscrewing the thumb
screw (bottom arrow) and then sliding the
cover in the direction of the top arrow.
2 Place the document face down on the
TART
document bed and press S
.
When the job is complete, remove the
document. Reattach the document cover
and close.
HP Digital Copy Operating Instructions
Page 65

Chapter 1 HP Digital Copy 65
Reading a page from a thick book
1
1 Open the document cover.
2 Place the book face down on the document bed
and press S
Note
Do not move the book during job operation.
TART
.
For advanced book copy features, see page 53
.
2
HP Digital Copy Operating Instructions
Page 66

Chapter 1 HP Digital Copy 66
Paper Specifications
Supported Sizes
Ledger - 11 x 17 in. (279 x 432 mm)
Executive - 7.3 x 10.5 in. (191 x 267 mm)
Letter - 8.5 x 11 in. (216 x 279 mm)
Legal - 8.5 x 14 in. (216 x 356 mm)
A3 - 11.7 x 16.5 in. (297 x 419 mm)
A4 - 8.3 x 11.7 in. (210 x 297 mm)
A5 - 5.8 x 8.2 in. (148 x 210 mm)
B4 (JIS) - 10.1 x 14.3 in. (257 x 364 mm)
B5 (JIS) - 7 x 9.9 in. (176 x 250 mm)
Note The automatic document feeder holds up to 50 sheets of paper.
HP Digital Copy Operating Instructions
Page 67

Chapter 1 HP Digital Copy 67
Document Quality
Do not load the following into the Automatic
Document Feeder
Carbonless paper
Carbonless forms
Paper with clips or staples
Paper that has been clipped or stapled
Paper with wet ink
Labels
Precautions
The following documents might be hard to feed through the automatic
document feeder. If the document slips in the automatic document feeder
(Jam Error) or a double feed occurs often, use the HP Digital Copy flatbed.
Paper of unequal thickness, such as envelopes
Paper with large wrinkles or curl
Color copied paper
Paper with folds or tears
Continued on next page.
HP Digital Copy Operating Instructions
Page 68

Chapter 1 HP Digital Copy 68
Tracing paper
Coated paper
Carbon paper
Paper smaller than 6 x 4 in. (148 x 105 mm) or larger than A3 or Double
Letter
Other than paper
cloth
metal foil
transparency film
Photographic paper
Paper with notches on the side
Paper that is not rectangular
Thin paper
HP Digital Copy Operating Instructions
Page 69

Chapter 1 HP Digital Copy 69
HP Digital Copy Maintenance
Clean the Document Cover, the Document Holder, and
the Flatbed Glass
Use a dry cloth or a cloth with a neutral cleanser or isopropyl alcohol to
remove dirt from the document cover, document holder, and flatbed glass.
CAUTION Do not use organic solvents such as a thinner.
Make sure that no liquid enters the scanner from the edges of the flatbed
glass.
Document Cover
HP Digital Copy Maintenance
Flatbed GlassDocument Holder
Page 70

Chapter 1 HP Digital Copy 70
Cleaning the Automatic Document Feeder
Paper Guide
Pad
Feed Roller
Automatic Document Feeder
Glass
Exit Roller
Pick Roller
Idler Roller
Continued on next page.
HP Digital Copy Maintenance
Page 71

Chapter 1 HP Digital Copy 71
Pad Use a cloth with isopropyl alcohol to wipe the pad in a downward
direction. Be careful not to hook the springs when wiping. A dir ty
pad can cause double feeds.
Automatic
Document Feeder
Glass
Pick Roller Use a cloth with isopropyl alcohol to wipe the roller in a horizontal
Feed, Exit, and
Idler Rollers
Paper Guide Gently wipe the paper guide area. A dirty or wor n paper guide can
Wipe the glass lightly with a cloth and isopropyl alcohol to remove
any paper dust or toner. Dirty glass can cause ver tical streaking
when using the automatic document feeder.
direction. Be careful not to damage the surface of the roller. A dirty
pick roller can cause misfeeds, paper slipage, and jams.
Use a cloth with isopropyl alcohol to wipe the rollers in a horizontal
direction. Make sure to remove any built-up toner or ink. Be sure
the rollers are dry before using the automatic document feeder.
Dirty rollers can cause paper jams.
cause vertical streaking.
Note If the HP Digital Copy is experiencing chronic misfeeds, then contact your
service provider to have it cleaned.
HP Digital Copy Maintenance
Page 72

Chapter 1 HP Digital Copy 72
Pad and Roller Maintenance
Cleaning of the pad and rollers is recommended every 6,000 pages.
Every 60,000 pages the pad and pick roller need to be replaced.
Print a configuration page for page count information since the last
maintenance. To pr int a configuration page, turn the printer on and be sure
ENU
READY is displayed. Press M
PRINT CONFIGURATION displays. Press S
until INFORMATION MENU displays. Press I
ELECT
to print the configuration pages.
Call your service provider to perform this service.
TEM
until
HP Digital Copy Maintenance
Page 73

Chapter 1 HP Digital Copy 73
HP Digital Copy Problem Solving
This section shows status messages that display on the HP Digital Copy
control panel when there is a problem with the HP Digital Copy. There are
two different types of errors made by the HP Digital Copy:
Temporary Error
Equipment Error
For printer error messages and problem solving information, see the printer
user guide.
All error conditions will fill up the entire HP Digital Copy control panel display.
WARNING! Make sure the power is off and the main power to the system has been
disconnected before servicing.
HP Digital Copy Problem Solving
Page 74

Chapter 1 HP Digital Copy 74
Temporary Error
A Te mporary Error displays when problems with the paper path occur. The
control panel will display the specific error and graphically illustrate the actions
needed to correct the error.
Automatic Document
Feeder
Error Message Description
ADF PAPER JAM A page has jammed inside of the automatic document feeder and
must be cleared for copying to continue.
ADF COVER IS OPEN The automatic document feeder cover is open and must be closed
for copying to continue.
ADF MISFEED A misfeed occurred from the automatic document feeder input tray.
Restack the pages in the automatic document feeder input tray.
TART
Press S
to continue the copy job.
HP Digital Copy Problem Solving
Page 75

Chapter 1 HP Digital Copy 75
Equipment Error
To correct an equipment error, turn the printer and HP Digital Copy off and
then turn the printer and HP Digital Copy on. If the error message persists,
then call your service provider.
Error Message Description
Device Error:
Backside RAM Buffer Failure
Device Error:
Motor Fuse Failure
Device Error:
Lamp Fuse Failure
Device Error:
Backside Optical Failure
Device Error:
Frontside Optical Error
Device Error:
Mechanical Failure
An error occurred while accessing the backside RAM
buffer. This error might require service to correct.
The motor has a blown fuse. This error might require
service to correct.
The lamp has a blown fuse. This error might require
service to correct.
A problem occurred with the backside optical system.
This error might require service to correct.
A problem occurred with the frontside optical system.
A mechanical problem occurred. Check to make sure
that the shipping lock has been removed and reinserted
properly.
HP Digital Copy Problem Solving
Page 76

Chapter 1 HP Digital Copy 76
HP Digital Copy Warranty
For warranty information, see the user guide supplied with your specific
HP LaserJet printer.
HP Digital Copy Warranty
Page 77

Chapter 2 HP Digital Sender Module 77
HP Digital Sender Module
2
Overview
The HP Digital Sender Module includes the HP Digital Copy and a
Windows NT ® ser ver or workstation that is running the HP Digital Sender
Module Service. The HP Digital Sender Module converts black-and-white
documents, drawings, and photographs into electronic form and distributes
them directly to Internet e-mail addresses.
A companion program called the HP Address Book Manager (ABM) combines
Overview
e-mail addresses into distribution lists. The system administrator can create
destinations and e-mail distribution lists and make them available to users.
For more information on the HP Digital Sender Module, see the documentation
included with the software CD that came with this kit.
Page 78

Appendix A Regulatory Information 78
Regulatory Information
A
Overview
Declaration of Conformity
FCC Regulations
Overview
Canadian DOC Regulations
VCCI Statement (Japan)
Korean EMI statement
Page 79

Appendix A Regulatory Information 79
Declaration of Conformity
according to ISO/IEC Guide 22 and EN 45014
Manufacturer's Name: Hewlett-Packard Company
Manufacturer's Address: 11311 Chinden Boulevard
Boise, Idaho 83714-1021, USA
declares, that the product
Product Name: HP Digital Copier
Model Number: C4230A
Product Options: ALL
conforms to the following Product Specifications:
Safety: IEC 950:1991+A1+A2+A3+A4/ EN 60950:1992+A1+A2+A3+A4
IEC 825-1:1993/EN 60825-1:1994 Class 1 (Laser/LED)
EMC:
Overview
CISPR 22:1993 / EN 55022:1994 Class A
1
)
Page 80

Appendix A Regulatory Information 80
EN 50081-1:1992
EN 50082-1:1992
IEC 801-2:1991 / prEN 55024-2:1992 - 3 kV CD, 8 kV AD
IEC 801-3:1984 / prEN 55024-3:1991 - 3 V/m
IEC 801-4:1988 / prEN 55024-4:1992 - 1.0 kV Power Lines
0.5 kV Signal Lines
2
FCC Title 47 CFR, Part 15 Class A
/ ICES-002, Issue 2
AS / NZS 3548:1995
Supplementary Information:
The product herewith complies with the requirements of the EMC Directive 89/336/EEC
and the Low Voltage Directive 73/23/EEC, and carries the CE-Marking accordingly.
1) The product was tested in a typical configuration with Hewlett-Packard Personal
Computer Systems.
Overview
Page 81

Appendix A Regulatory Information 81
2) This Device complies with part 15 of the FCC Rules. Operation is subject to the
following two conditions: (1) this device may not cause harmful interference, and (2) this
device must accept any interference received, including interference that may cause
undesired operation
Boise, Idaho USA
June 03, 1998
Australia Contact: Product Regulations Manager, Hewlett-Packard
Australia Ltd., 31-41 Joseph Street, Blackburn,
Victoria 3130, Australia.
European Contact: Your Local Hewlett-Packard Sales and Service Office
or Hewlett-Packard GmbH, Department HQ-TRE,
Herrenberger Stra·e 130, D-71034 B blingen
(Germany) (FAX: +49-7031-14-3143).
USA Contact: Product Regulations Manager, Hewlett-Packard
Company, PO Box 15, Mail Stop 160, Boise, ID, 837070015 (Phone: 208-396-6000).
Overview
Page 82

Appendix A Regulatory Information 82
FCC Regulations
This equipment has been tested and found to comply with the limits for a
Class A digital device, pursuant to Part 15 of the FCC rules. These limits are
designed to provide reasonable protection against harmful interference in a
residential installation. This equipment generates, uses, and can radiate
radio frequency energy. If this equipment is not installed and used in
accordance with the instructions, it may cause harmful interference to radio
communications. However, there is no guarantee that interference will not
occur in a particular installation. If this equipment does cause har mful
interference to radio or television reception, which can be determined by
turning the equipment off and on, the user is encouraged to tr y to correct
the interference by one or more of the following measures:
Reorient or relocate the receiving antenna.
Overview
Increase separation between equipment and receiver.
Connect equipment to an outlet on a circuit different from that to which the
receiver is located.
Consult your dealer or an experienced radio/TV technician.
Page 83

Appendix A Regulatory Information 83
Note Any changes or modifications to the printer that are not expressly appro ved
by HP could void the user’s authority to operate this equipment.
Use of a shielded interface cable is required to comply with the Class B
limits of Par t 15 of FCC rules.
Note The printer without the HP Digital Copy complies with Class B limits.
For more regulatory information, see the HP LaserJet MFP Upgrade Kit online
user guide.
Overview
Page 84

Appendix A Regulatory Information 84
Canadian DOC Regulations
Complies with Canadian EMC Class A requirements.
<<Conforme á la classe A des normes canadiennes de compatibilité
électromagnétiques. << CEM>>.>>
VCCI Statement (Japan)
HP Digital Copy (Model C4230A)
Overview
Page 85

Appendix A Regulatory Information 85
Korean EMI statement
HP Digital Copy (Model C4230A)
Overview
Page 86

86
Index
A
automatic document feeder 61
loading 61
B
button functions
HP Digital Copy 56
C
context sensitive help
HP Digital Copy 54
control panel
HP Digital Copy 44
control panel overlay
installing 39
copy connect cable
installing 36
copy connect EIO board
installing 35
customer support 4
D
Declaration of Conformity 79
default configurations
HP Digital Copy 55
document quality
HP Digital Copy 67
E
EMI statement (Korea) 85
equipment error
HP Digital Copy 75
F
flatbed 63
loading 63
H
HP Digital Copy
automatic document feeder 61
button functions 56
context sensitive help 54
control panel 44
default configurations 55
Page 87

87
document quality 67
equipment error 75
flatbed 63
installation specifications 27
installing 22
LED functions 56
location requirements 26
maintenance 69
menu tabs 46
operating instructions 43
paper specifications 66
parts 23
problem solving 73
settings 59
status bar 45
temporary error 74
troubleshooting 42
HP support services 4
L
LED functions
HP Digital Copy 56
loading
automatic document feeder 61
flatbed 63
M
maintenance
HP Digital Copy 69
menu tabs
HP Digital Copy 46
O
operating instructions
HP Digital Copy 43
P
paper specifications
HP Digital Copy 66
problem solving
HP Digital Copy 73
S
settings
HP Digital Copy 59
status bar
HP Digital Copy 45
support services 4
Page 88

88
T
temporary error
HP Digital Copy 74
troubleshooting
HP Digital Copy 42
V
VCCI statement (Japan) 84
W
warranty statement 76
World Wide Web support 4
Y
Y power cord
installing 38
 Loading...