

Page 1
HP LaserJet 8000, 8000 N, 8000 DN
English
and HP Mopier 240 Printers
Service Manual Supplement
for Paper-handling Accessories
(C4781A, C4782A, C4785A)
Page 2

HP LaserJet 8000, 8000 N,
8000 DN, and HP Mopier 240
Printers Service Manual Supplement
for Paper-handling Accessories
HP 2000-sheet Input Tray
(C4781A)
HP Multibin Mailbox
(C4785A)
HP Duplex Unit (C4782A)
Page 3

© Copyright
Hewlett-Packard
Company 1998
All Rights Reserved.
Reproduction, adaptation,
or translation without
prior written permission
is prohibited, except as
allowed under the
copyright laws.
Publication number
C4085-91023
First edition, March 1998
Warranty
The information
contained in this
document is subject to
change without notice.
Hewlett-Packard makes
no warranty of any kind
with respect to this
information.
HEWLETT-PACKARD
SPECIFICALLY
DISCLAIMS THE
IMPLIED WARRANTY
OF
MERCHANTABILITY
AND FITNESS FOR A
PARTICULAR
PURPOSE.
Hewlett-Packard shall not
be liable for any direct,
indirect, incidental,
consequential, or other
damage alleged in
connection with the
furnishing or use of this
information.
WARNING
Electrical Shock Hazard
To avoid electrical shock,
use only supplied power
cords and connect only to
properly grounded
(3-hole) wall outlets.
Hewlett-Packard Company
11311 Chinden Boulevard
Boise, Idaho 83714
Page 4
Conventions
This publication uses the following conventions:
The names of major printer parts and assemblies are Capitalized.
Color is used to emphasize important items.
Bold is used for emphasis.
Italic refers to a related document, is used for emphasis, or is used for
supporting text.
Note
Caution
WARNING!
Notes contain important information.
Caution messages appear before procedures that, if not observed, could
result in loss of data or damage to equipment.
Warning messages alert the reader to a specific procedure or practice
that, if not followed correctly, could cause personal injury.
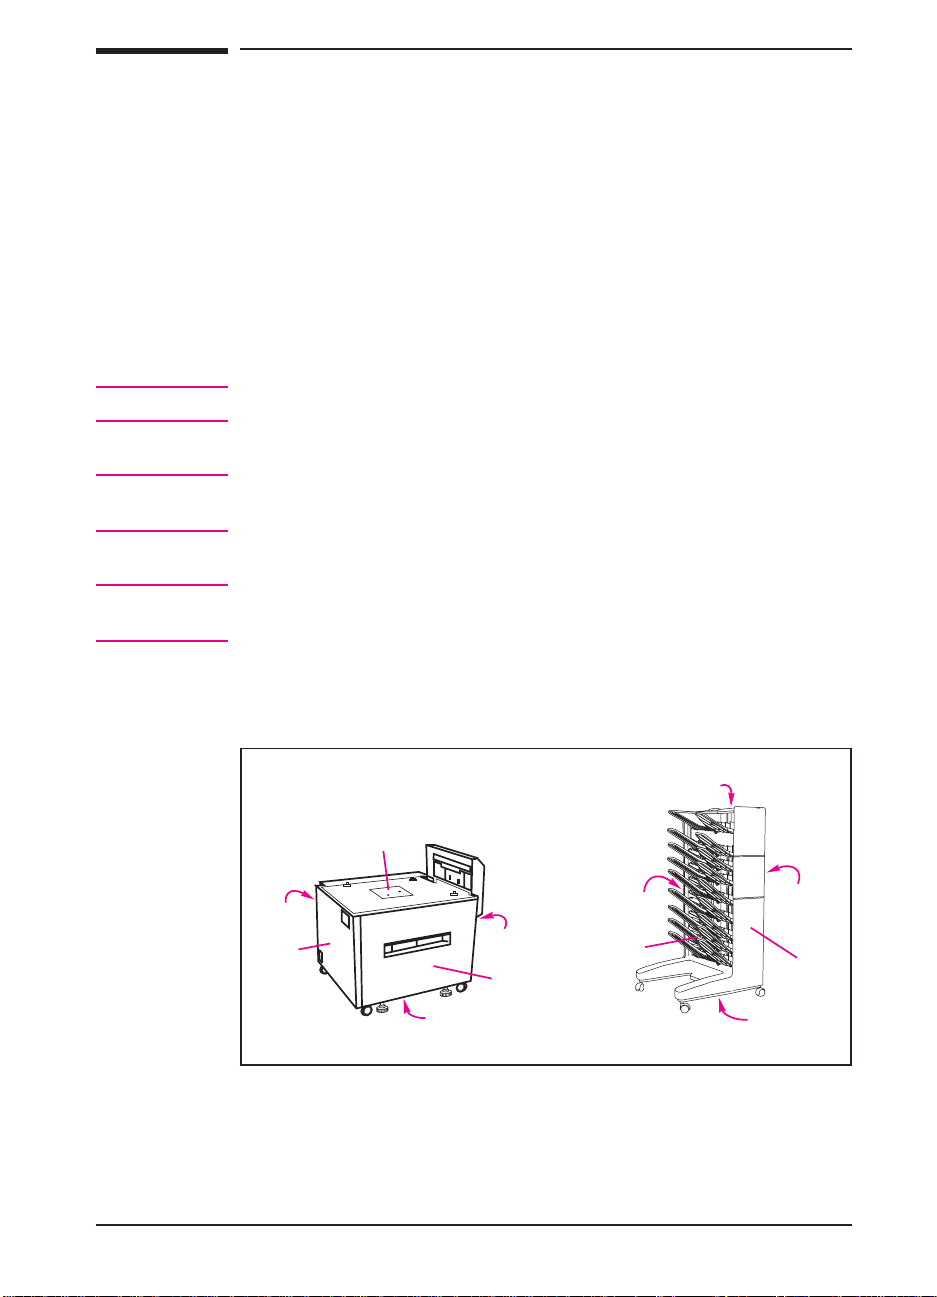
The illustration below shows the orientation of the paper-handling
accessories as they are referred to in this publication.
Top
Top
Back
Left
Right
Front
Back
Left
Right
Front
Bottom
Bottom
iii
Page 5

Contents
Conventions . . . . . . . . . . . . . . . . . . . . . . . . . . . . . . . iii
New Product Features . . . . . . . . . . . . . . . . . . . . . . . . . . x
1 Theory of Operation
Overview . . . . . . . . . . . . . . . . . . . . . . . . . . . . . . . 1-1
2000-sheet Input Tray Theory of Operation . . . . . . . . . . . . . 1-2
Features . . . . . . . . . . . . . . . . . . . . . . . . . . . . . . 1-2
Pickup and Feed System . . . . . . . . . . . . . . . . . . . . . . 1-2
Lifter Operation . . . . . . . . . . . . . . . . . . . . . . . . . . 1-3
Power Supply . . . . . . . . . . . . . . . . . . . . . . . . . . . 1-3
Paper Path . . . . . . . . . . . . . . . . . . . . . . . . . . . . . 1-4
Sensors, Switches, Clutches, and Motors . . . . . . . . . . . . . 1-5
Switches Functionality . . . . . . . . . . . . . . . . . . . . . . . 1-7
Multibin Mailbox Theory of Operation . . . . . . . . . . . . . . . 1-8
Features . . . . . . . . . . . . . . . . . . . . . . . . . . . . . . 1-8
Operating Modes . . . . . . . . . . . . . . . . . . . . . . . . . . 1-8
Configuring the Operating Modes . . . . . . . . . . . . . . . . . 1-9
Sensors, Switches, Motors, and Controller PCA . . . . . . . . . 1-10
Receiving Paper . . . . . . . . . . . . . . . . . . . . . . . . . . 1-12
Delivering Paper . . . . . . . . . . . . . . . . . . . . . . . . . . 1-12
Paper Path . . . . . . . . . . . . . . . . . . . . . . . . . . . . . 1-13
Power-on Sequence . . . . . . . . . . . . . . . . . . . . . . . . 1-14
Communication Link (C-link) Cables . . . . . . . . . . . . . . . 1-15
Duplexer Theory of Operation . . . . . . . . . . . . . . . . . . . . 1-16
2 Removal and Replacement
Overview . . . . . . . . . . . . . . . . . . . . . . . . . . . . . . . 2-1
Required Tools . . . . . . . . . . . . . . . . . . . . . . . . . . . . 2-2
2000-sheet Input Tray Removal and Replacement . . . . . . . . . . 2-3
2000-sheet Input Tray Orientation . . . . . . . . . . . . . . . . . 2-3
2000-sheet Input Tray Front Cover . . . . . . . . . . . . . . . . 2-4
2000-sheet Input Tray Back Cover . . . . . . . . . . . . . . . . 2-5
2000-sheet Input Tray Left Cover . . . . . . . . . . . . . . . . . 2-6
2000-sheet Input Tray Right Cover . . . . . . . . . . . . . . . . 2-7
2000-sheet Input Tray Main Drive Assembly . . . . . . . . . . . 2-8
2000-sheet Input Tray Paper Tray . . . . . . . . . . . . . . . . . 2-9
2000-sheet Input Tray Main Cable Harness . . . . . . . . . . . . 2-10
2000-sheet Input Tray Controller PCA . . . . . . . . . . . . . . 2-11
2000-sheet Input Tray Front LED PCA Assembly . . . . . . . . 2-12
2000-sheet Input TrayPickup Assembly . . . . . . . . . . . . . 2-13
2000-sheet Input Tray Power Supply . . . . . . . . . . . . . . . 2-15
2000-sheet Input Tray Pickup, Feed, and Separation Rollers . . . 2-16
iv
Page 6

2000-sheet Input Tray Paper Quantity Switch Assembly . . . . 2-18
2000-sheet Input Tray Paper Size Switch Assembly . . . . . . 2-18
2000-sheet Input Tray VTU . . . . . . . . . . . . . . . . . . . 2-20
2000-sheet Input Tray Tension Springs . . . . . . . . . . . . . 2-21
2000-sheet Input Tray Locating Pins . . . . . . . . . . . . . . 2-22
2000-sheet Input Tray Outriggers (Stabilizing Feet) . . . . . . 2-23
2000-sheet Input Tray Casters . . . . . . . . . . . . . . . . . . 2-24
2000-sheet Input Tray Adjustable Foot . . . . . . . . . . . . . 2-25
Multibin Mailbox Removal and Replacement . . . . . . . . . . . 2-26
Multibin Mailbox Orientation . . . . . . . . . . . . . . . . . . 2-26
Multibin Mailbox Front and Back Covers . . . . . . . . . . . . 2-27
Multibin Mailbox Top Cover . . . . . . . . . . . . . . . . . . . 2-28
Multibin Mailbox Power Supply . . . . . . . . . . . . . . . . . 2-29
Multibin Mailbox Paper Bins and Blind Cover . . . . . . . . . 2-30
Multibin Mailbox Flipper Assembly . . . . . . . . . . . . . . . 2-31
Multibin Mailbox Delivery Head Motor . . . . . . . . . . . . . 2-34
Multibin Mailbox Transport Belt Motor . . . . . . . . . . . . . 2-35
Multibin Mailbox Input Paper Guide . . . . . . . . . . . . . . 2-36
Multibin Mailbox Metal Tape and Housing Assembly . . . . . 2-38
Multibin Mailbox Controller PCA . . . . . . . . . . . . . . . . 2-40
Multibin Mailbox Anticurl Strings . . . . . . . . . . . . . . . . 2-42
Multibin Mailbox Delivery Head Assembly . . . . . . . . . . . 2-44
Multibin Mailbox Interlock Switch . . . . . . . . . . . . . . . 2-47
Multibin Mailbox Diagnostic LED PCA . . . . . . . . . . . . 2-48
Multibin Mailbox User Status LED PCA . . . . . . . . . . . . 2-50
Multibin Mailbox Adjustable and Fixed Casters . . . . . . . . 2-52
Multibin Mailbox Attachment Assembly . . . . . . . . . . . . 2-53
3 Troubleshooting
Overview . . . . . . . . . . . . . . . . . . . . . . . . . . . . . . . 3-1
Troubleshooting Approach . . . . . . . . . . . . . . . . . . . . . . 3-2
Print the Event Log . . . . . . . . . . . . . . . . . . . . . . . . . 3-2
Display the Event Log . . . . . . . . . . . . . . . . . . . . . . . 3-2
Interpret the Event Log . . . . . . . . . . . . . . . . . . . . . . . 3-3
Print a Configuration Page . . . . . . . . . . . . . . . . . . . . . 3-3
C-link Communication Cables . . . . . . . . . . . . . . . . . . . 3-6
Paper Path Test . . . . . . . . . . . . . . . . . . . . . . . . . . . 3-7
Messages Structure . . . . . . . . . . . . . . . . . . . . . . . . . . 3-9
Error Messages . . . . . . . . . . . . . . . . . . . . . . . . . . . . 3-9
2000-sheet Input Tray Standalone Diagnostics . . . . . . . . . . . 3-10
2000-sheet Input Tray Motor Test . . . . . . . . . . . . . . . . 3-10
2000-sheet Input Tray Standalone Running Test . . . . . . . . 3-11
2000-sheet Input Tray Sensor Test . . . . . . . . . . . . . . . . 3-11
2000-sheet Input Tray LED Status Interpretation . . . . . . . . 3-12
Multibin Mailbox Standalone Diagnostics . . . . . . . . . . . . . 3-13
Multibin Mailbox LEDs Description . . . . . . . . . . . . . . 3-13
Multibin Mailbox Standalone Diagnostic Test . . . . . . . . . . 3-14
v
Page 7

Power-on Test . . . . . . . . . . . . . . . . . . . . . . . . . . . 3-14
Multibin Mailbox Paper Path Test . . . . . . . . . . . . . . . . . 3-15
Multibin Mailbox LEDs Status Interpretation . . . . . . . . . . . 3-15
General Troubleshooting Information . . . . . . . . . . . . . . . . 3-19
Wiring Diagrams . . . . . . . . . . . . . . . . . . . . . . . . . . . 3-19
4 Parts
Overview . . . . . . . . . . . . . . . . . . . . . . . . . . . . . . . 4-1
2000-sheet Input Tray Components . . . . . . . . . . . . . . . . . 4-3
Multibin Mailbox Components . . . . . . . . . . . . . . . . . . . . 4-7
Duplexer . . . . . . . . . . . . . . . . . . . . . . . . . . . . . . . 4-11
vi
Page 8

List of Figures
Figure 1-1 2000-sheet Input Tray Paper Path . . . . . . . . . . 1-4
Figure 1-2 2000-sheet Input Tray Sensors, Switches, Clutches,
and Motors . . . . . . . . . . . . . . . . . . . . . . 1-6
Figure 1-3 Multibin Mailbox Sensors, Switches, Motors, and
Controller PCA . . . . . . . . . . . . . . . . . . . . 1-11
Figure 1-4 Multibin Mailbox Paper Path . . . . . . . . . . . . . 1-13
Figure 1-5 C-link Cables, Supported Daisy-chain Connections . 1-15
Figure 1-6 Duplexer Location . . . . . . . . . . . . . . . . . . 1-16
Figure 2-1 Phillips versus Posidriv Screwdrivers . . . . . . . . 2-2
Figure 2-2 2000-sheet Input Tray Orientation . . . . . . . . . . 2-3
Figure 2-3 2000-sheet Input Tray Front Cover . . . . . . . . . . 2-4
Figure 2-4 2000-sheet Input Tray Back Cover . . . . . . . . . . 2-5
Figure 2-5 2000-sheet Input Tray Left Cover . . . . . . . . . . 2-6
Figure 2-6 2000-sheet Input Tray Right Cover . . . . . . . . . 2-7
Figure 2-7 2000-sheet Input Tray Main Drive Assembly . . . . 2-8
Figure 2-8 2000-sheet Input Tray Paper Tray . . . . . . . . . . 2-9
Figure 2-9 2000-sheet Input Tray Main Cable Harness . . . . . 2-10
Figure 2-10 2000-sheet Input Tray Controller PCA . . . . . . . . 2-11
Figure 2-11 2000-sheet Input Tray Front LED PCA . . . . . . . 2-12
Figure 2-12 2000-sheet Input TrayPickup Assembly . . . . . . . 2-13
Figure 2-13 2000-sheet Input Tray Pickup Assembly
Photosensors . . . . . . . . . . . . . . . . . . . . . 2-14
Figure 2-14 2000-sheet Input Tray Power Supply . . . . . . . . . 2-15
Figure 2-15 2000-sheet Input Tray Rollers: Pickup, Feed, and
Separation . . . . . . . . . . . . . . . . . . . . . . . 2-17
Figure 2-16 2000-sheet Input Tray Paper Size and Paper
Quantity Switch Assemblies (1 of 2) . . . . . . . . . 2-19
Figure 2-17 2000-sheet Input Tray Paper Size and Paper
Quantity Switch Assemblies (2 of 2) . . . . . . . . . 2-19
Figure 2-18 2000-sheet Input Tray Vertical Transfer Unit (VTU) 2-20
Figure 2-19 2000-sheet Input Tray Tension Springs . . . . . . . 2-21
Figure 2-20 2000-sheet Input Tray Locating Pins . . . . . . . . . 2-22
Figure 2-21 2000-sheet Input Tray Outriggers . . . . . . . . . . 2-23
Figure 2-22 2000-sheet Input Tray Casters . . . . . . . . . . . . 2-24
Figure 2-23 2000-sheet Input TrayAdjustable Foot . . . . . . . . 2-25
Figure 2-24 Multibin Mailbox Orientation . . . . . . . . . . . . 2-26
Figure 2-25 Multibin Mailbox Covers (Front and Back) . . . . . 2-27
Figure 2-26 Multibin Mailbox Top Cover . . . . . . . . . . . . . 2-28
Figure 2-27 Multibin Mailbox Power Supply . . . . . . . . . . . 2-29
Figure 2-28 Multibin Mailbox Paper Bins and Blind Cover . . . 2-30
Figure 2-29 Multibin Mailbox Flipper Assembly (1 of 3) . . . . 2-32
Figure 2-30 Multibin Mailbox Flipper Assembly (2 of 3) . . . . 2-32
vii
Page 9

Figure 2-31 Multibin Mailbox Flipper Assembly (3 of 3) . . . . 2-33
Figure 2-32 Multibin Mailbox Delivery Head Motor . . . . . . . 2-34
Figure 2-33 Multibin Mailbox Transport Belt Motor . . . . . . . 2-35
Figure 2-34 Multibin Mailbox Input Paper Guide (1 of 2) . . . . 2-36
Figure 2-35 Multibin Mailbox Input Paper Guide (2 of 2) . . . . 2-37
Figure 2-36 Multibin Mailbox Metal Tape and Housing
Assembly (1 of 2) . . . . . . . . . . . . . . . . . . 2-39
Figure 2-37 Multibin Mailbox Metal Tape and Housing
Assembly (2 of 2) . . . . . . . . . . . . . . . . . . 2-39
Figure 2-38 Multibin Mailbox Controller PCA (1 of 2) . . . . . 2-40
Figure 2-39 Multibin Mailbox Controller PCA (2 of 2) . . . . . 2-41
Figure 2-40 Multibin Mailbox Anticurl Strings (1 of 2) . . . . . 2-42
Figure 2-41 Multibin Mailbox Anticurl Strings (2 of 2) . . . . . 2-43
Figure 2-42 Multibin Mailbox Delivery Head Assembly
(1 of 4) . . . . . . . . . . . . . . . . . . . . . . . . 2-45
Figure 2-43 Multibin Mailbox Delivery Head Assembly
(2 of 4) . . . . . . . . . . . . . . . . . . . . . . . . 2-45
Figure 2-44 Multibin Mailbox Delivery Head Assembly
(3 of 4) . . . . . . . . . . . . . . . . . . . . . . . . 2-46
Figure 2-45 Multibin Mailbox Delivery Head Assembly
(4 of 4) . . . . . . . . . . . . . . . . . . . . . . . . 2-46
Figure 2-46 Multibin Mailbox Interlock Switch . . . . . . . . . 2-47
Figure 2-47 Multibin Mailbox Diagnostic LED PCA (1 of 2) . . 2-48
Figure 2-48 Multibin Mailbox Diagnostic LED PCA (2 of 2) . . 2-49
Figure 2-49 Multibin Mailbox User Status LED PCA (1 of 2) . . 2-50
Figure 2-50 Multibin Mailbox User Status LED PCA (2 of 2) . . 2-51
Figure 2-51 Multibin Mailbox Adjustable and Fixed Casters . . 2-52
Figure 2-52 Multibin Mailbox Attachment Assembly . . . . . . 2-53
Figure 3-1 Sample Configuration Page . . . . . . . . . . . . . 3-4
Figure 3-2 Sample Menu Page . . . . . . . . . . . . . . . . . . 3-5
Figure 3-3 C-link Cables, Supported Daisy-chain Connections . 3-6
Figure 3-4 Paper Path Test Source and Output Selection . . . . 3-8
Figure 3-5 Multibin Mailbox LEDs Description . . . . . . . . 3-13
Figure 3-6 Multibin Mailbox Power Supply Test Mode Switch 3-14
Figure 3-7 2000-sheet Input Tray Controller PCA Inputs . . . . 3-20
Figure 3-8 2000-sheet Input Tray Controller PCA Outputs . . . 3-21
Figure 3-9 2000-sheet Input Tray Main Wiring Diagram . . . . 3-22
Figure 3-10 Multibin Mailbox Main Wiring Diagram . . . . . . 3-23
Figure 4-1 2000-sheet Input Tray (C4781A) Components
(1 of 2) . . . . . . . . . . . . . . . . . . . . . . . . 4-2
Figure 4-2 2000-sheet Input Tray (C4781A) Components
(2 of 2) . . . . . . . . . . . . . . . . . . . . . . . . 4-4
Figure 4-3 Multibin Mailbox (C4785A) Components (1 of 3) . 4-6
Figure 4-4 Multibin Mailbox (C4785A) Components (2 of 3) . 4-8
Figure 4-5 Multibin Mailbox (C4785A) Components (3 of 3) . 4-10
viii
Page 10

List of Tables
Table 1-1 2000-sheet Input Tray Sensors, Switches, Clutches,
and Motors . . . . . . . . . . . . . . . . . . . . . . . 1-5
Table 1-2 2000-sheet Input Tray Paper Quantity Switches . . . . 1-7
Table 1-3 2000-sheet Input Tray Paper Size Switches . . . . . . 1-7
Table 1-4 Multibin Mailbox Sensors, Switches, Motors, and
Controller PCA . . . . . . . . . . . . . . . . . . . . . 1-10
Table 3-1 DIP Switch Settings . . . . . . . . . . . . . . . . . . 3-10
Table 3-2 2000-sheet Input Tray LED Status Interpretation . . . 3-12
Table 3-3 Multibin Mailbox LED Status Interpretation . . . . . 3-15
Table 4-1 2000-sheet Input Tray (C4781A) Components
(1 of 2) . . . . . . . . . . . . . . . . . . . . . . . . . 4-3
Table 4-2 2000-sheet Input Tray (C4781A) Components
(2 of 2) . . . . . . . . . . . . . . . . . . . . . . . . . 4-5
Table 4-3 Multibin Mailbox (C4785A) Components (1 of 3) . . 4-7
Table 4-4 Multibin Mailbox (C4785A) Components (2 of 3) . . 4-9
Table 4-5 Multibin Mailbox (C4785A) Components (3 of 3) . . 4-11
Table 4-6 Duplexer . . . . . . . . . . . . . . . . . . . . . . . . 4-11
ix
Page 11

New Product Features
2000-sheet Input Tray
• variable speed
• standalone self-test diagnostics
• diagnostic LEDs
• user status LED
• new parts kits and field-replaceable units (FRUs)
Multibin Mailbox
• variable speed
• standalone self-test diagnostics
• diagnostic LEDs
• user status LED
• factory cable routing and preinstallation
• new parts kits and field-replaceable units (FRUs)
• new power supply
• adjustable casters
• new latching mechanism
Duplexer
• variable speed
• new FRU status
x
Page 12

Theory of Operation
Overview
The following information provides the theory of operation for the
following paper-handling accessories and parts:
• Paper-handling Controller
• HP 2000-sheet Input Tray
• HP Multibin Mailbox (MBM)
• Duplexer
The information in this manual supplements the information in the
HP LaserJet 8000, 8000 N, 8000 DN, and HP Mopier 240 Printers
Service Manual (part no. C4085-91017). Use this supplement with the
HP LaserJet 8000, 8000 N, 8000 DN, and HP Mopier 240 Printers
Service Manual.
1
Theory of Operation 1-1
Page 13

2000-sheet Input Tray Theory of Operation
Features
The HP 2000-sheet Input Tray now supports variable engine input
speeds, ranging from 6 to 32 ppm. The 2000-sheet Input Tray also
automatically senses paper size.
Pickup and Feed System
When the 2000-sheet Input Tray is loaded with paper and the paper tray
is closed, the paper stack moves into position under the Pickup, Feed,
and Separation Rollers. This operation is detected by the PS34 sensor in
the 2000-sheet Input Tray’s Pickup Assembly. The presence of paper in
the paper tray is detected by the PS33 sensor. The paper level is detected
by switches SW601 and SW602 in the Paper Quantity Switch Assembly.
The paper size is detected by switches SW701 through SW704 in the
Paper Size Switch Assembly.
When the Paper-handling Controller on the printer sends an input
command to the Controller PCA on the 2000-sheet Input Tray, the Paper
Deck Driver runs the Pickup Motor to rotate the Pickup, Feed, and
Separation Rollers. As the Pickup Roller turns, the paper feeds into the
Vertical Transfer Unit (VTU) and passes through the PS31 and PS32
sensors.
If the paper fails to reach the PS31 and PS32 sensors in the VTU within
the allotted time, the Controller PCA on the 2000-sheet Input Tray
assumes that a paper jam has occurred. The 2000-sheet Input Tray stops
the operation and reports the paper jam to the Paper-handling Controller
on the printer. A paper jam message appears on the printer control panel
display.
Hardware malfunctions are also displayed on the printer control panel.
1-2 Theory of Operation
Page 14

Lifter Operation
The lifter plate in the 2000-sheet Input Tray’s paper tray is held by two
wires that are wound on four pulleys by the Lifter Motor. When the
paper tray is open, the pulley gears disengage from the motor gears, and
the Lifter lowers by its own weight. The presence or absence of the tray
is detected by switches SW701 through SW704 on the unit’s Paper/Tray
Size Switch Assembly.
After the paper tray is closed, the Lifter Motor lifts the paper stack into
position; this action is detected by the PS34 sensor. The PS34 sensor
also maintains the height of the paper stack. As paper is picked up by the
rollers, the number of sheets decreases. Once the paper stack decreases
to a certain level, the PS34 sensor registers a low condition. Then the
Paper Deck Driver turns on the Lifter Motor again and lifts the paper
stack until the PS34 sensor registers sufficient paper in the tray.
Power Supply
The 2000-sheet Input Tray has an internal Power Supply that activates
when the printer’s power switch is turned on. The Paper-handling
Controller on the printer sends a power-on signal to the Power Supply
on the 2000-sheet Input Tray through the Controller PCA on the
2000-sheet Input Tray. When the signal is high, the Power Supply
provides both +24V and +5V to the Paper Deck Driver.The +24V drives
the motors, clutches, and solenoids for the lifter, feed, and pickup
systems. The +5V drives the sensors and PCA electronics.
Theory of Operation 1-3
Page 15
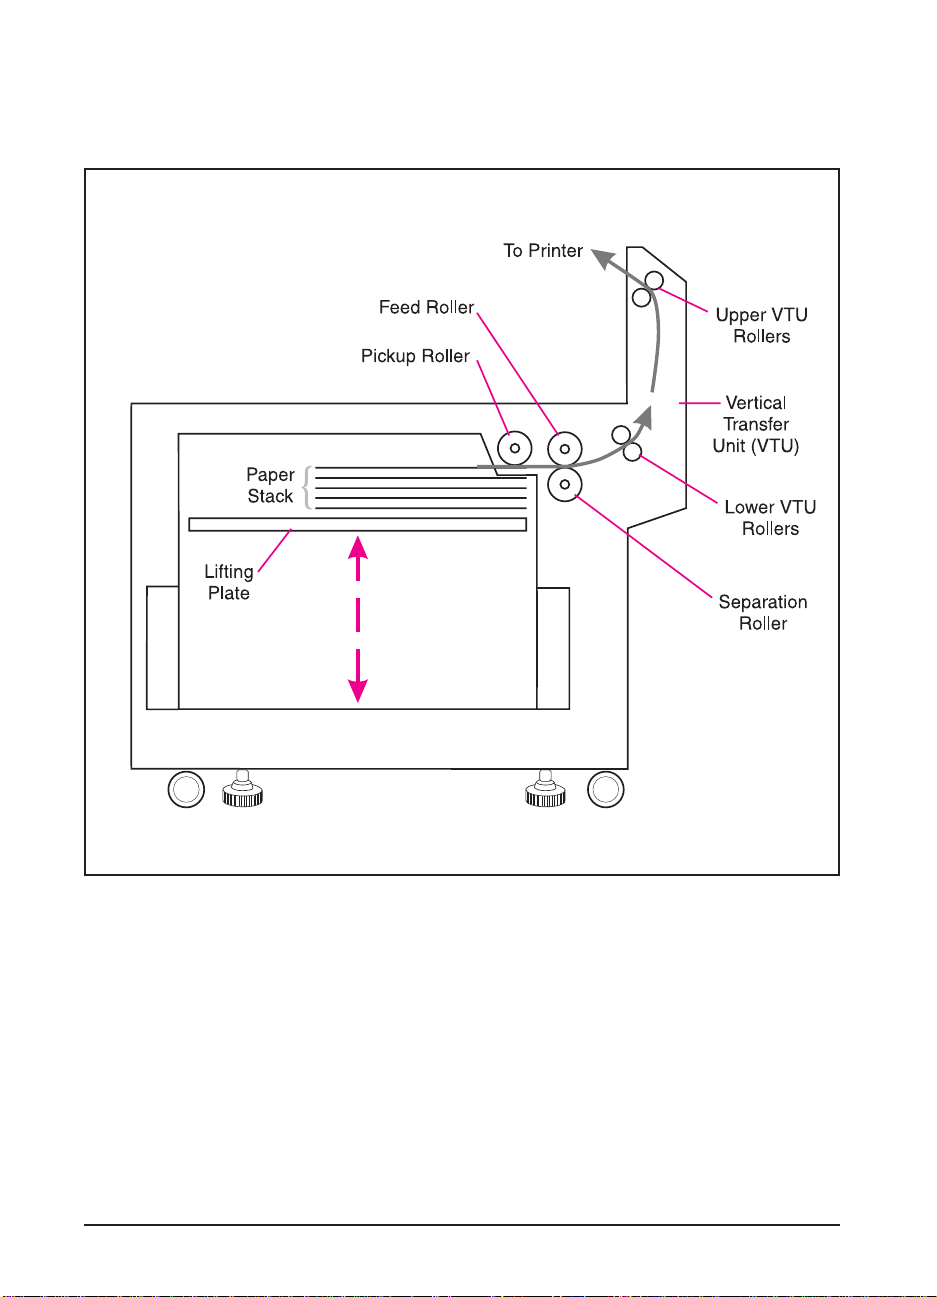
Paper Path
Figure 1-1 illustrates the paper path components in the 2000-sheet Input
Tray.
Figure 1-1 2000-sheet Input Tray Paper Path
1-4 Theory of Operation
Page 16

Sensors, Switches, Clutches, and Motors
Table 1-1 and Figure 1-2, on the next page describe and illustrate the
sensors, switches, clutches, and motors on the 2000-sheet Input Tray.
Table 1-1 2000-sheet Input Tray Sensors, Switches, Clutches, and Motors
Control Device Description Location
CL31 VerticalTransfer Unit (VTU)
Clutch
CL32 Main Drive Clutch VTU
MT31 Main Motor PaperDeck Drive Assembly
PS31 Paper Entry Sensor VTU
PS32 Paper Exit Sensor VTU
PS33 Paper Tray Empty Sensor PaperPickup Assembly
PS34 Paper Tray Raised Sensor PaperPickup Assembly
PS35 VTU Closed Sensor PaperPickup Assembly
SW601-SW602 Paper Quantity Switches Lower Chassis
SW701-SW704 Paper SizeSwitches Lower Chassis
PowerSupply Switch Normal/Diagnostic Mode
Switch
VerticalTransfer Unit (VTU)
PowerSupply
Theory of Operation 1-5
Page 17
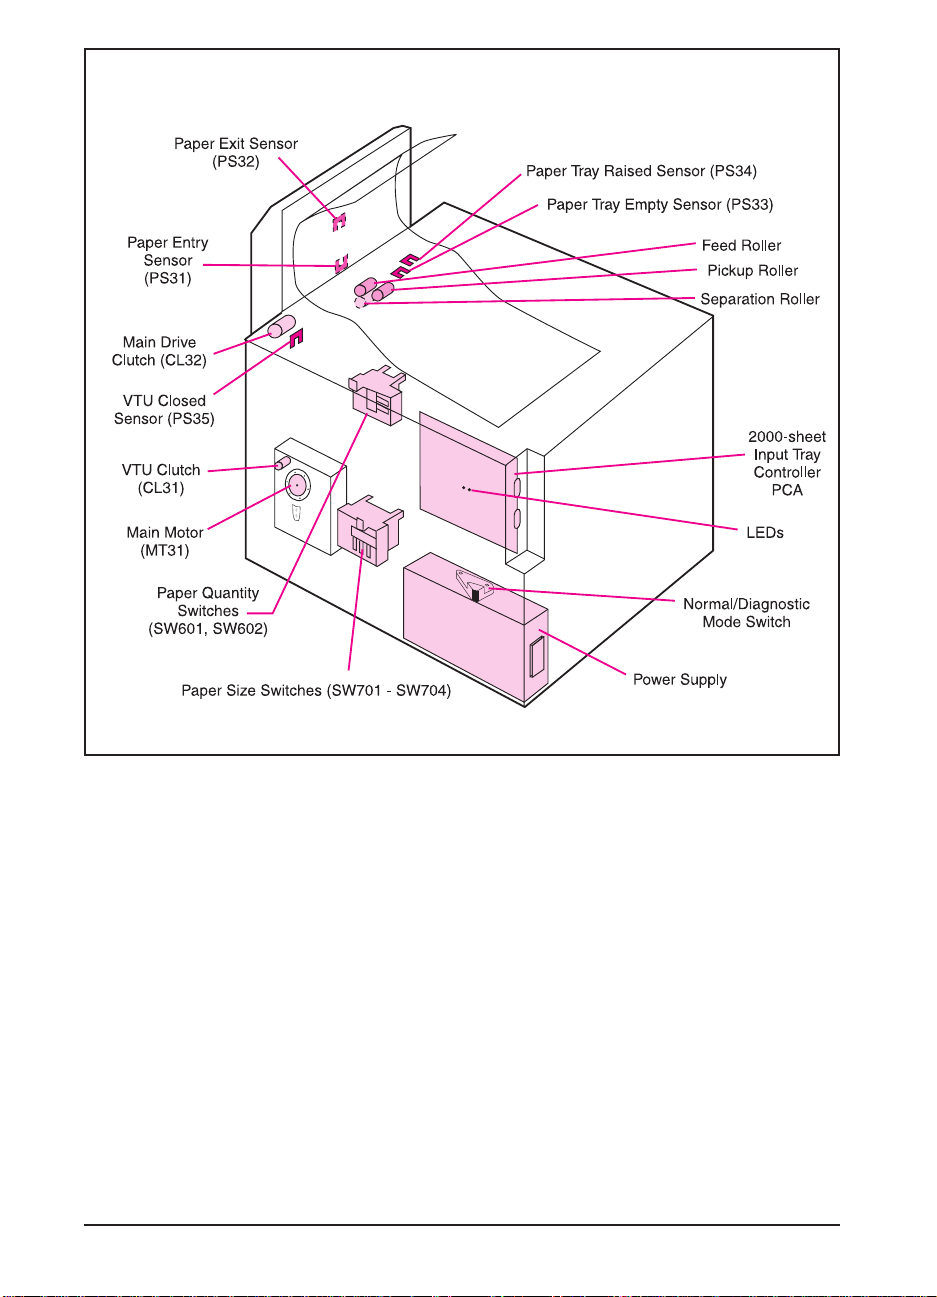
Figure 1-2 2000-sheet Input Tray Sensors, Switches, Clutches, and Motors
1-6 Theory of Operation
Page 18
Switches Functionality
Tables 1-2 and 1-3 show the paper quantity and paper size switches on
the 2000-sheet Input Tray.
Paper Quantity Switches
Table 1-2 2000-sheet Input Tray Paper QuantitySwitches
SW601 SW602 Remaining Paper
Off Off 100%
On Off 75%
On On 50%
Off On 25%
Paper Size Switches
Table 1-3 2000-sheet Input Tray Paper Size Switches
Paper Size SW701 SW702 SW703 SW704
Ledger (portrait) Off On Off Off
A3 (portrait) On On Off Off
B4 (portrait) Off Off On Off
Legal (portrait) Off On On Off
Letter (landscape) Off On Off On
A4 (landscape) On On Off On
Theory of Operation 1-7
Page 19

Multibin Mailbox Theory of Operation
Features
The Multibin Mailbox (MBM) is an output unit designed for variable
speeds, ranging from 6 to 32 ppm. The Multibin Mailbox holds up to
2,100 sheets distributed in eight 250-sheet standard output bins and one
100-sheet left output bin. The Multibin Mailbox also features four
intelligent and configurable operating modes.
Operating Modes
Mailbox Mode
In Mailbox Mode, the network administrator can address each bin as an
output destination with a name assigned to it. The printer sends a print
job to the selected bin. If the assigned bin is full, the printer either stops
printing or sends subsequent pages to the overflow bin, which is also
defined by the network administrator.
Job Separator Mode
In Job Separator Mode, each print job is placed in a separate bin. All
Multibin Mailbox bins are used for this purpose, starting with the first
standard output bin (at the top). If a Multibin Mailbox bin is full, the
printer automatically sends the job to the next available bin. If there are
more jobs than bins, the extra jobs will start again at the top standard
output bin.
This process is seen by the printer software as one logical bin.
Virtual Stacker Mode
In Virtual Stacker Mode, printed sheets are stacked face down in the bins
from the lowest bin to the top bin, regardless of where a print job begins
or ends. All printed sheets are sent to the bottom bin until it is full;
subsequent sheets are sent to the next upward bin until it is full. This
mode of operation takes advantage of the total capacity of the Multibin
Mailbox bins.
In this mode, the software sees the Multibin Mailbox as one logical bin.
When the Multibin Mailbox is full, the printer stops sending paper until
all the bins are emptied.
1-8 Theory of Operation
Page 20

Collator Mode
Each mopy (copy) of a single job is sent to a different bin (next bin
down). This mode separates mopies automatically.
In Collator Mode, the device automatically separates mopies. Each
mopy is delivered in consecutive bins, starting with the top standard
output bin. In this case, one job contains several mopies.
Configuring the Operating Modes
The network administrator chooses the mode of operation through an
HP network configuration utility, such as the HP JetAdmin utility or the
HP LaserJet utility for the Macintosh. Additionally,on all workstations
that print to the printer, the printer driver might need to be set up to
reflect the chosen operating mode.
Bidirectional environment: The printer automatically selects the mode
established by the network administrator.
Unidirectional environment: The mode of operation can be changed in
the driver. The method for changing the mode varies with the driver and
type of operating system. For additional information, see the online help
for the printer software.
Theory of Operation 1-9
Page 21

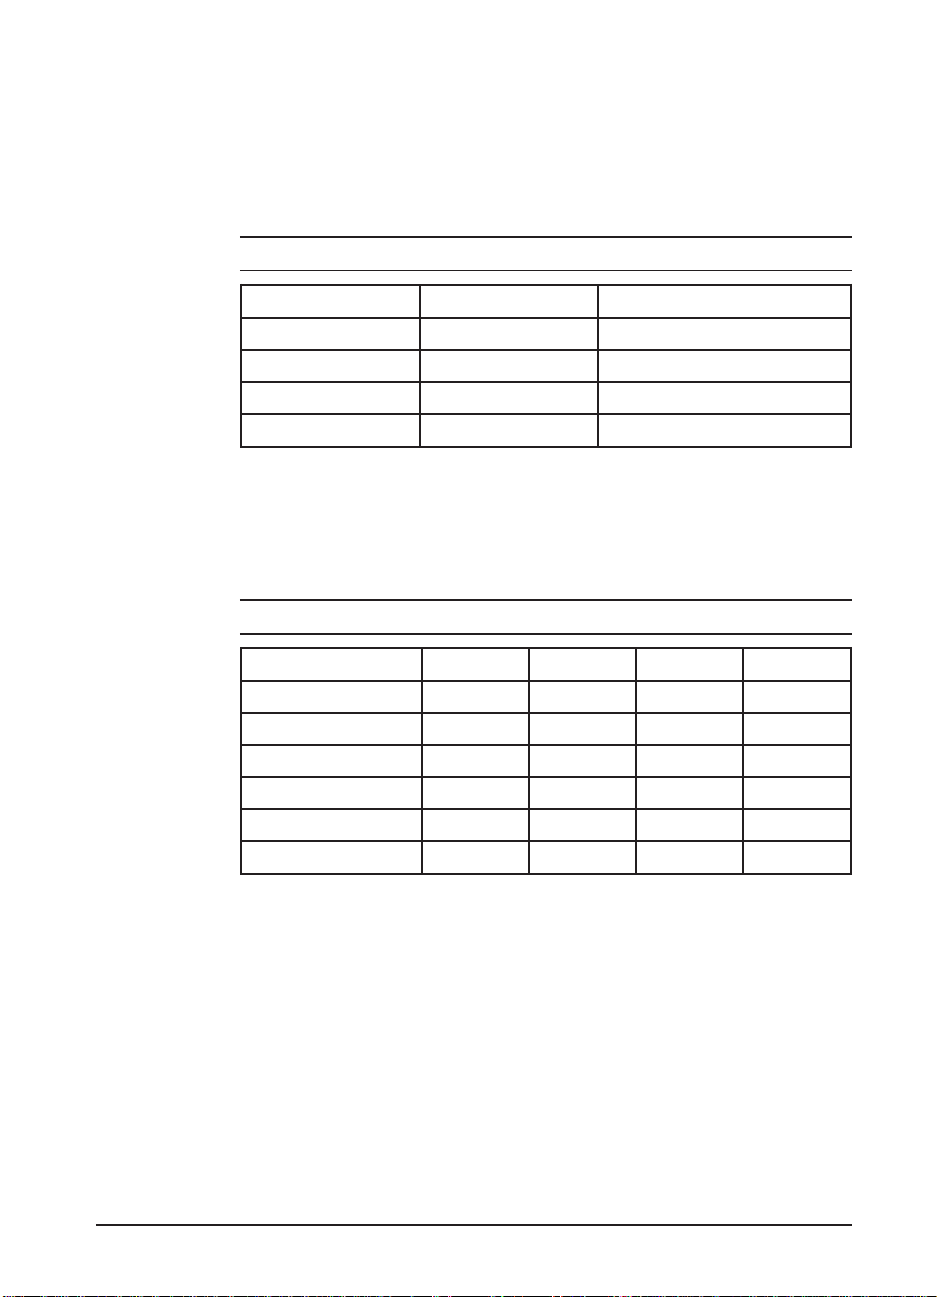
Sensors, Switches, Motors, and Controller PCA
Table 1-4 and Figure 1-3 on the next page illustrate and describe the
Multibin Mailbox sensors, switches, motors, and Controller PCA.
Table 1-4 Multibin Mailbox Sensors, Switches, Motors,and Controller PCA
Control Device Description Location
M1 Delivery Head Motor Upper-back Side
M2 Flipper Roller Motor with
M3 Delivery Head Roller Motor Delivery Head Assembly
M4 Ejector Motor Under Delivery Head Assembly
M5 Transport Belt Motor Lower-back Side
PSBinEmpty PaperBin Empty Sensor Delivery HeadAssembly
PSBinFull/Head
Position
PSEject Delivery Rollers Extended
PSEntry Paper Entry Sensor Flipper Assembly (top, center)
PSExit1 Paper Deliveredto Head
PSExit2 Paper Deliveredto Bin Sensor Delivery Head Assembly
PSFaceUp Reverse Stepper Motor Sensor Flipper Assembly (top, center)
PSFaceFull Left Output Bin Full Sensor Flipper Assembly (top, center)
SW1 Interlock Switch Middle-back Side
IR LED Infrared Light-emitting Diode
Encoder
PaperBin (below)Full Sensor Delivery Head Assembly
Sensor
Sensor
(forStapler Assembly)
Flipper Assembly (upper back)
(upper back)
(upper back)
(upper back)
Delivery Head Assembly
(upper back)
Delivery Head Assembly
(upper back)
(upper back)
Delivery Head Assembly (left, center)
1-10 Theory of Operation
Page 22
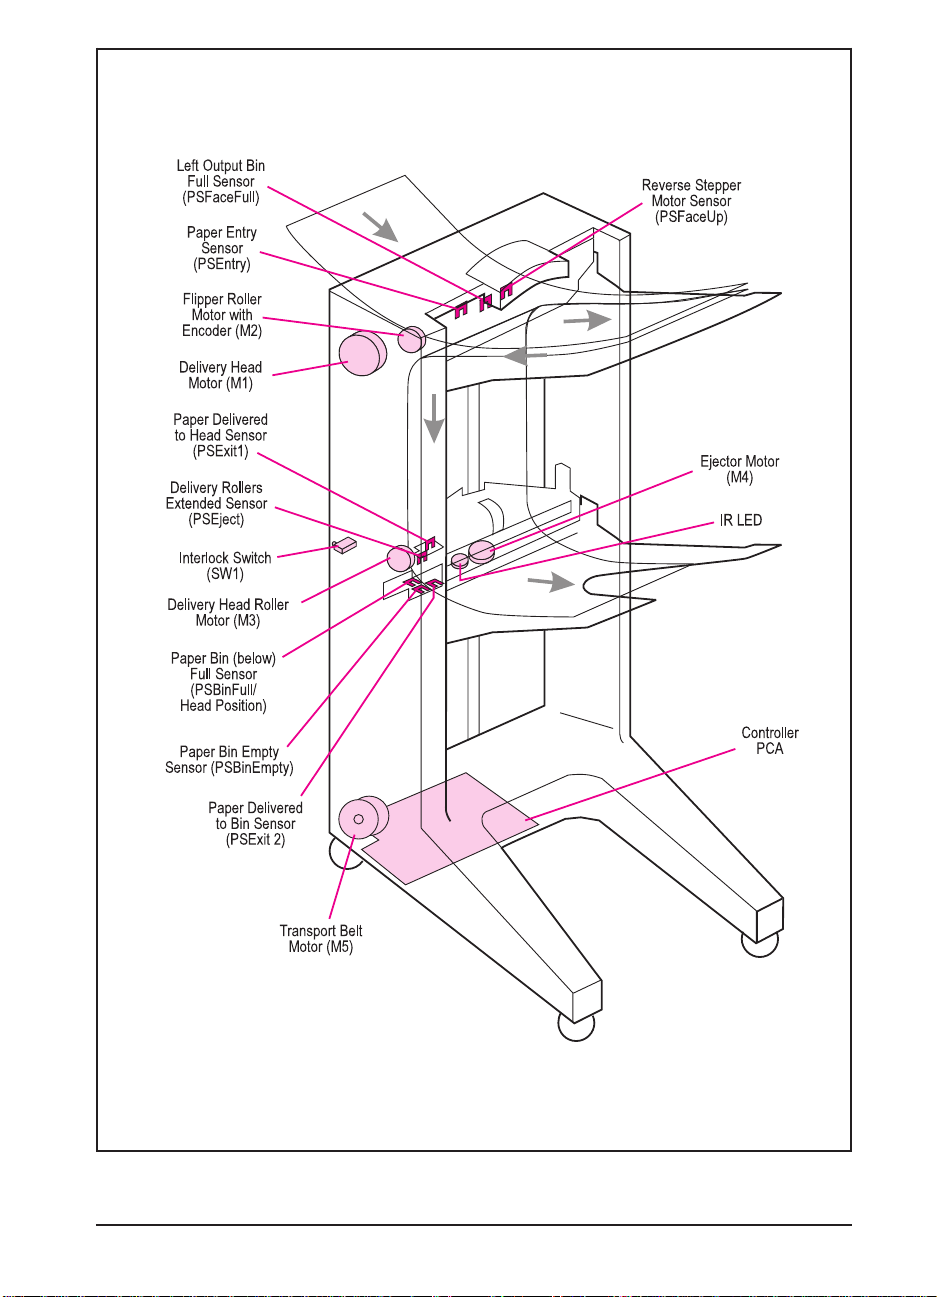
Figure 1-3 Multibin Mailbox Sensors, Switches, Motors, and Controller PCA
Theory of Operation 1-11
Page 23

Receiving Paper
The printer delivers paper to the Multibin Mailbox through the left
output delivery slot (Input Paper Guide) at a rate of 107 mm per second.
Paper arrival is sensed by the PSEntry sensor, which activates the
Flipper Roller Motor (M2), causing the paper to move through the
Multibin Mailbox transport and delivery system. See Figure 1-4.
Delivering Paper
The Delivery Head Assembly on the Multibin Mailbox moves or stays in
the indicated bin according to the commands coming from the
Paper-handling Controller on the printer. If paper is designated for the
left output bin, the Multibin Mailbox feeds it through the Flipper
Assembly. If paper is designated for one of the standard output bins, the
Multibin Mailbox feeds it through the Flipper Assembly until the
trailing edge is sensed by the PSFaceUp sensor. Then the Flipper Roller
Motor (M2) reverses and feeds the paper down between the Transport
Belt and the Metal Tape until it reaches the Delivery Head Assembly.
1-12 Theory of Operation
Page 24
Paper Path
Figure 1-4 illustrates the components of the Multibin Mailbox paper
path.
Figure 1-4 Multibin Mailbox Paper Path
Theory of Operation 1-13
Page 25

Power-on Sequence
During the power-on sequence, the Delivery Head Assembly moves first
to the top “home” position at the left output bin. From that position the
delivery head moves down, scanning to determine if all the Multibin
Mailbox bins are installed, if they contain paper, and if they are full.
Then the Delivery Head proceeds upward again to the home position
and remains there for about 7 seconds. Finally, the Delivery Head
Assembly moves to the bottom bin, where it waits for the next command
from the Paper-handling Controller.
Note
If one of the bins has been removed or is not seated correctly, the
Delivery Head Assembly will not complete the scan and will send an
error message to the printer control panel.
1-14 Theory of Operation
Page 26
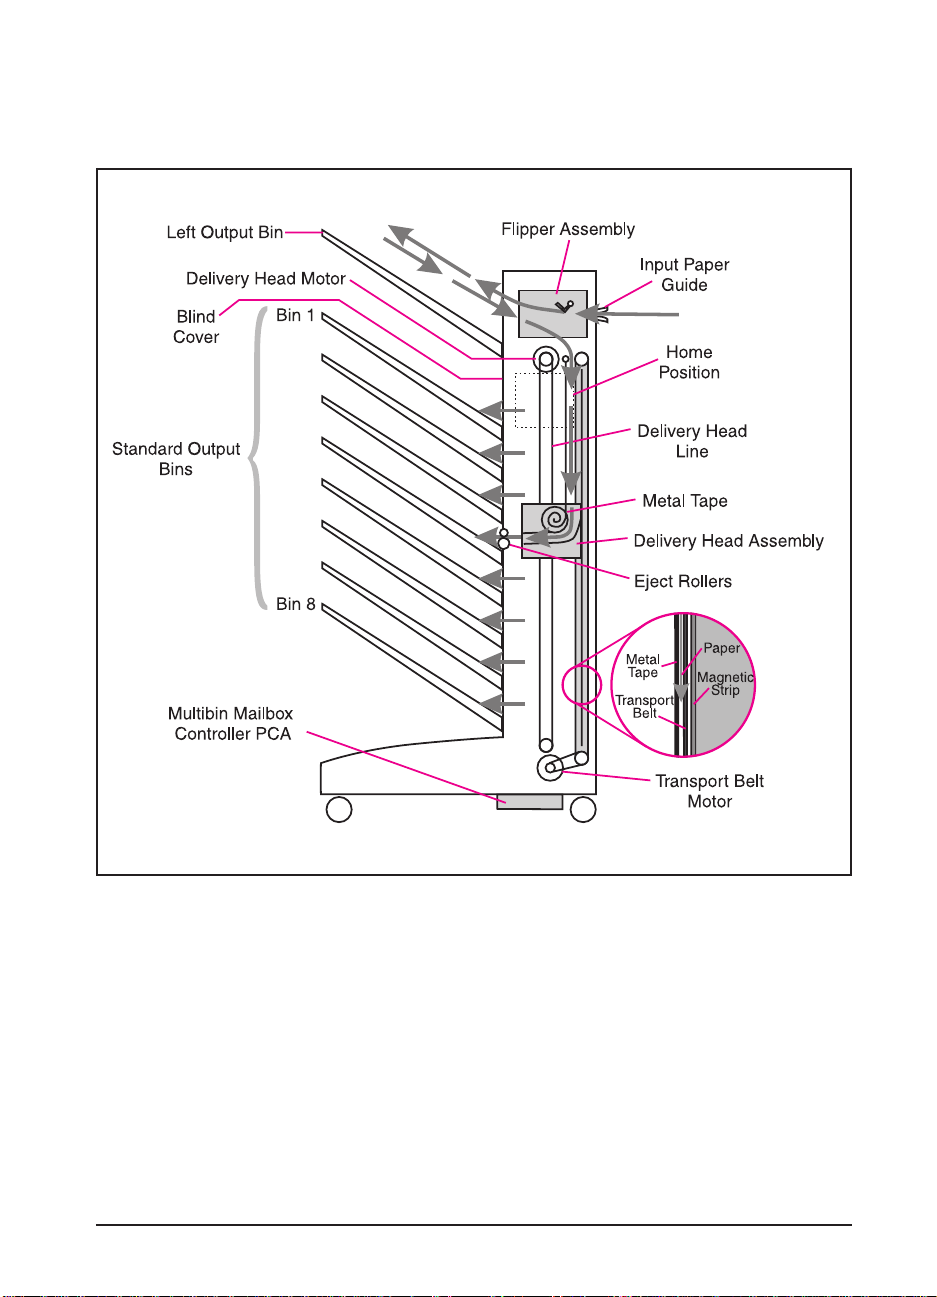
Communication Link (C-link) Cables
Communication with the Multibin Mailbox is handled through the
Paper-handling Controller on the printer. The information coming from
the Paper-handling Controller is carried by the C-link cables that
connect the Paper-handling Controller PCA to all the devices that
support the C-link protocol.
Figure 1-5 C-link Cables, Supported Daisy-chain Connections
Theory of Operation 1-15
Page 27
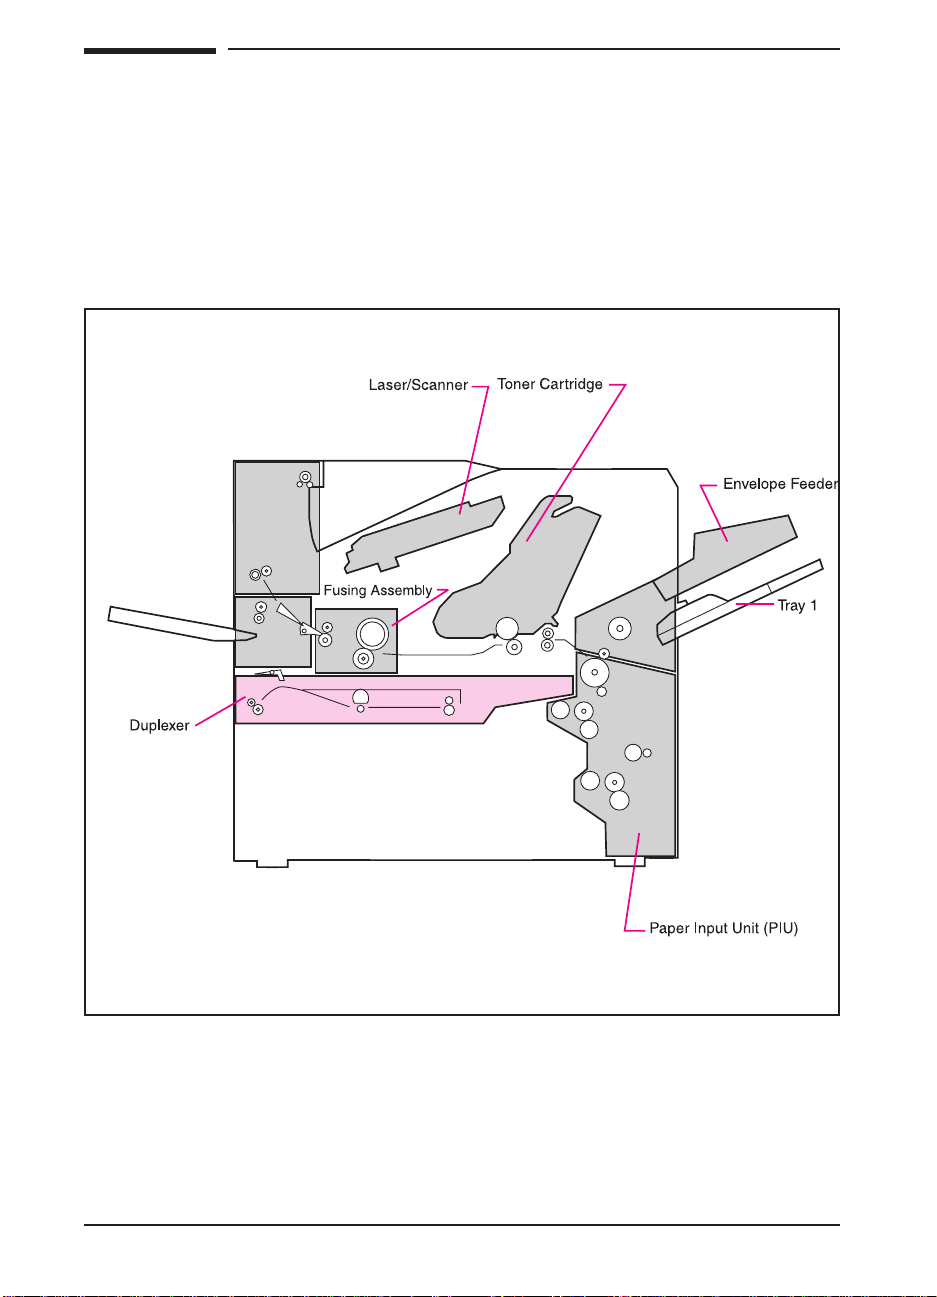
Duplexer Theory of Operation
The Duplexer installs inside the printer, below the Fusing Assembly. The
back side of the paper is printed first. Then the paper is turned over and
fed back through the paper path for front-sided printing. The new
Duplexer supports variable engine input speeds.
The Envelope Feeder installs on the right side of the printer above
Tray 1.
Figure 1-6 Duplexer Location
1-16 Theory of Operation
Page 28

Removal and Replacement
OverviewOverview
This chapter provides removal and replacement information for the
following HP paper-handling accessories:
• HP 2000-sheet Input Tray
• Multibin Mailbox (MBM)
The removal and replacement information presented in this chapter
supplements the information in the HP LaserJet 8000, 8000 N,
8000 DN, and HP Mopier 240 Printers Service Manual. Use this
supplement with the HP LaserJet 8000, 8000 N, 8000 DN, and
HP Mopier 240 Printers Service Manual.
2
WARNING!
Caution
Electrical Shock Hazard
To avoid electrical shock, use only supplied power cords and connect
only to properly grounded (3-hole) wall outlets.
The printer and accessories contain parts that are sensitive to
electrostatic discharge (ESD). Always service printers at an
ESD-protected workstation. Watch for the ESD reminder symbol on
illustrations.
Removal and Replacement 2-1
Page 29
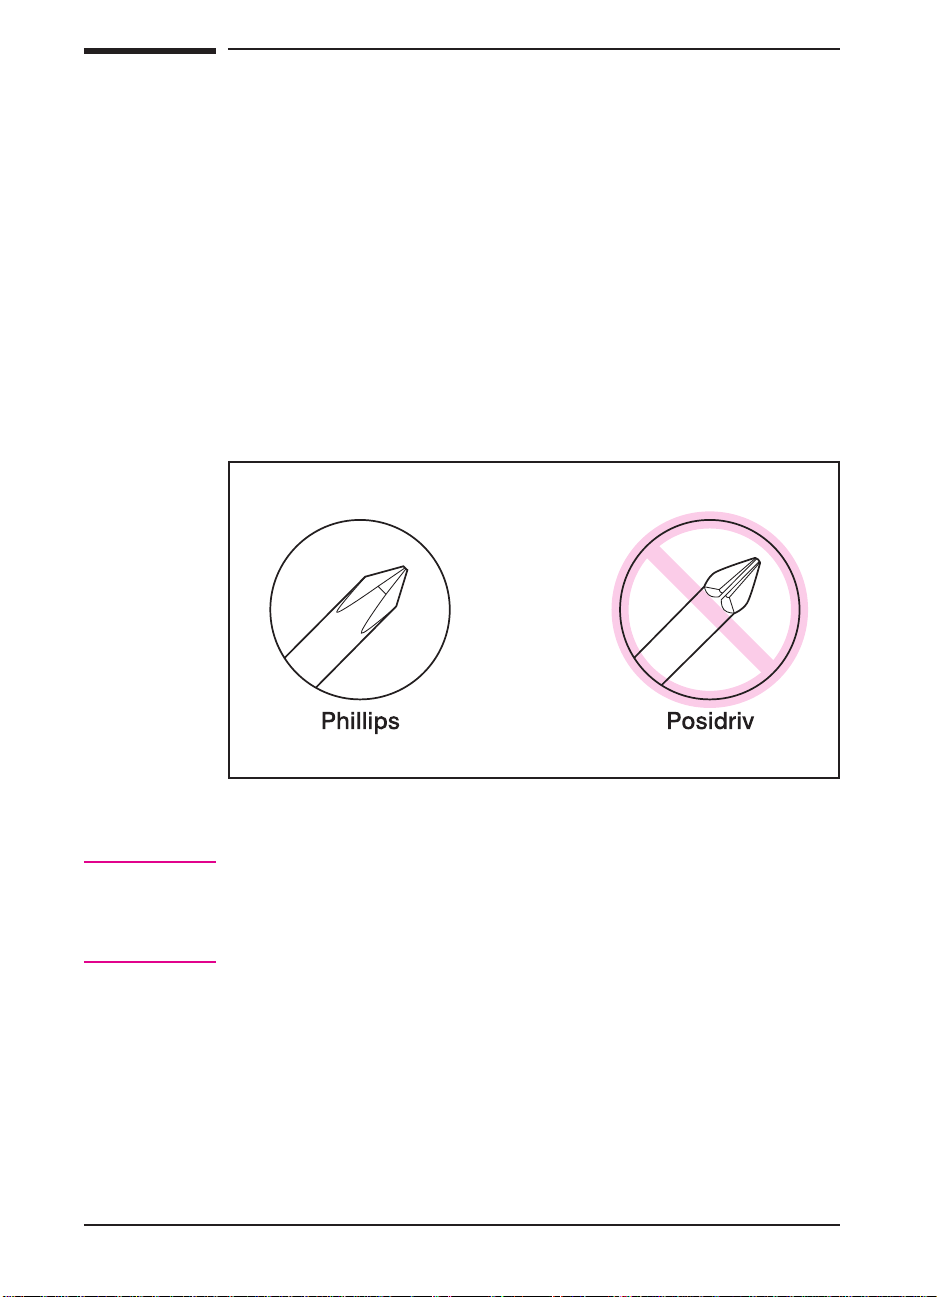
Figure 2-1
Required Tools
• #2 Phillips screwdriver (6-inch [152 mm] shaft)
• Small flat-blade screwdriver
• Small needle-nose pliers
• T-10, T-15, and T-20 Torx driver (6-inch shaft) for the Multibin Mailbox
All components in the 2000-sheet Input Tray use Phillips-head screws
that require a #2 Phillips screwdriver. Make sure that you have a Phillips
screwdriver and not a Posidriv screwdriver. Figure 2-1 shows the
difference between a Phillips and a Posidriv screwdriver. Note that the
Phillips tip has more beveled surfaces.
Phillips versus Posidriv Screwdrivers
Caution
2-2 Removal and Replacement
To install a self-tapping screw, first turn it counterclockwise to align it
with the existing thread pattern. Then carefully turn it clockwise to
tighten it. Do not over-tighten it. If a self-tapping screw hole becomes
stripped, either repair the screw hole or replace the affected assembly.
Page 30
2000-sheet Input Tray Removal and
Replacement
WARNING!
Note Reinstallation is generally the reverse of the removal process. Carefully
For the procedures in this section, the printer and all accessories must be
unplugged. Before attempting to service the 2000-sheet Input Tray,
unplug the power cord from the power source; otherwise, severe injury
may result.
The printer and accessories may have sharp edges that could cause
injury.
follow any additional instructions provided under “To Reinstall.”
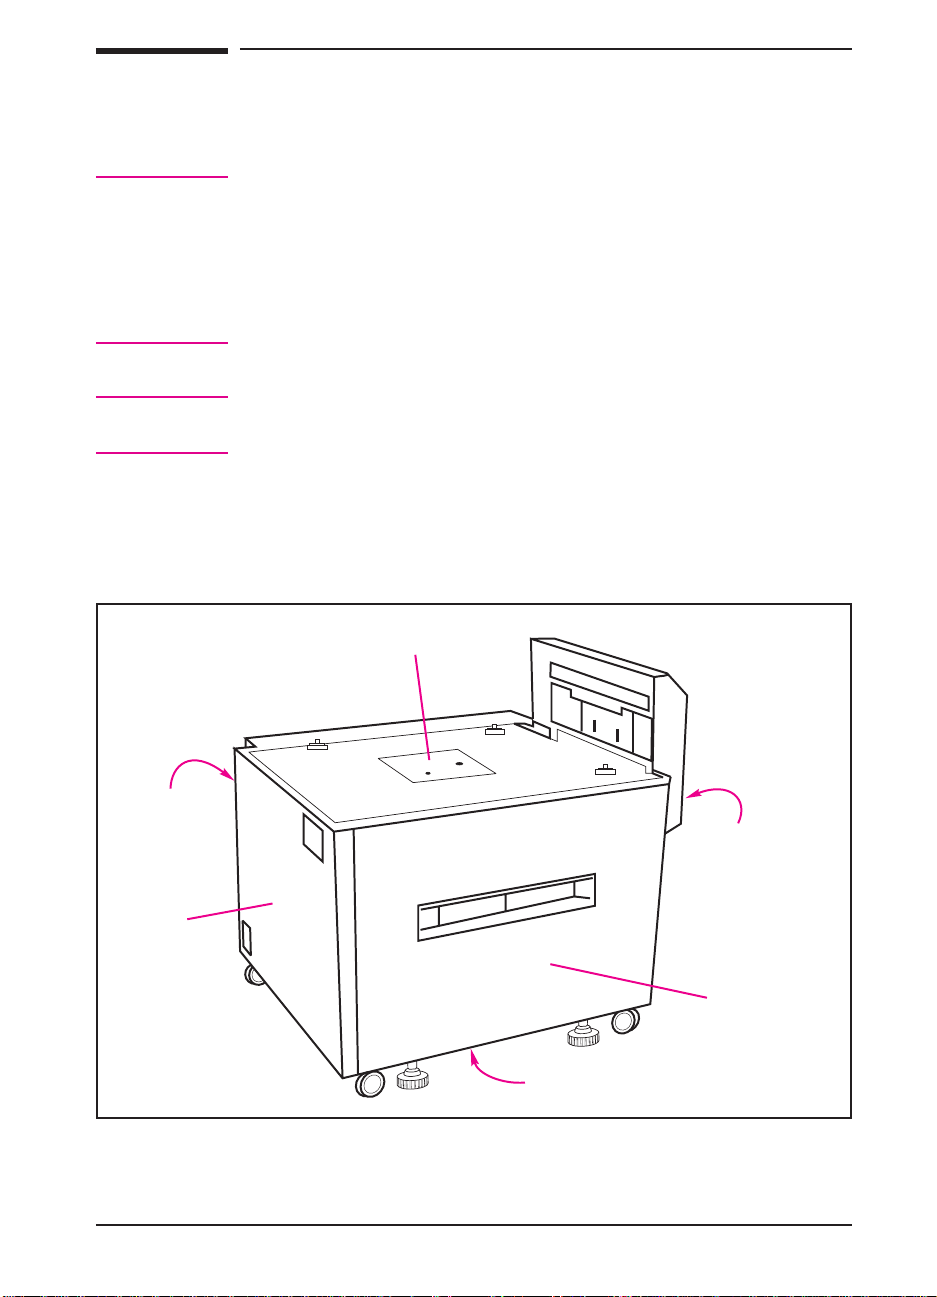
2000-sheet Input Tray Orientation
Figure 2-2 shows the orientation of the 2000-sheet Input Tray as it is
referred to in this section.
Top
Back
Left
Figure 2-2 2000-sheet Input Tray Orientation
Right
Front
Bottom
Removal and Replacement 2-3
Page 31

Figure 2-3
2000-sheet Input Tray Front Cover
1 Open the paper tray on the 2000-sheet Input Tray to the stops (Figure
2-3).
2 Remove the Paper Limit Back Plate from the paper tray (callout 1).
3 Remove the 4 screws in the front of the tray: 3 screws at the top of the
tray and 1 screw on the front-right side of the tray (callout 2).
4 Using a flat-blade screwdriver, release the plastic retaining tabs at the
left- and right-front sides of the tray (callout 3).
5 Carefully lift up on the Front Cover, and then pull it out to release the
plastic retaining tabs that secure the bottom of the Front Cover to the
tray chassis (callout 4).
To Reinstall:
1 Replace all the plastic retaining tabs properly (callout 4).
2 Reinstall the front adjustable plate, and configure it properly (callout 1).
3 Reinstall the cassette-size labels.
2000-sheet Input Tray Front Cover
2-4 Removal and Replacement
Page 32

Figure 2-4
2000-sheet Input Tray Back Cover
1 Make sure that the power cord for the 2000-sheet Input Tray is
unplugged from the power source.
2 Remove the 4 screws that secure the Back Cover of the 2000-sheet Input
Tray to the chassis: 1 screw on each corner (Figure 2-4, callout 1).
3 Pull the Back Cover out from the chassis.
To Reinstall:
1 Insert the tab on the lower-left corner into its alignment slot.
2000-sheet Input Tray Back Cover
Removal and Replacement 2-5
Page 33

Figure 2-5
2000-sheet Input Tray Left Cover
1 Unplug the power cord and the C-link interface cables from the
2000-sheet Input Tray.
2 Remove the 2 screws that are located at the top of the 2000-sheet Input
Tray’s Left Cover: 1 screw near each corner (Figure 2-5, callout 1).
3 Remove the Left Cover from the unit:
a Pull out on the top of the Left Cover, and then lift up on the Left
Cover’s right side to clear the retaining tabs that are along the Left
Cover’s bottom edge (callout 2).
b Pull out on the Left Cover’s lower-left corner to release the plastic
retainer tab that secures that corner of the cover to the chassis
(callout 3).
To Reinstall:
1 Replace the left side of the Left Cover first (callout 3).
2 Tilt the right side of the Left Cover down and toward the chassis to place
the lower retaining tabs over the chassis rail (callout 2).
2000-sheet Input Tray Left Cover
2-6 Removal and Replacement
Page 34

Figure 2-6
2000-sheet Input Tray Right Cover
1 Remove the Vertical Transfer Unit (VTU) from the 2000-sheet Input
Tray (see Figure 2-18).
2 Remove the 2 screws that are located near the middle of the 2000-sheet
Input Tray’s Right Cover: 1 screw on each side (Figure 2-6, callout 1).
3 Using a flat-blade screwdriver, release the plastic retaining tab that
secures the Right Cover’s upper-left corner to the chassis (callout 2).
4 To remove the Right Cover, carefully pull out on the top of the cover
while lifting it upward to clear the retaining tabs that are along the
cover’s bottom edge.
To Reinstall:
1 Place the retaining tabs that are along the Right Cover’s bottom edge
over the chassis rail.
2 Reinstall the VTU (see Figure 2-18).
2000-sheet Input Tray Right Cover
Removal and Replacement 2-7
Page 35

Figure 2-7
2000-sheet Input Tray Main Drive Assembly
1 Remove the Back Cover from the 2000-sheet Input Tray (see Figure
2-4).
2 Locate the cable that runs from the Main Drive Assembly on the
2000-sheet Input Tray to the unit’s Controller PCA. Disconnect the
cable from the J206 connector on the Controller PCA (Figure 2-7,
callout 1).
3 Release the cable from the 2 cable clips that hold the cable to the chassis
(callout 2).
4 Remove the 2 screws that connect the Main Drive Assembly to the
chassis: 1 screw on top of the Main Drive Assembly and 1 screw on the
bottom (callout 3).
5 Pull the Main Drive Assembly away from the chassis.
6 Inspect the Paper Deck Drive Bushing on the Main Drive Assembly. If
the bushing is damaged, it can be replaced without replacing the whole
drive assembly.
To Reinstall:
1 Reroute the cable through the cable clips (callout 2) and reconnect the
cable to the J206 connector on the Controller PCA (callout 1).
2000-sheet Input Tray Main Drive Assembly
2-8 Removal and Replacement
Page 36

Figure 2-8
2000-sheet Input Tray Paper Tray
1 Open the paper tray on the 2000-sheet Input Tray and remove any
unused paper.
2 Remove the Vertical Transfer Unit (VTU) from the 2000-sheet Input
Tray (see Figure 2-18).
3 Remove the Left and Right Covers from the 2000-sheet Input Tray (see
Figure 2-5 and Figure 2-6).
4 Remove the 2 screws and metal retaining tabs from the sides of the
unit’s chassis: 1 screw and retaining tab on each side of the chassis
(Figure 2-8, callout 1).
5 Slide the paper tray straight out of the chassis while carefully supporting
the rear of the paper tray.
To Reinstall:
1 Make sure that the retaining tabs are tightly secured to the unit’s chassis
(callout 1).
2 After replacing the tray, print a test page. If the print is too close to the
paper’s edge, adjust the tray. (For instructions, see the HP LaserJet
8000, 8000 N, 8000 DN, and HP Mopier 240 Printers Service Manual.)
2000-sheet Input Tray Paper Tray
Removal and Replacement 2-9
Page 37

Figure 2-9
2000-sheet Input Tray Main Cable Harness
1 Remove the Back Cover from the 2000-sheet Input Tray (see Figure
2-4).
2 Locate and disconnect the 6 cable connectors that connect the Main
Cable Harness to the Controller PCA on the 2000-sheet Input Tray
(Figure 2-9, callout 1).
3 Locate and disconnect the 5 cable connectors that connect the Main
Cable Harness to the unit’s chassis (callout 2).
4 Release the cable harness from the 4 cable clips that hold the harness to
the unit’s chassis (callout 3).
To Reinstall:
1 Properly replace all 11 cable harness connectors (callouts 1 and 2).
2 Reattach the harness to the 4 cable clips that hold the harness to the
unit’s chassis (callout 3).
2000-sheet Input Tray Main Cable Harness
2-10 Removal and Replacement
Page 38

Figure 2-10
2000-sheet Input Tray Controller PCA
1 Remove the Back and Left Covers from the 2000-sheet Input Tray (see
Figure 2-4 and Figure 2-5).
2 Disconnect the 11 cables from the Controller PCA on the 2000-sheet
Input Tray (Figure 2-10, callout 1).
3 Remove the 4 hex screws that secure the 2 C-link cable connectors to
the metal base (callout 2).
4 Remove the 2 screws that secure the right side of the Controller PCA to
the metal base (callout 3).
5 Release the 2 plastic retaining posts that secure the left side of the
Controller PCA to the metal base (callout 4), and then pull the
Controller PCA out from the unit’s chassis.
To Reinstall:
1 Seat the Controller PCA firmly onto the plastic retaining posts that
secure the left side of the Controller PCA to the metal plate on the
chassis (callout 4).
2 Properly reconnect all 11 cables to the Controller PCA (callout 1).
3 Make sure that the DIP switches on the Controller PCA are in the
normal setting (off) (callout 5). (See Table 3-1.)
2000-sheet Input Tray Controller PCA
Removal and Replacement 2-11
Page 39

Figure 2-11
2000-sheet Input Tray Front LED PCA Assembly
1 Open the paper tray on the 2000-sheet Input Tray halfway to the stops.
2 On the upper-left corner of the front of the unit’s chassis, locate and
remove the 1 screw that secures the LED PCA Assembly to the chassis
(Figure 2-11, callout 1).
3 Reach behind the LED PCA Assembly and pull it away from the chassis.
4 To remove the LED PCA from the cable connector, release the 3 plastic
retaining tabs that secure the LED PCA to the connector (Figure 2-11,
callout 2).
5 Pull the LED PCA from the connector.
To Reinstall:
1 Reconnect the LED PCA to the connector (callout 2).
2000-sheet Input Tray Front LED PCA
2-12 Removal and Replacement
Page 40

Figure 2-12
2000-sheet Input TrayPickup Assembly
1 Remove the Vertical Transfer Unit (VTU) from the 2000-sheet Input
Tray (see Figure 2-18).
2 Remove the Right Cover from the 2000-sheet Input Tray (see Figure
2-6).
3 Open the paper tray on the 2000-sheet Input Tray to the stops.
4 Disconnect the 3 cables that are located at the bottom-right side of the
Pickup Assembly (Figure 2-12, callout 1).
5 Remove the 5 screws that secure the Pickup Assembly to the unit’s
chassis: 3 screws along the top, and 1 screw on each side (callout 2).
6 Slide the Pickup Assembly straight out of the chassis.
To Reinstall:
1 Make sure that the paper tray is open to easily slide the Pickup
Assembly into the chassis.
2 Make sure that the Pickup Assembly is seated properly in the locating
slots (callout 3).
3 Reconnect the 3 cables that are located at the bottom-right side of the
Pickup Assembly (callout 1).
2000-sheet Input Tray Pickup Assembly
Removal and Replacement 2-13
Page 41

Figure 2-13
There are three photosensors on the Pickup Assembly:
• one to sense that the Transfer Assembly is closed (Figure 2-13,
callout 1).
• one to sense that the tray has raised the paper to the proper height
(callout 2).
• one to sense that the tray is empty (callout 3).
To remove a photosensor:
1 Remove the Pickup Assembly (see Figure 2-12).
2 Unplug the connector from the sensor.
3 Release the side-oriented retaining tabs and rotate the sensor to free the
end-oriented retaining tabs on the opposite end.
2000-sheet Input Tray Pickup Assembly Photosensors
2-14 Removal and Replacement
Page 42

Figure 2-14
2000-sheet Input Tray Power Supply
1 Remove the Back and Left Covers from the 2000-sheet Input Tray (see
Figure 2-4 and Figure 2-5).
2 Locate the cable that runs from the Controller PCA on the 2000-sheet
Input Tray to the unit’s Power Supply (Figure 2-14, callout 1).
Disconnect the cable from the Power Supply by pushing on the retaining
tab that is located behind the cable connector (callout 2).
3 Remove the 2 screws that secure the Power Supply to the chassis
(callout 3).
4 Lift the Power Supply upward to clear the locating tabs underneath, and
then slide the Power Supply to the left to free it from the chassis
(callout 4).
To Reinstall:
1 Carefully align the locating tabs so that they are positioned correctly.
2 Reconnect the cable that runs from the Power Supply to the Controller
PCA on the 2000-sheet Input Tray (callout 1). The cable connector is
seated properly when it clicks.
2000-sheet Input Tray Power Supply
Removal and Replacement 2-15
Page 43

2000-sheet Input Tray Pickup, Feed, and
Separation Rollers
Three rollers in the 2000-sheet Input Tray pick up paper and feed it to
the printer:
• The Pickup Roller is the upper-forward roller (Figure 2-15, callout 1).
• The Feed Roller is the upper-rear roller (callout 2).
• The Separation Roller is the lower roller (callout 3).
Note The Feed and Separation Rollers in the 2000-sheet Input Tray are
interchangeable with each other and with the Feed and Separation
Rollers in trays 2 and 3 on the printer. Additionally, the Pickup Roller in
the 2000-sheet Input Tray is interchangeable with the Pickup Rollers in
trays 2 and 3 on the printer.
The Feed and Separation Rollers have protruding retaining tabs that
secure the rollers to their respective shafts. The retaining tab on the
Pickup Roller is recessed.
Note
The Feed and Separation Rollers must be replaced every 350,000
images. The two rollers are included in the following HP LaserJet 8000,
8000 N, and 8000 DN maintenance kit: C3971B (110V), C3972B
(220V). The kit contains all the necessary parts for the required user
maintenance procedure.
To Remove the Feed and Separation Rollers
1 Open the Vertical Transfer Unit (VTU) on the 2000-sheet Input Tray.
2 Locate the rollers inside the tray cavity. To remove a roller, pinch the
retainer tabs together and slide the roller off the shaft. Remove the Feed
Roller (upper-rear roller) first. Then remove the Separation Roller
(lower roller).
To Remove the Pickup Roller
1 Open the paper tray on the 2000-sheet Input Tray to the stops.
2 Remove the Left Cover from the 2000-sheet Input Tray (see Figure 2-5).
3 Locate the Pickup Roller inside the tray cavity.
4 Pinch the recessed retainer tab on the roller, and slide the roller off the
shaft.
2-16 Removal and Replacement
Page 44

To Reinstall:
1 If all three rollers were removed, reinstall the Pickup Roller first
(callout 1).
2 When reinstalling the Feed and Separation Rollers, install the Separation
Roller (lower roller) first (callout 3). Then install the Feed Roller
(upper-rear roller) (callout 2).
3 When installing a roller, listen for a click. It signals that the roller is
secured onto the shaft.
Note
Figure 2-15
Avoid letting the rollers fall into the tray cavity.
2000-sheet Input Tray Rollers: Pickup, Feed, and Separation
Removal and Replacement 2-17
Page 45

2000-sheet Input Tray Paper Quantity Switch
Assembly
1 Remove the Back Cover from the 2000-sheet Input Tray (see Figure
2-4).
2 Locate the cable that runs from the Paper Quantity Switch Assembly on
the 2000-sheet Input Tray to the unit’s Controller PCA. Disconnect the
cable from the Controller PCA (J205 connector), and then free the cable
from the cable clips that secure it to the chassis (Figure 2-16, callout 1).
3 Remove the 1 screw (callout 2) and the metal retaining spring (callout 3)
that hold the switch assembly in place.
4 Pull the switch assembly out of its cavity (Figure 2-17, callout 1).
To Reinstall:
1 When reinstalling the metal retaining spring that holds the switch
assembly in place (Figure 2-16, callout 2), seat the retaining spring onto
the locating pins that are on the chassis.
2 Reconnect the switch assembly’s cable to the J205 connector on the
Controller PCA (Figure 2-16, callout 1).
2000-sheet Input Tray Paper Size Switch
Assembly
1 Remove the Back Cover from the 2000-sheet Input Tray (see Figure
2-4).
2 Locate the cable that runs from the Paper Size Switch Assembly on the
2000-sheet Input Tray to the unit’s Controller PCA. Disconnect the
cable from the Controller PCA (J204 connector) (Figure 2-16, callout 4).
3 Remove the 1 screw (callout 5) and the metal retaining spring (callout 6)
that hold the switch assembly in place.
4 Pull the switch assembly out of its cavity (Figure 2-17, callout 2).
To Reinstall:
1 When reinstalling the metal retaining spring that holds the switch
assembly in place (Figure 2-16, callout 5), seat the retaining spring onto
the locating pins on the chassis.
2 Reconnect the switch assembly’s cable to the J204 connector on the
Controller PCA (Figure 2-16, callout 4).
2-18 Removal and Replacement
Page 46

Figure 2-16
Figure 2-17
2000-sheet Input Tray Paper Size and Paper Quantity Switch
Assemblies (1 of 2)
2000-sheet Input Tray Paper Size and Paper Quantity Switch
Assemblies (2 of 2)
Removal and Replacement 2-19
Page 47

2000-sheet Input Tray VTU
1 Open the Vertical Transfer Unit (VTU) on the 2000-sheet Input Tray.
2 Rotate the 2 plastic cams on the VTU hinges toward the 2000-sheet
Input Tray to the secure position (Figure 2-18, callout 1).
WARNING!
WARNING!
Figure 2-18
Do not release the plastic cams from the secure position while the VTU
is off. The springs on the cams are very strong and may cause injury.
3 Locate the 2 cables that run from the VTU to the chassis at the right
side’s upper-back corner (Figure 2-18, callout 2) and disconnect the 2
cables from the chassis.
4 Remove the 2 screws that secure the VTU to the chassis: 1 screw near
each end of the VTU (Figure 2-18, callout 3).
5 Lift the VTU straight up to clear the metal locating tabs on the chassis.
To Reinstall:
Release the plastic cams only after tightening the screws that secure the
VTU to the chassis.
1 Before tightening the screws, make sure that the metal locating tabs are
in place.
2 Reconnect the cables that run from the VTU to the chassis at the right
side’s upper-back corner (callout 2).
2000-sheet Input Tray Vertical Transfer Unit (VTU)
2-20 Removal and Replacement
Page 48

Figure 2-19
2000-sheet Input Tray Tension Springs
1 Remove the Left Cover of the 2000-sheet Input Tray (see Figure 2-5).
2 Open the paper tray on the 2000-sheet Input Tray all the way to the
stops.
3 Inside the tray cavity, locate and remove the 2 springs on the tray
runners: 1 spring on left runner (left side of the chassis) and 1 spring on
the right runner (right side of the chassis) (Figure 2-19).
2000-sheet Input Tray Tension Springs
Removal and Replacement 2-21
Page 49

Figure 2-20
2000-sheet Input Tray Locating Pins
1 Remove the printer from the 2000-sheet Input Tray. (For instructions,
see the HP LaserJet 8000, 8000 N, 8000 DN, and HP Mopier 240
Printers Service Manual.)
2 Locate the 3 Locating Pins on the top of the 2000-sheet Input Tray
(Figure 2-20, callout 1), and remove the 2 screws on each Locating Pin.
3 Remove the Locating Pins by lifting them straight up.
2000-sheet Input Tray Locating Pins
2-22 Removal and Replacement
Page 50

Figure 2-21
2000-sheet Input Tray Outriggers (Stabilizing
Feet)
1 Remove the printer from the 2000-sheet Input Tray. (For instructions,
see the HP LaserJet 8000, 8000 N, 8000 DN, and HP Mopier 240
Printers Service Manual.)
2 Tip the 2000-sheet Input Tray onto its left side.
3 Locate the Outriggers on the bottom of the unit: 2 on the front side and 1
on the right side (callout 1).
4 Remove an Outrigger by sliding the entire foot assembly (Outrigger and
metal bar) out of its metal channel while pushing the end of the foot
assembly toward the chassis (callout 2).
To Reinstall:
1 Reinstall the protective cover (end cap) onto each foot assembly.
2000-sheet Input Tray Outriggers
Removal and Replacement 2-23
Page 51

Figure 2-22
2000-sheet Input Tray Casters
1 Remove the printer from the 2000-sheet Input Tray. (For instructions,
see the HP LaserJet 8000, 8000 N, 8000 DN, and HP Mopier 240
Printers Service Manual.)
2 Tip the 2000-sheet Input Tray onto its left side.
3 Locate the 4 Casters, 1 on each corner of the chassis (Figure 2-22,
callout 1).
4 Remove a Caster by removing the 2 screws that hold the Caster to the
chassis (callout 2).
To Reinstall:
1 Tighten the screws securely when reinstalling each caster (callout 2).
2000-sheet Input Tray Casters
2-24 Removal and Replacement
Page 52

Figure 2-23
2000-sheet Input Tray Adjustable Foot
1 Remove the printer from the 2000-sheet Input Tray. (For instructions,
see the HP LaserJet 8000, 8000 N, 8000 DN, and HP Mopier 240
Printers Service Manual.)
2 Tip the 2000-sheet Input Tray onto its left side.
3 Locate the Adjustable Foot (Figure 2-23, callout 1), and remove the 2
screws that secure the Adjustable Foot to the chassis (callout 2).
2000-sheet Input Tray Adjustable Foot
Removal and Replacement 2-25
Page 53

Multibin Mailbox Removal and
Replacement
WARNING!
Note
For the procedures in this section, the printer and all accessories must be
unplugged. Before attempting to service a Multibin Mailbox, unplug the
power cord from the power source; otherwise, severe injury may result.
This printer and accessories may have sharp edges that could cause
injury.
Reinstallation is generally the reverse of the removal process. Carefully
follow any additional instructions provided under “To Reinstall.”
Multibin Mailbox Orientation
Figure 2-24 shows the orientation of the Multibin Mailbox as it is
referred to in this section.
Top
Back
Left
Figure 2-24 Multibin Mailbox Orientation
2-26 Removal and Replacement
Right
Front
Bottom
Page 54

Multibin Mailbox Front and Back Covers
Note
WARNING!
Figure 2-25
The procedures for removing the Front and Back Covers are the same.
However, before removing the Back Cover, disconnect the Power
Supply cable that connects the Multibin Mailbox Power Supply to the
Multibin Mailbox Controller PCA.
Unplug the power cord from the Multibin Mailbox Power Supply, and
then unplug the Multibin Mailbox Power Supply cable from the
Multibin Mailbox Controller PCA.
1 Remove the Multibin Mailbox from the printer. (For instructions, see the
HP LaserJet 8000, 8000 N, 8000 DN, and HP Mopier 240 Printers
Service Manual.)
2 For each cover, using a small flat-blade screwdriver, release the 3
retaining tabs that secure the cover to the right side of the Multibin
Mailbox frame (callout 1), and rotate the cover outward to release it
from the frame.
To Reinstall:
1 Insert the retaining tabs that secure each cover to the left side of the
Multibin Mailbox frame, and then snap the opposite edge of each cover
into position.
Multibin Mailbox Covers (Front and Back)
Removal and Replacement 2-27
Page 55

Figure 2-26
Multibin Mailbox Top Cover
1 Remove the Front and Back Covers from the Multibin Mailbox (see
Figure 2-25).
2 Locate the User Status LED PCA at the upper-front side of the Multibin
Mailbox frame (Figure 2-26, callout 1), and disconnect the cable from
the LED PCA.
3 Remove the LED PCA by removing the 1 screw that secures the LED
PCA to the Multibin Mailbox frame (callout 2).
4 Remove the 2 screws closest to the upper-right side of the Multibin
Mailbox: 1 screw on the front and back sides of the Multibin Mailbox
frame (callout 3).
5 Pull and lift the Top Cover from the Multibin Mailbox frame.
To Reinstall:
1 After reinstalling the Top Cover, reattach the User Status LED PCA
(callout 1), and then reconnect the cable to the LED PCA.
Multibin Mailbox Top Cover
2-28 Removal and Replacement
Page 56

Figure 2-27
Multibin Mailbox Power Supply
1 Locate the cable that runs from the Multibin Mailbox Power Supply
down to the Multibin Mailbox Controller PCA, and disconnect the cable
from the Controller PCA (Figure 2-27, callout 1).
2 Remove the Power Supply from the Back Cover of the Multibin
Mailbox by pressing the plastic retaining tabs that are on each side of
the Power Supply (callout 2).
To Reinstall:
1 Align the Power Supply with the mounting holes that are on the Back
Cover so that the retaining tabs on the Power Supply (callout 2) fit into
their respective slots.
2 Reconnect the Power Supply Cable to the Multibin Mailbox Controller
PCA (callout 1).
Multibin Mailbox Power Supply
Removal and Replacement 2-29
Page 57

Figure 2-28
Multibin Mailbox Paper Bins and Blind Cover
The procedure for removing a paper bin and the Blind Cover is the
same. Each bin rests in its labeled slot.
1 Remove the Left Output Bin first. Lift up on the outer edge of the bin to
clear the retaining notch in the frame, and then pull the bin away from
the Multibin Mailbox frame (callout 1).
2 Remove the Blind Cover.
3 Remove each Standard Output Bin, starting at the top and working down
in sequence.
To Reinstall:
1 Slide a bin into its designated slot, and then lower the bin into the
retaining notch in the frame.
2 Replace the paper bins, beginning with the bottom Standard Output Bin
and continuing upward in order.
3 Place the Blind Cover between Standard Output Bin 1 and the Left
Output Bin.
Multibin Mailbox Paper Bins and Blind Cover
2-30 Removal and Replacement
Page 58

Multibin Mailbox Flipper Assembly
1 Remove all the paper bins and the Blind Cover from the Multibin
Mailbox (see Figure 2-28).
2 Remove the Front, Back, and Top Covers from the Multibin Mailbox
(see Figure 2-25 and Figure 2-26).
3 Remove the 2 screws closest to the upper-left side of the Multibin
Mailbox: 1 screw on the front and back sides of the Multibin Mailbox
frame (Figure 2-29, callouts 1).
4 Hold down the Jam Access Door while unplugging the ground wire that
runs from the Input Paper Guide to the Flipper Motor (Figure 2-30,
callout 2).
5 Unplug the Flipper Assembly’s 3 cables from the connectors that are
located on the Multibin Mailbox unit’s back side (Figure 2-29, callout 3).
6 Using a flat-blade screwdriver, release the plastic retaining tab that
secures the Flipper Assembly to the top of the Multibin Mailbox frame
(Figure 2-31, callout 4).
7 Hold down the Jam Access Door, and pull out the Flipper Assembly
(Figure 2-31, callout 5).
To Reinstall:
1 Hold down the Jam Access Door to reconnect the ground wire to the
Flipper Motor (Figure 2-30, callout 2).
2 Route the Flipper Assembly’s 3 cables through the back side of the
Multibin Mailbox frame and reconnect the 3 cables to the connectors
(Figure 2-29, callout 3).
Caution Do not over-tighten the screws that secure the Flipper Assembly to the
Multibin Mailbox frame. The nuts in the Flipper Assembly could rotate
in their slots.
Removal and Replacement 2-31
Page 59

Figure 2-29
Figure 2-30
Multibin Mailbox Flipper Assembly (1 of 3)
Multibin Mailbox Flipper Assembly (2 of 3)
2-32 Removal and Replacement
Page 60

Figure 2-31
Multibin Mailbox Flipper Assembly (3 of 3)
Removal and Replacement 2-33
Page 61

Figure 2-32
Multibin Mailbox Delivery Head Motor
1 Remove the Back Cover from the Multibin Mailbox (see Figure 2-25).
2 Locate the cable that runs from the Delivery Head Motor down to the
Multibin Mailbox Controller PCA, and disconnect the cable from the
connector in the middle of the Multibin Mailbox frame (Figure 2-32,
callout 1).
3 Remove the 2 screws that secure the Delivery Head Motor to the
Multibin Mailbox frame (callout 2).
4 Pull the Delivery Head Motor away from the Multibin Mailbox frame.
To Reinstall:
1 Position the motor in the Multibin Mailbox frame so that the cable
grommets face down.
2 Reconnect the motor’s cable to the connector in the middle of the frame
(callout 1).
Multibin Mailbox Delivery Head Motor
2-34 Removal and Replacement
Page 62

Multibin Mailbox Transport Belt Motor
1 Remove the Back Cover from the Multibin Mailbox (see Figure 2-25).
2 Remove all the paper bins and the Blind Cover from the Multibin
Mailbox (see Figure 2-28).
3 Release the Controller PCA Assembly from the bottom of the Multibin
Mailbox frame (see Figure 2-38, steps 1 through 7).
4 Locate the cable that runs from the Transport Belt Motor to the Multibin
Mailbox Controller PCA, and disconnect the cable from the J8
connector on the Controller PCA (Figure 2-33, callout 1).
5 Remove the 2 screws (and washers) that secure the Transport Belt Motor
to the Multibin Mailbox frame (callout 2).
Caution
Figure 2-33
When pulling out the motor, be careful to not damage the internal drive
belt.
6 Gently pull out the motor.
To Reinstall:
1 Reroute the cable on the Transport Belt Motor behind the flat cable, and
connect it to the J8 connector on the Multibin Mailbox Controller PCA
(callout 1).
2 Reinstall the Multibin Mailbox Controller PCA Assembly (see Figure
2-38).
3 Replace the internal drive belt onto the Transport Belt Motor’s gear
before replacing and tightening the screws that secure the motor to the
frame.
Multibin Mailbox Transport Belt Motor
Removal and Replacement 2-35
Page 63

Figure 2-34
Multibin Mailbox Input Paper Guide
1 Remove the Multibin Mailbox from the printer. (For instructions, see the
HP LaserJet 8000, 8000 N, 8000 DN, and HP Mopier 240 Printers
Service Manual.)
2 Remove the Left Output Bin and the Blind Cover from the Multibin
Mailbox (see Figure 2-28).
3 Hold down the Jam Access Door while unplugging the ground wire that
runs from the Input Paper Guide to the Flipper Motor (Figure 2-34,
callout 1).
4 Use a flat-blade screwdriver to release the retaining tabs that secure the
Input Paper Guide to the upper-right side of the Multibin Mailbox
(Figure 2-35, callout 2).
5 Pull the Input Paper Guide free of the frame (callout 3) while routing the
ground wire that connects to the end of the paper guide through the
wire’s access hole (callout 4).
To Reinstall:
1 Reroute the ground wire through its access hole (Figure 2-35, callout 4).
2 Reconnect the ground wire to the Flipper Motor (Figure 2-34, callout 1).
3 Replace the Left Output Bin and the Blind Cover (see Figure 2-28).
Multibin Mailbox Input Paper Guide (1 of 2)
2-36 Removal and Replacement
Page 64

Figure 2-35
Multibin Mailbox Input Paper Guide (2 of 2)
Removal and Replacement 2-37
Page 65

Multibin Mailbox Metal Tape and Housing
Assembly
1 Remove all the paper bins and the Blind Cover from the Multibin
Mailbox (see Figure 2-28).
WARNING!
The Metal Tape’s sharp edges can cause serious injury. When rewinding
the Metal Tape into its housing, hold the tape securely and rewind it
slowly.
2 With the Delivery Head Assembly at the top of the Multibin Mailbox,
hold the Metal Tape near the end, and push and release the retainer tab
that secures the end of the tape to the top of the Multibin Mailbox frame
(Figure 2-36, callout 1). Then let the tape slowly rewind into its housing.
3 Remove the 1 screw that secures the Static Brush to the Delivery Head
Assembly (callout 2), and then move the Static Brush out of the way.
4 Lower the Delivery Head Assembly halfway to the stops.
5 Using a flat-blade screwdriver, release the plastic retaining tabs located
on each side of the tape housing (Figure 2-37, callout 3).
6 Gently pull on the Delivery Head Assembly to remove the end of the
tape from behind the rollers that hold the tape in its track (callout 4).
Then pull the tape housing toward you to remove it.
To Reinstall:
1 Thread the end of the Metal Tape behind the rollers (callout 4), and then
pull the end of the tape to the top of the Multibin Mailbox and reinsert it
into place (Figure 2-36, callout 1).
2 Use the guide pins to reinstall the tape housing (Figure 2-37, callout 3).
When the housing is correctly positioned, it will click into place.
3 Reinstall the static brush (Figure 2-36, callout 1).
2-38 Removal and Replacement
Page 66

Figure 2-36
Figure 2-37
Multibin Mailbox Metal Tape and Housing Assembly (1 of 2)
Multibin Mailbox Metal Tape and Housing Assembly (2 of 2)
Removal and Replacement 2-39
Page 67

Multibin Mailbox Controller PCA
1 Remove the Multibin Mailbox from the printer. (For instructions, see the
HP LaserJet 8000, 8000 N, 8000 DN, and HP Mopier 240 Printers
Service Manual.)
2 Locate the power cable that runs from the Multibin Mailbox Power
Supply down to the Multibin Mailbox Controller PCA, and disconnect
the cable from the Controller PCA (Figure 2-38, callout 1).
3 Disconnect the C-link cable from the Multibin Mailbox Controller PCA
(callout 2).
4 Remove all paper bins and the Blind Cover from the Multibin Mailbox
(see Figure 2-28).
5 Carefully lay the Multibin Mailbox onto its front side.
6 Loosen the 1 grounding screw and the 2 self-tapping screws that secure
the Controller PCA to the bottom-right side of the Multibin Mailbox
frame (callout 3).
7 Remove the 2 self-tapping screws that secure the Controller PCA to the
bottom-left side of the Multibin Mailbox frame (callout 4).
8 Open the metal box to reveal the Controller PCA.
9 Disconnect the 8 cables from the Controller PCA (Figure 2-39,
callout 5).
To Reinstall:
1 Reconnect the 8 cables to the connectors on the Multibin Mailbox
Controller PCA (callout 5).
Figure 2-38
Multibin Mailbox Controller PCA (1 of 2)
2-40 Removal and Replacement
Page 68

Figure 2-39
Multibin Mailbox Controller PCA (2 of 2)
Removal and Replacement 2-41
Page 69

Figure 2-40
Multibin Mailbox Anticurl Strings
1 Remove the Back Cover, all the paper bins, and the Blind Cover from
the Multibin Mailbox (see Figure 2-25 and Figure 2-28).
2 At the lower-left side of the Multibin Mailbox frame, locate the Tension
Springs on the Anticurl Strings, and remove the 2 screws that secure the
springs to the frame (Figure 2-40, callout 1).
3 Remove the Anticurl Strings from the lower pulleys (callout 2).
4 Remove the Delivery Head Assembly from the Multibin Mailbox frame
(see Figure 2-42).
5 Release the upper ends of the Anticurl Strings from the Jam Access
Door by pushing the retaining tabs that secure the strings to the Jam
Access Door (Figure 2-41, callout 3).
To Reinstall:
1 Reverse the procedure given above.
Multibin Mailbox Anticurl Strings (1 of 2)
2-42 Removal and Replacement
Page 70

Figure 2-41
Multibin Mailbox Anticurl Strings (2 of 2)
Removal and Replacement 2-43
Page 71

Multibin Mailbox Delivery Head Assembly
1 Remove the Back Cover from the Multibin Mailbox (see Figure 2-25).
2 Remove all the paper bins and the Blind Cover from the Multibin
Mailbox (see Figure 2-28).
WARNING!
The Metal Tape’s sharp edges can cause serious injury. When rewinding
the Metal Tape into its housing, hold the tape securely and rewind it
slowly.
3 With the Delivery Head Assembly at the top of the Multibin Mailbox,
hold the Metal Tape near the end, and release the retainer tab that
secures the end of the tape to the top of the Multibin Mailbox frame
(Figure 2-42, callout 1). Then let the tape slowly rewind into its housing.
4 At the lower-left side of the Multibin Mailbox frame, locate the Tension
Springs on the Anticurl Strings, and remove the 2 screws that secure the
springs to the frame (Figure 2-43, callout 2).
5 Remove the Anticurl Strings from the lower pulleys (callout 3).
6 On the back side of the Multibin Mailbox, release the flat ribbon cable
from the cable clip that secures the cable to the Multibin Mailbox frame
(Figure 2-44, callout 4), and gently disconnect the flat ribbon cable from
the Delivery Head Assembly (callout 5).
7 Raise the Delivery Head Assembly to the top of the Multibin Mailbox
frame.
8 Hold up the Delivery Head Assembly,and remove the 2 screws that
secure it to the elevator mounts: 1 screw on each end of the assembly
(Figure 2-42, callout 6). The screw that secures the back end is captive.
9 Rotate the Delivery Head Assembly clockwise while guiding the back
end out of its access opening (see Figure 2-45).
10 Release the Anticurl Strings from the pulleys on each end of the
Delivery Head Assembly (Figure 2-45, callout 7).
To Reinstall:
1 Replace the Anticurl Strings into the pulleys on the ends of the Delivery
Head Assembly.
2 Reinstall the Delivery Head Assembly onto its elevator mounts and
secure it with the screws. Make sure that the locating pins are in place.
3 Replace the Tension Springs on the Anticurl Strings at the bottom of the
frame with the T-10 Torx screws (Figure 2-43, callout 2).
4 Snap the Anticurl Strings into the pulleys at the bottom of the frame
(Figure 2-43, callout 3).
5 Reconnect the flat ribbon cable to the Delivery Head Assembly, and
secure the cable to the frame with the cable clip (Figure 2-44, callouts 4
and 5).
6 Make sure that the Delivery Head Assembly moves up and down freely.
2-44 Removal and Replacement
Page 72

Figure 2-42
Figure 2-43
Multibin Mailbox Delivery Head Assembly (1 of 4)
Multibin Mailbox Delivery Head Assembly (2 of 4)
Removal and Replacement 2-45
Page 73

Figure 2-44
Figure 2-45
Multibin Mailbox Delivery Head Assembly (3 of 4)
Multibin Mailbox Delivery Head Assembly (4 of 4)
2-46 Removal and Replacement
Page 74

Multibin Mailbox Interlock Switch
1 Remove the Back Cover from the Multibin Mailbox (see Figure 2-25).
Caution Before removing the wires from the Multibin Mailbox Interlock Switch,
note the location of each wire. Replacing the wires incorrectly can
damage the Interlock Switch.
2 Inside the back side of the Multibin Mailbox frame, disconnect the 2
wires from the Interlock Switch (Figure 2-46, callout 1).
3 Remove the Interlock Switch by pressing together the 2 retaining tabs
that hold the switch in place (callout 2).
To Reinstall:
1 Reconnect the wires in the correct positions (callout 1).
Figure 2-46
Multibin Mailbox Interlock Switch
Removal and Replacement 2-47
Page 75

Figure 2-47
Multibin Mailbox Diagnostic LED PCA
1 Locate the Diagnostic LED that is on the back side of the Multibin
Mailbox (Figure 2-47, callout 1).
2 Remove the Back Cover from the Multibin Mailbox (see Figure 2-25).
3 Disconnect the 2 flat cables from the Diagnostic LED PCA (Figure
2-48, callout 2).
4 Remove the 1 screw that secures the Diagnostic LED PCA to the
Multibin Mailbox frame (callout 3).
5 Pull the Diagnostic LED PCA away from the Multibin Mailbox frame.
Multibin Mailbox Diagnostic LED PCA (1 of 2)
2-48 Removal and Replacement
Page 76

Figure 2-48
Multibin Mailbox Diagnostic LED PCA (2 of 2)
Removal and Replacement 2-49
Page 77

Figure 2-49
Multibin Mailbox User Status LED PCA
1 Locate the User Status LED PCA that is on the upper-front side of the
Multibin Mailbox (Figure 2-49, callout 1).
2 Remove the Front Cover from the Multibin Mailbox (see Figure 2-25).
3 Disconnect the cable from the User Status LED PCA (Figure 2-50,
callout 2).
4 Remove the 1 screw that secures the LED PCA to the Multibin Mailbox
frame (callout 3).
5 Pull the LED PCA away from the Multibin Mailbox frame.
Multibin Mailbox User Status LED PCA (1 of 2)
2-50 Removal and Replacement
Page 78

Figure 2-50
Multibin Mailbox User Status LED PCA (2 of 2)
Removal and Replacement 2-51
Page 79

Multibin Mailbox Adjustable and Fixed Casters
Note
Figure 2-51
The procedures for removing the Adjustable and Fixed Casters are the
same.
1 Remove the Multibin Mailbox from the printer. (For instructions, see the
HP LaserJet 8000, 8000 N, 8000 DN, and HP Mopier 240 Printers
Service Manual.)
2 Carefully lay the Multibin Mailbox onto its front side.
3 Remove the 1 screw that secures the caster to the Multibin Mailbox
frame (Figure 2-51, callout 1).
4 Remove the Caster.
Multibin Mailbox Adjustable and Fixed Casters
2-52 Removal and Replacement
Page 80

Figure 2-52
Multibin Mailbox Attachment Assembly
1 Disconnect the power cable and the C-link cable from the Multibin
Mailbox Controller PCA (see Figure 2-38, callouts 1 and 2).
2 Release the Controller PCA from the Multibin Mailbox frame, but leave
the wire cables connected to the Controller PCA (see Figure 2-39).
3 Set the Controller PCA on top of the Multibin Mailbox unit (Figure
2-52, callout 1).
4 Remove the E-clip (callout 2).
5 Release the pivot pin that holds the Attachment Assembly’s rod to the
Multibin Mailbox frame.
6 Remove the attachment assembly.
To Reinstall:
1 Replace the E-clip.
2 Reconnect the C-link cable and the power cable to the Controller PCA.
Multibin Mailbox Attachment Assembly
Removal and Replacement 2-53
Page 81

2-54 Removal and Replacement
Page 82

Troubleshooting
Overview
This chapter provides additional troubleshooting information for the
2000-sheet Input Tray,Multibin Mailbox (MBM), and Duplexer. Use
this information with the HP LaserJet 8000, 8000 N, and 8000 DN
Printers Service Manual.
3
Troubleshooting 3-1
Page 83

Troubleshooting Approach
This section provides a systematic approach to identifying the causes of
malfunctions and errors on the paper-handling accessories that attach to
the printer.
As a first step, confirm that the printer is turned on and is displaying a
readable message on the control panel display. It must indicate READY,
OFFLINE,orPOWERSAVE ON for a normal operating condition.
Otherwise, an error message will be displayed and logged in the Event
Log. With the printer’s test menu, you can access the Event Log to
display more specific information about the current error. The Event
Log can be printed or displayed.
Print the Event Log
The printer’s internal Event Log stores the most recent errors and can be
printed at any time. To print the Event Log:
1
Press [Menu] until INFORMATION MENU appears.
2
Press [Item] until PRINT EVENT LOG appears.
3 Press [Select] to print the Event Log.
Display the Event Log
If the printer cannot print or move any paper, follow these steps to
display the Event Log:
1
Press [Menu] until INFORMATION MENU appears.
2
Press [Item] until SHOW EVENT LOG appears.
3 Press [Select] to show the Event Log.
4 Press [+] or [-] to scroll through the Event Log.
5 Write down the error messages. For example:
6 Check the Event Log for specific error trends in the last 10,000 printed
pages.
7 Ask the customer for any observed error trends. (For example, do paper
jams tend to occur in a specific area of the printer?)
3-2 Troubleshooting
Page 84

8 Record any specific error trends and review “Interpret Event Log” in
chapter 7 of the HP LaserJet 8000, 8000 N, 8000 DN, and HP Mopier
240 Printers Service Manual.
9 See the alphabetical and numerical Event Log tables in “Printer
Messages” in chapter 7 of the HP LaserJet 8000, 8000 N, 8000 DN, and
HP Mopier 240 Printers Service Manual, and follow the recommended
action.
10
If the control panel displays READY, OFFLINE,orPOWERSAVE ON ,goto
the next section. If not, restart at step 1.
Interpret the Event Log
After printing the Event Log:
• Check the Event Log for specific error trends in the last 10,000 printed
pages.
• Ask the user for any observed error trends.
• Record any specific error trends.
• See the alphabetical and numerical Event Log tables in “Printer
Messages” in chapter 7 of the HP LaserJet 8000, 8000 N, 8000 DN, and
HP Mopier 240 Printers Service Manual to interpret the Event Log.
Before interpreting the Event Log or performing any intervention, print
and evaluate a configuration page
Print a Configuration Page
Use the configuration page to verify the proper installation of the
paper-handling accessories.
1
Press [Menu] until until INFORMATION MENU appears.
2
Press [Item] until PRINT CONFIGURATION appears.
3 Press [Select] to print the configuration pages.
After printing the configuration page:
• Make sure that the configuration page shows that the accessories are
installed.
• If any of the installed accessories are not shown on the configuration
page, check the corresponding cable connections. Make sure that the
C-link cabling is correctly connected and functional and that DC power
is available to the paper-handling accessories.
Troubleshooting 3-3
Page 85

Formatter
Number:
Division use
only.No
functionality or
accessibility
The default
S/N is aaxxyy
999999.Toset
the correct
S/N, see the
Service
Manual.
Formatter and
firmware
datacode and
version
number.
Check the
Total Memory
to see if it
corresponds
with what is
physically
installed in the
printer.
All the paper
handling
accessories that
are physically
present should
be listed. Verify
that each
accessory is
connected
according to
Figure 3-3.
The three most
recent
messages
display here.
Figure 3-1 Sample Configuration Page
The
configuration
page normally
shows:device
1=input, device
2=output, and
device
3=stapler.
3-4 Troubleshooting
Page 86

Figure 3-2
Sample Menu Page
Troubleshooting 3-5
Page 87

Figure 3-3
C-link Communication Cables
The architecture of the communication link (C-link) allows the
Paper-handling Controller PCA on the printer to control five external
paper-handling accessories that are properly connected in a daisy chain
(see Figure 3-3). While the Paper-handling Controller PCA has only one
output port, all C-link supported accessories have input and output ports
to provide the different connecting combinations. The following figure
shows the C-link daisy chain.
C-link Cables, Supported Daisy-chain Connections
3-6 Troubleshooting
Page 88

Paper Path Test
Using the information from the Event Log, you can verify a specific
printer paper path with the paper path test. You must first set the desired
paper destination in the configuration menu and then select the paper
path test. The paper path test menu will allow you to select the desired
paper source and number.
Note
Note
If the Multibin Mailbox is installed, in order to perform the paper path
test, the printer must be configured to mailbox mode. If the printer is not
in mailbox mode, ask the JetAdmin administrator to change the
configuration to the mailbox mode to complete this test.
To perform a paper path test:
1
Press [Menu] until INFORMATION MENU appears.
2
Press [Item] until PRINT PAPER PATH TEST appears.
3 Press [Select].
4 Press [+] or [-] until the desired input tray appears.
5 Press [Select].
6 Press [+] or [-] until the desired output bin appears.
7 Press [Select].
8 Press [+] or [-] until the desired duplex mode appears.
9 Press [Select].
10 Press [+] or [-] to choose the desired number of copies.
11 Press [Select].
To stop the paper path test, select CANCEL JOB on the control panel
button.
Troubleshooting 3-7
Page 89

Figure 3-4
Paper Path Test Source and Output Selection
3-8 Troubleshooting
Page 90

Messages Structure
Note
Note
See the HP LaserJet 8000, 8000 N, 8000 DN, and HP Mopier 240
Printers Service Manual for this information.
Error Messages
See the HP LaserJet 8000, 8000 N, 8000 DN, and HP Mopier 240
Printers Service Manual for this information.
Troubleshooting 3-9
Page 91

2000-sheet Input Tray Standalone
Diagnostics
The 2000-sheet Input Tray can run standalone diagnostic tests to test the
accessory’s motors, functionality, and sensors. You will need one power
cord, one #2 Phillips screwdriver, and a small flat-blade screwdriver for
the DIP switches.
Table 3-1 DIP Switch Settings
NORMAL
SETTING
OFF
POSITION
TEST
SETTING
ON
POSITION
DIP Switch Normal Motor Test Standalone
Running Test
1 Off On On Off
2 Off On Off Off
3 Off Off Off On
4 Off On On On
Sensor Test
2000-sheet Input Tray Motor Test
This test verifies that the three motors on the 2000-sheet Input Tray are
functioning properly.
1 Identify the Back Cover (opposite from the tray door). Remove the four
screws in the Back Cover. Remove the Back Cover.
2 Pull open the paper tray, and open the Vertical Transfer Unit (VTU).
3 Set the DIP switches on the Controller PCA to Motor Test Mode. (See
Table 3-1 for an explanation of the DIP switch settings.)
4 To turn the Power Supply switch to Diagnostic Mode pull out on the
blue handle.
• If the motors are working properly, you will hear them as they rotate
continuously.
• If the motors do not rotate, replace the corresponding
field-replaceable unit: either the Paper Pickup Assembly, the VTU, or
the Paper Deck Drive Assembly.
5 To stop the test, set the power switch back to Operational Mode (push
in), and reset the DIP switches on the Controller PCA to the off position
(see Table 3-1).
3-10 Troubleshooting
Page 92

2000-sheet Input Tray Standalone Running Test
This test verifies that the 2000-sheet Input Tray is functioning properly.
For this test, use the LED located on the Controller PCA on the
2000-sheet Input Tray.(See Table 3-2 for an interpretation of the LED
patterns.)
Caution
If the 2000-sheet Input Tray is setting underneath the printer, paper jams
may occur because the printer will not pick up the paper. To prevent
excessive paper jams during this test, feed only 6 to 8 pages.
1 Make sure that paper is in the tray.
2 Set the DIP switches on the Controller PCA for standalone running
mode (see Table 3-1 for an explanation of the settings).
3 To set the power supply switch to Diagnostic Mode, pull the blue power
supply switch outward. The motors will start. Paper should now be lifted
from the tray and fed through the VTU.
• If the unit does not work properly, the lower Service LED on the
Controller PCA flashes in a pattern that indicates the problem. (See
Table 3-2 for an interpretation of the LED patterns.)
4 To stop the test, set the power supply switch back to Operational Mode,
and set the DIP switches on the Controller PCA to the off position (see
Table 3-1). Open the VTU, and remove any media from the paper path.
2000-sheet Input Tray Sensor Test
This test manually activates the sensors on the 2000-sheet Input Tray to
test if they are working properly.
1 Set the DIP switches on the Controller PCA for sensor test mode. (See
Table 3-1 for an explanation of the settings.)
2 For each paper sensor:
a Pull open the paper tray, and open the VTU.
b Remove the metal spring that holds the sensor unit in place (secured
by 1 screw). (See Figure 2-16, callouts 2 and 5.)
c Pull out the sensor unit.
3 To set the power supply switch to Diagnostic Mode, pull the blue power
supply switch outward.
4 To manually activate each sensor, press it in with your finger.
• When you activate the sensor, the bottom Service LED on the
Controller PCA comes on. When you release the sensor, the LED
goes off.
• If the LED does not come on, there is a problem with the sensor.
Replace the corresponding field-replaceable unit.
Troubleshooting 3-11
Page 93

5 To stop the test, set the power supply switch back to Operational Mode,
and set the DIP switches on the Controller PCA to the off position (see
Table 3-1).
Note
Be sure to turn the power supply off and set all the DIP switches to the
off position (normal settings) when you finish the diagnostics or the unit
will not work properly. Then, replace the back cover.
2000-sheet Input Tray LED Status Interpretation
If the 2000-sheet Input Tray is working properly,it will pick up paper
from the tray and feed it through the VTU, and the bottom Service LED
will flash regularly every 0.5 seconds.
Table 3-2 2000-sheet Input Tray LED StatusInterpretation
Long
(1 sec.)
Short
(0.3 sec.)
3 1 Lifter Malfunction Make sure that the tray lifts freely by lifting it by hand. Make
2 1 Registration Sensor Delay Jam The media does notreach the sensor.Open the VTU door,
2 2 Registration Sensor Station
2 3 Jam Sensor Delay Jam The media did not reach thesensor.Open theVTU door,
2 4 Jam Sensor Stationary
1 1 VTU Door Open Close the door.
1 2 PaperTrayOpen
Description Recommended Action
sure that the paper sizeplates are correctly installed (in the
same corresponding slots) and are notbent.If neitherof
these is the problem, replace
Tray 4.
and remove the media. Replace the VTU assembly or the
paper pickup assembly.
Jam/Initial Jam
Jam/Initial Jam
Open the VTU door, and remove the media.Check the
sensors, and replace the corresponding field-replaceable
unit.
and remove the media. Replace the VTU orthe paper
pickup assembly.
Open the VTU door, and remove the media.
Close the tray.
Wrong Size Paper Loaded
1 3 No Paper in Tray Load paper, or check the sensors.
Load the correct size ofpaper, orcheck the sensors.
Note If the LED does not come on, replace the Paper Deck PCA or the
Universal PowerSupply Assembly.
3-12 Troubleshooting
Page 94

Figure 3-5
Multibin Mailbox Standalone Diagnostics
The standalone diagnostics are designed to test the accessory’s motors
and functionality without connection to the printer. Note that the
diagnostics do not test the functionality of the stapler. You will need one
power cord and a small flat-blade screwdriver for the power supply
switch.
Multibin Mailbox LEDs Description
The Multibin Mailbox has two sets of LEDs:
• User LED. The first is a single LED located on the right side of the top
cover (Figure 3-5, callout 1). This User LED provides information to the
end user about the Multibin Mailbox power-on status and the attachment
and alignment to the printer.
• Service LEDs. The second set is formed by three independent LEDs
located in the middle of the left side cover (Figure 3-5, callout 2). This
group is called the Service LEDs, and they show additional technical
information to decode the Multibin Mailbox status.
Multibin Mailbox LEDs Description
Troubleshooting 3-13
Page 95

Figure 3-6
Multibin Mailbox Standalone Diagnostic Test
Each time you run the standalone diagnostic test, proceed as follows:
1 Turn off the printer, and pull the Multibin Mailbox away from the printer.
2 With the Multibin Mailbox unplugged, configure the Multibin Mailbox
power supply switch to the test mode by sliding the power supply switch
up with a small flat-blade screwdriver (Figure 3-6, callout 1).
Multibin Mailbox Power Supply Test Mode Switch
3 Plug in the power cord. The User LED should be solid green, and the
Service LEDs should be ‘Off, Solid Red, Off’ to indicate the test mode
has been entered.
Note
Be sure to reset the power supply switch to the normal operation when
you finish the diagnostics; otherwise the unit will not work properly.
Power-on Test
1 Push the Multibin Mailbox interlock switch and keep it pressed. A
sequence of tests will begin to test the device.
2 The head assembly will move up and down twice, scanning that all unit
bins are properly installed and that all unit motors have started.
3 At the end of the power-on test, the flipper motor remains on and waits
for paper to be fed.
4 The User LED remains solid green and the service LEDs remain ‘Off,
Solid Red, Off’ as an indication that the power-on test was successful.
3-14 Troubleshooting
Page 96

5 If a problem exists, an error code will be shown in the Service LEDs.
(See table 3-3 for an interpretation of the LEDs.)
Multibin Mailbox Paper Path Test
1 If the power-on test is successful, then manually feed paper through the
input paper guide in the horizontal position.
2 The paper will pass across the flipper assembly and move down to the
bottom bin by the double belt system through the head assembly.
3 If after feeding several pages the paper path test is successful, then
reattach the Multibin Mailbox to the printer.
4 If a problem exists, an error code will be shown in the Service LEDs.
(See table 3-3 for an interpretation of the LEDs.)
Note
Be sure to reset the power supply switch to the normal operation when
you finish the diagnostics; otherwise the unit will not work properly.
Multibin Mailbox LEDs Status Interpretation
[] = solid green
[] = solid red
[] = blinking red
[] = solid amber
[] = blinking amber
[] = blank
Table 3-3 Multibin Mailbox LED Status Interpretation
Message Description User
LED
MBM Ready
The Multibin Mailbox was
successfully connected and
initialized by the printer.
PowerSave Mode
The Multibin Mailbox is in
PowerSave mode.
Service
LEDs
[] []
[]
[]
[] []
[]
[]
Recommended Action
No action required.
No action required.
Self-test Mode
The Multibin Mailbox is in test
mode.
MBM Unlatched from the Printer
The Multibin Mailbox is not
properly attached to the printer.
[] []
[] []
• Run the power-on test.
[]
[]
[]
[]
• Run the paper path test.
• Check for proper alignment.
• Check the attachment clips.
• Check the Adjustable Casters.
• Check the Interlock Switch.
Troubleshooting 3-15
Page 97

Table 3-3 Multibin Mailbox LED Status Interpretation, Continued
Message Description User
LED
Left Output Bin Is Too Full
The Left Output Bin has too much
paper and it has reached the
PSFaceUpflat, avoiding the
flipping operation.
Jam in Flipper Area
A time-out condition occurred at
the entry area.
Jam in Belt
A time-out condition occurred in
the TransportBelt.
Service
LEDs
[] []
[] []
[] []
Recommended Action
• Remove the paperfrom the Left
[]
[]
[]
[]
[]
[]
Output Bin.
• Check for a stuck Sensor Flag.
• Replace the Flipper Assembly.
• Check for the proper cable
connections.
• Open the Jam Access Door, and
check for a paper jam or an
out-of-place Flipper Assembly
shaft.
• Check for a stuck paper sensor.
• Replace the Flipper Assembly.
• Replace the Multibin Mailbox
PCA.
• Check for paper jammed at the
Transport Belt system/ Delivery
Head Assembly.
• Makesure that the Transport
Belt (both belts) move freely.
• Make sure that the belts are
parallel in the Transport Belt
system.
• Makesure that the Metal Tape is
in place and in good condition.
• Replace the Transport BeltMotor.
• Replace the Multibin Mailbox
PCA.
• Replace the Delivery Head
Assembly.
3-16 Troubleshooting
Page 98

Table 3-3 Multibin Mailbox LED Status Interpretation, Continued
Message Description User
LED
Jam in Delivery Head Assembly
A time-out condition occurred in
the PSExit1 sensor.
Jam in the Delivery Head
Position System
The elevator motor detected an
invalid window when scanning.
Service
LEDs
[] []
[] []
Recommended Action
• Check for paper jammed in the
[]
[]
[]
[]
Delivery Head Assembly.
• Make sure that both the PSExit1
and PSExit-2 sensors on the
Delivery Head Assembly move
freely.
• Make sure that the fingers are
over the Ejector Rollers on the
Delivery Head Assembly.
• Replace the flat ribbon cable that
connects to the Delivery Head
Assembly.
• Replace the Delivery Head
Assembly.
• Replace the Multibin Mailbox
PCA.
• Make sure that the Blind Cover
and Scan Bar are installed
properly.
• Check for paper jammed in the
Transport Belt System and the
Delivery Head Assembly.
• Make sure that the Delivery
Head Assembly(up and down)
moves freely.
• Make sure that all paper bins are
seated correctly.
• Make sure that the paper bins
and the Blind Cover are not
broken.
• Replace the Delivery Head
PositionMotor.
• Replace the Delivery Head
Assembly.
• Replace the Multibin Mailbox
PCA.
Slider Problem at the Head
Assembly
The sliders do not activatethe
slider photosensor.
[] []
• Check for paper jammed in the
[]
[]
Delivery Head Assembly.
• Make sure that all the paper bins
are seated correctly.
• Replace the Delivery Head
Assembly.
Troubleshooting 3-17
Page 99

Table 3-3 Multibin Mailbox LED Status Interpretation, Continued
Message Description User
LED
Wrong Page Request
A page request was received with
an invalid output bin or invalid
paper sizeinformation.
Flipper Error
During the flipper calibration, an
abnormal reference voltage was
encountered.
External Memory Error
The MultibinMailbox’s nonvolatile
RAM (NVRAM) is damaged.
Service
LEDs
[] []
[] []
[] []
Recommended Action
• Check the bin destination.
[]
[]
[]
[]
[]
[]
• Check the paper size
configuration.
• Turn on the printer.
• Check for paper jammed in the
Flipper Assembly area.
• Check the cables connections.
• Replace the Flipper Assembly.
• Replace the Multibin Mailbox
PCA.
• Replace the Multibin Mailbox
PCA.
3-18 Troubleshooting
Page 100

General Troubleshooting Information
Note
See the HP LaserJet 8000, 8000 N, 8000 DN, and HP Mopier 240
Family Printers Service Manual for this information.
Wiring Diagrams
The following are wiring diagrams for the 2000-sheet Input Tray and
Multibin Mailbox. See the HP LaserJet 8000, 8000 N, 8000 DN, and
HP Mopier 240 Family Printers Service Manual for wiring diagrams for
the other printer components.
Troubleshooting 3-19
 Loading...