

Page 1
HP LaserJet 5Si/5Si MX/5Si NX
Printer User’s Guide
English
Page 2

HP LaserJet 5Si/5Si MX/5Si NX
Printer
User’s Guide
Page 3

© Copyright HewlettPackard Company, 1996
All Rights Reserved.
Reproduction,
adaptation, or
translation without prior
written permission is
prohibited, except as
allowed under the
copyright laws.
Publication number
C3166-90952
First edition,
December 1996
Warranty
The information
contained in this
document is subject to
change without notice.
Hewlett-Packard
makes no warranty of
any kind with regard
to this material,
including, but not
limited to, the implied
warranties of
merchantability and
fitness for a particular
purpose.
Hewlett-Packard shall
not be liable for errors
contained herein or for
incidental or
consequential damages
in connection with the
furnishing, performance,
or use of this material.
Trademark Credits
Adobe™, PostScript™ ,
and PostScript II
™
are
trademarks of Adobe
Systems Incorporated
which may be registered
in certain jurisdictions.
Arial, Times New
Roman, and Monotype
are registered
trademarks of the
Monotype Corporation.
Bi-Tronics™, PCL5™ ,
and REt™ are
trademarks of
Hewlett-Packard
Company. Helvetica and
Univers are trademarks
of Linotype AG and/or
its subsidiaries in the
U.S. and other
countries. Macintosh
computer is a product of
Apple Computer, Inc.
Microsoft® and
Windows® are U.S.
registered trademarks of
Microsoft Corporation.
Novell™ is a trademark
of Novell, Incorporated.
TrueType™ is a
trademark of Apple
Computer, Inc.
Hewlett-Packard Company
11311 Chinden Boulevard
Boise, Idaho 83714
Page 4

Conventions
This manual uses the following conventions:
Italics are used for emphasis or to refer to another document.
COMPUTER FONT indicates text visible on a computer screen.
DISPLAY FONT indicates text visible on the printer control panel display.
The cursive letter l is used in examples to distinguish the letter l from
the numeral 1 (one). The character 0 is used in examples to distinguish
the numeral 0 from the letter O.
[Key Face] indicates keys (such as [On]Line] ) on the printer control
panel.
[Key Face] indicates keys (such as [Insert] ) on your computer
keyboard.
Note Notes contain important information about a topic in the text.
CAUTION Caution messages appear before procedures which, if not observed,
could result in loss of data or in damage to equipment.
WARNING Warning messages alert you to a specific procedure or practice
which, if not followed correctly, could cause serious personal injury.
iii
Page 5
Supplementary Documents
The technical reference guides listed below are designed for
programmers. The Paper Specification Guide is useful for purchasing
agents and paper buyers. These documents are available in English only.
You can order these documents through HP Direct Distribution or by
contacting your authorized HP dealer. (See Appendix E for a list of HP
sales and service offices.) There is a charge for some documents.
Documentation Available for the HP LaserJet 5Si/5Si MX/5Si NX Printers
Title Part Number
The
PCL/PJL Technical Reference Package
documents:
•
PCL 5 Printer Language Technical Reference Manual
Explains the PCL 5 printer language for experienced users and
programmers.
•
Printer Job Language Technical Reference Manual
Explains HP’s Printer Job Language (PJL) for experienced users and
programmers.
•
PCL/PJL Technical Quick Reference Guide
contains the following
5010-3997
•
PCL Comparison Guide
Describes the different implementation of commands and extensions
across the printer family supporting PJL and PCL 5.
HP LaserJet Printer Family Paper Specification Guide
HP JetDirect Print Server Software Installation Guide
The following related documents provide further information about the
PostScript printer language:
• The PostScript Language Reference Manual (Adobe)
• PostScript Language Supplements (Adobe)
Also check the README files that come with the software.
iv
5010-6394
5963-6599
Page 6

TABLE OF CONTENTS
Conventions . . . . . . . . . . . . . . . . . . . . . . . . . . . . i-iii
Supplementary Documents . . . . . . . . . . . . . . . . . . . . i-iv
1 About Your Printer
Introduction . . . . . . . . . . . . . . . . . . . . . . . . . . . . 1-1
Standard Features of the HP LaserJet 5Si/5Si MX/5Si NX Printer 1-4
Paper Handling . . . . . . . . . . . . . . . . . . . . . . . . . 1-4
Memory Management . . . . . . . . . . . . . . . . . . . . . 1-5
Printing System . . . . . . . . . . . . . . . . . . . . . . . . . 1-5
Input/Output . . . . . . . . . . . . . . . . . . . . . . . . . . 1-6
Energy Efficiency . . . . . . . . . . . . . . . . . . . . . . . . 1-6
EconoMode . . . . . . . . . . . . . . . . . . . . . . . . . . . 1-6
PCL Fonts . . . . . . . . . . . . . . . . . . . . . . . . . . . . 1-7
Special Features of the HP LaserJet 5Si MX Printer . . . . . . . 1-8
Additional Memory . . . . . . . . . . . . . . . . . . . . . . . 1-8
Networking Capabilities . . . . . . . . . . . . . . . . . . . . 1-8
PostScript Fonts . . . . . . . . . . . . . . . . . . . . . . . . . 1-9
Special Features of the HP LaserJet 5Si NX Printer . . . . . . . 1-10
Memory Management . . . . . . . . . . . . . . . . . . . . . 1-10
Networking Capabilities . . . . . . . . . . . . . . . . . . . . 1-10
Printer Parts . . . . . . . . . . . . . . . . . . . . . . . . . . . . 1-11
Accessories and Options . . . . . . . . . . . . . . . . . . . . . . 1-13
The Optional Printer Hard Disk . . . . . . . . . . . . . . . . . . 1-14
2 Memory and Memory Management
Introduction . . . . . . . . . . . . . . . . . . . . . . . . . . . . 2-1
Storing Print Data . . . . . . . . . . . . . . . . . . . . . . . . . 2-2
Saving Resources . . . . . . . . . . . . . . . . . . . . . . . . 2-2
Determining Memory Requirements . . . . . . . . . . . . . . . 2-3
Improving Performance with I/O Buffering . . . . . . . . . . 2-4
3 Printer Software
Printing System . . . . . . . . . . . . . . . . . . . . . . . . . . 3-1
Drivers . . . . . . . . . . . . . . . . . . . . . . . . . . . . . . . 3-3
What is a Driver? . . . . . . . . . . . . . . . . . . . . . . . . 3-3
HP LaserJet 5Si/5Si MX/5Si NX Printer Drivers . . . . . . . 3-4
Software Components . . . . . . . . . . . . . . . . . . . . . . . 3-6
End-User Software . . . . . . . . . . . . . . . . . . . . . . . 3-6
Network Administrator Software . . . . . . . . . . . . . . . . 3-7
EN TABLE OF CONTENTS-1
Page 7

4 Printer Control Panel
Introduction . . . . . . . . . . . . . . . . . . . . . . . . . . . . . 4-1
Control Panel Layout . . . . . . . . . . . . . . . . . . . . . . . . 4-2
Indicator Lights . . . . . . . . . . . . . . . . . . . . . . . . . . 4-2
Control Panel Keys . . . . . . . . . . . . . . . . . . . . . . . . 4-3
Control Panel Display . . . . . . . . . . . . . . . . . . . . . . 4-4
Settings and Defaults . . . . . . . . . . . . . . . . . . . . . . . 4-5
Control Panel Menus . . . . . . . . . . . . . . . . . . . . . . . . 4-7
Selecting a Menu Item . . . . . . . . . . . . . . . . . . . . . . 4-7
Tray Menu . . . . . . . . . . . . . . . . . . . . . . . . . . . . 4-8
Job Control Menu . . . . . . . . . . . . . . . . . . . . . . . . 4-9
Test Menu . . . . . . . . . . . . . . . . . . . . . . . . . . . . 4-10
PCL Menu . . . . . . . . . . . . . . . . . . . . . . . . . . . 4-23
Configuration Menu . . . . . . . . . . . . . . . . . . . . . . 4-24
Print Quality Menu . . . . . . . . . . . . . . . . . . . . . . . 4-26
PostScript Menu . . . . . . . . . . . . . . . . . . . . . . . . 4-27
Input/Output (IO) Menu . . . . . . . . . . . . . . . . . . . . 4-28
5 Print Tasks
Introduction . . . . . . . . . . . . . . . . . . . . . . . . . . . . . 5-1
Print Source and Media Options . . . . . . . . . . . . . . . . . . 5-2
Media Selection Guidelines . . . . . . . . . . . . . . . . . . . 5-3
Media Use Guidelines . . . . . . . . . . . . . . . . . . . . . . 5-5
Paper Trays 1, 2, 3, and (optional) Tray 4 . . . . . . . . . . . . . . 5-8
Loading Media Into Tray 1 (Multi-purpose) . . . . . . . . . . . 5-9
Loading Paper into Tray 2 or Tray 3 . . . . . . . . . . . . . . 5-11
Optional 2000 Sheet Input Tray . . . . . . . . . . . . . . . . . . 5-13
Loading Paper into Tray 4 . . . . . . . . . . . . . . . . . . . 5-14
Envelopes in Tray 1 . . . . . . . . . . . . . . . . . . . . . . . . 5-16
Loading Envelopes into Tray 1 . . . . . . . . . . . . . . . . . 5-17
Printing Envelopesfrom YourSoftware Application . . . . . 5-18
Optional Envelope Feeder . . . . . . . . . . . . . . . . . . . . . 5-19
Printing from the Optional Envelope Feeder . . . . . . . . . . 5-19
Changing Media Type and Size from the Control Panel . . . . . 5-21
Output Bins . . . . . . . . . . . . . . . . . . . . . . . . . . . . 5-22
Selecting the Left Output Bin . . . . . . . . . . . . . . . . . 5-25
Adjusting the Paper Stop . . . . . . . . . . . . . . . . . . . . 5-26
Printing to the Multibin Mailbox or Mailbox with Stapler . . 5-27
Stapling Documents . . . . . . . . . . . . . . . . . . . . . . 5-28
Different First Page . . . . . . . . . . . . . . . . . . . . . . . . 5-30
Custom Size Paper in Tray 1 . . . . . . . . . . . . . . . . . . . 5-31
Printing on the Smallest-Sized Paper . . . . . . . . . . . . . 5-31
Printing Bleeds . . . . . . . . . . . . . . . . . . . . . . . . . 5-32
Two-Sided Printing with the Duplex Unit . . . . . . . . . . . . . 5-33
Binding Options . . . . . . . . . . . . . . . . . . . . . . . . 5-34
Selecting Two-Sided Printing from the Control Panel . . . . . 5-34
Stopping a Print Request . . . . . . . . . . . . . . . . . . . . . 5-35
TABLE OF CONTENTS-2 EN
Page 8

6 Print Quality
Introduction . . . . . . . . . . . . . . . . . . . . . . . . . . . . 6-1
Print Resolution . . . . . . . . . . . . . . . . . . . . . . . . . . 6-2
Changing the Print Resolution Setting from the Control Panel 6-2
Print Density . . . . . . . . . . . . . . . . . . . . . . . . . . . . 6-3
Adjusting Print Density from the Control Panel . . . . . . . . 6-3
Resolution Enhancement . . . . . . . . . . . . . . . . . . . . . 6-4
Activating REt from the Control Panel . . . . . . . . . . . . . 6-4
Solving Print Quality Problems . . . . . . . . . . . . . . . . . . 6-5
EconoMode . . . . . . . . . . . . . . . . . . . . . . . . . . . . 6-9
Turning on EconoMode . . . . . . . . . . . . . . . . . . . . . 6-10
7 Maintenance and Troubleshooting
Introduction . . . . . . . . . . . . . . . . . . . . . . . . . . . . 7-1
Cleaning Tasks . . . . . . . . . . . . . . . . . . . . . . . . . . . 7-1
Cleaning the Printer . . . . . . . . . . . . . . . . . . . . . . . 7-2
Toner Cartridge . . . . . . . . . . . . . . . . . . . . . . . . . . 7-3
Extending Toner Cartridge Life . . . . . . . . . . . . . . . . 7-3
Storing and Installing the Toner Cartridge . . . . . . . . . . . 7-3
HP Policy on Use of Non-HP Toner Cartridges . . . . . . . . 7-3
Redistributing Toner in the Cartridge . . . . . . . . . . . . . . 7-4
Clearing the TONER LOW Message . . . . . . . . . . . . . . 7-5
Optional Stapler . . . . . . . . . . . . . . . . . . . . . . . . . . 7-6
Loading Staples . . . . . . . . . . . . . . . . . . . . . . . . . 7-6
Clearing Staple Jams . . . . . . . . . . . . . . . . . . . . . . 7-7
Troubleshooting Checklist . . . . . . . . . . . . . . . . . . . . . 7-8
Printer Response Problems . . . . . . . . . . . . . . . . . . . 7-8
Software, Computer, and Printer Interface Problems . . . . . 7-10
Problems with Accessories . . . . . . . . . . . . . . . . . . . 7-16
Paper Jams . . . . . . . . . . . . . . . . . . . . . . . . . . . . . 7-23
Repeated Paper Jams . . . . . . . . . . . . . . . . . . . . . . 7-35
Printer Messages . . . . . . . . . . . . . . . . . . . . . . . . . . 7-36
Calling for Help . . . . . . . . . . . . . . . . . . . . . . . . . . 7-48
A Specifications
Location Requirements . . . . . . . . . . . . . . . . . . . . . . A-1
Printer Specifications . . . . . . . . . . . . . . . . . . . . . . A-3
Regulatory Statements . . . . . . . . . . . . . . . . . . . . . . . A-4
FCC Regulations . . . . . . . . . . . . . . . . . . . . . . . . A-4
Canadian DOC Regulations . . . . . . . . . . . . . . . . . . A-4
VCCI Statement (Japan) . . . . . . . . . . . . . . . . . . . . A-5
Safety Information . . . . . . . . . . . . . . . . . . . . . . . . . A-6
Laser Safety . . . . . . . . . . . . . . . . . . . . . . . . . . . A-6
Material Safety Data Sheet (MSDS) . . . . . . . . . . . . . . A-6
Laser Statement for Finland . . . . . . . . . . . . . . . . . . A-7
EN TABLE OF CONTENTS-3
Page 9

B PCL Printer Commands (Escape Sequences)
PCL Printer Command Syntax . . . . . . . . . . . . . . . . . . B-1
Escape Character . . . . . . . . . . . . . . . . . . . . . . . . B-2
Setup Strings . . . . . . . . . . . . . . . . . . . . . . . . . . B-3
PCL Font Selection . . . . . . . . . . . . . . . . . . . . . . . . B-3
C Memory and Personality SIMM Installation
Installing a SIMM Board . . . . . . . . . . . . . . . . . . . . . C-2
Testing a SIMM Board . . . . . . . . . . . . . . . . . . . . . . C-4
Verifying a Memory SIMM . . . . . . . . . . . . . . . . . . C-4
Verifying a PostScript SIMM . . . . . . . . . . . . . . . . . C-5
D Warranty and Software License
HP Maintenance Agreements . . . . . . . . . . . . . . . . . . . D-1
On-Site Service Agreements . . . . . . . . . . . . . . . . . . D-1
Warranty . . . . . . . . . . . . . . . . . . . . . . . . . . . . . . D-2
One-Year On-Site Limited Warranty . . . . . . . . . . . . . . D-2
Exclusions . . . . . . . . . . . . . . . . . . . . . . . . . . . D-2
Warranty Limitations . . . . . . . . . . . . . . . . . . . . . . D-3
Service During the Warranty Period . . . . . . . . . . . . . . D-3
Service After the Warranty Period . . . . . . . . . . . . . . . D-3
Repacking Guidelines . . . . . . . . . . . . . . . . . . . . . . . D-4
HP Software Product License . . . . . . . . . . . . . . . . . . . D-5
E HP Customer Services and Sales
HP Support, Sales, and Service Information . . . . . . . . . . . . E-1
Customer Support . . . . . . . . . . . . . . . . . . . . . . . . E-1
Sales and Services . . . . . . . . . . . . . . . . . . . . . . . . E-4
INDEX
TABLE OF CONTENTS-4 EN
Page 10
About Your Printer
Introduction
This chapter introduces the features of the HP LaserJet 5Si/5Si MX and
5Si NX printers.
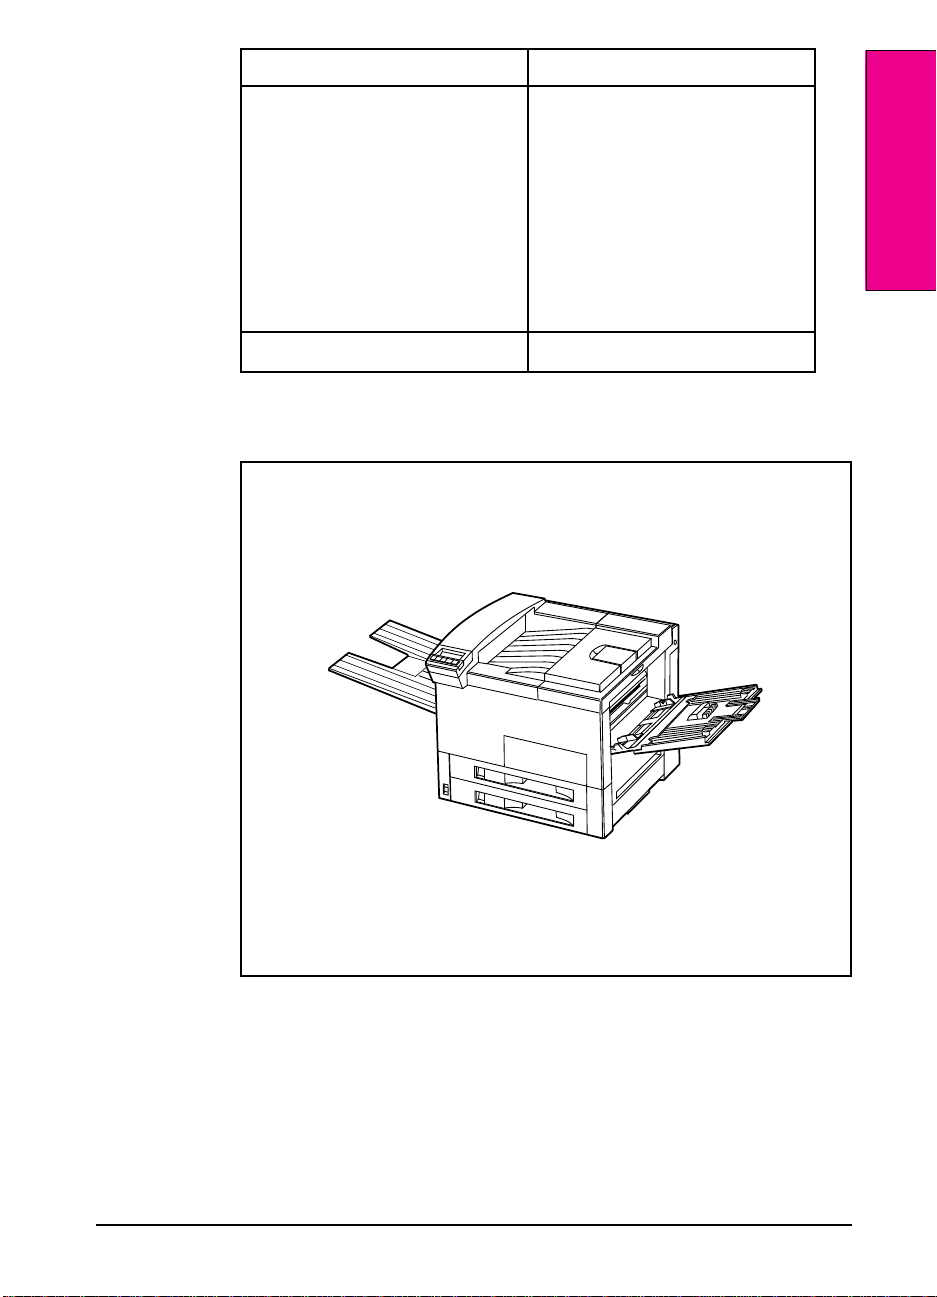
Table 1-1 lists the printer’s standard features.
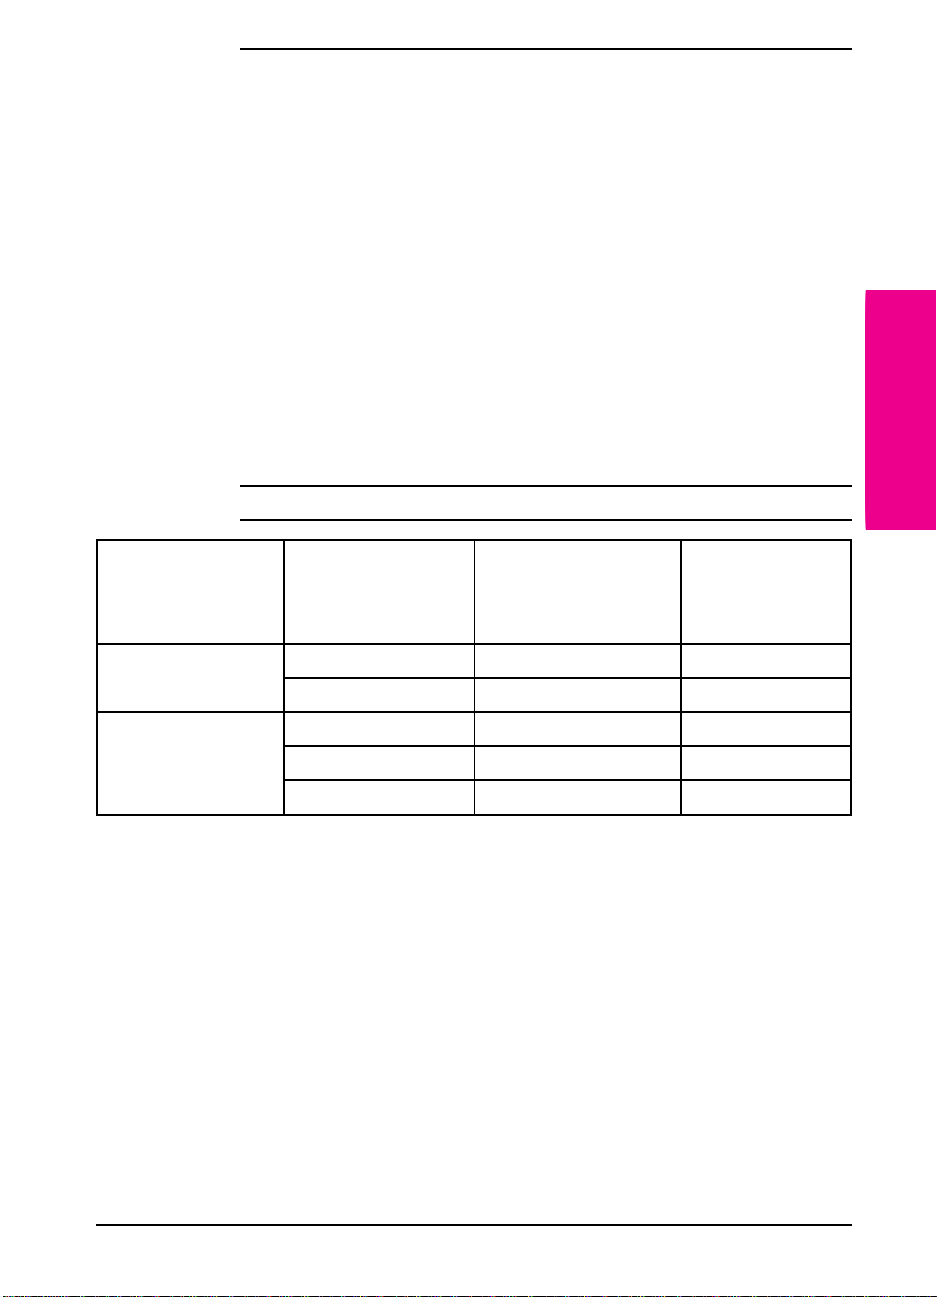
Table 1-1 Standard Printer Features
Feature Description
1
Speed/Performance
Print Resolution
Memory
Languages/Fonts
•24 pages per minute
•40 Megahertz AMD processor
•600 x 600 dots per inch with
Resolution Enhancement
technology (REt)
•More than 120 levels of gray
•Microfine toner
•4 (5Si/5Si NX) or 12 (5Si MX)
MBytes of RAM , expandable
using industry standard SIMMs
•Memory Enhancement
Technology (MEt) automatically
compresses data to use RAM
more efficiently
•HP PCL 5e
•Printer Job Language (PJL)
•Printer Management Language
(PML)
•45 scaleable PCL fonts
(plus 65 additional fonts with HP
FontSmart)
EN About YourPrinter 1-1
Page 11
Feature Description
Languages/Fontsavailableonly
with PostScript SIMM (Optional on
5Si/5Si NX, Standard on 5Si MX)
Paper Handling (Input)
Paper Handling (Output)
Software
•39 scaleable PostScript fonts
•Auto language switching
•Adobe PostScript Level 2
•Tray 1: A multipurpose tray for
paper, transparencies, and
envelopes. Capacity is up to 100
sheets with standard paper
•Trays 2 and 3 accept up to 500
sheets each, and automatically
sense paper size. These trays
should be used for paper only
•Top output bin holds up to 500
sheets of standard paper only,
and automatically senses when
full
•Left output bin holds up to 100
sheets of paper, usable for
envelopes, transparencies, or
standard paper
•Full-functionprinter drivers (PCL
and PostScript) for all major
operating systems
•HP JetAdmin network printer
software for all major operating
systems
•Improved document production
and monitoring capability
•Transparent access to printer
capabilities and information in
Windows 95 and Windows 3.1
Connectivity
•HP JetDirect Print Server
(Standard on 5Si MX, optional
on 5Si/5Si NX)
•Bi-directional parallel port with
ECP and MLC support
•One available MIO slot for
optional I/O. (2 available on 5Si)
1-2 About Your Printer EN
Page 12
Feature Description
Environmental features
•EconoMode reduces toner
consumption
•Power Save setting (meets
Energy Star guidelines)
•High content of recyclable
components and materials
•15,000-pagetoner cartridge
capacity (average)
1
About Your Printer
Figure 1-1
Duty Cycle
•100,000pages per month
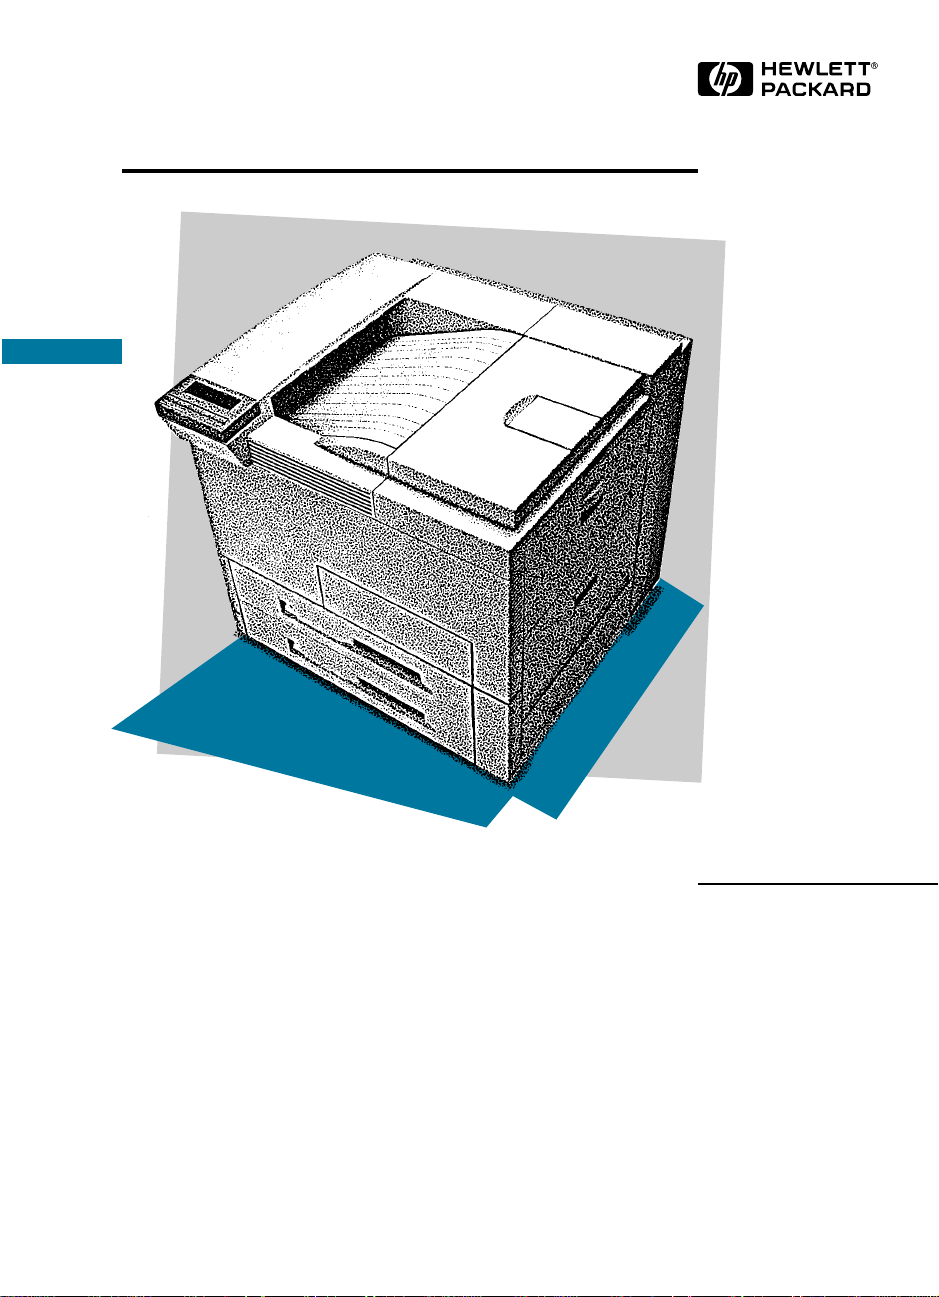
The HP LaserJet 5Si Printer is shown in Figure 1-1.
HP LaserJet 5Si Printer
EN About YourPrinter 1-3
Page 13
Standard Features of the HP LaserJet
5Si/5Si MX/5Si NX Printer
The HP LaserJet 5Si/5Si MX/5Si NX printer provides 24-ppm
(pages-per-minute) printing of Letter or ISO A4 paper at true 600-dpi
(dots-per-inch) resolution. Your printer handles a wide variety of paper
weights and sizes, including wide format paper 11 x 17 in (279 x 432
mm).
Paper Handling
HP JetAssist, Hewlett Packard’s trademark for an accessible
paper-handling architecture, is available in the HP LaserJet 5Si/5Si
MX/5Si NX printers. It enables intelligent, friendly communication with
paper-handling devices, making them easy to use.
Table 1-2 identifies each tray and bin with the specific capacity and the
media each supports. Tray 1, the multi-purpose tray, accommodates all
media types and sizes. Trays 2 and 3 are equipped with sensors that
automatically detect the size of paper you have loaded and the amount
of paper in the tray.
Optional paper handling accessories are available through your HP
dealer. They are described later in this chapter.
Table 1-2 Paper Handling
Tray or Bin Capacity Media
Input
Trays
Tray 1
(multi-purpose)
Tray 2 up to 500 sheets Paper: Letter, ISO A4, Legal, JIS B4
Tray 3 up to 500 sheets Paper:Letter ,ISO A4, Legal, JIS B4, ISO A3, 11
Tray 4
(optional)
up to 100 sheets Paper: Letter, ISO A4, Executive, Legal, 11 x 17 in
(279 x 432 mm), ISO A3, JIS B5, JIS B4
Maximum size: 11.7 x 17.7 in (297 x 450 mm)
Minimum size: 3.9 x 7.5 in (99 x 191 mm)
Other media: transparencies and sheets of labels
Envelopes:Commercial #10, C5, DL, Monarch,
ISOB5
x 17 in (279 x 432 mm)
up to 2000 sheets Paper:Letter, ISO A4, Legal, JISB4,ISOA3,11
x 17 in (279 x 432 mm)
1-4 About Your Printer EN
Page 14

Tray or Bin Capacity Media
Output
Bins
Top Output Bin
(face-down)
Left Output
Bin (face-up)
Addressable
Mailbins
(optional)
Stapler Bin
(optional)
up to 500 sheets Paper: Letter, ISO A4, Executive, Legal, 11 x 17 in
(279 x 432 mm), ISO A3, JIS B5, JIS B4
up to 100 sheets Paper: Letter, ISO A4, Executive, Legal, 11 x 17 in
(279 x 432 mm), ISO A3, JIS B5, JIS B4
up to 250 sheets
per bin
up to 350 sheets Paper: Letter, ISOA4 ONLY
Paper:Letter, ISO A4, Legal, JIS B4, ISO A3, 11 x
17 in (279 x 432 mm), ISO A3, JIS B5, JIS B4
No envelopes,transparencies,or labels
Memory Management
The 5Si is equipped with 4 MByte RAM and can be expanded to 132
MBytes maximum. To allow for expansion, the printer has 4 slots for
Single Inline Memory Modules, which accept 2, 4, 8, 16, or 32
megabytes of RAM each. The 5Si MX ships with an 8 MByte SIMM
installed for a total of 12 MBytes.
Memory Enhancement Technology (MEt) automatically compresses
page data to provide the most efficient use of the printer’s RAM.
For more information on memory management, see Chapter 2,
“Memory and Memory Management”.
1
About Your Printer
Printing System
Included with your HP LaserJet 5Si/5Si MX/5Si NX Printer is a CD
containing the HP LaserJet 5Si/5Si MX/5Si NX/5Si Mopier Printing
System (hereafter called the Printing System.). On the Printing System
CD are software components and drivers that benefit end users and
network administrators by providing full-feature support and
management capabilities for your printer.
The Printing System includes software designed for end users operating
in the following environments:
• Microsoft Windows 3.1x
• Microsoft Windows 95
• Microsoft Windows NT 3.51 and 4.0
• IBM OS/2 version 2.0 or greater
• Apple Macintosh System 7 or greater
It also includes software for network administrators using the following
network operating systems:
EN About YourPrinter 1-5
Page 15

• Novell NetWare 3.x or 4.x
• Microsoft Windows NT 3.51 and 4.0
• IBM LAN Server 3.0 or greater
• Apple AppleTalk
For more information about software and drivers, see Chapter 3,
“Printer Software.”
Input/Output
A built in Bi-Tronics parallel interface allows high-speed two-way
communication between the printer and your computer. Two MIO slots
allow for extended connectivity. If serial connection is required, contact
an authorized HP dealer for information about an optional serial MIO
card or a serial-to-parallel converter.
The HP JetDirect Print Server (standard on the 5Si MX/5Si NX and
available as an option on the 5Si) allows the printer to function through
most networks without a separate print server.
Energy Efficiency
The printer’s Power Save feature conserves electricity by substantially
reducing power consumption when idle for a user-specified length of
time. As an EPA Energy Star partner, Hewlett-Packard has determined
that this product meets the Energy Star guidelines for energy efficiency.
You may change the POWER SAVE DELAY from the default of 1 hour.
This item is located in the CONFIGURATION MENU on the printer control
panel.
EconoMode
EconoMode reduces the amount of toner applied to the printed page and
is ideal for printing document drafts. When EconoMode is on, the print
on the page appears significantly lighter but is still readable.
(EconoMode has no effect on the speed of the printer or the amount of
energy used—it only conserves toner.)
1-6 About Your Printer EN
Page 16
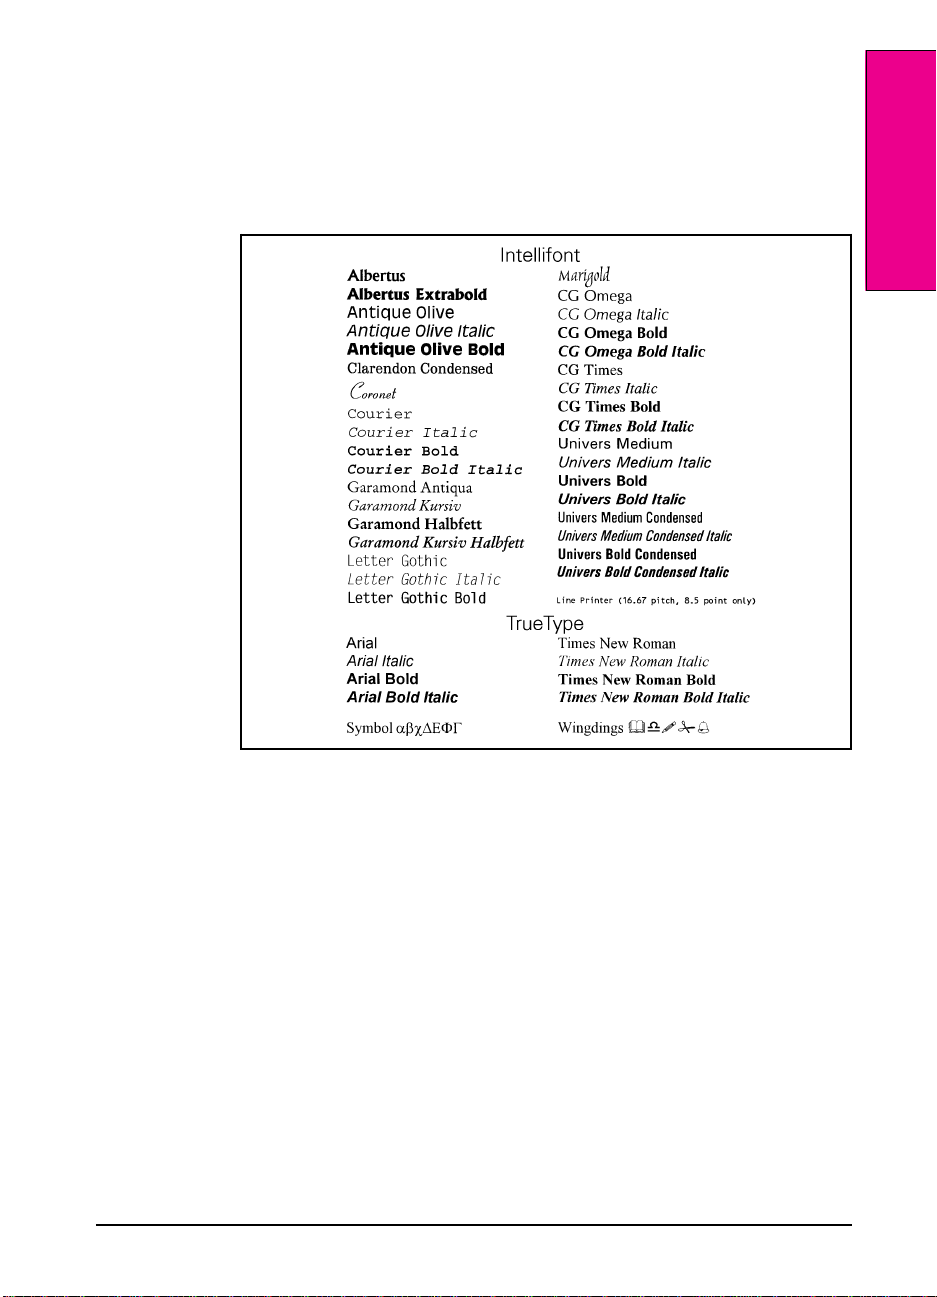
Figure 1-2
PCL Fonts
The printer comes with 35 scaleable fonts, as well as 10 True Type fonts.
You can scale True Type fonts within the printer. You also receive
matching True Type screen fonts for true WYSIWYG, short for “what
you see is what you get.” These internal fonts are part of the PCL
language. PCL font samples appear in Figure 1-2.
1
About Your Printer
PCL Fonts
EN About YourPrinter 1-7
Page 17

Special Features of the HP LaserJet 5Si
MX Printer
The HP LaserJet 5Si MX printer is configured with additional memory,
Hewlett-Packard’s PCL 5 language, Adobe’s PostScript Level 2
language, and an HP JetDirect print server that allows you to connect
your printer to Ethernet or Local Talk networks.
Additional Memory
The HP LaserJet 5Si MX contains 12 MBytes of installed memory. By
adding optional SIMMs with 2,4,8,16, or 32 MBytes, you can increase
memory to a total of 76 MBytes.
Networking Capabilities
The HP LaserJet 5Si MX printer’s factory-installed HP JetDirect print
server allows you to connect your printer directly to your Local Area
Network (LAN). The HP JetDirect automatically switches among
networked protocols, so a single printer can serve many networks at
once or be moved to a new network with no additional hardware
investment.
The HP JetDirect print server supports the following network operating
systems:
• Novell NetWare 286 v. 2.15c and beyond; 386 v. 3.11,3.12, 4.0, 4.01,
and 4.1
• Microsoft LAN Manager for OS/2, v. 2.1
• IBM LAN Server for OS/2, v. 3.0
• Microsoft Windows and Windows for Workgroups, v. 3.1, 3.11
• Apple Ether Talk
• Apple Local Talk
• Microsoft Windows NT, v. 1.0, 3.51, and 4.0
• Microsoft Windows 95
• HP-UX v. 8.0, 9.0, 10
• SunOS v. 4.1.1, 4.1.2, 4.1.3
• SCO UNIX V/386 v. 3.2.2, 3.2.4
• Solaris v. 2.1, 2.2, 2.3, 2.4
• IBM AIX v. 3.2.5
1-8 About Your Printer EN
Page 18
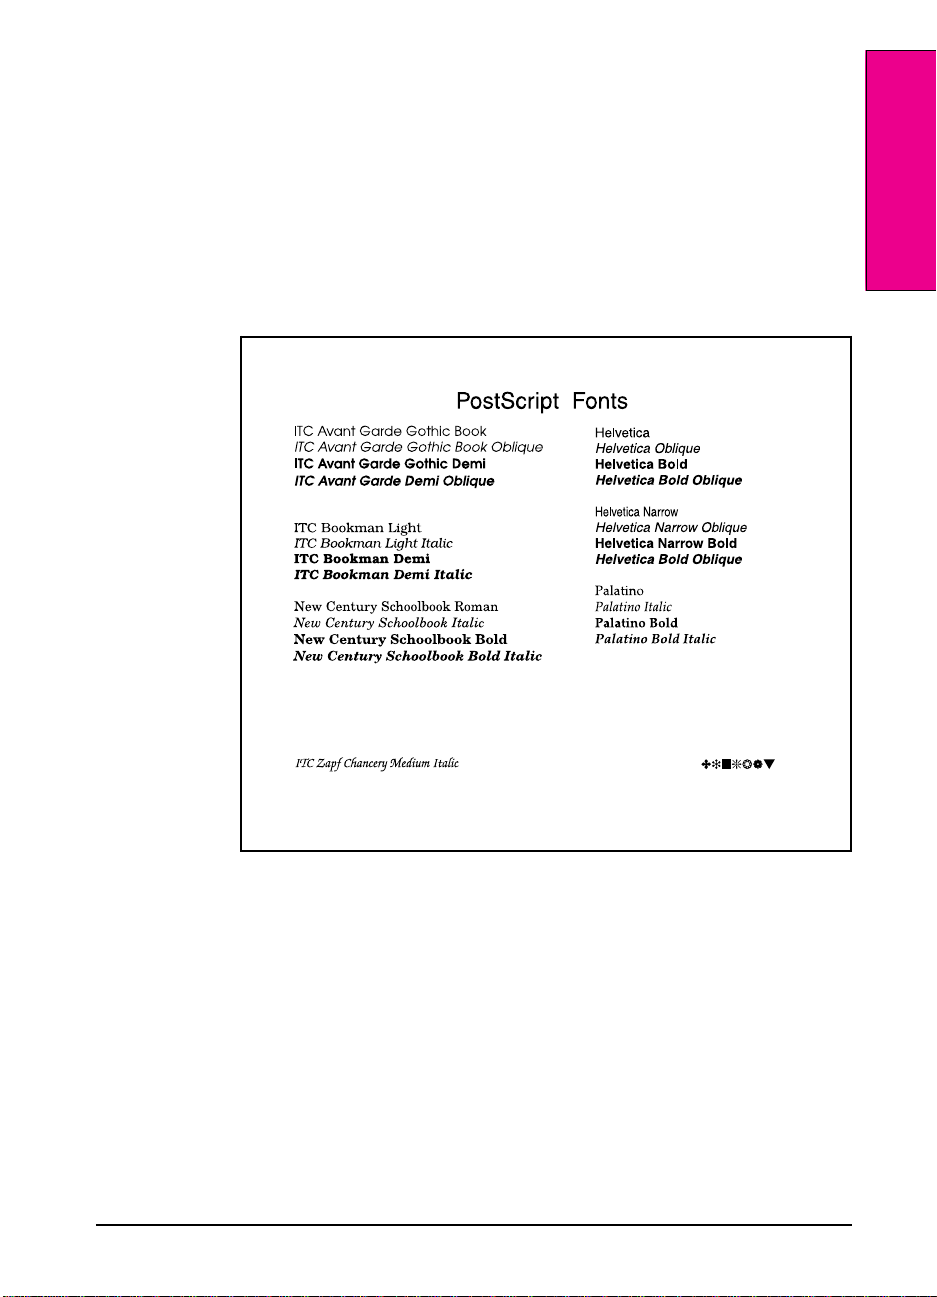
Figure 1-3
Clients may be DOS, Windows, Windows NT, OS/2, Macintosh, or
UNIX. Refer to the JetDirect documentation for further details.
PostScript Fonts
The HP LaserJet 5Si MX is configured with Adobe’s PostScript Level 2
language and includes 35 scaleable PostScript fonts. The 5Si/5Si NX
requires the optional Adobe PostScript SIMM be installed before this
option is available. Adobe’s PostScript Level 2 is compatible with earlier
versions of the language. PostScript font samples are shown in Figure
1-3.
1
About Your Printer
Times Roman
Courier
Courier Oblique
Courier Bold
Courier Bold Oblique
PostScript Fonts
EN About YourPrinter 1-9
Times Italic
Times Bold
Times Bold Italic
Symbol Σψµβολ
ITC Zapf Dingbats
Page 19

Special Features of the HP LaserJet 5Si
NX Printer
The HP LaserJet 5Si NX printer is configured with Hewlett-Packard’s
PCL 5 language, and an HP JetDirect print server that allows you to
connect your printer to Ethernet networks.
Memory Management
The HP LaserJet 5Si NX printer contains 4 MBytes of installed memory,
and can be expanded to as much as 132 MBytes by adding optional
SIMMs with 2, 4, 8, 16, or 32 MBytes each.
Networking Capabilities
The HP LaserJet 5Si NX printer’s factory-installed HP JetDirect print
server allows you to connect your printer directly to your Local Area
Network (LAN). The HP JetDirect automatically switches among
networked protocols, so a single printer can serve many networks at
once or be moved to a new network with no additional hardware
investment.
The HP JetDirect print server supports the following network operating
systems:
• Novell NetWare 286 v. 2.15c and beyond; 386 v. 3.11,3.12, 4.0, 4.01,
and 4.1
• Microsoft LAN Manager for OS/2, v. 2.1
• IBM LAN Server for OS/2, v. 3.0
• Microsoft Windows and Windows for Workgroups, v. 3.1, 3.11
• Microsoft Windows NT, v. 1.0, 3.51, and 4.0
• Microsoft Windows 95
• HP-UX v. 8.0, 9.0, 10
• SunOS v. 4.1.1, 4.1.2, 4.1.3
• SCO UNIX V/386 v. 3.2.2, 3.2.4
• Solaris v. 2.1, 2.2, 2.3, 2.4
• IBM AIX v. 3.2.5
Clients may be DOS, Windows, Windows NT, OS/2, Macintosh, or
UNIX. Refer to the JetDirect documentation for further details.
1-10 About Your Printer EN
Page 20
Printer Parts
Figures 1-4 and 1-5 show the locations and names of key printer parts.
1
About Your Printer
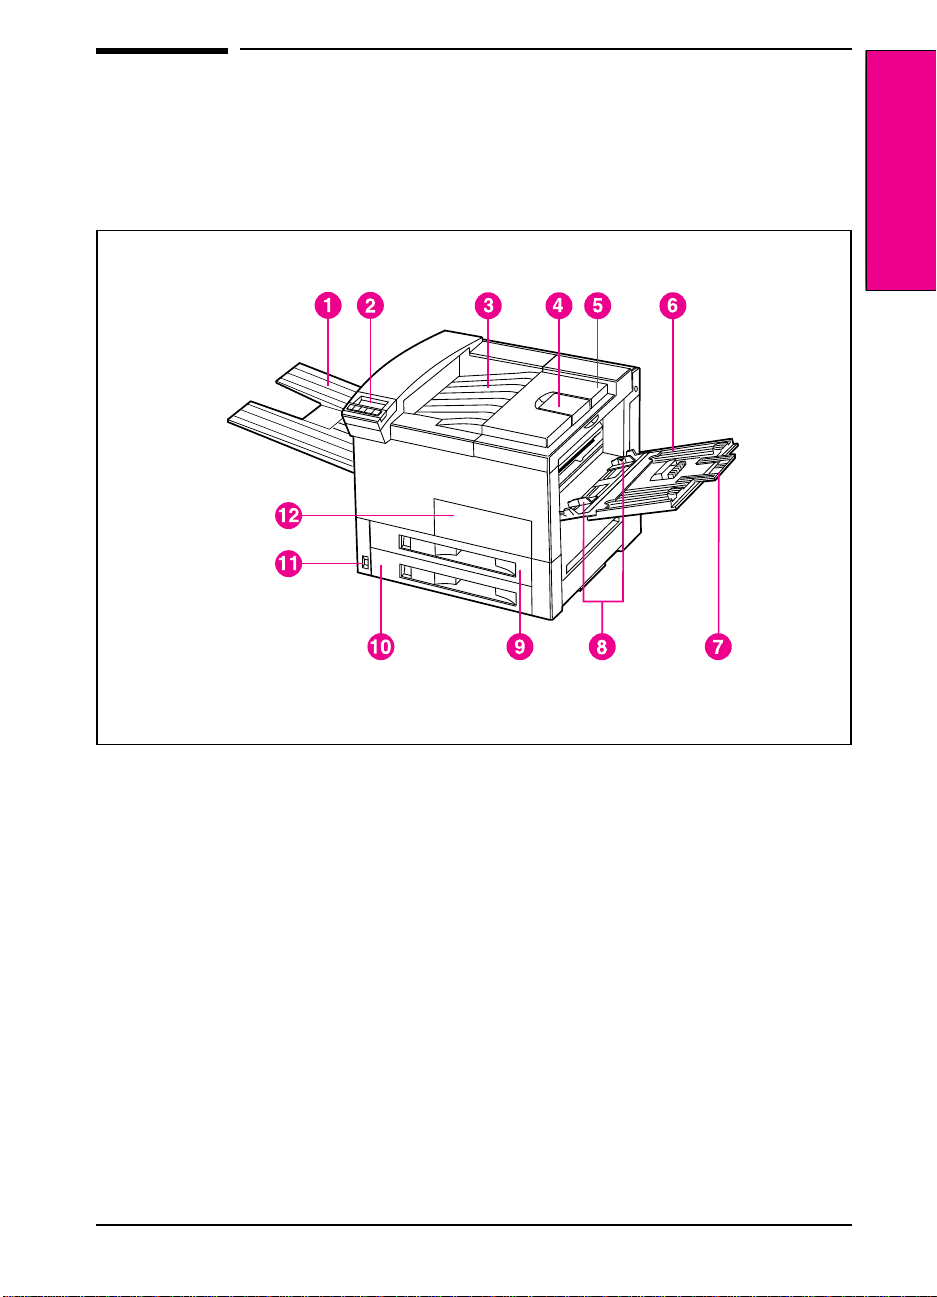
Figure 1-4 KeyPrinter Parts: Front View
1. Left Output Bin 7. Tray 1 extensions
2. Control Panel 8. Tray 1 PaperWidth Guides
3. Top Output Bin 9. Tray 2
4. Adjustable paper stop 10. Tray 3
5. Top cover 11. Power Switch
6. Tray 1 (multi-purpose) 12. Front door
EN AboutYour Printer 1-11
Page 21
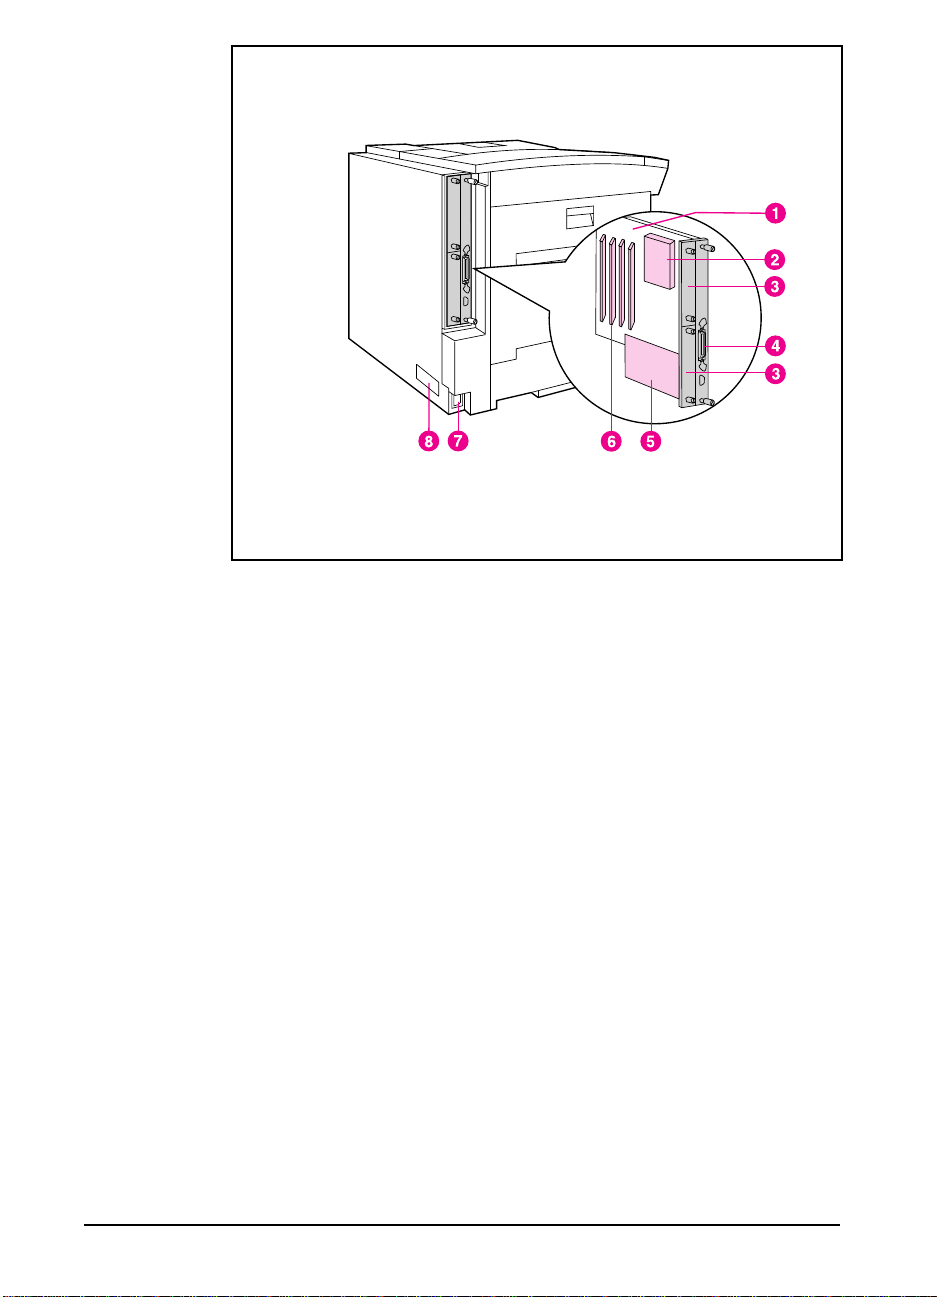
Figure 1-5
Key Printer Parts: Rear View
1. Printer Circuit Assembly (formatter board)
2. Printer’s Hard Disk (optional)
3. HP MIO slots (on the 5Si MX/5Si NX slot 1 contains the HP JetDirect Server)
4. Bi-Tronics parallel port
5. External Paper Handling Controller Board
6. SIMM slots
7. Power connector
8. Print engine serial number
1-12 About Your Printer EN
Page 22
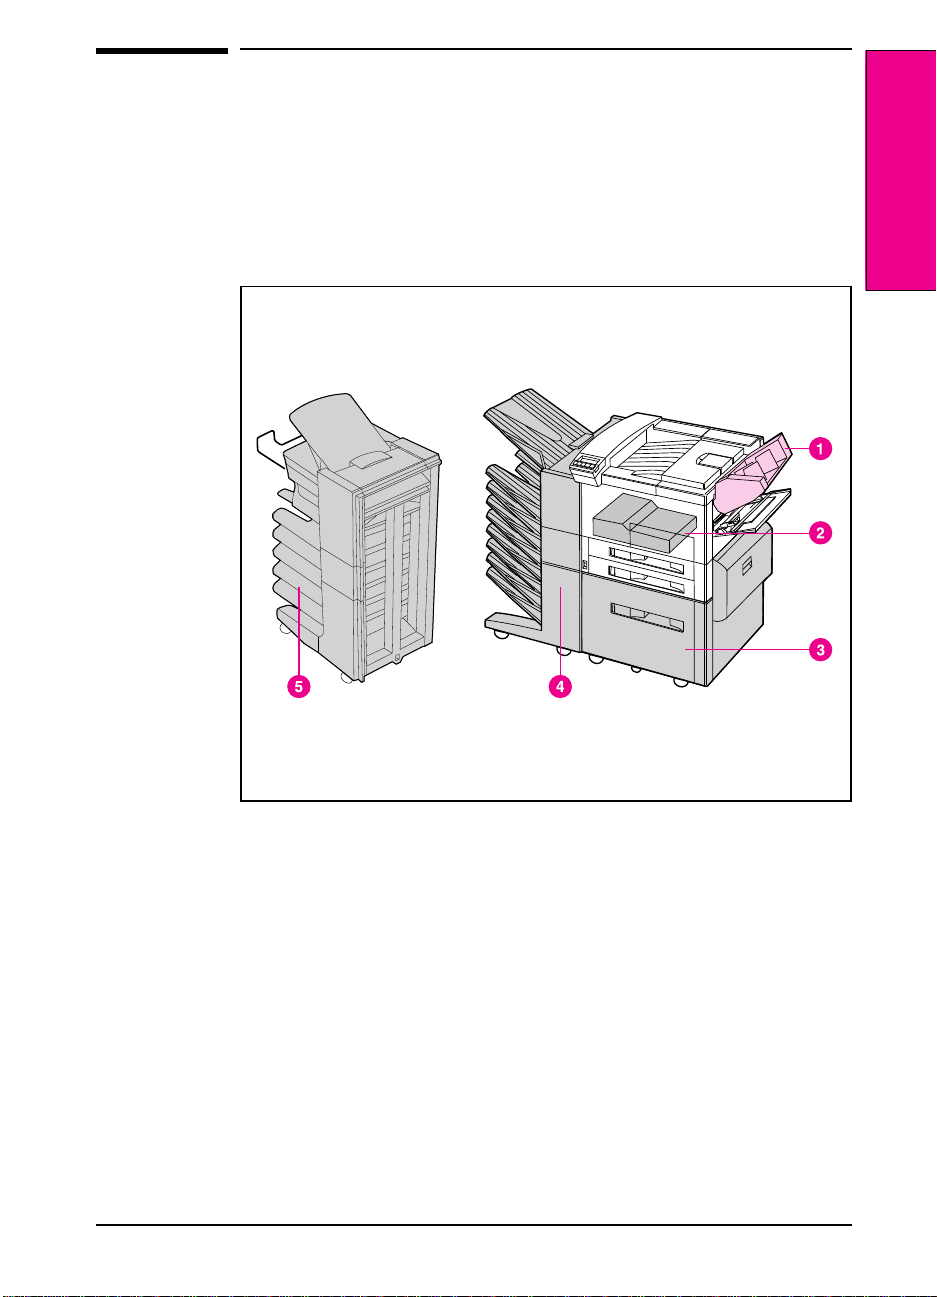
Figure 1-6
Accessories and Options
As printing and network needs grow, you can increase the printer’s
capabilities by adding accessories and options. Figure 1-6 shows the
paper handling options available. These options are described in Table
1-3, along with other available options. Ordering information can be
found in Appendix E, “HP Sales and Customer Service”. Look for
information about using the accessories in Chapter 5, “Print Tasks.”
1
About Your Printer
Paper Handling Accessories and Options
1. Envelope Feeder
2. Duplex Unit
3. 2000-Sheet Input Tray
4. Multi-Bin Mailbox (provides mailbox, job seperation, and job stacking)
5. Mailbox with Stapler (provides mailbox, job seperation, job stacking, and stapling)
EN AboutYour Printer 1-13
Page 23

The Optional Printer Hard Disk
The Printer Hard Disk accessory can be used to permanently store
downloaded fonts and forms in the printer. Unlike standard printer
memory, items on the Printer Hard Disk remain in the printer even when
the printer is powered off.
Fonts downloaded to the Printer Hard Disk are available to all users of
the printer.
Macintosh Users can use the HP LaserJet Utility, and Windows users
can use the HP printer driver to download fonts. The Printer Hard Disk
can also be write-protected through software for additional security.
Refer to the online help associated with your HP Software for more
information. For the Macintosh environment, refer to the HP LaserJet
Utility Guide online help included with your HP LaserJet Utility
software. For the Windows environment, refer to your HP Windows
driver online help.
If you are a PostScript language programmer, refer to Adobe’s
PostScript Language Reference Manual for information about
downloading forms and patterns to the disk.
1-14 About Your Printer EN
Page 24
Table 1-3 Accessories and Options
Option Part Number Description
Toner Cartridge C3909A Replacement toner cartridge
Stapler Cartridges C3772A 3-pack of staple cartridges.Each cartridge
contains 2000 staples.
1
About Your Printer
Memory upgrades 2 MByte—C3131A
4 MByte—C3132A
8 MByte—C3133A
16 MByte—C3146A
Adobe PostScript
Level 2 SIMM
Duplex Unit C3762A Provides duplexed (double-sided) printing
Envelope Feeder C3765A Attaches to printer above Tray 1;holds up to
2000-Sheet Input
Tray
Multi-Bin Mailbox C3764A Features eight bins holding up to 250 sheets
Mailbox with Stapler C3774A Features five bins holding up to 250 sheets
HP parallel printer
cable (2 meter)
HP parallel printer
cable (3 meter)
Modular I/O and
Network Cards
Printer Hard Disk C2965A 420 MByte Hard Disk Drive for PCL and
C3169A Adds Adobe’s PostScriptLevel2 language to
C3765A Adjustable for Letter, Legal, 11x17, ISO A4,
C2950A HP-recommended IEEE-1284 Cable, with A
C2951A HP-recommended IEEE-1284 Cable, with A
J2550A HP JetDirect Multi-protocol Network Card
J2555A HP JetDirect Multi-protocol Network Card with
Additional printer memory
32 MB SIMMs are also available from third
party suppliers
the 5Si/5Si NX printers
capability
100 envelopes.Supports Commercial #10,
C5, DL, Monarch, ISO B5.
ISO A3, JIS B4
each
each and a stapler
and B connectors
and B connectors
with Ethernet/IEEE802.3 10Base-T
Token Ring (DB9 and RJ45)
PostScript
110V Maintenance
Kit
220V Maintenance
Kit
EN AboutYour Printer 1-15
C3971A Maintenance kit that contains replacement
rollers and fuser for 110V printers and
mopiers.May be purchased through an
HP-authorized dealer
C3972A Maintenance kit that contains replacement
rollers and fuser for 220V printers and
mopiers.May be purchased through an
HP-authorized dealer
Page 25

1-16 About Your Printer EN
Page 26

Memory and Memory Management
Introduction
The HP LaserJet 5Si/5Si NX printer comes with 4 MBytes of internal
memory and 4 SIMM slots to allow for memory expansion. The 5Si MX
features a pre-installed 8-MByte single inline memory module (SIMM)
for a total of 12 MBytes. Memory is added in increments of 2, 4, 8, 16,
or 32 MBytes. (Note that 32-MByte SIMMs are not available from HP;
contact third-party providers.)
The SIMM slots can also hold optional languages, fonts, and other
SIMM-based products. The 5SI MX comes with a SIMM for the
PostScript language installed in one of the slots.
Memory Enhancement technology (MEt), a standard HP LaserJet
printer feature, allows most documents to print using the standard
amount of memory. MEt automatically compresses data to print
complex pages.
2
EN Memory and Memory Management 2-1
Page 27

Storing Print Data
The print engine memory receives, holds, and processes data from
incoming print jobs. It manages downloaded resources, including PCL
language, soft fonts, symbol sets, macros, and patterns. The print engine
also stores PostScript fonts, forms, patterns, and dictionaries.
In heavy use installations, the optional 420-MByte hard disk is
recommended to optimize the functionality of your print engine.
Saving Resources
When two or more personalities (such as PCL and PostScript) are
installed, the print engine reserves a portion of memory for each
personality’s resources. This feature is called Resource Saving. It
enables the print engine to keep downloaded resources (such as fonts,
forms, and macros) in memory under most conditions.
Resource Saving is automatically available on the print engine. By
default, the print engine allocates resources to each print engine
personality, based on the amount of memory each personality needs.
Most users do not need to customize the Resource Saving configuration,
but you can change the amount of memory allocated to each print
engine personality.
See Chapter 4, “Printer Control Panel,” to learn how to configure
memory for your printer.
2-2 Memory and Memory Management EN
Page 28
Determining Memory Requirements
The amount of memory you need depends on the types of documents
you print. Your print engine can print most text and graphics at 300 or
600 dpi without additional memory.
Add memory to your print engine if you:
• Commonly print complex graphics.
• Use many temporarily downloaded fonts.
• Print complex documents.
• Print duplexed PostScript documents.
• Use advanced functions (such as I/O Buffering and Resource Saving).
Table 2-1 presents the amount of memory required for the most common
print jobs using 600-dpi printing.
Table 2-1 Minimum Memory Requirements
2
Memory
Management
PCL Minimum Memory
Print Job Paper Size
single-sided printing Letter, A4, Legal 4 MBytes 9 MBytes
11 x 17 in, A3 4 MBytes 12 MBytes
two-sided printing Letter, A4 4 MBytes 12 MBytes
Legal 4 MBytes 14 MBytes
11 x 17 in, A3 10 MBytes 22 MBytes
Requirements
PostScript
Minimum
Memory
Requirements
EN Memory and Memory Management 2-3
Page 29

Improving Performance with I/O Buffering
When you select a print command from your software application, the
software sends your request to the print engine. To help you get back to
work more quickly, the print engine reserves a portion of its memory to
hold the file or page to be printed in an I/O buffer until it is the next to
be printed.
For each MByte of memory you add to your printer, 10 KBytes is
automatically reserved to hold print jobs in progress. The more memory
that is reserved, the greater the number of files or pages the printer can
store.
In most cases, it is to your advantage to let the printer automatically
reserve memory for I/O buffering. However, you may change the
amount of the I/O buffer by increments of 100 KBytes up to a maximum
of 10,000 KBytes.
See Chapter 4, “Printer Control Panel,” to learn how to use the printer’s
Input/Output (I/O) Menu to change the I/O buffer.
Note When you change the I/O buffer setting, all downloaded resources are
deleted, unless they are stored on the optional hard disk.
2-4 Memory and Memory Management EN
Page 30

Printer Software
Printing System
Included with your HP LaserJet 5Si/5Si MX/5Si NX printer is a CD
containing the HP LaserJet 5Si /5Si MX /5Si Mopier Printing System.
On the Printing System CD are software components and drivers that
benefit end users and network administrators. The CD has two
partitions, one for Intel-based systems and one for Apple Macintosh
systems. When you insert the CD, the partition that corresponds to your
operating system is automatically made available to you. The other
partition will be hidden.
The Printing System includes software designed for end users operating
in the following environments:
• Windows 3.1x
• Windows 95
• Windows NT 3.51 and 4.0
• IBM OS/2 version 2.0 or greater
• Apple Macintosh System 7 or greater
3
Additional drivers for Apple Macintosh GX System 7.5 or greater and
DOS WordPerfect 5.x and 6.x are available through your
Hewlett-Packard distributor or through electronic BBS channels.
The Printing System also includes software for network administrators
using the following network operating systems:
• Novell NetWare 3.x or 4.x
• Windows NT 3.51 and 4.0
• IBM LAN Server 3.0 or greater
• Apple AppleTalk
Network administration software for UNIX and Microsoft LAN
Manager is available through your Hewlett-Packard distributor or
through electronic BBS channels.
EN Printer Software 3-1
Page 31

The drivers and software components for end users and administrators
using the environments listed above are described in the following
sections.
3-2 Printer Software EN
Page 32

Drivers
What is a Driver?
A driver is a software program that enables your software applications to
access your printer’s features. For example, when you print a document,
the application sets up your print job with formatting commands such as
page breaks, font selections, paper tray selections, and number of copies.
The driver takes these commands, translates them into a printer language
(such as Hewlett-Packard’s Printer Control Language (PCL) or Adobe’s
PostScript), and then sends the job to the printer or printer. The driver’s
interface allows you to select various printer features that other software
applications don’t support directly, like automatic stapling.
Typically, a driver must be installed on your computer for each printer or
printer you are using.
Note The information in this chapter applies to users of Windows (3.1x, NT,
or ‘95), OS/2, or the Macintosh OS. DOS applications must support
advanced printers directly. Users of WordPerfect v 5.x-6.x for DOS can
obtain a special driver from HP. Users of other DOS programs may be
able to print using a program driver designed for an earlier model of HP
LaserJet (or a PostScript driver), but may not be able to use some of the
advanced features of the printer. UNIX systems also work differently consult the documentation which accompanies the Printing System for
UNIX.
3
Printer Software
Most applications allow you to access the printer driver through the
Properties, Print, Print Setup, or Page Setup commands. Print job
settings selected through your application typically override equivalent
settings made through the printer driver. Printer settings made in the
application or printer driver typically override the corresponding setting
made on the printer control panel.
In some environments, the printer can send status information back to
the operating system. This capability is called bi-directional
communication, since information is sent to and from the printer. In a
bi-directional environment, the optional printer accessories are detected
and enabled in the driver automatically. In non-bi-directional
environments, accessories that are installed in your printer need to be set
manually in your driver.
EN Printer Software 3-3
Page 33

HP LaserJet 5Si/5Si MX/5Si NX Printer Drivers
Overview
The drivers for the HP LaserJet 5Si/5Si MX/5Si NX printers allow the
selection of printer features that may not be supported directly in your
software applications. These features allow you to:
• Staple documents.
• Print watermarks.
• Print multiple page images on a single page (n-Up).
• Print the first page of a document on one type of media and the
remaining pages on another type of media.
• Select the paper on which to print (by source or type).
• Select which output bin to send output to.
• Download fonts to the printer’s hard disk (if installed)
Access the drivers directly from your application. The steps needed to
access the drivers may vary from application to application. Typically,
they are accessed from the application’s File menu by selecting Print,
then Printer Options.
Note To ensure the best performance when using collation, turn off the
collation feature in your application and turn it on in the driver. If an
installed accessory is not available in the driver, click the Accessories
tab and ensure that the accessory appears in the installed accessories list.
(If bi-directional communication is functioning, the Accessories tab will
not appear. The driver will automatically detect installed accessories.)
The following sections list the drivers available on the Printing System
CD. For more information on drivers, see the on-line help provided
within your selected driver.
PCL drivers
The Printing System includes PCL drivers for the following systems:
• Microsoft Windows 3.1x and Windows 95 (One driver that supports
both systems.)
• Microsoft Windows NT 3.51
• Microsoft Windows NT 4.0
• IBM OS/2 Version 2.0 or greater
3-4 Printer Software EN
Page 34

PostScript Drivers
The Printing System includes PostScript drivers for the following
systems:
• Microsoft Windows 3.1x
• Microsoft Windows 95
• Microsoft Windows NT 3.51
• Microsoft Windows NT 4.0
• IBM OS/2 version 2.0 or greater
• Apple Macintosh System 7 or greater
The PostScript drivers access Adobe’s PostScript Level 2 language.
They cannot be used on the 5Si/5Si NX without installing the optional
Adobe PostScript SIMM (a standard feature of the 5Si MX.)
Additional Drivers
The following drivers are available from your Hewlett-Packard
distributor or from electronic BBS channels:
• Apple Macintosh GX System 7.5 or greater
• DOS WordPerfect 5.x and 6.x
Note If a driver is not available, use an older HP LaserJet printer driver (such
as the HP LaserJet 4 printer driver) until a newer driver becomes
available. However, some of the advanced features of the new printer
may not be usable with an older driver. If the necessary software is not
listed in this chapter, contact your software manufacturer or distributor
and request software for the HP LaserJet 5Si family of printers.
3
Printer Software
EN Printer Software 3-5
Page 35

Software Components
In addition to drivers, the Printing System includes the software
components listed below.
For End-Users:
• HP Font Smart
• HP Toolbox
• DocWise
• HP JetPrint
For Network Administrators:
• HP JetAdmin
• HP Print Server NLM
• Macintosh Utilities
• HP LaserJet Utility
• Bitmapped Screen Fonts
• HP Symbol Set utility for DOS
Install the software by following the procedures listed on the disk labels
or on the insert in the CD ROM package. Software application notes are
available by calling HP First. See the “Calling for Help” section of
Chapter 7 for the HP First phone number.
The software components listed above are described in the following
sections.
End-User Software
HP Font Smart
The HP Font Smart utility is a font management tool. It allows you to
display on your computer screen the 45 fonts included in your printer.
This approximation of screen display to printed result is known as
WYSIWYG, an acronym for “what you see is what you get.” The
printer’s fonts are automatically loaded and configured when you install
the Printing System. Samples of all the fonts available to you are located
in Chapter 1. (HP Font Smart is not needed on Macintosh systems.)
3-6 Printer Software EN
Page 36

HP JetPrint
HP JetPrint is printer management software available only to Windows
3.1x clients running under Novell NetWare. It allows users to view,
select, and print to all HP printers and printers on the network from one
screen. Users can view control panel messages and check the status and
progress of print jobs. Access HP JetPrint from the “Utilities” tab of
HP Toolbox.
HP Toolbox
HP Toolbox is a one-step access tool to document status, printer status,
and “Show-Me-How” information available to Windows 95 clients on
Novell NetWare that is installed as part of the Printing System. From the
Toolbox, which is accessed from the printer icon on the taskbar in
Windows 95, users can also configure printer alerts and launch other
utilities like HP Font Smart. (A subset of this functionality is available
for Windows 3.1 clients as well.)
DocWise
DocWise is document monitoring software available to Windows 3.1
and 95 clients on Novell NetWare that is installed as part of the Printing
System. It provides status information on the document being printed or
on the status of the printer at the time the document was submitted. It
also includes helpful hints on using the printer.
3
Printer Software
Network Administrator Software
HP JetAdmin
HP JetAdmin is a printer management tool for network administrators.
With HP JetAdmin, a network administrator can remotely install,
configure, troubleshoot, manage, and set passwords for JetDirect
connected printers (as well as printers connected to file servers on
Novell NetWare.) Also, a network administrator can configure printer
accessories for network printers remotely.
HP JetAdmin is included on the Printing System CD for the following
operating environments:
• Novell NetWare 3.x, 4.x (from a Windows 3.1x or Windows 95
client)
• Windows NT 3.51, 4.0 (from a Windows 3.51 or 4.0 client)
• IBM LAN Server 3.0 or greater with clients running OS/2 version 3
or greater
EN Printer Software 3-7
Page 37

Printer management software is available for the following systems
through your Hewlett-Packard distributor or through electronic BBS
channels:
• UNIX (HP-UX 9.x/10.x, Sun OS 4.1.3/4.1.4, or Solaris
2.2/2.3/2.4/2.5)
• Microsoft LAN Manager
To learn more about HP JetAdmin for the HP LaserJet 5Si family of
printers, see the HP JetDirect Print Server Software Installation Guide.
HP Print Server NLM
The Printing System includes Hewlett-Packard’s print server network
loadable module (NLM), which runs on NetWare 3.x and 4.x file
servers. It allows a network administrator to manage and control a
peripheral attached to a parallel port on a NetWare file server. HP’s Print
Server NLM (JETPS.NLM) can be used as a replacement for Novell’s
PSERVER.NLM. It services print queues on one or more file servers
and provides the same NetWare printing functionality as HP’s JetDirect
products. To run the Print Server NLM, HP JetAdmin must also be
installed.
Note If the HP JetDirect Print Server (a hardware solution) is available, use
that in preference to the HP Print Server NLM (a software solution.)
This provides the same services and frees the server to concentrate on
other tasks.
Macintosh Utilities
The Macintosh software partition on the Printing System CD is only
accessible from Macintosh systems.
• HP LaserJet Utility
The HP LaserJet Utility allows the network administrator to configure
many printer features from the computer. This is especially helpful in a
network environment when the printer is not near your desktop. With
this utility you can:
• Name the printer, assign it to a zone on your network, download
files and fonts, and change many of the default settings
• Permanently download fonts to the printer’s hard disk (if installed)
• Monitor the status of networked printers
• Lock the printer control panel and set a password without leaving
your computer
3-8 Printer Software EN
Page 38

• Bitmapped Screen Fonts
The bitmapped screen fonts match your printer’s 35 internal PostScript
fonts, allowing you to see on screen how your printed page will look.
DOS Symbol Sets Utility
An additional utility is included with the Printing System. Use this
utility to print the symbol sets for each of the printer’s typefaces.
Symbol sets are collections of unique characters for international
languages, mathematical equations, legal citations, line drawings, and
other special applications.
Printing the Symbol Sets
1 Insert the Printing System CD.
2 At the DOS command prompt, switch to the drive where you inserted
the Printing System CD.
3 Type SYMSETS and press [Return] to start the utility.
4 At the DOS command prompt, type SYMSETS
where id number is the PCL Symbol Set identification number and x is
the number of the printer port.
Table 3–1 lists the symbol set names and identification numbers. This
table also shows which symbol sets are available for each typeface.
id number
LPT
x
,
3
Printer Software
EN Printer Software 3-9
Page 39

Table 3-1 DOS Symbol Sets
PCL
Symbol
Set ID Symbol Set
8U Roman-8
0N ISO 8859-1 Latin 1
(previously called
ECMA 94Latin 1)
2N ISO 8859-2 Latin 2
5N ISO 8859-9 Latin 5
10U PC-8 (Default)
11U PC-8 D/N
12U PC-850
17U PC-852
9T PC-Turk
19U Windows 3.1 Latin 1
(Microsoft callsit
ANSI)
9E Windows 3.1 Latin 2
5T Windows 3.1Latin 5
7J DeskTop
10J PS Text
13J VenturaInternational
14J VenturaUS
6J Microsoft Publishing
8M Math-8
5M PS Math
6M VenturaMath
15U Pi Font
1U Legal
1E ISO United Kingdom*
0U ASCII*
0S ISO Swedish: names*
0I ISO Italian*
2S ISO Spanish*
1G ISO German*
0D ISO Norwegian*
1F ISO French*
9U Windows 3.0 Latin 1
(previously called
Windows)
12J MC Text
19M Symbol
579L Wingdings
Typeface
Antique
Albertus
Clarend.
Olive
Cond. Coronet Courier
Garmnd
Antiqua
Letter
Line
Gothic
Printer MarigoldCGOmegaCGTimes Univers
Univers
Cond
•••••••••••••
•••••••••••••
•• ••
•• ••
•••••••••••••
•••••••••••••
•••••••••••••
•• ••
•• ••
••••••• •••••
•••••••••••••
•••••••••••••
••••••• •••••
••••••• •••••
••••••• •••••
••••••• •••••
••••••• •••••
•• ••
•• ••
•• ••
•• ••
•••••••••••••
•••••••••••••
•••••••••••••
•••••••••••••
•••••••••••••
•••••••••••••
•••••••••••••
•••••••••••••
•••••••••••••
••••••• •••••
••••••• •••••
* These symbol sets are variations of the Roman-8 symbol set.
3-10 Printer Software EN
Page 40

Printer Control Panel
Introduction
This chapter describes the following topics:
• An introduction to the control panel and an explanation of how to use
each of its options.
• How to print text pages that show the current printer settings,
including the configurations for PCL and PostScript.
• Illustration of common messages displayed on the control panel.
The most convenient way to control the printer is through software
applications or the software that comes with the printer. In fact,
commands in the software override control panel settings. Refer to the
on-line help files associated with the software for more information.
Note In this chapter, control panel refers to the control panel on the printer,
not to the Windows Control Panel. Menus refers to the menus on the
control panel display, not to menus on the computer screen. Reach the
printer menus by pressing the [Menus] key.
4
Use the printer control panel for overall configuration requirements or to
obtain printer status information. You also can use the control panel to
access printer features not supported by your software applications.
Note Refer to the HP JetDirect Print Server Software Installation Guide for
information about controlling the printer in a network environment. Also
refer to the online help files provided with HP JetAdmin and the HP
LaserJet Utility.
EN Printer Control Panel 4-1
Page 41

Figure 4-1
Control Panel Layout
The control panel includes three indicator lights, five keys, and a 2-line
display (20 characters per line).
+
*
Printer Control Panel
Indicator Lights
The control panel indicator lights are described in the following table.
Table 4-1 Indicator Lights
Indicator
Light
On Line On Ready toprint No action required
Data On Data being receivedor processed;more data
Attention On Printer requires service Note control panel messageand
Appearance Meaning Action Required
Flashing Goingoff-line No action required
Off Printer off-line Readand respond to control panel
message.
No action required
coming
Flashing Databeing received or processed No actionrequired
Off Nodata being received or processed No action required
call for service.
Flashing Printer needs attention Read and respond to controlpanel
message.
Off Nomessages or error conditions requiring attention No action required
4-2 Printer Control Panel EN
Page 42

Figure 4-2
Control Panel Keys
The function of each of the five keys on the control panel is labeled
above each key.
+
Control Panel Keys
*
The control panel arranges various printer options in a simple menu
structure similar to the levels of an outline. Each menu contains several
items. These items are operations the printer performs when you select
them.
Table 4-2 summarizes the function of each control panel key (examples
are provided later in this chapter).
Table 4-2 Control Panel Keys
Key Function
[On Line] Switches the state of communication between computer and printer to ON
(online) or OFF (offline).Stops printing as soon as possible.
[Menus] Provides a menu system for obtaining status information or changing the
printer configuration.
[Items] Cycles through the items on the selected menu. Menu items vary
depending on the options installed and configuration of other menu choices.
4
Panel
Printer Control
[+] Steps through the item choices.
[Select *] Selects a desired menu item choice.
EN Printer Control Panel 4-3
Page 43

Figure 4-3
Control Panel Display
The control panel presents messages about the printer in one or two lines
of the character display.
Control Panel Character Display
The control panel displays the following types of messages:
• Ready status messages mean the printer is ready to accept data.
• Printer status messages tell you what the printer is doing at a given
time. For example:
PROCESSING JOB
FROM TRAY 2
• Printer attendance messages tell you to perform some action, such as
adding paper or clearing a paper jam.
• Error messages communicate data and print errors. The printer stops
printing for ten seconds, displays a message, and then automatically
attempts to return to the online state.
• Service messages communicate a printer failure. Some errors can be
cleared by pressing the [Select *] key or by cycling power to the
printer (turn power off and then back on). Others stop all operations
and require service.
4-4 Printer Control Panel EN
Page 44

Settings and Defaults
The printer makes most printing decisions based on either temporary
settings or permanent defaults.
Note Settings you send from software applications override equivalent printer
defaults.
Table 4-3 Settings and Defaults
Setting or
Default Explanation
Temporary setting A value set for the current print job by your software application. For
example, if your printer default is portrait, you can request your software
to print pages with a landscape orientation.This temporary setting
remains in effect until the current print job is finished.
Control panel
default
Factory default Thevalue set for each menu item at the factory.Factory defaults
A value set at the control panel by selecting a menu item and pressing
[Select *].An asterisk (*) next to the item name indicates that it is now
the default.The printer retains this new value even when power is
switched OFF.
(permanent defaultsettings) are listed in Table 4-4.
Restoring Factory Settings
1 With power off, press and hold [On Line].
2 Continue to hold [On Line] and turn the printer on (push power ON).
3 Hold [On Line] until this message appears:
COLD RESET
This message is followed by the power-on self test message. Then the
following message appears:
RESTORING FACTORY
SETTINGS
until the printer system completes power-on initialization.
Factory defaults are listed in Table 4-4.
Note By printing a PCL configuration page, you can see the current settings
and all the choices available. Refer to Figures 4-4 and 4-5 later in this
chapter.
EN Printer Control Panel 4-5
4
Panel
Printer Control
Page 45

Table 4-4 Factory Default Settings
Menu Item Default Setting
DISPLAY LANGUAGE= ENGLISH
PAPER DESTINATION= TOP OUTPUT BIN
PAPER SIZE= LETTER or A4 (if 220 V)
PAPER TYPE= PLAIN
ENVELOPE FEEDER SIZE= COM10
ORIENTATION= PORTRAIT
PERSONALITY= AUTO
RESOLUTION ENHANCEMENT= ON
PRINT DENSITY= 3
ECONOMODE= OFF
2-SIDED= OFF
BINDING= LONG EDGE
PRINT POSTSCRIPT
ERRORS=
JAM RECOVERY= OFF
PAGE PROTECT= AUTO
RESOLUTION= 600 DOTS PER INCH
OFF
I/O TIMEOUT= 15 SECONDS
AUTO CONTINUE= ON
TONER LOW= STOP
POWER SAVE DELAY= 1 HOUR
RESOURCE SAVING= AUTO
PARALLEL I/O SPEED
SETTING=
IO BUFFER= AUTO
IO SIZE= 10K
COLD RESET PAPER= LETTER or A4 (if 220 V)
SERVICE MESSAGE= OFF
DIAGNOSTICS= OFF
HIGH
4-6 Printer Control Panel EN
Page 46

Control Panel Menus
Pressing [Menus] gives you access to control panel menu options.
Menus appear in the following order:
• Tray Menu
• Job Control Menu
• Test Menu
• PCL Menu
• Configuration Menu
• Print Quality Menu
• Input/Output (IO) Menu
• PostScript Menu (on 5Si MX or 5Si/5Si NX with optional PostScript
SIMM)
• HP MIO 1 Menu (on 5Si MX/5Si NX or 5Si with optional MIO
board installed)
• HP MIO 2 Menu (if a second MIO card is installed)
Each of these menus is described in a separate table later in this chapter.
Selecting a Menu Item
1 Press [Menus] repeatedly until the menu you want appears.
2 Press [Items] repeatedly until the item you want appears.
3 Press [+] repeatedly until the setting you want appears.
4 Press [Select *] to select and save your setting. An asterisk (*) appears
next to your choice, indicating that it is now the default.
5
Press [Menus] or [On Line] to exit.
Note In a menu mode, if no keys are pressed for approximately 30 seconds,
the system automatically returns to the top level and displays READY
(or an existing error or service message).
EN Printer Control Panel 4-7
4
Panel
Printer Control
Page 47

Tray Menu
This menu shows the paper status (type or size) of all available paper
trays.
Press [Items] repeatedly to see each tray size and type in turn.
Table 4-5 presents the messages that appear when you select each of the
menu items.
Table 4-5 Tray Menu
Menu Item Explanation
Note:Available only if you have the optional
ENVELOPE FEEDER
TYPE=PLAIN
ENVELOPE FEEDER
SIZE=COM10
Envelope Feeder.
Type of envelopes available in the optional
Envelope Feeder.Provides selection of other types.
Note:Available only if you have the optional
Envelope Feeder.
Size of envelopes available in the optional
Envelope Feeder.Provides selection of other sizes.
TRAY MENU
Note
TRAY 1
TYPE=LETTERHEAD
TRAY 1
SIZE=LETTER
TRAY 2
TYPE=PLAIN
TRAY 3
TYPE=PLAIN
TRAY 4
TYPE=PLAIN
Type of media loaded in Tray 1 (multi-purpose).
Provides selection of other types.
Size of media available in Tray 1. Provides
selection of other sizes.
Type of media availablein Tray 2.Provides
selection of other types.
Type of media availablein Tray 3.Provides
selection of other types.
Type of media available in optional 2000-Sheet
Input Tray (Tray 4).Provides selection of other
types.
Tray 1 and the optional Envelope Feeder do not have a sensor for
identifying paper size. If either is being used, you will also have a menu
item for media size. You must set the size of the paper loaded before
continuing. Paper sizes for Trays 2, 3, and 4 are automatically sensed.
4-8 Printer Control Panel EN
Page 48

Changing Paper Type from the Control Panel
1 Press [Menus] repeatedly until TRAY MENU appears.
2 Press [Items] repeatedly to scroll through the trays and their types.
3 Press [+] repeatedly to scroll through the paper type or size options.
4 Press [Select *] to save your choice.
Selecting media by type rather than source is similar to locking out the
tray(s), which is a feature of previous HP LaserJet printers. If letterhead
is loaded in Tray 1, and print on plain paper is selected in the driver, the
printer will not pull the letterhead paper from Tray 1. However, the
printer will pull from either of the other trays if plain paper is loaded,
and has been set on the printer control panel.
Job Control Menu
The Job Control Menu is used to cancel a current job or to eject data that
has been sent to the printer. The CANCEL JOB option will cancel the job
from the control panel. The FORMFEED option is useful when the data
light is on, but nothing is printing out. This situation occurs when the
application has not told the printer that it has finished sending data. This
commonly occurs when printing from DOS. Table 4-6 presents the
messages that appear after selecting each menu item.
Table 4-6 Job Control Menu
Menu Item Explanation
Press [Select *]. STOPPING CHECK LAST PAGE
appears until the last page currently being printed
is placed in the output bin. PRESS SELECT TO
CANCEL JOB
JOB CONTROL MENU
PRESS SELECT TO
FORMFEED
EN Printer Control Panel 4-9
CANCEL JOB is displayed.If you press [Select *]
again, CANCELING JOB appears until the entire print
job is removed or deleted.To ignore job
cancellation, press [On Line].
FORMFEEDING is displayed.The online indicator
flashes until the page is delivered to the output bin.
4
Panel
Printer Control
Page 49

Test Menu
Use selections from this menu to print configuration and font
demonstration pages. Samples of the printouts are presented on the
following pages with keys for interpreting the information. Table 4-7
presents the messages that appear after selecting each of the menu items.
Table 4-7 Test Menu
Menu Item Explanation
TEST MENU
PCL
CONFIGURATION PAGE
POSTSCRIPT
CONFIGURATION PAGE
PCL FONT LIST
POSTSCRIPT
FONT LIST
PRINTING CONFIGURATION PAGE appears on the
control panel display.Two pages are printed.The
first page presents variables and default
information relating attributes such as paper,
memory, and I/O channels.See Figure 4-4a and
the key to Figure 4-4a for a sample and further
explanation of the page. This page is similar to the
Self Test Page from other HP LaserJet printers.
The second page (Figure 4-4b) is a simple layout
of the menu structure with items and current
default settings for those items.
PRINTING CONFIGURATION PAGE appears on the
display. See Figure 4-5 and the key to Figure 4-5
for a sample and further explanation of the page.
(This option will not appear on the 5Si unless the
optional Adobe PostScript SIMM has been
installed.)
PRINTING FONT LIST appearson the display.The
page presents a list of fonts used by PCL.See
Figure 4-6 for a sample list.
PRINTING FONT LIST appearson the display.The
PostScript Font List has samples of the 35 built-in
PostScript language fonts plus fonts downloaded to
the printer’s memory and optional printer hard disk
(if installed.) See Figure 4-7 for a sample list.
Continued on the next page.
4-10 Printer Control Panel EN
Page 50

Table 4-7 Test Menu,
Menu Item Explanation
continued
TEST MENU DISK DIRECTORY
PAGE
DEMO PAGES PRINTING DEMO PAGES appears on the display.
PRINT ERROR LOG PRINTING ERROR LOG appears on the display. This
SHOW ERROR LOG A list of errors will appear on the display. Use [+] to
PAPER PATH TEST A user-configurable print test that checks the paper
PRINTING DISK DIRECTORY appears on the display.
The directory shows all the resources stored on the
hard disk (such as fonts and forms) and their
directories (this option only appears if the optional
printer Hard Disk is installed.) See Figure 4-8 for a
sample list.
log tracks the last 50 printer errors listed by the
number of their occurrences.See Figure 4-9 for a
sample list.
scroll through the list.
path of the printer.Input tray and number of copies
can be selected.
EN Printer Control Panel 4-11
4
Panel
Printer Control
Page 51

Configuration
Page
Figure 4-4a Sample PCL Configuration Page
4-12 Printer Control Panel EN
Page 52

Key to Figure 4-4a
1. Printer Information lists printer specific statistics.
Serial Number shows the serial number of the print engine.
Formatter Number shows the serial number of the formatter board.
Firmware Datecode is an eight-digit date (YYYYMMDD) of the
internal code.
Processor Revision shows the revision number of the firmware
processor.
Page Count shows the number of pages printed.
Pages Since Last Power Cycle shows the number of pages printed
since the last time the printer was turned off.
Pages Since Last Maintenance shows the number of pages printed
since the time a maintenance kit was installed.
2. Installed Personalities and Options lists printer languages and all
accessories that are installed.
3. Error Log shows the number of errors currently in the error log and
the last three errors that occurred.
4. Memory shows the total amount of installed memory and indicates the
amount of available memory for PCL applications (such as font
downloading software). Information about the current I/O Buffering and
Resource Saving configuration appears here. If the printer does not
have enough memory installed to enable these two features, the
amount of additional memory needed appears.
5. Security lists whether the control panel is locked, whether the control
panel has a security password, and if the optional hard disk has been
write-protected (if present.)
6. Paper Handling Options lists the installed paper handling
accessories.These accessories may include the Duplex Unit, optional
EnvelopeFeeder, 2000-Sheet Input Tray, Multi-Bin Mailbox or Multi-Bin
Mailbox with Stapler.
4
Panel
Printer Control
7. HP MIO information is reserved for the HP MIO and network statistics.
For some installed MIO options, this block of information can be as
long as 20 lines and three columns.
EN Printer Control Panel 4-13
Page 53

Figure 4-4b PCL Menu Map Page
4-14 Printer Control Panel EN
Page 54

Key to Figure 4-4b
1. Tray Menu lists the current media types settings for each tray, and the
media size for Tray 1.
2. Job Control Menu shows the Cancel Job and Form Feed items.
3. Test Menu lists the different available printer tests.
4. PCL Menu lists the PCL font settings used by your printer.
5. Configuration Menu lists the current settings for the configuration
items.
6. Print Quality Menu lists the current settings for the different print
quality items.
7. PostScript Menu lists the current settings for the two PostScript menu
items.
8. IO Menu lists the current settings for the Parallel IO Speed and the IO
Timeout.
9. HP MIO Menu(s) list the current settings for the HP MIO(s).
EN Printer Control Panel 4-15
4
Panel
Printer Control
Page 55

PostScript™Configuration Page
HP LaserJet 5Si MX
342
Adobe, Postscript, and the PostScript Logo are trademarks of Adobe Systems Incorporated which may be registered incertain jurisdictions.
Page Count
Figure 4-5 PostScript Configuration Page
4-16 Printer Control Panel EN
Page 56

Key to Figure 4-5
1. Settings (current printer control panel default settings and
product-specific information):
Printer Name is the name set by the user (a network name, for
instance).
Product Name is the HP LaserJet printer model.
PostScriptVersion refers to the version of PostScriptinstalled (if
any.)
Copies indicates the default number of originals to be printed.
Resolution is either 600 or 300 dpi.
Resolution Enhancement indicates if Resolution Enhancement is
set to ON, OFF, or AUTO(see Chapter 6, “Print Quality”).
HalftoneType indicates the current halftone type.
EconoMode indicates whether EconoMode is ON or OFF (see
Chapter 6, “Print Quality”).
WaitTimeout shows how long PostScript waits for additional data.
Print Errors indicates if a PostScript error page is automatically
printed when a PostScript error occurs.
Jam Recovery indicates whether Jam Recovery is ON or OFF.
Manual Feed indicates whether Manual Feed is ON or OFF.
Duplex indicates whether the duplexing feature is ON or OFF.
Trays 1-4 indicate the media specified for each tray.
2. Memory shows how much memory is installed in the printer.This value
may be useful for more experienced users, since PostScript Level 2
allows users to configure memory parameters. (See Adobe’s
Language Reference Manual
3. Printable Area gives the dimensions within the margins of the image
area.The current default is shown in the hollow box.
4. Disk Accessory show whether the optional printer hard disk is
present, and if so the total capacity of the printer’s hard disk, how many
bytes are availablefor use, and whether or not the hard disk is
write-protected.
5. Page Count shows how many pages hav ebeen printed by the printer in
all printer languages.Use the page count to track printer use.
forspecific information about these values.)
PostScript
4
Panel
Printer Control
EN Printer Control Panel 4-17
Page 57

Figure 4-6 PCL Font List
4-18 Printer Control Panel EN
Page 58

Key to Figure 4-6
1. Font is the name of the font.
2. Pitch/Point indicates the specified pitch or point size of the font.
“Scale” indicates a scaleable font.
3. Escape Sequence (a PCL programming command) is used to select
the designated font.
4. Font # is the number used to select internal or downloaded soft fonts
from the control panel.(Do not confuse the font number with the soft
font ID,described next.) The letter preceding the font number shows
the source of the font (I means Internal, and S means permanent soft
font, and M means SIMM - slot number follows).
5. Font ID is the number
them through software.
the user assigns
to soft fonts when downloading
EN Printer Control Panel 4-19
4
Panel
Printer Control
Page 59

PostScript™ROM Resident Fonts
Figure 4-7 PostScript Font List
4-20 Printer Control Panel EN
Page 60

Figure 4-8 Disk Directory Page
Key to Figure 4-8
1. Disk Information indicates the disk model number, serial number,
capacity, availablefree space, and write protection status.
2. File Size lists the size of each file under the Directory/File Name
column.If a directory is listed on the line, then Directory appears in this
column and its path is listed in the Directory/File Name column.
3. Directory/File Name lists the name of the file. Files in a sub-directory
are listed right after the directory line.The files are not necessarily
listed in alphabetic order.
EN Printer Control Panel 4-21
4
Panel
Printer Control
Page 61

Figure 4-9 Error Log Page
Key to Figure 4-9
1. Page Count lists the number of pages printed.
2. Serial Number shows the serial number of the printer.
3. Number indicates the order in which the errors occurred. The last
error to occur has the highest number.
4. Error lists the internal error codes for the 50 most recent errors.
5. Page Count indicates the number of pages printed when the error
occurred.
6. Personality or Jam Cause indicates whether the error occurred
due to a problem within a printer personality or a paper jam.
4-22 Printer Control Panel EN
Page 62

PCL Menu
This menu is used to change the default PCL font settings used by your
printer. Table 4-8 presents the messages that appear when each of the
menu items is selected.
Table 4-8 PCL Menu
Menu Item Explanation
PCL MENU
SOURCE=
[INTERNAL*,SLOT
4,SLOT 3,SLOT 2,
SLOT 1,SOFT]
NUMBER=
[0,..22]
PITCH=
[0.44..99.99]
SYM SET=
[ROMAN-8*,ISO
L1, ISO L2,ISO
L5,PC-8,PC-8DN,
PC-850,PC-852,
PC-8 TK, WIN
L1,WIN L2,
WINL5,DESKTOP,PS
TEXT,VN INTL,VN
US,MS PUBL,
MATH-8,PS MATH,
VN MATH, PI
FONT, LEGAL,
ISO 4,ISO 6,ISO
11,ISO 15,ISO
17,ISO 21,ISO
60,ISO 69,WIN3.0]
Indicates source of font information.Internal fonts
are those stored in the printer; slot numbers
correlate to font SIMMs that may be installed;and
soft fonts are those that have been manually
downloaded to the printer.
Each font is listed by a number.Thedefault font
number can be manually changed here.
This entry displays the pitch of the defaultfont.
This is the default symbol set, which is normally
Roman 8. The symbol set may be different
depending on the application.
4
Panel
Printer Control
FORM=
[60 LINES*,
5..128]
* Factory Default
EN Printer Control Panel 4-23
The FORM setting is the number of lines that will
be printed per page.The default is 60 lines.
Page 63

Configuration Menu
The items on the Configuration Menu set default parameters for
two-sided printing, binding, selected output bin, printing personality,
auto continue, power saving, resource saving, page protection and the
display of maintenance messages when the toner supply is low or
service is needed. Table 4-9 presents the messages that appear when you
select each of these menu items.
Table 4-9 Configuration Menu
Menu Item Explanation
CONFIGURATION MENU
* Factory default.
SERVICE MESSAGE=
[ON,OFF]
2-SIDED=
[OFF*,ON]
BINDING=
[LONG EDGE*,
SHORT EDGE]
PAPER DESTINATION=
[TOP OUTPUT BIN*,
LEFT OUTPUT BIN,
OPTIONAL OUTBIN]
ORIENTATION=
[PORTRAIT*,
LANDSCAPE]
POWER SAVE DELAY=
[1 HR*
2 HRS
3 HRS
OFF
15 MINUTES
30 MINUTES]
Appears at approximately 350,000-image intervals,
when the PERFORM USER MAINTENANCE message
appears.
Allows selection of duplex (two-sided) printing as
the default printing mode (only appears if the
optional Duplex Unit is installed.)
Allows control of the binding edges of duplexed
documents (only appears if the optional Duplex
Unit is installed.) More information about binding
options is located in Chapter 5, “Print Tasks.”
Allows the selection of the default output bin.More
information about the output bins is located in
Chapter 5.
When an output bin is full of paper, printing is
stopped and one of the following messages is
displayed:REMOVE PAPER FROM TOP OUTPUT BIN or
REMOVE PAPER FROM OPTIONAL OUTBIN n.Empty
the bin to resume printing.
(Note that the Left Output Bin will not cause the bin
full message to be displayed.)
By selecting the Stapler (if installed) as the output
bin, you can haveyour documents stapled.
Sets the default orientation of the printed page. The
orientation setting in your software application
overrides the control panel setting.
Allows you to change the setting for the time
interval the printer remains inactive prior to
entering Power Save mode. Warm up time for the
printer after the power save delay is approximately
60 seconds.
Continued on the next page
4-24 Printer Control Panel EN
Page 64

Table 4-9 Configuration Menu,
continued
Menu Item Explanation
Controls selection of the printer personality. The
PERSONALITY=
[AUTO*,PCL,
POSTSCRIPT]
choices available depend on which personalities
are installed. AUTO is the default, and allows the
printer to automatically determine the personality
needed for a given job.
Allows the printer to resume printing after
noncritical errors occur.If ON is selected, the
AUTO CONTINUE=
[ON*,OFF]
printer goes offline and the error message is
displayedfor ten seconds.After ten seconds, the
printer automatically returns to online. If turned off,
the printer will remain offline until attended.
Sets resource saving to ON, OFF, or AUTO(which
RESOURCE SAVE=
[AUTO*,OFF,ON]
automatically determines how much memory to
use for each installed personality).When set to ON,
you can select a specific amount of memory for
resource saving.
CONFIGURATION MENU
PCL MEM=nnnnnK
or
POSTSCRIPT MEM=
nnnnnK
This item becomes visible only if Resource Save is
set to ON. The value nnnnnK indicates the number
of KBytes of memory reserved for that personality.
The choices for this item range from 0 to the total
amount of available memory in the printer in
100-KByte increments. Press [+] repeatedly to
increase reserved memory.
This item controls the printer action taken when low
TONER LOW=
[STOP*,CONTINUE]
toner levels are detected. By default, the printer will
stop.(As toner runs low, the quality of the printed
page will deteriorate.)
PAGE PROTECT appears after a 21 PRINT OVERRUN
error has occurred. Try to simplify the format of the
PAGE PROTECT=
[ON,AUTO*]
job.If you must print the job “as is,” set PAGE
PROTECT to ON, then later return it to AUTO. Do not
leavePAGE PROTECT set to ON as it will degrade
performance.
* Factory default.
4
Panel
Printer Control
EN Printer Control Panel 4-25
Page 65

Print Quality Menu
The Print Quality Menu allows you to change the physical
characteristics of the printed page. All choices are saved until the current
print job has ended, except for Print Density, which changes after a few
pages. See Chapter 6, “Print Quality,” for more information.
Table 4-10 presents the messages that appear when you select each of
the menu items.
Table 4-10 Print Quality Menu
Menu Item Explanation
PRINT QUALITY MENU
* Factory default
ECONOMODE= [OFF*,
ON]
RESOLUTION=
(600*,300) DOTS
PER INCH
RESOLUTION
ENHANCEMENT=
[OFF,ON*]
PRINT DENSITY=
[1,2,3*,4,5]
Reduces the amount of toner on the printed page;
the result is similar to draft mode on some dot
matrix printers.(See Chapter 6.)
Prints at 300 or 600 dpi. If the printer is unable to
print a job at 600 dpi, it reverts to 300 dpi for the
remainder of the job.
Prints fine quality characters and graphics by
smoothing the gradations along the angles and
curves of the printed image.
Variesthe amount of toner applied to the paper
while printing. The higher the setting (5 is highest)
the darker the page; the lower the setting (1 is
lowest) the lighter the page.
Changes to this setting are effected during a print
job by stopping the receipt of new data, clearing
the printer of pages, changing the density, and then
resuming the print job.
4-26 Printer Control Panel EN
Page 66

PostScript Menu
This menu is only available if the Adobe PostScript SIMM is installed in
your printer. The HP LaserJet 5Si MX comes with PostScript
pre-installed. The HP LaserJet 5Si/5Si NX do not, but will accept the
SIMM as an upgrade.
Use this menu to print PostScript errors and to recover from paper jams.
Table 4-11 presents the messages that appear when you select each of
the menu items.
Table 4-11 PostScript Menu
Menu Item Explanation
POSTSCRIPT MENU
* Factory default.
PRINT POSTSCRIPT
ERRORS= [OFF*,ON]
JAM RECOVERY=
[OFF*,ON]
Determines whether PostScript error messages
print.
Determines whether PostScript attempts to recover
automatically from paper jams.Jam recovery uses
more memory and thus may affect performance.
4
Panel
Printer Control
EN Printer Control Panel 4-27
Page 67

Input/Output (IO) Menu
This menu contains the items related to I/O buffering. See Chapter 2,
“Memory and Memory Management,” for additional information about
the I/O functionality of your printer.
Table 4-12 presents the messages that will appear when you select each
of the menu items.
Table 4-12 IO Menu
Menus Item Explanation
PARALLEL IO
SPEED=[HIGH,LOW]
IO TIMEOUT=
[5 SEC,
10 SEC,
15 SEC*,
20 SEC,
30 SEC,
60 SEC,
120 SEC,
180 SEC,
240 SEC,
300 SEC]
IO MENU
IO BUFFER=
[AUTO*,OFF,ON]
IO SIZE=
nnnK
* Factory default.
The rate at which data is transferred to print a page.
The time, measured in seconds, that the printer
waits before ending an incomplete print job.Once
the item is selected, press [+] repeatedly to choose
the desired setting for best performance.
The portion of the printer memory set aside to hold
incoming data. When this item is set to AUTO,the
memory set aside for I/O buffering is automatically
determined by the printer based on available
memory.When it is set to ON, the size can be
manually adjusted. When it is set to OFF, no
memory is set aside.This menu item will NOT
appear in the menu unless sufficient memory is
available to allow I/O buffering.For PCL, the
standard 4 Mbytes of memory is sufficient. For
PostScript it will take more than 12 Mbytes of
memory.See Chapter 2 to learn how I/O buffering
improves performance.
Note:When the I/O buffer settings change, all
downloaded resources are deleted, unless they are
stored on the optional printer hard disk.
Becomes visible only if IO BUFFER is set to ON.It is
used to set the size of the buffer.Once the item is
selected, press [+] repeatedly to reach the
increment value desired.If you hold down the [+]
key, the values speed the increments.
4-28 Printer Control Panel EN
Page 68

Print Tasks
Introduction
This chapter explains how to:
• Print media from the best source.
• Load media into the input trays.
• Print a variety of media from Tray 1, including labels and
transparencies, custom-size paper, letterhead documents, preprinted
forms, and special papers.
• Print paper from the optional 2000-Sheet Input Tray (Tray 4).
• Verify the correct size and type of media in the paper trays.
5
• Print envelopes from Tray 1, from the optional Envelope Feeder, or
using a software application.
• Select print media and the output bins.
• Adjust the paper stop.
• Print to the optional Multi-Bin Mailbox or Mailbox with Stapler.
• Staple Documents with the optional Mailbox with Stapler
• Print the first page of a document on a different size or type of paper.
• Select two-sided printing with the Duplex Unit.
• Stop a print request.
• Print multiple copies of a document.
EN Print Tasks 5-1
Page 69

Print Source and Media Options
Your printer can print on the media identified in the following table
using the adjustable Trays 1, 2, 3, and (if installed) 4. The Duplex Unit
provides two-sided printing.
• Tray 1 (multi-purpose) holds up to 100 sheets of paper or up to 10
envelopes.
• Trays 2 and 3 hold up to 500 sheets of paper.
• An optional Tray 4 holds up to 2000 sheets of paper.
• An optional Envelope Feeder provides automatic feeding of up to 100
envelopes.
Note Paper or envelope holding capacities may vary depending on paper
weight. Stated capacities refer to standard 20-lb bond paper.
CAUTION Print heavy-weight papers, labels, maximum-size papers, and
transparencies only from Tray 1. The destination for heavy-weight
papers should be either the left or top output bins. Do not send
heavy-weight papers to the stapler or mailbox bins. Heavier papers
should be printed using Manual Feed. Load only one size of paper at a
time in Tray 1.
Table 5-1 lists specifications and guidelines for each media type
supported by the printer.
5-2 Print Tasks EN
Page 70

Media Selection Guidelines
Table 5-1 displays guidelines for selecting the appropriate media to print
from Trays 1, 2, 3, and 4, and to the optional Mailbox with Stapler.
Table 5-1 Media Selection Guidelines
Tray 1 Dimensions Weight Capacity
5
PrintTasks
Maximum paper size 11.7 x 17.7 in
(297 x 450 mm)
Minimum paper size 3.9 x 7.5 in
(100 x 191 mm)
Paper, Letter 8.5 x 11 in
(216 x 279 mm)
Paper, ISO A4 8.3 x 11.7 in
(210 x 297 mm)
Paper, Executive 7.25 x 10.5 in
(184 x 267 mm)
Paper, Legal 8.5 x 14 in
(216 x 356 mm)
Paper, 11 x 17 in 11 x 17 in
(279 x 432 mm)
Paper, ISO A3 11.7 x 16.5 in
(297 x 420 mm)
Paper, JIS B5 7.16 x 10.12 in
(182 x 257 mm)
Paper, JIS B4 10.12 x 14.33 in
(257 x 364 mm)
Transparency See minimum
and maximum
Label 0.005 – 0.007 in.thick
Envelope,Commercial
#10 (Com 10)
Envelope,C5 6.4 x 9.0 in
Envelope,DL 4.3 x 8.7 in
paper sizes
listed above.
4.1 x 9.5 in
(105 x 241 mm)
(163 x 231 mm)
(109 x 220 mm)
Single-sided:16-lb Bond
to 110-lb Index (60 to
199 g/m2)
Two-sided: 16- to 28-lb
Bond (60 to 105 g/m2)
Paper weighing above
28-lb (105 g/m2) should
be manually fed from
Tray 1.
Two-sided printing is
NOT availablefor
Maximum sized paper
or on media smaller
than Executive size.
0.0039 – 0.0045 in.thick
(0.099 to 0.114 mm)
(0.127 to 0.178 mm)
Should not exceed 24-lb
Bond (75 g/m2)
100 sheets of 20-lb
Bond (75 g/m2) paper
(Do not load to more
than a maximum height
of 10 mm—the paperfill
mark.)
Limit to paperfill mark
on paper width guides
Up to 10 at one time
Envelope,Monarch andB53.9 x 7.5 in
(99 x 191 mm)
EN Print Tasks 5-3
Should not exceed 24-lb
Bond (75 g/m2)
Up to 10 at one time
Page 71

Tray 2 Dimensions Weight Capacity
Paper, Letter 8.5 x 11 in
(216 x 279 mm)
Paper, ISO A4 8.3 x 11.7 in
(210 x 297 mm)
Paper, Legal 8.5 x 14 in
(216 x 356 mm)
Paper, JIS B4 10.12x 14.33 in
(257 x 364 mm)
Tray 3 and (optional)
Tray 4
Paper, Letter 8.5 x 11 in
Paper, ISO A4 8.3 x 11.7 in
Paper, Legal 8.5 x 14 in
Paper, JIS B4 10.12x 14.33 in
Paper, ISO A3 11.7 x 16.5 in
Paper, 11 x 17 in 11 x 17 in
Dimensions Weight Capacity
(216 x 279 mm)
(210 x 297 mm)
(216 x 356 mm)
(257 x 364 mm)
(297 x 420 mm)
(279 x 432 mm)
Single-sided:16- to
28-lb (60 to 105 g/m2)
Single-sided:16- to
28-lb (60 to 105 g/m2)
500 sheets of 20-lb
Bond (75 g/m2) paper
For Tray 3, 500 sheets
of 20-lb Bond (75 g/m2)
paper
For (optional) Tray4,
2000 sheets of 20-lb
Bond (75 g/m2) paper
(Optional)
Stapler Unit
Paper, Letter 8.5 x 11 in
Paper, ISO A4 8.3 x 11.7 in
(Optional)
Mailbox Bins
Face-UpBin (Left
OutputTray)
All media types
Face-Down Bins
(Mailboxes)
Paper, Letter
Dimensions Weight Capacity
Single-sided:16- to
(216 x 279 mm)
(210 x 297 mm)
Dimensions Weight Capacity
Up to 8.5 x 11 in
(216 x 279 mm)
Up to 8.5 x 11 in
(216 x 279 mm)
28-lb (60 to 105 g/m2)
No transparencies or
labels
Single-sided:16- to
28-lb (60 to 105 g/m2)
No envelopes,
transparencies or
labels
20 sheets of 20-lb Bond
(75 g/m2) paper per
stapled document, up to
400 sheets
500 sheets of 20-lb
Bond (75 g/m2) paper
5-4 Print Tasks EN
Page 72

Media Use Guidelines
The previous table presents guidelines for using media in the printer.
Media that does not meet these guidelines may increase the incidence of
paper jams, cause premature wear to the printer, and contribute to repair
costs.
Before purchasing any media or specialized forms in quantity, make
sure your paper supplier obtains and understands the paper and print
media requirements specified in the HP LaserJet Printer Family Paper
Specification Guide, which is available through HP Direct Distribution.
Refer to Chapter 7, “Calling for Help,” for ordering information.
Note Hewlett-Packard neither warrants nor recommends the use of a
particular brand of print media. Media properties are subject to change
by the manufacturer, and HP has no control over these changes. It is
possible that paper could meet all of the guidelines and still not print
satisfactorily.This might be due to improper handling, unacceptable
temperature and humidity levels in the room, or other variables over
which HP has no control.
HP recommends testing any paper before buying it in large quantities.
CAUTION Using media outside the specifications listed on the previous pages or in
the HP LaserJet Printer Family Paper Specification Guide may cause
problems requiring service. This service is not covered by the
Hewlett-Packard warranty or service agreements.
5
PrintTasks
EN Print Tasks 5-5
Page 73

Table 5-2 Media Use Guidelines
Media Type Guidelines
Paper and
Preprinted Forms
Adhesive Labels
Overhead
Transparencies
• For best results, use conventional 20-lb (75 g/m
of good quality and freeofcuts,nicks,tears,spots, loose particles, dust, wrinkles, voids, and
curled or bent edges.
• Do not use paper with cutouts or perforations (includingstandard pre-punched paper)
holes 8 mm in diameter or larger.
• Do not use letterhead papers that are printed withlow-temperature inks, such as those used in
some types of thermography.
• Use only colored papers or preprinted forms thatuseinks compatible with your printer’s fusing
temperature (392°F/200°C for 0.1 second).
• Keep paper stored in moisture-proof wrappingto prevent changesinmoisturecontent that
may cause poor print quality,jamming,or curling.
• Avoid paper with ragged or cut edges to prevent feedingproblems.
• Do not use paper heavier than 28-lb (105 g/m
16-lb Bond to 110-lb Index (60- 199 g/m
stacking problems, paperjams, poor toner fusing, poor print quality,andexcessivemechanical
wear.
• Do not use paper that is very rough, very smooth, or embossed. Such paper may cause
feeding or print qualityproblems, and rough papers may have poor toner adhesion.
• Use only labels recommended for use in laser printers.
• Use only the Left Output Bin for printing labels.
• The adhesive material should be stable at the 392° F/200° C temperatures encounteredinthe
fusing process. Noneoftheadhesive between the labels shouldbe exposed.
• Use labels with no exposed areas between labels. Usinglabel stock with spaces between
labels often causes labels to peel off during the printingcycle, causing serious jamming
problems. Use a sheet of labels onlyonce.
• Labels must lie flat with no more than 0.5 in (13 mm) of curl in any direction.
• Do not use labels that have separated from the backing sheet or with wrinkles, bubbles, or
other indicationsofdelamination.
• Overhead transparencies used in HP LaserJetprinters mustbe able to withstand the
392°F/200°C temperatureencountered in the fusing process.
• Use only transparencies recommendedforuseinlaserprinters. Because transparency films
tend to stick to each other, remove each transparency from the output bin before printing the
next one.
• Use only the Left or Top Output Bins for printing transparencies.
2
) xerographic paper.Makesurethe paper is
2
) from trays other than Tray 1. Tray 1 can feed
2
) paper. Heavier paper may causemisfeeds,
with
5-6 Print Tasks EN
Page 74

Media Type Guidelines
Envelopes
• The weight of the envelope paper should not exceed a 24-lb (90 g/m
jamming may result. Use only the LeftorTopOutputBins for printing envelopes.
• Envelopes should lie flat with less than 0.25 in (6 mm) curl.
• Do not use envelopes with windows or clasps.
• Make sure envelopes are not wrinkled, nicked, or otherwisedamaged.
• Envelopes with a peel-off adhesive strip or with more than one flapthatfoldsover to seal must
use adhesives compatiblewith the heat and pressure of the fusing rollers in the printer.The
extra flaps and strips may result inwrinkling or creasing, and may cause jamming.
2
) Bond rating, or
5
PrintTasks
EN Print Tasks 5-7
Page 75

Paper Trays 1, 2, 3, and (optional) Tray 4
You can load a single sheet of paper into Tray 1 or a stack of up to 100
sheets. Tray 1 (multi-purpose) is used for standard and custom paper
sizes, envelopes, labels, and transparencies.
Paper Trays 2 and 3 each hold up to 500 sheets of 20-lb Bond paper.
Tray 4 holds up to 2000 sheets of 20-lb bond paper.
Paper Tray 2 holds:
• Letter
• Legal
• ISO A4
• JIS B4
Paper Tray 3 and (optional) Tray 4 hold:
• Letter
• Legal
• ISO A4
• ISO A3
• 11 x 17 in
• JIS B4
Adjustable paper size guides for each of the media listed are located
inside the paper trays. See Tables 5-1 and 5-2 earlier in this chapter for
media selection and use guidelines.
When all trays have the same type and size media loaded, by default the
printer prints from paper sources in the following order:
1. Tray 1
2. Tray 4 (if installed)
3. Tray 2
4. Tray 3
For example, assume all paper sources contain the same size of paper. If
you specify Tray 1 or Automatic, send a print request to the printer, and
Tray 1 is empty, the printer prints from Tray 4. If Tray 4 is also empty
(or not installed), the printer prints from Tray 2, and then from Tray 3.
5-8 Print Tasks EN
Page 76

Loading Media Into Tray 1
(Multi-purpose)
CAUTION
To avoid a paper jam, never add or
remove media from Tray 1 while the
printer is printing.To avoid damaging the
printer, print labels and transparencies
only from Tray 1. Send them to the Left
Output Bin, and do not print them
two-sided.
When printing multiple transparencies,
promptly remove each print as soon as it
emerges from the printer (so the sheets
do not stick together).
1 Open Tray 1.
2 Pull out the tray extension, if needed
for the paper size you are printing.
3 Slide the paper width guides to the
appropriate size marked on the tray.
5
PrintTasks
Continued on the next page.
EN Print Tasks 5-9
Page 77

4 Place paper into the tray without
stacking it above the paperfill mark.
Less than 100 sheets of paper may
not lay flat.
Note
For single-sided printing place paper
into the tray with side-to-be-printed up.
Load 3-hole paper with the holes
toward the front of the printer.
For two-sided printing place paper with
the front side down, and load 3-hole
paper with the holes toward the back of
the printer.
5 Paper loading differs by size:
a. Load Letter and ISO A4 with the
longer edge of the page leading into
the printer.
b. Load envelopes, postcards,
Executive, Legal, 11 x 17 in, ISO
A3, JIS B5, or JIS B4 with the short
edge of the page leading into the
printer.
Note
You may use two-sided printing for
sizes equal to or larger than executive
size paper.
6 Slide the paper into the printer,
until paper fits squarely and firmly
between the paper width guides,
without bending the paper.
7 Set the correct paper type and size
for Tray 1 in the TRAY MENU on the
printer control panel.
Note
Paper heavier than 28-lb (105 g/m2)
should be printed from Tray 1 using
Manual Feed.
If you are using the Top Output Bin,
adjust the paper stop guide for the paper
size to be printed (see Figure 5-4).
5-10 Print Tasks EN
Page 78

Loading Paper into Tray 2
or T ray3
1 Open the tray until it stops.
2 Turn the paper guide lock to the
unlocked position.
3 Slide the paper guide to the mark
indicating the size of paper you are
loading.
4 Turn the paper guide lock to re-lock
the position of the tray.
5
PrintTasks
Continued on the next page.
EN Print Tasks 5-11
Page 79

5 Adjust the left paper guide by
pushing in (1), then lifting up and out
(2).
6 Position the guide over the
appropriate lines marked in the tray.
Press the guide into the rear slot (1)
and then lower down (2) into the front
slot (3). Be sure the guide is not
skewed.
7 Place paper into the tray without
stacking it above the paperfill mark.
Fewer than 100 sheets of paper may
not lay flat (from rear to front).
Note
For single-sided printing place paper into
the tray with side-to-be-printed down.
Letterhead should orient to the rear of the
tray. Load 3-hole paper with holes on
your right.
For two-sided printing place paper with
the front side (odd-numbered) up.
Letterhead should be oriented to the rear
of the tray. Load 3-hole paper with holes
on your left.
8 Ensure that the paper size tab is set
correctly. Then slide the tray back
into the printer.
9 If you wish to select your paper by
type rather than tray (source) in your
software, set the correct paper type
for Trays 2 and 3 in the TRAY MENU
on the printer control panel.
Adjust the paper stop guide on the Top
Output Bin for the paper sizes larger than
Letter or A4 (see Figure 5-4).
Note
If paper curls or skews excessively during
printing, open the tray and turn the stack
of paper over. To avoid a paper jam,
never open the tray while it is in use.
5-12 Print Tasks EN
Page 80

Figure 5-1
Optional 2000 Sheet Input Tray
An optional 2000 Sheet Input Tray is available as an option for the HP
LaserJet 5Si/5Si MX/5Si NX printers (see Figure 5-1.) The tray fits
under the printer, acting as a base.
4
5
PrintTasks
2000 Sheet Input Tray (Tray 4)
Tray 4 adjusts for Letter, Legal, ISO A4, ISO A3, 11 in. x 17 in., and JIS
B4 paper. The tray holds approximately 2000 sheets of 20-lb Bond paper.
EN Print Tasks 5-13
Page 81

Loading Paper into Tray 4
1 Slide Tray 4 open until it stops.
2 Adjust the front guide by pulling up
on the pin, placing the guide into
the corresponding top and bottom
slots, and then pushing in the pin.
3 Adjust the back guide by pulling up
on the pin, placing the guide into
the corresponding top and bottom
slots, and then pushing in the pin.
4 Adjust the left guide by pulling up
on the pin and placing the guide
into the corresponding top and
bottom slots. Store the left guide
when using 11 x 17 in paper.
5-14 Print Tasks EN
Page 82
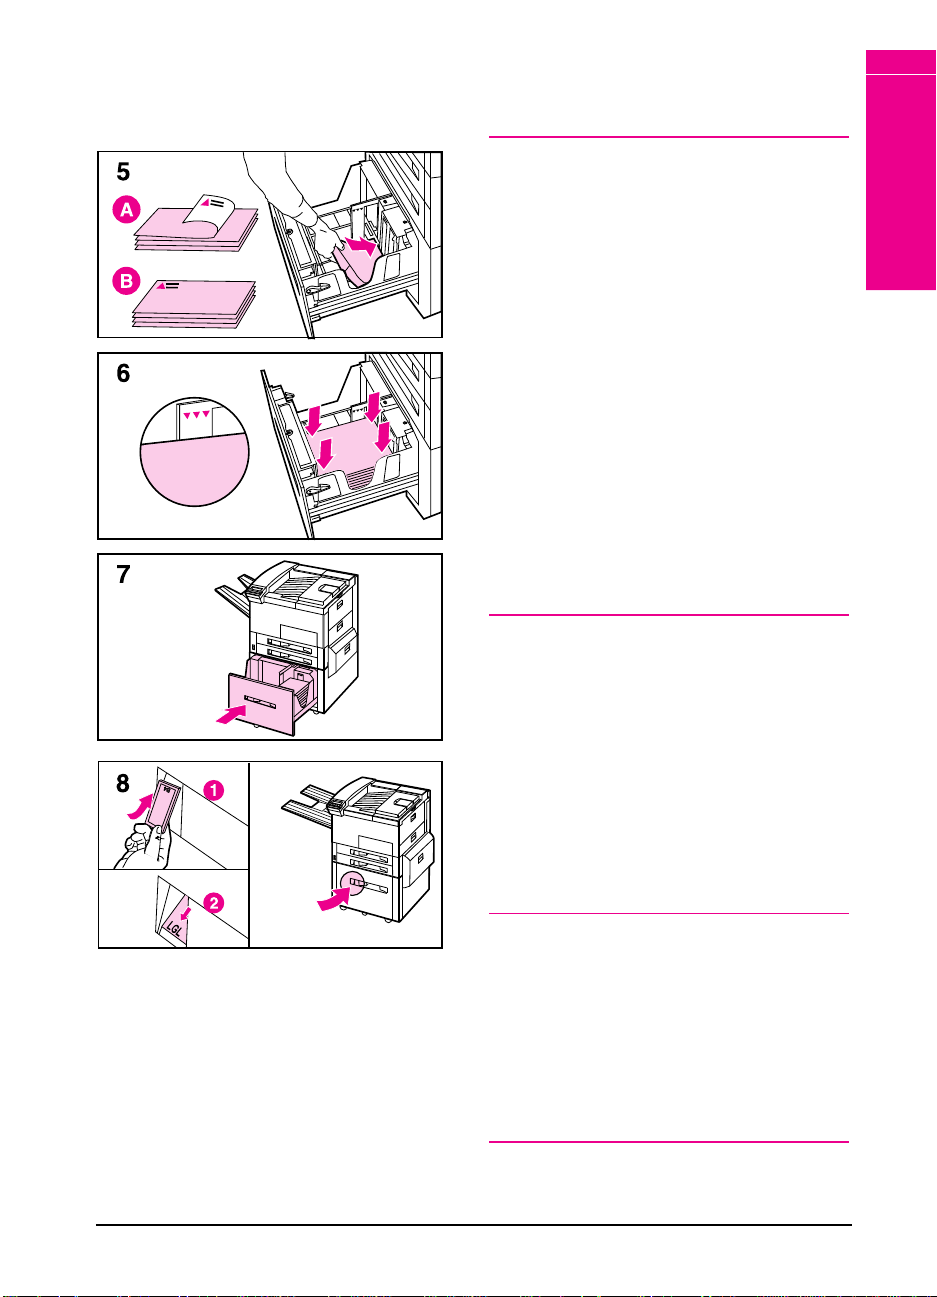
5 Load up to 2000 sheets of paper into
the tray; do not allow paper to extend
above the paperfill mark on the sides.
Note
For single-sided printing on Letter or A4
paper, place paper into Tray 4 with the
side-to-be-printed down. Letterhead
should be oriented to the rear of the tray.
Load 3-hole paper with holes on your
right. For two-sided printing, place paper
with the front side (odd-numbered) up.
The back side (even-numbered) is printed
first, and the front side is printed second.
Letterhead should be oriented to the rear
of the tray. Load 3-hole paper with holes
on your left.
For single-sided printing on 11 x 17 in,
Legal, A3, or JIS B4, place paper into the
tray with the side-to-be-printed down. For
two-sided printing, place paper with the
front side (odd-numbered) up. The back
side (even-numbered) is printed first, and
the front side is printed second.
5
PrintTasks
6 Press down on all four corners of the
paper stack to ensure the paper rests
flat in the tray, without bending the
paper.
7 Close Tray 4.
8 Ensure that the paper size tab is set
correctly.
Note
See “Changing Paper Type and Size from
the Control Panel” later in this chapter to
set the type of paper you loaded in the
tray.
If using the Top Output Bin, remember to
adjust the paper stop guide on the output bin
(see Figure 5-4).
EN Print Tasks 5-15
Page 83

Envelopes in Tray 1
You can print up to ten envelopes from Tray 1. This section explains
how to print an envelope using your software application. Table 5-1 lists
the kinds of envelopes you can print. Check the media use guidelines in
Table 5-2 before loading envelopes. (See “Media Use Guidelines”
earlier in this chapter.)
CAUTION Never use envelopes with clasps, snaps, windows, coated linings,
self-stick adhesives (peel and seal), or other synthetic materials. These
items can severely damage your printer. Never try to print on both sides
of an envelope. Jamming and printer damage can result. Do not staple
envelopes or send them to mailbox bins.
Before you load an envelope in Tray 1, check to make sure it is
rectangular in shape and undamaged. It is a good idea to run a pen or
pencil down the leading edge (side being fed into the printer) to flatten it
before you insert it in Tray 1.
Figure 5-2
A) Good Construction for Envelopes B) Poor Construction for Envelopes
5-16 Print Tasks EN
Page 84

Loading Envelopes into
Tray 1
1 Open the door of Tray 1.
2 If necessary, pull out the tray
extension for the envelope size you
are printing.
3 Gently place up to ten envelopes
between the paper width guides, face
up, with the back flap lying against
the rear paper guide.
4 Slide the paper width guides until they
lightly touch both sides of the
envelope stack without bending it.
5 Set the envelope size and type in the
TRAY MENU on the control panel for
Tray 1.
5
PrintTasks
EN Print Tasks 5-17
Page 85

Paper Source:
TRAY 1
Printing Envelopes from
Your Software Application
1 Load up to ten envelopes into Tray 1.
2 Specify Tray 1, Automatic, or select
the media source by type in your
software application, and set the
envelope size and type to the
appropriate envelope size, such as
COM 10 or DL.
3 If your software does not
automatically format an envelope,
specify Landscape for page
orientation in your application.
Paper Size:
Orientation
Com 10Envelope
Portrait
Landscape
CAUTION
To avoid a printer jam, once you begin
printing, do not remove an envelope and
reinsert it.
For best print quality, use the following
table to set margins for a return and
mailing address. It gives you typical
address margins for a Commercial #10 or
DL envelope. For envelopes of other sizes,
adjust the margin settings until they please
you. Avoid printing over the area where an
envelope’s three back flaps meet.
Type of Address Left Margin Top Margin
Return 0.5 in (15 mm) 0.5 in (15 mm)
Mail destination 4.0 in (85 mm) 2.0 in (51 mm)
5-18 Print Tasks EN
Page 86

Optional Envelope Feeder
The optional Envelope Feeder can hold 2X
postcards and B5, Com 10, C5, DL, and
Monarch envelopes. You can load up to 100
envelopes in the optional Envelope Feeder.
Select the appropriate envelope size and type
through the printer control panel before
printing.
Printing from the Optional
Envelope Feeder
1 Load up to 100 envelopes in the
feeder (do not exceed the paperfill
mark).
2 From the control panel, press [Menus]
repeatedly until TRAY MENU appears.
3 Press [Items] repeatedly until ENV
FEEDER TYPE= PLAIN * appears.
5
PrintTasks
4 Press [+] to view options.
Note
If printer displays a load envelope
message, load envelopes and press
Select * .
EN Print Tasks 5-19
Page 87

Select *
Items
+
5 Press [Select *] to select the
appropriate choice.
6 Press [Items] again to see ENV
FEEDER SIZE= COM10 *
7 Press [+] to view options.
8 Press [Select *] to select the
appropriate choice.
When printing you may select the optional
Envelope Feeder as your media source, or
you may select your media by type. To
select by media type, you choose the type
in the printer driver that matches the
envelope type you set on the printer
control panel.
If you cannot access the optional Envelope
Feeder when printing, you may need to
ensure that the optional Envelope Feeder
has been installed in your printer driver.
See Chapter 3, “Printer Software” for
information on accessing the printer driver.
Select *
5-20 Print Tasks EN
Page 88

Menu s
Items
+
Changing Media Type and Size from the
Control Panel
1 Press [Menus] repeatedly until TRAY
MENU appears.
2 Press [Items] repeatedly to scroll
through the trays and their media
types.
Note
You must select the size of the media
before using Tray 1 or the optional
Envelope Feeder since they do not have a
sensor for identifying paper size . If either
is being used, you will also have a menu
item for media size.
3 Press [+] repeatedly to scroll through
the media type options.
4 Press [Select *] to choose the type of
media you loaded in the tray.
5
PrintTasks
If you want to select the media for your
job by type, and not by the paper tray
(source), you will have to set the type
value for each tray on the printer control
panel, and in the printer driver. See
Select *
EN Print Tasks 5-21
Chapter 3 for information on accessing the
printer driver.
Selecting media by type rather than source
is similar to locking out the tray(s). If you
have letterhead loaded in Tray 1, and you
select to print on plain paper in your
driver, the printer will not pull the
letterhead paper from Tray 1. However, it
will pull from one of the other trays if
plain paper is loaded, and has been set on
the printer control panel.
Page 89

Output Bins
The Top Output Bin, located at the top of the printer (see 1 in Figure
5-3), holds up to 500 sheets of paper in the correct order as they exit the
printer. A sensor causes the printer to stop when the paper bin is full.
Printing continues when you empty or reduce the amount of paper in the
bin. The Top Output Bin is the factory default bin.
The Left Output Bin, located on the upper left side of the printer (see 2
in Figure 5-3), holds up to 125 sheets of paper face up as they exit the
printer. This bin is mainly used for special media types, such as labels or
transparencies, that cannot tolerate the curved paper path of the Top
Output Bin. This output bin does not sense when the bin is full.
The optional Multi-Bin Mailbox or Mailbox with Stapler (see 4 in
Figure 5-3) attaches to the left side of the printer. The Multi-Bin
Mailbox contains eight bins which hold up to 250 sheets each. The
Mailbox with Stapler contains five bins which hold 250 sheets each,
plus a stapler. The mailbox accessories work in one of the following
three modes:
• Mailbox - Each bin can be addressed individually as the output
destination, and can have a name assigned to it by the network
administrator.
• Job Separation - Automatically separates incoming jobs assigning a
bin to each job, which may include multiple copies. It uses all five
mailbox bins for this purpose, but is seen in the printer software as
one logical bin. If a mailbox bin is full, the printer round robins to the
other bins, and puts any overflow in the top output bin.
• Stacking - This mode stacks the printed output from the lowest bin to
the top, regardless of job boundaries. This mode of operation takes
advantage of the total capacity of the five mailbox bins. The device is
seen by the printer software as one logical bin.
In a bidirectional environment, the printer automatically selects the
mode established by the network administrator. In nonbidirectional
environments, you can change the mode in the driver. The method for
changing the mode varies by driver and by operating system. Refer to
your driver’s on-line help.
The printer control panel will display different messages depending on
which mode you are using.
5-22 Print Tasks EN
Page 90

In Mailbox Mode, if the
Control Panel says:
OPTIONAL OUTPUT BIN 1
Then the physical
location is:
Left Output Bin
5
PrintTasks
OPTIONAL OUTPUT BIN
2
through 6
OPTIONAL OUTPUT BIN X
(X represents any number other than 1 through 6.)
In Job Separator or Stacking
Modes, if the Control Panel
says:
OPTIONAL OUTPUT BIN 1
OPTIONAL OUTPUT BIN 2
OPTIONAL OUTPUT BIN X
(X represents any number other than 1 through 6.)
Note The mailbox handles all of the printer’s supported paper sizes.
Envelopes, labels, and transparencies are sent only to the Left Output
Bin (face-up).
Mailbox 1-5
Stapler Bin
Then the physical
location is:
Top Output Bin
Mailbox bins
Stapler Bin
EN Print Tasks 5-23
Page 91

Figure 5-3
Output Bins
1. Top Output Bin
2. Left Output Bin
3. Stapler Bin
4. Optional Mailbox Bins
5-24 Print Tasks EN
Page 92

Selecting the Left Output Bin
The Left Output Bin should be used for envelopes, transparencies, and
labels. Using this bin helps reduce paper curl.
Selecting the Left Output Bin through the Software
You can select an output bin through your software application or printer
driver, or from the printer control panel. Normally, we recommend
designating the paper destination in your software or printer driver, since
options set there override printer control panel settings. Follow the
instructions below for setting the Left Output Bin as the printer’s default
output bin through the printer control panel.
Note Where and how you make selections depends on your software
application or associated printer driver. In some environments, the
selection process may be available only from within the printer driver (if
the control panel has been locked by the network administrator, for
example.) See Chapter 3 or your application manual for more
information.
Selecting the Left Output Bin from the Control Panel
1 Press [Menus] repeatedly until CONFIGURATION MENU appears.
5
PrintTasks
2 Press [Items] repeatedly until PAPER DESTINATION=TOP OUTPUT
BIN * appears.
3 Press [+] repeatedly until OPTIONAL OUTPUT BIN 1 or bin name
assigned to it by the Network Administrator appears.
4 Press [Select *] to save your choice. An asterisk (*) appears next to your
selection.
EN Print Tasks 5-25
Page 93

Figure 5-4
Adjusting the Paper Stop
The paper stop (shown in Figure 5-4) is located near the Top Output
Bin. It can be adjusted to help paper lay flat as it exits the printer. The
paper stop does not have to be raised for Letter or A4 size media. Note
that the printer jams if the paper stop is set to a smaller size of media
than is being printed.
1 Pullthe left side of the paper stop up until the stop is in an upright position.
2 Slide the paper stop to the mark indicating the largest paper size to be
printed.
11x17
A3
B4
LGL
Adjustable Paper Stop
5-26 Print Tasks EN
Page 94

Printing to the Multibin Mailbox or Mailbox
with Stapler
The optional Multi-Bin Mailbox or Mailbox with Stapler can work in
one of three modes: mailbox mode, job separation mode, or stacking
mode. The network or printer administrator determines which mode of
operation is chosen through an HP network configuration utility, such as
HP JetAdmin or HP LaserJet Utility. You need to set up your printer
driver to reflect the mode chosen by the administrator. Bidirectional
environments automatically reflect the administrator’s choices in your
printer driver.
The printer control panel displays different names for the mailboxes and
stapler, depending on which mode the driver is using.
5
PrintTasks
In Mailbox Mode, if the
Control Panel says:
OPTIONAL OUTPUT BIN 1
OPTIONAL OUTPUT BIN
through 6
2
OPTIONAL OUTPUT BIN X
(X represents any number other than 1 through 6.)
In Job Separation or
Stacking Modes, if the
Control Panel says:
OPTIONAL OUTPUT BIN 1
OPTIONAL OUTPUT BIN 2
OPTIONAL OUTPUT BIN X
(X represents any number other than 1 through 6.)
Then the physical
location is:
Left Output Bin
Mailbox 1-5
Stapler Bin
Then the physical
location is:
Top Output Bin
Mailbox bins
Stapler Bin
Selecting the Multi-Bin Mailbox or Mailbox with Stapler
through the Software
You can select these output bins through your software application,
printer driver, or from the printer control panel. It is better to designate
the paper destination in your software or printer driver since you will
control to which output bin your job is sent. Otherwise, follow the
instructions below for setting the overall default output bin selection.
Note Where and how you make selections depends on your software
application or associated printer driver. The selection process may be
available only from within the printer driver. See Chapter 3 or your
application manual for more information.
EN Print Tasks 5-27
Page 95

Selecting the Multi-Bin Mailbox or Mailbox with Stapler
as default destination from the Control Panel
1 Press [Menus] repeatedly until CONFIGURATION MENU appears.
2 Press [Items] repeatedly until PAPER DESTINATION= TOP OUTPUT
BIN * appears.
3 Press [+] repeatedly until PAPER DESTINATION= OUTBIN x appears.
The x represents a number from 1–7 (for the output bins). Your network
administrator may have changed these names.
4 Press [Select *] to save your choice. An asterisk (*) appears next to your
selection.
Stapling Documents
The stapler can staple documents of 2 to 20 pages on 16 lb. to 20 lb.
bond paper, Letter and A4 size only. The stapler should not be set as the
default output bin. If your job is only one page, or if it is greater than 20
pages, the printer will print your job to the bin, but it will not be stapled.
The stapler bin can hold up to 350 stapled sheets. To haveyour job
stapled, send it to OPTIONAL OUTBIN 7.
Selecting the Stapler through the Software
You can select the stapler through your software application or printer
driver. This is the recommended method for stapling. If you are unable
to designate the paper destination in your software or printer driver,
follow the instructions below for setting the overall default printer
output bin selection.
Note Where and how you make selections depends on your software
application or associated printer driver. The selection process may be
available only from within the printer driver. See Chapter 3, “Printer
Software,” or your application manual for more information.
Selecting the Stapler as default destination from the
Control Panel
If your software does not support stapling, set it using the directions
below.
1 Press [Menus] repeatedly until CONFIGURATION MENU appears.
2 Press [Items] repeatedly until PAPER DESTINATION= TOP OUTPUT
BIN * appears.
5-28 Print Tasks EN
Page 96

3 Press [+] repeatedly until PAPER DESTINATION= OUTBIN 7 appears.
Your network administrator may have changed the name of this bin. For
example, it may be called STAPLER.
4 Press [Select *] to save your choice. An asterisk (*) appears next to your
selection.
5
PrintTasks
EN Print Tasks 5-29
Page 97

Different First Page
Use the following procedure to print the
first page of a document on preprinted or
special paper, such as a letter with just the
first page on letterhead paper.
1 Select a different paper for the first
Note
Where and how you make selections
depends on your software application or
associated printer driver. The selection
process may be available only from within
the printer driver. See Chapter 3 or your
application manual for more information.
2 Choose the designated tray (or
page in your application or printer
driver.
Manual Feed) for the first page and
the other tray for the remaining pages.
3 Place the paper for the first page in
the tray.
For manual feed, place a page in Tray
1 after the job is sent to the printer,
and the printer requests the paper to
be loaded. Place the page with the
side to be printed up, with the top of
the page placed towards the rear of
the printer and the long edge leading
into the printer.
4 Load the paper for the remaining
pages of the document in another tray.
You may select the first and remaining
pages by type of media. You must set the
types of media loaded in the trays through
the control panel (see “Changing Paper
Type and Size from the Control Panel”
earlier in this chapter). Then select the
paper source in the printer driver not by
tray, but by type.
5-30 Print Tasks EN
Page 98

1
Paper Source:
Paper Size:
2
Custom Size Paper in Tray 1
You can print on custom-size paper from
Tray 1. The largest size of paper
TRAY 1
Maximum
supported is 11.7 x 17.7 in (297 x 450
mm). The smallest size is 3.9 x 7.5 in (99
x 191 mm). When you select maximum
size of paper, the printer assumes the
maximum page size is 11.7 x 17.7 in (297
x 450 mm).
Printing on the
Smallest-Sized Paper
Some applications require you to calculate
margins in order to print on custom-size
paper. The following example is provided
as a guideline. Adapt this example to your
paper size and unit of measurement.
1 In your software application, select
Tray 1 for the paper source and
Maximum (Windows PCL) or
Oversize (Macintosh and Windows
PostScript) for the paper size.
5
PrintTasks
2 Calculate margins to identify the area
to be printed. Illustration 2 and steps
2a and 2b show how to calculate a
margin for 3.9 x 7.5-in (99 x 191 mm)
paper.
a. Take the maximum paper width
size 11.7 in (297 mm) and subtract
3.9 in (99 mm) for the width of the
paper. Take the answer, 7.8 in (198
mm), and divide it by 2, which equals
3.9 in (99 mm).
In your software application, select a
left margin of 3.9 in (99 mm) and a
right margin of 3.9 in (99 mm).
b. If your software allows, also set the
bottom margin. Take the maximum
paper length size, 17.7 in (450 mm),
and subtract 7.5 in (191 mm), the
length of the paper. The bottom
margin equals 10.2 in (259 mm).
Continued on the next page.
EN Print Tasks 5-31
Page 99

3 Print custom-size paper from Tray 1.
See “Loading Media into Tray 1”
earlier in this chapter for the
procedure.
4 The edge of the paper feeding into the
printer must be at least 3.9 in (99
mm) wide to allow rollers inside the
printer to grab the paper. Measuring
from the leading edge to the trailing
edge of the paper going into the
printer, the length dimension must be
at least 7.5 in (190 mm).
Note
You may use two-sided printing on paper
sizes equal to or larger than Executive.
Printing Bleeds
Since the printer has the ability to print on
specially cut paper up to 11.7 x 17.7 in
(297 x 450 mm), you can print up to 11 x
17 in (279 x 432 mm) bleed images with
crop marks. Refer to your software
application or online help.
5-32 Print Tasks EN
Page 100

Figure 5-5
Two-Sided Printing with the Duplex Unit
The Duplex Unit (shown in Figure 5-5) allows printing on both sides of
the paper (two-sided) with either portrait or landscape orientation. You
can select two-sided printing through your application, the printer driver,
or the printer control panel.
5
PrintTasks
Duplex Unit
EN Print Tasks 5-33
 Loading...