

Page 1

HP LaserJet 4345mfp
Software Technical Reference
Page 2

Page 3

HP LaserJet 4345mfp
Software Technical Reference
Page 4

Copyright and license
Trademark credits
©2004 Copyright Hewlett-Packard
Development Company, L.P.
Reproduction, adaptation or translation
without prior written permission is
prohibited, except as allowed under the
copyright laws.
The information contained herein is subject
to change without notice.
The only warranties for HP products and
services are set forth in the express
warranty statements accompanying such
products and services. Nothing herein
should be construed as constituting an
additional warranty. HP shall not be liable
for technical or editorial errors or omissions
contained herein.
Edition 1, 11/2004
Adobe®, Adobe Photoshop®, Acrobat®,
PostScript®, and the Acrobat logo® are
trademarks of Adobe Systems Incorporated.
Java™ is a US trademark of Sun
Microsystems, Inc.
The Bluetooth® trademarks are owned by
its proprietor and used by Hewlett-Packard
Company under license.
Linux is a U.S. registered trademark of
Linus Torvalds
Microsoft®, Windows®, and Windows NT®
are U.S. registered trademarks of Microsoft
Corporation.
Pentium® is a trademark or registered
trademark of Intel Corporation or its
subsidiaries in the United States and other
countries.
UNIX® is a registered trademark of The
Open Group.
EnergyStar® and the Energy Star logo®
are US registered marks of the United
States Environmental Protection Agency.
Page 5

Table of contents
1 Purpose and scope
Introduction..............................................................................................................................................1
HP LaserJet 4345mfp models.................................................................................................................2
Printing-system software CD...................................................................................................................5
HP LaserJet print drivers .......................................................................................................5
Software features....................................................................................................................5
Printing system and installer..................................................................................6
HP LaserJet 4345mfp printing-system software CD for Windows
systems .................................................................................................6
Installer features....................................................................................8
HP LaserJet print drivers........................................................................................9
HP PCL 6, PCL 5, and PS Emulation Drivers.......................................9
Print driver version numbers for Windows operating systems............10
Macintosh and Macintosh-compatible printing system.......................10
Additional driver availability.................................................................11
Driver Autoconfiguration.......................................................................................11
Update Now..........................................................................................................11
HP Driver Preconfiguration..................................................................................11
HP LaserJet documentation.................................................................................................12
HP LaserJet 4345mfp User Guide.......................................................................13
HP LaserJet 4345mfp series Printing System Install Notes ...............................14
HP Embedded Web Server Guide.......................................................................14
HP Driver Preconfiguration Support Guide..........................................................15
HP Jetdirect Administrator's Guide......................................................................15
HP Device Installer Customization Wizard..........................................................15
Structure and availability of the software CD........................................................................................17
In-box file layout ...................................................................................................................17
HP LaserJet software CD, Windows partition .....................................................17
HP LaserJet software CD, Macintosh partition....................................................18
Availability and fulfillment......................................................................................................18
In-box CDs ..........................................................................................................18
Web deployment..................................................................................................23
Printing-system software ....................................................................24
Standalone drivers .............................................................................24
Other operating systems.....................................................................24
Software component availability .........................................................25
2 Software description
Introduction............................................................................................................................................27
iii
Page 6

Supported operating systems ...............................................................................................................28
Technology background information.....................................................................................................29
Driver Configuration..............................................................................................................29
Bidirectional communication................................................................................29
Enterprise AutoConfiguration...............................................................................30
HP Driver Preconfiguration...................................................................................................32
Lockable features ................................................................................................33
HP Driver Diagnostic Printer Check tool...............................................................................33
HP Printer Access Tool.........................................................................................................34
Euro character .....................................................................................................................34
HP Embedded Web Server and HP Toolbox.......................................................................34
HP Embedded Web Server .................................................................................................35
The HP EWS frame..............................................................................................36
Information tab.....................................................................................................36
Links to off-product solutions...............................................................................37
Device Status ......................................................................................................37
Configuration Page .............................................................................................38
Settings tab..........................................................................................................40
Configure device..................................................................................................40
Alerts....................................................................................................................41
Security................................................................................................................43
Digital Sending tab...............................................................................................43
General................................................................................................43
Send to E-mail.....................................................................................44
Send to Fax.........................................................................................45
Addressing...........................................................................................46
Address Book......................................................................................47
Log.......................................................................................................48
Preferences.........................................................................................48
Networking tab ....................................................................................................49
Configuration section...........................................................................50
Security section...................................................................................51
Diagnostics section.............................................................................51
Network settings .................................................................................51
HP Toolbox...........................................................................................................................51
HP Toolbox requirements....................................................................................51
Installing HP Toolbox...........................................................................................52
To view the HP Toolbox.......................................................................................52
The HP Toolbox Frame .......................................................................................52
Top banner...........................................................................................................53
Status tab.............................................................................................................53
Alerts tab..............................................................................................................54
Linking to the HP Embedded Web Server...........................................................55
Other Links ..........................................................................................................56
HP Web Jetadmin.................................................................................................................5 7
HP Digital Sending Software................................................................................................59
Foreign Interface Harness....................................................................................................59
Bluetooth...............................................................................................................................59
Remote firmware update .....................................................................................................60
Determining the current level of firmware ...........................................................60
iv
Page 7

Downloading the new firmware from the HP Web site........................................60
Remote firmware update by using FTP through a browser.................................61
Remote firmware update by using FTP on a direct network connection.............61
Windows operating systems................................................................61
Macintosh operating systems..............................................................62
Remote firmware update through a local Windows port .....................................63
Windows 98 or Windows Me...............................................................63
Windows NT 4.0, Windows 2000, Windows XP, or Windows
Server 2003.........................................................................................64
Remote firmware update through a Windows network .......................................65
Remote firmware update for UNIX systems .......................................................65
Remote firmware update by using Fetch (Mac OS 9.x only)...............................65
Remote firmware update by using the HP LaserJet Utility (Mac OS 9.x only)....66
Remote firmware update by using the LPR command .......................................66
Remote firmware update through HP Web Jetadmin .........................................67
Printer messages during the firmware update.....................................................68
Troubleshooting a firmware update ....................................................................68
Printing print-ready documents from a command line .........................................................69
Print-ready file printing by using FTP through a browser....................................70
Print-ready file printing by using FTP on a direct network connection................70
Windows operating systems................................................................70
Macintosh operating systems..............................................................71
Print-ready printing by using a local Windows port..............................................72
Windows 98 or Windows Me...............................................................72
Windows NT 4.0, Windows 2000, Windows XP, or Windows
Server 2003 ........................................................................................73
Print-ready file printing in a Windows network.....................................................73
Print-ready file printing in UNIX systems.............................................................73
Print-ready file printing by using Fetch (Mac OS 9.x only)..................................73
File printing by using the HP LaserJet Utility (Mac OS 9.x only) ........................74
Print-ready file printing by using the LPR command ..........................................74
Driver-feature comparison in various operating systems.....................................................75
Job stream output ...............................................................................................75
PJL/PJL Encoding................................................................................................76
Job tracking..........................................................................................................76
Connectivity .........................................................................................................77
Bidirectional communication ...............................................................................77
HP Driver Preconfiguration .................................................................................78
Bundle support.....................................................................................................78
Tray and paper assignment.................................................................................79
Installable options ...............................................................................................79
UI features ...........................................................................................................80
Help features .......................................................................................................80
Quick Sets............................................................................................................81
Media Sizes..........................................................................................................81
Media Types.........................................................................................................81
Job storage ..........................................................................................................82
Print-quality and resolution..................................................................................83
Reordering Options..............................................................................................83
Resizing options...................................................................................................84
v
Page 8

Other document options.......................................................................................84
Watermarks .........................................................................................................85
Alternative source/paper type..............................................................................85
Printing destination...............................................................................................86
Finishing Options.................................................................................................86
Font support.........................................................................................................87
Postscript-specific features..................................................................................88
3 HP traditional print drivers for Windows
Introduction............................................................................................................................................91
HP traditional PCL 6 and HP traditional PCL 5 driver features ............................................................92
Access to print drivers...........................................................................................................92
Access to print drivers in Windows NT 4.0..........................................................92
Document Default driver tabs..............................................................92
Properties driver tabs..........................................................................93
Access to print drivers in Windows 98 and Windows Me....................................93
Help system..........................................................................................................................94
What's this? Help.................................................................................................94
Context-sensitive Help.........................................................................................94
Incompatible Options messages .........................................................................94
Bubble Help..........................................................................................................95
Finishing tab features............................................................................................................96
Print Task Quick Sets ..........................................................................................97
Default Print Settings...........................................................................97
User Guide Print Settings .................................................................100
Document Options.............................................................................................100
Print on Both Sides ...........................................................................100
Flip Pages Up ...................................................................................101
Booklet Printing.................................................................................101
Pages per Sheet................................................................................103
Print Page Borders............................................................................104
Page Order........................................................................................104
Document preview image...................................................................................104
Print Quality group box.......................................................................................105
Print Quality Details for the HP Traditional PCL 6 Driver..................105
Print Quality Details for the HP Traditional PCL 5 Driver..................107
Automatically printing on both sides.................................101
Book and Booklet Printing................................................102
Printing a Booklet.............................................102
Printing a Book.................................................103
Current Setting..................................................................106
Output Settings.................................................................106
Resolution........................................................107
Resolution Enhancement technology (REt).....107
Scale Patterns (WYSIWYG)............................107
Print all Text as Black......................................107
Font Settings ....................................................................107
Current Setting..................................................................108
Graphic Settings...............................................................108
Output Settings.................................................................109
vi
Page 9

Resolution........................................................109
Resolution Enhancement technology (REt).....109
Scale Patterns (WYSIWYG)............................109
Print all Text as Black......................................109
Font Settings ....................................................................110
Effects tab features.............................................................................................................110
Print Task Quick Sets.........................................................................................111
Fit To Page.........................................................................................................111
Print Document On setting ...............................................................111
Scale to Fit.........................................................................................111
% of Normal Size...............................................................................112
Watermarks........................................................................................................112
Watermarks drop-down menu...........................................................113
First Page Only..................................................................................113
Edit.....................................................................................................113
Current Watermarks.........................................................114
Watermark Message.........................................................115
Message Angle.................................................................115
Document preview image.................................................115
Font Attributes..................................................................115
Name................................................................115
Color.................................................................116
Shading............................................................116
Size..................................................................116
Style.................................................................116
Default settings................................................116
Paper tab features..............................................................................................................116
Print Task Quick Sets.........................................................................................117
Paper Options....................................................................................................118
Size is................................................................................................118
Source Is...........................................................................................119
Type is ..............................................................................................119
Custom..............................................................................................120
Name................................................................................121
Save, Delete, or Rename.................................................122
Custom size (width and height controls) .........................123
Custom width and height control limits.............................123
Paper and envelope icons...............................124
Dynamic measurement units ...........................................124
Close.................................................................................124
Use Different Paper/Covers..............................................................125
First Page..........................................................................125
Front Cover.......................................................................126
Other Pages......................................................................127
Last Page..........................................................................128
Back Cover.......................................................................129
Document preview image...................................................................................130
Product image....................................................................................................131
Output tab features.............................................................................................................131
Print Task Quick Sets.........................................................................................132
vii
Page 10

Output Options...................................................................................................133
Output Bin Options.............................................................................................133
Document preview image...................................................................................133
Product image....................................................................................................133
Job Storage tab features....................................................................................................133
Job Storage tab..................................................................................................134
Print Task Quick Sets.........................................................................................135
Status group box................................................................................................136
Job Storage Mode..............................................................................................136
Off......................................................................................................136
Proof and Hold ..................................................................................136
Private Job.........................................................................................137
Using a PIN for Private Job..............................................137
Quick Copy .......................................................................................137
Stored Job.........................................................................................137
PIN.....................................................................................................................138
Job notification...................................................................................................138
User Name.........................................................................................................138
Job Name...........................................................................................................139
Using Job Storage features when printing.........................................................139
Releasing a Job Storage print job.....................................................139
Deleting a Job Storage print job........................................................140
Basics tab features ............................................................................................................140
Print Task Quick Sets.........................................................................................141
Copies................................................................................................................142
Orientation .........................................................................................................142
Document preview image...................................................................................142
About .................................................................................................................142
Properties tabs....................................................................................................................143
NT Forms tab features ......................................................................................144
Configuring the trays.........................................................................145
Configure tab features .......................................................................................145
Printer Model.....................................................................................146
Paper Handling Options....................................................................147
Duplexing Unit..................................................................147
Envelope Feeder..............................................................147
Mopier Enabled ................................................................148
Mopier mode and collation...............................148
Optional Paper Destinations.............................................148
Optional Paper Sources ..................................................149
Other Options....................................................................................149
More configuration options...............................................149
Storage.............................................................150
Fonts................................................................150
Allow Scaling from Large Paper......................152
Alternative letterhead mode.............................152
Ignore Application Collation.............................152
Printer memory................................................152
Include types in application source list ...........153
Automatic configuration.....................................................................153
viii
Page 11

Printer image.....................................................................................153
HP Traditional Postscript 3 Emulation Driver features........................................................................154
Access to print drivers........................................................................................................154
Access to print drivers in Windows NT 4.0........................................................154
Properties driver tabs........................................................................155
Access to print-driver settings in Windows 98 and Windows Me......................155
PS 3 emulation support for the HP LaserJet 4345mfp.......................................................155
Help system........................................................................................................................156
What's this Help.................................................................................................156
Context-sensitive Help.......................................................................................156
Page Setup tab features.....................................................................................................156
Advanced tab features........................................................................................................157
Paper/Output......................................................................................................158
Graphic...............................................................................................................159
Document Options.............................................................................................159
Page Layout Option...........................................................................................159
PostScript Options.............................................................................................160
Printer Features.................................................................................................161
Job Storage tab features....................................................................................................163
Job Storage tab..................................................................................................164
Status group box................................................................................................164
Job Storage Mode..............................................................................................164
Off......................................................................................................165
Proof and Hold ..................................................................................165
Private Job ........................................................................................165
Using a PIN for Private Job..............................................166
Quick Copy .......................................................................................166
Stored Job ........................................................................................166
Job Identification................................................................................................167
User Name........................................................................................167
Job Name..........................................................................................167
PIN.....................................................................................................168
Using Job Storage features when printing.........................................................168
Releasing a Job Storage print job.....................................................168
Deleting a Job Storage print job........................................................169
Device Settings tab ............................................................................................................169
Form to Tray Assignment...................................................................................171
Font Substitution Table......................................................................................172
Postscript Configure...........................................................................................172
Available PostScript Memory............................................................172
Output Protocol..................................................................................172
Send Ctrl-D Before Each Job............................................................172
Send Ctrl-D After Each Job...............................................................173
Job Timeout.......................................................................................173
Wait Timeout.....................................................................................173
Minimum Font Size to Download as Outline.....................................173
Maximum Font Size to Download as Outline....................................173
Installable Options..............................................................................................173
Tray 3................................................................................................174
Tray 4................................................................................................174
ix
Page 12

Tray 5................................................................................................174
Duplex Unit (for 2-sided Printing)......................................................174
Envelope Feeder...............................................................................174
Printer Hard Disk...............................................................................174
Mopier Mode......................................................................................175
Job Storage.......................................................................................175
Accessory Output Bin........................................................................175
Printer Memory..................................................................................175
4 HP PCL 6, HP PCL 5, and HP PS 3 emulation unidrivers for Windows
Introduction..........................................................................................................................................177
HP PCL 6, HP PCL 5, and PS Emulation Unidriver features..............................................................178
Access to print drivers........................................................................................................178
Help system........................................................................................................................179
What's this? Help...............................................................................................179
Context-sensitive Help.......................................................................................179
Incompatible Print Settings messages...............................................................179
Advanced tab features........................................................................................................180
Paper/Output......................................................................................................181
Copy Count .......................................................................................181
Collated.............................................................................182
Graphic options..................................................................................................182
Document Options.............................................................................................182
Advanced Printing Features..............................................................182
Print Optimizations ...........................................................................183
Printer Features.................................................................................183
Print All Text as Black.......................................................183
Send TrueType as Bitmap ...............................................183
REt....................................................................................183
Alternative letterhead mode..............................................184
Graphics Mode.................................................................184
Layout Options..................................................................................184
Page Order.......................................................................184
Paper/Quality tab features..................................................................................................184
Print Task Quick Sets.........................................................................................185
Default Print Settings.........................................................................186
User Guide Print Settings..................................................................189
Type new Quick Set name here .......................................................189
Paper Options....................................................................................................190
Size is................................................................................................190
Custom..............................................................................................191
Name................................................................................191
Paper size ........................................................................191
Units..................................................................................192
Custom width and height control limits.............................192
Source Is...........................................................................................193
Type is...............................................................................................193
Use Different Paper/Covers..............................................................194
Front Cover.......................................................................194
First Page..........................................................................196
x
Page 13

Other Pages......................................................................197
Last Page..........................................................................198
Back Cover.......................................................................198
Document preview image...................................................................................200
Print Quality group box.......................................................................................200
Effects tab features.............................................................................................................200
Print Task Quick Sets.........................................................................................201
Resizing options.................................................................................................202
Actual Size.........................................................................................202
Print Document On ...........................................................................202
Scale to Fit ........................................................................................202
% of Normal Size...............................................................................203
Document preview image...................................................................................203
Watermarks........................................................................................................203
Current watermarks...........................................................................204
Watermark Message.........................................................................205
Message Angle..................................................................................205
Font Attributes...................................................................................205
Name................................................................................205
Color.................................................................................206
Shading.............................................................................206
Size...................................................................................206
Style..................................................................................206
Default settings.................................................................206
Finishing tab features.........................................................................................................206
Print Task Quick Sets.........................................................................................207
Document Options.............................................................................................208
Print on Both Sides............................................................................208
Automatically printing on both sides.................................208
Flip Pages Up....................................................................................209
Booklet layout....................................................................................209
Book and Booklet Printing................................................209
Printing a Booklet.............................................210
Printing a Book.................................................210
Pages per Sheet................................................................................210
Print Page Borders............................................................................210
Page Order........................................................................................210
Document preview image...................................................................................211
Orientation..........................................................................................................211
Output tab features.............................................................................................................212
Print Task Quick Sets.........................................................................................213
Output Options...................................................................................................213
Document preview image...................................................................................213
Output Bin Options.............................................................................................213
Job Storage tab features....................................................................................................214
Job Storage tab..................................................................................................214
Print Task Quick Sets.........................................................................................215
Status group box................................................................................................216
Job Storage Mode..............................................................................................216
Off......................................................................................................216
xi
Page 14

Proof and Hold ..................................................................................216
Private Job.........................................................................................216
Using a PIN for Private Job .............................................217
Quick Copy........................................................................................217
Stored Job.........................................................................................217
Require PIN........................................................................................................218
Job notification...................................................................................................218
User Name.........................................................................................................218
Job Name...........................................................................................................219
Using Job Storage features when printing.........................................................219
Releasing a Job Storage print job.....................................................220
Deleting a Job Storage print job........................................................220
Services tab features..........................................................................................................220
Properties tabs....................................................................................................................221
Device Settings .................................................................................................221
Form to Tray Assignment..................................................................222
Font Substitution Table.....................................................................223
External Fonts...................................................................................224
Installing external fonts.....................................................224
Removing external fonts...................................................225
Postscript options..............................................................................225
Available PostScript Memory............................................225
Output Protocol.................................................................226
Send Ctrl-D Before Each Job...........................................226
Send Ctrl-D After Each Job .............................................226
Convert Gray Text to PostScript Gray..............................226
Convert Gray Graphics to PostScript Gray......................226
Add Euro Currency Symbol to PostScript Fonts..............227
Job Timeout......................................................................227
Wait Timeout.....................................................................227
Minimum Font Size to Download as Outline....................227
Maximum Font Size to Download as Outline ..................227
Installable Options.............................................................................227
Automatic Configuration...................................................228
Envelope Feeder..............................................................228
Tray 3................................................................................228
Tray 4................................................................................228
Tray 5................................................................................228
Duplex Unit (for 2-Sided Printing) ....................................228
Accessory Output Bin.......................................................228
Postscript Passthrough.....................................................229
Printer Hard Disk..............................................................229
Job Storage......................................................................229
Mopier Mode.....................................................................229
Mopier mode and collation...............................230
Printer Memory.................................................................230
About tab............................................................................................................231
5 Installing the Windows printing-system components
Introduction..........................................................................................................................................233
xii
Page 15

Supported Windows operating systems..............................................................................................234
Windows system requirements...........................................................................................................235
Font support.........................................................................................................................................236
Basic fonts .........................................................................................................................236
Default fonts........................................................................................................................236
Installation instructions........................................................................................................................242
General installation for Windows 98, Me, 2000, and XP operating systems ....................242
Installing from the printing-system CD...............................................................242
Installing from a network or from downloaded files ..........................................243
Detailed Windows installation.............................................................................................243
Using the Back and Cancel buttons...................................................................243
Modifying a pre-existing installation...................................................................243
Typical Installation dialog box sequence...........................................................244
Custom Installation.............................................................................................270
Installing print drivers by using the Add Printer feature.....................................271
Installer Customization Wizard for Windows.....................................................271
Running the installer customization wizard.......................................272
Dialogs...............................................................................................272
Distribution.........................................................................................288
Point and Print installation for Windows 98, Me, NT 4.0, 2000, XP, and
2003...................................................................................................................289
Setting a default printer.......................................................................................................290
6 Installation for Macintosh, Linux, UNIX, and OS/2 operating systems
Introduction..........................................................................................................................................291
System requirements...........................................................................................................................292
Macintosh............................................................................................................................292
Linux....................................................................................................................................292
UNIX....................................................................................................................................292
OS/2....................................................................................................................................292
Macintosh Installation..........................................................................................................................293
Macintosh component descriptions....................................................................................293
HP LaserJet PPDs.............................................................................................293
PDEs..................................................................................................................293
HP Toolbox.........................................................................................................293
HP Embedded Web Server................................................................................294
Install notes........................................................................................................294
Online help.........................................................................................................294
Screen fonts.......................................................................................................294
Font support......................................................................................294
Installing the Macintosh printing system.............................................................................298
To install the HP LaserJet printing-system software for the Macintosh OS......298
To set up an AppleTalk networked Printer with Mac OS 9.x ............................299
To set up a Printer with Mac OS X.....................................................................299
To set up an IP/LPR networked Printer with Mac OS 9.x..................................299
Uninstalling the Macintosh printing system........................................................................300
In-box disk layout................................................................................................................300
Folders and files added through installation of the HP LaserJet 4345mfp software
(Mac OS).............................................................................................................................300
Mac OS Classic installation................................................................................................300
xiii
Page 16

7 Engineering detail
Introduction..........................................................................................................................................307
Media attributes...................................................................................................................................308
HP Toolbox..........................................................................................................................................314
Configuring accessory output bins through HP Web Jetadmin...........................................................316
Main Install dialog box sequence.......................................................................300
HP LaserJet Screen Fonts Installer dialog box sequence.................................303
Mac OS X installation.........................................................................................................304
Main Install dialog box sequence.......................................................................304
Media sources and destinations.........................................................................................308
Tray configurations.............................................................................................................308
Media-source commands...................................................................................................309
Media types and sizes........................................................................................................310
Driver features and attributes.............................................................................310
PCL 6 custom media sizes................................................................................312
Paper type commands.......................................................................................313
Enabling or disabling HP Toolbox support.........................................................................314
Uninstalling HP Toolbox through the Windows Start Menu...............................................314
Uninstalling HP Toolbox through the Windows Add/Remove Programs Control Panel
applet..................................................................................................................................314
Manually uninstalling HP Toolbox in Macintosh Operating Systems.................................315
Index....................................................................................................................................................................317
xiv
Page 17

List of tables
Table 1-1 Features of the HP LaserJet 4345mfp models................................................................................2
Table 1-2 Print drivers included with the HP LaserJet 4345mfp......................................................................5
Table 1-3 Documentation availability.............................................................................................................13
Table 1-4 CD AM - Americas and Europe......................................................................................................19
Table 1-5 CD WE - Western Europe and Arabic............................................................................................21
Table 1-6 CD NE - Northern Europe and Russian.........................................................................................21
Table 1-7 CD EE - Eastern Europe................................................................................................................22
Table 1-8 CD AS - Asia..................................................................................................................................23
Table 1-9 Software component availability for HP LaserJet 4345mfp...........................................................25
Table 2-1 EAC availability in Microsoft Windows and Microsoft Share..........................................................31
Table 2-2 EAC availability in Novell Netware environments .........................................................................31
Table 2-3 Availability of remote management and status tools.....................................................................58
Table 2-4 HP Web Jetadmin support ............................................................................................................58
Table 2-5 Update messages..........................................................................................................................68
Table 2-6 Troubleshooting a firmware update ...............................................................................................68
Table 2-7 Troubleshooting a firmware update failure.....................................................................................69
Table 2-8 Driver support for job stream output feature..................................................................................75
Table 2-9 Printer Job Language (PJL) and PJL encoding.............................................................................76
Table 2-10 Driver support for job tracking........................................................................................................76
Table 2-11 Driver support for connectivity features.........................................................................................77
Table 2-12 Driver support for bidirectional communication features................................................................77
Table 2-13 Driver support for HP Driver Preconfiguration...............................................................................78
Table 2-14 Bundle support...............................................................................................................................78
Table 2-15 Tray and paper assignment...........................................................................................................79
Table 2-16 Driver support for installable options..............................................................................................79
Table 2-17 Driver support for UI features.........................................................................................................80
Table 2-18 Driver support for Help features.....................................................................................................80
Table 2-19 Driver support for quick sets..........................................................................................................81
Table 2-20 Driver support for media sizes.......................................................................................................81
Table 2-21 Driver support for media types.......................................................................................................81
Table 2-22 Driver support for job storage features .........................................................................................82
Table 2-23 Print-quality and resolution features...............................................................................................83
Table 2-24 Driver support for reordering options.............................................................................................83
Table 2-25 Resizing options.............................................................................................................................84
Table 2-26 Other document options.................................................................................................................84
Table 2-27 Driver support for watermarks feature............................................................................................85
Table 2-28 Driver support for alternate source/paper type feature..................................................................85
Table 2-29 Driver support for printing destination feature................................................................................86
Table 2-30 Driver support for finishing options.................................................................................................86
Table 2-31 Font support...................................................................................................................................87
xv
Page 18

Table 2-32 Driver support for postscript-specific features................................................................................88
Table 3-1 Print Task Quick Set default values...............................................................................................97
Table 3-2 Page orientation...........................................................................................................................101
Table 3-3 Name drop-down menu text strings ............................................................................................122
Table 3-4 PCL 6 custom media sizes ..........................................................................................................123
Table 3-5 Close dialog box text strings .......................................................................................................124
Table 3-6 Printer model bundles..................................................................................................................147
Table 3-7 Driver Mopier mode and collation settings...................................................................................148
Table 4-1 Print Task Quick Set default values for the HP LaserJet 4345mfp..............................................186
Table 4-2 PCL 6 custom media sizes ..........................................................................................................192
Table 4-3 Page orientation...........................................................................................................................209
Table 4-4 Driver Mopier mode and collation settings...................................................................................230
Table 5-1 Default fonts.................................................................................................................................236
Table 5-2 Additional PS emulation fonts......................................................................................................239
Table 7-1 HP LaserJet 4345mfp paper sources and destinations...............................................................308
Table 7-2 Media tray configurations for the HP LaserJet 4345mfp..............................................................308
Table 7-3 Paper-source commands.............................................................................................................309
Table 7-4 Supported features and attributes by driver.................................................................................310
Table 7-5 Supported input media types.......................................................................................................312
Table 7-6 PCL 6 custom media sizes...........................................................................................................312
Table 7-7 Paper-type commands.................................................................................................................313
xvi
Page 19

List of figures
Figure 1-1 Installation software CD main screen...............................................................................................7
Figure 1-2 Installation software CD printer documentation screen.................................................................12
Figure 2-1 Device Status screen on the Information tab.................................................................................38
Figure 2-2 Configuration Page on Information tab..........................................................................................39
Figure 2-3 Settings tab - Configure Device.....................................................................................................41
Figure 2-4 Settings tab - Alerts - setup screen................................................................................................42
Figure 2-5 Security screen on the Settings tab ..............................................................................................43
Figure 2-6 General Settings screen on the Digital Sending tab......................................................................44
Figure 2-7 E-mail Settings screen on the Digital Sending tab.........................................................................45
Figure 2-8 Fax Settings screen on the Digital Sending tab.............................................................................46
Figure 2-9 Addressing Settings screen on the Digital Sending tab.................................................................47
Figure 2-10 Address Book screen on the Digital Sending tab...........................................................................48
Figure 2-11 Activity Log screen on the Digital Sending tab...............................................................................48
Figure 2-12 Preferences Settings screen on the Digital Sending tab...............................................................49
Figure 2-13 Networking tab - Configuration section..........................................................................................50
Figure 2-14 Toolbox Device Status tab.............................................................................................................53
Figure 2-15 Alerts tab........................................................................................................................................54
Figure 2-16 Administrative Settings...................................................................................................................55
Figure 2-17 Status tab with Device Settings button..........................................................................................56
Figure 3-1 A typical constraint message with an OK button............................................................................94
Figure 3-2 A property page with a Bubble Help icon.......................................................................................95
Figure 3-3 The default appearance of the Finishing tab..................................................................................96
Figure 3-4 Printing a booklet..........................................................................................................................103
Figure 3-5 Page-order preview images.........................................................................................................104
Figure 3-6 Print Quality Details dialog box for the HP Traditional PCL 6 Driver...........................................106
Figure 3-7 Print Quality Details dialog box for the HP Traditional PCL 5 Driver...........................................108
Figure 3-8 Effects tab.....................................................................................................................................110
Figure 3-9 Preview images - Legal on Letter; Scale to Fit off (left) and on (right)........................................112
Figure 3-10 Watermark Details........................................................................................................................114
Figure 3-11 Paper tab .....................................................................................................................................117
Figure 3-12 Paper Options group box (default)...............................................................................................118
Figure 3-13 Custom Paper Size dialog box ....................................................................................................120
Figure 3-14 First Page options .......................................................................................................................126
Figure 3-15 Front Cover options......................................................................................................................127
Figure 3-16 Other Pages options.....................................................................................................................128
Figure 3-17 Last Page options.........................................................................................................................129
Figure 3-18 Back Cover setting.......................................................................................................................130
Figure 3-19 Output tab.....................................................................................................................................132
Figure 3-20 Job Storage tab............................................................................................................................135
Figure 3-21 Basics tab.....................................................................................................................................141
xvii
Page 20

Figure 3-22 About This Driver dialog box........................................................................................................143
Figure 3-23 Driver NT Forms tab.....................................................................................................................144
Figure 3-24 Configure tab ...............................................................................................................................146
Figure 3-25 More Configuration Options dialog box .......................................................................................150
Figure 3-26 Configure Font Cards dialog box ................................................................................................151
Figure 3-27 Page Setup tab.............................................................................................................................157
Figure 3-28 Advanced tab...............................................................................................................................158
Figure 3-29 Job Storage tab ...........................................................................................................................164
Figure 3-30 Device Settings tab in Windows NT 4.0.......................................................................................170
Figure 3-31 Device Options tab in Windows 98..............................................................................................171
Figure 4-1 Incompatible Print Settings message ..........................................................................................180
Figure 4-2 The default appearance of the Advanced tab..............................................................................181
Figure 4-3 Paper/Quality tab..........................................................................................................................185
Figure 4-4 Paper Options group box.............................................................................................................190
Figure 4-5 Custom Paper Size dialog box.....................................................................................................191
Figure 4-6 Front Cover options .....................................................................................................................195
Figure 4-7 First Page options........................................................................................................................196
Figure 4-8 Other Pages options ....................................................................................................................197
Figure 4-9 Last Page options ........................................................................................................................198
Figure 4-10 Back Coverr setting......................................................................................................................199
Figure 4-11 Effects tab.....................................................................................................................................201
Figure 4-12 Preview images - Legal on Letter; Scale to Fit off (left) and on (right)........................................202
Figure 4-13 Watermark Details .......................................................................................................................204
Figure 4-14 Finishing tab.................................................................................................................................207
Figure 4-15 Page-order preview images.........................................................................................................211
Figure 4-16 Output tab.....................................................................................................................................212
Figure 4-17 Job Storage tab ...........................................................................................................................215
Figure 4-18 Services tab..................................................................................................................................221
Figure 4-19 Device Settings tab......................................................................................................................222
Figure 4-20 Font Substitution Table ...............................................................................................................223
Figure 4-21 HP Font Installer dialog box ........................................................................................................224
Figure 4-22 Device Settings tab for the HP PS Emulation Unidriver..............................................................225
Figure 4-23 About tab......................................................................................................................................231
Figure 5-1 Installation path............................................................................................................................245
Figure 5-2 Choose Setup Language dialog box............................................................................................246
Figure 5-3 Preparing to Installl dialog box ....................................................................................................247
Figure 5-4 Use the Add Printer Wizard..........................................................................................................247
Figure 5-5 Welcome dialog box.....................................................................................................................248
Figure 5-6 HP Software License Agreement dialog box...............................................................................249
Figure 5-7 Printer Connection dialog box......................................................................................................250
Figure 5-8 Connector Type dialog box..........................................................................................................251
Figure 5-9 Network Setup dialog box............................................................................................................252
Figure 5-10 Connection Type dialog box.........................................................................................................253
Figure 5-11 Cable Connection dialog box.......................................................................................................254
Figure 5-12 Print Job Management dialog box................................................................................................255
Figure 5-13 Recommended Network Setup dialog box ..................................................................................256
Figure 5-14 Identify Printer dialog box.............................................................................................................257
Figure 5-15 Specify Printer dialog box............................................................................................................258
Figure 5-16 Printer Found dialog box..............................................................................................................259
Figure 5-17 Confirm Settings dialog box.........................................................................................................260
xviii
Page 21

Figure 5-18 Set Network Protocol dialog box..................................................................................................261
Figure 5-19 Installation Type dialog box..........................................................................................................262
Figure 5-20 Features dialog box......................................................................................................................263
Figure 5-21 Printer Name dialog box ..............................................................................................................264
Figure 5-22 Printer Sharing dialog box ...........................................................................................................265
Figure 5-23 Client Driver Support dialog box .................................................................................................266
Figure 5-24 Printer Location and Comment dialog box ..................................................................................267
Figure 5-25 Ready to Install dialog box ..........................................................................................................268
Figure 5-26 Finish dialog box..........................................................................................................................269
Figure 5-27 Features dialog box, Custom Installation ....................................................................................270
Figure 5-28 Installer Customization Wizard Welcome dialog box...................................................................273
Figure 5-29 Language dialog box....................................................................................................................274
Figure 5-30 Printer Port dialog box..................................................................................................................275
Figure 5-31 Specify Printer dialog box............................................................................................................276
Figure 5-32 IP Settings dialog box...................................................................................................................277
Figure 5-33 Features dialog box......................................................................................................................278
Figure 5-34 Driver Configuration preconfigure dialog box...............................................................................279
Figure 5-35 Driver Configuration dialog box....................................................................................................280
Figure 5-36 Printer Name dialog box...............................................................................................................281
Figure 5-37 Printer Sharing dialog box............................................................................................................282
Figure 5-38 Client Driver Support dialog box..................................................................................................283
Figure 5-39 Printer Location and Comment support dialog box......................................................................284
Figure 5-40 Custom Installer Location dialog box...........................................................................................285
Figure 5-41 Change Current Destination Folder dialog box............................................................................286
Figure 5-42 Installing dialog box......................................................................................................................287
Figure 5-43 Finish dialog box..........................................................................................................................288
Figure 6-1 HP LaserJet for Macintosh installer splash screen dialog box ...................................................301
Figure 6-2 HP LaserJet Installer dialog box (easy install).............................................................................301
Figure 6-3 HP LaserJet Installer dialog box (custom install).........................................................................302
Figure 6-4 Installing dialog box......................................................................................................................302
Figure 6-5 Installation was successful dialog box.........................................................................................303
Figure 6-6 HP LaserJet Screen Fonts splash screen dialog box..................................................................303
Figure 6-7 HP LaserJet Screen Fonts installer dialog box............................................................................304
Figure 6-8 Installation was successful dialog box.........................................................................................304
Figure 6-9 HP LaserJet for Macintosh installer splash screen dialog box....................................................305
Figure 6-10 HP LaserJet Installer dialog box (easy install).............................................................................305
Figure 6-11 HP LaserJet Installer dialog box (custom install).........................................................................306
Figure 6-12 Installing dialog box......................................................................................................................306
xix
Page 22

xx
Page 23

1 Purpose and scope
Introduction
This chapter introduces the software technical reference (STR), the product models for the
HP LaserJet 4345mfp, the printing-system software for the HP LaserJet 4345mfp, and contains the
following sections:
●
HP LaserJet 4345mfp models
●
Printing-system software CD
Structure and availability of the software CD
●
This STR provides information about and troubleshooting tips for the printing-system software for the
HP LaserJet 4345mfp.
Purpose and scope
NOTE Information relating to networking functions is specific to product models that have
network capabilities.
This STR is prepared in an electronic format to serve as a quick-reference tool for Customer Care
Center (CCC) agents, support engineers, system administrators, management information systems
(MIS) personnel, and HP LaserJet 4345mfp end users, as appropriate.
NOTE This STR describes drivers that are shipped with the printing-system software CD.
This STR does not cover drivers that might be released for use by support personnel.
The following information is included in this STR:
■ Descriptions of print drivers and operating systems
■ Procedures for installing and uninstalling software components
■ Descriptions of various topics associated with the HP LaserJet 4345mfp, including engineering
details
NOTE An addendum to this STR includes system modification information and descriptions
of known software issues and workarounds.
The following table contains descriptions of the HP LaserJet 4345mfp models that are described in
this STR. Product configurations might vary among countries/regions.
Introduction 1
Page 24

Purpose and scope
HP LaserJet 4345mfp models
Table 1-1 Features of the HP LaserJet 4345mfp models
Feature Model Specifications
Performance
Memory
User interface ■ Graphic display on control panel
■ 45 pages per minute (ppm) when copying and printing on letter-sized
media; 43 ppm when copying and printing on A4-sized media
■ Less than 10 seconds to print the first page
■ 25% to 400% scalability when using the scanner glass
■ 25% to 200% scalability when using the automatic document feeder (ADF)
■ Transmit Once, Raster Image Processing (RIP) ONCE technology
■ 256 megabytes (MB) of random access memory (RAM)
■ Can be expanded to 512 MB by using industry standard 100-pin double
data rate dual inline memory modules (DDR DIMMs)
■ Memory Enhancement technology (MEt) that automatically compresses
data to use RAM more efficiently
■ Optional hard-disk drive can be added in an available EIO slot
■ Enhanced Help with animated graphics
■ Embedded Web server to gain access to support and order supplies
(network-connected products)
■ HP toolbox software to provide product status and alerts, show
documentation and troubleshooting information, and print internal product
information pages
Supported printer personalities ■ PCL 6
■ PCL 5
■ PDF
■ XHTML
■ MIME
■ Postscript
Storage features ■ Job storage
■ Personal identification number (PIN) printing (for products that have a
hard disk)
■ Fonts and forms
Environmental features ■ PowerSave setting
■ High content of recyclable components and materials
2 1 Purpose and scope
Page 25

Table 1-1 Features of the HP LaserJet 4345mfp models (continued)
Feature Model Specifications
■ Energy Star® compliant
■ Blue Angel compliant
Fonts
Media Handling
■ 80 scalable TrueType fonts installed with typical installation
■ 92 additional postscript fonts available on the installation CD
■ Includes HP Web Jetadmin to support forms and fonts on the disk
■ Prints on media from 76 x 127 mm (3 x 5 inches) to 216 x 356 mm (8.5 x
14.0 inches) in size
■
Prints on media with weights from 60 g/m
■ Prints on a wide range of media types including labels, transparencies,
and envelopes
■ Automatic document feeder (ADF) that holds up to 50 pages
■ 500-sheet tray 2
■ Optional 500-sheet tray 3; standard on the HP LaserJet 4345x mfp,
HP LaserJet 4345xs mfp, and the HP LaserJet 4345xm mfp models
■ Optional 500-sheet tray 4
■ Optional 500-sheet tray 5
■ Optional duplexing unit; standard on the HP LaserJet 4345x mfp,
HP LaserJet 4345xs mfp, and HP LaserJet 4345xm mfp models
■ 250-sheet face-down output bin
2
to 200 g/m2 (16 lb to 53 lb)
Purpose and scope
■ Optional envelope feeder
■ Optional 3-bin mailbox
Accessories ■ 100-pin DDR memory DIMM (dual inline memory module)
■ Enhanced input/output (EIO) hard disk
■ Optional 500-sheet stapler/stacker output accessory
■ Storage cabinet (recommended for additional optional trays)
■ HP LaserJet analog fax accessory 300
Connectivity
■ HP Jetdirect embedded print server
■ HP Web Jetadmin software
■ Standard bidirectional extended capabilities port (ECP) type-B (IEEE 1284-
compliant) parallel connection
■ Foreign Interface Harness (FIH) connection
■ Auxiliary connection for paper handling input devices
HP LaserJet 4345mfp models 3
Page 26

Purpose and scope
Table 1-1 Features of the HP LaserJet 4345mfp models (continued)
Feature Model Specifications
Supplies
■ The supplies status page contains information on toner level, page count,
and estimated pages remaining
■ The product uses a no-shake cartridge design
■ The product checks for authentic HP print cartridges at cartridge installation
■ The product offers Internet-enabled supply-ordering capabilities (by using
the embedded Web server or the HP Toolbox software)
4 1 Purpose and scope
Page 27

Printing-system software CD
This section contains information about the following topics:
HP LaserJet print drivers
●
Software features
●
HP LaserJet documentation
●
HP LaserJet print drivers
HP LaserJet 4345mfp print drivers provide printing features and communication between the
computer and the product. The printing-system CD includes software for end users and network
administrators who are working in the following operating environments:
■ Microsoft® Windows® 98 and Windows Millennium Edition (Me)
■ Microsoft Windows NT® 4.0, Windows 2000, Windows XP (32-bit), and Windows Server 2003
(32-bit)
■ Apple Mac OS 9.x and later, OS X (V10.1 and later)
NOTE For the latest information about the printing-system software components, view the
Readme files on the printing-system software CD. For additional information about installing
the printing-system software, view theHP LaserJet 4345mfp series Printing System Install
Notes on the printing-system software CD.
Purpose and scope
Table 1-2 Print drivers included with the HP LaserJet 4345mfp
Operating System
Windows 98, Me X X X
Windows NT 4.0 X X X
Windows 2000 X X X
Windows XP X X X
Windows Server 2003 X X X
Macintosh OS X
1
Not all product features are available from all drivers or operating systems. See the online Help in your driver for
information about the features that are available.
1
PCL 6 PCL 5 PS emulation
NOTE For the Windows NT 4.0 operating system, the print drivers can only be installed by
using the Add Printer installation method. For all Windows operating systems, the PCL 5
driver can only be installed by using the Add Printer installation method. For a list of print
drivers, updated HP printing-system software, and product support information, go to
www.hp.com/support/lj4345mfp.
Software features
This section contains information about the following topics:
Printing-system software CD 5
Page 28

Purpose and scope
● Printing system and installer
HP LaserJet print drivers
●
Driver Autoconfiguration
●
Update Now
●
●
HP Driver Preconfiguration
Automatic configuration, driver updates after a new configuration, and preconfiguration features are
available with the HP LaserJet 4345mfp.
Printing system and installer
The following sections contain information about the printing-system software and the installer on the
software CD that came with the product.
HP LaserJet 4345mfp printing-system software CD for Windows systems
For most Microsoft Windows operating systems (Windows 98, Windows Me, Windows 2000,
Windows XP, and Windows Server 2003), the HP LaserJet 4345mfp printing-system software CD
provides an interactive software window that you can use not only to install the printer drivers and
related components, but also to gain access to online user documentation, a customization utility,
and optional HP software. For the Windows NT 4.0 operating system, the print drivers can only be
installed by using the Add Printer installation method.
The following illustration shows the main screen of the HP LaserJet 4345mfp printing-system
software CD, which appears when you insert the software CD in your CD-ROM drive. If the screen
does not appear when you insert the software CD, click Start, click Run, click Browse..., navigate to
the root directory of the software CD, and then double-click the SETUP.EXE file to start the installer.
6 1 Purpose and scope
Page 29
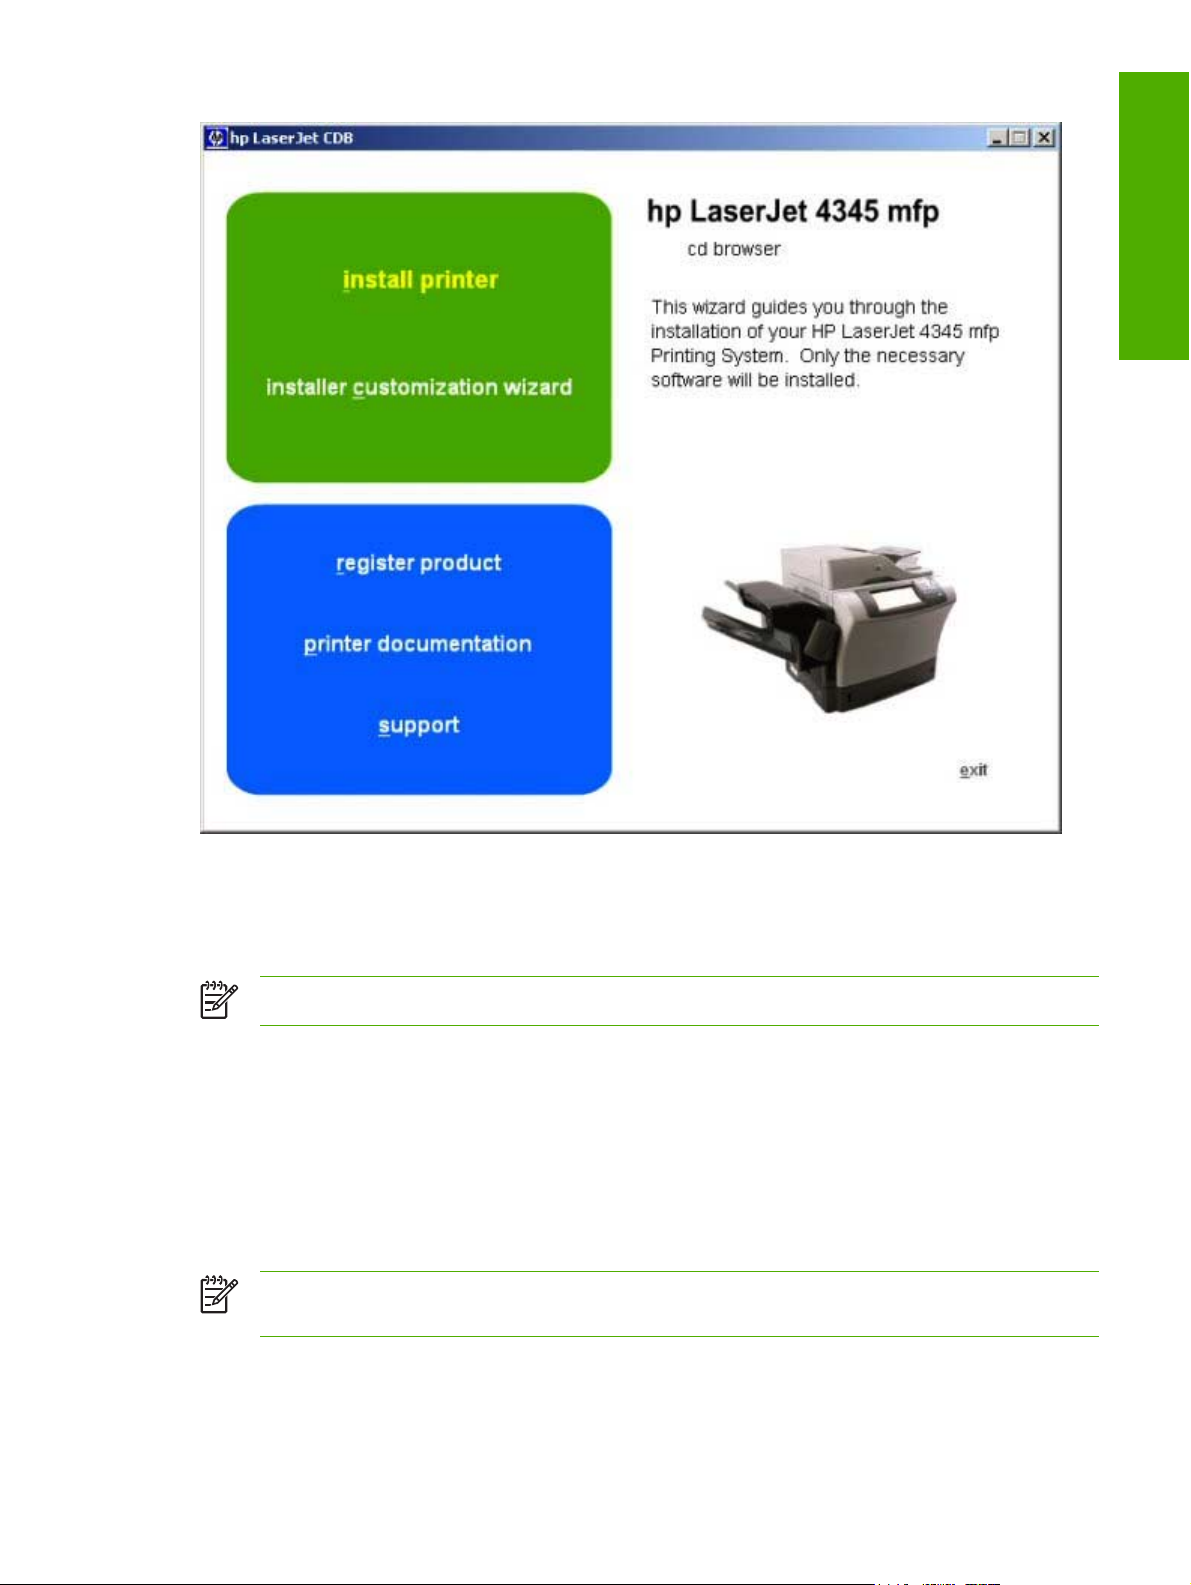
Figure 1-1 Installation software CD main screen
The main screen of the software CD contains installation options in the upper-left panel and
documentation options in the lower-left panel. As you move your cursor over each option, a
description of the option appears above the product image.
Purpose and scope
NOTE The options on your product might vary from the illustration.
install printer. This wizard guides you through the installation of your HP LaserJet 4345mfp printing-
system software. You are given the choice of performing a Typical Installation, a Minimum
Installation, or a Custom Installation. If you select Typical Installation, only the necessary software is
installed. If you select Minimum Installation, only the components required for basic printing are
installed. If you select Custom Installation, you can select the components that you want to install.
installer customization wizard. Use this wizard to customize the HP LaserJet 4345mfp installer by
presetting the installation options in a response file. The installer that you have customized can then
be used for silent, unattended installation.
NOTE For the HP Traditional PCL 5 Driver and all Windows NT 4.0 drivers, use HP Web
Jetadmin or the HP Driver Preconfiguration utility to create a silent installer.
Printing-system software CD 7
Page 30

Purpose and scope
register product. Use this option to register your product online. Using the Web registration, you
can gain access to support and services, manage your profile, and sign up for free support alerts,
driver notices, and personalized newsletters.
printer documentation. Use this option to view the HP LaserJet 4345mfp user documentation. The
following document options are available when you click this option:
■ user guide (interactive)
■ user guide (printer friendly)
■ install notes
■ hp driver preconfiguraiton user guide
■ embedded web server guide
■ hp jetdirect guide
NOTE If your system does not have Adobe® Acrobat® Reader 4.0 or later installed, clicking
any of the links to documentation that is provided in the portable document format (PDF)
opens a version of Adobe Acrobat Reader software that runs from the HP LaserJet 4345mfp
printing-system software CD. The Adobe Acrobat Reader software is not installed on your
computer and can only run while the printing-system software CD is in the CD-ROM drive.
Adobe Acrobat Reader is also available at the following URL:
www.adobe.com.
support. To increase productivity and get the most use from your HP LaserJet 4345mfp, view a list
of optional software programs that are available for installation and links to HP Web sites. The
following options are available:
■ Click hp web jetadmin to download HP Web Jetadmin software from the Web for a browser-
based network-management tool.
■
Click supplies for information about ordering HP LaserJet 4345mfp supplies.
■ Click product information for HP LaserJet 4345mfp support information and updates.
■ Click HP.com to go to the HP home Web page for information about products and services,
support, drivers, and HP online stores.
Installer features
The common installer is designed to provide a simple and consistent installation method for the
product. The common installer is available for the Windows 98, Windows Me, Windows 2000,
Windows XP, and Windows Server 2003 operating systems.
8 1 Purpose and scope
Page 31

The common installer offers the following features:
■ The HP LaserJet 4345mfp printing-system software CD features an interactive software
interface. See
■ Network connection is integrated so that you can install drivers and connect to a networked
product in a single process.
HP LaserJet 4345mfp printing-system software CD for Windows systems.
■ The selection dialog box sets the operating-system language as the default language (for
Windows 98, Windows Me, Windows 2000, Windows XP, and Windows Server 2003 only). You
can use the installer to select any of the languages on the HP LaserJet 4345mfp printing-system
software CD.
The HP LaserJet 4345mfp printing-system software CD also includes the following features:
■ The HP LaserJet Uninstaller Utility
■ The HP Customization Utility for custom installations
■ The HP Toolbox
All of the Windows system components are installed by using the HP LaserJet 4345mfp series
printing-system installer. The installer automatically detects your language of choice and your
operating system. You can select the type of installation that you prefer: Typical Installation,
Minimum Installation, or Custom Installation.
HP LaserJet print drivers
This section provides information about the various installable print drivers that are available either
on the HP LaserJet 4345mfp software CD or from the HP Web site.
HP PCL 6, PCL 5, and PS Emulation Drivers
The following drivers are available for the HP LaserJet 4345mfp:
Purpose and scope
■ The HP Traditional PCL 6 Driver for Windows 98, Windows Me, and Windows NT 4.0.
■ The HP Traditional PCL 5 Driver for Windows 98, Windows Me, and Windows NT 4.0.
NOTE You must use the Add Printer installation method to install the
HP Traditional PCL 5 Driver.
■ The HP Traditional PS Emulation Driver for Windows 98, Windows Me, and Windows NT 4.0.
■ The HP PCL 6 Unidriver, the HP PCL 5 Unidriver, and the HP PS Emulation Unidriver for
Windows 2000, Windows XP, and Windows Server 2003.
NOTE You must use the Add Printer installation method to install the HP PCL 5 Unidriver.
All of the drivers provide access to the media-handling and print-quality features, and are described
in chapters 3 and 4 of this STR.
NOTE If you select a Typical Installation during installation of the printing-system software,
the HP PCL 6 driver is installed by default.
Printing-system software CD 9
Page 32

Purpose and scope
Print driver version numbers for Windows operating systems
The HP LaserJet 4345mfp PCL 6 and PCL 5 print drivers support Windows 98, Windows Me,
Windows NT 4.0, Windows 2000, Windows XP, and Windows Server 2003 operating systems. The
HP LaserJet 4345mfp PS Emulation Driver software provides postscript feature support for the
HP LaserJet 4345mfp.
If you are using an HP traditional driver, you can view the print-driver version number by clicking the
HP logo in the lower-left corner of the following HP traditional PCL 6 or HP traditional PCL 5 driver
tabs:
■ Finishing
■ Effects
■ Paper
■ Job Storage
■ Basics
If you are using an HP unidriver in Windows 2000, Windows XP, or Windows Server 2003 operating
systems, follow these steps to find driver-version information:
1 Click Start.
2 Click Settings.
3 Click Printers (or Printers and Faxes in Windows XP and Windows Server 2003).
4 Right-click the product icon.
5 Click Properties.
6 Click the About tab.
Macintosh and Macintosh-compatible printing system
The HP LaserJet 4345mfp printing system for Macintosh is composed of the Print Center or Printer
Setup Utility for Mac OS X and the Apple LaserWriter driver for Mac OS 9, which are provided with
the operating system, and HP-created postscript printer definition (PPD) files and printer dialog
extension (PDE) files. The driver uses these files to determine the features and postscript commands
that the product supports. Bidirectional support in AppleTalk connections supports software
autoconfiguration. The following are installable components:
■ The HP LaserJet Installer for Mac OS 9, Mac OS X, and Mac OS X Classic
■ The HP LaserJet Screen Fonts Installer.
■ SYSTEM/EXTENSIONS/PRODUCT DESCRIPTIONS (for Mac OS 9)
■ LIBRARY/PRINTERS/PPDS/CONTENTS/RESOURCES/LANGUAGE.LPROJ (for Mac OS X)
■ The HP LaserJet Utility, an HP utility that is installed in the HP LaserJet folder of Mac OS 9. The
HP LaserJet Utility provides configuration and management support for postscript
■ Online Help, an HTML-based product and utility help that can be viewed through a browser or in
the Macintosh OS Help Center (in English only)
10 1 Purpose and scope
Page 33

■ Install notes.
NOTE The HP LaserJet Utility is a standalone utility that is not installed by the installer, but
is available on the HP LaserJet 4345mfp printer software CD. It is an HP utility that is installed
in the HP LaserJet folder of Mac OS 9 and provides configuration and management support
for postscript. It can be found on the CD in a directory called “hp OS 9 LaserJet Utility.”
Additional driver availability
All drivers on the printing-system CD are also available on the Web. The following drivers are only
available on the Web:
■ HP OpenVMS drivers. For further information, go to
■ HP Install Network Printer Wizard (INPW). For further information, go to
inpw_software.
■ OS/2 PCL 5/PCL 6 print driver. For further information, go to
■ OS/2 PS print driver. For further information, go to
■ UNIX model scripts. For further information about UNIX model scripts, go to
unixmodelscripts.
■ Tru64 UNIX printing. For further information, go to
■
Linux drivers. For further information, go to
■ SAP printing. For further information, go to
NOTE The OS/2 drivers are available from IBM and are packaged with OS/2. They are not
available in Traditional Chinese, Simplified Chinese, Korean, or Japanese.
www.hp.com/go/linuxprinting.
www.hp.com/go/sap/print.
h71000.www7.hp.com/openvms/print/.
www.hp.com/go/
www.ibm.com.
www.ibm.com.
www.hp.com/go/
h30097.www3.hp.com/printing/.
Purpose and scope
Driver Autoconfiguration
The HP LaserJet PCL 6 driver, PCL 5 driver, and PS Emulation Driver for Windows 2000,
Windows XP, and Mac OS X feature automatic discovery and driver configuration for product
accessories at the time of installation. Some accessories that can be detected include the duplexing
unit, optional trays, and dual inline memory modules (DIMMs).
Update Now
If you have modified the configuration of the HP LaserJet 4345mfp since installation, the driver can
be automatically updated with the new configuration in environments that support bidirectional
communication. Use the Update Now feature to automatically reflect the new configuration in the
driver.
NOTE The Update Now feature is not supported in environments where shared
Windows NT 4.0, Windows 2000, or Windows XP clients are connected to Windows NT 4.0,
Windows 2000, or Windows XP hosts.
HP Driver Preconfiguration
HP Driver Preconfiguration is a software architecture and set of tools that permits HP software to be
customized and distributed in managed corporate printing environments. Using HP Driver
Preconfiguration, information technology (IT) administrators in corporate and enterprise
Printing-system software CD 11
Page 34

Purpose and scope
environments can preconfigure the printing and device defaults for HP printer drivers before installing
the drivers in the network environment. For more information, see the HP Driver Preconfiguration
Support Guide, which is available at
www.hp.com/support/lj4345mfp.
Information about HP Driver Preconfiguration is also available by going to
hpdpc_sw, and then selecting Cross operating system (BIOS, Firmware, Diagnostics, etc.).
www.hp.com/go/
HP LaserJet documentation
This section describes the documentation that is available to users and administrators.
The following illustration shows the printer documentation screen, which appears when you click
printer documentation on the main screen of the HP LaserJet 4345mfp printing-system software CD.
Figure 1-2 Installation software CD printer documentation screen
The following table lists the availability of HP LaserJet 4345mfp printing-system documentation by
operating system.
12 1 Purpose and scope
Page 35

Table 1-3 Documentation availability
Document Windows
98/Me
HP LaserJet 4345mfp User Guide (.PDF file) x x x x
HP LaserJet 4345mfp User Guide (.CHM file) x x x
HP LaserJet 4345mfp series Printing System Install Notes x x x
HP Driver Preconfiguration Support Guide x x x
HP Embedded Web Server User Guide x x x x
HP Jetdirect Administrator's Guide x x x x
HP Device Installer Customization Wizard xxx
Windows NT
4.0
Windows 2000/
XP/Server 2003
Macintosh
Access to HP LaserJet documents depends on the type of document and its location. Some
documents can be opened from the installer CD Browser. Others are found on the software CD and
can be opened by navigating to the folder where they reside. Still others are available on the Web
through links in the installer CD Browser or CD folders. Documents are available in the following file
formats:
■ Portable Document Format (.PDF). The HP LaserJet 4345mfp printing-system software CD
includes Adobe Acrobat Reader for viewing online documentation. If your system does not have
Adobe Acrobat Reader 4.0 or later installed, clicking any of the links to documentation that is
provided in the .PDF file format opens a version of Adobe Acrobat Reader software that runs
from the HP LaserJet 4345mfp printing-system software CD. The Adobe Acrobat Reader
software is not installed on your computer and can only run while the printing-system software
CD is in the CD-ROM drive.
Purpose and scope
■ Compiled HTML (.CHM). When you click a documentation link to a .CHM document, a Microsoft
HTML Viewer opens the file on your computer screen. The .CHM files can reside either on the
printing-system software CD or on the Web.
■ Hypertext Markup (.HTM). When you click a documentation link to an .HTM document, a Web
browser opens the file on your computer screen. The .HTM files can reside either on the printingsystem software CD or on the Web.
■ Rich Text format (.RTF). This is a text file. You can navigate to .RTF files and open them in
Microsoft Word or Microsoft WordPad.
HP LaserJet 4345mfp User Guide
The HP LaserJet 4345mfp User Guide describes the basic features of the product.
To view this guide, click printer documentation in the installer CD Browser, and then click view
user guide. The guide opens as a Windows Help file (.CHM file). This readable, onscreen version of
the guide is provided in accordance with the Americans with Disabilities Act (ADA).
The screen-readable version (.CHM) of the User Guide for the HP LaserJet 4345mfp is also
available on the HP LaserJet 4345mfp printing-system software CD. To open the HP LaserJet
Printing-system software CD 13
Page 36

Purpose and scope
4345mfp User Guide from the software CD, navigate to the <language> folder for your language,
and then open the Manuals folder. In that folder, open the following file:
■ LJ4345_USE_XXWW.CHM
To print the User Guide, click printer documentation on the installer CD Browser, and then click
print user guide. The guide is provided as a .PDF file, which you can print.
This document is also available on the printing-system software CD. To open the .PDF version of the
guide, navigate to the <language> folder for your language, and then open the Manuals folder. In
that folder, open the following file:
■ LJ4345_USE_XXWW.PDF
When you have the file open, you can click File and then click Save As to save a copy of the file to
another location.
NOTE The "XX" in the file name varies for each language. For instance, the file name for the
French version of the guide is LJ4345_USE_FRWW.CHM.
NOTE The "XX" in the file name varies for each language. For instance, the file name for the
French version of the guide is LJ 4345_USE_FRWW.PDF.
HP LaserJet 4345mfp series Printing System Install Notes
The HP LaserJet 4345mfp series Printing System Install Notes is a document (in .HTM format) that
contains important information about product features, instructions for installing the printing-system
software, and technical assistance.
To view this file from the printing-system software CD, click printer documentation on the main
screen of the installer CD Browser, and then click install notes.
You can also open the HP LaserJet 4345mfp series Printing System Install Notes by inserting the
software CD into the CD-ROM drive and navigating to <language>. In that folder, open the following
file:
■ LJ4345mfp_INSTALL-NOTE_XXWW.HTM
NOTE The "XX" in the file name varies for each language. For instance, the file name for the
French version of the document is LJ4345mfp_INSTALL-NOTE_FRWW.HTM.
When you have the file open in a text editor (such as NotePad or WordPad), you can click File, and
then click Save As to save a copy of the file to another location.
HP Embedded Web Server Guide
The HP Embedded Web Server User Guide (in .PDF format) provides information about device
status, settings, and networking for the HP LaserJet 4345mfp.
To view this guide, click printer documentation on the main screen of the installer CD Browser, and
then click embedded web server guide.
14 1 Purpose and scope
Page 37

You can also gain access to the HP Embedded Web Server User Guide by inserting the printingsystem software CD into the CD-ROM drive, navigating to the <language> folder for your language,
and then opening the Manuals folder. In that folder, open the following file:
■ EWS90_USE_XXWW.PDF
NOTE The "XX" in the file name varies for each language. In French, the file name is
EWS90_USE_FRWW.HTM.
When you have the file open, you can click File and then click Save As to save a copy of the file to
another location.
HP Driver Preconfiguration Support Guide
The HP Driver Preconfiguration Support Guide is a guide (in .PDF format) for preconfiguring drivers
in network environments.
To view this guide, insert the printing-system software CD into the CD-ROM drive, navigate to
english, and then opening the Manuals folder. In that folder, open the following file:
■ PRECONFIG_SUPPORT_ENWW.PDF
NOTE The HP Driver Preconfiguration Support Guide is available only in English on the
software CD.
Purpose and scope
When you have the file open, you can click File and then click Save As to save a copy of the file to
another location.
HP Jetdirect Administrator's Guide
The HP Jetdirect Administrator's Guide is a network administrator's guide (in .PDF format) that
contains information about connecting the product directly to a network.
To view this guide, click printer documentation on the main screen of the installer CD Browser, and
then click hp jetdirect guide.
You can also gain access to the HP Jetdirect Administrator's Guide by inserting the printing-system
software CD into the CD-ROM drive, navigating to the <language> folder for your language, and
then opening the Manuals folder. In that folder, open the following file:
■ HPJDIAG_XXWW.PDF
NOTE The "XX" in the file name varies for each language. In French, the file name is
HPJDIAG_FRWW.PDF.
When you have the file open, you can click File and then click Save As to save a copy of the file to
another location.
HP Device Installer Customization Wizard
The HP Device Installer Customization Wizard (in .HTM format) provides network administrators with
information about pre-selectable options and installation settings for the Installer Customization
Wizard.
Printing-system software CD 15
Page 38

Purpose and scope
You can gain access to the HP Device Installer Customization Wizard by inserting the printingsystem software CD into the CD-ROM drive and navigating to the <language> folder for your
language. In that folder, open the following file:
■ CUSTOMIZATION_README_XXWW.RTF
When you have the file open, you can click File and then click Save As to save a copy of the file to
another location.
NOTE The file name is the same for all languages. The document itself has been localized.
To open the French version of the document, for instance, navigate to the francais folder.
16 1 Purpose and scope
Page 39

Structure and availability of the software CD
This section contains information about the following topics:
In-box file layout
●
Availability and fulfillment
●
The software CD for the HP LaserJet 4345mfp contains a variety of files for installing the printingsystem software on your computer. This section describes the files that are available on the software
CD, as well as additional support and fulfillment information.
In-box file layout
The HP LaserJet 4345mfp series printing-system software consists of two partitions: one for
installing the product in Windows operating systems, and the other for installing the product in
Macintosh operating systems. The files include documentation files and files that are required to
install and uninstall the printing-system components.
HP LaserJet software CD, Windows partition
The root directory in the Windows partition of the software CD contains the AUTORUN.EXE file,
SETUP.EXE file, and the following directories and support files:
■ autorun
■ Fonts
■ HW
■ System32
■ Temp
Purpose and scope
■ toolbox
■ WebReg
■ Language directories for all of the languages that are on the software CD
The printing-system files for each language reside in the following directories:
■ Drivers
■ Manuals
File layouts differ by language for each regional version of the software CD.
To view the files, insert the HP LaserJet 4345mfp software CD, right-click Start, click Explore, and
then select the CD-ROM drive.
Structure and availability of the software CD 17
Page 40

Purpose and scope
HP LaserJet software CD, Macintosh partition
The files contained in the Macintosh partition of the HP LaserJet software CD are grouped by
language and reside in the following directories and folders:
■ Root directory
■ HP LASERJET INSTALLERS (for Macintosh operating systems)
■ PDF (contains guides and manuals in .PDF format)
File layouts differ by language for each regional version of the software CD.
Availability and fulfillment
This section provides information about the availability of the HP LaserJet 4345mfp printing-system
software and related software and firmware. Printing-system software on a CD is available from
HP fulfillment centers.
In-box CDs
The HP LaserJet 4345mfp printing-system software CD is available in five versions. The following list
shows the five versions of the software CD and the languages that they support:
■ CD AM - Americas and Europe:
■ DE = German (Deutsch)
■ EN = English
■ ES = Spanish (Español)
■ FR = French (Français)
■ IT = Italian (Italiano)
■ NL = Dutch (Nederland)
■ PT = Brazilian Portuguese (Português)
■ CD WE- Western Europe and Arabic:
■ AR = Arabic
■ DN = Danish (Dansk)
■ EN = English
■ FR = French (Français)
■ CD NE- Northern Europe and Russian:
■ EN = English
■ FI = Finnish (Suomi)
■ NO = Norwegian (Norsk)
■ RU = Russian (Russ)
18 1 Purpose and scope
Page 41

■ SV = Swedish (Svenska)
■ TR = Turkish (Turkçe)
■ CD EE - Eastern Europe:
■ CZ = Czech (Cesky)
■ EL = Greek
■ EN = English
■ HE = Hebrew
■ HU = Hungarian (Magyar)
■ PL = Polish (Polski)
■ CD AS - Asia:
■ EN = English
■ JA = Japanese
■ KO = Korean
■ TH = Thai
Purpose and scope
■ ZHCN = Simplified Chinese
■ ZHTW = Traditional Chinese
NOTE Drivers for various languages do not necessarily correspond to geographic countries/
regions. European languages, for instance, are distributed on three CDs.
The following tables show the printing-system components that are supported in each language.
Table 1-4 CD AM - Americas and Europe
Component DE EN ES FR IT NL PT
HP Traditional PCL 6 Driver x x x x x x x
HP Traditional PCL 5 Driver x x x x x x x
HP Traditional Postscript 3
Emulation Driver
HP PCL 6 Unidriver x x x x x x x
HP PCL 5 Unidriverr x x x x x x x
HP Postscript 3 Emulation
Unidriver
Common Windows Installer x x x x x x x
x x x x x x x
x x x x x x x
Add Printer Wizard Installer x x x x x x x
Customization Utility Wizard x x x x x x x
CD Browser x x x x x x x
Structure and availability of the software CD 19
Page 42

Purpose and scope
Table 1-4 CD AM - Americas and Europe (continued)
Component DE EN ES FR IT NL PT
HP Driver Preconfiguration
Support Guide
HP LaserJet 4345mfp User
Guide (PDF)
HP LaserJet 4345mfp User
Guide (CHM)
HP Jetdirect Administrator's
Guide
HP LaserJet 4345mfp series
Printing System Install Notes
HP Embedded Web Server
User Guide
HP Device Installer
Customization Wizard
HP Toolbox x x xxxx x
x
x x x x x x x
x x x x x x x
x x x x x x x
x x x x x x x
x x x x x x
x x x x x x x
20 1 Purpose and scope
Page 43

Table 1-5 CD WE - Western Europe and Arabic
Component AR DN EN FR
HP Traditional PCL 6 Driver x x
HP Traditional PCL 5 Driver x x x x
HP Traditional Postscript 3 Emulation Driver x x x x
HP PCL 6 Unidriver x x x x
HP PCL 5 Unidriverr x x x x
HP Postscript 3 Emulation Unidriver x x x x
Common Windows Installer x x x x
Add Printer Wizard Installer x x x x
Customization Utility Wizard x x x
CD Browser x x x
HP Driver Preconfiguration Support Guide x
HP LaserJet 4345mfp User Guide (PDF) x x x x
HP LaserJet 4345mfp User Guide (CHM) x x x x
HP Jetdirect Administrator's Guide x x x
Purpose and scope
HP LaserJet 4345mfp series Printing
System Install Notes
HP Embedded Web Server User Guide x x x
HP Device Installer Customization Wizard x x x x
HP Toolbox x x x
x x x x
Table 1-6 CD NE - Northern Europe and Russian
Component EN FI NO RU SV TR
HP Traditional PCL 6 Driver x x x x x x
HP Traditional PCL 5 Driver x x x x x x
HP Traditional Postscript 3
Emulation Driver
HP PCL 6 Unidriver x x x x x x
HP PCL 5 Unidriverr x x x x x x
HP Postscript 3 Emulation
Unidriver
Common Windows Installer x x x x x x
x x x x x x
x x x x x x
Add Printer Wizard Installer x x x x x x
Customization Utility Wizard x x x x x x
CD Browser x x x x x x
Structure and availability of the software CD 21
Page 44

Purpose and scope
Table 1-6 CD NE - Northern Europe and Russian (continued)
Component EN FI NO RU SV TR
HP Driver Preconfiguration
Support Guide
HP LaserJet 4345mfp User
Guide (PDF)
HP LaserJet 4345mfp User
Guide (CHM)
HP Jetdirect Administrator's
Guide
HP LaserJet 4345mfp series
Printing System Install Notes
HP Embedded Web Server
User Guide
HP Device Installer
Customization Wizard
HP Toolbox x x x x
x
x x x x x x
x x x x x x
x x x x x x
x x x x x x
x x x x x
x x x x x x
Table 1-7 CD EE - Eastern Europe
Component CZ EL EN HE HU PL
HP Traditional PCL 6 Driver x x x x x x
HP Traditional PCL 5 Driver x x x x x x
HP Traditional Postscript 3
Emulation Driver
HP PCL 6 Unidriver x x x x x x
HP PCL 5 Unidriverr x x x x x x
HP Postscript 3 Emulation
Unidriver
Common Windows Installer x x x x x x
Add Printer Wizard Installer x x x x x x
Customization Utility Wizard x x x x x x
CD Browser x x x x x x
HP Driver Preconfiguration
Support Guide
HP LaserJet 4345mfp User
Guide (PDF)
HP LaserJet 4345mfp User
Guide (CHM)
HP Jetdirect Administrator's
Guide
x x x x x
x x x x x
x
x x x x x x
x x x x x x
x x x x
HP LaserJet 4345mfp series
Printing System Install Notes
22 1 Purpose and scope
x xxx xx
Page 45

Table 1-7 CD EE - Eastern Europe (continued)
Component CZ EL EN HE HU PL
HP Device Installer
Customization Wizard
HP Toolbox x
x x x x x x
Table 1-8 CD AS - Asia
Component EN JA KO TH ZHCN ZHTW
HP Traditional PCL 6 Driver x x x x x x
HP Traditional PCL 5 Driver x
HP Traditional Postscript 3
Emulation Driver
HP PCL 6 Unidriver x x x x x x
HP PCL 5 Unidriverr x
HP Postscript 3 Emulation
Unidriver
Common Windows Installer x x x x x x
Add Printer Wizard Installer x x x x x x
Customization Utility Wizard x x x x x x
x x x x x x
x x x x x x
Purpose and scope
CD Browser x x x x x x
HP Driver Preconfiguration
Support Guide
HP LaserJet 4345mfp User
Guide (PDF)
HP LaserJet 4345mfp User
Guide (CHM)
HP Jetdirect Administrator's
Guide
HP LaserJet 4345mfp series
Printing System Install Notes
HP Device Installer
Customization Wizard
HP Toolbox x
x
x x x x x x
x x x x x x
x x x x x
x x x x x x
x x x x x x
Web deployment
All software that is contained on the installation CD is also available on the Web.
Web deployment is the preferred method for obtaining the latest software. The Web site offers a
notification option for automatic e-mail notification about new software releases.
Structure and availability of the software CD 23
Page 46

Purpose and scope
Printing-system software
The HP LaserJet 4345mfp printing-system software is available for download from
lj4345mfp_software.
The printing-system software is supported in the following operating systems:
NOTE Only 32-bit printer drivers are available on the printing-system software CD. If your
computer is running a 64-bit operating system, you must install a 64-bit printer driver. 64-bit
printer drivers for Windows XP and Windows Server 2003 are available on the Web at
www.hp.com/support/lj4345mfp.
For more information about installing printer drivers for Windows, see
Installing the Windows
printing-system components.
■ Windows 98 and Windows Me
■ Windows XP Professional (32-bit )
■ Windows XP Home Edition
■ Windows 2000 (32-bit)
■ Windows Server 2003 (32-bit )
Standalone drivers
www.hp.com/go/
The HP PCL 6, HP PCL 5, and HP PS emulation drivers and unidrivers are available individually to
support the following operating systems:
■ Windows 98 and Windows Me
■ Windows NT 4.0
■ Windows 2000
■ Windows XP (32-bit and 64-bit)
■ Windows Server 2003 (32-bit and 64-bit)
■ Mac 9.x
■ Mac OS X (V10.1 or later)
Other operating systems
Drivers and related software are available for these additional operating systems:
■ UNIX
■ Linux
■ OS/2
■ HP Open VMS
24 1 Purpose and scope
Page 47

Software component availability
The following table lists the availability of HP LaserJet software components by operating system.
NOTE In the following table, "98/Me" refers to Windows 98 and Windows Me; "2K" refers to
Windows 2000; "4.0" refers to Windows NT 4.0; "XP" refers to Windows XP; and "Mac" refers
to Macintosh operating systems.
Table 1-9 Software component availability for HP LaserJet 4345mfp
Component 98/Me 4.0
Drivers
HP traditional PCL 6 and PCL 5 drivers
HP Traditional Postscript 3 Emulation
Driver
HP PCL 6 and PCL 5 unidrivers
HP Postscript 3 Emulation Unidriver
Macintosh PPD/PDE x
UNIX Model Script x
Linux printing drivers and model script x
HP Preconfiguration x x x x
Installers
Common Windows Installer
Customization Utility Wizard x x x
Macintosh Installer for OS 9 x
x x
x x
x x x
1
2K/XP
x x
x x
XP64 Mac UNIX Linux
Purpose and scope
Macintosh Installer for OS X x
CD Browser x x x
Add Printer Wizard install x x x x
Web Registration x x x x
1
This information also applies to Windows Server 2003.
Structure and availability of the software CD 25
Page 48

Purpose and scope
26 1 Purpose and scope
Page 49

2 Software description
Introduction
The HP LaserJet 4345mfp comes with software and installers for Microsoft® Windows® and Apple
Computer, Inc., Macintosh systems. Linux and UNIX® systems are supported, and software is
available on the Web. For information about specific system installers, drivers, and components, see
the section that corresponds to that operating system.
This chapter contains information about the following topics:
Supported operating systems
●
●
Technology background information
Software description
Introduction 27
Page 50

Supported operating systems
The support for Windows operating systems (OSs) offers a full-featured configuration of the
HP LaserJet 4345mfp. Support for OSs that are not described in this document offer varying levels of
functionality. The HP LaserJet 4345mfp printing-system software, including PCL 6, PCL 5, and PS
emulation drivers, supports the following OSs.
■ Windows 98
■ Windows Millennium Edition (Windows Me)
Software description
■ Windows NT 4.0 (Service packs 3 through 6)
■ Windows 2000 (Service packs 1 and 2)
■ Windows XP Home Edition
■ Windows XP Professional (Service pack 1 and greater)
■ Windows Server 2003
NOTE Throughout this manual, Windows XP is used to denote Windows XP Home Edition,
Windows XP Professional, and Windows Server 2003, unless noted otherwise.
The HP LaserJet 4345mfp is also supported in the following operating systems:
■ Mac OS 9 and Mac OS X (V10.1 or later)
■ Linux (available at
■ UNIX (available at
■ Windows Terminal Server
NOTE For the Windows NT 4.0 operating system, the print drivers can only be installed
by using the Add Printer installation method.
www.hp.com/go/linuxprinting)
www.hp.com/go/jetdirectunix_software)
■ Citrix Terminal Server
■ Windows Cluster Server 8
■ HP OpenVMS (available at
■ Tru64 UNIX printing. For further information, go to
■ SAP printing. For further information, go to
■ OS/2 printing. For further information, go to
For more information about the HP LaserJet 4345mfp, go to
28 2 Software description
h71000.www7.hp.com/openvms/print/)
h30097.www3.hp.com/printing/.
www.hp.com/go/sap/print.
www.ibm.com.
www.hp.com/support/lj4345mfp.
Page 51

Technology background information
This section contains information about the following topics:
Driver Configuration
●
HP Driver Preconfiguration
●
HP Driver Diagnostic Printer Check tool
●
●
HP Printer Access Tool
Euro character
●
●
HP Embedded Web Server and HP Toolbox
HP Embedded Web Server
●
HP Toolbox
●
●
HP Web Jetadmin
HP Digital Sending Software
●
●
Foreign Interface Harness
Bluetooth
●
Software description
Remote firmware update
●
●
Printing print-ready documents from a command line
Driver-feature comparison in various operating systems
●
Driver Configuration
The HP LaserJet 4345mfp print drivers feature bidirectional communication technology which, in
supported environments, provides automatic discovery and driver configuration for product
accessories. Some accessories that are automatically discovered and configured are the optional
500-sheet trays (tray 3, tray 4, and tray 5), the duplexing unit for automatic two-sided printing, the
optional envelope feeder, the product memory, the product hard disk, and the job-storage feature.
Automatic discovery and driver configuration through bidirectional communication occurs in the
following circumstances:
■ Upon every installation of a print driver, when using Enterprise Autoconfiguration (EAC)
■ When using the Update Now feature for a driver that is already installed
Bidirectional communication
In environments that support bidirectional communication, the computer communicates with the
product during installation, determines the physical configuration, and then configures the driver
accordingly.
Bidirectional communication is the capability of the product to respond to data inquiries from the
computer and report back information, such as what type of print media is available or what
accessories are connected to the product. If the connection does not have this capability (that is, if it
Technology background information 29
Page 52

has no bidirectional mode), it can only accept commands from the host and cannot report information
back to the host computer.
Bidirectional communication depends on your network operating system and on the type of
connection that you have between your computer and your HP LaserJet 4345mfp.
When you install the HP Toolbox, bidirectional communication is always enabled. Installing the
HP Toolbox activates the HP Network Registry Agent (HPNRA) to ensure constant communication
between your computer and the product. When you install a driver without installing the HP Toolbox
at the same time, bidirectional communication is enabled only to configure the driver, and is then
disabled unless the Update Now feature is used to update the driver.
Software description
Enterprise AutoConfiguration
Enterprise AutoConfiguration (EAC) uses bidirectional communication to provide autoconfiguration
functionality for installation of the print driver over a network, whether you use the installer on your
printing-system software CD or the Add Printer wizard to install the driver. Driver installation that
includes EAC is configured with the same settings as the physical configuration of the product.
Configuration occurs without user interaction. If bidirectional-communication software has been
installed previously, EAC is not activated, and the pre-existing bidirectional-communication software
is used to configure the print driver.
If bidirectional communication software has not been installed, EAC installs bidirectionalcommunication software that allows it to communicate with the product and automatically match the
print driver with the actual product configuration. EAC is activated during installation of the driver or
whenever the Update Now feature is used.
If the configuration of the HP LaserJet 4345mfp changes after installation, the driver can be
automatically updated with the new configuration in environments that support bidirectional
communication by using the Update Now feature. For example, if the HP LaserJet 4345mfp is
installed and an optional media-handling accessory is added later, you can use the Update Now
feature to query the product and update the settings to match the product configuration.
The Update Now feature triggers the driver to check the registry for new information. The feature
automatically updates the registry and changes the configuration information that appears on the
Configure tab if you are using an HP Traditional PCL 6 or PCL 5 driver, and on the Device Settings
tab if you are using an HP PCL 6, HP PCL 5, or HP PS Emulation Driver.
NOTE If you are using an HP PCL or PS emulation unidriver, you must select Update Now
through the Automatic Configuration setting on the Device Settings tab. If you are using an
HP traditional PCL 6 or PCL 5 driver, you must click the Update Now button on the
Configure tab. The Update Now feature is not available with the HP Traditional PS Emulation
Driver.
The following tables show the availability of EAC for various operating systems and network
environments that support bidirectional communication.
30 2 Software description
Page 53

Table 2-1 EAC availability in Microsoft Windows and Microsoft Share
Method Connection type Microsoft Windows
Microsoft Share
98 Me NT 4.0 2000 XP 2000/XP
host
with
2000/XP
client
Installer Direct
Parallel x x
connect
USB
Network Jetdirect TCP/IP x x x x x
IPX/SPX x x x x x
Standard TCP/IP
x x x x x
(HP)
TCP/IP
x x x x x
(MS)
IPX/SPX
x x x x x
(HP)
Add
Printer
Direct
connect
Parallel x
USB
Network Jetdirect TCP/IP x x x x x x
IPX/SPX x x x x x x
Standard TCP/IP
x x x x x x
(HP)
TCP/IP
x x x
(MS)
IPX/SPX
x x x x x x
(HP)
1
This column represents the following Microsoft Share configurations: 1. Windows 2000, Windows XP, or Windows Server 2003 Server
host with Windows NT 4.0, Windows 98, or Windows Me client; 2. Windows NT 4.0 host with Windows 2000, Windows XP, Windows
Server 2003, Windows 98, or Windows Me client; 3. Windows 98 or Windows Me host with any client.
2
In this environment, client machines use Point and Print to download the configured driver from the host.
1
NT 4.0
host
with NT
4.0 client
2
x
2
x
2
x
2
x
2
x
2
x
2
x
2
x
2
x
Software description
Table 2-2 EAC availability in Novell Netware environments
Method Connection type Novell
Netware 4.x Netware 5.x
Bindery
queue
Installer Direct connect Parallel
USB
Network Jetdirect TCP/IP x x x x
IPX/SPX
Technology background information 31
NDS queue Bindery
queue
NT 4.0
Page 54

Table 2-2 EAC availability in Novell Netware environments (continued)
Method Connection type Novell
Netware 4.x Netware 5.x
Software description
1
Bidirectional functionality is supported only with the client software from Novell. It is not supported with Microsoft (MS) Client Service for
NetWare.
HP Driver Preconfiguration
HP Driver Preconfiguration is a software architecture and set of tools that permits HP printing-system
software to be customized and distributed in managed corporate printing environments. Using HP
Driver Preconfiguration, information technology (IT) administrators in corporate and enterprise
environments can preconfigure the printing and device defaults for HP print drivers before installing
the drivers in the network environment.
HP Driver Preconfiguration is most beneficial when configuring print drivers for multiple workstations
or print servers for print queues that share the same configuration. Two types of features can be
configured: device settings and printing-preferences settings. The driver is configured to match the
product hardware so that gaining access to all of the product accessories through the driver is
enabled correctly (for example, for duplexing units and additional trays). Most driver feature settings
can also be configured.
Standard TCP/IP (HP)
TCP/IP (MS1)
IPX/SPX (HP)
Bindery
queue
NDS queue Bindery
queue
NT 4.0
HP Preconfiguration configures the driver to match the accessories installed on the product, or to
match the settings that IT administrators make in the configuration (.CFG) file (for example, optional
trays, total amount of memory, job-storage settings, or mopier settings).
The preconfiguration process consists of three basic steps: driver acquisition, driver preconfiguration,
and driver installation and deployment. These steps can be accomplished in different ways,
depending on the tool that is being used to define the configuration.
The configuration process for driver preconfiguration is supported through three distinct tools. All
three are designed with the same basic user interface (UI) controls for interacting with the
configuration (.CFG) file, but are packaged differently, either to support established product
32 2 Software description
Page 55

installation workflows or to leave the deployment and installation of the driver entirely up to the user.
The following tools support driver preconfiguration:
■ HP Driver Configuration Editor. The HP Driver Configuration Editor is a small, standalone
Windows software program that the administrator can use to open the .CFG file that is
associated with a particular driver and make modifications that are applied when that driver is
installed on the target computer. It is intended for use in environments that have an established
process for deploying drivers. This is the preconfiguration tool of choice to support any Novell or
HP Print Server Appliance (PSA) Point and Print environments. It is used in the way that any
ordinary Windows software program is used.
The HP Driver Configuration Editor is available from
■ The HP Web Jetadmin Driver Configuration Plugin. HP Web Jetadmin provides a queue
creation program that can be used to create printer queues on any Windows NT 4.0,
Windows 2000, Windows XP, or Windows Server 2003 workstation. The HP Web Jetadmin
Driver Configuration Plugin adds a number of screens to the existing queue creation workflow.
Use these screens to customize the drivers that are being installed for the queues. The plug-in is
limited to Internet Explorer browsers. Netscape Navigator (TM) is not supported.
The HP Web Jetadmin Driver Configuration Plugin is available from
web_jetadminplugin.html.
■ HP Customization Utility/Silent Installer. The Customization Utility features an install-time
mode of HP Driver Preconfiguration. IT administrators can use the utility to preconfigure the
drivers for a printing-system software driver installation that uses the silent installer.
Detailed information about gaining access to and installing these tools can be found in the HP Driver
Preconfiguration Support Guide, which is available on the printing-system software CD.
www.hp.com/go/hpdpc_sw.
www.hp.com/sbso/tpm/
Lockable features
The following driver features can be locked to prevent end-users from changing settings:
■ Print on Both Sides (Duplex)
■ Media Type
Software description
■ Paper Source
When a feature is locked, the selected default option is the only option that is available to users.
Generally, the feature is unavailable in the driver UI after it has been installed.
HP Driver Diagnostic Printer Check tool
NOTE This tool will become available after product release.
The HP Driver Diagnostic Printer Check tool is a Web-based diagnostic software that enables you to
determine whether you are using the correct and most current print driver for your
HP LaserJet 4345mfp. To gain access to the HP Driver Diagnostic Printer Check tool, go to
www.hp.com/go/drivercheck, or go to the HP Business Support Center (BSC) at www.hp.com/go/
bsc, select the self-help resources link on the left navigation bar, and then select automatic driver
checker to run the HP Driver Diagnostic Printer Check tool.
When you run the HP Driver Diagnostic Printer Check tool, you are presented with a list of products
that are currently installed on your computer. Select the HP product that you would like to check and
Technology background information 33
Page 56

the HP Driver Diagnostic Printer Check tool gathers information about your product, drivers, and
system setup. The data gathered is used for diagnosing your software driver configuration and for
checking your print driver update needs. The tool will then either verify that you are already using the
latest driver, or inform you if you are using an incorrect driver and let you know if there is an updated
driver version available for your product. If there is an update available, the tool enables you to
download and install the latest driver version by clicking on it.
The data gathered by the HP Driver Diagnostic Printer Check tool is stored anonymously for analysis
and continuous improvement of HP diagnostic tools. No private data is needed or accessed on your
computer.
Software description
HP Printer Access Tool
NOTE This tool will become available after product release.
The HP Printer Access Tool is a Web-based application that provides a single point of access to the
embedded Web server pages for each networked product in the user's local print folder, making it
easy to remotely manage the products in an unmanaged network environment without affecting
performance or reliability. For more information about the HP Embedded Web Server, see the
Embedded Web Server section of this guide.
To gain access to the HP Printer Access Tool, follow these steps:
NOTE The HP Printer Access Tool must be selected during installation to be available.
1 Select Start.
2 Select Programs.
3 Select HP LaserJet 4345mfp, and then select HP Printer Access Tool.
4 Click on the appropriate product name to access the EWS pages for that product.
Euro character
HP
The euro is the name for the currency of the European Union (EU). This unit was launched on
January 1, 1999. The euro has changed the way business is conducted in Europe and has affected
every company and industry in the world. It is vital that companies understand and prepare for the
changes that the euro brings.
The HP LaserJet 4345mfp includes euro characters for each of the internal fonts. The product can
print the euro character in the Windows 98, Windows Me, Windows NT 4.0, Windows 2000,
Windows XP, and Windows Server 2003 operating systems. Hewlett-Packard is committed to
maximizing document portability through supporting and promoting euro-symbol standards.
HP Embedded Web Server and HP Toolbox
The HP Embedded Web Server (HP EWS) and the HP Toolbox are both tools that can be used to
remotely configure products on a network. Both HP EWS and HP Toolbox are used with a Web
34 2 Software description
Page 57

browser and they have a similar look and feel. Many of the pages in HP EWS are nearly identical to
HP Toolbox pages. However, there are several key differences between the two utilities:
■ HP Toolbox is used to manage the products that are installed on the client machine where
Toolbox is installed. Toolbox gets the address of the products from the registry entry of the port
that the product is using.
■ HP Toolbox can also be used to manage locally connected products.
■ To gain access to HP EWS the user just needs to know the TCP/IP address of the products. No
software needs to be installed on the user's computer.
■ For most products, HP EWS can only be directly accessed when both the product and the
computer are equipped with network cards, or some form of network connection. In theses cases
the Web browser directly addresses the product's TCP/IP address. The only Web pages
available are those that are served from the product.
■ HP Toolbox supports network and direct connect forms of product connectivity. The browser
directs itself to a locally hosted TCP/IP service that monitors the printing port, be it network or
direct connect. HP Toolbox Web pages are generated through a combination of locally installed
Web content and data that is retrieved from the product. These web pages also facilitate product
control. On some products, HP Toolbox provides a link to the product's HP EWS page, but these
are not accessed directly through the browser, but rather through the locally hosted TCP/IP
service.
■ HP Toolbox provides the Select Device page, which is used to choose which of the locally
installed devices to manage if more than one has been installed.
Software description
The HP EWS and HP Toolbox utilities are described in detail in the following sections.
HP Embedded Web Server
The HP EWS is a standard feature for the HP LaserJet 4345mfp.
The HP EWS provides a simple, easy-to-use solution for one-to-one product management. In offices
that have a limited number of products, remote management of printing devices can be
accomplished without installing any management software, such as HP Web Jetadmin. The only
requirement is that the management console must have a supported Web browser.
In environments with a larger number of products, where one-to-one management is impractical, the
HP Embedded Web Server and HP Web Jetadmin work together to provide scalable remote product
management. Use HP Web Jetadmin for consolidated management tasks when you want to perform
operations on a selected set of products instead of on individual products. For such environments,
HP provides hooks between the HP Embedded Web Server and HP Web Jetadmin so that you can
configure HP Embedded Web Server features on multiple products in one operation. For example,
you can set the security password for the HP Embedded Web Server simultaneously on a population
of products.
For additional information and a copy of the HP Embedded Web Server User Guide, go to
www.hp.com/support/lj4345mfp.
To view information about the product by using the HP Embedded Web Server, open a supported
Web browser and type in the product transmission control protocol/internet protocol (TCP/IP)
address or host name. To find the TCP/IP address, look for IP Address on the enhanced input/
output (EIO) Jetdirect page, in the TCP/IP section. To find the host name of the product, look for
Host Name in the TCP/IP section.
Technology background information 35
Page 58

You also can view information about an installed HP Jetdirect print server by clicking the Networking
tab in the HP Embedded Web Server window.
To print a copy of the configuration page and the EIO Jetdirect page from the control-panel display,
follow these steps:
1 Press M
2 Touch INFORMATION.
3 Scroll to, and then touch PRINT CONFIGURATION. The configuration page and the EIO
Software description
Jetdirect page automatically print.
4
Look on the EIO Jetdirect page section marked "TCP/IP" for the TCP/IP address.
The HP EWS frame
Each screen in the HP EWS has a frame that contains a top banner, four category tabs, a leftaligned navigation menu bar, and a main-content area. Selecting one of the category tabs causes
the corresponding left-aligned navigation bar to appear. The left-aligned navigation menu includes
links to content that is appropriate for that tab. The main-content area shows information and opens
options in response to navigation tab selections and menu bar selections.
See the following sections for more information about each tab or area:
Information tab
■
ENU
.
Settings tab
■
Digital Sending tab
■
Networking tab
■
Information tab
The following information is available on the HP EWS Information tab. To view the information, click
the menu items on the left side of the HP EWS Information tab.
NOTE If an HP EWS password has been set, the Information tab is the only tab that is
visible until the user logs in. See
Not all of the screens on the tab are shown in this document. For more information, see the
HP Embedded Web Server User Guide.
■ Device Status. This screen provides current status information about the product.
■ Configuration Page. This screen provides information about the configuration of the product.
■ Supplies Status. This screen provides information about the print cartridge and the total number
of pages that have been printed, and the serial number of the product.
■
Event log. This screen provides information about reported printer errors.
Security for more information.
■ Usage page. This screen provides a page count for each size of media that has passed through
the device, as well as the number of duplexed pages.
36 2 Software description
Page 59

■ Device Information. This screen shows device information, such as the product TCP/IP address
and serial number.
■ Control Panel. This screen shows the product control panel.
■ Print. Use this screen to print documents that are print-ready, such as those generated by a
"print to file" driver option, .PCL documents, .PS documents, .PDF files, and text (.TXT) files.
Links to off-product solutions
Links on the HP EWS screens provide an easy way to locate information or complete tasks.
■ hp instant support. This link connects you to a set of dynamic Web resources that help you
solve specific problems and determine additional services that might be available for your
product. Specific status and configuration information about the product is retained and directed
to the "Solve a Problem" Web site. This site offers targeted support content and messages to
help resolve problems as quickly as possible.
■ Order Supplies. This link connects you to an HP product supplies screen from which you can
order genuine HP supplies for your product.
■ Product Support. This link connects to an HP product-support screen from which you can
search for information, contact the HP customer care home page, or find additional resources for
your product.
Device Status
Status information, such as whether the product is online or the toner is low, is available through your
Web browser on a computer that is linked directly to the product. You can view this information
without physically going to the product to identify the status. The following illustration shows how this
information is presented on the product Web page.
Software description
Technology background information 37
Page 60

Software description
Figure 2-1 Device Status screen on the Information tab
Configuration Page
You can gain access to the HP LaserJet 4345mfp configuration page remotely through the
HP Embedded Web Server. The HP EWS Configuration Page screen provides configuration
information about the product in the same way as the configuration page that is printed from the
product. The following illustration shows an example of a configuration page viewed remotely
through the HP EWS.
38 2 Software description
Page 61

Software description
Figure 2-2 Configuration Page on Information tab
Technology background information 39
Page 62

Settings tab
The following information is available on the HP EWS Settings tab. To view the information, click the
menu items on the left side of the HP EWS Settings tab. The Settings tab is shown in the
device section.
Not all of the screens on the tab are shown in this document. For more information, see the
HP Embedded Web Server User Guide.
■ Configure Device. Use the Configure Device screen to print product information pages and
configure the product remotely.
Software description
■
E-mail Server. Use the E-mail Server screen to configure e-mail settings for outgoing e-mail.
■ Alerts. IT administrators can set up the product to send alerts to anyone through e-mail
messages.
■ AutoSend. Use the AutoSend screen to send product configuration and supplies-usage
information periodically to your service provider.
■
Security. Use the Security screen to manage security on the product.
■ Edit Other Links. Use the Edit Other Links screen to add or customize up to five links to the
Web sites of your choice.
■ Device Information. Use the Device Information screen to provide a name of your choice for
the product, assign an asset number, and configure the company name, the person to contact
about the product, and the physical location of the product.
Configure
■ Language. Use the Language screen to select the language in which the HP EWS screens
appear.
■
Date & Time. Use the Date & Time screen to set the correct date and time for the product.
■ Wake Time. Use the Wake Time screen setting to wake the product up at a certain time on a
daily basis. There can only be one wake time setting per day; however, each day can have a
different wake time. The sleep mode delay can also be set on this screen.
Configure device
You can obtain product configuration information through a Web browser by opening the HP EWS
screen and changing any of the basic configuration information on the Settings tab. Security and
password controls give management information system managers the level of control that they
require within their environments. The following illustration shows an example of product options that
can be configured remotely.
40 2 Software description
Page 63

Figure 2-3 Settings tab - Configure Device
Alerts
The product can automatically send e-mail alerts about printing problems or job status to specified email addresses. For example, if toner is low, the product can notify the person who is responsible for
ordering or changing the toner bottle. If a product failure occurs, the product can send an e-mail alert
directly to the person who is responsible for fixing the problem. These e-mail alerts can be configured
to be sent to any device that can accept e-mail, such as digital phones, pagers, and personal digital
assistants (PDAs). In large environments, administrators can route e-mail addresses to list-servers or
uniform resource locators (URLs) for expanded notification.
Software description
Technology background information 41
Page 64

Software description
Figure 2-4 Settings tab - Alerts - setup screen
42 2 Software description
Page 65

Security
The HP EWS screens that appear, and the settings on them, vary according to how you gain access
to the HP EWS: as a general user, as an information technology (IT) administrator, or as a service
provider. To control access to the HP EWS screens, a password can be set on the Security page.
Software description
Figure 2-5 Security screen on the Settings tab
In a password-protected HP EWS, only the Information tab is available to users who do not log in by
using the password. If no password has been set, which is the default, then all of the tabs are visible.
If a password has been set, you must log on as an IT administrator or a service provider to gain
access to the protected HP EWS tabs (Settings, Digital Sending, and Networking).
Digital Sending tab
The following options are available on the HP Embedded Web Server Digital Sending tab.
Not all of the screens on the tab are shown in this document. For more information, see the
HP Embedded Web Server User Guide.
Use the menu on the left side of the screen to control the digital-sending features offered by the
HP LaserJet 4345mfp.
General
Use the General Settings screen to set digital-sending administrator information. For more
information, see the HP Embedded Web Server User Guide.
Technology background information 43
Page 66

Software description
Figure 2-6 General Settings screen on the Digital Sending tab
Send to E-mail
The HP LaserJet 4345mfp requires a Simple Mail Transfer Protocol (SMTP) Gateway server to
forward e-mail messages to destination e-mail addresses. Use the E-mail Settings screen to
configure SMTP settings, set the maximum e-mail attachment size, and set the default e-mail
address for the product. You can also set a default subject for all e-mail messages that the product
sends.
For more information, see the HP Embedded Web Server User Guide.
44 2 Software description
Page 67

Figure 2-7 E-mail Settings screen on the Digital Sending tab
Send to Fax
The HP LaserJet 4345mfp can send scanned documents to a fax number to simulate the sending
capabilities of a fax machine. If the product is equipped with a fax modem, it can also be set up to
process incoming faxes. Use the Fax Settings screen to configure the Send-to-Fax features for the
product.
For more information, see the HP Embedded Web Server User Guide.
Software description
Technology background information 45
Page 68

Software description
Figure 2-8 Fax Settings screen on the Digital Sending tab
Addressing
To send scanned documents with the HP LaserJet 4345mfp, you must provide e-mail addresses.
The product addressing feature simplifies this process by searching for destination e-mail addresses.
Use the Addressing Settings screen to set features that allow the product to get e-mail addresses
directly from the database of a Lightweight Directory Access Protocol (LDAP) server instead of from
a replicated LDAP Address Book. Using the LDAP Address Book directly guarantees that the latest
addresses are used.
For more information, see the HP Embedded Web Server User Guide.
46 2 Software description
Page 69

Figure 2-9 Addressing Settings screen on the Digital Sending tab.
Address Book
Use the Address Book screen to add a predefined list of e-mail addresses, in the form of a CommaSeparated Value (.CVS) file, to be imported into the product internal address book. The .CSV file is a
plain-text file (in UTF-8 encoding) that contains each e-mail address entry on a separate line. An
entry consists of an alias, which is the name that appears, followed by a comma and an e-mail
address. The aliases and e-mail addresses cannot contain any commas. For example:
Software description
■ name1, name1@your.company.com
■ name2, name2@your.company.com
On the product control panel, use the alias name to search for e-mail addresses. For more
information, see the HP Embedded Web Server User Guide.
Technology background information 47
Page 70

Software description
Figure 2-10 Address Book screen on the Digital Sending tab
Log
Use the Activity Log screen to view digital sending job information, including any errors that occur.
For more information, see the HP Embedded Web Server User Guide.
Figure 2-11 Activity Log screen on the Digital Sending tab
Preferences
Use the Preferences Settings screen to configure general settings for the digital-sending features.
For more information, see the HP Embedded Web Server User Guide.
48 2 Software description
Page 71

Figure 2-12 Preferences Settings screen on the Digital Sending tab
Networking tab
The following options are available on the HP EWS Networking tab.
Not all of the screens on the tab are shown in this document. For more information, see the
HP Embedded Web Server User Guide.
Software description
Technology background information 49
Page 72

Software description
Figure 2-13 Networking tab - Configuration section
The menu on the left side of the screen contains other networking options under three categories:
configuration, security, and diagnostics. For more information, see the HP Jetdirect Administrator's
Guide.
Configuration section
■
Network Settings
■ Other Settings
■ Privacy Settings
■ Select Language
50 2 Software description
Page 73

Security section
■ Settings
■ Authorization
■ Mgmt. Protocols
Diagnostics section
■ Network Statistics
■ Protocol Info
■ Configuration Page
Network settings
From the Networking tab, you can enable and configure the following network protocols:
■
TCP/IP
■ Internetwork packet exchange/Sequenced packet exchange (IPX/SPX)
■ AppleTalk
Software description
■ Data link control/logical link control (DLC/LLC)
■ Simple network management protocol (SNMP)
HP Toolbox
The HP Toolbox is a series of Web pages and a supporting Windows-based software program that
provide access to the HP LaserJet 4345mfp embedded Web servers and other firmware functions,
making them available on a browser-driven user interface where product properties can be viewed
and manipulated.
The HP Toolbox provides links to product status information, help information, and tools for
diagnosing and solving problems. The HP Toolbox also provides product status and settings
information from the embedded Web server, by clicking the Device Settings button in the upperright corner of each of the two tabs.
HP Toolbox requirements
The HP Toolbox requires one of these recent Internet browsers in order to show embedded Web
server pages:
■ Microsoft Internet Explorer 5.5 or later (Internet Explorer 5.2 and later for Macintosh)
■ Netscape Navigator 7.0 or later (Netscape Navigator 7.0 and later for Macintosh)
■ Opera Software ASA Opera 7.0 for Windows
■ Safari 1.0 for Macintosh
Technology background information 51
Page 74

These browser requirements are not necessarily minimum standards, but they are the minimum
tested environments. Other, untested browsers might also provide access to the HP Toolbox screens.
The HP Toolbox is supported only for Windows 98 and later operating systems (Windows Me,
Windows 2000, Windows XP, and Windows Server 2003). You must have performed a complete
software installation in order to use the HP Toolbox.
When the HP LaserJet 4345mfp is connected both through a network using an HP Jetdirect card and
through a local parallel connection, the network connection takes precedence. On a network
connection, bidirectional communication is supported through a TCP/IP or an IPX/SPX connection.
Software description
Installing HP Toolbox
To install HP Toolbox, perform a custom installation and select hp LaserJet toolbox from the Setup
dialog.
NOTE It is necessary to install HP Toolbox for each product, even when HP Toolbox is
currently in use for other products.
To view the HP Toolbox
To open the HP LaserJet 4345mfp Toolbox, on the Start menu, point to Programs, point to
hp LaserJet 4345, and then click hp LaserJet toolbox.
The HP Toolbox opens in your Web browser. The HP Toolbox software contains two tabs:
■ Status tab
■ Alerts tab
These tabs are on local browser screens that are installed when you install the printing-system
software, and you do not need an Internet service provider to view them.
The HP Toolbox also contains an area with links to the HP Web site. While you do not need to have
Internet access to open and use the HP Toolbox, you must have Internet access in order to gain
access to the sites that are associated with the links in the Other Links area.
If your computer is connected to the HP LaserJet 4345mfp through a network, you can bookmark the
URL of the HP Toolbox so that you can return to it quickly in the future.
The HP Toolbox Frame
Each screen in the HP Toolbox has a frame that contains a top banner, category tabs, a left-aligned
navigation menu bar, and a main-content area. Selecting one of the category tabs causes the
corresponding left-aligned navigation bar to appear. The left-aligned navigation menu includes links
to the content that is appropriate for that tab. The main-content area shows information and options
in response to selections that you make on an HP Toolbox screen.
See the following sections for more information about each tab or area:
Top banner
■
Status tab
■
Alerts tab
■
Linking to the HP Embedded Web Server
■
52 2 Software description
Page 75

■ Other Links
Top banner
The top banner has an HP logo. Next to the HP logo, the title of the page appears followed by the
product name and a copyright notice. The top banner is the same for all of the HP Toolbox Web
pages. The HP logo contains a link to the HP Web site (
www.hp.com).
Status tab
The Status tab, with the Device Status setting selected, is shown in the following illustration.
Software description
Figure 2-14 Toolbox Device Status tab
Technology background information 53
Page 76

The Status tab provides the following options:
■ Device Status. This screen shows the percentage of life remaining for each consumable, the
status and configuration information for the trays and output bins, and the accessories that are
installed on the product.
■ Supplies Status. This screen shows the levels remaining for all consumables and the HP part
numbers for each consumable. It is helpful to have the part numbers available when it is time to
order supplies.
■ Print Info Pages. Print the configuration page and various other information pages that are
Software description
available for the product, such as the Supplies Status page, the Demo page, and Menu Map.
■ toolbox Links. Select a device, view current alerts, or view the HP Toolbox Web site in text-only
format (without graphics).
■ Other Links. For information about these links, see
Embedded Web Server section of this guide.
Alerts tab
The Alerts tab is shown in the following illustration.
Links to off-product solutions in the HP
Figure 2-15 Alerts tab
54 2 Software description
Page 77

The navigation bar on the Alerts tab contains links to the information pages for the product. Some of
these pages are also available from other sources, such as the HP Embedded Web Server or the
product itself. From this section, you can view the following screens:
■ Set up Status Alerts
■ Administrative Settings
The Administrative Settings screen, which is shown in the following illustration, allows you to
change the rate at which the product is checked for alerts.
Software description
Figure 2-16 Administrative Settings
Linking to the HP Embedded Web Server
To gain access to the HP Embedded Web Server, click the Device Settings button in the upper-right
of any HP Toolbox screen. You can also open a browser window and type in the HP Jetdirect TCP/IP
address.
The HP Toolbox Device Settings option on the Status tab is shown in the following illustration.
Technology background information 55
Page 78

Software description
Figure 2-17 Status tab with Device Settings button
When you gain access to the HP EWS from HP Toolbox, a Back to toolbox button becomes
available in the screen title bar. You can click this button to return to the HP Toolbox screens.
For additional information and a copy of the HP Embedded Web Server User Guide, go to
www.hp.com/support/lj4345mfp.
Other Links
This section contains links that connect you to the Internet. These links appear on the left
navigational bar throughout the embedded Web server screens. You must have Internet access in
order to use any of these links. If you use a dial-up connection and did not connect when you first
opened the HP Toolbox, you must connect before you can visit these Web sites. Connecting might
require that you close the HP Toolbox and reopen it.
HP Instant Support ™ This link connects you to a set of dynamic Web resources that you can use
to solve specific problems and determine additional services that might be available for your product.
Specific status and configuration information about the product is retained and directed to the Solve
56 2 Software description
Page 79

a Problem Web site, which offers targeted support content and messages to help resolve problems
as quickly as possible.
Product Registration. Click this link to connect to a screen where you can register your
HP LaserJet 4345mfp.
Order Supplies. Click this link to connect to an ordering screen where you can order genuine HP
supplies, such as print cartridges and print media.
Product Support. This link connects you with an HP product-support screen from which you can
search for information, contact the HP customer care home page, or find additional resources for
your product.
HP Web Jetadmin
Use HP Web Jetadmin and a Web browser to manage HP Jetdirect connected products within your
intranet. HP Web Jetadmin is a browser-based management tool, and should be installed only on a
single network-administration server. It can be installed and run on Red Hat Linux; SuSE Linux;
Windows NT 4.0 Server and Workstation; Windows 2000 Professional, Server, and Advanced
Server; Windows XP Professional, and Windows Server 2003 systems.
To download a current version of HP Web Jetadmin and for the latest list of supported host systems,
www.hp.com/go/webjetadmin.
go to
When installed on a host server, any client can use HP Web Jetadmin through a supported Web
browser, such as Microsoft Internet Explorer 5.5 and 6.0 or Netscape Navigator 7.0.
HP Web Jetadmin provides the following features:
■ Task-oriented user interface that provides configurable views for network managers
■ User profiles that can be customized to let network administrators include only the function that is
being viewed or used
■ Routing of instant e-mail notification of hardware failure, low supplies, and other product
problems to different people
■ Remote installation and management from anywhere, using only a standard Web browser
■ Advanced automatic discovery of peripherals on the network without manually typing information
about each product into a database
■ Simple integration into enterprise-management packages
■ Capacity to find peripherals based on parameters such as the Internet protocol (IP) address,
color capability, and model name
■ Capacity to organize peripherals into logical groups, with an option that provides virtual office
maps for easy navigation
Software description
■ Capability to manage and configure multiple products at one time
The following table lists the availability of HP LaserJet 4345mfp remote management and status
tools by operating system.
Technology background information 57
Page 80

NOTE In the following table, "98/Me" refers to Windows 98 and Windows Me; "4.0" refers to
Windows NT 4.0; "2000" refers to Windows 2000; "XP" refers to Windows XP; “XP 64” refers
to 64-bit Windows XP; and "Mac" refers to Macintosh operating systems.
Table 2-3 Availability of remote management and status tools
Component 98/Me 4.0 2000/XP XP64 OS/2 Mac UNIX Linux
HP LaserJet 4345mfp plug-in for Web x x x
Software description
Device Storage Manager for Web x x x x
Preconfiguration plug-in for Web x x x x
The HP LaserJet 4345mfp printing-system software CD provides the following link to download the
latest version of the HP Web Jetadmin software:
Click support on the main screen in the installer CD Browser, and then click hp web jetadmin. The
following table shows the supporting operating systems and hardware for HP Web Jetadmin.
Table 2-4 HP Web Jetadmin support
Protocols ■ TCP/IP
Compatible operating systems ■ Microsoft Windows 2000 Professional, Windows Server,
www.hp.com/go/webjetadmin.
■ IPX/SPX
and Windows Advanced Server
■ Microsoft Windows XP Professional and Windows
Server 2003
■ Microsoft Windows NT Server and Workstation
■ Red Hat Linux 9.0
■ SuSE Linux 9.0
Shared print queue creation support
■ Microsoft Windows 2000 Professional, Server and
Advanced Server
■ Microsoft Windows XP Professional and Windows
Server 2003
■ Microsoft Windows NT 4.0 Server and Workstation
■ HP-UX ® 11.0
■ Red Hat Linux 9.0
■ Solaris 7 and 8
■ SuSE Linux 9.0
■ Novell NetWare 5.1 and 6.0 (IPX only) using Netware
Client 4.9 (using HP Web Jetadmin only on a Microsoft
Windows NT 4.0, Windows 2000, Windows XP, or
Windows Server 2003 system)
58 2 Software description
Page 81

Table 2-4 HP Web Jetadmin support (continued)
Supported products All HP and non-HP products that are connected through HP
Jetdirect print servers, and standard Management
Information Base-compliant (MIB-compliant) third-party
network-connected products
Supported browsers ■ Microsoft Internet Explorer 6.0, for Windows only
■ Netscape 7.1 (English) for Linux only
HP Digital Sending Software
The HP Digital Sending Software (HP DSS) is a software program that, in conjunction with firmware,
enables HP MFPs to send scanned documents directly to electronic mailboxes (e-mail) or to fax
destinations, transforming paper-based information into digital images that can be shared, stored, or
edited. Documents are initially scanned at the HP LaserJet 4345mfp, and then are transmitted to a
network-connected computer where the HP DSS is installed. This prevents users from having to
create an electronic copy of a hard-copy document. The HP DSS can also be configured to require
user authentication, ensuring that only authorized persons use the Digital Sending feature of the
MFP. For more information about HP DSS, see the HP Digital Sending Software Software Technical
Reference.
Foreign Interface Harness
Software description
The Foreign Interface Harness (FIH) provides a portal on the HP LaserJet 4345mfp for third-party job
accounting vendors to gain access to print and copy data for the HP LaserJet 4345mfp.
Bluetooth
Bluetooth®* wireless technology is a low-power, short-range radio technology that can be used to
wirelessly connect computers, printers, personal digital assistants (PDAs), cell phones, and other
devices.
* Bluetooth is a trademark owned by its proprietor and used by Hewlett-Packard Company under
license.
Because Bluetooth wireless technology uses radio signals, products do not have to be in the same
room, office, or cubicle and do not require unobstructed line of sight in order to communicate. This
wireless technology increases portability and efficiency within business networks.
The HP LaserJet 4345mfp can use a Bluetooth adapter (hp bt1300) to incorporate Bluetooth wireless
technology. The adapter is available for either USB or parallel connections. The adapter has a 10meter line-of-site operation range in the 2.5 GHz ISM band and can achieve data transfer rates up to
723 Kbps. The product supports the following Bluetooth profiles:
■ Hardcopy Cable Replacement Profile (HCRP)
■ Serial Port Profile (SPP)
■ Object Push Profile (OPP)
■ Basic Imaging Profile (BIP)
■ Basic Printing Profile (BPP) with XHTML-Print
Technology background information 59
Page 82

Remote firmware update
The HP LaserJet 4345mfp features remote firmware update (RFU) capability. The method for
downloading remote firmware updates from the Web site is similar to that used to download the
latest printing-system software and print drivers.
The process for remotely upgrading firmware involves three steps:
1 Determine the current level of firmware that is installed on the HP LaserJet 4345mfp.
2 Go to the HP Web site and download the latest firmware to your computer.
Software description
3 Download the new firmware to the product.
Determining the current level of firmware
To determine the current level of firmware, view the configuration page. To print a configuration
page, follow these instructions.
1 Press M
2 Touch INFORMATION.
3 Scroll to, and then touch PRINT CONFIGURATION. The configuration page and the EIO
Jetdirect page automatically print.
4 Look on the configuration page section marked "Device Information" for the firmware datecode.
ENU
.
Downloading the new firmware from the HP Web site
For support information about downloading new firmware from the Web, go to www.hp.com/support/
lj4345mfp_firmware.
The product can receive an .RFU update when the product is in a READY state. The product waits
for all of the I/O channels to become idle before performing the update.
NOTE If the firmware update involves a change in the format of nonvolatile random-access
memory (NVRAM), any menu settings that are changed from the default settings will return to
default settings. The settings must be changed again if you want them to be different from the
defaults. Examples of settings that are affected in this way are tray types, default symbol sets,
and Web-access alerts.
The elapsed time for an update depends on the I/O transfer time, as well as the time that it takes for
the product to reinitialize. The I/O transfer time depends on a number of things, including the speed
of the host computer that is sending the update and the I/O method (parallel or network). The
reinitialization time depends on the specific hardware configuration of the product, such as the
number of EIO devices installed, the presence of external media-handling devices, and the amount
of memory that is installed.
If the remote firmware update process is interrupted before the firmware is downloaded (while
RECEIVING UPGRADE appears on the control-panel display), the firmware file must be sent again.
If power is lost during the flash dual inline memory module (DIMM) update (while PERFORMING
UPGRADE appears on the control-panel display), the update is interrupted and the message
RESEND UPGRADE appears (in English only) on the control-panel display. The update must now
be sent only by a computer that is attached to the parallel port of the product.
60 2 Software description
Page 83

Finally, any print jobs that are ahead of the .RFU job in the queue are printed before the update is
processed.
Use one of the following methods to update your product firmware.
Remote firmware update by using FTP through a browser
Complete the following steps to update the product firmware by using file transfer protocol (FTP)
through a browser.
NOTE The following instructions can be used on Windows or Macintosh operating systems.
1 Take note of the TCP/IP address on the EIO-Jetdirect page. The EIO-Jetdirect page is the
second page of the configuration page printout. To print a configuration page, see
the current level of firmware.
2 Open a browser window.
3
In the address line of the browser, type ftp://<IPADDRESS>, where <IPADDRESS> is the TCP/
IP address of your product. For example, if the TCP/IP address is 192.168.0.90, type the
following:
FTP://192.168.0.90
4 Locate the downloaded .RFU file for the product.
Determining
Software description
5 Drag and drop the .RFU file onto the PORT1 icon in the browser window.
NOTE The product automatically restarts the firmware to activate the update. At the end of
the update process, the READY message appears on the control panel.
Remote firmware update by using FTP on a direct network connection
If the HP LaserJet 4345mfp uses a direct network connection, use file transfer protocol (FTP) to
update your firmware. Complete the following steps for your operating system.
Windows operating systems
1 Take note of the TCP/IP address on the EIO Jetdirect page. The HP Jetdirect page is the second
page of the configuration page printout. To print a configuration page, see
current level of firmware.
NOTE Before connecting to the product, make sure that the product is not in Sleep
mode. Also make sure that any error messages are cleared from the control-panel display.
2 Open a command window on your computer.
3
Type ftp <TCP/IP printer ADDRESS>. For example, if the TCP/IP address is 192.168.0.90,
type the following:
Determining the
ftp 192.168.0.90
4 Press Enter on the keyboard.
Technology background information 61
Page 84

5 When prompted for the user name, press Enter.
6 When prompted for the password, press Enter.
7
Type bin at the command prompt.
8 Press Enter. The message 200 Type set to I, Using binary mode to transfer files appears in
the command window.
9
Type put <FILENAME>, where <FILENAME> is the name of the .RFU file that was downloaded
from the Web, including the path. For example, type the following:
Software description
put C:\LJ\4345FW.RFU
10 Press Enter on the keyboard.
The following series of messages appears in the command window:
● 200 PORT command successful
● 150 Opening BINARY mode data connection
● 226 Ready
NOTE If the file name or path includes a space, you must enclose the file name or path
in quotation marks. For example, type put "C:\MY DOCUMENTS\LJ\4345FW.RFU"
● 226 Processing Job
● 226 Transfer complete
After these messages appear, a message containing transfer-speed information appears.
11 The download process begins and the firmware is updated on the product. This can take about
five minutes. Let the process finish without further interaction with the product or the computer.
NOTE The product automatically restarts the firmware to activate the update. At the end
of the update process, the READY message appears on the control panel.
12
At the command prompt, type bye to exit the FTP command.
13
At the command prompt, type exit to return to the Windows interface.
Macintosh operating systems
1 Take note of the TCP/IP address on the EIO-Jetdirect page. The EIO-Jetdirect page is the
second page of the configuration page printout. To print a configuration page, see
Determining
the current level of firmware.
2 Open a Terminal window on your Macintosh. You can find the Terminal application on the
computer hard drive in the Applications/Utilities folder.
3
Type FTP <TCP/IP printer ADDRESS> For example, if the TCP/IP address is 192.168.0.90,
type the following:
FTP 192.168.0.90
62 2 Software description
Page 85

4 Press Enter on the keyboard.
5 When prompted for a user name and password, press Enter.
6
Type put <path>, where <path> is the location where the .RFU file was downloaded from the
Web, including the path. For example, type the following:
put /USERNAME/DESKTOP/4345FW.RFU
NOTE If the file name or path includes a space, you must enclose the file name or path
in quotation marks. For example, type put "/USER NAME/DESKTOP/4345FW.RFU".
To ensure that the entire path to the .RFU file is placed in the put command, type put and
a space, and then drag and drop the .RFU file onto the terminal window. The complete
path to the file is automatically placed after the put command.
7 Press Enter on the keyboard.
8 The download process begins and the firmware is updated. This can take about five minutes. Let
the process finish without further interaction with the product or the computer.
NOTE The product automatically turns off and then on again to activate the update. At
the end of the update process, the READY message appears on the control panel.
Remote firmware update through a local Windows port
If the product is connected through a local port (parallel), then you can send the .RFU file directly to
the product by using a COPY command from a command prompt or an MS-DOS window. At the
command prompt, perform the following steps for your operating system.
Windows 98 or Windows Me
1 From a command prompt or in an MS-DOS window, type the following:
Mode lpt1:,,p
NOTE If the product is attached to a parallel port other than LPT1, then substitute the
correct LPT port number in the mode command.
2 Press Enter on the keyboard. The response you receive should be similar to these examples:
> LPT1 Not Rerouted
> Resident portion of MODE loaded
> Infinite retry on parallel printer time-out
Software description
3
At a command prompt, type copy /b <FILENAME> <PORTNAME>, where <FILENAME> is the
name of the .RFU file (including the path) and <PORTNAME> is the name of the appropriate
product port (such as LPT1). For example, type the following:
C:\>copy /b C:\4345FW.RFU LPT1
Technology background information 63
Page 86

4 Press Enter on the keyboard. The messages that are described in Printer messages during the
firmware update appear on the control panel.
Software description
5 Print a configuration page and verify that the firmware revision number matches the revision of
the current update. To print a configuration page, see
6
Type exit at the command prompt to close the command window.
Windows NT 4.0, Windows 2000, Windows XP, or Windows Server 2003
The .RFU file can be sent directly to the product by typing a copy command at a command prompt
or in an MS-DOS window.
1
At a command prompt, type copy /b <FILENAME> <PORTNAME> , where <FILENAME> is
the name of the .RFU file (including the path) and <PORTNAME> is the name of the appropriate
printer port (such as LPT1). For example, type the following:
C:\>copy /b c:\4345FW.RFU LPT1
NOTE If the file name or path includes a space, you must enclose the file name or path
in quotation marks. For example, type C:\>copy /b "C:\MY DOCUMENTS
\4345FW.RFU" LPT1
NOTE The product automatically turns off and then on again to activate the update. At
the end of the update process, the READY message appears on the control panel.
Determining the current level of firmware.
NOTE If the file name or path includes a space, you must enclose the file name or path
in quotation marks. For example, type C:\>copy /b "C:\MY DOCUMENTS
\4345FW.RFU" LPT1
2 Press Enter on the keyboard. The messages described in the section Printer messages during
the firmware update appear on the control panel.
NOTE The product automatically turns off and then on again to activate the update. At
the end of the update process, the READY message appears on the control panel.
3
At the command prompt, type exit to close the command window.
64 2 Software description
Page 87

Remote firmware update through a Windows network
If the product is shared on a Windows network, follow these instructions.
1
From a command prompt or in an MS-DOS window, type copy /b <FILENAME> \
\<COMPUTERNAME>\<SHARENAME>, where <FILENAME> is the name of the .RFU file
(including the path), <COMPUTERNAME> is the name of the computer from which the product is
being shared, and <SHARENAME> is the product share name. For example, type the following:
C:\>copy /b C:\4345FW.RFU \\your_server\your_computer
NOTE If the file name or path includes a space, you must enclose the file name or path
in quotation marks. For example, type C:\>copy /b "C:\MY DOCUMENTS
\4345FW.RFU" \\your_server\your_computer
2 Press Enter on the keyboard. The messages that are described in Printer messages during the
firmware update appear on the control panel. The message 1 file(s) copied appears on the
computer screen.
NOTE The product automatically turns off and then on again to activate the update. At
the end of the update process, the READY message appears on the control panel.
Remote firmware update for UNIX systems
Software description
For UNIX systems, any command method that delivers the .RFU file to the product is acceptable,
including the following:
At the command prompt, type cp /home/yourmachine/FILENAME /dev/parallel>, where </home/
yourmachine/FILENAME> is the location of the .RFU file.
NOTE The product automatically turns off and then on again to activate the update. At the
end of the update process, the READY message appears on the control panel.
Remote firmware update by using Fetch (Mac OS 9.x only)
For Mac OS 9.x, a shareware program called Fetch provides FTP control for a put command.
Download and install the program from
Complete the following steps to update the product firmware by using Fetch.
1 Start the program by clicking on the Fetch icon.
2 Type the IP address of the product in the Host: box.
3 Click the Put Files button and browse to the location of the .RFU file.
4 Double-click the file to select it and download it to the product. A confirmation message appears
in the main window.
5 Click OK.
download.com.com/3000-2151-10182446.html.
NOTE The product automatically turns off and then on again to activate the update. At
the end of the update process, the READY message appears on the control panel.
Technology background information 65
Page 88

Remote firmware update by using the HP LaserJet Utility (Mac OS 9.x only)
Complete the following steps to update the firmware by using the HP LaserJet Utility.
1 Make sure that you have the tools and files that are necessary for the update. You will need the
HP LaserJet Utility and the following firmware file for the product.
● 4345FW.RFU
The HP LaserJet Utility can be found on the HP LaserJet 4345mfp printing-system software CDROM that came with the product. If you do not have the CD-ROM, you can obtain the
Software description
HP LaserJet Utility by downloading the latest product installer from
The firmware file for the HP LaserJet 4345mfp (4345 FW.RFU) can be downloaded from
www.hp.com/support/lj4345mfp_firmware.
See
After you have the firmware file and the HP LaserJet Utility, you are ready to begin the update
process.
2 Open the HP LaserJet Utility.
3 Click Select Printer and locate the product that you would like to update on the network. Select
the product on the right side of the dialog box, and then click OK. An information dialog box for
the HP LaserJet 4345mfp appears.
www.hp.com.
Downloading the new firmware from the HP Web site for more information.
4 On the left side of the information dialog box, click Files. A dialog box appears where you can
select a file to be downloaded to the product.
5 Click Select File.
6 Locate the 4345FW.RFU on your hard disk and click the file name to highlight it. Click Select.
The Files dialog boxes update to show the RFU file under File to download.
7 Click Download. The HP LaserJet Utility starts downloading the file to the product. A progress
bar shows how much of the file has been downloaded. While the file is downloading, the
RECEIVING UPGRADE message appears on the control-panel display on the product. After the
file has downloaded to the product, the PERFORMING UPGRADE message appears on the
control-panel display.
NOTE The product automatically turns off and then on again to activate the update. At
the end of the update process, the READY message appears on the control panel.
Remote firmware update by using the LPR command
NOTE This remote firmware update method is for use in Windows NT 4.0, Windows 2000,
Windows XP, and Windows Server 2003.
66 2 Software description
Page 89

Complete the following steps to update the firmware by using the LPR command.
1
From a command window, type lpr -P <IPADDRESS> -S <IPADDRESS> -o l <FILENAME> OR- lpr -S <IPADDRESS> -Pbinps <FILENAME>, where <IPADDRESS> can be either the
TCP/IP address or the hostname of the product, and where <FILENAME> is the filename of
the .RFU file.
NOTE The parameter (-o l) consists of a lowercase "O", not a zero, and a lowercase "L",
not the numeral 1. This parameter sets the transport protocol to binary mode.
2 Press Enter on the keyboard. The messages described in the section Printer messages during
the firmware update appear on the control panel.
NOTE The product automatically turns off and then on again to activate the update. At
the end of the update process, the READY message appears on the control panel.
3
Type exit at the command prompt to close the command window.
Remote firmware update through HP Web Jetadmin
This procedure requires that you install HP Web Jetadmin version 7.0 or later on your computer.
Complete the following steps to update a single product through HP Web Jetadmin after
downloading the .RFU file from the HP Web site.
Software description
1 Start HP Web Jetadmin.
2 Type the TCP/IP address or IP host name of the product in the Quick Device Find field, and
then click Go. The product Status window opens.
3 Open the Device Management folder in the drop-down list in the Navigation panel. Navigate to
the Device Lists folder.
4 Expand the Device Lists folder and select All Devices. Locate the product that you want to
update in the list of products, and click to select it.
5 Locate the drop-down box for Device Tools in the upper-right corner of the window. Select
Update Printer Firmware from the choose action list.
6 If the name of the .RFU file is not listed in the All Available Images dialog box, click Browse in
the Upload New Firmware Image dialog box and navigate to the location of the .RFU file that
you downloaded from the Web at the start of this procedure. If the filename is listed, select it.
7 Click Upload to move the .RFU file from your hard drive to the HP Web Jetadmin server.
8 Refresh the browser.
9 Select the .RFU file from the Printer Firmware Update drop-down menu.
10 Click Update Firmware. HP Web Jetadmin sends the selected .RFU file to the product. The
messages that are described in
control panel.
Printer messages during the firmware update appear on the
NOTE The product automatically turns off and then on again to activate the update. At
the end of the update process, the READY message appears on the control panel.
Technology background information 67
Page 90

HP Web Jetadmin version 7.0 and later can also be used to perform multiple or unattended
installations. Complete the following steps for multiple or unattended installations.
1 Start HP Web Jetadmin.
2 Create a device group. A simple way to do this is to follow these steps:
a. Click Device Management, and then click All Devices.
-or-
Software description
b. Shift-click to select products that you want to be included in the group, and then click OK.
-or-
c. When prompted, type a name for the new device group, and then click OK.
3 To modify several products in a group, click the group name, and then click Open.
4 The drop-down menu for Device Group Tools appears on the right side of the window. Scroll if
necessary to view it.
5 In the Device Group Tools drop-down box, select an action. Type in the appropriate
information. Click Return to Device Group when finished.
Printer messages during the firmware update
Three messages appear during a normal update process.
Table 2-5 Update messages
Printer message Explanation
RECEIVING UPGRADE This message appears from the time the product recognizes the beginning of an .RFU
PERFORMING UPGRADE This message appears while the product is actually reprogramming the firmware.
INITIALIZING This message appears from the time the product has finished reprogramming the DIMM
update until the time the product has verified the validity and integrity of the .RFU update.
until the product reinitializes.
NOTE To verify that the firmware update succeeded, print a new configuration page from the
control panel and verify that the firmware date code on the configuration page has changed.
To print a configuration page, see
Determining the current level of firmware.
Troubleshooting a firmware update
The following table lists the causes and results of possible interruptions to the firmware update.
Table 2-6 Troubleshooting a firmware update
Cause Result
The job was cancelled from the control panel. No update has occurred.
A break in the I/O stream occurred during send (for
example, the parallel cable was removed).
68 2 Software description
No update has occurred.
Page 91

Table 2-6 Troubleshooting a firmware update (continued)
Cause Result
A power cycle occurred during the RECEIVING UPGRADE
process.
A power cycle occurred during the PERFORMING
UPGRADE process.
A power cycle occurred during the INITIALIZING process. The update has been completed.
No update has occurred.
No update has occurred. Resend the update through a
parallel port.
Print jobs that are sent to the product while an update is in process do not interrupt the update.
The following table lists possible reasons for the failure of a remote firmware update and the
corrective action that is required for each situation.
Table 2-7 Troubleshooting a firmware update failure
Reason for firmware update failure Corrective action
The .RFU file is corrupted. The product recognizes that the file is corrupted and rejects the update.
The wrong product is contained in
the .RFU file.
The upgrade was interrupted. See Troubleshooting a firmware update
Download the file again and send the new file to the product. Download the file
from http://www.hp.com/support/lj4345mfp.
The product recognizes the printer mismatch and rejects the update. Download
the correct file and send it to the product. Download the file from
http://www.hp.com/support/lj4345mfp.
.
Software description
A flash hardware failure occurred. Although it is extremely unlikely, the product might have a hardware failure. Call
technical support to address the problem (see the flyer that came with the
product for a local telephone support list).
NOTE All HP LaserJet products leave the factory with the latest available firmware version
installed. If a remote firmware update fails, the .RFU file must be sent over a parallel port
connection.
Printing print-ready documents from a command line
Documents in the following file formats can be printed by using a command line. That is, they do not
need to be opened in a software program that supports the file format (such as the Adobe Acrobat or
Acrobat Reader programs for .PDF files), but can be sent directly to the product using a command
line.
■ HP LaserJet Printer Control Language (.PCL)
■ Portable Document Format (.PDF)
■ Postscript (.PS)
■ Text (.TXT)
Use one of the following methods to send print-ready files to your product.
Technology background information 69
Page 92

NOTE The examples that are used in this section are for printing .PDF documents.
However, any print-ready file type can be substituted.
Print-ready file printing by using FTP through a browser
Complete the following steps to print print-ready files from a command line by using FTP through a
browser.
NOTE The following instructions can be used on Windows or Macintosh operating systems.
Software description
1 Take note of the TCP/IP address on the EIO Jetdirect page. The Jetdirect page is the second
page of the configuration-page printout. To print a configuration page, see
current level of firmware.
2 Open a browser window.
3
In the address line of the browser, type ftp://<IPADDRESS>. For example, if the TCP/IP
address of your product is 192.168.0.90, type the following:
FTP 192.168.0.90
4 Locate the print-ready file for the product.
5 Drag and drop the print-ready file onto the PORT1 icon in the browser window.
Determining the
Print-ready file printing by using FTP on a direct network connection
If the HP LaserJet 4345mfp uses a direct network connection, use file transfer protocol (FTP) to print
a print-ready file. Complete the following steps for the operating system.
Windows operating systems
1 Take note of the TCP/IP address on the EIO Jetdirect page. The Jetdirect page is the second
page of the configuration-page printout. To print a configuration page, see
current level of firmware.
2 Open a command window on your computer.
3
Type ftp <TCP/IP printer ADDRESS>. For example, if the TCP/IP address is 192.168.0.90,
type the following:
ftp 192.168.0.90
4 Press Enter on the keyboard.
5 When prompted for the user name, press Enter.
6 When prompted for the password, press Enter.
7
Type bin at the command prompt.
8 Press Enter. The message 200 Types set to I, Using binary mode to transfer files appears in
the command window.
Determining the
70 2 Software description
Page 93

9
Type put <FILENAME>, where <FILENAME> is the name of the print-ready file to be printed,
including the path. For example, type the following:
put C:\LJ\SAMPLE_DOC.PDF
NOTE If the file name or path includes a space, you must enclose the file name or path
in quotation marks. For example, type put "c:\MY DOCUMENTS\LJ
\SAMPLE_DOC.PDF"
10 Press Enter on the keyboard.
The following series of messages appears in the command window:
200 PORT command successful
150 Opening BINARY mode data connection
226 Ready
226 Processing Job
11 Your print-ready file prints.
Macintosh operating systems
1 Take note of the TCP/IP address on the EIO Jetdirect page. The Jetdirect page is the second
page of the configuration-page printout. To print a configuration page, see
Determining the
current level of firmware.
2 Open a Terminal window on your Macintosh. You can find the Terminal application on the
computer hard drive in the Applications/Utilities folder.
3
Type FTP <TCP/IP printer ADDRESS>. For example, if the TCP/IP address is 192.168.0.90,
type the following:
FTP 192.168.0.90
4 Press Enter on the keyboard.
5 When prompted for a user name and password, press Enter.
6
Type put <path>, where <path> is the location where the print-ready file was downloaded from
the Web. For example, type the following:
put /username/desktop/SAMPLE_DOC.PDF
NOTE If the file name or path includes a space, you must enclose the file name or path
in quotation marks. For example, type put "/user name/desktop/SAMPLE_DOC.PDF"
Software description
To ensure that the entire path to the print-ready file is placed in the put command, type
put and a space and then click and drag the print-ready file onto the terminal window. The
complete path to the file is automatically placed after the put command.
7 Press Enter on the keyboard.
8 Your print-ready file prints.
Technology background information 71
Page 94

Print-ready printing by using a local Windows port
To print from the command line by using a local Windows port, follow the instructions in this section
for your operating system.
Windows 98 or Windows Me
1 From a command prompt or in an MS-DOS window, type the following:
Mode lpt1:,,p
Software description
2 Press Enter on the keyboard. The response you receive should be similar to these examples:
> LPT1 Not Rerouted
> Resident portion of MODE loaded
> Infinite retry on parallel printer time-out
3
At a command prompt, type copy /b <FILENAME> <PORTNAME>, where <FILENAME> is the
name of the print-ready file (including the path) and <PORTNAME> is the name of the
appropriate printer port (such as LPT1). For example, at the c:\> command prompt, type the
following:
copy /b c:\SAMPLE_DOC.PDF lpt1
4 Press Enter on the keyboard. The message PROCESSING JOB appears on the control panel,
and the job prints.
NOTE If the product is attached to a parallel port other than LPT1, then substitute the
correct LPT port number in the mode command.
NOTE If the file name or path includes a space, you must enclose the file name or path
in quotation marks. For example, type C:\>copy /b "c:\My Documents
\SAMPLE_DOC.PDF"
5
At the command prompt, type exit to close the command window.
72 2 Software description
Page 95

Windows NT 4.0, Windows 2000, Windows XP, or Windows Server 2003
The print-ready file can be sent directly to the product by typing a copy command at a command
prompt or in an MS-DOS window.
1
At a command prompt, type copy /b <FILENAME> <PORTNAME>, where <FILENAME> is the
name of the print-ready file (including the path) and <PORTNAME> is the name of the
appropriate printer port (such as LPT1). For example, type the following:
C:\>copy /b c:\SAMPLE_DOC.PDF lpt1
2 Press Enter on the keyboard.
NOTE If the file name or path includes a space, you must enclose the file name or path
in quotation marks. For example, type C:\>copy /b "c:\My Documents
\SAMPLE_DOC.PDF". The message PROCESSING JOB appears on the control panel,
and the job prints.
3
At the command prompt, type exit to close the command window.
Print-ready file printing in a Windows network
If the product is shared on a Windows network, complete the following steps.
1
From a command prompt or in an MS-DOS window, type copy /b <FILENAME> \
\<COMPUTERNAME>\<SHARENAME>, where <FILENAME> is the name of the print-ready
file (including the path), <COMPUTERNAME> is the name of the computer from which the
product is being shared, and <SHARENAME> is the product share name. For example, type the
following:
C:\>copy /b c:\SAMPLE_DOC.PDF \\your_server\sharename
NOTE If the file name or path includes a space, you must enclose the file name or path
in quotation marks. For example, type C:\>copy /b "c:\My Documents
\SAMPLE_DOC.PDF" \\your_server\sharename
2 Press Enter on the keyboard. The message PROCESSING JOB appears on the control panel,
and the job prints. The message 1 file(s) copied appears on the computer screen.
Print-ready file printing in UNIX systems
For UNIX systems, any command method that delivers the print-ready file to the product is
acceptable, including the following:
At the command prompt, type cp </home/yourmachine/FILENAME/ dev/parallel>, where </
home/yourmachine/FILENAME> is the location of the print-ready file.
Software description
Print-ready file printing by using Fetch (Mac OS 9.x only)
For Mac OS 9.x, a shareware program called Fetch provides FTP control for a put command.
Download and install the program from
Technology background information 73
download.com.com/3000-2151-10182446.html.
Page 96

Complete the following steps to print print-ready files by using Fetch.
1 Start the program by clicking the Fetch icon.
2 Enter the IP address of the product in the Host: box
3 Click the Put Files button and browse to the location of the print-ready file.
4 Double-click the file to select it and download it to the product. A confirmation message appears
in the main window.
Software description
5 Click OK.
File printing by using the HP LaserJet Utility (Mac OS 9.x only)
Complete the following steps to print a print-ready file by using the HP LaserJet Utility.
1 Make sure that you have the tools and files necessary for the update. You will need the
HP LaserJet Utility and the print-ready file that you want to print.
The HP LaserJet Utility can be found on the HP LaserJet 4345mfp printing-system software CD
that came with the product. If you do not have the CD, you can obtain the HP LaserJet Utility by
downloading the latest product installer from
After you have the HP LaserJet Utility and you know the location of the print-ready file that you
want to print, you are ready to begin the command-line printing process.
2 Open the HP LaserJet Utility.
3 Click Select Printer and locate the product that you would like to upgrade on the network.
4 Select the product on the right side of the dialog box, and then click OK. An information dialog
box for the HP LaserJet 4345mfp appears.
5 On the left side of the Information dialog box, click Files. A dialog box appears where you can
select a file to be downloaded to the product.
6 Click Select File.
www.hp.com.
7 On your hard disk, locate the print-ready file that you want to print, and click the file name to
highlight it. Then click Select. The Files dialog box updates showing the print-ready file that you
want to print under File to download.
8 Click Download.
The HP LaserJet Utility starts downloading the file to the product. A progress bar keeps you
updated on how much of the file has been downloaded. While the file is downloading, the
PROCESSING JOB message appears on the control-panel display on the product, and the printready file prints.
Print-ready file printing by using the LPR command
NOTE This command-line printing method is for use in Windows NT 4.0, Windows 2000,
Windows XP, and Windows Server 2003.
74 2 Software description
Page 97

Complete the following steps to print a print-ready file by using the LPR command.
1 Take note of the TCP/IP address on the EIO Jetdirect page. The Jetdirect page is the second
page of the configuration-page printout. To print a configuration page, see
Determining the
current level of firmware.
2
From a command window, type lpr -P <IPADDRESS> -S <IPADDRESS> -o l <FILENAME> OR- lpr -S <IPADDRESS> -Pbinps <FILENAME>, where <IPADDRESS> can be either the
TCP/IP address or the hostname of the product, and where <FILENAME> is the filename of the
print-ready file.
NOTE The parameter (-o l) consists of a lowercase "O", not a zero, and a lowercase "L",
not the numeral 1. This parameter sets the transport protocol to binary mode.
3 The file prints, but no further messages appear in the command prompt window.
4
Type exit at the command prompt to close the command window.
Driver-feature comparison in various operating systems
The following tables detail the software features that are available for each driver type and for each
operating system that the HP LaserJet 4345mfp supports. The printing-system drivers for
Windows 98, Windows Me, and Windows NT 4.0 are the HP Traditional PCL 6, HP Traditional
PCL 5, and PS Emulation Drivers. The printing-system drivers for Windows 2000, Windows XP, and
Windows Server 2003 are the new HP unidrivers, with a user interface look and feel that is
consistent across the HP PCL 6, PCL 5, and PS emulation unidrivers.
For more information about the HP Traditional HP PCL 6, PCL 5, and PS Emulation Drivers, see
traditional print drivers for Windows. For more information about the HP PCL 6, HP PCL 5, and
HP PS Emulation Unidrivers see
HP PCL 6, HP PCL 5, and HP PS 3 emulation unidrivers for Windows.
Job stream output
Table 2-8 Driver support for job stream output feature
Operating system Windows XP (32-bit),
Driver type HP unidriver HP traditional driver HP traditional driver Macintosh
Driver PCL 6PCL 5PS
PCL 6 support x x x
PCL 5 pass-through
support
Windows 2000, Windows
Server 2003
emulation
x x x
Windows NT 4.0 Windows 98, Me Macintosh
PCL 6PCL 5PS
emulation
PCL 6PCL 5PS
emulation
Postscript
Software description
HP
PCL 6 Color
Postscript 3 x x x
Postscript 1, 2 x x x
Technology background information 75
Page 98

PJL/PJL Encoding
Table 2-9 Printer Job Language (PJL) and PJL encoding
Operating system Windows XP (32-bit),
Driver type HP unidriver HP traditional driver HP traditional driver Macintosh
Driver PCL 6PCL 5PS
Software description
PJL support x x x x x x x x x
7-bit Encoding for PJL
(a-z, A-Z, 0-9)
8-bit Encoding for PJL
(chars 32-255)
UTF-8 encoding for
PJL (Unicode to 8-bit)
Job tracking
Table 2-10 Driver support for job tracking
Operating system Windows XP (32-bit),
Windows 2000, Windows
Server 2003
emulation
xxx xxx xxx
Windows 2000, Windows
Server 2003
Windows NT 4.0 Windows 98, Me Macintosh
PCL 6PCL 5PS
emulation
Windows NT 4.0 Windows 98, Me Macintosh
PCL 6PCL 5PS
emulation
Postscript
Driver type HP unidriver HP traditional driver HP traditional driver Macintosh
Driver PCL 6PCL 5PS
PRN file driver
identification
Job accounting
information
Job accounting
enhancements (UUID)
Reliable Time - born on
date (PJL DMINFO)
Born on Date (PJL
TIMESTAMP)
Sending user name
with every job
x x x x x x x x
x x x x x x x
x x x x x x x
x x x x x x x
xxx xx xx
emulation
PCL 6PCL 5PS
emulation
PCL 6PCL 5PS
emulation
Postscript
76 2 Software description
Page 99

Connectivity
Table 2-11 Driver support for connectivity features
Operating system Windows XP (32-bit),
Driver type HP unidriver HP traditional driver HP traditional driver Macintosh
Driver PCL 6PCL 5PS
Parallel (direct connect) x x x x x x x x x
Network - TCP/IP
Network - AppleTalk
PAP
Wireless 802.11 x
Bluetooth x x x x x x x x x x
Rendezvous x
Windows 2000, Windows
Server 2003
emulation
x x x x x x x x x x
x
Windows NT 4.0 Windows 98, Me Macintosh
PCL 6PCL 5PS
emulation
PCL 6PCL 5PS
emulation
Postscript
Bidirectional communication
Table 2-12 Driver support for bidirectional communication features
Operating System Windows XP (32-bit),
Windows 2000, Windows
Server 2003
Windows NT 4.0 Windows 98, Me Macintosh
Software description
Driver type HP unidriver HP traditional driver HP traditional driver Macintosh
Driver PCL 6PCL 5PS
EAC x x x x x x x x
Status messages x x x x x x x x
Parallel (direct connect) x x
Network - TCP/IP x x x x
Network - AppleTalk
PAP
Update Now x x x x x x x x
Language Monitor
1
MasterMon, a pseudo-language monitor that is used for all HP LaserJet products for the duplex communication channel with
bidirectional communication products and to insert PJL commands into the job stream. It loads TCPMON for TCP/IP ports.
1
x
x x x x x x x
emulation
PCL 6PCL 5PS
emulation
PCL 6PCL 5PS
emulation
Postscript
NOTE In Windows 98 and Windows Me, bidirectional support and Update Now support has
been removed for the HP LaserJet 4345mfp when using a direct connect through the Installer.
Technology background information 77
Page 100

HP Driver Preconfiguration
Table 2-13 Driver support for HP Driver Preconfiguration
Operating system Windows XP (32-bit),
Driver type HP unidriver HP traditional driver HP traditional driver Macintosh
Driver PCL 6PCL 5PS
Software description
HP Driver
Preconfiguration
Feature lockout x x x x x x x
Enterprise
Autoconfiguration (EAC)
Continuous export x x x x x x x
DMC macro automation x x x x x x x
Bundle support
Table 2-14 Bundle support
Operating system Windows XP (32-bit),
Windows 2000, Windows
Server 2003
emulation
x x x x x x x
x x x x x x x x
Windows 2000, Windows
Server 2003
Windows NT 4.0 Windows 98, Me Macintosh
PCL 6PCL 5PS
emulation
Windows NT 4.0 Windows 98, Me Macintosh
PCL 6PCL 5PS
emulation
Postscript
Driver type HP unidriver HP traditional driver HP traditional driver Macintosh
Driver PCL 6PCL 5PS
Assign Bundle support
through the Installer
Printer bundle in UI x x x x x
x x x x x x x
emulation
PCL 6PCL 5PS
emulation
PCL 6PCL 5PS
emulation
Postscript
78 2 Software description
 Loading...