

Page 1
user guide
hp LaserJet 1200
series products
Page 2

Page 3
HP LaserJet 1200 Series
Printer and Print•Copy•Scan
Products
User Guide
Page 4

©
Copyright Hewlett-Packard
Company 2002
All Rights Reserved.
Reproduction, adaptation, or
translation without prior written
permission is prohibited, except
as allowed under the copyright
laws.
A user of the Hewlett-Packard
printer associated with this user
guide is granted a license to: a)
print hard copies of this user
guide for PERSONAL,
INTERNAL or COMPANY use
subject to the restriction not to
sell, re-sell or otherwise
distribute the hard copies; and
b) place an electronic copy of
this user guide on a network
server, provided access to the
electronic copy is limited to
PERSONAL, INTERNAL users
of the Hewlett-Packard printer
associated with this user guide.
The information contained in
this document is subject to
change without notice.
Publication number:
C7045-Online
Edition 4, 5/2003
Trademark Credits
®
Adobe
, Acrobat®, PostScript®,
and Adobe Photoshop
®
are
trademarks of Adobe Systems
Incorporated which may be
registered in certain
jurisdictions.
®
Arial
, Monotype®, and Times
New Roman
®
are U.S.
registered trademarks of the
Monotype Corporation.
CompuServe
™
is a U.S.
trademark of CompuServe, Inc.
Helvetica
and Times Roman
™
, Palatino™, Times™,
™
are
trademarks of Linotype AG
and/or its subsidiaries in the
U.S. and other countries.
Microsoft
Windows
MS-DOS
®
, MS Windows,
®
, Windows NT®, and
®
are U.S. registered
trademarks of Microsoft
Corporation.
LaserWriter
®
is a registered
trademark of Apple Computer,
Inc.
TrueType
™
is a U.S. trademark
of Apple Computer, Inc.
NERGY STAR
E
®
is a U.S.
registered service mark of the
U.S. EPA.
Netscape is a U.S. trademark of
Netscape Communications
Corporation.
®
Unix
is a registered trademark
of The Open Group.
Hewlett-Packard Company
11311 Chinden Boulevard
Boise, Idaho 83714 U.S.A.
Page 5

Contents
1 Getting to know the printer
Understanding the printer’s features and benefits . . . . . . . . . .12
Print with excellent quality . . . . . . . . . . . . . . . . . . . . . . . . . 12
Save Time . . . . . . . . . . . . . . . . . . . . . . . . . . . . . . . . . . . . .12
Save money. . . . . . . . . . . . . . . . . . . . . . . . . . . . . . . . . . . .12
Create professional documents. . . . . . . . . . . . . . . . . . . . . 12
Expand your printer . . . . . . . . . . . . . . . . . . . . . . . . . . . . . . 13
Identifying the printer’s components . . . . . . . . . . . . . . . . . . . .14
Printer control panel. . . . . . . . . . . . . . . . . . . . . . . . . . . . . .15
Printer input trays. . . . . . . . . . . . . . . . . . . . . . . . . . . . . . . .16
Printer media guides . . . . . . . . . . . . . . . . . . . . . . . . . . . . .17
Printer output paths . . . . . . . . . . . . . . . . . . . . . . . . . . . . . . 18
Toner door . . . . . . . . . . . . . . . . . . . . . . . . . . . . . . . . . . . .19
Choosing paper and other media. . . . . . . . . . . . . . . . . . . . . . . 20
Loading media into the input trays. . . . . . . . . . . . . . . . . . . . . . 21
Main input tray . . . . . . . . . . . . . . . . . . . . . . . . . . . . . . . . . .21
Priority input tray . . . . . . . . . . . . . . . . . . . . . . . . . . . . . . . .21
Specific types of media . . . . . . . . . . . . . . . . . . . . . . . . . . .21
Turning the power off . . . . . . . . . . . . . . . . . . . . . . . . . . . . . . . . 22
Understanding voltage conversions. . . . . . . . . . . . . . . . . . . . .22
Accessing the printer properties (driver) and help . . . . . . . . . .23
Printer properties (driver). . . . . . . . . . . . . . . . . . . . . . . . . .23
Software For Macintosh Computers . . . . . . . . . . . . . . . . .24
Printer online help . . . . . . . . . . . . . . . . . . . . . . . . . . . . . . .25
Printing a configuration page . . . . . . . . . . . . . . . . . . . . . . . . . .26
EN
2 Getting to know the copier/scanner
Understanding the copier/scanner’s features and benefits . . .28
Scan. . . . . . . . . . . . . . . . . . . . . . . . . . . . . . . . . . . . . . . . . .28
Copy . . . . . . . . . . . . . . . . . . . . . . . . . . . . . . . . . . . . . . . . .28
Identifying the copier/scanner’s components. . . . . . . . . . . . . .29
Copier/scanner control panel. . . . . . . . . . . . . . . . . . . . . . .30
Media input tray, guides, and output bin . . . . . . . . . . . . . .31
Copier/scanner door . . . . . . . . . . . . . . . . . . . . . . . . . . . . .31
Supported media sizes and types . . . . . . . . . . . . . . . . . . . . . .32
Precautions for copying and scanning. . . . . . . . . . . . . . . . . . . 33
Loading originals in the copier/scanner . . . . . . . . . . . . . . . . . .34
Contents
3
Page 6

Getting to know the software . . . . . . . . . . . . . . . . . . . . . . . . . .35
HP LaserJet Director
(Windows 98, 2000, Millennium, NT 4.0, and
Mac OS) . . . . . . . . . . . . . . . . . . . . . . . . . . . . . . . . . . .35
To turn off the HP LaserJet Director . . . . . . . . . . . . . . . . .36
HP LaserJet Document Manager
(Windows 98, 2000, Millennium, NT 4.0, and
Mac OS) . . . . . . . . . . . . . . . . . . . . . . . . . . . . . . . . . . .36
Quick Copy settings. . . . . . . . . . . . . . . . . . . . . . . . . . . . . .38
HP LaserJet Copier (Copy Plus) . . . . . . . . . . . . . . . . . . . . 38
HP LaserJet Director Toolbox
(Windows 9x, 2000, Millennium, and NT 4.0) . . . . . . .38
HP LaserJet Device Configuration. . . . . . . . . . . . . . . . . . . 39
HP LaserJet Photo Center
(Windows 9x, 2000, Millennium, and NT 4.0) . . . . . . .40
Accessing the online help . . . . . . . . . . . . . . . . . . . . . . . . . . . .41
3 Getting to know the print server
Understanding the print server’s features and benefits . . . . . .44
Using network protocols. . . . . . . . . . . . . . . . . . . . . . . . . . . . . . 44
Identifying the print server’s components. . . . . . . . . . . . . . . . .45
Installing the print server . . . . . . . . . . . . . . . . . . . . . . . . . . . . .45
Installing and configuring the network software . . . . . . . . . . . .47
Install the software on a network . . . . . . . . . . . . . . . . . . . .47
Install the printer and server . . . . . . . . . . . . . . . . . . . . . . .47
Using the embedded web server . . . . . . . . . . . . . . . . . . . . . . .48
Prerequisites . . . . . . . . . . . . . . . . . . . . . . . . . . . . . . . . . . .48
Compatible Web Browsers . . . . . . . . . . . . . . . . . . . . . . . .49
Starting the embedded web server . . . . . . . . . . . . . . . . . . . . . 49
Using HP Web JetAdmin . . . . . . . . . . . . . . . . . . . . . . . . . . . . .49
Additional configuration and management to ols . . . . . . . . . . .50
Using BOOTP . . . . . . . . . . . . . . . . . . . . . . . . . . . . . . . . . . . . .50
Benefits of using BOOTP. . . . . . . . . . . . . . . . . . . . . . . . . .50
Configuring the BOOTP server . . . . . . . . . . . . . . . . . . . . .51
Bootptab file entries. . . . . . . . . . . . . . . . . . . . . . . . . . . . . .52
Using DHCP. . . . . . . . . . . . . . . . . . . . . . . . . . . . . . . . . . . . . . . 54
UNIX systems . . . . . . . . . . . . . . . . . . . . . . . . . . . . . . . . . . . . .54
Windows systems . . . . . . . . . . . . . . . . . . . . . . . . . . . . . . .55
Windows NT 4.0 server . . . . . . . . . . . . . . . . . . . . . . . . . . . 55
Windows 2000 server . . . . . . . . . . . . . . . . . . . . . . . . . . . .57
Enabling or disabling DHCP . . . . . . . . . . . . . . . . . . . . . . .59
Moving to another network. . . . . . . . . . . . . . . . . . . . . . . . . . . . 60
4 Contents
EN
Page 7

4 Media
Optimizing print quality for media types. . . . . . . . . . . . . . . . . . 62
Printing transparencies and labels. . . . . . . . . . . . . . . . . . . . . .63
Printing envelopes . . . . . . . . . . . . . . . . . . . . . . . . . . . . . . . . . .64
Printing letterhead or preprinted forms. . . . . . . . . . . . . . . . . . .66
Printing custom-sized media or cardstock . . . . . . . . . . . . . . . .67
5 Printing tasks
Printing with manual feed. . . . . . . . . . . . . . . . . . . . . . . . . . . . . 70
Printing on both sides of the paper (manual duplexing). . . . . .71
Printing watermarks . . . . . . . . . . . . . . . . . . . . . . . . . . . . . . . . .74
Accessing the watermark feature . . . . . . . . . . . . . . . . . . .74
Printing multiple pages on a single sheet of paper
(N-up printing) . . . . . . . . . . . . . . . . . . . . . . . . . . . . . . . . . .75
Accessing the multiple pages per sheet feature
(Windows) . . . . . . . . . . . . . . . . . . . . . . . . . . . . . . . . . . 75
Accessing the multiple pages per sheet feature
(Mac OS). . . . . . . . . . . . . . . . . . . . . . . . . . . . . . . . . . . 75
Printing booklets. . . . . . . . . . . . . . . . . . . . . . . . . . . . . . . . . . . .76
Canceling a print job . . . . . . . . . . . . . . . . . . . . . . . . . . . . . . . .78
Understanding print quality settings. . . . . . . . . . . . . . . . . . . . .79
Using EconoMode (Save Toner) . . . . . . . . . . . . . . . . . . . . . . . 80
EN
6 Scanning tasks
Starting a scan . . . . . . . . . . . . . . . . . . . . . . . . . . . . . . . . . . . . . 82
Working with scanned items . . . . . . . . . . . . . . . . . . . . . . .83
Scanning to e-mail . . . . . . . . . . . . . . . . . . . . . . . . . . . . . . . . . .83
Using the e-mail feature
(Windows 98, 2000, Millennium, NT 4.0) . . . . . . . . . .84
Using the e-mail feature (Mac OS) . . . . . . . . . . . . . . . . . .84
Editing scanned text (Optical Character Recognition). . . . . . .85
Using the OCR feature
(Windows 98, 2000, Millennium, NT 4.0, and
Mac OS) . . . . . . . . . . . . . . . . . . . . . . . . . . . . . . . . . . .85
Storing scanned text or images . . . . . . . . . . . . . . . . . . . . . . . .87
Using the Store feature
(Windows 98, 2000, Millennium, NT 4.0, and
Mac OS) . . . . . . . . . . . . . . . . . . . . . . . . . . . . . . . . . . .87
Acquiring an image . . . . . . . . . . . . . . . . . . . . . . . . . . . . . . . . .88
Adjusting the contrast. . . . . . . . . . . . . . . . . . . . . . . . . . . . . . . .88
Accessing the contrast feature . . . . . . . . . . . . . . . . . . . . . 88
Enhancing the scanned image in HP Document Manager . . .89
Accessing the image enhancement features. . . . . . . . . . .89
5
Page 8

Adding annotations to scanned images. . . . . . . . . . . . . . . . . .90
Accessing the annotation features. . . . . . . . . . . . . . . . . . . 90
Canceling scan jobs. . . . . . . . . . . . . . . . . . . . . . . . . . . . . . . . .90
7 Copying tasks
Understanding copying features . . . . . . . . . . . . . . . . . . . . . . .92
Using the Quick Copy feature . . . . . . . . . . . . . . . . . . . . . . . . . 92
Quick Copy settings. . . . . . . . . . . . . . . . . . . . . . . . . . . . . .93
Using HP LaserJet Copier . . . . . . . . . . . . . . . . . . . . . . . . . . . .94
Accessing HP LaserJet Copier . . . . . . . . . . . . . . . . . . . . .94
Accessing HP LaserJet Copy Plus . . . . . . . . . . . . . . . . . .94
Adjusting the contrast. . . . . . . . . . . . . . . . . . . . . . . . . . . . . . . .96
Accessing the contrast feature . . . . . . . . . . . . . . . . . . . . . 96
Canceling copy jobs. . . . . . . . . . . . . . . . . . . . . . . . . . . . . . . . .96
8 Managing the toner cartridge
Using HP toner cartridges . . . . . . . . . . . . . . . . . . . . . . . . . . . .98
HP policy on non-HP toner cartridges . . . . . . . . . . . . . . . .98
Storing toner cartridges . . . . . . . . . . . . . . . . . . . . . . . . . . . . . . 98
Toner cartridge life expectancy . . . . . . . . . . . . . . . . . . . . .98
Recycling toner cartridges . . . . . . . . . . . . . . . . . . . . . . . . . . . .99
Saving toner. . . . . . . . . . . . . . . . . . . . . . . . . . . . . . . . . . . . . . .99
Redistributing toner . . . . . . . . . . . . . . . . . . . . . . . . . . . . . . . .100
Changing the toner cartridge . . . . . . . . . . . . . . . . . . . . . . . . .101
6 Contents
9 Troubleshooting the printer
Finding the solution . . . . . . . . . . . . . . . . . . . . . . . . . . . . . . . .104
Pages did not print. . . . . . . . . . . . . . . . . . . . . . . . . . . . . .104
Pages printed, but there was a problem . . . . . . . . . . . . .104
Printer light patterns. . . . . . . . . . . . . . . . . . . . . . . . . . . . .105
Error messages on the screen. . . . . . . . . . . . . . . . . . . . .107
Common Macintosh Problems . . . . . . . . . . . . . . . . . . . . 109
Selecting an Alternate PostScript Printer
Description (PPD) . . . . . . . . . . . . . . . . . . . . . . . . . . .113
Troubleshooting PostScript (PS) Errors . . . . . . . . . . . . . . . .114
Paper handling problems. . . . . . . . . . . . . . . . . . . . . . . . .116
Printed page is different than what appeared on screen.118
Improving print quality . . . . . . . . . . . . . . . . . . . . . . . . . . . . . .120
Cleaning the printer . . . . . . . . . . . . . . . . . . . . . . . . . . . . . . . . 125
Cleaning the printer media path. . . . . . . . . . . . . . . . . . . . 127
Clearing printer media jams . . . . . . . . . . . . . . . . . . . . . . . . . . 128
Changing the pickup roller . . . . . . . . . . . . . . . . . . . . . . . . . . .131
Cleaning the pickup roller. . . . . . . . . . . . . . . . . . . . . . . . . . . .133
Changing the printer separation pad . . . . . . . . . . . . . . . . . . . 134
EN
Page 9

10 Troubleshooting the copier/scanner
Finding the solution . . . . . . . . . . . . . . . . . . . . . . . . . . . . . . . .138
Scanning problems . . . . . . . . . . . . . . . . . . . . . . . . . . . . .138
Copying problems . . . . . . . . . . . . . . . . . . . . . . . . . . . . . .138
The scanner did nothing . . . . . . . . . . . . . . . . . . . . . . . . .139
No preview appeared on the screen . . . . . . . . . . . . . . . .141
Scanned image is of poor quality. . . . . . . . . . . . . . . . . . . 142
Part of the image did not scan or text is missing. . . . . . .144
The text cannot be edited . . . . . . . . . . . . . . . . . . . . . . . .145
The scan takes too long. . . . . . . . . . . . . . . . . . . . . . . . . . 146
Error messages appear on the screen . . . . . . . . . . . . . .147
No copy came out of the printer or the scanner
did nothing. . . . . . . . . . . . . . . . . . . . . . . . . . . . . . . . .148
Copies are blank, missing images, or faded . . . . . . . . . .149
Improving copy/scan quality. . . . . . . . . . . . . . . . . . . . . . . . . . 150
Preventing problems . . . . . . . . . . . . . . . . . . . . . . . . . . . .150
Identifying and correcting copy/scan defects. . . . . . . . . .151
Paper handling problems. . . . . . . . . . . . . . . . . . . . . . . . .154
Cleaning the copier/scanner . . . . . . . . . . . . . . . . . . . . . . . . .155
Clearing copier/scanner jams. . . . . . . . . . . . . . . . . . . . . . . . .156
Replacing the copier/scanner separation pad . . . . . . . . . . . .158
Removing the copier/scanner . . . . . . . . . . . . . . . . . . . . . . . .159
Closing the left side panel . . . . . . . . . . . . . . . . . . . . . . . . . . .161
EN
11 Troubleshooting the print server
Finding the solution . . . . . . . . . . . . . . . . . . . . . . . . . . . . . . . .164
HP JetDirect 175X configuration page. . . . . . . . . . . . . . . 165
Understanding the print server’s light patterns. . . . . . . . . . . .166
Using a print server configuration page . . . . . . . . . . . . . . . . .167
Printing a print server configuration page . . . . . . . . . . . .167
Understanding the print server configuration page . . . . . . . . 167
Status field error messages. . . . . . . . . . . . . . . . . . . . . . . 167
Page sections and messages . . . . . . . . . . . . . . . . . . . . .168
General HP JetDirect information . . . . . . . . . . . . . . . . . .169
USB port information . . . . . . . . . . . . . . . . . . . . . . . . . . . . 171
Network statistics. . . . . . . . . . . . . . . . . . . . . . . . . . . . . . .172
TCP/IP protocol information. . . . . . . . . . . . . . . . . . . . . . . 173
IPX/SPX protocol information . . . . . . . . . . . . . . . . . . . . .177
AppleTalk protocol information . . . . . . . . . . . . . . . . . . . .179
Error messages . . . . . . . . . . . . . . . . . . . . . . . . . . . . . . . . 180
Verifying your hardware . . . . . . . . . . . . . . . . . . . . . . . . . . . . . 185
The printer . . . . . . . . . . . . . . . . . . . . . . . . . . . . . . . . . . . .185
The print server . . . . . . . . . . . . . . . . . . . . . . . . . . . . . . . .185
Verify printing when attached to a computer . . . . . . . . . . 186
Verify scanning over the network. . . . . . . . . . . . . . . . . . . 186
7
Page 10

12 Service and support
Availability . . . . . . . . . . . . . . . . . . . . . . . . . . . . . . . . . . . . . . .188
Hardware service . . . . . . . . . . . . . . . . . . . . . . . . . . . . . . . . . . 188
Extended warranty . . . . . . . . . . . . . . . . . . . . . . . . . . . . . . . . . 188
Guidelines for repacking the printer. . . . . . . . . . . . . . . . . . . .189
Service information form . . . . . . . . . . . . . . . . . . . . . . . . . . . . 190
Hewlett-Packard Support . . . . . . . . . . . . . . . . . . . . . . . . . . . .191
Customer Support and product repair assistance
(U.S. and Canada) . . . . . . . . . . . . . . . . . . . . . . . . . . 191
European Customer Support Center. . . . . . . . . . . . . . . .192
In-country/region support numbers . . . . . . . . . . . . . . . . .193
Online services . . . . . . . . . . . . . . . . . . . . . . . . . . . . . . . .195
Obtaining software utilities and electronic information. . . 196
Hewlett-Packard direct ordering for accessories
or supplies. . . . . . . . . . . . . . . . . . . . . . . . . . . . . . . . . 196
Hewlett-Packard Support Assistant compact disc. . . . . .197
Hewlett-Packard service information. . . . . . . . . . . . . . . .197
Hewlett-Packard SupportPack. . . . . . . . . . . . . . . . . . . . .197
HP FIRST . . . . . . . . . . . . . . . . . . . . . . . . . . . . . . . . . . . .197
Worldwide country/region sales and service offices. . . . . . . . 199
Appendix A Printer specifications
Specifications. . . . . . . . . . . . . . . . . . . . . . . . . . . . . . . . . . . . .206
FCC compliance. . . . . . . . . . . . . . . . . . . . . . . . . . . . . . . . . . .209
Environmental Product Stewardship Program. . . . . . . . . . . .210
Protecting the Environment . . . . . . . . . . . . . . . . . . . . . . . 210
Material safety data sheet . . . . . . . . . . . . . . . . . . . . . . . . . . .212
Regulatory statements . . . . . . . . . . . . . . . . . . . . . . . . . . . . . . 213
Declaration of Conformity . . . . . . . . . . . . . . . . . . . . . . . .213
Laser safety statement . . . . . . . . . . . . . . . . . . . . . . . . . . 214
Canadian DOC regulations . . . . . . . . . . . . . . . . . . . . . . .214
Korean EMI statement. . . . . . . . . . . . . . . . . . . . . . . . . . . 214
Laser statement for Finland. . . . . . . . . . . . . . . . . . . . . . . 215
8 Contents
Appendix B Printer and copier/scanner
specifications
Specifications. . . . . . . . . . . . . . . . . . . . . . . . . . . . . . . . . . . . .218
FCC compliance. . . . . . . . . . . . . . . . . . . . . . . . . . . . . . . . . . .221
Environmental Product Stewardship Program. . . . . . . . . . . .222
Protecting the environment . . . . . . . . . . . . . . . . . . . . . . .222
EN
Page 11

Regulatory statements . . . . . . . . . . . . . . . . . . . . . . . . . . . . . . 223
Declaration of Conformity . . . . . . . . . . . . . . . . . . . . . . . .223
Laser safety statement . . . . . . . . . . . . . . . . . . . . . . . . . . 224
Canadian DOC regulations . . . . . . . . . . . . . . . . . . . . . . .224
Korean EMI statement. . . . . . . . . . . . . . . . . . . . . . . . . . . 224
Laser statement for Finland. . . . . . . . . . . . . . . . . . . . . . . 225
Appendix C Print server specifications
Specifications. . . . . . . . . . . . . . . . . . . . . . . . . . . . . . . . . . . . .228
FCC compliance. . . . . . . . . . . . . . . . . . . . . . . . . . . . . . . . . . .231
European community . . . . . . . . . . . . . . . . . . . . . . . . . . . . . . . 231
Regulatory statements . . . . . . . . . . . . . . . . . . . . . . . . . . . . . . 232
Declaration of Conformity . . . . . . . . . . . . . . . . . . . . . . . .232
Canada DOC regulations. . . . . . . . . . . . . . . . . . . . . . . . . 234
Japan VCCI Class 1 regulations . . . . . . . . . . . . . . . . . . .234
Korean EMI statement. . . . . . . . . . . . . . . . . . . . . . . . . . . 234
Taiwan Class A notice . . . . . . . . . . . . . . . . . . . . . . . . . . .234
Chinese safety statement . . . . . . . . . . . . . . . . . . . . . . . .235
Appendix D Media specifications
Printer media specifications . . . . . . . . . . . . . . . . . . . . . . . . . . 238
Supported media sizes (printer). . . . . . . . . . . . . . . . . . . . . . .239
Guidelines for using media. . . . . . . . . . . . . . . . . . . . . . . . . . .239
Paper. . . . . . . . . . . . . . . . . . . . . . . . . . . . . . . . . . . . . . . .239
Labels . . . . . . . . . . . . . . . . . . . . . . . . . . . . . . . . . . . . . . .241
Transparencies . . . . . . . . . . . . . . . . . . . . . . . . . . . . . . . . 241
Envelopes . . . . . . . . . . . . . . . . . . . . . . . . . . . . . . . . . . . .242
Card stock and heavy media . . . . . . . . . . . . . . . . . . . . . .243
EN
Appendix E Memory (DIMM)
Installing a DIMM (memory). . . . . . . . . . . . . . . . . . . . . . . . . .246
Testing the DIMM installation. . . . . . . . . . . . . . . . . . . . . . . . . 248
Removing a DIMM . . . . . . . . . . . . . . . . . . . . . . . . . . . . . . . . .249
Appendix F Warranty and licensing
Hewlett-Packard software license agreement . . . . . . . . . . . .252
Hewlett-Packard limited warranty statement . . . . . . . . . . . . .254
Limited warranty for toner cartridge life . . . . . . . . . . . . . . . . . 256
Appendix G Accessories and ordering information
9
Page 12

Appendix H Scanner resolution and color
Overview . . . . . . . . . . . . . . . . . . . . . . . . . . . . . . . . . . . . . . . . 264
Resolution and color guidelines . . . . . . . . . . . . . . . . . . . . . . .265
Resolution . . . . . . . . . . . . . . . . . . . . . . . . . . . . . . . . . . . . . . . 266
Color. . . . . . . . . . . . . . . . . . . . . . . . . . . . . . . . . . . . . . . . . . . .267
Index
10 Contents
EN
Page 13

Getting to know
Note
1
See the
for installation instructions.
the printer
This chapter provides information on the following topics:
Understanding the printer’s features and benefits
●
Identifying the printer’s components
●
Choosing paper and other media
●
Loading media into the input trays
●
Turning the power off
●
Understanding voltage conversions
●
Accessing the printer properties (driver) and help
●
Printing a configuration page
●
HP LaserJet Getting Started Guide
that came with your printer
EN
11
Page 14

Understanding the printer’s features and benefits
Congratulations on the purchase of your new product. The
HP LaserJet 1200 series provides the following benefits.
Print with excellent quality
Print 1200 dots per inch.
●
● PCL-5e, PCL-6, and P ostscript Le v el 2 emulatio n are already
installed on the printer.
● The printer automatically determines and switches to the
appropriate language for the print job.
Save Time
● Fast printing at 15 page s per minute (ppm) for letter size
pages and 14 ppm for A4 size pages.
● No waiting. The first page is out in less than 10 seconds.
Save money
● Use EconoMode to save toner.
● Print multiple pages on a single sheet of paper (N-up
printing).
Create professional documents
● Use watermarks, such as Confidential, to protect your
documents.
● Print booklets. You can use this feature to easily print the
pages in the order required to create cards or books. Once
printed, all you have to do is fold and staple the pages.
● Print the first page on different media than the rest of the
pages.
12 Chapter 1 Getting to know the printer
EN
Page 15

Expand your printer
You can add functionality to your HP LaserJet product in the
following ways:
Add copy/scan functionality with the HP copy/scan
●
attachment (C7046A).
Make your printer or Print●Copy●Scan product available on
●
the network with the HP JetDirect print server (J6035A).
Add memory using the memory DIMM slot:
●
• 8 MB (C7842A)
• 16 MB (C7843A)
• 32 MB (C7845A.)
• 64 MB (C7846A)
EN
Understanding the printer’s features and benefits
13
Page 16
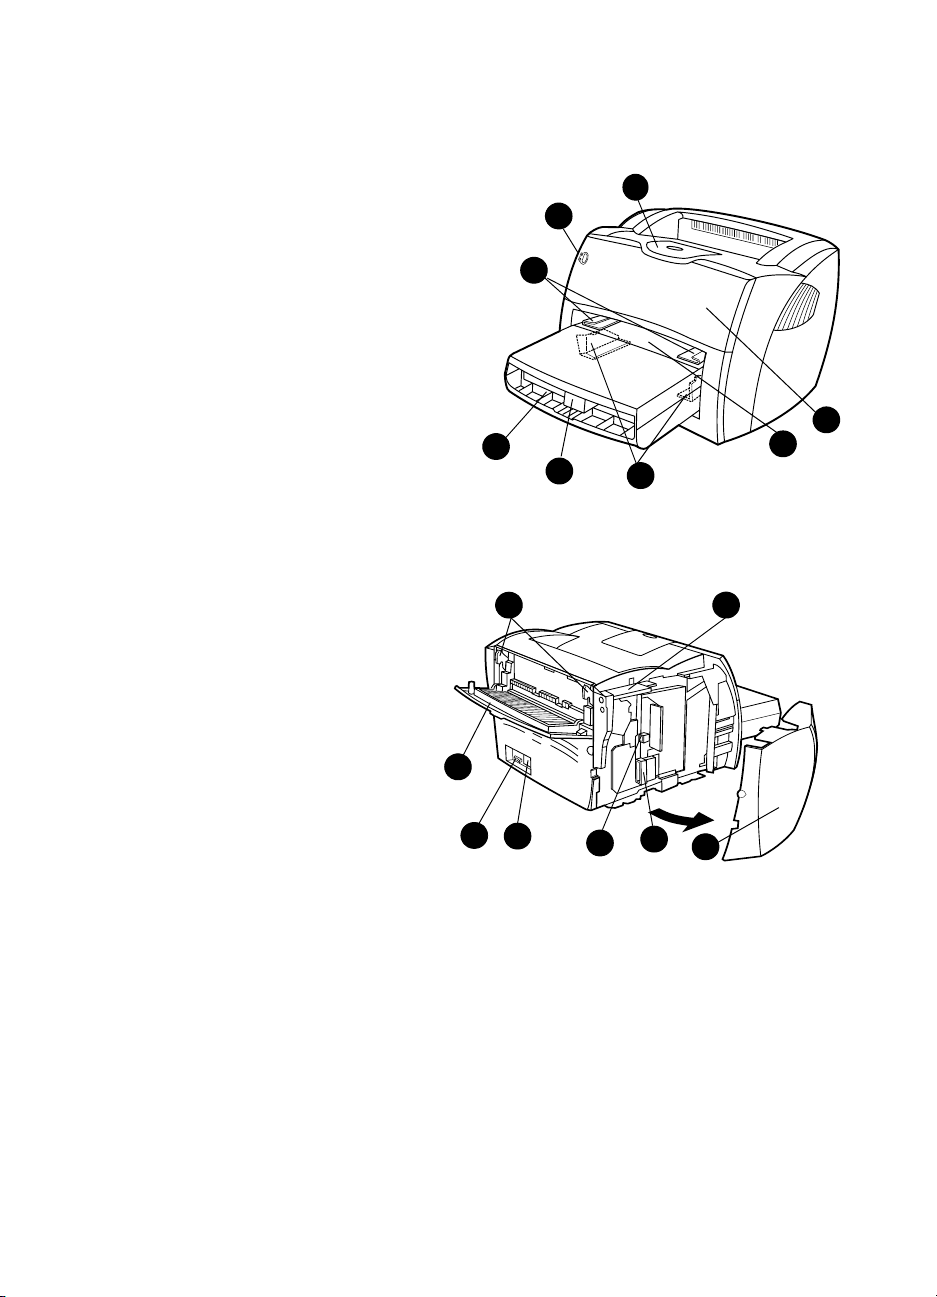
Identifying the printer’s components
1. Printer control panel
2. Long media extensio n (output bin)
3. Toner door
4. Priority input tray
5. Side media guides for the main input tray
6. Long media support for the main input tray
7. Main input tray
8. Side media guides for the priority input tray
7
1
8
6
2
3
4
5
9. Release levers
10. Connection to scanner (optional)
11. Left side panel
12. Parallel port
13. USB port
14. Power receptacle
15. Power switch (220-240 volt printers)
16. Straight-through output door
16
15
14
13
12
109
11
14 Chapter 1 Getting to know the printer
EN
Page 17
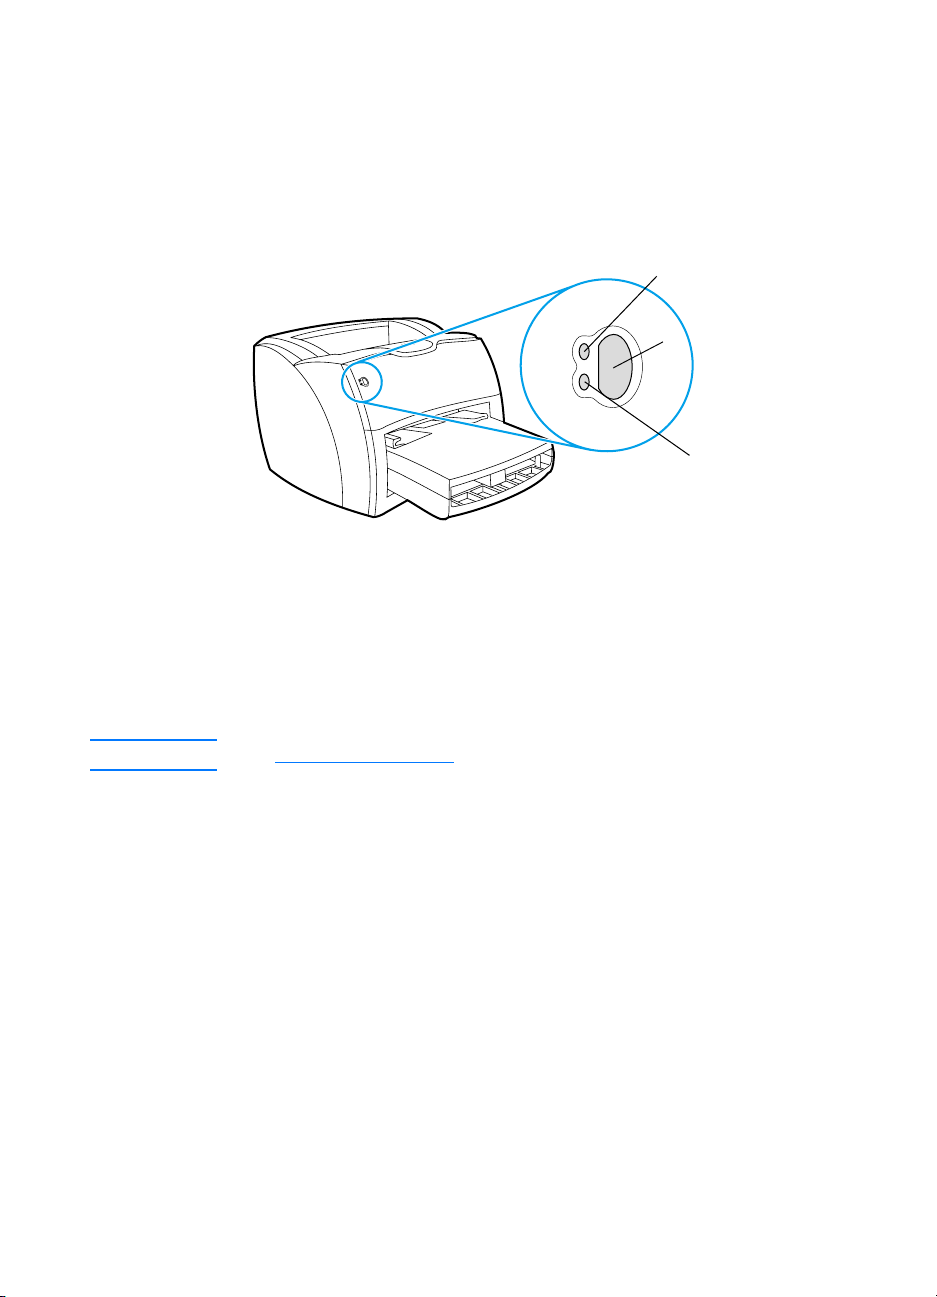
Printer control panel
Ready
light (green)
Attention
light (amber)
Go
button and light
(green)
The printer control panel is comprised of two lights and one
lighted button. These lights produce patterns that identify your
printer’s status.
Note
●
Go button and light:
continue printing while in manual feed mode, press and
release the Go button.
●
Ready light:
●
Attention light:
Indicates that the printer is ready to print.
toner door is open, toner cartridge is missing, or other errors.
See Printer light patterns
To print a configuration page or to
Indicates printer media input tray is empty,
for a description of the light patterns.
EN
Identifying the printer’s components
15
Page 18

Printer input trays
Main input tray
The enclosed main input tra y, located in front of the printer, holds
up to 250 sheets of 20 lb paper, multiple envelopes, or other
media.
Priority input tray
You should use the priority input tray when feeding up to
10 sheets of 20 lb paper or when printing single envelopes,
postcards, labels, or tr ansparencies. You can also use the priority
input tra y to print the first p age on d ifferent media than t he rest of
the document.
Note The printer automatically prints from the priority input tray before
printing from the main input tray.
See Media
16 Chapter 1 Getting to know the printer
for more information about media types.
EN
Page 19

Printer media guides
Both input trays ha v e side media guides . The main input tra y also
has a rear media guide. Media guides ensure that the media is
correctly fed into the printer and that the print is not skewed
(crooked on the media). When loading media, adjust the media
guides to match the width and length of the media that you are
using.
EN
Identifying the printer’s components
17
Page 20

Printer output paths
Output bin
The output bin is located on the top of the printer. Printed media
is collected here in the correct sequence when the
straight-through output door is closed. Use the output bin when
printing normal and large, collated documents.
Pull out for
long media.
Straight-through output path
The straight-through output path is useful when you are printing
envelopes , transpa rencies, hea vy media, or an y media that tends
to curl when printed. Printed media exits in reverse order when
the straight-through output door is open.
Note Printed media does not stack when y ou use the straight-through out put
path. The media drops to the surface below unless you remove each
sheet as it exits the printer.
18 Chapter 1 Getting to know the printer
EN
Page 21

Toner door
The toner door is located on the front of the printer. You must
open the toner door to access the toner cartridge, clear jams,
and clean the printer . To open the toner door, firmly grasp the left
and right sides and pull the toner door toward you.
Note
You will feel some resistance when opening the toner door. Opening
the toner door conveniently lifts the toner cartridge for easy removal.
EN
Identifying the printer’s components
19
Page 22

Choosing paper and other media
HP LaserJet printers produce excellent print quality documents.
You can print on a variety of media, such as paper (including up
to 100% recycled fiber content paper), envelopes, labels,
transparencies, and custom-sized media. The following are the
supported media sizes:
●
Minimum: 76 by 127 mm (3 by 5 in.)
●
Maximum: 216 by 356 mm (8.5 by 14 in.)
Properties such as weight, grain, and moisture content are
important factors that affect printer performance and quality. To
achieve the best possible print quality, only use high-quality
media designed for laser printers . See Printer media
specifications for detailed paper and media specifications.
Note Always test a sample of the media before you purchase large quantit ies.
Your media supplier should understand the requirements specified in
the Guidelines for Paper and Other Print Media (HP part number
5963-7863). See Printer media specifications for more information.
20 Chapter 1 Getting to know the printer
EN
Page 23

Loading media into the input trays
Main input tray
The main input tra y holds up to 2 50 pages of 20 lb paper or f e wer
pages of heavier media (25 mm or less stack). Load media with
the top forward and the side to be printed facing up. To prevent
jams and skewing, always adjust the side and rear media guides.
Priority input tray
The priority input tray holds up to 10 pages of 20 lb pa per or o ne
envelope , t ransparen cy, or card. Load media with the top f orw ard
and the side to be printed facing up. To prevent jams and
skewing, alw ays adjust the side media guides.
CAUTION
Note
If you try to print on media that is wrinkled, f olded, or damaged in any
way, a jam might occur. See Printer media specifications
information.
When you add ne w media, make su re that you rem ove all of the media
from the input tray and straighten the stack of new media. This helps
prevent multiple sheets of media from feeding through the printer at
one time, reducing media jams.
for more
Specific types of media
●
Transparencies and labels:
labels with the top forward and the side to be printed facing
up. See Printing transparencies and labels
information.
●
Envelopes:
forward and the side to be printed facing up. See Printing
envelopes for more information.
●
Letterhead or preprinted forms:
and the side to be printed facing up. See Printing letterhead
or preprinted forms for more information.
●
Cards and custom-sized media:
forward and the side to be printed facing up. See Printing
custom-sized media or cardstock for more information.
Load envelopes with the narrow, stamp side
Load transparencies and
for more
Load with the top forward
Load with the narrow side
EN
Loading media into the input trays
21
Page 24

Turning the power off
If the printer requires 110-127 volts of power, you must unplug
the printer to turn the power off. If the printer requires 220-240
volts, you can switch the printer off (the switch is located on the
left side of the power plug) or unplug it.
WARNING! T o ensure safety when working inside the printer for any reason, unplug
the printer.
Understanding voltage conversions
Because of the different specifications, Hewlett-Packard does not
offer a voltage conversion or support the voltage conversion of
the U.S. version of the HP LaserJet family of printers for foreign
use. If you plan on using the equipment outside of the United
States, Hewlett-Packard advises you to purchase the products in
the country/region where you will use them.
CAUTION Check your printer’s voltage requirement before you plug it in. Printers
that require 110-127 volts of power will not work with 220-240 voltage
outlets.
22 Chapter 1 Getting to know the printer
EN
Page 25

Accessing the printer properties (driver) and help
This section provides information on the following topics:
Printer properties (driver)
●
Printer online help
●
Printer properties (driver)
Printer properties control the printer. You can change the default
settings, such as media size and type, printing on both sides of
the paper (manual duple xing), p rinting multiple page s on a single
sheet of paper (N-up printing), resolution, and watermarks. You
can access the printer properties in the following ways:
Through the software application that you are using to print.
●
This only changes the settings for the current software
application.
Through the Windows® operating system. This changes the
●
default settings for all future print jobs.
Note
Because many software application s use a different method of
accessing the printer properties, the following section describes the
most common methods used in Windows 9x, 2000, Millennium, NT
4.0, and Mac OS.
Windows 9x, 2000, Millennium, and NT 4.0
●
Change the settings for the current softwa re application:
From within the software application, click
Properties
. (Although the steps can vary between software
File, Print
applications, this is the most common method.)
●
Change the default settings for all future prin t jobs:
in the Windows system tray,
Start
Settings
, and
Right-click the printer icon that yo u wa nt to change , and click
Properties
the
Document Defaults
. (Many of the f eature s in Windo ws NT are also in
menu.)
, and
Click
Printers
.
®
EN
Accessing the printer properties (driver) and help
23
Page 26

Software For Macintosh Computers
PostScript Printer Description Files (PPDs)
PPDs, in combination with the LaserWriter 8 driver, access the
printer features and allow the computer to communicate with the
printer. An installation program for the PPDs is provided on the
HP LaserJet 1200 Series CD.
Accessing the print driver
1 From the Apple menu, select the Chooser.
2 Click the LaserWriter icon.
3 Click the HP LaserJet 1200 Series icon.
4 Click Setup to make changes to the printer’s settings.
Note If you use the LaserWriter 8 print driver, you will lose scanner
capabilities.
HP LaserJet Utility
HP LaserJet Utility allows control over features that are not
available in the driver. The illustrated screens make selecting
printer features from the Macintosh computer easier than ever.
Use the HP LaserJet Utility to do the following:
● Name the printer, assign it to a zone on the network,
download files and fonts, and change most of the printer
settings. See the HP LaserJet Utility help.
● From the computer, lock out functions on the printer to
prevent unauthorized access.
24 Chapter 1 Getting to know the printer
EN
Page 27

Printer online help
Printer properties online help
The printer properties (driver) online help includes specific
information about the functions in the printer properties. This
online help guides you through the process of changing your
printer’s default settings.
To access the printer properties help system, open the printer
properties and click
Print●Copy●Scan Online help
The HP LaserJet 1220 online help includes information for all of
the printing, copying, and scanning software applications.
To access the HP LaserJet 1220 online help, use any of the
following methods:
Help
.
●
Program Group in Windows 9x and NT 4.0:
Programs, HP LaserJet 1220
, and
Help.
●
HP LaserJet Director:
Click the right mouse button on the
HP LaserJet Director toolbar then select
context menu.
●
LaserJet Document Manager:
Click
menu.
●
Mac OS:
Turn on Balloon help.
Click
Start
,
LaserJet 1220 Online
from the
Help
from the main
Help
EN
Accessing the printer properties (driver) and help
25
Page 28
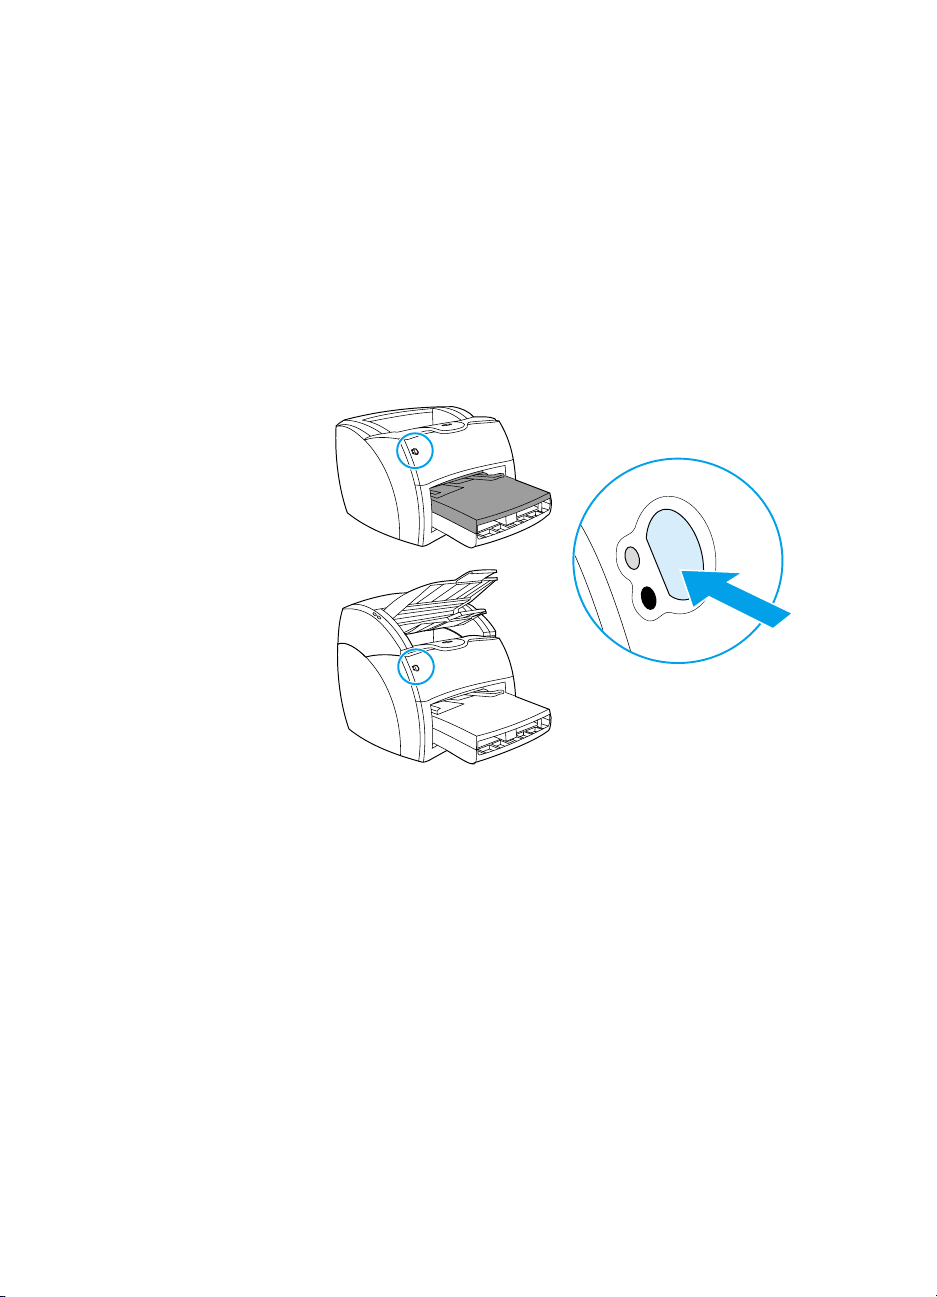
Printing a configuration page
Among other items, the configuration page provides all of the
printer configuration settings, verification that the scanner is
attached, a sample of the print quality, and information about the
printer’s page counts. You can also u se the conf igur ation page t o
verify that the printer is printing correctly.
To print a configuration page while the printer is in the Ready
state, press and release the Go button on the printer control
panel.
26 Chapter 1 Getting to know the printer
EN
Page 29

Getting to know the
Note
2
See the
copier/scanner for hardware and software installation instructions.
copier/scanner
This chapter provides information on the following topics:
Understanding the copier/scanner’s features and benefits
●
Identifying the copier/scanner’s components
●
Supported media sizes and types
●
Precautions for copying and scanning
●
Loading originals in the copier/scanner
●
Getting to know the software
●
Accessing the online help
●
HP LaserJet Getting Started Guide
that came with your
EN
27
Page 30

Understanding the copier/scanner’s features and benefits
Scan
You can use HP software to perf orm the following tasks,
increasing your efficiency:
● Easily attach documents to e-mail with one click
Edit text (Optical Character Recognition)
●
● Store and manage documents electronically with
HP LaserJet Document Manager
● Enhance scanned photos with HP LaserJet Photo Center
Copy
You can make Quick Copies when copying your most frequently
used type of original. You can use HP LaserJet Copy software to
customize and make multiple copies.
●
Simple and convenient (Quick Copy)
• Load the original and press a sing le button
●
Powerful copier software (Copy Plus)
• Make multiple copies
• Enable collation
• Reduce or enlarge
• Adjust the contrast
• Set the copy quality
• Make color copies by sending them to a color printer
28 Chapter 2 Getting to know the copier/scanner
EN
Page 31

Identifying the copier/scanner’s components
1
2
1. Media input tray guides
2. Copier/scanner door
3. Straight-through media path door
4. Door release button
5. Long media extensions
6. Output bin
7. Copier/scanner control panel
8. Media input tray
Note
See Removing the copier/scanner
the copier/scanner from the printer.
8
7
3
4
5
6
for more inf ormation about removing
EN
Identifying the copier/scanner’s components
29
Page 32

Copier/scanner control panel
The copier/scanner control panel is comprised of two buttons.
Copy
Scan
●
Copy: To perform Quick Copies, even if your computer is
powered off, press the Copy button.
●
Scan: To launch HP LaserJet Director, press the Scan
button. If HP LaserJet Director is configured correctly, you
can perform the following tasks:
• Scan to e-mail
• Store documents electronically
• Edit text (Optical Character Recognition)
• Make multiple and customized copies
Note To cancel a scan or copy job from the control panel, simultaneously
press both buttons.
30 Chapter 2 Getting to know the copier/scanner
EN
Page 33

Media input tray, guides, and output bin
The media input tray (1) is located on the front, top side of the
scanner. The media guides (2), which are located on the media
input tray, ensure that the media is correctly fed into the scanner
and prev ent ske wing (crook ed image). T he output bin (3) is belo w
the media input tray.
CAUTION
If the media is not loaded correctly, the media might jam and the original
that you are scanning or copying might be damaged. See Loading
originals in the copier/scanner for more information.
1 2 3
Copier/scanner door
The copier/scanner door is located on the top of the
copier/scanner. You must open the copier/scanner door to
remove jams or clean the copier/scanner. To release the latch
and open the door , pr ess the but ton located on th e right side, and
gently grasp the door and r otate it o pen. To close the door, rotate
the door until it clicks.
EN
Identifying the copier/scanner’s components
31
Page 34

Supported media sizes and types
The copier/scanner f or the HP LaserJet 1220 printer can handle
a broader range of media sizes and types than the printer itself
can. The following are the supported media sizes:
●
Minimum: 50.8 by 90 mm (2 by 3.5 in.)
●
Maximum: 216 by 762 mm (8.5 by 35 in.)
In addition, you can scan and copy many diff e rent types of media
that are typically not used for printing, such as newsprint,
photographs, business receipts, and business cards.
Note You must use a carrier sheet to feed small or delicate origin a ls, such
as newsprint, through the copier/scanner without causing a jam. To
make a carrier sheet, use a piece of paper and a transparency, tape
the leading edges together, and load your original between the sheets.
Note You must feed business cards and any media that is smaller tha n
76.2 by 127 mm (3 b y 5 in.) to the st raight-through output path. You can
also tape them to the leading edge of a carrier sheet and feed them to
the straight-through output bin.
See Precautions for copying and scanning
for more information.
32 Chapter 2 Getting to know the copier/scanner
EN
Page 35

Precautions for copying and scanning
You should not put anything in the copier/scanner that might jam
or damage the feed mechanism. To minimize the possibility of
jamming or damaging the f eed mechanism, observe the f ollo wing
precautions:
Remove self-stick notes.
●
Remove staples and paper clips.
●
Straighten any curls or wrinkles in the original that you are
●
scanning.
Feed irregularly sized originals one at a time.
●
Do not scan or copy an y original with glue , correction fl uid, or
●
wet ink on it.
Do not scan or copy gummed-backed paper, labels, or
●
originals.
Do no scan or copy originals that ha ve tears, perforations, o r
●
any defect that might cause a jam.
Do not scan originals that are larger or smaller than the
●
supported size. See Supported media sizes and types
more information.
for
Note
Note
Note
EN
You must use a carrier sheet to feed small or delicate origin a ls, such
as newsprint, through the copier/scanner without causing a jam. To
make a carrier sheet, use a piece of paper and a transparency, tape
the leading edges together, and load your original between the sheets.
You must feed business cards and any media that is smaller tha n
76.2 by 127 mm (3 b y 5 in.) to the st raight-through output path. You can
use a carrier sheet and feed them to the straight-through output bin.
T o obtain good results , it is important that you use the correct resolution
and color settings for your job. See Scanner resolution and color
for
more information.
Precautions for copying and scanning
33
Page 36

Loading originals in the copier/scanner
To load originals in the co pie r/ scann e r
1 Load the original with the side to be scanned f acing up . If y ou
are using the straight-through output path, load business
cards with the long side forw ard. See Precautions for copying
and scanning for more information.
2 Adjust the media guides.
3 Press the Scan button on the scanner or press the Copy
button for a Quick Copy.
Note When you add new o riginals, always remov e the originals from the input
tray and straighten the stack.
CAUTION Small originals will cause a jam if they are not loaded correctly.
Note If you are editing text (OCR), you must load the original with the text
positioned horizontally and upside down. See Editing scanned text
(Optical Character Recognition) for more information.
34 Chapter 2 Getting to know the copier/scanner
EN
Page 37

Getting to know the software
HP LaserJet Director (Windows 98, 2000, Millennium, NT 4.0, and Mac OS)
Note
HP LaserJet Director is not available under Windows 95.
HP LaserJet Director is a quick and con venient desktop tool
palette that you can use to facilitate many of your routine office
tasks, including the following:
Copying
●
Storing or managing scanned text and images
●
Scanning to e-mail
●
Editing scanned text (OCR)
●
Accessing HP LaserJet Director (Windows)
In the Windows system tray, click
1
Click
2
3
4
5
Programs
Click
HP LaserJet 1220 Series
Click
HP LaserJet Director
An HP icon appears in the Windows system tray. To display
HP LaserJet Director on your computer screen, click the
HP icon.
.
.
.
Start
.
Accessing HP LaserJet Director (Mac OS)
EN
From the desktop, double-click the
1
icon.
HP LaserJet Director
Getting to know the software
35
Page 38

To turn off the HP LaserJet Director
Use the following steps to close the HP LaserJet Director.
Windows
1 Open the HP LaserJet Director.
2 Click the right mouse button on the toolbar.
3 Select Exit from the context menu.
Note To restart the HP LaserJet Director af ter turning it off, click Start, point
to Programs, point to HP LaserJet 1220, and then click HP LaserJet
Director.
Mac OS
1 Open the HP LaserJet Director.
2 From the File menu, select Quit.
Note To restart the HP LaserJet Director after turning it off, double-click the
alias on the desktop.
HP LaserJet Document Manager (Windows 98, 2000, Millennium, NT 4.0, and Mac OS)
Note HP LaserJet Document Manager is not available under Windows 95.
HP LaserJet Document Manager (Windows) and HP WorkPlace
(Macintosh) is a full-f eatured desktop application f or t he scanning
and copying capabilities of the HP LaserJet 1220. From
HP LaserJet Document Manager, you can pe rform the following
tasks and more:
● Copy
● Scan images (or acquire an image from a TWAIN-compliant
device)
● Store and manage scanned images and all of y our
documents
● Send scanned images and documents to your fax (you must
install a fax software application on your computer)
36 Chapter 2 Getting to know the copier/scanner
EN
Page 39

Send scanned images to e-mail (you must install an e-mail
●
software application on your computer)
Use Optical Character Recognition (OCR) to send scanned
●
text to a word processing ap plication where you can edit it
Enhance the image
●
Add annotations
●
Note
You can print (electronically) to HP LaserJet Document Manager from
any software ap plication. You can use this f eature to access an y of the
functions within HP LaserJet Document Manager from the documents
that you create in your fav orite desktop pub lishing or wo rd processing
application, saving you the time it takes to first print and then scan a
hard copy version. The online help provides more information about
HP LaserJet Document Manager. See Accessing the online help.
Accessing HP LaserJet Document Manager
(Windows)
In the Windows system tray, click
1
Click
2
3
4
Programs
Click
HP LaserJet 1220 Series
Click
HP LaserJet Document Manager
.
.
Start
.
.
Accessing HP Workplace (Mac OS)
Display the desktop.
1
From the desktop, double-click the
2
HP Workplace
icon.
EN
Getting to know the software
37
Page 40

Quick Copy settings
You can use the Quick Copy feature to make consistent and
convenien t copies, even when your computer is turned off. Once
you have adjusted the settings to reflect the most common type
of original that you copy, you do not have to change the settings
again.
HP LaserJet Copier (Copy Plus)
You can use HP LaserJet Copier when you need full-featured
copying capabilities or when your original differs from your most
frequent copy job. You can also use Copy Plus when you w an t to
print color copies or print the copies on another printer. Consider
HP LaserJet Copier your personal copy machine.
See Using HP LaserJet Copier
using HP LaserJet Copier.
for instructions on accessing and
HP LaserJet Director Toolbox (Windows 9x, 2000, Millennium, and NT 4.0)
You can use HP LaserJet Director Toolbox to perfo rm the
following tasks:
● Access this user guide online
● Access the product tour
● Access online help
● Access HP’s Web site for support information
Accessing HP LaserJet Director Toolbox
1 From HP LaserJet Director, click Toolbox.
2 Click one of the links to access the appropriate help source.
38 Chapter 2 Getting to know the copier/scanner
EN
Page 41

HP LaserJet Device Configuration
Adjusting settings from the software is sometimes the easiest
method. To gain access to default settin gs, follow these steps:
Windows 9x, 2000, Millennium, and NT 4.0
CAUTION
Click
1
Click
2
Click
3
Click
4
Click
5
.
Start
Programs
HP LaserJet 1220 Series
Tools
HP LaserJet Device Configure
.
.
.
.
Mac OS
Double-click the
1
Click
2
3
When changing settings in a network environment, you are changing
settings for all users.
You can find out what product settings are currently selected by
printing a configuration page. See Printing a configuration page
For further instructions about adjusting product settings from the
software, see the software Help.
Tools
Click
Device Configuration
HP LaserJet Director
.
.
alias on the desktop.
.
EN
Getting to know the software
39
Page 42

HP LaserJet Photo Center (Windows 9x, 2000, Millennium, and NT 4.0)
HP LaserJet Photo Center is an easy-to-use program for editing
digital photographs. With HP LaserJet Photo Center, you can
perform the following tasks:
● Open existing photos
Create new files
●
● Scan images
● Adjust the size and layout of the images
Add text and simple shapes
●
● Correct the image’s color, brightness, and contrast
● Add filters and other special effects
Save and print images
●
Unlike complicated, full-featured photo editing software,
HP LaserJet Photo Center provides image-enhancing wizards
that you can use to easily change images.
Accessing HP LaserJet Photo Center
1 In the Windows system tray, click Start.
2 Click Programs.
3 Click HP LaserJet 1220 Series.
4 Click HP LaserJet Photo Center.
40 Chapter 2 Getting to know the copier/scanner
EN
Page 43

Accessing the online help
To access the HP LaserJet 1200/1220 online Help, use one of
the following methods.
Windows 9x, 2000, Millennium, and NT 4.0
In the Windows system tray, click
1
Click
2
3
4
Programs
Click
HP LaserJet 1220 Series
Click
HP LaserJet 1220 Online Help
.
Start
.
HP LaserJet Director
Click
1
2
Toolbox
Click
How to use your HP LaserJet Series Printer
.
HP LaserJet Document Manager
Click
1
Click
2
.
Help
Contents
.
Any HP LaserJet 1220 software
Click
1
Click
2
.
Help
Contents
.
.
.
.
EN
Accessing the online help
41
Page 44

42 Chapter 2 Getting to know the copier/scanner
EN
Page 45

Getting to know the
3
print server
This chapter provides information on the following topics:
Understanding the print server’s features and benefits
●
Using network protocols
●
Identifying the print server’s components
●
Installing the print server
●
Installing and configuring the network software
●
Using the embedded web server
●
Starting the embedded web server
●
Using HP Web JetAdmin
●
Additional configuration and management tools
●
Using BOOTP
●
Using DHCP
●
UNIX systems
●
Note
EN
See the
for installation instructions.
HP LaserJet Getting Started Guide
that came with your printer
43
Page 46

Understanding the print server’s features and benefits
If you purchased an HP JetDirect 175X with your
HP LaserJet 1200 printer , you can perform the following tasks:
● Enhance workgroup productivity by placing your printer at a
convenient location on the network while improving network
printer performance.
● Connect your printer directly to the network.
● Share scan and print functions with others on the network.
Note You can only attach one printer to the print server. Do not use a USB
hub to attach more than one printer.
Using network protocols
The HP JetDirect 175X supports the following protocols:
TCP/IP (Transmission Control Protocol/Internet Protocol)
●
● IPX/SPX (Internetwork Packet Exchange)
● AppleTalk
Note IPX/SPX is not supported on Novell networks. You must configure the
HP JetDirect print server f or a direct pee r-to-peer connection from the
computer to the device rather than through a Novell server. This is
sometimes called IPX direct mode.
If you are setting up client-server printing on a Mic ro so ft
Windows 95, 98, NT, or 2000 network, you can use the
installation software to configure your Windows 95, 98, NT,
or 2000 print server and then share the printer with client
computers.
If you are setting up peer-to-peer printing on a Microsoft
Windows 95, 98, NT, or 2000 network, you can use the
installation software to configure each client to print directly to
the printer.
44 Chapter 3 Getting to know the print server
EN
Page 47

Identifying the print server’s components
1
2
1. Test button
2. Network cable port
3. Power receptacle
4. USB port
5. Status indicator lights
3
5
4
Installing the print server
The HP JetDirect 175X has a single USB port and an RJ-45
network port (10Base-T or 100Base-T) for connecting to a
network. The following items are included with your HP JetDirect
175X:
EN
Power m odule
●
Clip (attached to server)
●
USB cable
●
Identifying the print server’s components
45
Page 48

To install the HP JetDirect 175X hardware
1 Use a network cable to connect the
1
2
5
3
175X to the network.
2 Use the USB cable to connect the
175X to your printer.
3 Attach the power module to the print
server.
4 Plug the module’s power cord into a
power receptacle.
5 The 10 and 100 LED should be
green, indicating that there is a
network connection. The
power/status LED should begin
blinking. Within 15 seconds the
power/status LED should be solid
green.
6 To print a configuration page and
verify the printer connection, press
the Test button.
6
7
46 Chapter 3 Getting to know the print server
7 Use the optional clip to physically
attach the print server to the back of
your printer or any convenient
location.
EN
Page 49

Installing and configuring the network software
The installation program on the printer CD-ROM provides the
easiest and fastest way to set up your print server, along with
your printer.
The CD-ROM contains software , documentation, an d registration
for your print server as well as your printer. Using this
information, you can perform the following tasks:
Quickly install the print server software
●
View documentation for your print server
●
Register your print server via the Internet
●
For additional option s, see the appropriate sections in this
chapter.
Install the software on a network
The installation program on th e CD-R OM gu ides y ou th rough th e
basic configuration of your print server, along with your printer.
Note
Note
If you purchased a print server separately, make sure that you install
the print server using the software found on the CD-ROM that came
with your printer. Do not use the HP JetDirect CD-ROM that came with
your print server. If you have already installed the printer using the
“Direct Connect” option, you m ust uninstall the printer software and run
the printer software again, using the “Connected to the network” option,
to ensure that all print, copy, and scan features function properly.
Install the printer and server
Quit all open applications.
1
Insert the CD-ROM into the CD-ROM drive. When the
2
welcome screen displays , f ollow the direct ions on the screen.
When asked how the printer will be connected, select
Connected to the network
If the welcome screen does not display, click
x:setup (where x is the letter of your CD-ROM drive), and click OK. If
it does not display in Macintosh, double-click the CD icon in the desktop,
then double-click
HP All-In-One Installer
, and click
Start
.
Next
.
, and
Run
. Type
EN
Installing and configuring the network software
47
Page 50

3 When the installation is nearly complete, a setup screen
appears that asks if you want to print a test page. Click Yes.
Note If you purchased a print server separately, make sure that you install
the print server software found on the CD-ROM that came with your
printer. Reinstall the printer software to ensure that all print, cop y, and
scan features function properly.
If your network uses the TCP/IP protocol, you can use additional
tools to customize the print server’s configuration for your
network environment.
Using the embedded web server
Each HP JetDirect 175X print server contains an embedded w eb
server that you can access thr ough a compatib le web browser o n
an intranet. The embedded web server provides access to
configuration and management pages f or t he print server and the
attached printer. The networking pages provide access to status
and configuration information on the HP JetDirect 175X print
server.
You can use the embedded web server to perform the following
tasks:
● Monitor the status of the printer and the print server
● Make optional configuration changes for t he print server to
customize it for your network
● Link to HP’s Web site
Scan images over the network without HP LaserJet 1220
●
software
Prerequisites
Computers with the TCP/IP protocol installed can use the
embedded web server to monitor and configure the printers
networked with an HP JetDirect print server. Use the installation
program on the printer CD-ROM to set this up.
Before you can use the embedded web server, you must
configure an IP address fo r the HP JetDirect print server. Use the
installation program on the printer CD-ROM to configure the IP
address.
48 Chapter 3 Getting to know the print server
EN
Page 51

Optionally, you can use BootP (Bootstrap Protocol) or DHCP
(Dynamic Host Configuration Protocol) to
the IP address over the network each time the print server is
turned on.
Compatible Web Browsers
If you use Windows 9x, 2000, Millennium, or NT 4.0, the
embedded web server works with the following browsers:
Netscape Navigator 4.6x, 4.7, 4.71, and 4.72
●
Internet Explorer 4.0, 4.01 with SP2, 5.0, and 5.01
●
(Millennium requires IE 5.0 or greater)
For the latest list of compatible web browsers, check HP’s
Customer Care online at http://www.hp.com/support/net_printing
Starting the embedded web server
After you estab lish an IP address on t he print server, perf orm the
following steps:
Run a suppor ted web browser.
1
automatically
configure
.
Enter the IP address of the print server as the URL. The print
2
server’s Home page displays.
Note
Click the
3
If you change the IP address and ot her par ameters , the co nnection to
the embedded web server closes . T o re-estab lish a connection, use the
new IP address as the URL. Also , some computer setups may no longer
work.
link on the web page for more information.
Help
Using HP Web JetAdmin
HP Web JetAdmin is a printer installation and management
application for intranets. You can obtain this software from HP
Customer Care Online at
http://www.hp.com/support/net_printing
Hewlett-Packard recommends that you use HP Web JetAdmin
version 6.0 or later f or operation with the print server’s embedded
web server.
.
EN
Starting the embedded web server
49
Page 52

Additional configuration and management tools
The rest of this chapter includes inf ormation about other netw ork
configurations that you ca n use to attach your HP LaserJet 1200
or 1220 series product to a network.
Using BOOTP
This section describes how to configure the print server using
Bootstrap Protocol (BOOTP) services on servers in some
operating systems. You use BOOTP to download network
configuration data from a server to the HP JetDirect print server
over the network.
Note On Windows NT and 2000 server systems, use the Microsoft DHCP
utilities to set up HP JetDirect configuration via BOOTP. See Using
DHCP for more information.
Benefits of using BOOTP
Using BOOTP to download configuration data provides the
following benefits:
● Enhanced configuration control of the HP JetDirect print
server. If you use other methods , such as the printer control
panel, the configuration is limited to select parameters.
● Ease of configuration management. You can have the
network configuration parameters for the entire network in
one location.
● Ease of HP JetDirect print server configuration. You can
automatically download complete network configuration
information each time you turn the pr in t se rver on.
The factory default for the HP JetDirect print server is to operate
through BOOTP.
50 Chapter 3 Getting to know the print server
EN
Page 53

Configuring the BOOTP server
Note
Note
Hewlett-Packard recommends that the BOOTP server be located on
the same subnet as the printers it serves. Routers cannot forward
BOOTP broadcast pack ets unle ss the routers are p roperly configured.
If the HP JetDirect print server does not receive its IP configuration
within two minutes, a default IP address is automatically assigned:
192.0.0.192. You are advised not to leave this address as it is, but to
change it to an address that f its into y our network addressing scheme .
You can, howe ver , use t his address to initially acce ss the print server,
and then change it to a more suitab le one. T o use the def ault IP address
temporarily, set up your computer with an IP address in the same
subnet, or establish an IP route to it.
For the HP JetDirect print server to obtain its configuration data
over the network, you must set up the BOOTP servers with the
appropriate configuration files. The print server uses BOOTP to
obtain entries in the
When you turn the HP JetDirect print server on, it broadcasts a
BOOTP request that contains its hardware address. A BOOTP
server daemon searches the
matching MAC address and, if successful, sends the
corresponding configuration data to the HP JetDirect print server
as a BOOTP reply. The configuration data in the
/etc/bootptab
file entries for a description of the entries.
/etc/bootptab
/etc/bootptab
file must be properly entered. See Bootptab
file on a BOOTP server.
file for a
CAUTION
EN
Community names (passwords) for your printer are not secure. If you
specify a community name for your printer, select a name that is
different from the passwords used for other systems on your network.
Using BOOTP
51
Page 54

Bootptab file entries
The following is an example of a /etc/bootptab file entry for
an HP JetDirect print server:
picasso:\
:hn:\
:ht=ether:\
:vm=rfc1048:\
:ha=0001E6123456:\
:ip=192.168.45.39:\
:sm=255.255.255.0:\
:gw=192.168.40.1:\
:lg=192.168.40.3:\
:T144=“hpnp/picasso.cfg”:
Note that the configuration data contains tags that identify the
various HP JetDirect paramete rs and their settings . The f ollo wing
table describes these tags.
Tag Description
nodename
hn
ht
vm
ha
The name of the peripheral. This is an entry point to a list of parameters for a
specific peripheral. This must be the first tag in an entry. (In the e xample, the
nodename
The host name tag. This tag does not take a value, but it causes the BOOTP
daemon to download the host name to the HP JetDirect print server. The
host name is printed on the HP JetDirect configuration page or a network
application returns the host name on an SNMP sysName request.
The hardware type tag. For the HP JetDirect print server, set this tag to
ether
tag.
ha
The BOOTP report format tag (required). Set this tag to
The hardware address tag. The hardware (MAC) address is the HP JetDirect
print server’s link-level or station address. You can find this address on the
HP JetDirect configuration page as the
HP JetDirect external print servers, this address is also printed on a label
attached to the print server.
is
picasso
(for Ethernet) or
.)
(for Token Ring). This tag must precede the
token
rfc1048
Hardware Address
.
. On
52 Chapter 3 Getting to know the print server
EN
Page 55

Tag Description
ip
gw
sm
lg
T144
T150
The IP address tag (required). This is the HP JetDirect prin t server’s IP
address.
The gateway IP address tag. This is the IP address of the default gateway
(router) that the HP JetDirect print server uses to communicate with other
subnets.
The subnet mask tag. The HP JetDirect print server uses the subnet mask to
identify the portions of an IP address that specify the network and
subnetwork number and the host address.
The syslog server’s IP address tag. This is the address of the server where
the HP JetDirect print server sends syslog messages.
A vendor-specific tag that specifies the relative path name of the TFTP
configuration file. You can truncate long path names. The path name must be
enclosed with quotes (for example, “pathname”). See Using DHCP
information about file formats.
Note
Standard BOOTP option 18 (extensions file path) also allows a standard tag
(ef) to specify the relative path name of the TFTP configuration file.
The TFTP server’s IP address tag.
for more
T151
EN
A BOOTP-only tag. You must specify
dynamic configuration methods, such as DHCP, are not used.
BOOTP-ONLY
to ensure that other
Use the following conventions for the bootptab file entries:
A colon (:) indicates the end of a field.
●
A backslash (\) indicates that the entry is continued on the
●
next line.
Spaces are not allowed between the characters on a line.
●
Names, such as host names, must begin with a letter and
●
can contain only letters, numbers, periods (for domain
names only), or hyphens.
The underscore character (_) is not allowed.
●
See your system documentation or online help for more
information.
Using BOOTP
53
Page 56

Using DHCP
Dynamic Host Configuration Protocol (DHCP), which is defined
by Request for Comments (RFC) 2131 and 2132, is one of
several auto configuration mechanisms that the HP JetDirect
print server uses. If you have a DHCP server on your network,
the HP JetDirect print server auto matically obtains its I P address
from that server and registers its name with any RFC 1001 and
1002-compliant dynamic name services as long as you have
specified a Windows Internet Naming Service (WINS) server IP
address.
Note If the HP JetDirect print server does not receive its IP configuration
within two minutes, a default IP address is automatically assigned:
192.0.0.192. You are advised not to leave this address as it is, but to
change it to an address that f its into y our network addressing scheme .
You can, howe ver , use t his address to initially acce ss the print server,
and then change it to a more suitab le one. T o use the def ault IP address
temporarily, set up your computer with an IP address in the same
subnet, or establish an IP route to it.DHCP services must be av ailab le
on the server . See y our system documen tation or online help to install
or enable DHCP services.
Note If the HP JetDirect print server and BOOTP/DHCP server are located
on different subnets, the IP configuration might fail unless the routing
device supports BOOTP Relay, which allows the transfer of BOOTP
requests between subnets.
UNIX systems
See the bootpd man page for more information about setting up
DHCP on UNIX systems.
On HP-UX systems, you might find a sample DHCP configuration
file (dhcptab) in the /etc directory.
Since HP-UX presently does not provide Dynamic Domain Name
Services (DDNS) for its DHCP implementations, He wlett-P ackard
recommends that you set all print server lease durations to
infinite. This ensures that print server IP addresses remain static
until dynamic name services are provided.
54 Chapter 3 Getting to know the print server
EN
Page 57

Windows systems
HP JetDirect print servers support IP configuration from a
Windows NT or 2000 DHCP server. This section describes how
to set up a pool, or “scope,” of IP addresses that the Windows
server can assign or lease to any requester. When configured f or
BOOTP/DHCP operation (factory default), the HP JetDirect print
server makes a request to the DHCP server for its IP
configuration when you turn the print server on.
Note
Note
This information is provided as an overview. See the information
supplied with your DHCP software for specific information or for
additional support.
To avoid problems resulting from IP addresses that change,
Hewlett-Packard recommends that you assign IP addresses with
infinite leases or reserved IP addresses to all of you printers.
Windows NT 4.0 server
To set up a DHCP scope on a Windows NT 4.0 server, perform
the following steps:
At the Windows NT server , open the
1
window, and double-click the
Double-click the
2
Select
3
Type the server IP address, and click OK to return to the
4
DHCP Manager
In the list of DHCP servers, select the server that you just
5
added, select
Select
6
section, set up the IP address range by typin g the beginning
IP address in the
address in the
for the subnet to which the IP address pool applies. The
starting and ending IP addresses define the end points of the
address pool assigned to this scope.
Server
Set up the IP Address Pool
DHCP Manager
, and select
window.
Scope
, and select
Start Address
End Address
Network Administrator
Server Add.
box. Also type the subnet mask
Program Manager
icon.
icon.
Create
box and the ending IP
.
. In the
IP Address Pool
Note
EN
You can also exclude ranges of IP addresses within a scope.
UNIX systems
55
Page 58

7 In the Lease Duration section, select Unlimited, and select
OK. To avoid the problems that result when IP addresses
change, Hewlett-Packard recommends that you assign
infinite leases to all of your printers. Be aware, however, that
selecting an unlimited lease duration for the scope causes all
of the clients in that scope to have infinite leases.
Note
If you want clients on your network to have finite leases, you
can set the duration to a f init e time, but y ou sh ould config ure
all of your printers as reserved clients for the scope.
8 If you have assigned unlimited leases, skip to step 9.
Otherwise, select Scope, and select Add Reservations to
set up your printers as reserved clients. For each printer,
perform the following steps in the Add Reserved Clients
window:
a Type the selected IP address.
b Obtain the hardware (MAC) address from the
configuration page, and typ e t h e add r e s s in the Unique
Identifier bo x.
c Type the client name (any name is acceptable).
d To add the reserved client, select Add. To delete a
reservation, in the DHCP Manager window, select
Scope, and select Active Leases . In the Act ive Leases
window, select the reservation that you want to delete,
and select Delete.
9 To return to the DHCP Manager window, select Close.
10 If you are not planning to use Windows Internet Naming
Service (WINS), skip to step 11 . Ot he rw ise pe rfor m the
following steps to configuring your DHCP server:
a From the DHCP Manager window, select DHCP
Options, and select one of the following:
Scope — If you only want Name Services for the
selected scope.
Global — If you want Name Services for all scopes.
b Add the server to the Active Options list. From the
DHCP Options window, select WINS/NBNS Servers
(044) from the Unused Options list. Select Add, and
select OK.
c A warning might appear requesting that y ou set the node
type. You do this in step 10d.
56 Chapter 3 Getting to know the print server
EN
Page 59

To provide the WINS server’s IP address, perform the
d
following steps:
e
f
g
h
To return to
11
Select
From the
delete any undesired addresses previously set. Type the
WINS server’s IP address, and select
Once the address appears in the list of IP addresses,
select OK. This returns you to the
window . If th e address that y ou just added appear s in the
list of IP addresses (near the bottom of the window)
return to step 10d. Otherwise, repeat step 10c.
In the
Type (046)
add the node type to the
box, type 0x4 to indicate a mi xed node, and select OK.
, and
Value
IP Address Array Editor
DHCP Options
from the
Program Manager
Edit Array
window, select
Unused Options
Active Options
.
, click
, select
DHCP Options
Close
Remove
.
Add
WINS/NBT Node
list. Select
list. In the
.
to
Add
Byte
to
Windows 2000 server
To set up a DHCP scope on a Windows 2000 server, perform the
following steps:
To run the Windows 2000 DHCP manager utility, click
1
Settings
Tools
, and
folder, and run the
Control Panel
DHCP
. Open the
utility.
Administrative
Start
,
Note
EN
In the DHCP window, find and select your Windows 2000
2
server in the DHCP tree. If your server is not listed in the
tree, select
server.
After selecting your server in the DHCP tree, click the
3
menu, and select
Wizard.
Scope
In the
4
5
6
If you are using subnetting, the sub net ma sk defin es which po rtion of
an IP address specifies the subnet and which portion specifies the
client device.
Add New Scope
Enter a name and description for this scope, and click
Type the range of IP addresses for this scope (begin ning IP
address and ending IP address). Also , type the subnet mask,
and click
Next
, and click the
DHCP
New Scope
.
Action
. This runs the
Wizard, click
menu to add the
Add New
.
Next
UNIX systems
Action
Next
57
.
Page 60

7 If applicable, type the range of IP addresses within the scope
that you want the server to exclude, and click Next.
8 Type the IP address lease duration for your DHCP clients,
and click Next. Hewlett-Packard recommends that you
assign reserved IP addresses to all of your printers. You can
do this after you set up the scope.
9 To configure the DHCP options for this scope later, select No,
and click Next. To configure the DHCP options now, select
Yes, and click Next.
a If desired, type the IP address of the router (or default
gateway) that the clients will use, and click Next.
b If desired, type the domain name and Domain Name
System (DNS) servers for the clients, and click Next.
c If desired, specify the WINS server names and IP
addresses, and click Next.
d To activate the DHCP options now, select Yes, and click
Next.
10 You have successfully set up the DHCP scope on this server .
To close the wizard, click Finish.
11 To configure your printer with a reserved IP address within
the DHCP scope, perform the following steps:
a In the DHCP tree, open the folder for your scope, and
select Reservations.
b Click the Action menu, and select New Reservation.
c Type the appropriate information in each field, including
the reserved IP address for your printer.
Note
The MAC address for your HP JetDirect-connected
printer is available on the HP JetDirect configuration
page.
d Under Supported types, select DHCP only, and click
Add.
Note
Selecting Both or BOOTP only results in a BOOTP
configuration because of the sequence in which
HP JetDirect print servers initiate the configuration
protocol requests.
58 Chapter 3 Getting to know the print server
EN
Page 61

Specify another reserved client, or click
e
Close
. The
reserved clients added are display ed in the Reservations
folder for this scope.
Close the DHCP manager utility.
12
Enabling or disabling DHCP
If you do not want your HP JetDirect print server configured via
DHCP, you must disable DHCP configurat ion. You can use one of
the following methods to enable or disable DHCP:
If you use the printer control panel to disable BOOTP on the
●
HP JetDirect print server, DHCP is disabled.
You can use Telnet to enable or disable DHCP operation on
●
the HP JetDirect print server. Wh en y ou use Telnet to disable
a DHCP configuration Telnet, the print server automatically
releases any names and IP addresses associated with the
DHCP server and reinitializes the TCP/IP protocol for the
print server. At this po int, the print server is unconfigured and
begins to send BOOTP and RARP requests to acquire new
(non-DHCP) configuration information.
You can use HP Web JetAdmin to modify the TCP/IP
●
parameters.
Note
EN
If you manually provide an IP address when you use Telnet to
disable DHCP, the print server still releases its DHCP-provided IP
address but the print server does not send BOOTP and RARP
configuration requests. Instead, the print server uses the
configuration information that you provided. Therefore, if you
provide the IP address, you should also manually set all of the
configuration parameters , such as subnet mask, default gatew a y,
and idle timeout.
If you change the DHCP configur ation state from disab led to enab led,
the print server assumes that it should acquire its configuration
information from a DHCP server. This means that when the Telnet
session is completed, the TCP/IP protocol for the print server is
reinitialized and all of the current configuration information is deleted.
The print server then tries to acquire new co nfiguratio n inf ormation by
sending DHCP requests on the network to a DHCP server.
UNIX systems
59
Page 62

Moving to another network
When you move an HP JetDirect print server that is configured
with an IP address to a new network, make sure that the IP
address does not conflict with the IP addresses on the new
network. You can change the print server’s IP address to one that
can be used on the new net work, or you can erase the curren t IP
address and configure another IP address after you install the
print server on the new network. Cold reset the print server (see
Troubleshooting the print server
If the current BOOTP server cannot be reached, you might need
to find a different BOOTP server and configure the printer to that
server.
If you used BOOTP or DHCP to configure the print server, edit
the appropriate system files with updated settings. If you
manually set the IP address, reconfigu re the IP parameters as
described in this chapter.
Follow the instructions on the appropriate Home page to
configure or modify your printer. These instructions show you
how to configure y our printer and set up the printer for printing.
Note You can substitute the server.domain with the TCP/IP address.
for instructions).
60 Chapter 3 Getting to know the print server
EN
Page 63

4
Media
This chapter provides information on the following topics:
Optimizing print quality for media types
●
Printing transparencies and labels
●
Printing envelopes
●
Printing letterhead or preprinted forms
●
Printing custom-sized media or cardstock
●
EN
61
Page 64

Optimizing print quality for media types
Media type settings control the temperature of your printer’s
fuser. You can change the settings for the media that you are
using to optimize the print quality. The following are the media
types that you can optimize:
● Plain paper
● Bond paper
● Cardstock
Envelope
●
● Heavy paper
● Labels
Rough paper
●
● Thin paper
● Transparency
You can access the optimizing f eature f rom the Paper tab in your
printer driver or from HP LaserJet Device Configuration.
Printing speeds are automatically reduced when printing
special-sized media.
62 Chapter 4 Media
EN
Page 65

Printing transparencies and labels
Only use transparencies and labels that are recommended for
use in laser printers, such as HP transparency film and
HP LaserJet labels. See Printer media specifications
information.
for more
CAUTION
Inspect the media to make sure that it is not wrinkled or curled and that
it does not have any torn edges or missing labels.
To print transparencies or labels
Open the straight-through output door.
1
Load a single page in the priority input tray or load multiple
2
pages in the main input tray. Make sure that the top of the
media is forward and the side to be printed (rough side) is
facing up.
Adjust the media guides.
3
Access the optimizing feature from the
4
printer driver or from HP LasetJet Device Configuration.
Then select
labels in the drop-down box.
Print the document. Remove the media from the back of the
5
printer as it prints to prevent it from sticking together and
place the printed pages on a flat surface.
Optimize for:
and choose transparency or
Paper
tab in your
EN
Printing transparencies and labels
63
Page 66

Printing envelopes
1
2
3
Printing one envelope
Only use envelopes that are
recommended for lase r printers. See
Printer media specifications
information.
Note
Use the priority input tray f or printing one
envelope. Use the main input tray for
printing multiple envelopes.
1 To prevent the envelopes from
curling as they print, open the
straight-through output door.
2 Before loading the envelopes, slide
the media guides outward to slightly
wider than the envelopes.
3 Place the envelope with the stamp
end forw ard and the side to be
printed facing up.
for more
4
64 Chapter 4 Media
Note
If the envelope has a flap on the short
edge, feed that edge into the printer first.
4 Adjust the media guides to the
length and width of the envelope.
Set Optimize for: to Envelope, and
print the envelope.
EN
Page 67

Printing multiple
envelopes
1
2
3
Only use envelopes that are
recommended for lase r printers. See
Printer media specifications
information.
Note
Use the priority input tray f or printing one
envelope. Use the main input tray for
printing multiple envelopes.
To prevent the envelopes from
1
curling as they print, open the
straight-through output door.
Before loading the envelopes, slide
2
the media guides outward to slightly
wider than the envelopes.
Place the envelopes with the stamp
3
end forw ard and the side to be
printed facing up.
for more
EN
Note
If the envelopes have a flap on the short
edge, feed that edge into the printer first.
Adjust the media guides to the
4
5
4
length and width of the envelopes.
Set
Optimize for:
print the envelope.
Replace the priority input tray.
5
to Envelope, and
Printing envelopes
65
Page 68

Printing letterhead or preprinted forms
To print letterhead or preprinted forms
1 Load the paper with the top forward and the side to be
printed facing up. Adjust the media guides to fit the width of
the paper.
2 Print the document.
Note To print a single-page cover letter on letterhead, followed by a
multiple-page document, load the letterhead in the priority input tray
and load the standard paper in the main input tray. The printer
automatically prints from the priority input tray first.
66 Chapter 4 Media
Cover letter f ollowed b y document.
Use both input trays.
EN
Page 69

Printing custom-sized media or cardstock
The HP LaserJet 1200 Series can print on custom-sized media
or cardstock between 76 by 127 mm (3 by 5 in.) and 216 by
356 mm (8.5 by 14 in.). Depending on the media, you can print
up to 10 sheets from the priority input tray. Use the main input
tray for multiple sheets.
CAUTION
Make sure that the sheet s are not stuck t ogether bef ore you load th em.
To print on custom-sized media or cardstock
Open the straight-through output door.
1
Load the media with the narrow side forward and the
2
side to be printed facing up. Adjust the side and rear
media guides to fit the media.
Select the correct size in the printer settings. (Software
3
settings can override printer properties.)
Access the optimizing feature from the
4
printer driver or from HP LasetJet Device Configuration.
Then select
drop-down box.
Print the document.
5
Optimize for:
and choose cardstock in the
Paper
tab in your
EN
Printing custom-sized media or cardstock
67
Page 70

68 Chapter 4 Media
EN
Page 71

5
Printing tasks
This chapter provides information on the following topics:
Printing with manual feed
●
Printing on both sides of the paper (manual duplexing)
●
Printing watermarks
●
Printing multiple pages on a single sheet of paper
●
(N-up printing)
Printing booklets
●
Canceling a print job
●
Understanding print quality settings
●
Using EconoMode (Save Toner)
●
EN
69
Page 72

Printing with manual feed
You can use manual feed when printing mixed media, for
example, a n env elope , then a le tter , t hen an en ve lope, and so o n.
Load an envelope in the priority input tray and load letterhead in
the main input tray. You can also use manual feed to prot ect your
privacy when printing to a network printer.
To print using manual feed, access the printer properties or
printer setup in your software application, and select Manual
Feed from the Source Tray drop-down list. See Printer
properties (driver) for instructions. After you have enabled the
setting, press the Go button (blinking) each time to print.
70 Chapter 5 Printing tasks
EN
Page 73

Printing on both sides of the paper (manual duplexing)
To print on both sides of the paper (manual duplexing), you m ust
run the paper through the printer twice. You can print using the
media output bin or the straight-through output path.
Hewlett-Packard recommends that you use the media output bin
for lightweigh t pape r an d use the str a ight - thro ugh outpu t p ath for
any heavy media or media that curls when printed.
See the following topics for more information:
Manual duplex using the output bin
●
Manual duplex on heavy media or card stock
●
Note
Note
Manual duplexing is only supported in Windows.
Manual duple xing can cause the printer to become dirty , reducing print
quality. See Cleaning the printer
dirty.
for instructions if the printer becomes
EN
Printing on both sides of the paper (manual duplexing)
71
Page 74

Manual duplex using the
output bin
1
1 Make sure that the straight-through
output door is closed.
2 Access the printer properties. See
Printer properties (driver)
instructions. On the Finishing tab,
click Print on Both Sides, select the
Flip Pages Up check box, and click
OK. Print the document.
for
2
3
4
3 After side one has printed, remove
the remaining paper from the input
tray, and set it aside until after you
finish your manual duplexing job.
4 Gather the printed pages, turn the
printed side down, and straighten
the stack.
5 Place the stack back in the input tr ay.
Side one should be f acing down with
the top edge toward the printer.
Replace the priority input tray.
Click OK (on screen), and wait for
side two to print.
72 Chapter 5 Printing tasks
EN
Page 75

Manual duplex on heavy
media or card stock
1
2
3
For heavy media, such as card stock,
use the straight-through output path.
Load the media, and open the
1
straight-through output door.
Access the printer properties. See
2
Printer properties (driver)
instructions. On the
click
Print on Both Sides
Straight Paper Path
click OK. Print the document.
After side one has printed, remove
3
the remaining paper from the input
tray and set it aside until after you
finish your manual duplexing job.
Gather the printed pages, turn the
4
printed side down, and straighten
the stack before placing it back in the
input tray. Side one should be facing
down with the top edge toward the
printer.
for
Finishing
check box, an d
tab,
, select the
EN
Click
side two to print.
4
Printing on both sides of the paper (manual duplexing)
(on screen), and wait for
OK
73
Page 76

Printing watermarks
You can use the watermark option to print text “underneath” (in
the background) of an existing document. For example, you
might want to have large gra y letters reading Draft or Confidential
printed diagonally across the first page or all of the pages of a
document.
Accessing the watermark feature
1 From your software application, access the printer
properties. See Printer properties (driver)
for instructions.
2 On the Effects tab (Windows) or the Watermark/Overlay
screen (Macintosh), specify the type of watermark that you
want to print on your document.
74 Chapter 5 Printing tasks
EN
Page 77

Printing multiple pages on a single sheet of paper
(N-up printing)
You can select the number of pages that you want to print on a
single sheet of paper. If you choose to print more than one page
per sheet, the pages appear smaller and are arranged on the
sheet in the order that they would otherwise be printed. You can
specify up to 9 pages per sheet of paper.
Accessing the multiple pages per sheet feature (Windows)
From your software application, access the printer
1
properties. See Printer properties (driver)
for instructions.
EN
On the
2
number of pages per sheet that you want to print.
There is also a check box for page borders and a pull-down
3
menu to specify the order of pages printed on the sheet.
Finishing
tab under
Pages Per Sheet,
specify the
Accessing the multiple pages per sheet feature (Mac OS)
From the desktop, select the
1
From the
2
In the
3
pages per sheet to print.
Click
4
Printing multiple pages on a single sheet of paper (N-up printing)
General
Pages Per Sheet
.
Save
dropdown list, select
dropdown list, select the number of
File
then
Print Desktop
Layout
.
.
75
Page 78

Printing booklets
You can print booklets on letter, legal,
executive, or A4 paper.
1
2
3
1 Load the paper, and make sure that
the straight-through output door is
closed.
2 Access the printer properties. See
Printer properties (driver)
instructions. On the Finishing tab
(Windows) or the Layout screen
(Macintosh), select Print on Both
Sides, and select Letter (Left
Binding) or Letter (Right Binding)
in the Booklet pull-down menu. Print
the booklet.
3 After side one has been printed,
remove the remaining paper from
the input tray, and set it aside until
your booklet job is complete.
4 Gather the printed pages, turn the
printed side down, and straighten
the stack of paper.
Continued on next page.
for
4
76 Chapter 5 Printing tasks
EN
Page 79

Place the pages from side one back
5
5
in the input tray. Side one should be
facing down with the top edge
toward the printer.
Click
(on screen), and wait for
OK
side two to print.
Fold and staple the pages.
6
6
EN
Printing booklets
77
Page 80

Canceling a print job
You can cancel a print job from a software application or a print
queue.
To stop the printer immediately, remove the remaining paper from
the printer. After the printer stops, use one of the following
options.
●
Printer control panel: To cancel the print job, press and
release the Go button on the printer control panel.
●
Software application: Typically, a dia log bo x appears briefly
on your screen, allowing you to cancel the print job.
●
Windows print queue: If a print job is waiting in a print
queue (computer memory) or print spooler, delete the job
there. Go to the Printer screen in Windows 9x, 2000,
Millennium, and NT 4.0, click Start, Settings, and Printers.
Double-click the HP LaserJet 1200 icon to open the window ,
select your print job, and click Delete.
●
Desktop print queue (Mac OS): Open the printer queue by
double-clicking on the printer’s icon in the Finder. Then
highlight the print job and click Trash.
If the status lights on the control panel continue to blink after you
cancel a print job, the computer is still sending the job to the
printer. Either de lete t he job fr om the p rint queue or wait until the
computer finishes sending data. The printer will return to the
Ready state.
78 Chapter 5 Printing tasks
EN
Page 81

Understanding print quality settings
Print quality settings affect how light or dark the print is on the
page and the style that the g raphics are printed. You can also use
the print quality settings to optimize the print quality for a specific
media type. See Optimizing prin t quality for m edia types
information.
You can change the settings in the printer properties to
accommodate the types of jobs you are printin g . The following
are the settings:
for more
Note
●
Best Quality:
This prints at 1200 dpi and provides the best
print quality.
●
Faster Printing:
The resolution is reduced slightly so that
the job can print faster. This is the default setting.
●
Custom:
This prints the same as the Faster Printing setting,
but you can chang e the scale patterns.
●
EconoMode (Save Toner):
Text is printed using less toner.
This setting is useful when you are printing drafts.
You can access these settings on the
under
Print Quality
details of each setting, click
Imaging Options
settings in the printer properties. To view the
Details
. For Macintosh, select the
screen.
Finishing
tab (Windows)
To change the print quality settings for all future print jobs, access th e
properties through the
menu in the Windows system tray. To
Start
change the print quality settings only for the curr ent software
application’s use , access the properties through the
Print Setup
menu
in the application you are using to print. See Printer properties (d river)
for more information.
EN
Understanding print quality settings
79
Page 82

Using EconoMode (Save Toner)
An excellent way to extend the life of your toner cartridge is by
using EconoMode. EconoMode uses substantially less toner
than normal printing. The printed image is much lighter, but it is
adequate for printing drafts or proofs.
To enable EconoMode, access the printer properties. On the
Finishing tab (Windows) or the Imaging Options screen
(Macintosh) under Print Quality, select EconoMode.
Note See Pr inter properties (driver)
for all future jobs.
for instructions on enabling EconoMode
80 Chapter 5 Printing tasks
EN
Page 83

6
Scanning tasks
This chapter provides information on the following topics:
Starting a scan
●
Scanning to e-mail
●
Editing scanned text (Optical Character Recognition)
●
Storing scanned text or images
●
Acquiring an image
●
Adjusting the contrast
●
Enhancing the scanned image in HP Document Manager
●
Adding annotations to scanned images
●
Canceling scan jobs
●
Note
EN
T o obtain good results , it is important that you use the correct resolution
and color settings to scan your jo b. See Scanner resolution and color
for more information.
81
Page 84

Starting a scan
You can start the scanning process from the HP LaserJet
Director.
Note The HP LaserJet Director is not supported for Microsoft Windows 95.
If you are using Windows 95, see Acquiring an image.
Windows
1 Place the item into the copier/scanner media input tray.
2 Press the Scan button on the copier/sca nner, or open the
HP LaserJet Director by clicking the HP LaserJet Director
icon located on the taskbar and clicking Scan.
3 Select a scan destination.
4 Choose to scan in color by selecting the Scan in color check
box. The product automatically scans in black and white if
you do not select this check box.
5 Select whether you want to scan all pages at once or scan
page-by-page.
If you choose to scan all pages at once, click Scan. T he edits
are saved and the rest of the pages are scanned
automatically. The entire document is sent to the destination.
If you send a scanned document to a file, a printer, or an
e-mail application, a secondary dialog box appears and
prompts you for additional information.
-OrIf you choose to scan page-by-page, see Working with
scanned items.
Mac OS
1 Place the item into the copier/scanner media input tray.
2 Press the Scan button on the copier/scanner, or double-click
the alias for the HP LaserJet Director that appears on the
desktop and clicking Scan on the HP LaserJet Director. The
HP LaserJet Scan Control Viewer dialog box appears.
3 Select a scan destination.
4 To select the color scanning option, click Scan in color . (The
product automatically scans the selection in black and white
if this option is not selected.)
82 Chapter 6 Scanning tasks
EN
Page 85

Select whether you want to scan all pages at once or scan
5
page-by-page.
If you choose to scan all pages at once, click
are saved and the rest of the pages are scanned
automatically. The entire document is sent to the destination.
If you send a scanned document to a file, a printer, or an
e-mail application, a secondary dialog box appears and
prompts you for additional information.
-OrIf you choose to scan page-by-page, see Working with
scanned items.
Scan
. The edits
Working with scanned items
If you choose to scan page-by-page, you can pe rfo r m editin g
functions on each page. Editing functions include lightening and
darkening photo regions, adding or rem o vin g re gio n s fro m th e
page, changing region types, and cropping sections.
Click
1
2
3
4
Scan First Page
appears in the Preview window.
Choose a Viewer mode by clicking its corresponding button
on the toolbar located in the upp er right corner of the Previe w
window.
Click
Scan Next Page
previous page and scan the next page in the document
feeder tr ay. Repeat steps 2 and 3 for the remaining pages in
the document feeder tray.
-OrClick
are scanned automatically. The entire document is sent to
the destination.
If you send a scanned document to a file, a printer, or an
e-mail application, a secondary dialog box appears and
prompts you for additional information.
. The edits are saved and the rest of the pages
Send
. The first page is scanned and
to save any edits performed on the
Scanning to e-mail
You can use HP LaserJet Director or HP LaserJet Document
Manager to scan to e-mail.
Note
EN
The e-mail feature is not available in Windows 95.
Scanning to e-mail
83
Page 86

Using the e-mail feature (Windows 98, 2000, Millennium, NT 4.0)
1 Load the original with the narrow side forward and t he side to
be scanned facing up.
2 Adjust the media guides.
3 Press the Scan button on the scanner. HP LaserJet Director
launches automatically unless you change the default
settings or are networked.
1 2 3
4 In HP LaserJet Director, click E-Mail.
5 The original is scanned, and your computer e-mail software
application launches and automatically attaches the scanned
image as a file.
Using the e-mail feature (Mac OS)
1 Open the HP LaserJet Director by double-clicking the alias
for the HP LaserJet Director that appears on the desktop.
2 Click the Email button on the HP LaserJet Director.
3 Choose e-mail as the destination.
4 If an e-mail appears with the scanned item attached, click
Send.
-OrFollow the instructions on the wizard.
84 Chapter 6 Scanning tasks
EN
Page 87

Editing scanned text (Optical Character Recognition)
You can use the Edit feature to edit faxes, letters, newspaper
clippings, and many other documents. When you edit scanned
text, an Optical Character Recognition (OCR) application reads
the text, and you can import the text into a word processing
program for editing. To change the link for your word processing
program, use HP LaserJet Director.
Note
The e-mail feature is not available in Windows 95.
Using the OCR feature (Windows 98, 2000, Millennium, NT 4.0, and Mac OS)
Load the original with the narrow side forward and t he side to
1
be scanned facing up.
Adjust the media guides.
2
Press the
3
launches unless you change the default settings or are
networked.
1 2 3
button on the scanner. HP LaserJet Director
Scan
EN
In HP LaserJet Director, click
4
Editing scanned text (Optical Character Recognition)
OCR
.
85
Page 88

5 The original is scanned, and your word processing software
application launches automatically. The scanned image has
been optically read and is now ready to edit.
6 Edit your document.
Note If the word processing icon is not present or active, either you do not
have a w ord processing software application installed on your comp uter
or the scanner software did not recognize the application during the
installation. The online help provides instru ctio n s on how to create a
link to your word processing software application. See Accessing the
online help.
86 Chapter 6 Scanning tasks
EN
Page 89

Storing scanned text or images
HP software provides direct access to your file management
system, which means that you can qu ic kly store scanned imag es
in any directory you choose. You can use HP LaserJet Director or
HP LaserJet Document Manager to store scanned images. See
HP LaserJet Director (Windows 98, 2000, Millennium, NT 4.0,
and Mac OS) or HP LaserJet Document Manager (Windows 98,
2000, Millennium, NT 4.0, and Mac OS) for more information.
Note
The e-mail feature is not available in Windows 95.
Using the Store feature (Windows 98, 2000, Millennium, NT 4.0, and Mac OS)
Load the original with the narrow side forward and t he side to
1
be scanned facing up.
Adjust the media guides.
2
Press the
3
launches automatically unless you change the default
settings or are networked.
1 2 3
button on the scanner. HP LaserJet Director
Scan
EN
In HP LaserJet Director, click
4
The document is scanned, and the scanned image is stored
5
on the desktop.
If necessary, you can crop or scale the image or add
6
annotations.
Select the
7
your choice listed on the left side of HP LaserJe t Document
Manager.
Folders
tab and drag the image to the directory of
Archive
Storing scanned text or images
.
87
Page 90

Acquiring an image
Note If you are using Windows 95 and want to scan documents, y ou will have
to use TWAIN-compliant software. For all other operating systems,
using TWAIN-compliant software is optional.
The product is TWAIN-compliant and works with Windows- and
Macintosh-based programs that support TWAIN-compliant
scanning devices. While in a TWAIN-enabled program, you can
access the scanning feature and scan an image directly into the
open application. To do so, follow the program’s instructions for
acquiring an image using TWAIN. For more specific information,
see Accessing the online help
.
Adjusting the contrast
When you scan originals that ha v e a colored
background an d text that does not stan d out
well (contrast-sensitive originals), you might
need to adjust the contrast. For exam ple, if
you scan a yellow receipt with light gray
print, the text might not be legible. To make
the text more legible, increase the contrast
(darken the text).
Accessing the contrast feature
●
Using the HP LaserJet TWAIN driver: To adjust the
contrast, move the slider left (less contrast) or right (more
contrast).
●
Using HP LaserJet Document Manager: Select the Tools
menu, select Image Enhancement, and select Contrast.
●
Using the Scan Control Viewer (Windows only): Scan the
document in page-by-page mode, select photo regions you
want to adjust, click the right-mouse button, and adjust the
contrast by selecting Lighten or Darken from the context
menu.
88 Chapter 6 Scanning tasks
EN
Page 91

Enhancing the scanned image in HP Document
Manager
You can use HP LaserJet Document Manager to make the
following enhancements to scanned images:
Adjust the contrast
●
Enhance
●
Annotate
●
Rotate and flip
●
Straighten
●
Invert
●
Sharpen
●
Clean
●
Convert to grayscale
●
Crop
●
Note
The online help provides instructions on how to use these featur es. See
Accessing the online help.
Accessing the image enhancement features
From HP LaserJet Document Manager, click
Image Enhancement
.
Tools
, and click
EN
Enhancing the scanned image in HP Document Manager
89
Page 92

Adding annotations to scanned images
You can use HP software to modify and annotate your scanned
images. You can perform any of the following tasks on your
scanned image:
● Add text
● Add electronic sticky notes
● Highlight text or g raphics
Rubber stamp the image (for example, Confidential)
●
● Draw lines and arrows
● Add hyperlinks
Note The online help provides instructions on how to use these featur es. See
Accessing the online help.
Accessing the annotation features
From HP Lase rJet Document Manager, select the Tools tab, and
click Annotations.
Note To change the annotations settings, click Tools, and clic k Annotation
Properties.
Canceling scan jobs
You can use the following methods to cancel a scan job:
● Simultaneously press both buttons on the copier/scanner
control panel.
● Click Cancel in the dialog box on the computer screen.
Note If you cancel a job during a scan, you will need to clear the original from
the copier/scanner media input tray.
90 Chapter 6 Scanning tasks
EN
Page 93

7
Copying tasks
This chapter provides information on the following topics:
Understanding copying features
●
Using the Quick Copy feature
●
Using HP LaserJet Copier
●
Adjusting the contrast
●
Canceling copy jobs
●
EN
91
Page 94

Understanding copying features
You can use the Quick Copy feature or HP LaserJet Copier to
make copies. You use each method for different purposes. See
the following sections for more information:
● Using the Quick Copy feature
● Using HP LaserJet Copier
Using the Quick Copy feature
You can use the Quick Copy feature to quickly make a single
copy of a document (up to 30 pages), even if your computer is
turned off. You can change the default Quick Copy settings, if
necessary, to provide the best looking copies for the type of
original that you copy the most. These settings are applied to
every Quick Copy job until you change them.
See Quick Copy settings
the default Quick Copy settings, or see Printer online help
1 Make sure that the printer is loaded with paper.
2 Load the original document (up to 30 pages) in the scanner
paper input tray with the narrow side forward and the
side to be copied facing up. Adjust the media guides to fit
the original. See Loading originals in the copier/scanner
more information.
3 Open or close the straight-through output door to
accommodate the copy job. If you are copying to
standard-weight media, use the output bin (door closed). If
you are copying to heavy media, use the straight-through
output path (door open).
4 Press the Copy button on the scanner.
for more information about changing
.
for
92 Chapter 7 Copying tasks
EN
Page 95

Quick Copy settings
You can change the default Quick Copy settings when your
computer is turned on. Quick Copy settings remain the same for
all future Quick Copy jobs, even when y our computer is turned
off, until you change the defaults again. Quick Copy settings
include the following defaults:
Number of copies = 1
●
Collation = On
●
Reduce or enlarge = Original (100%)
●
Copy quality = Text
●
Contrast = Middle Setting
●
Accessing the Quick Copy settings
●
WIndows 9x, 2000, Millennium, and NT 4.0:
HP LaserJet Director, click
Device Configuration.
Configuration
If HP LaserJet Director is not running:
●
•
Windows:
and
Tools, HP LaserJet Device Configuration
the
Copy
•
Mac OS:
Configuration
opens, click on the
Click
Start, Programs, HP LaserJet 1220
tab.
Double-click the
icon. Click the
Toolbox
After the
, and
HP LaserJet Device
Copy
HP LaserJet 1200 Device
Copy
tab.
In
HP LaserJet
tab.
,
. Click on
EN
Using the Quick Copy feature
93
Page 96

Using HP LaserJet Copier
You can use HP LaserJet Copier to perform any of the following
tasks when you copy your original:
● Print multiple copies of the same document (up to 30 pages)
● Enable or disable collation
● Reduce or enlarge the image
Adjust the contrast
●
● Specify the copy quality
● Make color copies by sending to a colo r printer
Note The online help provides instructions on how to use these featur es. See
Printer online help.
Accessing HP LaserJet Copier
Windows 9x, 2000, Millennium, NT 4.0, and
Mac OS
Access HP LaserJet Copier from the following locations:
●
HP LaserJet Director: Click Copy or Copy Plus.
●
Program Group (Windows only): Click Start, Programs,
HP LaserJet 1220, and HP LaserJet Copier.
●
HP LaserJet Document Manager (Windows) or
HP Workplace (Mac OS): Click on the Copier icon.
If you click the Copy Plus icon, in addition to the standard copier
settings, you can also adjust the brightness of your copies and
send the copy to another printer, including a color printer.
Accessing HP LaserJet Copy Plus
You can use HP LaserJet Copy Plus to send the scanned image
to any installed Windows printer, including color printers so that
you can make color copi es. You can also access advanced
features, such as copying N-up and including watermarks.
94 Chapter 7 Copying tasks
EN
Page 97

Windows 9x, 2000, Millennium, and NT 4.0
Access HP LaserJet Copy Plus from the following locations:
●
HP LaserJet Director:
●
Program Group (Windows only):
HP LaserJet 1220
Click
, and
HP LaserJet Copier
I want to copy to another printer
Copy Plus
Click
option.
.
Start, Programs
. Select the
,
EN
Using HP LaserJet Copier
95
Page 98

Adjusting the contrast
When you copy originals that have a colored
background and t ext that does not stand out
well (contrast-sensitive originals), you might
need to adjust the contrast. For example, if you
copy a yellow receipt with light gray print, the
text might not be legible. To make the te xt
more legible, increase the contra st (darken the
text).
Accessing the contrast feature
●
Quick Copies: From HP LaserJet Director, click Toolbox,
and HP LaserJet Device Configuration. After HP LaserJet
Device Configuratio n opens, click on the Copy tab.
●
If HP LaserJet Director is not running: See HP LaserJet
Director (Windows 98, 2000, Millennium, NT 4.0, and Mac
OS).
●
Full-featured copies: Open HP LaserJet Copier. See Using
HP LaserJet Copier for instructions.
Canceling copy jobs
You can use the following methods to cancel a copy job:
● Simultaneously pressing both buttons on the copier/scanner
control panel.
Click Cancel in the dialog box on your computer screen.
●
● Reset the printer.
● For copies started in HP LaserJet Copier, click Cancel.
Note If you cancel a job during a copy, you must clear the original from the
copier/scanner media input tray.
96 Chapter 7 Copying tasks
EN
Page 99

Managing the toner
8
cartridge
This chapter provides information on the following subjects:
Using HP toner cartridges
●
Storing toner cartridges
●
Recycling toner cartridges
●
Saving toner
●
Redistributing toner
●
Changing the toner cartridge
●
EN
97
Page 100

Using HP toner cartridges
HP policy on non-HP toner cartridges
Hewlett-Packard Compan y cannot recommend the use of
non-HP toner cartridges, either new, refilled, or rema nufactured.
Since they are not HP products, HP cannot influence their de sign
or control their quality.
Note The warranty does not apply to defects resulting from software,
interfacing, or parts not supplied by HP.
Storing toner cartridges
Do not remove the toner cartridge from its package until you are
ready to use it. The shelf life of a toner cartridge in an unopened
package is approximately 2.5 years. The shelf life of a toner
cartridge in an opened package is approximately 6 months.
CAUTION To prevent damage to the toner cartridge, do not expose it to light.
Toner cartridge life expectancy
The life of the toner cartridge depends on the amount of toner
that your print jobs require. When printing text at 5% coverage,
the standard toner cartridge (C7115A) lasts an average of
2,500 pages. The extended lif e toner cartridge (C7115X) lasts an
average of 3,500 pages. This assumes that you set the print
density to 3 and turn EconoMode off. (These are the default
settings.)
98 Chapter 8 Managing the toner cartridge
EN
 Loading...