

Page 1

service
hp LaserJet 1160 printer
hp LaserJet 1320 series printer
Page 2

Page 3

HP LaserJet 1160 printer and HP LaserJet
1320 Series printer
Service Manual
Page 4

Copyright information
© 2004 Copyright Hewlett-Packard
Development Company, L.P.
Reproduction, adaptation, or translation
without prior written permission is
prohibited, except as allowed under the
copyright laws.
The information contained herein is subject
to change without notice.
The only warranties for HP products and
services are set forth in the express
warranty statements accompanying such
products and services. Nothing herein
should be construed as constituting an
additional warranty. HP shall not be liable
for technical or editorial errors or omissions
contained herein.
Part number Q5927-90965
Edition 1, 11/2004
Safety information
WARNING!
Potential Shock Hazard
Always follow basic safety precautions
when using this product to reduce risk of
injury from fire or electric shock.
Read and understand all instructions in the
user guide.
Observe all warnings and instructions
marked on the product.
Use only a grounded electrical outlet when
connecting the printer to a power source. If
you do not know whether the outlet is
grounded, check with a qualified electrician.
Do not touch the contacts on the end of
any of the sockets on the printer. Replace
damaged cords immediately.
Unplug this product from wall outlets before
cleaning.
Do not install or use this product near water
or when you are wet.
Install the product securely on a stable
surface.
Install the product in a protected location
where no one can step on or trip over the
power cord and where the power cord will
not be damaged.
If the product does not operate normally,
see the online user guide.
Refer all servicing questions to qualified
personnel.
Information regarding FCC Class B, Parts
15 and 68 requirements can be found in
the user guide.
Trademark credits
Adobe®, Acrobat®, Adobe® PostScript®
3™, and the Acrobat Logo® are
trademarks of Adobe Systems Incorporated.
Microsoft®, Windows®, and Windows NT®
are U.S. registered trademarks of Microsoft
Corporation.
UNIX® is a registered trademark of The
Open Group.
Energy Star® and the Energy Star logo®
are U.S. registered marks of the United
States Environmental Protection Agency.
Page 5

Table of contents
1 Product Information
Chapter contents........................................................................................................................1
Printer configurations.................................................................................................................2
HP LaserJet 1160 and HP LaserJet 1320 Series printers base models.............................3
Features.....................................................................................................................................4
HP LaserJet 1160 printer.....................................................................................................4
HP LaserJet 1320 Series printer.........................................................................................4
HP LaserJet 1320n printer...................................................................................................5
HP LaserJet 1320tn printer..................................................................................................5
HP LaserJet 1320nw printer................................................................................................5
Specifications.............................................................................................................................6
Physical specifications ........................................................................................................6
Printer capacities and ratings .............................................................................................6
Memory specifications ........................................................................................................7
Port availability ....................................................................................................................7
Electrical specifications ......................................................................................................8
Acoustic emissions ...........................................................................................................10
Environmental specifications ............................................................................................10
Print media specifications .......................................................................................................11
Supported media sizes .....................................................................................................11
Hewlett-Packard limited warranty statement ..........................................................................12
Hewlett-Packard software license agreement ........................................................................13
Print cartridge limited warranty ...............................................................................................14
HP LaserJet printing supplies .................................................................................................15
Declaration of Conformity statements .....................................................................................16
Country/region-specific safety statements ..............................................................................18
Laser safety statement .....................................................................................................18
Canadian DOC regulations ...............................................................................................18
Korean EMI statement ......................................................................................................18
Laser statement for Finland ..............................................................................................19
2 Installation
Chapter contents......................................................................................................................21
Operating environment ............................................................................................................22
Printer connections .................................................................................................................22
Software...................................................................................................................................24
Supported operating systems ...........................................................................................24
Software for Windows .......................................................................................................25
Software for Macintosh computers ...................................................................................27
3 Operation
Chapter contents......................................................................................................................29
Printer control panel ................................................................................................................30
Status-light patterns ................................................................................................................31
ENWW iii
Page 6

Printer information pages ........................................................................................................37
Demo page .......................................................................................................................37
Configuration page ...........................................................................................................37
Supplies Status page ........................................................................................................37
Network Configuration page .............................................................................................37
Using the HP Toolbox .............................................................................................................38
Supported operating systems ...........................................................................................38
Supported browsers .........................................................................................................38
To view the HP Toolbox on Windows systems ................................................................39
To view the HP Toolbox on Macintosh systems ..............................................................39
HP Toolbox sections .........................................................................................................39
Other links .........................................................................................................................39
Status tab ..........................................................................................................................39
Troubleshooting tab ..........................................................................................................40
Alerts tab ...........................................................................................................................40
Documentation tab ...........................................................................................................40
Advanced Printer Settings window ...................................................................................41
Network window ................................................................................................................41
Using the embedded Web server ...........................................................................................42
To open the embedded Web server .................................................................................42
Information tab ..................................................................................................................43
Settings tab .......................................................................................................................43
Networking tab ..................................................................................................................43
Other links .........................................................................................................................44
Wireless printing ......................................................................................................................45
IEEE 802.11b/g standard .................................................................................................45
Bluetooth ...........................................................................................................................45
4 Maintenance
Chapter contents......................................................................................................................47
Replacing the print cartridge....................................................................................................48
To replace the print cartridge.............................................................................................48
Cleaning the printer .................................................................................................................49
Cleaning the print-cartridge area ......................................................................................49
Cleaning the printer media path .......................................................................................51
Changing the pickup roller ......................................................................................................52
Cleaning the pickup roller ........................................................................................................58
Changing the printer separation pad .......................................................................................59
Cleaning the printer separation pad.........................................................................................63
5 Theory of operation
Chapter contents......................................................................................................................65
Introduction...............................................................................................................................66
Internal components.................................................................................................................67
Timing.......................................................................................................................................68
Engine control system..............................................................................................................70
Laser/scanner system..............................................................................................................72
Pickup/feed/delivery system....................................................................................................73
Image-formation system...........................................................................................................75
6 Removal and replacement
Chapter contents......................................................................................................................79
Introduction ..............................................................................................................................80
Removal and replacement strategy ..................................................................................80
iv ENWW
Page 7

Electrostatic discharge .....................................................................................................80
User-replaceable parts .....................................................................................................80
Required tools ...................................................................................................................80
Before performing service .......................................................................................................81
Pre-service procedures ....................................................................................................81
Parts removal order ..........................................................................................................81
Covers......................................................................................................................................82
Left-side cover...................................................................................................................82
Right-side cover.................................................................................................................84
Back cover.........................................................................................................................86
Duplexer tray.....................................................................................................................89
Top cover...........................................................................................................................90
Control panel............................................................................................................................93
Formatter..................................................................................................................................95
Laser/scanner...........................................................................................................................96
Memory-tag-reader assembly..................................................................................................97
Duplex-drive PCA.....................................................................................................................99
Fuser......................................................................................................................................101
Fan...................................................................................................................................101
Duplex-drive gears/face-down gears...............................................................................103
Duplex solenoid (SL3) (HP LaserJet 1320 Series printers only).....................................106
Fuser................................................................................................................................107
Interlock assembly.................................................................................................................117
ECU........................................................................................................................................119
Main motor.............................................................................................................................127
Pickup and feed assemblies..................................................................................................129
Transfer roller..................................................................................................................129
Registration assembly.....................................................................................................130
Main gear assembly/tray 2 pickup solenoid...........................................................................131
Print-cartridge door................................................................................................................135
Wireless communications card..............................................................................................137
7 Troubleshooting
Chapter contents....................................................................................................................139
Basic troubleshooting.............................................................................................................141
Paper-handling problems ......................................................................................................144
Paper jam .......................................................................................................................144
Print is skewed (crooked) ...............................................................................................144
More than one sheet of media feeds through the printer at one time ............................144
Printer does not pull media from the media input tray ...................................................145
Printer curled the media .................................................................................................145
Printed media does not exit to the correct path ..............................................................145
Print job is extremely slow ..............................................................................................145
Paper-path troubleshooting....................................................................................................146
Solving print paper-feed problems..................................................................................146
Printed page is different than what appeared on screen ......................................................148
Garbled, incorrect, or incomplete text ............................................................................148
Missing graphics or text, or blank pages ........................................................................148
Page format is different than on another printer .............................................................149
Graphics quality ..............................................................................................................149
Status light patterns ..............................................................................................................150
Fatal error secondary messages...........................................................................................156
Accessory error secondary messages...................................................................................159
Troubleshooting postscript (PS) errors .................................................................................160
Image troubleshooting............................................................................................................161
ENWW v
Page 8

Print cartridge problems..................................................................................................161
Solving image-quality problems .....................................................................................162
Clearing jams ........................................................................................................................170
Print-cartridge area .........................................................................................................170
Input trays .......................................................................................................................172
Output bin .......................................................................................................................176
Straight-through output path ...........................................................................................176
Automatic two-sided printing (duplexing) path ...............................................................178
Functional checks..................................................................................................................182
Engine test.......................................................................................................................182
Printing an engine test.....................................................................................................182
Half self-test functional check..........................................................................................183
To perform a half self-test check.....................................................................................183
To perform other checks .................................................................................................183
Drum rotation functional check .............................................................................................184
Heating element check...........................................................................................................185
High-voltage contacts check..................................................................................................186
To check the print cartridge contacts ............................................................................186
To check the high-voltage connector assembly .............................................................186
Wired network setup problemsolving ....................................................................................187
NVRAM initialization...............................................................................................................188
Cold reset...............................................................................................................................189
Troubleshooting tools and reference diagrams.....................................................................190
Repetitive image defects.................................................................................................190
General timing chart........................................................................................................191
Circuit diagram.................................................................................................................192
Solenoids.........................................................................................................................194
Switches and sensors......................................................................................................195
Rollers and pads..............................................................................................................196
8 Parts and diagrams
Chapter contents....................................................................................................................197
Ordering parts and supplies ..................................................................................................198
Parts ...............................................................................................................................198
Related documentation and software .............................................................................198
Supplies ..........................................................................................................................198
Consumables and accessories..............................................................................................199
Assembly locations................................................................................................................202
Covers....................................................................................................................................206
Internal assemblies................................................................................................................208
Alphabetical parts list.............................................................................................................226
Numerical parts list.................................................................................................................230
Index
vi ENWW
Page 9

List of tables
Table 1-1. Feature designations for HP LaserJet 1320 Series printers..............................2
Table 1-2. Physical specifications.......................................................................................6
Table 1-3. Printer capacities and ratings.............................................................................6
Table 1-4. Memory..............................................................................................................7
Table 1-5. Port availability...................................................................................................7
Table 1-6. Electrical specifications, HP LaserJet 1160 printer ...........................................8
Table 1-7. Electrical specifications, HP LaserJet 1320 printer ...........................................8
Table 1-8. Electrical specifications, HP LaserJet 1320n printer ........................................8
Table 1-9. Electrical specifications, HP LaserJet 1320nw printer ......................................9
Table 1-10. Acoustic emissions, HP LaserJet 1160 printer ...............................................10
Table 1-11. Acoustic emissions, HP LaserJet 1320 Series printer ....................................10
Table 1-12. Environmental specifications...........................................................................10
Table 2-1. Available printer drivers ...................................................................................25
Table 3-1. Light status legend ..........................................................................................31
Table 3-2. Control-panel-light message ...........................................................................31
Table 5-1. Sequence of operation.....................................................................................68
Table 5-2. Power-on sequence.........................................................................................68
Table 7-1. Basic troubleshooting ...................................................................................141
Table 7-2. Solving print paper-feed problems.................................................................146
Table 7-3. Light status legend ........................................................................................150
Table 7-4. Control panel light message..........................................................................150
Table 7-5. Fatal error secondary messages...................................................................156
Table 7-6. Accessory error secondary messages...........................................................159
Table 7-7. PS errors .......................................................................................................160
Table 7-8. Solving print image-quality problems.............................................................162
Table 7-9. Repetitive image defects................................................................................190
Table 8-1. Technical support Web sites .........................................................................198
Table 8-2. Assembly locations (1 of 2)............................................................................203
Table 8-3. Assembly locations (2 of 2)............................................................................205
Table 8-4. Covers............................................................................................................207
Table 8-5. Internal components (1 of 4)..........................................................................209
Table 8-6. Internal components (2 of 4)..........................................................................211
Table 8-7. Internal components (3 of 4)..........................................................................213
Table 8-8. Internal components (4 of 4)..........................................................................215
Table 8-9. ECU assembly...............................................................................................217
Table 8-10. Duplex-drive assembly...................................................................................219
Table 8-11. Top output bin gear assembly........................................................................221
Table 8-12. Tray 2 assembly.............................................................................................223
Table 8-13. Duplexer.........................................................................................................225
Table 8-14. Alphabetical parts list.....................................................................................226
Table 8-15. Numerical parts list.........................................................................................230
ENWW vii
Page 10

viii ENWW
Page 11

List of figures
Figure 1-1. Front/right-side view...........................................................................................3
Figure 1-2. Rear/left-side view..............................................................................................3
Figure 2-1. USB connection...............................................................................................22
Figure 2-2. Parallel connection...........................................................................................22
Figure 2-3. Network connection..........................................................................................23
Figure 2-4. Wireless connection, infrastructure mode........................................................23
Figure 2-5. Wireless connection, ad hoc mode..................................................................23
Figure 5-1. Block diagram...................................................................................................66
Figure 5-2. Cross-section of printer....................................................................................67
Figure 5-3. Engine control system......................................................................................70
Figure 5-4. Engine control system circuit diagram.............................................................71
Figure 5-5. Laser/scanner system......................................................................................72
Figure 5-6. Pickup/feed/delivery system............................................................................74
Figure 5-7. Image-formation system...................................................................................75
Figure 5-8. Primary charging..............................................................................................75
Figure 5-9. Developing.......................................................................................................76
Figure 5-10. Transfer............................................................................................................7 6
Figure 5-11. Separation........................................................................................................77
Figure 5-12. Fusing...............................................................................................................77
Figure 5-13. Drum cleaning..................................................................................................78
Figure 6-1. Removing the left-side cover (1 of 2)...............................................................82
Figure 6-2. Removing the left-side cover (2 of 2)...............................................................83
Figure 6-3. Removing the right-side cover (1 of 2).............................................................84
Figure 6-4. Removing the right-side cover (2 of 2).............................................................85
Figure 6-5. Removing the back cover (1 of 2)....................................................................86
Figure 6-6. Removing the back cover (2 of 2)....................................................................87
Figure 6-7. Reinstalling the back cover..............................................................................88
Figure 6-8. Removing the duplexer tray.............................................................................89
Figure 6-9. Removing the top cover (1 of 3).......................................................................90
Figure 6-10. Removing the top cover (2 of 3).......................................................................91
Figure 6-11. Removing the top cover (3 of 3).......................................................................92
Figure 6-12. Removing the control panel (1 of 2).................................................................93
Figure 6-13. Removing the control panel (2 of 2).................................................................94
Figure 6-14. Removing the formatter....................................................................................95
Figure 6-15. Removing the memory-tag-reader assembly (1 of 2)......................................97
Figure 6-16. Removing the memory-tag-reader assembly (2 of 2)......................................98
Figure 6-17. Removing the duplex-drive PCA (1 of 2).........................................................99
Figure 6-18. Removing the duplex-drive PCA (2 of 2).......................................................100
Figure 6-19. Removing the fan (1 of 2)..............................................................................101
Figure 6-20. Removing the duplex-drive gears/face-down gears......................................103
Figure 6-21. Duplex-drive gears (HP LaserJet 1320 Series printers)................................104
Figure 6-22. Face-down gears (HP LaserJet 1160 printers)..............................................105
Figure 6-23. Removing the duplex solenoid.......................................................................106
Figure 6-24. Removing the fuser (1 of 10).........................................................................107
Figure 6-25. Removing the fuser (2 of 10).........................................................................108
Figure 6-26. Removing the fuser (3 of 10).........................................................................109
ENWW ix
Page 12

Figure 6-27. Removing the fuser (4 of 10).........................................................................110
Figure 6-28. Removing the fuser (5 of 10).........................................................................111
Figure 6-29. Removing the fuser (6 of 10).........................................................................112
Figure 6-30. Removing the fuser (7 of 10).........................................................................113
Figure 6-31. Removing the fuser (8 of 10).........................................................................114
Figure 6-32. Removing the fuser (9 of 10).........................................................................115
Figure 6-33. Removing the fuser (10 of 10).......................................................................116
Figure 6-34. Removing the interlock assembly (1 of 2)......................................................117
Figure 6-35. Removing the interlock assembly (2 of 2)......................................................118
Figure 6-36. Removing the ECU (1 of 8)............................................................................119
Figure 6-37. Removing the ECU (2 of 8)............................................................................120
Figure 6-38. Removing the ECU (3 of 8)............................................................................121
Figure 6-39. Removing the ECU (4 of 8)............................................................................122
Figure 6-40. Removing the ECU (5 of 8)............................................................................123
Figure 6-41. Removing the ECU (6 of 8)............................................................................124
Figure 6-42. Removing the ECU (7 of 8)............................................................................125
Figure 6-43. Removing the ECU (8 of 8)............................................................................126
Figure 6-44. Removing the main motor (1 of 2).................................................................127
Figure 6-45. Removing the main motor (2 of 2).................................................................128
Figure 6-46. Removing the transfer roller...........................................................................129
Figure 6-47. Removing the registration assembly..............................................................130
Figure 6-48. Removing the main gear assembly (1 of 2)...................................................131
Figure 6-49. Removing the main gear assembly (2 of 2)...................................................132
Figure 6-50. Removing the tray 2 pickup solenoid (1 of 2)................................................133
Figure 6-51. Removing the tray 2 pickup solenoid (2 of 2)................................................134
Figure 6-52. Removing the print-cartridge door (1 of 2).....................................................135
Figure 6-53. Removing the print-cartridge door (2 of 2).....................................................136
Figure 6-54. Removing the wireless communications card (1 of 2)...................................137
Figure 6-55. Removing the wireless communications card (2 of 2)...................................138
Figure 7-1. Location of engine-test switch........................................................................182
Figure 7-2. Print cartridge high-voltage connection points (right side).............................186
Figure 7-3. Print cartridge high-voltage connection points (left side)...............................186
Figure 7-4. Network Reset button.....................................................................................187
Figure 7-5. General timing chart.......................................................................................191
Figure 7-6. Circuit diagram (1 of 2)...................................................................................192
Figure 7-7. Circuit diagram (2 of 2)...................................................................................193
Figure 7-8. Solenoids........................................................................................................194
Figure 7-9. Switches and sensors....................................................................................195
Figure 7-10. Rollers and pads............................................................................................196
Figure 8-1. Assembly locations (1 of 2)............................................................................202
Figure 8-2. Assembly locations (2 of 2)............................................................................204
Figure 8-3. Covers............................................................................................................206
Figure 8-4. Internal components (1 of 4)..........................................................................208
Figure 8-5. Internal components (2 of 4)..........................................................................210
Figure 8-6. Internal components (3 of 4)..........................................................................212
Figure 8-7. Internal components (4 of 4)..........................................................................214
Figure 8-8. ECU assembly...............................................................................................216
Figure 8-9. Duplex-drive assembly...................................................................................218
Figure 8-10. Top output bin gear assembly........................................................................220
Figure 8-11. Tray 2 assembly.............................................................................................222
Figure 8-12. Duplexer.........................................................................................................224
x ENWW
Page 13

Product Information
1
Chapter contents
Chapter contents........................................................................................................................1
Printer configurations.................................................................................................................2
HP LaserJet 1160 and HP LaserJet 1320 Series printers base models.............................3
Features.....................................................................................................................................4
HP LaserJet 1160 printer.....................................................................................................4
HP LaserJet 1320 Series printer.........................................................................................4
HP LaserJet 1320n printer...................................................................................................5
HP LaserJet 1320tn printer..................................................................................................5
HP LaserJet 1320nw printer................................................................................................5
Specifications.............................................................................................................................6
Physical specifications ........................................................................................................6
Printer capacities and ratings .............................................................................................6
Memory specifications ........................................................................................................7
Port availability ....................................................................................................................7
Electrical specifications ......................................................................................................8
Acoustic emissions ...........................................................................................................10
Environmental specifications ............................................................................................10
Print media specifications .......................................................................................................11
Supported media sizes .....................................................................................................11
Hewlett-Packard limited warranty statement ..........................................................................12
Hewlett-Packard software license agreement ........................................................................13
Print cartridge limited warranty ...............................................................................................14
HP LaserJet printing supplies .................................................................................................15
Declaration of Conformity statements .....................................................................................16
Country/region-specific safety statements ..............................................................................18
Laser safety statement .....................................................................................................18
Canadian DOC regulations ...............................................................................................18
Korean EMI statement ......................................................................................................18
Laser statement for Finland ..............................................................................................19
ENWW Chapter contents 1
Page 14
Printer configurations
The HP LaserJet 1160 printer is only available in the base configuration.
The HP LaserJet 1320 Series printer is available in several configurations. The letters that
follow the printer name indicate the differences between the configurations. Each letter
refers to a specific feature. Use the information in this section to determine which features
your model has.
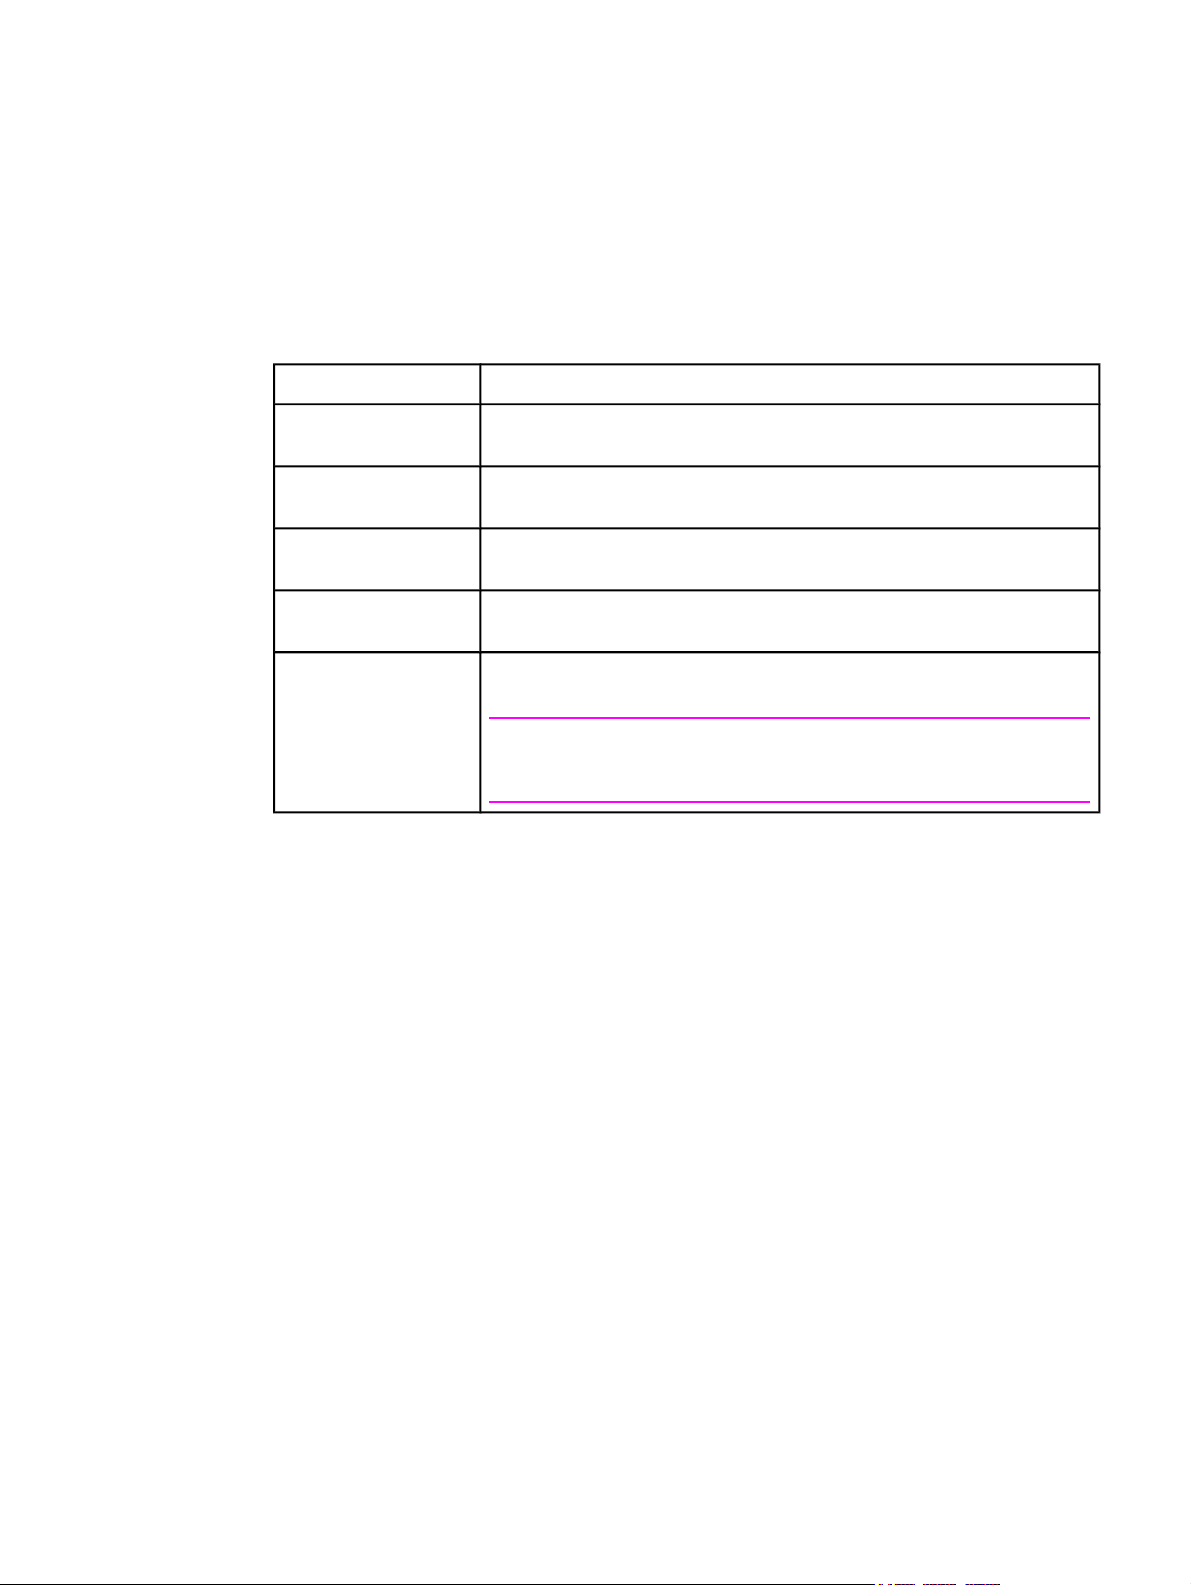
Table 1-1. Feature designations for HP LaserJet 1320 Series printers
Printer Model Description
HP LaserJet 1160 This is the base model. It includes an IEEE-1284B parallel port and a
HP LaserJet 1320 This is the base model. It includes an IEEE-1284B parallel port and a
HP LaserJet 1320n The printer includes the same features as HP LaserJet 1320 with an
HP LaserJet 1320tn This printer includes the same features as HP LaserJet 1320n and adds a
HP LaserJet 1320nw This printer includes the same features as HP LaserJet 1320t and adds
universal serial bus (USB) port.
universal serial bus (USB) port.
internal HP Jetdirect network port instead of the IEEE-1284B parallel port
250-sheet input tray.
integrated 802.11b/g wireless connectivity.
NOTE
For more information about this product, see the HP LaserJet 1320nw
wireless printer user guide.
2 Chapter 1 Product Information ENWW
Page 15

HP LaserJet 1160 and HP LaserJet 1320 Series printers base models
Figure 1-1.
Front/right-side view
1 Wireless light (HP LaserJet 1320nw printer only)
2 Toner light
3 Attention light
4 Ready light
5 G
6 C
7 Output bin
8 Media support
9 Print-cartridge door
10 Single-sheet priority input slot (tray 1)
11 Main input tray (tray 2)
12
O
button and light
ANCEL
button
On/off switch
Figure 1-2.
Rear/left-side view
1 Straight-through output door
2 Power receptacle
3 Automatic two-sided printing media-size selector
4 USB port
5 Parallel port (HP LaserJet 1160 and HP LaserJet 1320 printers)
6 Internal HP Jetdirect network port (HP LaserJet 1320n, HP LaserJet 1320tn, and
HP LaserJet 1320nw printers)
7 Rear automatic two-sided path door
8 Jam-clearing levers
ENWW Printer configurations 3
Page 16

Features
The following lists describe the features of HP LaserJet 1160 and HP LaserJet 1320 Series
printers.
HP LaserJet 1160 printer
● 20 ppm (Letter), 19 ppm (A4)
● First page out in as little as 8.5 seconds
● 1200 dpi effective output quality (600 x 600 dpi with Resolution Enhancement
technology [REt] with FastRes 1200)
● 250-sheet enclosed input tray (tray 2)
● Single-sheet priority input slot (tray 1)
● EconoMode (saves toner)
● The ability to print watermarks, booklets, and multiple pages per sheet (N-up), and to
print the first page on different media from the remainder of the document
● 16 MB RAM
● 2,500-page print cartridge
● Host-based and PCL 5e (printer automatically determines and switches to the
appropriate language)
● Compatible with USB 2.0 specifications
● IEEE-1284B parallel port
●
Windows
driver only), Windows 2000, Windows Server 2003 (printer driver only), Windows XP 32bit, Windows XP 64-bit (printer driver only)
● Mac OS 9.2 (printer driver only) and OS X V10.1.
● Power switch
● HP Toolbox (provides printer status information, troubleshooting information, and printer
configuration information)
● 26 HP PCL fonts
®
98, Windows Millennium Edition (Me), Windows NT® (parallel and printer
HP LaserJet 1320 Series printer
● 22 ppm (letter), 21 ppm (A4)
● First page out in as little as 8.5 seconds
● ProRes 1200 (provides fine-line detail at 1200 x 1200 dpi)
● 600 dpi (provides 600 x 600 dpi output with Resolution Enhancement Technology [REt]
for improved text)
● 250-sheet enclosed input tray (tray 2)
● Single-sheet priority input slot (tray 1)
● Optional additional 250-sheet input tray (tray 3) is available
● Automatic two-sided (duplex) printing
4 Chapter 1 Product Information ENWW
Page 17

● EconoMode (saves toner)
● The ability to print watermarks, booklets, and multiple pages per sheet (N-up), and to
print the first page on different media from the remainder of the document
● 16 MB RAM
● Memory is upgradeable to 144 MB
● 2,500- or 6,000-page print cartridge
● PCL 6, PCL 5e, and HP postscript Level 2 emulation (printer automatically determines
and switches to the appropriate language)
● Compatible with USB 2.0 specifications
● IEEE-1284B parallel port
● Windows 98, Windows Me, Windows NT (parallel, network, and printer driver only),
Windows 2000, Windows Server 2003 (printer driver only), Windows XP 32-bit,
Windows XP 64-bit (printer driver only)
● Mac OS 9.1 and later (printer driver only)
● Mac OS X V10.1 (printer driver only), V10.2 and later
● Power switch
● HP Toolbox (provides printer status information, troubleshooting information, and
configuration information)
● 46 HP PCL fonts
● 35 HP postscript fonts
HP LaserJet 1320n printer
● The HP LaserJet 1320n printer includes all of the features of the HP LaserJet 1320
printer.
● The HP LaserJet 1320n printer substitutes an internal HP Jetdirect network port for the
IEEE-1284B parallel port found on HP LaserJet 1320 printers.
HP LaserJet 1320tn printer
● The HP LaserJet 1320tn printer includes all of the features of the HP LaserJet 1320n
printer.
● The HP LaserJet 1320tn printer adds an optional 250-sheet tray (tray 3).
HP LaserJet 1320nw printer
● The HP LaserJet 1320nw printer includes all of the features of the HP LaserJet 1320n
printer.
● The HP LaserJet 1320nw printer adds integrated 802.11b/g wireless connectivity
ENWW Features 5
Page 18
Specifications
Physical specifications
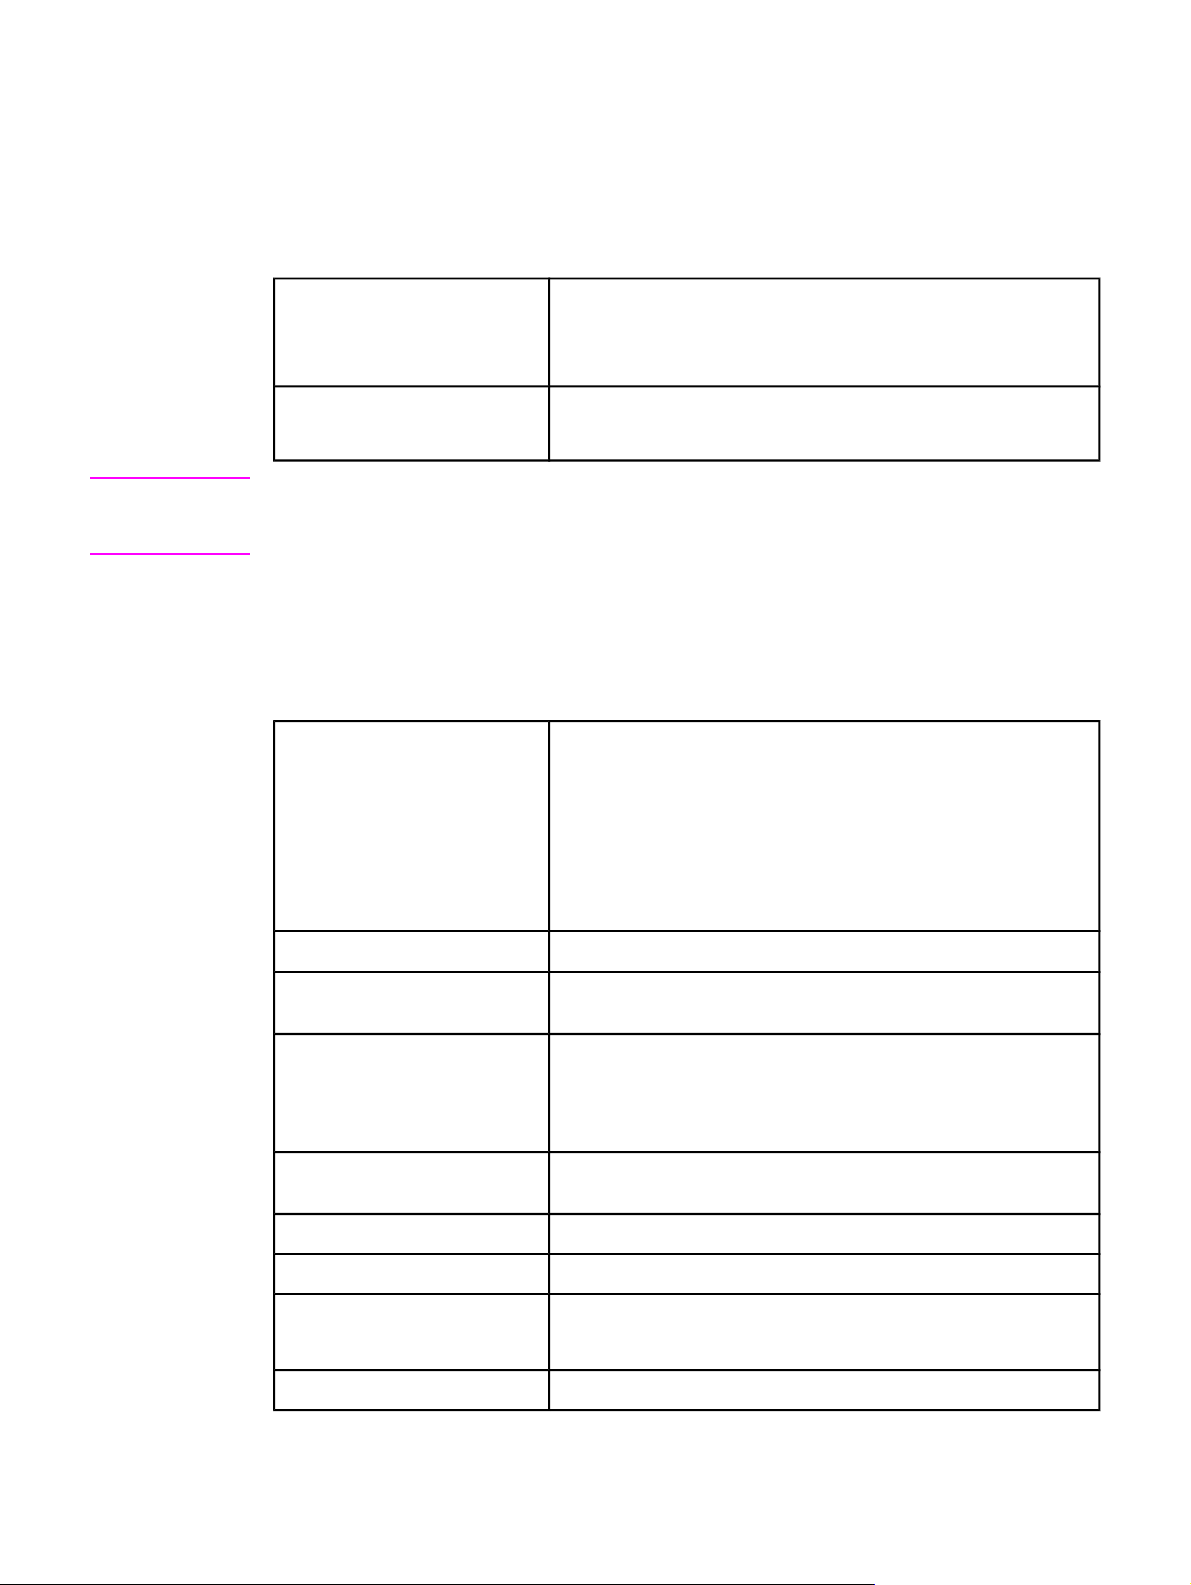
Table 1-2. Physical specifications
Dimensions ● Width: 350 mm (16.8 inches)
● Depth: 352 mm (13.9 inches)
● Height: 256 mm (10.0 inches)
NOTE
Weight (2,500-page cartridge
installed)
HP LaserJet 1160 printer: 10.7 kg (23.6 lb)
HP LaserJet 1320 Series printer: 11.3 kg (24.9 lb)
Values are current as of April 1, 2004. Values are subject to change without notice. See
http://www.hp.com/support/lj1160/ or http://www.hp.com/support/lj1320/ for current
information.
Printer capacities and ratings
Table 1-3. Printer capacities and ratings
Print speed HP LaserJet 1160 printer:
● 20 ppm (Letter), 19 ppm (A4)
● First page out in as few as 8.5 seconds
HP LaserJet 1320 Series printer:
● 22 ppm (Letter), 21 ppm (A4)
● First page out in as few as 8.5 seconds
Main input tray (tray 2) capacity
250 sheets of 75 g/m2 (20 lb) media
Single-sheet priority input slot
(tray 1) capacity
Optional input tray (tray 3)
capacity
(HP LaserJet 1320 Series
printer or Q2485A)
Top (face down) output bin
capacity
Minimum media size 76 x 127 mm (3 x 5 inches)
Maximum media size 216 x 356 mm (8.5 x 14 inches)
Media weight
Base memory 16 MB of RAM
1 sheet of media up to 163 g/m2 (43 lb) media or 1 envelope
250 sheets of 75 g/m2 (20 lb) media
125 sheets of regular weight 75 g/m2 (20 lb) paper
Output bin: 60 to 105 g/m2 (16 to 28 lb)
2
Straight through media path: 60 to 163 g/m
(16 to 43 lb)
6 Chapter 1 Product Information ENWW
Page 19
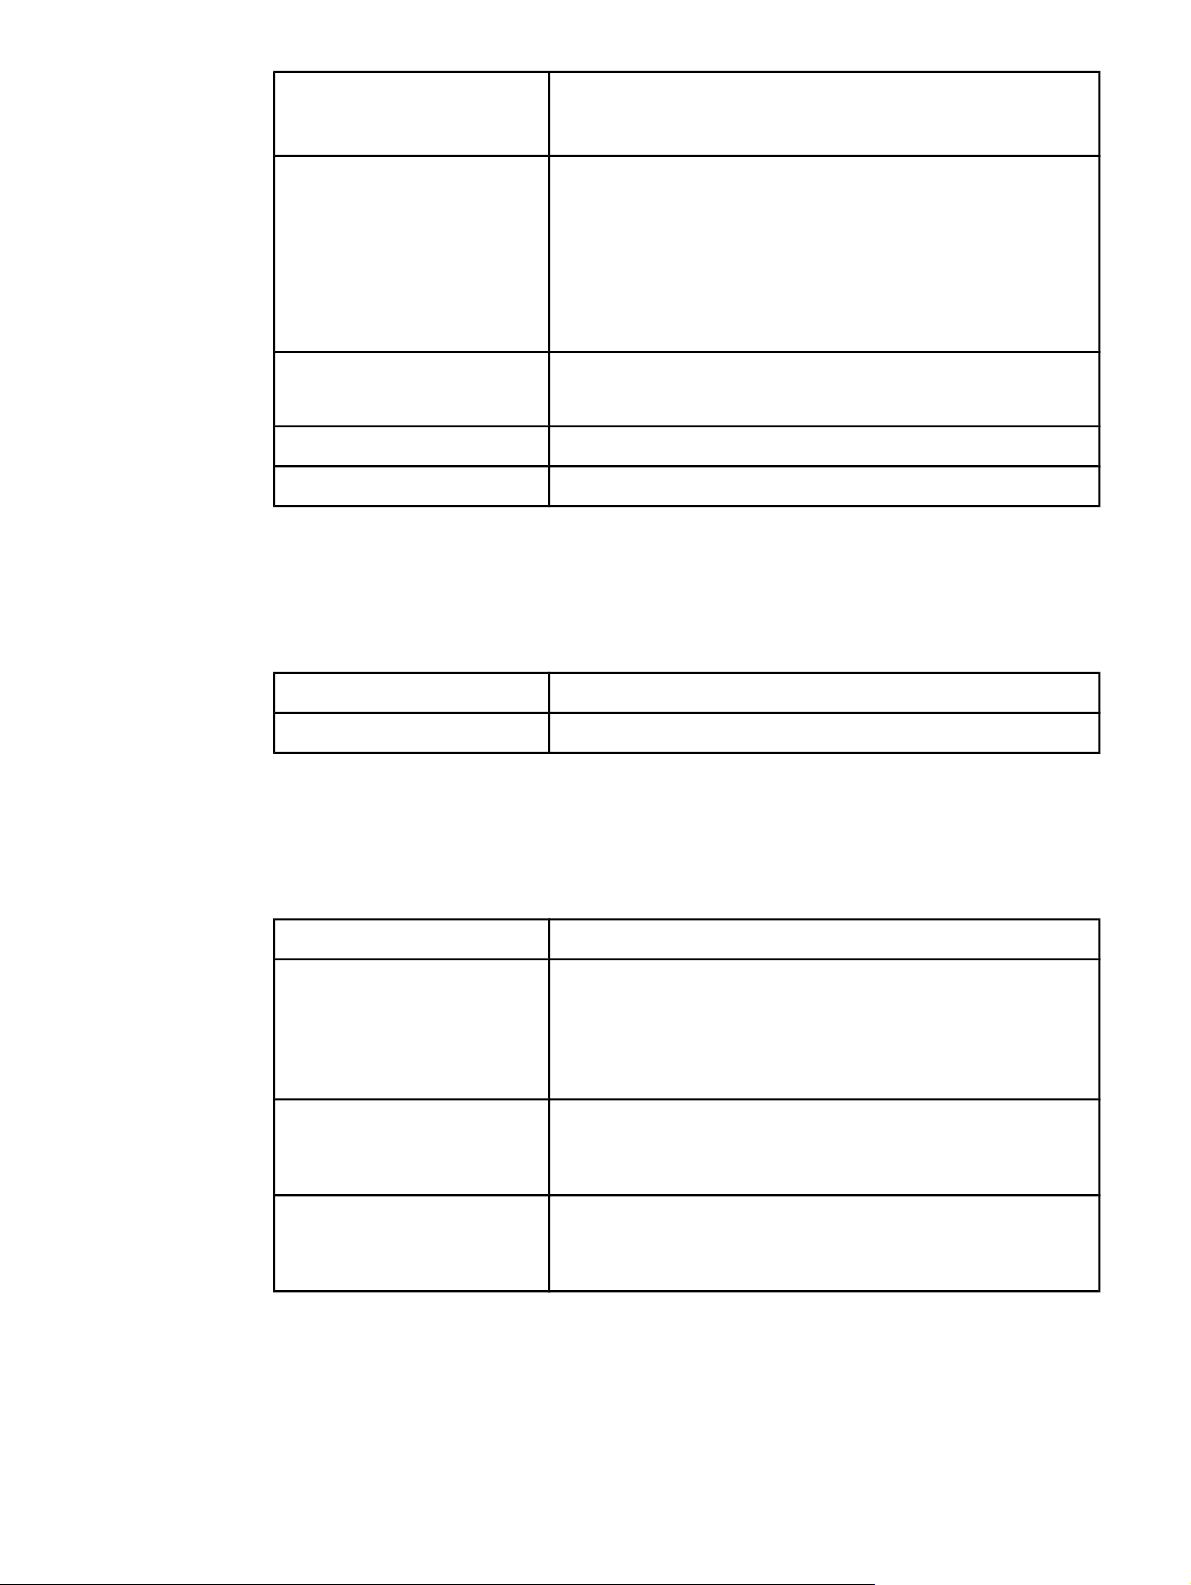
Table 1-3. Printer capacities and ratings (continued)
Memory upgrade
(HP LaserJet 1320 Series
printer only)
One DIMM slot available for a 16, 32, 64, or 128 MB RAM DIMM
Print resolution
Duty cycle
PCL PCL 5e, PCL 6
HP postscript (HPLJ 1320) Level 2 emulation
● 1200 dpi: (HP LaserJet 1320 Series printer only) This setting
uses ProRes 1200 to provide fine-line detail at
1200 x 1200 dpi.
● 1200 effective dpi: This setting provides 1200 dpi effective
output quality using FastRes 1200.
● 600 dpi: This setting provides 600 x 600 dpi output with
Resolution Enhancement technology (REt) for improved text.
● 10,000 single-sided pages per month (maximum)
●
1,000 single-sided pages per month (average)
Memory specifications
Table 1-4. Memory
Base memory 16 MB RAM
Memory upgrade 100-pin, 66 MHz minimum speed
Port availability
Table 1-5. Port availability
USB Compatible with USB 2.0 specifications
Network
(HP LaserJet 1320n,
HP LaserJet 1320tn, and
HP LaserJet 1320nw printers
only)
Wireless
(HP LaserJet 1320nw printer
only)
Parallel
(HP LaserJet 1160 and
HP LaserJet 1320 printers only)
RJ-45, Ethernet 10/100
802.11b/g
● IEEE-1284B receptacle
● Set host computer to ECP
ENWW Specifications 7
Page 20

Electrical specifications
WARNING!
Power requirements are based on the country/region where the printer is sold. Do not
convert operating voltages. Doing so might damage the printer and void the product warranty.
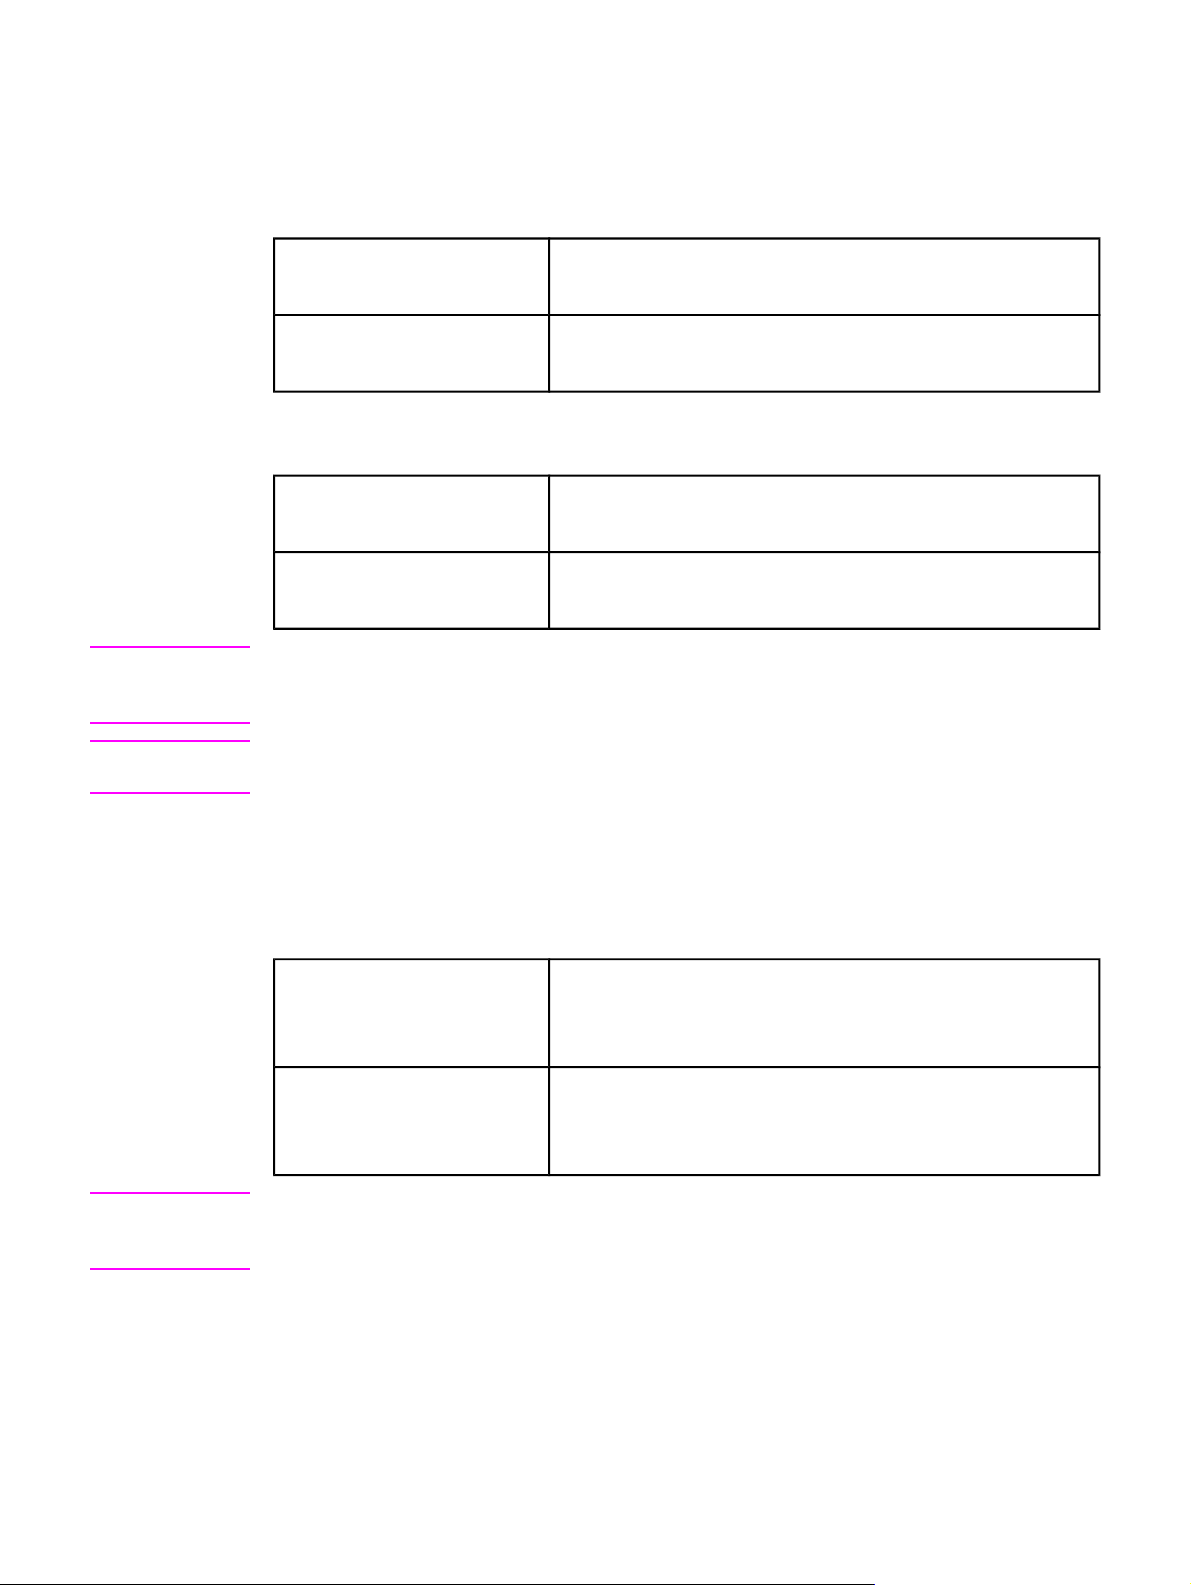
Table 1-6. Electrical specifications, HP LaserJet 1160 printer
Power requirements, 110-127
V models
Power requirements, 220-240
V models
Power consumption ● During printing (20 ppm): 340 watts (average)
Minimum recommended circuit
capacity for typical product
110-127 V (+/-10%), 50/60 Hz (+/-2)
220-240 V (+/-10%), 50/60 Hz (+/-2 Hz)
● During Ready (Standby) and PowerSave (instant-on fuser
technology) modes: 4 watts
● Off: <1 watt
● 4.5 amps at 115 V
● 2.6 amps at 230 V
Table 1-7. Electrical specifications, HP LaserJet 1320 printer
Power requirements, 110-127
V models
110-127 V (+/-10%), 50/60 Hz (+/-2)
Power requirements, 220-240
V models
Power consumption ● During printing (22 ppm): 340 watts (average)
Minimum recommended circuit
capacity for typical product
220-240 V (+/-10%), 50/60 Hz (+/-2 Hz)
● During Ready (Standby) and PowerSave (instant-on fuser
technology) modes: 6 watts
● Off: <1 watt
● 4.5 amps at 115 V
● 2.6 amps at 230 V
Table 1-8. Electrical specifications, HP LaserJet 1320n printer
Power requirements, 110-127
V models
Power requirements, 220-240
V models
Power consumption ● During printing (22 ppm): 345 watts (average)
110-127 V (+/-10%), 50/60 Hz (+/-2)
220-240 V (+/-10%), 50/60 Hz (+/-2 Hz)
● During Ready (Standby) and PowerSave (instant-on fuser
technology) modes: 6 watts
● Off: <1 watt
Minimum recommended circuit
capacity for typical product
● 4.5 amps at 115 V
● 2.6 amps at 230 V
8 Chapter 1 Product Information ENWW
Page 21

Table 1-9. Electrical specifications, HP LaserJet 1320nw printer
NOTE
NOTE
NOTE
Power requirements, 110-127
V models
Power requirements, 220-240
V models
Power consumption ● During printing (22 ppm): 345 watts (average)
Minimum recommended circuit
capacity for typical product
110-127 V (+/-10%), 50/60 Hz (+/-2)
220-240 V (+/-10%), 50/60 Hz (+/-2 Hz)
● During Ready (Standby) and PowerSave (instant-on fuser
technology) modes: 6 watts
● Off: <1 watt
● 4.5 amps at 115 Power requirements (110)
● 2.6 amps at 230 Power requirements (110)
Values are current as of April 1, 2004. Values are subject to change without notice. See
http://www.hp.com/support/lj1160/ or http://www.hp.com/support/lj1320/ for current
information.
The power reported is the highest value measured for monochrome printing using all
standard voltages.
The default time from Ready mode to PowerSave mode and the recovery time from
PowerSave mode to the start of printing is negligible (less than 10 seconds) because of the
instant-on fuser technology.
NOTE
The heat dissipation in Ready mode is 20 BTU/hour.
ENWW Specifications 9
Page 22
Acoustic emissions
Declared per ISO 9296
Table 1-10. Acoustic emissions, HP LaserJet 1160 printer
NOTE
NOTE
Sound-power level
Sound-pressure level
bystander position
Printing (20 ppm): L
Ready and PowerSave: essentially inaudible
Printing (20 ppm): L
Ready and PowerSave: essentially inaudible
= 6.2 Bels A and 62 dB (A)
WAd
= 48 dB (A)
pAm
Table 1-11. Acoustic emissions, HP LaserJet 1320 Series printer
Sound-power level
Sound-pressure level
bystander position
Printing (22 ppm): L
Ready and PowerSave: essentially inaudible
Printing (22 ppm): L
Ready and PowerSave: essentially inaudible
= 6.2 Bels A and 62 dB (A)
WAd
= 48 dB (A)
pAm
Values are current as of April 1, 2004. Values are subject to change without notice. See
http://www.hp.com/support/lj1160/ or http://www.hp.com/support/lj1320/ for current
information.
The configuration that was tested to arrive at these values as an HP LaserJet 1320 printer
(base model) with its standard tray, using A4 paper and simplex continuous printing.
NOTE
Environmental specifications
Table 1-12. Environmental specifications
Operating environment Printer plugged into an ac outlet:
● Temperature: 10°C to 32.5°C (50°F to 90.5°F)
● Humidity: 20% to 80% (no condensation)
Storage environment Printer unplugged from an AC outlet:
● Temperature: 0°C to 40°C (32°F to 104°F)
● Humidity: 10% to 80% (no condensation)
Values are current as of April 1, 2004. Values are subject to change without notice. See
http://www.hp.com/support/lj1160/ or http://www.hp.com/support/lj1320/ for current
information.
10 Chapter 1 Product Information ENWW
Page 23

Print media specifications
HP LaserJet printers produce excellent print quality. The printer accepts a variety of print
media, such as cut-sheet paper (including recycled paper), envelopes, labels,
transparencies, and custom-size paper. Properties such as weight, grain, and moisture
content are important factors affecting printer performance and output quality.
The printer can use a variety of paper and other print media in accordance with the
guidelines in this guide. Media that does not meet these guidelines might cause the following
problems:
● Poor print quality
● Increased jams
● Premature wear on the printer, requiring repair
For best results, use only HP-brand paper and print media. Hewlett-Packard Company
cannot recommend the use of other brands. Because they are not HP products, HP cannot
influence or control their quality.
It is possible for media to meet all of the guidelines in this user guide and still not produce
satisfactory results. This might be the result of incorrect handling, unacceptable temperature
and humidity levels, or other variables over which HP has no control.
Before you purchase a large quantity of media, make sure that it meets the requirements
specified in this user guide and in HP LaserJet Printer Family Media Guide. The guidelines
can be downloaded from http://www.hp.com/support/ljpaperguide/. Always test media before
you purchase a large quantity.
CAUTION
Using media that does not meet Hewlett-Packard's specifications might cause problems for
the printer, requiring repair. This repair is not covered by the Hewlett-Packard warranty or
service agreements.
Supported media sizes
The following are the supported media sizes:
● Minimum: 76 x 127 mm (3 x 5 inches)
● Maximum: 216 x 356 mm (8.5 x 14 inches)
Also see
Printer capacities and ratings
ENWW Print media specifications 11
Page 24

Hewlett-Packard limited warranty statement
HP PRODUCT
HP LaserJet 1160 and HP LaserJet 1320 Series
printers
HP warrants to you, the end-user customer, that HP hardware and accessories will be free
from defects in materials and workmanship after the date of purchase, for the period
specified above. If HP receives notice of such defects during the warranty period, HP will, at
its option, either repair or replace products which prove to be defective. Replacement
products may be either new or equivalent in performance to new.
HP warrants to you that HP software will not fail to execute its programming instructions after
the date of purchase, for the period specified above, due to defects in material and
workmanship when properly installed and used. If HP receives notice of such defects during
the warranty period, HP will replace software which does not execute its programming
instructions due to such defects.
HP does not warrant that the operation of HP products will be uninterrupted or error free. If
HP is unable, within a reasonable time, to repair or replace any product to a condition as
warranted, you will be entitled to a refund of the purchase price upon prompt return of the
product.
HP products may contain remanufactured parts equivalent to new in performance or may
have been subject to incidental use.
Warranty does not apply to defects resulting from (a) improper or inadequate maintenance
or calibration, (b) software, interfacing, parts or supplies not supplied by HP,
(c) unauthorized modification or misuse, (d) operation outside of the published
environmental specifications for the product, or (e) improper site preparation or maintenance.
HP's limited warranty is valid in any country/region or locality where HP has a support
presence for this product and where HP has marketed this product. The level of warranty
service you receive may vary according to local standards. HP will not alter form, fit or
function of the product to make it operate in a country/region for which it was never intended
to function for legal or regulatory reasons. TO THE EXTENT ALLOWED BY LOCAL LAW,
THE ABOVE WARRANTIES ARE EXCLUSIVE AND NO OTHER WARRANTY OR
CONDITION, WHETHER WRITTEN OR ORAL, IS EXPRESSED OR IMPLIED AND
HP SPECIFICALLY DISCLAIMS ANY IMPLIED WARRANTIES OR CONDITIONS OF
MERCHANTABILITY, SATISFACTORY QUALITY, AND FITNESS FOR A PARTICULAR
PURPOSE. Some countries/regions, states or provinces do not allow limitations on the
duration of an implied warranty, so the above limitation or exclusion might not apply to you.
This warranty gives you specific legal rights and you might also have other rights that vary
from country/region to country/region, state to state, or province to province.
TO THE EXTENT ALLOWED BY LOCAL LAW, THE REMEDIES IN THIS WARRANTY
STATEMENT ARE YOUR SOLE AND EXCLUSIVE REMEDIES. EXCEPT AS INDICATED
ABOVE, IN NO EVENT WILL HP OR ITS SUPPLIERS BE LIABLE FOR LOSS OF DATA
OR FOR DIRECT, SPECIAL, INCIDENTAL, CONSEQUENTIAL (INCLUDING LOST
PROFIT OR DATA), OR OTHER DAMAGE, WHETHER BASED IN CONTRACT, TORT, OR
OTHERWISE. Some countries/regions, states or provinces do not allow the exclusion or
limitation of incidental or consequential damages, so the above limitation or exclusion may
not apply to you.
THE WARRANTY TERMS CONTAINED IN THIS STATEMENT, EXCEPT TO THE EXTENT
LAWFULLY PERMITTED, DO NOT EXCLUDE, RESTRICT OR MODIFY AND ARE IN
ADDITION TO THE MANDATORY STATUTORY RIGHTS APPLICABLE TO THE SALE OF
THIS PRODUCT TO YOU.
DURATION OF LIMITED WARRANTY
One year from date of purchase
12 Chapter 1 Product Information ENWW
Page 25

Hewlett-Packard software license agreement
ATTENTION: USE OF THE SOFTWARE IS SUBJECT TO THE HP SOFTWARE LICENSE
TERMS SET FORTH BELOW. USING THE SOFTWARE INDICATES YOUR
ACCEPTANCE OF THESE LICENSE TERMS.
HP SOFTWARE LICENSE TERMS
The following License Terms govern your use of the accompanying Software unless you
have a separate signed agreement with Hewlett-Packard.
License Grant. Hewlett-Packard grants you a license to use one copy of the Software.
"Use" means storing, loading, installing, executing, or displaying the Software. You may not
modify the Software or disable any licensing or control features of the Software. If the
Software is licensed for "concurrent use," you may not allow more than the maximum
number of authorized users to Use the Software concurrently.
Ownership. The Software is owned and copyrighted by Hewlett-Packard or its third-party
suppliers. Your license confers no title to, or ownership in, the Software and is not a sale of
any rights in the Software. Hewlett-Packard's third-party suppliers may protect their rights in
the event of any violation of these License Terms.
Copies and Adaptations. You may only make copies or adaptations of the Software for
archival purposes or when copying or adaptation is an essential step in the authorized Use
of the Software. You must reproduce all copyright notices in the original Software on all
copies or adaptations. You may not copy the Software onto any public network.
No Disassembly or Decryption. You may not disassemble or decompile the Software
unless HP's prior written consent is obtained. In some jurisdictions, HP's consent may not be
required for limited disassembly or decompilation. Upon request, you will provide HP with
reasonably detailed information regarding any disassembly or decompilation. You may not
decrypt the Software unless decryption is a necessary part of the operation of the Software.
Transfer. Your license will automatically terminate upon any transfer of the Software. Upon
transfer, you must deliver the Software, including any copies and related documentation, to
the transferee. The transferee must accept these License Terms as a condition to the
transfer.
Termination. HP may terminate your license upon notice for failure to comply with any of
these License Terms. Upon termination, you must immediately destroy the Software,
together with all copies, adaptations, and merged portions in any form.
Export Requirements. You may not export or re-export the Software or any copy or
adaptation in violation of any applicable laws or regulations.
U.S. Government Restricted Rights. The Software and any accompanying documentation
have been developed entirely at private expense. They are delivered and licensed as
"commercial computer software" as defined in DFARS 252.227-7013 (Oct 1988),
DFARS 252.211-7015 (May 1991), or DFARS 252.227-7014 (Jun 1995), as a "commercial
item" as defined in FAR 2.101(a) (Jun 1987), or as "Restricted computer software" as
defined in FAR 52.227-19 (Jun 1987) (or any equivalent agency regulation or contract
clause), whichever is applicable. You have only those rights provided for such Software and
any accompanying documentation by the applicable DFARs or FAR clause or the
HP standard software agreement for the product involved.
ENWW Hewlett-Packard software license agreement 13
Page 26

Print cartridge limited warranty
NOTE
The following warranty applies to the print cartridge that came with this printer.
This HP product is warranted to be free from defects in materials and workmanship. This
warranty does not apply to products that (a) have been refilled, refurbished, remanufactured
or tampered with in any way, (b) experience problems resulting from misuse, improper
storage, or operation outside of the published environmental specifications for the printer
product or (c) exhibit wear from ordinary use. To obtain warranty service, please return the
product to place of purchase (with a written description of the problem and the print samples)
or contact HP customer support. At HP's option, HP will either replace products that prove to
be defective or refund your purchase price. TO THE EXTENT ALLOWED BY LOCAL LAW,
THE ABOVE WARRANTY IS EXCLUSIVE AND NO OTHER WARRANTY OR CONDITION,
WHETHER WRITTEN OR ORAL, IS EXPRESSED OR IMPLIED AND HP SPECIFICALLY
DISCLAIMS ANY IMPLIED WARRANTIES OR CONDITIONS OF MERCHANTABILITY,
SATISFACTORY QUALITY, AND FITNESS FOR A PARTICULAR PURPOSE. TO THE
EXTENT ALLOWED BY LOCAL LAW, IN NO EVENT WILL HP OR ITS SUPPLIERS BE
LIABLE FOR DIRECT, SPECIAL INCIDENTAL, CONSEQUENTIAL (INCLUDING LOST
PROFIT OR DATA), OR OTHER DAMAGE, WHETHER BASED IN CONTRACT, TORT, OR
OTHERWISE. THE WARRANTY TERMS CONTAINED IN THIS STATEMENT, EXCEPT TO
THE EXTENT LAWFULLY PERMITTED, DO NOT EXCLUDE, RESTRICT OR MODIFY
AND ARE IN ADDITION TO THE MANDATORY STATUTORY RIGHTS APPLICABLE TO
THE SALE OF THIS PRODUCT TO YOU.
14 Chapter 1 Product Information ENWW
Page 27

HP LaserJet printing supplies
In many countries/regions, this product's printing supplies (for example, the print cartridge
and fuser) can be returned to HP through the HP Printing Supplies Environmental Program.
This easy-to-use and free take-back program is available in more than 30 countries/regions.
Multilingual program information and instructions are included in every new HP LaserJet
print-cartridge and supplies package.
HP Printing Supplies Returns and Recycling Program Information
Since 1992, HP has offered HP LaserJet supplies return and recycling free of charge in the
world market where HP LaserJet supplies are sold. Postage-paid and pre-addressed labels
are included within the instruction guide in most HP LaserJet print cartridge boxes. Labels
and bulk boxes are also available through the Web site at http://www.hp.com/recycle. More
than 10 million HP LaserJet print cartridges were recycled globally in 2002 through the
HP Planet Partners supplies recycling program. This record number represents 26 million
pounds of print cartridge materials that were diverted from landfills. Worldwide, HP recycled
an average of 80% of the print cartridge by weight, consisting primarily of plastic and metals.
Recycled plastics and metals are used to make new products, such as HP products, plastic
trays, and spools. The remaining materials are disposed of in an environmentally
responsible manner.
● U.S. returns For a more environmentally responsible return of used cartridges and
supplies, HP encourages the use of bulk returns. Simply bundle two or more cartridges
together and use the single, postage-paid, pre-addressed UPS label that is supplied in
the package. For more information in the U.S., call 800-340-2445 or visit the
HP LaserJet Supplies Web site at http://www.hp.com/recycle.
● Non-U.S. returns Non-U.S. customers should call the local HP Sales and Service Office
or visit http://www.hp.com/recycle for further information regarding availability of the
HP Supplies Returns and Recycling Program.
● Material Safety Data Sheets (MSDSs) For more information regarding toner safety,
visit the http://www.hp.com/go/msds Web site.
ENWW HP LaserJet printing supplies 15
Page 28

Declaration of Conformity statements
Declaration of Conformity
according to ISO/IEC Guide 22 and EN 45014
Manufacturer's Name: Hewlett-Packard Company
Manufacturer's Address: 11311 Chinden Boulevard,
Boise, Idaho 83714-1021, USA
declares that the product
Product Name: HP LaserJet 1160 printer
Regulatory Model
Product Options: ALL
conforms to the following Product Specifications:
Safety: IEC 60950:1999 / EN 60950:2000
EMC:
Supplementary Information:
The product herewith complies with the requirements of the EMC Directive 89/336/EEC and the Low Voltage Directive 73/23/EEC, and carries
the CE-marking accordingly.
1) The product was tested in a typical configuration with Hewlett-Packard Personal Computer Systems.
2) This Device complies with Part 15 of the FCC Rules. Operation is subject to the following two Conditions: (1) this device may not cause
harmful interference, and (2) this device must accept any interference received, including interference that may cause undesired operation.
3) For regulatory purposes, this product is assigned a Regulatory model number. This number should not be confused with the marketing
name (HP LaserJet 1160 printer) or the product number (Q5933A).
For Regulatory Topics ONLY, contact:
Australia Contact: Product Regulations Manager, Hewlett-Packard Australia Ltd.,, 31-41 Joseph Street,, Blackburn, Victoria 3130,
European Contact: Your Local Hewlett-Packard Sales and Service Office or Hewlett-Packard GmbH, Department HQ-TRE / Standards
USA Contact: Product Regulations Manager, Hewlett-Packard Company,, PO Box 15, Mail Stop 160, Boise, Idaho 83707-0015,
3)
:
IEC 60825-1:1993 +A1:1997 +A2:2001 / EN 60825-1:1994 +A11:1996 +A2:2001 (Class 1 Laser/LED Product)
GB4943-2001
CISPR 22:1997 / EN 55022:1998 Class B
EN 61000-3-2:2000
EN 61000-3-3:1995 / A1
EN 55024:1998
FCC Title 47 CFR, Part 15 Class B
GB9254-1998, GB17625.1-1998 / CNS13438
Australia
Europe,, Herrenberger Straße 140,, Böblingen, D-71034, Germany (FAX: +49-7031-14-3143)
USA (Phone: 208-396-6000)
BOISB-0402-02
1)
2)
/ ICES-003, Issue 3
Boise, Idaho 83714, USA
30 April 2004
16 Chapter 1 Product Information ENWW
Page 29

Declaration of Conformity
according to ISO/IEC Guide 22 and EN 45014
Manufacturer's Name: Hewlett-Packard Company
Manufacturer's Address: 11311 Chinden Boulevard,
Boise, Idaho 83714-1021, USA
declares that the product
Product Name
4)
:
Regulatory Model
3)
:
HP LaserJet 1320 Series printer, HP LaserJet 1320n printer, HP LaserJet 1320tn
printer, HP LaserJet 1320nw printer
BOISB-0402-00/BOISB-0402-01
Including
Q5931A - Optional 250-Sheet Input Tray
Product Options: ALL
conforms to the following Product Specifications:
Safety: IEC 60950:1999 / EN 60950:2000
IEC 60825-1:1993 +A1:1997 +A2:2001 / EN 60825-1:1994 +A11:1996 +A2:2001 (Class 1 Laser/LED Product)
GB4943-2001
EMC:
CISPR 22:1997 / EN 55022:1998 Class B
1)
EN 61000-3-2:2000
EN 61000-3-3:1995 / A1
EN 55024:1998
FCC Title 47 CFR, Part 15 Class B
2)
/ ICES-003, Issue 3
GB9254-1998, GB17625.1-1998 / CNS13438
Supplementary Information:
The product herewith complies with the requirements of the EMC Directive 89/336/EEC and the Low Voltage Directive 73/23/EEC, and carries
the CE-marking accordingly.
1) The product was tested in a typical configuration with Hewlett-Packard Personal Computer Systems.
2) This Device complies with Part 15 of the FCC Rules. Operation is subject to the following two Conditions: (1) this device may not cause
harmful interference, and (2) this device must accept any interference received, including interference that may cause undesired operation.
3) For regulatory purposes, this product is assigned a Regulatory model number. This number should not be confused with the marketing
name (HP LaserJet 1320 Series printers) or the product numbers (Q5927A, Q5928A, Q5929A, and Q5930A).
4) Regulatory information regarding radio module approvals for the HP LaserJet 1320nw (Regulatory Model Number: BOISB-0402-01) can be
found in the wireless user guide for that product.
Boise, Idaho 83714, USA
30 April 2004
For Regulatory Topics ONLY, contact:
Australia Contact: Product Regulations Manager, Hewlett-Packard Australia Ltd.,, 31-41 Joseph Street,, Blackburn, Victoria 3130,
Australia
European Contact: Your Local Hewlett-Packard Sales and Service Office or Hewlett-Packard GmbH, Department HQ-TRE / Standards
Europe,, Herrenberger Straße 140,, Böblingen, D-71034, Germany (FAX: +49-7031-14-3143)
USA Contact: Product Regulations Manager, Hewlett-Packard Company,, PO Box 15, Mail Stop 160, Boise, Idaho 83707-0015,
USA (Phone: 208-396-6000)
ENWW Declaration of Conformity statements 17
Page 30
Country/region-specific safety statements
Laser safety statement
The Center for Devices and Radiological Health (CDRH) of the U.S. Food and Drug
Administration has implemented regulations for laser products manufactured since August 1,
1976. Compliance is mandatory for products marketed in the United States. The printer is
certified as a "Class 1" laser product under the U.S. Department of Health and Human
Services (DHHS) Radiation Performance Standard according to the Radiation Control for
Health and Safety Act of 1968.
Since radiation emitted inside the printer is completely confined within protective housings
and external covers, the laser beam cannot escape during any phase of normal user
operation.
WARNING!
Using controls, making adjustments, or performing procedures other than those specified in
this user guide could result in exposure to hazardous radiation.
Canadian DOC regulations
Complies with Canadian EMC Class B requirements.
«Conforme á la classe B des normes canadiennes de compatibilité électromagnétiques.
«CEM».»
Korean EMI statement
18 Chapter 1 Product Information ENWW
Page 31

Laser statement for Finland
LASERTURVALLISUUS
LUOKAN 1 LASERLAITE
KLASS 1 LASER APPARAT
HP LaserJet 1160, HP LaserJet 1320, HP LaserJet 1320n, HP LaserJet 1320tn,
HP LaserJet 1320nw -laserkirjoitin on käyttäjän kannalta turvallinen luokan 1 laserlaite.
Normaalissa käytössä kirjoittimen suojakotelointi estää lasersäteen pääsyn laitteen
ulkopuolelle.
Laitteen turvallisuusluokka on määritetty standardin EN 60825-1 (1994) mukaisesti.
VAROITUS!
Laitteen käyttäminen muulla kuin käyttöohjeessa mainitulla tavalla saattaa altistaa käyttäjän
turvallisuusluokan 1 ylittävälle näkymättömälle lasersäteilylle.
VARNING!
Om apparaten används på annat sätt än i bruksanvisning specificerats, kan användaren
utsättas för osynlig laserstrålning, som överskrider gränsen för laserklass 1.
HUOLTO
HP LaserJet 1160, HP LaserJet 1320, HP LaserJet 1320n, HP LaserJet 1320tn,
HP LaserJet 1320nw -kirjoittimen sisällä ei ole käyttäjän huollettavissa olevia kohteita.
Laitteen saa avata ja huoltaa ainoastaan sen huoltamiseen koulutettu henkilö. Tällaiseksi
huoltotoimenpiteeksi ei katsota väriainekasetin vaihtamista, paperiradan puhdistusta tai
muita käyttäjän käsikirjassa lueteltuja, käyttäjän tehtäväksi tarkoitettuja ylläpitotoimia, jotka
voidaan suorittaa ilman erikoistyökaluja.
VARO!
Mikäli kirjoittimen suojakotelo avataan, olet alttiina näkymättömälle lasersäteilylle laitteen
ollessa toiminnassa. Älä katso säteeseen.
VARNING!
Om laserprinterns skyddshölje öppnas då apparaten är i funktion, utsättas användaren för
osynlig laserstrålning. Betrakta ej strålen.
Tiedot laitteessa käytettävän laserdiodin säteilyominaisuuksista:
Aallonpituus 785-800 nm
Teho 5 mW
Luokan 3B laser
ENWW Country/region-specific safety statements 19
Page 32

20 Chapter 1 Product Information ENWW
Page 33

Installation
2
Chapter contents
Chapter contents......................................................................................................................21
Operating environment ............................................................................................................22
Printer connections .................................................................................................................22
Software...................................................................................................................................24
Supported operating systems ...........................................................................................24
Software for Windows .......................................................................................................25
Software for Macintosh computers ...................................................................................27
ENWW Chapter contents 21
Page 34

Operating environment
Place the printer on a sturdy, level surface in a well-ventilated area that meets the following
environmental requirements:
● Temperature: 15°C to 32.5°C (59°F to 90.5°F)
● Humidity: 10% to 80% relative humidity (no condensation)
● Away from direct sunlight, open flames, ammonia fumes, and air vents
● With sufficient space around the printer for access and ventilation (see
specifications for printer measurements).
Printer connections
All HP LaserJet 1160 and HP LaserJet 1320 Series printers support USB connections. The
base models (HP LaserJet 1160 printer and HP LaserJet 1320 Series printer) also support
parallel connections. HP LaserJet 1320n, HP LaserJet 1320tn, and HP LaserJet 1320nw
printers also support network connections.
Physical
Figure 2-1. USB connection
Figure 2-2. Parallel connection
22 Chapter 2 Installation ENWW
Page 35

Figure 2-3. Network connection
Figure 2-4. Wireless connection, infrastructure mode
Figure 2-5. Wireless connection, ad hoc mode
ENWW Printer connections 23
Page 36

Software
The following sections describe the software that is provided with the HP LaserJet 1160 and
HP LaserJet 1320 Series printers.
Supported operating systems
For easy printer setup and access to the full range of printer features, HP strongly
recommends that you install the software provided. Not all software is available in all
languages. Install the software before setting up the printer. See the Readme for the latest
software information.
The most recent drivers, additional drivers, and other software are available from the Internet
and other sources.
The printer comes with software for the following operating systems:
● Windows 98, second edition
● Windows Me
● Windows NT (printer driver only)
● Windows 2000
● Windows Server 2003 (printer driver only)
NOTE
For more information about upgrading from Windows 2000 Server to Windows
Server 2003, go to http://www.microsoft.com/windowsserver2003/.
For more information about Windows Server 2003 Point and Print, go to
http://www.microsoft.com/windowsserver2003/.
For more information about Windows Server 2003 Terminal Services and Printing, go to
http://www.microsoft.com/windowsserver2003/.
● Windows XP (32-bit)
● Windows XP (64-bit) (printer driver only)
● Mac OS 9.2 (printer driver only)
● Mac OS X V10.1 (printer driver only), V10.2 and later
Apple encourages OS X V10.0 users to upgrade to V10.1 or later.
24 Chapter 2 Installation ENWW
Page 37

Software for Windows
The following software is available:
Printer drivers
A printer driver is the software component that provides access to printer features and
provides the means for the computer to communicate with the printer. Choose a printer
driver based on the way you use the printer.
● Use the PCL 5e printer driver if you need print results to look consistent with those from
older HP LaserJet printers. Certain features are not available in this printer driver. (Do
not use the PCL 5e driver for this printer in other, older printers.)
● Use the PCL 6 printer driver to take full advantage of the printer features
(HP LaserJet 1320 Series printer only). Unless complete backward compatibility with
previous PCL drivers or older printers is necessary, the PCL 6 driver is recommended.
● Use the PS printer driver for compatibility with HP postscript level 2 emulation
(HP LaserJet 1320 Series printer only). Certain printer features are not available in this
printer driver.
● Use the host-based printer driver (HP LaserJet 1160 printer only).
The printer automatically switches between PS and PCL printer languages depending on the
driver you have selected.
Available printer drivers
The following printer drivers are included with the printer.
Table 2-1. Available printer drivers
HP LaserJet 1160 printer HP LaserJet 1320 Series printer
● PCL 5e
● Host-based
● PCL 5e
● PCL 6
● HP postscript level 2 emulation
ENWW Software 25
Page 38

HP Toolbox
NOTE
NOTE
This feature is not available for Windows Server 2003 and Windows XP (64-bit).
You can view the HP Toolbox when the printer is directly connected to your computer or
when it is connected to a network. You must have performed a complete software
installation to use the HP Toolbox.
The HP Toolbox is a Web-based program that you can use for the following tasks:
● Check the printer status.
● Configure the printer settings.
● View troubleshooting information.
● View online documentation.
Using the HP Toolbox for more information.
See
Embedded Web server
This feature is available on the HP LaserJet 1320n, HP LaserJet 1320tn, and
HP LaserJet 1320nw printers.
The embedded Web server is available for the HP LaserJet 1320 Series printer over the
Internal HP Jetdirect network connection.
With the embedded Web server, you can gain access to the printer settings and information
by typing an IP address or hostname of the printer in a Web browser (such as Netscape
Navigator or Microsoft
Web server to configure the printer, view status information, and obtain troubleshooting
information.
®
Internet Explorer) on any computer. You can use the embedded
NOTE
These settings can also be changed by using the HP Toolbox.
The embedded Web server works with the following supported Web browsers:
● Internet Explorer 5.5 and later
● Netscape Navigator 4.75 and later
Using the embedded Web server for more information.
See
26 Chapter 2 Installation ENWW
Page 39

Software for Macintosh computers
The following sections describe the software for Macintosh computers that is available for
the HP LaserJet 1160 and HP LaserJet 1320 Series printers.
HP LaserJet 1160 printer
The following sections describe how to gain access to the Macintosh software for the
HP LaserJet 1160 printer.
Gaining access to the printer driver (Mac OS 9.2 and later)
1. From the Apple menu, select the Chooser.
2. On the top, left side of the Chooser dialog box, click HP LaserJet.
3. Select one of the following options, depending on how the computer and the printer are
connected:
● TCP/IP: In the dialog box, select yes to scan for TCP/IP network printers.
● USB: Go to step 4.
4. On the right side of the Chooser dialog box, click HP LaserJet 1160 printer.
5. Close the Chooser.
Gaining access to the printer driver (Mac OS X V10.1 and later)
1. The Print Center should automatically start. If it does not start, perform the following
steps:
a. Double-click the hard-drive icon on the desktop.
b. Open the Applications folder, and then open the Utilities folder.
c. Double-click Print Center or Printer Setup Utility, depending on the operating
system.
2. Click Add. The Add Printer List dialog box appears.
3. Select one of the following options from the top menu, depending on how the computer
and the printer are connected:
● USB
● TCP/IP: For connecting to your TCP/IP printer in OS X V10.1, select ip printing.
For OS X V10.2 and later, select Rendezvous.
4. Select the printer name from the printer list.
5. Click Add.
HP LaserJet 1320 Series printer
The following sections describe how to access the Macintosh software for the
HP LaserJet 1320 Series printer.
ENWW Software 27
Page 40

Gaining access to the printer driver (Mac OS 9.2)
1. Double-click the hard-drive icon on the desktop.
2. Open the Applications folder, and then open the Utilities folder.
3. Start the Desktop Printer Utility.
4. Double-click Printer (USB).
5. In the USB Printer Selection section of the dialog box, click Change.
6. Select HP LaserJet 1320 Series printer.
7. Click Auto Setup.
8. Click Create.
9. Click Save.
Gaining access to the printer driver (Mac OS X V10.1 and later)
1. The Print Center should automatically start. If it does not start, perform the following
steps:
a. Double-click the hard-drive icon on the desktop.
b. Open the Applications folder, and then open the Utilities folder.
c. Double-click Print Center or Printer Setup Utility, depending on the operating
system.
2. Click Add. The Add Printer List dialog box appears.
3. Select one of the following options from the top menu, depending on how the computer
and the printer are connected:
● USB
● TCP/IP: For connecting to your TCP/IP printer in OS X V10.1, select ip printing.
For OS X V10.2 and later, select Rendezvous.
4. Select the printer name from the printer list.
5. Click Add.
PostScript Printer Description files (PPDs)
PPDs, in combination with the Apple printer driver, provide access to the printer features and
allow the computer to communicate with the printer. An installation program for the PPDs is
provided on the HP LaserJet 1320 Series printer CD.
28 Chapter 2 Installation ENWW
Page 41

Operation
3
Chapter contents
Chapter contents......................................................................................................................29
Printer control panel ................................................................................................................30
Status-light patterns ................................................................................................................31
Printer information pages ........................................................................................................37
Demo page .......................................................................................................................37
Configuration page ...........................................................................................................37
Supplies Status page ........................................................................................................37
Network Configuration page .............................................................................................37
Using the HP Toolbox .............................................................................................................38
Supported operating systems ...........................................................................................38
Supported browsers .........................................................................................................38
To view the HP Toolbox on Windows systems ................................................................39
To view the HP Toolbox on Macintosh systems ..............................................................39
HP Toolbox sections .........................................................................................................39
Other links .........................................................................................................................39
Status tab ..........................................................................................................................39
Troubleshooting tab ..........................................................................................................40
Alerts tab ...........................................................................................................................40
Documentation tab ...........................................................................................................40
Advanced Printer Settings window ...................................................................................41
Network window ................................................................................................................41
Using the embedded Web server ...........................................................................................42
To open the embedded Web server .................................................................................42
Information tab ..................................................................................................................43
Settings tab .......................................................................................................................43
Networking tab ..................................................................................................................43
Other links .........................................................................................................................44
Wireless printing ......................................................................................................................45
IEEE 802.11b/g standard .................................................................................................45
Bluetooth ...........................................................................................................................45
ENWW Chapter contents 29
Page 42

Printer control panel
The printer control panel is comprised of four lights and two buttons. The HP LaserJet
1320nw printer has an additional light at the top of the control panel. These lights produce
patterns that identify your printer status.
1 Wireless light (HP LaserJet 1320nw printer only): When the Wireless light is on solid, a
wireless connection has been established. When the Wireless light is off, wireless operation is
disabled. When the Wireless light is flashing, the printer is trying to establish a wireless
connection.
2 Toner light: When the toner is low, the Toner light is on solid. When the print cartridge is out of
the printer or when the print cartridge is empty, the Toner light is flashing.
3 Attention light: Indicates that the input tray is empty, the print-cartridge door is open, or that
other errors exist. See
4 Ready light: Indicates that the printer is ready to print.
5 G
6 C
O
button and light: To print a Demo page or to continue printing while in the manual feed
mode, press and release the G
button for 5 seconds.
ANCEL
Printer information pages for more information.
O
button. To print a configuration page, press and hold the G
button: To cancel the print job that is currently printing, press the C
ANCEL
O
button.
NOTE
See Status-light patterns for a description of the light patterns.
30 Chapter 3 Operation ENWW
Page 43

Status-light patterns
Table 3-1. Light status legend
Symbol for "light off"
Symbol for "light on"
Symbol for "light blinking"
Table 3-2. Control-panel-light message
Light status State of the printer Action
Initialization/Startup
While in the Startup state, the
Go, Ready, and Attention lights
cycle (at the rate of 500 ms)
one after another.
During the Initialization
process, pressing buttons has
no effect.
ENWW Status-light patterns 31
Page 44

Table 3-2. Control-panel-light message (continued)
Light status State of the printer Action
Reconfiguration Initialization
During the printer start up, you
can request special
initialization sequences that
reconfigure the printer. When
one of the sequences is
requested, such as a cold
reset, the lights cycle as in the
Initialization/Startup state.
Ready
The printer is ready with no job
activity.
During the Reconfiguration
process, pressing buttons has
no effect.
To print a Configuration page,
press and hold the G
O
button
for 5 seconds.
To print a Demo page, press
and release the G
O
button.
Processing Data
The printer is processing or
To cancel the current job, press
the C
ANCEL
button.
receiving data.
32 Chapter 3 Operation ENWW
Page 45

Table 3-2. Control-panel-light message (continued)
Light status State of the printer Action
Job Cancel Pressing the GO button has no
effect.
After the cancellation process
is complete, the printer returns
to the Ready state.
Manual Feed or Continuable
Error
This state can occur in the
following circumstances:
● Manual feed
● Input tray is empty
● General continuable error
● Memory-configuration error
● Personality/job-related error
Attention
This state can occur in the
following circumstances:
● Input tray is empty
● Door is open
● Jam
To recover from the error and
print whatever data is possible,
press the G
O
button.
If the recovery is successful,
the printer goes to the
Processing Data state and
completes the job.
If the recovery is unsuccessful,
the printer returns to the
Continuable Error state.
To reset the printer after a jam,
press the G
O
button.
You might need to clear the
error manually, and press the
G
O
button or close the top cover.
If the error persists, the printer
returns to the Attention state.
● Misfeed from a tray
ENWW Status-light patterns 33
Page 46

Table 3-2. Control-panel-light message (continued)
Light status State of the printer Action
Fatal Error Turn off the printer, wait 10
seconds, and turn on the printer.
See
Troubleshooting
Accessory Error
(HP LaserJet 1320 Series
printer only)
Cleaning Page
The cleaning page feature is
not available through the
control panel. The cleaning
page can be activated using
the HP Toolbox, which is
included as part of the overall
printer software package.
To see additional error
information, press the G
O
button. The light pattern
changes. For more information
about the light pattern that
appears, see
When you release the G
Troubleshooting.
O
button, the printer returns to the
initial Accessory Error state.
During cleaning mode,
pressing buttons has no effect.
The printer motor slows down
and the printer prints a page.
34 Chapter 3 Operation ENWW
Page 47

Table 3-2. Control-panel-light message (continued)
Light status State of the printer Action
Toner Low
The toner supply in the
cartridge is running low.
The Go, Ready, and Attention
lights act independently of the
Toner Low state.
Print Cartridge Missing
The print cartridge has been
removed from the printer.
It is necessary to purchase a
new print cartridge. Replace
the print cartridge when the
print on the page begins to fade.
Reinsert the print cartridge in
the printer.
Wireless Connection
Established
The Go, Ready, Attention, and
Toner lights act independently
of the Wireless light.
No action is necessary.
ENWW Status-light patterns 35
Page 48

Table 3-2. Control-panel-light message (continued)
Light status State of the printer Action
Wireless Disabled
The Go, Ready, Attention, and
Toner lights act independently
of the Wireless light.
Attempting to Establish
Wireless Connection
The Wireless light blinks at onehalf second intervals.
The Go, Ready, Attention, and
Toner lights act independently
of the Wireless light.
No action is necessary.
No action is necessary.
36 Chapter 3 Operation ENWW
Page 49

Printer information pages
Special pages reside within the memory of the printer. These pages help you to diagnose
and solve problems with the printer.
Demo page
The Demo page contains examples of text and graphics. To print the Demo page, press and
immediately release G
Configuration page
The configuration page lists current settings and contains a status log report. You can print a
configuration page from the printer, the embedded web server, or the HP Toolbox.
To print the configuration page from the printer, press G
comes on, when the printer is in the ready state.
O
when the printer is ready (the Ready light on) and not printing.
O
for 5 seconds, until the yellow light
NOTE
NOTE
NOTE
Make sure that you hold the GO button for less than 10 seconds.
You can also get the information contained in the event log and the configuration page
through the HP Toolbox without printing the pages. See
information.
Using the HP Toolbox for more
Supplies Status page
The Supplies Status page provides information about the print cartridge that is installed in
the printer, the amount of toner that remains in the print cartridge, and the number of pages
and print jobs that have been processed. The Supplies Status page also provides ordering
and recycling information. The Supplies Status page automatically prints when you print a
configuration page from the control panel.
Network Configuration page
The Network Configuration page is only available on the HP LaserJet 1320n,
HP LaserJet 1320tn, and HP LaserJet 1320nw printers.
A Network Configuration page prints whenever a printer configuration page is printed. You
can also print a Network Configuration page by pressing the network Reset button at the
back of the printer (see
Figure 7-4. Network Reset button).
The Network Configuration page provides information about the network configuration,
including the IP address, firmware revision, network statistics, protocol information, and so
on. The Network Configuration page automatically prints when you print a configuration
page from the control panel.
ENWW Printer information pages 37
Page 50

Using the HP Toolbox
The HP Toolbox is a Web-based program that you can use for the following tasks:
● Check the printer status.
● Configure the printer settings.
● View troubleshooting information.
● View online documentation.
You can view the HP Toolbox when the printer is directly connected to your computer or
when you are using a supported network connection. You must have performed a complete
software installation to use the HP Toolbox.
NOTE
You do not have to have Internet access to open and use the HP Toolbox. However, if you
click a link in the Other Links area, you must have Internet access in order to go to the site
associated with the link. See
To install the HP Toolbox, you must install the TCP/IP protocol and the most recent version
of the Java™ Virtual Machine on the computer. You must also install the DOT4 protocol for
all USB connections, LPT connections for Windows 2000 and Windows XP, and LPT1
connections for Windows 98 S.E., Windows Me, and Windows NT 4.0. See the system
administrator or computer manufacturer's documentation for more information about
installing the TCP/IP protocol and the DOT4 protocol. To download the most recent version
of the Java Virtual Machine from Sun Microsystems, go to http://www.sun.com/.
Other links for more information.
Supported operating systems
HP Toolbox is supported for the following operating systems:
● Windows 98 SE, Windows 2000, Windows Me, and Windows XP
● Mac OS X V10.2 and later
Supported browsers
To use the HP Toolbox, you must have one of the following browsers:
● Microsoft Internet Explorer 5.5 or later
● Netscape Navigator 6.0 or later
38 Chapter 3 Operation ENWW
Page 51

To view the HP Toolbox on Windows systems
1. On the Start menu, point to Programs or All Programs, point to HP LaserJet 1160 or
HP LaserJet 1320, and then select the HP Toolbox.
2. The HP Toolbox opens in a Web browser.
NOTE
After you open the URL, you can bookmark it so that you can return to it quickly in the future.
To view the HP Toolbox on Macintosh systems
1. Double-click the hard-drive icon on the desktop.
2. Click Applications, and then click Utilities.
3. Double-click hp toolbox.
HP Toolbox sections
The HP Toolbox software contains these sections:
Status tab
●
Troubleshooting tab
●
Alerts tab
●
Documentation tab
●
Advanced Printer Settings window
●
Network window (available only for the HP LaserJet 1320n, HP LaserJet 1320tn, and
●
HP LaserJet 1320nw printers)
Other links
Each page in the HP Toolbox contains links to the HP Web site for product registration,
product support, and for ordering supplies. You must have Internet access in order to use
any of these links. If you use a dial-up connection and did not connect when you first opened
the HP Toolbox, you must connect before you can visit these web sites.
Status tab
The Status tab has links to these main pages:
● Device Status. View printer status information. This page indicates printer conditions
such as a jam or an empty tray. After you correct a problem with the printer, click the
Refresh button to update the device status.
● Supplies Status. View detailed supplies status such as the percentage of toner
remaining in the print cartridge and the number of pages that have been printed with the
current print cartridge. This page also has links to order supplies and to find recycling
information.
● Print Info pages. Print the configuration page and various other information pages that
are available for the printer.
ENWW Using the HP Toolbox 39
Page 52

Troubleshooting tab
The Troubleshooting tab provides links to printer troubleshooting information. For example,
these pages provide information about how to clear a jam, how to resolve print-quality
problems, how to interpret the control-panel lights, and how to resolve other problems with
the printer.
Alerts tab
Use the Alerts tab to configure the printer to automatically notify you of printer alerts. The
Alerts tab has links to these main pages:
● Set up status alerts
● Set up e-mail alerts
● Administrative settings
Set up status alerts
On the Set up status alerts page you can turn alerts on or off, specify when the printer
should send an alert, and choose from two different types of alerts:
● Pop-up message
● Task bar icon
Click Apply to activate the settings.
Set up e-mail alerts
Use this page to designate up to two e-mail addresses to receive printer-status alerts. Follow
the instructions on the screen to set up e-mail alerts.
Administrative settings
Use this page to set how frequently the HP Toolbox checks for printer alerts. Three settings
are available:
● Less often
● Normal
● More often
If you want to reduce network I/O traffic, reduce the frequency with which the printer checks
for alerts.
Documentation tab
The Documentation tab contains links to these information sources:
● User Guide. Contains the information about the printer usage, warranty, specifications,
and support. The user guide is available in both .html and .pdf format.
● ReadMe. Contains additional information that is not included in the user guide.
40 Chapter 3 Operation ENWW
Page 53

Advanced Printer Settings window
When you click the Advanced Printer Settings link, a new window opens. The Advanced
Printer Settings window has two tabs:
● Information tab
● Settings tab
Information tab
The Information tab provides quick links to the following information:
● Device status
● Device configuration
● Supplies status
● Event log
● Print Info pages
Settings tab
The Settings tab has links to several pages that allow you to view and change the printer's
configuration.
NOTE
NOTE
Driver settings can override settings made in the HP Toolbox.
● Device Information. View basic information about the printer.
● Paper Handling. View and change the settings for the input tray.
● Printing. View and change the default printer job settings.
● PCL. View and change the PCL font information.
● PostScript. This page is available for the HP LaserJet 1320 Series printer only. View
and change the settings for PS errors and timeout.
● Print Quality. View and change the print quality settings.
● Print Modes. View and change the print modes for various media types.
● System Setup. View and change system information.
● I/O. View and change the I/O timeout setting.
● Resets. Return all of the printer settings to the factory default settings.
Network window
This option is only available for the HP LaserJet 1320n, HP LaserJet 1320tn, and
HP LaserJet 1320nw printers.
When you click the Network link on the Advanced Printer Settings page, a new window
opens. Use this section to configure network settings.
ENWW Using the HP Toolbox 41
Page 54

Using the embedded Web server
The embedded Web server can be directly accessed on the HP LaserJet 1320n,
HP LaserJet 1320tn, and HP LaserJet 1320nw printers. The embedded Web server provides
the same functions as the Advanced Printer Settings section of the HP Toolbox. Following
are the main differences between using the embedded Web server and using the HP Toolbox:
● You do not have to install any software on the computer. You only need a supported
Web browser. To use the embedded Web server, you must have Microsoft Internet
Explorer 5.5 or later or Netscape Navigator 4.75 or later.
● The embedded Web server is available in English only.
● The embedded Web server does not provide e-mail or status alerts.
Use the embedded Web server to view printer and network status and to manage printing
functions from your computer instead of from the printer control panel. The following are
examples of what you can do using the embedded Web server:
● View printer status information
● View and print internal pages
● Determine the remaining life for all supplies and order new ones
● Set the size and type of media that is loaded in each tray
● View and change tray configurations
NOTE
NOTE
● View and change the printer default configuration settings
● View and change network configuration
The embedded Web server works when the printer is connected to an IP-based network.
The embedded Web server does not support IPX-based printer connections.
You do not have to have Internet access to open and use the embedded Web server.
However, if you click a link in the Other Links area, you must have Internet access in order
to go to the site associated with the link.
To open the embedded Web server
1. In a supported Web browser, type the IP address or hostname for the printer. To find the
O
IP address, print a configuration page at the printer by pressing and holding G
5 seconds, but less than 10 seconds.
After you open the URL, you can bookmark it so that you can return to it quickly in the future.
2. The embedded Web server has three tabs that contain settings and information about
the printer: the Information tab, the Settings tab, and the Networking tab. Click the tab
that you want to view.
for
42 Chapter 3 Operation ENWW
Page 55

Information tab
The Information tab consists of the following pages:
● Device Status. This page shows the printer status and shows the life remaining for
HP supplies. This page also shows product information such as the network name,
network address, and model information.
● Configuration. This page shows the information that is also found on the printer
configuration page.
● Supplies Status. This page shows the life remaining for HP supplies and provides
supplies part numbers.
● To order new supplies, click Order Supplies in the Other Links area on the left side
of the window.
● To visit any Web site, you must have Internet access.
●
Event log. This page shows a list of all printer events and errors.
● Print Info Pages. This page has links that you can use to print the various information
pages that reside within the printer memory.
Settings tab
Use the Settings tab to configure the printer from your computer. If this printer is networked,
always consult with the printer administrator before changing settings on this tab.
NOTE
The Settings tab contains the following pages:
● Device Information. View and change basic information about the printer.
● Paper Handling. View and change the settings for the input tray.
● Printing. View and change the default printer job settings.
● PCL. View and change the PCL font information.
● PostScript. View and change the settings for PS errors and timeout.
● Print Quality. View and change the print quality settings.
● Print Modes. View and change the print modes for various media types.
● System Setup. View and change system information.
● I/O. View and change the I/O timeout setting.
● Service. Complete service tasks in the printer, such as changing all the printer settings
back to the factory default settings.
Networking tab
This option is only available for the HP LaserJet 1320n, HP LaserJet 1320tn, and
HP LaserJet 1320nw printers.
The network administrator can use this tab to control network-related settings for the printer
when it is connected to an IP-based network.
ENWW Using the embedded Web server 43
Page 56

Other links
This section contains links that connect you to the Internet. You must have Internet access in
order to use any of these links. If you use a dial-up connection and did not connect when
you first opened the embedded Web server, you must connect before you can visit these
Web sites. Connecting might require that you close the embedded Web server and reopen it.
● Product Registration. Connects you to the product registration page on the HP Web
site.
● Order Supplies. Click this link to connect to the Sure Supply Web site and order
genuine HP supplies from HP or a reseller of your choice.
● Product Support. Connects to the support site for the HP LaserJet 1320 Series printer.
You can search for help regarding general topics.
44 Chapter 3 Operation ENWW
Page 57

Wireless printing
Wireless networks offer a safe, secure, and cost-effective alternative to traditional wired
network connections. The HP LaserJet 1320nw printer has built-in wireless connectivity.
IEEE 802.11b/g standard
With wireless IEEE 802.11b/g compliant connectivity, the printers can be placed in the office
or home and connected to a wireless network running Microsoft, Apple, NetWare, UNIX
Linux network operating systems. This wireless technology provides a high-quality printing
solution without the physical constraints of wiring. Peripherals can be conveniently placed in
an office or home and can be easily moved without changing network cables.
Optional external HP Jetdirect 802.11b/g print servers are available for USB connections.
See the documentation that came with the HP LaserJet 1320nw printer for more information.
®
, or
Bluetooth
Bluetooth wireless technology is a low-power, short-range radio technology that can be used
to wirelessly connect computers, printers, personal digital assistants, cell phones, and other
devices.
Unlike infrared technology, Bluetooth's reliance on radio signals means that devices do not
have to be in the same room, office, or cubicle or have an unobstructed line of sight in order
to communicate. This wireless technology increases portability and efficiency within
business networks.
Bluetooth adapters are available for USB and parallel connections.
ENWW Wireless printing 45
Page 58

46 Chapter 3 Operation ENWW
Page 59

Maintenance
4
Chapter contents
Chapter contents......................................................................................................................47
Replacing the print cartridge....................................................................................................48
To replace the print cartridge.............................................................................................48
Cleaning the printer .................................................................................................................49
Cleaning the print-cartridge area ......................................................................................49
Cleaning the printer media path .......................................................................................51
Changing the pickup roller ......................................................................................................52
Cleaning the pickup roller ........................................................................................................58
Changing the printer separation pad .......................................................................................59
Cleaning the printer separation pad.........................................................................................63
ENWW Chapter contents 47
Page 60

Replacing the print cartridge
Use the below instructions to remove or replace the print cartridge.
To replace the print cartridge
1. Open the print-cartridge door, and remove the print cartridge.
CAUTION
To prevent damage, do not expose the print cartridge to light. Cover the print cartridge if
necessary. Also, do not touch the black sponge transfer roller inside the printer. By doing so,
you can damage the printer.
2. Remove the new print cartridge from the packaging.
3. Remove the sealing tape from the new print cartridge.
4. Reinstall the print cartridge, and then close the print-cartridge door.
5. Dispose of the old print cartridge according to the instructions that were shipped with the
new print cartridge.
48 Chapter 4 Maintenance ENWW
Page 61

Cleaning the printer
Clean the outside of the printer with a clean, damp cloth when necessary.
WARNING!
CAUTION
Before cleaning the printer, turn the printer off, unplug the power cord, and wait for the
printer to cool.
Do not use ammonia-based cleaners on or around the printer.
Cleaning the print-cartridge area
During the printing process, paper, toner, and dust particles can accumulate inside the
printer. Over time, this buildup can cause print-quality problems, such as toner specks or
smearing, and jams. To correct and prevent these types of problems, you can clean the printcartridge area and the printer media path.
You do not have to clean the print-cartridge area often. However, cleaning this area can
improve the quality of your printed sheets.
1. Open the print-cartridge door, and remove the print cartridge.
CAUTION
ENWW Cleaning the printer 49
To prevent damage, do not expose the print cartridge to light. Cover the print cartridge to
shield it from light. Also, do not touch the black sponge transfer roller inside the printer.
Touching the roller can damage the printer.
Page 62

2. Using a dry, lint-free cloth, wipe any residue from the media path area and the print
cartridge cavity.
3. Replace the print cartridge, and close the print-cartridge door.
4. Plug the power cord into the printer and then turn on the printer.
50 Chapter 4 Maintenance ENWW
Page 63

Cleaning the printer media path
If you are experiencing toner specks or dots on the printouts, clean the printer media path.
This process uses a transparency to remove dust and toner from the media path. Do not use
bond or rough paper.
NOTE
NOTE
For best results use a sheet of transparency. If you do not have any transparencies, you can
use copier grade paper (70 to 90 g/m
2
[ (18 to 24 lb)]) that has a smooth surface.
1. Make sure that the printer is idle and the Ready light is on.
2. Load the transparency in the input tray.
3. Print a cleaning page by using one of the following methods:
● Open the HP Toolbox. See
Using the HP Toolbox for instructions. Click the
Troubleshooting tab, and click Print Quality Tools. Select the cleaning page.
O
● On the printer control panel, press and hold the G
illuminate (about 10 seconds). When all three lights illuminate, release the G
button until all three lights
O
button.
The cleaning process takes approximately two minutes. The cleaning page stops periodically
during the cleaning process. Do not turn the printer off until the cleaning process has
finished. You might have to repeat the cleaning process several times to thoroughly clean
the printer.
ENWW Cleaning the printer 51
Page 64

Changing the pickup roller
Normal use with good media causes wear. The use of poor media might require more
frequent replacement of the pickup roller.
If the printer regularly mispicks (no media feeds through), you might need to change or clean
the pickup roller. See
Ordering parts and supplies to order a new pickup roller.
CAUTION
Failure to complete this procedure might damage the printer.
1. Turn off the printer, unplug the power cord from the printer, and then allow the printer to
cool.
2. Open the print-cartridge door, and remove the print cartridge.
52 Chapter 4 Maintenance ENWW
Page 65

3. Remove tray 2.
4. Open the front automatic two-sided-printing path door (HP LaserJet 1320 Series printer
only).
5. Place the printer on the work surface with the front of the printer facing up.
ENWW Changing the pickup roller 53
Page 66

6. Pull the white tabs outward, and rotate the tabs up.
7. Slide the right tab to the right, and leave the tab in this position throughout the procedure.
54 Chapter 4 Maintenance ENWW
Page 67

8. Slide the pickup roller assembly to the right, and remove the left end cap.
9. Remove the pickup roller.
ENWW Changing the pickup roller 55
Page 68

10. Insert the left side of the new pickup roller into the left slot (1), and insert the right side
(with notches in the shaft) into the right slot (2).
11. Rotate the shaft until the notches engage and the shaft clicks into place.
12. Place the end cap over the shaft on the left side, push the end cap to the right, and
rotate the tab downward into position.
13. Push the right tab to the left, and rotate the tab downward into position.
14. Place the printer on the work surface with the top of the printer facing up.
56 Chapter 4 Maintenance ENWW
Page 69

15. Close the front automatic two-sided-printing path door.
16. Reinstall the print cartridge, and close the print-cartridge door.
17. Plug the power cord into the printer and then turn on the printer.
ENWW Changing the pickup roller 57
Page 70

Cleaning the pickup roller
If you want to clean the pickup roller rather than replace it, follow these instructions:
1. Remove the pickup roller as described in steps 1 through 9 of
2. Dab a lint-free cloth in water, and scrub the roller.
3. Using a dry, lint-free cloth, wipe the pickup roller to remove loosened dirt.
4. Allow the pickup roller to dry completely before you reinstall it in the printer (see steps 10
through 17 of
Changing the pickup roller).
Changing the pickup roller.
58 Chapter 4 Maintenance ENWW
Page 71
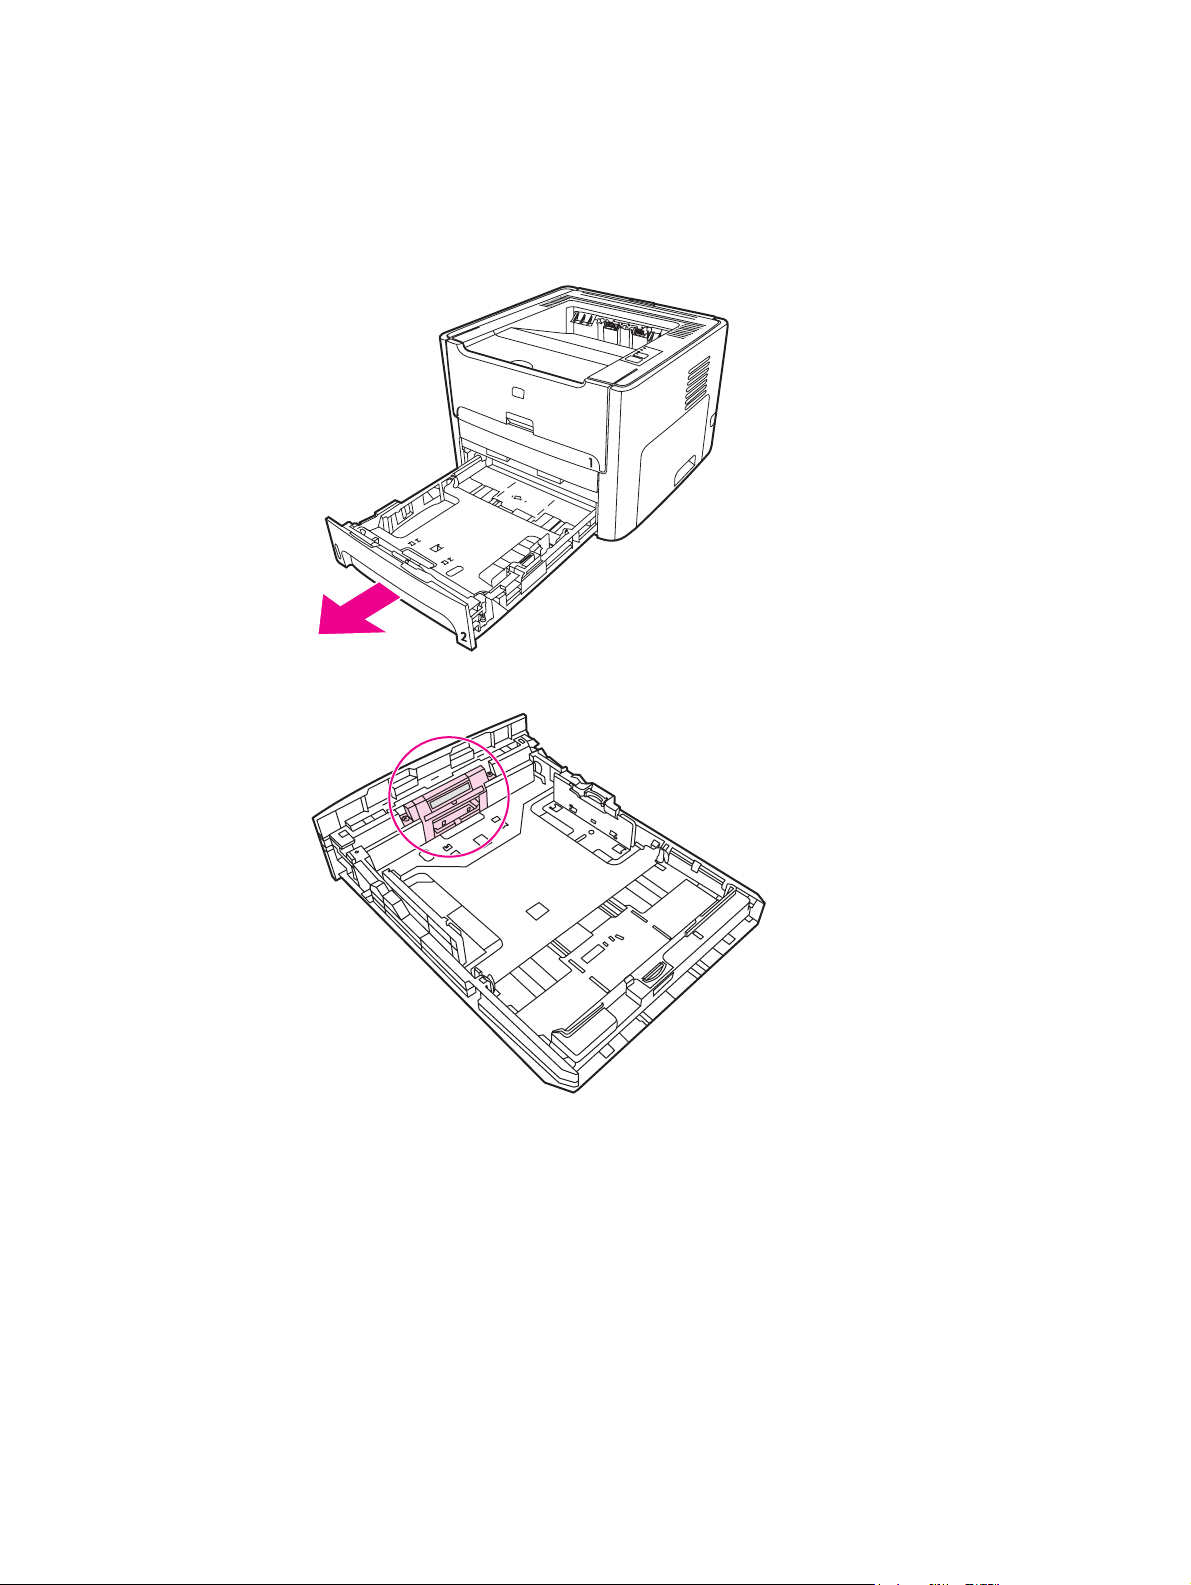
Changing the printer separation pad
Normal use with good media causes wear. The use of poor media might require more
frequent replacement of the separation pad. If the printer regularly pulls multiple sheets of
media at a time, you might need to change the separation pad.
1. Remove the main input tray (tray 2).
2. Locate the separation pad.
ENWW Changing the printer separation pad 59
Page 72

3. Remove the screws.
60 Chapter 4 Maintenance ENWW
Page 73

4. Remove the separation pad.
NOTE
Before you proceed to step 4, examine the position of the separation pad in the tray.
5. Insert the new separation pad.
ENWW Changing the printer separation pad 61
Page 74

6. Replace the screws.
62 Chapter 4 Maintenance ENWW
Page 75

Cleaning the printer separation pad
If you want to clean the separation pad rather than replace it, follow the instructions below.
1. Remove the separation pad as described in steps 1 through 4 of
separation pad.
2. Dab a lint-free cloth in water, and scrub the separation pad.
3. Using a dry, lint-free cloth, wipe the pickup roller to remove loosened dirt.
4. Allow the separation pad to dry completely before you reinstall it in the printer (see steps
5 and 6 of
Changing the printer separation pad).
Changing the printer
ENWW Cleaning the printer separation pad 63
Page 76

64 Chapter 4 Maintenance ENWW
Page 77

Theory of operation
5
Chapter contents
Chapter contents......................................................................................................................65
Introduction...............................................................................................................................66
Internal components.................................................................................................................67
Timing.......................................................................................................................................68
Engine control system..............................................................................................................70
Laser/scanner system..............................................................................................................72
Pickup/feed/delivery system....................................................................................................73
Image-formation system...........................................................................................................75
ENWW Chapter contents 65
Page 78

Introduction
This chapter presents an overview of the relationships between major components in the
printer, and includes a detailed discussion of the image-formation system. The following
systems are discussed:
● Engine control system
● Laser/scanner system
● Pickup/feed/delivery system
● Image-formation system
Figure 5-1. Block diagram illustrates the relationships among the four systems.
Figure 5-1.
Block diagram
66 Chapter 5 Theory of operation ENWW
Page 79

Internal components
Figure 5-2. Cross-section of printer highlights the major internal components.
Figure 5-2.
Cross-section of printer
1 Top output bin delivery roller
2 Fuser film
3 Laser/scanner
4 Primary charging roller
5 Developing cylinder
6 Print cartridge
7 Feed roller
8 Separation pad
9 Pickup roller
10 Registration roller
11 Duplexer pickup roller
12 Registration shutter
13 Transfer roller
14 Photosensitive drum
15 Duplexer feed roller
16 Pressure roller
17 Rear output bin delivery roller
ENWW Internal components 67
Page 80

Timing
Sequence of operation
Operation sequences are controlled by the microprocessor on the dc controller.
Table 5-1.
Sequence of operation describes engine operations for each period of a print operation.
Table 5-1. Sequence of operation
Name Timing Purpose
WAIT From power-on until the end of the main
motor initial drive
STBY
(standby)
INTR (initial
rotation)
PRINT From the end of the INTR period until the
From the end of the WAIT or LSTR
period until either a print command is
sent from the formatter or the power is
turned off.
From the time of the print command until
the pickup solenoid is turned on.
primary high-voltage is turned off.
Detects presence of a print cartridge.
Clears potential from the drum surface
and cleans the transfer roller.
See
Table 5-2. Power-on sequence for a
complete description of the WAIT (poweron) period. Also see
for detailed information about printer
timing.
Prepares the printer to receive print
commands
Prepares the photosensitive drum for
printing.
Forms the image on the photosensitive
drum and transfers the toner image to the
media.
General timing chart
LSTR (last
rotation)
From the end of the PRINT period (when
high-voltage is turned off) until the main
motor stops rotating.
Delivers the last page of a print job.
After LSTR, the printer either returns to
STBY or, if another print command was
sent from the formatter, enters INTR.
Power-on sequence
Table 5-2. Power-on sequence
Step Action
1 Power-on
2 CPU initialization
3 Video interface communication start
4 Check sensors for residual media
5 Main motor initial drive
6 Fuser heater initial drive. The fuser heater reaches a surface temperature
of 100 degrees C.
7 Laser/scanner motor initial drive
68 Chapter 5 Theory of operation ENWW
Page 81

Table 5-2. Power-on sequence (continued)
Step Action
8 High-voltage control
Detect presence of a print cartridge
Clean the transfer roller after the primary charging ac bias is turned on
9 Failure/abnormality check: detect laser/scanner failure, fuser failure, and
open covers
10 Communication with the memory tag
ENWW Timing 69
Page 82

Engine control system
The engine control system coordinates all printer functions, according to commands sent
from the formatter. It drives the laser/scanner system, the image-formation system, and the
pickup/feed/delivery system.
The engine control system contains the following components:
● Dc controller
● High-voltage PCA
Figure 5-3. Engine control system
70 Chapter 5 Theory of operation ENWW
Page 83

Figure 5-4. Engine control system circuit diagram
ENWW Engine control system 71
Page 84

Laser/scanner system
The laser/scanner system receives video signals from the dc controller and the formatter and
converts the signals into latent images on the photosensitive drum.
Figure 5-5. Laser/scanner system
72 Chapter 5 Theory of operation ENWW
Page 85

Pickup/feed/delivery system
The pickup/feed/delivery system consists of several types of feed rollers and sensors. The
dc controller uses two motors and two solenoids to drive the rollers. Three media-detection
sensors detect media as it passes through the printer. If media does not reach or pass each
sensor within a specified time period, the dc controller determines that a jam has occurred
and alerts the formatter.
The following components are identified in
● M1, main motor
● SL1, tray 2pickup solenoid
● SL2, tray 1pickup solenoid
● SL3, duplex solenoid (HPLJ 1320 only)
● PS911, tray 1 media sensor
● PS912, top-of-page sensor
● PS913, width-detection sensor
● PS914, tray 2 media sensor
Figure 5-6. Pickup/feed/delivery system:
ENWW Pickup/feed/delivery system 73
Page 86

● PS915, fuser delivery sensor
● PS915, duplex sensor (HPLJ 1320 only)
Figure 5-6.
74 Chapter 5 Theory of operation ENWW
Pickup/feed/delivery system
Page 87

Image-formation system
Laser printing requires the interaction of several different technologies, including electronics,
optics, and electrophotographics, to provide a printed page. Each process functions
independently and must be coordinated with the other printer processes. Image formation
consists of the following five processes:
● electrostatic latent-image formation
● developing
● transfer
● fusing
● drum cleaning
Figure 5-7.
The five processes contain eight steps, which are shown in
system and described in the following sections.
Image-formation system
Step 1: Primary charging
Dc and ac biases are applied to the primary charging roller, which transfers a uniform
negative potential to the photosensitive drum.
Figure 5-7. Image-formation
Figure 5-8. Primary charging
Step 2: Laser beam exposure
The laser beam scans the photosensitive drum to neutralize negative charges on parts of
the drum. An electrostatic latent image is formed on the drum where negative charges were
neutralized.
ENWW Image-formation system 75
Page 88

Step 3: Developing
The developing cylinder comes in contact with the photosensitive drum to deposit toner onto
the electrostatic latent image.
NOTE
Figure 5-9.
The charges on the exposed area of the drum are shown as positive in Figure 5-9.
Developing. The charges are actually negative, but they are more positive than the charges
on the developing cylinder.
Developing
Toner acquires a negative charge through friction from the developing cylinder and the
blade. When the negatively charged toner comes in contact with the drum, the toner adheres
to the electrostatic latent image. The image on the drum becomes visible because of the
toner.
Step 4: Transfer
The transfer charging roller, to which a dc positive bias is applied, imparts a positive charge
on the print media. When the print media comes in contact with the photosensitive drum, the
toner is transferred to the print media.
Figure 5-10. Transfer
Step 5: Separation
76 Chapter 5 Theory of operation ENWW
Page 89

The elasticity of the print media causes its separation from the photosensitive drum. A static
charge eliminator aids separation by weakening any electrostatic adhesion.
Figure 5-11. Separation
Step 6: Fusing
The dc negative bias applied to the fusing film strengthens the holding force of the toner on
the print media and prevents the toner from scattering.
Figure 5-12. Fusing
Step 7: Drum cleaning
ENWW Image-formation system 77
Page 90

The cleaning blade scrapes the residual toner off of the photosensitive drum and deposits it
into the waste toner case.
Figure 5-13. Drum cleaning
78 Chapter 5 Theory of operation ENWW
Page 91

Removal and replacement
6
Chapter contents
Chapter contents......................................................................................................................79
Introduction ..............................................................................................................................80
Removal and replacement strategy ..................................................................................80
Electrostatic discharge .....................................................................................................80
User-replaceable parts .....................................................................................................80
Required tools ...................................................................................................................80
Before performing service .......................................................................................................81
Pre-service procedures ....................................................................................................81
Parts removal order ..........................................................................................................81
Covers......................................................................................................................................82
Left-side cover...................................................................................................................82
Right-side cover.................................................................................................................84
Back cover.........................................................................................................................86
Duplexer tray.....................................................................................................................89
Top cover...........................................................................................................................90
Control panel............................................................................................................................93
Formatter..................................................................................................................................95
Laser/scanner...........................................................................................................................96
Memory-tag-reader assembly..................................................................................................97
Duplex-drive PCA.....................................................................................................................99
Fuser......................................................................................................................................101
Fan...................................................................................................................................101
Duplex-drive gears/face-down gears...............................................................................103
Duplex solenoid (SL3) (HP LaserJet 1320 Series printers only).....................................106
Fuser................................................................................................................................107
Interlock assembly.................................................................................................................117
ECU........................................................................................................................................119
Main motor.............................................................................................................................127
Pickup and feed assemblies..................................................................................................129
Transfer roller..................................................................................................................129
Registration assembly.....................................................................................................130
Main gear assembly/tray 2 pickup solenoid...........................................................................131
Print-cartridge door................................................................................................................135
Wireless communications card..............................................................................................137
ENWW Chapter contents 79
Page 92

Introduction
This chapter documents removal and replacement of field replaceable units (FRUs) only.
Removal and replacement strategy
Replace parts in the reverse order of their removal. Directions for difficult or critical
replacement procedures are included.
WARNING!
NOTE
CAUTION
The sheet-metal edges of the product can be sharp. Use caution when working on the
product.
Note the length, diameter, color, type, and location of each screw. Be sure to return each
screw to its original location during reassembly.
Incorrectly routed or loose wire harnesses can interfere with other internal components and
can become damaged or broken. Frayed or pinched harness wires can be difficult to locate.
When replacing wire harnesses, always use the provided wire loops, lance points, or wireharness guides.
Electrostatic discharge
The product contains parts that are sensitive to electrostatic discharge (ESD). Always
service the product at an ESD-protected workstation, or use an ESD mat.
Watch for the ESD symbol to identify the parts that are sensitive to ESD. Protect these parts
by using an ESD wrist strap and by placing ESD-sensitive parts into protective ESD pouches.
User-replaceable parts
To remove and replace the pickup roller or separation pad, see Maintenance.
Required tools
The following tools are needed to service this product:
● #2 Phillips screwdriver with magnetic tip
● Small flat blade screwdriver
● Small needle-nose pliers
● ESD mat
● Penlight
CAUTION
80 Chapter 6 Removal and replacement ENWW
A pozidrive screwdriver can damage the screw heads on the product. Use a #2 Phillips
screwdriver.
If you use a multispeed screwdriver, use a torque limiter.
Page 93

Before performing service
Follow the pre-service procedures before you perform service.
Pre-service procedures
1. Remove all media from the product.
2. Place the product on an ESD mat. If an ESD mat or an ESD-protected workstation is not
available, discharge body static and ground the product chassis before servicing the
product.
3. Remove the print cartridge, see
4. Unplug the power cord and the interface cable.
5. Lift the printer (and optional tray 2) off of optional tray 3 (if it is installed).
Replacing the print cartridge.
Parts removal order
Use the following diagram to determine which parts must be removed before removing other
parts.
ENWW Before performing service 81
Page 94

Covers
Left-side cover
1. Open the print-cartridge door.
2. Release two tabs (callout 1) to pry the cover away at the back of the printer
approximately 38 mm (1.5 inches).
NOTE
A screwdriver is required to remove the left-side cover from an HP LaserJet 1160 printer.
Figure 6-1. Removing the left-side cover (1 of 2)
82 Chapter 6 Removal and replacement ENWW
Page 95

3. Slide the cover toward the front of the printer to clear the interlock tab (callout 2).
Figure 6-2. Removing the left-side cover (2 of 2)
4. Lift the cover away from the printer.
ENWW Covers 83
Page 96

Right-side cover
1. Open the print-cartridge door.
2. Lift the back of the printer off of the workspace and use a flat blade screwdriver to pry
the cover from the tab (callout 1) at the bottom of the printer.
Figure 6-3. Removing the right-side cover (1 of 2)
84 Chapter 6 Removal and replacement ENWW
Page 97

3. Use a flat blade screwdriver to pry the cover at the back of the printer, releasing two
internal tabs (callout 2).
Figure 6-4. Removing the right-side cover (2 of 2)
4. Lift the cover away from the printer.
ENWW Covers 85
Page 98

Back cover
1. Remove the left-side cover (see Left-side cover) and the right-side cover (see Right-side
cover).
2. Remove four screws (callout 1).
Figure 6-5. Removing the back cover (1 of 2)
3. Tip the printer so that it rests on its front.
4. Release the tab (callout 2) at the back of the printer on the right side of the printer.
86 Chapter 6 Removal and replacement ENWW
Page 99

5. Slide the cover toward the right side of the printer to clear the tab (callout 3) on the
duplex tray.
Figure 6-6. Removing the back cover (2 of 2)
6. Lift the cover straight up and away from the printer.
ENWW Covers 87
Page 100

Reinstallation tip
Make sure that the flag (callout 1) and both of the fuser-release levers (callout 2) fit through
the holes in the cover before attaching the cover.
Figure 6-7. Reinstalling the back cover
88 Chapter 6 Removal and replacement ENWW
 Loading...