

Page 1
Copyright© 1998
Hewlett-Packard Co.
Printed in USA
HP
LaserJet
Q
R
G
1
e
Printedonatleast
50%TotalRecycledFiber with
atleast 10% Post-ConsumerPaper
ManualPartNo.
C4218-90901
*C4218-90901*
*C4218-90901*
C4218-90901
Page 2
6
4
5
8
9
10
110-127V
Page 3
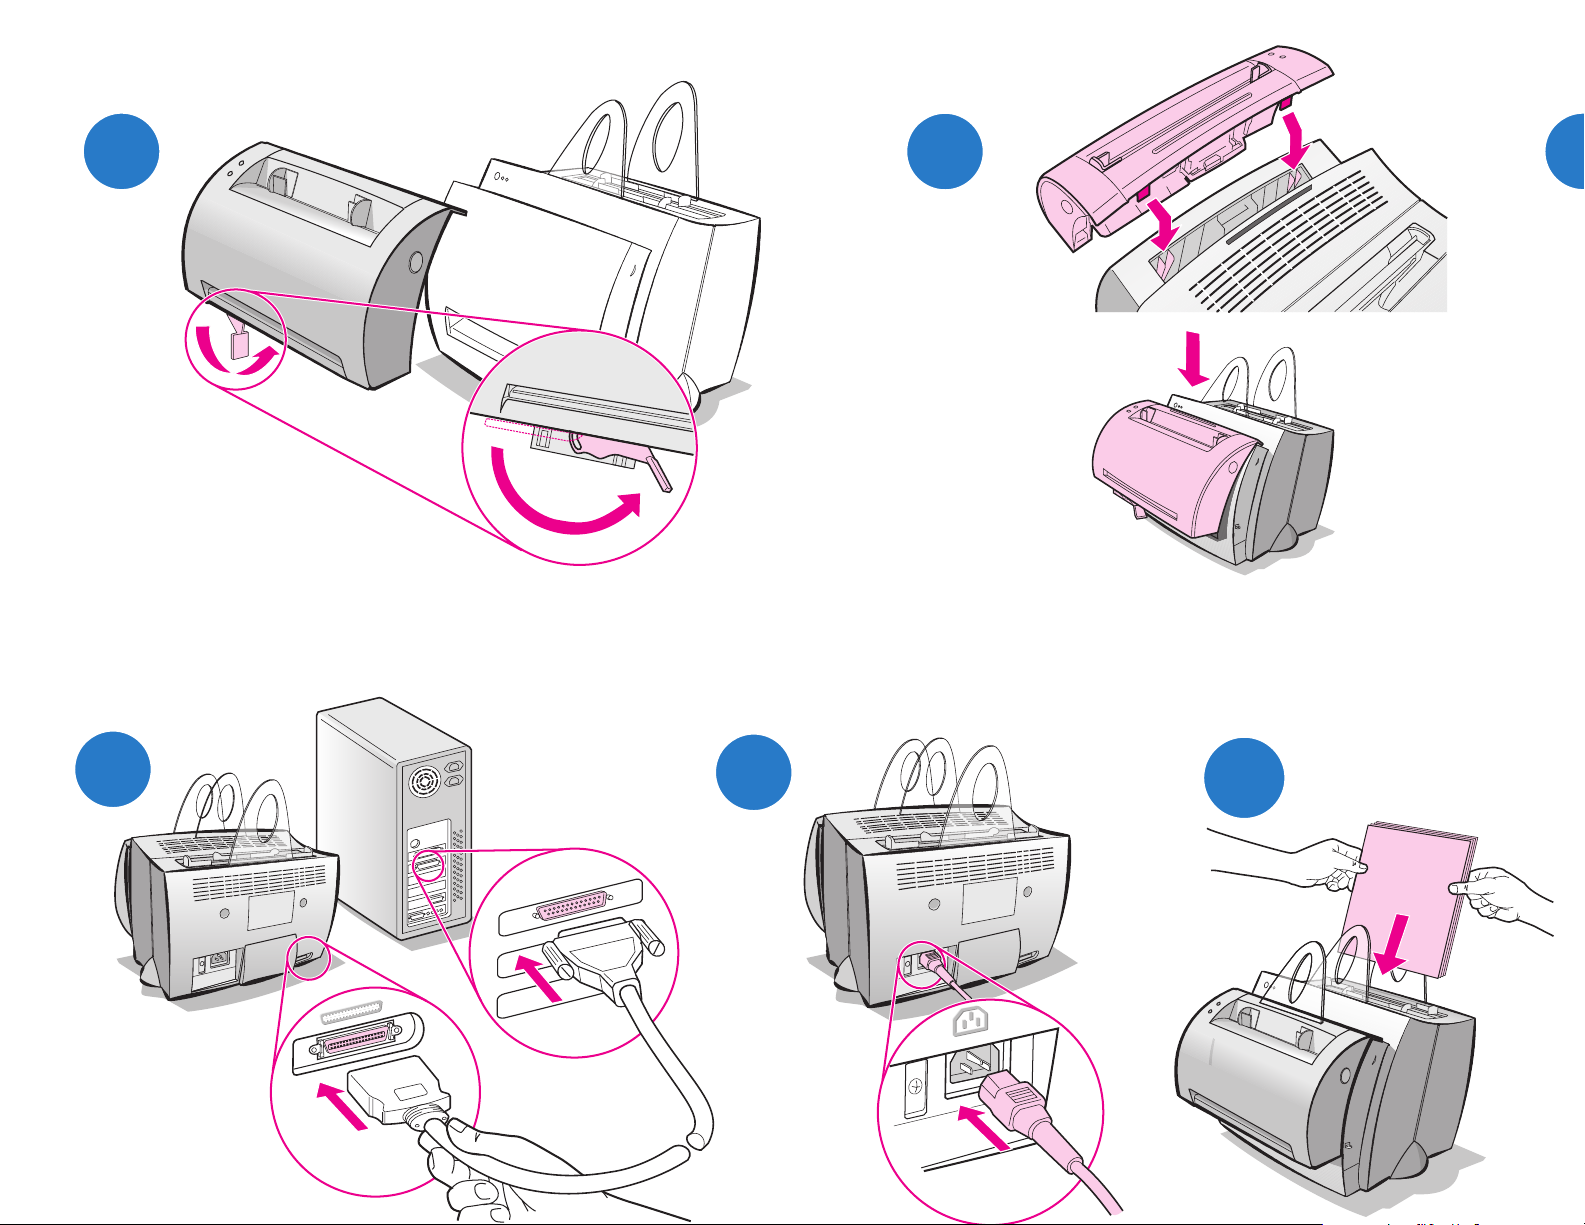
Remove paper from the input tray before loading
more paper to ensure proper paper feeding.
Attach the label to your printer as a reminder.
Page 4

Page 5

How to use your HP documentation
This guide
Use this guide to quickly and easily set up and install the software for
your new HP LaserJet 1100A Printer•Copier•Scanner. You can find
the following information in this guide:
●
Hardware setup information (fold-out cover)
●
Package contents (fold-out cover)
●
Verifying hardware installation
●
Installing the software
●
Printer components
●
Copier/Scanner components
●
Printer control panel lights
●
Scanner control panel
●
Troubleshooting common issues
●
Service and suppor t
●
FCC compliance
●
Acknowledgments
●
Warranty
English
EN
How to use your HP documentation
1
Page 6

The online help and online user guide
The online help is a comprehensive source of information, designed
to help you learn about the
software
HP LaserJet 1100 printer or your Copier/Scanner for the
HP LaserJet 1100. The online help provides step-by-step instructions
for the many tasks the software enables you to perform.
The online user guide is a comprehensive source of information,
designed to help you learn how to use your HP LaserJet 1100 printer
or your Copier/Scanner for the HP LaserJet 1100. The focus of this
guide is
hardware.
Accessing the online help and user guide
You can access the online help and user guide via the following:
●
CD-ROM: Online user guide only.
●
Document Assistant: Access from the main screen under Tools.
(Document Assistant is not available for Windows 3.1x operating
systems.)
●
LaserJet Document Desktop: Access from the main screen under
Help.
●
Program Group:
• Windows 9x & NT 4.0: Click Start, Programs,
HP LaserJet 1100, and then HP 1100 User Guide or Online
Help.
• Windows 3.1x: From the Program Manager, double-click
the HP LaserJet 1100 icon, and then double-click
HP 1100 User Guide or Online Help.
included with your
2
LaserJet 1100 Tutorial
The LaserJet 1100 Tutorial enables you to quickly learn about the
features and benefits of using the copying and scanning functionality
of the optional HP LaserJet 1100A Printer•Copier•Scanner.
Accessing the LaserJet 1100 Tutorial
Program Group:
●
Windows 9x & NT 4.0: Click Start, Programs,
HP LaserJet 1100, and then LaserJet 1100 Tutorial.
●
Windows 3.1x: From the Program Manager, double-click the
HP LaserJet 1100 icon, and then double-click
LaserJet 1100 Tutorial.
EN
Page 7
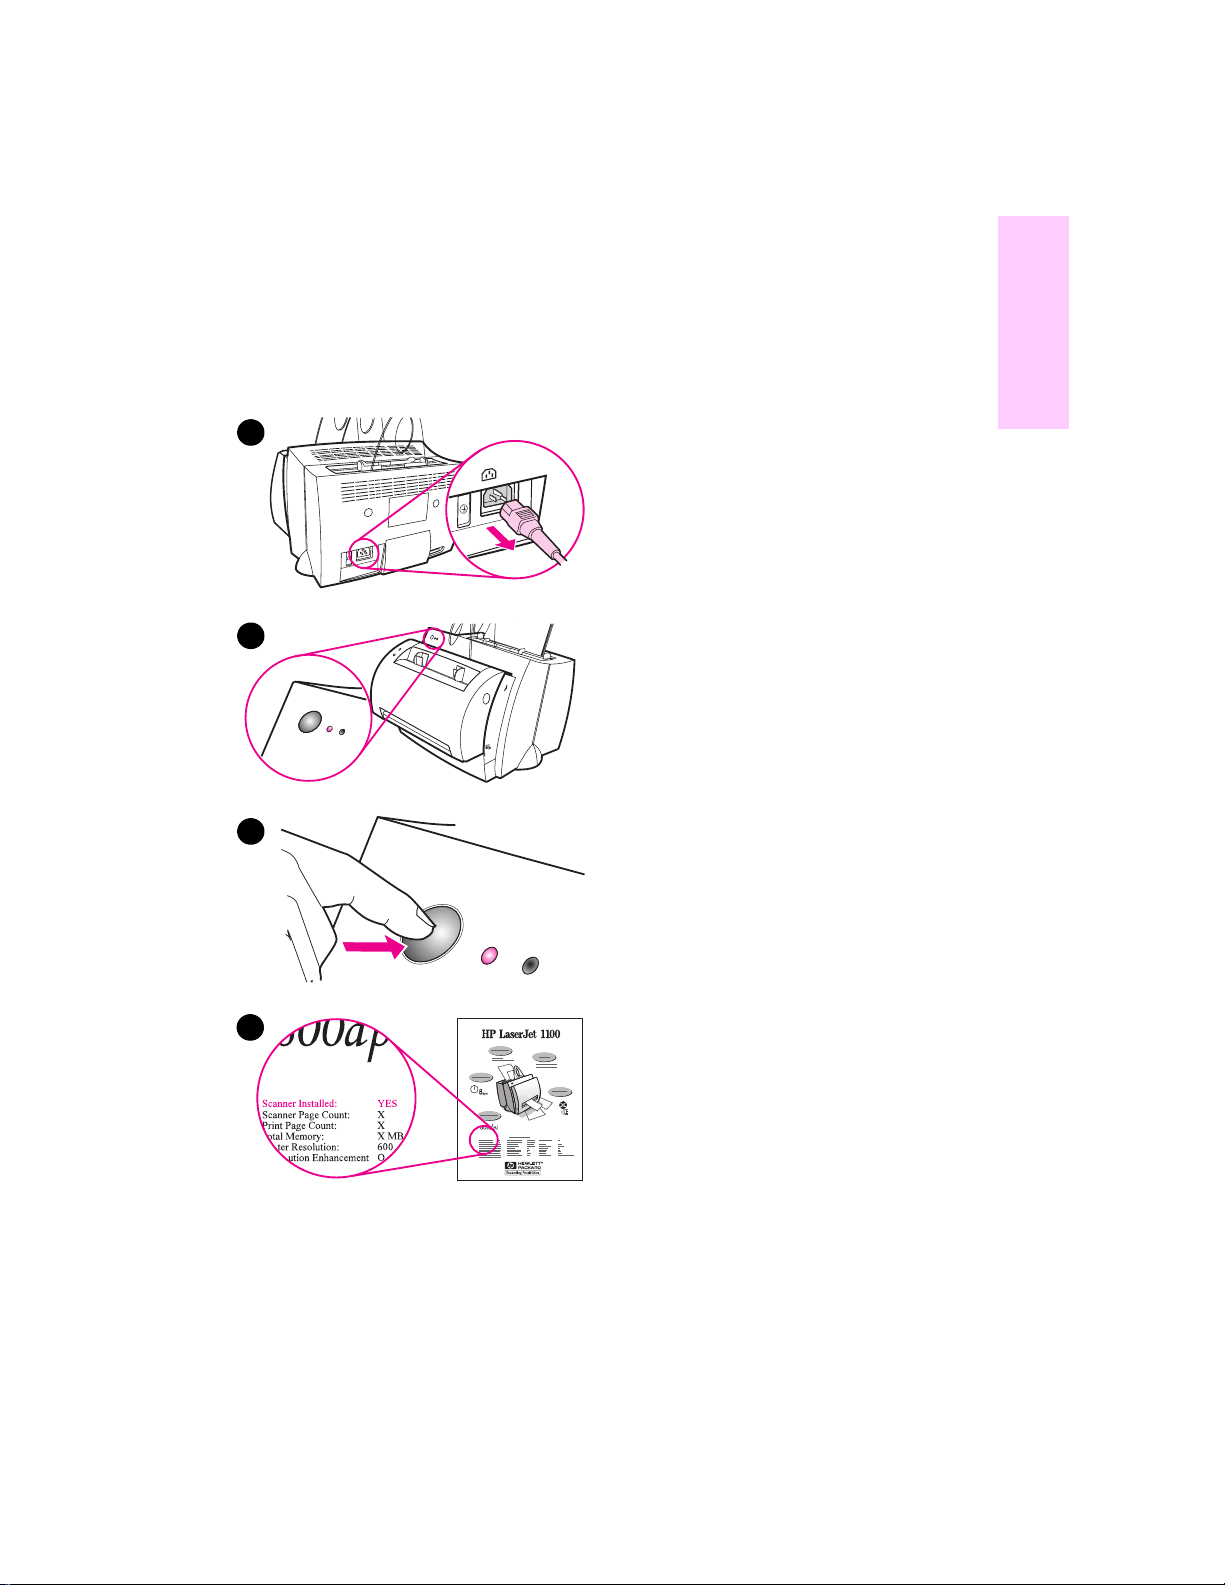
Verifying hardware
installation
After completing the installation process,
test your HP LaserJet 1100A
Printer•Copier•Scanner to ensure it is
working correctly.
English
1
2
3
1 Ensure power to the printer is on and
that paper is loaded.
2
Wait f or the printer to get into Ready
status (center light illuminated).
3
Press and release the Go button to
print a self-test page.
4 If the scanner is correctly installed,
the lower left-hand side of the selftest page should read “Scanner
Installed: YES.”
EN
4
How to use your HP documentation
3
Page 8

Installing the software
General
Before installing the software, verify the following:
●
At least 8 MB or more of RAM is installed on your PC (16 MB
recommended).
●
There is at least 20 MB of free hard disk space on your PC.
●
All applications are closed on your PC before beginning
installation. (A system reboot may be required after the software
is installed.)
• Windows 9x & NT 4.0: No icons should appear on the taskbar.
• Windows 3.1x: Press Alt+Tab. Only the Program Manager
should appear.
Windows® 9x & NT® 4.0
1 Insert the CD into the disk drive on your PC. The installation will
automatically begin.
• If the installation does not automatically begin, click Start, and
then click Run. Type D:\setup in the command line . If your CD
drive is not D, type the correct drive letter.
4
2 Follow the instructions on the screen to complete the installation.
Windows 3.1x
1 Insert the CD into the disk drive on your PC.
2 In the Windows Program Manager screen, pull down the File
menu and click Run.
3 Type D:\setup in the command line (D=the letter for your CD
drive).
4 Follow the instructions on the screen to complete the installation.
EN
Page 9

Printer components
1. Printer control panel
2. Paper supports
3. Paper input tray
4. Single-sheet paper input tray
5. Paper guides
6. Paper-output lever
7. Straight-through output path
8. Printer door
9. Paper output bin
1. Power switch (220-240 volt only)
2. Power receptacle
3. Memory door
4. Parallel port
2
1
9
8
7
2
1
3
4
5
6
4
3
English
Note
Printers that require 110-127 volts of power do not hav e a power switch.
Unplug the printer to turn it off.
Copier/Scanner components
1. Scanner control panel
2. Paper input tray
3. Paper guides
4. Paper support
5. Door release button
6. Paper output path
7. Scanner attachment lever
8. Scanner door
EN
3
4
2
1
8
7
6
Printer components
5
5
Page 10

Printer control panel lights
The control panel lights indicate the status of your printer.
Light status legend
Symbol for “light off”
Symbol for “light on”
Symbol for “light blinking”
Printer control panel light messages
Light status Condition of the
printer
PowerSave mode
(or the power is
disconnected)
The printer uses Sleep
mode to conserve power.
Ready
The printer is ready to
print.
Processing
The printer is receiving or
processing data.
Buffered data
The printer memory is
retaining unprinted data.
Description and required
action
Pressing the Go button on the
printer control panel, or printing,
will awaken the printer from
PowerSave mode. Check the
power cord if the above actions
do not generate a response (and
the power switch on 220-240 v olt
printers).
No action is necessary; however ,
if you press and release the Go
button on the printer control
panel, a self-test page will print.
Wait for the job to print.
Press and release the Go button
on the printer control panel to
print the remaining data.
6
EN
Page 11

Printer control panel light messages (continued)
Light status Condition of the
printer
Manual feed
The printer is in manual
feed mode.
Door open, no toner
cartridge, or paper jam
The printer is in an error
state.
Paper out
The printer is out of
paper.
Memory out
The printer ran out of
memory in the middle of a
print job.
Description and required
action
Check that you have loaded the
correct paper, then press and
release the Go button on the
printer control panel to print. If
you do not want to be in manual
feed mode, change the setting
from your printer properties.
Check the following:
●
The printer door is closed.
●
The toner cartridge is
correctly installed in the
printer.
●
There are no paper jams.
Load paper into the printer.
The page being printed may
have been too complex for the
memory capacity of the printer.
Press and release the Go button
to print.
English
EN
Reset/Printer
initialization
The printer memory is
being reset and all
previously sent print jobs
are being purged. Or, a
printer initialization is
taking place.
Fatal error
All lights are on.
No action is necessary. Ho wever ,
you can reset the printer if you
press and hold the Go button for
5 seconds.
●
Reset the printer.
●
Turn the printer off and then
back on.
●
Contact HP Support.
Printer control panel lights
7
Page 12

Scanner control panel
The scanner control panel is comprised of two buttons:
● Copy: Press the Copy button to perform a single Quick Copy—
your computer does not have to be on.
● Scan: Press the Scan button to launch the softw are. If configured
correctly, you can perform the following tasks:
• Scan to fax
• Scan to e-mail
• Store documents electronically
• Edit text (OCR: Optical Character Recognition)
• Make multiple and customized copies
Note The PC must be on and the software installed to use the Scan button.
Note To cancel a scan or copy job, press both buttons simultaneously.
Copy
8
Scan
EN
Page 13

Troubleshooting common issues
1 Basic troubleshooting checks:
• Connect power to the printer and print a self-test page by
pressing and releasing the Go button while the printer is in
Ready status. This verifies the power cord is working correctly,
power is on, and the toner is correctly installed with the
protective tape removed.
• Copy the self-test page by pressing the Copy button on the
scanner control panel (scanner installed only). This verifies
scanner operation.
• Send a print job from a software application on your PC to your
HP LaserJet 1100 printer. This v erifies the software installation
and communication to the printer.
• Press the Scan button on the scanner control panel. If the
software launches on your PC, this verifies the scanning
software installation and verifies communication to the printer.
2 If the software installation failed without errors or if you
cannot print from the PC, verify the following:
• Verify that all applications are closed.
Windows 9x: Press
Systray and Explorer should be closed. If not, close them by
selecting one at a time and clicking
• Reinstall the software using the method described in “Installing
the software.”
• Reboot your PC.
Ctrl+Alt+Del.
English
All programs except
End Task.
EN
Continued on next page.
Troubleshooting common issues
9
Page 14

3 If the software installation fails in step 2, try installing the
software using the following method:
Note The alternate software installation method will install the printer
software only.
●
Alternate software installation for Windows 9x & NT 4.0
Close all software that is currently open on your PC.
1
Click
2
Double-click
3
Windows NT 4.0 only: select appropriate LPT port.
4
Click
5
Click
6
Enter
7
<language> being whatever language you want to select.
Click
8
Remove the CD when the installation is complete.
9
●
Alternate software installation for Windows 3.1x
Close all software that is currently open on your PC.
1
From the
2
Open the
3
Click
4
or Updated Printer
Click
5
Click
6
<language> being whatever language you want to select.
Follow the instructions on your screen to complete the installation.
7
Remove the CD when the installation is complete.
8
select
Start,
Next
Have Disk.
“<language>\drivers\OS”
Next,
Program Manager,
Add.
Install.
Have Disk,
Settings,
Add Printer.
until you come to the list of
and then click
Control Panel,
A list of printers will appear on your screen with
and then enter
and then select
Next
open the
and then open
highlighted.
Printers.
Printer Manufacturers.
again.
group.
Main
Printers.
“<language>\drivers\OS”
Install Unlisted
10
EN
Page 15

Clearing printer paper
jams
Occasionally, paper can become
jammed while printing. Following is a
list of some possible causes:
●
The media was loaded incorrectly.
●
The paper-output lever w as adjusted
while a job was printing.
●
The printer door was opened while a
job was printing.
●
The media being used does not
meet HP specifications.
●
The media used was smaller than
76.2 x 127 mm (3 x 5 in.).
Paper input tray areas
Pull the page from the paper input tray
side until it is fully removed.
Paper output paths
English
EN
If the page is sticking out of the paper
output path, pull it until it is fully
removed.
Note
Loose toner may remain in the printer
after a paper jam. This will clear after a
few sheets have printed.
Troubleshooting common issues
11
Page 16

Printer paper jams
If the scanner is attached to the printer, it
may be necessary to pull the printer to
the edge of the work space to enable full
extension of the printer door.
1
2
1 Open the printer door. If the paper
can be removed without removing
the toner cartridge, go to step 3.
Otherwise, continue with step 2.
2 Remove the toner cartridge and
place it aside, covering it with a
piece of paper.
CAUTION
Paper jams in this area may result in
loose toner on the page. If you get any
toner on your clothes, wash them in cold
Hot water will permanently set the
water.
toner into fabric.
3
4
CAUTION
To prevent damage to the toner
cartridge, do not expose the toner
cartridge to light for more than a few
minutes. Cover it with a sheet of paper.
3 With both hands, grasp the side of
the paper that is most visible (this
includes the middle), and then
carefully pull it free from the printer.
12
Note
If the paper tears, see “Removing torn
pieces of paper from the printer.”
4 After the jammed paper has been
removed, replace the toner cartridge
and close the printer door.
EN
Page 17

Removing torn pieces of
paper from the printer
1
2
3
A piece of jammed paper can tear while
being removed. Use the following
procedure to remove any small pieces of
paper left in the printer.
1 Make sure the toner cartridge is
installed and the printer door is
closed.
2
Turn the printer off and then back on.
As the printer restarts, the rollers will
advance the piece(s) of paper.
Note
To turn the power off, unplug the power
cord. Plug the power cord back in to turn
the printer on.
3 Open the printer door and remove
the toner cartridge.
4 Remove the piece(s) of paper.
5 Reinstall the toner cartridge and
close the printer door.
If the paper is still not accessible, repeat
steps 1 through 5.
English
EN
4
5
Troubleshooting common issues
13
Page 18

Clearing Copier/Scanner
jams
Occasionally, paper becomes jammed
during a scan or copy job. Following is a
list of some of the causes:
●
The paper input trays are loaded
improperly.
●
The original is too small or delicate
to be correctly fed through the
scanner.
●
Media that does not meet HP
specifications is used.
1
2
3
Note
Small or delicate originals, such as
business cards or newsprint, may
require a carrier sheet to correctly feed
through the Copier/Scanner. You can
make a carrier sheet by simply taping the
leading edge of the original to a standard
sheet of paper.
A message will appear on your computer
screen informing you of an error.
1 Open the scanner door.
2 Locate and grasp the original on the
top or bottom side, whichever side
sticks out farther, and then pull
gently and steadily.
3 If necessary, roll the white wheel in
the opposite direction you are pulling
the original. For example, if you are
pulling the original from the bottom,
roll the wheel up.
If the jammed original is not visible, see
“Clearing hard-to-reach jams.”
14
EN
Page 19

Clearing hard-to-reach
jams
CAUTION
To prevent damaging your printer and/or
scanner, unplug the power cord before
removing the scanner.
1
1
2
3
Unplug the printer, and then remove
the scanner from the printer. See
“Removing the scanner.”
2 Rotate the scanner so the top is
facing toward the ground.
3
Gently shake the scanner until the
original falls out the top.
Note
Try using a carrier sheet to scan the
original.
English
EN
Troubleshooting common issues
15
Page 20

Removing the scanner
To remove the scanner from the printer,
follow the instructions below:
1
2
3
1 Unplug the power-cord from the
printer.
2 Move the scanner lever, located
under the scanner, from left to right
to disengage the connector.
3 Grasp the scanner on each side,
rotate the bottom portion away
from the printer, and then lift the
entire scanner up and clear from the
printer.
16
EN
Page 21

Service and support
English
World Wide Web URL:
Support phone:
USA, Canada, and the Caribbean: (1) (208) 323-2551
HP FIRST: (1) (800) 333-1917
FCC compliance
This equipment has been tested and found to comply with the limits
for a Class B digital device, pursuant to Part 15 of the FCC Rules.
Reference Appendix A of the User Guide (online or hard copy
version) for the Regulatory Compliance statements, including the
FCC compliance declaration.
Acknowledgments
Windows and Windows NT are U.S. registered trademarks of
Microsoft corporation.
Warranty
http://www.hp.com/support/lj1100
English
EN
You can find detailed warranty information in the HP LaserJet 1100
Online User Guide.
Service and support
17
Page 22

18
EN
 Loading...