

Page 1
EN
Quick reference guide
Page 2

You can nd legal and warranty information on the CD. Further information is available at HP’s support Web
site (http://www.hp.com/go/knowledge_center/).
Legal notices
The information contained herein is subject to change without notice. The only warranties for HP Products and
services are set forth in the express warranty statement accompanying such products and services. Nothing herein
should be construed as constituting an additional warranty. HP shall not be liable for technical or editorial errors or
omissions contained herein.
Page 3

Table of contents
1 Introduction
Using this guide .............................................................................................. 1
Scanner software ............................................................................................ 1
2 Basic Operations
Add a new printer ............................................................................................ 5
Delete a printer ............................................................................................... 6
Create a new media profile ............................................................................. 6
Set the output quality .................................................................................... 10
Copy a document .......................................................................................... 15
Collate copies ............................................................................................... 19
Perform a batch copy .................................................................................... 19
Scan a document to a file ............................................................................. 21
Scan a document to the network .................................................................. 23
Perform a batch scan .................................................................................... 25
Print a file ...................................................................................................... 26
Adjust color ................................................................................................... 27
View, move, rename, or delete a file ............................................................ 28
Scan heavyweight paper or cardboard ......................................................... 28
Preview copies .............................................................................................. 31
Save files on a CD or DVD ........................................................................... 34
Access the shared folder from my computer ................................................ 34
Introduction ................................................................................... 1
Basic operations ........................................................................... 1
Maintenance ................................................................................. 1
Troubleshooting ............................................................................ 1
Index ............................................................................................. 1
Warnings and Cautions ................................................................ 1
Copy-quality settings for scanning and printing .......................... 10
Print-quality settings for printing from a file ................................ 12
Scan-quality settings .................................................................. 13
Add a network connection .......................................................... 23
Scan to the network .................................................................... 24
Access files in the network folder ............................................... 24
Use the auto-naming feature ...................................................... 25
Scan the documents ................................................................... 25
Zoom all ...................................................................................... 31
Zoom in ...................................................................................... 31
Zoom out .................................................................................... 31
One-to-one pixel viewing ............................................................ 32
Resize paper frame .................................................................... 32
Move tool .................................................................................... 32
Position the paper frame ............................................................ 32
Align left and align right .............................................................. 33
Accessing the shared folder from Windows XP ......................... 35
Accessing the shared folder from Windows 2000 ...................... 35
iii
Page 4

Accessing the shared folder from Windows 98 .......................... 36
Accessing the shared folder from Mac OS X ............................. 36
Set up a password ........................................................................................ 36
Enable password access to a shared directory ............................................ 38
Connect the scanner to a network ................................................................ 39
Manage an account ...................................................................................... 40
Create an account ...................................................................... 41
Delete an account ...................................................................... 42
Reset an account ....................................................................... 43
Rename an account ................................................................... 44
Set the time, date, and timezone .................................................................. 45
Set sleep and wake-up timers ...................................................................... 46
3 Maintenance
Clean the glass plate and the scanning area ................................................ 47
Calibrate the scanner .................................................................................... 47
Calibrate the touch screen pointer ................................................................ 49
Replace worn parts ....................................................................................... 49
Lamp unit .................................................................................... 50
Air filters ..................................................................................... 50
White-background platen ........................................................... 50
Glass plate ................................................................................. 50
4 Troubleshooting
The Diagnostics light is flashing ................................................................... 52
The Wait light is flashing ............................................................................... 53
The Wait and Diagnostics lights are both flashing ........................................ 53
The Power, Wait, Diagnostics, and Paper-Ready lights are flashing ........... 53
Lines in the scanned image appear too thin or discontinuous ...................... 54
A warning message appears on the panel PC touch screen ........................ 55
The scanner software is in the wrong language ........................................... 55
The scanner software does not start ............................................................ 55
The CD or DVD cannot be read by my computer ......................................... 56
A media profile cannot be generated ............................................................ 56
Streaks in the scanned image ...................................................................... 56
The scanner is not detected after it is power-cycled ..................................... 57
Index ............................................................................................................................... 58
iv
Page 5

1 Introduction
Using this guide
●
Scanner software
●
Using this guide
This guide is organized into the following chapters.
Introduction
This chapter provides a brief introduction to the scanner and its documentation for
new users.
Basic operations
This chapter helps you to carry out various common procedures.
Maintenance
This chapter helps you to carry out various calibration and maintenance
procedures.
Troubleshooting
This chapter helps you to solve problems that may occur while scanning.
Index
In addition to the table of contents, there is an alphabetical index to help you to find
topics quickly.
Warnings and Cautions
Symbols are used in this manual to ensure the proper use of the printer and to
prevent printer damage. Follow the instructions that are marked with these symbols.
WARNING! Failure to follow the guidelines that are marked with this symbol could
result in serious personal injury or death.
CAUTION: Failure to follow the guidelines that are marked with this symbol could
result in minor personal injury or damage to the product.
Introduction
Scanner software
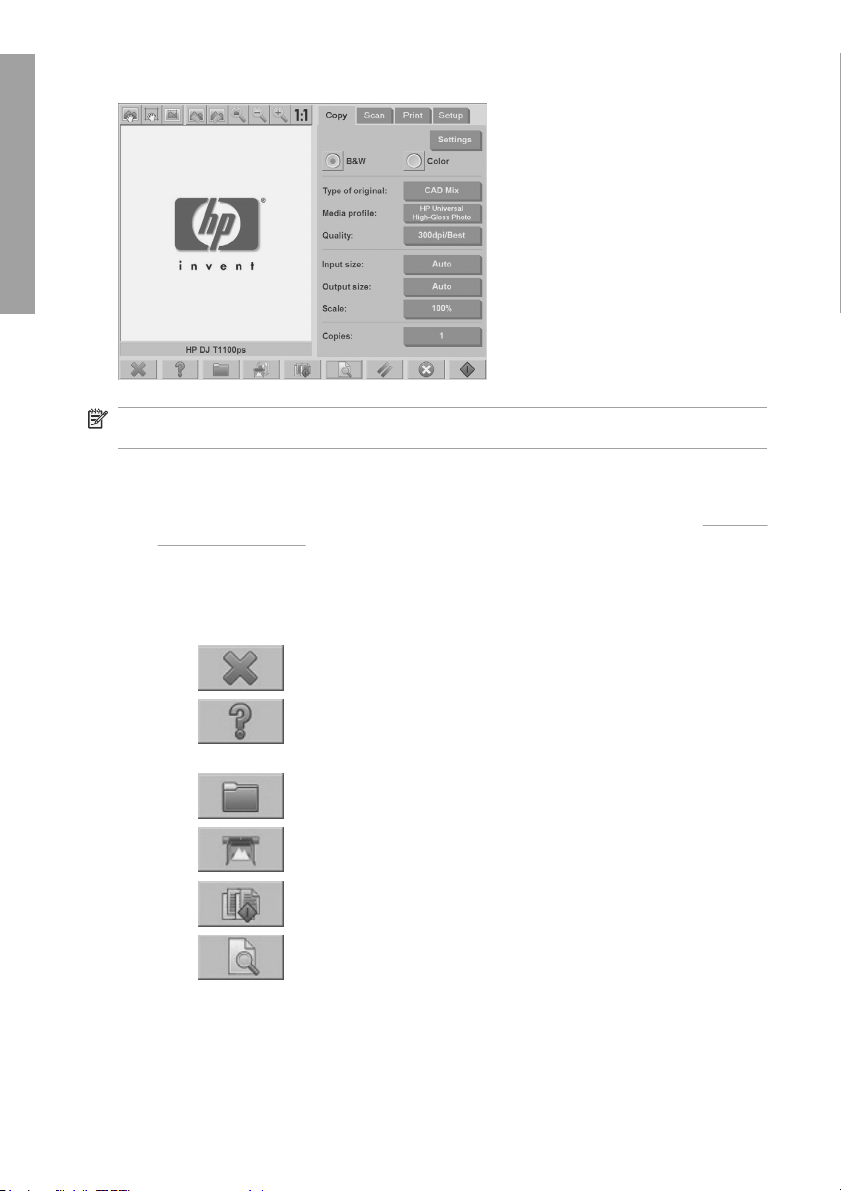
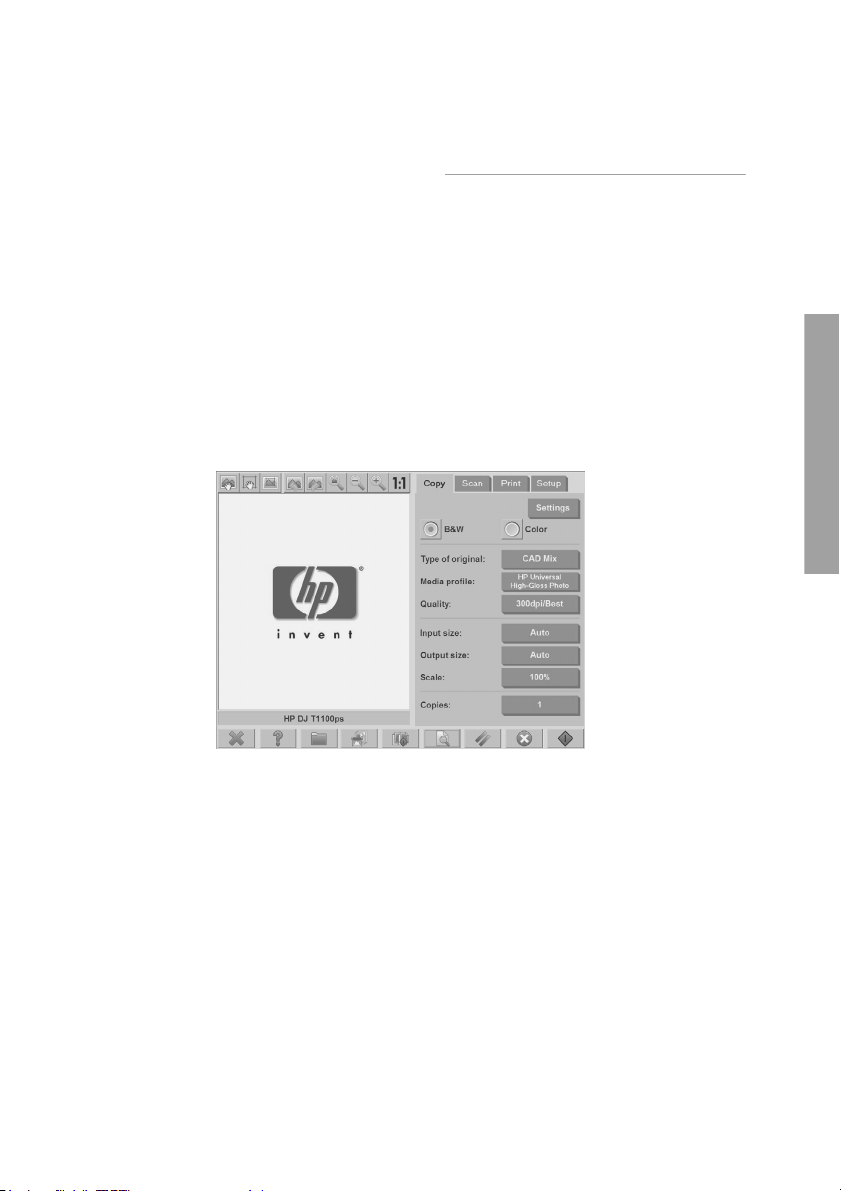
The scanner software is installed in the scanner's touch screen, and runs
automatically when you switch on the touch screen. The first screen that you see
is divided into three main sections:
The viewing section on the left, for viewing scanned images
●
The control section on the right
●
The toolbar on the bottom
●
Using this guide
1
Page 6
Introduction
NOTE: Some details of this screen may vary depending on which printer is
connected to the scanner.
The screen includes:
The preview window. Fills most of the viewing section. Above it is the image
●
toolbar, with nine buttons that can be used to change the preview (see
Preview
copies on page 31).
The control section. Contains four tabs: Copy, Scan, Print, and Setup. Each
●
tab provides options that you can select when performing copy, scan, print, or
setup tasks.
Nine larger function buttons at the bottom of the screen:
●
◦
Quit: shuts down the touch screen
◦
Online help: provides additional information on many topics
not included in this document
◦
File Manager: opens the File Management dialogue box
◦
Print queue: accesses the print queue
◦
Collate: groups copies into sets
◦
Preview: scans the document to preview the image and
select an area of interest
2 Chapter 1 Introduction
Page 7

◦
Reset: resets settings to default values
◦
Stop: cancels the current activity
◦
Copy, Scan, or Print: each icon
appears in its respective tab, and initiates the copy, scan, or print function
depending on the tab within which you are working.
Introduction
Scanner software
3
Page 8

2 Basic Operations
Add a new printer
●
Delete a printer
●
Create a new media profile
●
Set the output quality
●
Copy a document
●
Collate copies
●
Perform a batch copy
●
Scan a document to a file
Basic Operations
●
Scan a document to the network
●
Perform a batch scan
●
Print a file
●
Adjust color
●
View, move, rename, or delete a file
●
Scan heavyweight paper or cardboard
●
Preview copies
●
Save files on a CD or DVD
●
Access the shared folder from my computer
●
Set up a password
●
Enable password access to a shared directory
●
Connect the scanner to a network
●
Manage an account
●
Set the time, date, and timezone
●
Set sleep and wake-up timers
●
4 Chapter 2 Basic Operations
Page 9
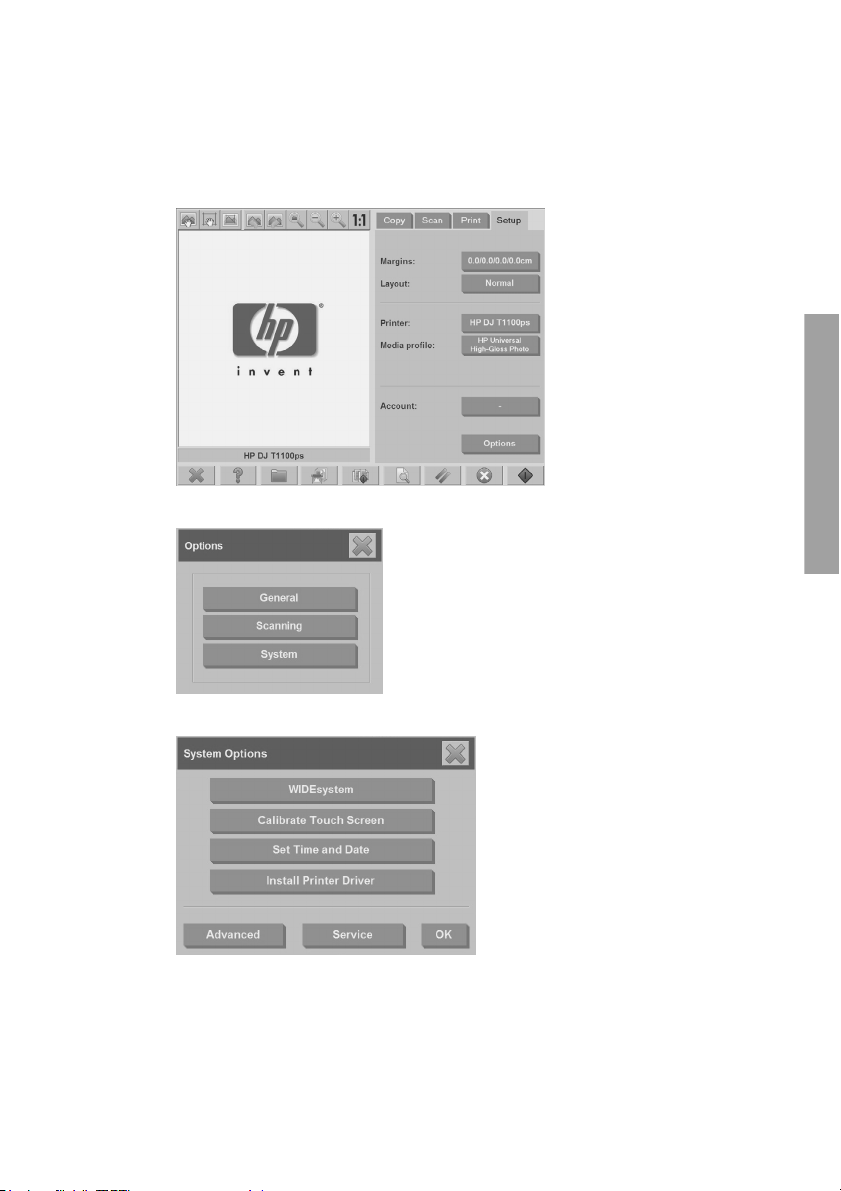
Add a new printer
To add a new HP Designjet printer to the printer list in your scanner software, follow
these steps:
1. Press the Setup tab.
2. Press the Options button. The Options dialog box appears:
3. Press the System button. The System options dialog box appears:
4. Press the Install Printer Driver button.
5. Select the printer you want to install.
Basic Operations
Add a new printer
5
Page 10
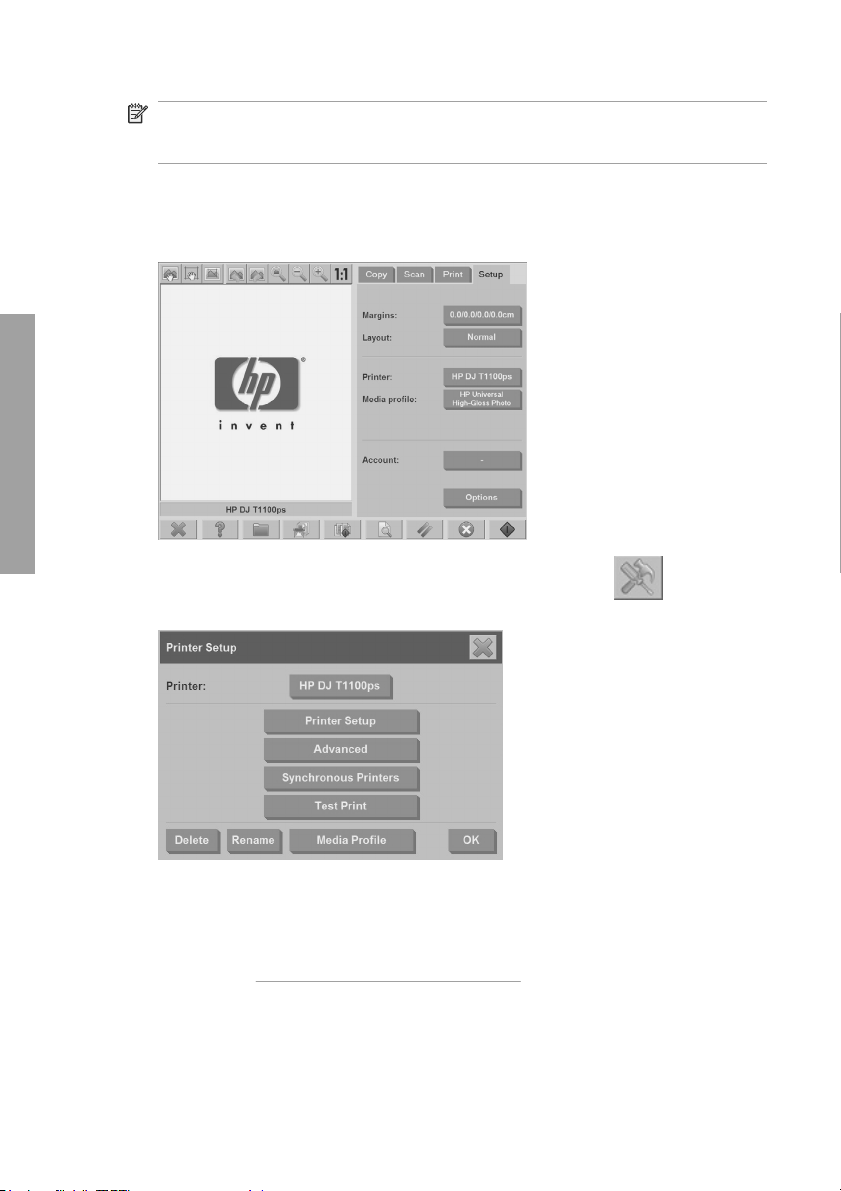
Delete a printer
To delete an HP Designjet printer from the printer list in your scanner software:
1. Press the Setup tab.
Basic Operations
2.
NOTE: If more than one printer of the same model number is installed on
the system, the name of the second printer added is denoted by “#2”, the third
by “#3”, and so on.
Press the Printer button, and then press the Tool button
Setup dialog box appears.
. The Printer
3. Press the Delete button.
Create a new media profile
Before starting the following procedure, make sure that you have color-calibrated
the scanner (see
profile you intend to create does not already exist in the media profile list.
6 Chapter 2 Basic Operations
Calibrate the scanner on page 47) and make sure that the media
Page 11
NOTE: When using HP Designjet 45XX, 40XX, or T11XX, you can only create
media profiles for paper types that are currently loaded in the printer. These
standard paper types are detected by the system and their names appear in the list
of media profiles. You can then select one of these and create a media profile for
it as described below. You can not change the names of the media profiles with
these printers.
When using Designjet 500, 800, 5X00, or 1000 you can create media profiles with
any name you want. The system prompts you to enter a name for the required
paper.
NOTE: You are required to create a media profile before you can copy and print.
You are also required to have at least one printer connected to the scanner before
you can copy and print. The printer can be connected to the scanner directly through
the panel PC, or through the local area network (LAN).
NOTE: To create a new media profile, you are required to have media loaded into
the printer.
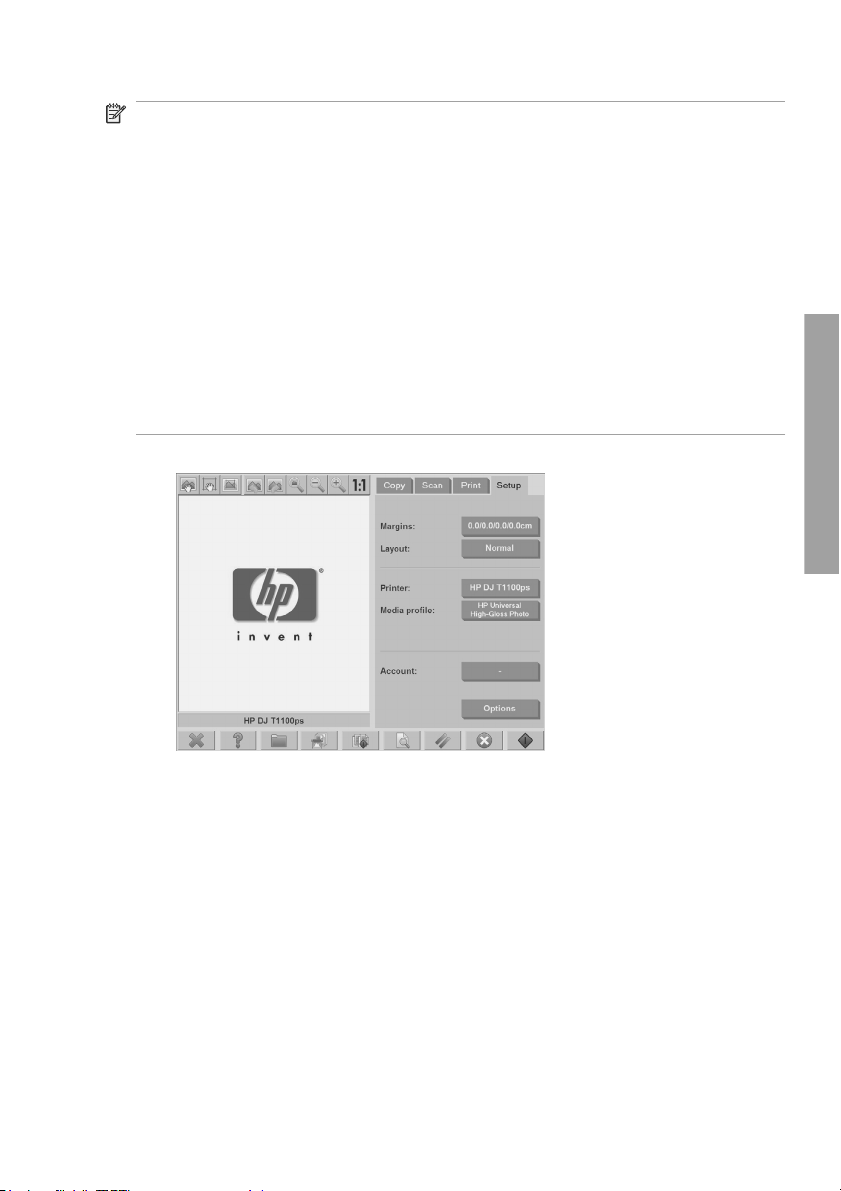
1. Press the Setup tab.
Basic Operations
Create a new media profile
7
Page 12
Basic Operations
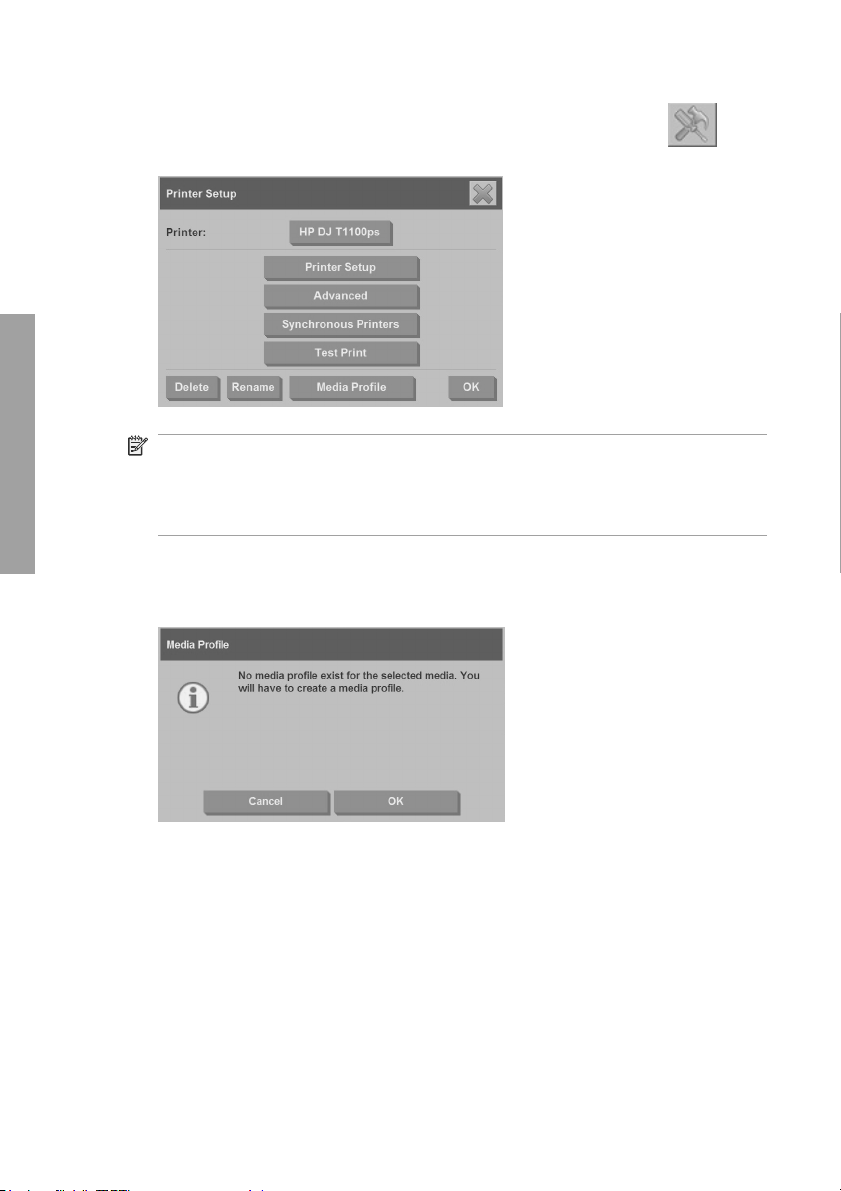
2.
Press the Media Profile button, and then press the Tool button
.
(Alternative path: Printer > Tool > Media Profile).
NOTE: With some printers, a Calibrate RIP feature is available in the dialog
box as the first step. Calibrating the RIP involves configuring the gamma
values of red, green, and blue to ensure a neutral appearance of printed gray
(also referred to as gray balance). Press the Calibrate RIP button and follow
the on-screen instructions to use this feature.
3. Press the button that corresponds to the media that you have loaded in the
printer.
4. Press the OK button when this message appears.
8 Chapter 2 Basic Operations
Page 13
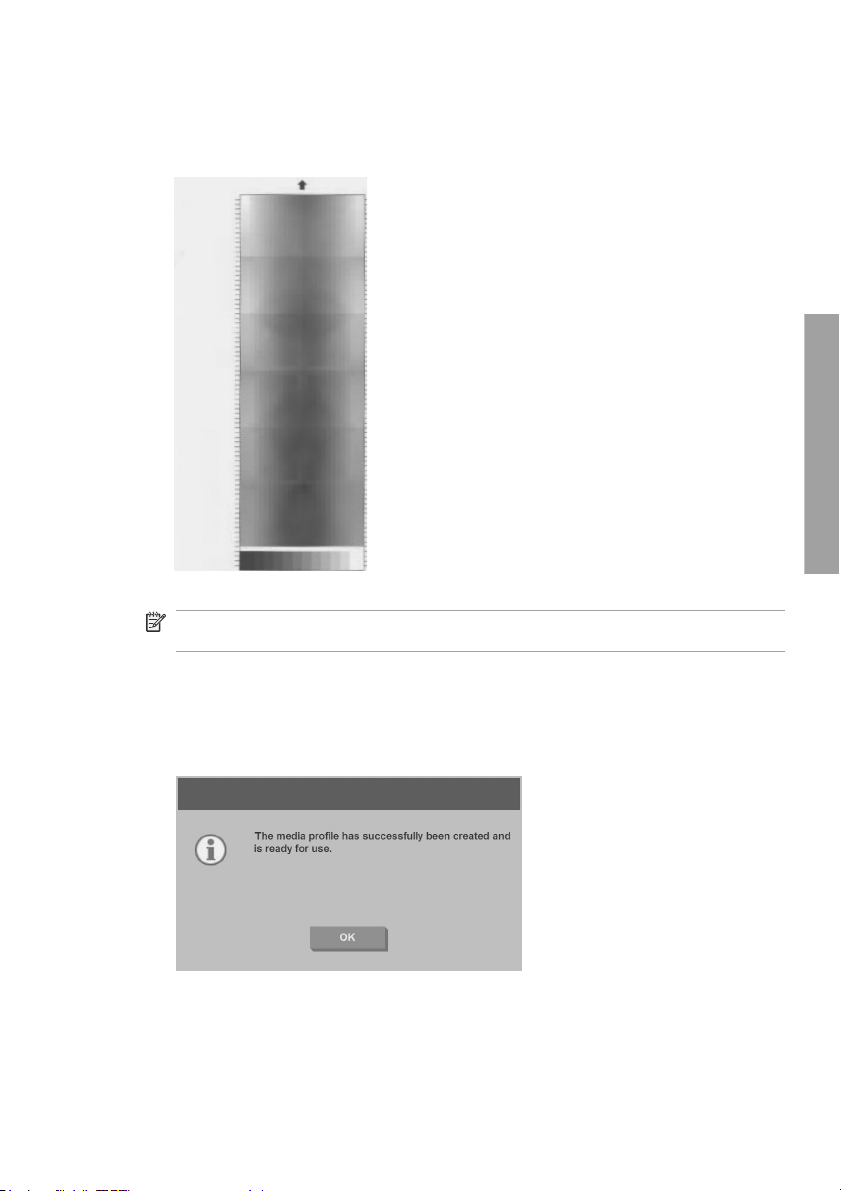
5. Press the Print Color Sheet button to print a color patch reference sheet.
Some printers print a special test sheet just before printing the color sheet. Do
not use the test sheet—only use the color sheet (shown below).
6. Press the Scan Sheet button to scan the color sheet.
NOTE: Some HP Designjet models require that you enter the media profile
name when the system is connected through the LAN.
7. Load the color sheet into the scanner face down. Align the arrow on the color
sheet with the arrow on the center of the scanner.
8. Press the OK button to initiate the scan.
9. Press the OK button when this message appears.
Basic Operations
The media profile is active and visible in the list of available media profiles.
Create a new media profile
9
Page 14
Use the Delete button to delete media profiles. Only user-created profiles can be
deleted.
Use the Rename button (if available) to rename media profiles.
NOTE: When using HP Designjet 45XX, 40XX, or T11XX, the Rename button is
not available in the dialog box. Use the Validate button to check that the media
profile is valid for your scanner and printer combination.
Set the output quality
This section describes how to set the output quality for your scanner and printer.
Copy-quality settings for scanning and printing
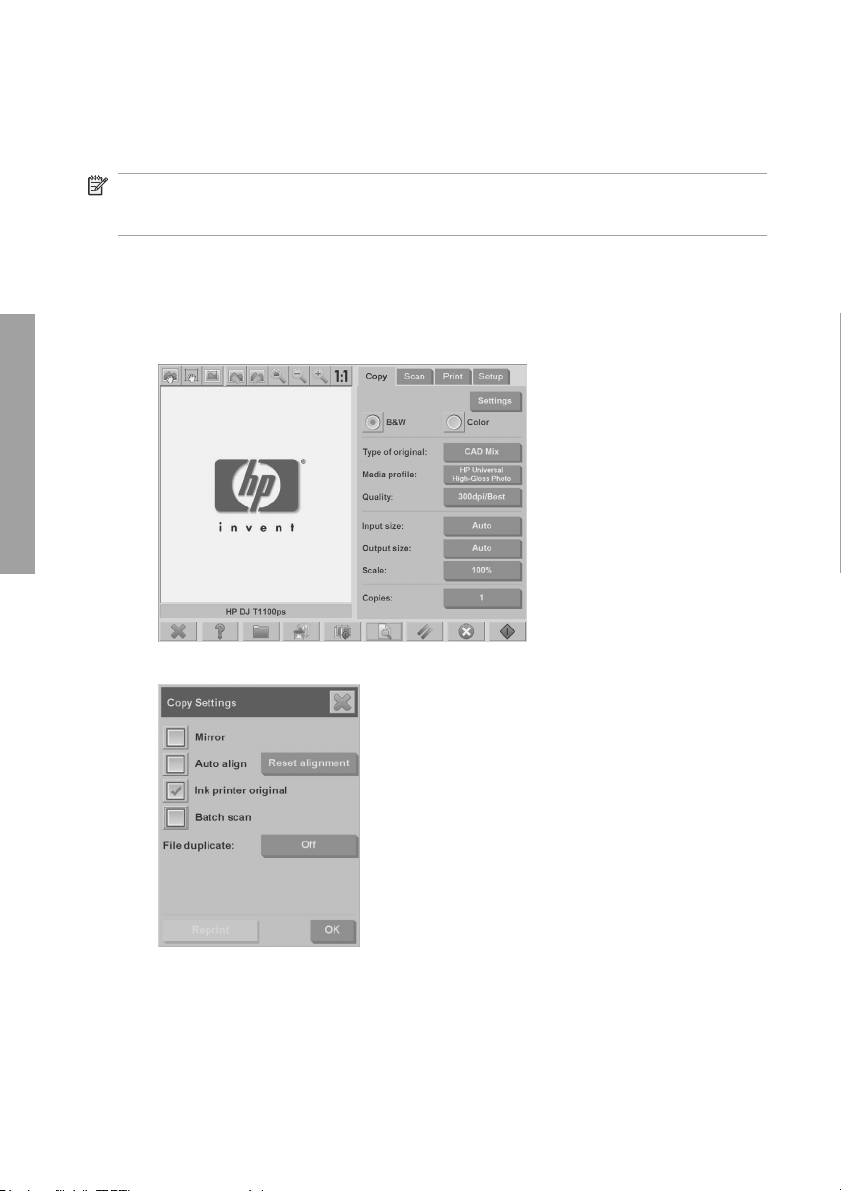
1. Press the Copy tab.
Basic Operations
2. Press the Settings button. The Copy Settings dialog box appears:
3. Select Ink Printer Original to improve the quality of your copy or print if the
original that you want to scan has been printed with an inkjet printer.
10 Chapter 2 Basic Operations
Page 15
4. Press the OK button.
5. Press the Quality button.
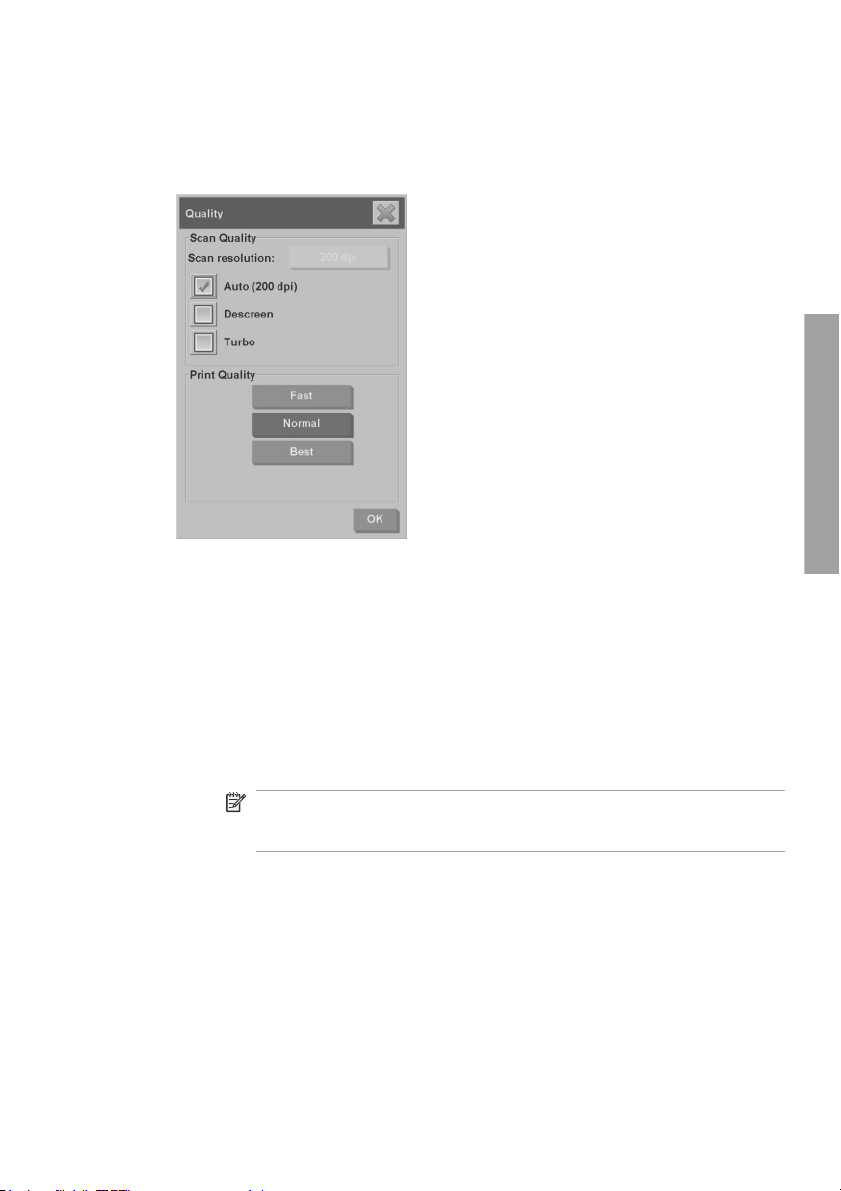
6. Define the scan quality and print-quality settings using the Quality dialog box.
Scan quality: Select one of the following scan quality settings:
●
Scan resolution: Manually set the scan resolution in dots per inch
◦
(dpi).
Auto: The system determines the best scan resolution based on the
◦
print quality (Fast, Normal, or Best) that you select. The resolution
setting (in dpi) is displayed next to the Auto checkbox (200 dpi in
the example above).
Descreen: The scanner scans with the optical resolution and relays
◦
the data to the system. The software then sets the optimal resolution
value.
NOTE: The Descreen setting gives the best results when
scanning raster images (non-vector images, such as .jpeg, .tiff,
and .pdf files), however the scanning speed is reduced.
Turbo: The Turbo setting increases the rate at which the paper is
◦
fed and reduces the amount of scanning data that is captured, which
means the scanning speed increases, but the image quality
decreases. To use the Turbo setting, first manually set the scan
resolution, and then select Turbo.
Basic Operations
Set the output quality
11
Page 16
NOTE: The turbo setting has no effect when the resolution is set
below 300 dpi.
Print quality: Select Fast, Normal, or Best.
●
NOTE: If you set the scan quality to Auto, the print-quality setting that
you select determines the scan resolution (as described above).
7. Press the OK button.
Print-quality settings for printing from a file
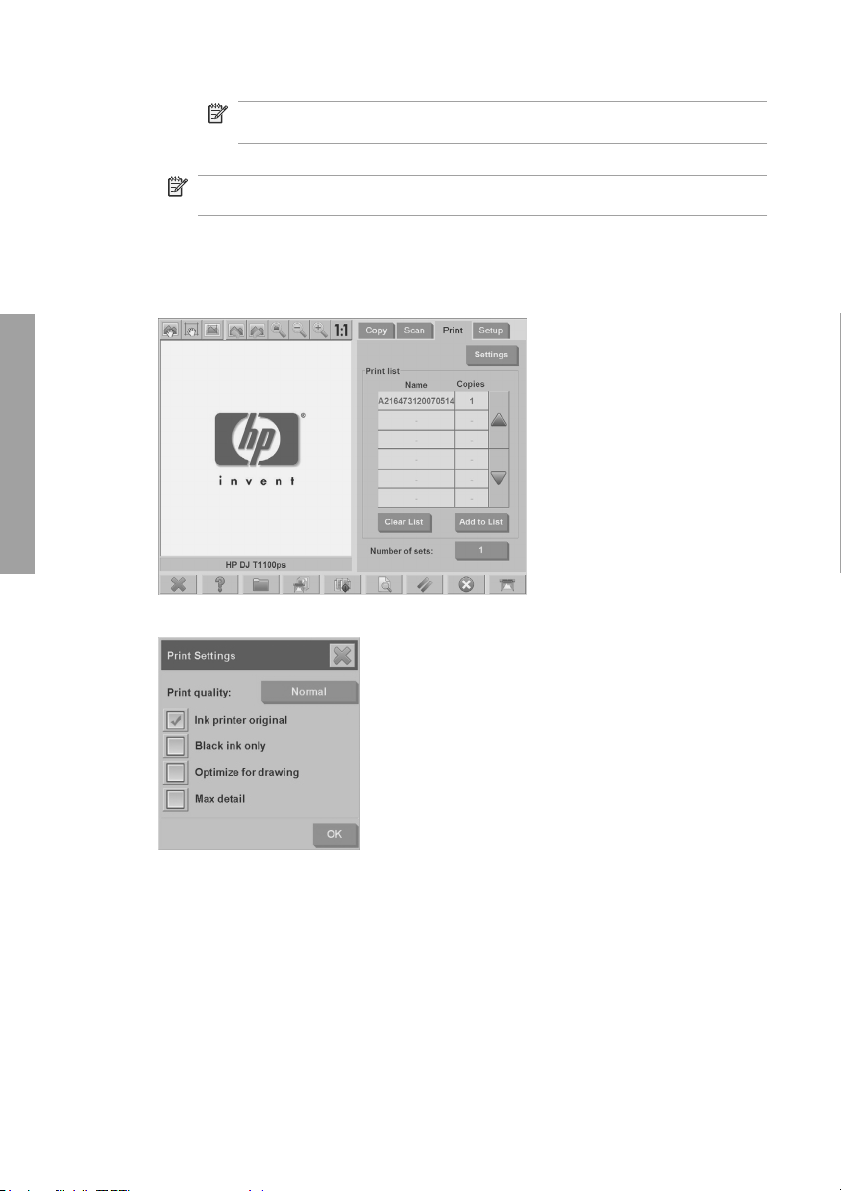
1. Press the Print tab.
Basic Operations
2. Press the Settings button. The Print Settings dialog box appears:
3. Select from the following print settings:
Print quality: Press the Print quality button to select a Fast, Normal,
●
or Best print-quality setting.
Ink printer original: This setting is used to improve the quality of your
●
copy or print if the original you want to scan has been printed with an
inkjet printer.
12 Chapter 2 Basic Operations
Page 17
Black ink only: This setting is used to create true- and neutral-graytone
●
output from graytone image files.
NOTE: The use of this setting can result in output that is more grainy
than graytone output which was created with colored inks.
Optimize for drawing: This setting is recommended for text and
●
drawings.
NOTE: The use of this setting for documents which contain pictures can
result in reduced image quality.
Max detail: This setting is used for enhancing detailed graphics, such as
●
maps and certain CAD drawings.
NOTE: The use of this setting for documents which contain pictures can
result in reduced image quality.
4. Press the OK button.
NOTE: The availability of these options depends on the printer model.
Scan-quality settings
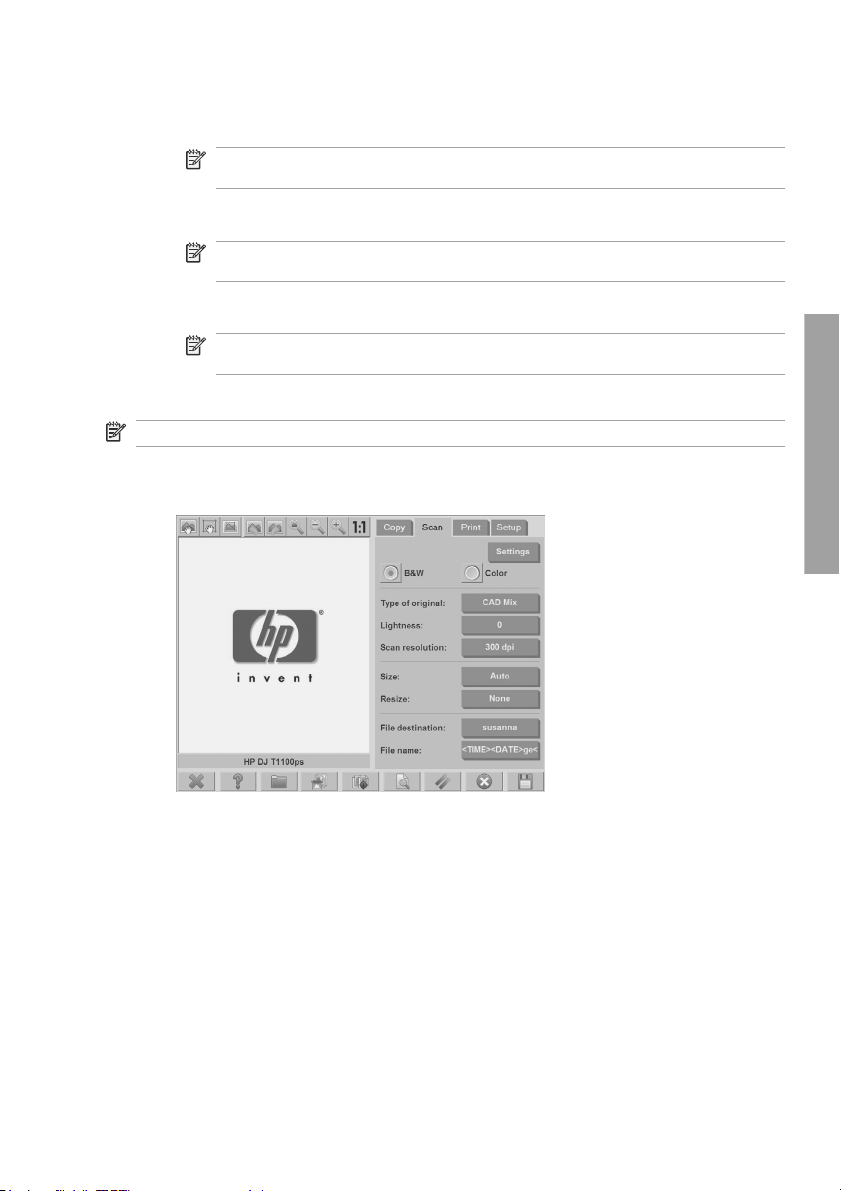
1. Press the Scan tab.
Basic Operations
Set the output quality
13
Page 18
Basic Operations
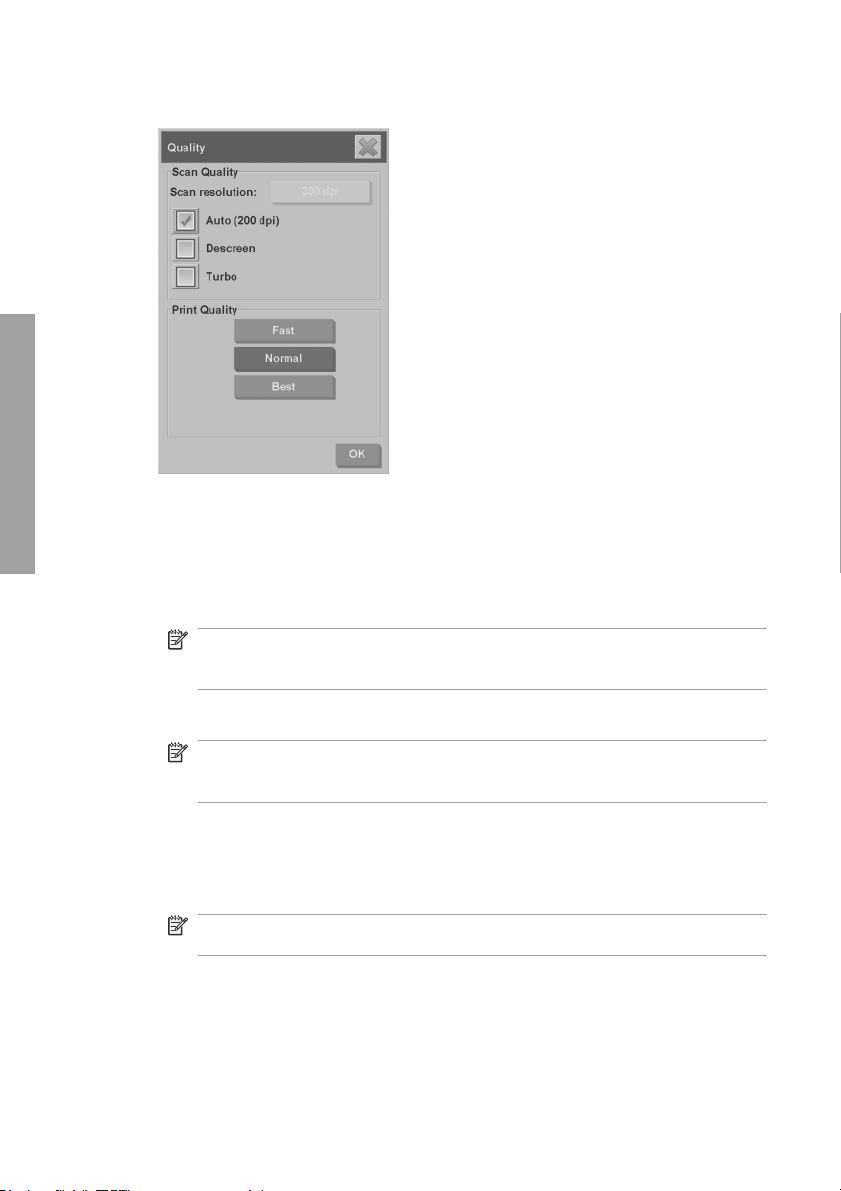
2. Press the Scan resolution button. The Quality dialog box appears:
3. Select from the following quality settings:
Scan resolution: Manually set the scan resolution in dots per inch (dpi).
●
Auto: The system determines the best scan resolution based on the print
●
quality (Fast, Normal, or Best) that you select. The resolution setting (in
dpi) is displayed next to the Auto checkbox (200 dpi in the example
above).
NOTE: The system determines the scan resolution based on the print-
quality that you select, however the print-quality setting is not actually
used in the scan-to-network process.
Descreen: The scanner scans with the optical resolution and relays the
●
data to the system. The software then sets the optimal resolution value.
NOTE: The Descreen setting gives the best results when scanning
raster images (non-vector images, such as .jpeg, .tiff, and .pdf files),
however the scanning speed is reduced.
Turbo: The Turbo setting increases the rate at which the paper is fed
●
and reduces the amount of scanning data that is captured, which means
the scanning speed increases, but the image quality decreases. To use
the Turbo setting, first manually set the scan resolution, and then
select Turbo.
NOTE: The turbo setting has no effect when the resolution is set below
300 dpi.
4. Press the OK button.
14 Chapter 2 Basic Operations
Page 19
Copy a document
1. If you do not already have a media profile for the paper type you are planning
to use, you must create one. See
2. Insert your document.
a. Place the document face down with the top edge forward in the scanner
insertion slot. Align the center of the document with the center of the
insertion slot.
b. Slide the document gently into the insertion slot until you feel it pulled into
the starting position.
3. Select color or black-and-white copying.
Your selection determines which type-of-original templates are available in the
following step.
4. Select the type-of-original template.
a. Press the Copy tab.
Create a new media profile on page 6.
Basic Operations
Copy a document
15
Page 20
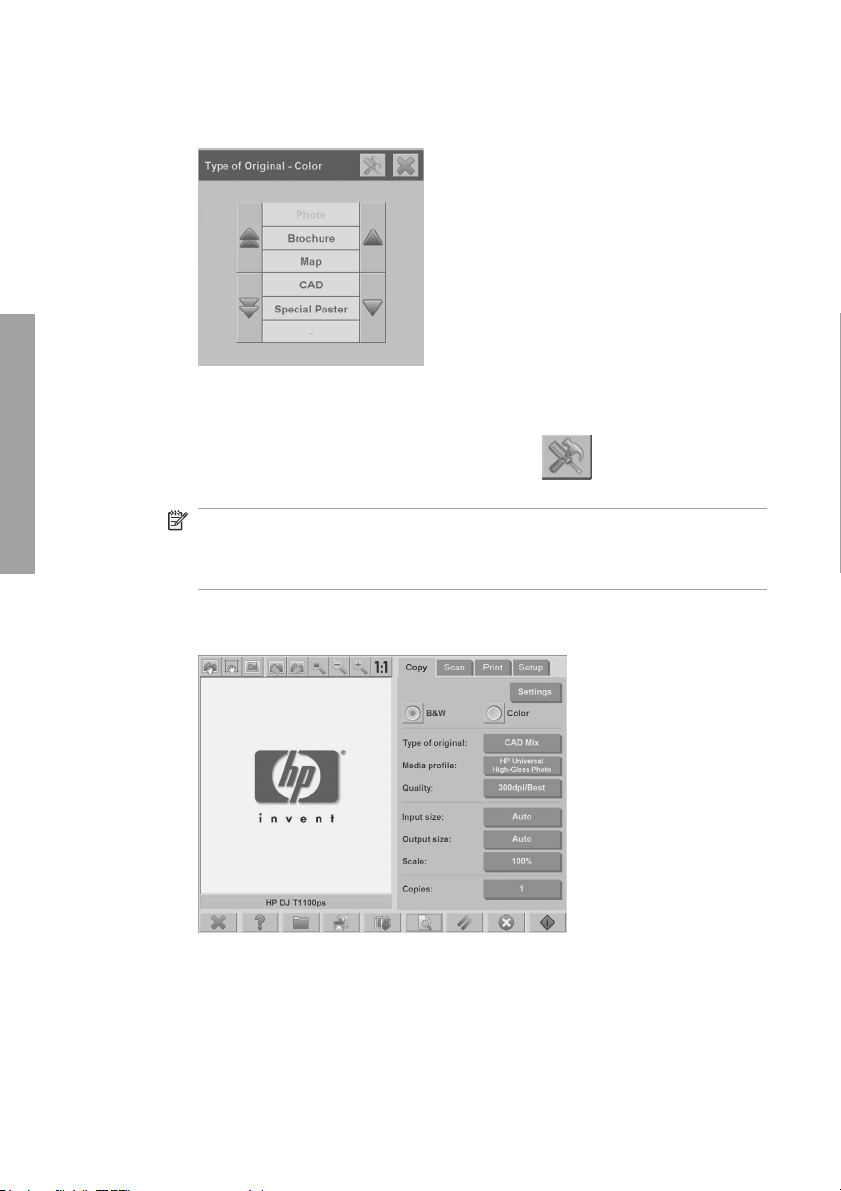
Basic Operations
b. Press the Type of original button. The Type of original dialog box
appears:
c. Select a type-of-original template that best describes your current input.
d. If you want to change the settings for any of these options, or want to
create a new option, press the Tool button
configuration, press the New button and enter a name for it.
NOTE: If you change any of the original template settings, the Type of
Original dialog box shows the symbol “*” next to the template name to
denote that changes have been made. For example, changes made to
the CAD template appear in the dialog box as “CAD*”.
5. Select the input size.
a. Press the Copy tab.
. To save the new
16 Chapter 2 Basic Operations
Page 21

b. Press the Input size button. The Input size dialog box appears:
c. Select the size that fits your original. Select Auto to have the scanner
automatically detect the width and length of the original.
d. If you want to change the settings for any of these options, or want to
create a custom-paper size, press the Tool button
changes or the custom-paper size, press the New button and enter a
name for it.
6. Select the output size.
a. Press the Copy tab.
. To save the
Basic Operations
Copy a document
17
Page 22

b. Press the Output Size button. The Output Size dialog box appears:
Basic Operations
c. Select the size that you want for your output copy.
d. If you want to change the settings for any of these options, or want to
create a custom-paper size, press the Tool button
. To save the
changes or the custom-paper size, press the New button and enter a
name for it.
If you have selected an output size that differs from the input size, the scanner
calculates the scaling percentage and display it on the Scale button in the
Copy tab after the first preview. Alternatively, you can specify a scaling
percentage by pressing the Scale button and selecting a predefined scale
percentage, or by pressing the Tool button
and entering a scale
percentage.
7. Set the number of copies.
a. Press the Copies button if you want to make more than one copy of the
loaded document.
b. Enter the number of copies in the Edit field.
This option allows you to leave the system working unattended.
8.
Press the Copy button
to begin copying with the settings you have
configured.
Press the Stop button
to cancel the current preview or copy
process.
18 Chapter 2 Basic Operations
Page 23

Press the Reset button to clear the settings you have configured and
reset the program to the default values.
Collate copies
The collate feature allows you to group your copies into sets, and then print a
selected number of these sets on your printer. All of the preview and enhancement
options that are available for single document copying, are also available when
using the collate feature.
1. Press the Copy tab.
2. Feed a document into the scanner, and then press the Collate button
NOTE: The original image is captured as with single-sheet copying, however
it is put on standby in your system instead of being sent to the printer.
3. Feed another document, and then press the Collate button. Continue on in
this manner until all of the documents that you want to be part of the set have
been scanned. You can adjust each copy in the set in the same way you do
with single document copying.
4. Define the number of sets by pressing the Copies bu tto n in the Copy tab. The
number of copies indicates how many sets are copied. Each set contains all
of the collated documents.
5. Press the Collate Print button to activate the copy job.
Basic Operations
on the main touch screen.
Perform a batch copy
Batch copying means processing more than one original document in one session
without adjusting any settings and without having to press the Copy button for each
Collate copies
19
Page 24

Basic Operations
original. Batch copying is useful when you want to copy groups of documents with
the same settings.
1. Prepare the originals that you want to copy with the same settings.
2. Feed the first original into the scanner.
3. Configure the settings in the Copy tab as you would for single-document
copying. See
Copy a document on page 15.
NOTE: If you have original documents with different dimensions, use the
Auto size-detection setting and select Auto width and Auto length.
4. Press the Copy tab.
5. Press the Settings button, select Batch scan, and the press the OK button.
6.
Press the Copy button
documents.
20 Chapter 2 Basic Operations
, and then begin feeding your original
Page 25

TIP: If you want to interrupt the batch-copy mode, press the Stop button
. Doing so temporarily stops the batch-copy mode, allowing you to copy
a single document with different settings. The batch-copy mode is resumed after
you have copied the single document.
TIP: You can configure the scanner to eject each original document upon copy
completion so that the next original can be fed. To select this option, go to the
Setup tab and select Options > Scanning > Eject paper.
The scanner remains in batch-copy mode until you cancel it by pressing the
Settings button in the Copy tab, and then deselecting the Batch scan option.
Scan a document to a file
1. Place the document face down with the top edge of the original in the scanner
insertion slot. Feed the original into the scanner. Use the center arrow for
correct positioning.
2. Select the Scan tab, and then configure the scan settings, which are described
in the following steps.
Basic Operations
Output settings such as margins, layout, and media profile can be configured
later, when you print the file.
3. Select Color or B&W scanning.
4. Select the type-of-original template that best describes your original.
Scan a document to a file
21
Page 26

Basic Operations
5. Set the scan resolution. Scan resolution determines the image quality. You
can set a custom dpi value, or choose from the following settings:
Auto: the system determines the best scan resolution based on the print
●
quality (Fast, Normal, or Best) that you select.
Descreen: the scanner scans with the optical resolution and relays the
●
data to the system without interpolation.
Turbo: this setting increases the rate at which the paper is fed and
●
reduces the amount of scanning data that is captured, which means the
scanning speed increases, but the image quality decreases.
6. Use the Size and Resize options to define the dimensions of your scanned
image. You can use Size: Auto and Resize: None to maintain the size of the
original.
7. The default filename is composed of the current date and time. To change the
default name, press the File Name button and enter a new name.
NOTE: For information on the auto-naming feature (which is more useful
when batch scanning), see
Use the auto-naming feature on page 25.
8. Press Settings > File Format to select the output-file format. Various format
options are available.
9. Press the File destination button to select the folder to which the scanned file
is saved. The Change Folder dialogue box appears.
10. In the Change Folder dialog box, you can:
Press the arrows to navigate the folders.
●
Press the folder up button (marked "..") to move up a level.
●
Press the New Folder button to create a new folder within the current
●
folder.
Press a folder name to move your search to that folder's level.
●
11. Press OK in the Change Folder dialog box when you have selected the
destination folder for your file. Files to be shared across the network should
be placed in the D:\images folder. Once a file is saved in this folder it can be
22 Chapter 2 Basic Operations
Page 27

accessed throughout the network, from any computer running any operating
system.
12.
Press the Scan to file button
save the image.
13. To view or delete the resulting file, see
on page 28.
Scan a document to the network
By default, your scanner’s file manager only displays local drives and folders. This
topic explains how to add network connections, how to use the network locations
as file destinations for scan-to-file jobs, and how to access them with the file
manager.
NOTE: To scan a document to a computer or server on the network, the
destination computer or server must have all firewalls disabled and the destination
folder must be a shared folder.
to start the scan-to-file process and
View, move, rename, or delete a file
Add a network connection
Verify that your system is connected to the network.
1.
Press the Folder button
2. Press the Network button.
3. Press the Add Network Connection button. The Add Network
Connection dialog box appears:
Contact your network administrator if you require additional information about
one or more of the settings described in the following steps.
Basic Operations
to open the File Manager dialog box.
Scan a document to the network
23
Page 28

Basic Operations
4. Remote name: Enter the full path name to the remote machine or folder on
the network in the following format: \\PCname\sharedfolder.
5. User name: Enter the domain name and your login user name for the remote
server or computer in the following format: DOMAIN\username.
6. Password: Enter the login password for the remote server or computer.
7. Label: Enter a name to help you to identify the remote destination. This is the
name that appears in the HP Designjet scanner File Manager dialog box.
NOTE: You can add as many network connections as you want. However,
because of a Microsoft Windows limitation, you cannot map a network folder that
has been previously mapped by another person on the same computer. To map to
a previously mapped network folder, you must first remove that network connection.
To remove network connections, press the Folder button
Network button, and then the Remove Network Connection button.
Scan to the network
Verify that you have added a network connection. See Add a network connection
on page 23.
1. Configure the settings in the Scan tab as you would for any scan-to-file job.
2. Press the File destination button.
3. Press the folder up button (marked "..") until it no longer appears. When the
“path up” button no longer appears, you have reached the highest level of the
list, which shows all of the accessible drives.
4. Navigate the list and select the network location to which you wan to scan.
5. Select the destination folder to which you want to scan.
6. Press the OK button.
Access files in the network folder
Verify that you have added a network connection. See Add a network connection
on page 23.
1.
Press the Folder button
2. Press the folder up button (marked "..") until it no longer appears. When the
“path up” button no longer appears, you have reached the highest level of the
list, which shows all of the accessible drives.
3. Navigate the list and select the network location that you want to access.
, then the
to open the File Manager dialog box.
24 Chapter 2 Basic Operations
Page 29

4. Select the destination folder that you want to access.
5. Press the OK button.
NOTE: The scanner system provides a shared folder (D:\images) that can be
accessed from other computers on the network. For security reasons, no other
folders in the scanner system can be accessed by a computer on the network.
Therefore, if you want scanned files to be accessible from other computers on the
network, you must save them in D:\images. For more information on accessing the
shared folder, see
Access the shared folder from my computer on page 34.
Perform a batch scan
Batch scanning means processing more than one original document in one session,
without adjusting any settings and without having to press the Scan button for each
original. Batch scanning is useful when you want to scan groups of documents with
the same settings.
Use the auto-naming feature
When you batch scan documents, the scanner saves each document as an
individual file and names each file according to the default naming convention,
which is composed of the current date and time. However, the auto-naming feature
allows you to define how the documents are named when they are scanned to file.
To configure the auto-naming feature, press the File name button in the Scan tab
before starting to scan, and then enter a filename followed by the suffix: “<###>”.
This suffix tells the system to add a number to the end of each filename, and to
increase the number by an increment of one for each document scanned. The
amount of characters in the number is equal to the number of “#” characters you
have in the suffix. For example, if you enter the file name “new_image<###>”, the
system creates files new_image001, new_image002, new_image003, and so on,
for each original document scanned. Use the Insert counter button to insert the
suffix: “<###>”.
NOTE: The system examines the file-destination folder and begins numbering
after the last number in a series of file names, to avoid overwriting any files already
in the folder. For example, if you enter the file name “new_image<###>”, and the
file-destination folder already contains files named “new_image001” and
“new_image002”, the system saves the new files starting at “new_image003”.
Basic Operations
Scan the documents
1. Prepare the originals that you want to scan with the same settings.
2. Feed the first original into the scanner.
3. Configure the settings in the Scan tab as you would for single-document
scanning. See
NOTE: If you have original documents with different dimensions, use the
Auto size-detection setting and select Auto width and Auto length.
Scan a document to a file on page 21.
Perform a batch scan
25
Page 30

Basic Operations
Print a file
4. Press the Scan tab.
5. Press the Settings button, select Batch Scan, and then press the OK button.
6.
Press the Scan-to-file button
documents. Each document is scanned and saved as a file.
TIP: If you want to interrupt the batch-scan mode, press the Stop button
. Doing so temporarily stops the batch-scan mode, allowing you to scan
a single document with different settings. The batch-scan mode is resumed after
you have scanned the single document.
TIP: You can configure the scanner to eject each original document upon copy
completion so that the next original can be fed. To select this option, go to the
Setup tab and select Options > Scanning > Eject paper.
The scanner remains in batch-scan mode until you cancel it by pressing the
Settings button in the Scan tab, and then deselecting the Batch Scan option.
You manage the files that you want to print in the Print tab. You can define the
number of copies you want of an individual file, and how many sets of the complete
list you want copied.
1. If you do not already have a media profile for the paper type you are planning
to use, you must create one. See
, and then begin feeding your original
Create a new media profile on page 6.
26 Chapter 2 Basic Operations
Page 31

2. Press the Print tab.
When you enter the Print dialog box, the Copy button changes to
Basic Operations
the Print button
The Print list shows the files currently selected for printing. Press the Add to
List button to add files to the Print list.
3. Configure the settings in the Setup tab as necessary. The Setup tab settings
such as margins, layout, printer and media profile, apply to the entire print job.
4.
Press the Print button
NOTE: The Print tab is designed for printing files created within the Scan tab; it
cannot be used to print files from other sources.
Adjust color
To access the Type of Original Setup dialog box and adjust the colors of your
scanned images, follow these steps:
1. Press the Type of Original button in the Copy tab or the Scan tab.
.
to send the files to the printer.
Adjust color
27
Page 32

2.
Press the Tool button
Basic Operations
3. Use the available settings to adjust the colors of the scanned image.
View, move, rename, or delete a file
1.
Press the File Manager button
touch screen.
2. Select a file in the list.
3. View, move, rename, or delete the file as necessary.
. The Type of Original Setup dialog box appears:
in the toolbar at the bottom of the
Scan heavyweight paper or cardboard
Your scanner is capable of scanning heavyweight coated paper and cardboard.
28 Chapter 2 Basic Operations
Page 33

WARNING! Other thick materials are not supported and could cause damage.
Remove staples and any abrasive attachments before scanning.
1. Press the Automatic Thickness Adjustment Control key on your scanner's
control panel.
2. Press and hold the arrow-up key to increase the height of the insertion slot
until there is enough room to insert the document. You can change the
insertion-slot height from 2 to 15 mm (0.08 to 0.59 inches).
3. Feed the document.
4. Press and hold the arrow-down key until the insertion slot stops adjusting.
5. Preview the image to see if the lines are even. Use the zoom function to see
in greater detail
NOTE: A large document might need to be supported with both hands as it
is being fed into the scanner, and as it is being ejected from the scanner.
If lines appear uneven, follow these steps:
1. Press the Setup tab.
Basic Operations
Scan heavyweight paper or cardboard
29
Page 34

2. Select the Options button, and then select the Scanning button. The Scan
Options dialog box appears:
Basic Operations
3. In the Scan Options dialog box, press the Scanner button. The Scanner
dialog box appears:
4. In the Scanner dialog box, press the Setup button.
5. Select the Extended Thickness tab, and check the Use extended thickness
paper handling box.
6. Change the value for each of the scanner’s cameras. Normally, only positive
values should be used.
30 Chapter 2 Basic Operations
Page 35

7. Print test scans and adjust the camera values until you are satisfied with the
results.
8. Click OK to save your settings.
To return the insertion slot height to its normal position:
1. Remove all material from the insertion slot.
2. Press the Automatic Thickness Adjustment Control key.
3. Press and hold the arrow-down key until the insertion slot has stopped
adjusting.
Try to avoid leaving the insertion slot set above the minimum height for long periods
of time. The insertion slot must be at its minimum height for the scanner to perform
the automatic self-adjustment procedure.
Preview copies
The preview feature allows you to make various adjustment to the document size,
margins, and paper frame. The document size is determined by the size settings
made in the Copy tab. The size and thickness of the paper frame in the preview
window is determined by the Input Size, Output Size, and Margins settings.
Basic Operations
Press the Preview button
Zoom all
Use this feature to resize the preview image such that it fits exactly within the
preview window.
Zoom in
Use this feature to zoom in on the preview image. The zoom in axis is in the center
of the preview window. Continue pressing the Zoom In button to the required level
of detail.
Zoom out
to preview a document.
Preview copies
31
Page 36

Use this feature to zoom out on the preview image. The zoom out axis is in the
center of the preview window. Continue pressing the Zoom Out button to the
required level of detail.
One-to-one pixel viewing
Use this feature to view the preview image at the same size in which the document
was scanned.
Resize paper frame
Basic Operations
This feature is especially useful for copying non-standard paper sizes. Use this
feature to divide the areas around the paper frame into sections. When a given
section is pressed, the closest frame side or corner is resized to the new position.
Move tool
Use this feature to move the image within the the preview window.
There are two ways to move the image:
Drag the image to another point within the preview window.
●
Press any point of the image. The point at which the image is pressed becomes
●
part of one of the edges of the preview window.
Position the paper frame
Use this feature to position the paper frame directly in the preview window and set
the copy area.
32 Chapter 2 Basic Operations
Page 37

There are three ways to move the frame:
Drag the frame to another point in the preview window.
●
Press a point in the preview window. The point where you pressed becomes
●
the new center for the paper frame.
This method is especially useful when you are making spot-test strips for
printing. It lets you continuously and rapidly reposition the frame on important
areas that you want to test.
Drag the edges to resize the paper frame.
●
Align left and align right
The align left button:
The align right button:
You are not required to reload the original if it appears crooked in the preview
window. If the image appears crooked, use the left and right align buttons to align
the image with the paper frame.
Basic Operations
Alternatively, press the Settings button in the Copy tab or in the Scan tab, and
then select the Auto-align option, and press OK to automatically align the image.
If you are not satisfied with the result, press the Reset alignment button, press
OK, and then use the left and right align buttons to align the image manually.
Preview copies
33
Page 38

Basic Operations
Save files on a CD or DVD
Your HP Designjet is capable of writing to CDs or DVDs in the same easy way as
it writes to other storage media.
1. Insert a blank CD or DVD into the touch screen’s CD/DVD drive. You may also
be able to write to a partly-used CD or DVD if the disc has not been ‘closed’.
2. Press the File Manager button to open the File Management dialogue box.
3. Navigate and select the files you want to save to the CD or DVD by checking
the box to the left of a file name.
NOTE: You can make multiple selections if you want to copy all of the files
to the same disk.
4. Press the Scan button to open the Destination folder dialog box.
5. Navigate to the CD/DVD drive as the destination.
6. Press OK to save the files to the destination disc.
NOTE: When the files have been saved to the disc, the disc automatically
ejects from the touch screen. If the disc does not automatically eject, press
the eject button on the drive. The disc ejects approximately 45 seconds after
the eject button has been pushed.
Access the shared folder from my computer
The scanner system provides a shared folder D:\images that can be accessed from
other computers over a network. For security reasons, no other folders on the
scanner system can be accessed over a network. Therefore, in order to access
scanned images from other computers, you must save them in D:\images.
34 Chapter 2 Basic Operations
Page 39

In order to establish a connection over the network, you need to know the IP address
of your scanner system. Follow these steps to obtain the IP address:
1. Press the Setup tab.
2. Press the Options button.
3. Press the General button.
4. Press the About button.
The scanner's IP address is shown in the About box.
Accessing the shared folder from Windows XP
1. On your computer's desktop, double-click My Network Places.
2. In the Network Places window, double-click Add Network Place.
3. In the Add Network Place Wizard window, click Choose another network
location, and then click Next.
4. In the Internet or network address field, enter http://scanner_ip/
images (where “scanner_ip” is the IP address of your scanner system), and
then click Next.
5. Enter a name for the folder on this computer, and then click Next.
To access the shared folder subsequently, double-click My Network Places. The
new folder appears in the Network Places window. You can drag the folder to your
desktop for easier access.
Accessing the shared folder from Windows 2000
1. On your computer's desktop, double-click My Network Places.
2. In the Network Places window, double-click Add Network Place.
Basic Operations
Access the shared folder from my computer
35
Page 40

3. In the Add Network Place Wizard window, enter http://scanner_ip/
images (where “scanner_ip” is the IP address of your scanner system), and
then click Next.
4. Enter a name for the folder on this computer, and then click Finish.
To access the shared folder subsequently, double-click My Network Places. The
new folder appears in the Network Places window. You can drag the folder to your
desktop for easier access.
Accessing the shared folder from Windows 98
1. On your computer's desktop, double-click My Computer.
Basic Operations
2. In the My Computer window, double-click Web Folders.
3. In the Web Folders window, double-click Add Web Folder.
4. In the Add Web Folder window, enter http://scanner_ip/images (where
“scanner_ip” is the IP address of your scanner system), and then click Next.
5. Enter a name for the folder on this computer, and then click Finish.
To access the shared folder subsequently, double-click My Computer and then
select Web Folders. The new folder appears in the Web Folders window. You can
drag the folder to your desktop for easier access.
Accessing the shared folder from Mac OS X
1. Select the Connect to Server feature from the Go menu.
2. In the Connect to Server window, enter http://scanner_ip/images
(where “scanner_ip” is the IP address of your scanner system), and then
click Connect.
Set up a password
An administrator password is used to protect key administrative settings such as
the interface language, network parameters, and accounting settings. The default
administrator password is "hpinvent" (all lowercase letters).
If the default administrator password is not changed, or has been reset to the
default, no password protection is applied to the key administrative settings and
they remain open for editing by all users. If the default administrator password is
changed, the key administrative settings are protected and users are required to
enter the password before they can edit the key administrative settings.
36 Chapter 2 Basic Operations
Page 41

If many users will share the system, HP recommends that the password be changed
by the system administrator when the system is set up for the first time. To change
the password, follow these steps:
1. Press the Setup tab.
2. Press the Options button.
The Options dialog box appears.
3. Press the System button.
4. Press the Advanced button.
5. Press the Set/Change Password button.
6. Enter a new administrator password. You are prompted to confirm the new
password.
7. When you have finished, click the OK button.
The new password is effective immediately.
To disable password protection, follow the steps to change the password and reset
the password to the default: "hpinvent".
Basic Operations
Set up a password
37
Page 42

Enable password access to a shared directory
Protect your system's shared folders from network access by applying a login and
password under the FTP and WebDAV option area.
1. Press the Setup tab.
Basic Operations
2. Press the Options button.
3. Press the System button.
4. Press the Advanced button.
5. Press the Network Settings button. The Network Settings dialog box
appears:
38 Chapter 2 Basic Operations
Page 43

6. Press the Login and Password buttons to enter strings and apply them.
NOTE: The string "@scanner" is always appended to the entered login
name.
7. Restart the system to apply new login/password protection.
TIP: Press the Reset button to remove login/password protection for FTP/
WebDAV access.
Connect the scanner to a network
To make your system recognizable to others on the network, follow these steps.
NOTE: If an administrator password has been set, you are required to enter it
before you can configure the network settings.
1. Connect the RJ45 network cable to the Ethernet port at the back of your touch
screen.
2. Check your network settings:
a. Press the Setup tab.
Basic Operations
b. Press the Options button.
c. Press the System button.
d. Press the Advanced button.
e. Enter the administrator password if prompted by the system.
Connect the scanner to a network
39
Page 44

f. Press the Network Settings button. The Network Settings dialog box
Basic Operations
g. Select the DHCP option if you know that your network has a DHCP
h. Select the Manually option for manual connection. Obtain a valid IP
i. Click the OK button.
3. Place the files that you want to be shared across the network in the D:
\images folder. Once a file is saved to this folder, it can be accessed
throughout the network, from any computer running any operating system.
You can connect your printer to the same network. See your printer's
documentation for further information.
Manage an account
The Accounting feature helps you to keep track of your copy activities. Accounting
information such as total scans, prints, copies, and paper usage is stored in a simple
format so that it can be loaded into spreadsheets and databases. You can view the
scanning activity information for your account in the account dialog.
NOTE: Only one account (besides the Total account) can be active at a time.
appears:
server. This tells the system to automatically find the network connection
information.
address, subnet mask, and default gateway from your system
administrator.
NOTE: If an administrator password has been set, users are required to enter the
password before they can rename, reset, create, and delete accounts.
40 Chapter 2 Basic Operations
Page 45
There are two types of accounts:
Active account: The user-established account to which activities are currently
●
registered. The active account name is displayed on the Account button in
the Setup tab.
Total account: The built-in total account to which all of the system activities
●
are registered. The total account is always active and cannot be deleted or
reset. All of the activities registered to an active account are concurrently
registered in the Total account.
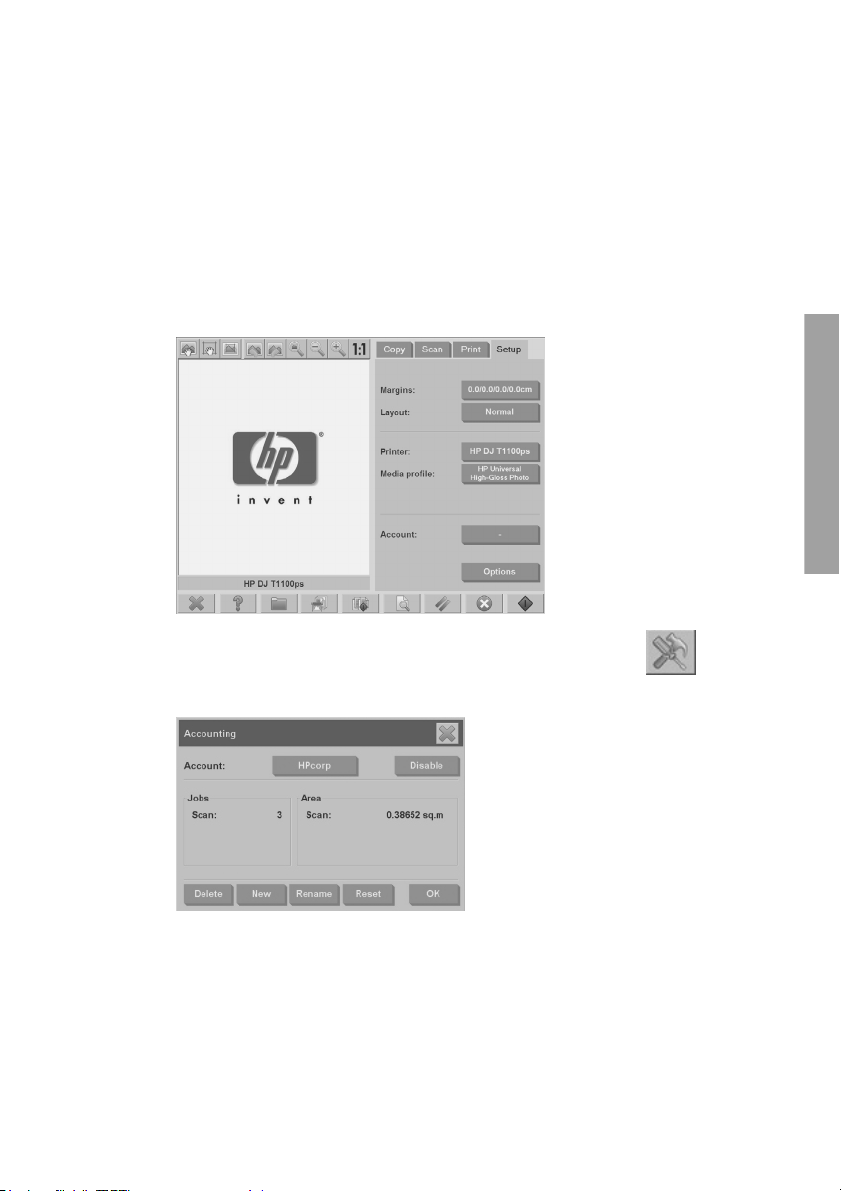
Create an account
1. Press the Setup tab.
2.
Press the Account button, and then press the Tool button
3. In the Accounting dialog box, press the New button.
Basic Operations
.
4. Enter the administrator password if prompted.
5. Enter a name for the new account.
6. Press the OK button.
Manage an account
41
Page 46

The new account automatically becomes the active account.
To access the accounting information, enter: http://scanner_ip/
accounting (where “scanner_ip” is the IP address of your scanner system)
in the Internet or network address field, and then press the Next button.
NOTE: If an account is created, users are required to select an account from the
account list, which appears each time the Copy button
file button
Delete an account
Basic Operations
1. Press the Setup tab.
2.
3. In the Accounting dialog box, press the Delete button.
is pressed.
Press the Account button, and then press the Tool button
or the Scan to
.
42 Chapter 2 Basic Operations
Page 47

4. Enter the administrator password if prompted.
5. Press the OK button.
Reset an account
1. Press the Setup tab.
2.
Press the Account button, and then press the Tool button
3. Select the account that you want to reset.
Basic Operations
.
4. Press the Reset button.
5. Enter the administrator password if prompted.
Manage an account
43
Page 48

Rename an account
1. Press the Setup tab.
Basic Operations
2. Press the Account button.
3. Make sure that the Quick select list is showing.
4.
Press the Tool button
5. In the Accounting dialog box, press the Rename button.
.
6. Enter the administrator password if prompted.
7. Enter the new name for the account.
8. Press the OK button.
44 Chapter 2 Basic Operations
Page 49

Set the time, date, and timezone
1. Press the Setup tab.
2. Press the Options button.
3. Press the System button.
4. Press the Set time and date button.
Select the value that you want to change and enter the correct value.
●
Select your timezone from the list.
●
NOTE: You can choose to enable automatic daylight savings time
adjustment.
5. Press the OK button.
Basic Operations
Set the time, date, and timezone
45
Page 50

Set sleep and wake-up timers
Because setting the sleep and wake-up timers ensures that the scanner will shut
down automatically when not in use, it is the best way to maximize the useful life
of the lamp.
1. Press the Setup tab.
Basic Operations
2. Press the Options button.
3. Press the System button.
4. Press the WIDEsystem button, and then select the Timer tab.
To activate automatic power-on, select the check box for the day in the
●
On column.
To modify the time, select the hours digits and press the up or down
buttons and then select the minutes digits and repeat the process.
Select AM or PM, and press the up or down buttons.
To activate automatic power off, select the check box for the day in the
●
Off column, then set the time as described above.
5. Press the Apply button to confirm your changes and continue, or press the
OK button to confirm changes and exit WIDEsystem.
46 Chapter 2 Basic Operations
Page 51

3 Maintenance
Clean the glass plate and the scanning area
●
Calibrate the scanner
●
Calibrate the touch screen pointer
●
Replace worn parts
●
Clean the glass plate and the scanning area
1. Turn off the scanner and disconnect the scanner power cable.
2. Push down on the two lever buttons found near the insertion slot on each side
of the scanning area lid. The scanning area lid-locking mechanism
disengages.
3. Holding both lever buttons down, place your free fingers in the insertion slot
and flip open the scanning area lid. The scanning area is exposed for cleaning.
4. Gently wipe the glass plate and the entire scanning area, including the main
cover and the roller, with a lint-free cloth dampened with a mild, streak-free,
glass cleaner.
CAUTION: Do not use abrasives, acetone, benzene, or fluids that contain
these chemicals. Do not spray liquids directly onto the scanner's glass plate
or anywhere else in the scanner.
The lifespan of the glass plate depends on the paper types that pass across
it. Abrasive papers such as mylar may cause premature deterioration.
5. Dry the glass completely using a separate clean, dry, lint-free cloth like the
one provided with the maintenance kit.
Calibrate the scanner
HP recommends that you calibrate the scanner once a month to maintain optimum
scan quality.
NOTE: It is important that you clean the glass and the scanning area before
calibrating the scanner.
1. Before calibrating, read the scanner's online guide on how to clean the scan
area. Then turn off the scanner and clean the scan area. Calibration does not
work well if the scan area is not clean.
2. When you have finished cleaning the scan area, turn on the scanner and leave
it on for at least an hour before proceeding to the next step.
Maintenance
Clean the glass plate and the scanning area
47
Page 52

Maintenance
3. Press the messages section, which is located below the preview screen.
NOTE: If there are no pending actions, the messages section might be blank.
4. In the Scanner Messages dialog box, press the Scanner Maintenance
button.
5. The Maintenance Wizard guides you through the procedures of camera
alignment, stitching, and calibration. To calibrate the scanner, you need the
maintenance sheet that came with your scanner.
48 Chapter 3 Maintenance
Page 53

Calibrate the touch screen pointer
1. Press the Setup tab.
2. Press the Options button.
3. Press the System button.
4. Press the Calibrate Touch Screen button and follow the instructions on the
screen.
Calibration is done by pressing the targets that appear in different positions on the
screen. Press the targets until they no longer appear.
Replace worn parts
Over time, the condition of certain key scanner parts will deteriorate. This section
addresses the parts that wear out under normal usage conditions and that can be
replaced without the assistance of an HP support technician.
To order any of the parts mentioned below, call HP Support.
Calibrate the touch screen pointer
Maintenance
49
Page 54

Lamp unit
Over time, the intensity of the lamp weakens. When the intensity weakens beyond
a certain point, a message appears on the touch screen advising you to replace the
lamp unit. It is important to replace the lamp unit when the message appears.
Failure to do so will result in poor image quality.
For step-by-step instructions on replacing the lamp unit, press
consult the scanner online help.
NOTE: Before replacing the lamp unit, you should thoroughly clean the glass plate
and the entire scanning area and see if that clears the advisory message. For more
information on cleaning the glass plate and scanning area, see
plate and the scanning area on page 47.
NOTE: The lamp unit and the air filter are included in the same package and
should be replaced at the same time.
Air filters
The air filters protect the scanner from dust and other airborne particles. Over time,
they become saturated. Timely replacement of air filters reduces the need for
cleaning and calibration, and helps to maintains image quality.
NOTE: The lamp unit and the air filter are included in the same package and
should be replaced at the same time.
For step-by-step instructions on replacing the air filters, press and
Maintenance
consult the scanner online help.
White-background platen
The white-background platen can become worn, discolored, warped, or otherwise
damaged after long periods of use.
For step-by-step instructions on replacing the white-background platen, press
and consult the scanner online help.
NOTE: Before replacing the white-background platen, you should thoroughly
clean it.
and
Clean the glass
Glass plate
Over time, the condition of the glass plate can deteriorate. Even very small
scratches can reduce image quality.
For step-by-step instructions on replacing the glass plate, press
consult the scanner online help.
50 Chapter 3 Maintenance
and
Page 55

NOTE: Before replacing the glass plate, you should thoroughly clean it and the
entire scanning area. For more information on cleaning the glass plate and scanning
area, see
Clean the glass plate and the scanning area on page 47.
Replace worn parts
Maintenance
51
Page 56

4 Troubleshooting
If you notice problems with the scanner other than those described below, consult
the scanner's online guide for further advice.
The Diagnostics light is flashing
●
The Wait light is flashing
●
The Wait and Diagnostics lights are both flashing
●
The Power, Wait, Diagnostics, and Paper-Ready lights are flashing
●
Lines in the scanned image appear too thin or discontinuous
●
A warning message appears on the panel PC touch screen
●
The scanner software is in the wrong language
●
The scanner software does not start
●
The CD or DVD cannot be read by my computer
●
A media profile cannot be generated
●
Streaks in the scanned image
●
The scanner is not detected after it is power-cycled
●
The Diagnostics light is flashing
The most likely explanation for the flashing diagnostics light is that the scanning
area needs to be cleaned. To resolve this issue, perform the routine maintenance
procedures explained in your online guide, and then restart the scanner.
If the diagnostics light continues to flash, there may be camera position errors. In
Troubleshooting
52 Chapter 4 Troubleshooting
this case, contact HP Support.
Page 57

The Wait light is flashing
The flashing wait light indicates that the scanner needs to make a readjustment but
is unable to do so. To resolve this issue, remove any paper from the scanner, ensure
that the insertion slot is set to the minimum height, and wait for the light to turn off.
The Wait and Diagnostics lights are both flashing
If the wait light and the diagnostics lights are both flashing, follow the remedies
described for a flashing diagnostics light. See
on page 52.
The Diagnostics light is flashing
The Power, Wait, Diagnostics, and Paper-Ready lights are
flashing
The Wait light is flashing
Troubleshooting
53
Page 58

When power, wait, diagnostics, and paper-ready lights are all flashing, it means the
scanner has powered up in Boot mode. This mode is used in emergency cases to
upgrade the scanner's firmware when the upgrade-firmware process has been
interrupted. If the scanner shows this combination of flashing lights, try the following
remedies:
Reboot the scanner and the touch screen.
●
If the scanner remains in Boot mode, perform a system recovery with the
●
System Recovery DVD that came with your scanner.
Lines in the scanned image appear too thin or
discontinuous
When scanning documents with thin lines, such as CAD drawings, a scanresolution setting of less than 300 dpi can result in disproportionately thin or
discontinuous lines. HP recommends that you set the scan resolution to a minimum
of 300 dpi when scanning CAD drawings and other documents with thin lines.
Scanning with higher resolution lengthens the overall scan time, but it ensures
greater image quality. This issue is not as noticeable when scanning photos and
area fills. For more information on setting the scan resolution, see
settings on page 13.
The images below help to illustrate the issue:
Figure 4-1 CAD drawing scanned at 150 dpi
Scan-quality
Figure 4-2 CAD drawing scanned at 300 dpi
Troubleshooting
54 Chapter 4 Troubleshooting
Page 59

A warning message appears on the panel PC touch screen
Under the following circumstances, a warning message might appear on the panel
PC touch screen, advising the user to perform maintenance:
Scanner maintenance has not been performed within the last 30 days.
●
The lamp intensity diminishes.
●
NOTE: If you replace the lamp, you should also replace the filter.
The condition of the glass plate has deteriorated beyond an acceptable level.
●
The condition of the original background has deteriorated beyond an
●
acceptable level.
If you see any of these warnings displayed on the panel PC touch screen, consult
the scanner's online guide for information on recommended maintenance
procedures.
The scanner software is in the wrong language
To change the scanner software language, follow these steps:
1. Press the Setup tab.
2. Press the Options button.
3. Press the System button.
4. Press the Advanced button.
5. Press the Change Language button.
6. Select your preferred language.
The scanner software does not start
If your scanner system software does not start up when you turn on the touch
screen, trying turning it off and then turning it on again.
A warning message appears on the panel PC touch screen
Troubleshooting
55
Page 60

If it persistently fails to start up, use the ’System Recovery’ DVD that came with
your scanner system to reinstall the software.
1. With the system on, insert the System Recovery DVD into the DVD drive.
2. Turn off the touch screen and then turn it on again.
3. Follow the instructions on the screen.
4. When the software has been reinstalled, you are prompted to remove the DVD
and restart the touch screen.
5. When the touch screen restarts, you are required to calibrate the position of
the pointer by touching the targets that appear on the screen. For an accurate
calibration, perform the calibration from your most typical operating position
and use whatever implement you use to operate the touch screen.
6. After touching the targets, you are asked to touch any part of the touch screen.
If you are satisfied with the result of the calibration, press the Yes button. If
you are prompted to restart the system, press the No button.
7. The language selection screen appears. Select the language you want to use
for the Designjet Scan application. The touch screen automatically restarts in
the selected language.
8. Allow time for the operating system to reload. The process is complete when
the touch screen shows the Copy tab of the Designjet Scan application.
The CD or DVD cannot be read by my computer
The scanner creates CDs and DVDs compliant with the ISO 9660 standard plus
Joliet Extension. This standard is commonly supported, but HP does not guarantee
that all computers can read the CDs and DVDs created by the scanner.
A media profile cannot be generated
Ensure that the scanner and the printer are both turned on and ready for normal
operation.
Ensure that the scanner is connected to the printer and that both the scanner and
printer are connected to the LAN.
Streaks in the scanned image
If the problem is visible when previewing the image on screen, it may be due to dirt
Troubleshooting
or scratches on the glass. First, check the original document to make sure that it is
clean and free of creases or other impediments that may drag across the glass. If
the document is clean and in good condition, try cleaning the glass (see
glass plate and the scanning area on page 47). If the problem persists, you may
need to replace the glass.
Clean the
56 Chapter 4 Troubleshooting
Page 61

The scanner is not detected after it is power-cycled
If the scanner is not detected, use the Rescan feature and see if that solves the
problem. If the problem persists, turn off the scanner and the touch screen, and
then disconnect the touch screen from the scanner. Reconnect the touch screen
and turn on the scanner and touch screen.
The scanner is not detected after it is power-cycled
Troubleshooting
57
Page 62

Index
A
accessing the shared folder 34
account management 40
adding a printer 5
adjusting color 27
administrator password 36
B
both lights flashing 53
C
calibration 47
can't make media profile 56
CD, saving files on 34
cleaning the glass 47
collating copies 19
copying a document 15
creating a media profile 6
D
delete file 28
deleting a printer 6
diagnostics light flashing 52
does not start 55
DVD, saving files on 34
L
lines in the image are too thin 54
M
maintenance warnings 55
media profiles 6
move file 28
printing a file 26
printing a scanned document 26
R
rename file 28
replacing worn parts 49
S
saving files on CD or DVD 34
scanner not detected after power-cycle 57
scanning a document to a file 21
scanning a document to the network 23
scanning heavyweight paper or cardboard 28
setting the output quality 10
setting the time, date, and timezone 45
setting timers 46
software introduction 1
streaks in the image 56
T
thick materials 28
touch screen calibration 49
U
unreadable CD/DVD 56
using this guide 1
V
view file 28
W
wait light flashing 53
wrong language 55
N
network connection 39
P
password access 38
performing a batch copy 19
performing a batch scan 25
power light on with Wait, Diagnostics and Paper Ready
lights flashing 53
previewing copies 31
printer configuration 5, 6
58 Index
Page 63

Page 64

© 2008 Hewlett-Packard Development Company L.P.
Printed in Germany - Imprimé en Allemagne - Stampato in Germania
www.hp.com
 Loading...