

Page 1
EN
Quick reference guide
TR
CS
HU
HP Designjet T11 MFP /
45
mfp / 45 Tarayıcı
Hızlı başvuru kılavuzu
Skenery
HP Designjet T11
45
mfp / 45
Stručná referenční příručka
HP Designjet T11
45 mfp többfunkciós készülék/
45
lapolvasó
Felhasználói gyorskalauz
MFP /
MFP /
Page 2

EN
You can nd legal and warranty information on the CD. Further information is available at HP’s support Web
site (http://www.hp.com/go/knowledge_center/).
Legal notices
The information contained herein is subject to change without notice. The only warranties for HP Products and
services are set forth in the express warranty statement accompanying such products and services. Nothing herein
should be construed as constituting an additional warranty. HP shall not be liable for technical or editorial errors or
omissions contained herein.
TR
CD'de yasal ve garanti ile ilgili bilgiler mevcuttur. Diğer bilgiler HP’nin destek web sitesinde
(http://www.hp.com/go/knowledge_center/) bulunmaktadır.
Yasal bildirimler
Burada yer alan bilgiler önceden bildirilmeden değiştirilebilir. HP ürün ve hizmetleri için yalnızca söz konusu ürün
ve hizmetlere eşlik eden açık garanti belgelerinde belirtilen garantiler geçerlidir. Burada kullanılan hiçbir ifade ek
garanti olarak yorumlanamaz. HP, bu belgedeki teknik hatalardan veya yazım hatalarından ya da eksikliklerden
sorumlu tutulamaz.
CS
Na disku CD naleznete právní ujednání a informace o záruce. Další informace jsou k dispozici
na webu podpory společnosti HP (http://www.hp.com/go/knowledge_center/).
Právní informace
Informace v tomto dokumentu mohou být změněny bez předchozího upozornění. Jediné záruky poskytované
k produktům a službám HP jsou výslovně uvedeny v prohlášení o záruce, které se dodává společně s těmito
produkty a službami. Žádné z informací uvedených v tomto dokumentu nemohou sloužit jako podklad pro
vyvození dalších záruk. Společnost HP nenese odpovědnost za případné technické či redakční chyby ani
opomenutí v tomto dokumentu.
HU
A CD-lemezen jogi tudnivalókat és a jótállással kapcsolatos információkat találhat. További információ
a HP terméktámogatási webhelyén található (http://www.hp.com/go/knowledge_center/).
Jogi kitételek
Az itt található információk előzetes értesítés nélkül megváltozhatnak. A HP termékekre és szolgáltatásokra
vonatkozó garanciákat kizárólag az ilyen termékek és szolgáltatások kifejezett garancianyilatkozatában rögzítettek
szerint vállaljuk. Az itt talált információk semmilyen módon nem tekinthetők további garanciának. A HP nem felelős
az itt található semmilyen technikai vagy szerkesztési hibáért vagy kihagyásért.
Page 3

Table of contents
EN
1 Introduction
Using this guide .............................................................................................. 1
Scanner software ............................................................................................ 1
2 Basic Operations
Add a new printer ................................ .......................................... .. ................ 5
Delete a printer ............................................................................................... 6
Create a new media profile ............................................................................. 6
Set the output quality .................................................................................... 10
Copy a document .......................................................................................... 15
Collate copies ............................................................................................... 19
Perform a batch copy .................................................................................... 19
Scan a document to a file ............................................................................. 21
Scan a document to the network .................................................................. 23
Perform a batch scan .................................................................................... 25
Print a file .............................................. ...... .................................................. 26
Adjust color ................................................................................................ ... 27
View, move, rename, or delete a file ............................................................ 28
Scan heavyweight paper or cardboard ......................................................... 28
Preview copies ....................................... ....... ... ....... .... ....... ... ....... ... ....... .... ... 31
Save files on a CD or DVD ........................................................................... 34
Access the shared folder from my computer ................................................ 34
Introduction ................................................................................... 1
Basic operations ........................................................................... 1
Maintenance .................................................... ............................. 1
Troubleshooting ............................................................................ 1
Index ............................................................................................. 1
Warnings and Cautions ................................................................ 1
Copy-quality settings for scanning and printing .......................... 10
Print-quality settings for printing from a file .. .............................. 12
Scan-quality settings .................................................................. 13
Add a network connection .......................................................... 23
Scan to the network .................................................................... 24
Access files in the network folder ............................................... 24
Use the auto-naming feature ...................................................... 25
Scan the documents ................................ ................................... 25
Zoom all .............................. ......................................... ............... 31
Zoom in ...................................................................................... 31
Zoom out .................................................................................... 31
One-to-one pixel viewing ............................................................ 32
Resize paper frame .................................................................... 32
Move tool ............................................... ..................................... 32
Position the paper frame ............................................................ 32
Align left and align right .............................................................. 33
Accessing the shared folder from Window s XP ......................... 35
Accessing the shared folder from Windows 2000 ...................... 35
Page 4

Accessing the shared folder from Windows 98 ...................... .... 36
Accessing the shared f older from Mac OS X ............................. 36
Set up a password ........................................................................................ 36
Enable password access to a shared directory ............................................ 38
Connect the scanner to a network ................................................................ 39
Manage an account ...................................................................................... 40
Create an account ...................................................................... 41
Delete an account ...................................................................... 42
Reset an account ....................................................................... 43
Rename an account ................................................................... 44
Set the time, date, and timezone .................................................................. 45
Set sleep and wake-up timers ..................................................................... . 46
3 Maintenance
Clean the glass plate and the scanning area ................................................ 47
Calibrate the scanner .................................................................................... 47
Calibrate the touch screen pointer ............................................................. ... 49
Replace worn parts ....................................................... ................................ 49
Lamp unit .................................................................................... 50
Air filters ..................................................................................... 50
White-background platen ........................................................... 50
Glass plate ................................................................................. 50
4 Troubleshooting
The Diagnostics light is flashing ................................................................... 52
The Wait light is flashing ............................................................................... 53
The Wait and Diagnostics lights are both flashing ........................................ 53
The Power, Wa it, Diagnostics, and Paper-Ready light s are flashing ........... 53
Lines in the scanned image appear too thin or discontinuous ...................... 54
A warning message appears on the panel PC touch screen ........................ 55
The scanner software is in the wrong language ........................................... 55
The scanner software does not start ............................................. ............... 55
The CD or DVD cannot be read by my computer ......................................... 56
A media profile cannot be generated ............................................................ 56
Streaks in the scanned image ...................................................................... 56
The scanner is not detected after it is power-cycled ................................. .... 57
Index ......................................... .................................................. .................................... 58
Page 5

1 Introduction
Using this guide
●
Scanner software
●
Using this guide
This guide is organized into the following chapters.
Introduction
This chapter provides a brief introduction to the scanner and its do cument ation f or
new users.
Basic operations
This chapter helps you to carry out various common procedures.
Maintenance
This chapter helps you to carry out various calibrat i on and maintenance
procedures.
Troubleshooting
This chapter helps you to solve problems that may occur while scann in g.
Index
In addition to the table of contents, there i s an alphabetical index t o help you to find
topics quickly.
Warnings and Cautions
Symbols are used in this manual to ensure the proper use of the p rinter and to
prevent printer damage. Follow the instructions that are marked with these symbols.
WARNING! Failure to follow the guidelines th at are marked with this symbol could
result in serious personal injury or death.
CAUTION: Failure to follow the guidelines that are marked wi th this symbol could
result in minor personal injury or damage to the product.
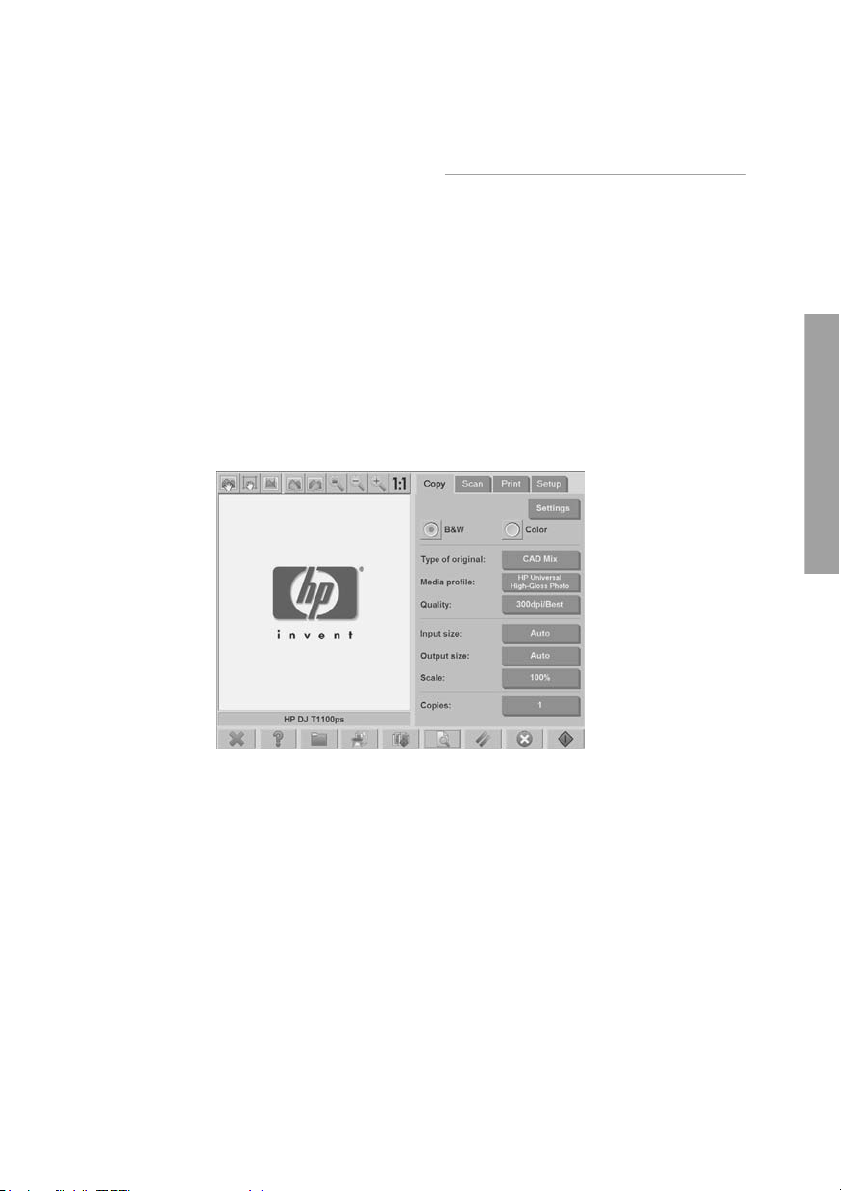
Introduction
Scanner software
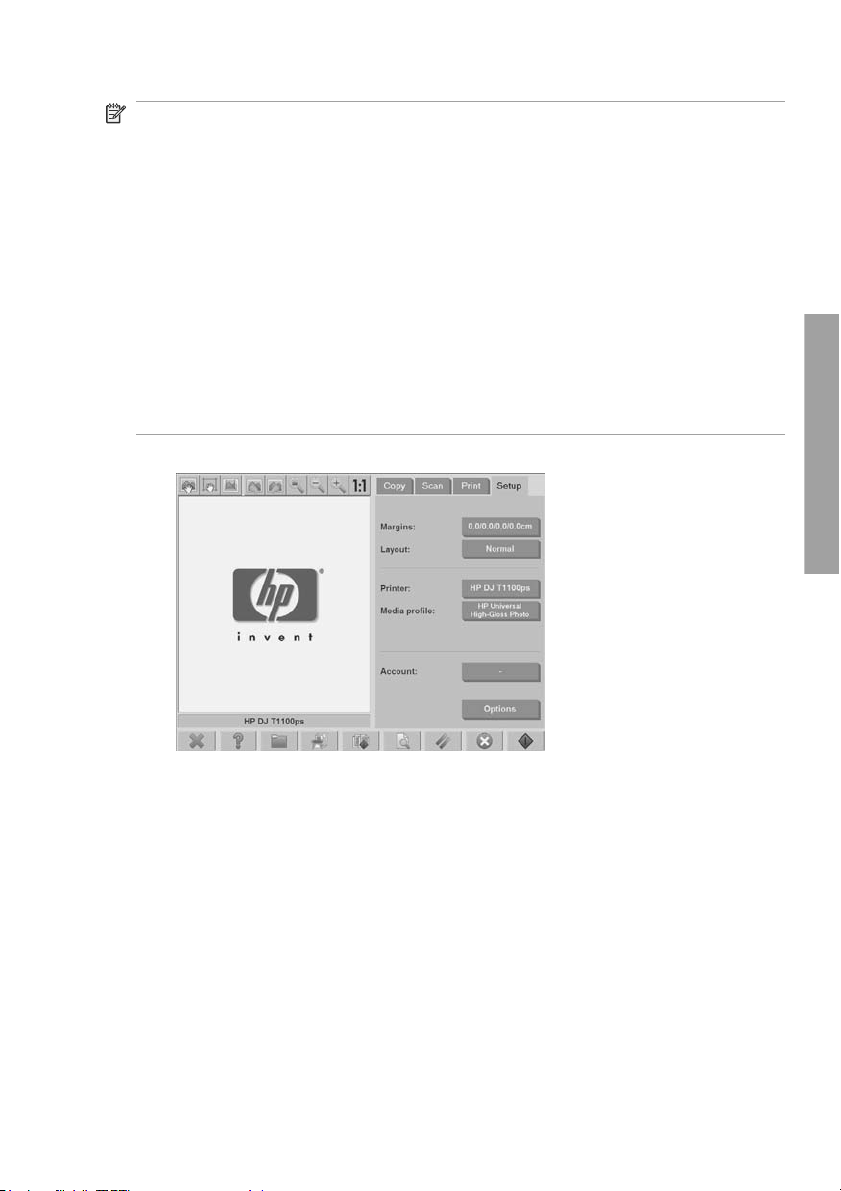
The scanner software is installed in the scanner's touch screen , a nd run s
automatically when you switch on the touch screen. The first screen that you see
is divided into three main sections:
The viewing section on the left, for viewing scanne d i m a ges
●
The control section on the right
●
The toolbar on the bottom
●
Using this guide
1
Page 6
Introduction
NOTE: Some details of this screen may vary depending on which printer is
connected to the scanner.
The screen includes:
The preview window. Fills most of the viewi ng section. Above it is the image
●
toolbar, with nine buttons that ca n be used to change the preview (see
Preview
copies on page 31).
The control section. Contains four t abs: Copy, Scan, Print, and Setup. Each
●
tab provides options that you can select when performing copy, scan, print, or
setup tasks.
Nine larger function buttons at the b ottom of the screen:
●
◦
Quit: shuts down the touch screen
◦
Online help: provides additional i nfo rmation on many topics
not included in this document
◦
File Manager: opens the File Management dialogue box
◦
Print queue: accesses the print queue
◦
Collate: groups copies into sets
◦
Preview: scans the document to preview the image and
select an area of interest
2 Chapter 1 Introduction
Page 7

◦
Reset: resets settings to default values
◦
Stop: cancels the current activity
◦
Copy, Scan, or Print: each icon
appears in its respective tab, and initiates t he copy, scan, or print function
depending on the tab within which you are working.
Introduction
Scanner software
3
Page 8

2 Basic Operations
Add a new printer
●
Delete a printer
●
Create a new media profile
●
Set the output quality
●
Copy a document
●
Collate copies
●
Perform a batch copy
●
Scan a document to a file
Basic Operations
●
Scan a document to the network
●
Perform a batch scan
●
Print a file
●
Adjust color
●
View, move, rename, or delete a file
●
Scan heavyweight paper or cardboard
●
Preview copies
●
Save files on a CD or DVD
●
Access the shared folder from my computer
●
Set up a password
●
Enable password access to a shared directory
●
Connect the scanner to a network
●
Manage an account
●
Set the time, date, and timezone
●
Set sleep and wake-up timers
●
4 Chapter 2 Basic Operations
Page 9
Add a new printer
To add a new HP Designjet printer to the printer li st in your scanner software, follow
these steps:
1. Press the Setup tab.
2. Press the Options button. The Options dialog box appears:
3. Press the System button. The System options dial og box app ear s:
4. Press the Install Printer Driver button.
5. Select the printer you want to install.
Basic Operations
Add a new printer
5
Page 10
Delete a printer
To delete an HP Designjet printer from the printer list in your scanner software:
1. Press the Setup tab.
Basic Operations
2.
NOTE: If more than one printer of the same model number is inst all ed on
the system, the name of the second printer added is denoted by “#2”, the third
by “#3”, and so on.
Press the Printer button, and then press the Tool button
Setup dialog box appears.
. The Printer
3. Press the Delete button.
Create a new media profile
Before starting the following procedure, make sure that you have color-calibrated
the scanner (see
profile you intend to create does not already e xi s t i n th e media profile list.
6 Chapter 2 Basic Operations
Calibrate the scanner on page 47) and make sure that th e media
Page 11
NOTE: When using HP Designjet 45XX, 40XX, or T11XX, you can only create
media profiles for paper types that are currently loaded in the pri nt er. These
standard paper types are detected by the system and their names appear in the list
of media profiles. You can then select one of these and create a media profile for
it as described below. You can not change the names of the media profiles with
these printers.
When using Designjet 500, 800, 5X00, or 1000 you ca n creat e media profil es with
any name you want. The system prompts you to enter a name for the required
paper.
NOTE: You are required to create a media profile before you can copy and print.
You are also required to have at least one printer connected to the scanner before
you can copy and print. The printer can be connected to the sca nner directly through
the panel PC, or through the local area network (LAN).
NOTE: To create a new media profile, you are requir ed to have media loaded into
the printer.
1. Press the Setup tab.
Basic Operations
Create a new media profile
7
Page 12
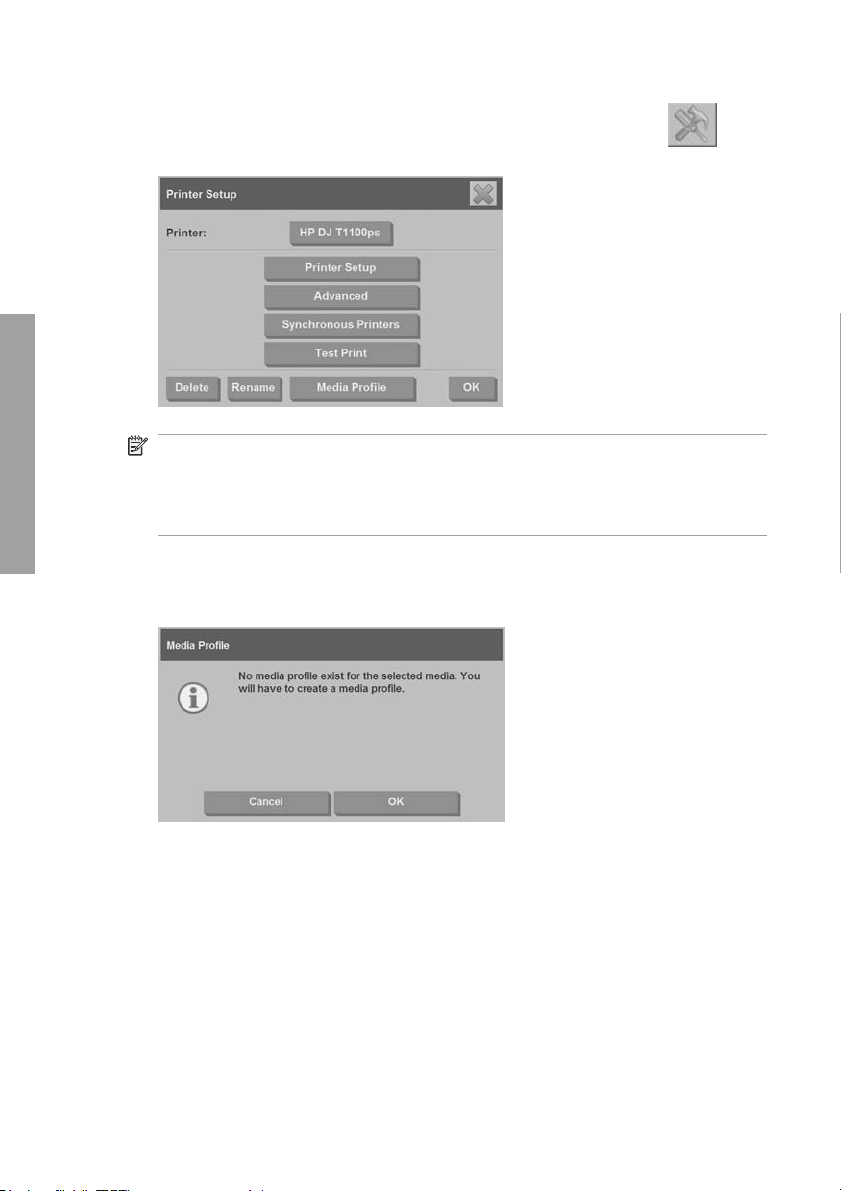
Basic Operations
2.
Press the Media Profile button, and then press the Tool button
.
(Alternative path: Printer > Tool > Media Profile).
NOTE: With some printers, a Calibrate RIP feature is available in the dialog
box as the first step. Calibrating the RIP involves configuring the gamma
values of red, green, and blue to ensure a neutral appearance of printed gray
(also referred to as gray balance). Press the Calibrate RIP button and follow
the on-screen instructions to use this feature.
3. Press the button that corresponds to the media that you have loaded in the
printer.
4. Press the OK button when this message appears.
8 Chapter 2 Basic Operations
Page 13
5. Press the Print Color Sheet button to print a color patch reference sheet .
Some printers print a special test sheet just befo re printing the color sheet. Do
not use the test sheet—only use the color sheet (shown bel ow ) .
6. Press the Scan Sheet button to scan the color sheet.
NOTE: Some HP Designjet models require that you enter the media profile
name when the system is connected through the LAN.
7. Load the color sheet into the scanner face down. Align the arrow on the color
sheet with the arrow on the center of the scanner.
8. Press the OK button to initiate the scan.
9. Press the OK button when this message appears.
Basic Operations
The media profile is active and visible in the list of available media profiles.
Create a new media profile
9
Page 14
Use the Delete button to delete media profiles. Only user-created profiles can be
deleted.
Use the Rename button (if available) to rename media profiles.
NOTE: When using HP Designjet 45XX, 40XX, or T11 X X , the Rename button is
not available in the dialog box. Use the Validate button to check that the media
profile is valid for your scanner and printer combi nation.
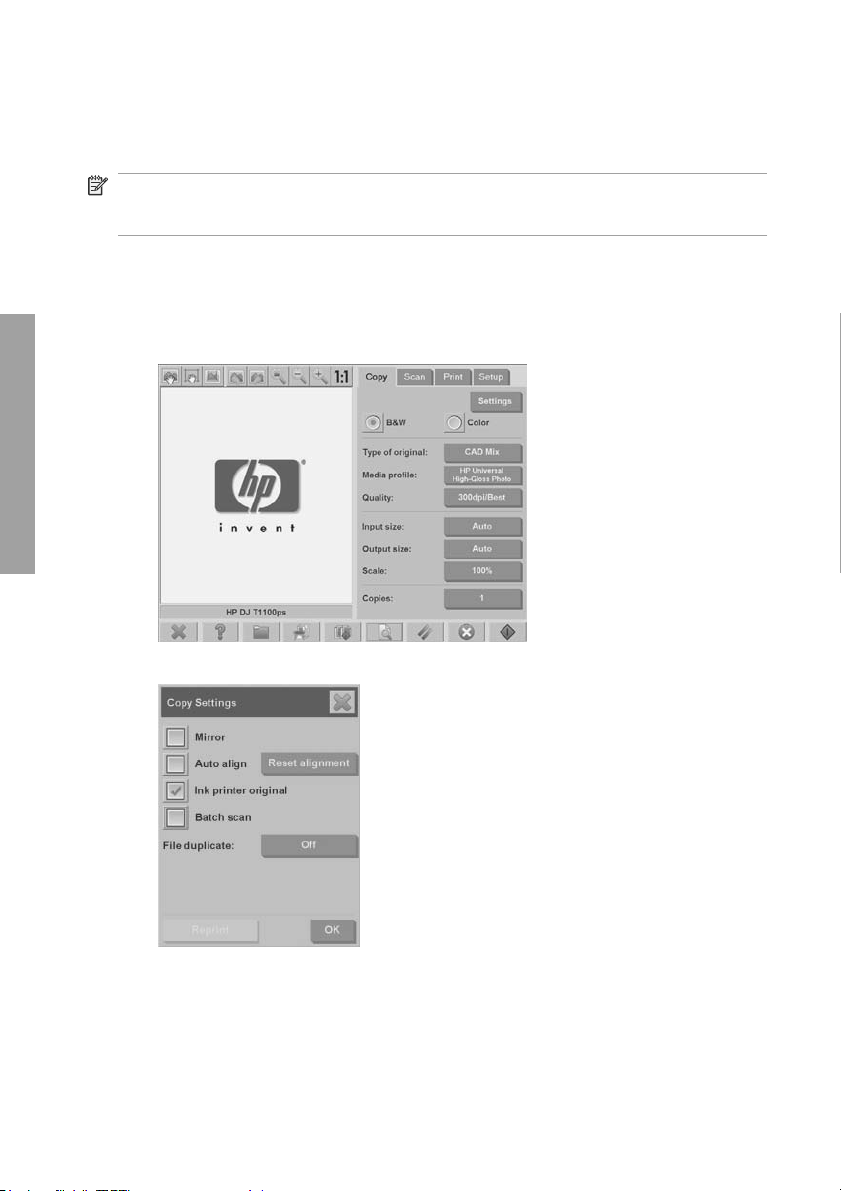
Set the output quality
This section describes how to set the output quali ty for your scanner and printer.
Copy-quality settings for scanning and printing
1. Press the Copy tab.
Basic Operations
2. Press the Settings button. The Copy Settings dialog box appears:
3. Select Ink Printer Original to improve the quality of your copy or print if the
original that you want to scan has been pri nted with an inkjet printer.
10 Chapter 2 Basic Operations
Page 15
4. Press the OK button.
5. Press the Quality button.
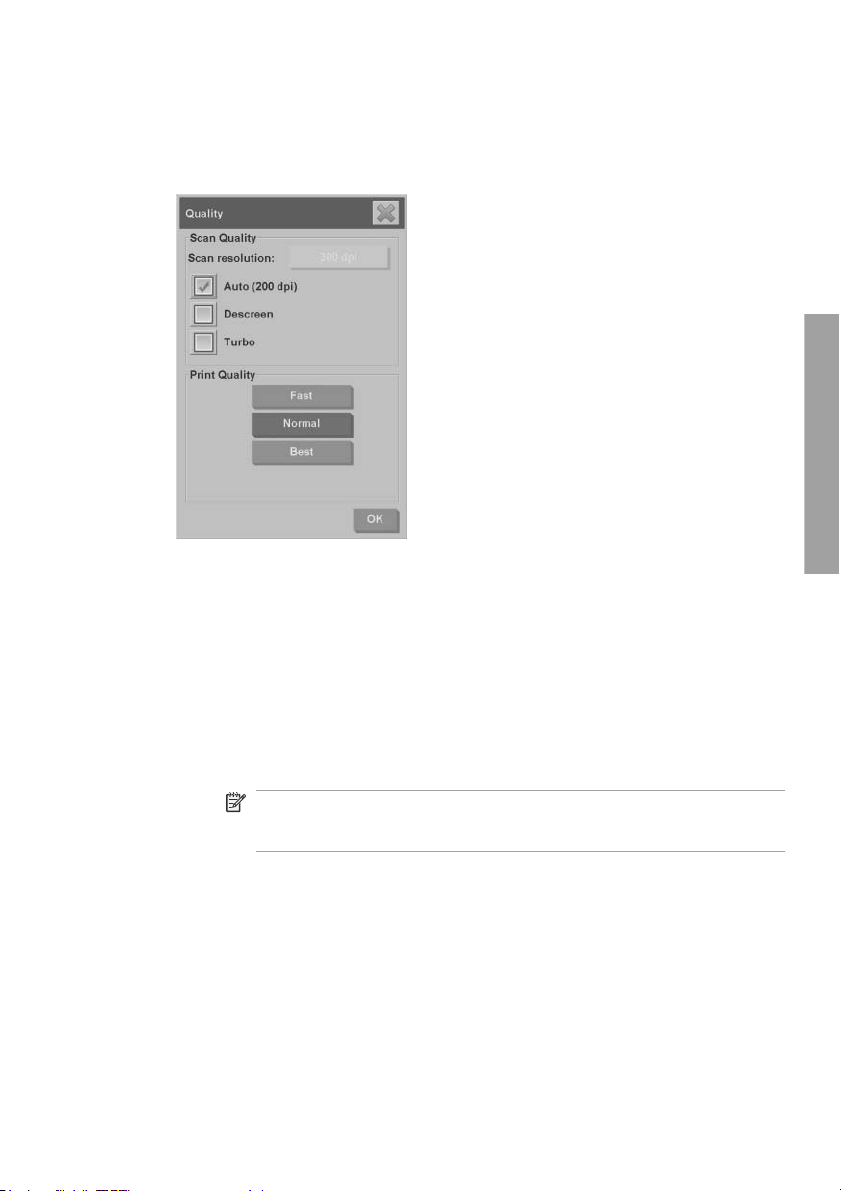
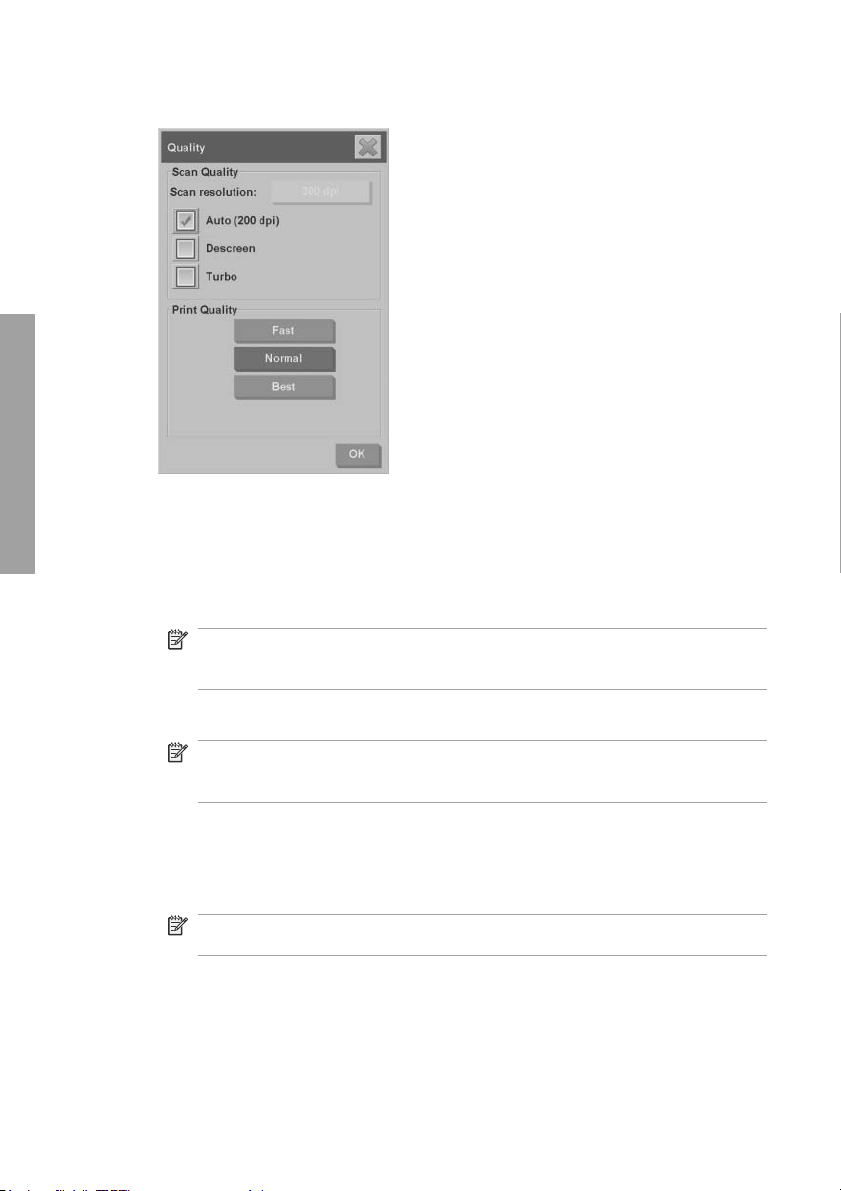
6. Define the scan quality and print-quality set tings using the Quality dialog box.
Scan quality: Select one of the follow i ng scan quality settings:
●
Scan resolution: Manually set the scan resolution in dots per inch
◦
(dpi).
Auto: The system determines the best scan resolution based on the
◦
print quality (Fast, Normal, or Best) that you select. The resolution
setting (in dpi) is displayed next to the Auto checkbox (200 dpi i n
the example above).
Descreen: The scanner scans with the optical resolution and relays
◦
the data to the system. The software th en sets the optimal resolution
value.
NOTE: The Descreen setting gives the best results when
scanning raster images (non-vector images, such as .jpeg, .tiff,
and .pdf files), however the scanning speed is reduced.
Turbo: The Turbo setting increases the rate at which the pape r is
◦
fed and reduces the amount of scanning d ata that is captured, which
means the scanning speed increases, but the image quality
decreases. To use the Turbo setting, first manually set the scan
resolution, and then select Turbo.
Basic Operations
Set the output quality
11
Page 16
NOTE: The turbo setting has no effect when t he re so lution is set
below 300 dpi.
Print quality: Select Fast, Normal, or Best.
●
NOTE: If you set the scan quality to Auto, the prin t-qu ality setting that
you select determines the scan resolution (as descri bed a bove ).
7. Press the OK button.
Print-quality settings for printing from a file
1. Press the Print tab.
Basic Operations
2. Press the Settings button. The Print Settings dialog box appears:
3. Select from the following print settings:
Print quality: Press the Print quality button to select a Fast, Normal,
●
or Best print-quality settin g.
Ink printer original: This setting is used to improve the quality of your
●
copy or print if the original you want to scan has been printed with an
inkjet printer.
12 Chapter 2 Basic Operations
Page 17
Black ink only: This setting is used t o create true- and neu tral-graytone
●
output from graytone image files.
NOTE: The use of this setting can result in output that is more grainy
than graytone output which was created with colored inks.
Optimize for drawing: This setting is recommended for text and
●
drawings.
NOTE: The use of this setting for do cuments which contain pictures can
result in reduced image quality.
Max detail: This setting is used for enhancing detailed grap hics, such as
●
maps and certain CAD drawings.
NOTE: The use of this setting for do cuments which contain pictures can
result in reduced image quality.
4. Press the OK button.
NOTE: The availability of these options depends on the printer model.
Scan-quality settings
1. Press the Scan tab.
Basic Operations
Set the output quality
13
Page 18
Basic Operations
2. Press the Scan resolution button. The Quality dialog box appears:
3. Select from the following quality settings:
Scan resolution: Manually set the scan resolution in dots per in ch (dpi).
●
Auto: The system determines the best scan resolution based on the print
●
quality (Fast, Normal, or Best) that you select. The resolution setting (in
dpi) is displayed next to the Auto checkbox (200 dpi in the e x amp le
above).
NOTE: The system determines the scan resolution based on the print-
quality that you select, however the pr in t-quality setting is not actually
used in the scan-to-network process.
Descreen: The scanner scans with the op ti cal re so lu tion and relays the
●
data to the system. The software then sets the optimal resolution value.
NOTE: The Descreen setting gives the best results when scanning
raster images (non-vector images, such as .jpeg, .tiff, and .pd f files),
however the scanning speed is reduced.
Turbo: The Turbo setting increases the rate at which the paper is fed
●
and reduces the amount of scanning data that is captured, which means
the scanning speed increases, but the image quality decreases. To use
the Turbo setting, first manually set the scan resolution, and then
select Turbo.
NOTE: The turbo setting has no effect when the resolution is set be low
300 dpi.
4. Press the OK button.
14 Chapter 2 Basic Operations
Page 19
Copy a document
1. If you do not already have a media profile for the pap er type you ar e planning
to use, you must create one. See
2. Insert your document.
a. Place the document face down with the top edge forw ard in the scanne r
insertion slot. Align the center of the document with the center of the
insertion slot.
b. Slid e the document gently into the insertion slot until you feel it pulled into
the starting position.
3. Select color or black-and-white copying.
Your selection determines which type-of-origi nal templates are available in the
following step.
4. Select the type-of-original template.
a. Press the Copy tab.
Create a new media profile on page 6.
Basic Operations
Copy a document
15
Page 20
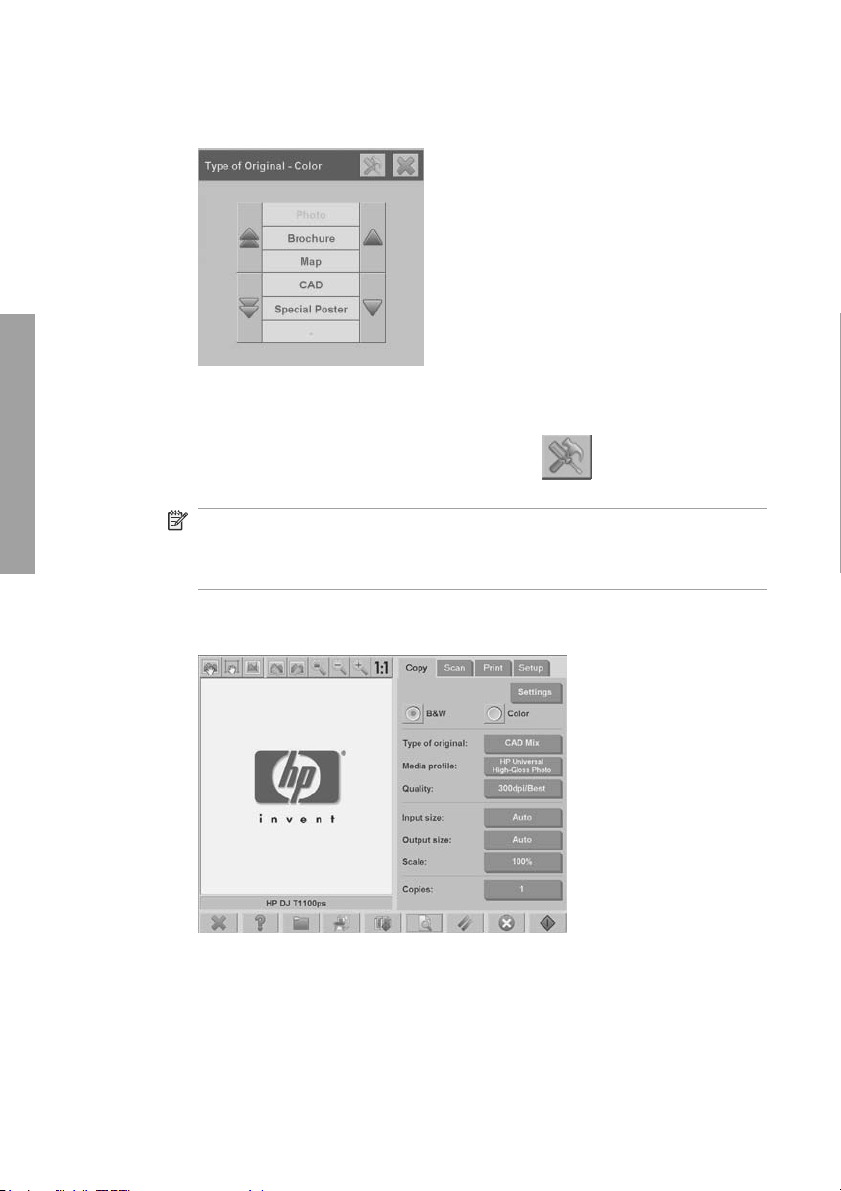
Basic Operations
b. Press the Type of original button. The Type of original dialog box
appears:
c. Select a type-of-original template that best describes your current input.
d. If you want to change the set t i ngs for any of these options, or want to
create a new option, press the Tool button
configuration, press the New button and enter a name for it.
NOTE: If you change any of the original template settings, the Type of
Original dialog box shows the symbol “*” next to the template n ame to
denote that changes have been made. For exam ple, changes made to
the CAD template appear in the dialog box as “CAD*”.
5. Select the input size.
a. Press the Copy tab.
. To save the new
16 Chapter 2 Basic Operations
Page 21
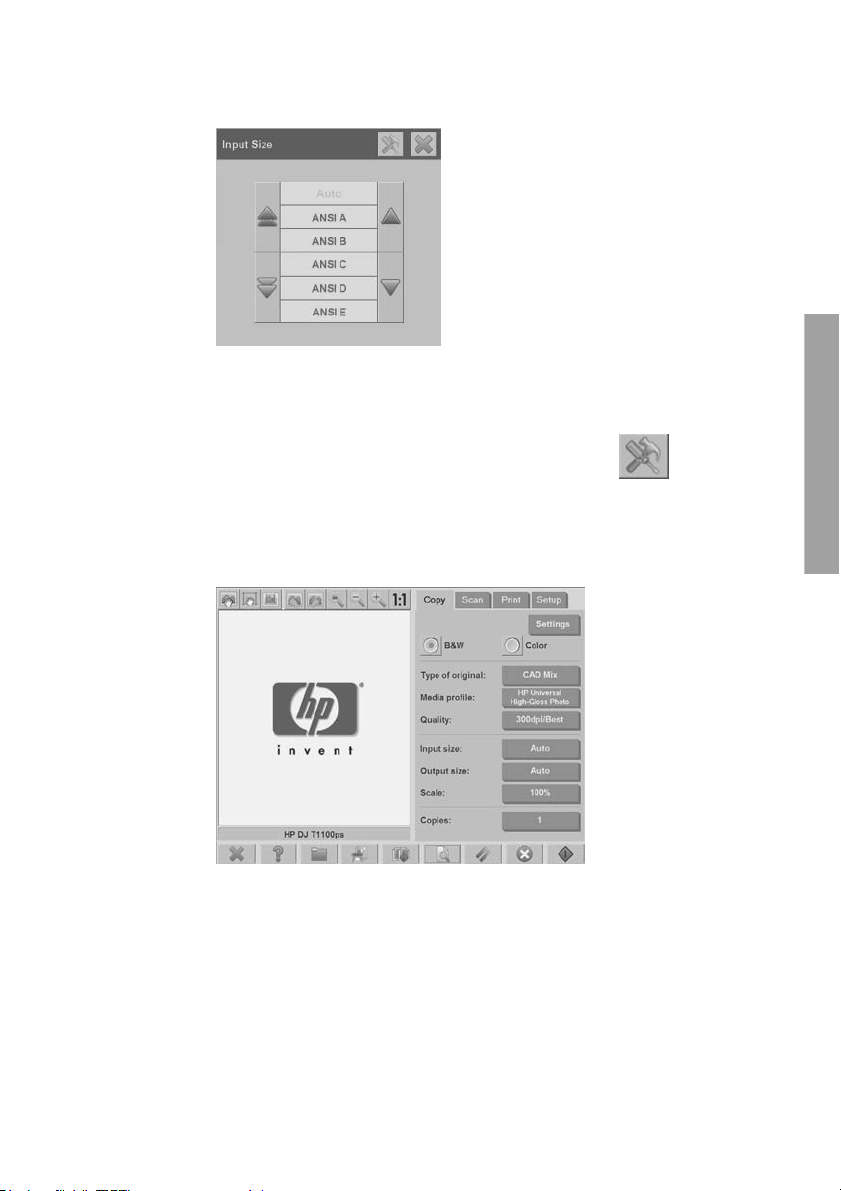
b. Pre ss th e Input size button. The Input size dialog box appears:
c. Select the size that fits your original. Select Auto to have the scanner
automatically detect the width an d le ngth of the original.
d. If you want to change the settings for any of these options, or w an t to
create a custom-paper size, press the Tool button
changes or the custom-paper size, press the New button and enter a
name for it.
6. Select the output size.
a. Press the Copy tab.
. To save the
Basic Operations
Copy a document
17
Page 22
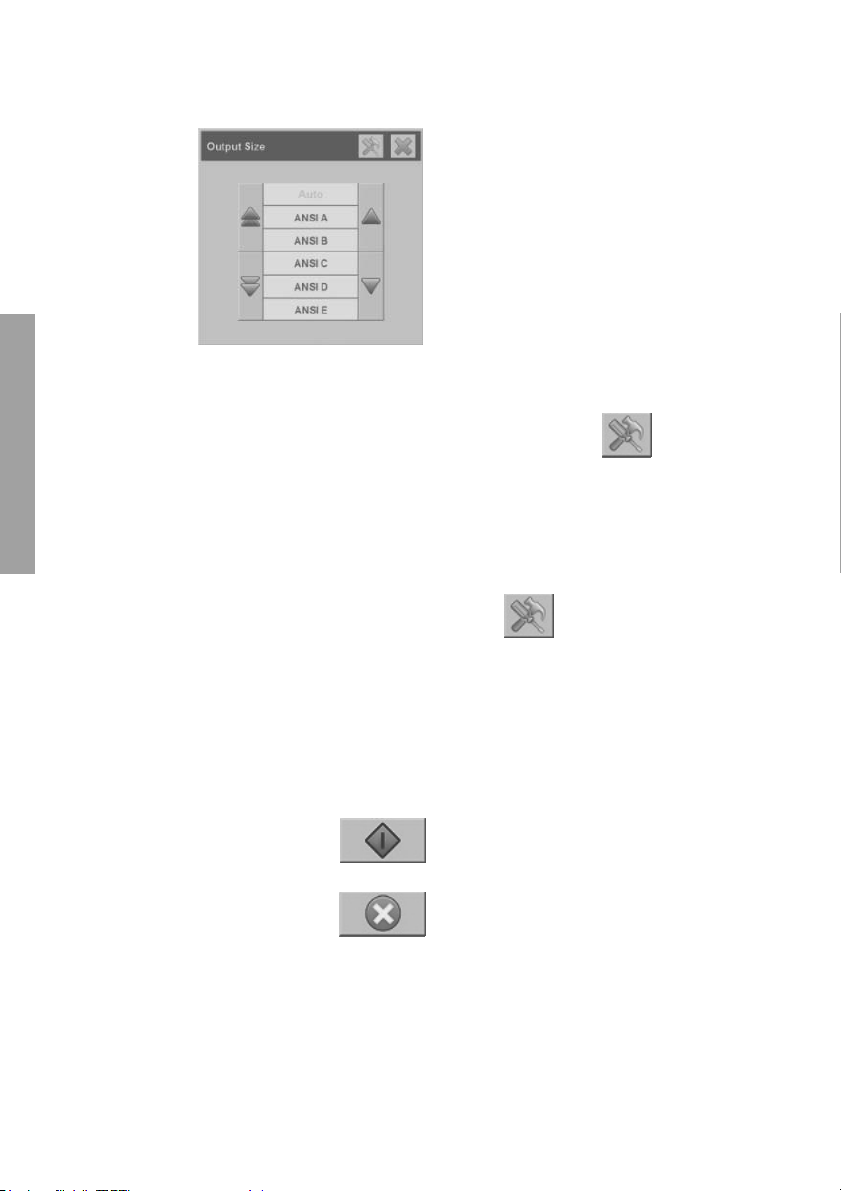
b. Press the Output Size button. The Output Size dialog box appears:
Basic Operations
c. Select the size that you want for your output copy.
d. If you want to change the set t i ngs for any of these options, or want to
create a custom-paper size, press the Tool button
. To save the
changes or the custom-paper size, press the New button and enter a
name for it.
If you have selected an output size that differs from t he input size, the scanner
calculates the scaling percentage and displa y it on the Scale button in the
Copy tab after the first preview. Alternatively, you can specify a scaling
percentage by pressing the Scale button and selecting a pr ede fined scale
percentage, or by pressing the Tool button
and entering a scale
percentage.
7. Set the number of copies.
a. Press the Copies button if you want to make more than one copy of the
loaded document.
b. Enter the number of copies in the Edit field.
This option allows you to leave the system working unattended.
8.
Press the Copy button
to begin copying with the settings you have
configured.
Press the Stop button
to cancel the current preview or copy
process.
18 Chapter 2 Basic Operations
Page 23
Press the Reset button to clear the settings you have configured an d
reset the program to the default values.
Collate copies
The collate feature allows you to group your copies into sets, and then print a
selected number of these sets on your printer. All of th e preview and enhancem ent
options that are available for single document copying, are also avai lable when
using the collate feature .
1. Press the Copy tab.
2. Feed a document into the scanner, and then press t he Collate button
NOTE: The original image is captured as wit h single-sheet copying, however
it is put on standby in your system instead of being sent to the printer.
3. Feed another document, and then press the Collate button. Continue on in
this manner until all of the documents that you want to be part of the set have
been scanned. You can adjust each copy in the set in the same way you do
with single document copying.
4. Define the number of sets by pressi ng the Copies button in the Copy tab. The
number of copies indicates how many sets are copied. Each se t contains all
of the collated documents.
5. Press the Collate Print button to activate the copy job.
Basic Operations
on the main touch screen.
Perform a batch copy
Batch copying means processing more than one original docume nt in one session
without adjusting any settings and without having to press th e Copy button for each
Collate copies
19
Page 24
Basic Operations
original. Batch copying is useful when you wan t to copy gro ups of do cu ments w ith
the same settings.
1. Prepare the originals that you want to copy with the same set t i ngs.
2. Feed the first original into the scanne r.
3. Configure the settings in the Copy tab as you would for single-document
copying. See
Copy a document on page 15.
NOTE: If you have original documents with di fferent dimensions, use the
Auto size-detection setting and select Auto width and Auto length.
4. Press the Copy tab.
5. Press the Settings button, select Batch scan, and the press the OK button.
6.
Press the Copy button
documents.
20 Chapter 2 Basic Operations
, and then begin feeding your origi nal
Page 25
TIP: If you want to interrupt the batch-copy mode, press the Stop button
. Doing so temporarily stops the batch-copy mode, all owing you to co py
a single document with different settings. The b atch -copy mo de is resumed after
you have copied the single document .
TIP: You can configure the scanner to eject each original document upon copy
completion so that the next original can be fed . T o select this option, go to the
Setup tab and select Options > Scanning > Eject paper.
The scanner remains in batch-copy mode until you cancel it by pressing the
Settings button in the Copy tab, and then deselect in g th e Batch scan option.
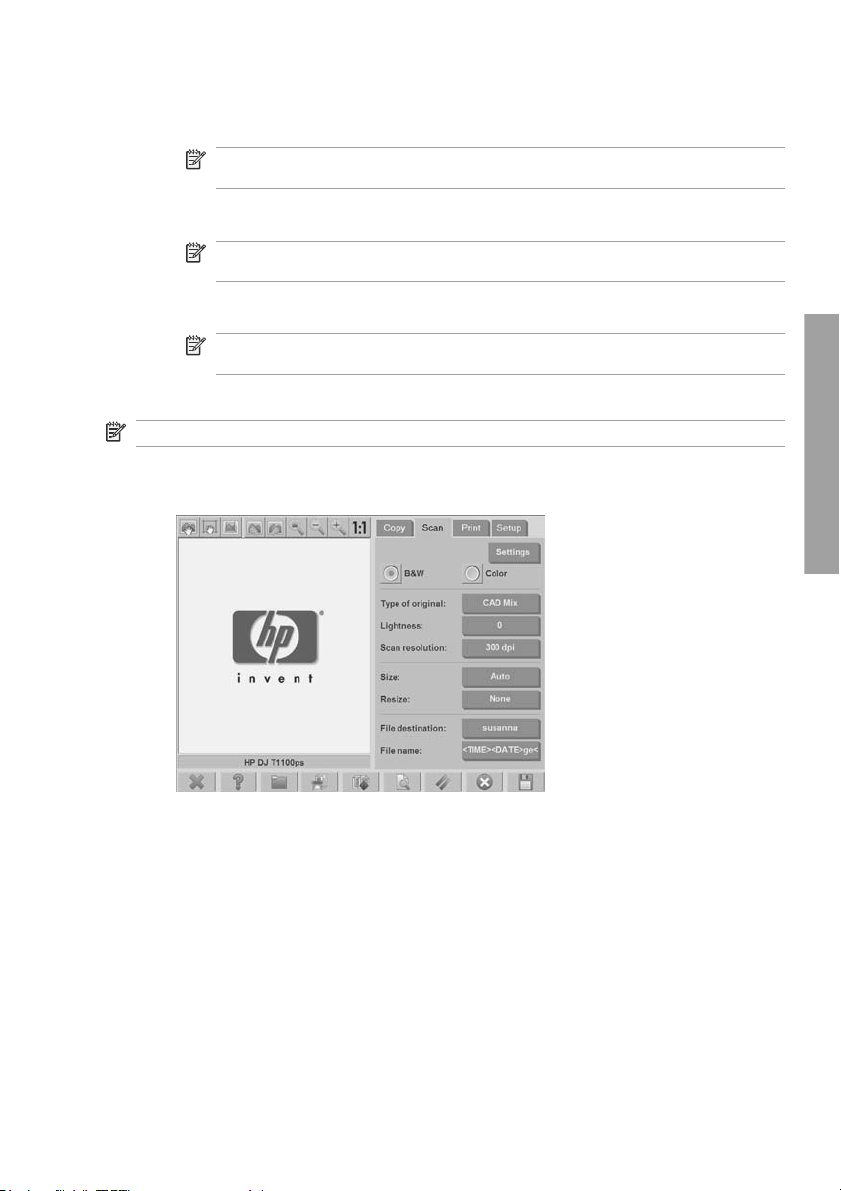
Scan a document to a file
1. Place the document face down with the t op edge of the original in the scanner
insertion slot. Feed the original into the scanner. Use the center arrow for
correct positioning.
2. Select the Scan tab, and then configure the scan settings, which are de scribed
in the following steps.
Basic Operations
Output settings such as margins, layout, and media profile can be co nfigur ed
later, when you print the file.
3. Select Color or B&W scanning.
4. Select the type-of-original template th at best describes your original.
Scan a document to a file
21
Page 26
Basic Operations
5. Set the scan resolution. Scan resolution determines the image quality. You
can set a custom dpi value, or choose from the foll ow i ng settings:
Auto: the system determines the best scan resolution based on the print
●
quality (Fast, Normal, or Best) that you select.
Descreen: the scanner scans with the optical resolution and relays the
●
data to the system without interpolation.
Turbo: this setting increases the rate at which the p ape r is fe d an d
●
reduces the amount of scanning data that is captured, which means the
scanning speed increases, but the image quali ty decreases.
6. Use the Size and Resize options to define the dimen sions of your scanned
image. You can use Size: Auto and Resize: None to maintain the size of the
original.
7. The default filename is compo sed of the current date and time. To change the
default name, press the File Name button and enter a new name.
NOTE: For information on the auto-naming feature (which is more useful
when batch scanning), see
Use the auto-naming feature on page 25.
8. Press Settings > File Format to select the output-file format. Various format
options are available.
9. Press the File destination button to select t he folder to which the scan ned file
is saved. The Change Folder dialogue box appears.
10. In the Change Folder dialog box, you can:
Press the arrows to navigate the folders.
●
Press the folder up button (marked "..") to move up a level.
●
Press the New Folder button to create a new folder within the current
●
folder.
Press a folder name to move your search to that folder's level.
●
11. Press OK in the Change Folder dialog box when you have se lected the
destination folder for your file. Files to be shared across the ne tw ork should
be placed in the D:\images folder. Once a file is saved in this folder it can be
22 Chapter 2 Basic Operations
Page 27
accessed throughout the network, from any computer running any operating
system.
12.
Press the Scan to file button
save the image.
13. To view or delete the resulting file, see
on page 28.
Scan a document to the network
By default, your scanner’s file manager only displays lo cal drives and fo lders. Thi s
topic explains how to add network connections, how to u s e the network locations
as file destinations for scan-to-file j obs, and how to access them with the file
manager.
NOTE: To scan a document to a computer or server on the network, the
destination computer or server must have all firewalls disabled and the de stination
folder must be a shared folder.
to start the scan-to-file process and
View, move, rename, or delete a file
Add a network connection
Verify that your system is connected to the network.
1.
Press the Folder button
2. Press the Network button.
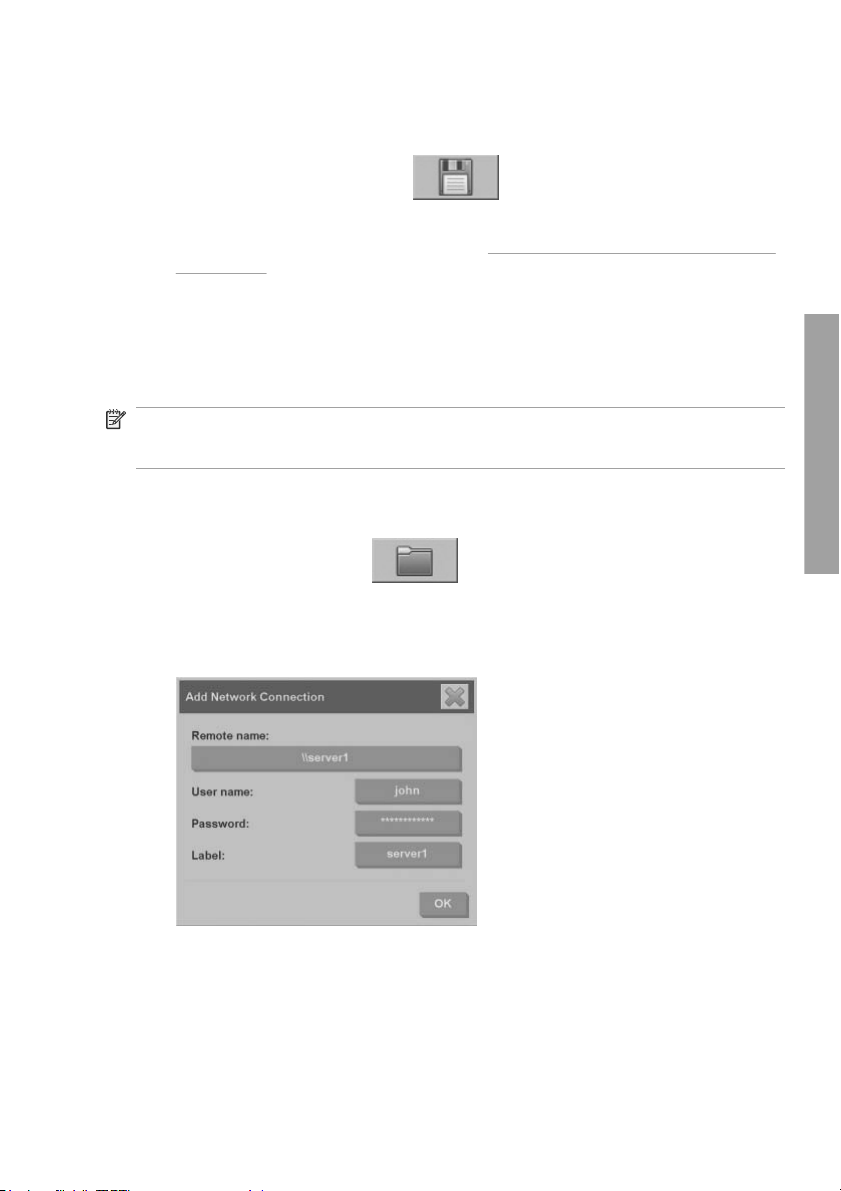
3. Press the Add Network Connection button. The Add Network
Connection dialog box appears:
Contact your network administrator if you require additi onal information a bout
one or more of the settings described in the foll ow ing steps.
Basic Operations
to open the File Manager dialog box.
Scan a document to the network
23
Page 28
Basic Operations
4. Remote name: Enter the full path name to the remote machine or folder on
the network in the following format: \\PCname\sharedfolder.
5. User name: Enter the domain name a nd your log in user name for th e remote
server or computer in the following format: DOMAIN\username.
6. Password: Enter the login password for the remo te serve r or comp ute r .
7. Label: Enter a name to help you to identify the remote desti nation. This is the
name that appears in the HP Designjet scanner File Manager dialog box.
NOTE: You can add as many network connections as you want. However,
because of a Microsoft Windows limitation , you ca nnot map a network folder that
has been previously mapped by another person on t he same compute r. To map to
a previously mapped network folder, you must first remove th at network connection.
To remove network connections, press the Folder button
Network button, and then the Remove Network Connection button.
Scan to the network
Verify that you have added a network connecti on. See Add a network connection
on page 23.
1. Configure the settings in the Scan tab as you would for any scan-to-file job.
2. Press the File destination button.
3. Press the folder up button (marked "..") until it no longer appears. When the
“path up” button no longer appears, you have rea ched the high est level of t he
list, which shows all of the accessible drives.
4. Navigate the list and select the netw ork location to which you wan to scan.
5. Select the destination folder to which you want to scan.
6. Press the OK button.
Access files in the network folder
Verify that you have added a network connecti on. See Add a network connection
on page 23.
1.
Press the Folder button
2. Press the folder up button (marked "..") until it no longer appears. When the
“path up” button no longer appears, you have rea ched the high est level of t he
list, which shows all of the accessible drives.
3. Navigate the list and select the netw ork location that you want to access.
, then the
to open the File Manager dialog box.
24 Chapter 2 Basic Operations
Page 29

4. Select the destination folder that you want to access.
5. Press the OK button.
NOTE: The scanner system provides a shared folder (D:\images) that can be
accessed from other computers on the network. For security reasons, n o o the r
folders in the scanner system can be accessed by a computer on the network.
Therefore, if you want scanned files to be accessible from other computers on the
network, you must save them in D:\images. For more information on accessing the
shared folder, see
Access the shared folder from my computer on page 34.
Perform a batch scan
Batch scanning means processing more than o ne original document in one session,
without adjusting any settings and without having to press the Scan button for each
original. Batch scanning is useful when you want to scan groups of documents with
the same settings.
Use the auto-naming feature
When you batch scan documents, the scanner saves each docum ent as an
individual file and names each file according to the default naming convention,
which is composed of the current date an d time. However, the a uto-naming feature
allows you to define how the documents are named when they are scanned to file.
To configure the auto-naming feature, p ress the Fil e name button in th e Scan tab
before starting to scan, and then enter a filename followed by the suffix: “<###>”.
This suffix tells the system to add a number to the end of each filename, and to
increase the number by an increment of one f or ea ch document scanned. The
amount of characters in the number is equal to the number o f “#” cha racters you
have in the suffix. For example, if you enter the file name “new_image<###>”, the
system creates files new_image001, new_image002, new_image003, and so on,
for each original document scanned. Use the Insert counter button to insert the
suffix: “<###>”.
NOTE: The system examines the file-destina tion folder and begins numbering
after the last number in a series of file names, to avoid overwriting any files already
in the folder. For example, if you enter the file name “new_image<###>”, and the
file-destination folder already contains files named “new _image0 01” and
“new_image002”, the system saves the new files starting at “new_image003”.
Basic Operations
Scan the documents
1. Prepare the originals that you want to scan with th e same settings.
2. Feed the first original into the scanne r.
3. Configure the settings in the Scan tab as you would for single-document
scanning. See
NOTE: If you have original documents with different dimensions, use the
Auto size-detection setting and select Auto width and Auto length.
Scan a document to a file on page 21.
Perform a batch scan
25
Page 30
Basic Operations
Print a file
4. Press the Scan tab.
5. Press the Settings button, select Batch Scan, and t hen press the OK button.
6.
Press the Scan-to-file button
documents. Each document is scanned and saved as a file.
TIP: If you want to interrupt the batch-scan mode, press the Stop button
. Doing so temporarily stops the batch-scan mode, allowi ng you to sca n
a single document with different setti ngs. The batch-scan mode is resumed after
you have scanned the single document.
TIP: You can configure the scanner to eject each original document upon copy
completion so that the next original can be fed. To select this option , g o to the
Setup tab and select Options > Scanning > Eject paper.
The scanner remains in batch-scan mode until you cancel it by pressing the
Settings button in the Scan tab, and then deselecting the Batch Scan option.
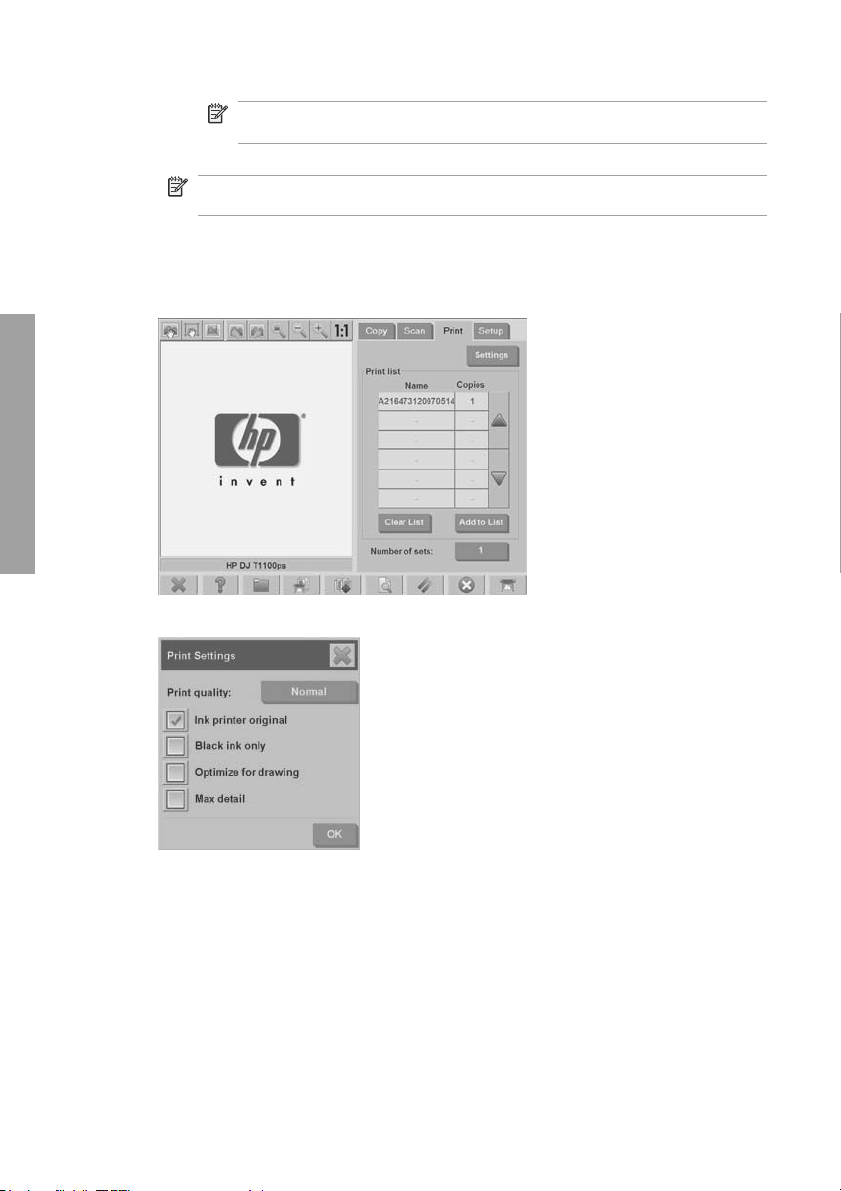
You manage the files that you want to print in the Print tab. You can define the
number of copies you want of an individual file, and how many sets of t he complete
list you want copied.
1. If you do not already have a media profile fo r the paper t ype you a re planni ng
to use, you must create one. See
, and then begin feeding your original
Create a new media profile on page 6.
26 Chapter 2 Basic Operations
Page 31

2. Press the Print tab.
When you enter the Print dialog box, the Copy button changes to
Basic Operations
the Print button
The Print list shows the files currently selected for printing. Press the Add to
List button to add files to the Print list.
3. Configure the settings in th e Setup tab as nece ssary. The Setup tab sett ings
such as margins, layout, printer and media profi le, apply to the entire print job.
4.
Press the Print button
NOTE: The Print tab is designed for printing files created w ithin the Scan tab; it
cannot be used to print files from other sou r ce s.
Adjust color
To access the Type of Original Setup dialog box and adjust the colors of your
scanned images, follow these steps:
1. Press the Type of Original button in the Copy tab or the Scan tab.
.
to send the files to the printer.
Adjust color
27
Page 32

2.
Press the Tool button
Basic Operations
3. Use the available settings to adjust the colors of the scanned image.
View, move, rename, or delete a file
1.
Press the File Manager button
touch screen.
2. Select a file in the list.
3. View, move, rename, or delete the file as nece ssary.
. The Type of Original Setup dialog box appears:
in the toolbar at the bottom of the
Scan heavyweight paper or cardboard
Your scanner is capable of scanning heavyweig ht coated paper and cardboard.
28 Chapter 2 Basic Operations
Page 33

WARNING! Other thick materials are not supported and could cause damage.
Remove staples and any abrasive attachments before scanning.
1. Press the Automatic Thickness Adjustment Control key on your scanner's
control panel.
2. Press and hold the arrow-up key to increase the height of t he in serti on slot
until there is enough room to insert the do cument. You can change the
insertion-slot height from 2 to 15 mm (0.08 to 0.59 inches).
3. Feed the document.
4. Press and hold the arrow-down key until the inserti on slot stops adjusting.
5. Preview the image to see if the lines are even. Use the zoom function to see
in greater detail
NOTE: A large document might need to be supported w ith both hands as it
is being fed into the scanner, and as it is bei ng ejected from the scanner.
If lines appear uneven, follow the s e steps:
1. Press the Setup tab.
Basic Operations
Scan heavyweight paper or cardboard
29
Page 34

2. Select the Options button, and then select the Scanning button. The Scan
Options dialog box appears:
Basic Operations
3. In the Scan Options dialog box, press the Scanner button. The Scanner
dialog box appears:
4. In the Scanner dialog box, press the Setup button.
5. Select the Extended Thickness tab, and check the Use extended thickness
paper handling box.
6. Change the value for each of the scanner’s cameras. Normal ly, only positive
values should be used.
30 Chapter 2 Basic Operations
Page 35

7. Print test scans and adjust the camera values until you are satisfied with the
results.
8. Click OK to save your settings.
To return the insertion slot height to it s no rmal position:
1. Remove all material from the insertion slot.
2. Press the Automatic Thickness Adjustment Control ke y.
3. Press and hold the arrow-down key until the insertion slot has stopped
adjusting.
Try to avoid leaving the insertion slot set above the minimum height for long periods
of time. The insertion slot must be at its m inimum height fo r the scanner to perform
the automatic self-adjustment pro cedu re.
Preview copies
The preview feature allows you to make various adj ustm ent to the document size,
margins, and paper frame. The document size is determined by the size settings
made in the Copy tab. The size and thickness of t he pap er fram e i n th e pre view
window is determined by the Input Size, Output Size , an d Margins settings.
Basic Operations
Press the Preview button
Zoom all
Use this feature to resize the preview image such tha t it fits exactly within the
preview window.
Zoom in
Use this feature to zoom in on the preview image. The zoom in axis is in the center
of the preview window. Continue pressi ng the Zoom I n button to the required level
of detail.
Zoom out
to preview a document.
Preview copies
31
Page 36

Use this feature to zoom out on the preview image. The zoom out axis is in the
center of the preview window. Conti nue pressing the Zoom Out button to the
required level of detail.
One-to-one pixel viewing
Use this feature to view the preview image at the same size in which the document
was scanned.
Resize paper frame
Basic Operations
This feature is especially useful for copying non-standard paper sizes. Use this
feature to divide the areas around the paper frame into sections. When a given
section is pressed, the closest frame side or corner is resized to the new position.
Move tool
Use this feature to move the image within the the preview window.
There are two ways to move the image :
Drag the image to another point withi n t he preview window.
●
Press any point of the image. The point a t which the image is pressed becomes
●
part of one of the edges of the preview window.
Position the paper frame
Use this feature to position the paper fram e directly in th e preview window an d set
the copy area.
32 Chapter 2 Basic Operations
Page 37

There are three ways to move the frame:
Drag the frame to another point in the pre view window.
●
Press a point in the preview window. The point where yo u pressed becomes
●
the new center for the paper frame.
This method is especially useful when you are maki ng spot-test strips for
printing. It lets you continuously and rapidly reposition the fram e on important
areas that you want to test.
Drag the edges to resize the paper frame.
●
Align left and align right
The align left button:
The align right button:
You are not required to reload the original if it ap pears crooked in the preview
window. If the image appears crooked, use the left and right align buttons to align
the image with the paper frame.
Basic Operations
Alternatively, press the Settings button in the Copy tab or in the Scan tab, and
then select the Auto-align option, and press OK to automatically align the image.
If you are not satisfied with the result, press the Reset al ignme nt button, press
OK, and then use the left and right align buttons to align the image manually.
Preview copies
33
Page 38

Basic Operations
Save files on a CD or DVD
Your HP Designjet is capable of writing to CDs or DVDs in the same easy way as
it writes to other storage media.
1. Insert a blank CD or DVD into the touch screen’s CD/DVD drive. You may also
be able to write to a partly-used CD or DVD if the disc has not been ‘closed’.
2. Press the File Manager button to open the File Management dialogue box.
3. Navigate and select the files you want to save to the CD or DVD by checking
the box to the left of a file name.
NOTE: You can make multiple selections if you wan t to copy all of the files
to the same disk.
4. Press the Scan button to open the Destination folder dialog box.
5. Navigate to the CD/DVD drive as t he destination.
6. Press OK to save the files to the destination disc.
NOTE: When the files have been saved to the disc, the disc automatically
ejects from the touch screen. If the disc does not automatically eject, press
the eject button on the drive. The disc ejects approxim a tely 45 seconds after
the eject button has been pushed.
Access the shared folder from my computer
The scanner system provides a shared folder D:\images that can be accessed from
other computers over a network. For security reasons, no ot her folders on the
scanner system can be accessed over a network. Therefore, i n orde r to access
scanned images from other computers, you must save them in D:\images.
34 Chapter 2 Basic Operations
Page 39

In order to establish a connection over the network, you need to know the IP address
of your scanner system. Follow these steps to obtain the IP address:
1. Press the Setup tab.
2. Press the Options button.
3. Press the General button.
4. Press the About button.
The scanner's IP address is shown in the About box.
Accessing the shared folder from Windows XP
1. On your computer's desktop, double-click My Network Places.
2. In the Network Places window, double-click Add Network Place.
3. In the Add Network Place Wizard window, click Choose another network
location, and then click Next.
4. In the Internet or network address field, enter http://scanner_ip/
images (where “scanner_ip” is the IP address of your scanner system), and
then click Next.
5. Enter a name for the folder on this computer, and then click Next.
To access the shared folder subsequently, dou ble -click My Network Places. The
new folder appears in the Network Places window. You can drag the folder to your
desktop for easier access.
Accessing the shared folder from Windows 2000
1. On your computer's desktop, double-click My Network Places.
2. In the Network Places window, double-click Add Network Place.
Basic Operations
Access the shared folder from my computer
35
Page 40

3. In the Add Network Place Wizard window, enter http://scanner_ip/
images (where “scanner_ip” is the IP address of your scanner system), and
then click Next.
4. Enter a name for the folder on this computer, and then click Finish.
To access the shared folder subsequently, double-click My Network Places. The
new folder appears in the Network Places window. Yo u can drag the folder to your
desktop for easier access.
Accessing the shared folder from Windows 98
1. On your computer's desktop, double-click My Computer.
Basic Operations
2. In the My Computer window, double-click Web Folders.
3. In the Web Folders window, double-click Add Web Folder.
4. In the Add Web Folder window, enter http://scanner_ip/images (where
“scanner_ip” is the IP address of your scanner system), and then click Next.
5. Enter a name for the folder on this computer, and then click Finish.
To access the shared folder subsequently, double-click My Computer and then
select Web Fold ers. The new folder appears in th e Web Folders window. You can
drag the folder to your desktop for easier access.
Accessing the shared folder from Mac OS X
1. Select the Connect to Server feature from the Go menu.
2. In the Connect to Server window, enter http://scanner_ip/images
(where “scanner_ip” is the IP address of your scanner system), and then
click Connect.
Set up a password
An administrator password is used to protect ke y ad ministrative settings such as
the interface language, network parameters, and accounting settings. The default
administrator password is "hpinvent" (all lowercase letters).
If the default administrator password is not changed, or has been reset to the
default, no password protection is applied to the key administrative settings and
they remain open for editing by all users. If th e default administrator password is
changed, the key administrative settings are prot ecte d and users are required to
enter the password before they can edit the key administrative settings.
36 Chapter 2 Basic Operations
Page 41

If many users will share the system, HP recommends that the password be changed
by the system administrator when the system is set up for the first time. To change
the password, follow these steps:
1. Press the Setup tab.
2. Press the Options button.
The Options dialog box appears.
3. Press the System button.
4. Press the Advanced button.
5. Press the Set/Change Password button.
6. Enter a new administrator password. You are prom pted to confirm the new
password.
7. When you have finished, click the OK bu tton.
The new password is effective immediately.
To disable password protection, follow the step s to change the password a nd reset
the password to the default: "hpinvent".
Basic Operations
Set up a password
37
Page 42

Enable password access to a shared directory
Protect your system's shared folders from network access by applying a login and
password under the FTP and WebDAV option area.
1. Press the Setup tab.
Basic Operations
2. Press the Options button.
3. Press the System button.
4. Press the Advanced button.
5. Press the Network Settings button. The Network Settings dialog box
appears:
38 Chapter 2 Basic Operations
Page 43

6. Press the Login and Password buttons to enter strings and apply them.
NOTE: The string "@scanner" is always appended to the entered login
name.
7. Restart the system to apply new login/password protection.
TIP: Press the Reset button to remove login/password prot ecti on for FTP/
WebDAV access.
Connect the scanner to a network
To make your system recognizable to others on the network, follow these steps.
NOTE: If an administrator password has been set, you are requ ired to ent er i t
before you can configure the network sett i ngs.
1. Connect the RJ45 network cable to the Ethernet port at th e back of your touch
screen.
2. Check your network settings:
a. Press the Setup tab.
Basic Operations
b. Press the Options button.
c. Press the System button.
d. Press the Advanced button.
e. Enter the administrator password if prompted by the system.
Connect the scanner to a network
39
Page 44

f. Press the Network Settings but ton. The Network Settings dialog box
Basic Operations
g. Select the DHCP option if you know th at your network has a DHCP
h. Select the Manually option for ma nua l con nection. Obtain a valid IP
i. Click the OK button.
3. Place the files that you want to be shared across the network in the D:
\images folder. Once a file is saved to this folder, it can be accessed
throughout the network, from any computer running any o pera ti ng system.
You can connect your printer to the same network. See your printer's
documentation for further info rmation.
Manage an account
The Accounting feature helps you to keep tr ack of your copy activitie s. Accounting
information such as total scans, prints, copies, and paper usage is stored in a simple
format so that it can be loaded into spreadsheets and databases. You can view the
scanning activity information for your account in the account dialog.
NOTE: Only one account (besides the Total account) can be active at a time.
appears:
server. This tells the system to automatically find the network connection
information.
address, subnet mask, and default gateway from your system
administrator.
NOTE: If an administrator password has been set, users are required to enter the
password before they can rename, reset, create, and dele te accou nt s .
40 Chapter 2 Basic Operations
Page 45

There are two types of accounts:
Active account: The user-established accou nt to which activities are currently
●
registered. The active account name is displayed on the Account button in
the Setup tab.
Total account: The built-in total account to which all of the system activities
●
are registered. The total account is always active and cann ot be deleted or
reset. All of the activities registered to an active accou nt are concurrently
registered in the Total account.
Create an account
1. Press the Setup tab.
2.
Press the Account button, and then press the Tool button
3. In the Accounting dialog box, press the New button.
Basic Operations
.
4. Enter the administrator password if prompted.
5. Enter a name for the new account.
6. Press the OK button.
Manage an account
41
Page 46

The new account automatically becomes the active account.
To access the accounting information, enter: http://scanner_ip/
accounting (where “scanner_ip” is the IP address of your scanner system)
in the Internet or network address field, and then press the Next button.
NOTE: If an account is created, users are required to select an account from the
account list, which appears each time the Copy button
file button
Delete an account
Basic Operations
1. Press the Setup tab.
2.
3. In the Accounting dialog box, press the Delete button.
is pressed.
Press the Account button, and then press the Tool button
or the Scan to
.
42 Chapter 2 Basic Operations
Page 47

4. Enter the administrator password if prompted.
5. Press the OK button.
Reset an account
1. Press the Setup tab.
2.
Press the Account button, and then press the Tool button
3. Select the account that you want to reset.
Basic Operations
.
4. Press the Reset button.
5. Enter the administrator password if prompted.
Manage an account
43
Page 48

Rename an account
1. Press the Setup tab.
Basic Operations
2. Press the Account button.
3. Make sure that the Quick select list is showing.
4.
Press the Tool button
5. In the Accounting dialog box, press the Rename button.
.
6. Enter the administrator password if prompted.
7. Enter the new name for the account.
8. Press the OK button.
44 Chapter 2 Basic Operations
Page 49

Set the time, date, and timezone
1. Press the Setup tab.
2. Press the Options button.
3. Press the System button.
4. Press the Set time and date button.
Select the value that you want to change and enter the correct value.
●
Select your timezone from the list.
●
NOTE: You can choose to enable autom atic daylight savings time
adjustment.
5. Press the OK button.
Basic Operations
Set the time, date, and timezone
45
Page 50

Set sleep and wake-up timers
Because setting the sleep and wake-up timers ensures that the scanner will shut
down automatically when not in use, it is the best way to maximize the useful life
of the lamp.
1. Press the Setup tab.
Basic Operations
2. Press the Options button.
3. Press the System button.
4. Press the WIDEsystem button, and then select th e Timer tab.
To activate automatic power-on, select the check box for the day in the
●
On column.
To modify the time, select the hours digits and press the up or dow n
buttons and then select the minutes digits an d repeat the process.
Select AM or PM, and press the up or down buttons.
To activate automatic power off, select the check box for the day in the
●
Off column, then set the time as described above.
5. Press the Apply button to confirm your changes and cont in ue, or press the
OK button to confirm changes and exit WIDEsystem.
46 Chapter 2 Basic Operations
Page 51

3 Maintenance
Clean the glass plate and the scanning area
●
Calibrate the scanner
●
Calibrate the touch screen pointer
●
Replace worn parts
●
Clean the glass plate and the scanning area
1. Turn off the scanner and disconnect the sca nn er p ow er cable.
2. Push down on the two lever buttons found near the in sertion slot on each side
of the scanning area lid. The scanning area lid-locking mechanism
disengages.
3. Holding both lever buttons down, place your free f in gers in the insertion slot
and flip open the scanning area lid. The scanning area is exposed for cleaning.
4. Gently wipe the glass plate and the entire scan nin g area, including the main
cover and the roller, with a lint-free cloth dampened with a mild, streak-free,
glass cleaner.
CAUTION: Do not use abrasives, acetone, benzene, o r fluids that contain
these chemicals. Do not spray liquids di rectly onto the scanner's glass plate
or anywhere else in the scanner.
The lifespan of the glass plate depends on the p ape r types that pass across
it. Abrasive papers such as mylar may cause premature deterioration.
5. Dry the glass completely using a separate clean, dry, lint-free cloth like the
one provided with the maintenance kit.
Calibrate the scanner
HP recommends that you calibrate the scanner once a month to ma intain optimum
scan quality.
NOTE: It is important that you clean the glass and the scannin g are a before
calibrating the scanner.
1. Before calibrating, read the scanner's online guide on how to clean the scan
area. Then turn off the scanner and cl ean the scan area. C alibration does not
work well if the scan area is not clean.
2. When you have finished cleaning the scan area , turn on the scanner and leave
it on for at least an hour before proceeding to the next step.
Maintenance
Clean the glass plate and the scanning area
47
Page 52

Maintenance
3. Press the messages section, which is located below the preview screen.
NOTE: If there are no pending actions, the messages section might be blank.
4. In the Scanner Messages dialog box, press the Scanner Maintenance
button.
5. The Maintenance Wizard guides you through the procedures of camera
alignment, stitching, and calibrat ion . To calibrate the scanner, you need the
maintenance sheet that came with your scanner.
48 Chapter 3 Maintenance
Page 53

Calibrate the touch screen pointer
1. Press the Setup tab.
2. Press the Options button.
3. Press the System button.
4. Press the Calibrate Touch Screen button and follow the instructions on the
screen.
Calibration is done by pressing the target s that ap pear in d iffere nt positi ons on the
screen. Press the targets until they no longer appear.
Replace worn parts
Over time, the condition of certain key scanner parts will de te ri ora t e. This section
addresses the parts that wear out under normal usage conditions and that can be
replaced without the assistance of an HP support technician.
To order any of the parts mentioned below, call HP Supp ort.
Calibrate the touch screen pointer
Maintenance
49
Page 54

Lamp unit
Over time, the intensity of the lamp weak ens. When the inte nsity weakens b eyond
a certain point, a message appears on t he touch screen advising you to replace the
lamp unit. It is important to replace the lamp unit when the message appears.
Failure to do so will result in poor image quality.
For step-by-step instructions on replacing the lam p u ni t, press
consult the scanner online help.
NOTE: Before replacing the lamp unit, you should thoro ughly clean the glass plate
and the entire scanning area and see if that clea rs the advisory message. For more
information on cleaning the glass plate an d scan ni ng area, see
plate and the scanning area on page 47.
NOTE: The lamp unit and the air filter are included in the same package and
should be replaced at the same time.
Air filters
The air filters protect the scanner from dust and other airborne particles. Over time,
they become saturated. Timely replacement of air filters reduces the need for
cleaning and calibration, and h el ps to maintains image quality.
NOTE: The lamp unit and the air filter are included in the same package and
should be replaced at the same time.
For step-by-step instructions on replacing the air fil ters, press and
Maintenance
consult the scanner online help.
White-background platen
The white-background platen can becom e w o rn , discolored, warped, or otherwise
damaged after long periods of use.
For step-by-step instructions on replacing the white-background platen, press
and consult the scanner online help.
NOTE: Before replacing the white-background platen, you sho uld tho roug hly
clean it.
and
Clean the glass
Glass plate
Over time, the condition of the glass plate can de teri orate. Even very small
scratches can reduce image quality.
For step-by-step instructions on replacing the glass plat e, press
consult the scanner online help.
50 Chapter 3 Maintenance
and
Page 55

NOTE: Before replacing the glass plate, you should thoroughly clean it and the
entire scanning area. For more information on cleani ng the glass plate and scanning
area, see
Clean the glass plate and the scanning area on page 47.
Replace worn parts
Maintenance
51
Page 56

4 Troubleshooting
If you notice problems with the scanner ot he r th an those described below, consult
the scanner's online guide for further advice.
The Diagnostics light is flashing
●
The Wait light is flashing
●
The Wait and Diagnostics light s are both flashing
●
The Power, Wait, Diagnostics, and Paper-Ready li gh ts a r e f la s hin g
●
Lines in the scanned image appear too thin or discontinuous
●
A warning message appears on the panel PC touch screen
●
The scanner software is in the wrong lang uage
●
The scanner software does not start
●
The CD or DVD cannot be read by my computer
●
A media profile cannot be generated
●
Streaks in the scanned image
●
The scanner is not detected after it is power-cycled
●
The Diagnostics light is flashing
The most likely explanation for the flashing diagnostics light is that the scanning
area needs to be cleaned. To resolve this issue, perf orm the routine maintenance
procedures explained in your online guide, and then restart the scanner.
If the diagnostics light continues to flash , there may be camera position errors. In
Troubleshooting
52 Chapter 4 Troubleshooting
this case, contact HP Support.
Page 57

The Wait light is flashing
The flashing wait light indicates that the scanner need s to make a readjustment but
is unable to do so. To resolve t his issue, remove any paper from the scanne r, ensure
that the insertion slot is set to the minimum height, and wait for the light to turn off.
The Wait and Diagnostics lights are both flashing
If the wait light and the diagnostics li gh ts are both flashing, follow the remedies
described for a flashing diagnostics light. See
on page 52.
The Diagnostics light is flashing
The Power, Wait, Diagnostics, and Paper-Ready lights are
flashing
The Wait light is flashing
Troubleshooting
53
Page 58

When power, wait, diagnostics, and paper-ready light s are all flashing, it means the
scanner has powered up in Boot mode. This mode is used in em erg ency ca ses t o
upgrade the scanner's firmware when the upgrade-firmware process has been
interrupted. If the scanner shows this combination of flashing lights, try the following
remedies:
Reboot the scanner and the touch screen.
●
If the scanner remains in Boot mode, perform a system recovery with the
●
System Recovery DVD that came with your scanner.
Lines in the scanned image appear too thin or
discontinuous
When scanning documents with thin lines, su ch as C A D drawings, a scanresolution setting of less than 300 dpi can result in disproportionately thin or
discontinuous lines. HP recommends that yo u set the scan resolution to a minimum
of 300 dpi when scanning CAD drawings and ot her documents with thin lines.
Scanning with higher resolution lengthens the overall scan time, but it ensures
greater image quality. This issue is not as noticeable when scanning photos and
area fills. For more information on setting the scan resolution, see
settings on page 13.
The images below help to illustrate t he issue:
Figure 4-1 CAD drawing scanned at 150 dpi
Scan-quality
Figure 4-2 CAD drawing scanned at 300 dpi
Troubleshooting
54 Chapter 4 Troubleshooting
Page 59

A warning message appears on the panel PC touch screen
Under the following circumstances, a warning message mig ht appear on t he panel
PC touch screen, advising the user to perform maintenance:
Scanner maintenance has not been performed w ithin the last 30 days.
●
The lamp intensity diminishes.
●
NOTE: If you replace the lamp, you should also replace th e filter.
The condition of the glass plate has deteriorate d beyond an acceptab le level.
●
The condition of the original ba ckground has deteriorated beyond an
●
acceptable level.
If you see any of these warnings displayed on the panel PC touch screen, consult
the scanner's online guide for information on recommended maintenance
procedures.
The scanner software is in the wrong language
To change the scanner software language, follow these steps:
1. Press the Setup tab.
2. Press the Options button.
3. Press the System button.
4. Press the Advanced button.
5. Press the Change Language button.
6. Select your preferred language.
The scanner software does not start
If your scanner system software does not start up when you turn on the touch
screen, trying turning it off and then turni ng it on again.
A warning message appears on the panel PC touch screen
Troubleshooting
55
Page 60

If it persistently fails to start up, use the ’System Recovery’ DVD that came with
your scanner system to reinstall the software.
1. With the system on, insert the System Recovery DVD into the DVD drive.
2. Turn off the touch screen and then turn it on agai n.
3. Follow the instructions on the screen.
4. When the software has been reinst alled, you are prompted to rem ove the DVD
and restart the touch screen.
5. When the touch screen restarts, you are required to calibrate th e p osition of
the pointer by touching the targets that appear on the screen. For an accurate
calibration, perform the calibration from your most typical operating position
and use whatever implement you use to ope rate the touch screen.
6. After touching the targets, you are asked to touch any part of the touch screen.
If you are satisfied with the result of the ca libration, press the Yes button. If
you are prompted to restart the system, press the No button.
7. The language selection screen appears. Select the la nguage you want to use
for the Designjet Scan application. The touch screen au tomatical ly restart s in
the selected language.
8. Allow time for the operating system to reload. The process is complete when
the touch screen shows the Copy tab of the Designjet Scan application.
The CD or DVD cannot be read by my computer
The scanner creates CDs and DVDs compliant with the I SO 9660 standard plus
Joliet Extension. This standard is commonly supported, but HP does not guarante e
that all computers can read the CDs and DVDs created by the scanner.
A media profile cannot be generated
Ensure that the scanner and the printer are both turned on and rea dy for normal
operation.
Ensure that the scanner is connected to the print er an d th at both the scanner and
printer are connected to the LAN.
Streaks in the scanned image
If the problem is visible when previewing the image on screen, it may be due to di rt
Troubleshooting
or scratches on the glass. First, check the ori ginal documen t to make sure that it is
clean and free of creases or other impediments that may drag across the glass. If
the document is clean and in good condition, t ry clea ning the glass (see
glass plate and the scanning a r ea on page 47). If the problem persists, you may
need to replace the glass.
Clean the
56 Chapter 4 Troubleshooting
Page 61

The scanner is not detected after it is power-cycled
If the scanner is not detected, use the Rescan feature and see if that solves the
problem. If the problem persists, turn off the scanner and the touch screen, and
then disconnect the touch screen from the scanner. Reconne ct t he to uch screen
and turn on the scanner and touch screen.
The scanner is not detected after it is power-cycled
Troubleshooting
57
Page 62

Index
A
accessing the shared folder 34
account management 40
adding a printer 5
adjusting color 27
administrator password 36
B
both lights flashing 53
C
calibration 47
can't make media profile 56
CD, saving files on 34
cleaning the glass 47
collating copies 19
copying a document 15
creating a media profile 6
D
delete file 28
deleting a printer 6
diagnostics light flashing 52
does not start 55
DVD, saving files on 34
L
lines in the image are too thin 54
M
maintenance warnings 55
media profiles 6
move file 28
printing a file 26
printing a scanned document 26
R
rename file 28
replacing worn parts 49
S
saving files on CD or DVD 34
scanner not detected after power-cycle 57
scanning a document to a file 21
scanning a document to the network 23
scanning heavyweight paper or cardboard 28
setting the output quality 10
setting the time, date, and timezone 45
setting timers 46
software introduction 1
streaks in the image 56
T
thick materials 28
touch screen calibration 49
U
unreadable CD/DVD 56
using this guide 1
V
view file 28
W
wait light flashing 53
wrong language 55
N
network connection 39
P
password access 38
performing a batch copy 19
performing a batch scan 25
power light on with Wait, Diagnostics and Paper Ready
lights flashing 53
previewing copies 31
printer configuration 5, 6
58 Index
Page 63

İçindekiler
TR
1 Giriş
Bu kılavuzu kullanm a .............. .............................................................. ......... . 1
Tarayıcı yazılımı ............................................................................................. 2
2 Temel İşlemler
Yeni yaz ıcı ekleme ......... ....... ............................................... ........................... 6
Yazıcı silme .................................................................................................... 7
Yeni bir ortam profili oluşturma ....................................................................... 8
Çıkış kalitesini ayarlama ............................................................................... 11
Belge kopyalama .......................................................................................... 17
Kopyaları harmanlama .................................................................................. 21
Toplu kopyalama .......................................................................................... 22
Belgeyi dosyaya tarama ............................................................................... 24
Belgeyi ağa tarama ....................................................................................... 27
Toplu tarama gerçekleştirme ........................................................................ 30
Dosya yazd
Rengi ayarlama ............................................................................................. 33
Dosyayı görüntüleme, taşıma, yeni den adlandırma veya silme ................... 34
Ağır kuşe kağıt veya karton tarama .............................................................. 34
Kopyaları önizleme ....................................................................................... 37
Dosyaları CD veya DVD'ye kaydetme .......................................................... 41
Paylaşılan kla söre b ilgi say arım dan e rişme ................................................... 41
Giriş .............................................................................................. 1
Temel işlemler .............................................................................. 1
Bakım ........................................................................................... 1
Sorun Giderme ............................................................................. 1
Dizin ............................................................................................. 1
Uyarılar ve Dikkat Edilmesi Gereken Hususlar ............................ 1
Tarama ve yazdırma için kopya kalitesi ayarları ........................ 12
Dosyadan yazdırma için baskı kalitesi ayarları .......................... 14
Tarama kalitesi ayarları .............................................................. 16
Ağ bağlantısı ekleme .................................................................. 27
Ağa tarama ................................................................................. 29
Ağ klasöründe dosyalara erişme ................................................ 29
Otomatik adlandırma özelliğini kullanma .................................... 30
Belgeleri tarama ......................................................................... 30
ırma ............................................................................................ 32
Tümünü yakınlaştır ..................................................................... 37
Yakınlaştır .................................................................................. 37
Uzaklaştır ................................................................................... 38
Bire bir piksel görüntüleme ......................................................... 38
Kağıt çerçevesini yeniden boyut landır ........................................ 38
Taşıma aracı .............................................................................. 38
Kağıt çerçevesini konumlandır ................................................... 39
Sola hizala ve sağa hizala .......................................................... 39
Paylaşılan klasöre Windows XP üzerinden erişme .. ... ............... 42
Paylaşılan klasöre Windows 2000 üzerind en erişme ................. 43
Page 64

Paylaşılan klasöre Windows 98 üzerinden erişme ..................... 43
Parola ayarlama ............................................................................................ 44
Paylaşılan bir dizine parolayla erişimi etkinleştirme ...................................... 45
Tarayıcıyı ağa bağlama ................................................................................ 46
Hesap yönetme ............................................................................................. 48
Saat, tarih ve saat dilimi ayarlama ................................................................ 53
Uyku ve uyanma zaman ölçerlerini ayarlama ............................................... 54
Paylaşılan klasöre Mac OS X üzerinden erişme ........................ 43
Hesap oluşturma ........................................................................ 49
Hesap silme ................................................................................ 50
Hesap sıfırlama .......................................................................... 51
Hesabı yeniden adlandırma ....................................................... 52
3 Bakım
4 Sorun Giderme
Dizin ................................................................................................................................ 67
Cam plakayı ve tarama alanını temizleme .................................................... 55
Tarayıcıyı ayarlama ...................................................................................... 55
Dokunmatik ekran işaretçisini ayarlama ....................................................... 57
Aşınan parçaları değiştirme .......................................................................... 58
Tanılama ışığı yanıp sönüyor ....................................................................... 60
Bekleme ışığı yan
Hem bekleme, hem de tanılama ışığı yanıp sönüyor ................................... 61
Güç, Bekleme, Tanılama ve Kağıt Hazır ışıkları yanıp sönüyor ................... 62
Taranan görüntüdeki çizgiler çok ince veya kesikli ...................................... 62
Panel PC dokunmatik ekranında bir uyarı mesajı görüntüleniyor ................. 63
Tarayıcı yazılımı yanlış dilde ........................................................................ 64
Tarayıcı yazılımı başlamıyor ......................................................................... 64
CD veya DVD bilgisayarımda okunamıyor ................................................... 65
Ortam profili oluşturulamıyor ......................................................................... 65
Taranan resimde lekeler ............................................................................... 65
Tarayıcı yeniden başlatıldıktan sonra algılanmıyor ...................................... 66
Lamba birimi ............................................................................... 58
Hava filtreleri .............................................................................. 59
Beyaz arka plan plakası ............................................................. 59
Cam plaka .................................................................................. 59
ıp sönüyor ........................................................................ 61
Page 65

1Giriş
Bu kılavuzu kullanma
●
Tarayıcı yazılımı
●
Bu kılavuzu kullanma
Bu kılavuz aşağıdaki bölümlerden oluşmaktadır.
Giriş
Bu bölüm yeni ku llanıcılar için tarayıcıya ve belgelerine kısa bir giriş sağlar.
Temel işlemler
Bu bölüm çok sayıda genel işlemi yapmanıza yardımcı olur.
Bakım
Bu bölüm çeşitli ayar ve bakım işlemlerini yapmanıza yardımcı olur.
Sorun Giderme
Bu bölüm tarama sırasın da ol u şabilecek sorunları çözmenize yardımcı
olur.
Dizin
Konuları hızlı bir şekilde bulmanıza yardımcı olmak için için dek il er
tablosuna ek olarak alfab etik bir diz in de bul unm aktadır.
Giriş
Uyarılar ve Dikkat Edilmesi Gereken Hususlar
Bu kılavuzda, yazıcının doğru kullanımını sa ğla ma k ve yazıcının zarar
görmesini önleme k üzer e se mboller kullanılmıştır. Bu sembollerle
işaretlenmiş yönergeleri yerin e ge tir in .
UYARI! Bu sembolle işaretlenmiş yönergelerin yerine getirilmemesi ciddi
yaralanmalar vey a öl üml e s onu çlanabilir.
DİKKAT: Bu sembolle işaretlenmiş yönergelerin yerine getirilmemesi hafif
yaralanmalara veya ür ünü n zar ar görmes in e neden olabilir.
Bu kılavuzu kullanma
1
Page 66

Tarayıcı yazılımı
Giriş
Tarayıcı yazılımı tarayıcının dokunmatik ekranına yükl enm iştir ve
dokunmati k ekranı aç tığınızda otomatik olarak çalışacaktır. Gördüğünüz ilk
sayfa üç ana bölüme ayrılmıştır:
Taranan resimleri görüntülemek için soldaki görüntüleme bölümü
●
Sağdaki denetleme bölümü
●
En alttaki araç çubuğu
●
NOT: Bu ekrandaki ayrıntıların bir kısmı tarayıcıya bağlı olan yazıcıya
göre değişiklik gösterebilir.
2 Bölüm 1 Giriş
Page 67

Bu ekran şunları içerir :
Önizleme penceresi . Gö rünürdeki bölümün büyük kısmını doldurur.
●
Bunun üzerinde, önizlemeyi değiştirmek için kull anılan, dokuz düğme
içeren resim araç çubuğu bulunur (bkz:
Kopyaları önizle me
sayfa 37).
Denetleme bölümü. Dört sekme içerir: Copy (Kopyala), Scan (Tara),
●
Print (Yazdır) ve Setup (Kurulum). Her sekmede kopyalama, tarama,
yazdırma ve ayarlama görevlerini gerçekl eştirirken
belirleyebileceğiniz seçenekl er s unulur.
Sayfanın altında dokuz büyük işlev düğmesi vardır.
●
◦
Çık: dokunmatik ekranı kapatır
◦
Çevrimiçi yardım: bu belgede bulunmayan çoğu konu
hakkında ek bilgi sağlar
◦
Dosya Yöneticisi: Bu, File Management (Dosya
Yönetimi) iletişim kut us unu a çar
◦
Yazdırma kuyruğu: yazdırma kuyruğuna erişir
◦
Harmanla: kopyaları setler halinde gruplar
Giriş
◦
Önizleme: resmin önizlem es ini gör üntü lem ek ve il gil i
alanı seçmek için belg eyi tar ar
◦
Sıfırla: ayarları varsay ıla n değerlere sıfırlar
◦
Dur: geçerli etkinliği iptal eder
◦
Kopyala, Tara veya Yazdır: Her
simge ilgili sekmesinde görüntülenir ve çalışmakta olduğunuz
Tarayıcı yazılımı
3
Page 68

sekmeye bağlı olarak kopyalama, tarama veya yazdırma işlevini
başlatır.
Giriş
4 Bölüm 1 Giriş
Page 69

2 Temel İşlemler
Yeni yazıcı ekleme
●
Yazıcı silme
●
Yeni bir ortam profili oluşturma
●
Çıkış kalitesini ayarlama
●
Belge kopyalam a
●
Kopyaları harmanlama
●
Toplu kopyalama
●
Belgeyi dosyaya tarama
●
Belgeyi ağa taram a
●
Toplu tarama gerçek leştirme
●
Dosya yazdırma
●
Rengi ayarlama
●
Dosyayı görüntüleme, taşıma, yeniden adlandırma veya silme
●
Ağır kuşe kağıt veya karton tarama
●
Kopyaları önizleme
●
Dosyaları CD veya DVD'ye kaydetme
●
Paylaşılan klas öre bil gi say ar ımd an e ri şme
●
Parola ayarlam a
●
Paylaşılan bir dizine parolayla erişimi etkinleştirme
●
Tarayıcıyı
●
Hesap yönetme
●
Saat, tarih ve saat dilimi ayarlama
●
Uyku ve uyanma zaman ölçerlerini ayarlama
●
ağa bağlama
Temel İşlemler
5
Page 70

Yeni yazıcı ekleme
Tarayıcı yazılımınızdaki yazıcı listesine yeni bir HP Designjet ya zıcı
eklemek için şu adımları uygulayın:
1. Setup (Kurulum ) se km es ine basın.
Temel İşlemler
2. Options (Seçenekle r) dü ğmesine basın. Options (Seçenekler)
iletişim kutusu görü ntül enir.
6 Bölüm 2 Temel İşlemler
Page 71

3. System (Sistem) düğmesi ne bas ın. System options (Sistem
seçenekleri) i letişim kutusu görüntülen ir .
4. Install Printer Driver (Yazıcı Sürücüsünü Yükle) düğmes in e bas ın.
5. Yüklemek istediğiniz yazıcıyı seçin.
NOT: Sisteme aynı model numarasına sahip birden fazla yazıcı
yüklenmişse ikinci yazıcı adına “#2”, üçüncüye“#3” vb. eklenir.
Yazıcı silme
Tarayıcı yazılımınızdaki yazıcı listesinden bir HP Designjet yazıcıyı silmek
için:
1. Setup (Kurulum ) sekmesine basın.
Temel İşlemler
Yazıcı silme
7
Page 72

2.
Önce Printer (Yazıcı) dü ğmesine, sonra da Araç düğmesine
basın. Printer Set u p (Yazıcı Kurulumu) iletişim kutusu görünür.
Temel İşlemler
3. Delete (Sil) düğmesine basın.
Yeni bir ortam profili oluşturma
Bu yordama başlamadan önce, tarayıcının renk ayarını yaptığınızdan (bkz.
Tarayıcıyı ayarlama sayfa 55) ve oluşturmak istediğiniz ortam profilinin
ortam profili listesin de zaten bulun madığından emin olun.
NOT: HP Designjet 45XX, 40XX veya T11XX yazıcılarını kullanırken,
yalnızca yazıcıda o anda yüklü olan kağıt türleri için ortam profilleri
oluşturabilirsiniz. Bu standart kağıt türleri sistem tarafından algılanır ve
adları ortam profilleri listesinde görünür. Bunlardan birini seçebilir ve onun
için aşağıda anlatıldığı şekilde ortam profili oluşturabilirsiniz. Bu yazıcılarla
ortam profillerinin ad lar ını değiştiremezsiniz.
Designjet 500, 800, 5X00, vey a 100 0 ku lla n ırken, is ted iğiniz adl a ort am
profili oluşturabilirsiniz. Sistem, gerekli kağıt için bir ad girmeniz i is ter.
NOT: Kopyalama ve yazdırma işlemlerin i ger ç ekl e ştirmeden önce ortam
profili oluşturmanız gerekir. Kopyalama ve yaz dırma işlemlerini
gerçekleştirmeden önce en az bir yazıcının tarayıcıya bağlı olması da
gerekir. Yazıcı tarayıcıya ya doğrudan panel PC aracılığıyla ya da yerel ağ
(LAN) aracılığıyla bağlanabilir.
8 Bölüm 2 Temel İşlemler
Page 73

NOT: Yeni ortam profili oluşturmak için yazıcıya ortam yüklemiş olmanız
gerekir.
1. Setup (Kurulum ) sekmesine basın.
2. Önce Media Profile (Ortam Profili) düğmesine, sonra da Araç
düğmesine basın
. (Alternatif yol: Printer (Yazıcı) > Tool (Araç)
> Media Profile (Ortam Profili)).
NOT: Bazı yazıcılarda, ileti şi m ku tus unda Calibrate RIP (RIP'i
Ayarla) özelliği ilk adım olarak görünür. RIP’in ayarlanması, basılı gri
rengin (gri dengesi olar ak da bil in ir ) nö tr gö rün mes in i sağlamak için
kırmızı, yeşil ve mavi gama değerlerinin yapılandırılmasından oluşur.
Özelliği kullanmak için Calibrate RIP (RIP’i Ayarla) düğmesine basıp
ekrandaki yöner gel eri izleyin.
3. Yazıcıya yüklemi ş olduğunuz kağıtla ilgili düğmeye basın.
Temel İşlemler
Yeni bir ortam profili oluşturma
9
Page 74

4. İleti görüntülendiğinde OK (Tamam) düğmesine basın.
Temel İşlemler
Sheet (Renk Sayfası Yazdır) düğmesine basın.
Bazı yazıcılar, renk sayfasını yazdırmada n önc e öz el bi r s ınama
sayfası yazdırır. Sınama sa yfasını kullanmayın; yalnızca renk
sayfasını kulla nın (aşağıda g ös ter ilm iştir).
6. Renk sayfasını taramak için Scan Sheet (Sayfayı Tara) düğmesine
basın.
5. Renklerin yer ald ığı bir başvur u s ayfası yazdırmak için Print Color
NOT: Bazı HP Designjet modellerinde, sistem LAN aracılığıyla
bağlandığında ortam profili adı girmeniz gerekir.
10 Bölüm 2 Temel İşlemler
Page 75

7. Renk sayfasını tarayıcıya yüzü aşağı bakacak şekilde yerleştirin. Renk
sayfasındaki oku tarayıcının ortasındaki okla hiz ala yın.
8. Taramayı başlatmak için OK (Tamam) düğmesin e bas ın.
9. İleti görüntülendiğinde OK (Tamam) düğmesine basın.
Ortam profili etkinleştirili r ve kullanılabilir ortam profil ler i l is tes ind e ye r al ır.
Ortam profiller in i si lmek için Delete (Sil) düğmesini kullanın. Yal n ızca
kullanıcı tarafından oluşturulmuş profiller s il in ebi lir .
Ortam profillerin i ye nid en adlandırmak için Rename (Yeniden Adlandır)
(varsa) düğmesini kullanın.
NOT: HP Designjet 45XX, 40XX veya T11XX kullanırken Rename
(Yeniden Adlandır) düğmesi iletişim kutusunda bulunmaz. Ortam profilinin
tarayıcı ve yazıcı birleşiminiz için geçerli olduğunu denetlemek üzere
Validate (Doğrula) düğmesini kullanın.
Çıkış kalitesini ayarlama
Bu bölümde tarayıcınız ve yazıcınız için çıkış kalitesinin nasıl ayarlanması
gerektiği açıklanmaktadır.
Temel İşlemler
Çıkış kalitesini ayarlama
11
Page 76

Tarama ve yazdırma için kopya kalitesi ayarları
1. Copy (Kopya) sekmesine basın.
Temel İşlemler
2. Settings (Ayarlar) düğmesine basın. Copy Settings (Kopya Ayarları)
iletişim kutusu görü ntül enir.
3. Taramak istediğiniz orijinal mürekkep püsk ür tme li b ir yaz ıcıyla
yazdırılmışsa, kopyanızın veya baskınızın kalitesini yükseltmek için
Ink Printer Original (Ink Yazıcı Orijinal i) seçene ği ni belirleyin.
4. OK (Tamam) düğmesine basın.
5. Quality (Kalite) düğmesine basın.
6. Quality (Kalite) iletişim kutusunu kullanarak tarama kalitesi ve
yazdırma kalit esi ay ar lar ını tanımlayın.
12 Bölüm 2 Temel İşlemler
Page 77

Tarama kalitesi: Aşağıdaki tarama kalites i ayar lar ınd an b ir ini
●
seçin:
Scan resolution (Tarama çözünürlüğü): Tarama
◦
çözünürlüğünü nokta / inç (dp i) cin sinde n el il e ay arl ayın.
Auto (Otomatik): Sistem, seçtiğiniz baskı kalitesi (Fast
◦
(Hızlı), Normal veya Best (En İyi)) esasında en iyi tarama
çözünürlüğünü sapta r. Çözün ür lük ay arı (d pi c ins in den )
Auto (Otomatik) onay kutus unu n yanında görüntülenir
(yukarıdaki örnekte 200 dpi ) .
Descreen (Ekrandan Bağımsız): Tarayıcı optik çözünürlükle
◦
tarama yapar ve verileri sis tem e gönderir. Bundan sonra
yazılım en iyi çözünürlü k de ğer ini aya rl ar .
NOT: Descreen (Ekrandan Bağımsız) ayarı, tarama
görüntülerinde (.jpeg, .tiff ve .pdf dosy al arı gibi vektör
olmayan görüntüler) en iyi sonuçları verir, ancak tarama hızı
düşer.
Turbo: Turbo ayarı kağıdın beslendiği hızı artırıp kaydedilen
◦
tarama verisi miktarını azaltır; diğer bir deyişle tarama hızı
artarken görüntü kalitesi azalır. Turbo ayarını kullanmak için
önce el ile tarama çözünürlüğünü ayarlayın, sonra da
Turbo öğesini seçin.
Temel İşlemler
Çıkış kalitesini ayarlama
13
Page 78

NOT: Çözünürlük 300 dpi altında olduğunda turbo ayarının
bir etkisi olmaz.
Print quality (Baskı kalitesi): Fast (Hızlı), Normal veya Best (En
●
İyi) öğesini seçin.
NOT: Tarama kalitesini Auto (Otomatik) olarak ayarlarsan ız
seçtiğiniz yazdırma kalitesi ayarı tarama çözünürlüğünü saptar
(yukarıda açıklandığı gibi).
7. OK (Tamam) düğmesine basın.
Dosyadan yazdırma için baskı kalitesi ayarları
Temel İşlemler
1. Print (Yazdır) sekmes ine ba sın.
2. Settings (Ayarlar) düğmesine basın. Print Settings (Yazdırma
Ayarları) iletişim kutusu görünt ül eni r.
14 Bölüm 2 Temel İşlemler
Page 79

3. Aşağıdaki yazdırma ayarları seçeneklerinden istediğiniz i s e çi n:
Print quality (Baskı kalitesi): Fast (Hızlı), Normal veya Best (En
●
İyi) baskı kalitesi ayarını seçmek için Print quality (Baskı kalitesi)
düğmesine basın.
Ink printer original (Ink yazıcı orijinali): Taramak istediğiniz
●
orijinal mü rekk ep püsk ürt meli ya zıcıyla ya zdırılmışsa kopya veya
baskı kalitenizi artırmak için bu ayar kullan ılır.
Black ink only (Yalnızca siyah mü rek kep ): Gri tonlu görüntü
●
dosyalarından gerçek ve nötr gri tonlu çıkış oluşturmak için bu
ayar kullanılır.
NOT: Bu ayarın kullanılması, renkli mürekke ple rl e ol uşturulan
gri tonlu çıkışa göre daha grenli çıkışa neden olur.
Optimize for drawin g (Ç iz im ler içi n opti miz e et) : Bu aya r me tin
●
ve çizimler için önerilir.
NOT: Resimlerin bulunduğu belgeler için bu ayarın kullanılması
baskı kalitesinde azalmaya ne den olabilir.
Max detail (Maksimum ayrıntı): Haritalar ve bazı CAD çizimleri
●
gibi ayrıntılı grafiklerin kalitesini artırmak için bu ayar kulla n ılır.
NOT: Resimlerin bulunduğu belgeler için bu ayarın kullanılması
baskı kalitesinde azalmaya ne den olabilir.
4. OK (Tamam) düğmesine basın.
Temel İşlemler
NOT: B u se çeneklerin kulla nılabilirliği yazıcının modeline bağlıdır.
Çıkış kalitesini ayarlama
15
Page 80

Tarama kalitesi ayarları
1. Scan (Tara) sekm es ine basın.
Temel İşlemler
2. Scan resolution (Tarama çözünürlüğü) düğmesine basın. Quality
(Kalite) iletişim kutus u gö rü ntül eni r .
16 Bölüm 2 Temel İşlemler
Page 81

3. Aşağıdaki kalite ayarları seçeneklerinden istediğinizi seçin:
Scan resolution (Tarama çözünürlüğü): Tarama çözünürlüğünü
●
nokta / inç (dpi) cinsinden el i le ay ar lay ın.
Auto (Otomatik): Sistem, seçtiğiniz baskı kalite si (Fast (Hızlı),
●
Normal veya Best (En İyi)) esasında en iyi tarama çözünürlüğünü
saptar. Çözünürlük ayar ı (d pi c ins in den) Auto (Otomatik) onay
kutusunun yanında görüntülenir (yukarıdaki örnekte 200 dpi).
NOT: Sistem, seçti ğiniz baskı kalitesini temel alan tarama
çözünürlüğünü saptasa da baskı kali tes i ay arının kendisi ağa
tarama işlemlerinde ku lla n ılmaz.
Descreen (Ekrandan Bağımsız): Tarayıcı optik ç öz ünü rl ük le
●
tarama yapar ve veriler i si ste me gö nder i r. Bu ndan sonra yazılım
en iyi çözünürlük değerini ayarlar.
NOT: Descreen (Ekrandan Bağımsız) ayarı, tarama
görüntülerinde (.jpeg, .tiff ve .pdf dosyaları gibi vektör olmayan
görüntüler) en iyi sonuçları verir, ancak tarama hızı düşer.
Turbo: Turbo ayarı kağıdın beslendiği hızı artırıp kaydedilen
●
tarama verisi miktarını azaltır; diğer bir deyişle tarama hızı
artarken görüntü kalitesi azalır. Turbo ayarını kullanmak için önce
el ile tarama çözünür lüğünü ayarlayın, sonra da Turbo öğesini
seçin.
NOT: Çözünürlük 300 dpi altında olduğunda turbo ayarının bir
etkisi olmaz.
Temel İşlemler
4. OK (Tamam) düğmesine basın.
Belge kopyalama
1. Kullanmayı planladığınız kağıt türü için hazır bir ortam profiliniz yoksa
oluşturmalısınız. Bkz:
2. Belgenizi yer le ştirin.
a. Belgenizi, yüzü aşağıda bakac ak ve üst ken arı tarayıcının
yerleştirme yuvasına doğru gelecek şekilde yerle ştir in . Belgenin
ortasını yerleştirme yuvasının ortasıyla hizalayın.
b. Başlatma konumuna çekildiğini hissedene kadar belgeyi
yerleştirme yuvasına yavaşça kaydırarak itin.
Yeni bir ortam profili oluşturma sayfa 8.
Belge kopyalama
17
Page 82

3. Renkli veya siyah beyaz kopyal am ay ı seçin.
Seçiminiz, sonraki adımda hangi orijinal türü şablonlarının
kullanılacağını belirler.
4. Orijinal türü şabl onunu seçin.
a. Copy (Kopya) sekmesine basın.
Temel İşlemler
b. Type of original (Orijinal türü) düğmesine basın. Type of
original (Orijinal türü) il etişim kutusu görüntüle nir .
c. Geçerli girişinize en uygun orijinal türü şablonunu s eçi n.
d. Bu seçeneklerin ayarlarını değiştirm ek v e y a yen i bir se çe nek
oluşturmak istiyorsanız Araç
yapılandırmayı kaydetmek için New (Yeni) düğmesine basıp
bunun için bir ad girin.
18 Bölüm 2 Temel İşlemler
düğmesine basın. Yeni
Page 83

NOT: Orijinal şablon ay arlarını değiştirirseniz Type of Original
(Orijinal Türü) iletişim kutusund a değişiklik yapıldığını belirtmek
için şablon adının yanında “*” sembolü göste rili r. Ö rn e ğin,
değişiklik yapılan CAD şablonu iletişim kutusunda “CAD*” olarak
görüntülenir.
5. Giriş boyutunu seçin.
a. Copy (Kopya) sekmesine basın.
b. Input size (Giriş boyutu) düğmesine basın. Input size (Giriş
boyutu) iletişim kutusu gö rüntülenir:
Temel İşlemler
Belge kopyalama
19
Page 84

c. Orijinaliniz e uy an b oyutu seçin. Tarayıcının, orijinalin genişliğini
ve uzunluğunu otomatik olarak al gılaması için Auto (Otomatik)
seçeneğini belirle yin.
d. Bu seçeneklerin ayarlarını değiştirmek veya özel kağıt boyutu
oluşturmak istiyorsanız Araç
düğmesine basın.
Değişiklikleri v eya özel kağıt bo yutunu kaydet mek için New (Y eni)
düğmesine basıp bunun için bir ad girin.
6. Çıkış boyutunu seçin.
a. Copy (Kopya) sekmesine basın.
Temel İşlemler
b. Outpu t Size (Çıkış Boyutu) d üğmesine basın. Ou tput Size (Çıkış
Boyutu) iletişim k utus u görüntülenir:
20 Bölüm 2 Temel İşlemler
Page 85

c. Çıkış kopyanız için istediğini z boyutu seçin.
d. Bu seçeneklerin ayarlarını değiştirmek veya özel kağıt boyutu
oluşturmak istiyorsanız Araç
düğmesine basın.
Değişiklikleri veya özel kağıt boyutunu kaydetmek için New (Yeni)
düğmesine basıp bunun için bir ad girin.
Giriş boyutundan farklı bir çıkış boyutu seçtiyseniz, tarayıcı, ilk
önizlemeden sonra ölçeklendirme yüzdesini hesaplar ve Copy
(Kopyala) sekmesindeki Scale (Ölçek) düğmesinde görüntüler. Farklı
olarak, Scale (Ölçek) düğmesine basıp ön tanımlı ölçek yüzdesi
seçerek veya Araç
düğmesine basıp ölçek yüz des i gi rerek de
ölçeklendirme yüz desi belirte bilir sini z.
7. Kopya sayısını ayarlayın.
a. Yüklenen belgenin birden fazla kopyasını yapmak isti yorsanız
Copies (Kopya sayısı) düğmesine basın.
b. Edit (Düzen) alanına kopya sayısını girin.
Bu seçenek, sistemi katılımınız gerekmeden çalışır durumda
bırakmanıza olanak tanır.
8. Yapılandırdığınız ayarlarla kopyalayamaya başlamak için Kopya
düğmesine basın.
Geçerli önizleme veya kopyalama işlemini iptal etmek için Durdur
düğmesine basın.
Temel İşlemler
Yapılandırdığınız ayarları temizleyip programı varsayılan değerlerine
sıfırlamak için Sıfırla
Kopyaları harmanlama
Harmanlama özelliği kopyalarınızı setler halinde gruplamanızı ve sonra
yazıcınızda bu setlerden seçtiğiniz sayıda yazdırmanızı sağlar. Tek bir
düğmesine basın.
Kopyaları harmanlama
21
Page 86

belge kopyalarke n k ull an ıl abi le n öni zl em e ve geliştirme seçene kl er ini n
tümü harmanlama öze lli ği kullanılırken de vardır.
1. Copy (Kopya) sekmesine basın.
Temel İşlemler
2. Tarayıcıya belge yerleştirip ana dokunmatik ekranda Harmanla
düğmesine basın.
NOT: Orijinal belge tek sayfa kopy al ama da ol du ğu gibi kaydedilse
de, yazıcıya gönderilmek yerine sistemde beklemeye alınır.
3. Başka bir belge besl eyin, sonra Collate (Harmanla) düğmesine
yeniden basın. Sete dahil etm ek iste diğiniz belgelerin tümü taranana
kadar bu şekilde dev am edin. Be lge setin dek i her kopyayı, tek belge
kopyalamada yaptığınız gibi aynı şekilde ayarlayabili rs in iz .
4. Copy (Kopya) sekmesinde Copies (Kopya Sayısı) düğmesine
basarak belge seti sayısını ayarlayın. Kopya sayısı kaç setin
kopyalandığını belirtir. Her sette harmanlanan belgelerin tümü vardır.
5. Kopyalama işini etkinl eştirmek için Collate Pr int (Harmanlayarak
Yazdır) düğmesin e bas ın.
Toplu kopyalama
Toplu kopyalama tek oturumda hiç ayar yapmadan ve her or ij inal için
Copy (Kopya) düğmesini kullanmadan birden çok belgenin işlenmesi
22 Bölüm 2 Temel İşlemler
Page 87

anlamına gelir. Toplu kopyalama, aynı ayarlarla belge grupları kopyalamak
istediğinizde ya rarl ıdır.
1. Aynı ayarla kopyalamak istediğiniz orijinalleri hazırlayın.
2. İlk orijinali tarayıcıya besleyin.
3. Copy (Kopya) sekmesinde ayarları tek belge kopyalamada yaptığınız
gibi yapılandırın. Bkz.
NOT: Farklı boyutlarda orijinal belgeleriniz varsa Auto (Otomatik)
Belge kopyalama sayfa 17.
boyut algılama ayarını kullanıp Auto width (Otomatik genişlik) ve
Auto length (Otomatik uzunluk) seçenekler ini bel ir ley in .
4. Copy (Kopya) sekmesine basın.
Temel İşlemler
Toplu kopyalama
23
Page 88

5. Settings (Ayarlar) düğmesine basıp Batch scan (Toplu tarama)
seçeneğini belirleyin ve OK (Tamam) düğmesine basın.
Temel İşlemler
6.
Kopya
düğmesine basıp orijin al belgelerinizi besl eme ye
başlayın.
İPUCU: Toplu kopyalama modunu kes mek ist ersen iz Durdur
düğmesine basın. Geçici olarak bunun y apılması farklı ayarlarla tek bi r
belge kopyalamanıza olanak vererek toplu kopyalama mo dunu durdurur.
Tek belgeyi kopyalamanızdan sonra toplu kopyalama modu devam eder.
İPUCU: Tarayıcıyı her orijinali kopyalama tam am lan ır ta mamlanmaz
çıkaracak şekilde yapılandırabil ir si ni z; bö yl ec e, s onr ak i or ij ina l b elge
beslenebilir. Bu seçeneği belirlemek için Setup (Kurulum) sekmesine gidip
Options (Seçenekler) > Scanning (Tarama) > Eject pape r (K ağıdı çıkar)
seçeneğini belirleyin.
Copy sekmesinde Settings (Ayarlar) düğmesine basıp Batch scan (Toplu
tarama) seçimini kaldırarak iptal edene kadar tara yıcı top lu kopy ala ma
modunda kalır.
Belgeyi dosyaya tarama
1. Belgenizi, yüzü aşağıda bakacak ve orijinalin üst kenarı tarayıcının
yerleştirme yuvasına doğru gelecek şekilde yerleştirin. Orijinali
tarayıcıya besleyin. Doğru konumlandır ma iç in mer ke zde ki oku
kullanın.
24 Bölüm 2 Temel İşlemler
Page 89

2. Scan (Tara) sekm es ini seç ip ilerideki adımlarda açıklanan tarama
ayarlarını yapılandırın.
Kenar boşlukları, yerleşim ve ortam profili gibi çıkış ayarları, daha
sonra dosya yazdırılırken y apılandırılabilir.
3. Color (Renkli) ya da B&W (Siyah Beyaz) taramayı seçin.
4. Orijinal belgenizi en uygun şekilde tanımlayan orijinal türü şablonunu
seçin.
5. Tarama çözünürlüğünü ayarlayın. Tarama çözünürlüğü görüntü
kalitesini belirler. Özel bir dpi değeri ayarlayabileceğiniz gibi aşağıdaki
ayarlardan da seçim yapabilirsiniz:
Temel İşlemler
Auto (Otomatik): sistem, seçtiğiniz baskı kalitesi (Fast (Hızlı),
●
Normal veya Best (En İyi)) esasında en iyi tarama çözünürlüğünü
saptar.
Descreen (Ekrandan Bağımsız): optik çözünürlükle tar ama
●
yapan tarayıcı ara değerleme olmadan verileri sisteme gönderir.
Turbo: Bu ayar kağıdın beslendiği hızı artırıp kayd edi len tarama
●
verisi miktarını azaltır; diğer bir deyişle tarama hızı artarken
görüntü kalitesi azalır.
6. Taranan görüntünüzün boyu tlarını saptamak için Size (Boyut) ve
Resize (Yeniden Boyutlandır) seçeneklerini kulla n ın. Or ij inalin
boyutunu korumak iç in Size: Auto (Boyut: Otoma tik ) ve Resize:
None (Yeniden Boyutlandır: Yok) seçeneklerini kul lan abi li rs iniz.
Belgeyi dosyaya tarama
25
Page 90

7. Varsayılan dosya adı geçerli tarih ve saatten ol u şur. Varsayılan adı
değiştirmek için File name (Dosya adı) düğmesine basın.
NOT: Otomatik adlandırma hakk ında daha fazla bilgi için (toplu
taramadan daha kullanışlıdır) bkz.
Otomatik adlandırma özelliğini
kullanma sayfa 30.
8. Çıkış dosyası biçimini seçmek için Settings > File Format (Ayarlar >
Dosya Biçimi) se çeneğine basın. Çeşitli biçim seçenekleri vardır.
9. Taranan dosyanın kayd edi lec e ği klasörü seçmek için File
destination (Dosya hedefi) düğmesine basın. Change Folder (Klasör
Değiştir) iletişim kutusu görüntülenir.
Temel İşlemler
10. Change Folder (Klasör Değiştir) iletişim kutusunda şunları
yapabilirsiniz.
Klasörlerde gezi nme k iç in ok la ra b as ın.
●
Bir üst düzeye çıkmak iç in klasör yukarı (".." işaretli) düğmesine
●
basın.
Geçerli klasörd e yeni klasör oluşturmak için New Folder (Yeni
●
Klasör) düğmesine bas ın.
Aramanızı bir klasörün düzeyine taşımak için o k las ör ün ad ını
●
tıklatın.
11. Dosyanız için hedef klasörü seçtiğinizde Change Folder (Klasör
Değiştir) iletişim kutusundaki OK (Tamam) düğmesine basın. Ağ
üzerinden paylaşılac ak dosy alar D:\images klasör üne
yerleştirilmelidir. Bir do s ya b u kl as ör e yerl eştirildikten sonra, herhangi
bir işletim sistemi çalıştıran herhangi bir bilg is aya r tara fından ağ
üzerinde bu dosyaya er işilebilir.
26 Bölüm 2 Temel İşlemler
Page 91

12. Dosyaya tarama işlemini başlatmak ve görüntüyü kaydetmek için
Dosyaya tara
13. Ortaya çıkan dosyayı görmek veya silmek için bkz.
görüntüleme, taşıma, ye nid en adl and ırma veya silme sayfa 34.
Belgeyi ağa tarama
Varsayılan olarak, tarayıcınızın dosya yöneticisi yalnızca yerel sürücüleri
ve klasörleri görünt üle r. Bu konu ba şlığı altınd a, nas ıl ağ bağlantısı
ekleneceği, dosy aya tar ama i şler i iç in ağ konumlarının dosya hedefleri
olarak nasıl kullanılacağı, dosya yöneticisiyle bunlara nas ıl e ri şileceği
açıklanmıştır.
NOT: Ağdaki bilgisayara veya sunucuya belge taramak için hedef
bilgisayar veya sunucuda tüm güvenlik duvarlarının devre dışı bırakılması,
hedef klasörün de paylaşılan klasör olması gerekir.
Ağ bağlantısı ekleme
Sisteminizin ağa bağlı olduğunu doğrulayın.
1. File Manager (Dosya Yöneticisi) ilet işim kutusunu açmak için
Klasör
2. Network (Ağ) düğmesine basın.
düğmesine basın.
Dosyayı
Temel İşlemler
düğmesine basın.
Belgeyi ağa tarama
27
Page 92

3. Add Network Connection (Ağ Bağlantısı Ekle) düğmesine basın.
Add Network Connection (Ağ Bağlantısı Ekle) iletişim kutusu
görüntülenir.
Temel İşlemler
Aşağıdaki adımlarda açıklanan bir veya daha fazla ayar hakkında ek
bilgi gerekirse ağ yöneticinizle görüşün.
4. Remote name (Uzak ad): Ağdaki uzak makine veya klasörü
hedefleyen tam dizin yolu adını şu biçimde girin: \\PCadı
\paylaşılanklasör.
5. User name (Kullanıcı adı): Uzak sunucu veya bilgisayar için etki alanı
adı ve oturum açma kullanıcı adını şu biçimde girin: ETKİALANI
\kullanıcıadı.
6. Password (Parola): Uzak sunucu veya bilgisayar için oturum açma
parolasını girin.
7. Label (Etiket): Uzak hedefi belirtmenize yardımcı olması için adı girin.
HP Designjet tarayıcı File Manager (Dosya Yöneticisi) ile tişim
kutusunda görüntülenen ad budur.
NOT: İstediğiniz kadar ağ bağlantısı ekleyebilirsiniz. Ancak, Microsoft
Windows sınırlandırmaları nedeniyle ayn ı bilgisayarda başka bir kişi
tarafından daha önce eşleştirilen ağ klasörünü eşleştiremezsiniz. Daha
önce eşleştirilmiş ağ klasörünü eşleştirmek için önce ağ bağlantısını
kaldırmanız gerekir. Ağ bağlantılarını kaldırma k için Klasör
düğmesine, ardından Network (Ağ) düğmesine, son olarak da Remove
Network Connection (Ağ Bağlantısını Kaldır) düğmesine basın.
28 Bölüm 2 Temel İşlemler
Page 93

Ağa tarama
Ağ bağlantınız olduğunu doğrulayın. Bkz. Ağ bağlantısı ekleme sayfa 27.
1. Dosya tarama işlerinde olmasını istediğiniz ayarları Scan (Tara)
sekmesinde yapılandırın.
2. File destination (Dosya hedefi) düğmes in e bas ın.
3. Artık görüntülenme ye kada r kl as ör yuk ar ı (".." işaretli) düğmesine
basın. Artık “yol yukarı” düğmesi görüntül enmeyince kullanılabilir
sürücülerin tümü nü göster en lis tenin en üst düzeyine erişmişsinizdir.
4. Listede gezinip tara may ı yapmak istediğiniz konumu seçin.
5. Taramayı yapmak istediğiniz hedef klasörü seçi n.
6. OK (Tamam) düğmesine basın.
Ağ klasöründe dosyalara erişme
Ağ bağlantınız olduğunu doğrulayın. Bkz. Ağ bağlantısı ekleme sayfa 27.
1. File Manager (Dosya Yöneticisi) ilet işim kutusunu açmak için
Klasör
düğmesine basın.
2. Artık görüntülenme ye kada r kl as ör yuk ar ı (".." işaretli) düğmesine
basın. Artık “yol yukarı” düğmesi görüntül enmeyince kullanılabilir
sürücülerin tümü nü göster en lis tenin en üst düzeyine erişmişsinizdir.
3. Listede gezinip eri şmek istediğiniz konumu seçin.
4. Erişmek istediğiniz hedef klasörü seçin.
5. OK (Tamam) düğmesine basın.
NOT: Tarayıcı sistemi ağdaki diğer bilgi sa yar l ar ta rafından erişilebilen
paylaşılan klasörü (D:\images) sağlar. Güvenlik nedeniyle, tarayıcı
sistemindeki başka hiçbir klasöre ağ üzerindeki bilgisayarla erişilemez. Bu
nedenle, taranmış resimlerin ağdaki diğer bilgisayarlardan erişebilir
olmasını isterseniz, bunları D:\images klasörü ne k ayd etm eniz gerekir.
Paylaşılan klasöre erişme hakkında daha fazla bilgi için bkz.
Paylaşılan
klasöre bilgisayarımdan erişme sayfa 41.
Temel İşlemler
Belgeyi ağa tarama
29
Page 94

Toplu tarama gerçekleştirme
Toplu tarama tek oturumda hi ç aya r ya pma dan ve her orijinal için Scan
(Tara) düğmesini kull an mad an bir de n çok belgenin işlenmesi anl amına
gelir. Toplu tarama, aynı ayarlarla belgelerin gruplarını tarama k
istediğinizde yararlıdır.
Otomatik adlandırma özelliğini kullanma
Belgeleri toplu taradığınızda tarayıcı her be lgeyi tek tek dosyalar halinde
kaydedip, her dosyayı o andaki tarih ve saatten oluşan varsayılan
adlandırma kuralına göre adlandırır. Ancak, otomatik adlandırm a öz el liği
Temel İşlemler
belgeleri, dosyaya tarandıklarında nasıl adland ıracağınızı tanımlamanıza
olanak verir.
Otomatik adlandırma özel liğini yapılandırmak için , tar ama yı başlatmadan
önce Scan (Tara) sekmesinde File name (Dosya adı) düğmesine basıp
sonunda şu sonek bulunan dosya adını girin: “<###>”. Bu sonek si st e m e
her dosya adının sonuna bir sayı ekleneceğini ve tar anan her dosya için
sayının birer birer artacağını belirtir. Sayıdaki karakter miktarı sonekteki “#”
karakteri sayısına eşittir. Örneğin, dosya adı olarak “yeni_resim<###>”
girerseniz, sistem tar ana n her oriji nal belg e için y eni _r esi m0 01,
yeni_resim002, yeni_r es im0 03 v b. dos yaları oluşturacaktır. Insert
counter (Sayaç ekle) düğmesini kullanarak şu soneki ekleyin : “<###>”.
NOT: Sistem dosya hedefi klas örünü inceleyip, klasör de bu lun a n
dosyaların değiştirilmesini önlemek için dosya adı dizisindeki son
numaradan sonra numaralandırmaya başlar. Örneğin, dosya adı olarak
“yeni_resim<###>” gi re rs eniz ve dosya hedefi kl as örü nde
“yeni_resim001” ve “yeni_resim002” adlı dosyalar zaten var sa, siste m yeni
dosyaları “yeni_re s im 003 ” adıyla başlayarak kaydedecektir.
Belgeleri tarama
1. Aynı ayarla tarama k is ted i ğini z or ij in all e ri haz ırlayın.
2. İlk orijinali tarayıcıy a bes le yin.
3. Scan (Tara) sekmesin de ay ar ları tek belg e tar ama da y aptığınız gibi
yapılandırın. Bkz.
NOT: Farklı boyutlar da ori jin al be lgeleriniz varsa Auto (Otomatik)
boyut algılama ayarını kullanıp Auto width (Otomatik genişlik) ve
Auto length (Otomatik uzunluk) seçenekler ini bel ir leyin.
30 Bölüm 2 Temel İşlemler
Belgeyi dosyaya tarama sayfa 24.
Page 95

4. Scan (Tara) sekmesine basın.
5. Settings (Ayarlar) düğmesine basın, Batch Scan (Toplu Tarama)
seçeneğini belirleyip OK (Tamam) düğmesine basın.
6.
Dosyaya tara
düğmesine basıp orijinal belgelerinizi
beslemeye başlayın. Her belge taranıp dosya olarak kaydedilir.
İPUCU: Toplu tarama modunu kesme k is ters eni z Durdur
düğmesine basın. Geçici olarak bunun yapılması farklı ayarlarla tek belgeyi
taramanıza izin vererek toplu tarama modunu durdurur. Tek belgeyi
taramanızdan sonra toplu tarama modu devam eder.
Temel İşlemler
İPUCU: Tarayıcıyı her orijinali kopyalama tamam lan ır tamamlanmaz
çıkaracak şekil de yapılandırabilirsiniz; böylece, sonraki orijinal beslenebilir.
Bu seçeneği belirlemek için Setup (Kurulum) sekmesi ne gi dip Options
(Seçenekler) > Scanning (Tarama) > Eject paper (Kağıdı çıkar)
seçeneğini belirleyin.
Scan (Tara) s ekmesinde Settings (Ayarlar) düğmesine basıp Batch
Scan (Toplu Tarama) seçimini kaldırarak iptal edene kadar taray ıcı toplu
tarama modunda kalır.
Toplu tarama gerçekleştirme
31
Page 96

Dosya yazdırma
Yazdırmak istediğiniz dosyala rı Print (Yazdır) sekmesinde yönetirs ini z.
Belirli bir dosyadan is ted i ğiniz kopya sayısını ve tam listeden kaç se t
kopyalanmasını istediğin izi be lirtebil irsi niz.
1. Kullanmayı planladığınız kağıt türü için hazır bir ortam profiliniz yoksa
2. Print (Yazdır) sekmes ine ba sın.
Temel İşlemler
oluşturmalısınız. Bkz:
Yeni bir ortam profili oluşturma sayfa 8.
Print (Yazdır) iletişim kutusuna girdi ğinizde, Kopyala
düğmesi Yazdır düğmesi olarak değişir.
Print list (Yazdırma listesi) yazdırılmak üzere seçilen dosyal ar ı
gösterir. Print list (Yaz dırma listesi) konumuna dos y a ekl em ek i çi n
Add to List (Listeye Ekle) düğmesine basın.
3. Gerekiyorsa Setup (Kurulum) sekmesinde ayarları yapılandırın.
Kenar boşlukları, yerleşim, yazıcı ve ortam profili gibi Setup (Kurulum)
sekmesi ayarlar ı yaz dırma işinin tamamına uygulanır.
4.
Dosyaları yazıcıya göndermek için Yazdır
basın.
32 Bölüm 2 Temel İşlemler
düğmesine
Page 97

NOT: Print (Yazdır) sekmesi Scan (Tara) sekmesinde oluşturulan
dosyaları yazdırmak amacıyla tasarlanmıştır; diğer ka yna kl ar dan gele n
dosyaları yazdırmak için kullanılamaz.
Rengi ayarlama
Type of Original Setup (Orijina l Tü rü Ayarı) iletişim kutusuna erişme k ve
taranan görüntülerin renklerini ayarlamak için şu adımları uygulayın:
1. Copy (Kopya) sekmesinde veya Scan (Tara) sekmesinde Type of
Original (Orijinal Türü) düğmesine basın.
2.
Araç
Ayarı) iletişim kutusu görüntülenir.
düğmesine basın. Type of Original Setup (Orijinal Türü
Temel İşlemler
3. Taranan görüntünün ren kler ini ay ar lam ak için k ull an ıl abi li r a yar la rı
kullanın.
Rengi ayarlama
33
Page 98

Dosyayı görüntüleme, taşıma, yeniden adlandırma veya
silme
1. Dokunmatik ekranın altındaki araç çubuğunda Dosya Yöneticisi
düğmesine basın.
2. Listeden dosya seçi n.
3. Gerekiyorsa dos y ay ı görüntüleyin, taşıyın, yeniden adlandırın veya
silin.
Temel İşlemler
Ağır kuşe kağıt veya karton tarama
Tarayıcınız ağır kuşe kağıtları ve kartonları tarayabilir.
UYARI! Diğer kalın malzemeler dest ek len mez ve ha sar a neden olabilir.
Taramadan önce zımb a ve aşındırıcı ekleri çıkarın.
1. Tarayıcınızın denetim panelindeki Otomatik Kalınlık Ayarı
Denetimi tuşuna basın.
2. Yerleştirme yuvasının yüksekliğini artırmak iç in, y ukar ı ok tuşuna
basın ve belgeyi yerleşt ir mek iç in ye ter li boşluk oluşana kadar b asılı
tutun. Yerleştirme yuvası yüks e kl iğini 2 - 15 mm (0,08 - 0,59 inç)
arasında değiştirebilirsiniz.
3. Belgeyi besleyi n.
4. Aşağı ok tuşuna basın ve yerleştirme yuvası ayarlamayı durduran a
kadar basılı tutun.
5. Çizgiler in düz olup olmadığını görmek için görüntünün ön iz lem es ini
oluşturun. Daha ayrıntılı görmek için yak ınlaştırma işlevini kullanın.
NOT: Büyük bir belgenin tarayıcıya beslendiği sırada v e tar ay ıcıdan
çıkarıldığı sırada iki elle destek le nme si ger ek ebi lir .
34 Bölüm 2 Temel İşlemler
Page 99

Çizgiler düz değilse şu adımları uygulayın:
1. Setup (Kurulum ) sekmesine basın.
2. Options (Seçenekler) düğmesini, sonra da Scanning (Tarama)
düğmesini seçin. Scan O ptions (Tarama Seçenekleri) iletişim kutusu
görüntülenir.
Temel İşlemler
Ağır kuşe kağıt veya karton tarama
35
Page 100

3. Scan Options (Tarama Seçenekleri) iletişim kutusunda Scanner
(Tarayıcı) düğmesine basın. Scanner (Tarayıcı) iletişim kutusu
görüntülenir.
Temel İşlemler
4. Scanner (Tarayıcı) iletişim kutusunda Setup (Kurulum) düğmesine
basın.
5. Extended Thickness (Genişletilmiş Kalınlık) sekmesini seçin ve Use
extended thickness paper hand ling (Genişletilmiş kalınlıkta kağıt
işleme kullan) etiketli ona y k utu sunu işaretleyin.
6. Tarayıcının her kamerasının değerlerini değiştiri n. No rm al ol ar ak ,
yalnızca pozitif de ğer le r k u ll anılmalıdır.
7. Sonuçlar tatmin edici olana kad ar s ınam a tar am ala rını yazdırın ve
kamera değerleri ni ay arlayın.
8. Ayarlarınızı kaydetmek için OK (Tamam) düğmesine basın.
36 Bölüm 2 Temel İşlemler
 Loading...