

Page 1
HP Designjet
T1120 & T620
printer series
EN
Printer Assembly
Instructions
JP
セットアップ 手 順
ZHCN
组装说明
ZHTW
印表機組裝說明
KO
프린터 조립 지침
Petunjuk Pemasangan
Dudukan Printer
© 2009 Hewlett-Packard Company
Large Format Division
Camí de Can Graells 1-21 · 08174
Sant Cugat del Vallès
Barcelona · Spain
All rights reserved
Printed in Singapore
1 2
EN
Read these instructions carefully...
What you will need for this procedure
• Because the printer is heavy, you may need three people to unpack it. When
more than one person is needed, this symbol is displayed*.
• To assemble the printer you will need at least 1 x 2 m (40 x 80 in) of empty
oor space.
**Whenever you see this icon, you can nd an animation illustrating the procedure on the HP Start-Up Kit DVD.
JP
以下の指示をよくお読みください。
セ ットア ップ に 必 要 な も の
• このプリンタは重いため、開梱する際には 3人必要になります。複数名で行う必
要がある作業には、以下のような記号が表示されています*。
• プリンタを組み立てるには、最低でも1x2mの設置面積が必要です。
**このアイコンが表示されている場合は、『HPスタートアップキット』DVDに手順
についてのアニメーションが収録されています。
ZHCN
请仔细阅读以下说明...
该组装过程需要注意哪些事项
• 因为打印机很重,打开包装可能需要 三人。需要一人以上时,则显示此符号*
• 要组装打印机,您需要至少 1 x 2 m (40 x 80 in) 的地板空间。
**只要您看到该图标,就可以在 HP Start-Up Kit DVD 中找到步骤的动画说明。
ZHTW
請仔細閱讀下列說明 ...
本程序中應注意的事項
• 因為印表機很重,可能需要三個人才有辦法拆裝。需要多人幫忙時,這裡會用
這個符號來表示 *。
• 如果要組裝印表機,您必須至少騰出 1 x 2 公尺(40 x 80 英吋)的地板空間。
** 看到這個圖示時,即表示您可以在 HP Start-Up Kit DVD 上找到動畫的圖解程序。
KO
이 지시사항을 주의 깊게 읽으십시오...
이 절차를 수행하는 데 필요한 사항
• 프린터가 무거우므로 상자에서 꺼낼 때 세 사람이 필요할 수도 있습니다. 한
사람 이상이 필요한 경우 이 기호가 표시되어 있습니다*.
• 프린터를 조립하려면 최소 1 x 2m (40 x 80 인치) 넓이의 빈 공간이
필요합니다.
**이 아이콘이 표시되어 있으면 HP Star t-Up Kit DVD(HP 시작 키트 DVD) 에
있는 절차를 보여주는 애니메이션을 찾을 수 있습니다.
Baca petunjuk ini dengan cermat...
Yang Anda butuhkan untuk prosedur ini
• Karena printer ini berat, Anda mungkin memerlukan tiga orang untuk
mengeluarkannya dari kemasan boks. Apabila diperlukan lebih dari satu orang,
simbol ini akan ditampilkan*.
• Untuk memasang printer ini, Anda memerlukan minimal 1 x 2 m (40 x 80 inci)
ruang kosong.
**Bila Anda melihat ikon ini, animasi yang menggambarkan prosedur dapat
Anda temukan dalam DVD HP Start-Up Kit
[Perangkat Persiapan HP].
**
*
EN
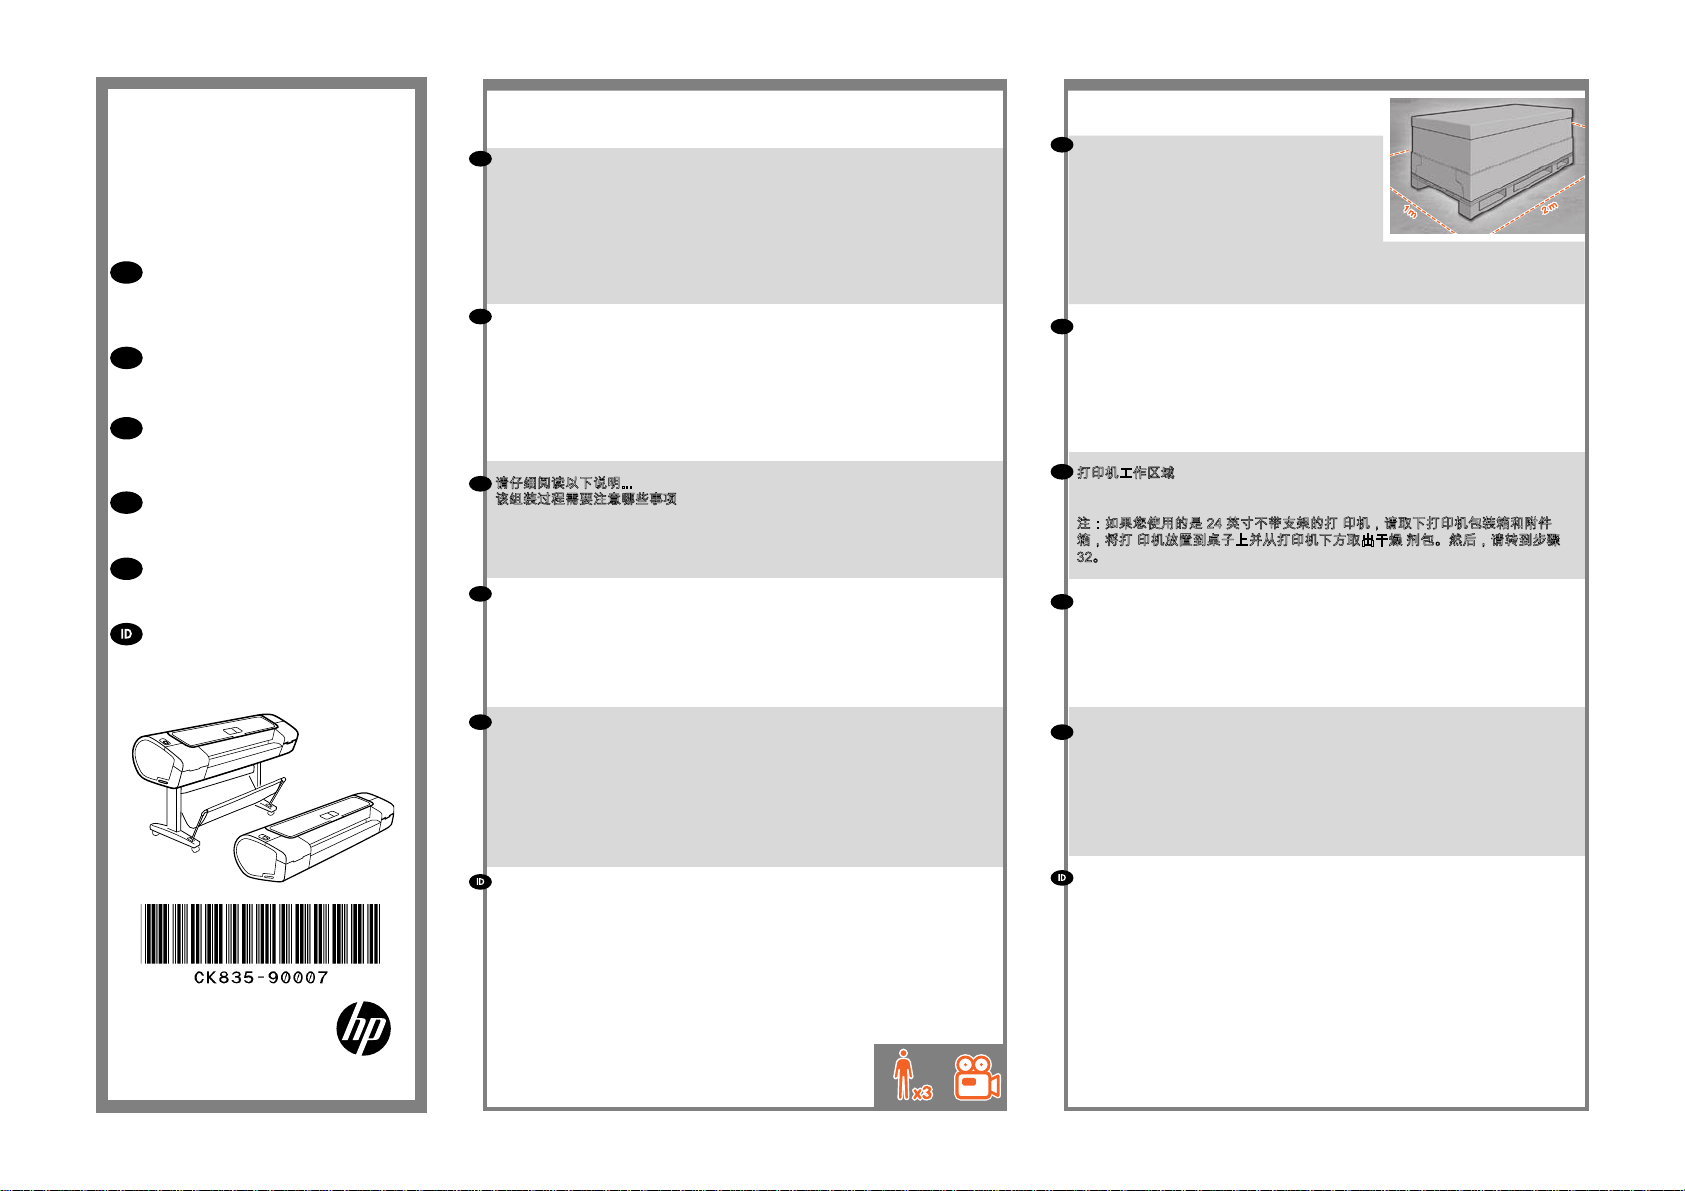
Printer working area
Before you start unpacking, consider where you
are going to put the assembled printer. You
should allow some clear space on all sides of the
printer box. The recommended clearances are
shown in the illustration above.
Note: If your printer is 24-in without stand,
remove the printer box and the accessories box, place the printer on a table and
remove the desiccant bag from below the printer. Then go to step 32.
JP
プリンタの設置場所
開梱する前に、組み立てたプリンタの設置場所を決めてください。プリンタの箱の
周囲に、スペースが必要になります。推奨するスペースは上記のとおりです。
注記: 24 インチ プリンタ (スタンドなし) の場合は、プリンタ本体が収められてい
る箱 とア クセ サリの 箱 を 取り 除き、 プ リン タを テ ーブル の 上 に 置 き、プ リン タの 下
にある乾燥剤の袋を取り出してください。次に手順 32 に進みます。
ZHCN
打印机工作区域
开始打开包装之前,请考虑在何处安放组装好的打印机。应该在打印机包装箱的
四周清理出一些空间。上图显示了建议的空间大小。
注:如果您使用的是 24 英寸不带支架的打 印机,请取下打印机包装箱和附件
箱,将打 印机放置到桌子上并从打印机下方取出干燥 剂包。然后,请转到步骤
32。
ZHTW
印表機工作區
開始拆裝之前,請先想好要將組裝的印表機放置在何處。印表機包裝箱四周應該
預留空間。建議清出的空間大小,如上圖所示。
注 意: 如 果 您 是 使 用 非 標 準 的 24 英 吋 印 表 機,
請取出 包裝箱和配件盒, 將印表機放置在 桌上,然後 取出印表機下方的乾 燥劑。
接著跳到步驟 32。
KO
프린터 작업 장소
포장을 풀기 전에 조립된 프린터를 놓을 장소를 먼저 고려하십시오. 프린터
상자의 주변 사방에 어느 정도의 여유 공간이 있어야 합니다. 권장되는 여유
간격이 위의 그림에 나와 있습니다.
참고: 61c m 프린터(스탠드 미포함)의 경우 프린터 상자와 부속품 상자를 제거하고
프 린터를 테이블 위에 올려놓은 다음 프린터 아래에 있는 건조제 봉지를 떼어
냅니다. 그 다음 32단계로 이동합니다.
Area kerja printer
Sebelum Anda mulai membuka kemasan boks, pertimbangkan tempat untuk
meletakkan printer yang sudah dipasang. Anda harus memberikan ruang kosong
pada semua sisi boks printer. Jarak yang dianjurkan dapat dilihat pada gambar di
atas.
Catatan: Jika printer berukuran 24 inci tanpa dudukan, keluarkan printer dan aksesori
dari kema-san, letakkan printer di atas meja, kemudian keluarkan kantong pe-nyerap
lembab dari bagian bawah printer. Setelah itu, lanjutkan ke langkah 32.
Page 2
3 4 5 6
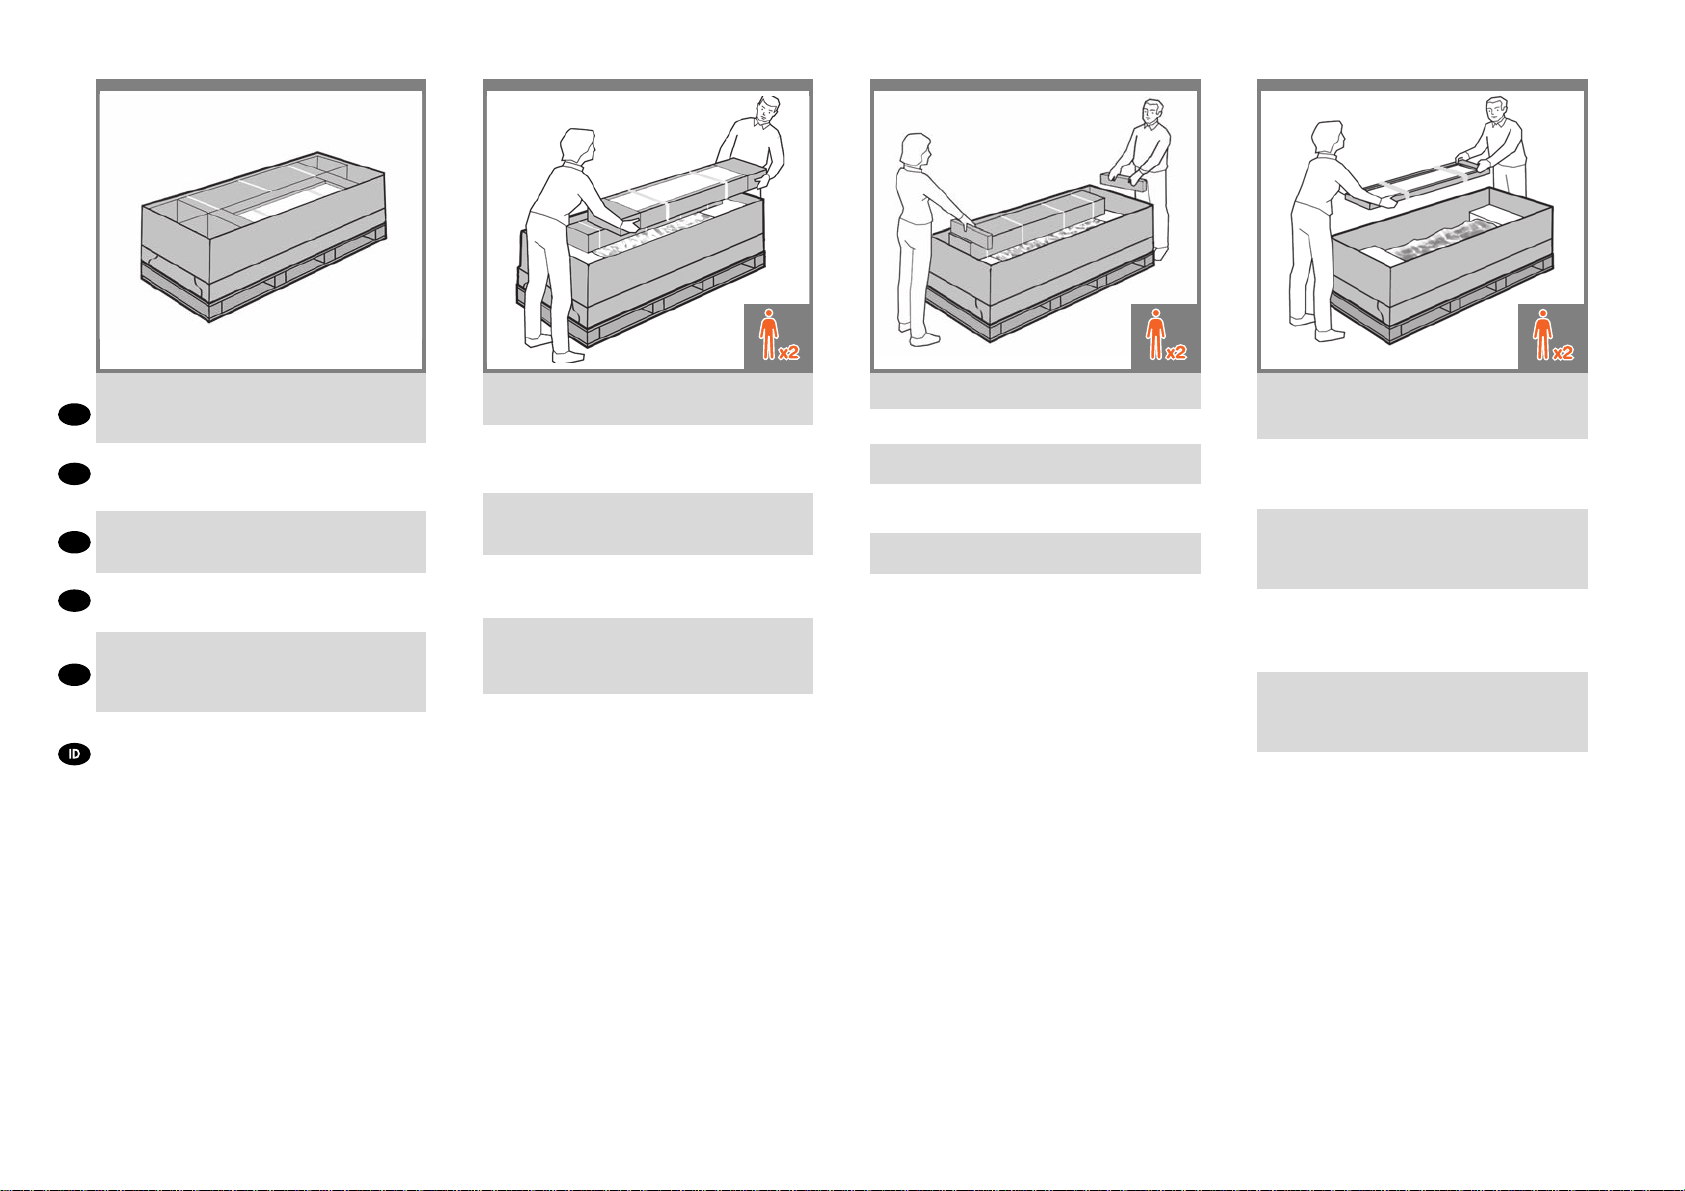
Remove the accessories from the printer box. You will
nd the documentation and software for your printer
EN
on top of the printer.
プリンタ本体 が収められている箱からアクセサリを取
り出します。プリンタの上にプリンタのマニュアルとソ
JP
フトウェアが同 梱 されて います。
从打印机包装箱中取出附件箱。可以在打印机的最上
ZHCN
面找 到打印机的文档和软件。
從印表機包裝箱中取出配件。印表機上會有印表機的
ZHTW
文件和軟體。
프린터 상자에서 부속품을 들어냅니다.
프린터 맨 위에 프린터 설명서와 소프트웨어가
KO
있습니다 .
Keluarkan aksesori dari kemasan printer. Di bagian atas
printer tersebut terdapat dokumen dan perangkat lunak
untuk printer Anda.
Remove the stand box, which is the largest one. To do
so you may need two people, one at each end.
スタンドが収められている一番大きな箱を取り出し
ます。この箱を取り出すには、両端を持つ必要がある
ので 2 人 必 要 に なりま す。
取出底座包装盒,即最大的一个纸盒。执行此操作可
能需要两个人,纸盒两侧各一人。
取出機架盒,這是裡頭最大的盒子。這時需要兩個人
各持一端,將它取出。
스텐드 상자(가장 큰 상자)를 꺼냅니다.
이 상자를 꺼내려면 양 끝에 한 명씩 두 사람이
필요할 수 있습니다.
Keluarkan boks dudukan, yakni boks terbesar. Untuk
mengeluarkannya, Anda mungkin memerlukan 2
orang, masing-masing pada setiap ujungnya.
Remove the pieces of cardboard.
厚 紙を取り除き ま す。
取出卡纸板。
取出厚紙板。
카드보드 조각을 제거합니다.
Keluarkan bagian karton penahan.
Remove the rear tray from the printer box.
Note: If you don’t nd the tray in the box, it may
already be installed.
背面トレイをプリンタ本体が収められている箱から取
り出しま す。注記:トレイが箱にない場合は、すでに取
り付けられている場合 があります。
从打印机包装箱中取出后纸盒。
注意:如果在包装箱中找不到纸盒,则说明纸盒可能
已安装。
從印表機包裝箱中取出後方紙匣。
注意:如果在包裝箱中找不到紙匣,紙匣可能
已經安裝完成。
뒷면 용지함을 프린터 박스에서 빼냅니다.
참고: 상자 안에 용지함이 들어 있지 않으면 프린터에
이미 장착되어 있을 것입니다.
Ambil baki belakang dari dalam boks printer.
Catatan: Jika tidak ada di dalam kemasan,
kemungkinan baki telah terpasang.
Page 3
87 109
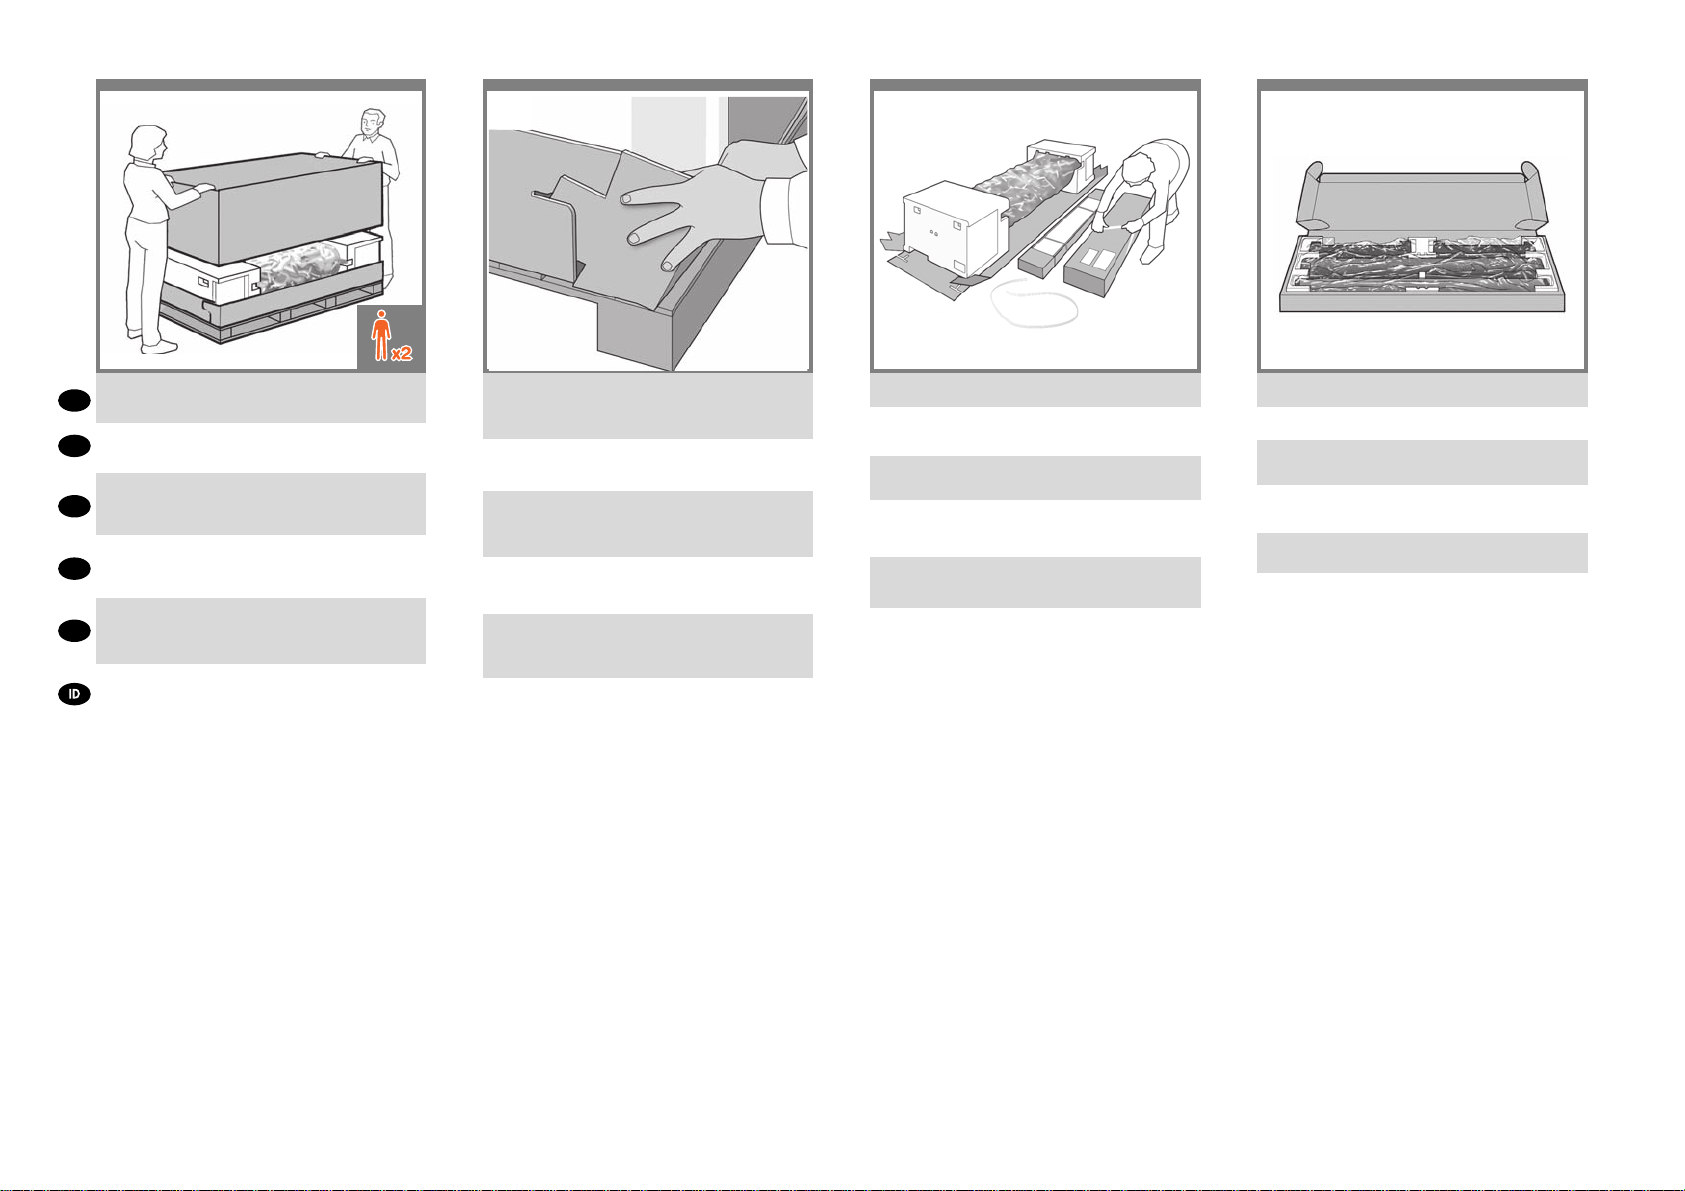
Lift up the sides and top of the printer box, and remove
EN
them from the printer.
プリンタ本体が収められている箱の上部と側面を持っ
JP
て持ち上げ、プリンタから取り外してください。
提起打印机包装箱的侧面和顶部,并从打印机上将
ZHCN
其取下。
抬起印表機包裝箱的上半部,然後將它從印表機
ZHTW
抽離。
프린터 상자의 양쪽 및 상단을 들어 올리고
KO
제거합 니다.
Angkat semua sisi dan bagian atas boks printer,
kemudian lepaskan dari printer.
Dismantle the bottom of the printer box by disengaging
each corner and then folding down the sides so that
they are out of the way.
プリンタの箱 の底 部分を、じゃまにならないように解
体します。角の合わせ部分を外し、側面を倒します。
拆除打印机包装箱的底部,方法是解开打印机包装箱
的四角,然后向下打开四边,使它们完全铺开。
鬆開四個角落以將箱子的底部拆下來,接著扳開側板,
才不會妨礙動作。
방해가 되지 않도록 각 모서리를 분리한 다음 양면을
접어 프린터 상자 바닥을 벗겨내십시오.
Pisahkan bagian bawah boks printer dengan
melepaskan setiap sudutnya, kemudian melipat sisinya
ke bawah sehingga dapat dikeluarkan.
Cut and remove the straps around the stand box.
スタンドの箱を固定しているストラップを切 断し取り
除きま す。
剪断并取下底座包装盒四周的带子。
割斷並拆除機架盒上的綑紮帶。 請勿移除白色包裝材
料,直到步驟指示移除。
스탠드 상자를 묶은 띠를 잘라서 버립니다.
Potong dan lepaskan tali yang mengikat boks
dudukan.
Open the stand box.
スタンドの箱を開きます。
打开底座包装盒。
打開機架盒。
스탠드 상자를 엽니다.
Buka boks dudukan.
Page 4
11 12
13
14
x22 x8
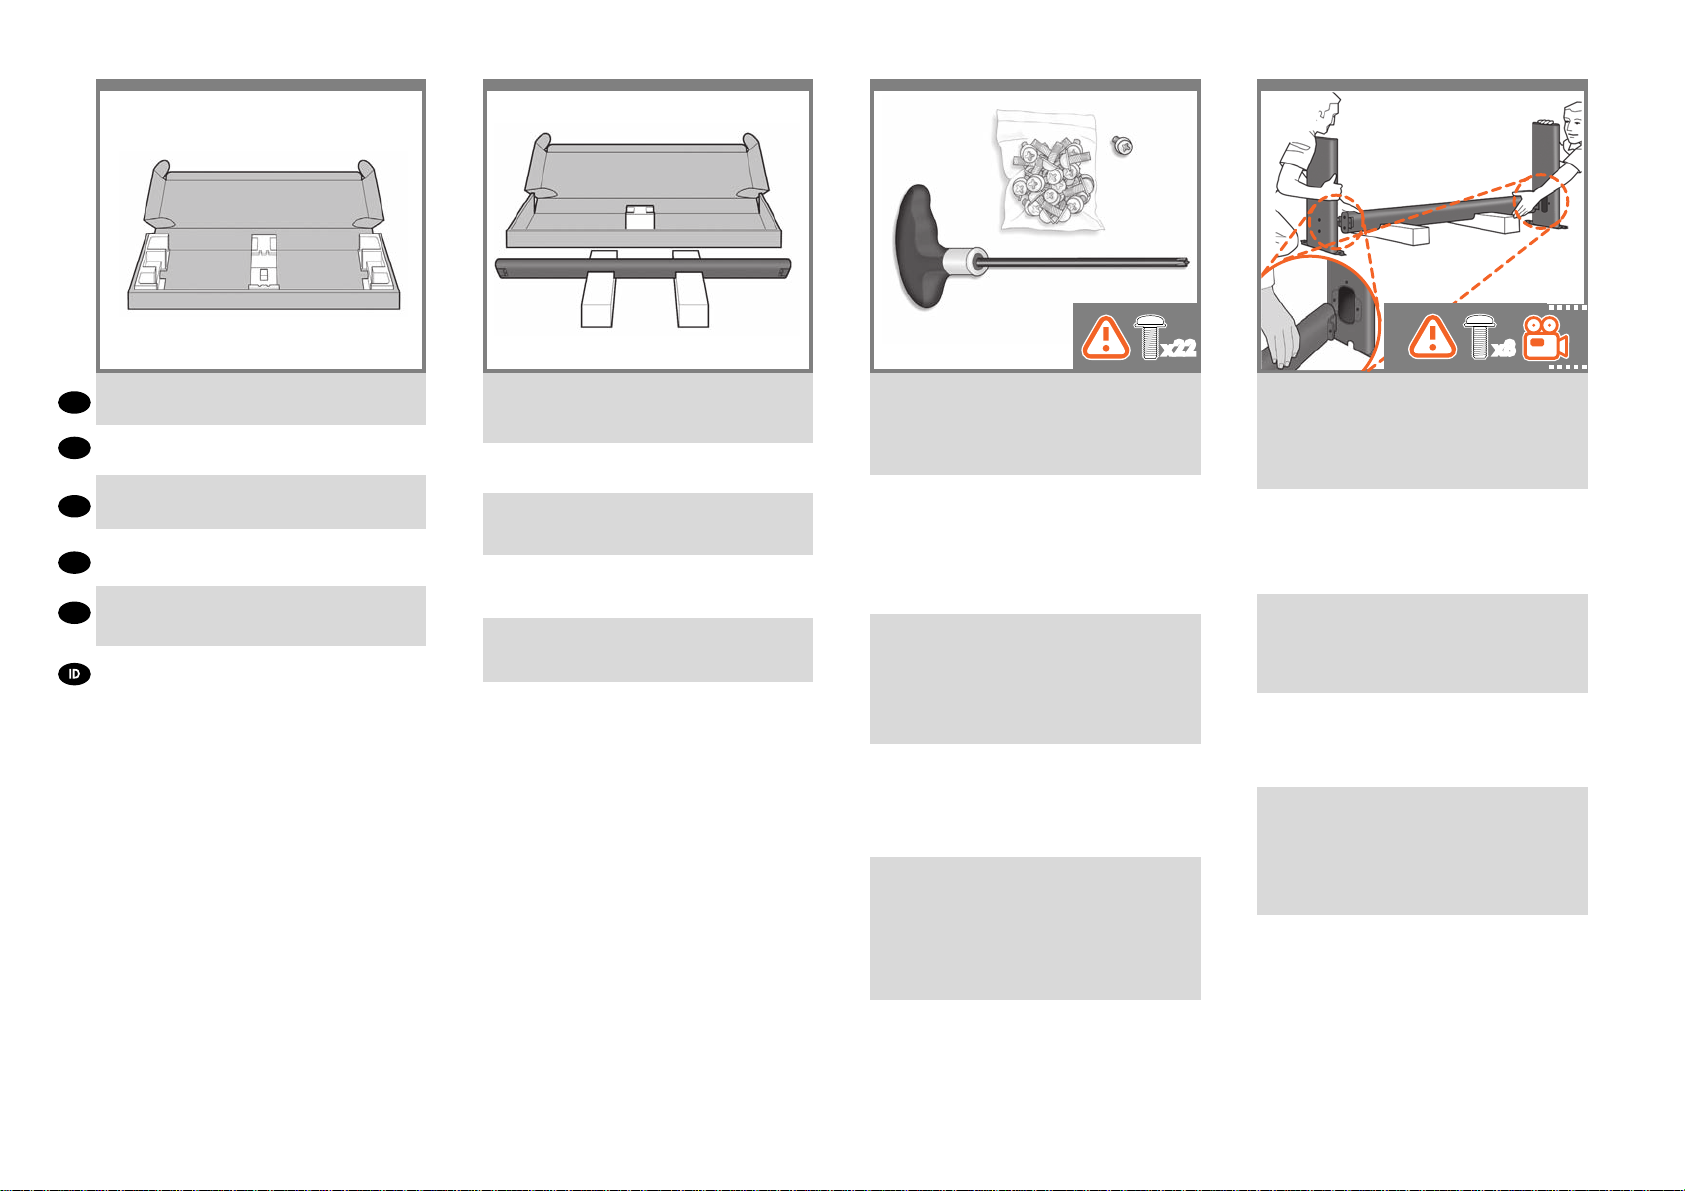
Remove the cross-brace and the two pieces of
EN
packaging material from each end of the stand box.
クロスブレイスと、スタンドの箱の両端にある2つの
JP
梱 包 材 を 取り 除きま す。
取下支撑横梁,然后从底座箱的每侧取下两块泡沫填
ZHCN
塞块。
取出橫撐桿以及機架盒兩端各一的包裝材。
ZHTW
스탠드 상자의 각 끝에서 버팀대 및 두 개의 조립용
KO
막대를 꺼냅니다.
Keluarkan batang penahan dan 2 buah materi
kemasan dari setiap ujung boks dudukan.
Place the two pieces of packaging material on the
oor, spaced 40 cm apart, and place the cross-brace
on top of them.
2つの梱包材を 40cm離して床に置き、その上にクロス
ブレイスを置きます。
将两块泡沫填塞块放在地板上,使它们相距 40 厘米
远,并将支撑横梁放在它们上面。
將兩端的包裝材放在地上,相隔約 40 公分,
然後在這上面放置橫撐桿。
두 개의 조립용 막대를 40cm 떨어지게 바닥에 두고
그 위에 버팀대를 놓습니다.
Letakkan 2 buah materi kemasan pada lantai dengan
jarak 40 cm, kemudian letakkan batang penahan di
atasnya.
A screwdriver and 22 screws are provided in the stand
box: 16 screws to assemble the stand, 4 to attach it to
the printer, and 2 are spare. Do not try to remove the
washers from the screws. Note: All the screws are for
the stand. The basket does not need screws.
スタンドの箱にはドライバと22 本 のネジが 同梱されて
います。16 本はスタンドの組み立て用で、4本はプリン
タへ の 取り付 け 用 です。
残り の 2 本は 予 備 用 で す。
ネジからワッシャを取り外さ ないでください 。
注記:すべての ネジは スタンド用です。バスケットの取
り付けにはネジは不要です。
底座盒中有一个螺丝刀和 22 枚螺钉: 其中 16 枚螺钉
用于组装底座,4 枚用于将底座连接到打印机,剩下
2 枚螺钉是备用的。
不要尝试从螺钉上取下垫圈。
注:所有螺钉都是用于底座的。纸筐的
安装不需要螺钉。
機架盒內附有螺絲起子和 22 顆螺絲:16 顆螺絲組裝
機架、4 顆將印表機固定在機架上,剩下的
請勿拆除螺絲的墊圈。
注意:全部的螺絲都是給機架使用的。承紙籃並不需
要螺絲。
스탠드 상자에는 드라이버와 22 개의 나사가 들어
있습니다. 스탠드를 조립하는 데 16 개, 프린터에
스탠드를 연결하는 데 4 개, 그리고
2 개는 예비용입니다.
나사에서 와셔를 제거하지 마십시오. 참고: 모든
나사는 스탠드용입니다. 바스켓에는 나사가 필요
없습니다.
Dalam kotak dudukan terdapat obeng dan 22 sekrup: 16
sekrup untuk memasang dudukan, 4 sekrup untuk dipasang
di printer, dan 2 sebagai cadangan.
Jangan coba melepas cincin dari sekrup. Catatan: Semua
sekrup tersebut digunakan untuk dudukan. Keranjang printer
tidak memerlukan sekrup.
2 顆備用
Attach each leg of the stand to the cross-brace, using
two screws on the outside of the leg and then two on
the inside.
First t all four screws loosely, then tighten up the
screws on the outside of the leg, followed by the
screws on the inside.
スタンドの各 脚部 を、外側 から2本、内 側から2 本のネ
ジ でクロ スブ レ イス に 固 定しま す。
まず4 本すべてのネジを緩めに取り付けてから、脚部
の外側 からネジを固く締め 、次 に内 側からネジを 固く
締 めま す。
将底座支柱固定到支撑横梁,方法是在支柱外侧拧上
两枚螺钉,然后在支柱内侧拧上两枚螺钉。
先松松地拧上这四枚螺钉,再拧紧支柱
外侧的螺钉,然后拧紧支柱内侧的螺钉。
將 機 架 的 各 腳 柱 裝 到 橫 撐 桿 上, 在 腳
柱外側使用兩顆螺絲,再於內側使用兩顆。
先將這四顆螺絲大致鎖上,然後再旋緊腳
柱外側的螺絲,再接著旋緊內側的螺絲。
。
스탠드의 각각의 다리를 버팀대에 연결합니다. 이때
다리 바깥쪽에 나사 두 개를 사용한 다음 다리
안쪽에 두 개의 나사를 사용합니다.
처음에는 나사 네 개 모두를 느슨하게 맞춘
후먼저 바깥쪽 나사를 조이고 안쪽에 있는 나사를
조입니다.
Pasang masing-masing kaki dudukan ke batang
penahan menggunakan 2 sekrup di bagian luar,
kemudian 2 sekrup di bagian dalam kaki.
Pertama-tama, pasang 4 sekrup, kemudian
kencangkan sekrup tersebut di bagian luar kaki, diikuti
dengan sekrup di bagian dalam kaki.
Page 5
15
16
17
18
4+4=8
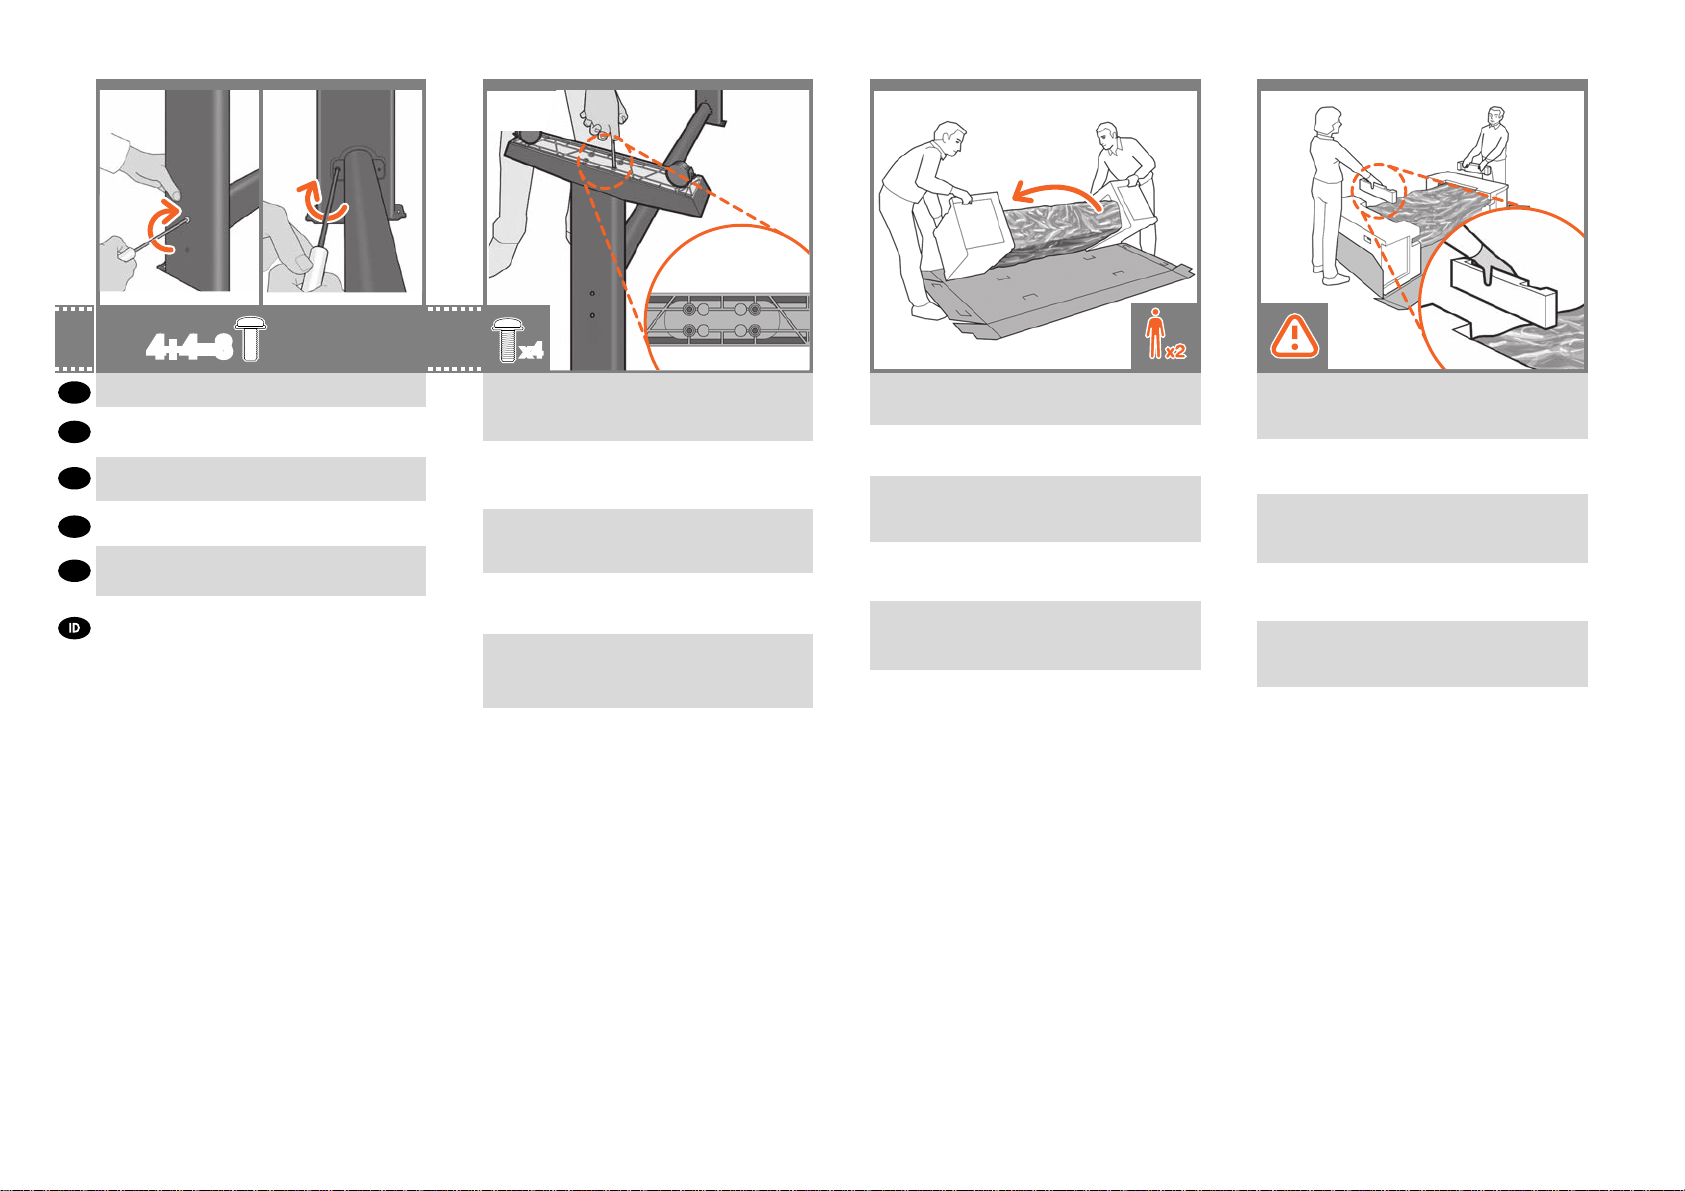
Make sure you have used 4 screws in each leg.
EN
各脚部の固定には、それぞれ必ず4本のネジを使用し
JP
てくだ さ い 。
ZHCN
确保每个支柱都使用了 4 枚螺钉。
ZHTW
請確定每隻腳架上都有 4 顆螺絲。
KO
각 다리마다 나사를 4 개씩 사용합니다.
Pastikan Anda telah menggunakan
4 sekrup pada setiap kaki.
x4
Attach a foot to each leg, using four screws in each
foot. First t all four screws loosely, then tighten
them up.
4 本 の ネ ジ で 各 足 部 を 各 脚 部 に 固 定 し ま す。
まず4本すべてのネジを緩めに取り付けてから、固く
締 めま す。
为每个支柱连接底板,每个底板使用四枚螺钉。先松
松地拧上这四枚螺钉,然后再拧紧。
為每隻腳架裝上腳座,每個腳座各用四顆螺絲鎖定。
先將四顆螺絲大致裝上,然後再一一鎖緊。
각 발에 나사 네 개씩 사용하여 각 다리에 발을
연결합니다. 먼저 나사 네 개를 모두 느슨하게
맞춘 후 꽉 조이십시오.
Pasang bagian dasar ke setiap kaki menggunakan 4
sekrup di setiap bagian dasar. Pertama-tama, pasang 4
sekrup, kemudian kencangkan.
Return to the main body of the printer, carefully turn
the printer upside down in order to attach the legs.
プリンタ本体に戻り、脚部を取り付けるため、プリン
タを慎重に逆さにします。
回到打印机主体,小心翻转打印机,使其面朝下以便
安装支柱。
回到印表機的主體,然後從兩頭的泡棉端蓋中取出小
擋板。
프린터 본체로 돌아가서 다리를 연결하기 위해
프린터를 조심스럽게 뒤집어 놓습니다.
Kembali ke badan utama printer, balikkan printer
dengan hati-hati untuk memasang kakinya.
Remove the small aps from each of the foam
end pieces.
Do not remove the foam end pieces.
両 端 の 梱 包 材 か ら小さな カ バーを 取り 外しま す。
両端 の梱包材 は取り外さないでください。
从每个泡沫端填塞块中取出小法兰。
不要取出泡沫端填塞块。
從兩頭的泡棉蓋中取出小擋板。
請勿拆下泡棉端蓋。
각 폼 끝 조각에서 작은 덮개를 제거합니다.
폼 끝 조각은 제거하지 마십시오.
Lepaskan sirip kecil di setiap bagian ujung gabus.
Jangan lepaskan bagian ujung gabus.
Page 6
19 20 21 22
Remove the orange tape from the transparent covering
EN
that protects the printer.
プリンタを 保 護 する 透明カバーからオレンジ 色のテ ー
JP
プを剥がします。
从保护打印机的透明护罩上取下橙色 胶带。
ZHCN
將橙色膠布從保護印表機的透明護套上取下。
ZHTW
프린터를 보호하는 투명 덮개에서 오렌지색 테이프를
KO
떼어 냅니다.
Lepaskan pita perekat oranye dari penutup transparan
yang melindungi printer.
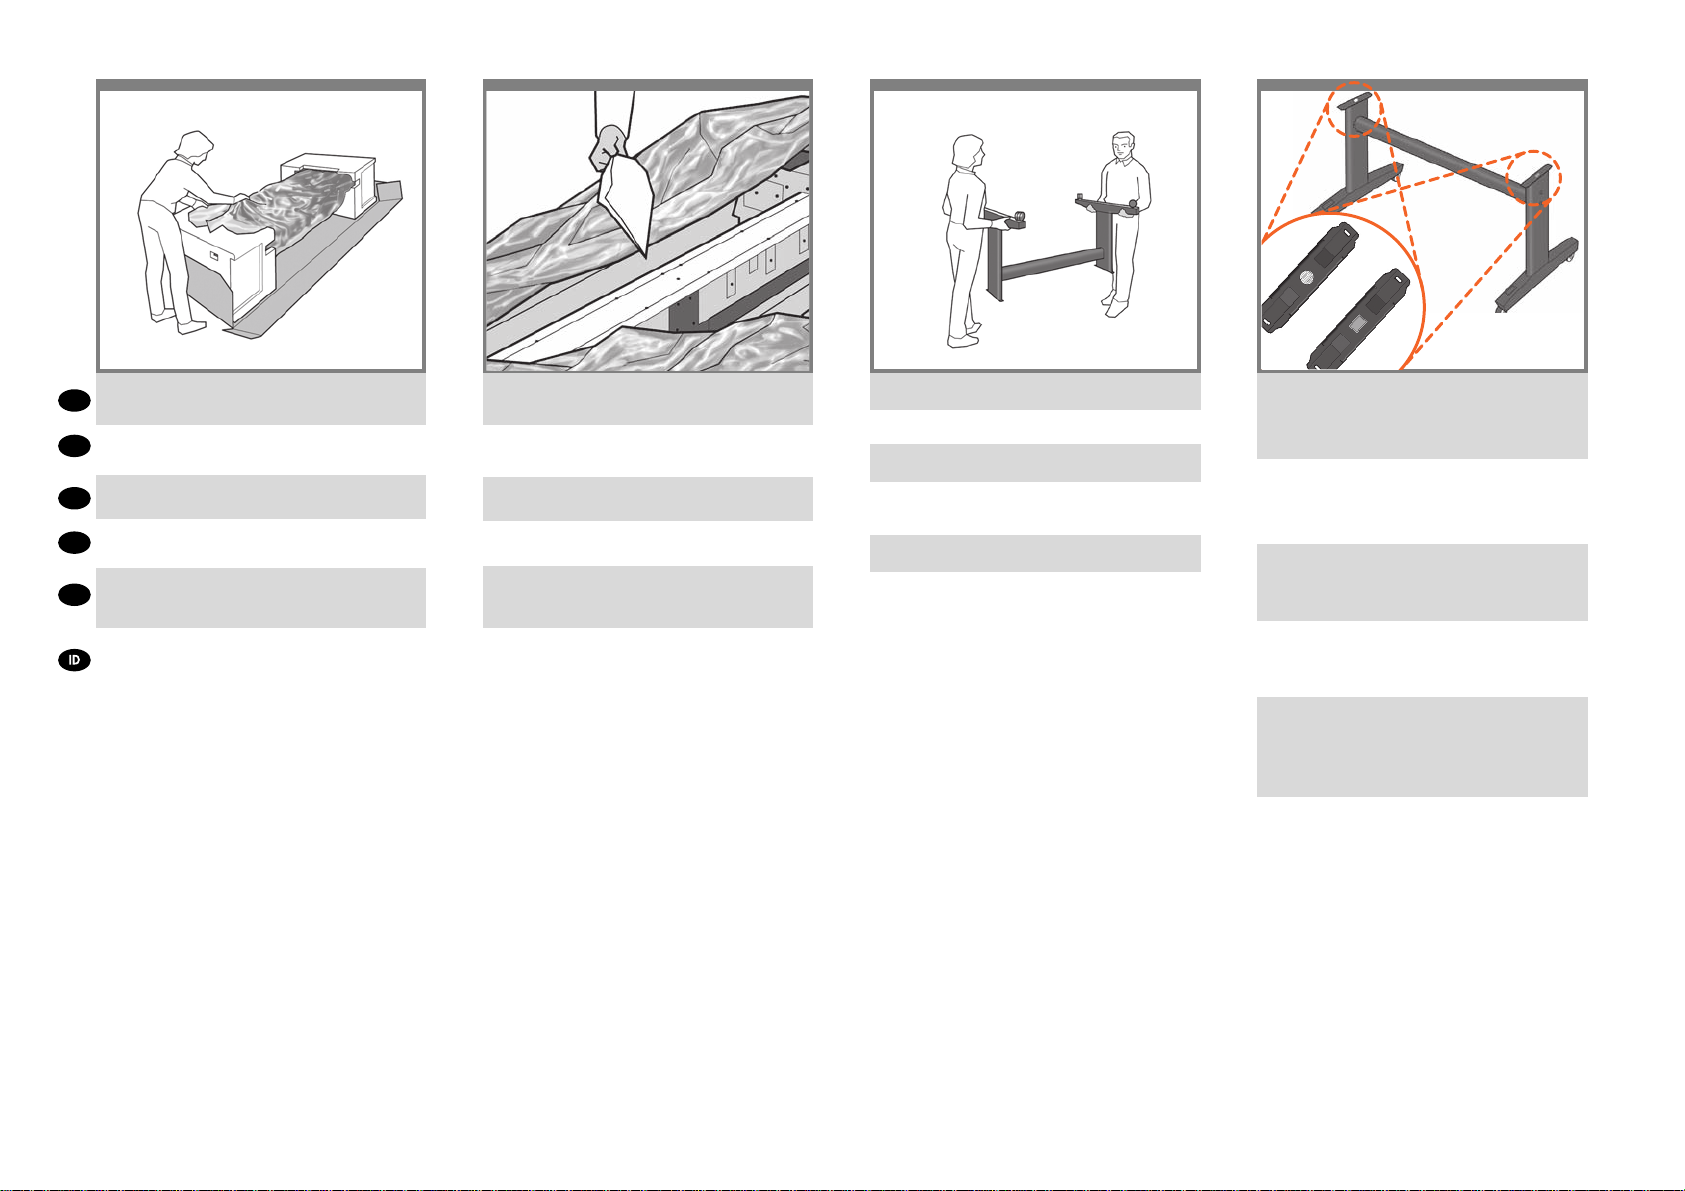
Open the transparent covering and remove the
desiccant bag from the top of the printer.
透明カバーを開き、プリンタの上にある乾燥剤の袋を
取り出し ます。
打开透明护罩并从打印机顶部取出 干燥剂。
打開透明護套,然後取出印表機上面的乾燥劑。
투명 덮개를 열고 프린터의 위쪽에 있는 건조제
봉지를 제거합니다.
Buka penutup transparan, kemudian keluarkan kantong
penyerap lembab dari bagian atas printer.
Lift the stand, keeping it upside down.
スタンドを逆さにしたまま持ち上げます。
保持底座的倒置状态并抬起。
提起機架,將它顛倒過來。
스탠드를 뒤집어서 들어올립니다.
Angkat dudukan dengan posisi terbalik.
There is a round yellow button protruding from the
top of one stand leg, and a square green button
protruding from the top of the other leg. Each button
ts into a hole in the printer.
一方のスタンド脚 部の上部には丸い黄色のボタン、も
う一方のスタンド脚部の上部には四角い 緑色のボタン
が出ています。プリンタには 各ボタンと合わせるための
穴 が あります。
一个底座支柱顶部有一个凸起的黄色圆按钮,另一个
支柱顶部有一个凸起的绿色方形按钮。每个按钮卡入
打印机的一个小孔中。
其中一隻機架腳架頂端會有黃色的圓形凸鈕,而另一
隻腳架則有綠色的方形凸鈕。凸鈕將各自插入印表機
中適合的孔。
스탠드의 한쪽 다리에는 둥글고 노란 버튼이
돌출되어 있고 다른 쪽 다리에는 사각형의 녹색
버튼이 돌출되어 있습니다. 각 버튼은 프린터에 있는
구멍에 들어 맞습니다.
Pada salah satu kaki dudukan, terdapat tombol kuning
bulat yang menonjol keluar, dan tombol hijau kotak
yang menonjol keluar dari bagian atas kaki dudukan
lainnya. Masukkan masing-masing tombol tersebut ke
dalam lubang di printer.
Page 7
23 24 26
25
x20
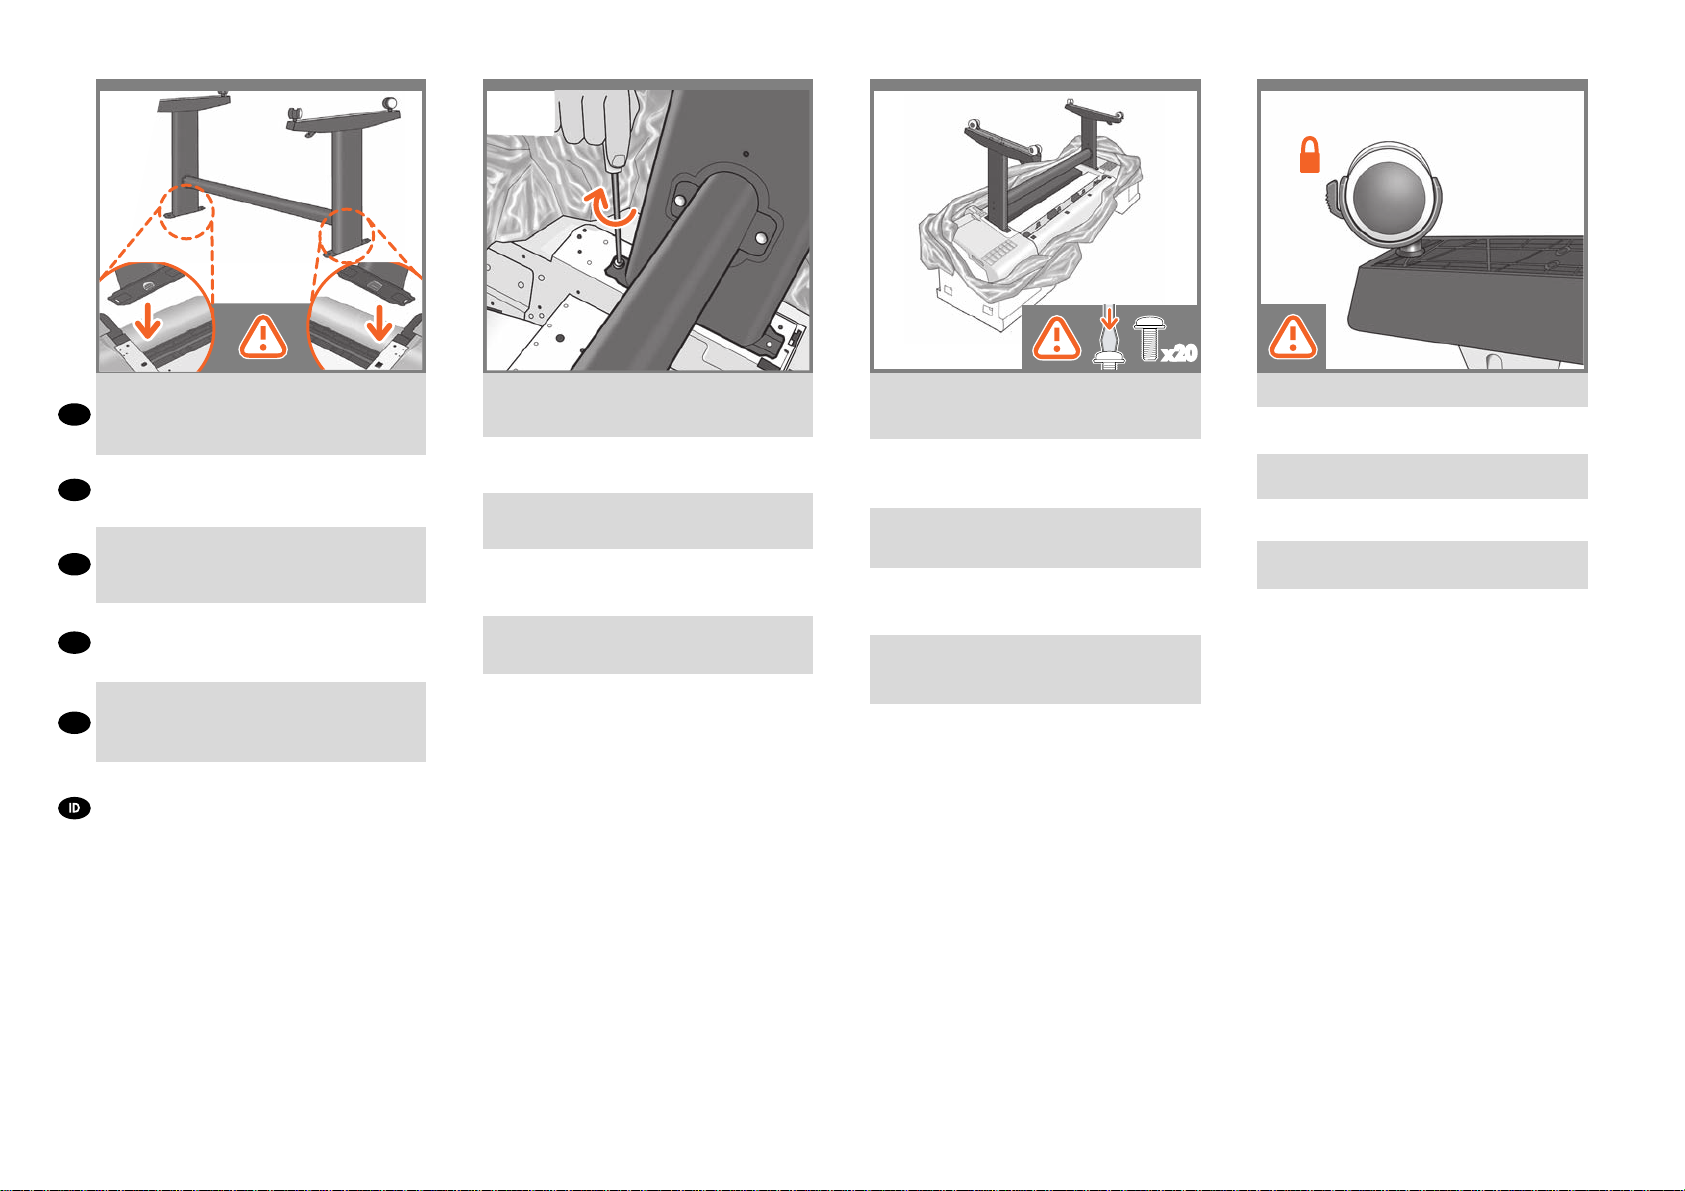
Place the stand on the printer slowly and carefully,
so that the colored buttons on the legs t into the
EN
corresponding holes in the printer. Notice that the
printer body is upside down.
脚部の 色 の付いたボタン をプリンタの対 応する穴に合
わせて、ス タンド を ゆっくりと慎 重にプ リンタ上に 置き
JP
ます。プリンタ本体 は上下が 逆さになっています。
小心翼翼地将底座放置在打印机上,支柱上带颜色的
按钮正好卡入打印机上对应的小孔中。注意:打印机
ZHCN
主体处于倒置状态。
小心緩慢的將機架放置在印表機上,讓腳架上有顏色
的凸鈕插入對應的印表機孔。
ZHTW
請注意,現在的印表機機體是上下顛倒的。
다리에 있는 컬러 버튼을 프린터의 해당 구멍에
맞추어 스탠드를 프린터 위에 조심스럽게 놓습니다.
KO
프린터 본체가 뒤집어져 있다는 점에 주의하십시오.
Letakkan dudukan pada printer dengan perlahan dan
hati-hati, sehingga tombol berwarna pada kaki masuk
ke dalam lubang yang sesuai pada printer.
Perhatikan bahwa badan printer dalam posisi terbalik.
When the legs are correctly located on the printer,
attach them to the printer using two screws for
each leg.
脚 部 をプ リ ン タ の 正 し い 位 置 に 合 わ せ た ら、
2 本 のネジ で 各 脚 部 をプリンタに固定します。
将支柱正确放置在打印机上后,每个支柱使用两枚螺
钉连接到打印机。
將腳架正確安放在印表機之後,各使用兩顆螺絲, 將
每隻腳架鎖到印表機上。
다리가 프린터의 올바른 위치에 있으면 각 다리에
나사 두 개씩을 사용하여 프린터에 연결합니다.
Bila kaki dudukan sudah berada di posisi yang
benar pada printer, pasang kaki tersebut ke printer
menggunakan 2 sekrup untuk setiap kaki.
Check that you have used a total of twenty screws,
and that all have been tightened. You should have two
screws left over, which are spare.
20本のネジすべてを使用し、すべてのネジが固く締め
られて いることを確 認します。予備 のネジ が 2 本 残り
ます。
检查是否已用完了 20 枚螺钉,并且所有螺钉都已拧
紧。应该还会剩下两枚备用螺钉。
檢查是否總共使用了二十顆螺絲,以及是否全部都已
鎖緊。您應該還剩兩顆備用螺絲。
나사를 총 스무 개 사용했는지와 모든 나사가
조여졌는지 확인하십시오. 여분으로 제공된 나사
두 개가 남아 있어야 합니다.
Pastikan Anda telah menggunakan kedua puluh sekrup
dan semuanya telah dikencangkan. Anda harus
memiliki 2 sekrup tersisa sebagai cadangan.
Check that the wheels on the stand are locked.
スタンドのキャスターがロックされていることを確 認し
ます。
检查底座的滚轮是否锁紧。
檢查機架的腳輪是否鎖定。
스탠드의 바퀴가 잠겨 있는지 확인합니다.
Pastikan roda pada dudukan telah terkunci.
Page 8
27
24:60kg
44:80kg
28 29 30
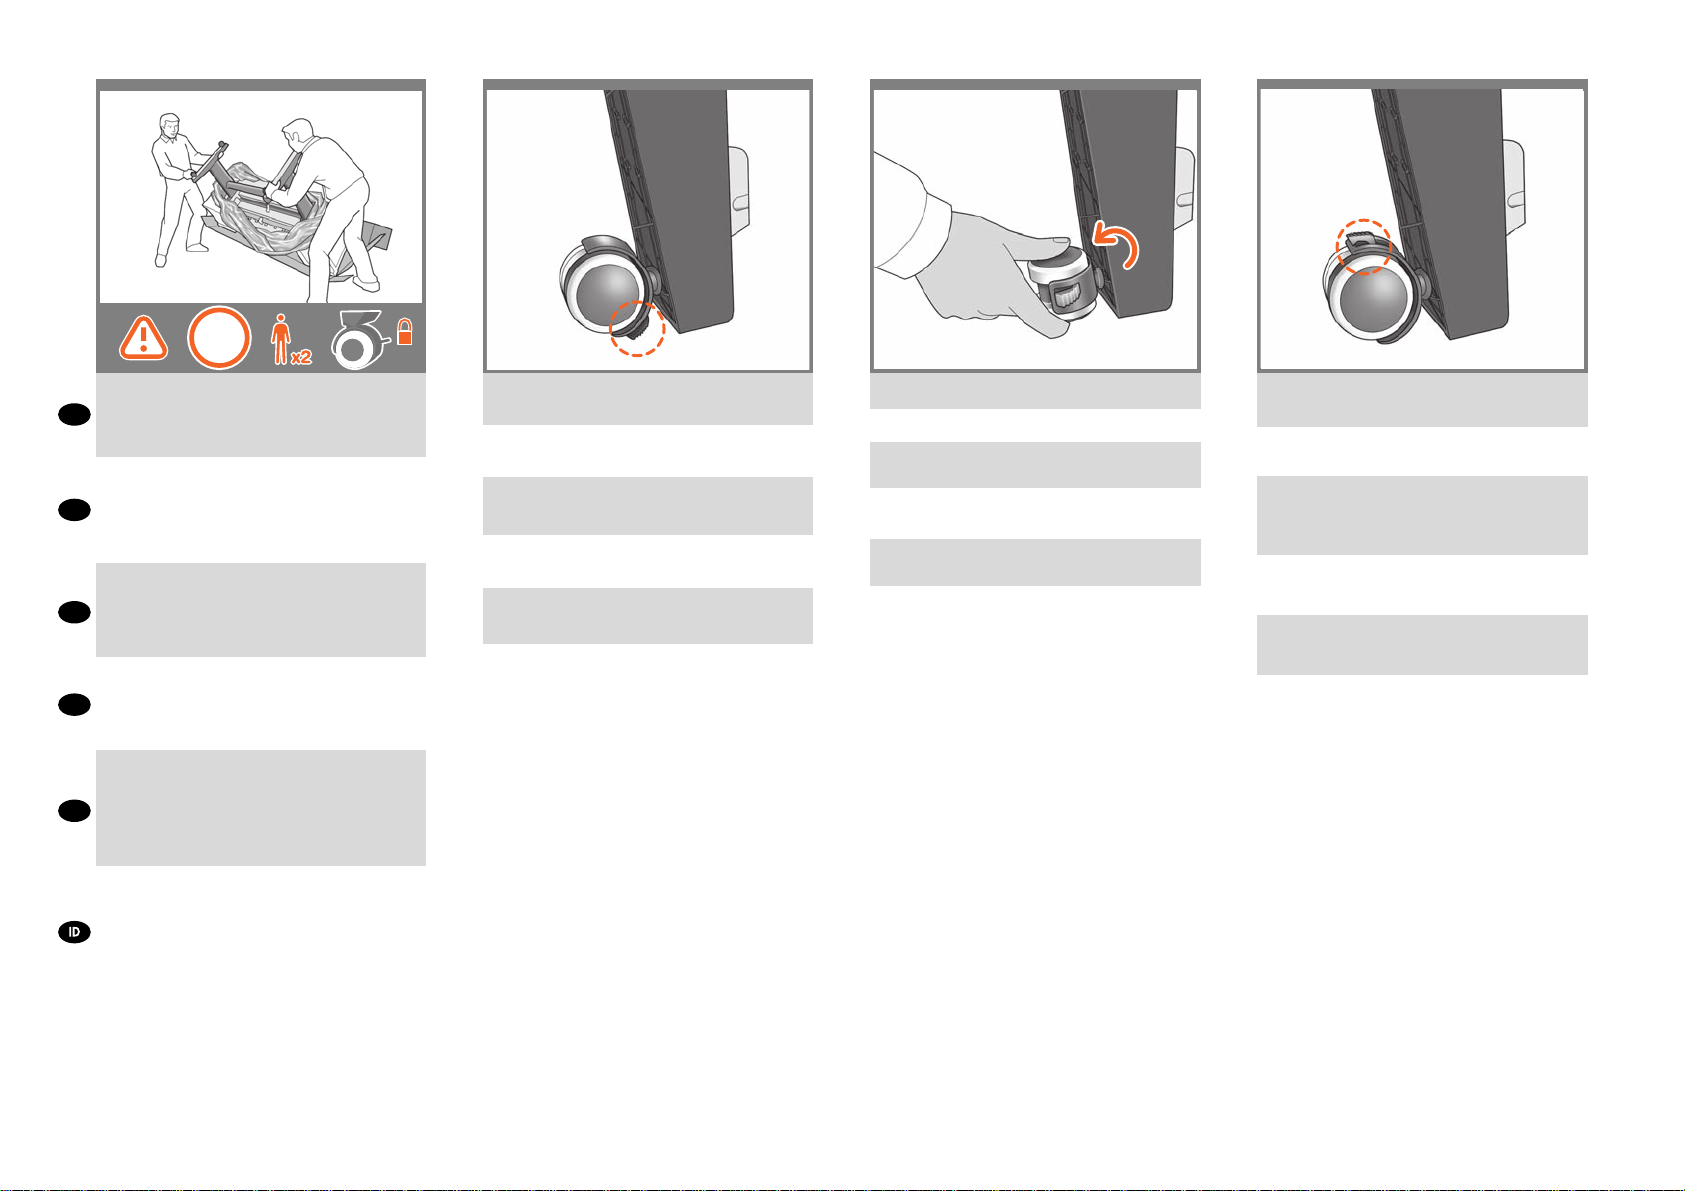
Turning the printer over is done in two stages. For the
rst stage, hold the printer by its feet and rotate the
EN
feet until they touch the oor. The printer weighs 60 kg
(132 lb) (24" model) or 80 kg (167 lb) (44" model).
プリンタを起こすには、まずプリンタの脚部を持ち、
脚 部 が床に付くまで プ リンタを 回 転 させま す。
JP
プリンタの重さは、60kg(132ポンド)
(24インチモデル )または80kg(167ポンド )(44 インチ
モデル)あります。
将打印机翻转过来有两个步骤。第一步,握住打印机
的底板,翻转底板直到底板接触地面。
ZHCN
打印机重 60 千克(132 磅)(24 英寸机型)或
80 千克(167 磅)(44 英寸机型)。
分兩段動作將印表機翻轉放正。首先,握住印表機的
腳座,將它們扳轉到地面。
ZHTW
印表機重 60 公斤(132 磅)(型號:24)或 80 公斤
(167 磅)(型號:44)。
프린터 바로 세우기는 두 단계로 진행됩니다.
첫 번째 단계에서는 프린터 발을 이용하여 프린터를
받치면서 발이 바닥에 닿을 때까지 회전시킵니다.
KO
프린터의 무게는 60 kg(132 lb) (24 인치 모델) 또는
80 kg(167 lb) (44 인치 모델) 입니다.
Printer harus dibalik dalam dua tahap. Untuk tahap
pertama, pegang printer pada bagian dasar
kakinya, kemudian putar kaki tersebut tersebut hingga
menyentuh lantai.
Berat printer adalah 60 kg (132 lb) (untuk model 24“)
atau 80 kg (167 lb) (untuk model 44”).
If the full weight of the printer rests on the wheel lock,
it may break.
プリンタの全重量がキャスターのロックにかかると、
キャスターのロックが破損する可能性 があります。
如果打印机的全部重量都落在滚轮锁上,可能会压
坏锁。
如果印表機的總重量壓於輪鎖之上,輪鎖可能會損壞。
프린터 전체 무게가 바퀴 잠금장치에 가중될 경우
부서질 수 있습니다.
Kunci roda dapat patah jika berat printer bertumpu
sepenuhnya pada kunci roda.
If necessary, rotate the wheel.
必要に応じて、キャスターを回転させます。
必要时旋转滚轮。
如有必要,請旋轉輪子。
필요할 경우 바퀴를 회전시킵니다.
Jika perlu, putar roda.
The lock on each wheel should be facing inwards
(away from the oor).
各キャスターのロックは、内側に向ける(床から離す)
必要があります。
每个滚轮上的锁应朝内(远离地板)。
每個輪子的輪鎖都應該面向內側(遠離地板)。
각 바 퀴 의 잠 금 장 치 는 앞 쪽 으 로 향 해 야
합니다 ( 바닥과 떨어짐 ).
Kunci pada setiap roda harus menghadap ke bagian
dalam (menjauh dari lantai).
Page 9

31
3332
34
Now hold the printer by the foam end pieces and by
the center rear, and continue to rotate it until it stands
EN
on its feet, all four wheels in contact with the oor.
両 端 の 梱 包 材 と中央部 の 背 面 を持ってプ リン タを支
え、4つのキャスターすべてが床に接し、プリンタが足
JP
部で立つまでプリンタを回転させます。
现在,握住打印机的泡沫端填塞块和后部中心,然后
ZHCN
继续翻转打印机,直到四个滚轮接触地面。
接著抓好泡棉端蓋,並抓住印表機後方中間位置,接
ZHTW
著扳轉印表機,直到它的腳座站穩、四個腳輪全部碰
到地面。
프린터의 폼 끝 조각과 후면 중앙을 잡고 프린터가 바
KO
로 설 때까지 계속 회전시킵니다.
Sekarang pegang printer pada ujung gabusnya
dan bagian belakang tengah, kemudian terus putar
hingga printer berdiri pada kakinya, keempat rodanya
menyentuh lantai.
Remove the foam end pieces.
両端の梱包材を取り除きます。
取下泡沫端填塞块。
拆下泡棉端蓋。
폼 끝 조각을 제거합니다.
Lepaskan bagian ujung gabus.
Remove the transparent covering from the printer.
プリンタから透明カバーを取り除きます。
从打印机上取下透明护罩。
撕下印表機的透明護套。
프린터에서 투명 덮개를 제거합니다.
Lepaskan penutup transparan dari printer.
Unlock the brake lever on each of the four wheels
by lifting the lever.
4つのキャスターのレバーを上げて、ブレーキレバー
のロック を 解 除しま す。
提起四个滚轮的每个制动手柄以将其
松开。
將四個腳輪的制動柄逐一上扳以鬆開每個腳輪。
레버를 들어서 네 개의 바퀴에서 고리 레버를 풉니다.
Buka pengunci tuas rem pada setiap roda dengan
mengangkat tuasnya.
Page 10

35
36 37 38
EN
Lay out the components of the basket.
バスケットの部品を並べます。
JP
取出纸筐的组件。
ZHCN
ZHTW
將承紙籃的組件擺放整齊。
KO
바스켓의 부품들을 바닥에 진열합니다.
Siapkan komponen keranjang.
Fit the basket supports to the stand legs, one to each leg.
スタンドの各脚部に、バスケットサポートを1つずつ取
り付け ま す。
将纸筐支架安装到底座支柱上,每个支柱安装一个
支架。
將承紙籃支托安插到機架的腳架,每隻腳架各有一個。
바스켓 지지대를 스탠드의 각 다리마다 하나씩
맞춥니다.
Masukkan penyangga keranjang ke kaki dudukan,
satu untuk setiap kaki.
Fit the two short tubes to the printer’s feet, one on the
front of each foot. Each tube should click into place.
2本の短いチューブをプリンタの各足部の前面に合わ
せ ま す。各 チ ュ ー ブ を 所 定 の 位 置 に カ チ ッ と 音 が す る ま
で 押し 込 みます。
将两个短管安装到打印机底板上,每个底板前面安装
一个短管。两个短管都应该卡入到位。
將兩根短的管條安裝到印表機的腳座上,每根管條都
應該喀嚓一聲卡入定位。
작은 튜브 두 개를 프린터 앞쪽 발에 각각 하나씩
맞추십시오. 각 튜브가 딸깍 소리를 내야 합니다.
Pasang 2 batangan pendek ke bagian dasar kaki
printer, satu di setiap depan dasar kaki. Masingmasing batangan harus terpasang dengan benar
pada tempatnya.
Attach the basket’s front tube to the two short tubes on
each foot.
バスケットの前面 のチューブを 各足部の 2本の 短い
チュ ーブ に 取 り 付 け ま す。
将纸筐的前管连接到每个底板的两根短管上。
將承紙籃的前端管條連接到兩根個別裝在各腳座上的
短管條。
바스켓의 앞쪽 튜브를 각 발의 작은 튜브 두 개에
연결합니다.
Pasang batangan depan keranjang pada kedua
batangan pendek di setiap dasar kaki.
Page 11

39
40 42
41
Rest the basket’s rear tube on the supports that you
EN
have just tted to each leg of the stand.
スタンドの各 脚部 に取り付けた バスケットサポートに、
JP
バスケットの 背面 のチューブを 乗せます。
将纸筐的后管放在已经安装到每个底座支柱的支架
ZHCN
上。
將承紙籃的後端管條擱放在剛才安插到機架各隻腳架
ZHTW
上的支托。
스탠드의 각 다리에 맞추었던 지지대에 바스켓의
KO
뒤쪽 튜브를 맞춥니다.
Letakkan batangan belakang keranjang pada
penyangga yang baru saja Anda pasang ke setiap
kaki dudukan.
The basket is now complete.
これでバスケットの取り付けは完了です。
纸筐现已安装完毕。
承紙籃就完成了。
바스켓이 이제 완성되었습니다.
Pemasangan keranjang sekarang telah selesai.
Remove the orange tape from the printer window.
プリンタのウィンドウに付いているオレンジ色 のテー
プ を取り除きま す。
纸筐现已安装完毕。
拔掉印表機窗蓋上的橙色膠布。
프린터 창에서 오렌지색 테이프를 제거합니다.
Lepaskan pita oranye dari jendela printer.
Open the window (printer’s top cover).
ウィンドウ( プリンタの上部のカバー)を開きます。
打开护盖(打印机的顶盖)。
打開上蓋(印表機的上蓋)。
창을 엽니다(프린터의 상단 덮개).
Buka jendela (penutup atas printer).
Page 12

43 44 45 46
Beside the front panel, you will see a cardboard
support attached to the printer with tape. Remove the
EN
tape.
フロントパネルの横には厚紙のサポートがあり、テー
JP
プでプリンタに固定されています。テープを取り外し
ます。
在前面板旁边,还会看到一个用胶带固定在打印机上
ZHCN
的纸板架。取下胶带。
除了前方面板,您還會看到用膠帶固定在印表機上的
ZHTW
紙板支撐物。拔掉膠帶。
전면 패널 옆에 테이프로 프린터에 부착된 카드보드
KO
지지대가 있습니다. 테이프를 제거합니다.
Di sebelah panel depan, Anda akan melihat karton
penahan yang terpasang ke printer menggunakan pita
perekat. Lepaskan pita perekat tersebut.
Turn the cardboard support 90° to the right.
厚 紙 の サ ポートを右に 9 0 度 回し ま す。
将纸板架向右旋转 90 度。
將紙板支撐物向右旋轉 90 度。
카드보드 지지대를 오른쪽으로 90° 돌립니다.
Putar karton penahan hingga 90° ke kanan.
Carefully lift the cardboard support up and out of the
printer. It will not be needed again; you can discard it.
サポート用の厚紙を慎重に持ち上げ、プリンタから取
り外します。この厚紙は今後使うことはないため、捨
ててかまいません。
小心提起纸板支架,将其从打印机中取出。以后不会再
用到它,您可以将其丢弃。
小心地拿起紙板支撐物,將它從印表機中取出。之後
不會再用到,您可以將它捨棄。
카드보드 지지대를 조심스럽게 위로 들어 올려
프린터에서 제거합니다. 카드보드 지지대는 더 이상
필요하지 않으므로 폐기해도 됩니다.
Angkat karton penahan ke atas dengan hati-hati,
kemudian keluarkan dari printer. Karton penahan
tersebut tidak lagi diperlukan, Anda dapat membuangnya.
Inside the right-hand side of the printer, you will see an
orange carriage stopper.
Release the stopper by lifting the lever wrapped
with light blue paper, then remove the stopper from the
printer.
プリンタの内部右側には、オレンジ色のキャリッジス
トッパ が あり ます。
薄い青色の紙で包まれたレバーを上げてストッパを解
除し、プリンタから取り外します。
在打印机内部右侧,可以看到一个橙色托架挡块。
提起用浅蓝色纸包裹的手柄,松开挡块,然后从打印
机中取出挡块。
在印表機右邊內側,您會看到橙色的托架止動塊。
將淺藍色紙包住的手柄往上扳,鬆開止動塊,
再從印表機取出止動塊。
프린터 내부 오른쪽에 오렌지색 캐리지 스토퍼가
보입니다.
밝은 파란색 종이에 감겨진 레버를 들어 올려
스토퍼를 빼낸 후 프린터에서 스토퍼를 제거합니다.
Pada bagian dalam sisi kanan printer, Anda akan
melihat pengaman media berwarna oranye.
Lepaskan pengaman tersebut dengan mengangkat
tuas yang dibungkus kertas biru tipis, kemudian
keluarkan dari printer.
Page 13

47 4948 50
Part of the stopper may fall off while you are removing
it; in this case, remove both parts. The stopper will not
EN
be needed again; you can discard it.
ストッパを取り外すときに、ストッパのパーツが
外れることがあります。その場合は、両方のパー
JP
ツを取り外してください。このストッパは今後使
うことはないため、捨ててかまいません。
取出挡块时,挡块有一部分可能会脱落。在这种情况
下,请将挡块的两部分都取 出。由于不再需要挡块,
ZHCN
可以将其丢弃。
當您拔掉膠帶時,部分的止動塊會脫落,在這種情況
下,請移除所有止動塊。之後不會再用到這些止動塊,
ZHTW
您可以捨棄這些止動塊。
스토퍼의 한쪽이 스토퍼를 제거하는 동안 떨어져
나갈 수 있습니다. 이 경우 양쪽 모두를 제거합니다.
KO
스토퍼는 다시 필요하지 않습니다. 버려도 좋습니다.
Bagian pengaman dapat terjatuh sewaktu Anda
mengeluarkannya; karena itu keluarkan kedua
bagiannya. Pengaman tersebut tidak akan diperlukan
lagi; Anda dapat membuangnya.
Move to the rear of the printer and t the rear tray
to the printer. Note: The rear tray may already be
assembled (as in step 50). If so, please remove the
orange tape from the rear tray and go to step 51.
プリンタの背面に移動して、プリンタに背面
トレイを 取り付 け ます。
付けられてい る 場 合があります(手 順 50 参照 )。 その
場合、背面トレイのオレンジ色のテープをはがして手
順51に進みます。
转到打印机的后面,将后纸盒安装到打印机上。
注意:后纸盒可能已安装(如第 50 步中所示)。如
果是这种情况,请从后纸盒上撕下橙色胶带,并转至
第 51 步 。
移至印表機後方,將後方紙匣裝到印表機上。
後方紙匣可能已安裝完成(如步驟 50 。若有,請移除
後方紙匣上的橙色膠帶,並進行步驟 51。
프린터의 뒷면으로 가서 뒷면 용지함을 프린터에
끼웁니다.
것입니다(50단계 참조). 이 경우 후면 용지함에서
오렌지색 테이프를 제거하고 51단계로 이동하십시오.
Lihat bagian belakang printer, kemudian pasang
baki belakang ke printer. Catatan: Baki belakang
mungkin telah terpasang (seperti pada langkah 50).
Jika demikian, lepaskan pita perekat oranye dari baki
belakang, kemudian lanjutkan ke langkah 51.
참고: 후면 용지함은 이미 조립되어 있을
注記:背面トレ イはす で に取り
注意:
Slide it in and then down.
トレ イを 下 方 向 に スラ イドさせ て 取 り付 け ま す。
将后纸盒滑入打印机,然后向下推。
將它輕輕插入,再順勢滑下。
뒷면 용지함을 안으로 밀어 넣은 다음 아래로
밀어 넣으십시오.
Dorong baki ke dalam, kemudian ke bawah.
Push up the back of the tray into its closed position.
トレイの背面を押し上げて閉じます。
向上推动纸盒背面,直至它进入封闭 位置。
將紙匣背面往上推到關上的位置。
용지함 뒤를 밀어 용지함을 닫습니다.
Dorong bagian belakang baki ke atas hingga
terkunci.
Page 14

51
5352
54
Connect the supplied network cable or a certied
USB 2.0 cable to the appropriate socket on the rear
EN
right of the printer, and secure the cable with the clip
provided, to prevent accidental unplugging.
付属のネットワークケーブルまたは、認定済み USB2.0
ケ ーブルをプ リンタ 背 面 右 側 の 適 切 な ソケットに 接 続
JP
し、誤ってプラグが抜けないように同梱のクリップで
ケ ーブルを固 定します。
将附带的网络电缆 或经认证的 USB 2.0 电缆连接到
打印机右后方的相应插槽中,使用附带的卡夹固定电
ZHCN
缆,以防止电缆意外脱开。
將提供的 USB 纜線 或經過驗證的 USB 2.0 纜線連接
至印表機右後方的適當插座,並使用提供的勾夾固定
ZHTW
纜線,以免不小心拔除。
제공받은 네트워크 케이블 이나 공인된 USB 2.0
케이블을 프린터 뒷면 오른쪽의 적절한 소켓에
KO
연결하고 잘못하여 빠지는 일이 없도록 제공받은
클립으로 케이블을 고정시킵니다.
Sambungkan kabel jaringan yang tersedia atau kabel
USB 2.0 bersertikat ke soket yang sesuai di bagian
kanan belakang printer, kemudian kencangkan kabel
dengan klip yang tersedia agar tidak mudah terlepas.
Connect the power cable to the printer’s power socket.
電 源 ケ ーブ ル をプリ ンタの電 源 ソケット に 差 し込 み
ます。
将电源线连接到打印机的电源插座中。
將電源線連接到印表機的電源插座。
전원 케이블을 프린터의 전원 소켓에 연결합니다.
Hubungkan kabel daya ke soket daya printer.
Switch on power to the printer using the switch just
above the power socket. Remove the plastic lm covering the window and the plastic lm covering the front
panel (LCD display).
電 源 ソケットの すぐ上 に あ る スイッ チでプリン タの 電
源を入 れ ま す。
ウィンドウを覆っているビニールと、フロントパネル(液
晶ディスプレイ)を覆っているビニールを取り除きます。
使用电源插座正上方的开关打开打印机的电源。
取下打印机护盖和前面板(LCD 显示屏)上的塑料
薄膜。
使用電源插座正上方的開關,打開印表機電源。
移除覆蓋印表機窗蓋的塑膠膜,以及覆蓋前方面板的
塑膠膜(LCD 顯示器)。
전원 소켓 위쪽의 스위치를 사용하여 프린터 전원을
켭니다.
창을 덮고 있는 플라스틱 필름 및 전면
패널(LCD 디스플레이)을 덮고 있는 플라스틱 필름을
제거합 니다.
Hidupkan daya printer menggunakan tombol yang
berada tepat di bagian atas soket daya.
Lepaskan lembar plastik yang menutupi jendela dan
lembar plastik yang menutupi panel depan (layar
LCD).
On the front panel, the HP logo appears. Please
wait a while. You will then be prompted to select
the language of the printer.
フロントパネルにHP ロゴが表示されますので表示さ
れるまでしばらくお待ちください。その後、プリンタの
言 語 を 選 択 するよう 求 められ ま す。
HP 徽标出现在前面板上。请稍等片刻。 随后系统会
提示您选择打印机的语言。
前方面板上,將會出現 HP 標誌。請稍候一下。
接著會提示您選取印表機的語言。
전면 패널에 HP 로고가 나타납니다. 잠시
기다립니다. 곧 프린터 언어를 선택하라는 메시지가
나타 납니다.
Logo HP akan muncul pada panel depan. Tunggu
sebentar. Selanjutnya Anda akan diminta untuk
memilih bahasa printer.
Page 15

55 5756 58
The printer checks for the presence of ink cartridges.
On nding none, it prompts you to install the ink
EN
cartridges.
プリンタは、インクカートリッジが取り付けられてい
るかどうかを確 認します。取り付けられていないことを
JP
検出すると、 イン クカ ートリッジ を取 り 付けるよう に
指 示し ま す。
打印机检查是否有墨盒。如果没有找到,打印机将提
ZHCN
示您安装墨盒。
印表機會接著檢查有沒有墨水匣。找不到時,
ZHTW
就會提示您安裝墨水匣。
잉크 카트리지가 있는지 프린터가 검사합니다.
잉크 카트리지가 없는 경우에는 잉크 카트리지를
KO
설치하라는 메시지가 표시됩니다.
Printer akan memeriksa keberadaan kartrid tinta. Jika
tidak ditemukan, printer akan meminta Anda untuk
memasang kartrid tinta.
Open the cover on the left-hand side of the printer.
プリンタの左 側にあるカバーを開きます。
打开打印机左侧的护盖。
打開印表機左邊的蓋子。
프린터 왼쪽 덮개를 엽니다.
Buka penutup yang berada di sisi kiri printer.
Insert the ink cartridges one by one. Each cartridge is
marked with its own color, and should be inserted only
into the slot of the same color. Avoid touching pins,
leads or circuits.
インクカ ートリッジ を 1 つずつ 取り 付 けます。各カート
リッジ にはそのカ ートリッジ の色が表 示 さ れている の
で、同じ色のスロットに挿入する必要があります。ピン、
導線、または回路には触らないでください。
逐个插入墨盒。每个墨盒都标记了颜色,只能插入标
有同样颜色的插槽中。避免接触插针、引线或电路。
逐一插入墨水匣。每個墨水匣都標示有自己的顏色,
只能插入相同顏色的插槽中。請避免碰到針
腳、導線或電路。
잉크 카트리지를 하나씩 삽입합니다.
각 카트리지에는 색이 표시되어 있으므로 같은
색으로 된 슬롯에 카트리지를 삽입해야 합니다.
핀, 리드 또는 회로를 만지지 마십시오.
Masukkan kartrid tinta satu per satu. Setiap kartrid
ditandai dengan warnanya masing-masing dan harus
dimasukkan hanya ke slot dengan warna sama.
Jangan sentuh pin, kabel, atau sirkuit.
The cartridges must be inserted the right way around:
the ink outlet in the catridge should meet the ink inlet
in the slot. Push the cartridge into the slot until it clicks
into place. The printer beeps whenever a cartridge is
successfully inserted.
カートリッジの インク出 口をスロットの インク注 入 口に
合わせ 、カートリッジを 必ず 適 切 な方向に 挿入してくだ
さい。カ ートリッジ を所定の 位 置にカ チッと音が するま
で押し込みます。カートリッジが正しく挿入されると、
プリンタ のブザ ー 音 が 鳴 りま す。
墨盒必须按正确方式插入:即墨盒的出墨口应该紧贴
插槽的进墨口。将墨盒推入插槽,直到它卡入到位。
只要成功插入墨盒,打印机就会发出哔声。
墨水匣必須以正 確方式插入:墨水匣中的出墨口應該
對準插 槽中的墨水入口。將墨水匣 壓入插槽,直到喀
嚓一聲 卡入定位。每當成功插入墨 水匣,印表機就會
發出嗶聲。
카트리지를 바르게 삽입해야 합니다. 즉, 카트리지의
잉크 출구를 슬롯의 잉크 흡입구에 맞추어야 합니다.
딸각 소리를 내며 제자리에 들어갈 때까지 카트리지를
밀어 넣습니다. 카트리지가 제대로 장착되면
프린터에서 삐 소리가 납니다.
Kartrid harus dimasukkan dengan benar, yakni: lubang
keluar tinta pada kartrid harus bertemu dengan lubang
masuk tinta pada slot. Tekan kartrid ke dalam slot
hingga terpasang dengan benar. Printer akan berbunyi
‘bip’ setiap kali kartrid berhasil dimasukkan.
Page 16

59
60
61
62
When you have inserted all of the ink cartridges correctly, the printer must prepare the ink system for its rst
use. It will do this immediately if you press the OK key,
EN
or after a 60-second pause if you do not press the OK
key. When the ink system is ready, the front panel will
prompt you to open the window.
すべての インクカ ートリッジを正しく取り付 けたらプリン
タで最初にインクシステムを使用するための準備をす
る 必 要 が あります。[OK] ボタン を押すと 、 直ちに 実 行 さ
JP
れ ます。[O K]ボタンを押さない場合は、60秒後に実行
されます。インクシステムの準備が整うと、ウィンドウを
開くよう にフ ロントパネ ル にメッセージ が 表 示されま す。
正确插入所有墨盒后,打印机必须为首次使用准备墨水
系统。如果您按下 OK 键,打印机将立即执行此操作,
ZHCN
否则将在暂停 60 秒后执行此操作。墨水系统准备就绪
后,前面板将提示您打开护盖。
當您正 確 地插 入 所有墨 水匣後, 印 表機 將 會準備 墨
水 系 統 以 進 行 第 一 次 的 使 用。 如 果 您 按 下 OK 按
ZHTW
鍵, 或 者 不 按 此 鍵 並 稍 候 60 秒 鐘, 印 表 機 隨
即 會 執 行 這 個 準 備 工 作。 墨 水 系 統 準 備 就 緒 時,
前方面板將提示您打開上蓋。
모든 잉크 카트리지를 올바로 설치했을 경우
프린터에서는 첫 인쇄를 위한 잉크 시스템이
준비되어야 합니다. 이 준비 작업은 사용자가
OK(확인) 키를 누르면 진행됩니다. OK(확인) 키를
KO
누르지 않더라도 사용자가 아무 동작없이 60 초가
지나면 준비 작업이 진행됩니다. 잉크 시스템이
준비되면 창을 열라는 메시지가 전면 패널에
표시됩니다.
Open the window and grasp the blue handle of the
printhead cover.
ウィンドウを開き、プリントヘッドカバーの
青 いハンドル をつかみま す。
打开护盖并握住打印头遮盖的蓝色手柄。
打開上蓋並抓緊印字頭護蓋的藍色把手。
창을 열고 프린트 헤드 덮개의 파란색 손잡이를
잡습니다.
Buka jendela, kemudian pegang tuas biru pada
penutup printhead.
Pull the blue handle towards you as far as it will go.
青いハンドルを、いっぱいまで手前に引き出します。
将蓝色手柄朝您的方向拉动,直到拉不动为止。
將藍色把手朝著自己拉到底。
파란 손잡이를 최대한 앞으로 당깁니다.
Tarik tuas biru ke arah Anda sejauh mungkin.
Lift the handle up to open the printhead cover. The
front panel prompts you for the next step: removing the
printheads. Do not press OK until you have removed
all the printheads.
ハンドルを持 ち上げて、プ リントヘッドカバ ーを開 き
ます。フロントパネルに、プリントヘッドを取り外すよ
うメッセ ージが表示さ れ ま す。すべ ての プリントヘッドを
取り外すまで、[OK ]を押さないでください。
向上提起手柄以打开打印头遮盖。 前面板提示执行以
下步骤:卸下打印头。 卸下所有打印头后,按 OK 。
提起把手以掀開印字頭護蓋。 前方面板會接著提示您
下一個步驟:取出印字頭。在所有印字頭拆除之前,
請勿按下「OK」。
손잡이를 들어올려 프린트 헤드 덮개를 엽니다.
다음 단계로 넘어 가라는 메시지가 전면 패널에
표시됩니다: 프린트 헤드 제거. 모든 프린트 헤드를
제거한 후 OK(확인) 키를 누릅니다.
Angkat tuas tersebut untuk membuka penutup
printhead. Panel depan akan meminta Anda untuk
melakukan langkah berikutnya: mengeluarkan
printhead. Jangan tekan OK hingga Anda
mengeluarkan semua printhead.
Bila Anda telah memasukkan semua kartrid tinta
dengan benar, printer harus mempersiapkan sistem tinta
untuk penggunaan pertamanya. Printer akan segera
melakukannya jika Anda menekan tombol OK atau setelah
jeda selama 60 detik jika Anda tidak menekan tombol OK.
Bila sistem tinta siap, panel depan akan meminta Anda
untuk membuka jendela.
Page 17

63
64 66
65
The setup printheads exist only to prevent the escape
of ink during ink cartridge installation. The front panel
EN
now prompts you to remove the setup printheads and
press the OK key when you have nished.
付属のプリントヘッドは、インクカートリッジを取り付
け る と き の イ ン ク 漏 れ を 防 ぐ た め の も の で す。付 属 の
プリントヘッド を取 り外すようにフロントパネル にメッ
JP
セージが表示されます。終了したら[O K]ボタンを押し
ます。
设置打印头只是为了防止在墨盒安装过程中墨水溢
出。前面板现在提示您卸下设置打印头,您完成后
ZHCN
按 OK 键。
設定印字頭的用途,僅在於防止安裝墨水匣時墨水漏
ZHTW
出。前方面板現在會提示您取出設定印字頭,並在取
出後按「OK」按鍵。
셋업 프린트 헤드는 잉크 카트리지 설치 중에 잉크가
새어 나오는 것을 방지하기 위한 목적이 전부입니다.
KO
이제 셋업 프린트 헤드를 제거하고 OK(확인) 키를
누르라는 메시지가 전면 패널에 표시됩니다.
Printhead kongurasi hanya tersedia untuk mencegah
keluarnya tinta saat pemasangan kartrid tinta
berlangsung. Sekarang panel depan akan meminta
Anda untuk mengeluarkan printhead kongurasi,
kemudian tekan tombol OK bila Anda telah selesai.
Remove and discard all orange setup printheads.
You may need to use force to extract each printhead.
The setup printheads contain ink, which could leak
out. Avoid touching pins, leads or circuits.
オレンジ色の付属のプリントヘッドをすべて取り外して
廃棄します。プリントヘッドを取り外すには、適度な
力が必要な場合があります。
付 属 の プ リ ン ト ヘ ッ ド に は イ ン ク が 入 って い る た め 、漏
れる場合があります。ピン、導線、または回路には触ら
ないで くださ い。
取下并丢弃所有的橙色设置打印头。拔下每个打印头
时可能要用力。
设置打印头中有墨水,有可能泄漏。
避免接触插针、引线或电路。
拆下並捨棄所有橙色的設定印字頭。您可能需要用點
力氣將每個印字頭抽出。
設定印字頭含有墨水,會漏出來。請避免碰到針腳、
導線或電路。
모든 오렌지색 셋업 프린트 헤드를 꺼내어
폐기합니다. 각 프린트 헤드를 빼낼 때 힘을 주어야
할 수도 있습니다.
셋업 프린트 헤드에는 잉크가 들어 있고 이 잉크가
누출될 수도 있습니다. 핀, 리드 또는 회로를 만지지
마십시오.
Keluarkan dan buang semua printhead kongurasi
berwarna oranye. Anda mungkin harus menggunakan
tenaga untuk mengambil setiap printhead tersebut.
Printhead kongurasi berisi tinta yang dapat bocor.
Jangan sentuh pin, kabel, atau sirkuit.
Press the OK key on the front panel when you have
removed all of the setup printheads. The front panel
then prompts you to install the new printheads.
付属の プリントヘッド を取り外 した ら、フ ロントパネ ル
の[O K] ボタ ン を 押 し ま す。新し いプリ ント ヘッドを取
り付 けるよう に、フロントパ ネルに メッセー ジ が 表 示
されます。
卸下所有设置打印头后,按前面板上的 OK 键。前面
板将提示您安装新打印头。
將設定印字頭全部拆除後,按下前方面板上的 「OK」
按鍵。前方面板會接著提示安裝新的印
字頭。
셋업 프린트 헤드를 모두 제거했으면 전면 패널에
있는 OK(확인) 키를 누릅니다. 그러면 새 프린트
헤드를 설치하라는 메시지가 전면 패널에 표시됩니다.
Tekan tombol OK pada panel depan bila Anda telah
melepas semua printhead kongurasi. Setelah itu
panel depan akan meminta Anda untuk memasang
printhead baru.
Unwrap each printhead and remove all orange parts.
プリントヘッドの包装を開き、オレンジ色の
部分をすべて 取り外します。
拆开每个打印头的包装并卸下所有橙色部件。
打開每個印字頭包裝,並將橙色部件全部拆掉。
각 프린트 헤드를 벗기고 오렌지색 부분을 모두
제거합 니다.
Buka kemasan setiap printhead, kemudian lepaskan
semua komponen berwarna oranye.
Page 18

67 68 69 70
Insert the printheads one by one. Each printhead
is marked with its own colors, and should be inserted
only into the correct slot marked with the same
EN
colors. Insert the printheads with the blue handle
towards you.
プリントヘッドを1つずつ挿入します。各プリントヘッ
ドにはそのプリントヘッドの色が表示されているので、
JP
同じ色のスロットに挿入する必要があります。プリント
ヘッドの青いハンドルを手前に引いて、プリントヘッ
ドを挿入します。
逐个插入打印头。每个打印头都标有颜色,只能插入
ZHCN
标有同样颜色的正确插槽中。插入打印头时,使蓝色
手柄朝向您。
逐個插入印字頭。每個印字頭都標示有自己的顏色,
只能插入標示相同顏色的正確插槽中。讓藍色把手朝
ZHTW
著自己,再將印字頭插入。
프린트 헤드를 하나씩 삽입합니다. 각 프린트
헤드에는 색이 표시되어 있으므로 같은 색으로
KO
된 슬롯에 삽입해야 합니다. 파란 손잡이가 앞으로
향하도록 하여 프린트 헤드를 삽입하십시오.
Masukkan printhead satu per satu. Setiap printhead
ditandai dengan warna tertentu dan harus dimasukkan
ke slot dengan warna yang sama. Masukkan
printhead dengan tuas biru mengarah kepada Anda.
Push each printhead into the slot until it clicks into
place. The front panel tells you whether the printhead
has been inserted correctly.
プリントヘッドを所定の位置にカチッと音がするまで
押し込みます。プリントヘッドが正しく挿入されたかど
うかがフロントパネルに表示されます。
将每个打印头推入插槽,直到它卡入到位。前面板将
显示打印头是否正确插入。
將每個印字頭壓入插槽,直到喀嚓一聲卡入定位。前
方面板會告訴您是否正確插入印字頭。
딸각 소리를 내며 제자리에 들어갈 때까지 프린트
헤드를 밀어 넣습니다. 프린트 헤드가 올바르게
장착되었는지 여부가 전면 패널에 표시됩니다.
Tekan setiap printhead ke dalam slot hingga terpasang
dengan benar. Panel depan akan memberitahukan
Anda jika printhead telah dipasang dengan benar.
Pull the blue handle towards you as far as it will go,
picking up the latch in the process.
青いハンドルをラッチに掛け、いっぱいまで手前に引
き出 します。
将蓝色手柄朝您的方向拉动,直到拉不动为止,在此
过程中拾起闩锁。
將藍色把手朝著自己拉到底,順勢扳開閂鎖。
파란 손잡이를 최대한 앞으로 당겨서 걸쇠가
드러나게 합니다.
Tarik tuas biru ke arah Anda sejauh mungkin sambil
mengencangkan pengait.
Push the handle down on top of the printhead cover.
The printer checks and prepares the new printheads,
which may take 30 to 40 minutes depending on the
condition of the printheads and of the environment.
Close the window.
プリントヘッドカバーの上にハンドルを押し下げます。
プリンタが新しいプリントヘッド を確認して準 備し
ます。プリントヘッドの状態および環境によって、30
分~ 40 分かかる場合があります。
ウィン ド ウ を 閉 じ ま す。
向下推动打印头遮盖上的手柄。
打印机检查并准备新的打印头,此期间将持续 30 到
40 分钟,这取决于打印头和环境的状况。
盖上护盖。
將把手往下推到印字頭護蓋。
印表機會檢查並準備新的印字頭,需時約 30 至 40
分鐘,依印字頭及環境的狀況而定。
關閉上蓋。
손잡이를 프린트 헤드 덮개 위로 누릅니다.
프린터는 새 프린트 헤드를 검사하고 준비합니다.
이 과정은 프린트 헤드의 조건이나 환경에 따라
30-40 분이 걸릴 수 있습니다.
창을 닫습니다.
Tekan ke bawah tuas yang berada di bagian
atas penutup printhead. Printer akan memeriksa
dan mempersiapkan printerhead baru, mungkin
berlangsung selama 30 hingga 40 menit, tergantung
pada kondisi printhead tersebut dan lingkungan.
Tutup jendela.
Page 19

71
HP Designjet
T1120 & T620
printer series
Start-up
© 2009 Hewlett-Packard Development Company, L.P.
72
73 74
While the printer is preparing the printheads,
you could spend the time installing the printer software
on your computer. Be sure to follow the software
EN
installation instructions. Connecting your printer before
installing the software can lead to printer errors.
プリンタがプリントヘッド を準 備している間に、コン
ピュータでプリンタソフトウェアをインストールでき
ます。
JP
必ずソフトウェアのインストール手順に従って、インス
トールしてください。ソフトウェアをインストールする
前にプリンタを接 続すると、プリンタのエラーが発 生 す
る可 能 性 が あります。
在打印机准备打印头期间,您可以在计算机上安装打
印机软件。
ZHCN
确保按照软件安装说明进行操作。安装软件之前先连
接打印机可能会引起打印机错误。
當印表機準備印字頭時,您可以趁這個時候在電腦上
安裝印表機軟體。
ZHTW
確定有依照軟體安裝指示進行安裝。在安裝軟體之前
連接印表機會發生印表機錯誤。
프린터가 프린트 헤드를 준비하는 동안 컴퓨터에
프린터 소프트웨어를 설치하는 것이 좋습니다.
소프트웨어 설치 지침을 따르십시오. 소프트웨어를
KO
설치하기 전에 프린터를 연결하면 프린터 오류가
발생할 수 있습니다.
Sementara printer mempersiapkan printhead,
Anda dapat menginstal perangkat lunak printer
di komputer. Pastikan untuk mengikuti petunjuk
penginstalan perangkat lunak. Menghubungkan printer
Anda sebelum menginstal perangkat lunak dapat
mengakibatkan kesalahan printer.
Once the printhead check has nished the printer will
be ready to load paper for the printhead alignment.
プリントヘッドの確認が終了すると、プリントヘッドの
軸合わせのために用紙を取り付けることができます。
完成打印头的检查后,打印机将准备装入纸张,以对
齐打印头。
當印字頭檢查完畢,即可開始將紙張裝入印表機以進
行印字頭校正。
프린트 헤드 검사가 끝나면 프린터는 프린트 헤드
정렬을 위한 용지 공급 준비를 마칩니다.
Setelah pemeriksaan printhead selesai, printer siap
menerima kertas untuk menyelaraskan printhead.
Go to the rear of the printer, and remove the orange
stoppers from each end of the spindle.
プリンタの背面に移動して、スピンドルのそれぞれの
端にあるオレンジのストッパを取り外します。
转到打印机的后面,从卷轴两端取下橙色挡块。
請走到印表機後方,取下捲軸兩端的橘色止動件。
프린터 뒤쪽으로 가서 각 스핀들의 끝에 있는 오렌지색
스토퍼를 제거합니다 .
Buka bagian belakang printer, lalu lepaskan pengaman oranye dari setiap ujung penggulung.
Remove the spindle by lifting out rst the right-hand
end, then the left.
最 初 に 右 端 を 持 ち 上 げ 、次 に 左 端 を 持 ち 上 げ て 、ス ピ ン
ドルを取り外します。
取出卷轴,先提起右端再提起左端。
先拿起右端,再拿起左端以取出捲軸。
오른쪽 끝을 먼저 들어올린 다음 왼쪽을 들어올리는
방법으로 스핀들을 제거합니다.
Keluarkan penggulung dengan terlebih dahulu
mengangkat ujung sisi kanan, kemudian sisi kiri.
Page 20

75
7 6
77
78
If the blue removable stop is on the spindle, remove
it. Put the roll onto the spindle, making sure to put
it on the right way round: the leading edge of the
EN
paper should go into the printer from the top of the
roll. Add the removable stop to the spindle to keep the
roll in place.
青いストッパ (取り外し可能) がスピンドルに付いてい
る場合は、取り外します。
スピ ンド ル にロ ール 紙を取 り付けま す。
用紙の先端がロール紙の上部からプリンタに入るよう
JP
に、正しい方向に取り付けられていることを確認し
ます。
青いストッパ ( 取り外し可能 )をスピンドルに取り付け
て、ロール紙を所定の位置に保 持します。
如果卷轴上有蓝色可移动挡块,请将其取下。
将纸卷装到卷轴上,确保它处于正确位置:即纸卷的
ZHCN
前缘应该进入到打印机中。
为卷轴加上可移动挡块,使纸卷处于正确位置。
如果捲軸上有可移動的藍色限動環,請將它取下。
將捲筒紙裝到捲軸上,並確定是以正確方式進行:紙
ZHTW
張前邊沿應該從捲筒紙上方進入印表機。
在捲軸上加裝可移動限動環,使捲筒紙保持定位。
스핀들에 파란색의 탈착식 스톱이 있으면 그것을
제거합 니다.
올바른 방법으로 롤을 스핀들에 놓습니다. 즉, 롤의
KO
위쪽으로부터 용지의 앞쪽 끝이 프린터로 들어가도록
해야 합니다.
롤이 제자리를 잡도록 탈착식 스톱을 끼웁니다.
Push the removable stop towards the roll as far
as it will go.
No gap should be left between stop and paper.
青いストッパをいっぱいまでロール紙の方向に押し込
みます。
ストッパと用紙の間に隙間ができないように
してくだ さ い 。
将可移动挡块朝纸卷的方向推动,直至不能再推动
为止。
挡块和纸张之间不能有任何间隙。
將可移動限動環朝捲筒紙推到底。
限動環和紙張之間不能留空隙。
탈착식 스톱을 최대한 앞쪽으로 누릅니다.
스톱과 용지 사이에 틈이 없어야 합니다.
Dorong pengaman yang dapat dilepas ke arah
gulungan sejauh mungkin.
Di antara pengaman dan kertas tidak boleh ada
celah.
Replace the spindle into the printer, left end rst, with
the xed stop on the left and the blue removable stop
on the right.
固定ストッパを左側に、青いストッパ( 取り外し可能)
を右側にして、左端からスピンドルをプリンタに取り
付 けます。
将卷轴重新放入打印机,先放入左端,
使固定挡块位于左端,蓝色可移动挡块位于右端。
將捲軸裝回印表機,左端應先進去,並且固定的限動
環位置是在左側,而可移動的藍色限動環則在右側。
고정식 스톱은 왼쪽으로, 파란색 탈착식 스톱은
오른쪽으로 가도록 하여 스핀들을 다시 프린터에
놓습니다.
Pasang kembali penggulung ke printer, ujung sisi kiri
terlebih dulu, dengan pengaman tetap berada di sisi
kiri dan pengaman berwarna biru yang dapat dilepas
di sisi kanan.
Feed the leading edge of the paper into the printer
until the printer takes hold of it. Then move to the front
of the printer.
プリンタが用紙を保持するまで、用紙の先端をプリン
タに挿入します。次に、プリンタの前面に移動します。
将纸张前缘装入打印机,直到打印机完全包住它。然
后转到打印机的前面。
將紙張前邊沿送入印表機,讓印表機夾住它。
然後走到印表機前方。
용지의 앞쪽 끝을 프린터에 공급하여 프린터에
용지가 물리도록 합니다 . 그런 다음 프린터 앞으로
이동합니다.
Masukkan tepi kepala kertas ke printer hingga printer
menahannya. Setelah itu lihat bagian depan printer.
Lepaskan pengaman biru yang dapat dilepas jika
terdapat pada penggulung.
Letakkan gulungan pada penggulung, pastikan untuk
meletakkannya dengan benar: tepi kepala kertas
harus masuk ke printer dari bagian atas gulungan.
Masukkan pengaman yang dapat dilepas ke dalam
penggulung agar gulungan kertas tetap berada di
tempatnya.
Page 21

79 8180 82
1
2
89
The front panel will ask whether you are loading
roll or sheet paper. The printer will proceed to align
EN
the printheads. This process involves printing, and
therefore needs to use some paper.
フロントパネルに、ロール紙またはカット紙のどちらを
取り付けるか確認するメッセージが表示されます。プ
JP
リンタが、プリントヘッドの軸合わせを続行します。こ
の処理では印刷が行われるので、用紙が使用されます。
前面板将询问您是否要装入卷筒或单张纸张。打印机
ZHCN
将继续对齐打印头。此过程涉及到打印,因此需要使
用一些纸张。
如果捲軸上有可移動的藍色限動環,請將它取下。 將
ZHTW
捲筒紙裝到捲軸上,並確定是以正確方式進行:紙張
前邊沿應該從捲筒紙上方進入印表機。 在捲軸上加裝
可移動限動環,使捲筒紙保持定位。
KO
스핀들에 파란색의 탈착식 스톱이 있으면 그것을
제거합니다. 올바른 방법으로 롤을 스핀들에
놓습니다. 즉, 롤의 위쪽으로부터 용지의 앞쪽 끝이
프린터로 들어가도록 해야 합니다. 롤이 제자리를
잡도록 탈착식 스톱을 끼웁니다.
Lepaskan pengaman biru yang dapat dilepas jika
terdapat pada penggulung. Letakkan gulungan pada
penggulung, pastikan untuk meletakkannya dengan
benar: tepi kepala kertas harus masuk ke printer dari
bagian atas gulungan. Masukkan pengaman yang
dapat dilepas ke dalam penggulung agar gulungan
kertas tetap berada di tempatnya.
The front panel will display a series of messages
showing the progress of the printhead alignment.
There is no need to take any action until the
alignment has nished, when you will see the
message shown below. Press the OK key.
フロントパネルには、プリントヘッドの軸合わせの進
捗 状 況 を示すメッセ ージが表示さ れ ま す。下 記 のメッ
セージが表示されて、軸合わせが終了するまでは操
作は必要ありません。[OK]ボタンを押します。
前面板将显示一系列消息,说明打印头对齐的进度。
对齐过程完成之前不需要进行任何操作,完成时您将
看到下面显示的消息。按 OK 键。
前方面板會顯示一連串訊息,指出印字頭校正的進度。
校正完成以前,並不需要執行任何動作;完成時,面
板上會顯示訊息告訴您。請按下 OK 按鍵。
프린트 헤드 정렬 과정을 보여주는 일련의 메시지가
전면 패널에 표시됩니다. 아래에 보이는 것처럼
이러한 메시지가 나타나는 동안은 정렬이 완료될
때까지 별다른 조치가 필요없습니다. OK(확인)
키를 누릅니다.
Panel depan akan menampilkan serangkaian pesan
yang menunjukkan proses penyelarasan printhead.
Anda tidak perlu melakukan apapun hingga
penyelarasan selesai, yakni bila Anda melihat pesan
yang ditampilkan di bawah ini. Tekan tombol OK.
You can now, or at some later time, color-calibrate the
paper type that you intend to use in the printer. Color
calibration is recommended for accurate color printing.
It can be started from the Printer Utility program installed
as part of your printer software, or from the front panel’s
Image Quality Maintenance menu.
この時点で、または後で、プリンタで使用する用紙の種
類に対応したカラーキャリブレーションを実行できます。
正確なカラー 印刷 を行 うためにカラ ー キャリブレ ー
ションの実行をお勧めします。カラーキャリブレーション
は 、 プ リン タ ソ フト ウェアの 一 部 としてインストー ル さ れ
たプリンタユーティリティプログラムから開始できます。
または、フロントパネルのイメージ品質の保守メニューか
ら開始で き ま す。
您可以在现在或以后对打印机中要使用 的纸张类型进行
颜色校准。建议进行颜色校准,这样打印的颜色更加准
确。可以从 打印机实用程序(已安装的打印机软件) 启
动颜色校准过程,也可以从前面板的“图像质量维护”菜
单启动。
您可以現在或稍後對印表機所要使用的紙張類型進行顏
色校準。如果需要精確的彩色列印,您最好進行顏色校準。
您可以從所安裝印表機軟體中的印表機公用程式,或從
前方面板的「影像品質維護」功能表,開始進行校準。
이제 프린터에서 사용할 용지 종류에 대해 색상 보정
작업을 수행할 수 있습니다. 이 작업은 시간이 지난 후
나중에 수행해도 됩니다. 색상 보정을 하면 좀더 정확한
색으로 인쇄할 수 있습니다. 프린터 소프트웨어의 일부로
설치되는 프린터 유틸리티 프로그램이나 전면 패널의
이미지 품질 유지 관리 메뉴를 통해 색상 보정 작업을
시작할 수 있습니다.
Mulai saat ini, Anda dapat mengkalibrasi warna jenis
kertas yang akan digunakan printer. Kalibrasi warna
dianjurkan untuk pencetakan warna yang akurat. Kalibrasi
ini dapat dilakukan dari program Printer Utility [Utilitas
Printer] yang diinstal sebagai bagian dari perangkat lunak
printer Anda, atau dari menu Image Quality Maintenance
[Pemeliharaan Kualitas Gambar] pada panel depan.
4
3
1- View ink levels
2- View loaded paper
3- Unload paper
4- Form feed and cut
5- Back
1- インク容量の 表示
2- 取り付 けられている用紙 の表示
3- 用紙の取り外し
4 - 排 紙 / カ ット
5-戻る
1 – 查看墨水量
2 – 查看装入的纸张
3 – 取出纸张
4 – 进纸并裁切
5 – 返回
1- 檢視墨水量
2- 檢視已裝紙張
3- 取出紙張
4- 進紙並裁切
5- 上一步
1- 잉크 수준 보기
2- 공급된 용지 보기
3- 용지 꺼내기
4- 용지 바꿈/자동 절단
5- 뒤로
1-Menampilkan tingkat tinta
2-Menampilkan kertas yang
dimasukkan
3- Mengeluarkan kertas
4- Memajukan dan memotong
kertas
5
6
6- Menu
7- Power
8- cancel
9- OK
6 -メニュー
7-電源
8 - キ ャン セ ル
9-OK
6 – 菜单
7 – 电源
8 – 取消
9 – OK
6- 功能表
7- 電源
8- 取消
9- OK
6- 메뉴
7- 전원
8- 취소
9- 확인
5- Kembali
6- Menu
7- Daya
8- Batal
9- OK
7
Page 22

EN
Note for MAC & Windows USB
connection:
Do not connect the computer to the printer yet.
You must rst install the printer driver software
on the computer.
Insert the HP Start Up Kit DVD into your com-
puter.
For Windows:
* If the DVD does not start automatically, run
autorun.exe program on the root folder on the
DVD.
* To install a Network Printer, click on Express
Network Install, otherwise click on Custom Install and follow the instructions on your screen.
For Mac:
* If the DVD does not start automatically, open
the DVD icon on your desktop.
* Open the Mac OS X HP Designjet Installer
icon and follow the instructions on your screen.
NOTE: If the installation failed, reinstall the
software from:
HP Designjet T1120:
http://www.hp.com/go/T1120/drivers
or
JP
Mac および Windows の USB 接続
に関する注記:
この時点ではまだコンピュータをプリンタに接
続しないでください。最初に、プリンタドライ
バソフトウェアをインストールする必要があり
ます。
コンピュータに『HPスタートアップキット』DVD
を挿入します。
Windows の場合:
*DVDが自動的に起動しない場合は、DVDの
ルートフォルダ内のautorun.exeを実行します。
*ネットワークプリンタをインストールするに
は、[エクスプレスネットワークインストール]を
クリックするか、または[カスタムインストール]
をクリックして画面の指示に従います。
Mac の場合:
*DVDが自動的に起動しない場合は、デスクトッ
プのDVDアイコンを開きます。
*MACOSXHPDesignjetInstallerアイコンを
開き、画面の指示に従ってください。
注記:インストールが失敗した場合は、ソフトウ
ェアを以下のサイトから再度インストールして
ください。
HP Designjet T1120:
http://www.hp.com/go/T1120/drivers
ZHCN ZHTW
MAC 和 Windows USB 连接注意事
项:
刚开始时,不要立即将计算机连接到打印机。
必须首先在计算机上安装打印机驱动程序软
件。 将 HP Start Up Kit DVD 插入计算机。
对于 Windows:
* 如果 DVD 未自动启动,请运行 DVD 根文件
夹下的 autorun.exe 程序。
* 要安装网络打印机,请单击“快速网络安装”,
或者单击“自定义安装”并按照屏幕上的说明进
行操作。
对于 Mac:
* 如果 DVD 未自动启动,请打开桌面上的
DVD 图标。
* 打开 Mac OS X HP Designjet Installer 图标,
然后按照屏幕上的说明进行操作。
注意:如果安装失败,请从以下站点重新安装
软件:
HP Designjet T1120:
http://www.hp.com/go/T1120/drivers
或
http://www.hp.com/go/T1120PS/drivers
HP Designjet T620:
請注意,當 MAC 與 Windows
USB 連線時:
請不要急著將電腦連接到印表機。您必須先在
電腦上安裝印表機驅動程式軟體。
將「
在 Windows 中:
* 如果 DVD 沒有自動執行,請執行 DVD 根資
料夾中的 autorun.exe 程式。
* 如果要安裝網路印表機,請按一下「快速網
路安裝」或「自訂安裝」,並且依照螢幕上的指
示進行。
在 Mac 中:
* 如果 DVD 沒有自動執行,請開啟桌面上的
「DVD」圖示。
* 開啟「Mac OS X HP Designjet Installer」圖
示,並且依照螢幕上指示進行。
註:如果安裝失敗,請在這裡重新安裝軟體:
HP Designjet T1120:
http://www.hp.com/go/T1120/drivers
或
http://www.hp.com/go/T1120PS/drivers
HP Start-Up Kit」DVD
放入電腦。
http://www.hp.com/go/T1120PS/drivers
HP Designjet T620:
http://www.hp.com/go/T620/drivers
または
http://www.hp.com/go/T1120PS/drivers
HP Designjet T620:
http://www.hp.com/go/T620/drivers
http://www.hp.com/go/T620/drivers
HP Designjet T620:
http://www.hp.com/go/T620/drivers
Page 23

KO
MAC 및 Windows USB 연결을
위한 안내
아직 컴퓨터를 프린터에 연결하지 마십시오.
먼저 프린터 드라이버 소프트웨어를 컴퓨터에
설치합니다.
HP Star t-Up Kit(HP 시작 키트) DVD를
컴퓨터에 삽입합니다.
Windows의 경우:
* DVD가 자동으로 실행되지 않는 경우 DVD의
루트 폴더에서 autorun.exe 프로그램을
실행합니다.
* 네트워크 프린터를 설치하려면 Express
네트워크 설치를 클릭하거나 사용자 지정
설치를 클릭한 다음 화면의 지침을 따릅니다.
Mac의 경우:
* DVD가 자동으로 실행되지 않는 경우 바탕
화면에서 DVD 아이콘을 엽니다.
* Mac OS X HP Designjet Installer 아이콘을
열고 화면의 지침을 따릅니다.
주: 설치하는 데 실패한 경우 다음 위치에서
각각의 소프트웨어를 다시 설치합니다.
HP Designjet T1120:
http://www.hp.com/go/T1120/drivers
Catatan tentang sambungan USB
untuk MAC & Windows:
Jangan sambungkan dulu komputer ke printer. Anda
harus terlebih dulu menginstal perangkat lunak driver
printer di komputer.
Masukkan DVD HP Start Up Kit ke komputer
Untuk Windows:
* Jika DVD tidak memulai secara otomatis, jalankan
program autorun.exe pada folder akar DVD.
* Untuk menginstal Network Printer, klik Express
Network Install atau klik Custom Install, kemudian
jalankan petunjuk pada layar.
Untuk Mac:
* Jika DVD tidak memulai secara otomatis, buka ikon
DVD di desktop.
* Buka ikon Mac OS X HP Designjet Installer, kemudian jalankan petunjuk pada layar.
CATATAN: Jika penginstalan gagal, instal ulang
perangkat lunak dari:
HP Designjet T1120:
http://www.hp.com/go/T1120/drivers
or
http://www.hp.com/go/T1120PS/drivers
HP Designjet T620:
http://www.hp.com/go/T620/drivers
또는
http://www.hp.com/go/T1120PS/drivers
HP Designjet T620:
http://www.hp.com/go/T620/drivers
Page 24

Legal notices
© Copyright 2009 Hewlett-Packard Development
Company, L.P.
The information contained herein is subject to change
without notice. The only warranties for HP products
and services are set forth in the express warranty
statements accompanying such products and services.
Nothing herein should be construed as constituting an
additional warranty. HP shall not be liable for
technical or editorial errors or omissions contained
herein.
Trademarks
Microsoft ®; and Windows ®; are U.S. registered
trademarks of Microsoft Corporation.
FireWire is a trademark of Apple Computer, Inc.,
registered in the U.S. and other countries.
 Loading...