


Operating Instructions
OVEN
Contents
GB
|
|
|
|
|
|
Installation, 2-3 |
|
|
|
DK |
|
|
|
||
GB |
|
|
NO |
|
Positioning |
||
|
|
|
|
|
|
Electrical connections |
|
English,1 |
Dansk, 12 |
Norsk,23 |
|||||
Description of the appliance, 4 |
|||||||
|
|
|
|
|
|
||
FI |
|
SE |
|
|
|
Overall view |
|
|
|
|
|
Control panel |
|||
|
|
|
|
|
|
||
|
|
|
|
|
|
|
|
Suomi, 34 |
Svenska, 45 |
|
|
Start-up and use, 5 |
|||
|
|
|
|
|
|
Starting the oven |
|
|
|
|
|
|
|
Data plate |
|
FZ 830.1 NE/HA FZ 830.1 IX NE/HA FQ 830.1 NE/HA
The electronic cooking programmer, 6
Cooking modes, 7-9
Cooking modes
Practical cooking advice
Cooking advice table
Precautions and tips, 10
General safety Disposal
Respecting and conserving the environment Assistance
Maintenance and care, 11
Switching the appliance off Cleaning the appliance Cleaning the oven door Replacing the light bulb

Installation
Before placing your new appliance into operation GB please read these operating instructions carefully.
They contain important information for safe use, for installation and for care of the appliance.
Please keep these operating instructions for future reference. Pass them on to possible new owners of the appliance.
Positioning
Keep packaging material out of the reach of children. It can become a choking or suffocation hazard. see Precautions and tips).
! The appliance must be installed by a qualified person in compliance with the instructions provided. Incorrect installation may cause harm to persons, animals or may damage property.
Fitting the appliance
Use the appropriate cabinet to ensure that the appliance functions properly.
•The panels adjacent to the oven must be made of heat-resistant material.
•Cabinets with a veneer exterior must be assembled with glues which can withstand temperatures of up to 100°C.
•To install the oven under the counter (see diagram) and in a kitchen unit, the cabinet must have the following dimensions:
|
|
|
|
|
|
|
|
|
|
. |
|
|
|
|
|
|
|
|
|
|
in |
|
|
|
|
|
|
|
|
|
|
.m |
|
|
|
|
|
|
|
|
|
|
m |
|
|
|
|
|
|
|
mm.23 |
|
|
7m |
|
|
|
mm. |
|
|
|
|
|
4 |
|
|
|
|
|||
|
|
|
|
|
5 |
|
|
|
|
|
|
|
|
|
|
|
|
|
|
|
. |
|
|
|
|
|
|
|
45 |
mm |
|
|
|||
mm.595 |
|
|
|
mm.567 |
|
|
|
|
593 |
||
|
|
|
|
|
558 |
mm. |
|||||
|
|
|
|
|
|
|
|
|
|
||
|
|
|
5 mm. |
|
|
|
|
|
|
|
|
|
595 |
|
|
. |
|
|
|
|
|
|
|
|
|
mm. |
545 |
mm |
|
|
|
|
|
|
|
|
|
|
|
|
|
|
|
|
|
||
|
|
|
|
|
|
|
|
|
|
|
|
|
|
. |
|
|
|
|
|
|
|
|
|
|
|
mm |
|
|
|
|
|
|
|
|
|
|
24 |
|
|
|
|
|
|
|
|
|
|
! The appliance must not come into contact with electrical parts once it has been installed.
The consumption indications on the data plate have been calculated for this type of installation.
Ventilation
To ensure good ventilation, the back panel of the cabinet must be removed. It is advisable to install the oven so that it rests on two strips of wood, or on a completely flat surface with an opening of at least 45 x
560 mm (see diagrams).
. |
45 |
mm |
|
m |
|
. |
|
m |
|
|
|
560 |
|
|
|
Centring and fastening
Position the 4 tabs on the side of the oven according to the 4 holes of the outer frame. Adjust the tabs according to the thickness of the cabinet side panel, as shown below:
thickness of 20 mm: take off the removable part of the tab
(see diagram)
thickness of 18 mm: use the first groove, which has already been set in the factory (see
diagram)
thickness of 16 mm: use the second groove (see diagram)
Secure the appliance to the cabinet by opening the oven door and putting 4 screws into the 4 holes of the outer frame.
! All parts which ensure the safe operation of the appliance must not be removable without the aid of a tool.
2
Electrical connections
! Ovens equipped with a three-pole power supply cable are designed to operate with alternating current at the voltage and frequency indicated on the data plate located on the appliance (see below).
Fitting the power supply cable
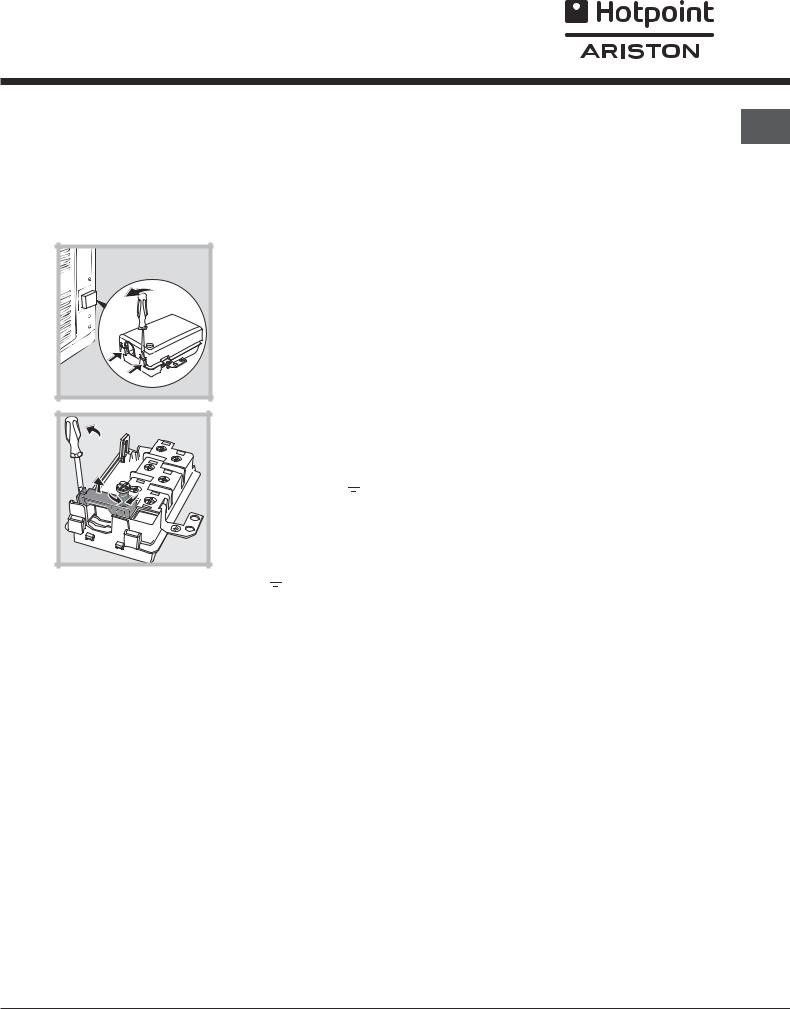
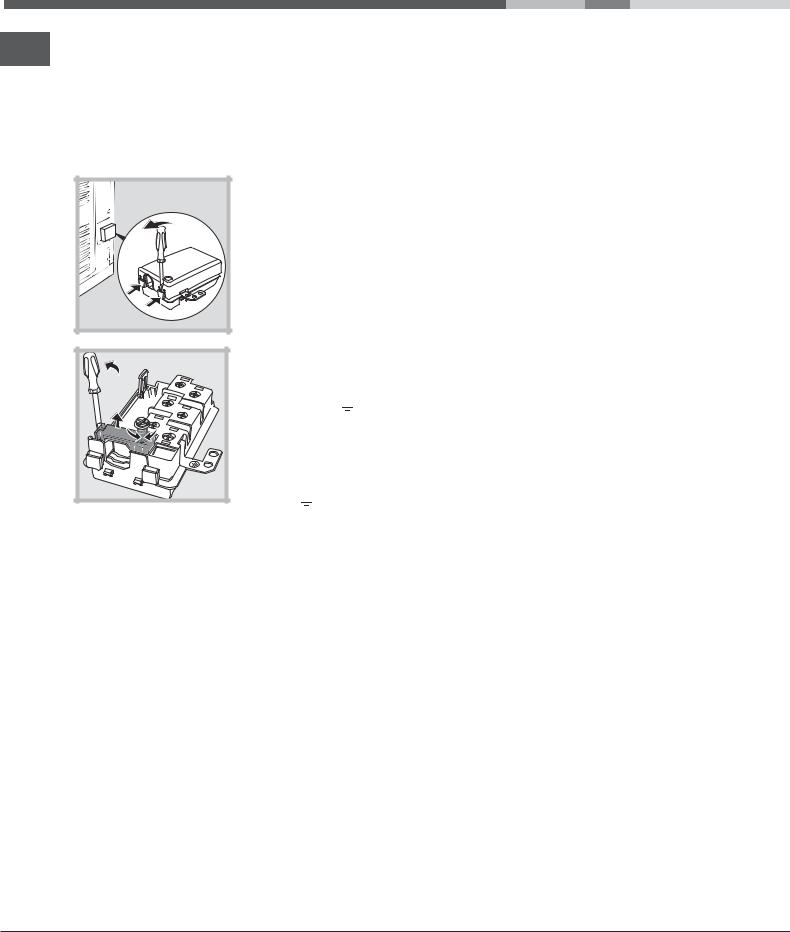
1. Open the terminal board by inserting a screwdriver into the side tabs of the cover. Use the screwdriver as a lever by pushing it down to open the cover
(see diagram).
2. Loosen the cable clamp screw and remove it, using a screwdriver as a lever (see figure).
3. Remove the wire contact screws L-N-  , then fasten the wires under the screw heads, respecting the colour code: Blue (N), Brown
(L) and Yellow-Green Verde ( ).
).
Connecting the supply cable to the mains
GB
Install a standardised plug corresponding to the load indicated on the data plate (see side).
The appliance must be directly connected to the mains using an omnipolar circuit-breaker with a minimum contact opening of 3 mm installed between the appliance and the mains, suitable for the load indicated and complying with current electrical regulations (the earthing wire must not be interrupted by the circuitbreaker). The supply cable must not come into contact with surfaces with temperatures higher than 50°C.
! The installer must ensure that the correct electrical connection has been made and that it is compliant with safety regulations.
Before connecting to the power supply, make sure that:
•The appliance is earthed and the plug is compliant with the law.
•The socket can withstand the maximum power of the appliance, which is indicated on the data plate (see below).
•The voltage must be in the range between the values indicated on the data plate (see below).
•The socket is compatible with the plug of the appliance. If the socket is incompatible with the plug, ask an authorised technician to replace it. Do not use extension cords or multiple sockets.
!Once the appliance has been installed, the power supply cable and the electrical socket must be easily accessible.
!The cable must not be bent or compressed.
!The cable must be checked regularly and replaced by authorised technicians only (see Assistance).
!The manufacturer declines any liability should these safety measures not be observed.
3
Description of the appliance
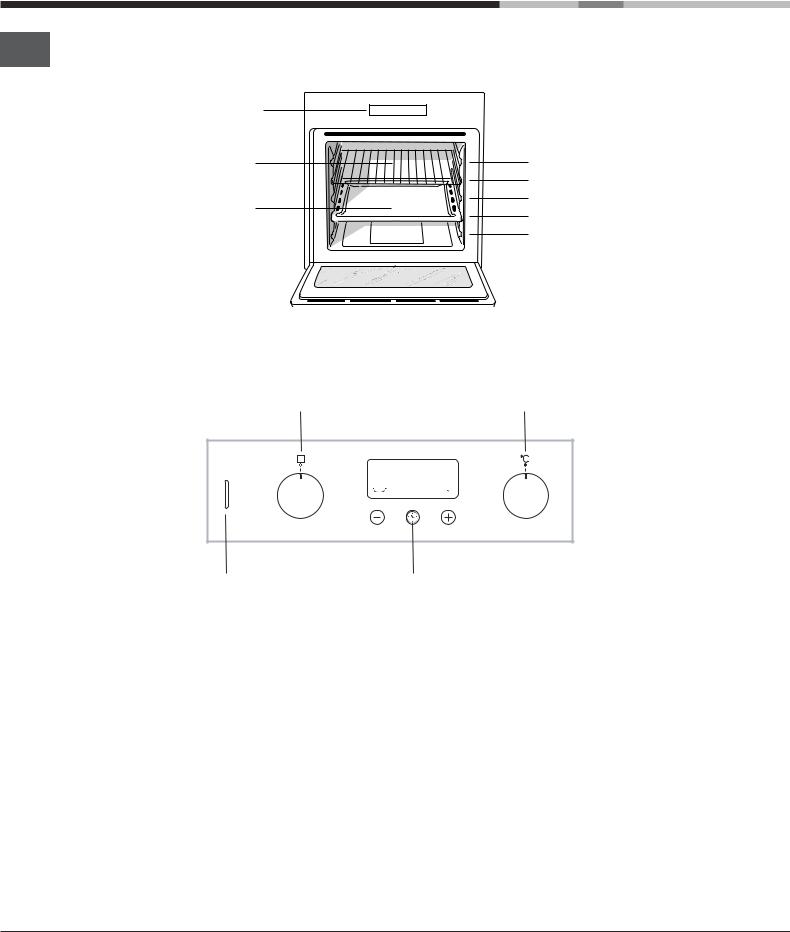
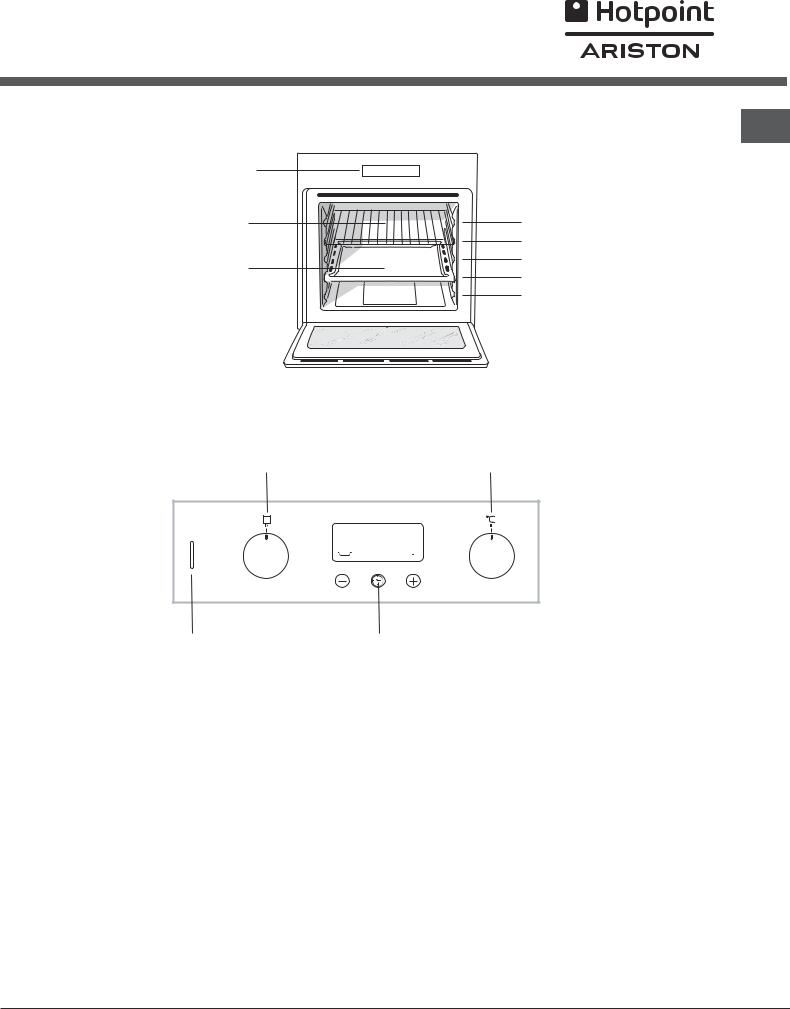
Overall view
GB
Control panel |
GUIDES for the |
|
|
sliding racks |
|
GRILL |
position 5 |
|
|
position 4 |
|
DRIPPING PAN |
position 3 |
|
position 2 |
||
|
||
|
position 1 |
Control panel
SELECTOR |
THERMOSTAT |
Knob |
Knob |
 ••
•• ••
••
Indicator light |
ELECTRONIC |
THERMOSTAT |
Programmer |
4
Start-up and use
! The first time you use your appliance, heat the empty oven with its door closed at its maximum temperature for at least half an hour. Ensure that the room is well ventilated before switching the oven off and opening the oven door. The appliance may produce a slightly unpleasant odour caused by the burning away of protective substances used during the manufacturing process.
Starting the oven
1.Select the desired cooking mode by turning the SELECTOR knob.
2.Select the desired temperature with the THERMOSTAT knob. See the Cooking advice table for cooking modes and the suggested cooking temperatures (see Cooking Modes).
3.When lit, the THERMOSTAT indicator light indicates that the oven is heating up to the temperature set.
4.You may do the following during cooking:
-change the cooking mode by turning the SELECTOR knob.
-change the temperature by turning the THERMOSTAT knob.
-stop cooking by turning the SELECTOR knob to the “0” position.
!Never put objects directly on the oven bottom to avoid damaging the enamel coating.
!Always place cookware on the rack(s) provided.
Cooling ventilation
GB
In order to cool down the external temperature of the oven, some models are fitted with a cooling fan that blows out air between the control panel and the oven door.
! Once the cooking has been completed, the cooling fan remains on until the oven has cooled down sufficiently.
Oven light
It goes on when selecting  with the SELECTOR knob. It stays on when a cooking mode is selected.
DATA PLATE
width 43.5 cm
Dimensions height 32 cm depth 41,5 cm
Volume |
lt. 58 |
|
|
|
|
|
|
|
|
||
Electrical |
voltage: 220-240V ~ 50Hz |
||||
maximum power absorbed |
|||||
connections |
|||||
2800W |
|
|
|
||
|
|
|
|
||
|
|
|
|
||
|
Directive 2002/40/EC on the label |
||||
|
of electric ovens. |
||||
|
Standard EN 50304 |
||||
ENERGY LABEL |
Energy consumption for Natural |
||||
convection – heating mode: |
|||||
|
Convection mode. |
|
|
||
|
Declared energy consumption for |
||||
|
Forced convection Class – heating |
||||
|
mode: |
Baking. |
|||
This appliance conforms to the following European Economic Community directives:
- 2006/95/EEC of 12/12/06 (Low Voltage) and subsequent amendments;
- 89/336/EEC of 03/05/89 (Electromagnetic Compatibility) and subsequent amendments;
-93/68/EEC of 22/07/93 and subsequent amendments.
-2002/96/EC
5

The electronic cooking programmer
GB
|
|
|
|
|
|
DISPLAY |
|
|
|
|
|
|
|
|
|
|
|
|
|
|
|
|
|
||
END OF |
|
|
|
•• •• |
|
|
|
|
CLOCK icon |
|||
COOKING icon |
|
|
|
|
|
|
||||||
DURATION |
|
|
|
|
|
|
|
TIMER icon |
||||
icon |
|
|
|
|
|
|
|
|
|
|||
DECREASE TIME |
|
|
|
|
|
|
|
|
|
|
|
INCREASE TIME |
|
|
|
|
|
|
|
|
|
|
|
||
|
|
|
|
|
|
|
||||||
button |
|
|
|
|
|
|
|
|
button |
|||
SET TIME button
Setting the clock
The clock may be set when the oven is switched off or when it is switched on, provided that a the end time of a cooking cycle has not been programmed previously.
After the appliance has been connected to the
mains, or after a blackout, the icon and the four numerical digits on the DISPLAY will begin to flash.
1.Press the 
 button several times until the icon and the four digits on the display begin to flash.
2.Use the “+” and “-” buttons to adjust the time; if you press and hold either button, the display will scroll through the values more quickly, making it quicker and easier to set the desired value.
3.Wait for 10 seconds or press the 
 button again to finalise the setting.
Setting the timer
This function does not interrupt cooking and does not affect the oven; it is simply used to activate the buzzer when the set amount of time has elapsed.
1.Press the 
 button several times until the
  icon and the three digits on the display begin to flash.
2.Use the “+” and “-” buttons to set the desired time; if you press and hold either button, the display will scroll through the values more quickly, making it quicker and easier to set the value.
3.Wait for 10 seconds or press the 
 button again to finalise the setting.
The display will then show the time as it counts down. When this period of time has elapsed the buzzer will be activated.
Programming cooking
A cooking mode must be selected before programming can take place.
Programming the cooking duration
1.Press the 
 button several times until the icon and the three digits on the DISPLAY begin to flash.
2.Use the “+” and “-” buttons to set the desired duration; if you press and hold either button, the display will scroll through the values more quickly, making it quicker and easier to set the value.
3.Wait for 10 seconds or press the 
 button again to finalise the setting.
4.When the set time has elapsed, the text END appears on the DISPLAY, the oven will stop cooking and a buzzer sounds.
• For example: it is 9:00 a.m. and a time of 1 hour and 15 minutes is programmed. The programme will stop automatically at 10:15 a.m.
Setting the end time for a cooking mode
A cooking duration must be set before the cooking end time can be scheduled.
1.Follow steps 1 to 3 to set the duration as detailed above.
2.Next, press the 
 button until the
  icon and the four digits on the DISPLAY begin to flash.
3.use the “+” and “-” buttons to adjust the cooking end time; if you press and hold either button, the display will scroll through the values more quickly, making it quicker and easier to set the desired value.
4.Wait for 10 seconds or press the 
 button again to finalise the setting.
5.When the set time has elapsed, the text END appears on the DISPLAY, the oven will stop cooking and a buzzer sounds.
Programming has been set when the and buttons are illuminated. The DISPLAY shows the cooking end time and the cooking duration alternately.
Cancelling a programme
To cancel a programme:
•press the 
 button until the icon corresponding to the setting you wish to cancel and the digits on the display are no longer flashing. Press the “-” button until the digits 00:00 appear on the display.
•Press and hold the “+” and “-” buttons; this will cancel all the settings selected previously, including timer settings.
6

Cooking modes
Cooking modes
! A temperature value can be set for all cooking modes between 60°C and Max, except for
•BARBECUE (recommended: set only to MAX power level);
•GRATIN (recommended: do not exceed 200°C).
LEAVENING mode
The oven reaches and maintains a temperature of 40°C irrespective of the position of the THERMOSTAT knob. This mode is ideal for leavening dough made with yeast.
TRADITIONAL OVEN mode
Both the top and bottom heating elements will come on. With this traditional cooking mode, it is best to use one cooking rack only: if more than one rack is used, the heat distribution will be uneven.
BAKING mode
The rear heating element and the fan come on, guaranteeing the distribution of heat delicately and uniformly throughout the oven. This mode is ideal for baking and cooking temperature sensitive foods such as cakes that need to rise and to prepare certain tartlets on 3 shelves simultaneously.
 FAST COOKING mode
The heating elements and the fan come on, guaranteeing the distribution of heat consistently and uniformly throughout the oven.
Pre-heating is not necessary for this cooking mode. This mode is especially recommended for cooking pre-packed food quickly (frozen or pre-cooked). The best results are obtained if you use one cooking rack only.
MULTI-COOKING mode
All the heating elements (top, bottom and circular), as well as the fan, will come on. Since the heat remains constant throughout the oven, the air cooks and browns food uniformly. A maximum of two racks may be used at the same time.
PIZZA mode |
GB |
|
The heating elements (bottom and circular) and the fan come on. This combination heats the oven rapidly by producing a considerable amount of heat, particularly from the bottom element. If you use more than one rack simultaneously, switch the position of the dishes halfway through the cooking process.
 BARBECUE mode
The top heating element and the rotisserie (where present) come on. The high and direct temperature of the grill is recommended for food that requires high surface temperature. Always cook in this mode with the oven door closed.
 GRATIN mode
The top heating element as well as the fan and the rotisserie (where present) come on. This combination of features increases the effectiveness of the unidirectional thermal radiation of the heating elements through forced circulation of the air throughout the oven.
This helps prevent food from burning on the surface, allowing the heat to penetrate right into the food. Always cook in this mode with the oven door closed.
The Rotisserie (only available on certain models)
To operate the rotisserie (see diagram) proceed as follows:
1.Place the dripping pan in position 1.
2.Place the rotisserie support in position 3 and insert the spit in the hole provided on the back panel of the oven.
3.Start the rotisserie using the knob to select MODE
or .
When |
mode is on, the rotisserie will stop if the |
door is opened.
7

Practical cooking advice
GB
!Do not place racks in position 1 and 5 during fanassisted cooking. Excessive direct heat can burn temperature sensitive foods.
!In the BARBECUE and GRATIN cooking modes, particularly when using the rotisserie, place the dripping pan in position 1 to collect cooking residues (fat and/or grease).
MULTI-COOKING
•Use position 2 and 4, placing the food that requires more heat on 2.
•Place the dripping pan on the bottom and the rack on top.
BARBECUE
•Insert the rack in position 3 or 4. Place the food in the centre of the rack.
•We recommend that you set the maximum power level. The top heating element is regulated by a thermostat and may not always be on.
PIZZA MODE
•Use a light aluminium pizza pan. Place it on the rack provided.
For a crispy crust, do not use the dripping pan (prevents crust from forming by extending cooking time).
•If the pizza has a lot of toppings, we recommend adding the mozzarella cheese on top of the pizza halfway through the cooking process.
8
Cooking advice table
GB
|
Cooking |
Foods |
Weight |
Rack Position |
Pre-heating |
Recommended |
Cooking |
|
|
modes |
|
(in kg) |
|
time |
temperature |
time |
|
|
|
|
|
|
(minutes) |
|
(minutes) |
|
|
Leavening |
Leavening process of dough made with |
|
|
|
|
|
|
|
yeast or baking powder (brioches, bread, |
|
|
|
|
|
|
|
|
|
sugar pie, croissants, etc.) |
|
|
|
|
|
|
|
|
Duck |
1 |
3 |
15 |
200 |
65-75 |
|
|
Traditional |
Roast veal or beef |
1 |
3 |
15 |
200 |
70-75 |
|
|
Oven |
Pork roast |
1 |
3 |
15 |
200 |
70-80 |
|
|
Biscuits (short pastry) |
- |
3 |
15 |
180 |
15-20 |
|
|
|
|
|
||||||
|
|
Tarts |
1 |
3 |
15 |
180 |
30-35 |
|
|
|
Tarts |
0.5 |
3 |
15 |
180 |
20-30 |
|
|
|
Fruit cakes |
1 |
2 or 3 |
15 |
180 |
40-45 |
|
|
|
Plum cake |
0.7 |
3 |
15 |
180 |
40-50 |
|
|
Baking |
Sponge cake |
0.5 |
3 |
15 |
160 |
25-30 |
|
|
Stuffed pancakes (on 2 racks) |
1.2 |
2 and 4 |
15 |
200 |
30-35 |
|
|
|
Mode |
Small cakes (on 2 racks) |
0.6 |
2 and 4 |
15 |
190 |
20-25 |
|
|
|
Cheese puffs (on 2 racks) |
0.4 |
2 and 4 |
15 |
210 |
15-20 |
|
|
|
Cream puffs (on 3 racks) |
0.7 |
1 and 3 and 5 |
15 |
180 |
20-25 |
|
|
|
Biscuits (on 3 racks) |
0.7 |
1 and 3 and 5 |
15 |
180 |
20-25 |
|
|
|
Meringues (on 3 racks) |
0.5 |
1 and 3 and 5 |
15 |
90 |
180 |
|
|
|
Frozen food |
|
|
|
|
|
|
|
|
Pizza |
0.3 |
2 |
- |
250 |
12 |
|
|
|
Courgette and prawn pie |
0.4 |
2 |
- |
200 |
20 |
|
|
|
Country style spinach pie |
0.5 |
2 |
- |
220 |
30-35 |
|
|
|
Turnovers |
0.3 |
2 |
- |
200 |
25 |
|
|
Fast |
Lasagne |
0.5 |
2 |
- |
200 |
35 |
|
|
Golden Rolls |
0.4 |
2 |
- |
180 |
25-30 |
|
|
|
cooking |
Chicken morsels |
0.4 |
2 |
- |
220 |
15-20 |
|
|
|
Pre-cooked food |
|
|
|
|
|
|
|
|
Golden chicken wings |
0.4 |
2 |
- |
200 |
20-25 |
|
|
|
Fresh Food |
|
|
|
|
|
|
|
|
Biscuits (short pastry) |
0.3 |
2 |
- |
200 |
15-18 |
|
|
|
Plum cake |
0.6 |
2 |
- |
180 |
45 |
|
|
|
Cheese puffs |
0.2 |
2 |
- |
210 |
10-12 |
|
|
|
Pizza (on 2 racks) |
1 |
2 and 4 |
15 |
230 |
15-20 |
|
|
|
Lasagne |
1 |
3 |
10 |
180 |
30-35 |
|
|
|
Lamb |
1 |
2 |
10 |
180 |
40-45 |
|
|
|
Roast chicken + potatoes |
1+1 |
2 and 4 |
15 |
200 |
60-70 |
|
|
Multi- |
Mackerel |
1 |
2 |
10 |
180 |
30-35 |
|
|
Plum cake |
1 |
2 |
10 |
170 |
40-50 |
|
|
|
cooking |
|
||||||
|
Cream puffs (on 2 racks) |
0.5 |
2 and 4 |
10 |
190 |
20-25 |
|
|
|
|
|
||||||
|
|
Biscuits (on 2 racks) |
0.5 |
2 and 4 |
10 |
180 |
10-15 |
|
|
|
Sponge cake (on 1 rack) |
0.5 |
2 |
10 |
170 |
15-20 |
|
|
|
Sponge cake (on 2 racks) |
1 |
2 and 4 |
10 |
170 |
20-25 |
|
|
|
Savoury pies |
1.5 |
3 |
15 |
200 |
25-30 |
|
|
Pizza Mode |
Pizza |
0.5 |
3 |
15 |
220 |
15-20 |
|
|
Roast veal or beef |
1 |
2 |
10 |
220 |
25-30 |
|
|
|
|
Chicken |
1 |
2 or 3 |
10 |
180 |
60-70 |
|
|
|
Soles and cuttlefish |
0.7 |
4 |
- |
Max |
10-12 |
|
|
|
Squid and prawn kebabs |
0.6 |
4 |
- |
Max |
8-10 |
|
|
|
Cuttlefish |
0.6 |
4 |
- |
Max |
10-15 |
|
|
|
Cod filet |
0.8 |
4 |
- |
Max |
10-15 |
|
|
|
Grilled vegetables |
0.4 |
3 or 4 |
- |
Max |
15-20 |
|
|
|
Veal steak |
0.8 |
4 |
- |
Max |
15-20 |
|
|
Barbecue |
Sausages |
0.6 |
4 |
- |
Max |
15-20 |
|
|
Hamburgers |
0.6 |
4 |
- |
Max |
10-12 |
|
|
|
|
|
||||||
|
|
Mackerels |
1 |
4 |
- |
Max |
15-20 |
|
|
|
Toasted sandwiches (or toast) |
4 and 6 |
4 |
- |
Max |
3-5 |
|
|
|
With rotisserie (where present) |
|
|
|
|
|
|
|
|
Veal on the spit |
1.0 |
- |
- |
Max |
80-90 |
|
|
|
Chicken on the spit |
1.5 |
- |
- |
Max |
70-80 |
|
|
|
Lamb on the spit |
1.0 |
- |
- |
Max |
70-80 |
|
|
|
Grilled chicken |
1.5 |
2 |
10 |
200 |
55-60 |
|
|
|
Cuttlefish |
1.5 |
2 |
10 |
200 |
30-35 |
|
|
Gratin |
With rotisserie (where present) |
|
|
|
|
|
|
|
Veal on the spit |
1.5 |
- |
10 |
200 |
70-80 |
|
|
|
|
Lamb on the spit |
1.5 |
- |
10 |
200 |
70-80 |
|
|
|
Chicken on the spit + |
1.5 |
- |
10 |
200 |
70-75 |
|
|
|
potatoes (roasted) |
- |
2 |
10 |
200 |
70-75 |
|
|
|
|
|
|
|
|
|
|
9

Precautions and tips
!Theappliancewasdesignedandmanufacturedincompliancewith GB internationalsafetystandards.Thefollowingwarningsareprovidedfor
safetyreasonsandmustbereadcarefully.
General safety
•Theappliancewasdesignedfordomesticuseinsidethehome andisnotintendedforcommercialorindustrialuse.
•Theappliancemustnotbeinstalledoutdoors,evenincovered areas.Itisextremelydangeroustoleavetheapplianceexposed torainandstorms.
•Whenhandlingtheappliance,alwaysusethehandlesprovided on the sides of the oven.
•Donottouchtheappliancewithbarefeetorwithwetormoist handsandfeet.
•Theappliancemustbeusedtocookfoodbyadultsonlyand accordingtotheinstructionsinthismanual.
•When the appliance is in use, the heating
elements and some parts of the oven door become extremely hot. Make sure you don't touch them and keep children well away.
•Ensurethatthepowersupplycableofotherelectricalappliances does not come into contact with the hot parts of the oven.
•Theopeningsusedforventilationanddispersionofheatmust neverbecovered.
•Alwaysgriptheovendoorhandleinthecentre:theendsmaybe hot.
•Alwaysuseovenglovestoplacecookwareintheovenorwhen removingit.
•Donotusealuminiumfoiltolinethebottomoftheoven.
•Donotplaceflammablematerialsintheoven:iftheapplianceis switchedonbymistake,itcouldcatchfire.
•Alwaysmakesuretheknobsareinthe“l”/“¡”positionwhenthe applianceisnotinuse.
•Whenunpluggingtheappliancealwayspulltheplugfromthe mainssocket,donotpullonthecable.
•Nevercarryoutanycleaningormaintenanceworkwithouthaving unpluggedtheplugfromthemains.
•Inthecaseofamalfunction,undernocircumstancesshouldyou attempttorepairtheapplianceyourself.Repairscarriedoutby
inexperiencedpersonsmaycauseinjuryorfurthermalfunctioning oftheappliance.ContactaServiceCentre(seeAssistance).
•Donotrestheavyobjectsontheopenovendoor.
•Theapplianceshouldnotbeoperatedbypeople(including children)withreducedphysical,sensoryormentalcapacities,by inexperiencedindividualsorbyanyonewhoisnotfamiliarwiththe product.Theseindividualsshould,attheveryleast,besupervised bysomeonewhoassumesresponsibilityfortheirsafetyorreceive preliminaryinstructionsrelatingtotheoperationoftheappliance.
•Donotletchildrenplaywiththeappliance.
Disposal
•Observelocalenvironmentalstandardswhendisposingpackaging materialforrecyclingpurposes.Observeexistinglegislationwhen disposingoftheoldappliance.
•TheEuropeanDirective2002/96/EConWasteElectricaland ElectronicEquipment(WEEE),requiresthatoldhousehold electricalappliancesmustnotbedisposedofinthenormal unsortedmunicipalwastestream.Oldappliancesmustbe collectedseparatelyinordertooptimisetherecoveryand recyclingofthematerialstheycontainandreducetheimpacton humanhealthandtheenvironment.Thecrossedout“wheeled bin”symbolontheproductremindsyouofyourobligation,that whenyoudisposeoftheapplianceitmustbeseparately collected.
Consumersshouldcontacttheirlocalauthorityorretailerfor informationconcerningthecorrectdisposaloftheiroldappliance.
Respecting and conserving the environment
•Byusingtheapplianceinthehoursbetweenlateafternoonand earlymorning,youcanhelpreducetheworkloadplacedon electricalcompanies.
•AlwayskeeptheovendoorclosedwhenusingtheBARBECUE andGRATINmodes: toattainbestresultsandtosaveenergy (approximately10%).
•Regularlycheckthedoorsealsandwipecleantoensuretheyare freeofdebrissothattheystickproperlytothedooranddonot allowheattodisperse.
Assistance
Communicating:
•appliancemodel(Mod.)
•serialnumber(S/N)
Thisinformationisfoundonthedataplatelocatedontheappliance and/oronthepackaging.
10
Maintenance and care
Switching the appliance off
Disconnect your appliance from the electricity supply before carrying out any work on it.
Cleaning the appliance
•The stainless-steel or enamel-coated external parts as well as the rubber seals may be cleaned using a sponge that has been soaked in lukewarm water and neutral soap. If these stains are difficult to remove, use only specialised products. After cleaning, rinse and dry thoroughly. Do not use abrasive powders or corrosive substances.
•Ideally, the inside of the oven should be cleaned after each use, when it is still lukewarm. Use hot water and detergent, rinse and dry with a soft cloth. Do not use abrasive products.
•All accessories - with the exception of the sliding
racks - can be washed like everyday crockery.
Never use steam cleaners or pressure cleaners on the appliance.
Cleaning the oven door
Clean the glass part of the oven door using a sponge and a non-abrasive cleaning product, then dry thoroughly with a soft cloth. Do not use rough abrasive material or sharp metal scrapers as these could scratch the surface and cause the glass to crack.
To clean more thoroughly, you can remove the oven door.
1.Open the oven door fully (see diagram).
2.Lift up and turn the small levers located on the two hinges (see diagram).
F |
F |
3. Grip the door on the two external sides and close it approximately half way.
Unlock the door by pressing on the clamps ., then pull the door towards you lifting it out of its seat (see diagram).
To replace the door, reverse this sequence.
Inspecting the seals
Check the door seals around the oven periodically. If GB the seals are damaged, please contact your nearest After-sales Service Centre (see Assistance). We
recommend not using the oven until the seals have been replaced.
Replacing the light bulb
To replace the oven light bulb:
1. Remove the glass cover of the lamp-holder.
2. Remove the
light bulb and replace it with a similar one:
Wattage 25 W,
cap E 14.
3. Replace the glass cover (see
diagram).
11

Brugervejledning
OVN
|
|
|
|
|
|
|
|
|
|
|
|
|
|
|
|
|
|
|
Oversigt |
|
DK |
|
|
|
|
|
|
|
|
|
|
|
|
|
|
|
|||
|
|
|
|
|
|
|
|
|
Installation, 13-14 |
|
|
|
GB |
|
|
|
|
|
|
|
|
|
|
DK |
|
NO |
|
Placering |
|
|
|
|
|
|
|
|
|
|
Elektrisk tilslutning |
|
|
|
English,1 |
Dansk, 12 |
Norsk,23 |
||||
|
|
|
Beskrivelse af ovnen, 15 |
||||||
|
|
|
|
|
|
|
|
|
|
|
|
|
FI |
|
SE |
|
|
|
Samlet illustration |
|
|
|
|
|
|
|
Betjeningspanel |
||
|
|
|
|
|
|
|
|
|
|
|
|
|
Suomi, 34 |
Svenska, 45 |
|
|
Start og brug, 16 |
||
|
|
|
|
|
|
|
|
|
Sådan tændes for ovnen |
|
|
|
|
|
|
|
|
|
Typeskilt |
|
|
|
|
|
|
|
|
|
Elektronisk programmeringsenhed, 17 |
|
|
|
|
|
|
|
|
|
Programmer, 18-20 |
|
|
|
|
|
|
|
|
|
Tilberedningsprogrammer |
|
|
|
FZ 830.1 NE/HA |
|
|
Praktiske råd til tilberedning |
|||
|
|
|
|
|
Skema over tilberedning |
||||
|
|
|
FZ 830.1 IX NE/HA |
|
|
|
|||
|
FQ 830.1 NE/HA |
Forskrifter og råd, 21 |
||
|
Generelt om sikkerheden |
|||
|
|
|
|
|
|
|
|
|
Bortskaffelse |
|
|
|
|
Spar på energien og værn om miljøet |
|
|
|
|
Vedligeholdelse, 22 |
|
|
|
|
Afbrydelse af strømmen |
|
|
|
|
Rengøring af apparatet |
|
|
|
|
Rengøring af ovndøren |
|
|
|
|
Udskiftning af pære |
|
|
|
|
Service |
|
|
|
|
|
|
|
|
|
|
|
|
|
|
|
|
|
|
|
|
|
|
|
|
|

Installation
Det er vigtigt at opbevare dette hæfte et sted, så det nemt kan konsulteres. Hvis apparatet sælges, overdrages eller flyttes, skal man sørge for, at brugervejledningen følger med, så den nye ejer kan få oplysninger om apparatets funktion og eventuelle advarsler.
Læs omhyggeligt instruktionerne: De indeholder vigtige oplysninger om installation, anvendelse og sikkerhed.
Placering
Emballagen må ikke betragtes som legetøj til børn, og den skal bortskaffes i henhold til bestemmelserne om sortering af affald (se afsnittet Forskrifter og råd).
Installationen skal udføres i overensstemmelse med instruktionerne og af en kvalificeret tekniker. En fejlagtig installation kan medføre personskade, skader på dyr samt materielle skader.
Indbygning
For at ovnen skal kunne fungere korrekt, skal indbygningsskabet være egnet dertil:
•Panelerne på skabene ved siden af ovnen skal være lavet af materialer, der er modstandsdygtige over for varme.
•På skabe af finerplader skal limen være modstandsdygtig over for temperaturer på 100ºC.
•Hvis ovnen indbygges i et skab, både ved montering under en bordplade (se figuren) og ved søjleopbygning, skal skabet have følgende mål:
|
23 mm. |
595 mm. |
567 mm. |
|
5 mm. |
595 |
|
|
. |
|
mm. |
545 |
mm |
|
|
||
|
|
|
|
|
. |
|
|
|
mm |
|
|
24 |
|
|
|
|
|
|
|
|
. |
|
|
|
|
in |
|
|
|
|
.m |
|
|
|
|
m |
|
|
|
|
7m |
|
|
|
|
4 |
|
|
|
|
|
5 |
|
|
|
|
|
|
|
|
|
. |
|
45 |
mm |
|
|||
|
|
|
|
||
|
|
558 |
m |
||
|
|
|
|
||
|
|
|
|
|
m. |
593 mm.
Når ovnen er blevet indbygget, må der ikke være mulighed for eventuelt kontakt med de elektriske dele. Oplysningerne om energiforbrug, angivet på typeskiltet, er målt på denne type installation.
Ventilation
DK
For at sikre en god ventilation, er det nødvendigt at afmontere den bageste væg på indbygningsskabet. Det tilrådes at installere ovnen, så den støtter på to trælister eller på en plan overflade med en åbning på minimum 45 x 560 mm (se figuren).
. |
45 |
mm |
|
m |
|
. |
|
m |
|
|
|
560 |
|
|
|
Centrering og fastgørelse
Placér de 4 stifter på siden af ovnen ud for de 4 huller på omkredsrammen, idet der tages hensyn til køkkenelementets tykkelse:
Tykkelse på 20 mm: Fjern den bevægelige del af den udragende stift (se figuren).
Tykkelse på 18 mm: Brug den første rille, som allerede findes ved levering fra fabrikken (se
figuren).
Tykkelse på 16 mm: Brug den anden rille (se figuren).
Sådan fastgøres ovnen til køkkenelementet: Åbn ovndøren, og skru de 4 skruer i de 4 passende huller på omkredsrammen.
Alle sikkerhedsdele skal være monteret på en sådan måde, at de ikke kan fjernes uden brug af værktøj.
13
Elektrisk tilslutning
DK
Ovne, der er udstyret med et trepolet forsyningskabel er klargjort til funktion med vekselstrøm ved den spænding og frekvens, der er anført på ovnens typeskilt (se herunder).
Montering af forsyningskabel
1. Åbn klemrækken ved at stikke en skruetrækker ned i klapperne på siden af dækslet. Træk og åbn dækslet (se figuren).
2. Løsn skruen i kabelklemmen, og tag den ud ved at vrikke skruetrækkeren (se
figuren).
3. Tag skruerne af kontakterne L-N- og fastgør de små ledninger under skruehovederne i overensstemmelse med farverne Blå (N) Brun (L) Gulgrøn (
 ).
).
Tilslutning af strømforsyningskablet til nettet
Anvend et standardstik på kablet til den belastning, der er anført på typeskiltet (se her ved siden af). Hvis man ønsker en direkte forbindelse til el-nettet, skal man indsætte en flerpolet afbryder med en minimumsåbning mellem kontakterne på 3 mm. i overensstemmelse med belastningen og i overensstemmelse med de gældende regler (der skal ikke være en afbryder på jordforbindelsen). Forsyningskablet skal være placeret på en sådan måde, at det ikke når en temperatur på 50º C over omgivelsestemperaturen på noget punkt.
Installatøren er ansvarlig for en korrekt elektrisk tilslutning samt overholdelse af sikkerhedsreglerne. Inden tilslutningen udføres, skal man kontrollere følgende:
•at stikkontakten har jordforbindelse og er i overensstemmelse med loven,
•at stikkontakten kan bære apparatets maksimale spændingsbelastning, som angivet på typeskiltet (se herunder),
•at forsyningsspændingen ligger inden for værdierne, som angivet på typeskiltet (se herunder),
•at stikkontakten passer til apparatets stik. I modsat fald skal man udskifte stikkontakten eller stikket. Undgå anvendelse af forlængerledninger eller flerdobbelte stikdåser.
Når apparatet er installeret, skal man nemt kunne nå ind til både ledning og stikkontakt.
Ledningen må ikke bøjes eller trykkes sammen.
Ledningen skal regelmæssigt kontrolleres og må kun udskiftes af autoriserede teknikere (se afsnittet
Service).
Virksomheden fralægger sig ethvert ansvar, såfremt disse regler ikke overholdes.
14
Beskrivelse af apparatet
Samlet illustration
DK
Betjeningspanel |
GLIDESKINNER |
|
|
til pladerne |
|
RIST |
rille 5 |
|
|
rille 4 |
|
BRADEPANDE |
rille 3 |
|
rille 2 |
||
|
||
|
rille 1 |
Betjeningspanel
PROGRAMVÆLGER |
TERMOSTATKNAP |
 ••
•• ••
••
Kontrollampe for |
ELEKTRONISK |
TERMOSTAT |
programmeringsenhed |
15

Start og brug
Når ovnen tændes første gang, anbefales det at lade DK ovnen være i funktion i tom tilstand i mindst en time
med termostaten indstillet på maksimum og ovndøren lukket. Herefter skal man åbne ovndøren og udlufte lokalet. Lugten, der opstår, skyldes fordampning af beskyttelsesmidlerne i ovnen.
Sådan tændes for ovnen
1.Vælg det ønskede tilberedningsprogram ved at dreje på PROGRAMKNAPPEN.
2.Indstil temperaturen ved at dreje på knappen TERMOSTAT. Der findes en liste over tilberedninger og de anbefalede temperaturer i tilberedningsskemaet
(se afsnittet Programmer).
3.Kontrollampen TERMOSTAT angiver, at ovnen er i gang med at varme op til den valgte temperatur
4.Under tilberedningen er det altid muligt at:
-ændre programmet ved at dreje på PROGRAMKNAPPEN,
-ændre temperaturen ved hjælp af TERMOSTATKNAPPEN,
-afbryde tilberedningen ved at dreje PROGRAMKNAPPEN over på position “0”.
Undgå at placere genstande i bunden af ovnen, da det kan beskadige ovnens lakering.
Placér altid beholderne på den medfølgende rist.
Afkølingsventilation
For at mindske den udvendige temperatur, er nogle modeller udstyret med en afkølingsblæser. Blæseren skaber en luftstråle, der blæses ud gennem betjeningspanelet og ovndøren.
Ved afsluttet tilberedning fortsætter blæseren med at være tændt, indtil ovnen er passende afkølet.
Ovnlys
Lyset tændes ved at vælge  med knappen PROGRAMMER. Den bliver ved med at lyse, når der vælges et tilberedningsprogram.
TYPESKILT
Mål |
bredde 43,5 cm |
højde 32 cm |
|
|
dybde 41,5 cm |
Volumen |
lt. 58 |
Elektriske |
spænding 220-240V ~ 50Hz |
tilslutninger |
maks. optaget effekt 2800W |
|
Direktiv 2002/40/EF på de |
|
elektriske ovnes etikette |
|
Standard EN 50304 |
|
Energiforbrug ved naturlig |
|
varmestrømning - |
ENERGIMÆRKNING |
opvarmningsfunktion: |
Traditionel ovn; |
|
|
Erklæret energiforbrug for |
|
klasse med forceret |
|
varmestrømning - |
|
opvarmningsfunktion: |
|
Fint bagværk. |
|
Dette apparat er i |
|
overensstemmelse med |
|
følgende EU-direktiver: |
|
2006/95/EØF af 12/12/06 |
|
(Lavspænding) og |
|
efterfølgende ændringer - |
|
89/336/EØF af 03/05/89 |
|
(Elektromagnetisk |
|
kompatibilitet) og efterfølgende |
|
ændringer - 93/68/EØF af |
|
22/07/93 og efterfølgende |
|
ændringer. 2002/96/EF |
16
Elektronisk programmeringsenhed


 ••
•• ••
••


Indstilling af uret
Indstillingerne kan både foretage, når ovnen er slukket og når den er tændt, men ikke når der er programmeret et afslutningstidspunkt for tilberedningen.
Efter tilslutning til el-nettet, eller efter
strømafbrydelse, blinker ikonet  og de fire cifre på DISPLAYET blinker.
1. Tryk gentagne gange på tasten  , indtil ikonet og de fire cifre på DISPLAYET blinker.
2.med tasterne “+” og “-” indstilles klokkeslættet, og hvis man holder tasterne nede, skifter tallene hurtigere, så indstillingen gøres nemmere.
3.vent 10 sekunder, eller tryk igen på tasten  for at gemme indstillingen.
Indstilling af minuttælleren
Denne funktion afbryder ikke tilberedningen og påvirker ikke brugen af ovnen. Den gør det kun muligt at aktivere et lydsignal, når det indstillede antal minutter er gået.
1. Tryk gentagne gange på tasten  , indtil ikonet og de tre cifre på DISPLAYET blinker.
2.med tasterne “+” og “-” indstilles den ønskede tid, og hvis man holder tasterne nede, skifter tallene hurtigere, så indstillingen gøres nemmere.
3.vent 10 sekunder, eller tryk igen på tasten  for at gemme indstillingen.
Herefter vises nedtællingen, indtil lydsignalet høres.
Programmering af tilberedning
DK
Det er kun muligt at programmere tilberedningen, efter man har valgt et tilberedningsprogram.
Programmering af tilberedningsvarighed
1. Tryk gentagne gange på tasten  , indtil ikonet og de tre cifre på DISPLAYET blinker.
2.med tasterne “+” og “-” indstilles den ønskede varighed, og hvis man holder tasterne nede, skifter tallene hurtigere, så indstillingen gøres nemmere.
3.vent 10 sekunder, eller tryk igen på tasten  for at gemme indstillingen.
4.Når tiden er gået, vises meddelelsen END på DISPLAYET, ovnen afslutter tilberedningen og der udsendes et lydsignal.
• Eksempel: Klokken er 9:00, og der programmeres en tilberedningstid på 1 time og 15 minutter. Programmet standser automatisk kl. 10:15.
Programmering af afslutningstidspunkt for
tilberedningen
Programmering af afslutningstidspunktet for tilberedningen kan kun udføres, efter at man har indstillet varigheden.
1.Benyt samme fremgangsmåde som beskrevet under punkt 1 til 3 for varigheden.
2.Tryk derefter gentagne gange på tasten  , indtil ikonet
  og de fire cifre på DISPLAYET blinker.
3.med tasterne “+” og “-” indstilles tidspunktet for afslutning af tilberedningen, og hvis man holder tasterne nede, skifter tallene hurtigere, så indstillingen gøres nemmere.
4.vent 10 sekunder, eller tryk igen på tasten  for at gemme indstillingen.
5.Når tiden er gået, vises meddelelsen END på DISPLAYET, ovnen afslutter tilberedningen og der udsendes et lydsignal.
De tændte ikoner  og
og  viser, at der er foretaget en programmering. På DISPLAYET vises hhv. afslutningstidspunkt og varighed for tilberedningen.
Annullering af en programmering
Sådan annulleres en programmering:
•tryk på tasten  , indtil ikonet for indstillingen, der skal annulleres og cifrene på displayet blinker. Tryk på tasten “-”, indtil displayet viser cifrene 00:00.
•tryk og hold begge tasterne “+” og ”-” nede samtidig for at annullere alle programmeringer, også minuttællerne.
17
 Loading...