


Operating Instructions
|
REFRIGERATOR/FREEZER COMBINATION |
|
|
Contents |
GB |
|
|
|
GB |
Installation, 2-3 |
|
Positioning and connection |
|
|
|
Reversible doors |
|
English
Description of the appliance, 4-5
Control panel Overall view
Start-up and use, 6-7-8
Starting the appliance
Navigating the display
No Frost Cooling system
Using the refrigerator to its full potential
Using the freezer to its full potential
FF4200DP
FF4200DX
Maintenance and care, 9
Switching the appliance off Cleaning the appliance
Avoiding mould and unpleasant odours Replacing the light bulb
Precautions and tips, 10
General safety Disposal
Respecting and conserving the environment
Troubleshooting, 11
Guarantee, 12
After Sales Service, 13

Installation
! Before operating your new appliance, please read GB these operating instructions carefully. They contain
important information for safe use, installation and care of the appliance.
! Please keep these operating instructions for future reference. Pass them on to possible new owners of the appliance.
Positioning and connection
Positioning
1.Place the appliance in a well-ventilated humidity-free room.
2.Do not obstruct the airflow under and behind the appliance. The compressor and condenser give off heat and require good ventilation to operate correctly and save energy.
3.Ensure the appliance is far away from any sources of heat (direct sunlight, electric stove, etc.).
Electrical connections
After transportation of the appliance, carefully place it vertically and wait at least 3 hours before connecting it to the electricity mains. Before inserting the plug into the electrical socket ensure the following:
•The appliance is earthed and the plug is compliant with the law.
•The socket can withstand the maximum power of the appliance, which is indicated on the data plate located on the bottom left side of the fridge (e.g. 150 W).
•The voltage must be in the range between the values indicated on the data plate located on the bottom left side (e.g. 220-240V, 50Hz).
•The socket is compatible with the plug of the appliance.
If the socket is incompatible with the plug, ask an authorised technician to replace it (see After Sales Service). Do not use extension cords or multiple sockets.
!Once the appliance has been installed, the power supply cable and the electrical socket must be easily accessible.
!The cable must not be bent or compressed.
!The cable must be checked regularly and replaced by authorised technicians only (see After Sales Service).
!The manufacturer declines any liability should these safety measures not be observed.
Your appliance is supplied with a 13amp fused plug that can be plugged into a 13amp socket for immediate use. Before using the appliance please read the instructions below.
WARNING:
THIS APPLIANCE MUST BE EARTHED.
Replacing fuse covers:
When replacing a faulty fuse, a 13amp ASTA approved fuse to BS 1362 should always be used and the fuse cover re-fitted.
If the fuse cover is lost, the plug must not be used until a replacement is obtained.
Replacement fuse covers:
If a replacement fuse cover is fitted, it must be of the correct colour as indicated by the coloured marking or the colour that is embossed in words on the base of the plug.
Changing the plug:
Removing the plug
If your appliance has a non-rewireable moulded plug and you should wish to remove it to add a longer cable or to re-route the mains cable through partitions, units etc. please ensure that either:
-The plug is replaced by a fused 13amp rewireable plug bearing the BSI mark of approval.
or
-The mains cable is wired directly into a 13amp cable outlet, controlled by a switch (in compliance with BS 5733) which is accessible without moving the appliance.
Disposing of the plug
Cut off and dispose of the supplied plug if it does not fit your socket. The cable should be cut as close as possible to the moulded plug.
Remove the fuse.
WARNING:
To avoid a shock hazard do not insert the discarded plug into a socket anywhere else.
2
Fitting a new plug
IMPORTANT:
WIRES IN THE MAINS LEAD ARE COLOURED IN ACCORDANCE WITH THE FOLLOWING CODE...
Green and Yellow |
- Earth |
Blue |
- Neutral |
Brown |
- Live |
As the colours of the wires in the mains lead may not correspond with the coloured markings identifying the terminals in your plug, proceed as follows:
-Connect Green and Yellow wire to terminal marked 'E' or  or coloured Green and Yellow.
-Connect Brown wire to terminal marked 'L' or coloured red or brown.
-Connect Blue wire to terminal marked 'N' or coloured Black or Blue.
If a 13amp plug (BS 1363) is used it must be fitted with a 13amp fuse. A 15amp plug must be
protected by a 15amp fuse, either in the plug or adaptor or at the distribution board.
If you are in any doubt about the electrical supply to your machine, consult a qualified electrician before use.
CE Marking certifies that this appliance conforms to the following EEC directives :
Low Voltage Equipment - 73/23/EEC & 93/68 EEC Electromagnetic Compatibility 89/336/EEC, 92/31/EEC & 93/68/EEC
Reversible doors
GB
If it is necessary to change the direction in which the doors open, please contact the Hotpoint Service (see After Sales Service).
3
Description of the appliance
|
|
|
|
|
|
|
|
|
|
|
|
|
|
|
|
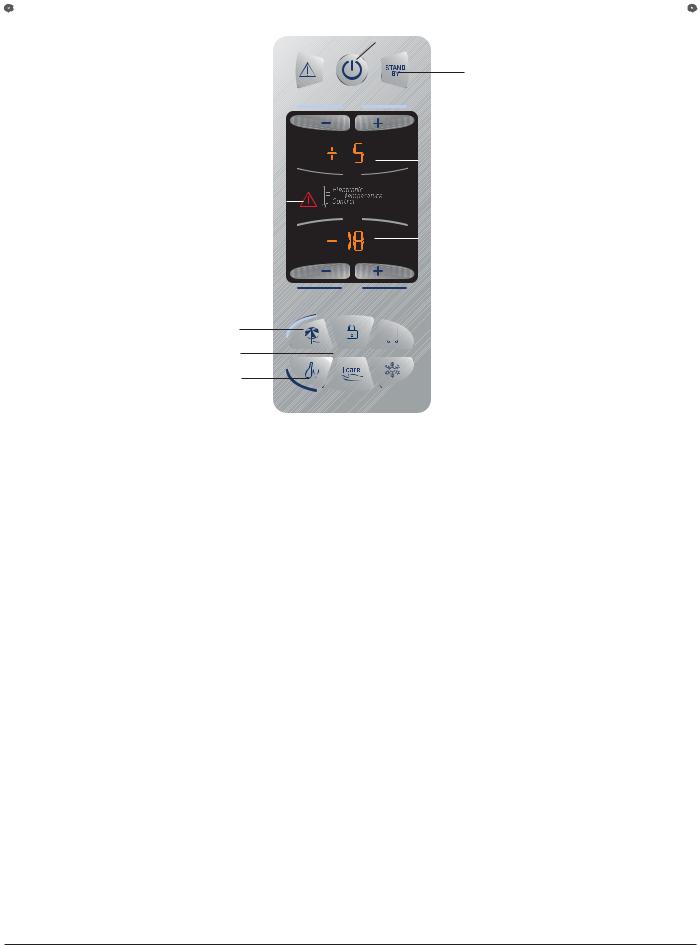
Control panel |
|
|
|
ON/OFF |
|||||||||
GB |
||||||||||||||
|
|
|
||||||||||||
|
|
ALARM RESET |
|
|
|
|
|
|
|
|
|
STANDBY (display energy |
||
|
|
|
|
|
|
|
|
|||||||
|
|
|
|
|
|
|
|
|
|
|
|
|
saving mode) |
|
|
|
REFRIGERATOR |
|
|
|
|
|
|
|
|
||||
|
|
|
|
|
|
|
|
|
||||||
|
|
temperature adjustment |
|
|
|
|||||||||
|
|
ALARM |
|
|
|
|
|
|
|
|
REFRIGERATOR display |
|||
|
|
|
|
|
|
|
|
|
|
|||||
|
|
|
|
|
|
FREEZER display |
||||||||
|
|
|
|
|
||||||||||
|
|
FREEZER |
|
|
|
|
|
|
|
|
|
|
||
|
|
|
|
|
|
|
|
|
|
|
|
|||
|
|
|
|
|
|
|
|
|
||||||
|
|
|
|
|
|
|
|
|||||||
|
|
temperature adjustment |
|
|
|
|||||||||
HOLIDAY
I CARE
ICE PARTY
ON/OFF
The entire product (both the refrigerator and freezer compartments) may be switched on by pressing this button. The red LED indicates that the product is switched off, while the green LED shows that it is operating.
REFRIGERATOR - and + temperature adjustment
Used to modify the temperature setting of the refrigerator; confirmation corresponding to the selected temperature appears on the display.
REFRIGERATOR display
Shows the set temperature for the refrigerator compartment.
I-CARE
Controls the activation and deactivation of the I-CARE function (optimal operating temperature at minimal energy consumption). When this function is activated, the I-CARE LED on the keypad lights up. Ten minutes after the most recent user interaction, the display enters its energy saving mode (see STANDBY function).
ALARM
An alarm situation has been detected in the product (see Troubleshooting section).
STANDBY (display energy saving mode)
Used to activate the energy saving mode of the display: all LEDs on the display switch off apart from the ON/OFF indicator. To exit the energy saving mode, simply press any button or open the refrigerator door.
ALARM RESET
Used to reset any product alarm statuses which have occurred (freezer temperature or refrigerator door open).
 SUPER COOL
 CHILD LOCK
 SUPER FREEZE
FREEZER - and + temperature adjustment
Used to modify the temperature setting of the freezer; confirmation corresponding to the selected temperature appears on the display.
FREEZER display
Shows the set temperature for the freezer compartment.
SUPER COOL
Activates or deactivates the SUPER COOL function (rapid cooling). The SUPER COOL LED on the keypad lights up and ‘SC’ appears on the refrigerator display.
SUPER FREEZE
Activates or deactivates the SUPER FREEZE function (rapid freezing). The SUPER FREEZE LED on the keypad lights up and ‘SF’ appears on the freezer display.
HOLIDAY
Activates or deactivates the HOLIDAY function (the HOLIDAY LED on the keypad lights up), while the temperature values +12°C and -18°C appear on the displays respectively. Ten minutes after the most recent user interaction, the display enters its energy saving mode (see STANDBY function).
ICE PARTY
Activates the ICE PARTY function (the temperature is decreased for the amount of time it takes to cool a bottle). The ICE PARTY LED on the keypad lights up.
CHILD LOCK
Activates or deactivates the control panel button lock in order to avoid the risk of the various functions being activated accidentally by children. The CHILD LOCK LED on the keypad lights up.
4

Overall view
GB
The instructions contained in this manual are applicable to different model refrigerators. The diagrams may not directly represent the appliance purchased. For more complex features, consult the following pages.
LAMP
(see Maintenance)
SHELVES•
WINE RACK*
FRUIT and VEGETABLE bin
FREEZER and
STORAGE compartment
ICE CARE ice tray•
STORAGE compartment
ICE CARE ice tray•
Removable lidded shelf with EGG TRAY
Removable multipurpose
SHELVES•
BOTTLE shelf
Levelling FEET
• Varies by number and/or position. * Available only on certain models.
5
 Loading...