


Model |
U5507/09-900/950 U5511/12-900 |
|
|
|
|
|
|
Language |
English |
|
|
Page |
16 |
Color(cover/body) |
2/1 |
Material |
100g |
Size(W*H) |
210x300 |
Date |
2008.04.18 |
Designer |
Yang zhihua |
Part No. |
MFL34895107 |
Description |
service manual |
Chage Record
No. |
Change content |
ECO No. Date Designer Confirm |
1
2
3
4
5
6
7
8
9
TM
TMUpright Cleaner
®
Aspirateur vertical EliteMC RewindMC
SERVICE MANUAL
MODEL: U5507/09-900/950
U5511/12-900
CAUTION
BEFORE SERVICING THE UNIT,
READ THE SAFETY PRECAUTIONS IN THIS MANUAL.
P /NO.: MFL34895107 |
APR.2008 |
Printed in China |

CONTENTS
|
|
|
|
|
|
.............................................................................. |
|
IMPORTANT SAFEGUARDS |
|
3 |
|||||
|
|
|
|
|
................................................................................... |
||
CLEANER DESCRIPTION |
|
|
4 |
||||
|
|
................................................................................................ |
|||||
SPECIFICATIONS |
|
|
|
|
|
4 |
|
|
.................................................................................................................. |
||||||
PARTS |
|
|
|
|
|
|
4 |
|
|
|
|
|
|
|
...................................................................... |
REPLACEMENT INSTRUCTIONS |
5 |
||||||
|
|
|
......................................................................................... |
||||
TROUBLESHOOTING |
|
|
|
|
9 |
||
|
|
|
|
.................................................................................... |
|||
SCHEMATIC DIAGRAM |
|
|
|
10 |
|||
|
|
.............................................................................................. |
|||||
EXPLODED VIEW |
|
|
|
|
|
11 |
|
2
IMPORTANT SAFEGUARDS
WARNING
Your safety is important to us. To reduce the risk of fire, electrical shock, injury to persons, or damage when using your vacuum cleaner, follow basic safety precautions, including the following:
1.Disconnect power supply before servicing and/or cleaning the unit.
2.Do not leave appliance plugged in. Unplug from outlet when not in use or before servicing.
3.Do not use outdoors or on wet surfaces. Do not pick up water or wet materials.
4.Do not handle plug or appliance with wet hands.
5.Do not allow it to be used as a toy. Close attention is necessary when used by or near children.
6.Use only as described in this manual. Use only attachments recommended by manufacturer.
7.Do not use with damaged cord or plug. If the supply cord is damaged, it must be replaced by the manufacturer or an Authorized Service Center or a similarly qualified person in order to avoid a hazard.
8.Do not pull or carry by the power cord as a handle, close door on cord, or pull the cord around sharp edges or corners. Do not run appliance over the cord. Keep the cord away from heated surfaces.
9.Do not unplug by pulling the cord. To unplug, grasp the plug, not the cord.
10.Do not put any object into openings. Do not use with any opening blocked. Keep free from dust, lint, hair and anything that may reduce air flow.
11.Keep hair, loose clothing, fingers, and all parts of body away from the openings and moving parts. Do not use vacuum cleaner to pick up sharp, hard objects, small toys, pins, etc.
12.Do not pick up anything that is burning or smoking, such as cigarettes, matches, or hot ashes.
13.Do not use to pick up flammable or combustible liquid or vapors such as gasoline or use in areas where they may exist.
14.Do not use vacuum cleaner without dust bag and/or filters in place.
15.Always turn off all controls before unplugging.
16.Do not keep vacuum cleaner on chairs, tables, etc. Extra care must be taken when cleaning stairs.
17.Always unplug the unit or turn off the switch when the unit automatically stops unintentionally. If you don’t, the cleaner could re-start unintentionally.
Polarized plug: This appliance has a polarized plug (one blade is wider than the other). As a safety feature to reduce the risk of electric shock, this plug is intended to fit in polarized outlet only one way. If the plug does not fit fully into the outlet, reverse the plug. If still does not fit, contact a qualified electrician. Do not attempt to defeat this safety feature.
Thermal protector: This vacuum cleaner has a special thermostat that protects the cleaner in case of motor overheating. If the cleaner suddenly shuts off, turn off the switch and unplug the cleaner. Check the cleaner for a possible source of overheating such as a full bag, a blocked hose or clogged filter. If these conditions are found, fix them and wait at least 30 minutes before attempting to use the cleaner. After the 30 minutes period, plug the cleaner back in and turn on the switch. If the cleaner still does not run, contact a qualified electrician.
3
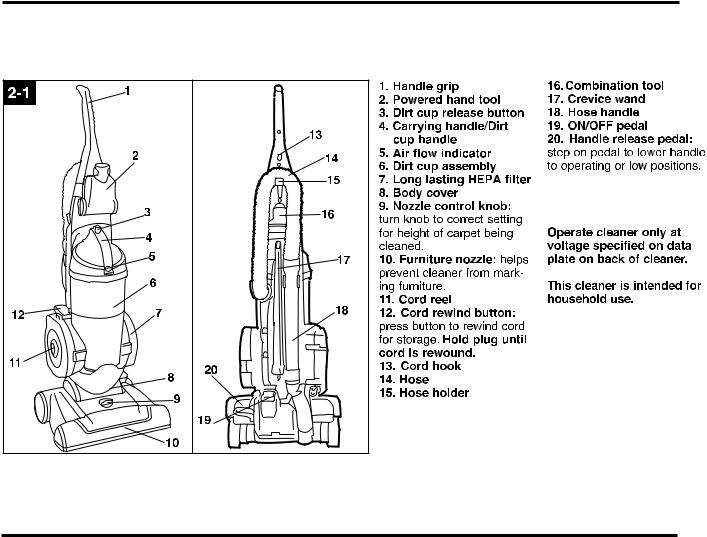
CLEANER DESCRIPTION
After assembly, the cleaner will look like the picture below.
SPECIFICATIONS
|
Model |
U5507/09-900/950 |
|
U5511/12-900 |
|
Power supply |
On the rating label |
|
|
|
Ampacity |
On the rating label |
|
|
|
Dimension/upright position (WxDxH) |
823x385x290 |
|
|
|
Cord length |
8m |
|
|
|
Weight |
7.8 KG |
|
7.8 KG |
PARTS |
|
|
|
|
|
|
|
|
|
|
Model |
U5507/09-900/950 |
|
U5511/12-900 |
|
Dust Bag |
Tank dust |
|
|
|
Belt |
4400FI3351A |
|
|
|
Exhaust Filter(HEPA) |
5231FI2514C |
|
|
|
Cord length |
8m |
|
|
|
|
|
|
|
4

REPLACEMENT INSTRUCTIONS
WARNING
Electrical Shock or Personal Injury Hazard
Disconnect electrical supply before servicing or cleaning the unit. Failure to do so could result in electrical shock or personal injury from cleaner suddenly starting.
5-1


 yellow


5-2
A
Dirt cup
When to empty
It is recommended that the dirt cup be emptied before the dirt reaches the fill line (A), or after every use if preferred.
CAUTION: Very fine materials, such as face powder or cornstarch, may seal the filter and cause loss of suction. When using the cleaner for this type of dust, empty the cup and clean the filters often.
5-3 B 
How to empty
Disconnect cleaner from electrical outlet. Do not use the cleaner without dirt cup or filters in place.
Press dirt cup release button (B) and pivot cup out.
5-4 |
5-5 |
C
D
Holding dirt cup over trash receptacle, press dirt cup door release rod (C) on back of dirt cup to opendirt
cup door (D).
Empty dirt cup.Close
and snap dirt cup door shut.
Place bottom of dirt cup in first.Pivot cup into cleaner body.Press dirt cup firmly until you hear a click to ensure that it is locked in place.
5-6
A

Remove dirt cup as described in Fig. 5-3.
Twist dirt cup lid (A) counterclockwise until arrows on lid and dirt
cupalign. Remove lid with filter cartridge from dirt cup.
5
 Loading...