


©2013TechtronicFloorCareTechnology.LimitedTousdroits.réservés#961151070ID106423-R1
LAPRÉSENTE.GARANTIE L’UTILISATIONDECEPRODUITÀDESFINSCOMMERCIALESINVALIDE
VEUILLEZNEPASRETOURNERCEPRODUITAU.MAGASIN 18009449200dulundiauvendredi,de8hà19h.(HNE)
Vousavezdesquestionsoudesinquiétudes?Veuillezappelerleserviceàlaclientèleau
D’UTILISER.L’ASPIRATEUR IMPORTANT:LIRECESINSTRUCTIONSATTENTIVEMENTAVANT
OWNER’S MANUAL
Operating and Servicing Instructions
Español - página E1
www.hoover.com
com.hoover.www
Instructionsd’utilisationetd’entretien GUIDED’UTILISATI
IMPORTANT: READ CAREFULLY BEFORE ASSEMBLY AND USE.
Questions or concerns? For assistance, please call Customer Service at 1-800-944-9200 Mon-Fri 8am-7pm EST. PLEASE DO NOT RETURN THIS PRODUCT TO THE STORE.
THIS PRODUCT IS INTENDED FOR HOUSEHOLD USE ONLY. IF USED COMMERCIALLY WARRANTY IS VOID.
©2013 Techtronic FloorONCare Technology Limited. All rights reserved. #961151070 ID106423-R1

Thank you for choosing a HOOVER® product.
Please enter the complete model and Manufacturing Code in the spaces provided.
MODEL
MFG. CODE
Hint: Attach your sales receipt to this owner’s manual. Verification of date of purchase may be required for warranty service of your HOOVER® product.
Be sure to register your product online at Hoover.com or call 1-800-944-9200 to register by phone.
MANUFACTURING CODE |
(Label located on bottom of cleaner) |
CONTENTS |
|
Important Safety Instructions ................................................................................... |
3-4 |
Cleaner Assembly ...................................................................................................... |
5 |
Carton Contents .................................................................................................... |
5 |
Connect Hose ....................................................................................................... |
5 |
Connect Wand ...................................................................................................... |
5 |
Connect Nozzle..................................................................................................... |
5 |
How To Use................................................................................................................. |
6 |
Cleaner Description............................................................................................... |
6 |
Cord Release ........................................................................................................ |
6 |
Carry Handle ......................................................................................................... |
6 |
On-Off Switch........................................................................................................ |
6 |
Stair Cleaning........................................................................................................ |
6 |
Floor surface selector............................................................................................ |
7 |
Select Proper Tool ................................................................................................ |
7 |
Attaching Tools ..................................................................................................... |
7 |
Cord Rewind/Storage............................................................................................ |
7 |
Maintenance................................................................................................................ |
8 |
Dirt Cup ................................................................................................................. |
8 |
Cyclone Separator ................................................................................................ |
9 |
Filters .................................................................................................................... |
9-10 |
Checking for and Clearing blockages ................................................................... |
11 |
Troubleshooting ......................................................................................................... |
12 |
Service......................................................................................................................... |
13 |
Warranty...................................................................................................................... |
14 |
If you need assistance:
Visit our website at hoover.com. Follow the authorized dealer locator link to find the Hoover® authorized dealer nearest you or call 1-800-944-9200 for an automated referral of Hoover® authorized dealer locations (U.S. only) or to speak with a customer service representative; Mon-Fri 8am7pm EST.
PLEASE DO NOT RETURN THIS PRODUCT TO THE STORE.
2
|
|
2 |
|
|
|
VEUILLEZNE.MAGASIN AU PRODUIT CE RETOURNER PAS |
|
|
oupourparleràunreprésentantduserviceàlaclientèle(de8hà19h,hne,dulundiau.vendredi) |
|
|
pourécouterunmessageindiquantlesadressesdesmarchandsautorisésHooverMD.(é-.USeulement) |
|
||
autorisésHooverMDpourtrouverlemarchandleplusprèsdechezvous,oucomposezle18009449200 |
|
||
Visiteznotresitewebàl’adresse.ca.hoover.wwwCliquezsurleliendulocalisateurdemarchands |
|
||
|
|
Pourobtenirde: l’assistance |
|
14 |
Garantie..................................................................................................................... |
|
|
13 |
Service....................................................................................................................... |
|
|
................................................................................................................12 |
Dépannage |
|
|
.......................................................................................11 |
obstructions les Retirer |
|
|
..................................................................................................................9 |
Filtres |
|
|
...................................................................9 |
cyclonique séparateur du Nettoyage |
|
|
....................................................................................................8 |
Vide-poussière |
|
|
....................................................................................................................8 |
Entretien |
|
|
.....................................................................7 |
cordon du Enroulement/rangement |
|
|
.........................................................................................7 |
Poseaccessoires des |
|
|
....................................................................7 |
approprié l’accessoire de Sélection |
|
|
...........................................................................................7 |
surface de Sélecteur |
|
|
......................................................................................6 |
escaliers des Nettoyage |
|
|
.................................................................................6 |
marche/arrêt Commutateur |
|
|
...........................................................................................6 |
transport de Poignée |
|
|
.......................................................................................6 |
cordon du Dégagement |
|
|
...................................................................................6 |
l’aspirateur de Description |
|
|
..................................................................................................................6 |
Utilisation |
|
|
................................................................................................5 |
suceur le Installer |
|
|
.........................................................................................5 |
rallonge la Raccorder |
|
|
..............................................................................................5 |
tuyau le Raccorder |
|
|
......................................................................................5 |
l’emballage de Contenu |
|
|
........................................................................................5 |
l’aspirateur de Assemblage |
|
|
.......................................................................3-4 |
importantes sécurité de Consignes |
|
|
|
|
|
|
|
|
CONTENU |
|
figureaubasde ON
|
|
|
|
|
|
|
|
|
.l’appareil) |
|
|
|
|
|
1-800-944-9200. |
|||||||
|
|
|
|
|
|
|
|
|
|
au |
|
partéléphone, |
ou |
com,.Hoover |
l’adresse |
|||||||
(Lenumérodemodèle |
|
|
||||||||||||||||||||
|
N’oubliezpasd’enregistrervotreproduitenligne,à |
|||||||||||||||||||||
|
|
|
|
|
|
|
|
|
DECOFABRI |
|
||||||||||||
|
|
|
|
|
|
|
|
|
DE |
|
ATIC |
|
|
|
||||||||
|
|
|
|
|
|
|
|
|
|
|
|
|
|
|
|
|
|
couverteparlagarantiedevotreproduitHOOVERMD. |
||||
|
|
|
|
|
|
|
|
|
|
|
|
|
|
|
|
|
dated’achatpeutêtreeffectuéeavanttouteréparation |
|||||
|
|
|
|
|
|
|
|
|
|
|
|
|
|
|
|
|
caisseauguidedel’utilisateur,carunevérificationdela |
|||||
|
|
|
|
|
|
|
|
|
|
|
|
|
|
|
|
|
||||||
|
|
|
|
|
|
|
|
|
|
|
|
|
|
|
|
|
||||||
|
|
|
|
|
|
|
|
|
|
|
|
|
|
|
|
|
||||||
|
|
|
|
|
|
|
|
|
|
|
|
|
|
|
|
|
joindrevotrereçude |
estrecommandéde |
Conseil:Il |
|||
|
|
|
|
|
|
|
|
|
|
|
|
|
|
|
|
|
|
|
|
|
CODEDEFABRICATION |
|
|
|
|
|
|
|
|
|
|
|
|
|
|
|
|
|
|
|
|
|
|
||
|
|
|
|
|
|
|
|
|
|
|
|
|
|
|
|
|
|
|
|
|
|
MODÈLE |
|
|
|
|
|
|
|
|
|
|
|
|
|
|
|
|
|
|
|
|
|
|
|
|
|
|
|
|
|
|
|
|
|
|
|
|
|
|
|
|
|
|
|
|
|
|
|
|
|
|
|
|
|
|
|
|
|
|
|
|
|
|
|
|
|
COMPLETSdanslesespacesfournisàceteffet |
|||
|
|
|
|
|
|
|
|
|
|
|
|
|
|
|
|
|
|
|
||||
|
|
|
|
|
|
|
|
|
|
|
|
|
|
|
|
|
série |
Veuillezinscrirelesnumérosdemodèleetde |
||||
Mercid’avoirchoisiunproduitHOOVERMD.
3 |
|
etnepasutiliserl’appareildansdesendroitsoùdetellesmatièressont.présentes |
|
Nepasramasserdeliquidesinflammablesoucombustiblescommedel’essence, |
• |
pourraitcauserdesblessuresoudes.dommages |
|
de.l’escalierNepasplacerl’appareildanslesescaliersousurunmeuble,cequi |
|
oulesdommagesetd’empêcherl’appareildetomber,toujoursleplaceraubas |
|
Êtretrèsprudentpendantl’utilisationdansles.escaliersAfind’éviterlesblessures |
• |
distancedesouverturesetdesautrespiècesmobilesde.l’appareil |
|
Garderlescheveux,lesvêtements,lesdoigtsettouteautrepartieducorpsàbonne |
• |
oudetouteautrematièrequipourraitréduireledébit.d’air |
|
obstruée;garderlesouverturesexemptesdepoussière,depeluches,decheveux |
|
Nepasintroduired’objetsdansles.ouverturesS’assurerqu’aucuneouverturen’est |
• |
Nejamaismanipulerlaficheoul’appareilaveclesmains.mouillées |
• |
etnonlecordonpourdébrancher.l’appareil |
|
Nepastirersurlecordond’alimentationpourdébrancher.l’appareilSaisirlafiche |
• |
coinsoud’arêtes.vives |
|
ousouleverl’appareil,fermeruneportesurlecordonoutirerlecordonautourde |
|
Nepastirerl’appareilparlecordond’alimentation,utiliserlecordonpourtransporter |
• |
laisséàl’extérieur,ildoitêtreapportéàuncentrede.service |
|
fonctionnemal,s’ilesttombéparterreoudansl’eau,s’ilestendommagéouaété |
|
Nepasutiliserl’appareilsilaficheoulecordonest.endommagéSil’appareil |
• |
uniquementlesaccessoiresetlesproduitsrecommandésparle.fabricant |
|
L’appareildoitêtreutiliséseulementcommeindiquédansce.manuelUtiliser |
• |
.ouvertures |
|
enfants,etnepasleurpermettredeplacerleursdoigtsoudesobjetsdansles |
|
risquesdeblessuresoudedommages,tenirleproduithorsdelaportéedes |
|
surveillancelorsquel’appareilestutiliséàproximité.d’enfantsPouréviterles |
|
conçupourêtreutilisépardesenfantsde12anset.moinsExerceruneétroite |
|
Nepaspermettrequel’appareilsoitutilisécommeun.jouetCeproduitn’estpas |
• |
Nepasutiliserl’appareilàl’extérieurousurdessurfaces.humides |
• |
quandiln’estpasutiliséetavantd’enfaire.l’entretien |
|
Nepaslaisserl’appareilsanssurveillancelorsqu’ilest.branchéLedébrancher |
• |
basde.l’appareil |
|
N’utiliserl’aspirateurqu’àlatensionspécifiéesurlaplaquesignalétiquesituéeau |
• |
Assemblercomplètementavant.l’utilisation |
• |
chocélectriqueoudeblessures: |
|
minimumlesrisquesd’incendie,de |
|
AVERTISSEMENT:Afinderéduireau |
|
LIRETOUTESLESINSTRUCTIONSAVANTD’UTILISERCET.APPAREIL |
|
élémentaires,ycomprislessuivantes: |
|
Durantl’utilisationd’unappareilélectrique,toujoursrespecterlesprécau |
|
RANGERETCONSERVERCESINSTRUCTIONS |
|
CONSIGNESDESÉCURITÉIMPORTANTES |
|
IMPORTANT SAFETY INSTRUCTIONS
SAVE THESE INSTRUCTIONS
When using an electrical appliance, basic precautions should always be followed, including the following:
READ ALL INSTRUCTIONS BEFORE USING THIS APPLIANCE.
WARNING: TO REDUCE THE RISK OF FIRE, ELECTRIC SHOCK OR INJURY:
•Fully assemble before operating.
•Operate cleaner only at voltage specified on data plate on bottom of cleaner.
•Do not leave appliance when plugged in. Unplug from outlet when not in use and before cleaning or servicing.
•Do not use outdoors or on wet surfaces.
•Do not allow to be used as a toy. Not intended for use by children age 12 and under. Close supervision is necessary when used near children. To avoid injury or damage, keep children away from product, and do not allow children to place fingers or other objects into any openings.
•Use only as described in this manual. Use only manufacturer’s recommended attachments and products.
•Do not use with damaged cord or plug. If appliance is not working as it should, has been dropped, damaged, left outdoors, or dropped into water, take it to a service center prior to continuing use.
•Do not pull or carry by cord, use cord as a handle, close a door on cord, or pull cord around sharp edges or corners. Do not place product on cord. Do not run appliance over cord. Keep cord away from heated surfaces.
•Do not unplug by pulling on cord. To unplug, grasp the plug, not the cord.
•Do not handle plug or appliance with wet hands.
•Do not put any object into openings. Do not use with any opening blocked; keep free of dust, lint, hair, and anything that may reduce air flow.
•Keep hair, loose clothing, fingers, and all parts of body away from openings and moving parts.
•Turn off all controls before unplugging.
•Use extra care when cleaning on stairs. To avoid personal injury or damage, and to prevent the cleaner from falling, always place cleaner at bottom of stairs or on floor. Do not place cleaner on stairs or furniture, as it may result in injury or damage.
•Do not use to pick up flammable or combustible liquids, such as gasoline, or use in areas where they may be present.
•The hose contains electrical wires. Avoid picking up sharp objects. If hose appears damaged, cut, punctured, or wires are exposed, unplug unit and discontinue use. Do not attempt to repair damaged hose, take to an authorized service center for repair.
•Always turn off this appliance before connecting or disconnecting either hose or motorized nozzle.
•Hold plug when rewinding onto cord reel. Do not allow plug to whip when rewinding.
•Do not pick up anything that is burning or smoking, such as cigarettes, matches, or hot ashes. tions
•Do not use without Dirt Cup and / or Filters in place.
•WARNING: This product contains chemicals known to the State of California to cause
cancer, birth defects or reproductive harm. WASH HANDS AFTER HANDLING.
3
CAUTION:
TO REDUCE THE RISK OF DAMAGE:
•Avoid picking up hard, sharp objects with this product, as they may cause damage.
•Store appropriately indoors in a dry place. Do not expose machine to freezing temperatures.
•Do not use sharp objects to clean out hose as they can cause damage.
•Do not allow power nozzle with brushroll running to sit in one location for an extended period of time, as damage to floor can result.
WARNING:
•To reduce the risk of electric shock, this appliance has a polarized plug (one blade is wider than the other). This plug will fit in a polarized outlet only one way. If the plug does not fit fully in the outlet, reverse the plug. If it still does not fit, contact a qualified electrican to install the proper outlet. Do not change the plug in any way.
4
4
jamaismodifierla.fiche |
|
toujourspas,demanderàunélectricienqualifiéd’installerlaprise.appropriéeNe |
|
nes’insèrepascomplètementdanslaprise,ilfaut.l’inverserSiellenes’insère |
|
quedansuneprisedecourantpolariséeetuniquementdansun.sensSilafiche |
|
fichepolarisée(unetigeestpluslargeque.l’autre)Cettefichenepeutêtreinsérée |
|
Afinderéduirelesrisquesdedéchargeélectrique,cetappareilestmunid’une |
• |
AVERTISSEMENT: |
|
pendantdelonguespériodesdetemps,carcelapourraitendommagerle.plancher |
|
Nepaslaisserlesuceurélectriqueéquipédurouleau-brosseaumêmeendroit |
• |
risqueraitde.l’endommager |
|
Nepasutiliserd’objetsauxarêtestranchantespournettoyerletuyaucarcela |
• |
l’appareilàdestempératuresde.gel |
|
Rangerdefaçonappropriée,àl’intérieur,dansunendroit.secNepasexposer |
• |
peuventendommager.l’appareil |
|
Éviterderamasserdesobjetsdursouauxarêtestranchantesavec.l’appareilIls |
• |
RISQUESDEDOMMAGES: |
|
MISEENGARDE:POURRÉDUIRELES |
|
APRÈSL’UTILISATIONDE.L’APPAREIL |
|
congénitalesoud’autrestroublesdela.reproductionSELAVERLESMAINS |
|
delaCaliforniecommepouvantcauserlecancerou,entraînerdesmalformations |
|
MISEENGARDE:Cetappareilcontientdesproduitschimiquesreconnusparl’État |
• |
Nepasutiliserl’appareilsilesacàpoussièreoulefiltern’estpasen.place |
• |
quibrûle,commedescigarettes,desallumettesoudescendresencore.chaudes |
|
Nepasutiliserl’aspirateurpourramassertoutematièrequidégagedelafuméeou |
• |
Tenirlafichelorsdel’enroulementducordonafinqu’ellenecingle.pas |
• |
Toujourséteindrecetappareilavantd’installerouderetirerlesuceur.électrique |
• |
l’apporteràuncentredeserviceautorisépourlefaire.réparer |
|
l’appareiletcesserde.l’utiliserNepastenterderéparerletuyauendommagé; |
|
sembleendommagé,coupéoutroué,ousilesfilssontexposés,débrancher |
|
Letuyaucontientdesfils.électriquesÉviterd’aspirerdesobjets.acérésSiletuyau |
• |

celui.illustré |
5 |
Lemodèled’aspirateurpeutvarierde |
|
suceur.électrique |
|
Toujourséteindrecetappareilavantd’installerle |
||
! |
AVERTISSEMENT |
! |
|
||
|
|
|
G |
4.1 |
débrancherdu.suceur |
|||
la |
lancepour |
tirerla |
|
et |
suceur |
du |
ment |
dedégage |
lebouton |
||
Pourretirer,appuyersur |
|||
|
suceur.électrique |
||
le |
dans |
fermement |
|
opposéedelarallonge |
|||
4.1Pousserl’extrémité |
|||
|
DUSUCEUR |
||
|
INSTALLATION |
||
|
F |
- |
|
E |
|
|
|
|
D |
|
3.1 |
|
|
|
|
DELA |
|
delarallongeet.tirer |
||||
longesituéàl’extrémité |
||||
déclenchementdelaral |
||||
appuyersurleboutonde |
||||
tuyau, |
du |
rallonge |
la |
|
retirer |
Pour |
.scopique |
||
fonctiontéle |
utiliserla |
|||
(F)surlarallongepour |
||||
bouton |
le |
sur |
Appuyer |
|
déclicsefasse.entendre |
||||
qu’un |
ce |
jusqu’à |
(E) |
|
l’extrémitédelarallonge |
||||
dans |
fermement |
(D) |
||
Pousserlapoignée |
3.1 |
|||
|
RALLONGE |
|||
RACCORDEMENT |
||||
1. CLEANER ASSEMBLY
CARTON CONTENTS
A.Canister-
B.Dirt Cup (Packaged Attached To Canister)
C.Hose Handle Assembly
D.Telescoping Extension Wand
E.PowerNozzle
F.3 in 1 Tool
G.Hard Floor Brush
Remove all parts from carton and identify each item shown.
Make sure all parts are located before disposing of packing materials.
1.1 |
A |
C |
D |
|
|
B |
|
|
E |
F |
G |
A |
B |
C |
|
|
2.1 |
|
coupéoupercé,ousidesfilssont.dénudés |
|
suceur.électriqueNepasutiliserl’appareilsiletuyauestendommagé, |
||
Letuyausouplecontientdesfilsélectriquesnécessairesaubranchementdu |
||
|
IMPORTANT |
|
|
|
dutuyau,puis.tirer |
surlesboutonsdedégagement(C)situésdechaquecôtéduconnecteur |
||
àl’avantde.l’aspirateurPourdébrancherletuyaudel’aspirateur,appuyer |
||
2.1Pousserleconnecteuràl’extrémitédutuyau(A)dansl’ouverture(B) |
||
Toujourséteindrecetappareilavantd’installerle.tuyau |
||
! |
AVERTISSEMENT |
! |
|
||
|
|
|
RACCORDEMTUYAU
CONNECT HOSE
! WARNING !
Always turn off this appliance before connecting hose.
1.2 Push Hose Connector end (A) into opening
(B) on front of cleaner. To disconnect hose from DU ENTcleaner, press release buttons (C) on sides of Hose
Connector and pull out.
G |
F |
E |
|
.manque |
|
|
|
|
|
|
|
|
|
|
|
s’assurerqu’aucunedespiècesillustréesne |
|
|
|
|
|
Avantd’éliminerlesmatériauxd’emballage, |
|
|
|
|
|
Retirertouteslespiècesde |
|
|
|
|
|
.GBrossepourplancherdur |
|
|
|
|
|
.FOutil»«3en1 |
|
|
|
|
|
.ESuceurélectrique |
|
|
|
|
|
.DRallongetélescopique |
|
|
B |
|
|
.CEnsembletuyau/manche |
|
|
|
|
(attachéauréservoirdansl’emballage) |
|
|
|
|
|
|
.BVide-poussière |
|
D |
C |
A |
1.1 |
.AAspirateur |
|
CONTENUDEL’EGEBALLA |
|
||||
|
|
|
|
|
|
|
|
|
|
.1L’ASPIRATEURASSEMBLAG |
EDE |
 IMPORTANT
The flexible hose contains electrical wires for connection to the Power Nozzle and should not be used if damaged, cut, punctured, or wires are exposed.
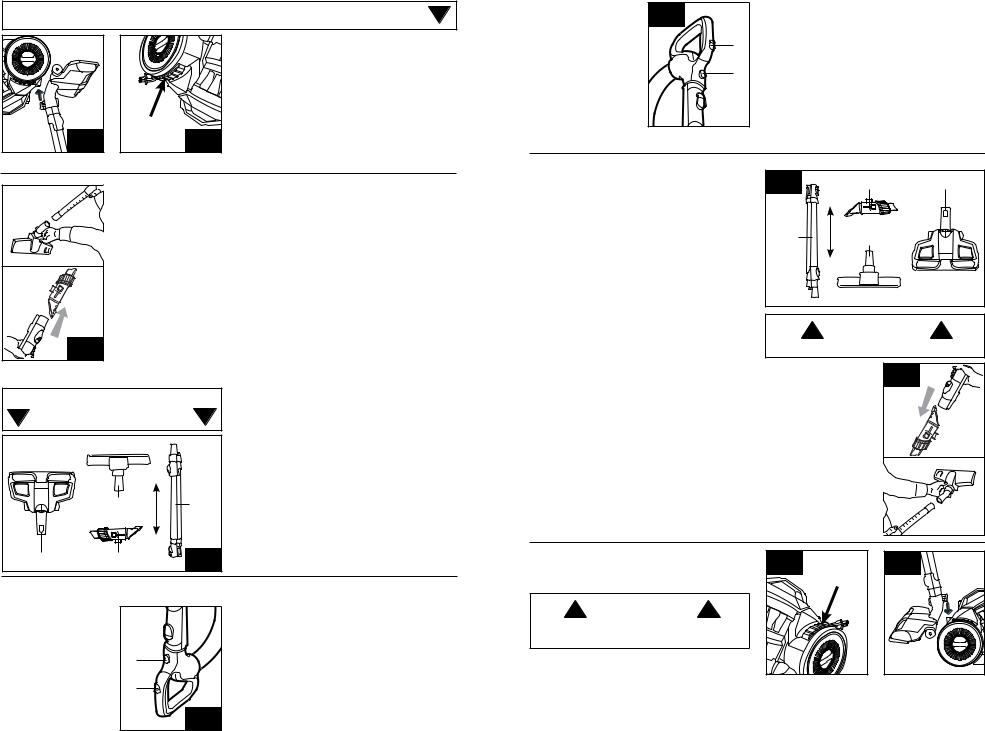
CONNECT WAND
1.3 Push Hand Grip
(D) firmly into end of |
||
.l’emballage |
Latch |
|
Wand |
(E) until |
|
clicks. |
Push |
button |
(F) on wand to utilize telescopic feature. To remove Wand from Hose, press on Wand Release Button on end of Wand and pull apart.
1.3 |
D |
E |
|
F |
|
M
1.2 |
|
|
C |
B |
A |
CONNECT NOZZLE
! WARNING !
Always turn off this appliance before connecting Power Nozzle.
1.4 Push the opposite end of Wand firmly into Power Nozzle.
To remove, press on Nozzle Release Button
(G) and pull wand out to disconnect from nozzle.
1.4 |
G |
5 Actual model may vary from images shown.

|
|
2. HOW TO USE |
|
|
CLEANER DESCRIPTION |
|
|||
1. |
Rinsable Filter Cover |
2.1 |
|
|
2. |
Max Fill Line |
6 |
||
3. |
Dirt Cup |
|
||
|
7 |
|||
4. |
Cyclone Separator |
1 |
||
|
||||
|
(Located inside of |
|
|
|
|
|
|
|
8 |
|
|
the dirt cup) |
|
|
|
|
|
|
|
|
|
5. |
Hose Inlet |
|
|
|
|
|
|
|
|
9 |
6. Dirt Cup & Carry Handle |
|
2 |
|
|
|
|
|
|||
7. Dirt Cup Release Button |
|
|
|
|
|
|
|
|||
8. Auto Cord Rewind Button |
3 |
|
|
|
|
|
|
|||
9. |
Plug |
|
|
4 |
|
|
|
|
|
|
10. Power Nozzle Parking |
|
|
|
|
|
|
|
|||
|
Storage |
|
|
|
|
|
|
|
|
|
11. On/Off Button |
|
5 |
|
|
|
|
8 |
11 |
||
12. Filter Made With HEPA |
|
|
|
|
|
|||||
|
|
|
|
|
|
|
||||
|
Media Cover (Located |
|
|
|
|
|
|
9 |
12 |
|
|
in wheel) |
|
|
|
|
|
|
|
||
|
|
|
|
|
|
|
|
|
|
10 |
CORD RELEASE |
|
|
CARRY HANDLE |
2.2 |
||||||
Grasp the end of the plug and pull to release cord |
2.2 |
Use |
the |
carry |
|
|||||
from cord reel. |
|
|
|
handle |
located |
on the |
|
|||
|
IMPORTANT |
top of the canister to |
|
|||||||
|
cleaner |
from room to |
|
|||||||
|
|
|
|
|
move |
the |
vacuum |
|
||
When pulling on the cord, yellow tape will identify |
room. |
|
|
|
|
|||||
when the cord is almost fully extended. When red |
|
|
|
|
||||||
|
|
|
|
|
|
|||||
tape is visible on the cord, the cord has reached |
|
|
|
|
|
|
||||
its full length. (Do not pull the cord past the red |
|
|
|
|
|
|
||||
tape.) |
|
|
|
|
|
|
|
|
|
|
ON-OFF SWITCH |
2.3 |
|
STAIR CLEANING |
2.4 |
||||||
2.3 Insert the plug into |
|
A |
2.4 |
Clean |
stairs from |
|
||||
the |
electrical |
outlet. |
|
bottom to top. |
|
|
||||
Press the on/off |
pedal |
|
|
|
|
|
|
|
|
|
(A) on back of canister, |
|
|
|
|
|
|
|
|
||
to switch the cleaner on |
|
|
|
|
|
|
|
|
||
and press pedal again |
|
|
|
|
|
|
|
|
||
to turn the cleaner off. |
|
|
|
|
|
|
|
|
||
! CAUTION !
Use extra care when cleaning on stairs. To avoid personal injury or damage, and to prevent the cleaner from falling, always place cleaner at bottom of stairs or on floor. Do not place cleaner on stairs or furniture, as it may result in injury or damage.
Actual model may vary from images shown. |
6 |
6 |
celui.illustré |
Lemodèled’aspirateurpeutvarierde |
|
des.dommages |
|
meuble,cequipourraitcauserdesblessuresou |
||
placerl’appareildanslesescaliersousurun |
||
toujoursleplaceraubasde.l’escalierNepas |
||
dommagesetd’empêcherl’appareildetomber, |
||
les |
Afind’éviterlesblessuresou |
.escaliers |
les |
prudentpendantl’utilisationdans |
Êtretrès |
AVERTISSEMENT |
! |
|
|
|
|
|
versle.haut |
|
|
ensedéplaçantdubas |
|
|
4.2Nettoyerlesescaliers |
|
4.2 |
DESESALIERS |
|
NETTYAGE |
||
A |
|
C |
3.2 |
|
O
|
|
.l’éteindre |
|
||
pour |
pédale |
la |
sur |
|
|
denouveau |
appuyer |
|
|||
l’appareilenmarcheet |
|
||||
pourmettreenmarche |
|
||||
(A)derrièreleréservoir |
|
||||
marche/arrêt |
pédale |
|
|||
.courantAppuyersurla |
|
||||
de |
prise |
une |
dans |
|
|
|
fiche |
la |
Brancher3.2 |
|
|
COMMUTATEUR |
T |
||||
2.2 |
d’unepièceà.l’autre |
||
transporterl’aspirateur |
||
pour |
réservoir |
du |
ledessusducouvercle |
||
detransportsituéesur |
||
poignée |
Utiliserla |
2.2 |
.rouge .maleNepastirerlecordonau-delàdelabande cordon,cedernieraatteintsalongueurmaxi .sortiLorsquelabanderougeestvisiblesurle indiquelemomentoùilestpresqueentièrement Lorsquelecordonesttiré,unrubanjaune
 IMPORTANT
dégagerlecordondel’enrouleurde.cordon Empoignerl’extrémitédelaficheettirerpour
|
|
|
NÉEDETRANSPPOIG |
DÉGAGEMENTORTDU |
||
|
10 |
|
|
|
danslaroue) |
|
|
|
|
|
|
|
|
|
|
|
|
|
substancefiltranteHEPA(situé |
|
|
|
|
|
|
.12Filtrecomposéd’une |
|
12 |
|
|
9 |
|
.11Interrupteurmarche/arrêt |
|
|
|
|
lesuceurélectrique |
|
||
|
|
|
|
|
||
|
|
|
|
|
|
|
11 |
|
|
8 |
5 |
.10Espacederangementpour |
|
|
|
Fiche |
.9 |
|||
|
|
|
||||
|
|
|
|
|
cordonautomatique |
|
|
|
|
|
4 |
Boutondel’enrouleurde |
.8 |
|
|
|
|
vide-poussière |
|
|
|
|
|
|
|
|
|
|
|
|
|
3 |
Boutondedégagementdu |
.7 |
|
|
|
|
2 |
transport |
|
|
9 |
|
|
Vide-poussièreetpoignéede |
.6 |
|
|
|
|
|
Prisedutuyau |
.5 |
|
|
8 |
|
|
|
duvidepoussière) |
|
|
|
|
|
(Situéàl’intérieur |
|
|
|
|
|
|
|
|
|
|
|
|
|
1 |
Séparateurcyclonique |
.4 |
|
7 |
|
|
Vide-poussière |
.3 |
|
|
|
|
|
|||
|
|
6 |
|
1.2 |
maximal |
|
|
|
|
Lignederemplissage |
.2 |
||
|
|
|
|
|||
|
|
|
|
|
||
|
|
|
|
|
Couvercledufiltrelavable |
.1 |
|
|
|
|
DESCRIPTIONDEL’APPAREIL |
||
|
|
|
|
.2UTILISATION |
|
|
celui.illustré |
|
7 |
|
|
|
|
Lemodèled’aspirateurpeutvarierde |
|
|
|
|
|
|
laisserlafichecinglerlorsde |
l’enroulementdu.cordon |
|
! |
|||
Tenirlafichelorsdel’enroulementdu.cordonNepas |
AVERTISSEMENT |
|
||||
|
|
|
tuyauenvuedutransportetdu.rangement |
|||
|
|
permetderangerl’accessoirepourplancheretle |
||||
|
|
del’aspirateur |
situéeàl’arrière |
rangement |
||
|
|
unefentede |
9.2Auxfinsdecommodité, |
|||
|
|
|
|
l’enroulementdu.cordon |
||
|
|
de |
cinglerlors |
.cordonNepaslaisserlafiche |
||
|
|
|
Tenirlafiche.cordonlorsdel’enroulementdu |
|||
9.2 |
8.2 |
lateniretappuyersurlapédaled’enroulementdu |
||||
8.2Pourfairerentrerlecordon,débrancherlafiche, |
||||||
|
|
ENROULEMENT/RANGEMENTDU |
||||
FLOOR SURFACE |
2.5 |
||
SELECTOR |
|
|
|
Carpet, Rug or Hard |
C |
||
Floor Cleaning |
|
||
|
|
||
2.5 Push |
brushroll |
D |
|
button (C) |
to |
turn |
|
brushroll On |
and |
Off. |
|
Brushroll |
|
on: |
|
Vacuums carpets. |
|
|
|
Brushroll off: |
|
|
|
Vacuums hard floors. |
|
||
|
|
|
CORDON |
SELECT PROPER TOOL |
|||
|
|
|
|
|
|
|
|
brossepourplancher.dur |
|||
|
|
|
|
|
recouvrementslaminésetlacéramique,utiliserla |
||||||
|
|
|
|
|
les |
parquets, |
les |
comme |
durs, |
planchers |
|
|
|
|
|
|
|
|
.DLabrossepourplancher: |
||||
|
|
|
|
|
|
|
|
Nettoyagedela.moquette |
|||
|
|
|
|
|
|
Rouleaubrosseàlapositiondemarche: |
|||||
|
|
le.raccordement |
|
|
|
planchersàsurface.dure |
|||||
|
|
pourserreroudesserrer |
servirànettoyerlesmoquettes,lescarpettesetles |
||||||||
|
|
.CSuceurélectrique:Lesuceurélectriquepeut |
|||||||||
|
|
l’accessoirelégèrement |
|||||||||
|
|
vêtementsetlesescaliersrecouvertsde.moquette |
|||||||||
|
|
Tourner |
.rallonge |
||||||||
|
|
meublesrembourrés,lesrideaux,lesmatelas,les |
|||||||||
|
|
danslapoignéeoula |
utilisépourles |
être |
mobilierpeut |
à |
Lesuceur |
||||
|
|
l’accessoire |
fermement |
|
|
|
voletsetles.registres |
||||
|
|
ouàla.rallongePousser |
lesluminaires,lesstoresvénitiens,lesplinthes,les |
||||||||
|
|
meublessculptés,lesdessusdetables,leslivres, |
|||||||||
|
|
directementàlapoignée |
|||||||||
|
|
Labrosseàépousseterpeutservirànettoyerles |
|||||||||
|
7.2 |
êtrefixés |
peuvent |
||||||||
|
|
rembourrés,lesescaliersetles.plinthes |
|||||||||
|
accessoires |
7.2Les |
tiroirs,lesmeubles |
queles |
tels |
desendroits |
|||||
|
|
|
|
|
restreints,lescoinsetlelongdesbordures,soità |
||||||
|
|
|
SEDESPOCCESSOIRESA |
|
|
|
|
|
|||
|
|
|
|
|
Lesuceurplatpeuts’employerdanslesespaces |
||||||
|
|
|
|
|
|
|
|
|
|
suceur.plat |
|
|
Nepasutiliserpourtoiletterun.animal |
|
épousseter,etleglisserverslebaspourutiliserle |
||||||||
! |
MISEENGARDE |
! |
boutondeverrouillagepourdégagerlabrosseà |
||||||||
|
|
|
|
|
|
.cas |
|||||
|
|
|
|
.BAccesoriocombinado3en1: |
|||||||
|
|
|
|
|
manièreàlesséparerouàlesrassembler,selonle |
||||||
|
|
|
|
|
boutonetfaireglisserlespartiesdelarallongede |
||||||
|
|
|
|
|
le |
rallongetélescopique,enfoncer |
la |
raccourcir |
|||
|
|
|
|
|
ou |
:Pourallonger |
.ARallongetélescopique |
||||
|
|
|
|
|
|
|
|
|
|
|
le.ranger |
|
|
|
|
|
accessoire,letourner,leretireravecprécautionet |
||||||
|
|
D |
A |
|
l’extrémitédelalanceoudu.tuyauPourretirerun |
||||||
|
|
|
l’accessoireà |
d’insérerfermement |
6.2Ilsuffit |
||||||
|
|
|
|
|
|||||||
|
|
|
|
|
|
|
|
ccessoireAcombiné3en |
|||
3-in-1 Combination Tool
2.6 Simply push the attachment firmly on the end of les nettoyerthePourwand or hose end. To remove tool, twist and
pull apart gently and return to storage.
A.Telescoping Extension Wand: The telescoping extension wand can be lengthened or shortened by pushing the button in and and sliding the wand apart or together as required.
B.3 in 1 Combination Tool: Push lock button in to release dusting brush and slide down to revert to crevice mode.
Crevice Tool may be used in tight spaces, corners and along edges in such places as dresser drawers, upholstered furniture, stairs and baseboards.
Dusting Brush may be used for furniture, table tops, books, lamps, lighting fixtures, venetian blinds, baseboards, shutters, and registers.
Furniture Nozzle may be used for upholstered le sur Appuyer furniture, draperies, mattresses, clothing, and
carpeted stairs.
C. Power Nozzle: May be used for carpets, rugs and hard floor surfaces.
Brushroll on: Vacuums carpets.
Brushroll off: Vacuums hard floors.
D. Hard Floor Tool: Use hard floor tool to vacuum
hardwood, laminate and ceramic floors. 1
|
|
|
|
|
|
6.2 |
|
APPROPRIÉ |
CORD REWIND/ STORAGE |
|
|
|
C |
|
B |
|
|
||||
|
|
|
|
NCCESSOIREDEL’ASÉLECTIO |
||||||
|
|
|
|
|
|
|
|
|
2.8 To return cord for storage, unplug from wall hold |
|
|
|
|
|
|
.rideaux |
|
|
|
plug and press down Cord Release Pedal. |
|
|
|
|
|
|
|
|
|
! WARNING ! |
||
descarpetteslégèresdes |
|
|
|
|||||||
à |
s’applique |
nettoyage |
|
|
|
|||||
le |
si |
ou |
moquettes |
|
|
planchersàsurface.dure |
Hold plug when rewinding onto cord reel. Do |
|||
certaines |
sur |
pousser |
|
|
||||||
|
Rouleaubrosseàlapositiond’arrêt:Nettoyagede |
not allow plug to whip when rewinding. |
||||||||
à |
difficile |
est |
électrique |
|
||||||
suceur |
|
le |
si |
l’ouvrir |
D |
|
dela.moquette |
2.9 For convenience there is a parking slot |
||
succion; |
|
de |
puissance |
|
||||||
|
Nettoyage |
Rouleaubrosseàlapositiondemarche: |
||||||||
la |
maximiser |
pour |
|
located at the rear of the vacuum cleaner |
||||||
|
|
|
||||||||
puissancedesuccion(D) |
|
mettrelerouleaubrosseenmarcheet.l’arrêter |
||||||||
C |
where the floor tool and hose can be parked |
|||||||||
Fermerlerégulateurdela |
5.2Appuyersurleboutondurouleaubrosse(A)pour |
|||||||||
for carrying and storage. |
||||||||||
|
|
|
|
DECCIONSU |
||||||
|
|
|
|
|
|
|||||
|
|
|
|
|
deplanchersàsurfacedure |
|
||||
|
LAPUISSAN |
5.2CE |
|
|
||||||
|
ettoyageNdemoquettes,decarpetteset |
|
||||||||
|
|
|
ULATEURRÉGDE |
|
TEURDESURFASÉLEC |
CE |
||||
SUCTION REGULATOR
Slide the Suction Regulator (D) to close for maximum suction; open if power nozzle is difficult to push on some carpets or if lightweight rugs or draperies are being cleaned.
2.6 |
B |
C |
A D
! CAUTION !
Not to be used for grooming a pet.
ATTACHING 2.7 TOOLS
2.7 Tools may be attached directly to the hand grip or to the telescoping wand. Firmly push tool into
the hand grip or wand. Twist tool slightly to tighten or loosen connection.
2.8 |
2.9 |
7 Actual model may vary from images shown.
 Loading...