

Page 1

Security Label Applier
Operator Manual
Model
SLA-1, SLA-2 ML-44180
SLA-2A ML-44197
SLA-3 ML-44192
701 S. RIDGE AVENUE
TROY, OHIO 45374
937 332-3000
www.hobartcorp.com
© HOBART 2006 F33995 (Rev. A, 6/06)
Page 2
Security Label Applier (SLA)
SAVE THESE INSTRUCTIONS
Note
This equipment has been tested and found to comply with the
limits for a Class A digital device, pursuant to Part 15 of the
FCC Rules. These limits are designed to provide reasonable
protection against harmful interference when the equipment is
operated in a commercial environment. This equipment
generates, uses, and can radiate radio frequency energy and, if
not installed and used in accordance with the instruction
manual, may cause harmful interference to radio
communications. Operation of this equipment in a residential
area is likely to cause harmful interference; in which case, the
user will be required to correct the interference at his own
expense.
CAUTION — Look At This
To provide continued protection against risk of electric shock,
connect to properly grounded outlets only.
F33995 (Rev. A, 6/06) Page 2 of 12 © HOBART 2006
Page 3
Security Label Applier
The Security Label Applier (SLA) is designed to apply an
Electronic Article Surveillance (EAS) label to a standard Ultima
scale label. The SLA works in conjunction with an Ultima (with
remote keypad) and an Ultima Wrapping System (UWS),
Compact Label Applier (CLA) or Indexing Label Applier (ILA).
As a label is printed and expelled from the Ultima Printer, the
SLA attaches a security label to the adhesive side of the
merchandising label. The UWS, CLA or ILA then places the
label on the package. As the label’s barcode is scanned, the
security label is deactivated by the security provider’s
(Checkpoint or Sensormatic) equipment and will not be
detected by the store security system.
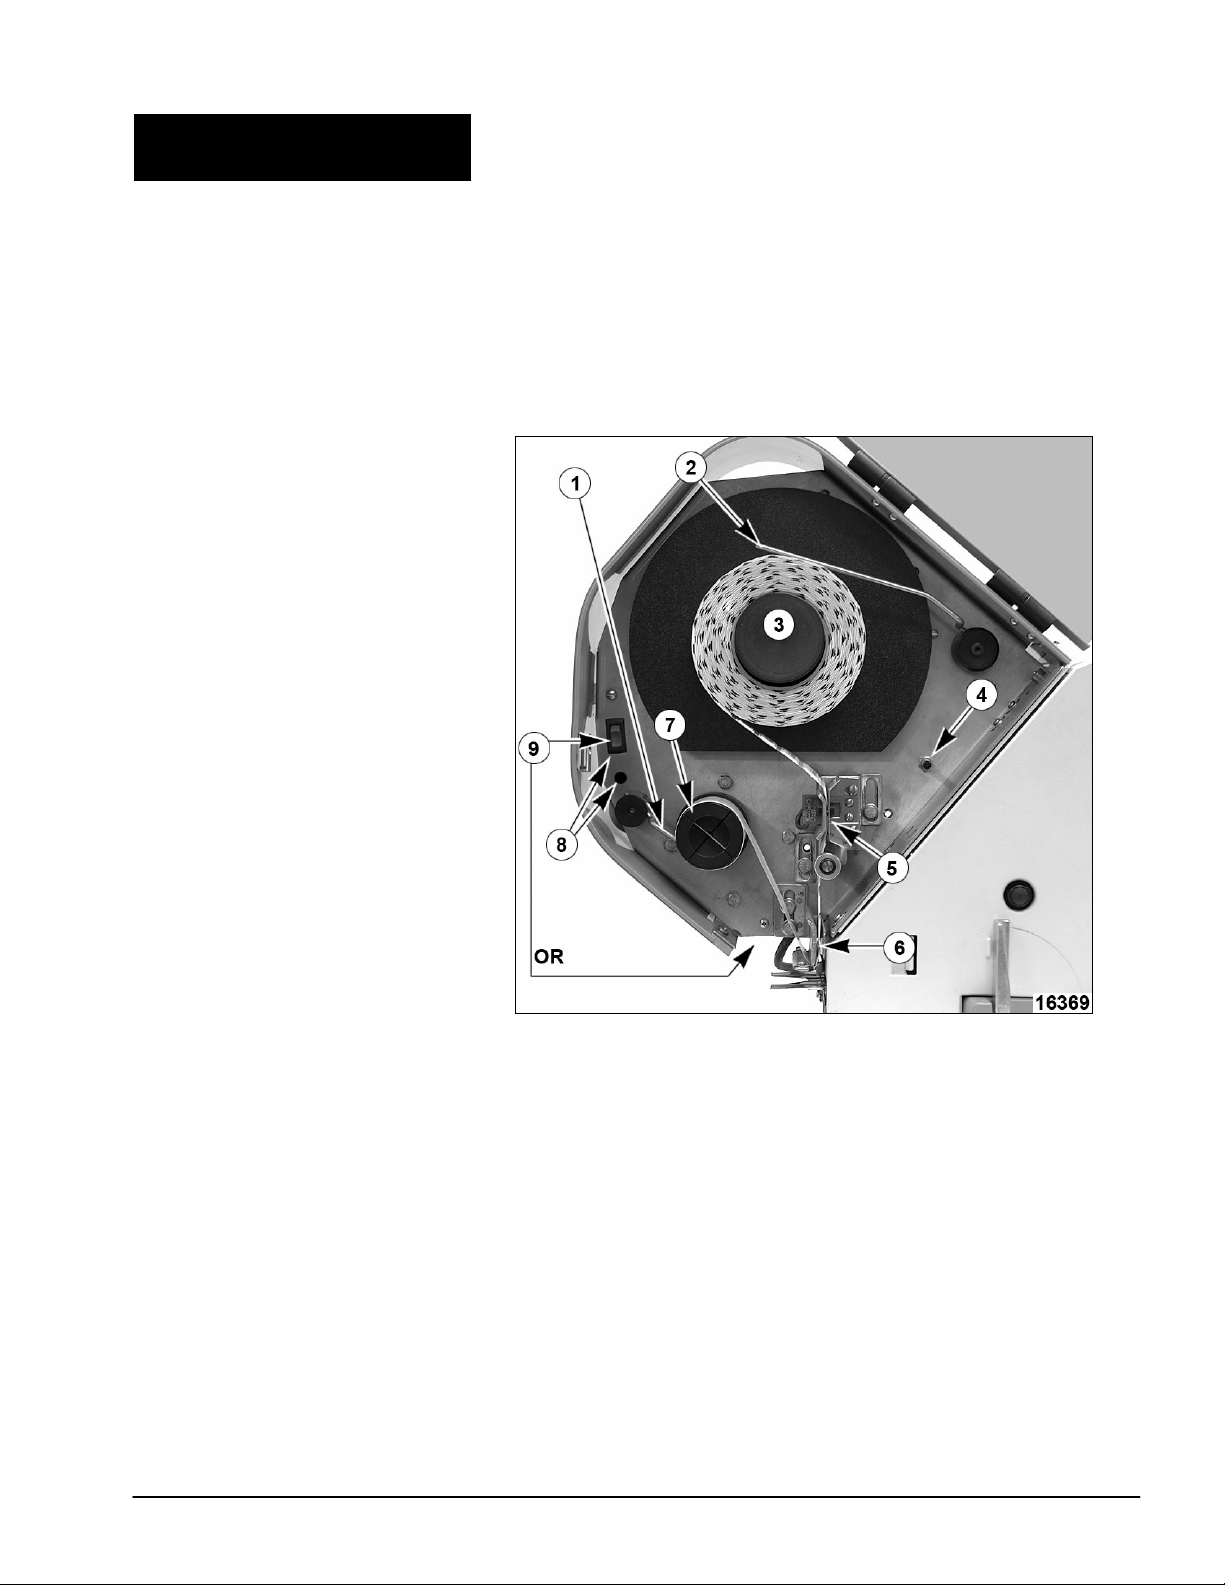
1. Dwell arm 6. Peel bar
2. Tension arm 7. Take up spool
3. Label hub 8. Power on indicator
4. Label eject switch 9. ON/OFF power switch
5. Label sensor assembly
© HOBART 2006 Page 3 of 12 F33995 (Rev. A, 6/06)
Page 4
Note
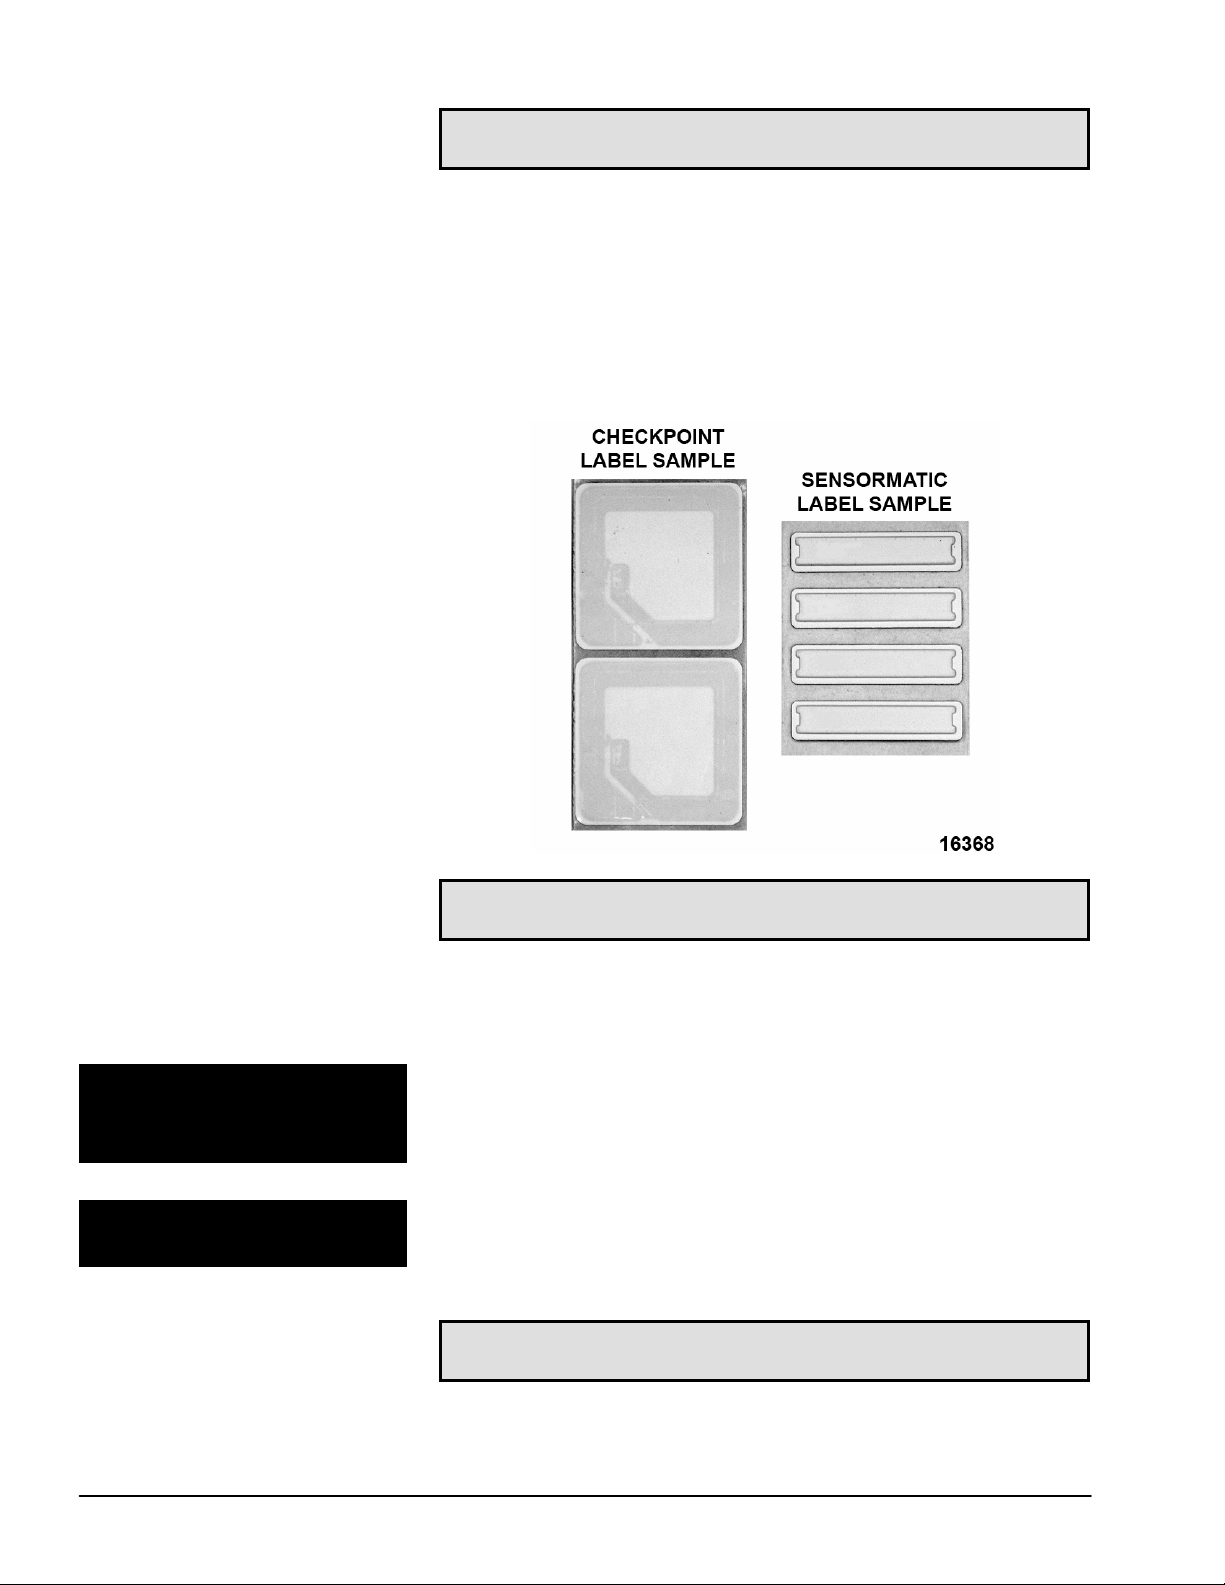
There are two types of security labels available. Depending on
If used with an HWS or NSW Semi Automatic System, the
security label is automatically placed on the Ultima scale label.
The Operator then hand applies the labels to the package.
your store security system, you will either use the Checkpoint
label (similar in size to the safe handling label) or the
Sensormatic label (similar to what is used with audio CDs).
Note
Powering Up/Powering Down
Setting Up the SLA
F33995 (Rev. A, 6/06) Page 4 of 12 © HOBART 2006
For label ordering information, contact your security system
provider.
Power runs to the SLA through a standard 110 VAC electrical
connection. Flip the switch located inside the unit or lower front
to power up/down.
The SLA can determine which packages receive a security label
by Minimum Unit Price, Minimum Total Price and/or PLU
number.
Note
Early model SLA was only configurable for minimum Unit Price.
Page 5

1. At the Ultima Keypad, PRESS [SUPER MENU ON/OFF]. If
applicable, enter your Secret ID. The Supervisor Menu
displays.
2. PRESS [F5] to select Scale Setup Menu.
3. PRESS [F3] to select Labels Menu.
4. PRESS [F6] to select Security Labels.
© HOBART 2006 Page 5 of 12 F33995 (Rev. A, 6/06)
Page 6

5. From the Security Labels screen, enter the minimum Unit
Price and/or the minimum Total Price. A security label will be
applied to any package with a Unit Price and/or Total Price
that is the same as or higher than the amounts entered. If
the Unit Price and Total Price are lower than the entered
prices, the security label will not be applied.
6. PRESS [ESC] to return to the Start a Run screen.
To set up the SLA to apply a label by PLU:
1. At the Ultima Keypad, PRESS [SUPER MENU ON/OFF]. If
applicable, enter your Secret ID. The Supervisor Menu
displays.
2. Use the numeric keypad to enter 10 in the Function code
box and PRESS [ENTER].
F33995 (Rev. A, 6/06) Page 6 of 12 © HOBART 2006
Page 7

3. Use the numeric keypad to enter PLU number in the Product
number and PRESS [ENTER].
4. PRESS [F2] to select Apply Security Label.
5. PRESS [ESC] to return to the Start a Run screen.
Once set up, the SLA runs with minimal operator intervention.
Operating the SLA
The labels are automatically generated, combined and placed
on the appropriate package.
The SLA contains a label sensor to alert the operator when out
of labels or when labels are not advancing. When the sensor
does not find a label edge in 5 seconds, the message Out of
Security Labels displays on the Ultima console and a beep
sounds to alert the operator.
Note
If used with an HSW or NSW Semi Automatic System, the
security label is automatically placed on the scale label, but the
Operator must hand apply the labels to the package.
© HOBART 2006 Page 7 of 12 F33995 (Rev. A, 6/06)
Page 8

Loading Labels
The SLA contains a label sensor to alert the operator when out
of labels or when labels are not advancing. When applicable,
the message Out of Security Labels displays on the Ultima
console and a beep sounds to alert the operator. Although,
when out of security labels, the Ultima merchandising labels
continue to print. You may also receive this message if the SLA
is turned off, but you are still operating the Ultima printer.
Refer to the following procedures and diagrams to correctly load
labels. Be sure the SLA is powered off when loading labels.
Note
If applicable, remove the backing paper from the take-up spool
and label core from the label hub before you begin loading.
To load labels:
1. Open the SLA label supply door.
2. Turn off power at ON/OFF power switch.
3. Place the roll of labels on the label hub.
4. If the label roll does not have a leader, strip approximately
12” of labels off the backing paper to create a leader.
5. Thread the leader between the label sensor guide and the
label guide as shown in Fig 1 and 2. On the early model
SLA, thread the leader between the label sensor guide and
the 2 guide pins as shown in Fig 3 and 4.
6. Continue threading the leader past the label guide pin as
shown in Fig 1-4.
7. For Sensormatic labels, the leader should be threaded
between the stripper plate and the stripper guide plate. Loop
the end of the leader and thread through the slit in the
stripper plate as shown in Fig 2 or Fig 4. For Checkpoint
labels, the leader should be threaded around the stripper
plate as shown in Fig 1 or Fig 3.
8. Thread the leader thru the slots of the take-up spool. Wrap
the leader counterclockwise around the take-up spool as
shown in Fig 1-4.
9. Turn the take-up spool counterclockwise a few times to be
sure the backing paper winds securely.
10. Turn on power at ON/OFF power switch.
11. Press label eject switch to position the label so that it is
visible below the edge of the stripper plate. This may require
the label eject switch to be pressed several times.
12. Close the SLA label supply door.
F33995 (Rev. A, 6/06) Page 8 of 12 © HOBART 2006
Page 9

Fig 1 Fig 2
Fig 3 Fig 4
© HOBART 2006 Page 9 of 12 F33995 (Rev. A, 6/06)
Page 10

Cleaning and Maintaining
Maintain the SLA by regularly cleaning the paper dust from
inside the unit. Clean the SLA exterior surfaces with a cloth and
warm water/detergent solution. When cleaning, be sure to
protect the unit from direct water entry.
To clean the SLA:
1. Dampen a soft cloth with mild detergent and water.
2. Wipe the exterior surfaces.
Note
Remove any adhered labels with an alcohol soaked cloth. Do
not use metal to scrape the labels or adhesive off of the unit.
Troubleshooting
DISPLAY PROMPTS POSSIBLE CAUSES/REMIDIES
1. Out of security labels. Load security
labels or press escape to continue.
2. Verify labels threaded correctly.
3. SLA power switch is OFF.
4. Check power cord and power source.
5. Call local Hobart Office.
SYMPTOMS POSSIBLE CAUSES/REMIDIES
Power ON indicator is not illuminated and unit will
not function.
1. SLA power switch is OFF.
2. Check power cord and power source.
3. Call local Hobart Office.
Power ON indicator is illuminated and will not
issue label (motor does not run).
Issue label only when manual eject button is
pressed.
1. Call local Hobart Office.
1. Minimum Unit Price or minimum Total
Price is set too high in the Security label
setup and/or apply by PLU is not
configured correctly in Change Product
screen in Supervisor.
2. Call local Hobart office.
Label does not peel off of backing paper.
1. Verify labels threaded correctly.
2. Call local Hobart office.
F33995 (Rev. A, 6/06) Page 10 of 12 © HOBART 2006
Page 11

SYMPTOMS POSSIBLE CAUSES/REMIDIES
Multiple labels are issued followed by an
audible beeping sound.
No label is issued followed by an audible
beeping sound
.
1. Verify labels threaded correctly.
2. Call local Hobart office.
1. Out of security labels.
2. Missing security labels on backing paper.
3. Verify labels threaded correctly.
4. Call local Hobart Office.
Security label placement on Ultima label is
incorrect.
1. Verify that dwell control lever is resting
against the backing paper on the take-up
spool.
2. Verify labels threaded correctly.
3. Call local Hobart office.
© HOBART 2006 Page 11 of 12 F33995 (Rev. A, 6/06)
Page 12

© HOBART 2006 F33995 (Rev. A, 6/06)
 Loading...