

Page 1
SD100 Service-Counter Scale
QUICKSTART GUIDE
This booklet describes the functions you need to start using your scale.
For additional details and advanced functions, consult the User Instructions
on the CD shipped with the scale. The User Instructions may include functions
that are not applicable to your model scale. Ignore any sections that do not
apply.
Label Source
To order labels or speak with an ITW label representative, please call
1 - 800 - 695 - 0036.
F35523 (Sept. 2008)
Page 2
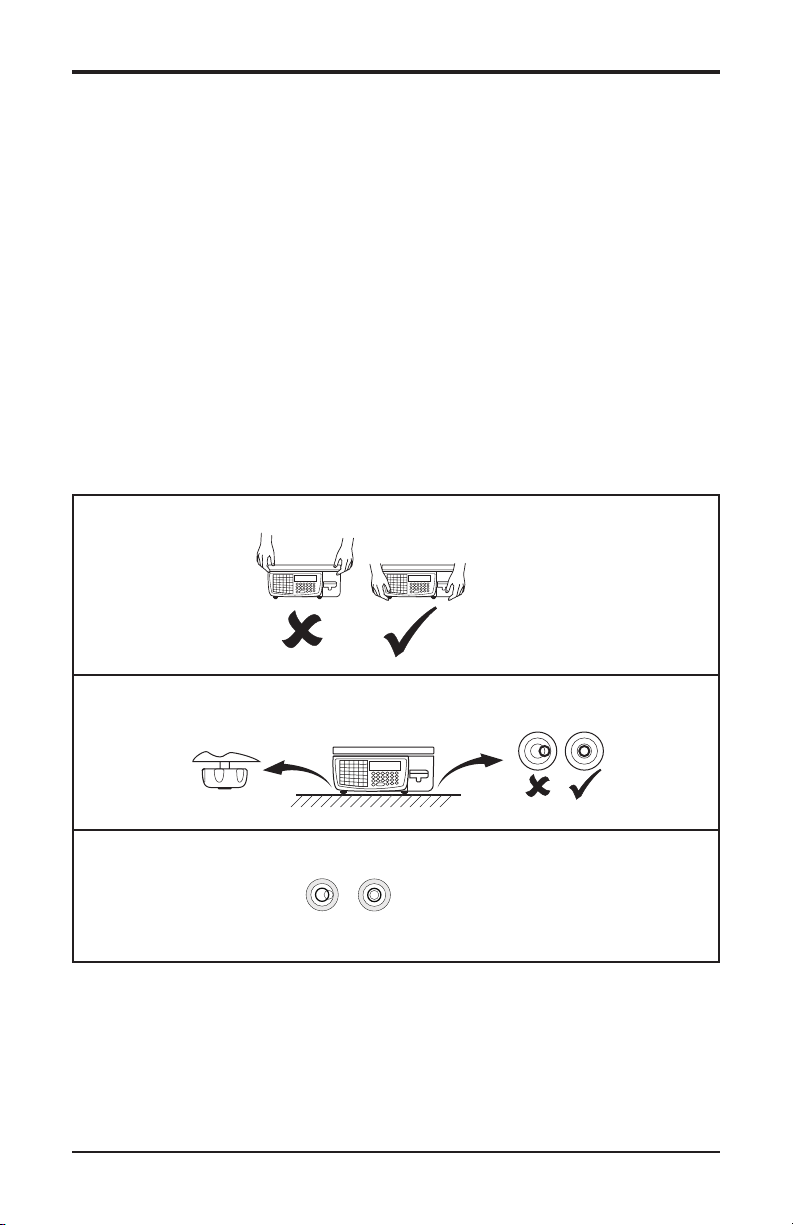
INSTALLATION
Make sure that the scale is placed securely on a at and level surface.
Training
Do not attempt to operate or carry out any procedure on a machine or
network unless you have received the appropriate training or read the
instructions provided.
Radio Interference
This scale is a class A device. In a domestic environment, this device may
cause radio interference in which case the user may be required to take
adequate preventive measures.
Handling
2
Leveling
Weights & Measures Requirement
©
Hobart, 2008
Page 3
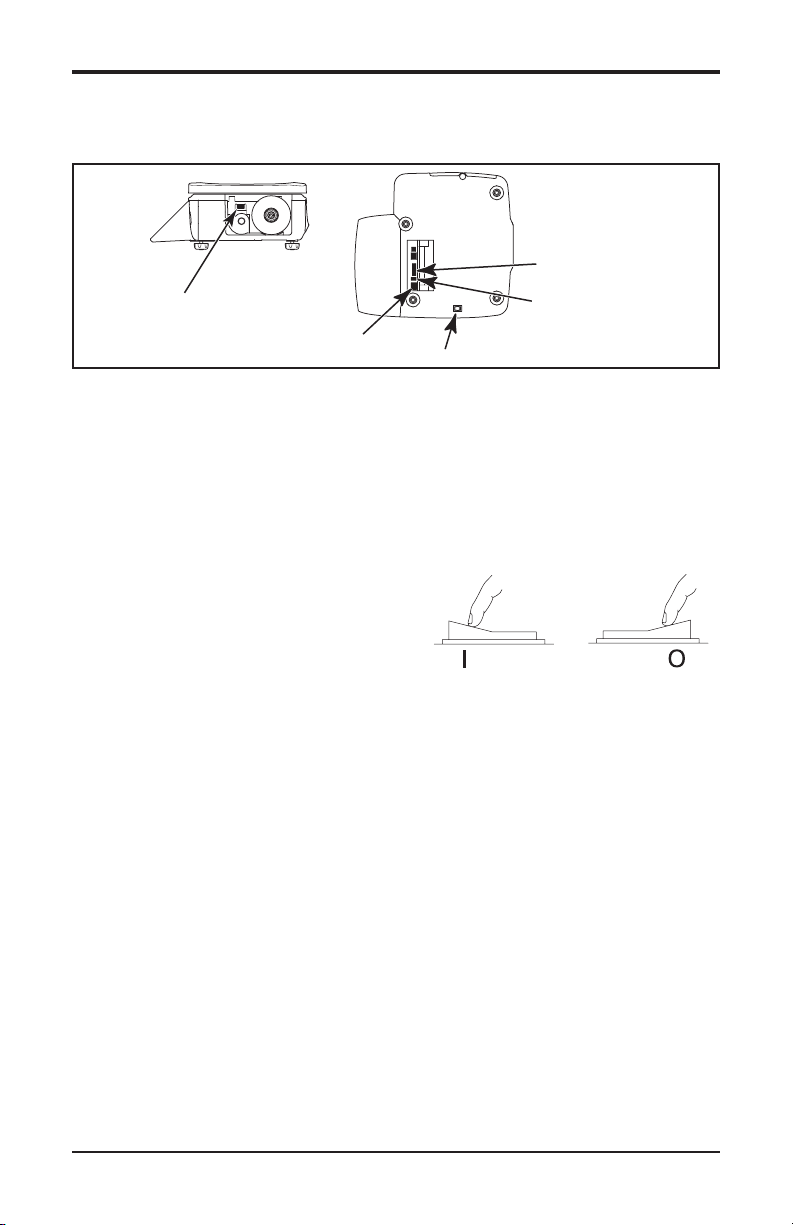
Connections
USB
ETHERNET NETWORK
ON/OFF SWITCH
USB
POWER
The scale should be connected to a 120 Volt receptacle protected by a
15 Amp. circuit breaker or fuse. The transformer on the power cord
converts the 120 VAC power to 24 Volts DC.
Before operating your scale make sure that it has been programmed with
the required data and setup with the necessary functions.
Switching On & Off
The switch is located underneath on the
left side. Turn off before unplugging.
ON OFF
3
Page 4
Clear
Test
Override
Zero
Accept
Void
Hold
Prepack
Enter
PLU
Tare
Print
Enter
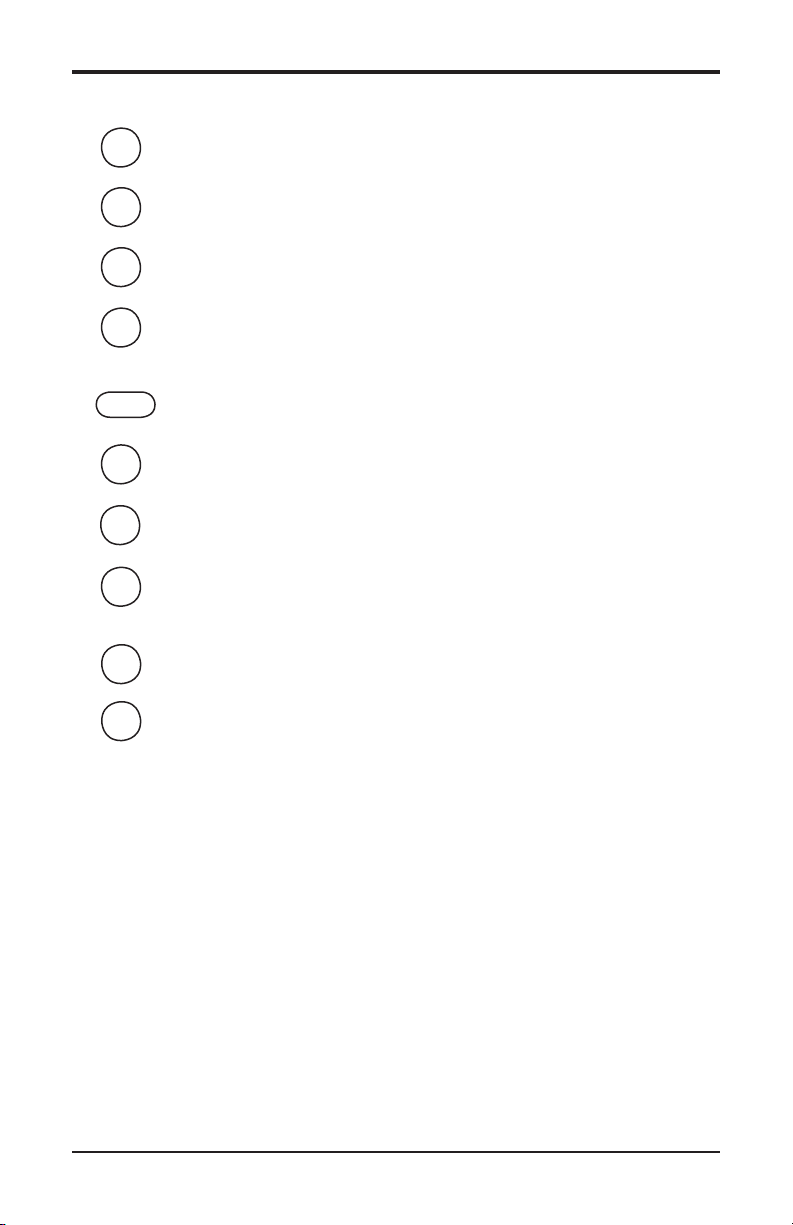
OPERATION
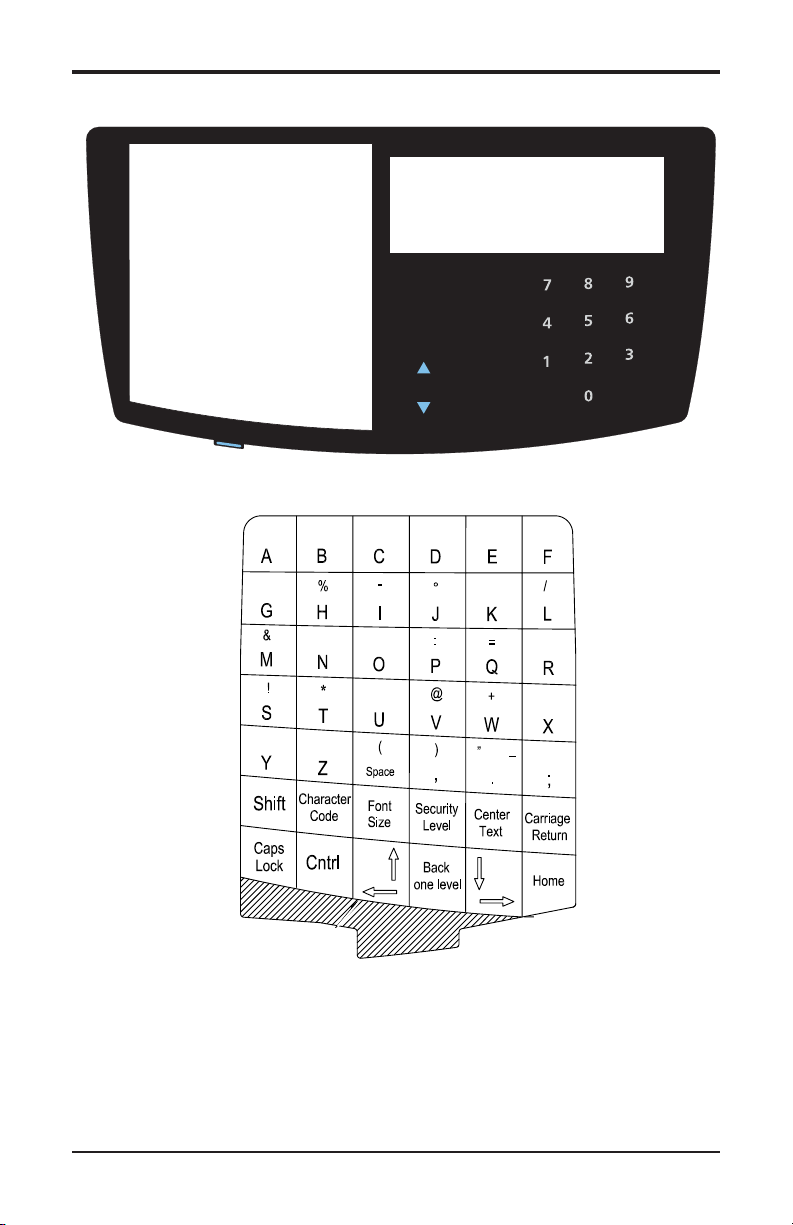
Speedkeys Display & Operator Keys
Programming Keys
Keyboard Overlay
The keyboard overlay reverses to display the manager side of the
overlay when programming the scale or the operator Speedkeys
when weighing and labeling packages. To reverse the overlay,
hold the tab in the middle of the bottom and slide it down.
Reverse the overlay and slide it back under the protective cover.
4
Page 5
Operator Keys
Zero
Resets the scale weight to zero.
Tare
Subtracts the weight of the container when weighing items.
Hold
Prepack
Prepack mode retains the tare and the PLU until cancelled.
Clear
PRINT
Enter
Enter
PLU
Override
Accept
Test
Cancels a PLU or price override. It also clears messages or
characters from the display.
Prints a label.
Conrms data entry.
Allows you to enter the PLU number using the number keys.
Allows you to enter a price that is different from the programmed
price of a PLU.
Saves entered data during Create / Edit PLU.
Allows you to do the following three functions:
1. Initiates test sequence for the display.
2. Press again during the test sequence to print a test report.
3. Press an operator key and enter their PIN number during
the test sequence to gain access to Manager Mode.
Speedkeys (PLUs)
The white keys on the ip side of the programming keyboard
overlay function during normal operation. They can be assigned
to special functions such as specic PLUs, Manual Price entry,
lb/oz toggle, Operator ID, department, etc.
5
Page 6
SD
Function List
Selected Function
Basic Programming
1
2
4
5
6
7
3
8
0
9
1
2
4
5
6
7
3
8
0
9
Operator PIN
Operator 1 is the default and the associated PIN is 4296.
For additional security, you can assign each operator with an
individual PIN and individual function access limits.
To Enter Manager Mode (before programming)
888888 888888
Test
888888 888888
Enter
Press Test, then Enter.
Authorizing Op 1
Operator 1
Operator 2
Operator 3
Operator 4
s
s
Select Operator
Enter
PIN
4296
Manager Mode Layout
SD100 | Max 30 lb Min 0.20 lb d=0.01lb
5 Communication
6 USB Backkup
7 Audit Mode
System Data Accesses These Submenus
1 Products 5 Tables 9 Nutri Facts
2 Departments 6 Add Label
3 Operators 7 Date & Time
4 Messages 8 Function Security
Programming Keys
The programming keys are used with some operator keys (below)
to move around the menus and select menu items.
Enter
Selects the highlighted
^
^
^
^
Enter
menu item.
Move up or left on menu.
s
=
Move down or right on
s
=
menu.
Use number keys to select
a numbered menu item.
Quick save during PLU create/edit.
Accept
Back
Move to previous menu.
one level
Move to top level of menu. At top level
of menu, Home returns you to operator
Home
mode.
6
Page 7
Basic Operations
1
2
4
5
6
7
3
8
0
9
1
2
4
5
6
7
3
8
0
9
1
2
4
5
6
7
3
8
0
9
1
2
4
5
6
7
3
8
0
9
1
2
4
5
6
7
3
8
0
9
Operator 1
Maria
1
2
4
5
6
7
3
8
0
9
1
2
4
5
6
7
3
8
0
9
1
2
4
5
6
7
3
8
0
9
1
2
4
5
6
7
3
8
0
9
C
C
Æ
Í
B
Ä
À
%
g
G
A
Á
Å
1
2
4
5
6
7
3
8
0
9
1
2
4
5
6
7
3
8
0
9
1
2
4
5
6
7
3
8
0
9
1
2
4
5
6
7
3
8
0
9
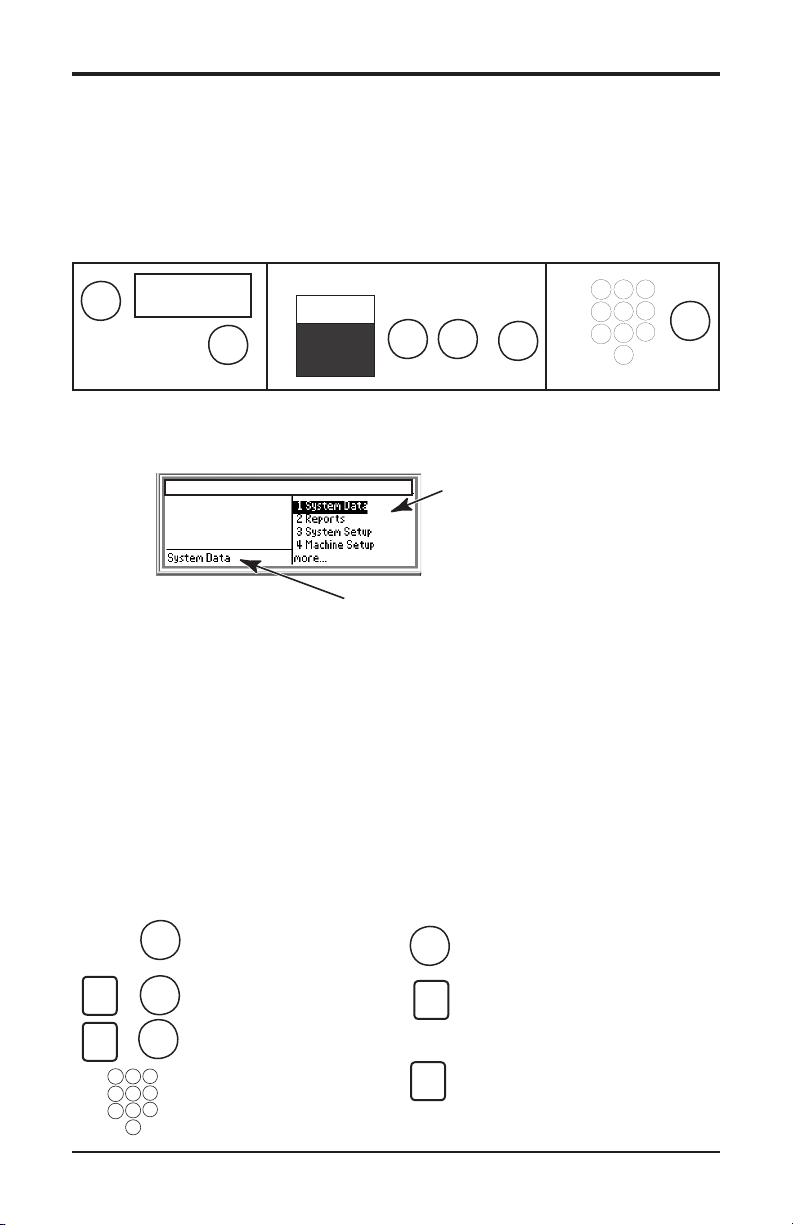
Assigning PLU Keys
Manager Mode
4 Machine Setup
1 Keyboard Setup
Enter
1 Key Assign
1 Standard Assign
Menu Item Number
Programming Operators
Manager Mode
1 System Data
Enter
3 Operators
Menu Item Number
Reenter
PIN
Enter Enter
Security Level
0 - 2
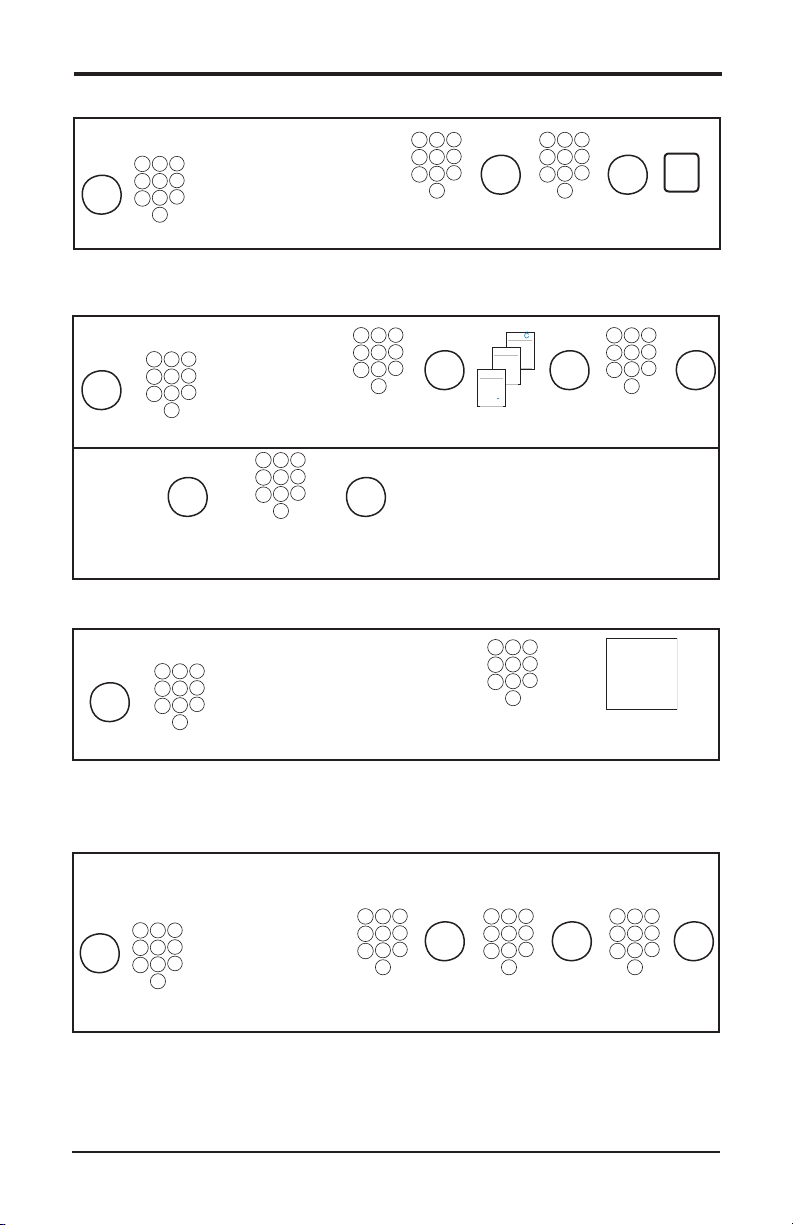
Assigning Operator Keys
Manager Mode
Enter
Menu Item Number
4 Machine Setup
1 Keyboard Setup
1Key Assign
1 Standard Assign
2 Operator
Dept. Number
Operator Number
0 - 20
Enter Enter
PLU Number
0 - 9
PLU
?
Assign
PLU Key
Enter Enter Enter
PIN
Operator Name
Logged On/Off
Operator Number
0 - 20
Assign Operator Key
Changing Prices
Use this function if you want to change only the unit/item price.
Manager Mode
1 System Data
1 Products
Enter
Menu Item Number
1 Change Price
Dept. Number
Enter Enter
PLU Number
0 - 9
Enter
New Price
7
Page 8
1
2
4
5
6
7
3
8
0
9
Operator Functions
1
2
4
5
6
7
3
8
0
9
1
2
4
5
6
7
3
8
0
9
1
2
4
5
6
7
3
8
0
9
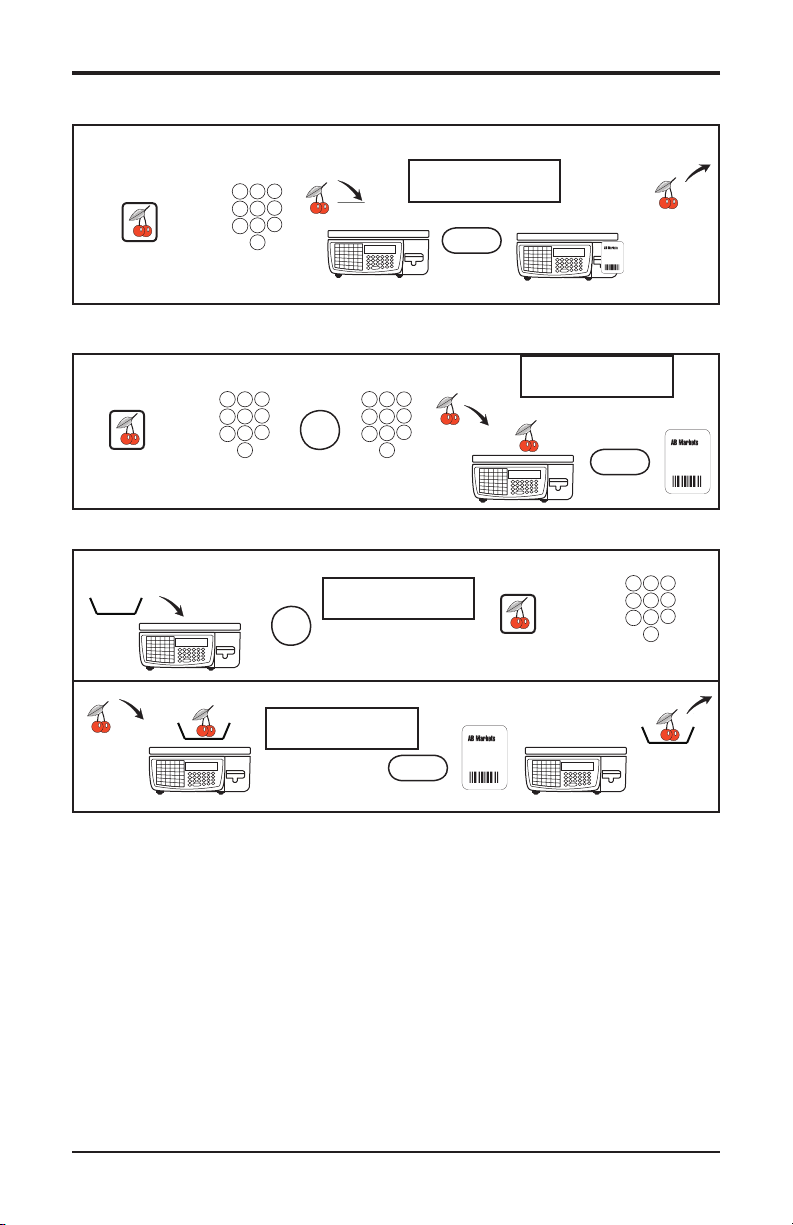
Printing Labels
Sales Mode
0.65 LB $1.40
Cherries
or
Speedkey PLU PLU Number
Using the Override Key
Sales Mode
or
Speedkey PLU PLU Number New Price
Override
Using a Tare
Sales Mode
0.00 LB $0.00
Tare
0.65 LB $1.40
Cherries
PRINT
0.65 LB $1.40
Cherries
PRINT
or
Speedkey PLU PLU Number
PRINT
8
Page 9
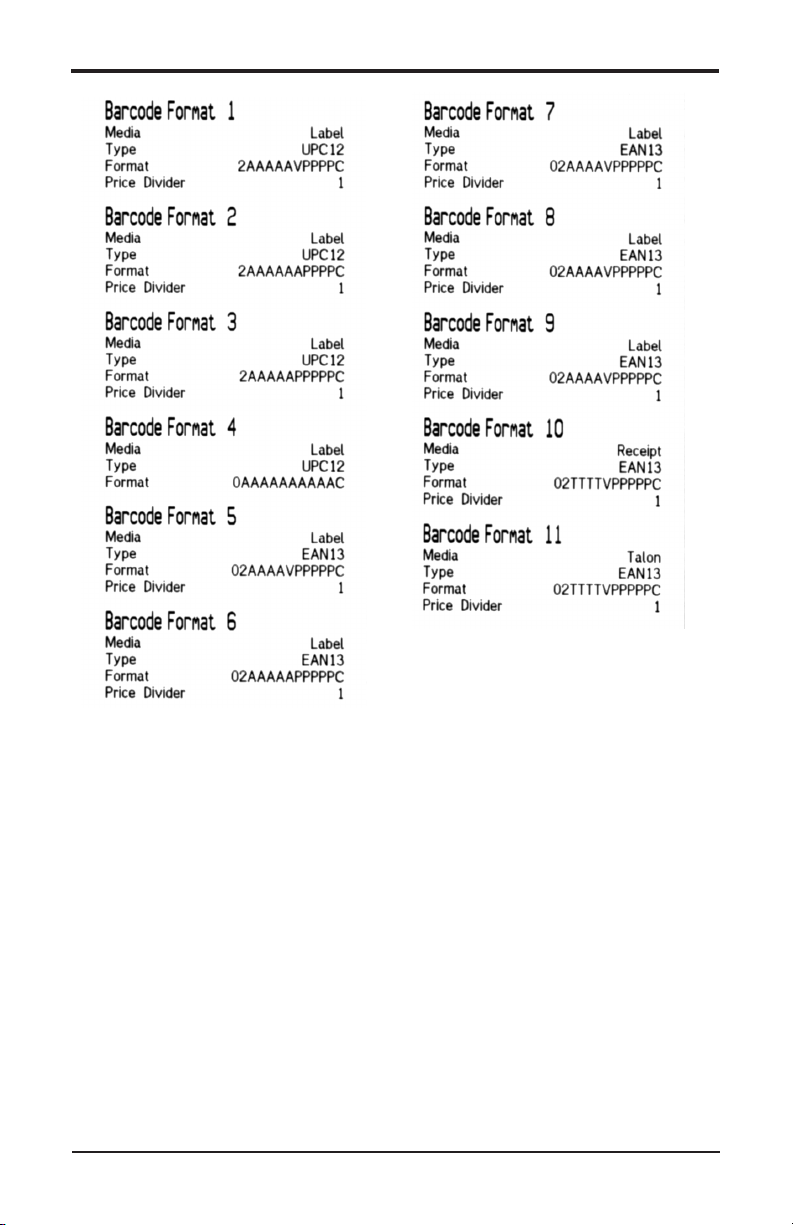
Barcode Formats
Barcode Format Character Denitions
A - PLU or article number
nd
V - Price verier (2
check digit)
P - Price
C - Overall check verier, cannot be changed (1st check digit)
9
Page 10

Preloaded Label Formats
Format 0 • 2.25” x 1.75” (W x L)
Bar Code (UPC 12)
PLU Text 1 (40 chars)
Font Size C
Date 1
Weight or Count
Store Name
Unit Price / Item Price
Packed On
Net Wt / Ct Unit Price Total Price
Store Logo (Preprinted
or Bit Map Image)
Sell By
Date 2
Total Price
10
Page 11

Format 1 • 2.25” x 2.375” (W x L)
Bar Code (UPC 12)
PLU Text 1 (40 chars)
Font Size C
PLU Text 2 (1500 chars)
Font Size 6 (7 Lines
approx. 67 chars/line)
Sales Text
Weight or Count
Store Name
Net Wt / Ct Unit Price Total Price
Unit Price / Item Price
Store Logo (Preprinted
or Bit Map Image)
Sell By
Date 2
Total Price
11
Page 12

Format 2 • 2.25” x 3.00” (W x L)
Bar Code (UPC 12)
PLU Text 1 (40 chars)
Font Size F
Safe Handling Logo
Store Logo (Preprinted
or Bit Map Image)
Sales Text
Weight or Count
Store Name
Sell By
Net Wt / Ct Unit Price Total Price
Unit Price / Item Price
Date 2
Total Price
12
Page 13

Format 3 • 2.25” x 3.00” (W x L)
Bar Code (UPC 12)
PLU Text 1 (40 chars)
Font Size F
PLU Text 2
(1500 chars max.)
Font Size 6
14 Lines
Sales Text
Font 8
Store Logo (Preprinted
or Bit Map Image)
Date 1
Weight or Count
Store Name
Packed On
Net Wt / Ct Unit Price Total Price
Sell By
Unit Price / Item Price
Date 2
Total Price
13
Page 14

Format 4 • 2.25” x 3.00” (W x L)
Bar Code (UPC 12)
PLU Text 1 (40 chars)
Font Size F
PLU Text 2
(1500 chars max.)
Font Size 6
13 Lines
Store Logo (Preprinted
or Bit Map Image)
Weight or Count
Net Wt lb oz (g)
Store Name
Unit Price / Item Price
Net Wt / Ct Unit Price Total Price
Total Price
14
Page 15

Format 5 • 2.25” x 4.50” (W x L)
Bar Code (UPC 12)
PLU Text 1 (40 chars)
Font Size F
PLU Text 2
(1500 chars max.)
Font Size 6
35 Lines
Sales Text
Font 8
Store Logo (Preprinted
or Bit Map Image)
Date 1
Weight or Count
Store Name
Packed On
Net Wt / Ct Unit Price Total Price
Sell By
Unit Price / Item Price
Date 2
Total Price
15
Page 16

Format 5 • Label
Format 6 • Label
16
Page 17

Format 6 • 2.25” x 4.50” (W x L)
Bar Code (UPC 12)
PLU Text 1 (40 chars)
Font Size F
PLU Text 2
(1500 chars max.)
Font Size 6
34 Lines
Total Price
Unit Price / Item Price
Store Logo (Preprinted
or Bit Map Image)
Weight or Count
Net Wt lb oz (g)
Store Name
Net Wt / Ct Unit Price Total Price
17
Page 18

Format 7 • 2.25” x 6.00” (W x L)
Bar Code (UPC 12)
PLU Text 1 (40 chars)
Font Size F
PLU Text 2
(1500 chars max.)
Font Size 6
46 Lines
Store Logo (Preprinted
or Bit Map Image)
Net Wt lb oz (g)
Sales Text
Weight or Count
Unit Price / Item Price
Total Price
18
Date 2
Date 1
Font 8
Packed On
Net Wt / Ct Unit Price Total Price
Sell By
Page 19

Format 7 • Label
19
Page 20

Format 8 • 2.25” x 3.50” (W x L)
Bar Code (UPC 12)
PLU Text 1 (40 chars)
Font Size F
Traceability Information
Lot No. & Origin 1, 2, 3
Safe Handling Logo
Store Logo (Preprinted
or Bit Map Image)
Weight or Count
20
Sales Text
Sell By
Net Wt / Ct Unit Price Total Price
Unit Price / Item Price
Date 2
Total Price
Page 21

Format 8 • COOL Label
Traceability includes COOL (country of origin labeling).
21
Page 22

1
2
4
5
6
7
3
8
0
9
Create & Edit PLU
1
2
4
5
6
7
3
8
0
9
Read left to right across, then down.
Enter Manager Mode
(refer to page 6):
Test / Enter
To Create PLUs: Touch menu numbers 1, 1, 2.
Or, select the menu items by using the arrow
keys and pressing
Operator 1 / Enter
PIN (4296) / Enter
Creating New PLU
Label Format ( 0 - 8, default = 0)
Refer to pages 10 - 21.
Group Number
(defaults to 0)
Or select 1 - 5.
Enter
1 Promotion Off
2 Frequent Shopper
(default = promotion off)
Enter
Select &
.
Set Tare Wt.
(1 - 9)
See Tare, page 23.
Prop. Tare 0.00%
Enter
Groups
0 <Not Dened>
1 GRAND TOTALS
2 MEAT
3 DELI
4 BAKERY
5 PRODUCE
If not off, select:
1 Price
2 % Discount
3 Reduction
Date 1= Packed On (Fmt 0,3,5,7)
Date 2 = Sell By (Fmt 0-3,5,7,8)
To enable, press s or s &
Set ‘add time’...Days / Months / Hours.
after each selection.
Enter
1 System Data
1 Products
2 Create & Edit PLU
Display Text /
(16 Chars Max.)
Enter
Display text defaults to
‘PLU Description’ and
can be edited.
Pricing
Enter
.
1 By Weight
2 By Count
3 By Count Neg.
4 Fixed Weight
5 Fixed Price
0<Not Dened>
1 Packed On
2 Best Before
3 Sell By
4 Net Wt/Ct
more...
Select 1 - 5,
or highlight
&
Promo Message
(default = 0).
Or, select 1 - 20
&
Enter
Sales Text 1
(default = 0).
Enter
Or, select 1 - 10
.
&
PLU Number
PLU Description /
(1500 Chars Max.)
PLU Text 2 /
(1500 Chars Max.)
Enter the Unit or Item
Price
Promo Weight Limit
Promo Tran Limit
0<Not Dened>
1 Packed On
2 Best Before
Enter
.
3 Sell By
4 Net Wt/Ct
more...
Enter
Enter
Enter
Enter
Logo
1 Logo Disabled
Select &
etc.
Enter
.
Nutri Panel
Bar Code
Default is ‘disabled’.
To enable, press
or s &
s
Select the Bar Code Format 1 - 11
(refer to page 9).
Enter the ‘AAAA’ value to insert
the PLU number into the bar code.
Assign Key
Enter
.
1 Traceability Off
2 Traceability On
Default is ‘off’.
If you select On, select the scheme:
1 Farm Raised
2 Wild Seafood
3 Meat
Create & Edit PLU
Default is ‘off’.
Press the speedkey where
To select, press
s
1 Nutri Panel Off
2 Separate Nutri
3 Combined Nutri
22
ors&
Enter
.
you want this PLU to be
accessed.
Entry Accepted
PLU Number
Go to the top right corner and
begin another PLU;
or, exit Manager Mode
(Home, Home).
Page 23

Preloaded Data Files
The following data les were preloaded into the scale to enable initial label
printing.
Sales Messages Group Names Tare
1. Packed On
2. Best Before
3. Sell By
4. Net Wt/Ct
5. Unit Price
6. Total Price
7. Net Weight
8. KEEP REFRIGERATED
9. $
10. %%+3.2%%
1. GRAND TOTALS
2. MEAT
3. DELI
4. BAKERY
5. PRODUCE
1 0.01 lb
2 0.02 lb
3 0.03 lb
4 0.04 lb
5 0.05 lb
6 0.06 lb
7 0.07 lb
8 0.08 lb
9 0.09 lb
23
Page 24

List of Countries
Country of origin can be assigned to the label using the applicable
reference number listed on pages 24 - 26, assuming Traceability is ‘on’
and Label Format 8 is selected.
1 USA
2 CANADA
3 MEXICO
4 Afghanistan
8 Albania
10 Antarctica
12 Algeria
16 American Samoa
20 Andorra
24 Angola
28 Antigua and Barbuda
31 Azerbaijan
32 Argentina
36 Australia
40 Austria
44 Bahamas
48 Bahrain
50 Bangladesh
51 Armenia
52 Barbados
56 Belgium
60 Bermuda
64 Bhutan
68 Bolivia
70 Bosnia and Herzegovina
72 Botswana
74 Bouvet Island
76 Brazil
84 Belize
86 British Indian Ocean Territory
90 Solomon Islands
92 Virgin Islands (British)
96 Brunei Darussalam
100 Bulgaria
104 Myanmar
108 Burundi
112 Belarus
116 Cambodia
120 Cameroon
124 Canada
132 Cape Verde
136 Cayman Islands
140 Central African Republic
144 Sri Lanka
148 Chad
152 Chile
156 China
158 Taiwan
162 Christmas Island
166 Cocos (Keeling) Islands
170 Colombia
174 Comoros
175 Mayotte
178 Congo
180 “Congo, Democratic Republic
Of The”
184 Cook Islands
188 Costa Rica
191 Croatia
192 Cuba
196 Cyprus
203 Czech Republic
204 Benin
208 Denmark
212 Dominica
214 Dominican Republic
218 Ecuador
222 El Salvador
226 Equatorial Guinea
231 Ethiopia
232 Eritrea
233 Estonia
234 Faroe Islands
238 Falkland Islands
239 South Georgia And South
Sandwich Islands
242 Fiji
246 Finland
248 Aland Islands
249 “France, Metropolitan”
24
Page 25

250 France
254 French Guiana
258 French Polynesia
260 French Southern Territories
262 Djibouti
266 Gabon
268 Georgia
270 Gambia
275 Occupied Palestinian Territory
276 Germany
288 Ghana
292 Gibraltar
296 Kiribati
300 Greece
304 Greenland
308 Grenada
312 Guadeloupe
316 Guam
320 Guatemala
324 Guinea
328 Guyana
332 Haiti
334 Heard and McDonald Islands
336 Vatican City State
340 Honduras
344 Hong Kong
348 Hungary
352 Iceland
356 India
360 Indonesia
364 Iran
368 Iraq
372 Ireland
376 Israel
380 Italy
384 Cote D’lvoire
388 Jamaica
392 Japan
398 Kazakhstan
400 Jordan
404 Kenya
408 “Korea, DPR”
410 “Korea, Republic”
414 Kuwait
417 Kyrgyzstan
418 Lao
422 Lebanon
426 Lesotho
428 Latvia
430 Liberia
434 Libya
438 Liechtenstein
440 Lithuania
442 Luxembourg
446 Macao
450 Madagascar
454 Malawi
458 Malaysia
462 Maldives
466 Mali
470 Malta
474 Martinique
478 Mauritania
480 Mauritius
484 Mexico
492 Monaco
496 Mongolia
498 Moldova
499 Montenegro
500 Montserrat
504 Morocco
508 Mozambique
512 Oman
516 Namibia
520 Nauru
524 Nepal
528 Netherlands
530 Netherlands Antilles
533 Aruba
540 New Caledonia
548 Vanuatu
554 New Zealand
558 Nicaragua
562 Niger
566 Nigeria
570 Niue
574 Norfolk Island
578 Norway
25
Page 26

580 Northern Mariana Islands
581 United States Minor
Outlying Islands
583 Micronesia
584 Marshall Islands
585 Palau
586 Pakistan
591 Panama
598 Papua New Guinea
600 Paraguay
604 Peru
608 Philippines
612 Pitcairn
616 Poland
620 Portugal
624 Guinea-Bissau
626 Timor-Leste
630 Puerto Rico
634 Qatar
638 Reunion
642 Romania
643 Russian Federation
646 Rwanda
652 Saint Barthelemy
654 St. Helena
659 Saint Kitts and Nevis
660 Anguilla
662 Saint Lucia
663 Saint Martin (French
666 St. Pierre and Miquelon
670 Saint Vincent and the
Grenadines
674 San Marino
678 Sao Tome and Principe
682 Saudi Arabia
686 Senegal
688 Serbia
690 Sey chelles
694 Sierra Leone
702 Singapore
703 Slovakia
704 Vietnam
705 Slovenia
706 Somalia
710 South Africa
716 Zimbabwe
724 Spain
732 Western Sahara
736 Sudan
740 Suriname
744 Svalbard and Jan Mayen Islands
748 Swaziland
752 Sweden
756 Switzerland
760 Syria
762 Tajikistan
764 Thailand
768 Togo
772 Tokelau
776 Tonga
780 Trinidad and Tobago
784 United Arab Emirates
788 Tunisia
792 Turkey
795 Turkmenistan
796 Turks and Caicos Islands
798 Tuvalu
800 Uganda
804 Ukraine
807 Macedonia
818 Egypt
826 United Kingdom
830 Channel Islands
831 Guernsey
832 Jersey
833 Isle Of Man
834 Tanzania
840 United States
850 Virgin Islands
854 Burkina Faso
858 Uruguay
860 Uzbekistan
862 Venezuela
876 Wallis and Futuna Islands
882 Samoa
887 Yemen
891 Serbia and Montenegro
894 Zambia
26
Page 27

Routing the Label Paper
Labels with Backing Paper Rewound
Continuous Paper for Receipts and Reports
Rewinding the Backing Paper on the Take-up Spindel
j
k l
m
n
o
2 or 3 times
Cleaning
Unplug before cleaning or servicing.
Harsh abrasives, solvents, scouring cleaners and alkaline
cleaning solvents, such as baking soda, should not be used especially
on the display windows. Under no circumstances should you attempt
to wipe the inside of the scale. The outside may be wiped down with
a clean cloth moistened with a dilute solution of water and mild liquid
dishwashing detergent.
27
Page 28

Cleaning the Print Head
Unplug before cleaning or servicing.
Clean the print head weekly to maintain print quality and maximize
the life of the print head. Use the print head cleaning kit, part number
00-445170-28, available from your Hobart sales and service ofce.
Always follow the instructions on the cleaning kit.
➀
➂ Release print head catch.
➁
➃
➄ ➅ Close print head.
➆ Insert cleaning card. ➇ Close print head.
➈ Pull cleaning card through.
28
➉
F35523 (Sept. 2008)
 Loading...