


SONOCLOCK 740
ELECTRONIC CLOCK RADIO
SONOCLOCK 740
2
INDEX
© Important notes for users in the U.K.
Mains plug
This apparatus is fitted with an approved moulded 13 Amp plug. To change a fuse
in this type of plug proceed as follows:
• Remove fuse cover and fuse.
• Fix new fuse which should be a BS1362 5 Amp, A.S.T.A. or BSI approved type.
• Refit the fuse cover.
If the fitted plug is not suitable for your socket outlets, it should be cut off and an
appropriate plug fitted in its place.
If the mains plug contains a fuse, this should have a value of 5 Amp. If a plug
without a fuse is used, the fuse at the distribution board should not be greater than 5
Amp.
Note: The severed plug must be disposed to avoid a possible shock hazard should it
be inserted into a 13 Amp socket elsewhere.
How to connect a plug
The wires in the mains lead are coloured with the following code: blue = neutral
(N), brown = live (L).
As these colours may not correspond with the colour markings identifying the
terminals in your plug, proceed as follows:
• Connect the blue wire to the terminal marked N or coloured black.
• Connect the brown wire to the terminal marked L or coloured red.
• Do not connect either wire to the earth terminal in the plug, marked E (or e) or
coloured green (or green and yellow).
Before replacing the plug cover, make certain that the cord grip is clamped over the
sheath of the lead – not simply over the two wires.
Dichiarazione di
conformità ai sensi del
D.M. 28.08.95, n. 548
Si dichiara che gli apparecchi
illustrati nel pre
sente libretto di istru-
zioni per l'uso rispondono alle
prescrizioni dell'articolo 2, comma
1, del
Decreto Ministeriale 28 Agosto
1995, n. 548.
Fatto a Fürth il 01/04/1999
GRUNDIG Fernseh-Video Produkte
und Systeme GmbH
Kurgartenstraße 37
D-90762 FUERTH
GRUNDIG A.G.
Kurgartenstraße, 37
90762 FUERTH
GERMANIA
i
Deutsch Seite
Einleitung.........................4
Bedienelemente ............4/5
Stromversorgung ...............6
Synchronisation der Uhr .....7
Einstellen der Uhr ..............8
Radio..............................9
Wecken....................9/10
Übrige Funktionen ...........11
English Page
Introduction ....................12
Controls ..................12/13
Power supply..................14
Clock synchronisation .....15
Clock setting ..................16
Radio............................17
Alarm......................17/18
Other functions ...............19
Français Page
Introduction ....................20
Contrôles.................20/21
Alimentation ...................22
Synchronisation de l’horloge
23
Réglage de l’horloge .......24
Radio............................25
Réveil......................25/26
Autres fonctions...............27
Italiano Pagina
Introduzione ...................28
Controlli ..................28/29
Alimentazione.................30
Sincronizzazione dell’orologio
31
Impostazione dell’orologio32
Radio............................33
Sveglia ...................33/34
Altre funzioni ..................35
Português Página
Introdução .....................36
Controlos.................36/37
Alimentação...................38
Sincronização do relógio 39
Acertar o relógio.............40
Rádio............................41
Despertador .............41/42
Otras funções.................43
Español Página
Introducción ...................44
Controles.................44/45
Alimentación ..................46
Sincronización del reloj ...47
Ajuste del reloj ...............48
Radio............................49
Despertador .............49/50
Otras funciones...............51
Nederlands Pagina
Inleiding ........................52
Bediening................52/53
Stroomvoorziening...........54
Synchronisatie van de klok55
Instellen van de klok ........56
Radio............................57
Wekken ..................57/58
Overige functies..............59
Dansk Side
Indledning .....................60
Kontroller.................60/61
Forsyning.......................62
Tidssynkronisering............63
Indstilling af uret..............64
Radio............................65
Vækning..................65/66
Øvrige funktioner ............67
Svenska Sida
Inledning .......................68
Kontroller.................68/69
Strömförsörjning ..............70
Klocksykronisering ...........71
Klockinställning ...............72
Radio............................73
Väckning .................73/74
Övriga funktioner ............75
Suomi Sivu
Johdanto........................76
Säätimet..................76/77
Käyttöjännite ..................78
Kellon synkronisointi.........79
Kellon asetus ..................80
Radio............................81
Herätys ...................81/82
Yleistä...........................83
3
INDEX
D
GB
F
I
P
E
NL
DK
S
FIN
montags bis freitags
von 8.00 – 19.00 Uhr
* Gebührenpflichtig –
in Deutschland und
Österreich möglich
STETS FÜR SIE DA!
DEUTSCHLAND
01 80/5 30 21 22*
ÖSTERREICH
06 60/66 99*
GRUNDIG
KUNDENBERATUNGS-
ZENTRUM
Funkuhr, DCF 77
Mit Ihrer Uhr, sind Sie im Besitz einer absolut präzisen
Alarm- und Terminuhr, die sich selbständig vollautomatisch
auf die radioübertragenen Zeitsignale der genauesten Uhr
der Welt einstellt: Die Atomuhr der Physikalisch-
Technischen Bundesanstalt in Braunschweig (PTB). Sie ist
so genau, daß in 1 Million Jahren eine Gangabweichung
von 1 Sekunde zu erwarten ist.
Ihre funkgesteuerte Sonoclock 740 empfängt
“Zeittelegramme” über Langwelle 77,5 kHz vom
Zeitzeichensender DCF 77, der sich in Mainflingen (24
km südöstlich von Frankfurt/Main) befindet. Dieser Zeit-
zeichensender hat eine Reichweite von 1500 km.
Die Uhr empfängt den Sender DCF 77 gebührenfrei über
die angeschlossene DCF 77-Antenne überall dort, wo z.
B. mit einem guten Kofferradio ein ausreichender
Langwellenempfang möglich ist. In vielen Fällen empfängt
Ihre Funkuhr die Zeittelegramme in einer beachtlich
größeren Distanz zum Sender; hierbei spielt jedoch die
örtliche Empfangsqualität eine große Rolle.
Der eingebaute Mikroprozessor der Funkuhr
verarbeitet
die empfangenen Zeittelegramme
und steuert
vollautomatisch die Quartzuhr. Sobald der Empfang der
DCF-Zeitsignale wieder möglich ist, wird die Uhr
umgehend synchronisiert. Neben den Vorzügen der
Zeitpräzision und sekundengenauem Weck- und
Alarmsignal, stellt sich Ihre Funkuhr vollautomatisch von
Winter- auf Sommerzeit und umgekehrt um.
4
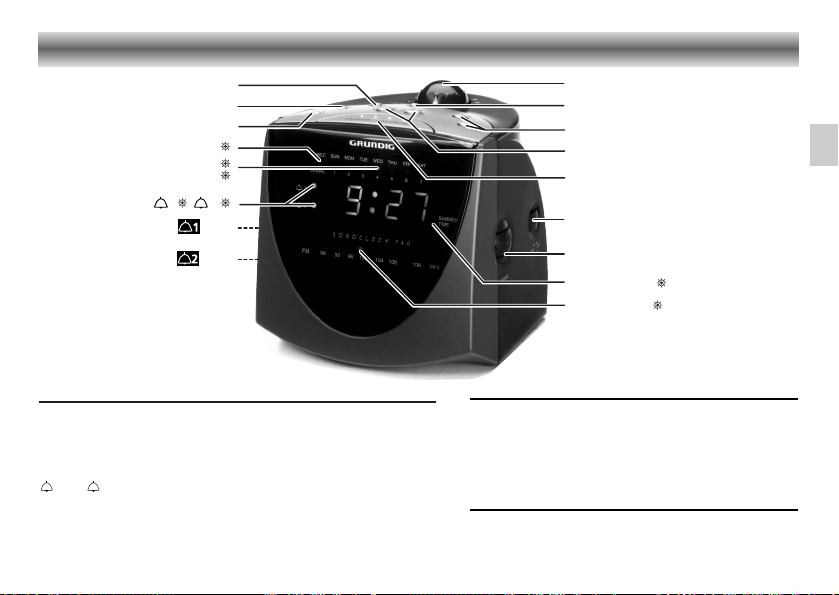
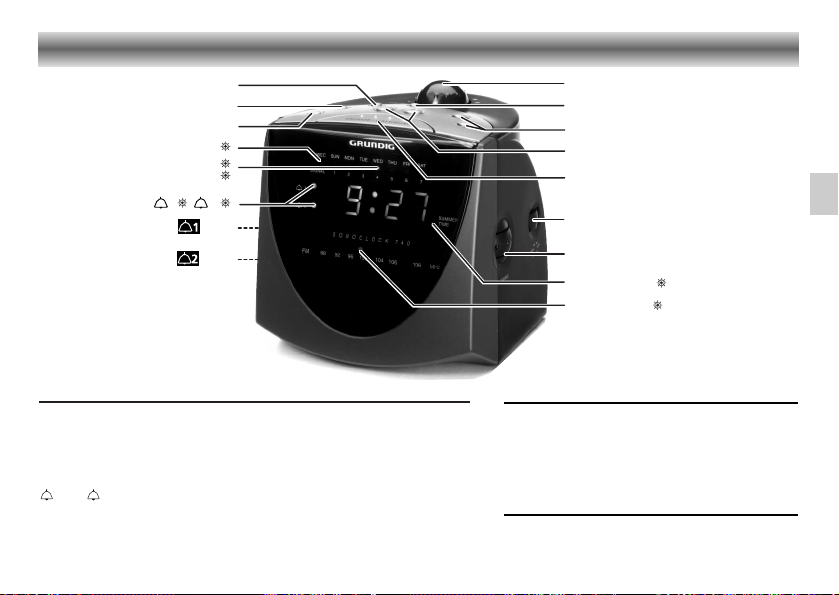
EINLEITUNG BEDIENELEMENTE
D
Funktionsschalter für Weckzeit und
¤ – Wecken mit Rundfunkprogramm
/ – Wecken mit Signalton
OFF – Keine Weckfunktion
+UP/
–
Einstellen der Zeit (Uhrzeit und Weckzeit).
– DOWN
– Einstellen des Datums.
WEC –
Mit dieser Taste schalten Sie die Funktion '
WeekEnd
Cancellation' ein und aus
ON/OFF
–
Zum Ein- und Ausschalten des Radios
–
Drücken der Taste schaltet außerdem das Alarm-
signal
(und/oder Radio) aus, wenn die Weck-
funktion aktiviert wurde.
–
Vorzeitiges Beenden des Schlummerbetriebs
SLEEP –
Schaltet das Radio für max. 90 Minuten ein
TIME –
Zum manuellen Einstellen zusammen
mit
– DOWN/
+
UP
der Zeit
ALARM 1/ – Kurzes Drücken dieser Taste zeigt Ihnen die
ALARM 2 aktuelle Weckzeit an
– Zum Einstellen mit
– DOWN/
+
UP
der Weckzeit
SNOOZE/ –
Zum Unterbrechen des Weckens für ca.5 Minuten
CALENDAR
– Einmaliges Drücken zeigt das Datum an
– Zweimaliges Drücken zeigt das Jahr an
– Durch einmaliges Drücken und gedrückt halten,
können Sie das Datum manuell einstellen.
– Durch zweimaliges Drücken und gedrückt halten,
können Sie die Jahreszahl manuell einstellen.
VOLUME – Zum Einstellen der Lautstärke
TUNING –
Zum Abstimmen auf einen Radiosender
DIMMER
–
Zum Einstellen der Helligkeit des Displays
HI/LOW

Leuchtpunkte 6:
WEC 6 – Zeigt an, daß die 'WeedEnd Cancellation' aktiviert ist.
Sun...Sat 6 – Zeigt den Wochentag an.
SIGNAL 1…7 6 – Zeigt die Signalstärke des Senders DCF 77 an.
1 6/2 6 –
Zeigt an, daß die Weckfunktion
für
Weckzeit 1 oder 2 aktiviert
wurde.
SUMMER TIME 6
– Leuchtet auf, wenn die automatische Sommerzeitfunktion
eingeschaltet ist.
TUNING DIAL
6 – Leuchtet auf, wenn das Radio (oder Wecken) eingeschaltet ist
Geräterückseite:
– Netzkabel
– Ferritstab für den Empfang von DCF
77 Zeitsignalen.
– Wurfantenne für FM-Empfang
Geräteunterseite
Battery – Fach für Stützbatterie
5
BEDIENELEMENTE
D
VOLUME
WEC
TIME
WEC
SUN...SAT
SIGNAL 1...7
1 / 2
SLEEP
ON/OFF
/ /OFF
TUNING DIAL
– DOWN / + UP
HIGH LOW
DIMMER
TUNING
SNOOZE/CALENDAR
ALARM 1/ALARM 2
SUMMER TIME
¤
/ /OFF
¤
Netzanschluß
Schließen Sie das Gerät an Wechselspannung 230 V~,
50/60 Hz an.
Nach dem ersten Anschließen und nach Stromausfall (ohne
Stützbatterie) empfängt der eingebaute Mikroprozessor
automatisch das DCF 77 Zeitsignal (Dieser Vorgang kan
einige Minuten dauern).
Stützbatterie – Stromausfall
Ist eine Stützbatterie eingesetzt, läuft die Uhr auch bei Strom-
ausfall weiter. Das Radio funktioniert allerdings nicht und das
Display ist nicht beleuchtet.
• Setzen Sie in das Batteriefach (in der Geräte
unterseite) eine
9 V-Alkali-Batterie ein (IEC6 LF22).
• Batterie erst einsetzen, wenn das Gerät ans Netz ange-
schlossen ist, um sie nicht unnötig zu belasten.
• Wir empfehlen, die Stützbatterie nach ca. 1 Jahr
auszutauschen.
•
Wird das Gerät längere Zeit vom Netz getrennt, muß die
Stützbatterie herausgenommen werden.
6
STROMVERSORGUNG
D
Hinweis:
Das Gerät bleibt, auch wenn es ausgeschaltet ist, mit dem
Wechselspannungsnetz verbunden. Nur durch Ziehen des
Netzsteckers wird das Gerät vom Netz getrennt.
Umwelt-Hinweis
Verbrauchte Batterien nicht in den Hausmüll
werfen!
Geben Sie bei Neukauf die alten Batterien bei
Ihrem Händler oder an den öffentlichen
Sammelstellen ab.
Hinweis:
Das Radio funktioniert nur, nachdem die Zeit eingestellt
wurde.
Dadurch werden Verzögerungen bei dem ersten
Zeitempfang durch interne Störungen des
Rundfunkempfängers vermieden.
• Wenn Sie das Radio einschalten möchten bevor die Uhr
durch das Zeitsignal eingestellt wurde, dann stellen Sie die
Uhrzeit zuerst manuell ein.
Einstellen der Zeitzone
Der Zeitzeichensender DCF 77 sendet die in Mitteleuropa
gültige Mitteleuropäische Zeit (MEZ) bzw. die Mittel-
europäische Sommerzeit (MESZ) aus.
Schalten Sie Ihre Funkuhr z.B. in England ein, können Sie die
Uhrzeit wie folgt eine Stunde zurückstellen:
• Den Netzstecker aus der Steckdose ziehen.
• Entfernen Sie die Stützbatterie (falls eingelegt).
•
Drücken Sie die Taste TIME und halten Sie diese gedrückt,
während Sie den Netzstecker in die Steckdose führen.
–
Die Sonoclock beginnt mit dem Empfang des DCF-77
Zeit-
signals und stellt die Uhrzeit automatisch eine Stunde zurück.
Automatische Zeiteinstellung
Wenn die Uhr ans Netz angeschlossen wird, erscheint im
Display:
:59
Der Doppelpunkt neben der Sekundenanzeige blinkt. Ist die
Signalstärke ausreichend, blinkt der Doppelpunkt einmal jede
Sekunde und die Anzeige läuft vorwärts bis ein korrektes Zeit-
zeichen empfangen wird. Das Display zeigt jetzt die exakte
Zeit und der Leuchtpunkt des richtigen Wochentags leuchtet
auf.
Ist dies nach wenigen Minuten nicht der Fall, ist entweder die
Empfangsstärke zu schwach oder es kommt zu Signal-
störungen. Im Anzeigefeld erscheint 'HALLO'. Positionieren Sie
dann die angeschlossene Empfänger-Antenne anders und
ändern Sie ihre Richtung, z.B. horizontal und quer zum
Sender, weiter entfernt vom Gerät (mindestens 50 cm)
bzw.nicht in Nähe metallischer Gegenstände oder
angeschalteter Fernsehgeräte, bis der Doppelpunkt
regelmäßig einmal jede Sekunde blinkt.
Als Hilfe erscheint die Signalstärke auch in der Anzeige der
Wochentage (SIGNAL 1…7 6). Umso größer die Zahl ist,
bei der das Licht aufleuchtet, desto stärker wird das Signal
empfangen.
Die Funkuhr stimmt nun exakt mit den Sekunden überein. Die
Uhr läuft, durch das interne System der Quartzzeitbasis (4,19
MHz) kontrolliert, weiter. Die Synchronisation über den
Sender DCF 77 findet jede Stunde statt.
7
SYNCHRONISATION DER UHR
D

8
EINSTELLEN DER UHR
D
Kalenderfunktion
Die Sonoclock 740 ist mit einer Kalenderfunktion
ausgestattet. Tag, Monat und Jahr werden von dem
Sender DCF-77 empfangen, können aber auch
manuell eingestellt werden.
Der Wochentag wird automatisch gemäß der
eingebenen Information über Tag, Monat und Jahr
angewählt.
Anzeigen des Kalenders
•
Drücken Sie die Taste CALENDAR einmal.
– Tag und Monat erscheinen im Display.
– Nach ca. 3 Sekunden erscheint erneut die
Uhrzeit.
• Drücken Sie die Taste CALENDAR zweimal.
– Die Jahresanzeige erscheint im Display.
– Nach ca. 3 Sekunden erscheint erneut die
Uhrzeit.
Manuelle Zeiteinstellung
(wenn kein Zeitsignal empfangen wird)
Manuelle Zeiteinstellung
• Drücken Sie die Taste TIME und halten Sie diese gedrückt. Stellen
Sie dann mit den Tasten
– DOWN/
+
UP
die Quartzuhr auf die richtige
Zeit.
– Bei gedrückt gehaltenen Tasten wird die Zeit erst langsam, dann
(nach 4 Sekunden) im Schnellgang gesetzt.
• Lassen Sie die Tasten los, wenn die gewünschte Einstellung erreicht ist.
– Die Uhrzeit beginnt zu laufen, wenn die Tasten losgelassen werden.
Manuelle Einstellung des Datums
• Drücken Sie die Taste CALENDAR und halten Sie diese gedrückt.
Stellen Sie nun mit den Tasten
– DOWN/
+
UP
das aktuelle Datum ein.
– Bei gedrückt gehaltenen Tasten wird das Datum erst langsam, dann
(nach 4 Sekunden) im Schnellgang gesetzt.
• Lassen Sie die Tasten los, wenn die gewünschte Einstellung erreicht ist.
Manuelle Einstellung der Jahreszahl
• Drücken Sie die Taste CALENDAR zweimal bis die Jahreszahl im
Display erscheint. Ist die Jahreszahl aktiviert, halten Sie die Taste
CALENDAR ge
drückt und stellen Sie mit den Tasten – DOWN/+ UP die
gewünschte Zahl ein.
– Bei gedrückt gehaltenen Tasten wird die Jahreszahl erst langsam,
dann (nach 4 Sekunden) im Schnellgang gesetzt (von 1990 bis 2099).
•
Lassen Sie die Tasten los, wenn die gewünschte Einstellung erreicht ist.
– Die Wochentaganzeige ändert sich automatisch.
Radioempfang
HINWEIS:
Das Radio funktioniert nur, nachdem die Zeit eingestellt
wurde.
Dadurch werden Verzögerungen bei dem ersten
Zeitempfang durch interne Störungen des
Rundfunkempfängers vermieden.
• Wenn Sie das Radio einschalten möchten bevor die Uhr
durch das Zeitsignal eingestellt wurde, dann stellen Sie die
Uhrzeit zuerst manuell ein.
•
Schalten Sie dann das Radio mit der Taste ON/OFF ein.
– Als Einschaltkontrolle dient der Leuchtzeiger
(TUNING DIAL 6).
• Senderwahl mit dem Rändel TUNING.
• Lautstärke einstellen mit dem Rändel VOLUME.
Antenne
Für FM-Empfang dient die Wurfantenne (Geräterückseite).
• Legen Sie die Wurfantenne so aus, daß bester Empfang
erzielt wird.
Wecken
• Wählen Sie die gewünschte Weckfunktion (Rundfunk-
programm bzw. Signalton) mit dem Schalter oder
.
–
Sind beide Weckzeiten aktiviert, wird dies durch
die
Leuchtpunkte 1 6 und 2 6 angezeigt.
Einstellen der Weckzeit
• Drücken Sie kurz die Taste ALARM 1 oder ALARM 2.
–
Im Display wird die aktuelle Weckzeit angezeigt
•
Drücken Sie die Taste ALARM 1 oder ALARM 2
und halten
Sie diese gedrückt. Stellen Sie nun mit den Tasten – DOWN/
+ UP die Weckzeit ein.
'Weekend Alarm Cancellation' (WEC)
• Möchten Sie am Wochenende nicht zu der eingestellten
Weckzeit geweckt werden, drücken Sie einmal WEC.
– Die Anzeige WEC 6 leuchtet auf.
– Die Weckzeit bleibt für die Wochentage bestehen.
– Dies gilt für Weckzeit 1 und Weckzeit 2.
• Drücken Sie erneut WEC, um die Funktion zu deaktivieren.
9
RADIO WECKEN
D
10
D
WECKEN
Wecken mit Rundfunkprogramm
•
Schalten Sie das Gerät mit Taste ON/OFF ein.
• Wählen Sie den Sender, dessen Programm Sie wecken
soll und stellen Sie die zum Wecken gewünschte
Lautstärke ein.
• Schalten Sie das Gerät mit Taste ON/OFF ab.
•
Stellen Sie den Funktionsschalter bzw. (oder beide)
auf Position
¤.
– Das Rundfunkteil schaltet sich zu den eingestellten Weck-
zeiten ein und ca. eine Stunde später automatisch wieder
aus.
Wecken mit Signalton
• Stellen Sie den Funktionsschalter bzw. (oder
beide) auf Position .
– Der Signalton schaltet sich zu den eingestellten Weckzeiten
ein und ca. eine Stunde später automatisch wieder aus.
– Die Signaltöne für Weckzeit 1 und Weckzeit 2
unterscheiden sich in der Tonhöhe.
Unterbrechen und Wiederholen des
Weckens
• Unabhängig davon wie Sie geweckt wurden (Rundfunk-
programm oder Signalton), können Sie das Wecken mit
der Taste SNOOZE unterbrechen.
• Nach ca. 5 Minuten weckt das Gerät erneut.
• Sie können das Wecken innerhalb der Einschaltdauer von
59 Minuten mehrmals unterbrechen.
Abstellen des Weckens
• Möchten Sie den Weckbetrieb beenden, so drücken Sie
die Taste ON/OFF.
Die Weckbereitschaft für den nächsten Tag bleibt erhalten.
• Wollen Sie den Weckbetrieb ganz beenden, stellen Sie
den Funktionsschalter bzw. auf Position OFF.
11
D
ÜBRIGE FUNKTIONEN
Einschlafen mit Musik
• Drücken Sie die Schlummertaste SLEEP.
– Das Radio wird angeschaltet und im Display erscheint die
vorher eingestellte 'Schlummerzeit'.
• Diese 'Schlummerzeit' kann von 10 bis 90 Minuten einge-
stellt werden, indem Sie die Taste SLEEP anhaltend
drücken.
– Nach Ablauf der programmierten Dauer schaltet das Gerät
ab.
• Einschaltdauer vorzeitig löschen: Taste ON/OFF drücken.
Dimmer-Schalter
• Die Helligkeit des Displays können Sie mit dem
Schalter
DIMMER
HIGH - LOW
der Raumbeleuchtung anpassen.
Aufstellen des Gerätes
– Bitte beachten Sie beim Aufstellen des Gerätes, daß
Oberflächen von Möbeln mit den verschiedensten Lacken
und Kunststoffen beschichtet sind, welche
meistens
chemische Zusätze enthalten.
– Diese Zusätze
können u.a. das Material der Gerätefüße
angreifen,
wodurch Rückstände auf der Möbeloberfläche
entstehen, die sich nur schwer oder nicht mehr entfernen
lassen.
Sonstige Hinweise
• Gehäuse nur mit weichem, staubbindendem Lappen
reinigen. Keine scharfen Polier- oder Reinigungsmittel
verwenden.
• Schützen Sie das Gerät vor jeder Feuchtigkeit (z.B. Tropf-
und Spritzwasser).
•
Typenangaben finden Sie auf der Geräteunterseite.
Technische Daten
Wellenbereich: FM ...........................87,5 – 108 MHz
Ausgangsleistung:.............................................400 mW
Dieses Gerät ist funkentstört entsprechend den geltenden
EG-Richtlinien.
Dieses Produkt erfüllt die europäischen Richtlinien
89/336/EEC, 73/23/EEC und 93/68/EEC.
Der 'Regulierungsbehörde für Telekommunikation und Post
'
wurde angezeigt, daß das
Gerät in Verkehr gebracht
wurde. Ihm wurde
auch die Berechtigung eingeräumt, die
Serie auf
Einhaltung der Bestimmungen zu überprüfen.
Dieses Gerät entspricht der Sicherheitsbestimmung VDE
0860 und somit der internationalen Sicherheitsvorschrift
IEC 65.
Technische und optische Änderungen vorbehalten!
Radio controlled clock, DCF 77
With your radio controlled clock Sonoclock 740,
you are
in the possesion of an absolutely precise alarm- and
appointment clock which sets itself fully automatically to
the radio-transmitted time signal of the most accurate clock
in the world: the atomic clock of the Bundesanstalt
(Federal Standards Institute) in Braunschweig/Germany
(PTB). The time deviation is smaller than 1 second in 1
million years.
Your radio controlled alarm clock Sonoclock 740 receives
time 'telegrams' on the longwave band (77.5 kHz) from
the official German standard frequency and time signal
transmitter DCF 77, located in Mainflingen (24 km south-
east of Frankfurt/Main). This transmitter has a range of up
to 1500 km.
Your Sonoclock 740 receives the DCF 77 transmitter free
of charge via the DCF 77 antenna in any place where
reasonable longwave reception is possible with a good
portable radio. In many cases, your alarm clock receives
the time telegrams at a considerably greater distance from
the transmitter, but here the local reception conditions play
an important role.
The built-in microprocessor of your alarm clock processes
the received time telegrams and controls the clock fully
automatically. As soon as reception of the DCF time signals
is possible again after an interruption, the clock will imme-
diately be synchronized. In addition to the advantages of
time precision and a wake-up signal accurate to the
second, the radio controlled Sonoclock 740
adjusts itself
automatically from normal time to summer time, and vice versa.
12
INTRODUCTION CONTROLS
GB
Selection switches for alarm and
¤ – Radio is switched on at alarm time
/–
Alarm tone sounds at alarm time
OFF – No alarm function
– DOWN/
–
For setting the time (clock and alarm time).
+UP
For setting the date
WEC – To switch the WeekEnd Cancellation function on
and off
ON/OFF
– Press to switch the radio on and off
–
Press to switch off the alarm tone (or radio)
when
alarm function is activated
– For switching off the radio before the preset
'sleep' time has elapsed
SLEEP – For switching on the radio for max. 90 minutes
TIME – Used with
– DOWN/
+
UP
to set the time manually
ALARM 1/ – Press briefly to display the present alarm time
ALARM 2 Used with
– DOWN/
+
UP
to set the alarm time
SNOOZE/ – For interrupting radio or electronic sound alarm
CALENDAR
for approx. 5 minutes
– Press once to display the date
– Press twice to display the year
– Press once and hold to adjust the date manually
– Press twice and hold to adjust the year manually
VOLUME – For adjusting the volume
TUNING – For selecting the frequency
DIMMER
– to set the brightness of the display
HI/LOW
Light dots 6
WEC 6 – Indicates that the WeekEnd Cancellation
function is activated
Sun...Sat 6 – Indicates the day of the week.
SIGNAL 1…7 6
– Indicates the DCF 77 signal strength.
1 6/2 6 – Indicates that the alarm function is activated for
alarm 1 or alarm 2.
SUMMER TIME 6
– Indicates the Automatic Summer Time function.
TUNING DIAL
6 – Lights up when the radio (or alarm) is on.
Back of the set:
– AC mains cable
– External antenna for reception of the DCF 77 time
signals
– Wire antenna for FM reception
Base of the set:
Battery – back-up battery compartment
13
CONTROLS
GB
VOLUME
WEC
TIME
WEC
SUN...SAT
SIGNAL 1...7
1 / 2
SLEEP
ON/OFF
/ /OFF
TUNING DIAL
– DOWN / + UP
HIGH LOW
DIMMER
TUNING
SNOOZE/CALENDAR
ALARM 1/ALARM 2
SUMMER TIME
¤
/ /OFF
¤

Connecting the unit
The unit is designed to operate from a mains supply of
230 V~, 50/60 Hz.
When the set is connected for the first time or after a power
failure (without standby battery
fitted), the clock automatically
starts receiving the DCF 77 time signal
.
Standby-battery – mains failure
If a standby battery is fitted, the clock will continue to
operate
during mains failure. However, the display will
not be
illuminated and the radio does not work
.
• Insert a 9 V alkaline battery (IEC 6 LF 22) into the battery
compartment on the bottom of the unit.
•
Insert the battery only after the unit has been connected
to the
mains in order to prevent unnecessary drain.
• We recommend that the battery is replaced after approx.
1 year.
• If the clock radio is to be disconnected for a long
period,
the standby battery should be removed, as it would
otherwise discharge too quickly and may leak.
14
POWER SUPPLY
GB
Important note for users in the U.K.:
When fitting a mains plug, follow the instructions on page 2.
Note:
The unit remains connected to the mains even when it
is switched off.
The unit is only fully isolated from the mains if the mains plug
is removed from the wall socket.
Note on Environmental Protection
Do not throw exhausted batteries in the
household refuse.
Hand over the old batteries to your dealer or
public collecting points when buying new ones.
Note:
The radio only functions after time adjustment.
This ensures the fastest possible time signal reception,
which is then not disturbed by the radio.
• If you wish to switch on the radio before time signals have
been received, you should first set the time manually.

Setting the time zone
The time signal transmitter DCF 77 transmits the time valid in
middle-europe, or the Daylight Saving Time of middle-europe.
When using your Sonoclock 740 e.g. in the U.K., you can
set the clock one hour earlier, as follows:
• Disconnect the mains plug from the wall socket.
• Remove the standby battery (if fitted)
• Press and hold the TIME button while inserting the AC
mains plug in the socket.
– The Sonoclock will start to receive the DCF 77 time signals
and will automatically adjust the time one hour earlier than
the received DCF 77 time.
Automatic time setting
When the clock has been connected, the time display shows:
:59
The colon next to the seconds indication flashes. If the signal
strength is sufficient, the colon indication flashes once every
second and the seconds are count up until a correct time
telegram has been decoded. The display shows the exact
time and the correct week day indication lights up.
If this is not the case after several minutes, the signal strength
is poor or there are signal-interferences. The display indicates
'HALLO'. You should then reposition the connected aerial and
change its direction, for example, in a horizontal position at
right angles to the receiver, farther away from the receiver (at
least 50 cm), and away from metallic objects or switched on
TV receivers, until the colon indication flashes regularly once
every second.
To help you, the Week Day indicator also shows the signal
strength (SIGNAL 1…7 6). The higher the number of the dot
that lights up, the stronger the signal.
The clock is now running exactly to the second. The clock
continues running being controlled by the internal quartz time
base (4,19 MHz). Synchronisation through DCF 77 takes
place once every hour.
15
CLOCK SYNCHRONISATION
GB

Calendar function
The Sonoclock 740 is provided with a calendar
function. The day, month and year are received from
DCF 77 or can be set manually.
The week day is set automatically according to the day,
month and year.
Displaying the calendar
• Press CALENDAR once.
– The day and month appear on the display.
– After approx. 3 seconds, the display returns to the
indication of the time.
• Press CALENDAR twice.
– The year appears on the display.
– After approx. 3 seconds, the display returns to the
indication of the time.
16
CLOCK SETTING
GB
Manual setting
(if no time signal is received)
Manual time setting
• Press and hold down the TIME button and set the quartz clock
with the
– DOWN/
+
UP
buttons.
– If the respective button is kept pressed, time setting will first run at
low and then (after 4 seconds) at high speed.
• Release the buttons when the desired time is reached.
– The clock starts running when the buttons are released.
Manual date setting
• Press and hold down the CALENDAR button and set the date
with the
– DOWN/
+
UP
buttons.
– If the respective button is kept pressed, date setting will first run
at low and then (after 4 seconds) at high speed.
• Release the buttons when the desired date is reached.
Manual year setting
• Press the CALENDAR button twice until the year indication
appears. With the year indication active, hold the CALENDAR
button down and set the year with the
– DOWN/
+
UP
buttons.
– If the respective button is kept pressed, year setting will first run
at low and then (after 4 seconds) at high speed (from the year
1990 to 2099).
• Release the buttons when the desired year is reached.
– The week day indication changes automatically.
Alarm
• Select the required alarm time function (radio alarm or
sound signal alarm) with the switch or .
– If both alarm times are activated, this will be indicated by
the light dots 1 6 and 2 6.
Setting the alarm time
• Press the ALARM 1 or ALARM 2 button briefly.
– The display shows the present alarm time.
• Press and hold down the ALARM 1 or ALARM 2 button
and set the alarm time with the
– DOWN/
+
UP
buttons.
Weekend Alarm Cancellation (WEC)
• If you do not wish to be woken by the alarm on the
weekend, press WEC once.
– The WEC 6 light dot lights up.
– The alarm will function normally on the other days.
– This applies to alarm time 1 and alarm time 2.
• Press the WEC button again to switch this function off.
17
RADIO ALARM
GB
Radio reception
NOTE:
The radio only functions after time adjustment.
This ensures the fastest possible time signal reception,
which is then not disturbed by the radio.
• If you wish to switch on the radio before time signals have
been received, you should first set the time manually as
described before.
• Then, switch on the radio with the ON/OFF button.
– The illuminated dial pointer led (TUNING DIAL 6). serves
as 'on' indicator.
• Tune to stations with the rotary control TUNING.
• Adjust the volume with the rotary control VOLUME
Aerials
The wire aerial at the back of the set is used for VHF (FM)
reception.
• Position the wire aerial so that optimum reception is
obtained.
18
GB
ALARM
Wake-up by radio
• Switch on the unit with the ON/OFF button.
• Tune to a station which will be broadcasting at the alarm
time and adjust the volume to the required level.
• Switch off the unit with the ON/OFF button.
• Set the function selection switch or (or both) to
position
¤.
– At the preselected alarm times the radio will switch on and
switch off again automatically approx. 1 hour later.
Wake-up by sound signal
• Set the function selection switch or (or both) to
position .
– At the preselected alarm times the sound signal will switch
on and switch off again automatically approx. 1 hour
later.
– The two alarm signals for alarm time 1 and alarm time 2
differ in tone.
Interrupting and repeating the alarm
• The radio alarm or electronic sound alarm can be
interrupted with the SNOOZE button.
• After about 5 minutes, the alarm comes on again.
• It is possible to interrupt the alarm function several times
during the switch-on period of approx. 1 hour.
Switching off the alarm
• The alarm function can be switched off by pressing the
ON/OFF button.
The alarm remains set to operate the next day.
• If you wish to switch off the alarm completely, set the
function selection switch or to position OFF.
19
GB
OTHER FUNCTIONS
Going to sleep while listening to
the radio
• Switch on the radio and select the required station.
• Press the SLEEP button briefly.
– The unit switches on the radio and the display will show
the previously set 'sleep' period.
• The 'sleep' time can be adjusted from 10 minutes --> 90
minutes by pressing the SLEEP button continuously.
– After the preset sleep time has elapsed, the radio will
switch off automatically.
• The SLEEP function can be terminated prematurely by
pressing the ON/OFF button.
Dimmer control
• The brightness of the display can be adjusted to the actual
room illumination by the DIMMER HIGH - LOW control.
Positioning the set
• Caution should be exercised if the set is placed on
furniture as surfaces are often coated with lacquers and
plastic finishes containing additives which attack the
material of which the feet of the set are made, leaving
stains which can only be removed with difficulty or not at
all.
Further notes:
• Only a soft cloth which picks up dust should be used to
clean the cabinet. Do not use aggressive polishes or
cleaning agents.
• Do not expose the unit to moisture (e.g. dripping or
splashing).
• The type label is on the bottom of the unit.
Technical specifications
Wavebands: FM ...............................87.5 – 108 MHz
Power output:...................................................400 mW
The unit meets the CEE regulations concerning interference
radiation.
This product fulfills European directives 89/336/EEC,
73/23/EEC and 93/68/EEC.
This set complies with the safety regulations according to
VDE 0860 / BS 415 and thus with the international safety
regulations according to IEC 65.
Subject to technical alterations and alterations in styling. E
& O.E.
Réveil radio-piloté, DCF 77
Avec votre réveil radio-piloté, vous disposez d'un réveil et
d'un agenda extrêmement
précis qui se règlent entièrement
automatique
ment sur l'heure standard transmise par radio
de l'horloge la plus précise au monde. L'horloge la plus
précise au monde est la
base de temps au césium de
l'institut allemand
de physique et des techniques de Bruns-
wick
(PTB). Elle est si précise qu'elle ne présentera
qu'1
seconde de décalage même dans un million d'années.
Votre réveil radio-piloté Sonoclock 740 capte des
télégrammes horaires émis sur la grande onde (77,5 kHz)
par l'émetteur de signaux horaires DCF 77 qui se trouve
à Mainflingen (à 24 km au sud est de
Francfort/Main). Le
rayon d'action maximal de cet émetteur est de 1500 km.
Votre Sonoclock 740 capte gratuitement l'émetteur DCF
77 par l'intermédiaire de l'antenne DCF 77 partout où
par ex. il est possible de capter avec une bonne radio
portative des grandes ondes exploitables. Bien
souvent le
réveil radio-piloté reçoit les télégrammes
horaires de
l'émetteur
situé à une distance plus grande, selon les
conditions de réception locales.
Le micoprocesseur intégré dans votre réveil radio-piloté
traite les télégrammes horaires captés et commande entière
-
ment automatiquement l'horloge à quartz. Dès que la réception
des signaux horaires DCF est
à nouveau possible (après
une interruption), l'horloge est immédiatement synchronisée.
En plus des avantages de la précision horaire et du
signal de réveil ou d'alarme à la seconde près, votre
Sonoclock 740 passe
entièrement automatiquement de
l'heure d’hiver à l'heure d'été et vice-versa.
20
INTRODUCTION CONTRÔLES
F
Commutateurs de fonctions pour les alarmes et
¤ – Réveil par le programme radio
/ – Réveil par le signal sonore
OFF – Pas de fonction de réveil
– DOWN/
– Pour régler l'heure (heure actuelle et de réveil).
+UP
Pour régler la date
WEC –
Pour activer ou déactiver la fonction d'annulation
pendant le week end (WeekEnd Cancellation).
ON/OFF
– Pour allumer ou éteindre l´appareil
– Appuyez pour annuler la fonction réveil quand la
fonction réveil est activée.
–
Pour l'arrêt précoce du mode sommeil.
SLEEP – Met la radio en marche pour une durée maxi. de
90 minutes.
TIME – S'utilise avec
– DOWN/
+
UP
pour régler l'heure
manuellement.
ALARM 1/ – Appuyez brièvement pour faire apparaître
ALARM 2 l'heure de réveil présent
–
S'utilise avec – DOWN/+ UP pour régler l'heure de
réveil
SNOOZE/ –
Pour l'interruption de réveil pendant env. 5 min.
CALENDAR
–
Appuyez une fois pour montrer la date
Appuyez deux fois pour montrer l'année
– Appuyez une fois et maintenez pour régler
manuellement la date.
– Appuyez deux fois et maintenez pour régler
manuellement l'année.
VOLUME – Pour le réglage du volume
TUNING – Pour le réglage d'une station radio
DIMMER
– Pour le réglage de la luminosité de l'afficheur
HI/LOW
Points lumineux 6:
WEC 6 –
Indique que la fonction d'annulation pendant le
weekend (WeekEnd Cancellation) est active.
Sun...Sat 6 – Indique le jour de la semaine.
SIGNAL 1…7 6 – Indique la force du signal reçu de DCF 77.
1 6/2 6 – Indique que la fonction de réveil est activée pour les
alarmes 1 et 2.
SUMMER TIME
6 – Indique la fonction automatique de l'heure d'Été.
TUNING DIAL
6 – Indique que la radio ou le réveil sont allumés.
21
CONTRÔLES
F
A l'arrière de l'appareil :
– Cordon secteur
– Antenne ferrite pour la réception des
télégrammes horaires DCF 77.
– Cable antenne pour la réception FM
Sous l'appareil :
Battery – logement pour la pile d'appoint
VOLUME
WEC
TIME
WEC
SUN...SAT
SIGNAL 1...7
1 / 2
SLEEP
ON/OFF
/ /OFF
TUNING DIAL
– DOWN / + UP
HIGH LOW
DIMMER
TUNING
SNOOZE/CALENDAR
ALARM 1/ALARM 2
SUMMER TIME
¤
/ /OFF
¤
Raccordement au réseau électrique
Raccordez l'appareil au courant alternatif 230 V~,
50/60 Hz.
Après la prémiere mise en service, ou après une panne de
secteur
(sans pile d'appoint), l
e Sonoclock commence à recevoir les
signaux horaires DCF
Pile d'appoint – Panne de courant
Lorsque la pile d'appoint est en place, la montre fonctionne
même pendant une panne de courant. Par contre la radio ne
fonctionne pas et l'afficheur reste éteint.
• Mettez une pile de 9V-alcaline (IEC6 LF22) dans le
logement de pile (sous l'appareil).
• N'introduire la pile que lorsque l'appareil est relié au
secteur afin d'éviter de décharger la pile sans raison.
• Nous recommandons un échange de la pile après une
année de fonctionnement.
• Si l'appareil reste pendant longtemps débranché du
secteur, il est préférable de retirer la pile d'appoint.
Elle se
déchargerait rapidement et pourrait couler.
22
ALIMENTATION
F
Note:
L'appareil reste en liaison avec le secteur,
même
lorsqu'il se trouve à l'arrêt. L'appareil
est coupé du secteur
uniquement lorsque vous retirez le cordon de raccordement
secteur de la prise.
Indication pour la protection de l'environnement
Ne jetez pas vos piles usagées dans votre
poubelle!
Rapportez-les chez votre revendeur lors de
l'achat
de piles neuves ou encore portez-
les dans un dépôt
public prévu à cet usage.
REMARQUE:
La radio ne fonctionne qu’une fois le réglage de l’heure
effectué.
Ceci assure la réception la plus vite possible du signal
horaire, qui à ce point n’est pas perturbé par la radio.
• Si vous désirez mettre en marche la radio avant la
réception du signal horaire, il faudra d’abord mettre
l’heure manuellement.

Ajuster la zone horaire
Le poste émeteur de signaux horaires DCF 77 transmet l'heure
actuelle ou l'heure d'été de l'Europe centrale. Utilisant votre
Sonoclock 740 au Royaume-Uni, par exemple, vous pouvez
retarder la montre une heure, de la façon suivante:
• Débranchez la fiche électrique de la prise.
• Enlevez la pile d’appoint (le cas échéant).
• Appuyez en maintenant la touche TIME pendant
que vous
introduisez la fiche électrique dans la prise
– Le Sonoclock commence à recevoir les signaux horaires
DCF 77 et réglera automatiquement l’heure une heure
avant l’heure DCF 77 reçue.
Réglage de l’heure automatique
Après que l'horloge soit reliée au courant électrique,
l'afficheur indique:
:59
Les deux points (:) à gauche de l'indication des secondes
clignotent. Si l'intensité du signal est suffisante, les deux points
clignotent une fois par seconde et les secondes sont comptées
jusqu'à ce que le signal horaire correct soit reçu. L'afficheur
indique maintenant l'heure exacte et l'indication du jour de la
semaine s'allume.
Si ce n'est pas le cas après quelques minutes la reception des
signaux est extrèmement faible ou il y a une interférence de
signaux. Indication de l'afficheur : 'HALLO'. Amener dans ce
cas l'antenne raccordée dans une autre position et modifiez
son orientation, p.ex. horizontalement en travers à l'émetteur,
ou plus éloignée de l'appareil (50 cm minimum) et d'objets
métalliques ou de téleviseurs mis en service, jusqu'à que les
deux points clignotent de façon regulière, une fois par
seconde.
Pour l'aider, l'indicateur du jour de la semaine indique aussi
l'intensité du signal (SIGNAL 1…7 6). Plus le numéro
de la
lampe qui s'allume est haut, plus le signal reçu est fort.
L'horloge est réglée aux secondes près. L’horloge continue à
marcher sous contrôle d’une base temps interne à quartz
(4,19 MHz). La synchronisation de l'heure survient une fois
par heure.
23
SYNCHRONISATION DE L’HORLOGE
F
24
RÉGLAGE DE L’HORLOGE
F
Régulation manuelle
(si aucun signal de l'heure est reçu)
Régulation manuelle de l'heure
• Maintenez la touche TIME appuyée et réglez la montre de quartz
avec les touches
– DOWN/
+
UP
.
– Si l'on maintient la touche respective enfoncée, le réglage s'éffectue
d'abord à basse puis (après 4 secondes) à haute vitesse.
• Lachez cette touche quand l'heure désirée apparaît.
– L'horloge commence à fonctionner aussitôt que vous lâchez les
touches.
Régulation manuelle de la date
• Maintenez la touche CALENDAR appuyée et réglez la date avec les
touches
– DOWN/
+
UP
.
– Si l'on maintient la touche respective enfoncée, le réglage s'éffectue
d'abord à basse puis (après 4 secondes) à haute vitesse.
• Lachez cette touche quand la date désirée apparaît.
Régulation manuelle de l'année
• Appuyez deux fois sur la touche CALENDAR jusqu'à que l'indication
de l'année apparaisse. Avec cette indication active, appuyez en
maintenant la touche CALENDAR et réglez l'année avec les touches
– DOWN/
+
UP
.
– Si l'on maintient la touche respective enfoncée, le réglage s'éffectue
d'abord à basse puis (après 4 secondes) à haute vitesse (dès l'année
1990 jusqu'à 2099).
• Lachez cette touche quand l'année désirée apparaît.
– L'indication du jour de la semaine change automatiquement.
Fonction de calendrier
Le Sonoclock 740 possède une fonction de
calendrier. Le jour, le mois et l'année sont reçus du
DCF 77 ou peuvent être réglés manuellement.
Le jour de la semaine est reglé automatique
ment,
d'accord avec le jour, le mois et l'année.
Indication du calendrier
•
Appuyez une fois sur la touche CALENDAR.
– Le jour et le mois apparaissent sur l'afficheur.
– Après environ 3 secondes, l'afficheur indique
l'heure à nouveau.
• Appuyez deux fois sur la touche CALENDAR.
– L'année apparaît sur l'afficheur.
– Après environ 3 secondes, l'afficheur indique
l'heure à nouveau.
Réception radio
REMARQUE:
La radio ne fonctionne qu’une fois le réglage de l’heure
effectué.
Ceci assure la réception la plus vite possible du signal
horaire, qui à ce point n’est pas perturbé par la radio.
• Si vous désirez mettre en marche la radio avant la
réception du signal horaire, il faudra d’abord mettre
l’heure manuellement comme d’écrit ci-dessus.
• Ensuite mettez la radio en marche à l’aide de la touche
ON/OFF.
– L'aiguille lumineuse (TUNING DIAL 6). sert de témoin de
fonctionnement.
• Choisissez la station à l'aide du bouton moleté TUNING.
• Réglez le volume à l'aide du bouton moleté VOLUME
Antennes
– Le câble antenne sert à la réception FM (à l'arrière de
l'appareil).
• Orientez l'antenne de manière à obtenir une réception
optimale.
Réveil
• Sélectionnez la fonction de réveil souhaitée (programme
radio ou signal sonore) par le sélecteur ou .
–
Lorsque les deux heures de réveil sont activées, ceci
est
indiqué par les points lumineux 1 6 et 2 6.
Réglage de l'heure de réveil
• Appuyez brìevement sur la touche ALARM 1 ou ALARM 2.
– L'afficheur indique l'heure de réveil actuelle.
• Maintenez la touche ALARM 1 ou ALARM 2 appuyée et
réglez l'heure de réveil avec les touches
– DOWN/
+
UP
.
Fonction d'annulation pendant le
weekend (WEC)
• Si vous ne voulez pas être réveillé pendant le weekend,
appuyez une fois sur la touche WEC.
– Le point lumineux WEC 6 s'allume.
– L'alarme fonctionne normalement les autres jours de la
semaine.
– Cela fonctionne pour l'alarme 1 et pour l'alarme 2.
• Appuyez sur la touche WEC à nouveau pour désactiver
cette fonction.
25
RADIO RÉVEIL
F
26
F
RÉVEIL
Réveil avec programme radio
• Mettez la radio en service par la touche ON/OFF.
• Sélectionner la station que vous désirez écouter à votre
réveil et régler également le volume souhaité.
• Mettez la radio hors service par la touche ON/OFF.
• Mettez le commutateur ou (ou les deux) en
position
¤.
– L'appareil se met en marche à l'heure de réveil program-
mée, et s'arrête automatiquement au bout d'une heure
environ.
Réveil par signal sonore
• Mettez le commutateur ou (ou les deux) en
position .
– Aux heures de réveil programmées, le signal sonore retentit
et s'arrêtera automatiquement au bout d'une heure environ.
– Les signaux sonores pour l'heure de réveil 1 et l'heure de
réveil 2 se distinguent par leur hauteur du son.
Interruption et répétition du réveil
• Vous pouvez, indépendament du mode de réveil
(programme radio ou alarme), interrompre le réveil à l'aide
de la touche SNOOZE.
• Le réveil se remet en marche aprés env. 5 minutes.
• Il est possible d'interrompre plusieurs fois
le réveil pendant la
durée active de celui-ci.
Arrêt du réveil
• Si vous désirez arrêter la fonction réveil, il vous suffit
d'appuyer sur la touche ON/OFF.
La programmation du réveil reste valable pour le jour
suivant.
• Pour annuler définitivement la fonction de réveil, amener
l'interrupteur ou en position OFF.
 Loading...