


User Manual
Digital Camcorder
DV 1

CONTENTS |
|
CONTENTS................................................................................................ |
2 |
PRECAUTIONS.......................................................................................... |
6 |
Preface........................................................................................................................... |
6 |
Copyright............................................................................................................... |
6 |
Trademarks........................................................................................................... |
6 |
About this manual............................................................................................... |
6 |
Symbols used in this manual............................................................................ |
6 |
WARNING....................................................................................................................... |
7 |
SAFETY PRECAUTIONS................................................................................................. |
9 |
Video camera notes............................................................................................ |
9 |
Memory card notes............................................................................................. |
9 |
LCD screen notes............................................................................................... |
10 |
Please read the following important information |
|
carefully before using this product............................................................... |
10 |
WATER & DUST PROOF PRECAUTIONS.................................................................... |
11 |
Water & Dust Proof........................................................................................... |
11 |
Precautions Before Using................................................................................ |
11 |
Precautions When Using................................................................................. |
11 |
Maintenance Precautions After Using.......................................................... |
12 |
GETTING STARTED................................................................................. |
13 |
Accessories ................................................................................................................. |
13 |

Each Component Name............................................................................................ |
14 |
Charge and Insert SD Card....................................................................................... |
15 |
Charging.............................................................................................................. |
15 |
Insert SD/SDHC Card........................................................................................ |
16 |
TurningOn/Off............................................................................................................ |
17 |
Setting Language and Date/Time.......................................................................... |
18 |
Set Display Language....................................................................................... |
19 |
Set Date and Time............................................................................................. |
20 |
BASIC OPERATION................................................................................. |
21 |
Recording Movies....................................................................................................... |
21 |
Zoom Function................................................................................................... |
21 |
White Balance.................................................................................................... |
22 |
Shooting.............................................................................................................. |
22 |
LCDScreenDisplayinDifferentModes................................................................. |
23 |
Shooting Screen................................................................................................. |
23 |
Video Recording................................................................................................. |
24 |
Playback.............................................................................................................. |
25 |
DISP...................................................................................................................... |
26 |
PLAYBACK............................................................................................... |
27 |
Preview Photos and Videos...................................................................................... |
27 |
Video..................................................................................................................... |
27 |

Zoom in Photos.................................................................................................. |
29 |
Screen Display in the Playback Mode........................................................... |
30 |
Delete Photos and Videos................................................................................ |
31 |
MENU SETUP.......................................................................................... |
32 |
Photo Setup................................................................................................................. |
32 |
Quality.................................................................................................................. |
33 |
Exposure Metering............................................................................................ |
33 |
HDR....................................................................................................................... |
34 |
Continuous Shot................................................................................................ |
34 |
Date Imprint....................................................................................................... |
35 |
Movie Setup................................................................................................................. |
36 |
Movie Resolution............................................................................................... |
37 |
Exposure Metering Modes............................................................................... |
37 |
HDR....................................................................................................................... |
38 |
General Setup............................................................................................................. |
39 |
Beep Setup.......................................................................................................... |
40 |
LCD Brightness................................................................................................... |
40 |
World Time.......................................................................................................... |
41 |
Power Saver........................................................................................................ |
41 |
firmwareVersion............................................................................................... |
42 |
Format Memory................................................................................................. |
42 |
Reset..................................................................................................................... |
43 |

Copy to Card....................................................................................................... |
43 |
Playback Setup........................................................................................................... |
44 |
Delete................................................................................................................... |
45 |
Slide Show........................................................................................................... |
47 |
Red Eye Removal............................................................................................... |
48 |
CONNECTION......................................................................................... |
49 |
Connecting to TV Output with HDMI...................................................................... |
49 |
Connecting to a PC via USB...................................................................................... |
50 |
APPENDICES........................................................................................... |
52 |
Specifications:DV1.................................................................................................... |
52 |
Error Messages........................................................................................................... |
55 |
Troubleshooting......................................................................................................... |
57 |

PRECAUTIONS
Preface
Thank you for purchasing this GE digital video camera. Please read this manual carefully and keep it in a safe place for future reference.
Copyright
Copyright 2010 General Imaging Company All rights reserved.
No part of this publication may be reproduced, transmitted, transcribed, stored in a retrieval system, or translated into any language or computer language, in any form, by any means, without the prior written permission of General Imaging Company.
Trademarks
Alltrademarksmentionedinthismanualareusedforidentificationpurposes only and are properties of their respective owners.
About this manual
This manual provides you with instructions on how to use your GE digital video camera.Everyefforthasbeenmadetoensurethatthecontentsofthismanual are accurate, however GIC (General Imaging Copmnay) reserves the right to make changes without notice.
Symbols used in this manual
Throughout this manual, the following symbols are used to help you locate informationquicklyandeasily:
 Indicates important information.
 Indicates precautions to be taken while operating the video camera.

WARNING
Do not expose the video camera battery pack or other accessories to rain or humiditytotoreducetheriskoffirehazardorelectricshockfirehazardor electric shock.
For customers in the U.S.A.
Tested To Comply With FCC Standards
FOR HOME OR OFFICE USE
FCC Statement
This device complies with part 15 of the FCC Rules. Operation is subject to the followingtwoconditions:
(1)This device may not cause harmful interference, and
(2)This device must accept any interference received, including interference that may cause undesired operation.
For customers in Europe
"CE" mark indicates that this product complies with the European requirements for safety, health, environment and customer protection. "CE" marked video cameras are intended for sales in Europe.
This symbol [crossed-out wheeled bin WEEE Annex IV] indicates separate collection of waste electrical and electronic equipment in the European countries. Please do not throw the equipment into the trash. Please electronically recycle responsibly.

Declaration of Conformity
ModelName: |
DV1 |
TradeName: |
GE |
ResponsibleParty: |
GeneralImagingCo. |
Address: |
1411W.190thStreet,Suite550,Gardena,CA90248,USA. |
TelephoneNumber: |
+1-800-730-6597 |
(OutsideU.S.&Canada:+1-310-755-6857) PowersupplyshouldconformtoCCCstandard:
EMC EN55022:1998/A1:2000/A2:2003ClassB
EN55024:1998/A1:2001/A2:2003
EN61000-3-2:2000/A1:2001
EN61000-3-3:1995/A1:2001
following the provision of the EMC Directive (89/336/EEC, 2004/108/EEC)

SAFETY PRECAUTIONS
Video camera notes:
Donotstoreorusethevideocamerainthefollowingtypesoflocations:
•In direct sunlight for a long period of time or high temperature (beyond 40ºC);
•Inenvironmentswithhighmagneticfields;
•In very humid and dusty places;
Doing so may shorten the life of the digital video camera or allow foreign materials to enter which could damage the internal components.
If the video camera will not be used for a long period of time, we suggest you download photos and remove the memory card.
If the video camera is taken from a relatively cool environment (lower than 40ºC/104F), and placed in a warmer or more humid atmosphere, condensation may occur within the appliance. We suggest you wait for it to warm to room temperature before turning on the video camera.
General Imaging is not responsible for any loss of data.
Memory card notes:
When using a new memory card, or a memory card has been initialized by a
PC, you might have to format the card if the camera is not reading it. However, please back up any data on the card as the formatting will delete all data on the card.
Toeditimagedata,copytheimagedatatoPCfirst.
Donotchangeordeletethefoldernamesorfilenamesinthememorycardfrom your PC, as this may make it unusable and/or unreadable.
Onlyremoveandinsertamemorycardwhenthecameraisoffasdatalossand/ or corruption may occur otherwise.
Donotturnthecameraoffwhenthefirmwareisbeingupdatedortheremaybe data or picture loss and/or corruption.
The memory card can be inserted only one way into the camera.

LCD screen notes:
Due to current LCD manufacturing technology, you may see a few light or dark pixels on your LCD. This is normal.
Theselightordarkpixelswillnotaffectthequalityofthephotoorvideoimage.
If the LCD screen is damaged, take particular care with the liquid crystal in the screen. If any of the following situations arise, take the recommended immediate actionindicatedbelow:
•If liquid crystal comes in contact with your skin, wash thoroughly with soap and running water.
•Ifliquidcrystalgetsintoyoureye,flushtheaffectedeyewithcleanwaterfor at least 15 minutes and then seek medical assistance.
•Ifliquidcrystalisswallowed,flushyourmouththoroughlywithwaterandtry to induce vomiting. Then seek medical assistance immediately.
Please read the following important information carefully before using the product:
•Do not disassemble or attempt to service the video camera yourself.
•Do not drop or knock the video camera. Improper handling may damage the product as it will void the warranty.
•Turnoffthevideocamerabeforeinsertingorremovingthememorycard.
•Do not touch the video camera lens.
•Do not expose the video camera lens to direct sunlight for extended periods.
•Do not use abrasive cleansers, alcohol-based, or solvent based cleaners to clean the video camera body. To clean, wipe the video camera lens with a professional lens cleaning cloth and special cleaning agent for cameras and electronics.
10
Water & Dust Proof Precautions
Water & Dust Proof
•The video camera meets JIS/IEC waterproof grade 8 (IPX8) and JIS/IEC dustproof grade 6 (IPX6).
•The accessories included with the video camera are not for use in wet conditions.
Precautions Before Using
•Please make sure that the SD cover and HDMI/USB interface cover (hereinafter referred to as “interface cover”) are locked securely.
•The rubber mating surfaces on the covers and doors should be clean and free of foreign matter to insure a tight seal.
•Unitwithdamagedwaterproofingrubbershouldnotbeusedinwet conditions.
•Don’t use the video camera in a geothermal spring.
•When using the video camera in water, a wrist strap should be used.
Precautions When Using
•Don’t use the video camera below 5 meters (approximately 15 feet) underwater.
•Don’t use the video camera under water for more than 2 hours.
•The camera should not be dropped into water. Avoid jumping or diving into water with the camera as the SD cover or interface cover may open on impact.
•Don’t open the SD cover or interface cover underwater .
11

Maintenance Precautions After Using
•Wipe the video camera with a clean, dry lint free cloth.
•When the SD cover or interface cover is opened, there may be water drops on the inside of the SD cover or interface cover and on the contact surface of video camera body; make sure to dry it out.
•After using the video camera in the water or near sand, mud or other foreign materials, please wash it with clean water (don’t open the SD card cover or interface cover when cleaning). After cleaning, wipe out the video camera with a clean and dry lint free cloth.
•Tohelpensurethecamera'swaterproofability,wipeoffanydust,sandor other foreign materials from the rubber gaskets and corresponding slot areas.
•Don’t use any chemical agents to clean the camera. Do not use silicone grease on the rubber.
 Damagedwaterproofingrubbergasketswithcracksorscatcheswillallow
  the entrance of water into the camera. Contact customer service for service.
12
GETTING STARTED
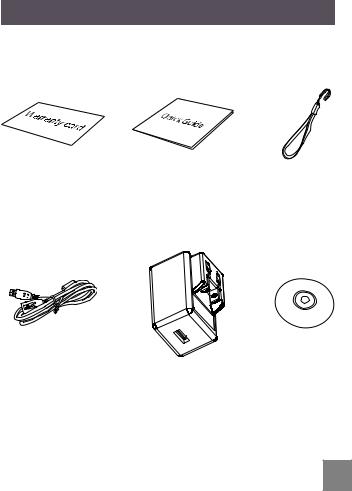
Accessories
Your package should contain the video camera model you purchased along with the items below. If anything is missing or appears to be damaged, please contact our customer service department.
Warranty Card |
Quick Guide |
Wrist Strap |
|
|
|
|
|
|
USB Cable |
Power Adapter |
CD-ROM |
13

Each Component Name
16 17
15
1
14
18
|
|
|
|
13 |
|
|
|
|
|
|
|
|
|
|
19 |
|
2 |
|
|
|
|
|
|
|
3 |
|
|
12 |
|
|
20 |
|
|
|
|
|
|
23 |
|
|
|
|
|
|
|
21 |
|
|
|
|
|
|
|
|
|
|
4 |
|
|
|
|
|
|
|
8 |
9 |
10 |
11 |
|
|
|
5 |
7 |
|
|
|
|
|
|
|
6 |
|
|
|
|
22 |
|
1 |
LCD Screen |
|
|
12 |
SD Card Slot |
|
|
2 |
Shooting Button |
13 |
SD Card Slot Switch |
|
|||
3 |
Playback Button |
14 |
Power Button |
|
|||
4 |
Up Button / Zoom in Button |
15 |
Status Indicator |
|
|||
5 |
Left Button / Disp |
16 |
Lens |
|
|||
6 |
Down Button / Zoom out |
17 |
Microphone |
|
|||
Button |
|
|
|
|
|||
|
|
|
|
|
|
|
|
7 |
Right Button / White Balance |
18 |
USB/HDMI Card Slot Switch |
||||
8 |
OK Button / Record Button |
19 |
USB lock |
|
|||
9 |
Wrist Strap Hole |
20 |
HDMI Interface |
|
|||
10 |
Delete Button |
21 |
USB Jack |
|
|||
11 |
Menu Button |
|
22 |
Tripod Socket |
|
||
|
23 |
Speaker |
|
||||
|
|
|
|
|
|
||
14

Charge and Insert SD Card
Charge:
This video camera has an internal battery. You can use the following three methodstochargethevideocamera:
1.UsetheUSBcabletoconnectthevideocamerawiththeadapterseefigure(1);
2.UsetheUSBcabletoconnectthevideocameratothePCseefigure(2);
3.ConnecttheUSBconnectortoPCdirectlyseefigure(3).
1 |
2 |
3 |
Itshouldchargeforabout4hoursforthefirsttime,andthestatus indicator will turn green when the battery is fully charged.
If you use method (1) to charge, the charging time is 3 hours. If you use method (2) or (3) to charge, the charging time is 5 hours.
15
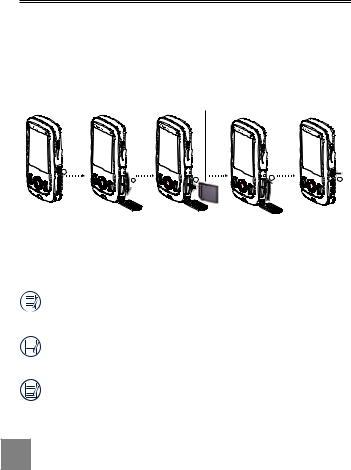
Insert SD/SDHC Card
1.Open SD Card Cover according to , ;
2.Insert SD Card according to ;
3.Close SD Card Cover according to , .
Write-protection buckle
1
2 |
3 |
4 |
5 |
|
After opening the buckle on the SD Card Cover according to the arrow direction showninthefigure , SD Card Cover will open automatically. To remove SD card, gently press it to pop it out.
Optional SD/SDHC cards are not included in the accessories and must be purchased separately.
 WhenselectingFullHDsize(1920X1080,1440X1080)torecordvideo,please
use High Speed Card (above Class 4).
When taking video, if “Memory card accessing is slow” on the LCD screen, please select High Speed Card or format this card, then take video.
16

TurningOn/Off
PressthePowerbuttontoturnthevideocameraon/off.
Whenthepowerisoff,pressthePowerbutton for to turn the video camera on.
When the power supply is on, press the Power buttonfortoturnthevideocameraoff.
If there is no response on the video camera, press and hold the power button and the  button for at least two secondstoresetandpoweroff.
17

Setting Language and Date/Time
Language,Date / Time setting menu will appear when turning the video cameraonforthefirsttime.
Usethefollowingprocedurestosetthecameratoyourpreferences:
1.Press Power button to turn the video camera on.
2.Press

 button to select the settings.
3.Press  buttontoconfirmthesettings.
18
 Loading...