


DSS26DHWCSS

ge.com
Safety Instructions ............... 2-4
°e..<
:/3
Operating Instructions
Automatic Icemaker ............... ] ]
Care and Cleaning .............. ] 3, ] 4
Crispers and Pans ................. ] 0
Ice and X_'ater Dispenser ......... ] 2, ] 3
Reflig_ramr Doors ................. 9
Replacing the Light Bu]bs ........... 15
Shelves and Bins ................. 7, 8
Temperature Controls ............... 5
TurboCool _'' . ...................... 5
V(ater Filter ....................... 6
Installation Instructions
Installing the Refligerator . ....... 21-24
Moving the Refiigerator . ........ 17-20
Preparing to Install
the Refiigerator . .................. 16
VC_ter Line Installation .......... 25-27
Troubleshooting Tips ........... 28-31
Normal Operating Sounds .......... 28
Consumer Support
Consumer Support ......... Back Cover
Performance Data Sheet ............ 32
Product Registration (U.S.) ....... 33, 34
Product Registration (Canadian) . . .35, 36
State of California X_'ater
Treatment Device Certificate ......... 37
VCarranty (Canadian) ............... 38
X_'arrantv (U.S.) ................... 39
Models23,25and27
C6te a C6te
R frig rateurs
La sectionfran_aise commencea la page40
Iado a Iado
Refrigeradores
La seccionen espa#ol empiezaen la pagina 74
Write the model and serial numbers here:
Model #
Serial #
Find these numbe_ on a label inside
the refl'igerator compartment at the
top on the IJght side.
200DSO74P014 49-60488 12-06JR

IMPORTANTSAFETYINFORMATION.
READALLINSTRUCTIONSBEFOREUSING.
WARNING!
Use this appliance only for its intended purpose as described in this Owner's Manual.
SAFETYPRECAUTIONS
When using electrical appliances, basic safety precautions should be followed, including the following:
i)::This refi'igerator must be properly installed
and located in accordance with tile Installation
Instructions before it is used.
i)::Do not allow children to climb, st;rod or hang
on the shelves in the reli-igerato_: They could
damage the reti_igerator and seriously iqj ure
themselves.
::_ Do not touch tile cold sui-lilces in tile fl'eezer
compartment when hands are damp or wet. Skin
may stick to these extremely cold surlhces,
}_'<Do not store or use gasoline or other flammable
\_q)o_ and liquids in tile \'icini_i of this or any
other appliance.
i)_:In refl'igerato_ with automatic icemake_,
avoid contact with the m oving parts of the
ejector mechanism, or with tile heating element
locamd on tile bottom of tile icemake_: Do
not place tinge_ or hands on tile automatic
icemaking mechanism while the refrigerator
is plugged in.
i)::Kee I)finge_ out of tile "pinch point" areas;
clearances between the doo_ and between
the doo_ and cabinet are necessarily small.
Be caretul closing doo_ when children are
in the area.
i)::Uni)lug tile refrigerator befiwe cleaning and
making repairs.
NOTE."We stronglyrecommendthatanyservicingbe
performedby aqualified individual
i)::Do not refi'eeze ti'ozen foods which have
thawed completel>
NOTE: rurnlhg the refwerator off wa the controls on
the touchpanel doesnot shut off electricalpower to the
refrigerator
2

ge.com .....
A DANGER! RISK OFCHILDENTRAPMENT
PROPERDISPOSALOFTHEREFRIGERATOR
Child entrapn_ent and ,alff cation are not i)roblems Refrigerants
of the past.Jm_ked or abandoned reti_igerato_ are
still dan<,erous e',en if they will sit for "'ust a tew _M1 refl_igeration products contain refl'igerants,
days." lf)ou are getting rid of)our old reffigeratox; which under federal law must be removed prior
please fi_llow the instructions below to help pre_ent to product disposal. If you are getting rid of an ,
accidents, old refrigeration product, check with the
compare handling the disposal about what
Before YouThrowAway YourOld Refrigerator to do.
or Freezer: _"
iJi::Take off the doo_.
!i_:I,eaxe the shelxes in place so that children ma_ _
not easilx climb inside.
USEOFEXTENSIONCORDS
Because of potential safety hazards under certain conditions, we strongly recommend against the use
of an extension cord.
However, if _ou must use an extension cord, it is absohltel_ necessar_ that it be a IL)I,-listed (in the United
States) or a CSA-listed (in Canada), 3-wire groundin , t_ )e a ))liance extension cord haxing a grounding _'
t},]_e I)lu'"_ and outlet and that the electrical rating of the cord be 15 amperes (minimum) and 120 xolts.
g
7,
g
R
3
IMPORTANTSAFETYINFORMATION.
READALLINSTRUCTIONSBEFOREUSING.
WARNING!
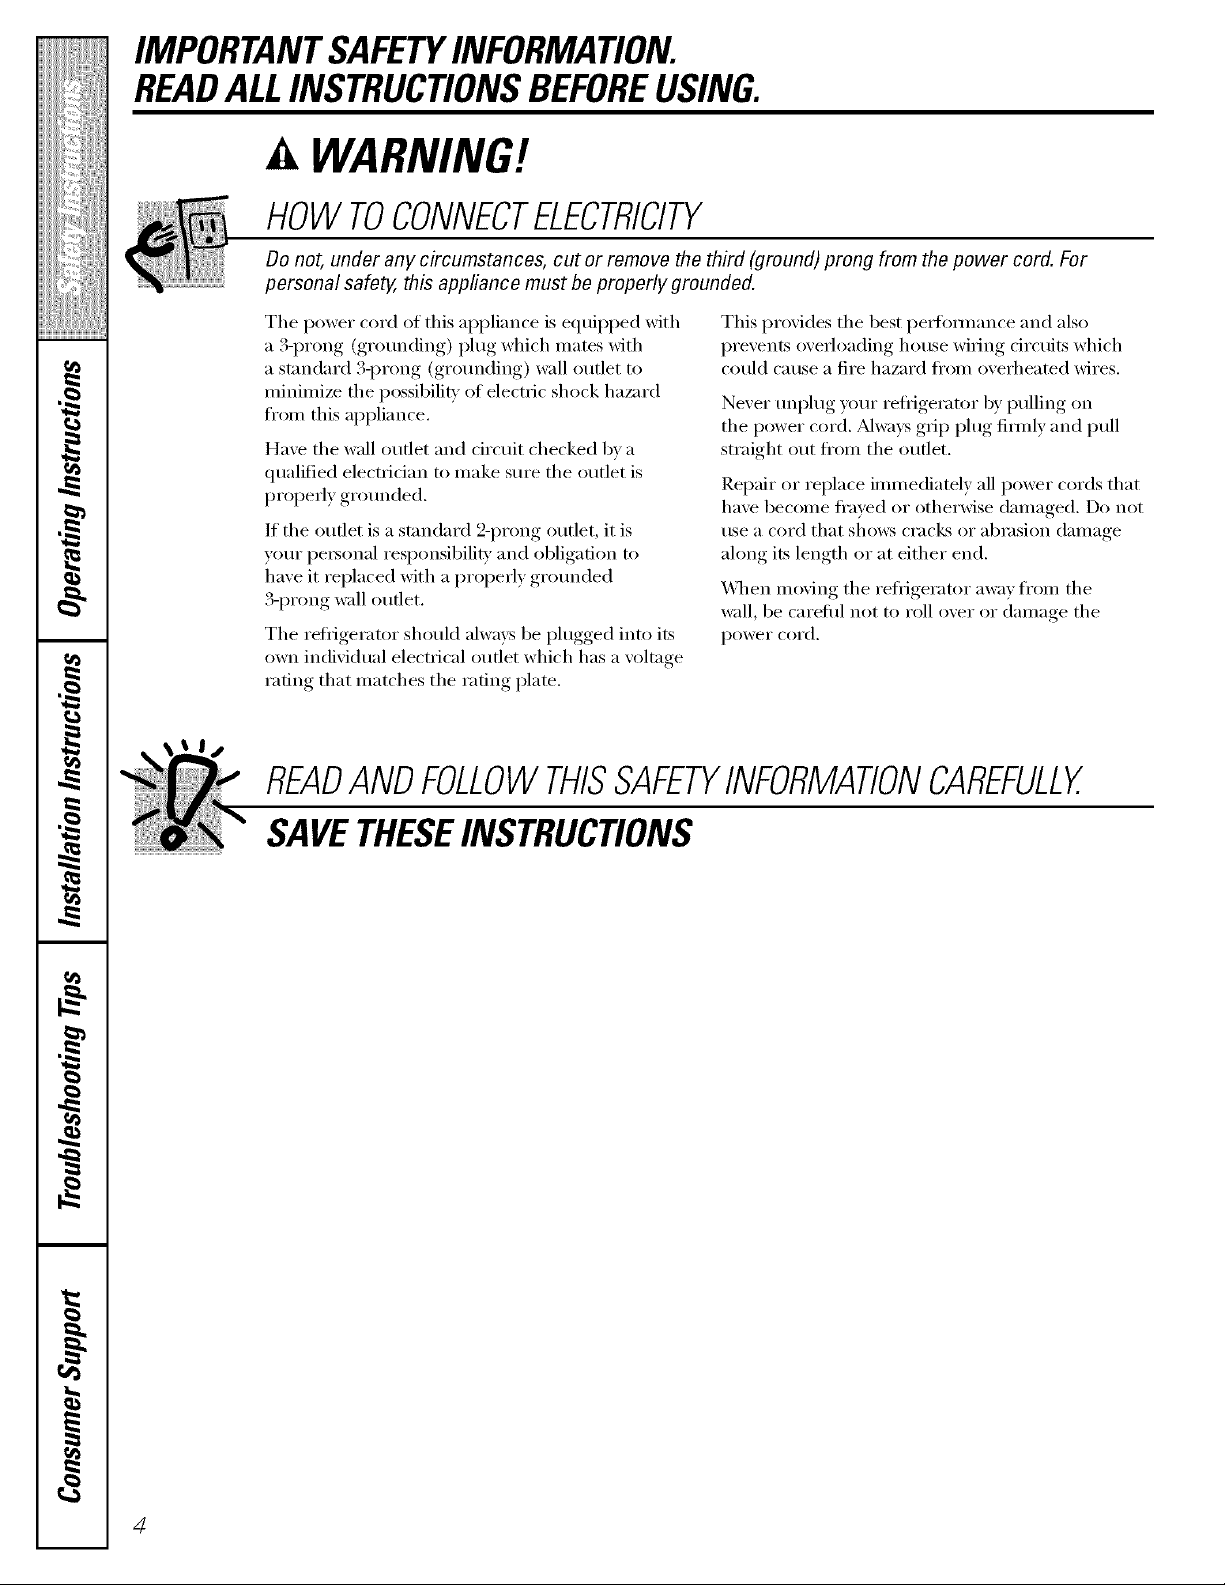
HOWTOCONNECTELECTRICITY
Do not, under any circumstances, cut or remove the third (ground) prong from the power cord. For
personal safe_ this appflance must be properly grounded.
The power cord of this appliance is equipped with
a 3-prong (grounding) plug which mates Mth
a standard 3-prong (gromMing) wall outlet to
minimize the possibili_' of electric shock hazard
from this appliance.
Have the wall outlet and circuit checked by a
qualNed electfidan to make sure the outlet is
propedy grotmded.
If the outlet is a standard 2-prong outlet, it is
yore" personal responsibili_' and obligation to
have it replaced with a properly grotmded
3-prong wall outlet.
The refl'igerator should always be plugged into its
own individual electrical outlet which has a w)ltage
rating that matches the rating plate.
This provides the best pertimnance and also
I)rexents oxerloading, house wiring circuits which
could cause a fire hazard from oxerheated wires.
Never m_plug yore" refrigerator by pulling on
the power cord. Mways grip plug firefly and pull
straight out fl'om the outlet.
Repair or replace immediately all power cords that
have become fl'aved or otherwise damaged. Do not
use a cord that shows cracks or abrasion damage
along its length or at either end.
When moving the refl_igerator away from the
wall, be careflfl not to roll over or damage the
power cord.
READANDFOLLOWTHISSAFETYINFORMATIONCAREFULLY.
SAVETHESEINSTRUCTIONS
4
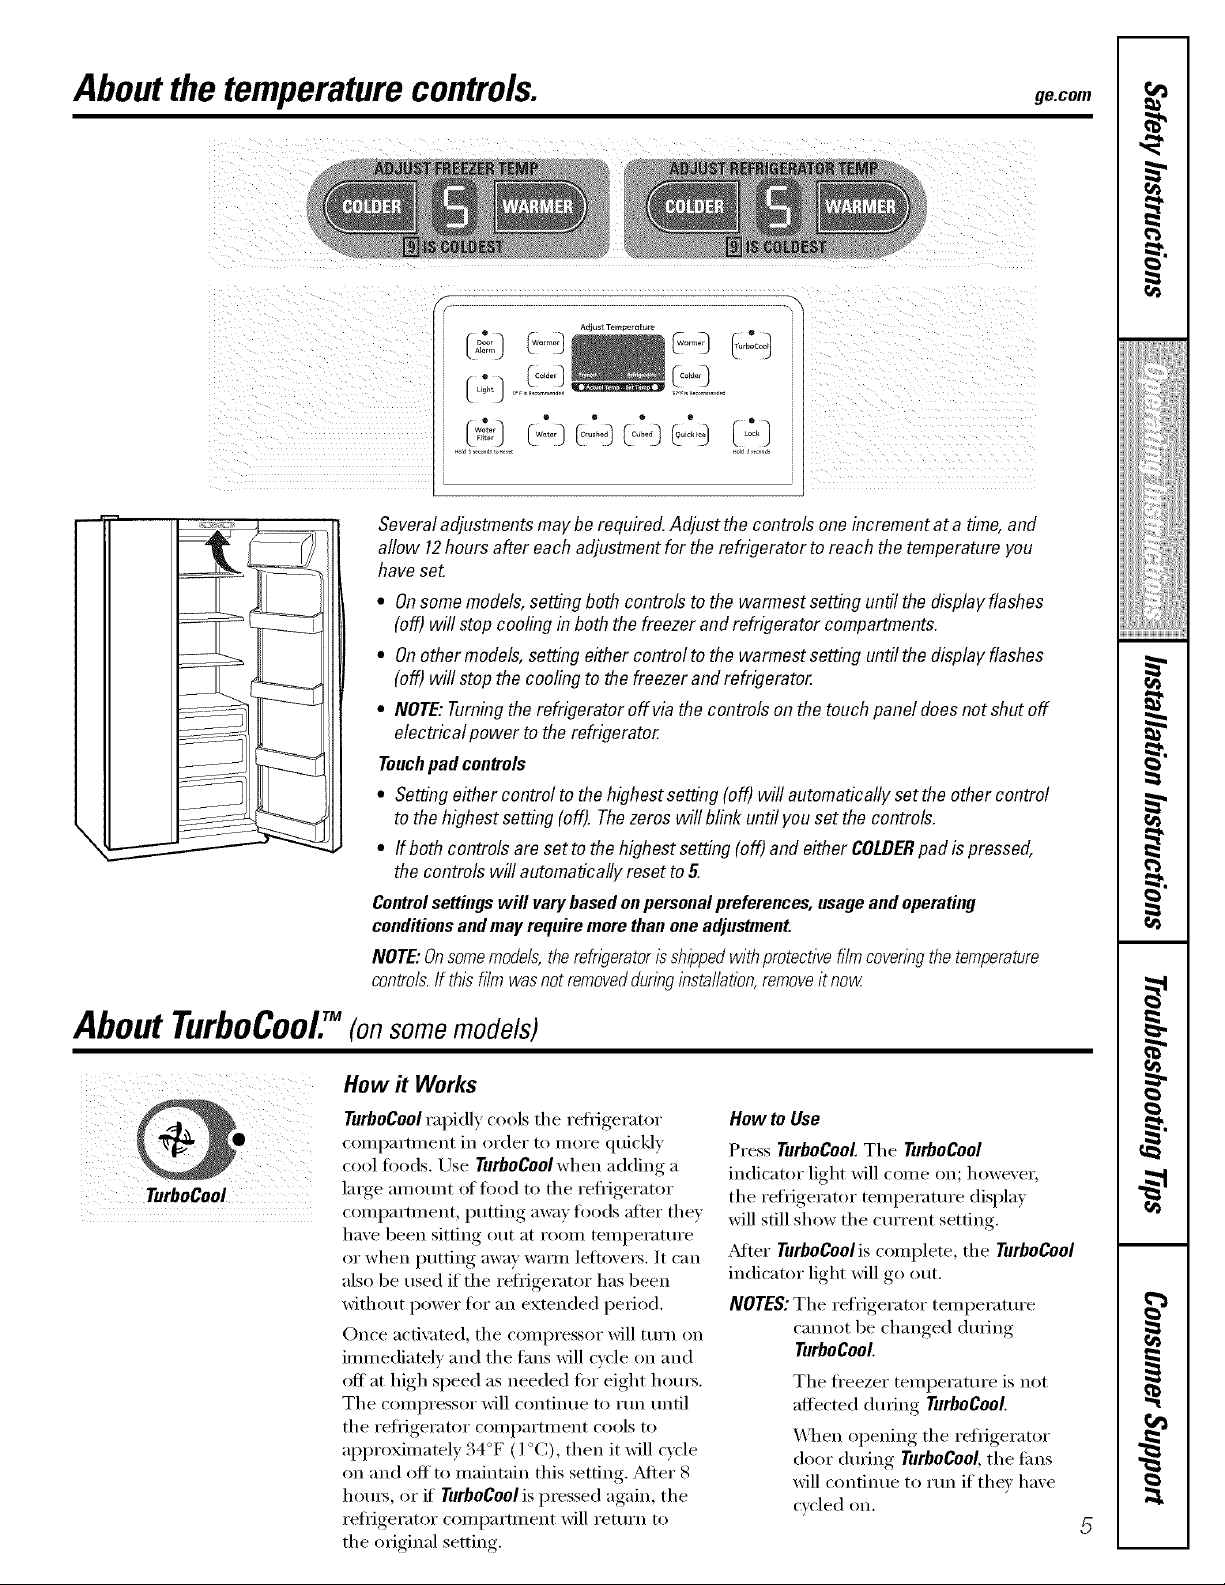
Aboutthe temperaturecontrols. ge.com
Severaladjustmentsmaybe required.Adjust the controls oneincrementata time,and
allow 12hours after eachadjustmentfor therefrigeratorto reachthe temperatureyou
haveset
• Onsomemodels,settingboth controlstothe warmestsettinguntilthe displayflashes
(off)will stopcoolingin both thefreezerandrefrigeratorcompartments.
• Onothermodels,settingeithercontrol tothe warmestsetting untilthe displayflashes
(off)will stopthe cooling to thefreezerandrefrigerator.
• NOTE:Turningtherefrigeratoroffvia thecontrols on thetouchpaneldoesnot shutoff
electricalpower to the refrigerator.
Touchpadcontrols
• Settingeithercontrol tothe highestsetting (off)will automaticallyset the other control
tothehighest setting(off).Thezeroswill blinkuntilyouset thecontrols.
• ff both controlsaresettothe highestsetting(off)and either COLDERpad ispressed,
the controls will automatically resetto5.
Controlsettingswill varybasedonpersonalpreferences,usageandoperating
conditionsandmayrequiremorethanoneadjustment.
NOTE:Onsomemodels,therefrigeratorisshippedwithprotectivefilmcoveringthetemperature
controls.If thisfilmwasnotremoveddun#ginstallation,removeit now
I
,,,><,,,,,,,,,,,,,,,,,,
ii!iiiiii_i_ii{iiii{iiiii
w
About TurboCoolY(onsome models)
How # Works
TurboCoolrapidly cools the reti_igerator
compartment in order to more quickly
cool foods. Use TurboCoolwhen adding a
large alllOtlnt ot tood to the refl-igerator
compartment, putting away foods af*er they
have been sitting out at room temperature
or when putting away wam_ letiox'e_s. It can
also be used if the reti_igerator has been
without power flw an extended pe_iod.
Once acfi\:_md, the compressor will tui'n on
immediately and the rims will cycle on and
off at high speed as needed fiw eight hours.
The compressor will continue to rtm until
the refl-ige_'ator compaYtment cools to
approximately 34°F (l °C), then it will cycle
on and off to maintain this setting. After 8
hou_, or if TurboCoolis p_essed again, the
reli_ige_wtor compartment will return to
the o_iginal setting,
How to Use
Press TurboCool.The TurboCool
indicator light Mll come on; howe\'e_',
the refrigerator temperature display
will still show the current setting.
_Mter TurboCoolis complete, the TurboCoo/
indicator light will go out.
NOTES:The refYigerator temperature
cannot be changed dtu'hlg
TurboCooL
The ti'eezer temperature is not
affected (hm'ng rurboCool.
_]_en opening the reliig-erator
door (ltu'h_g TurboCool,the liras
will continue to run if they have
cycled on.
g
i
H
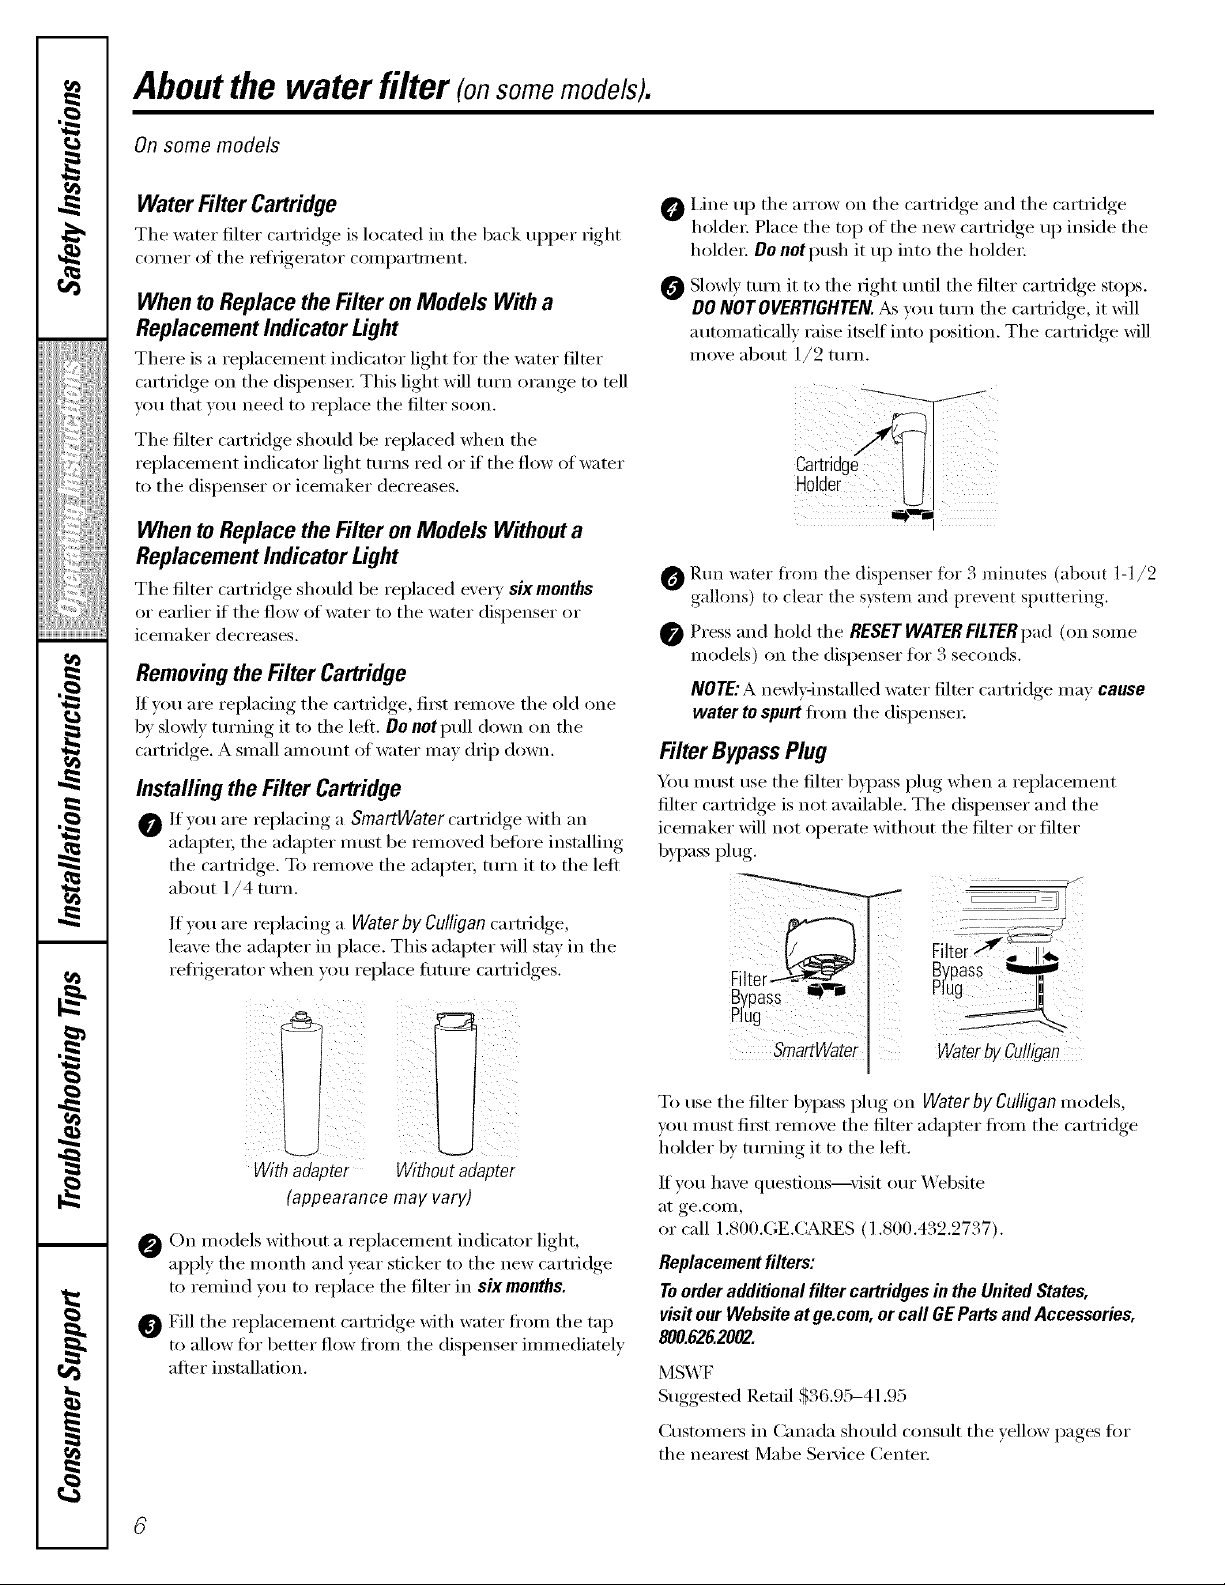
Aboutthe water filter (onsomemodels).
On some models
Water FilterCartridge
The water filter cartridge is located in tile back upper right
coi'ileF of tile reflJgerator COlllpaFtl/lellt.
When toReplace the Filter onModels With a
ReplacementIndicatorLight
There is a replacement indicator light for tile water filter
cartridge on the dispense_; This light will mrn orange to tell
you that w_u need to replace tile filter soon.
The filter cartridge should be replaced when the
replacement indicator light turns red or if the flow of water
to the dispenser or icemaker decreases.
When toReplace the Filter onModels Withouta
ReplacementIndicatorLight
The filter cartridge should be replaced every sixmonths
or earlier if the flow of water to tile water dispenser or
icemaker decreases.
Removingthe Filter Cartridge
If you are replacing tile cartridge, first remove tile old one
b)' slowly turning it to tile left, Do n0t pull down on tile
cartridge. A small amo/mt of water may drip down.
Installing the Filter Cartridge
If _u are re )la('im, a SmartWater cart_idoe with an
adapte_, tile adapter i/ltlst be remoxed before mstalhng
tile cartridge. To remove tile adapte_; turn it to tile left
about l/4 turn.
O i,ine up tile arrow on tile camidge and tile camidge
holder: Place tile top of tile new cartridge up inside tile
holdex: Do not push it up into tile holdex:
Slowly tm'n it to tile right tmfil tile filter cartridge stops.
DO NOTOVERTIGHTEN. As you turn tile camidge, it will
automatically raise itself into position. The cartridge will
move about l/2 turn.
H01(
O Run water fl'om the dispenser for 3 mintttes (about 1-1/2
gallons) to clear the s_stem and pre_ent sputtering,
Press and hold tile RESET WATERFILTERpad (on some
models) on the dispenser for 3 seconds.
NOTE:A newly-installed water filter cartridge may cause
water to spurt fl'om tile dispensex:
FilterBypassPlug
Ym must use tile filter b)pass plug when a replacement
filter cartridge is not a\:filable. The dispenser and the
icemaker will not operate without the filter or filter
bypass plug.
]fxou are replacing a Water by Culligan cartridge,
leaxe tile adapter in place. This adapter will stay in tile
refl_igerator when )ou replace fllttu'e cartridges.
Withadapter Withoutada
(appearance may vary)
On models without a replacement indicator light,
apply the month and year sticker to the new cartridge
to remind xou to replace the filter in six months.
Fill tile replacement cartridge with water fl'om tile tap
to allow fin" better flow from the dispenser immediately
alter installation.
?ter
Filter_,, I1_
Bypass
Plfig_
smartwater
To use tile filter bypass plug on Water by Culligan models,
you must fi_t remove tile filter adapter fl'om tile cartridge
i/older by turning it to tile left.
If vou have quesfions_visit ore" Website
at ge.colll_
or call 1.800.GE.( :ARES (1.800.432.2737).
Replacement filters:
Toorder additional filter cartridges in the United States,
visit our Website at Be.corn,or call GE Parts andAccessories,
800.626.2002.
MSWF
Suggested Retail $36.95-41.95
(_ustolners in Canada should consult tile )ellow pages fin"
tile nearest Mabe Se_Mce Center:
WaterbyCulligan

Abouttheshelvesandbins.
Not all features are on all models.
Refrigerator Door Bins and Freezer Door Tilt-Out Bins
Large Bins
The larger refl_gerator door bins and
fl'eezer tilt-out door bins are ac!iustable.
Toremove: i,ifi the ti'ont of the bin straight
up, then lilt up and out.
Refrigerawr om
Freezerbin
Toreplace or relocate: Engage the back side Donotblock
of the bin in the molded supports of the [[ /J]
do(n: Then push down on the ti'ont of the
bin. Bin will lock in place.
SmallBms
Toremove: Lift the fl'ont of the bin straight
up then out.
Toreplace: Position the bin above the
rectangular molded supports on the doo_:
Then slide the bin down onto the support
to lock it in place.
ge.com
The snugger helps prevent tipping, spilling
or sliding of small items stored on the door
shelK Place a finger on either side of the
snugger near the rear and move it back
and forth to fit your needs,
CAUTION:On
modelswithanice
chuteinsidethetop
freezerdoorbib,be
carefulwhenp/aclbg
itemsinthebib.
Makesurethat
itemsdonotblock
orfailintotheice
chute.
I
ii!iiiiii_i_iiiiiiiiiiiii
i
w
Freezer tilt-out bin
Press tab and pull shelf
forward to remove
Slide-Out Spillproof Sheff
The slide-out spillprooI shell allows you
to reach items stored behind othe_. The
special edges are designed to help prevent
spills ti'om ddpping to lower shelves.
Toremove:
Slide the shell out tmtil it reaches the stop,
then press down on the tab and slide the
shelf straight out.
Toreplace orrelocate:
I,ine the shelf up Mth the suI)ports and
slide it into place. The shelf can be
repositioned when the door is at 90 ° or
more. To reposition the shelf, slide the shelf
past the stops and angle downward. Slide
shelf down to the desired position, line up
with the supports and slide into place.
Make sure youpush the shelves all the way back
in before you dose the door
=d.
g
N"
i
H
7
Abouttheshelvesandbins.
Not all features are on all models.
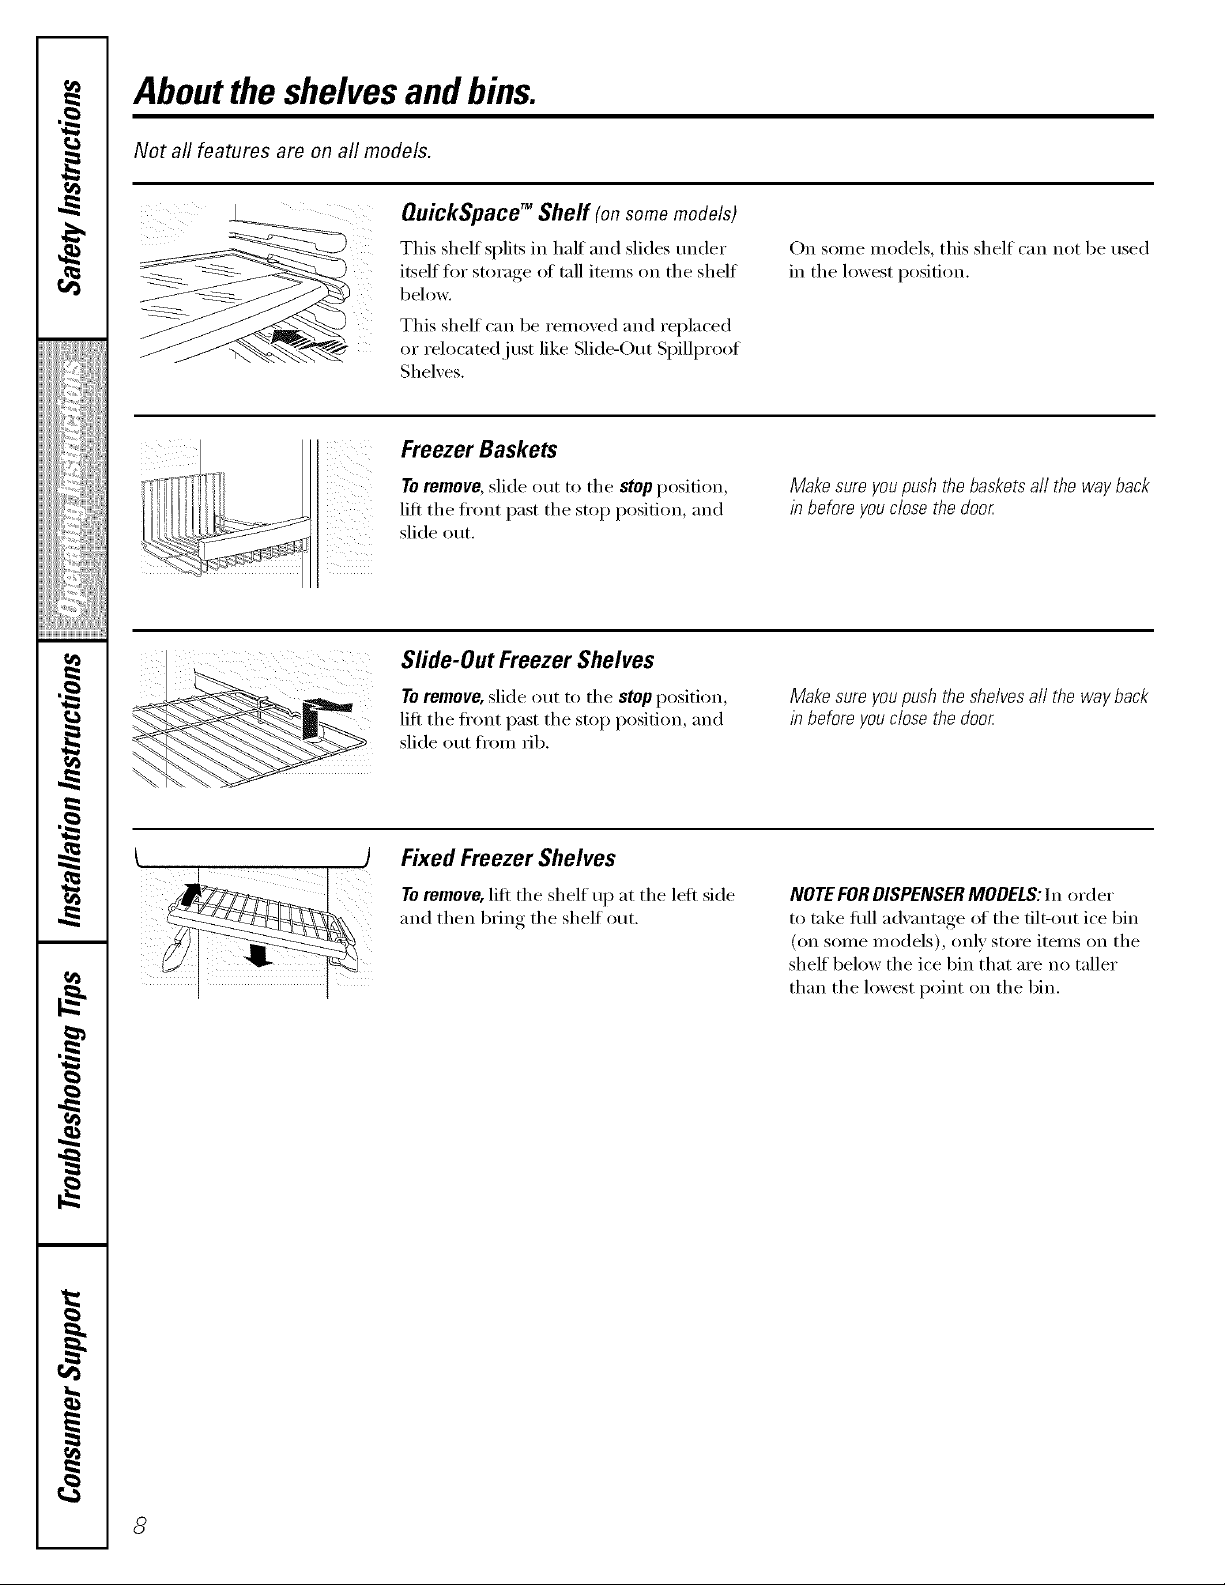
QuickSpace TM Sheff (onsomemodels)
This shelf splits in half and slides under
itself for storage _ff tall items on the shelf
below.
This shelf can be removed and replaced
or relocatedj ust like Slide-Out Spillpmof
Shelves,
Freezer Baskets
On some models, this shelf can not be used
in the lowest position.
i/ iTM:
To remove, slide out to the stop position,
lift the fl'ont past the stop position, and
slide out,
Sfide-Out Freezer Shelves
Toremove, slide out to the stop position,
lift the front past the stop position, and
slide out fl'om rib,
Fixed Freezer Shelves
To remove, lift the shelf up at the left side
and then bring the shelf out,
Makesureyoupushthebasketsall thewayback
in beforeyouclosethe door
Makesureyoupushtheshelvesall the wayback
in beforeyouclosethe door
NOTE FOR DISPENSER MODELS: In order
to take flfll advantage of the tilt-out ice bin
(on some models), only store items on the
shelf below the ice bin that are no taller
than the lowest point on the bin,
8
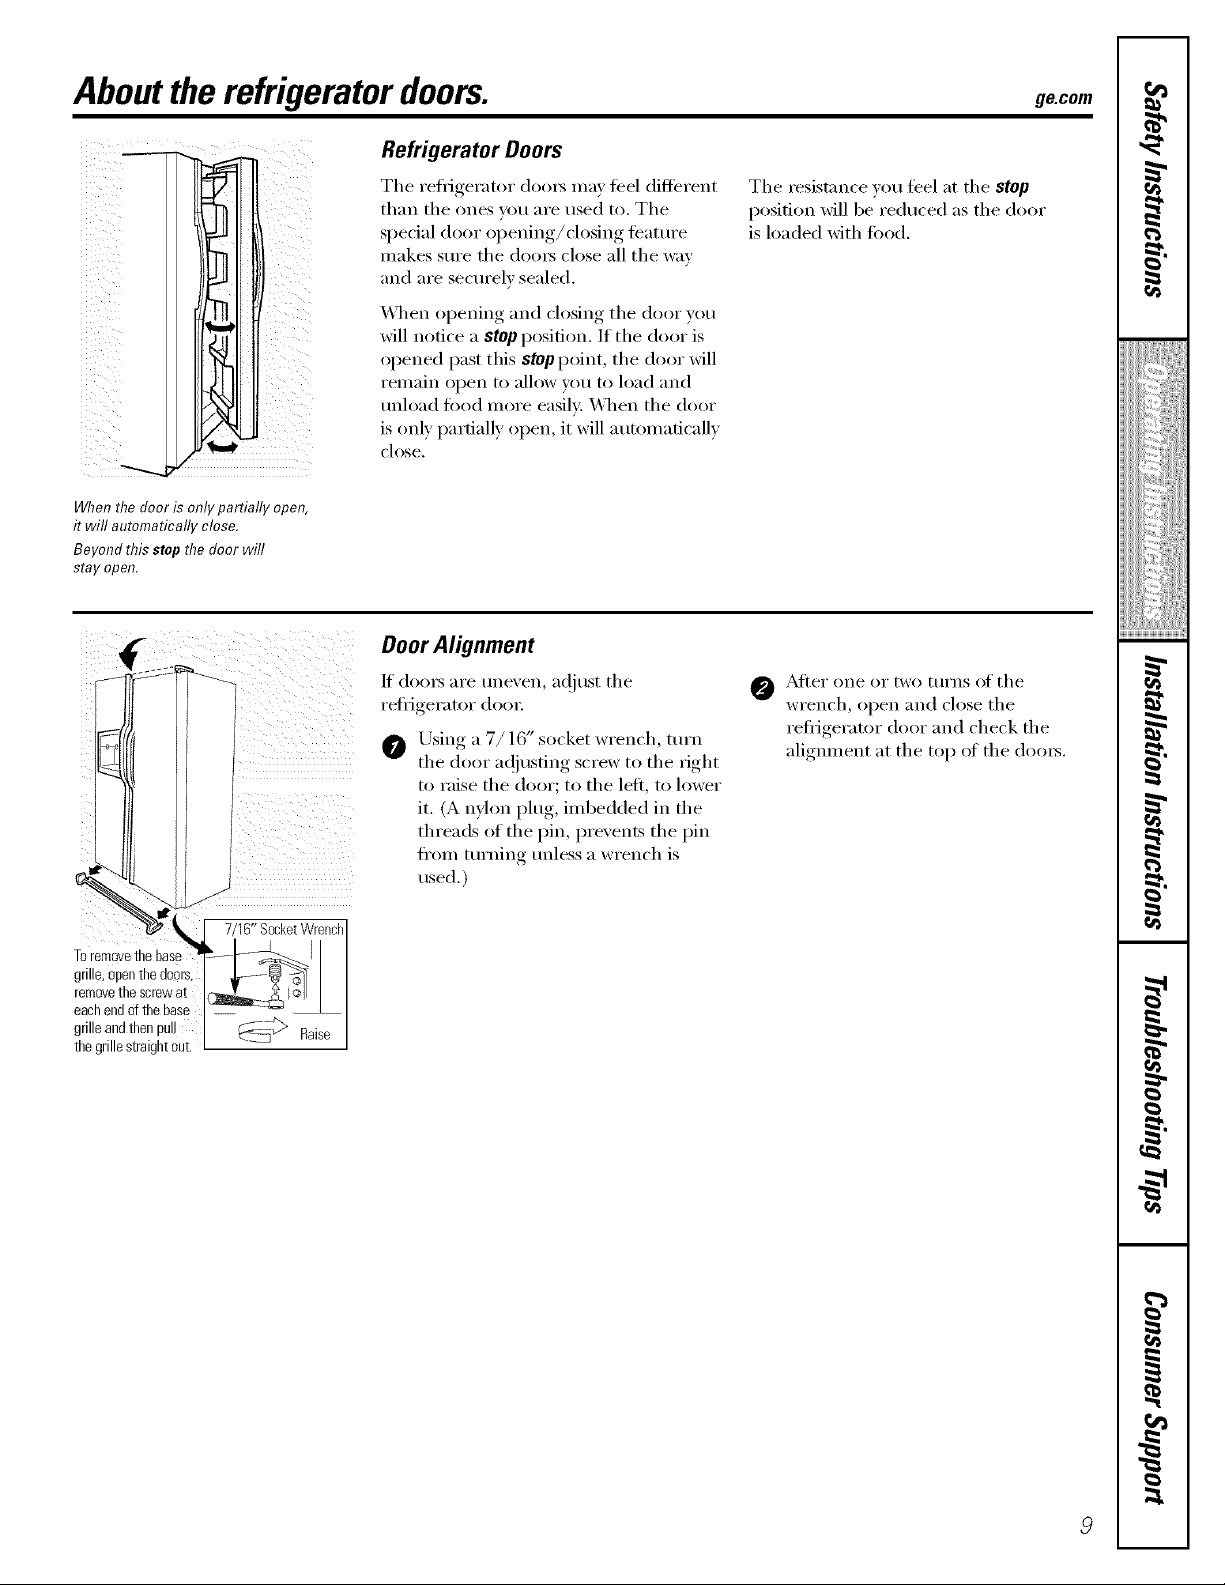
Abouttherefrigeratordoors.
Refrigerator Doors
ge.com
When the door is only partially open,
it will automatically close.
Beyond this stop the door will
stay open.
The refl_igerator (loo_ may teel different
than the ones you are used to. The
special door opening/closing teature
makes sm'e the do(n_ close all the way
and are secm'elv sealed.
_41_en opening and closing the door you
will notice a stop position. If the door is
opened past this stop point, the door will
I'eI/l}lin el)on 1o allow you to load }lll(1
tmload toed inore easily. _\]/en the door
is only partially open, it will automatically
close,
Door Alignment
It doot_ are tme\'en, at!just the
refl_gerator dooI:
O Using a 7/] 6" socket wrench, ttli'n
the door a(!justing screw to the right
to raise the door; to the left, to lower
it. (A nfl(m plug, imbedded in the
threads of the pin, prevents the pin
fl'om turning tmless a wrench is
used.)
The resistance xou teel at the stop
position will be reduced as the door
is loaded with fi)od.
I
,,,><,,,,,,,,,,,,,,,,,,
ii!iiiiii_i_iiiiiiiiiiiii
i
w
0 _Mter one or two turns of the
wrench, open and close the
refl_igerator door and check the
aligmnent at the top of the doors.
g
i
H
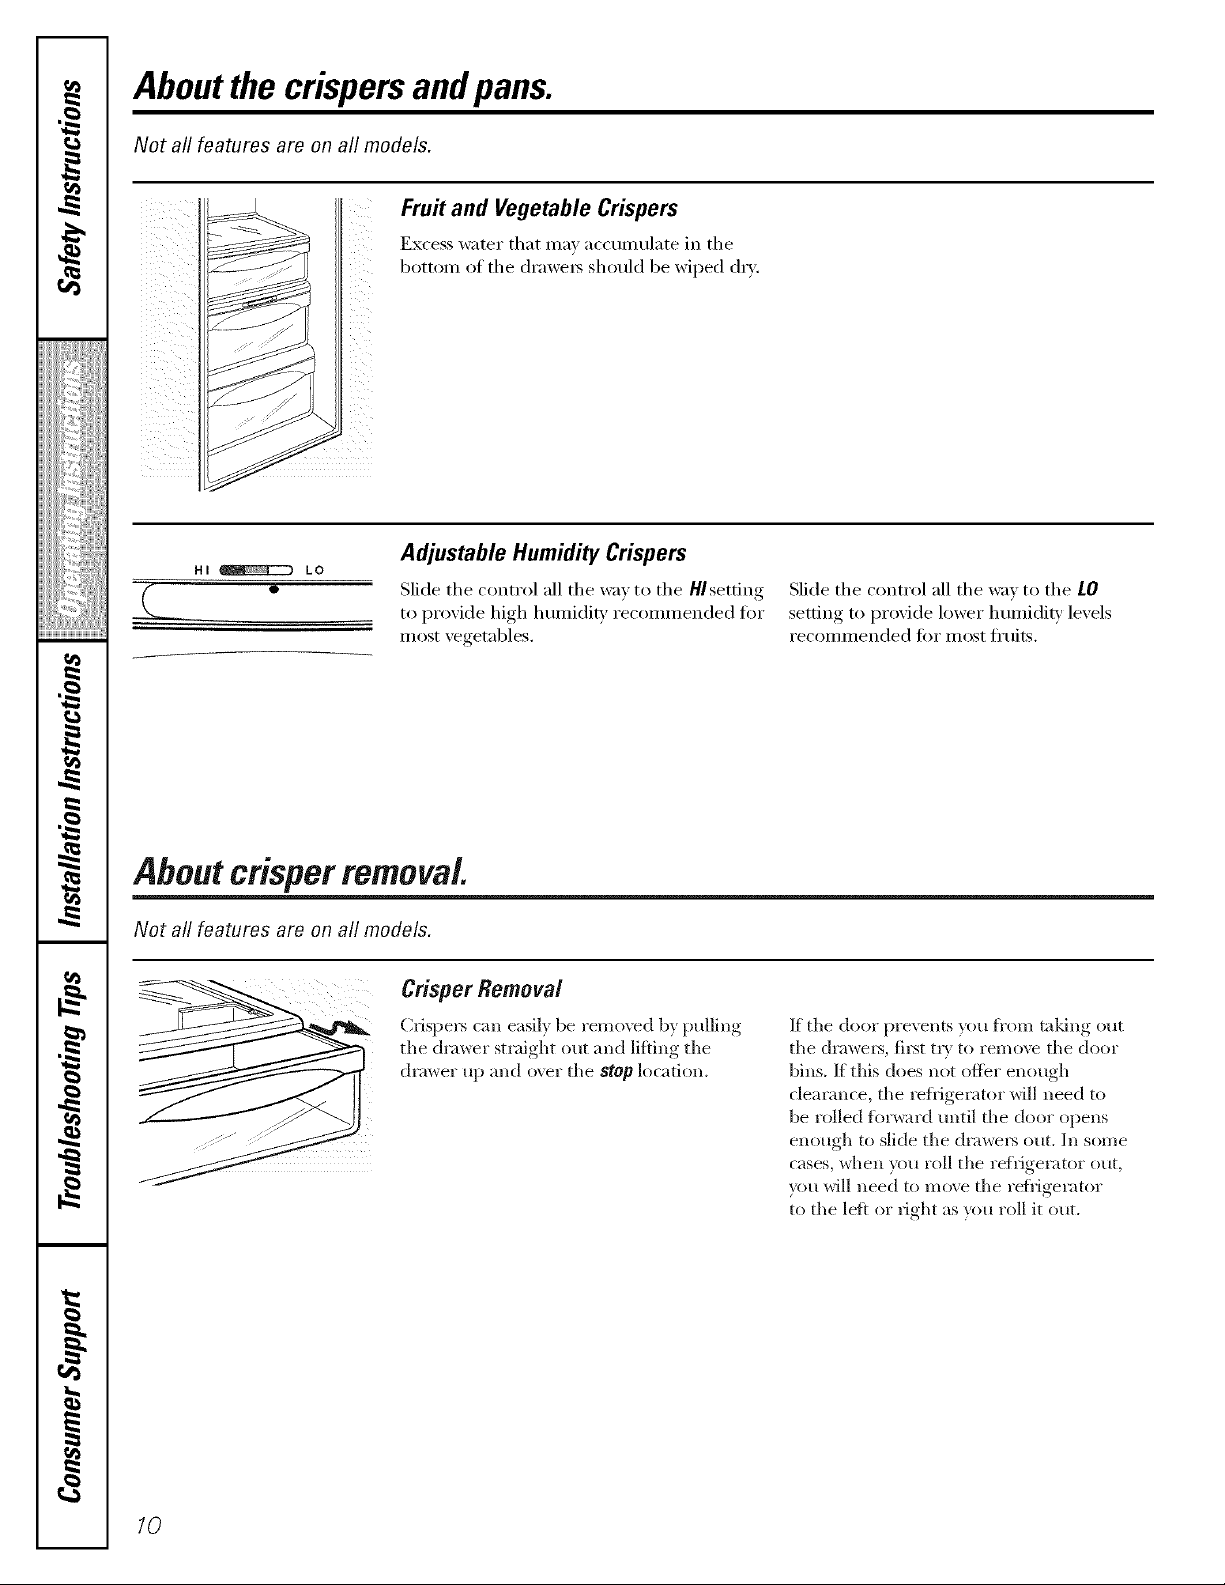
Aboutthe crispersandpans.
Not all features are on all models.
Fru# and Vegetable Crispers
Excess water that may accmnulate in tile
botton] of tile draweis should be wiped (h_'.
[ii [I
Adjustable Humidity Crispers
_(
Slide tile control all tile way to tile HIsetting
to provide high humidi_' recommended fi)r
most vegetables,
Slide tile control all tile wa_ to tile LO
,settino_ to provide lower humidity, le_ els
recoininei]ded fi>i" most fl'uits.
Aboutcrisper removal
Not all features are on all models.
Crisper Removal
Crispers can easily be remo\vd by pulling
tile drawer straight out and lifting the
drawer up and o\er tile stop location.
If tile door prevents you fl'om mldng out
tile di'awel_, fil_t ti T to remove tile door
bills. If this does not offer enough
clearance, tile refl_igerator xdll need to
be rolled ti/v_trd until tile door opens
enough to slide tile drax_'e]_ (ILK. 111SOi//e
cases, when )_m roll tile refl-Jgerator ()l/t,
_)tl will Ileed to move tile refligerator
to tile lett or fight as you roll it out.
10
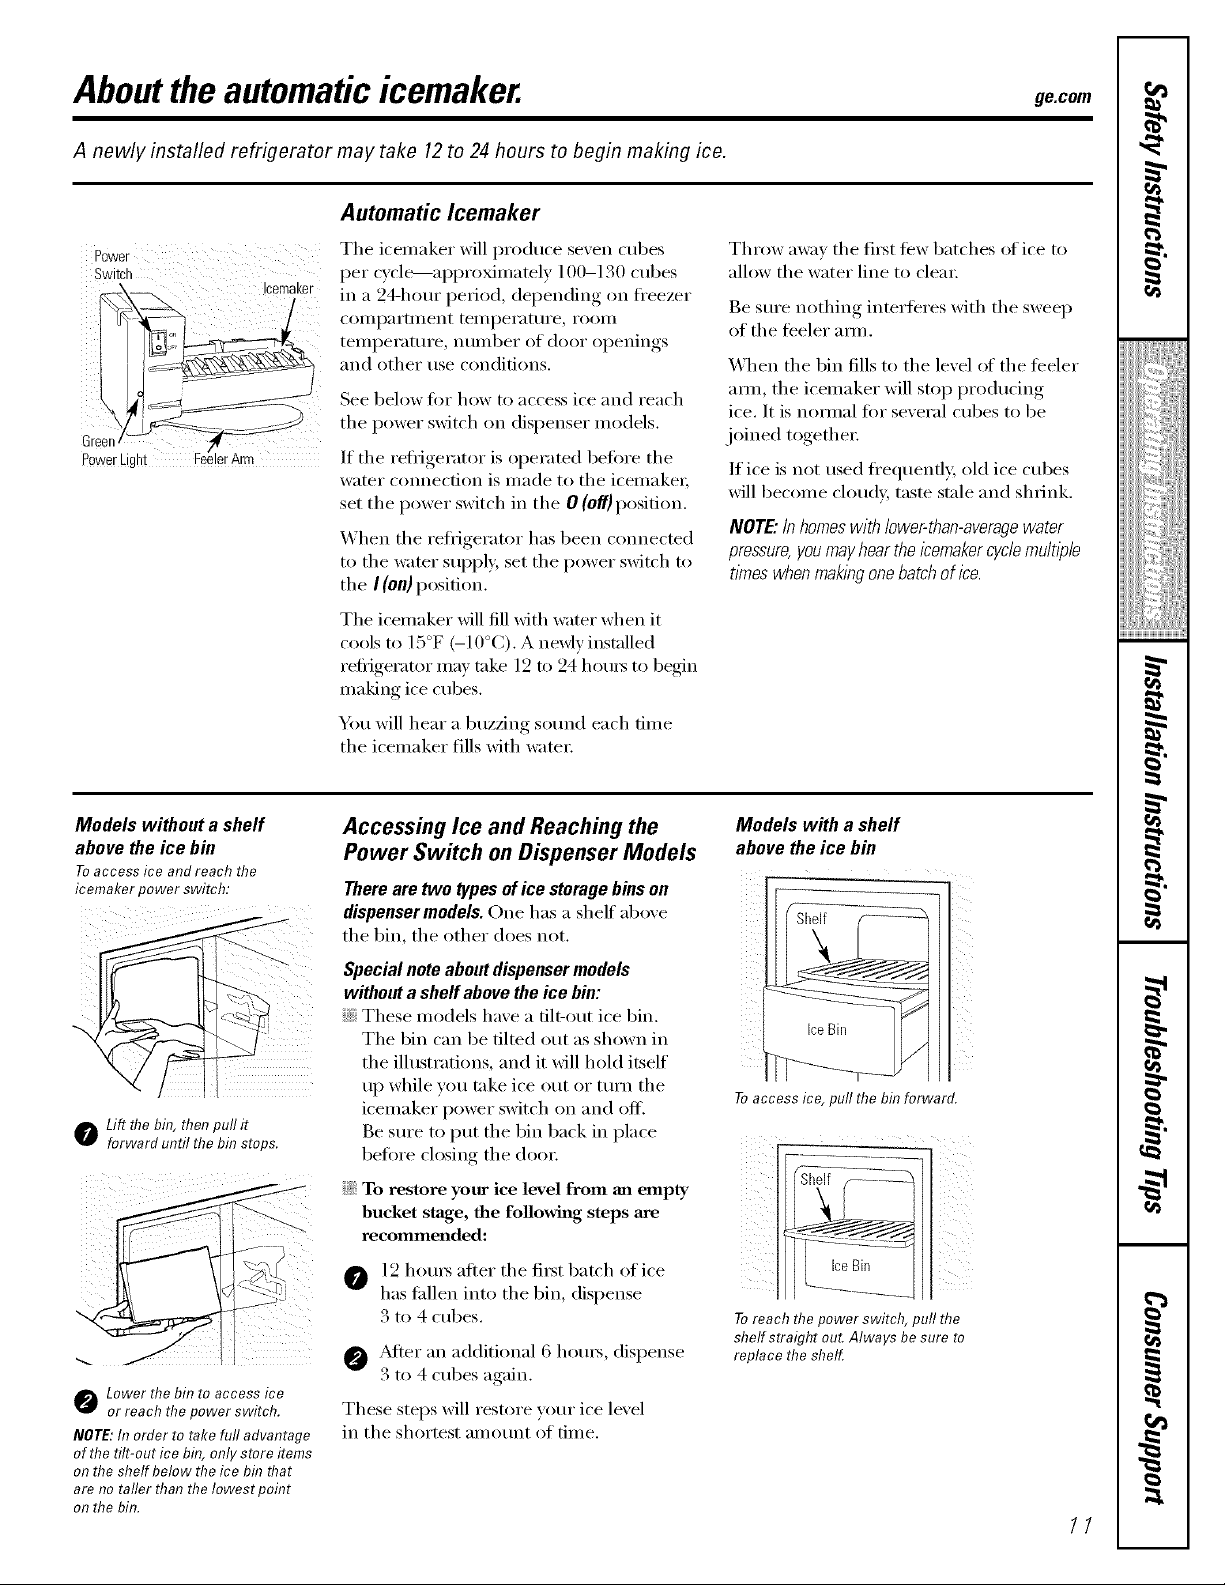
Abouttheautomaticicemaker, gecom
A newly installed refrigerator may take 12to 24 hours to begin making ice.
Automatic Icemaker
Power
Switch
Green
PowerLight
Icemaker
The icemaker will produce seven cubes
per cycle----ai)i)roxin/ately 100-130 cubes
in a 24-hour period, depending on fl'eezer
coi//l)ai'tillent tei//l)ei'attli'e _ i'ooi//
teml)erature, munber of door openings
and other use conditions.
See below fin" how to access ice and reach
the power switch on dispenser models.
If the reti_igerator is operated betore the
water connection is made to the icemakei;
set the power switch in the 0 (off) position.
When the refl-igerator has been connected
to the water supply, set the power switch to
the I (on) position.
The k'emaker will fill with water when it
cools to 15°F (-10°C). A newly installed
refi_igerator may take 12 to 24 hours to begin
making ice cubes.
You will hear a buzzing sound each dine
the k'emaker fills with watei:
Throw awm the first tew batches of ice to
allow the water line to clem:
Be sure nothing interteres with the sweep
of the teeler ram.
When the bin fills to the level of the teeler
aml, the icemaker will stop producing
ice. It is noi_nal tin"several cubes to be
joined togethei:
If ice is not used fl'equenfl> old ice cubes
will become cloudy, taste stale and shrink.
NOTE."Inhomeswith lower-than-averagewater
pressure,you mayhear the icemaker cyclemultiple
times whenmaking onebatch of ice.
I
,,,><,,,,,,,,,,,,,,,,,,
ii!iiiiii_i_iiiiiiiiiiiii
w
Models without a shelf
above the ice bin
Toaccessiceandreachthe
icemakerrowerswitch:
o Lift flTebin,thenpull it
forwarduntilthebin stops.
Lower thebin to access ice
or reach the power switch.
NOTE:In order to take full advantage
of the tilt-out ice bbL only store items
on the shelf below the ice b#7that
are no tafler than the Iowest pohTt
on the bin.
Accessing Ice and Reaching the
Power Switch on Dispenser Models
Thereare two types of ice storage bins on
dispenser models. One has a shelf aboxe
tile bin, the other does not.
Special note about dispenser models
without a shelf above the ice bin:
i_:These models have a tilt-out ice bin.
The bin can be tilted ()tit as shown ill
the illustrations, and it will hold itself
up while you take ice ()tit or turn the
icelnaker power switch on and off.
Be sure to put the bin back in place
befiwe closing the dooi:
To restore your ice level from an empty
s e, ste s
12 hom_ after the fiI_t batch of ice
has tidlen into the bin, disl)ense
3 to 4 cubes.
@ _Mter an additional 6 hems, dispense
3 to 4 cubes again.
These steps will restore your ice level
ill the shortest ai//otint of tilne.
Models with a shelf
above the ice bin
Toaccessice,pullthe binforward.
Toreach the power switch, pull the
shelf straight out Always besure to
replace the shelf.
g
N"
i
H
11
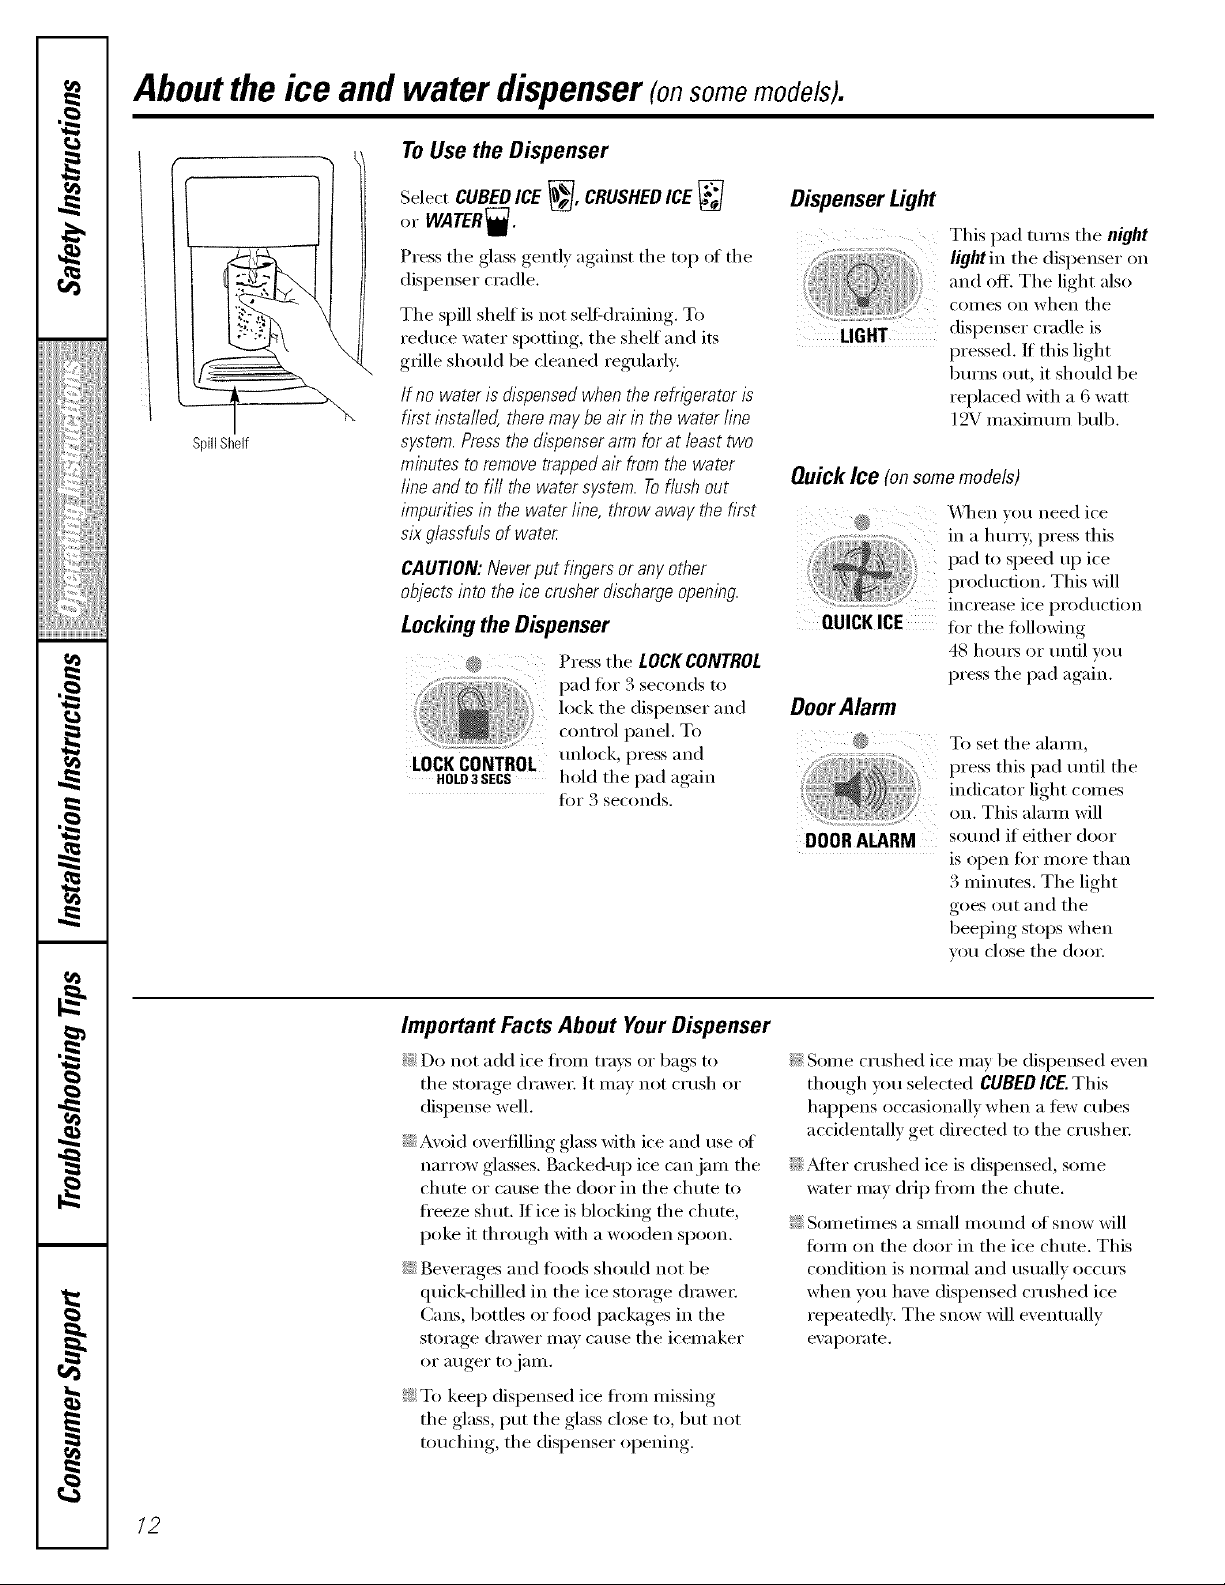
About the ice and water dispenser (onsome models).
ToUsetheDispenser
Select CUBEDICE _, CRUSHEDICE _ Dispenser Light
or WATER_. This pad turns tile night
Press tile glass gently against tile top ot tile lightin tile dispenser on
dispenser cradle, and off. The light also
SpillShelf
The spill shelf is not sel6(h'aining. To ....
reduce water spotting, tile shelf and its .........................................
grille should be cleaned regularly:
If no water is dispensed when therefn)erator is
first installed, there may be air in the water line
system. Press the dispenser arm for at least two
minutes to remove trapped air from the water
line and to fill the water system. Toflush out Quick Ice (on some models)
impurities in the water line, throw away the first X,\q/en)ou need ice
Sl)¢glassfuls of water @ in a hurrv; press this
CAUTION: Neverput fingers or any other
objects into the ice crasher discharge opening
Locking the Dispenser
@ Press the LOCKCONTROL
pad for :4seconds to
lock tile dispenser and
control panel. To
LOCKCONTROL
HOLD3SECS hold tile pad again
tmlock, press and
fi)r 3 seconds.
LIGHT dispenser cradle is
QUICK ICE for tile tollowing
DoorAlarm
@
<_!!!:_:_:_:_:_:!_!!!!!!!i!!!!!!!!!!i!!'!!¸!_:_!'_
DOOR ALARM
COllieS on when tile
pressed. If this light
burns out, it should be
replaced with a 6 watt
12V maximmn bulb.
l)ad to speed up ice
production. This will
increase ice production
48 hom_ or tmtil you
press tile pad again.
To set tile alamL
press this pad tmtil tile
indicator light comes
on. This alarm will
sotmd if either door
is open fi)r more than
3 minums. Tile light
goes out and the
beeping stops when
VO/I close tile dool:
Important Facts About Your Dispenser
_: Do not add ice fl'om trays or bags to
tile storage (h'awe_: It may not crush or
dispense well.
iJi::Avoid ove_tilling glass with ice and use ol
narrow glasses, gacke&up ice can jam tile
chute or cause tile door in tile chute to
freeze shut. If ice is blocking the chute,
poke it through with a wooden spoon.
iJi::Beverages and toods should not be
quick-chilled in the ice storage drawe_:
Cans, bottles or food packages in the
storage drawer may cause the icemaker
or a/iger to jaIll.
_: To kee I) dispensed ice fl'om missing
the glass, put the glass close to, but not
touching, tile dispenser opening.
?_:Some crushed ice may be dispensed even
though you selected CUBEDICE.This
happens occasionally when a tew cubes
accidentally get directed to the crushe_:
iJi::_Mter crushed ice is dispensed, some
water may drip fl'om tile chute.
_: Sometimes a small motmd of snow will
titan on the door in the ice chute. This
condition is nomml and usually occms
when you have dispensed crushed ice
repeatedly. The snow will eventually
eval)Oi'ate.
/2

ge.com
Models without a shelf
above the ice bin
Toremove:
o Lift flTebin. then ouo/r
forward until me om swos.
o Lift and oull forward again
to remove the bin.
Removing and Replacing the Ice
Storage Bin on Dispenser Models
There are two types of ice storage bins on
dispenser models. One has a shelf aboxe
the bin, the other does not.
Mways set tile icemaker power switch to tile
0 (off) position befi)re rein eying tile ice bin.
When replacing either type of ice bin:
Mways be sure to press it firefly into place.
If it does not go all the wm back reinoxe it
and rotnte the drixe mechanism 1/4 turn.
Then push file bin back again.
Drive
Mechanism
Models with a shelf
above the ice bin
Toremove:
!
I
Pull the bin straight out, then lift past
the step position.
ii!iiiiii_i_iiiiiiiiiiiii
i
w
Careand cleaning of the refrigerator.
Cleaning the Outside
The dispenser drip area (on some models),
beneath tile grille, shotfld be wiped dry: _\'ater
left in this area may leave deposits. Remove
tile deposits by adding mMiluted vinegar to
Dispenser drip area.
tile well. Soak until tile deposits disappear
or becoil/e loose enotlgh to I_nse awav.
The dispenser cradle (on some models).
Before cleaning, lock tile disl)enser bv
pressing and holding tile LOCKCONTROL
pad tor 3 seconds. Clean with w:mn
water and baking soda solution - al)out
a tnblespoon (l 5 ml) of baking soda to
a quart (1 limr) (ff water. Rinse thoroughly
and wipe dry.
Cleaning the Inside
To help prevent odors, leave an open box of
baking soda in tile fl'esh t0od and fl'eezer
COIIll)a i'[lilents.
Unplugtherefrigeratorbeforecleaning.If this
is not practical, wring excess moisture out
of sponge or cloth when cleaning around
switches, lights or controls.
Use warn/water and baking soda solution -
about a tnblespoon (l 5 ml) of baking soda
to a quart (l liter) of water: This both
cleans and neutralizes o(lms. Rinse and
wipe dry:
The doorhandles and trim. Clean Mth
a cloth dampened Mth soapy wateI:
Dry with a soft cloth.
Keep the outside clean. _,Vii)e with a clean
doth lightly dampened with kitchen
ai)pliance wax or mild liquid dish detergent.
Dry and polish with a clean, soft cloth,
Do not w))e the refn)erator with a soiled dish
cloth or wet towel. Thesemay leave a residue
that can erode the painL Do not use scouring
pads,powdered cleaners, bleach or cleaners
containing bleach because these products can
scratch and weaken the paint finish.
Useof anycleaningsolution otherthanthat
which is recommended, especially those that
contain petroleumdistillates,can crack or
damage the interior of the refrigerator.
Avoid cleaningco/c/glassshelves with hot water
because the extreme temperature difference
may cause them to break. Hand& glass shelves
carefull_ Bumping tempered g/ass can cause
it to shatter
Do not wash any p/astic refngerator parts in the
dishwasher
g
i
H
13
Careand cleaningoftherefrigerator.
Behind the Refrigerator
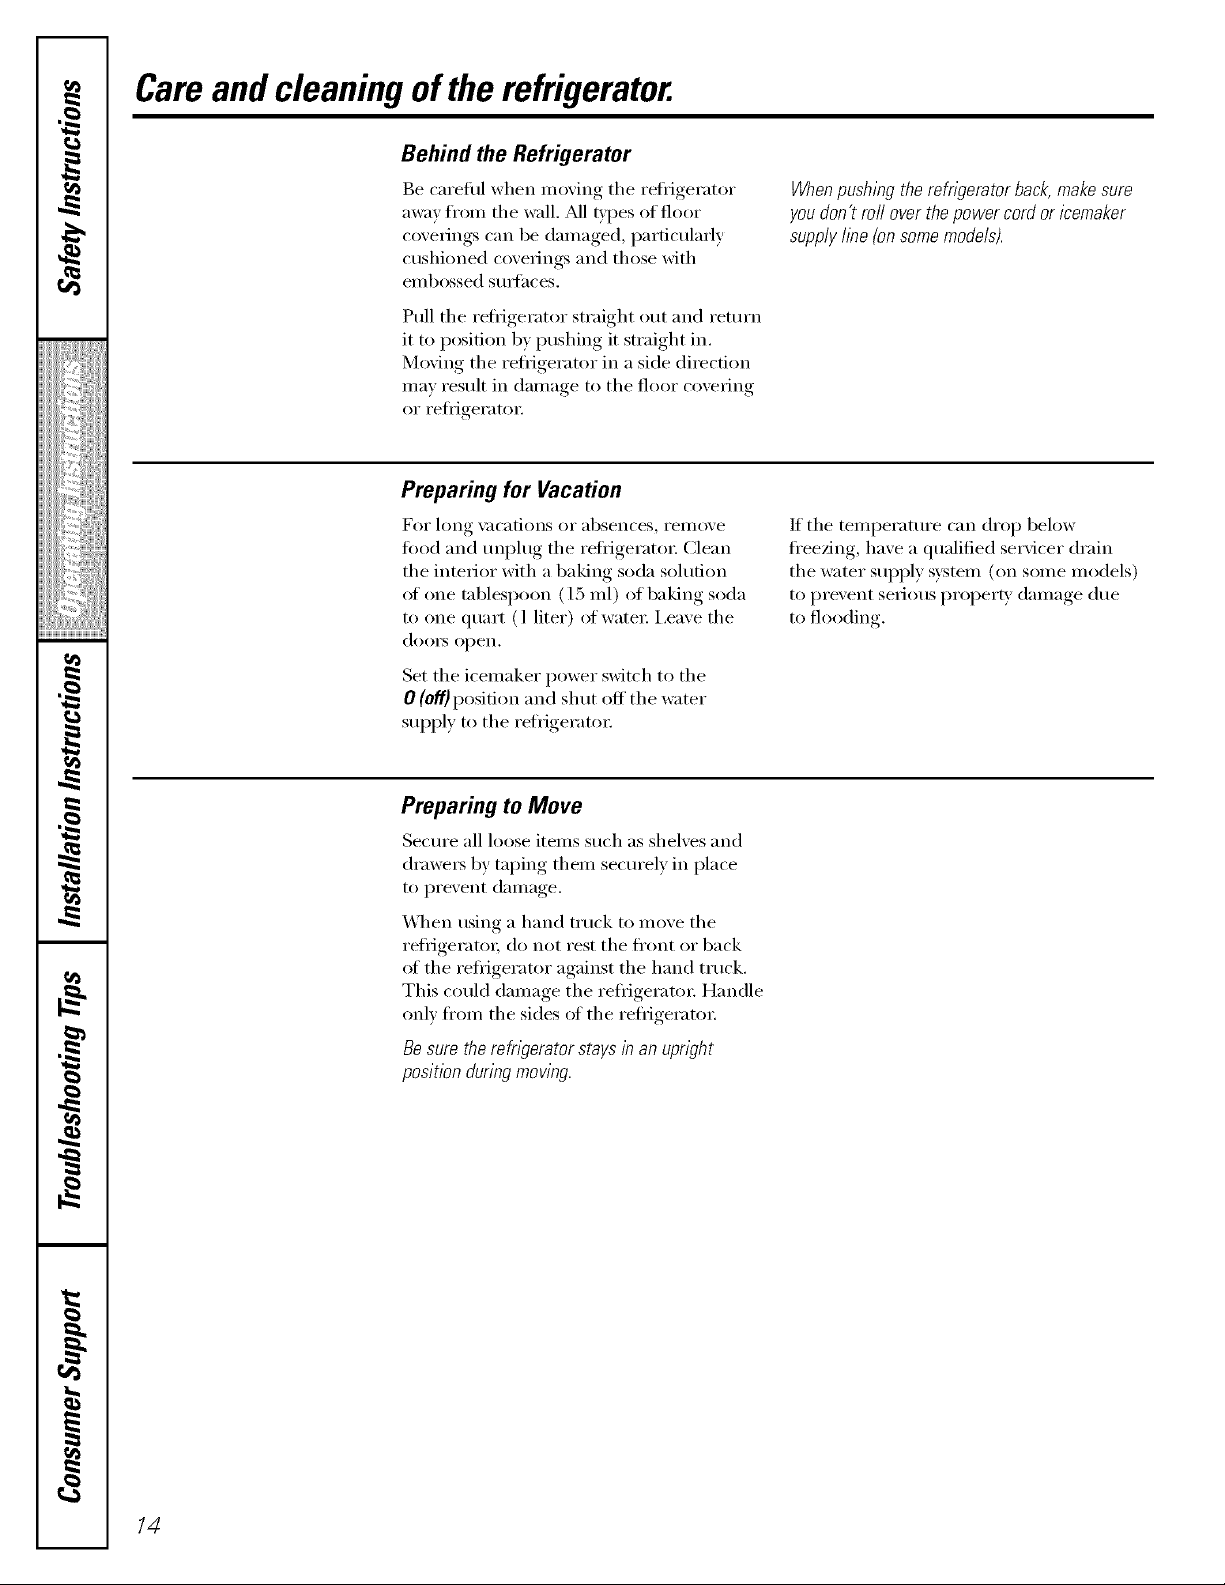
Be carethl when moving the refl_igerator
away fl'om the wall. _M1t,ipes of floor
coverings can be damaged, particularly
cushioned coverings and those with
embossed sm_hces.
Pull the reti_igerator straight out and return
it to position by pushing it straight in.
Moving the refl_igerator in a side direction
may result in damage to the floor covering
or refl_igeratm:
Preparing for Vacation
For long \;l(-ations or absences, i'eillove
food and unplug the refl_igerato_: Clean
the interior with a baking soda solution
of one tablespoon (15 ml) of baking soda
to one quart (1 liter) of water: I,eave the
dooi_ open,
Set the icemaker power switch to the
0 (Of'[}position and shut off the water
supply to the refl_igeratox:
When pushing the refngerator back, make sure
you don't rofl over the power cord or icemaker
supply hne (on some models).
If the temperature can drop below
fl'eezing, have a qualified servicer drain
the water supply system (on some models)
to prevent serious propert}, damage due
to flooding.
Preparing to Move
Secure all loose items such as shelves and
(h'awe_ by taping them secm'ely in place
to prevent damage.
\_]_en using a hand truck to move the
refl-igeratm; do not rest the front or back
of the refl_igerator against the hand truck.
This could damage the refl-igeratm: Handle
only fl'om the sides ot the refl-igeratm:
Be sure the refngerator stays in an upright
position during moving.
14

Replacingthe lightbulbs, gecom
NOTE: Turning the refrigerator off via the controls on the touch panel does not shut off electrical power to the
refrigerator.
Refrigerator Compartment--Upper Light
O Unplug the refl'igerator.
The bulbs are located at the top of the
compartment, inside the light shield.
I),emove the screw at the fl'ont ot the
light shield.
To remove the light shield, press in on
the tabs on the sides ot the shield and
slide tin'ward and out.
Refrigerator Compartment--Lower Light
This light is located above the top drawec
Unplug the reffigemtm:
I,ifl the light shield up and pull it out.
Freezer Compartment
Unplug the refrigerator.
Remove the shelf just above the light
shield. (The shelf will be easier to
remove if it is emptied filst.) Remove
the screw at the top of the light shield.
To remove the light shield, press in on
the sides, and lift up and out.
_Mter replacing the bulb with an
appliance bull) ot the same or lower
wattage, replace the light shield and
screw. X4]_en replacing the light shield,
make sure that the tabs at the back of
the shield fit into the slots at the back
of the light shield housing.
Plug the refl{gerator back in.
_Mter replacing the bulb with an
appliance bulb of the same or lower
wattage, replace the shield.
Plug the refl'igerator back in.
Replace the 1)ulb with an appliance
bulb of the same or lower wattage,
and reinstall the light shield. X,Vhen
reinstalling the light shield, make
sure the top tabs snap securelv
into place. Replace the screw.
Reinstall the shelf and plug the
refl'igerator back in.
I
,,,><,,,,,,,,,,,,,,,,,,
ii!iiiiii_i_ii{iiii{iiiii
i
w
g
Dispenser
Unplug the refl{gerator.
The bulb is located on the dispenser
trader the control panel.
Remove the light bulb by tm'ning
it cotmterclockwise.
Replace the bulb with a bulb of the
same size and wattage.
Plug the refrigerator back in.
i
H
15

Installation
Refrigerator
Instructions
Questions? Call 800.GE.CARES (800.432.2737) or Visit our Website at: ge.com
I
BEFORE YOU BEGIN
Read these instructions completely
and carefully.
• iMPORTANT - Savethese
instructions for local inspector's use.
• iMPORTANT - Observeall
governing codes and ordinances.
Note to Installer - Be sure to leave these
instructions with the Consumer.
Note to Consumer - Keep these
instructions for future reference.
Skill level - Installation of this appliance
requires basic mechanical skills.
Completion time - Refrigerator Installation
Proper installation is the responsibility of
the installer.
In Canada, call 1.800.361.3400 or Visit our Website at: www.geappliances.ca
PREPARATION
WATER SUPPLY TO THE ICEMAKER
If the refrigerator has an icemaker, it will have
to be connected to a cold water line. AGE
water supply kit (containing tubing, shutoff
valve, fittings and instructions) is available
at extra cost from your dealer, by visiting
our Website at go.corn (in Canada at
www.geappliances.ca) or from Parts and
Accessories, 800.626.2002 (in Canada
1.888.261.3055).
TOOLS YOU WILL NEED
30 minutes
Water Line installation
30 minutes
3/8" and 5/16" Socket 1/2" and 7/16" Wrench
Models 25 & 27
I
Product failure due to improper installation
is not covered under the Warranty.
if the refrigerator has already been installed,
remove the base grille (see Step 2 in Moving
the Refrigerator), then skip to Step 5 in
Installing the Refrigerator.
Plastic Putty Knife
Phillips Head Screwdriver
16
Installation Instructions
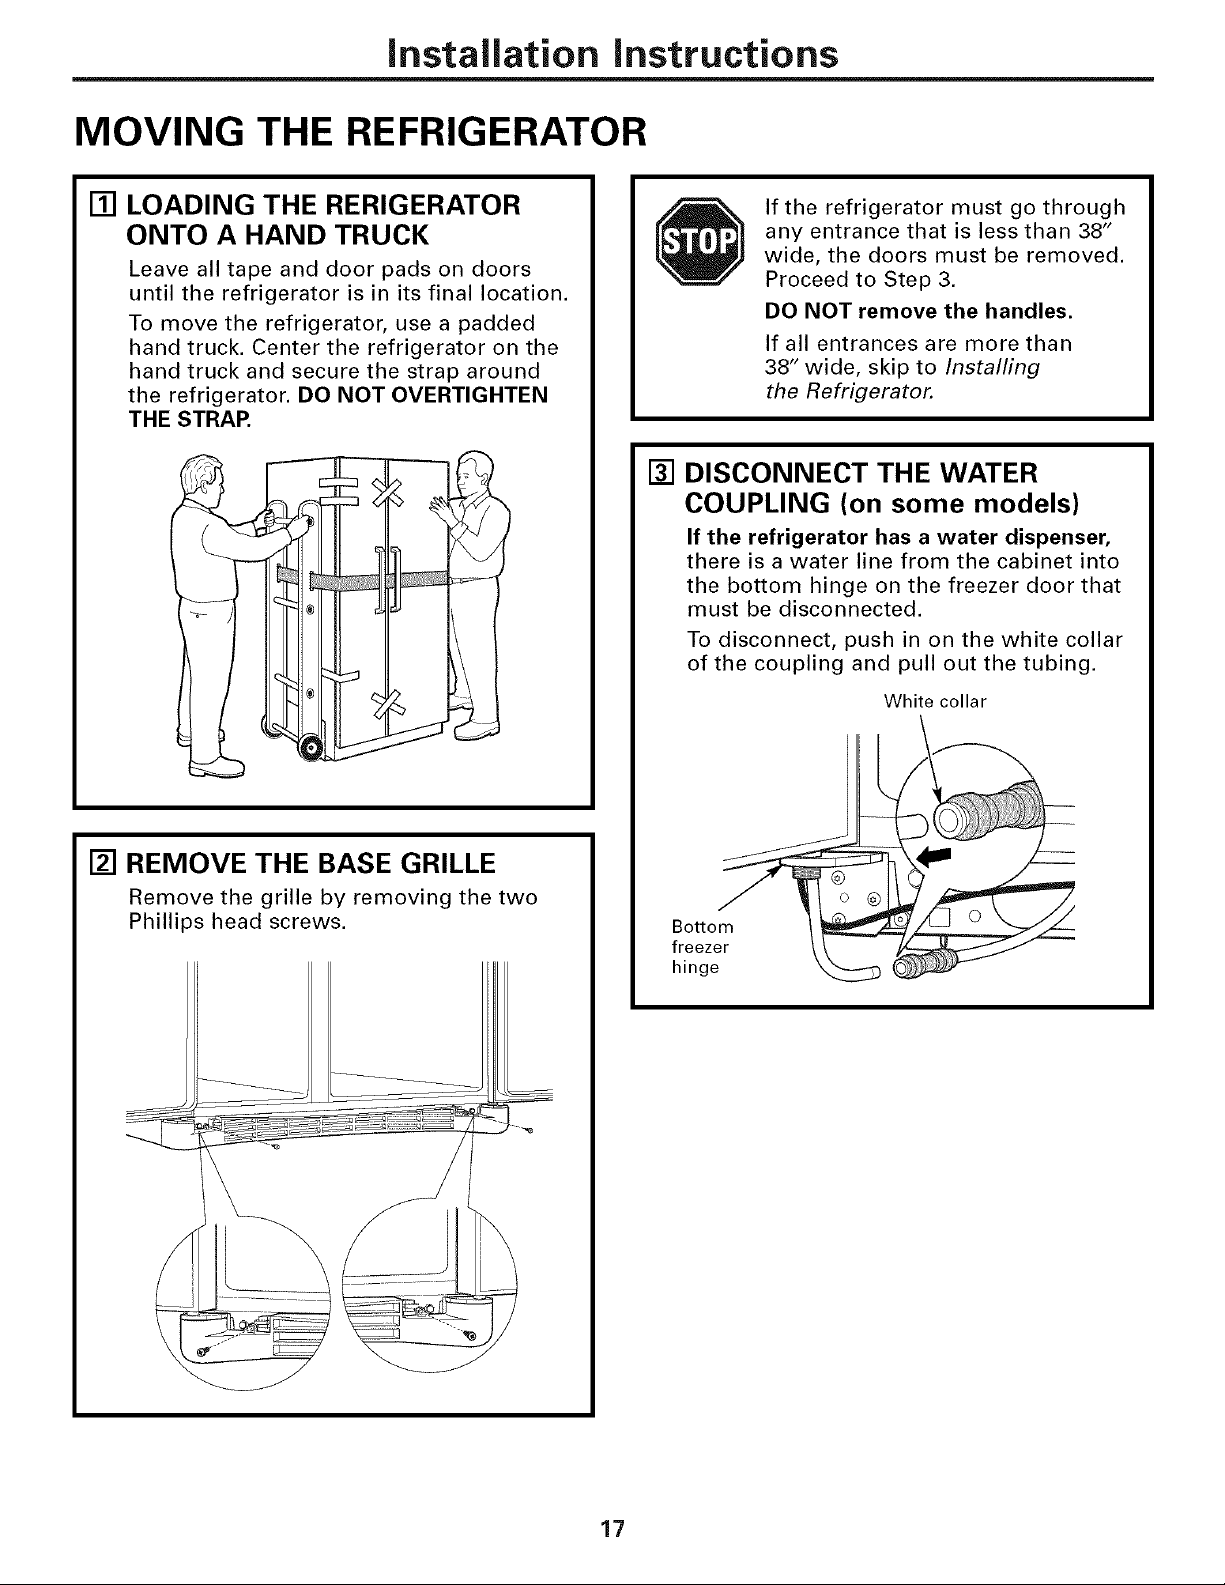
MOVING THE REFRIGERATOR
[] LOADING THE RERIGERATOR
ONTO A HAND TRUCK
Leave all tape and door pads on doors
until the refrigerator is in its final location.
To move the refrigerator, use a padded
hand truck. Center the refrigerator on the
hand truck and secure the strap around
the refrigerator. DO NOT OVERTIGHTEN
THE STRAP.
If the refrigerator must go through
any entrance that is less than 38"
wide, the doors must be removed.
Proceed to Step 3.
DO NOT remove the handles.
If all entrances are more than
38" wide, skip to Installing
the Refrigerator.
[] DISCONNECT THE WATER
COUPLING (on some models)
If the refrigerator has a water dispenser,
there is a water line from the cabinet into
the bottom hinge on the freezer door that
must be disconnected.
To disconnect, push in on the white collar
of the coupling and pull out the tubing.
White collar
[] REMOVE THE BASE GRILLE
Remove the grille by removing the two
Phillips head screws.
Bottom
freezer
hinge
17

Installation instructions
MOVING THE REFRIGERATOR (CONT.)
[] DISCONNECT THE POWER
COUPLING (on some models)
If the refrigerator has a water dispenser,
there is a power line (harness) from the
cabinet into the bottom hinge on the
freezer door that must be disconnected.
To disconnect pull apart at the coupling.
4""
Bottom _ _ LJ 0 _//
freezer / _ __J_
hin
DISCONNECT THE ELECTRICAL
[]
CONNECTORS (on some models)
If the refrigerator has a refreshment
center, there are electrical connectors
(harnesses) from the cabinet into the
bottom hinge on the refrigerator door
that must be disconnected.
To disconnect, pull apart each connector.
[] CLOSE THE FREEZER AND
REFRIGERATOR DOORS
[] REMOVE THE FREEZER DOOR
[] Remove the freezer door top hinge cover
by either squeezing it and pulling it up or
by prying it off with a plastic putty knife.
[] Remove the two 5/16" hex head screws,
then lift the hinge straight up to free the
hinge pin.
5/16" Hex Head
Bottom
refrigerator
hinge
[] Open the freezer door to 90. °
90 °
18
Installation instructions
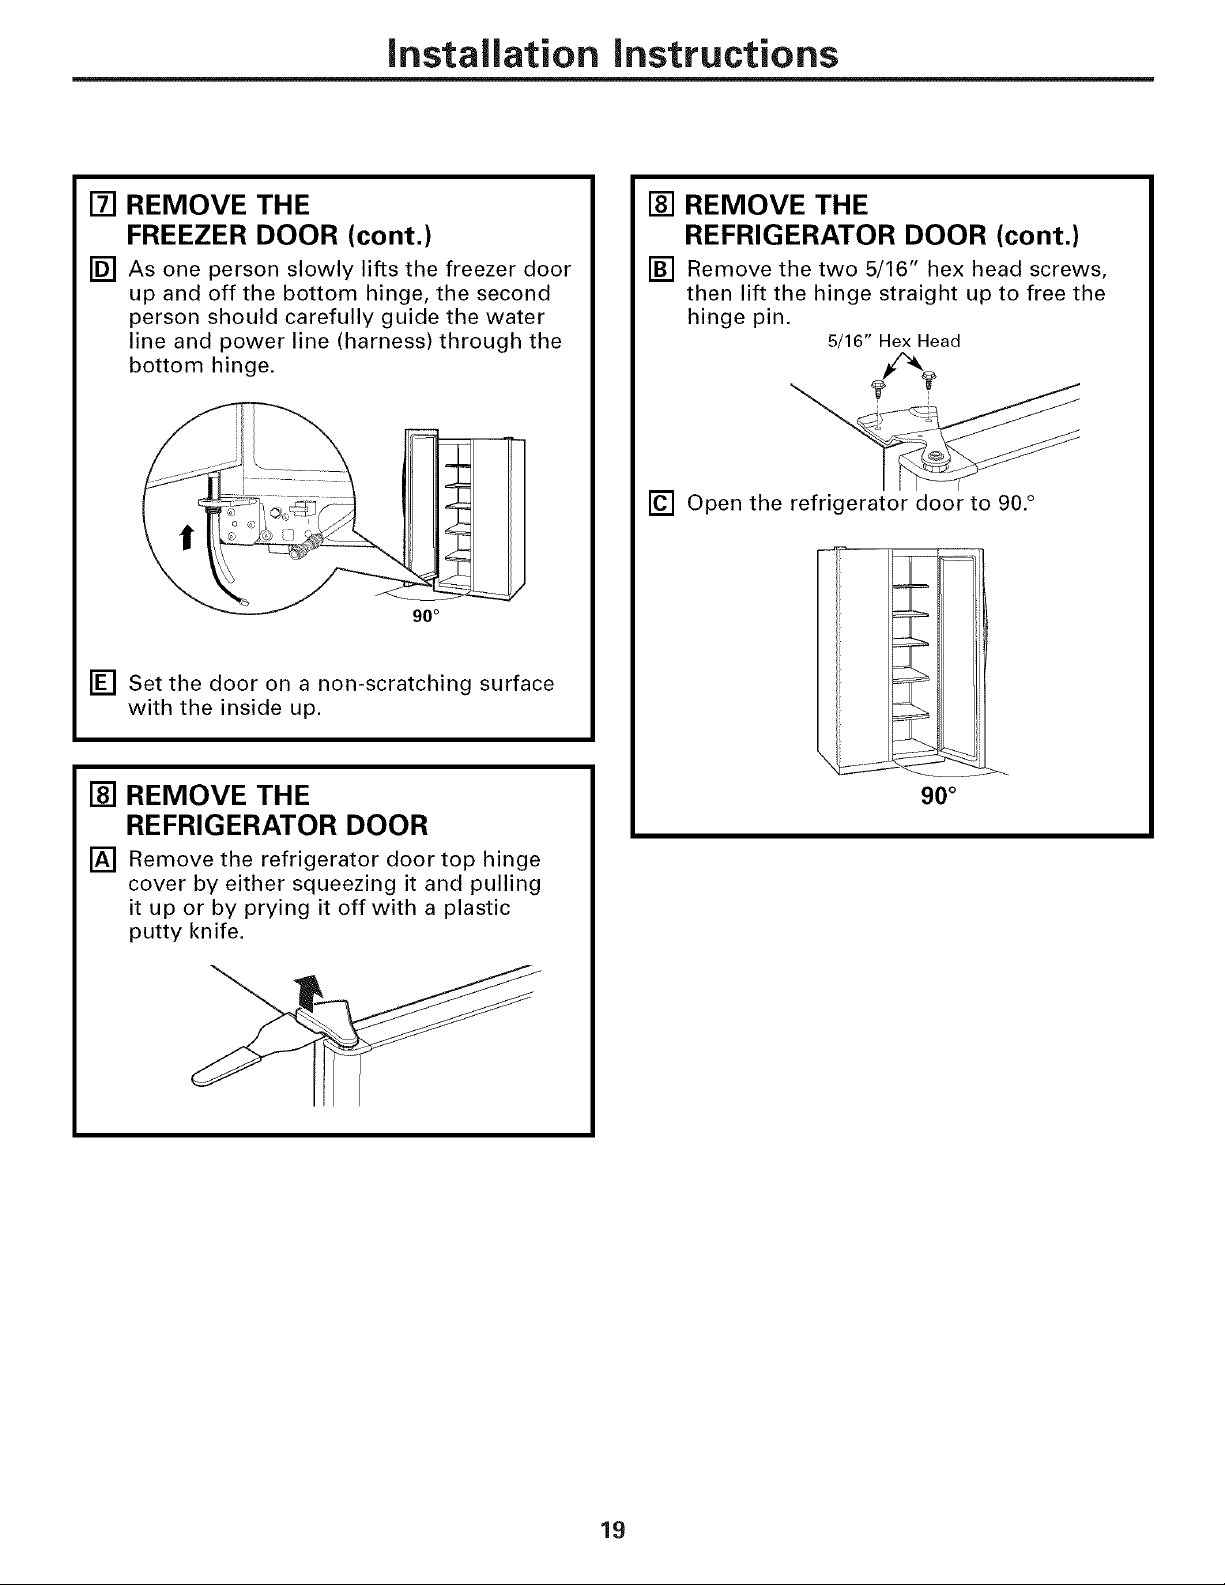
[] REMOVE THE
FREEZER DOOR (cont.)
[] As one person slowly lifts the freezer door
up and off the bottom hinge, the second
person should carefully guide the water
line and power line (harness) through the
bottom hinge.
[] Set the door on a non-scratching surface
with the inside up.
[] REMOVE THE
REFRIGERATOR DOOR (cont.)
[] Remove the two 5/16" hex head screws,
then lift the hinge straight up to free the
hinge pin.
5/16" Hex Head
[] Open the refrigerator door to 90. °
_H
[] REMOVE THE
REFRIGERATOR DOOR
[] Remove the refrigerator door top hinge
cover by either squeezing it and pulling
it up or by prying it off with a plastic
putty knife.
90 °
19

Installation Instructions
MOVING THE REFRIGERATOR (CONT.)
[]
REMOVE THE
REFRIGERATOR DOOR (cont.)
[]
Lift the refrigerator door up and off the
bottom hinge.
If the refrigerator has a refreshment
center, one person should slowly lift the
door up and off the bottom hinge and the
second person should carefully guide the
electrical lines (harnesses) through the
bottom hinge.
--=4
[] REPLACING THE DOORS
To replace the doors, simply reverse
steps 3 through 8.
However, please note the following:
• When lowering the doors onto the
bottom hinges, make sure the second
person carefully guides the tube and
harnesses through the holes in the
hinges.
• When connecting the water line, make
sure you insert the tubing all the way
to the mark.
L
90°
Refreshment Center Models only
[] Set the door on a non-scratching surface
with the inside up.
Mark
• Do not pinch the tubing and harnesses
when placing the doors on the bottom
hinges.
• When connecting the power line and
the electrical lines (refreshment center
models only), be sure that the
connectors are seated together fully.
20
Installation Instructions
INSTALLING THE REFRIGERATOR
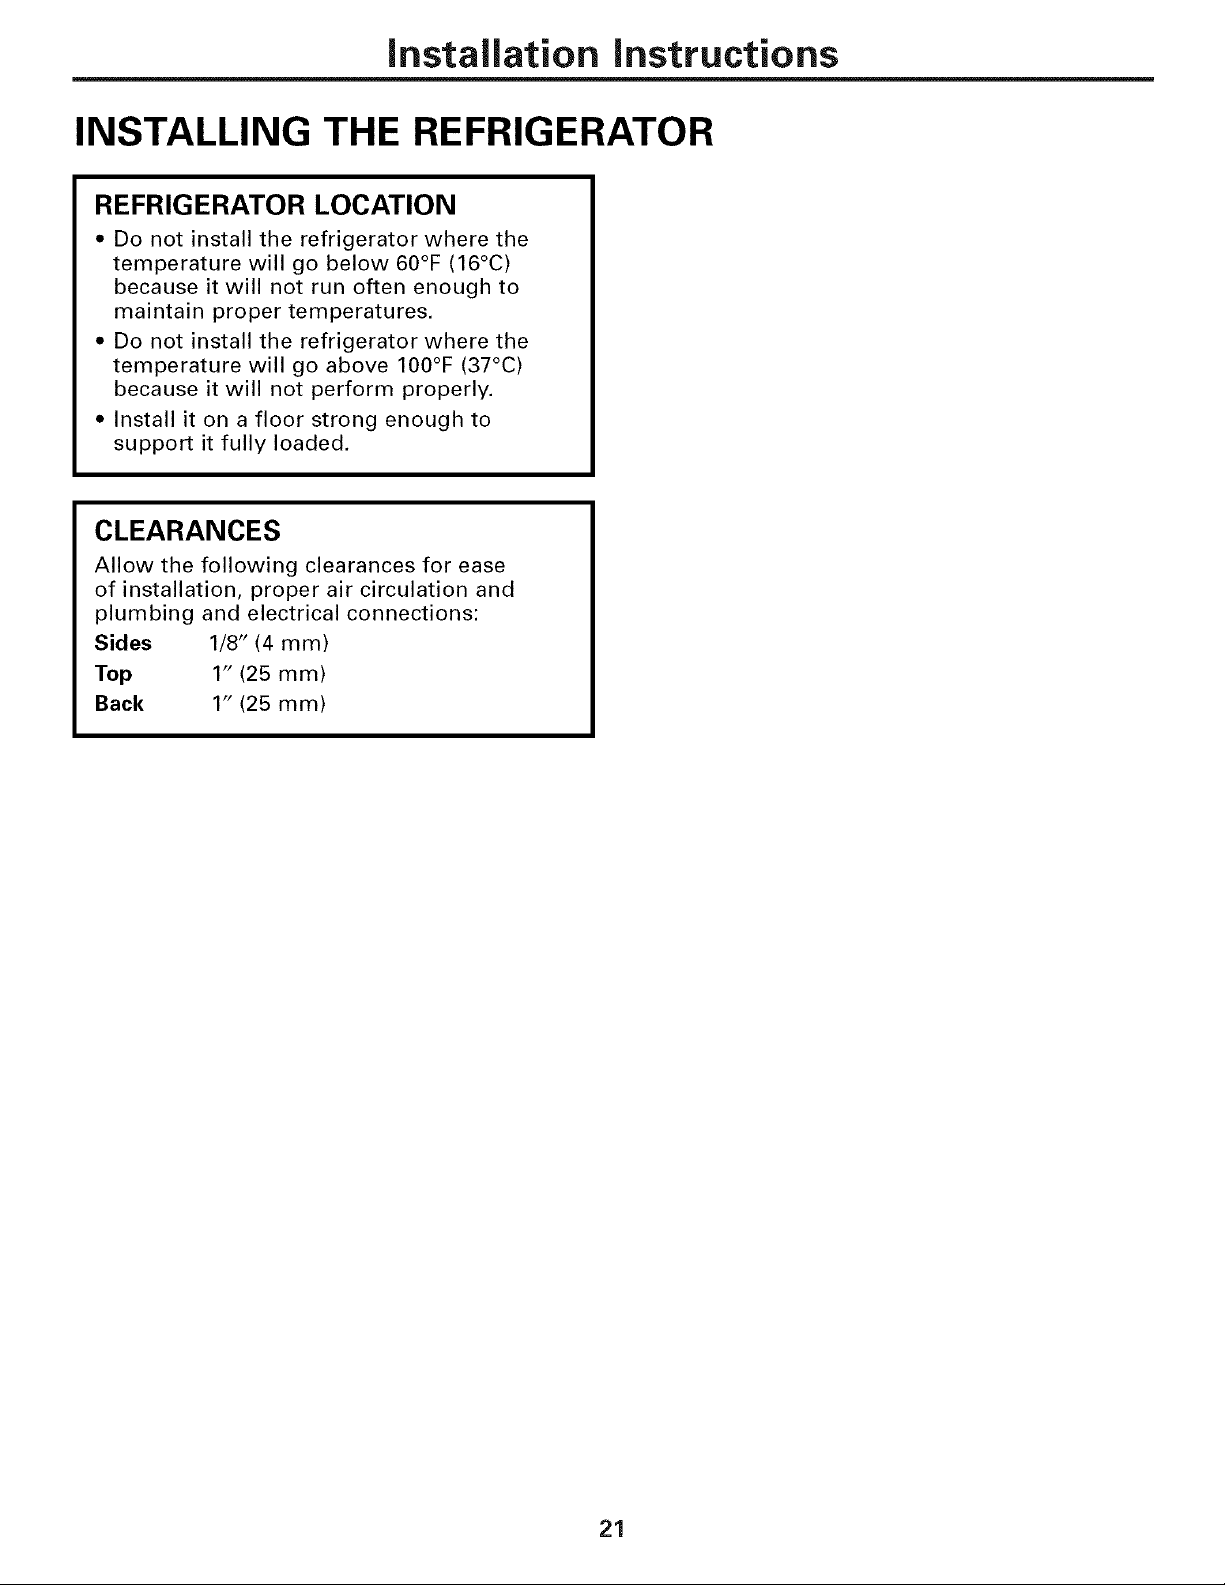
REFRIGERATOR LOCATION
• Do not install the refrigerator where the
temperature will go below 60°F (16°C)
because it will not run often enough to
maintain proper temperatures.
• Do not install the refrigerator where the
temperature will go above 100°F (37°C)
because it will not perform properly.
• Install it on a floor strong enough to
support it fully loaded.
CLEARANCES
Allow the following clearances for ease
of installation, proper air circulation and
plumbing and electrical connections:
Sides 1/8" (4 mm)
Top 1" (25 mm)
Back 1" (25 mm)
21
Installation Instructions
INSTALLING THE REFRIGERATOR (CONT.)
[]
CONNECTING THE REFRIGERATOR
TO THE HOUSE WATER LINE
(icemaker and dispenser models)
A cold water supply is required for
automatic icemaker and dispenser
operation. If there is not a cold water
supply, you will need to provide one.
See "Installing the Water Line" section.
NOTES:
Before making the connection to the
refrigerator, be sure the refrigerator
power cord is not plugged into the wall
outlet.
• If your refrigerator does not have a
water filter, we recommend installing
one if your water supply has sand or
particles that could clog the screen of
the refrigerator's water valve. Install it
in the water line near the refrigerator.
If using GE SmartConnect TM Refrigerator
Tubing Kit, you will need an additional
tube (WX08X10002) to connect the filter.
Do not cut plastic tube to install filter.
[]
If you are using copper tubing, place a
compression nut and ferrule (sleeve) onto
the end of the tubing coming from the
house cold water supply.
If you are using the GE SmartConnect TM
tubing, the nuts are already assembled to
the tubing.
[]
If you are using copper tubing, insert
the end of the tubing into the refrigerator
connection, at the back of the refrigerator,
as far as possible. While holding the
tubing, tighten the fitting.
If you are using GE SmartConnect TM
tubing, insert the molded end of the
tubing into the refrigerator connection,
at the back of the refrigerator, and tighten
the compression nut until it is hand tight.
Then tighten one additional turn with a
wrench. Overtightening may cause leaks.
[] Fasten the tubing into the clamp provided
to hold it in position. You may need to pry
open the clamp.
Tubing Clamp 1/4" Tubing
1/4"
Compression
Ferrule
(sleeve)
Refrigerator
Connection
[] TURN ON THE WATER SUPPLY
Turn the water on at the shutoff valve
(house water supply) and check for
any leaks,
[] PLUG IN THE REFRIGERATOR
Before plugging in the refrigerator, make
sure the icemaker power switch is set to
the O (off) position.
SmartConnect TMTubing
22
See the grounding information attached
to the power cord.

Installation instructions
[] PUT THE REFRIGERATOR
IN PLACE
Move the refrigerator to its final location.
[] LEVEL THE REFRIGERATOR
The refrigerator can be leveled by
adjusting the rollers located near the
bottom hinges.
_"""""_ Rol Iers////_
Rollers have three purposes:
• Rollers adjust so the door closes easily
when opened about halfway. (Raise the
front about 5/8" [16 mm] from the floor.)
• Rollers adjust so the refrigerator is
firmly positioned on the floor and does
not wobble.
• Rollers allow you to move the
refrigerator away from the wall for
cleaning.
€'1
Raise
[] LEVEL THE DOORS
Adjust the refrigerator door to make the
doors even at the top.
To align:
[]
Using a 7/16" wrench, turn the door
adjusting screw to the right to raise the
door, to the left to lower it.
NOTE:
A nylon plug, imbedded in the threads
of the pin, prevents the pin from turning
unless a wrench is used.
[]
After one or two turns of the wrench,
open and close the refrigerator door and
check the alignment at the top of the doors.
Doors should be even at top
To adjust the rollers:
• Turn the roller ,) II I
adjusting screws _
clockwise to
raise the
refrigerator,
counterclockwise
to lower it. Use a
3/8" hex socket ) [] __
or wrench, or an _\
adjustable
wrench. Roller adjusting screw
\
23
Installation Instructions
INSTALLING THE REFRIGERATOR (CONT.)
[] REPLACE THE BASE GRILLE
Replace the grille by installing the two
Phillips head screws.
[] START THE ICEMAKER
Set the icemaker power switch to the
I (on) position. The icemaker will not
begin to operate until it reaches its
operating temperature of 15°F (-9°C)
or below. It will then begin operation
automatically. It will take 2-3 days to
fill the ice bin.
NOTE:
In lower water pressure conditions, the
water valve may turn on up to 3 times
to deliver enough water to the icemaker.
[] SET THE CONTROLS
Set the controls to the recommended
setting.
5 5
[.EOOMME.OEOCO.T.O'SE ..OS]
0 *FIS RECOMMENDED 37 *F IS RECOMMENDED
24
Installation instructions
iNSTALLiNG THE WATER LiNE (ICEMAKER&DISPENSERIVIODELS)
BEFORE YOU BEGIN
Recommended copper water supply kits are
WX8X2, WX8X3 or WX8X4, depending on the
amount of tubing you need. Approved plastic
water supply lines are GE SmartConnect TM
Refrigerator Tubing (WX08Xl0002,
WX08X10006, WX08X10015 and
WX08X 10025).
When connecting your refrigerator to a GE
Reverse Osmosis Water System, the only
approved installation is with a GE RVKit. For
other reverse osmosis water systems, follow
the manufacturer's recommendations.
If the water supply to the refrigerator is from
a Reverse Osmosis Water Filtration System
AND the refrigerator also has a water filter,
use the refrigerator's filter bypass plug. Using
the refrigerator's water filtration cartridge in
conjunction with the RO filter can result in
hollow ice cubes and slower water flow from
the water dispenser.
This water line installation is not warranted
by the refrigerator or icemaker manufacturer.
Follow these instructions carefully to
minimize the risk of expensive water damage.
Water hammer (water banging in the pipes)
in house plumbing can cause damage to
refrigerator parts and lead to water leakage
or flooding. Call a qualified plumber to correct
water hammer before installing the water
supply line to the refrigerator.
To prevent burns and product damage, do not
hook up the water line to the hot water line.
If you use your refrigerator before connecting
the water line, make sure the icemaker power
switch is in the O (off) position.
Do not install the icemaker tubing in areas
where temperatures fall below freezing.
When using any electrical device (such as a
power drill) during installation, be sure the
device is double insulated or grounded in a
manner to prevent the hazard of electric
shock, or is battery powered.
All installations must be in accordance with
local plumbing code requirements.
WHAT YOU WiLL NEED
J
• Copper or GE SmartConnect TM Refrigerator
Tubing kit, 1/4" outer diameter to connect
the refrigerator to the water supply. If using
copper, be sure both ends of the tubing are
cut square.
To determine how much tubing you need:
measure the distance from the water valve
on the back of the refrigerator to the water
supply pipe. Be sure there is sufficient extra
tubing to allow the refrigerator to move out
from the wall after installation.
GE SmartConnect TMRefrigerator Tubing Kits
are available in the following lengths:
2' (0.6 m) - WX08Xl0002
6'(1.8 m) -WX08Xl0006
15' (4.6 m) - WX08X10015
25' (7.6 m) - WX08X10025
25
Installation Instructions
INSTALLING THE WATER LINE (CONT.)
Install the shutoff valve on the nearest
WHAT YOU WILL NEED (CONT.)
NOTE: The only GE approved plastic tubing
is that supplied in GE SmartConnect"
Refrigerator Tubing kits, Do not use any
other plastic water supply line because the
line is under pressure at all times. Certain
types of plastic will crack or rupture with age
and cause water damage to your home.
= AGE water supply kit (containing tubing,
shutoff valve and fittings listed below) is
available at extra cost from your dealer or
from Parts and Accessories, 800.626.2002
(in Canada 1.888.261.3055).
• A cold water supply. The water pressure must
be between 20 and 120 p.s.i. (1.4-8.1 bar).
• Power drill.
* 1/2" or adjustable wrench.
= Straight and Phillips blade screwdriver.
frequently used drinking water line.
[] SHUT OFF THE MAIN WATER
SUPPLY
Turn on the nearest faucet long enough
to clear the line of water.
[] CHOOSE THE VALVE LOCATION
Choose a location for the valve that is
easily accessible. It is best to connect into
the side of a vertical water pipe. When it is
necessary to connect into a horizontal
water pipe, make the connection to the
top or side, rather than at the bottom,
to avoid drawing off any sediment from
the water pipe.
= Two 1/4" outer diameter compression nuts
and 2 ferrules (sleeves)--to connect the
copper tubing to the shutoff valve and the
refrigerator water valve.
OR
If you are using a GE SmartConnect TM
Refrigerator Tubing kit, the necessary
fittings are preassembled to the tubing.
,, If your existing copper water line has a
flared fitting at the end, you will need an
adapter (available at plumbing supply
stores) to connect the water line to the
refrigerator OR you can cut off the flared
fitting with a tube cutter and then use a
compression fitting. Do not cut formed end
from GE SmartConnect TMRefrigerator tubing.
• Shutoff valve to connect to the cold water
line. The shutoff valve should have a water
inlet with a minimum inside diameter of
5/32" at the point of connection to the COLD
WATER LINE. Saddle-type shutoff valves are
included in many water supply kits. Before
purchasing, make sure a saddle-type valve
complies with your local plumbing codes.
[] DRILL THE HOLE FOR THE VALVE
Drill a 1/4" hole in the water pipe (even if
using a self-piercing valve), using a sharp
bit. Remove any burrs resulting from
drilling the hole in the pipe.
Take care not to allow water to drain into
the drill.
Failure to drill a 1/4" hole may result in
reduced ice production or smaller cubes.
26
Installation Instructions
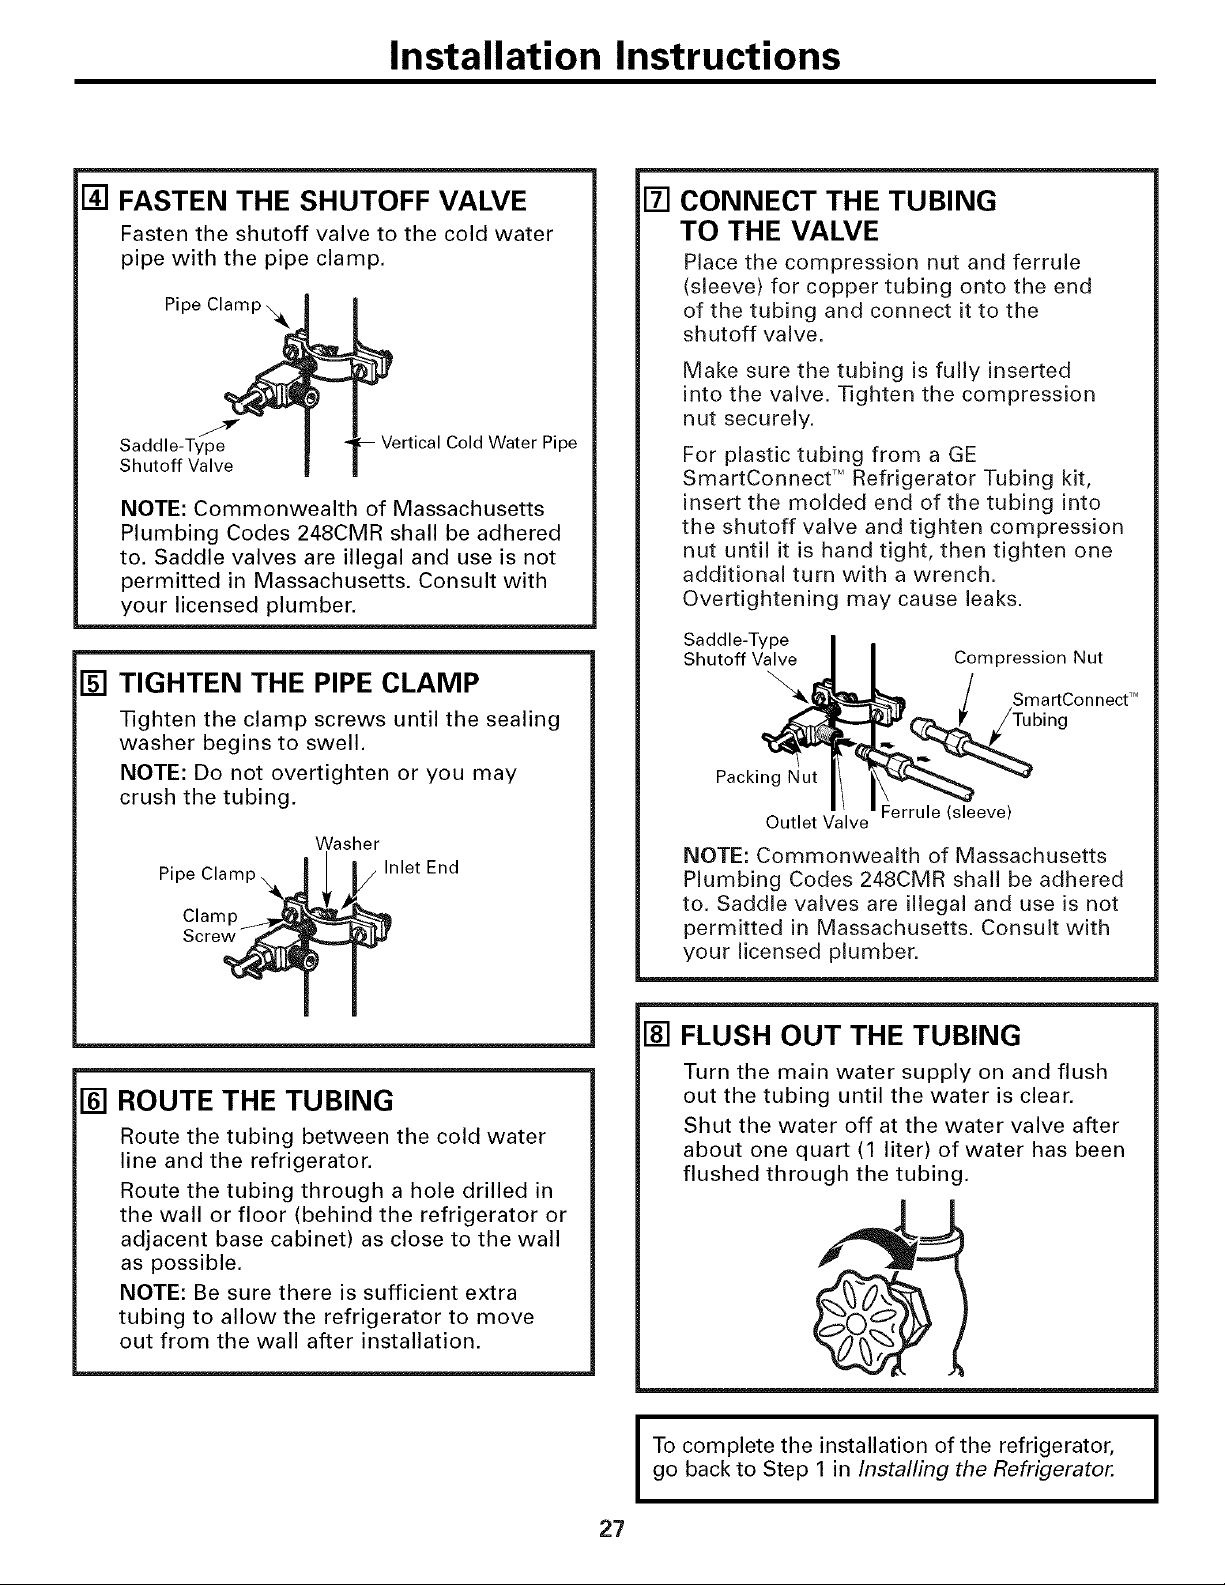
[] FASTEN THE SHUTOFF VALVE
Fasten the shutoff valve to the cold water
pipe with the pipe clamp.
Pipe
Saddle-Type
Shutoff Valve
NOTE: Commonwealth of Massachusetts
Plumbing Codes 248CMR shall be adhered
to. Saddle valves are illegal and use is not
permitted in Massachusetts. Consult with
your licensed plumber.
[] TIGHTEN THE PIPE CLAMP
Tighten the clamp screws until the sealing
washer begins to swell.
NOTE: Do not overtighten or you may
crush the tubing.
Washer
Pi
Clamp
Screw
Inlet End
[] CONNECT THE TUBING
TO THE VALVE
Place the compression nut and ferrule
(sleeve) for copper tubing onto the end
of the tubing and connect it to the
shutoff valve.
Make sure the tubing is fully inserted
into the valve. Tighten the compression
nut securely.
pe
For plastic tubing from a GE
SmartConnect TMRefrigerator Tubing kit,
insert the molded end of the tubing into
the shutoff valve and tighten compression
nut until it is hand tight, then tighten one
additional turn with a wrench.
Overtightening may cause leaks.
Saddle-Type
Shutoff Valve
Packing Nut
Outlet Valve
NOTE: Commonwealth of Massachusetts
Plumbing Codes 248CMR shall be adhered
to. Saddle valves are illegal and use is not
permitted in Massachusetts. Consult with
your licensed plumber.
Ferrule (sleeve)
Compression Nut
/ SmartConnect 'M
Tubing
[] ROUTE THE TUBING
Route the tubing between the cold water
line and the refrigerator.
Route the tubing through a hole drilled in
the wall or floor (behind the refrigerator or
adjacent base cabinet) as close to the wall
as possible.
NOTE: Be sure there is sufficient extra
tubing to allow the refrigerator to move
out from the wall after installation.
[] FLUSH OUT THE TUBING
Turn the main water supply on and flush
out the tubing until the water is clear.
Shut the water off at the water valve after
about one quart (1 liter) of water has been
flushed through the tubing.
go back to Step 1 in Installing the Refrigerator.
I To complete the installation of the refrigerator, I
27
I
,O
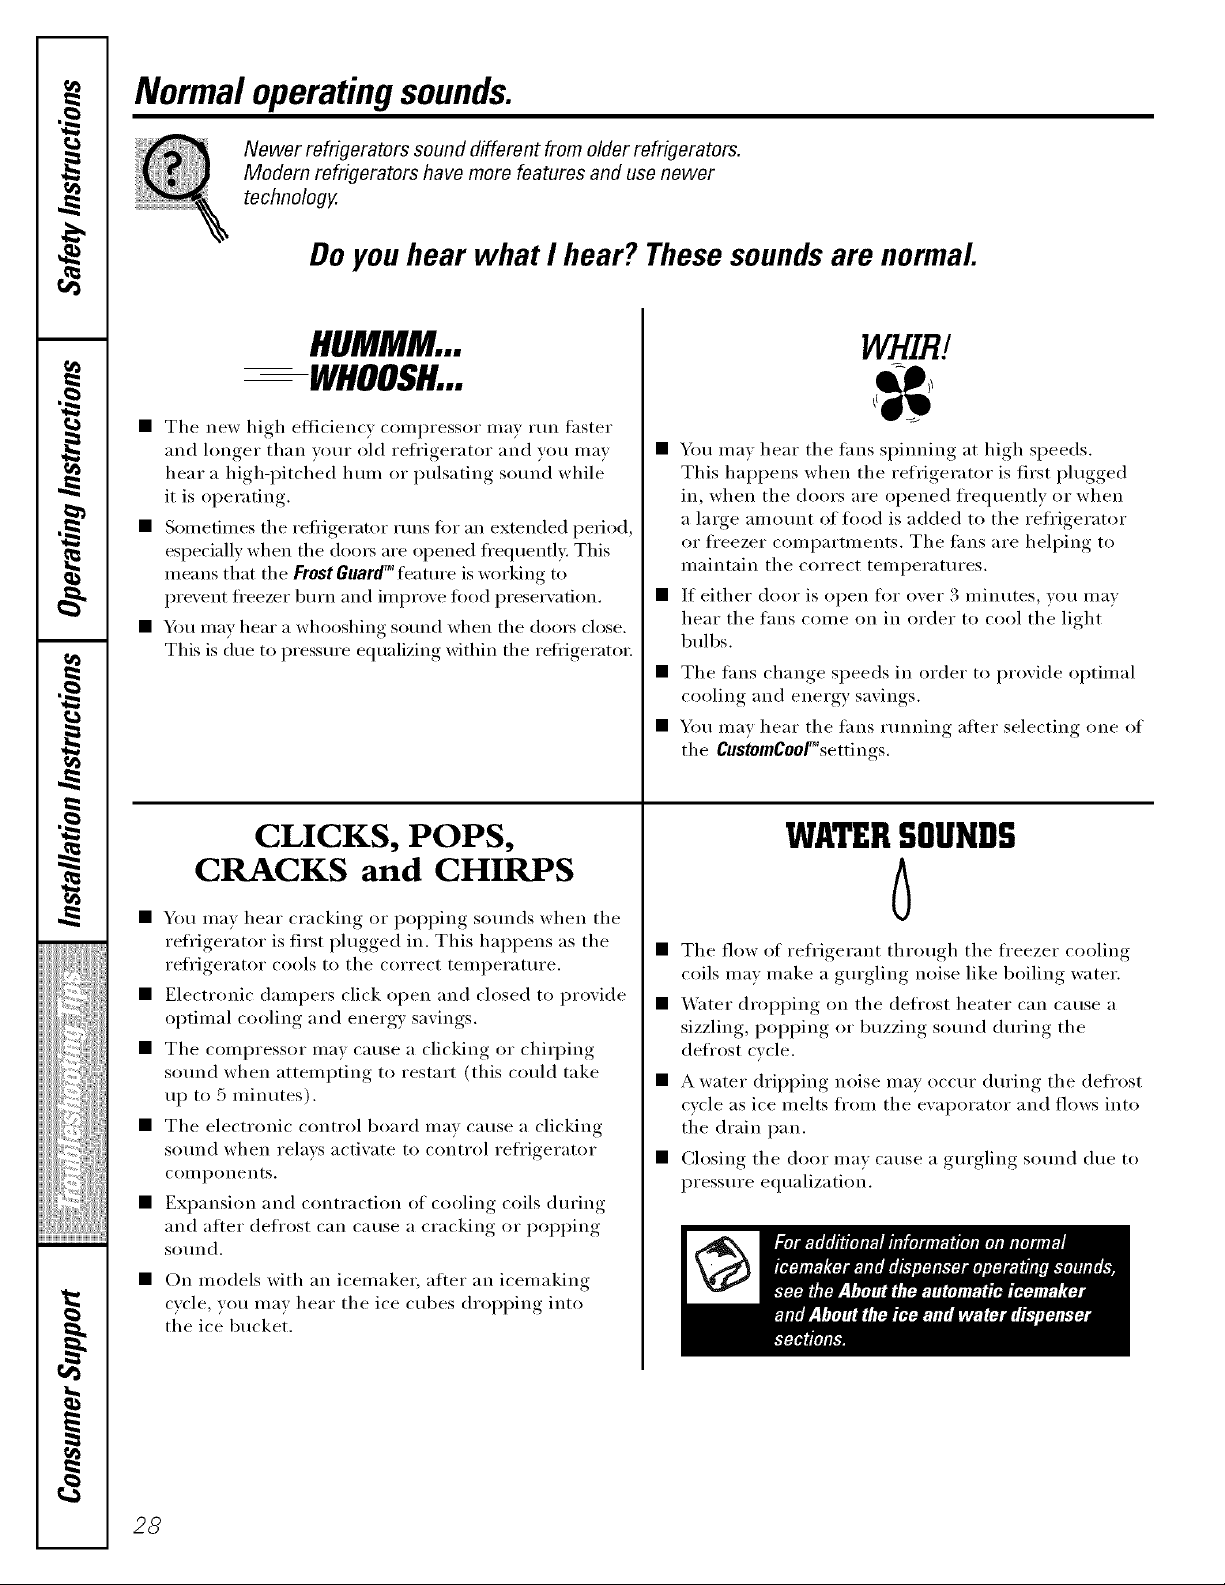
Newer refrigerators sound different from older refrigerators.
Modem refrigerators have more features and use newer
technology.
Do you hear what I hear? These sounds are normal.
HUMMM...
WHOOSH...
,O
• The new high etticiem,_ compressor ma) Hm faster
Normal operatingsounds.
and hmger than your old refrigerator and you mm
hear a high-i)itched hum or I)ulsating, sound while
it is oi)erating,.
• Sometimes the reli'igeramr runs tot an extended period,
especially when the doo_s are opened ti'equently. This
means that the Frost Guard_ feature is working to
prevent ti'eezer burn and improve tood preservation.
i
,O
• You may hear a whooshing sound when the (loo_ close.
This is due to pressure equalizing within the reliigerato_:
• You may hear the tans spinning at high speeds.
This hal)pens when the refrigerator is first plugged
in, when the doors are opened ti'equently or when
a large aI//Otlll[ of food is added to the refrigerator
or ti'eezer compartments. The tans are helping to
maintain the correct temperatures.
• If either door is open fi_r over 3 minutes, you may
hear the trois come on in order to cool the light
bulbs.
• Tile £ms change speeds in order to provide optimal
cooling and energy savings.
• You may hear the tans running atter selecting one of
the CustomCoo[%ettings.
,O
• You may hear cracking or poi)ping sounds when the
• Electronic dampers click open and closed to provide
iii_iii_!iiii;i/iiii!
i!_J_2;yii
iiiili!%_ii
• The compressor may cause a clicking or chiq_ing
• The electronic control board may cause a clicking
• Expansion and contraction of cooling coils during
iii/l! ii
l
• On models with an icemake_; after an icemaking
E
CLICKS, POPS,
CRACKS and CHIRPS
reli'igerator is first i)lugged in. This hal)pens as the
reli'igerator cools to the correct temperature.
optimal cooling and energy savings.
sound when attempting to restart (this could take
up to 5 minutes).
sound when relays activate to control reii'igerator
COII/l)OIleIltS,
and after deii'ost can cause a cracking or i)oi_ping
SOtlnd.
cycle, yo]l Ill}IV hear the ice ctlbes dropping into
the ice bucket.
WATERSOUNDS
6
• Tile flow of refl'igerant through the fl'eezer cooling
coils may make a gurgling noise like boiling water.
• _4'ater dropping on the defl'ost heater can cause a
sizzling, I)opping or buzzing SOtlild during the
defl'ost cvcle.
• A water dripping noise may occur during the defl'ost
cvcle as ice melts fl'om the evaporator and flows into
the drain pan.
• Closing the door may cause a gurgling sound due to
pressure equalization.
28

Beforeyoucall forservice...
Troubleshooting -tips
Save time and money! Review the charts on the following
pages first and you may not need to call for service.
Possible Causes What ToDo
Refrigerator does not Refrigerator in defrost cycle. * Wait about 30 miuutes tor deti'ost cycle to eud.
operate Either or both controls set to OFF. * Set tile controls to a lower temperature setting.
Refrigerator is maplugged. • Push tile plug c(nupletely into the outlet.
The fuse is blown/cireuit • Replace fl/se or reset the breaker.
breaker is tripped.
Refrigerator is ha showroom ]node. * tluplug the refl'igerator and plug it back in.
Vibration or rattling Rollers need adjusting. * See Rollers.
(slight vibration
is normal)
Motor operates for Normal when refrigerator * Wait 24 hotu_ fin" the refi_ige_ator to completely
Iongperiodsorcycles is first plugged ha. cool down.
on and off frequently.
(Modern refrigerators amounts of food are
with more storage
space and a larger placed ha refrigerator.
freezer require more Door left open. * Check to see if package is holdiug door open.
operating time. They
start and stop often Hot weather or frequent * This is uom_al.
to maintain even door openhags.
temperatures.) Temperature controls * See About the controls.
Often occurs when large * This is uoH.al.
set at the coldest
setting.
ge.com
i
Refrigeratororfreezer Temperature control not set * SeeAbout thecontrols.
compartment too warm cold enough.
Warm weather or frequent * Set the teu/peratttre (outrol one step colder.
door openings. SeeAbout the controls.
Door left open. * Check to _ee if package i_ holding door open.
Frost orice crystals Door left open. * Check to see if l)ackage, is holding, door opeu.
onfrozenfood
(frost within package Too frequent or too long
is normal) door openhags.
Divider between Automatic energy saver * Thi_ hellas Iareveut coudeusafioi] oi] the outside.
refrigerator and freezer system circulates warm
compartments liquid around front edge
feels warm of freezer compartment.
Automatic icemaker lcemaker power switch • Set the power _wit(h to the I (on) positiou.
doesnotwork is ha the 0 (Off) position.
Water supply turned off or * See Installingthewater line.
not comaected.
Freezer compartment * _,Lfit 24 hotu_ fin" the refiJge_ltor to comlaletely
tOO _Var]n. C()O1 U()WI],
Piled up cubes ha the storage * Level cttbes by hand.
bin cause the icemaker
to shut off.
:;;t;iJii
!i_:;;i_iiiiii
iiiiii'_i?)ii!ii
!;?i::iiiii
i
Ice cubes stuck ha icemaker.
(Green power light on
icemaker blhfldng).
• Turn off the icemake_, remove cubes, and turn the
icelnaker back on.
i
29
,O
Beforeyoucall forservice...
Possible Causes What ToDo
Ice cubes have Ice storage bin needs clemfing. * EmpF and wash bin. Discard old cubes.
odor/taste
i
Smallorhollowcubes Water filter clogged. • Replace filter cam_doe with new cam_dge or with )lw,
Food lrmasllfitthlg odor/taste * _M'ap fi)ods well.
to ice cubes.
Interior of refrigerator * See Care and cleaning.
needs demfing.
,O
Slow ice cube freezing Door left open. * Check to see if package is holding door open,
Temperature control not set * See About the contro/s
cold enough.
Orange glowin Defrost heater is on. * This is n,mnal.
the freezer
Cube dispenser does not lcema.ker tmamd off or * Turn on icemaker or water supply.
water supply tmamd off.
Ice cubes are frozen to * ken/o_e cubes.
icema_ker feeler arm.
An item is blockil_g or has fallen * Remove am item that might be blocking, or has fifllen
,O
,O
into the ice chute h_side the top into, the chute.
door bin of the freezer.
Irregular ice clmnps ha * Break up with fingertip pressure and discard
storage container, remaining chml )s
• Freezer ram' be too waml. A(!iust the fl'eezer control
to a colder setting, one position at a time, until clumps
do ilot form.
Dispenser is LOCKED. • Press and hold the LOCK CONTROL pad for 3 seconds.
Waterhaspoortaste/odor Water dispenser has not been • Dispense water until all water ill s}steln is replenished.
(ou some models) used for a long tbne.
Water in first glass is Normal when refrigerator • "_,%fit 24 houi_ fin" the reflJgerator to completely
is first hzstalled, cool down.
iii_iii_!iiii;i/iiii!
iiiili!%_ii
iii/l! ii
l
E
Water dispenser has not been • Dispense water until all water in s}stelll is replenished.
used for along tilne.
Water system has been drained. • _Mlow sexeral houi_ for replenished suppl} to chili.
Water dispenser does Water supply line turned • See Installing the water line.
not work (on some models) off or not comlected.
Water filter clogged. • Replace filter (artlJdge or relllOXe tilter alld install phlg.
Air may be lrapped h_ the • Press the dispenser ann for at least two minutes.
water system.
Dispenser is LOCKED. • Press and hold the LOCKCONTROLpad for 3 seconds.
Waterspurting from Newly-hlsta_led filter cartridge. • Run water fl'oln tile dispenser for 3 ininutes (about
dispenser(onsomemodels) one and a half galhms).
Waterisnotdispensed Water ill reservoir is • Call fi)r service.
(onsomemodels)but frozen.
icemake r is working Refrigerator control settillg • Set to a wallner settin,
is too cold.
3O
 Loading...