


GE DVM7195SK3SS, DVM7195SK2SS, DVM7195FL1DS, DVM7195EK2ES, DVM7195DK3WW Owner’s Manual
...MICROWAVE OVEN
SAFETY INFORMATION . . . . . . . 2-7
OPERATING INSTRUCTIONS
Oven Features. . . . . . . . . . . . . . . . . . . . . . 8-10
Power Levels. . . . . . . . . . . . . . . . . . . . . . . . . 11
Time Features . . . . . . . . . . . . . . . . . . . . . 12-16
Sensor Features . . . . . . . . . . . . . . . . . . . 17, 18
Other Features . . . . . . . . . . . . . . . . . . . 19, 20
Microwave Terms . . . . . . . . . . . . . . . . . . . . . 21
CARE AND CLEANING
Care and Cleaning . . . . . . . . . . . . . . . . .22-24
TROUBLESHOOTING
Things that are Normal . . . . . . . . . . . . . . . .25
CONSUMER SUPPORT
Warranty . . . . . . . . . . . . . . . . . . . . . . . . . . . .27
Consumer Support . . . . . . . . . . . .Back Cover
Write the model and serial numbers here:
Model #_________________
Serial # _________________
You can find them on a label inside the oven.
OWNER’S MANUAL
DVM7195
ESPAÑOL
Para consultar una version en español de este manual de instrucciones, visite nuestro sitio de internet GEAppliances.com.
GE is a trademark of the General Electric Company. Manufactured under trademark license.
49-40767-2 03-17 GEA

IMPORTANT SAFETY INSTRUCTIONS.
READ ALL INSTRUCTIONS BEFORE USING.
SAFETY INFORMATION
 This is the safety alert symbol. This symbol alerts you to potential hazards that can kill or hurt you and others. All safety messages will follow the safety alert symbol and the word “DANGER”, “WARNING”, or “CAUTION”. These words are defined as:
|
DANGER |
Indicates a hazardous situation which, if not avoided, will result in death or serious injury. |
|
||
|
|
|
|
|
|
|
WARNING |
Indicates a hazardous situation which, if not avoided, could result in death or serious injury. |
|
|
|
CAUTION |
Indicates a hazardous situation which, if not avoided, could result in minor or moderate injury. |
|
When using electrical appliances basic safety precautions should be followed, including the following:
To reduce risk of burns, electric shock, fire, personal injury or exposure to excessive microwave
WARNING energy.
³ 5HDG DQG IROORZ WKH VSHFLILF SUHFDXWLRQV LQ WKH
PRECAUTIONS TO AVOID POSSIBLE EXPOSURE TO EXCESSIVE MICROWAVE ENERGY section on page 4.
³ 8VH WKLV DSSOLDQFH RQO\ IRU LWV LQWHQGHG XVH DV GHVFULEHG in this manual. Do not use corrosive chemicals or vapors in this appliance. This microwave oven is specifically designed to heat, dry or cook food, and is not intended for laboratory or industrial use.
³ 7KLV PLFURZDYH VKRXOG EH VHUYLFHG RQO\ E\ TXDOLILHG service personnel. Contact nearest authorized service facility for examination, repair, or adjustment.
INSTALLATION
³ ,QVWDOO RU ORFDWH WKLV DSSOLDQFH RQO\ LQ DFFRUGDQFH ZLWK the provided installation instructions.
³ 7KLV DSSOLDQFH PXVW EH JURXQGHG &RQQHFW RQO\ WR a properly grounded outlet. See the GROUNDING INSTRUCTIONS section on page 3.
³ 7KLV PLFURZDYH RYHQ LV 8/ OLVWHG IRU LQVWDOODWLRQ RYHU ERWK gas (less than 60,000 BTU) and electric ranges.
³ 7KLV XQLW LV VXLWDEOH IRU XVH DERYH JDV RU HOHFWULF FRRNLQJ HTXLSPHQW µ RU OHVV ZLGH
³ 'R QRW RSHUDWH WKLV DSSOLDQFH LI LW KDV D GDPDJHG SRZHU cord or plug, if it is not working properly, or if it has been damaged or dropped.
³ .HHS SRZHU FRUG DZD\ IURP KHDWHG VXUIDFHV
³ 'R QRW OHW SRZHU FRUG KDQJ RYHU HGJH RI WDEOH RU counter.
³ 'R QRW LPPHUVH SRZHU FRUG RU SOXJ LQ ZDWHU³ 'R QRW EORFN RU FRYHU DQ\ RSHQLQJV RQ WKH DSSOLDQFH ³ 'R QRW VWRUH WKLV DSSOLDQFH RXWGRRUV 'R QRW XVH WKLV
SURGXFW QHDU ZDWHU³IRU H[DPSOH LQ D ZHW EDVHPHQW near a swimming pool, near a sink or in similar location.
³ 'R QRW PRXQW WKLV DSSOLDQFH RYHU D VLQN
TO REDUCE THE RISK OF FIRE IN THE OVEN CAVITY
³ 'R QRW RYHUFRRN IRRG &DUHIXOO\ DWWHQG DSSOLDQFH ZKHQ paper, plastic or other combustible materials are placed inside the oven while cooking.
³5HPRYH ZLUH WZLVW WLHV DQG PHWDO KDQGOHV IURP SDSHU RU plastic containers before placing them in the oven.
³'R QRW VWRUH DQ\ PDWHULDOV RWKHU WKDQ RXU UHFRPPHQGHG accessories, in this oven when not in use. Do not leave paper products, cooking utensils or food in the cavity when not in use. Microwave rack should be removed from oven when not in use.
³,I PDWHULDOV LQVLGH WKH RYHQ LJQLWH NHHS WKH RYHQ GRRU closed, turn the oven off and disconnect the power cord, or shut off power at the fuse or circuit breaker panel.
³'R QRW RSHUDWH WKH PLFURZDYH ZLWKRXW IRRG LQ WKH RYHQ
TO REDUCE THE RISK OF BURNS
³ %H FDUHIXO ZKHQ RSHQLQJ FRQWDLQHUV RI KRW IRRG 8VH SRW holders and direct steam away from face and hands.
³ 9HQW SLHUFH RU VOLW FRQWDLQHUV SRXFKHV RU SODVWLF EDJV WR SUHYHQW EXLOG XS RI SUHVVXUH
³ %H FDUHIXO ZKHQ WRXFKLQJ WKH WXUQWDEOH GRRU RU ZDOOV RI the oven which may become hot during use.
³ /LTXLGV DQG FHUWDLQ IRRGV KHDWHG LQ WKH PLFURZDYH RYHQ can present a risk of burn when removing them from the microwave. The potential for a burn is greater in young children, who should not be allowed to remove hot items
from the microwave.
OPERATING AND CLEANING
³ $V ZLWK DQ\ DSSOLDQFH FORVH VXSHUYLVLRQ LV QHFHVVDU\ when used by children.
³ 'R QRW VWRUH DQ\WKLQJ GLUHFWO\ RQ WRS RI WKH PLFURZDYH surface when the microwave oven is in operation.
³ 2YHUVL]HG IRRG RU RYHUVL]HG PHWDO FRRNZDUH VKRXOG QRW be used in a microwave/convection oven because they increase the risk of electric shock and could cause a fire.
³ 'R QRW FOHDQ ZLWK PHWDO VFRXULQJ SDGV 3LHFHV FDQ EXUQ off the pad and touch electrical parts involving risk of electric shock.
³ 'R QRW XVH SDSHU SURGXFWV LQ RYHQ ZKHQ DSSOLDQFH LV operated in any cooking mode except microwave only.
2 |
SAVE THESE INSTRUCTIONS |
|

IMPORTANT SAFETY INSTRUCTIONS. READ ALL INSTRUCTIONS BEFORE USING.
OPERATING AND CLEANING (Continued)
³ 6RPH SURGXFWV VXFK DV ZKROH HJJV DQG VHDOHG
FRQWDLQHUV³IRU H[DPSOH FORVHG MDUV³DUH DEOH WR H[SORGH and should not be heated in this microwave oven.
³ 'R QRW FRYHU DQ\ SDUW RI WKH PLFURZDYH ZLWK PHWDO IRLO
This will cause overheating of the microwave.
³ &RRN PHDW DQG SRXOWU\ WKRURXJKO\³PHDW WR DW OHDVW DQ
INTERNAL temperature of 160°F and poultry to at least an INTERNAL temperature of 180°F. Cooking to these temperatures usually protects against food borne illness.
³ 0DNH VXUH DOO FRRNZDUH XVHG LQ \RXU PLFURZDYH RYHQ LV suitable for microwaving. Most glass casseroles, cooking dishes, measuring cups, custard cups, pottery or china dinnerware which does not have metallic trim or glaze with a metallic sheen can be used in compliance with cookware manufacturers’ recommendations.
³ ,W LV LPSRUWDQW WR NHHS WKH DUHD FOHDQ ZKHUH WKH GRRU seals against the microwave. Use only mild, nonabrasive detergents applied with a clean sponge or soft cloth. Rinse well.
SUPERHEATED WATER
³ /LTXLGV VXFK DV ZDWHU FRIIHH RU WHD DUH DEOH WR EH overheated beyond the boiling point without appearing to be boiling. Visible bubbling or boiling when the container is removed from the microwave oven is
not always present. THIS COULD RESULT IN VERY HOT LIQUIDS SUDDENLY BOILING OVER WHEN THE CONTAINER IS DISTURBED OR A SPOON OR OTHER UTENSIL IS INSERTED INTO THE LIQUID.
To reduce the risk of injury to persons:
³ 'R QRW RYHUKHDW WKH OLTXLG ³ 6WLU WKH OLTXLG ERWK EHIRUH DQG KDOIZD\ WKURXJK KHDWLQJ LW ³ 'R QRW XVH VWUDLJKW VLGHG FRQWDLQHUV ZLWK QDUURZ QHFNV
³ $IWHU KHDWLQJ DOORZ WKH FRQWDLQHU WR VWDQG LQ WKH microwave oven for a short time before removing the container.
³ 8VH H[WUHPH FDUH ZKHQ LQVHUWLQJ D VSRRQ RU RWKHU XWHQVLO into the container.
GROUNDING INSTRUCTIONS

 WARNING To prevent risk of electric shock, follow these instructions:
³ 3OXJ PLFURZDYH LQWR D JURXQGHG SURQJ RXWOHW |
&RQVXOW D TXDOLILHG HOHFWULFLDQ RU VHUYLFH WHFKQLFLDQ LI WKH |
|
³ 'R QRW UHPRYH WKH JURXQG SURQJ RU XVH DQ DGDSWHU |
grounding instructions are not completely understood, |
|
³ 'R QRW XVH DQ H[WHQVLRQ FRUG |
or if doubt exists as to whether the appliance is properly |
|
Improper use of the grounding plug can result in a |
grounded. |
|
risk of electric shock. |
$ VKRUW SRZHU VXSSO\ LV SURYLGHG WR UHGXFH WKH ULVNV |
|
This appliance must be grounded. In the event of an |
||
resulting from becoming entangled or tripping over a longer |
||
electrical short circuit, grounding reduces the risk of electric |
||
cord. Do not use an extension cord with this appliance. If |
||
shock by providing an escape wire for the electric current. |
||
WKH SRZHU FRUG LV WRR VKRUW KDYH D TXDOLILHG HOHFWULFLDQ RU |
||
7KLV DSSOLDQFH LV HTXLSSHG ZLWK D SRZHU FRUG KDYLQJ D |
||
service technician install an outlet near the appliance. |
||
grounding wire with a grounding plug. The plug must |
||
|
||
be plugged into an outlet that is properly installed and |
|
|
grounded. |
|
VENT FAN
The fan will operate automatically under certain conditions. Take care to prevent the starting and spreading of accidental cooking fires while the vent fan is in use. ³ Clean the underside of the microwave often. Do not allow
grease to build up on the microwave or the fan filters. ³ In the event of a grease fire on the surface units below the microwave oven, smother a flaming pan on the
surface unit by covering the pan completely with a lid, a cookie sheet or a flat tray.
PACEMAKERS
³ Use care when cleaning the vent fan filters. Corrosive
FOHDQLQJ DJHQWV VXFK DV O\H EDVHG RYHQ FOHDQHUV PD\ damage the filters.
³ When preparing flaming foods under the microwave, turn the fan on.
³ Never leave surface units beneath your microwave oven unattended at high heat settings. Boil overs cause smoking and greasy spill overs that may ignite and spread if the microwave vent fan is operating. To
PLQLPL]H DXWRPDWLF IDQ RSHUDWLRQ XVH DGHTXDWH VL]HG cookware and use high heat on surface units only when necessary.
Most pacemakers are shielded from interference from electronic products, including microwaves. However, patients with pacemakers may wish to consult their physicians if they have concerns.
SAVE THESE INSTRUCTIONS
3

IMPORTANT SAFETY INSTRUCTIONS.
READ ALL INSTRUCTIONS BEFORE USING.
PRECAUTIONS TO AVOID POSSIBLE EXPOSURE TO EXCESSIVE MICROWAVE ENERGY
• |
Do Not Attempt to operate this oven with the door |
properly and that there is no damage to the: |
|
RSHQ VLQFH RSHQ GRRU RSHUDWLRQ FDQ UHVXOW LQ KDUPIXO |
(1) door (bent) |
|
exposure to microwave energy. It is important not to |
(2) hinges and latches (broken or loosened) |
|
defeat or tamper with the safety interlocks. |
(3) door seals and sealing surfaces |
• |
Do Not Place any object between the oven front |
• The Oven Should Not be adjusted or repaired by |
|
face and the door or allow soil or cleaner residue to |
DQ\RQH H[FHSW SURSHUO\ TXDOLILHG VHUYLFH SHUVRQQHO |
|
accumulate on sealing surfaces. |
Contact nearest authorized service facility for |
• |
Do Not Operate the oven if it is damaged. It is |
examination, repair or adjustment. |
|
particularly important that the oven door close |
|
READ AND FOLLOW THIS SAFETY INFORMATION CAREFULLY.
SAVE THESE INSTRUCTIONS
FEDERAL COMMUNICATIONS COMMISSION (U.S.A.) RADIO FREQUENCY INTERFERENCE STATEMENT
7KLV HTXLSPHQW JHQHUDWHV DQG XVHV ,60 IUHTXHQF\ HQHUJ\ and if not installed and used properly, that is in strict accordance with the manufacturer’s instructions, may cause interference to radio and television reception. It has been type tested and found to comply with limits for an
,60 (TXLSPHQW SXUVXDQW WR SDUW RI )&& 5XOHV ZKLFK DUH designed to provide reasonable protection against such interference in a residential installation. However, there is no guarantee that interference will not occur in a particular
LQVWDOODWLRQ ,I WKLV HTXLSPHQW GRHV FDXVH LQWHUIHUHQFH WR radio or television reception, which can be determined by
WXQLQJ WKH HTXLSPHQW RII DQG RQ WKH XVHU LV HQFRXUDJHG WR try to correct the interference by one or more of the following:
Reorient the receiving antenna of radio or television.
Relocate the Microwave oven with respect to the receiver.
Move the microwave oven away from the receiver.
Plug the microwave oven into a different outlet so that microwave oven and receiver are on different branch circuits.
The manufacturer is not responsible for any radio or TV interference cause by unauthorized modification to this microwave oven. It is the responsibility of the user to correct such interference.
4
INSTRUCCIONES IMPORTANTES DE SEGURIDAD.
LEA PRIMERO TODA LAS INSTRUCCIONES.
INFORMACIÓN DE SEGURIDAD
 eVWH HV HO VtPEROR GH DOHUWD GH VHJXULGDG (O PLVPR DOHUWD VREUH SRWHQFLDOHV ULHVJRV GH PXHUWH R OHVLRQHV WDQWR SDUD XVWHG FRQ SDUD RWUDV SHUVRQDV 7RGRV ORV PHQVDMHV GH VHJXULGDG HVWDUiQ D FRQWLQXDFLyQ GHO VtPEROR GH DOHUWD GH VHJXULGDG \ FRQ OD palabra “PELIGRO”, “ADVERTENCIA” o “PRECAUCIÓN”. Estas palabras se definen como:
|
PELIGRO |
,QGLFD XQD VLWXDFLyQ GH ULHVJR TXH VL QR VH HYLWD resultará en la muerte o en lesiones graves. |
|
||
|
|
|
 ADVERTENCIA ,QGLFD XQD VLWXDFLyQ GH ULHVJR TXH VL QR VH HYLWD puede resultar en la muerte o en lesiones graves.
 PRECAUCIÓN ,QGLFD XQD VLWXDFLyQ GH ULHVJR TXH VL QR VH HYLWD puede resultar en lesiones menores o moderadas.
$O XVDU DUWHIDFWRV HOpFWULFRV VH GHEHUiQ VHJXLU ODV SUHFDXFLRQHV EiVLFDV GH VHJXULGDG LQFOX\HQGR OR VLJXLHQWH
ADVERTENCIA |
Por su seguridad, la información contenida en este manual debe seguirse para minimizar el |
riesgo de incendio, explosión, descarga eléctrica, exposición a energía microondas. |
|
|
|
³ /HD \ VLJD ODV SUHFDXFLRQHV HVSHFtILFDV HQ OD VHFFLyQ
PRECAUCIONES PARA EVITAR UNA POSIBLE EXPOSICIÓN A UNA EXCESIVA ENERGÍA DE MICROONDAS en la página 4.
³ 'p D HVWH HOHFWURGRPpVWLFR HO XVR SDUD HO FXDO IXH diseñado únicamente, como se describe en este manual.
1R XVH SURGXFWRV TXtPLFRV FRUURVLYRV QL YDSRUHV HQ HVWH HOHFWURGRPpVWLFR (VWH KRUQR PLFURRQGDV IXH GLVHxDGR
HVSHFtILFDPHQWH SDUD FDOHQWDU VHFDU R FRFLQDU FRPLGD \ QR para uso industrial o en laboratorio.
³ (VWH HOHFWURGRPpVWLFR VyOR GHEHUtD VHU UHSDUDGR SRU SHUVRQDO WpFQLFR FRQ FDOLILFDFLyQ (Q FDVR GH QHFHVLWDU XQD HYDOXDFLyQ
UHSDUDFLyQ R DMXVWH FRPXQtTXHVH FRQ HO VHUYLFLR DXWRUL]DGR más cercano.
INSTALACIÓN
³ ,QVWDOH R XELTXH HO HOHFWURGRPpVWLFR VyOR GH DFXHUGR FRQ ODV LQVWUXFFLRQHV GH LQVWDODFLyQ SURYLVWDV
³ (VWH HOHFWURGRPpVWLFR GHEHUi HVWDU FRQHFWDGR D WLHUUD &RQHFWH VyOR D XQ WRPDFRUULHQWH FRQ OD DGHFXDGD FRQH[LyQ
D WLHUUD /HD OD VHFFLyQ ,16758&&,21(6 3$5$ &21(;,Ï1 $
TIERRA en la página 3.
³ (VWH KRUQR PLFURRQGDV ILJXUD HQ OD OLVWD GH 8/ SDUD VX SRVLEOH LQVWDODFLyQ WDQWR HQ HVWXIDV D JDV PHQRV GH %78 FRPR HOpFWULFDV
³ (VWD XQLGDG IXH GLVHxDGD SDUD XVH VREUH HTXLSDPLHQWRV GH FRFFLyQ D JDV R HOpFWULFRV GH XQ DQFKR GH µ R PHQRV ³ 1R XWLOLFH HVWH DUWHIDFWR VL SRVHH XQ FDEOH R HQFKXIH GDxDGR VL QR IXQFLRQD FRUUHFWDPHQWH R VL IXH GDxDGR R VXIULy XQD FDtGD³ 0DQWHQJD HO FDEOH GH FRUULHQWH DOHMDGR GH VXSHUILFLHV FDOLHQWHV
³ 1R SHUPLWD TXH HO FDEOH GH FRUULHQWH FXHOJXH GHO H[WUHPR GH una mesa o mostrador.
³ 1R VXPHUMD HO FDEOH GH FRUULHQWH R HO HQFKXIH HQ HO DJXD³ 1R EORTXHH QL FXEUD FXDOTXLHU DEHUWXUD GHO HOHFWURGRPpVWLFR³ 1R JXDUGH HVWH HOHFWURGRPpVWLFR DO DLUH OLEUH 1R XVH HVWH
SURGXFWR FHUFD GHO DJXD SRU HMHPSOR HQ XQ VyWDQR K~PHGR cerca de una piscina, cerca de un lavabo o en ubicaciones similares.
³ 1R FRORTXH HVWH DUWHIDFWR VREUH XQ ODYDER
PARA REDUCIR EL RIESGO DE INCNDIOS EN LA CAVIDAD DEL HORNO
³ 1R FRFLQH HQ H[FHVR OD FRPLGD 3UHVWH HVSHFLDO DWHQFLyQ
FXDQGR VH FRORTXH SDSHO SOiVWLFR X RWURV PDWHULDOHV combustibles dentro del horno mientras se cocina.
³ (OLPLQH FXDOTXLHU WRUFHGXUD GHO FDEOH \ DVDV PHWiOLFDV GH ORV envases de papel o plástico antes de colocar estos en el horno.
³ 1R JXDUGH QLQJ~Q PDWHULDO D H[FHSFLyQ GH QXHVWURV
DFFHVRULRV UHFRPHQGDGRV HQ HVWH KRUQR FXDQGR QR HVWp HQ uso No deje productos de papel, utensilios de cocina ni comida
HQ HO KRUQR FXDQGR QR HVWp HQ XVR (O HVWDQWH GHO PLFURRQGDV se deberá retirar del horno cuando no se encuentre en uso.
³ 6L ORV PDWHULDOHV GHQWUR GHO KRUQR VH SUHQGHQ IXHJR PDQWHQJD la puerta del horno cerrada, apague el mismo y desconecte
el cable de la corriente, o corte la corriente desde el panel del fusible o el disyuntor.
³ 1R XWLOLFH HO PLFURRQGDV VLQ FRPLGD GHQWUR GHO KRUQR
A FIN DE REDUCIR RIESGOS DE QUEMADURAS
³ 7HQJD FXLGDGR DO DEULU UHFLSLHQWHV FRQ FRPLGD FDOLHQWH 8VH ODV manijas de las ollas y evite el contacto directo del vapor con la cara y las manos.
³ 9HQWLOH SHUIRUH R FRUWH ORV UHFLSLHQWHV EROVDV R EROVDV SOiVWLFDV SDUD HYLWDU OD DFXPXODFLyQ GH SUHVLyQ
³ 7HQJD FXLGDGR DO WRFDU HO SODWR JLUDWRULR OD SXHUWD R ODV SDUHGHV del horno, los cuales se podrán calentar durante el uso.
³ /RV OtTXLGRV \ FLHUWDV FRPLGDV FDOHQWDGDV HQ HO KRUQR PLFURRQGDV SXHGHQ SUHVHQWDU HO ULHVJR GH TXHPDGXUDV DO UHWLUDUORV GHO KRUQR PLFURRQGDV /D SRVLELOLGDG GH VXIULU TXHPDGXUDV HV PD\RU HQ QLxRV SHTXHxRV D TXLHQHV QR VH OHV GHEHUi SHUPLWLU HO UHWLUR GH
tWHPV FDOLHQWHV GHO KRUQR PLFURRQGDV
FUNCIONAMIENTO Y LIMPIEZA
³ $O LJXDO TXH FRQ FXDOTXLHU HOHFWURGRPpVWLFR VH GHEHUi UHDOL]DU XQD VXSHUYLVLyQ GH FHUFD VL HV XVDGR SRU QLxRV
³ 1R JXDUGH QDGD GLUHFWDPHQWH VREUH OD VXSHUILFLH GHO KRUQR microondas cuando el mismo se encuentre en funcionamiento.
³ 1R VH GHEHUtD XVDU FRPLGD QL XWHQVLOLRV PHWiOLFRV GH WDPDxR H[FHVLYR HQ XQ KRUQR PLFURRQGDV SRU FRQYHFFLyQ \D TXH
LQFUHPHQWDQ HO ULHVJR GH GHVFDUJDV HOpFWULFDV \ HVWR SRGUtD ocasionar un incendio.
³ 1R OLPSLH FRQ DOPRKDGLOODV PHWiOLFDV SDUD IUHJDU /DV SLH]DV SRGUiQ TXHPDU OD DOPRKDGLOOD \ WHQHU FRQWDFWR FRQ SDUWHV HOpFWULFDV \ SURGXFLU ULHVJRV GH GHVFDUJDV HOpFWULFDV
³ 1R XVH SURGXFWRV GH SDSHO HQ HO KRUQR FXDQGR HO HOHFWURGRPpVWLFR VHD XVDGR HQ FXDOTXLHU PRGR GH FRFFLyQ H[FHSWR HQ FRFFLyQ SRU PLFURRQGDV
GUARDE ESTAS INSTRUCCIONES |
5 |
|

INSTRUCCIONES IMPORTANTES DE SEGURIDAD. LEA PRIMERO TODA LAS INSTRUCCIONES.
FUNCIONAMIENTO Y LIMPIEZA (Continúa)
³ $OJXQRV SURGXFWRV WDOHV FRPR KXHYRV HQWHURV \ HQYDVHV sellados – por ejemplo: tarros de vidrio cerrados – pueden explotar y por esto no se deben calentar en el horno microondas.
³ 1R FXEUD HO HVWDQWH GHO PLFURRQGDV R FXDOTXLHU SDUWH GHO KRUQR con papel de aluminio. Esto ocasionará un sobrecalentamiento
GHO KRUQR PLFURRQGDV SRU FRQYHFFLyQ
³ &RFLQH OD FDUQH \ FDUQH GH DYH FRPSOHWDPHQWH ² OD FDUQH D por lo menos una temperatura INTERNA de 160ºF y la carne de ave a por lo menos una temperatura INTERNA de 180ºF. La
FRFFLyQ D HVWDV WHPSHUDWXUDV QRUPDOPHQWH HV XQD SURWHFFLyQ contra las enfermedades producidas por la carne.
³ $VHJ~UHVH GH TXH WRGRV ORV XWHQVLOLRV XVDGRV HQ HO KRUQR microondas sean para uso en el mismo. Se pueden usar la
PD\RUtD GH ODV FD]XHODV GH YLGULR SODWRV GH FRFFLyQ WD]DV graduadas, tazas para postre, vajillas de cerámica o cubiertos
GH SRUFHODQD TXH QR SRVHHQ ERUGHV PHWiOLFRV R YLGULDGRV con un brillo metálico, siguiendo las recomendaciones del fabricante.
³ (V LPSRUWDQWH PDQWHQHU HO iUHD OLPSLD GRQGH OD SXHUWD VH VHOOH
FRQWUD HO KRUQR PLFURRQGDV 8VH VyOR GHWHUJHQWHV VXDYHV \ QR abrasivos con una esponja limpia o tela suave. Enjuague bien.
AGUA SOBRECALENTADA
/RV OtTXLGRV WDOHV FRPR HO DJXD FDIp R Wp VH SRGUiQ VREUHFDOHQWDU PiV DOOi GH VX SXQWR GH KHUYRU VLQ TXH SDUH]FD
TXH HVWR HVWi VXFHGLHQGR 1R VLHPSUH VH REVHUYDQ EXUEXMDV o hervor cuando el envase es retirado del horno microondas. ESTO PODRÍA PROVOCAR QUE LÍQUIDOS MUY CALIENTES DE PRONTO HIERVAN CUANDO SE MUEVA EL ENVASE O CUANDO SE INSERTE UNA CUCHARA U OTRO UTENSILIO EN EL LÍQUIDO.
Para reducir el riesgo de lesiones personales:
³ 1R VREUHFDOLHQWH HO OtTXLGR
³ 5HYXHOYD HO OtTXLGR WDQWR DQWHV FRPR D OD PLWDG GHO WLHPSR mientras lo calienta.
³ 1R XVH HQYDVHV FRQ ODGRV UHFWRV \ FXHOORV DQJRVWRV³ 'HVSXpV GH FDOHQWDU GHMH UHSRVDU HO HQYDVH HQ HO KRUQR
PLFURRQGDV GXUDQWH XQ SHUtRGR FRUWR DQWHV GH UHWLUDU HO mismo.
³ 7HQJD H[WUHPR FXLGDGR DO LQVHUWDU XQD FXFKDUD X RWUR XWHQVLOLR en el envase.
INSTRUCCIONES DE CONEXIÓN A TIERRA
WARNING |
Para evitar el riesgo de descargas eléctricas, siga estas instrucciones. |
||
|
XQ WRPDFRUULHQWH FRQ FRQH[LyQ |
Consulte a un electricista calificado o al personal del servicio |
|
³ (QFKXIH HO PLFURRQGDV HQ |
|||
a tierra de 3 cables. |
WpFQLFR HQ FDVR GH TXH ODV LQVWUXFFLRQHV GH FRQH[LyQ D WLHUUD |
||
³ 1R UHWLUH HO HQFKXIH GH FRQH[LyQ D WLHUUD QL XVH XQ DGDSWDGRU |
no se entiendan completamente, o si tiene dudas sobre si la |
||
³ 1R XVH XQ SURORQJDGRU |
herramienta está conectada a tierra de forma apropiada. |
||
El uso inadecuado del enchufe de conexión a tierra puede |
Se brinda un cable de corriente corto a fin de reducir los |
||
provocar riesgos de descargas eléctricas. |
|||
riesgos asociados con enredos o tropiezos con un cable más |
|||
(VWH HOHFWURGRPpVWLFR GHEHUi HVWDU FRQHFWDGR D WLHUUD (Q FDVR |
ODUJR 1R XVH SURORQJDGRUHV FRQ HVWH HOHFWURGRPpVWLFR 6L HO |
||
GH TXH VH SURGX]FD XQ FRUWRFLUFXLWR OD FRQH[LyQ D WLHUUD UHGXFH HO |
cable de corriente es demasiado corto, solicite a un electricista |
||
ULHVJR GH GHVFDUJD HOpFWULFD EULQGDQGR XQ FDEOH GH HVFDSH GH OD R D SHUVRQDO GHO VHUYLFLR WpFQLFR FDOLILFDGR TXH LQVWDOH XQ |
|||
FRUULHQWH HOpFWULFD |
WRPDFRUULHQWH FHUFD GHO HOHFWURGRPpVWLFR |
||
(VWH HOHFWURGRPpVWLFR HVWi HTXLSDGR FRQ XQ FDEOH GH FRUULHQWH
TXH SRVHH XQ FDEOH GH FRQH[LyQ D WLHUUD FRQ XQ HQFKXIH D WLHUUD
El enchufe se deberá colocar en un tomacorriente instalado y
conectado a tierra de forma adecuada.
VENTILADOR CON EXTRACTOR
El ventilador funcionará de forma automática bajo ciertas
FRQGLFLRQHV $VHJ~UHVH GH HYLWDU OD DFWLYDFLyQ \ H[WHQVLyQ
DFFLGHQWDO GHO IXHJR GH FRFFLyQ PLHQWUDV HO YHQWLODGRU HVWp HQ uso.
³ /LPSLH OD FDUD LQIHULRU GHO KRUQR PLFURRQGDV HQ IRUPD
IUHFXHQWH 1R SHUPLWD TXH VH DFXPXOH JUDVD HQ HO KRUQR microondas ni en los filtros del ventilador.
³ (Q FDVR GH TXH KD\D IXHJR SURGXFLGR SRU OD JUDVD HQ ODV unidades de la superficie debajo del horno microondas, apague una olla llameante sobre la unidad de la superficie cubriendo la olla completamente con una tapa, una asadera de galletitas o una bandeja plana.
³ /LPSLH FRQ FXLGDGR ORV ILOWURV GHO YHQWLODGRU $JHQWHV GH limpieza corrosivos, tales como los limpiadores de horno a base de soda cáustica, podrán dañar los filtros.
³ $O SUHSDUDU FRPLGDV OODPHDQWHV GHEDMR GHO KRUQR PLFURRQGDV encienda el ventilador.
³ 1XQFD GHMH GH SUHVWDU DWHQFLyQ D ODV XQLGDGHV GH OD VXSHUILFLH debajo de su horno microondas en las configuraciones altas de calor. Las ebulliciones producen humo y derrames de grasa
TXH SXHGHQ HQFHQGHU \ HVSDUFLU HO IXHJR VL HO YHQWLODGRU GHO horno microondas está en funcionamiento. A fin de minimizar el funcionamiento del ventilador automático, use utensilios de tamaño adecuado y use un nivel de calor alto en las unidades
GH OD VXSHUILFLH VyOR FXDQGR VHD QHFHVDULR
MARCAPASOS
/D PD\RUtD GH ORV PDUFDSDVRV SRVHHQ SURWHFFLyQ FRQWUD LQWHUIHUHQFLDV GH SURGXFWRV HOpFWULFRV LQFOX\HQGR PLFURRQGDV 6LQ HPEDUJR HV DFRQVHMDEOH TXH ORV SDFLHQWHV FRQ PDUFDSDVRV FRQVXOWHQ D VXV PpGLFRV DQWH FXDOTXLHU GXGD
GUARDE ESTAS INSTRUCCIONES
6

INSTRUCCIONES IMPORTANTES DE SEGURIDAD. LEA PRIMERO TODA LAS INSTRUCCIONES.
PRECAUCIONES PARA EVITAR POSIBLE EXPOSICIÓN A UNA EXCESIVA ENERGÍA DE MICROONDAS.
(a)No Intente operar este horno con la puerta abierta ya
TXH HVWR SRGUtD UHVXOWDU HQ XQD H[SRVLFLyQ D HQHUJtD microondas dañina. Es importante no cancelar ni manipular de forma indebida los dispositivos de seguridad.
(b)No Sitúe ningún objeto entre la parte frontal del horno
\ OD SXHUWD QL SHUPLWD TXH VH DFXPXOH VXFLHGDG R UHVLGXRV OLPSLRV HQ ODV JRPDV GH FLHUUH KHUPpWLFR
(c)No Use el horno si está dañado. Es especialmente
LPSRUWDQWH TXH OD SXHUWD GHO KRUQR VH FLHUUH FRUUHFWDPHQWH \ TXH QR VH GDxH
(1)la puerta (doblada),
(2)bisagras y pasadores (rotos o sueltos),
VHOORV GH OD SXHUWD \ JRPDV GH FLHUUH KHUPpWLFR
(d)El horno no debería ajustarse ni repararse por nadie
TXH QR VHD SHUVRQDO GH VHUYLFLR DGHFXDGDPHQWH calificado.
DE LEER Y SEGUIR CUIDADOSAMENTE ESTA INFORMACIÓN DE SEGURIDAD.
GUARDE ESTAS INSTRUCCIONES
COMISIÓN DE COMUNICACIONES FEDERALES (EE.UU.) DECLARACIÓN DE INTERFERENCIA DE RADIO FRECUENCIA
(VWH HTXLSR JHQHUD \ XVD HQHUJtD GH IUHFXHQFLD ,60 \ VL QR es instalado y usado de forma adecuada, en cumplimiento estricto con las instrucciones del fabricante, se podrán
RFDVLRQDU LQWHUIHUHQFLDV HQ OD UHFHSFLyQ GH UDGLR \ WHOHYLVLyQ 6H UHDOL]y XQD HYDOXDFLyQ SRU WLSR \ VH HQFRQWUy HQ FXPSOLPLHQWR FRQ ORV OtPLWHV GH XQ HTXLSR ,60 GH DFXHUGR FRQ OD SDUWH GH ODV 5HJODV )&& TXH IXHURQ GLVHxDGDV SDUD EULQGDU XQD SURWHFFLyQ UD]RQDEOH FRQWUD GLFKDV LQWHUIHUHQFLDV HQ XQD LQVWDODFLyQ UHVLGHQFLDO 6LQ HPEDUJR QR VH JDUDQWL]D TXH QR VH SUHVHQWHQ LQWHUIHUHQFLDV HQ XQD LQVWDODFLyQ HQ SDUWLFXODU 6L HO HTXLSR SURYRFD LQWHUIHUHQFLDV HQ OD UHFHSFLyQ GH UDGLR R WHOHYLVLyQ OR TXH VH SXHGH GHWHUPLQDU HQFHQGLHQGR \ DSDJDQGR HO HTXLSR VH DFRQVHMD DO XVXDULR
TXH LQWHQWH FRUUHJLU OD LQWHUIHUHQFLD D WUDYpV GH XQD R PiV GH las siguientes medidas:
5HRULHQWH OD DQWHQD UHFHSWRUD GH UDGLR R WHOHYLVLyQ
5HXELTXH HO KRUQR PLFURRQGDV FRQ UHVSHFWR DO UHFHSWRU
&RORTXH HO KRUQR PLFURRQGDV DOHMDGR GHO UHFHSWRU
Enchufe el horno microondas en un tomacorriente
GLIHUHQWH GH PRGR TXH HO KRUQR PLFURRQGDV \ HO UHFHSWRU HVWpQ HQ GLIHUHQWHV FLUFXLWRV GH HPSDOPHV
(O IDEULFDQWH QR HV UHVSRQVDEOH GH FXDOTXLHU LQWHUIHUHQFLD GH
UDGLR R 79 RFDVLRQDGD SRU XQD PRGLILFDFLyQ QR DXWRUL]DGD sobre este horno microondas. Es responsabilidad del usuario corregir dicha interferencia.
7
About the features of your microwave oven.
Throughout this manual, features and appearance may vary from your model.
1000 Watts
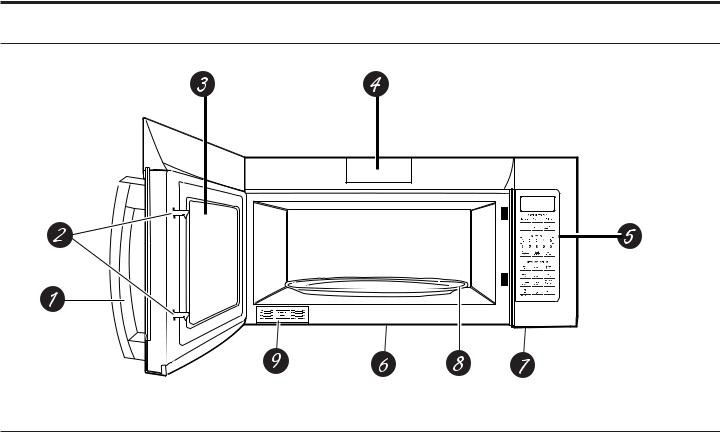
Features of the Oven
1Door Handle. Pull to open the door. The door must be securely latched for the microwave to operate.
2Door Latches.
3Window with Metal Shield. Screen allows cooking to be viewed while keeping microwaves confined in the oven.
4Charcoal Filter Door. Push down two button to open the door. You can change charcoal filter easily.
5Touch Control Panel. You must set the clock and calendar before using the “Auto Night Light”.
6Cooktop Light.
7Grease Filter.
8Removable Turntable.
Turntable and support must be in place when using the oven. The turntable may be removed for cleaning.
9Rating Plate.
NOTE: Oven vent(s) and oven light are located on the inside walls of the microwave oven.
8

Optional Accessories
Filler Panel Kits JX36DWW - White JX36DBB - Black JX36DSS - Stainless JX36DES - Slate
When replacing a 36” range hood, filler panel kits fill in the
DGGLWLRQDO ZLGWK WR SURYLGH D FXVWRP EXLOW LQ DSSHDUDQFH
)RU LQVWDOODWLRQ EHWZHHQ FDELQHWV RQO\ QRW IRU HQG RI cabinet installation. Each kit contains two 3” wide filler panels. Two kits are needed for a 36” opening.
Recirculating Charcoal Filter Kit JX81J (sales number) WB02X1124 (service number)
Filter kits are used when the microwave oven cannot be vented to the outside.
15” Cabinet Installation Kit JX15BUMPBB - Black JX15BUMPWW - White
For use when installing with 15” depth cabinets.
Available at extra cost from your GE Appliances supplier, or see the GE Appliances Service numbers.
Filer Panel Kits
JX81J (sales number) WB02X1124 (service number)
9

About the features of your microwave oven.
You can microwave by time or with the sensor features. Not all features on all models.
Cooking Controls
Check the Convenience Guide before you begin.
Time Features
Press |
Enter |
Cook Time |
Amount of cooking time |
Express Cook |
Starts Immediately! |
Add 30 Sec |
Starts Immediately! |
Power Level |
Power level 1 to 10 |
Defrost Weight/Time |
Amount of defrosting weight/time |
Steam Cook |
)RRG |
Sensor Features
Press |
Enter |
Popcorn |
Starts immediately! |
Beverage |
Starts immediately! |
Reheat |
)RRG |
Potato |
Starts Immediately! |
10
|
|
|
|
Cook |
|
|
Changing the Power Level |
||
|
|
|
|
Time |
|
|
The power level may be entered or changed |
||
|
|
|
|
Power |
|
|
|||
|
|
|
|
|
|
immediately after entering the feature time for |
|||
|
|
|
|
Level |
|
|
Cook Time, Time Defrost, Add 30 Sec or Express |
||
|
|
|
|
|
|
|
|
||
1 |
2 |
3 |
|
4 |
5 |
Cook. The power level may also be changed |
|||
6 |
7 |
8 |
|
9 |
0 |
during the time countdown. |
|||
|
1. |
Press Cook Time. |
|||||||
|
|
|
|
|
|
|
|
||
|
|
|
|
Start |
|
|
|
2. |
Enter cooking or defrosting time |
|
|
|
|
Pause |
|
|
|||
|
|
|
|
|
|
|
|
||
|
|
|
|
|
|
|
|
3. |
Press Power Level. |
|
|
|
|
|
|
|
|
||
|
|
|
|
|
|
|
|
4. |
Select desired power level 1-10. |
|
|
|
|
|
|
|
|
3. |
Press Start/Pause. Pressing Start/Pause is |
|
|
|
|
|
|
|
|
|
not necessary for Express Cook buttons. |
Variable power levels add flexibility to microwave cooking. The power levels on the microwave oven can be compared to the surface units on a range. Each power level gives you microwave energy
a certain percent of the time. Power level 7 is microwave energy 70% of the time. Power level 3 is energy 30% of the time. Most cooking will be done on HI which gives you 100% power.
Power Level 10 will cook faster but food may
QHHG PRUH IUHTXHQW VWLUULQJ URWDWLQJ RU WXUQLQJ over. A lower setting will cook more evenly and need less stirring or rotating of the food.
Some foods may have better flavor, texture or appearance if one of the lower settings is used. Use a lower power level when cooking foods that have a tendency to boil over, such as scalloped potatoes.
Rest periods (when the microwave energy cycles
RII JLYH WLPH IRU WKH IRRG WR ´HTXDOL]Hµ RU WUDQVIHU heat to the inside of the food. An example of this is shown with power level 3³WKH GHIURVW F\FOH ,I microwave energy did not cycle off, the outside of the food would cook before the inside was defrosted.
Here are some examples of uses for various power levels:
Power Level 10: Fish, bacon, vegetables, boiling
OLTXLGV
Power Level 7: Gentle cooking of meat and poultry; baking casseroles and reheating.
Power Level 5: Slow cooking and tenderizing for stews and less tender cuts of meat.
Power Level 2 or 3: Defrosting; simmering; delicate sauces.
Power Level 1: .HHSLQJ IRRG ZDUP VRIWHQLQJ butter.
11

About the time features.
|
|
|
Cook |
|
|
Cook Time I |
|
|
|
|
Time |
|
|
Allows you to microwave for any time up to 99 |
|
|
|
|
|
|
|
|
|
1 |
2 |
3 |
|
4 |
5 |
minutes and 99 seconds. |
|
|
Power level 10 (high) is automatically set, but |
||||||
6 |
7 |
8 |
|
9 |
0 |
||
|
you may change it for more flexibility. |
||||||
|
|
|
|
|
|
|
|
|
|
|
Start |
|
|
|
1. Press Cook Time. |
Pause
2.Enter cooking time.
3.Change power level if you don’t want full power. (Press Power Level. Select a desired power level 1–10.)
4.Press Start/Pause.
You may open the door during Cook Time to check the food. Close the door and press Start/Pause to resume cooking.
Cook Time II
Lets you change power levels automatically during cooking. Here’s how to do it:
1.Press Cook Time.
2.Enter the first cook time.
3.Change the power level if you don’t want full power. (Press Power Level. Select a desired power level 1–10.)
4.Press Cook Time again.
5.Enter the second cook time.
6.Change the power level if you don’t want full power. (Press Power Level. Select a desired power level 1–10.)
7.Press Start/Pause.
At the end of Cook Time I, Cook Time II counts down.
12

|
|
|
|
|
Express Cook |
1 |
2 |
3 |
4 |
5 |
This is a quick way to set cooking time for 1–5 minutes. |
Press one of the Express Cook pads (from 1 to 5) for 1 to 5 minutes of cooking at power level 10. For example, press the 2 pad for 2 minutes of cooking time.
The power level can be changed as time is counting down. Press POWER LEVEL and enter 1–10.
Add 30 Sec
You can use this feature two ways:
It will add 30 seconds to the time counting down each time the pad is pressed.
,W FDQ EH XVHG DV D TXLFN ZD\ WR VHW VHFRQGV RI FRRNLQJ WLPH
My Cycle
The Add 30 Sec button can be adjusted to the My Cycle feature.
Press Settings button and select My Cycle.
Select a time (from 5 Sec to 59 Sec) and press the Settings button to complete the selection.
Steam Cook
Use the Steam Cook IHDWXUH WR VWHDP FHUWDLQ SUH programmed foods. For best performance, please use a glass bowl with lid or vented plastic wrap.
1.Press the Steam button.
2.Select the food you wish to steam.
3.Place bowl with water, salt (if necessary), and food in the microwave.
4.Press Start to begin cooking.
Amount of |
First Choice |
Second |
Water Added |
|
Choice |
|
|
|
1 cup |
5LFH |
FXS ZKLWH |
|
|
FXS |
|
|
brown |
1/4 cup per 1 |
$VSDUDJXV |
1 to 2 cups |
cup vegetables |
|
|
1/4 cup per 1 |
%URFFROL |
1 to 2 cups |
cup vegetables |
|
|
1/4 cup per 1 |
%UXVVHO |
1 to 2 cups |
cup vegetables |
Sprouts |
|
1/4 cup per 1 |
&DUURWV |
1 to 2 cups |
cup vegetables |
|
|
1/4 cup per 1 |
&DXOLIORZHU |
1 to 2 cups |
cup vegetables |
|
|
1/4 cup per 1 |
=XFFKLQL |
1 to 2 cups |
cup vegetables |
|
|
13

About the time features.
|
|
Defrost |
|
|
Weight Defrost |
||
|
|
|
|
|
|||
|
|
Weight/Time |
|
|
The Defrost Weight/Time feature gives you |
||
|
|
|
|
|
|
|
|
1 |
2 |
3 |
|
4 |
5 |
two ways to defrost food. |
|
|
Press Defrost Weight/Time once for |
||||||
6 |
7 |
8 |
|
9 |
0 |
||
|
weight defrost or twice for Time Defrost. |
||||||
|
|
|
|
|
|
|
|
|
|
|
Start |
|
|
|
Use Weight Defrost for meat, poultry and |
Pause |
fish up to 6 pounds. Use Time Defrost for |
|
|
|
most other frozen foods. |
|
Weight Defrost automatically sets the |
|
defrosting times and power levels to give |
|
even defrosting results for meats, poultry |
|
and fish. |
|
1. Press Defrost Weight/Time once. |
|
2. Using the conversion guide, enter food |
|
weight. For example, press pads 1 and 2 |
|
for 1.2 pounds (1 pound, 3 ounces). |
|
3. Press Start/Pause. |
|
(Time Defrost is explained in the Time |
|
Features section.) |
|
• Remove meat from package and place on |
|
PLFURZDYH VDIH GLVK |
|
• When the oven signals, turn the food |
|
over. Remove defrosted meat or shield |
|
warm areas with small pieces of foil. |
|
• After defrosting, most meats need to |
|
stand 5 minutes to complete defrosting. |
|
Large roasts should stand for about 30 |
|
minutes. |
Conversion Guide
If the weight of food is stated in pounds and ounces, the ounces must be converted to tenths (.1) of a pound.
Ounces |
Pounds |
|
|
1–2 |
.1 |
|
|
3 |
.2 |
|
|
4–5 |
.3 |
|
|
6–7 |
.4 |
|
|
8 |
.5 |
|
|
9–10 |
.6 |
|
|
11 |
.7 |
|
|
12–13 |
.8 |
|
|
14–15 |
.9 |
|
|
14

|
|
Defrost |
|
|
Time Defrost allows you to defrost for a |
|||
|
|
|
|
selected length of time. See the Defrosting |
||||
|
|
Weight/Time |
|
|
||||
1 |
2 |
3 |
|
4 |
5 |
Guide for suggested times. (Weight Defrost is |
||
|
explained in the Auto Feature section.) |
|||||||
6 |
7 |
8 |
|
9 |
0 |
1. |
Press Defrost Weight/Time twice. |
|
|
|
|
Start |
|
|
2. |
Enter defrosting time. |
|
|
|
|
Pause |
|
|
|
3. |
Press Start/Pause. |
|
|
|
|
|
|
|
||
|
|
|
|
|
|
|
||
|
|
|
|
|
|
|
4. |
Turn food over when the oven signal. |
|
|
|
|
|
|
|
5. |
Press Start/Pause. |
When the oven signals, turn food over and break apart or rearrange pieces for more even defrosting. Shield any warm areas with small pieces of foil. The oven will continue to defrost if you don’t open the door and turn the food.
Power level is automatically set at 3, but can be changed. You can defrost small
LWHPV TXLFNO\ E\ UDLVLQJ WKH SRZHU OHYHO DIWHU entering the time. Power level 7 cuts the total defrosting time in about half; power level 10 cuts the total time to approximately
+RZHYHU IRRG ZLOO QHHG PRUH IUHTXHQW attention than usual.
A dull thumping noise may be heard during defrosting. This is normal when oven is not operating at High power.
Defrosting Tips
•Foods frozen in paper or plastic can be defrosted in the package. Closed packages should be slit, pierced or vented AFTER food has partially defrosted. Plastic storage containers should be partially uncovered.
)DPLO\ VL]H SUHSDFNDJHG IUR]HQ GLQQHUV FDQ be defrosted and microwaved. If the food is
LQ D IRLO FRQWDLQHU WUDQVIHU LW WR D PLFURZDYH safe dish.
•For more even defrosting of larger foods, such as roasts, use Defrost Weight. Be sure large meats are completely defrosted before cooking.
•Foods that spoil easily should not be allowed to sit out for more than one hour after defrosting. Room temperature promotes the growth of harmful bacteria.
•When defrosted, food should be cool but softened in all areas. If still slightly icy, return to the microwave very briefly, or let it stand a few minutes counts down.
15

About the time features.
Defrosting Guide
Food |
Time |
Comments |
|
|
|
|
|
Breads, Cakes |
|
|
|
|
Bread, buns or rolls (1 piece) |
1 min. |
|
|
Sweet rolls (approx. 12 oz.) |
3 to 5 min. |
Rearrange after half of time. |
|
|
|
|
Fish and Seafood |
|
|
|
|
Fillets, frozen (1 lb.) |
6 to 8 min. |
|
|
Shellfish, small pieces (1 lb.) |
5 to 7 min. |
Place block in casserole. |
|
|
|
Turn over and break up after first half of time. |
|
|
|
|
Fruit |
|
|
|
|
3ODVWLF SRXFK³ RU |
WR PLQ |
|
R] SDFNDJH |
|
|
|
|
|
|
|
Meat |
|
|
|
|
Bacon (1 lb.) |
2 to 5 min. |
Place unopened package in oven. Let stand 5 minutes after defrosting. |
|
Franks (1 lb.) |
2 to 5 min. |
Place unopened package in oven. Microwave just until franks can be |
|
|
|
separated. Let stand 5 minutes, if necessary, to complete defrosting. |
|
Ground meat (1 lb.) |
5 to 7 min. |
Turn meat over after first half of time. |
|
Roast: beef, lamb, veal, pork |
12 to 16 min. per lb. |
Use power level Warm (1). |
|
Steaks, chops and cutlets |
5 to 7 min. per lb. |
Place unwrapped meat in cooking dish. Turn over after first half |
|
|
|
of time and shield warm areas with foil. After second half of time, |
|
|
|
separate pieces with table knife. Let stand to complete defrosting. |
|
|
|
|
Poultry |
|
|
|
&KLFNHQ EURLOHU IU\HU FXW XS |
WR PLQ |
3ODFH ZUDSSHG FKLFNHQ LQ GLVK 8QZUDS DQG WXUQ RYHU DIWHU ILUVW |
|
|
(2 1/2 to 3 lbs.) |
|
half of time. After second half of time, separate pieces and place in |
|
|
|
cooking dish. Microwave 2 to 4 minutes more, if necessary. Let stand |
|
|
|
a few minutes to finish defrosting. |
|
Chicken, whole (2 1/2 to 3 lbs.) |
17 to 21 min. |
Place wrapped chicken in dish. After first half of time, unwrap |
|
|
|
and turn chicken over. Shield warm areas with foil. To complete |
|
|
|
defrosting, run cool water in cavity until giblets can be removed. |
|
&RUQLVK KHQ |
WR PLQ SHU OE |
3ODFH XQZUDSSHG KHQ LQ RYHQ EUHDVW VLGH XS 7XUQ RYHU DIWHU ILUVW KDOI |
|
|
|
of time. Run cool water in cavity until giblets can be removed. |
|
7XUNH\ EUHDVW WR OEV |
WR PLQ SHU OE |
3ODFH XQZUDSSHG EUHDVW LQ PLFURZDYH VDIH GLVK EUHDVW VLGH GRZQ |
|
|
|
$IWHU ILUVW KDOI RI WLPH WXUQ EUHDVW VLGH XS DQG VKLHOG ZDUP DUHDV |
|
|
|
with foil. Defrost for second half of time. Let stand 1 to 2 hours in |
|
|
|
refrigerator to complete defrosting. |
|
|
|
|
16
 Loading...