


GE A1050PK, A1050RD, A1035, A1050SL, A1250 User Manual
...User Manual
Digital Still Camera
A Series |
A950 / A1050 / A1250 / WM1050 |
|
/ A1035 / A1235 |
E Series |
E1255W |
GETTING READY
BASIC OPERATION
USING THE MODES
PLAYBACK
USING THE MENUS
CONNECTIONS
APPENDICES
EN

WARNING
Topreventfireorshockhazard,donotexposetheunit to rain or moisture.
For customers in the U.S.A.
Tested To Comply With FCC Standards
FOR HOME OR OFFICE USE
FCC Statement
This device complies with part 15 of the FCC Rules. Operation is subject to the following two conditions:
(1)This device may not cause harmful interference, and
(2)this device must accept any interference received, including interference that may cause undesired operation.
For customers in Europe
"CE"markindicatesthatthisproductcomplies with the European requirements for safety,
health, environment and customer protection. "CE" markcamerasareintendedforsalesinEurope.
This symbol [crossed-out wheeled bin WEEE Annex
IV] indicates separate collection of waste electrical and electronic equipment in the EU countries.
Please do not throw the equipment into the domestic refuse. Please use the return and collection systems available in your country for the disposal of this product.
Declaration of Conformity
Model Name : A950/A1050/A1250/A1035/A1235/
WM1050/E1255W Trade Name : GE
Responsible Party : General Imaging Co.
Address : 2158 W.190th Street, Torrance, CA 90504, USA Telephone Number : 1-800-730-6597
Conforms to the following Standards:
EMC |
: EN 55022:1998/A1:2000/A2:2003 Class B |
|
EN 55024:1998/A1:2001/A2:2003 |
|
EN 61000-3-2:2000/A1:2001 |
|
EN 61000-3-3:1995/A1:2001 |
following the provision of the EMC Directive (89/336/ EEC,2004/108/EEC)

SAFETY PRECAUTIONS
Camera notes:
 Do not store or use the camera in the following types of locations:
•In the rain, very humid and dusty places.
•In a place where the camera can be exposed directly to the sunlight or subject to high temperature, e.g. Inside a closed car in summer.
•In a place where the camera is subject to a high magneticfield,e.g.nearmotors,transformersor magnets.
 Do not place the camera on a wet surface or places where dripping water or sand may come in contact with the camera, which may cause irrepairable faults.
 If the camera will not be used for a long period of time, we suggest you remove the battery and the memory card.
 If you carry the camera suddenly from a cold location to a warm place, moisture may condense inside the camera. We suggest you wait for a while before turing on the camera.
 No compensation for loss of recordings. Loss of recordings cannot be compensated for if a malfunction
ofyourcameraorrecordingmedia,etc,makesthe ii playbackofrecordingsnotpossible.
Battery notes:
 Incorrect use of the batteries may cause them to leak,becomehot,igniteorburst.Alwaysobservethe precautions given below.
•Donotexposethebatteriestowater,andtake particularcaretokeeptheterminalsdry.
•Donotheatthebatteriesorthrowthemintoafire.
•Do not attempt to deform, disassemble or modify the batteries.
•UseGEchargerinthepackagetochargethelithium battery only (for G and E series).
 Keep the batteries out of reach of babies and small children.
 In cold locations, battery performance deteriorates and thetimeforwhichtheycanbeusedshortensmarkedly.
Memory card notes:
 When using a new memory card, or a memory card has beeninitializedbyaPC,besuretoformatthecardwith your digital camera before using it.
 To edit image data, copy the image data to the PC's hard diskandthenformatmemorycardifupgradethefirmware.
 Donotchangeordeletethedirectorynames,orfile names in the memory card from your PC, as this may makeitimpossibletousethecardinyourcamera.

BEFORE YOU START
Preface
ThankyouforpurchasingGEdigitalcameras.Please readthismanualcarefullyandkeepitinasafeplacefor future reference.
Copyright
© Copyright 2009 General Imaging Company All rights reserved.
No part of this publication may be reproduced, transmitted, transcribed, stored in a retrieval system, or translated into any language or computer language, in any form, by any means, without the prior written permission of General Imaging Company.
Trademarks
Alltrademarksmentionedinthismanualareusedfor identificationpurposesonlyandmaybepropertiesof their respective owners.
Safety information
Please read the following important information carefully before using the product.
•Donottakeapartorattempttoservicethecamera yourself.
•Donotdroporknockthecamera.Improperhandling may damage the product.
•Turnoffthecamerabeforeinsertingorremovingthe battery and memory card.
•Use only the type of battery and charger that came with your camera. Using other types of batteries or chargers may damage the camera and invalidate the warranty.
•When using Li-ion batteries in this product, ensure that they are inserted correctly. Inserting the batteries upside down can cause damage to the camera andpossiblystartafire.
•Do not touch the camera lens.

•Do not expose the camera to moisture, or extreme temperatures. Extreme environments may shorten the life of your camera or damage the batteries.
•Do not use or store the camera in dusty, dirty, or sandy areas, as its components may be damaged.
•Do not expose the lens to direct sunlight for extended periods.
•Download all pictures and remove the batteries from the camera if you are going to store the camera for long periods.
•Do not use abrasive cleansers, alcohol-based, or solvent-based cleaners to clean the camera. Wipe the camera with a slightly damp soft cloth.
About this manual
This manual provides you with instructions on how touseyourGEdigitalcamera.Everyefforthasbeen made to ensure that the contents of this manual are accurate, but General Imaging Company reserves the righttomakechangeswithoutnotice.
Symbols used in this manual
Throughout this manual, the following symbols are usedtohelpyoulocateinformationquicklyandeasily.
 Indicatestheusefulinformationtoknow.
Indicatestheprecautionstobetakenwhile operating the camera.

CONTENTS
WARNING |
|
SAFETY PRECAUTIONS |
|
BEFORE YOU START.............................................. |
1 |
Preface.............................................................................. |
1 |
Copyright................................................................... |
1 |
Trademarks............................................................... |
1 |
Safety information.......................................................... |
1 |
About this manual.......................................................... |
2 |
Symbols used in this manual................................ |
2 |
CONTENTS............................................................. |
3 |
GETTING READY.................................................... |
7 |
Unpacking......................................................................... |
7 |
Camera Views : A Series................................................. |
8 |
: E Series.............................................. |
10 |
Charging the battery................................................... |
12 |
Inserting the battery................................................... |
13 |
Inserting an optional SD/SDHC card....................... |
16 |
Turningonandoff........................................................ |
17 |
Using the Mode Dial.................................................... |
18 |
Setting date/time and language.............................. |
19 |
Setting the Date and Time.................................. |
19 |
Setting the Language.......................................... |
20 |
About the LCD screen.................................................. |
21 |
BASIC OPERATION.............................................. |
22 |
Shooting in Auto mode............................................... |
22 |
Usingthezoomfunction............................................ |
22 |
Usingtheflash.............................................................. |
23 |
Using the self-timer/Multiple shots......................... |
23 |
Using Macro mode....................................................... |
24 |
Exposure compensation............................................. |
24 |
Advanced function menu (quickmenusetup)....... |
25 |
WB (White Balance)............................................. |
25 |
ISO............................................................................ |
26 |

Quality.................................................................... |
27 |
Size........................................................................... |
28 |
Color........................................................................ |
29 |
USING THE MODES............................................. |
32 |
LCD Screen display...................................................... |
32 |
Still shooting mode display................................ |
32 |
Video shooting mode display............................. |
34 |
Playbackmodedisplay....................................... |
35 |
Auto Scene mode (ASCN)............................................ |
36 |
Landscape Mode................................................... |
37 |
Portrait mode........................................................ |
37 |
Night Portrait........................................................ |
37 |
BacklitPortrait...................................................... |
37 |
Night Landscape Mode....................................... |
37 |
Macro Mode........................................................... |
37 |
Auto Mode.............................................................. |
37 |
Scene mode (SCN)........................................................ |
38 |
Sport........................................................................ |
38 |
Children.................................................................. |
38 |
Indoor...................................................................... |
38 |
Leaf.......................................................................... |
38 |
Snow........................................................................ |
38 |
Sunset..................................................................... |
39 |
Fireworks................................................................ |
39 |
Glass........................................................................ |
39 |
Museum.................................................................. |
39 |
Landscape.............................................................. |
39 |
Night landscape.................................................... |
39 |
Night portrait........................................................ |
39 |
Return to the scene mode palette.................... |
40 |
Pan-Capture Panorama............................................. |
40 |
ImageStabilizationmode.......................................... |
42 |
Face Detection.............................................................. |
44 |
Smile Detection............................................................ |
45 |
BlinkDetection............................................................. |
46 |

PLAYBACK............................................................ |
47 |
Viewing photos and videos........................................ |
47 |
Editing video.......................................................... |
49 |
Thumbnail view............................................................ |
50 |
Usingzoomplayback(forstillpicturesonly)......... |
51 |
Using the Delete button............................................. |
52 |
USING THE MENUS............................................. |
53 |
Still menu....................................................................... |
53 |
AF mode (Auto-Focus mode).............................. |
54 |
AF-assist beam..................................................... |
54 |
Expo Metering (Exposure Metering)................. |
54 |
Cont.Shot (Continuous shot).............................. |
55 |
Grid.......................................................................... |
55 |
QuickReview......................................................... |
56 |
Digital Zoom.......................................................... |
56 |
Histogram.............................................................. |
57 |
Slow Shutter.......................................................... |
57 |
BlinkDetection...................................................... |
58 |
Date Imprint.......................................................... |
58 |
Movie menu................................................................... |
59 |
Expo Metering (Exposure Metering)................. |
60 |
Playbackmenu............................................................. |
61 |
Protect.................................................................... |
61 |
Delete...................................................................... |
62 |
DPOF (Digital Print Order Format).................... |
63 |
Info. Box (Information Box)................................. |
64 |
Trim......................................................................... |
64 |
Resize...................................................................... |
65 |
Rotate..................................................................... |
65 |
Slide show.............................................................. |
66 |
Red-eye removal................................................... |
67 |
Setup menu................................................................... |
68 |
Format Memory.................................................... |
68 |

Beep......................................................................... |
69 |
LCD Brightness...................................................... |
69 |
Power Saver........................................................... |
70 |
Date/Time.............................................................. |
71 |
World time............................................................. |
71 |
File Numbering..................................................... |
71 |
Language............................................................... |
72 |
Video system......................................................... |
72 |
Copy to Card (Copy internal |
|
memory to memory card)................................... |
73 |
Reset Settings....................................................... |
73 |
FW Ver. (Firmware version)................................ |
74 |
CONNECTIONS.................................................... |
75 |
Connecting to a TV....................................................... |
75 |
Connecting to a PC...................................................... |
76 |
Setting the USB mode.......................................... |
76 |
TransferringfilestoyourPC.............................. |
76 |
Connecting to a PictBridge compatible printer.... |
79 |
Setting the USB mode.......................................... |
79 |
Connecting the camera and priter................... |
80 |
Using the PictBridge menu........................................ |
81 |
Print with date...................................................... |
81 |
Print without date................................................ |
82 |
Print index.............................................................. |
83 |
Print DPOF.............................................................. |
84 |
Exit........................................................................... |
84 |
APPENDICES........................................................ |
85 |
Specifications: |
|
A950/A1050/WM1050/A1250................... |
85 |
A1035/A1235................................................ |
90 |
E1255W......................................................... |
94 |
Error messages............................................................. |
98 |
Troubleshooting......................................................... |
100 |
GETTING READY
Unpacking
Yourpackageshouldcontainthecameramodelyoupurchasedalongwiththefollowingitems. Ifanythingismissing or appears to be damaged, please contact your vendor. The accessories will vary based on model purchased and are noted below.
User |
Man |
|
|
|
ual |
Rechargeable |
AA-sizealkaline |
User Manual |
Quickstartguide |
Wrist strap |
Lithium-ion battery |
batteries X2 (A |
|
|
|
(except A Series) |
Series only) |
|
|
|
USB cable |
AV cable |
Battery charger |
|
Warranty card |
|
CD-ROM |
|
||||
|
|
(except A Series) |
|
|
|
|
|
|
|
|
|
|
|
|
|
|
|
|
|
|
|
|
|

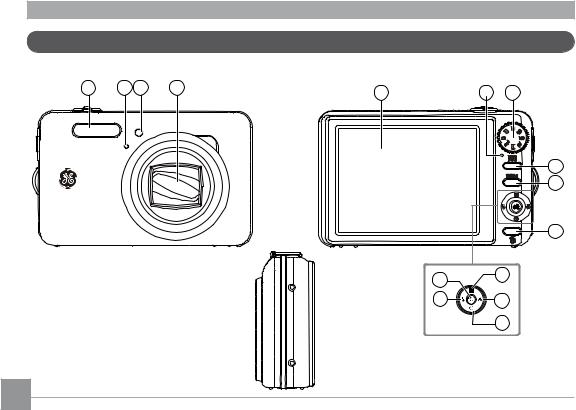
Camera views : A Series
Front View |
1 |
2 |
3 |
Back View |
|
|
4 |
Right View |

 17
17
5 |
6 |
7 |
|
8 |
|
9 |
|
10 |
15 |
11 |
|
|
14 |
12 |
|
13 |
|
|
|
|
|
|
|
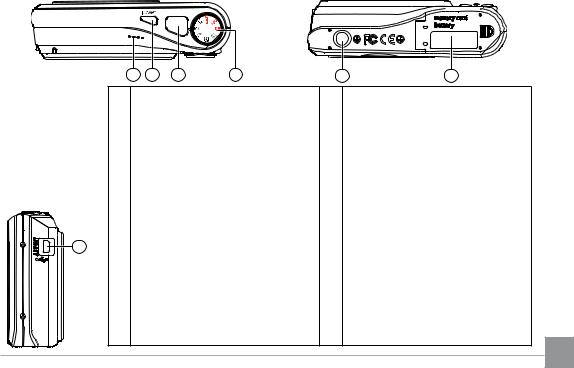
Top View |
Bottom View |
|||||
|
|
|
|
|
|
|
|
|
|
|
|
|
|
|
|
|
|
|
|
|
|
|
18 |
19 |
20 |
21 |
22 |
23 |
|
1 |
AF assist beam / Timer indicator |
13 |
Self-timer / Down button |
|||
|
2 |
Flash |
|
|
14 |
Flash mode / Left button |
|
|
3 |
Lens |
|
|
15 |
Func/okbutton |
|
|
4 |
Mic |
|
|
16 |
USB/ AV port |
|
Left View |
5 |
Status LED |
|
17 |
Wrist strap mount |
||
6 |
LCD screen |
|
18 |
Speaker |
|||
|
|
||||||
|
7 |
Zoom scroll wheel |
|
19 |
Power button |
||
16 |
8 |
Face detection AF button |
20 |
Shutter button |
|||
|
9 |
Menu button |
|
21 |
Mode dial |
||
|
10 |
Erase button |
|
22 |
Tripod mount point |
||
|
11 |
Exposure compensation / Up button |
23 |
Memory card / Battery compartment |
|||
|
12 |
Macro mode/ Right button |
|
|
|||
Camera views : E Series
Front View |
Back View |
1 |
2 |
3 |
4 |
5 |
6 |
7 |
|
|
|
|
8
9
Right |
10 |
|
View |
||
|
||
15 |
11 |
|
|
||
14 |
12 |
|
|
13 |
10
|
|
|
|
|
|
|
|
|
|
|
|
|
|
|
|
|
|
|
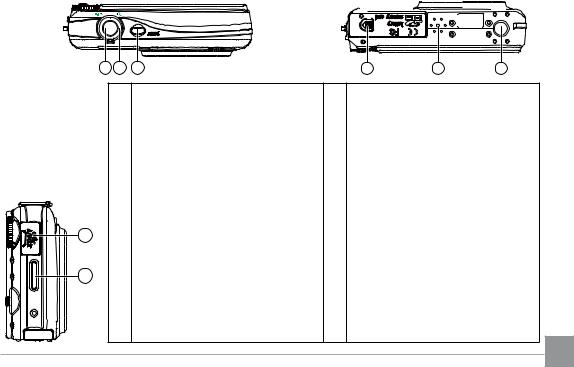
Top View |
Bottom View |
|||||||||||||||||
|
|
|
|
|
|
|
|
|
|
|
|
|
|
|
|
|
|
|
|
|
|
|
|
|
|
|
|
|
|
|
|
|
|
|
|
|
|
|
|
|
|
|
|
|
|
|
|
|
|
|
|
|
|
|
|
|
|
|
|
|
|
|
|
|
|
|
|
|
|
|
|
|
|
|
|
|
|
|
|
|
|
|
|
|
|
|
|
|
|
|
|
|
|
|
16 |
17 |
18 |
|
19 |
20 |
21 |
|
1 |
Flash |
13 |
Self-timer / Down button |
|
|
|
2 |
Mic |
14 |
Flash mode / Left button |
|
|
|
3 |
AF assist beam / Timer indicator |
15 |
Func/okbutton |
|
|
|
4 |
Lens |
16 |
Shutter button |
|
|
Left View |
5 |
LCD screen |
17 |
Zoom scroll wheel |
|
|
|
|
|
|
|
|
|
|
6 |
Status LED |
18 |
Power button |
|
|
22 |
7 |
Mode dial |
19 |
Memory card / Battery compartment |
||
8 |
Face detection AF button |
20 |
Speaker |
|
|
|
|
|
|
||||
23 |
9 |
Menu button |
21 |
Tripod mount point |
|
|
10 |
Erase button |
22 |
USB / AV port |
|
|
|
|
|
|
||||
|
11 |
Exposure compensation / Up button |
23 |
Wrist strap mount |
|
|
|
12 Macro mode / Right button |
|
|
|
|
|
11 |
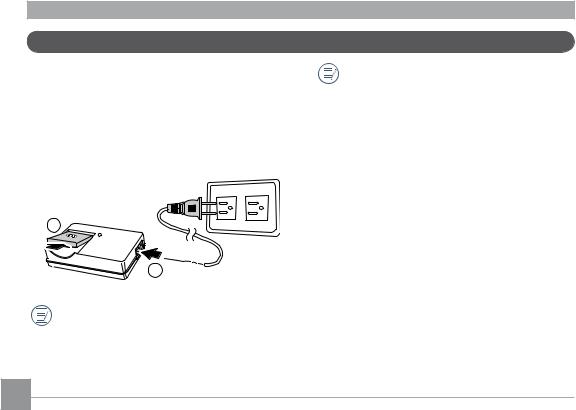
Charging the battery (except A Series)
1.Place the battery into the charger as shown.
2.Plug one end of the connecting cable into the charger base.
3.Plug the other end of the connecting cable into a wall outlet.
1
2 
Leave the battery to charge until the charger light goes green.
(Tomaximizebatterylife,thefirstchargeshould be at least 4 hours)
Throughout the rest of the manual, the following illustrations show the A1050 model as an example. The A950, A1250, A1035, A1235, WM1050, E1255W models operate similarly.)
12
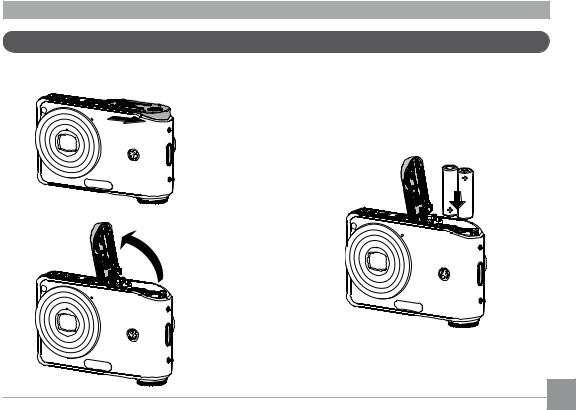
Inserting the battery
1. Open the battery compartment.
2.Insert the battery while observing the correct polarity. Use the side of battery to press down the stopper as shown, allowing the battery to be inserted properly.
- |
+ |
|
|
+ |
- |
|
13
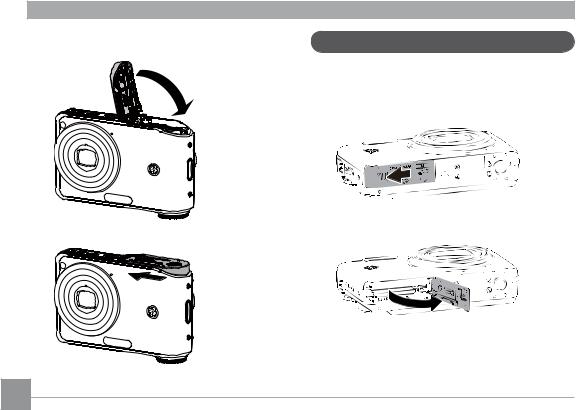
3. Close the battery compartment.
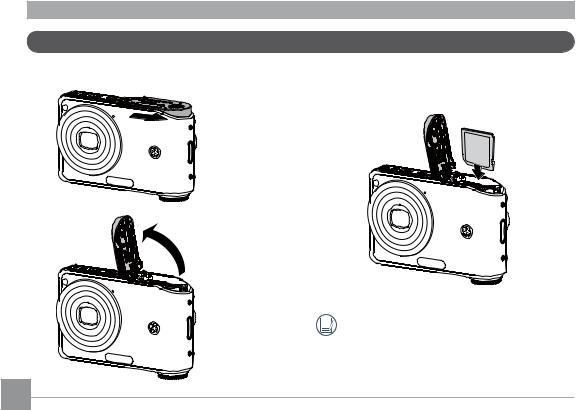
Inserting the battery (E Series)
1. Open the battery compartment.
14
2.Insert the battery while observing the correct polarity. Use the side of battery to press down the stopper as shown, allowing the battery to be inserted properly.
3. Close the battery compartment.
 Battery capacity decreases with usage.
15
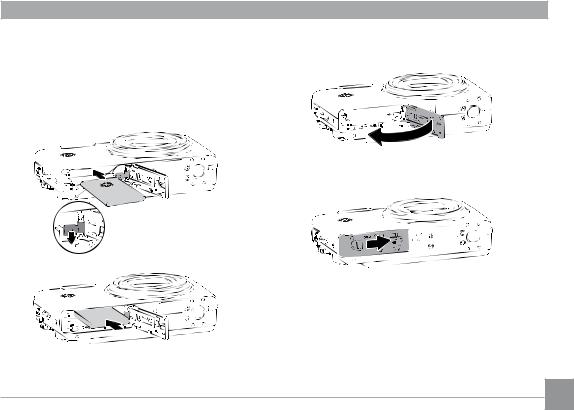
Inserting an optional SD/SDHC card
1. Open the battery compartment.
2.Insert an optional SD/SDHC card into the memory card slot as shown.
 Optional SD/SDHC cards are not included. The use of64MBto8GBmemorycardsfromrecognized manufacturerssuchasSanDisk,Panasonicand
Toshiba is recommended for reliable data storage.
16
3. Close the battery compartment.
To remove the SD/SDHC card, open the battery compartment and gently push the card to release it. Pull the card carefully.
Turningonandoff
Press the Power button to turn the camera on. To turn offthecamera,pressthePower button again.
Power Button
When turned on, the camera will enter the mode according to the mode dial setting. You can also turn the mode dial to change the modes after the camera is turned on.
17

Using the Mode Dial
TheGEcameraprovidesaconvenientmodedialthatallowsyoutoswitchbetweendifferentmodeswithease.Allthe available modes are listed as follows.
Mode Name |
Icon |
Description |
Auto |
|
Switchtotakestillpictures.(Thecamerausesthedefaultprogrammedautomatic |
|
settings.) |
|
|
|
|
|
|
|
Playback |
|
Switch to view the pictures/videos stored in the memory card and internal memory. |
|
|
|
Movie |
|
Switch to record videos. |
|
|
|
ImageStabiliza- |
|
SwitchtouseImageStabilizationwhentakingstillpictures. |
tion |
|
|
|
|
|
|
|
|
Scene |
|
Switchtouseapresetscenemodefortakingstillpictures.Thereare12scenesintotal. |
|
|
|
Auto Scene |
|
Inthe"ASCN"mode,differentconditionsaredetectedintelligentlyandthemostsuit- |
|
able settings will be automatically selected. |
|
|
|
|
Panorama |
|
Switch to capture a sequence of shots and stitch them together into a panoramic |
|
photo. |
|
|
|
|
Manual |
|
Switchtotakestillpicturesinmanualmode,wheremanycamerasettingscanbe |
|
configured.(Recommendedforadvancedusersonly) |
|
|
|
18
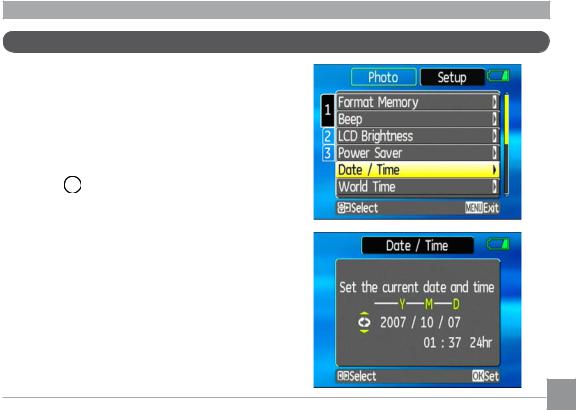
Setting date/time and language
To set the language, date, and time, the following settingsneedtobeconfiguredintheSetup menu.
•Date / Time
•Display language
To access the Setup menu, do the following:
1.Press Power to turn the camera on.
2.Press the  button and use Up/Down/Left/Right to select the Setup menu.
Setting the Date and Time
1.Use the Up/Down to select Date/Time. Then press the Right to enter the setting.
19
2.Press the Left/Right tohighlighteachfieldanduse the Up/Down to adjust the value.
3.Press the buttontoconfirmthesetting.
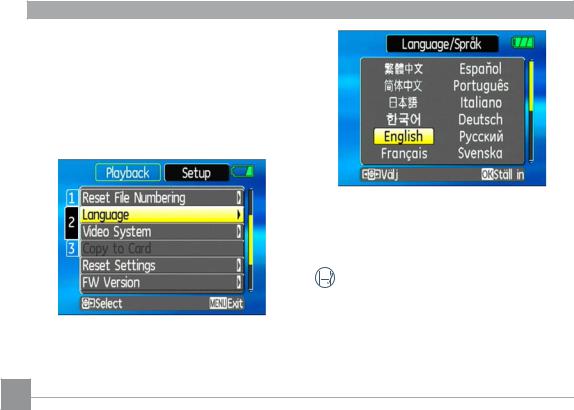
Setting the Language
1.Use the Up/Down to select Language. Then press the Right to enter the setting.
2. Use the navigation buttons to select the desired language.
3. Press the buttontoconfirmthesetting.
 The Set date/time and language screen will
  automatically appear when the camera is turned onthefirsttime.
20

About the LCD screen
When you turn the camera on, various icons are shown on the LCD screen to indicate the current camera settings and status. To learn more about the displayed icons, see “LCD Screen display” on page 32.
LCD Screen notes:
Extremely high-precision technology had been used to manufacture the LCD screen so that most of the pixels are operational for use. However, there may be some minutepoints(black,white,red,blueorgreen)that constantly appear on the LCD screen. These points are normal in the manufacturing process and the recording isnotaffectedinanyway.
IftheLCDmonitorisdamaged,takeparticular care with the liquid crystal in the monitor. If any ofthefollowingsituationsarise,taketheurgent action indicated.
•Ifliquidcrystalcomesincontactwithyourskin,wipe the area with a cloth and then wash thoroughly with soap and running water.
•Ifliquidcrystalgetsintoyoureye,flushtheaffected eye with clean water for at least 15 minutes and thenseekmedicalassistance.
•Ifliquidcrystalisswallowed,flushyourmouth thoroughlywithwater.Drinklargequantitiesof waterandinducevomiting.Thenseekmedical assistance.
21

BASIC OPERATION
Shooting in Auto mode
Auto modeistheeasiestmodetotakephotos.While operating in this mode, the camera automatically optimizesyourphotosforbestresults.
To start shooting, do the following:
1.Set the mode dial to Auto mode ( ).
).
2.Press Power to turn the camera on.
3.Compose your picture on the LCD screen and press the shutter button halfway to focus on the subject.
4.When the subject is in focus, the green colored focus frame appears on the center of the LCD screen.
5.Press Shutter fully to capture the image.
22
Usingthezoomfunction
Yourcameraisequippedwithtwotypesofzoom:opticalzoomanddigitalzoom.PresstheZoom button on eithertheWideorTelepositionofthecameratozoom inoroutonyoursubjectwhiletakingpictures.
Zoom button
 Zoom indicator (See “Digital Zoom“ on page 56)
Whentheopticalzoomfactorreachesitsmaximum value, it stops momentarily. Keep pressing down the Tele position (  )andthezoomwillswitchoverto digitalzoomautomatically.
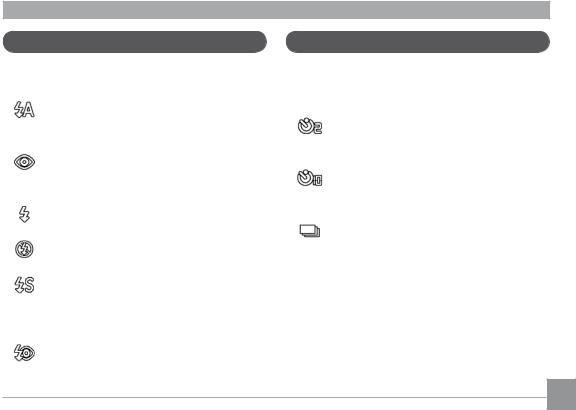
Usingtheflash
Therearesixflashmodes.PresstheLeft/Flash to cyclethroughthefollowingflashmodes.
• |
Autoflash |
|
Cameraflashfiresautomaticallybasedon |
|
existing light conditions. |
• |
Red-eyereductionflash |
|
Thecamerafiresabriefflashbeforethepic- |
|
tureistakentoreducered-eyeeffects. |
• |
Forcedflash |
|
Flashalwaysfires. |
• |
Flashoff |
|
Flashisturnedoff. |
• |
Slow Synchro |
|
Thisallowsyoutotakepicturesofpeopleat |
|
night that clearly show both your subjects and |
|
thenighttimebackdrop. |
• |
Red-Eye Reduction+Slow Synchro |
|
Use this mode for slow synchro shots with |
|
red-eye reduction. |
Using the self-timer/Multiple shots
To enable the self-timer function, press the Down/ Self-timer to select 2-second timer delay, 10-second timer delay, or a continuous shot.
• |
2-second timer delay |
|
A single picture is shot 2 seconds after the |
|
shutter button is pressed. |
• |
10-second timer delay |
|
A single picture is shot 10 seconds after the |
|
shutter button is pressed. |
•Continuous shot
Pictures are shot continuously when the shutter button is pressed based on the Continuous Shot settings in the menu. (See “Continuous Shot” on page 55).
23

Using Macro mode
In Macro mode, you can capture tiny details of the subject at a very close range. Press the Right/Macro totakeclose-upshots.
•  Macro
Macro
Select this to focus on subjects 5cm from the lens.
Exposure compensation
The exposure compensation allows you to adjust the backgroundbrightnesstoproducethebestresultof photos. To change the exposure values, do the following:
1.Whentakingapicture,presstheUp/Exposurebutton to activate the set exposure screen.
2.Use the Left/Right to adjust the exposure value for the picture. The range is from EV -2.0 to EV+2.0 (steps of 0.3).
24
Advancedfunctionmenu(quickmenusetup)
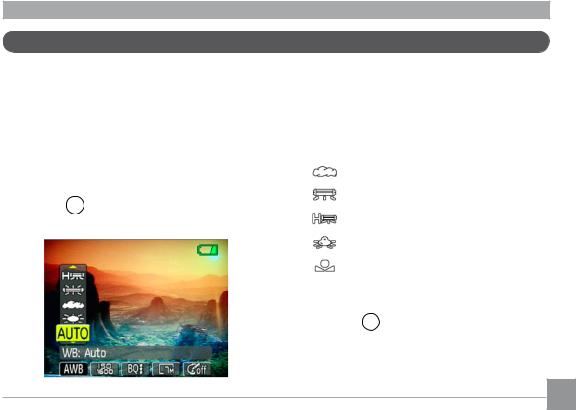
WB (White Balance)
The white balance allows the user to adjust the color temperatureunderdifferentlightsourcetoensurefaithful color reproduction.
(The WB setting is only available when the camera is in the Manual mode).
To set the white balance, do the following:
1.Press the  button to enter the Function menu. MakesuretheWB function is selected.
2.Use Up/Down navigation buttons to select the setting you want. The following options are available:
•  Auto
Auto
•  Daylight
• |
Cloudy |
• |
Fluorescent |
• |
Fluorescent CWF |
• |
Incandescent |
• |
Manual WB adjustment (press the menu |
|
button to set) |
3.Use the Left/Right buttons to select other options,
or press the  buttononcetoconfirmyour selection and exit the current menu.
25

ISO
The ISO function allows you to set the camera sensor sensitivity to light. To improve the performance in darkerenvironments,ahigherISOvalueisrequired.
On the other hand, a lower ISO value is needed when in bright conditions.
(The ISO setting is only available when the camera is in the  Manual mode).
To set the ISO value, do the following:
1.Press the  button to enter the Function menu.
2.Use the Left/Right navigation buttons to highlight the ISO function.
Higher ISO pictures will naturally have more noise than lower ISO pictures.
3.Use the Up/Down navigation buttons to select the desired ISO value from Auto, 64, 80,100, 200, 400, 800, or 1600.
4.Press the  buttontoconfirmyoursetting.
5.Use the Left/Right buttons to select other options,
or press the  buttononcetoconfirmyourselection and exit the current menu.
26
 Loading...