


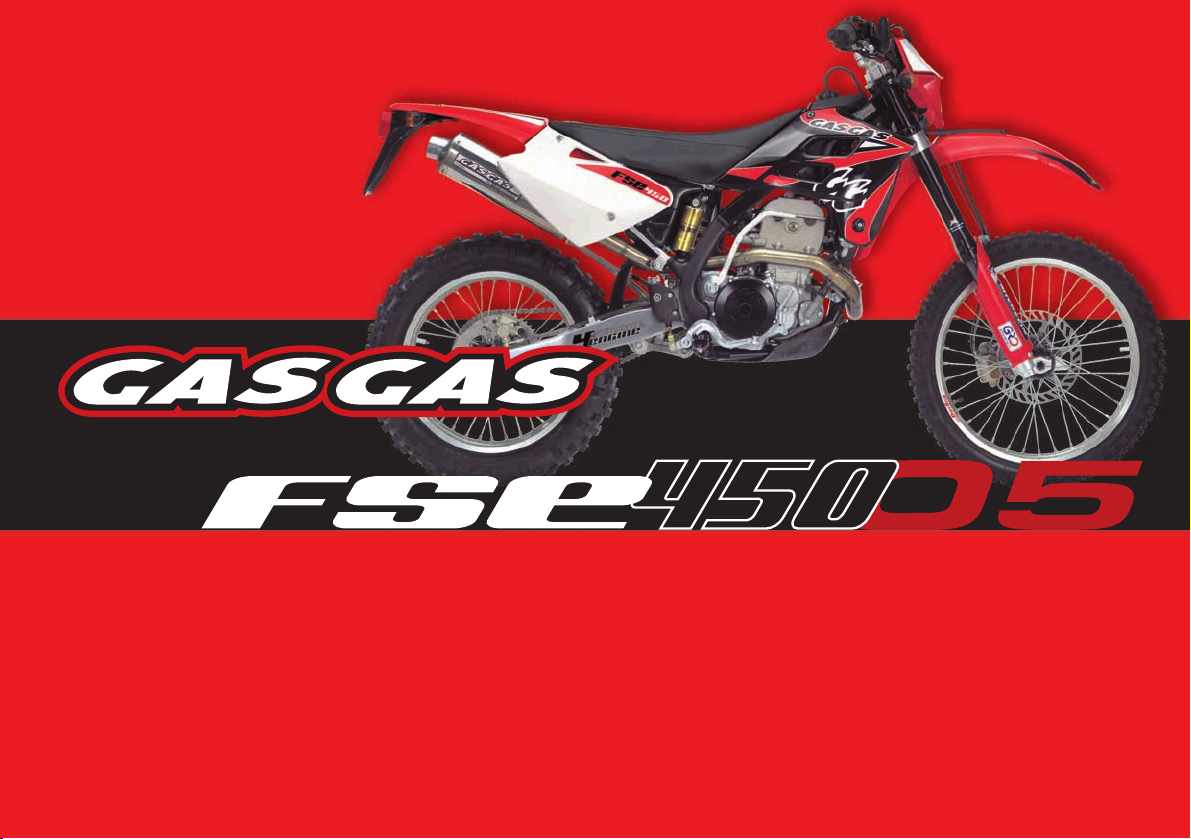
FSE 450 2005
MANUAL DEL USUARIO
MANUAL DEL USUARIO
SERVICE MANUAL
SERVICE MANUAL
MANUEL D’ENTRETIEN
MANUEL D’ENTRETIEN
LIBRETTO D´USO
LIBRETTO D´USO


USER MANUAL
USER MANUAL
ENGLISH

Foreword
GAS GAS thanks you for your confidence.
By choosing the new GAS GAS FSE / FSE SM 2005 you have just entered the great GAS GAS family and,
as a user of the number one off-road motorbike manufacturer, you deserve the distinguished treatment that
we wish to offer to you both in our after-sale relationship and in the explanations that we provide in this manual.
Our FSE / FSE SM 2005 is a bike conceived for highly competitive performance. In fact this bike is the fruit
of many years of competition and experimentation in these demanding disciplines; many great trial riders have
contributed their expertise and achievements to the essential da
exclusive motorcycles incorporating key features such as reliability, high performance and stability.
Congratulations for making, without a doubt, the right choice. With skill at the controls of this motorbike, an
adequate preparation and the corresponding essential servicing this GAS GAS will remain highly reliable and
you will be able to enjoy the most comfortable and rewarding motor sport.
Thank you for your confidence and welcome to GAS GAS motos SA.
ta we have used to create these high-quality,
-3-
IMPORTANT NOTICE
Read this manual carefully. This manual covers aspects that will
contribute to your security and to that of others, as well as guaranteeing
a correct conservation and maintenance of this GAS GAS motorcycle
you have just acquired.
All of the instructions to correctly handle and drive this motorcycle
are described in detail. Each message will be preceded by a symbol.
WARNING
This warning symbol identifies special instructions or procedures
that, if not correctly followed, could result in personal injury, or even
death.
CAUTION
Inadequate driving skill could cause problems to the environment
and conflict with other people. Responsible use of your motorcycle
will ensure that these problems and conflicts do not occur
TO PROTECT THE FUTURE OF YOUR SPORT, MAKE SURE
YOU USE YOUR BIKE LEGALLY, WITH CONCERN FOR THE
ENVIRONMENT, AND RESPECT THE RIGHTS OF OTHER
PEOPLE.
Motorcycle riding is a fantastic sport, and we hope you will enjoy it
to the fullest.
.
This caution symbol identifies special instructions or procedures
that, if not strictly observed, could result in damage to or destruction
of equipment.
NOTE
This symbol indicates points of particular interest for more
efficient and convenient operation.
OIL RECOMMENDED:
-4-
TABLE OF CONTENTS
Foreword.........................................................................................3
Important notice..............................................................................4
Table of contents ............................................................................5
General information ........................................................................6
Component locations......................................................................8
Side stand.....................................................................................10
Petrol ....................................................................10
Serial number and the qualification approval plate.......................11
Starting and stopping the engine .....................................12
Cold starting ............................................................13
Gear changes...........................................................13
Stopping the motorcycle...............................................14
Break-in .................................................................14
Maintenance chart .....................................................15
Battery...................................................................16
Cooling system .........................................................17
Spark plug.....................................................................................20
Air filter ..................................................................23
Accelerator cable.......................................................24
Clutch....................................................................25
Exhaust system ........................................................25
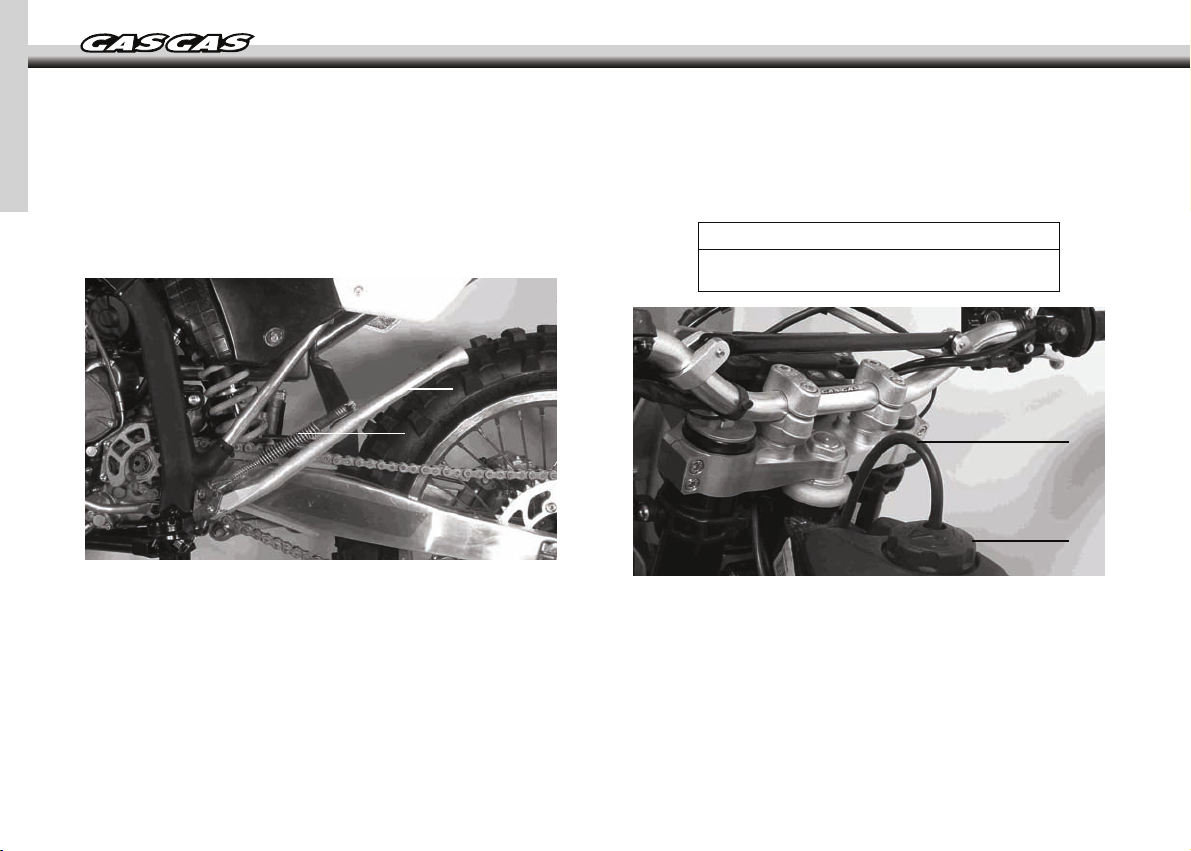
Chain guide .............................................................26
Tension adjustment ....................................................27
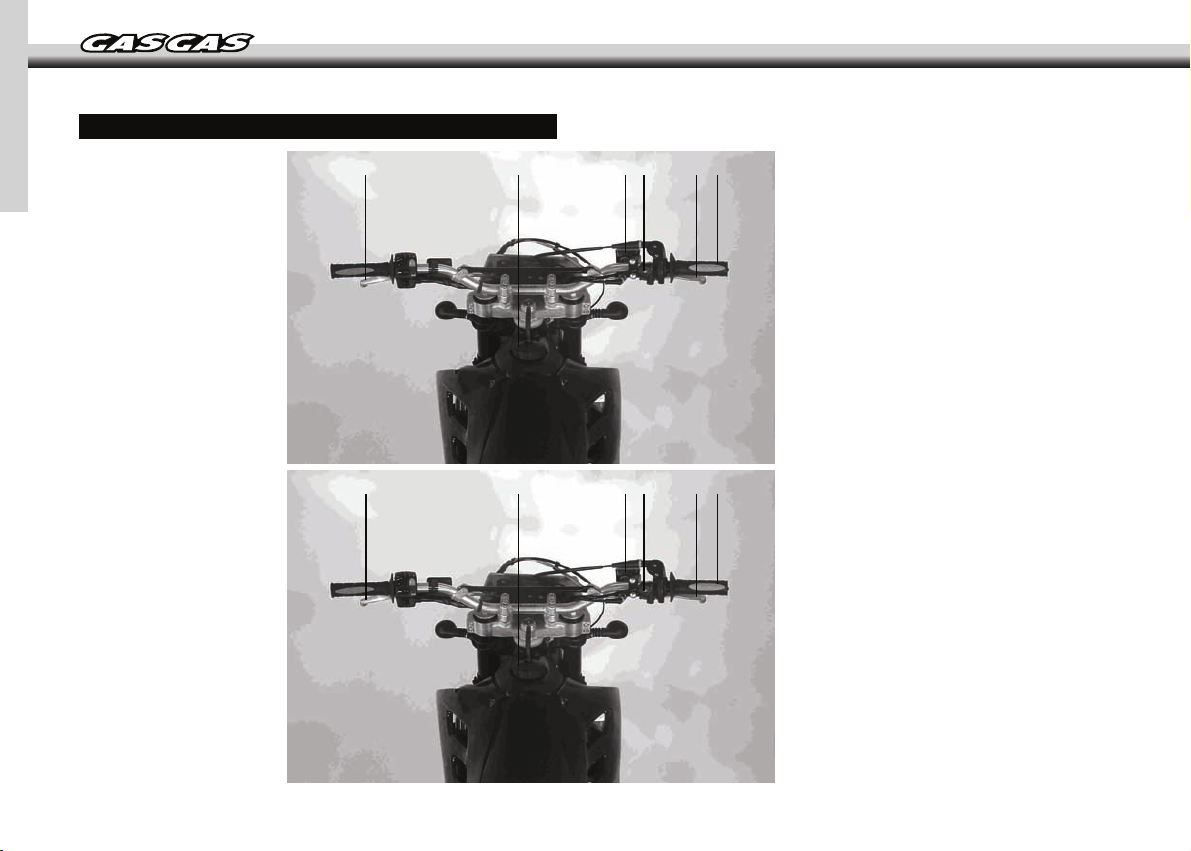
Handle bars.............................................................29
Brakes ...................................................................29
Steering .................................................................31
Steering lock............................................................32
Front forks...............................................................33
Rear suspension .......................................................36
Wheels ..................................................................38
Cleaning.................................................................39
Tighten bolts and nuts .................................................40
Tightening torque table ................................................41
Lubrication ..............................................................42
Engine oil................................................................43
Suspension adjustment................................................47
In competition...........................................................52
Storage ..................................................................53
Multi-function instructions ............................................53
Fault diagnosis .........................................................55
Electrical schemas .....................................................61
Guarantee manual .....................................................63
-5-
GENERAL INFORMATION
ENGINE
Engine 4 stroke, single-cylinder DOHC 4 valves, liquid cooled
Displacement in cubic centimetres 443 cc
Bore and stroke 95 x 62.6 mm.
Spark plug NGK CR8E or DENSO U24ESR-N
Fuel supply Magneti Marelli electronic injection
TRANSMISSION
Transmission type 6 speed
Clutch type Oil bath, multi-disk hydraulic action
Secondary transmission By chain
Gear ratio 1st 2.071(29/14)
2nd 1.625(26/16)
3rd 1.333(24/18)
4th 1.100(22/20)
5th 0.913(21/23)
6th 0.791(19/24)
Primary reduction ratio 2.85(57/20)
Final reduction ratio 3.692 (48/13)
Overall drive ratio 8.149(6th gear)
Transmission oil Capacity 1200 cc
Type 5W40 API SF or SG
CHASSIS
Type DELTABOX, semi double cradle chassis made from rectangular Cromoly tubes.
Aluminium rocker
Tyre sizes Front FSE - 90/90 x 21
FSE SM - 120/60 ZR17
Rear FSE - 140/80 x 18
FSE SM - 150/60 ZR17
-6-

Suspension Front Öhlins ø 48mm inverted fork.
Marzocchi ø 45mm inverted fork.
Rear Progressive system with single multi-adjustment ÖHLINS shock absorber.
Suspension stroke Front 295 mm.
Rear 320 mm.
Front suspension oil MARZOCCHI SAE 7.5
ÖHLINS SAE 5 - 7.5
Front fork oil level Marzocchi: 110 mm (compressed, without spring).
ÖHLINS: 110 mm (compressed, without spring).
BRAKES
Type Front / rear Disk brakes, NISSIN pump and simple / double callipers.
Effective disk diameter Front 260 mm
Rear 220 mm
DIMENSIONS
Overall height 1260 mm.
Overall length 2135 mm.
Overall width 810 mm.
Wheel base 1475 mm.
Minimum ground clearance 340 mm.
Fuel tank capacity 9.5 litres
Weight 119 Kg.
(Specifications subject to change without notification, also possibly not applicable in some countries).
-7-
LOCATION OF COMPONENTS
GAS GAS FSE 450
GAS GAS FSE SM 450
1 3 4 2 65
1- Clutch handle
2- Engine start button
3- Fuel tank cap
4- Front brake fluid tank
5- Front brake handle
6- Throttle control
1 3 4 2 65
1- Clutch handle
2- Engine start button
3- Fuel tank cap
4- Front brake fluid tank
5- Front brake handle
6- Throttle control
-8-

7
9
16
1112
18 19
14
23
13
8
10
15 17
7- Front suspension
8- Radiator
9- Fuel tank
10- Air filter
11- Seat
12- Front brake disk
13- Front brake callipers
14- Rear brake fluid tank
15- Shift pedal
-9-
2021 22
16- Rear shock absorber
17- Chain guide
18- Chain
19- Silencer
20- Rear shock absorber gas tank
21- Tie rod and rocker suspension
22- Rear brake pedal
23- Engine oil rod
24- Exhaust bend
24
SIDE STAND
PETROL
To unfold the side stand
(B) then the stand is opened to vertical position.
The stand returns to its original position with the aid of the spring
(B).
(A) the securing strap must be released
(A)
(B)
(A). Side stand.
(B). Spring.
Do not start the engine or ride the motorcycle when the side
stand is down. Always engage the security strap before driving
the motorcycle.
NOTE
The GAS GAS FSE / SM FSE 450 has a four stroke engine and
requires 98 octane, unleaded petrol.
Fuel Tank Capacity
7.2L
(B)
(A)
(A). Fuel cap.
(B). Fuel vent hose.
To open the fuel cap
handle bar and rotate the fuel cap in an anti-clockwise direction.
To close the fuel cap, rotate it in a clockwise direction.
(A), release the fuel vent hose (B) from the
-10-
RECOMMENDED FUEL
SERIAL NUMBER
Use lead-free petrol with an octane rating equal to or higher than
that shown in the table.
OCTANE RATING METHOD OCTANE
RATING
(MIN)
Antiknock Index (RON+MON)/2 90
Research Octane No. (RON) 98
NOTE
If knocking occurs, try a different brand of gasoline or higher octane
grade.
WARNING
Gasoline is extremely flammable and can be explosive under certain
conditions. Always stop the engine and do not smoke. Make sure
the area is well ventilated and free from any source of flame or
sparks; this includes any appliance with a pilot light.
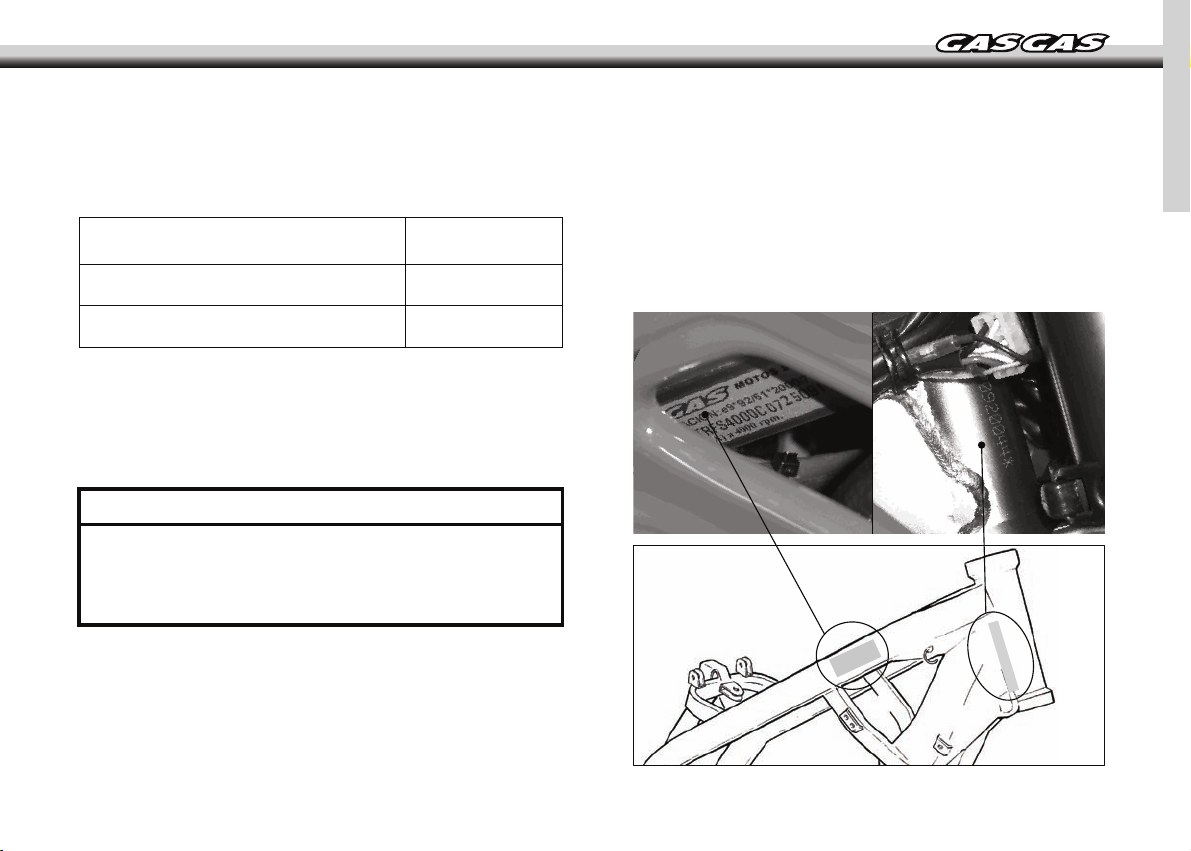
Printed on the steering tube. Indicates the frame number with which
the motorcycle is registered.
Qualification approval plate
The motorcycle is fitted with its own corresponding qualification
approval plate with the serial number, also printed on the steering
tube and whose data also coincides with that in the documents.
-11-
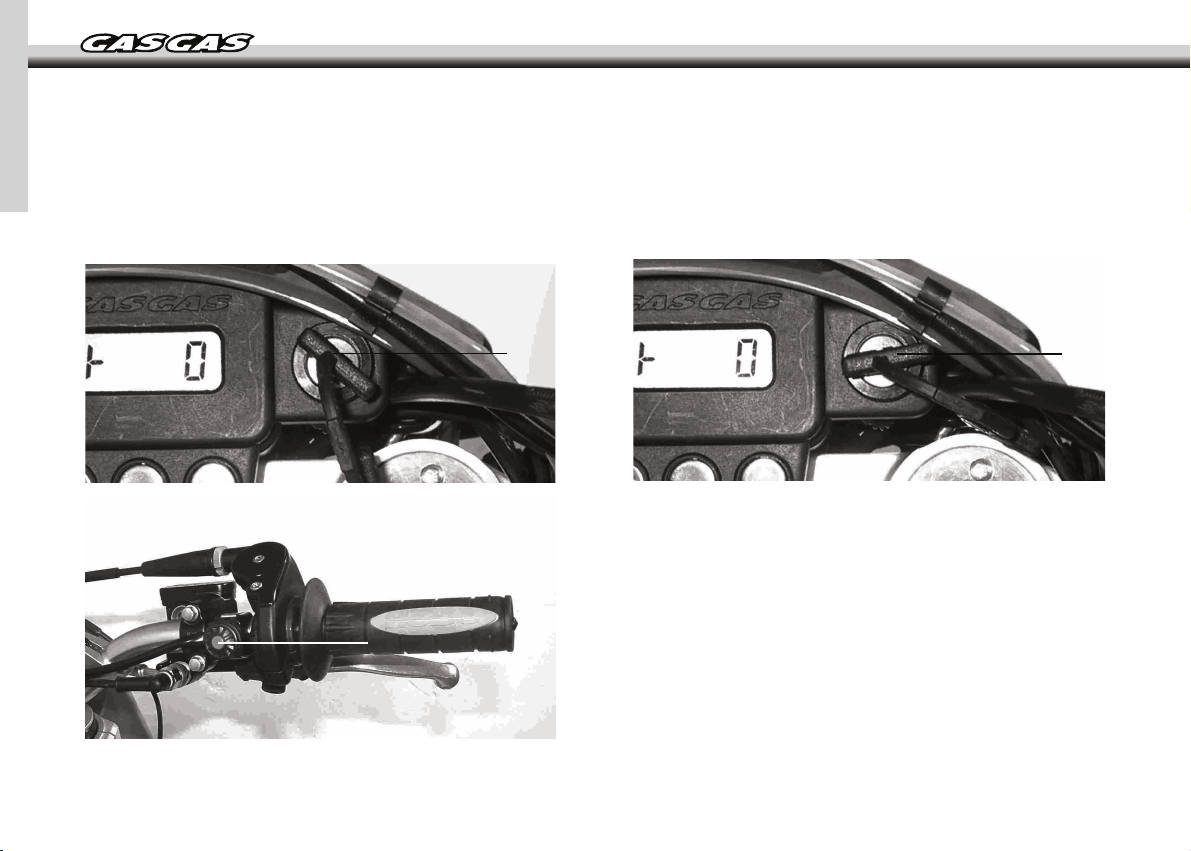
STARTING THE ENGINE
Stopping the engine
- Ensure that the motorcycle is in neutral.
- Rotate the starter key clockwise (ON
electric circuits are active and the engine can start.
(A) position), in this way the
(A)
(B)
- Without using the throttle, press the electric start button (B).
- Change gear to neutral.
- After a slight acceleration, release the throttle completely and rotate
the ignition key anti-clockwise.
(D)
- The key should point left
circuits are inactive. The engine cannot start.
- The key may be extracted from the ignition.
Starting the engine while the key is being turned to the ON
position may cause a loss in battery power.
(D), this means that all of the electric
NOTE
-12-

COLD STARTING
The cold start function is responsible for aiding the engine start if
this is cold.
- There is no need to use the throttle, simply start the engine. Note
that the engine will start after a certain number of revolutions.
After some seconds, the engine will be at normal operation
temperature. The engine will reach its optimal temperature, in low
time and without causing damage.
NOTE
- If the engine is flooded then start with the throttle fully open.
- The motorcycle may be started in gear if the clutch is
disengaged.
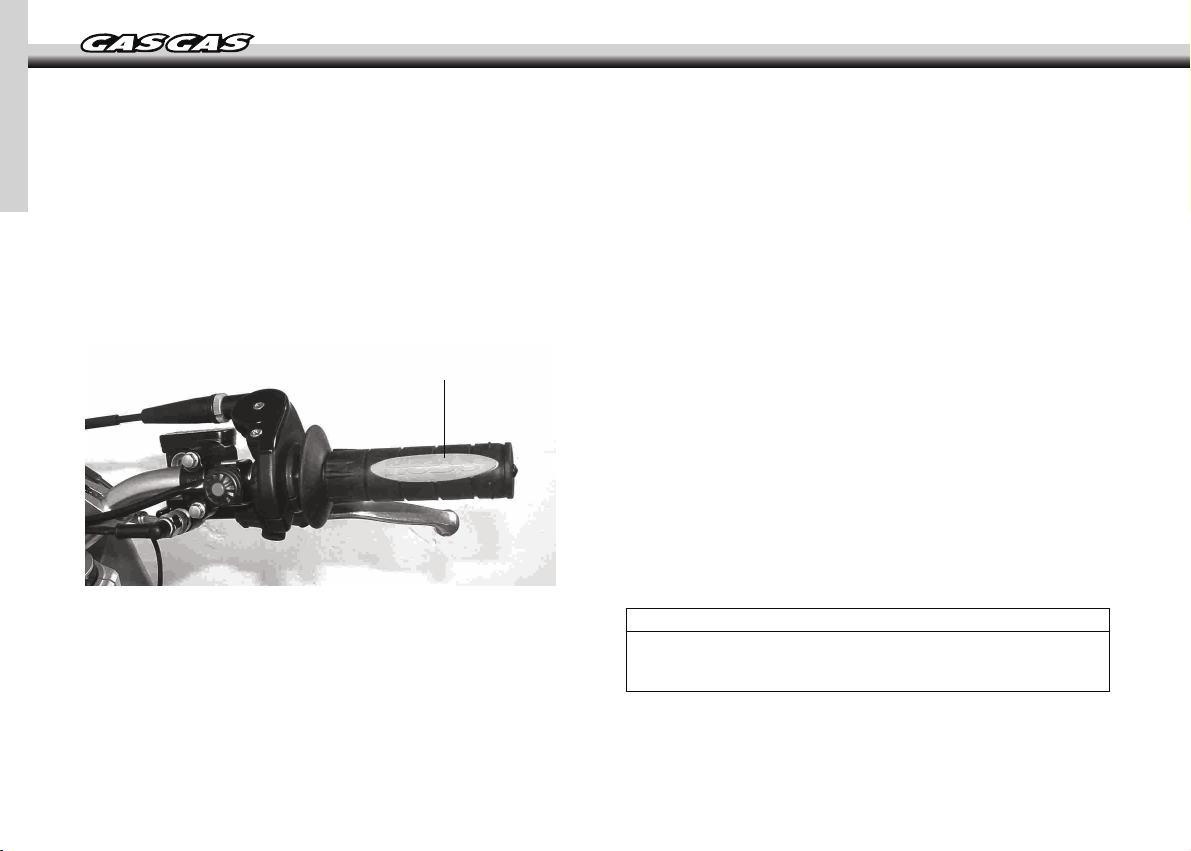
SHIFTING GEARS
The transmission is a 6 speed, return shift type meaning that to go
back to first gear from a higher gear, you must shift back through
the gears one by one.
To engage first gear from neutral, pull in the clutch lever and push
down on the shift pedal then release the pressure on the shift pedal
and gently release the clutch lever.
CAUTION
When changing gears, press firmly on the shift pedal to ensure
complete, positive shifting. Careless, incomplete shifts can cause
the transmission to jump out of gear and lead to engine damage.
(B)
-13-
(B). Shift pedal.
STOPPING THE MOTORCYCLE
For maximum deceleration, close the throttle (A) and apply both
front and rear brakes. Disengage the clutch as the motorcycle comes
to a stop. Independent use of the front or rear brake may be
advantageous under certain conditions.
Downshift progressively as speed is reduced to ensure good engine
response when you want to accelerate.
(A)
BREAK-IN
To obtain the proper operating clearances in the engine and
transmission that are necessary for smooth engine performance and
reliability, an initial break-in must be completed. For the first hour
or 100 Km of operation, run the engine at low rpm.
The slow speed necessary during the break-in period may cause
carbon to build up on the spark plug and soil it. If inspection
of the spark plug shows this to be the case, replace the standard
spark plug with a higher heat grade spark plug for the duration
of the break-in period.
Break-in following these steps:
1. Start the engine and let it run at idle until the engine is thoroughly
warmed up.
2. Stop and let the engine cool completely
3. Start the engine and ride for 10 minutes at
moderate speed. NEVER ACCELERATE FULLY.
4. Stop and let the engine cool completely. Check and
slack and spoke tightness and make a general inspection.
5. Start the engine and ride for 20 minutes at
moderate engine speed. NEVER ACCELERATE FULLY.
6. Stop and let the engine cool completely. Check and adjust (4).
7. Fit the inspected parts.
8. Fill the radiator up completely with cooling liquid. Before
starting the engine bleed the air from the cooling system.
9. Start the engine and ride for 30 minutes at moderate speed.
10. Stop and let the engine cool completely. Check and adjust (4).
11. After the break-in procedure has been properly carried out, the
motorcycle is ready for regular operation.
In any case, even an imprudent acceleration can cause engine
trouble, take special care and use the proper skills and techniques
required for correct driving of the motorcycle.
Following the break-in, fit a new standard spark plug.
NOTE
adjust chain
CAUTION
NOTE
-14-
Article
Air filter
*Exhaust connectors and bolts
*Valve tolerances
Spark plug
Injection pump pipes
Engine oil and filter oil
*Engine oil pipes
Coolant
Radiator hoses
Clutch
Chain
*Brakes
Brake lines
Brake liquid
Tyres
*Steering assembly
*Front forks
*Rear suspension
*Chassis bolts and nuts
MAINTENANCE CHART
Period
First 5 hours
Period
Every 30 hours
Period
Every 60 hours
Inspect each time that the motorcycle has run or when necessary
T
I
I
T
I
I
T
I
R
I
*Revise every 4 years
R
I
-
R
I
I
R
I
I
Revise every 2 years
I
I
I
I
I
I
Clean, lubricate and inspect each time the motorcycle has run
I
I
I
I
I
I
*Revise every 4 years
I
I
I
*Revise every 2 years
Inspect tyres for damage and check the tyre pressure every time the motorcycle has run
I
I
I
T
-
-
-
T
I
I
I
T
NOTE: I = Inspect and clean, adjust, replace or lubricate if necessary; R = Replace, T = Tighten, C = Clean
-15-

BATTERY
This battery is maintenance free and checking the fluid level is not
required. It is advisable to check the charge of the battery periodically
To remove the battery, follow these steps:
(A)
3. Disconnect the terminals ensuring that they do not
enter into contact with metal parts then extract the
battery.
WARNING
Hydrogen gas produced by the battery may explode if exposed to
open flame or sparks.
Keep the area ventilated and free from naked flames.
The operating instructions for the battery are as follows:
1. Check the battery tension in open circuit status (disconnected).
(B)
(C)
1. Remove the screws (A) and remove the seat (B).
2. Release the rubber (C).
2. In case the battery's tension is below 12.60 V, or if the storage
period has exceeded 6 months, the battery has to be recharged
following the instructions in paragraph 3.
If the battery voltage is above 12.60 V, the battery can be
installed on the vehicle without having to recharge it.
3.1. Constant voltage charge mode.
- Constant voltage = 14.40 - 14.70V
- Initial charge current = 0.1 – 0.5 Cn
- Charge duration = 6 hours minimum / 24 hours maximum.
3.2. Constant power charge mode.
- Maximum charge current = 0.1 Cn
-16-
- Recommended charging duration = 5 - 8 hours.
- The product (charge current) X (charge duration) must be within
the range: 0.5 - 0.8 Cn.
Note
In case that a different mode of charging is used to those
established here, never exceed the maximum allowed currents
nor the maximum charge duration of 24 hours.
CAUTION
Not using the standard manner of charging may seriously shorten
the battery life.
Never exceed the standard charge.
Using a high pressure water source could damage the radiator fins
CAUTION
and render it ineffective.
Do not obstruct or deviate the radiator air intake by installing nonapproved accessories. Interfering with the radiator could cause
overheating and result in engine damage.
Coolant
This absorbs excessive heat from the engine and transfers it to the
air at the radiator. If the coolant level becomes low, the engine
overheats and may suffer severe damage. Check the coolant level
each day before riding the motorcycle. Replenish coolant if the level
is low.
Inverting the polarity of the battery terminals may cause battery
CAUTION
charge problems and cause damage to the battery system.
The red terminal is positive (+) and the black terminal is negative
(-).
THE COOLING SYSTEM
Radiator hose
Check the radiator hoses for cracks or deterioration, and connections
for leaks.
Radiator
Check the radiator fins for obstruction by insects or mud. Clean off
any obstructions with a stream of low-pressure water.
WARNING
To avoid burns, do not remove the radiator cap or try to change the
coolant when the engine is still hot.
Wait for it to cool down.
Anti-freeze liquid information
To protect the cooling system aluminium parts (engine and radiator)
from rust and corrosion, the use of corrosion and rust inhibitor
chemicals in the coolant is essential. If coolant containing corrosion
and rust inhibitor chemicals is not used, over a period of time, the
radiator will rust. This will block the cooling hoses.
-17-

Use of incorrect coolant solutions will cause severe engine and
CAUTION
cooling system damage.
Use coolant containing corrosion inhibitors made specifically for
aluminium engines and radiators in accordance with the instructions
of the manufacturer.
WARNING
Coolant chemicals are harmful to the human body. Follow coolant
manufacturer warnings and coolant handing instructions.
Coolant Level
- Situate the motorcycle so that it is perpendicular to the ground.
- Remove the radiator cap in two stages.
wise and wait for a few seconds. Then push and turn it further in the
same direction to remove the cap.
First turn the cap anti-clock
(A)
Soft or distilled water must be used with the inhibitor chemicals and
the antifreeze in the cooling system.
If normal water is used in the system, it the cooling system tubes
may become blocked.
If the lowest ambient temperature encountered falls below the freezing
point of water, protect the cooling system against freezing.
Use a permanent type of anti-freeze (soft water and ethylene glycol
plus corrosion and rust inhibitor chemicals
and radiators) in the cooling system.
For the coolant mixture ratio under extreme conditions, choose the
mixture ratio listed on the container for the lowest ambient temperature.
CAUTION
for aluminium engines
(A). Radiator Cap.
CAUTION
Permanent types of antifreeze on the market have anticorrosion and
anti-rust properties. When diluted excessively these lose their
antifreeze and anticorrosion properties. These must be diluted in
accordance with the instructions of manufacturer.
-18-
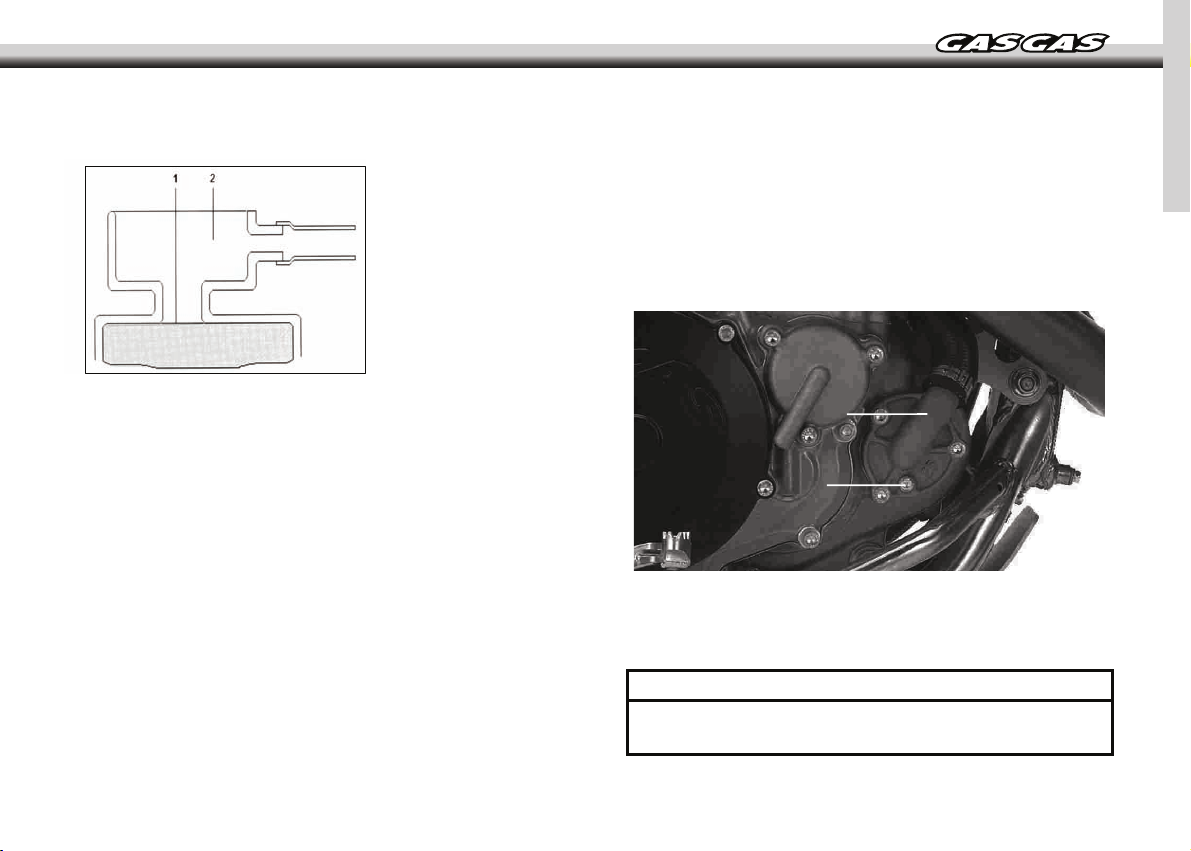
Check the level when the engine is cold.
NOTE
(1). Coolant level.
(2). Filler opening.
Changing the coolant
-
The coolant should be changed periodically to ensure long engine life.
- Wait for the engine to cool completely.
- Situate the motorcycle so that it is perpendicular to the ground.
- Remove the radiator cap.
- Place a container under the coolant drain plug, and drain the coolant
from the radiator and engine by removing the drain plug at the bottom
of the water pump cover. Immediately wipe or wash off any coolant
that spills on the frame, engine, or wheels.
If the coolant level is low, add the correct amount of coolant through
the filler opening.
Recommended liquid
Permanent type of antifreeze (distilled water and ethylene glycol)
with corrosion and rust inhibitor chemicals for aluminium engines
and radiators).
NOTE
Initially a permanent type of antifreeze is installed in the cooling
system by the manufacturer. This is green in colour, containing
50 % ethylene glycol with a freezing point of –35°C.
Total quantity
Mix antifreeze and distilled water 1:1 (distilled water 50%, antifreeze
50%).
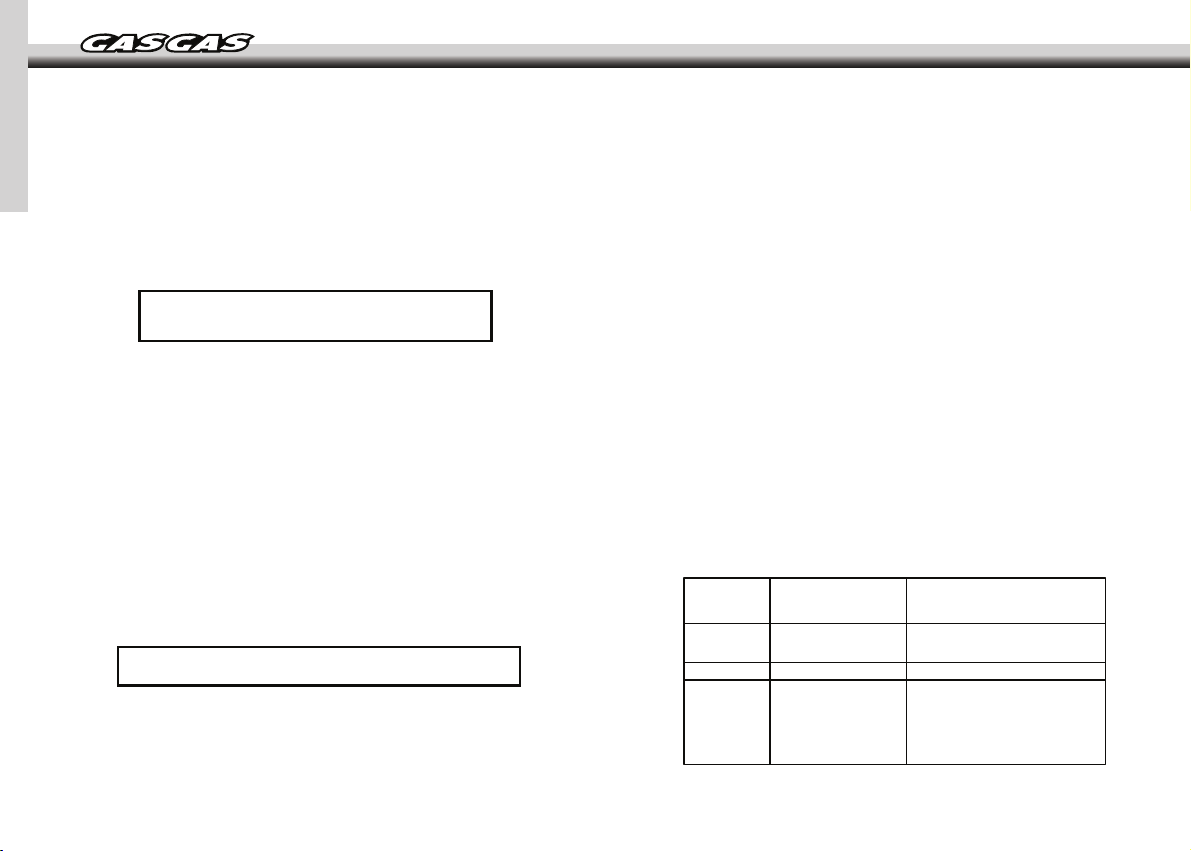
(A)
(B)
(A). Water pump cover.
(B). Coolant drain Plug.
WARNING
If coolant gets on the tyres this will make them slippery and could
result in an accident.
-19-
-Inspection of the coolant. If white cotton-like patches appear in the
liquid then this means that the aluminium elements of the cooling
system are corroded. If the liquid is brown then this means that the
steal or iron parts of the system are oxidized. In either case clean
out the system.
- Check the cooling system for damage, loose joints, or leaks.
- Install the water pump cover drain plug and cylinder drain plug with
the specified torque shown in the table. Always replace seals with
new ones.
between electrodes using a gauge and adjust in case that it is not
correct by bending the outer electrode. If the spark plug electrodes
are oxidised, damaged or the insulation is broken then replace the
plug.
NOTE
Inspect every 30 hours. Replace every 60 hours.
Bolt torques:
Water pump plug: 9 Nm.
-
Fill the radiator up to the edge and install the radiator cap.
- Check the cooling system for leaks.
- Start the engine, warm up the engine, and then stop it.
- Check the coolant level after the engine cools down. Add
coolant up to the bottom of the radiator filler neck.
SPARK PLUG
The standard spark plug is shown in the table and is tightened to
11 Nm.
Standard spark plug
NGK CR8 E or DENSO U24ESR-N 0.7-0.8 mm.
The spark plug should be taken out periodically to check the electrode
gap. If the plug is oily or has carbon build up on it the clean it with
a sand blaster. Following abrasive particle cleaning, the spark plug
should be cleaned with a wire brush or similar. Measure the distance
To find the correct heat grade spark plug is being used, take it out
and examine the insulation around the electrode. If the ceramic is
light brown, the spark plug is correctly matched to engine temperature.
If the ceramic is white, the plug should be replaced with the next
coldest plug. If the ceramic is black, the plug should be replaced
with the next hottest plug.
NOTE
If the engine output decreases, replace the spark plug to regain
performance.
Spark plug maintenance
NGK
CR7E
DENSO
U22ESR-N
COMMENTS
If the standard spark plug
is wet then replace it.
CR8E
CR9E
U24ESR-N
U27ESR-N
Standard
If the standard spark plug
looks
glassy or has a white
colour, replace it(
-20-
 Loading...