


“With the shock of the last destroyer’s explosion still shaking the ship, the battle was now over. Gripping the controls, he strafed the ship into a slow swoop past the wreckage and towards the sun. Dropping the throttle down, he looked out of the ship interface and surveyed the wondrous sight that lay before him.
He remembered all the time and effort that he had put in to getting here; the fortune, empire and fleet that had been built to achieve this moment. His heart lifted, with a wave of emotion, as he realised that despite all he had done, nothing could compare to the ultimate prize.”
“ This is not the end.It is not even the beginning of the end.But, it is, perhaps, the end of the beginning.” - Winston Churchill
2

GETTING STARTED................................................................................................................. |
4 |
|
System Requirements............................................................................................................. |
4 |
|
Installation................................................................................................................................ |
5 |
|
What are the benefits of Egosoft Game Registration?........................................................ |
5 |
|
Troubleshooting ...................................................................................................................... |
6 |
|
Starting the game for the first time........................................................................................ |
8 |
|
Guide to Quick Menu Keys ................................................................................................... |
10 |
|
Keyboard, Joystick, Mouse and Gamepad Command Keys............................................. |
11 |
|
Controller Profile Configuration........................................................................................... |
14 |
|
Ship Control (Joystick/Mouse/GamePad) ........................................................................... |
14 |
|
The Options Menu ................................................................................................................. |
16 |
|
TerraCorp Spacefleet Pilot’s Manual................................................................................... |
20 |
|
Introduction............................................................................................................................ |
20 |
|
Trade, Fight, Build, Think ..................................................................................................... |
21 |
|
Getting to know your Ship Interface.................................................................................... |
22 |
|
How to Start............................................................................................................................ |
27 |
|
Where are you?...................................................................................................................... |
28 |
|
How to Dock at Stations ....................................................................................................... |
29 |
|
How to travel to different Sectors........................................................................................ |
31 |
|
Strategies of Play................................................................................................................... |
33 |
|
How to progress .................................................................................................................... |
33 |
|
How to start Trading.............................................................................................................. |
35 |
|
Building Factories ................................................................................................................. |
40 |
|
Where to build your factory.................................................................................................. |
41 |
|
Bartering for Wares ............................................................................................................... |
53 |
|
How to Fight and Capture..................................................................................................... |
54 |
|
Missions ................................................................................................................................. |
67 |
|
Upgrades & Equipment......................................................................................................... |
71 |
|
Weapons................................................................................................................................. |
75 |
|
Wares & commodities ........................................................................................................... |
80 |
|
Fight, Trade and Race Ranks ............................................................................................... |
87 |
|
Inhabitants of The X Universe .............................................................................................. |
87 |
|
Argon ...................................................................................................................................... |
88 |
|
Boron ...................................................................................................................................... |
88 |
|
Paranid.................................................................................................................................... |
89 |
|
Split ......................................................................................................................................... |
89 |
|
Teladi ...................................................................................................................................... |
90 |
|
Goner ...................................................................................................................................... |
91 |
|
The Terran Race..................................................................................................................... |
92 |
|
The TerraCorp Company ...................................................................................................... |
92 |
|
Xenon...................................................................................................................................... |
92 |
|
Kha’ak ..................................................................................................................................... |
93 |
|
Pirates..................................................................................................................................... |
93 |
|
Unlockable Game Start Positions........................................................................................ |
94 |
|
Books based upon the X Universe ...................................................................................... |
95 |
3 |
Credits .................................................................................................................................... |
96 |

GETTING STARTED
SYSTEM REQUIREMENTS
Please read the minimum specifications before you install the game.
Minimum
Microsoft® Windows® 98 SE, ME, 2000, XP Pentium® IV (or AMD® equivalent) 1.7 GHz 512MB RAM
128MB 3D DirectX 9 compatible card (not onboard) with Pixel Shader 1.3 support Soundcard
4.3 GB free hard disk space DVD-ROM drive
Mouse + Keyboard or Joystick (Optional support for force-feedback) or Gamepad
Recommended
Microsoft® Windows® 98 SE, ME, 2000, XP Pentium® IV (or AMD® equivalent) 2.4 GHz 1GB RAM
256MB 3D DirectX 9 compatible card (not onboard) with Pixel Shader 2.0 support Soundcard (Surround sound support recommended)
4.3 GB free hard disk space DVD-ROM drive
Mouse + Keyboard or Joystick (Optional support for force-feedback) or Gamepad
EPILEPSY WARNING
Some people are prone to epileptic fits or the loss of consciousness as a result of being exposed to strobing light sources. These people may have attacks while watching television or playing computer games. Fits can happen to people who have no previous history of epilepsy. If you or your family has any history of epilepsy it is advised that you contact your doctor before playing. If you suffer from any of the following symptoms: disturbed vision, eye or muscle spasm, fainting, disorientation, convulsions or other uncoordinated movements, you should immediately stop playing the game and contact your doctor.
Safety Procedures
•Sit an appropriate distance from the monitor, ideally as far away as the cables will allow.
•Use a small monitor.
•Avoid playing the game if you are tired.
•Make sure the room is adequately lit.
•Take a 10-15 minute break every hour of playing.
4

TROUBLESHOOTING
TECHNICAL SUPPORT
If you have any problems installing this software please log on to our online technical support website at:
(Europe – Deepsilver) - www.softwarehelpdesk.co.uk (United States – Enlight) – support@enlight.com
General System Performance:
1. Check your system against the published System Requirements above.
- The minimum specification is the basic requirement to play the game smoothly. At this specification, performance may vary or be quite slow at times and does not guarantee that you will always see a particular frame rate. Below this specification the game may not run. - The optimal specification (if provided) should provide smooth game play in almost all situations. However, because the game universe is complex and varied, there may occasionally be situations in which even this specification is pushed to its limits.
2. Make sure that your PC is configured for best performance.
- Processor speed, graphics card and available memory are all important factors.
- Update motherboard drivers where possible, and in particular update any additional drivers if you have on-board chipsets such as sound.
- Keep your operating system and drivers up to date, but do not automatically assume that newer is faster and better. If you find that a driver version is slow or unstable, remove it and reinstall one that you know is good. Use a driver cleaner between versions.
- Do not run any software in the background. In particular, switch off applications that access the Internet as these often check to see if the connection is still there, causing pauses.
- Make sure your PC is clear of viruses and spyware, which can slow a PC down as well as causing other problems. When playing, however, you should consider switching off your antivirus software, since this too can slow things down.
|
3. Set the in-game settings so that they are appropriate for your specification. |
|
- Playing at a lower resolution is the simplest way to reduce the load on your graphics card, |
|
but there are a few cases where graphics cards seem to work better at specific resolutions so |
|
try higher resolutions and see what works for you. |
|
- Anti-aliasing (AA) provides smoother edges to objects so that they don't appear jagged. |
|
However, anti-aliasing is demanding of processing power, so you should only consider using |
|
it on midto high-end graphics cards. |
|
- The Automatic Quality Control (AQC) system is a built-in feature to try to prevent frame rates |
|
from dropping too low and should be left switched on for all but the highest spec systems. |
|
- Use in-game settings rather than driver settings where possible. Many drivers allow you to |
|
force features such as AA or vsync, but these will normally adversely affect performance. |
|
-Try switching Environmental Audio Extensions (EAX) off or on. Most systems either ignore it |
6 |
if they don't support it or use it fine if they do. |
|
4. The game comes with graphics settings that you can change to improve performance. At the startup screen: - Texture resolution: HIGH, MEDIUM and LOW (default is HIGH)
-Anisotropic filtering: ON or OFF (default is ON)
-Shader Quality: HIGH, MEDIUM and LOW (default is HIGH)
In the game: - Post processing (glows): ON or OFF (default is ON)
Basic Errors:
1. Graphical errors.
-The most common causes of graphical errors are issues with the driver, which may have errors, or may simply be corrupt.
2. Sound errors.
-The most common causes are audio codecs. Try removing, adding or adjusting their priorities in Control Panel.

-Sound errors can also be caused by a corrupt game installation, particularly one where the wrong updates or patches have been installed.
-It’s recommended to have a separate sound card (i.e. not onboard) and drivers really can make a difference. Many problems occur because of poor sound hardware, poor sound drivers or incorrect audio codecs.
Crashes:
1. Eliminate system configuration issues first.
-It is perfectly possible for problems with a game to be caused by the configuration of the system it is running on, even if it runs other software and games without problems.
-If there is a problem while installing, make sure you switch off any drive emulation software that the copy protection system might have problems with. Check that the CD or DVD is clean, update the drivers for them.
-If you are overclocking any part of your system, then throttle it back to normal speed.
-Check your other hardware. Hardware problems with components such as the graphics card and system memory can show in one game even if those are fine when running other games.
-Check for viruses and also for other software interfering with the game. A wide range of software can do this, from anti-virus software to utilities such as drive emulators, instant messaging software and file-sharing tools.
-Update your drivers. If they are already up to date, try older ones. Use a driver cleaner between versions. If you are having problems with third party drivers, use drivers supplied with the original hardware.
-Try different audio codecs. One of the most common causes of game crashes is the installation of third party codec packs. Ironically, installing such codec packs can often also be a solution to codec problems because of the way Windows handles its codecs.
2. Once you have eliminated system problems, check the game itself.
-Make sure that you have downloaded and installed the latest updates and patches. Check that you have installed the right versions for your copy of the game, and that you have installed them to the correct location.
-It is possible for savegames to become corrupted, either by external causes or by game problems. Try starting a new game and see if the problem still occurs. Save regularly and use several save slots so as not to get caught out by this.
-Try uninstalling and reinstalling the game. The installation may have become corrupt due to a disk error, or an important file may have been overwritten. After reinstalling, try starting a new game first before trying your savegames again.
-A frequent cause of in-game problems is the installation of third party scripts or mods. If reinstalling the game, but not installing these additional items solves the problem then the chances are high that they are the cause.
When submitting a fault via our helpdesk please include the following information:
• Exact error message, if any.
• Steps that should be taken to reproduce the error/fault.
• Details of programs running at time of fault, including Anti-Virus and firewall applications.
• Most importantly, email to us a Direct X Diagnostic report. Follow the instructions below:
Click the START button on your Windows task bar, and then click run and type dxdiag in the box that opens. The DirectX diagnostic toolbox should automatically run. This tool details your whole system and the details can be dumped to a log file by clicking on the "Save All Information" button at the bottom. This will save a text file called "DxDiag", which you can just attach to any correspondence. This information will best assist us in resolving your query as quickly as possible.
7
Additional support can also be obtained from the official X³ website: www.x3reunion.com.
You can also visit the official forums here and read through questions sent by other X³: Reunion players. Here you will also find a multitude of hints and tips to enhance your gaming experience, plus a host of other wide-ranging topics. Please view the “Readme” file on the game CD/DVD for the latest information.

STARTING THE GAME FOR THE FIRST TIME
Starting X³: Reunion
1.From the Start Menu, point to Programs, point to Egosoft, and then point to X³: Reunion.
2.At the initial start-up screen, you may change some basic settings, such as Screen Resolution and other Graphics Settings. It is recommended that settings such as antialiasing are selected here rather than on your graphics card settings. The Effects factors (4x etc) are automatically selected for your graphics card, raising these numbers above the suggested ones will decrease performance, lowering them will improve performance. You will also get the chance to alter some of these graphics settings from within the game.
8

EAX - stands for Environmental Audio Extensions. This Creative Labs technology provides an improved audio experience including special audio effects such as "occlusion". You can read more about it on the page: http://eax.creative.com
Ignore last settings and start with default – is an option for resetting the game start options to their default settings if you experience any start-up problems, for instance after an upgrade.
Run as Benchmark – will provide you an output of FPS (frames per second) performance measurements of the game.
3.Click Start X³. You may skip the opening sequence, if you wish, by pressing the [Esc] key.
Note: The game name will have the version on the above start-up screen, which will be relevant for Technical Support and for any upgrades that may be available.
Getting Started
Welcome to X³: Reunion
‘Say goodbye to social life and/or sleep’
It is recommended that you at least play through the combat training whether you are new to the X-Universe or not, before progressing into the game proper.
Otherwise, pressing NEW GAME will start a new game from the beginning. If you have a savegame, then you should instead select CONTINUE.
From here, you will be taken through the first parts of the storyline in X³: Reunion. You will meet one of the main characters and they will help you to get started. Once you’ve finished your introduction to the plot, you’ll be flying your new ship in no time at all.
From this point on, it’s all up to you. You can follow the plot or go off and have your own adventures. You can jump in and out of the plot, as you don’t have to respond to the requests immediately. This will allow you to start building your resources by trading, building, fighting and exploring the universe, as parts of the plot may require considerably more than what you start with. A little tip: you can delay meeting friends on missions until sometime later into your travels. They will wait for you, and so you don’t forget, they will send you a reminder message every now and then.
Keys, Controller settings, Profiles and Menus will be detailed in the following sections or you can jump to the Main Menu if you are very familiar with the X series already; even so, you are advised to familiarise yourself with the controller profiles, which are new to X³.
With such an open-ended X universe, many have joined the very extensive and helpful online |
9 |
community at the Egosoft forums. Exchanging their experiences, providing help and answers to each other and producing topics with ideas and hints, they have taken their gaming experiences much further. Join the community in the X Universe at http://www.egosoft.com/
“Sometimes I think we're alone in the universe, and sometimes I think we're not. In either case the idea is quite staggering.” Arthur C. Clarke
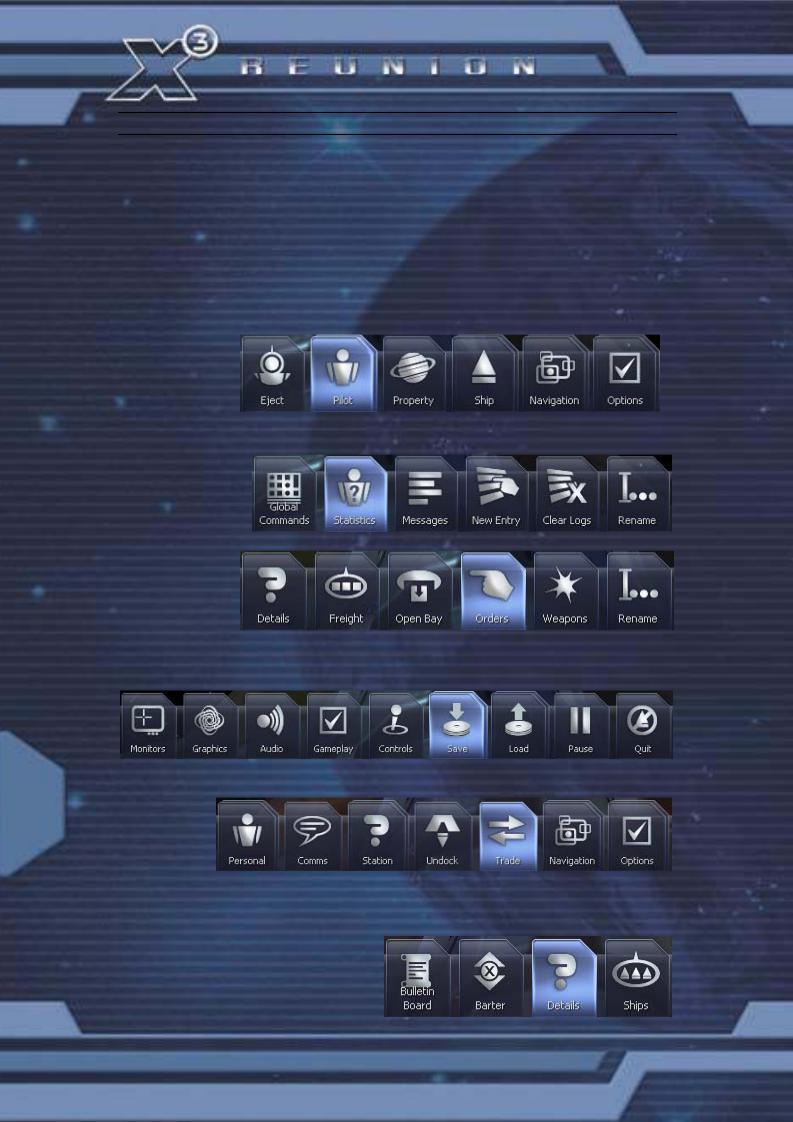
GUIDE TO QUICK MENU KEYS
The Quick Menu provides quick and easy access to the various commands that you require. You can access all other menus using the same commands, either with your M.O.U.S.E (Mobile Online Universal Sector Engagement device ) or by ship data interface.
Pressing Esc on your ship data interface will bring you back one level, pressing it again will do the same. Once you have pressed Esc twice you will now be at the main menu. You can also use the down arrow to go back to the previous menu; this serves as an alternative to the Esc key. You can use the arrow keys to quickly navigate the available menus.
To access the Quick Menus press the Enter key on your ship’s Data Interface. You will now see an Information Panel appear, labelled Main Menu.
After selecting Pilot and highlighting Statistics, you will see it is highlighted. This indicates that Statistics is currently your selected option.
Pressing Esc brings you back to the Main Menu. Selecting Ship will bring up the Ship menu.
Pressing Esc again and selecting Options from the Main Menu will display the game options. These allow you to change the configuration of your data interface using the Controls menu.
|
As you will see, the Main Menu will change when you are docked at a station, as will the |
10 |
menu options |
that are |
relevant to what you may want to do.
By selecting Station for instance, you can then go to the Bulletin Board for News, Missions or even use the Barter system to exchange what you have in your cargo bay for some other wares.

KEYBOARD, JOYSTICK, MOUSE AND GAMEPAD COMMAND KEYS
The key controls listed below are the X3 Default Profile keys for the controls, there also is the Alternative and Classic Profiles available. If you choose different controller profiles or change the keys for actions, the list below will not reflect what you have set in your game.
Controls – Ship Interface Controls
[ Joystick ] |
Steer ship or turret |
[ Mouse ] |
Steer ship or turret |
[ Joystick Z ] |
Roll ship |
[ Throttle ] |
Ship speed control |
Game - Flight Controls |
|
[ DOWN ] |
Pitch Up |
[ UP ] |
Pitch Down |
[ LEFT ] |
Yaw Left |
[ RIGHT ] |
Yaw Left |
[ q ] |
Roll Left |
[ e ] |
Roll Right |
[ x ] |
Accelerate |
[ z ] |
Decelerate |
[ TAB ] |
Boost Extension |
[ BACKSPACE ] |
Break to Stop |
[ u ] |
Toggle autopilot |
[ Shift+d ] |
Dock with target |
[ Shift+m ] |
Switch gravidar modes |
[ Shift+e ] |
Eject from ship and Re-enter a ship |
[ a ] |
Strafe left |
[ d ] |
Strafe right |
[ w ] |
Strafe up |
[ s ] |
Strafe down |
- Weapon controls |
|
[ L Ctrl ] |
Fire weapons |
[ LMB ] |
Fire weapons |
[ Joystick B1 ] |
Fire weapons |
[ k ] |
Laser targeting mode (auto target) |
[ m ] |
Select/cycle missile type |
[ Joystick B2 ] |
Fire weapons |
[ Hold Joystick B2 ] |
Launch Missile |
[ L ] |
Launch missile |
[ 1,2,3,4 ] |
Select weapon group |
[ g ] |
Weapons Menu |
- Targeting |
11 |
[ t ] |
Track target |
[ Shift+t ] |
Target nearest enemy |
[ PGUP ] |
Target next object |
[ M Wheel Up ] |
Target next object |
[ Joystick B3 ] |
Target next object |
[ PGDown ] |
Target Previous object |
[ M Wheel Down ] |
Target Previous object |
[ Joystick B4 ] |
Target Previous object |
[ Insert ] |
Target next owned object |
[ Del ] |
Target previous owned object |
[ Home ] |
Target next enemy |
[ End ] |
Target Previous enemy |
|
- Information |
|
|
[ I ] |
Identify selected object |
|
[ u ] |
View details of selected target |
|
[ y ] |
Current ship menu |
|
[ p ] |
Player menu |
|
[ . ] |
Sector map |
|
[ , ] |
Universe map |
|
[ g ] |
Show selection on galaxy map |
|
[ r ] |
Owned property |
|
[ L ] |
Message log |
|
- Commands & Management |
|
|
[ Shift+c ] |
Command console of current ship |
|
[ m ] |
Rename object |
|
[ Shift+6 ] |
Command wingmen: Attack target |
|
[ Shift+7 ] |
Command wingmen: Protect me |
|
[ Shift+8 ] |
Command drones: Attack Target |
|
[ Shift+9 ] |
Command drones: Protect me |
|
- Ship & Stations |
Quick Menu only |
|
|
|
|
- Freight |
|
|
[ f ] |
Freight menu |
|
[ o ] |
Open/close freight bay door |
|
[ none ] |
Freight exchange |
|
- Upgrades |
|
|
[ j ] |
SETA time accelerator |
|
[ Shift+j ] |
Activate Jumpdrive (repeat keys to cancel jump) |
|
[ Shift+d ] |
Docking Computer |
|
[ Alt,MMB ] |
Video enhancement goggles |
|
[ 5 ] |
Best selling price locator |
|
[ 6 ] |
Best buys locator |
|
[ g ] |
Toggle Ecliptic projector |
|
Interface - General |
|
|
[ Num enter ] |
Main Menu |
|
[ RETURN ] |
Quick Menu |
|
[ Shift+o ] |
Options Menu |
|
[ Shift+l ] |
Load game |
|
[ Shift+s ] |
Save game using salvage insurance |
|
[ Shift+q ] |
Quit game |
12 |
[ RMB ] |
Toggle mouse cursor |
- View Controls |
|
|
|
|
|
|
[ F1 ] |
Select view mode |
|
[ F2 ] |
Select external view |
|
[ F3 ] |
Target View |
|
[ Shift+h ] |
Toggle Hud display |
|
[ F4 ] |
Select monitor |
|
[ F4 hold ] |
Select monitor arrangement |
|
[ F5 ] |
Toggle all monitors on/off |
|
[ + ] |
Zoom in |
|
[ - ] |
Zoom out |
|
[ NUM 0 ] |
Select camera mode |

[ Default View ] |
Num 5 |
|
|
[View from Northeast] POV up-right Num 9 |
|
||
[View from East] |
POV right Num 6 |
|
|
[View from Southeast] POV Down-right Num 3 |
|
||
[View from South] |
POV Down Num 2 |
|
|
[View from Southwest]POV Down-left Num 1 |
|
||
[View from West] |
POV left Num 4 |
|
|
[View from Northwest] POV Up-left Num 7 |
|
||
- Menu |
|
|
|
[ Esc ] |
Skip cut scenes, remove screen tips |
|
|
[ LMB-JS1-Enter ] |
Select Option |
|
|
[ POV Up-MW Up-Up] |
Scroll Up |
|
|
[ POV Dn-MW-Dn-Dn] |
Scroll Down |
|
|
[ Left-POV Left ] |
Scroll Left |
|
|
[ Right-POV Right ] |
Scroll Right |
|
|
[ Home ] |
Empty selection |
|
|
[ End ] |
Fill selection |
|
|
[ Delete ] |
Close all Menus |
|
|
- Editing |
|
|
|
[ Delete ] |
Delete character |
|
|
[ Backspace ] |
Backspace |
|
|
[ Home ] |
Home |
|
|
[ End ] |
End |
|
|
- Archival |
|
|
|
[ F9 Print Scrn ] |
Save in-game screenshot – These pictures are saved into |
|
|
- Maps |
[My Documents\Egosoft\X3\Screenshots] in .tga format. |
|
|
|
|
||
[ Num 4 ] |
Move cursor left |
|
|
[ Num 6 ] |
Move cursor Right |
|
|
[ Num 8 ] |
Move cursor up |
|
|
[ Num 2 ] |
Move cursor down |
|
|
[ Num 7 ] |
Move cursor up and left |
|
|
[ Num 9 ] |
Move cursor up and right |
|
|
[ Num 1 ] |
Move cursor down and left |
|
|
[ Num 3 ] |
Move cursor down and right |
|
|
[ Insert ] |
Change map axis |
|
|
[ Home ] |
Zoom Map in |
|
|
[ End ] |
Zoom Map out |
|
|
- Factory Positioning |
|
|
|
[ Ins ] |
Change to Z Axis |
|
|
[ Ins,2,8 ] |
After Ins use 2 & 8 to change elevation |
13 |
|
[ 1,3,7,9 ] |
Change orientation of station |
||
|
|||
[ 2,4,6,8 ] |
Position station on grid |
|
|
[ Home/End ] |
Zoom in/out at factory position |
|
|
- Additional hotkeys |
|
|
|
[ Pause ] |
Pause game |
|
|
[ a-z ] |
Select sector in universe map by first letter |
|
|
[ 1-9,0 ] |
Select amount in trade menu |
|
|
Mouse control special Keys
For switching between in-game menus, you may use the interactive assistance system and ship interface. You can select targets and menus using mouse control. To do so, right-click to activate mouse control, then left-click on the desired target icon. Right-click again to restore normal control.
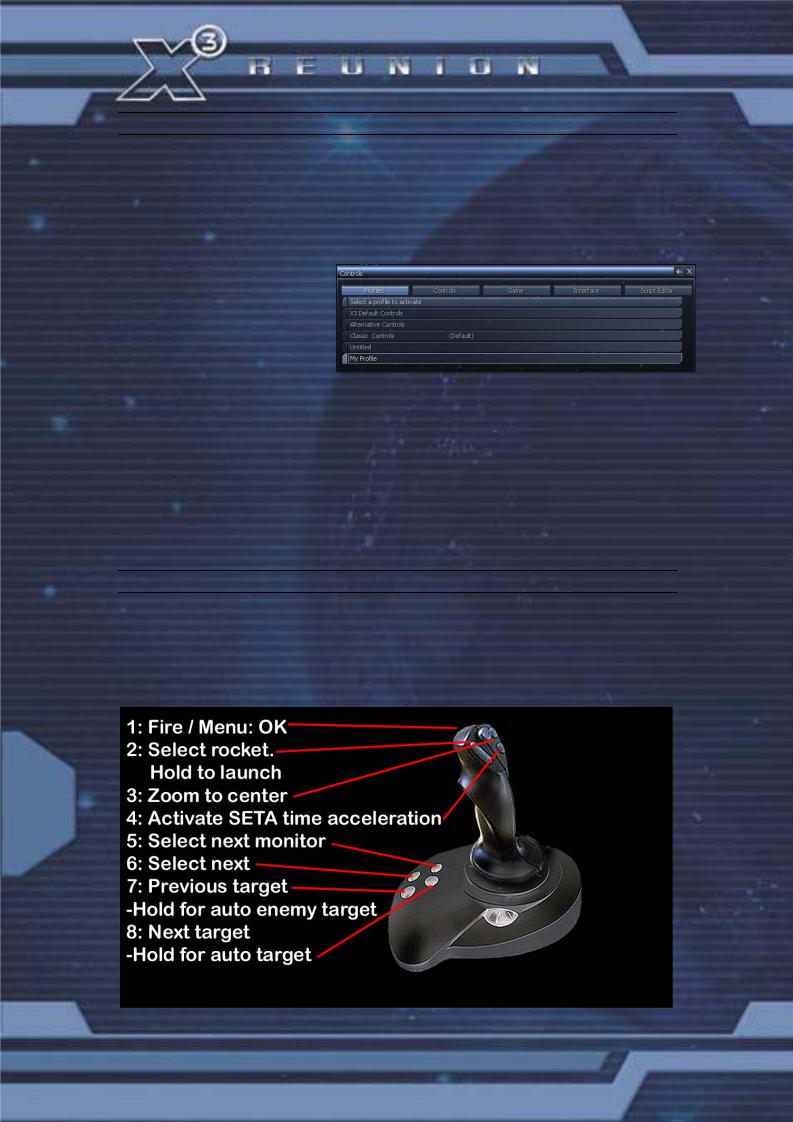
CONTROLLER PROFILE CONFIGURATION
In the game it is now possible to map the controller buttons and keyboard keys to a range of actions. The same keys can be used again in different modes (Flight, Docked and Map movement).
You can create different Profiles, and switch between them for different types of game play. The profiles can also be renamed and made the default profile when the game starts. They can be accessed from the Quick Menu, [ Options ], [ Controls ].
Create New Profile
This option allows you to create a profile by giving it a name; then editing the Controls, Game and
Interface tabs.
In these tabs, controls can be
configured for each action. If you want just one control for an action, remove the original control first and then add a new one. If you add a control that is already assigned, that control will be removed from its previous assignment, so it is important to check all the controls before you save. Certain controls are locked. The "apply" button will be disabled for keys and controls for the main menu that cannot be unmapped.
After you have changed all the control settings, they can be saved to the profile. Additionally the profiles can themselves be organised via Switch Current Profile, Save Profile, Rename a Profile and Select Default Profile. The three main profiles are the ‘X3 Default Controls’ profile, a ‘Alternative Controls’ profile, and a ‘Classic Controls’ profile.
SHIP CONTROL (JOYSTICK/MOUSE/GAMEPAD)
You are free to use any combination of the flight control methods that best suit your style. The following diagrams show the default settings and these may be further configured or adjusted depending on your model(s). Please consult your manufacturer’s documentation for configuring your input devices. Note that the POV “hat” can be used to navigate the menus if you have one available.
Joystick Control
14
Mouse Control
The mouse is by far the most powerful instrument to play X³: Reunion. The Mouse operates in two modes, Semi-automatic and Manual. You can switch between these modes by clicking the RMB (right mouse button). Use the Wheel to navigate the menus and the LMB to select.
Press the RMB again to exit the current menu and return to the previous menu or, if you wish to exit the menu system altogether, press and HOLD the RMB.
X³ supports two input methods: Manual ship control and mouse cursor mode (aka. semiautomatic mode).
You can switch between these two modes by pressing the right mouse button by the (X3 Default Controls profile but can be changed to any key).
In manual control, the left mouse button fires your selected lasers, whereas the mouse wheel can be used to switch targets. In semi-automatic mode you activate a mouse cursor, which you can use to control all elements of the game with simple mouse clicks:
-Quick menus
-Context menus
-Laser configuration
-Mini monitor activation and configuration
These and many more things can all be controlled with simple mouse clicks
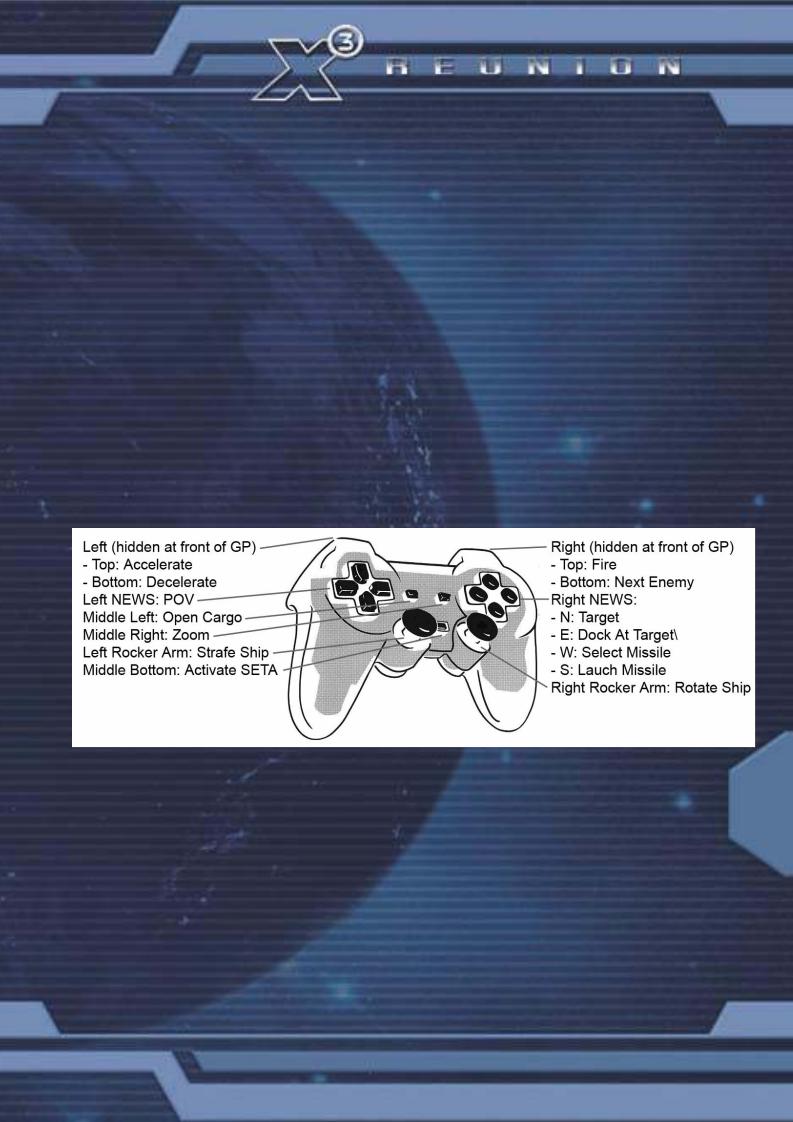
Gamepad Controls
You can change all the above controls to ones you prefer using the Controller profiles
15
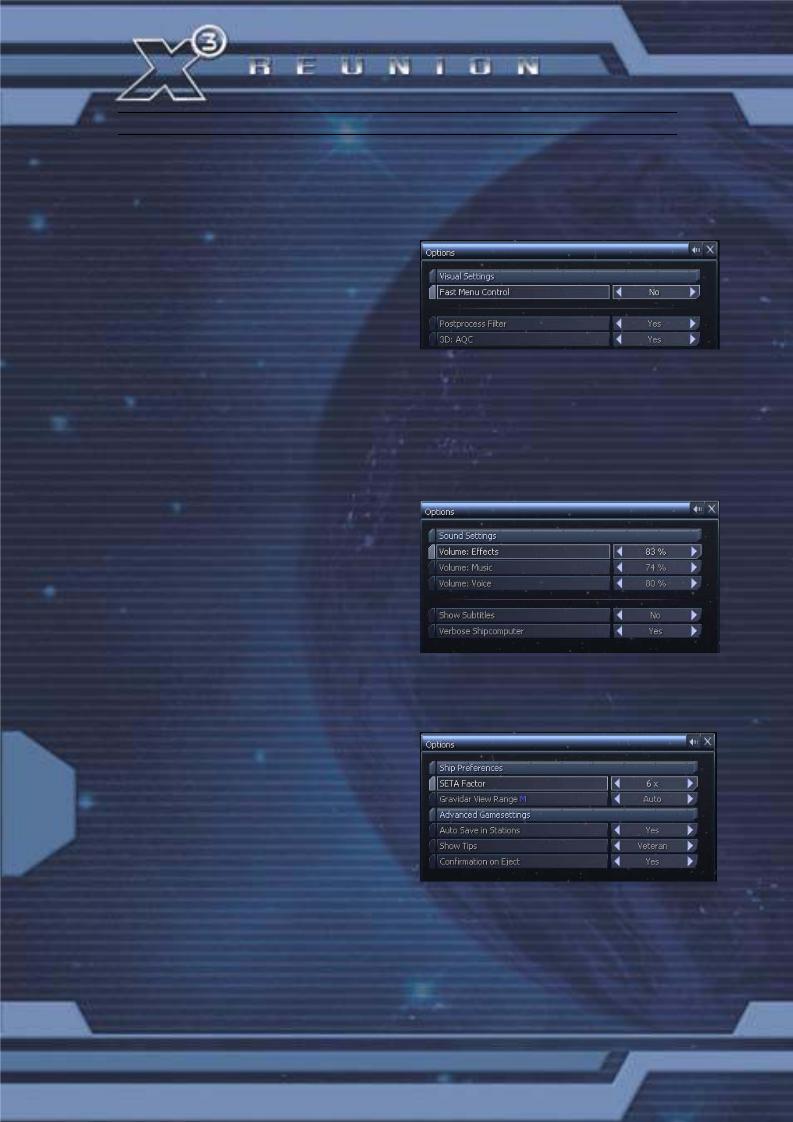
THE OPTIONS MENU
The Options Menu is accessed within the game by pressing Quick Menu [ Return ] [ Options ]. This enables you to change some features, such as Graphics, Audio, Controls, Gameplay and the Monitors.
Graphics
Fast Menu Control
The Fast Menu Control option changes the key repeat behaviour in menus. Specifically, enabling the option decreases the delay between when you first press a key and when it begins to repeat, and increases the rate at which the repeat occurs.
Use Postprocess Filter
Post processing defines how some effects are implemented and rendered, giving the universe a softer look. If you have performance issues with slower/older graphics cards, you can also disable this with the ‘Glow enabled’ option in the Start-up screen Graphics Options.
3D: AQC
Automatic Quality Control is a system that attempts to keep the frame rate of the game above a certain minimum by reducing the visual quality gradually.
Audio
Volume: Effects
Change the volume of in-game sound effects.
Volume: Music
Change the volume of in-game music.
Volume: Voice
Change the volume of in-game voices.
Show Subtitles
Toggle the subtitles on or off for in-game announcements or dialogue.
Verbose Ship computer
Toggle to turn on/off the computer voice.
Gameplay
SETA Factor
Allows the increase or decrease of how much 16 SETA actually speeds up time. The default
setting is 6x. For players with systems relatively close to the minimum specification, if the game slows whilst SETA is engaged, try reducing the value here. Anything more than 10x is not normally achievable.
Gravidar View Range
Changes the scale of the radar in the interface. The default setting of Auto will adjust the view according to how close objects are to you. Players managing a large fleet in the same sector or players stuck in very close combat may find changing the values to a fixed range very helpful.
Auto. Save at Stations:
When you dock with a station the game can auto-save, allowing you to retrieve one of the last three auto-saves in addition to your own manually saved games.
Show Tips
If you are a new player you may prefer to leave Show Tips with the setting of Beginner, as this will mean anything you do for the first time will cause a helpful tip to appear. To remove a tip from your screen, you just press the [Esc] Key. Changing this setting to Veteran will stop simple tips from being displayed, however more complicated features will be explained when you first use them.
Confirmation of Eject
Toggles the confirmation warning you receive when ejecting from your ship.
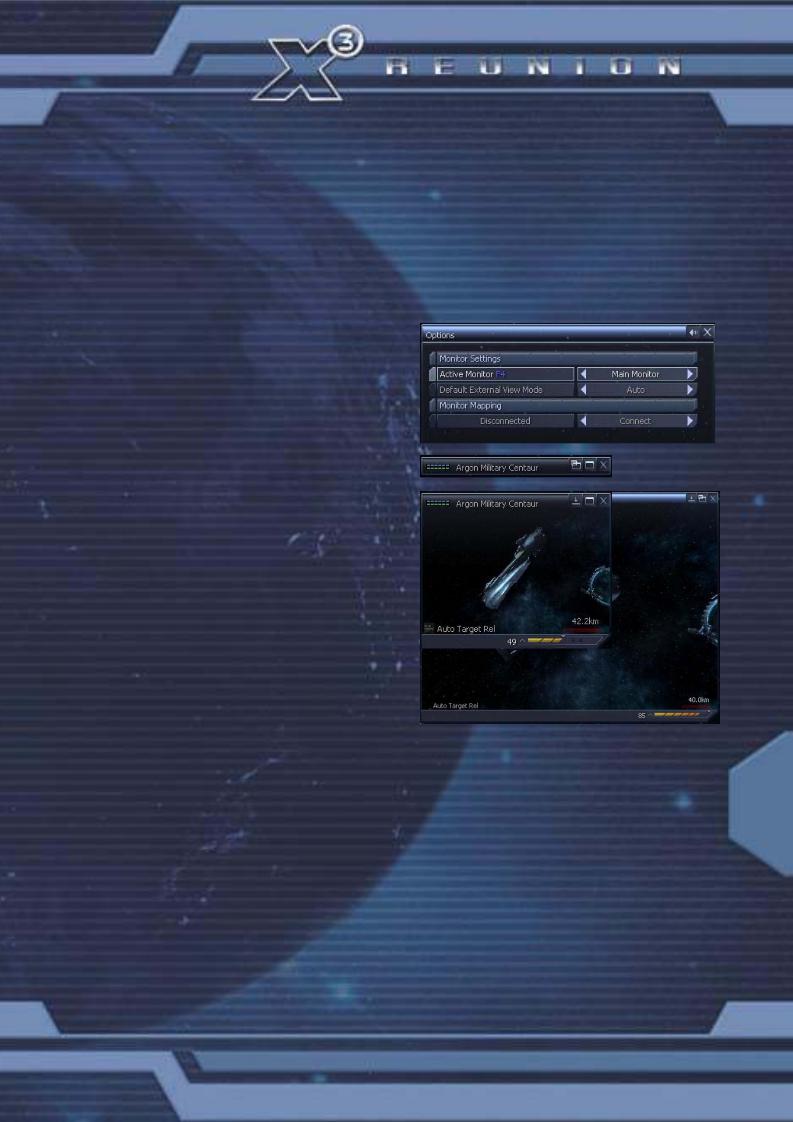
Monitors
There are two monitors available, one on the top left and another one top right. The left one is always set to auto target, the right monitor is mappable.
Monitor Layout will enable you to position your in-game monitors on your screen.
Show Monitors F5
By pressing the F5 key you can toggle the minimized and standard Monitor views. After using F4 to select a monitor, pressing F3 will then enlarge the monitor view.
Active Monitor F4
Pressing F4 will cycle you between the open monitors.
Default External View Mode the [ F2 ] key allows you to toggle between Auto and Manual. The Manual setting will allow you to rotate the view around your ship using the keypad numbers.
Monitor Mapping allows you to select exactly
what appears on your monitors when you bring them up.
"To consider the Earth as the only populated world in infinite space is as absurd as to assert that in an entire field of millet, only one grain will grow." Metrodorus of Chios (400BC)
17
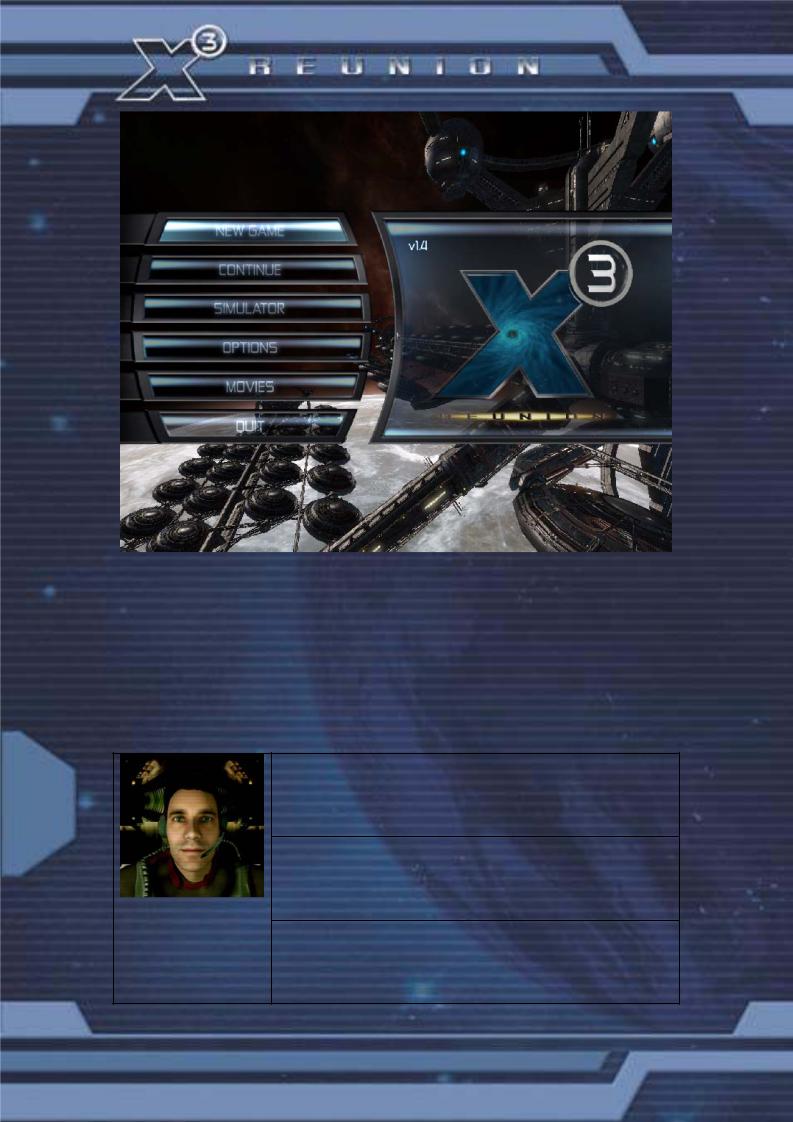
Main Menu
New Game
The first three games start with the plot storyline enabled and the main character, 21 year old Julian Brennan. You can jump in and out of the plot, as you want to; this gives you time to think about your game strategy, and about how you will build your trade and fight ranks.
The starting difficulty level affects which upgrades and equipment are installed on your ship(s) and how many Credits you start with. It will also affect your initial reputation with the other races. It has no effect on any other aspect of gameplay. If your goal is to reach the difficult- to-obtain X-treme ranks (see the Fight, Trade and Race Ranks section), you might want to (but don’t have to) start the game the way you would wish to end it, as X-treme.
Normal
Difficulty: Average.
18 Jump right in to the action and discover the exciting events that are brewing in the X Universe. Trade your way to wealth, fight off your ruthless foes and build a lasting legacy.
Quick start
Difficulty: Easy.
Wield the developing power of your fledging fleet and face the X universe
Julian Brennan head on. You are well equipped for your journey, but there may be advantages to doing it the hard way.
Player character
X-treme
Difficulty: Hard.
Conquer a harsh and unforgiving universe with the pure power of your will. Struggles will present themselves at every turn. Even your enemies loathe you with an unusual intensity.
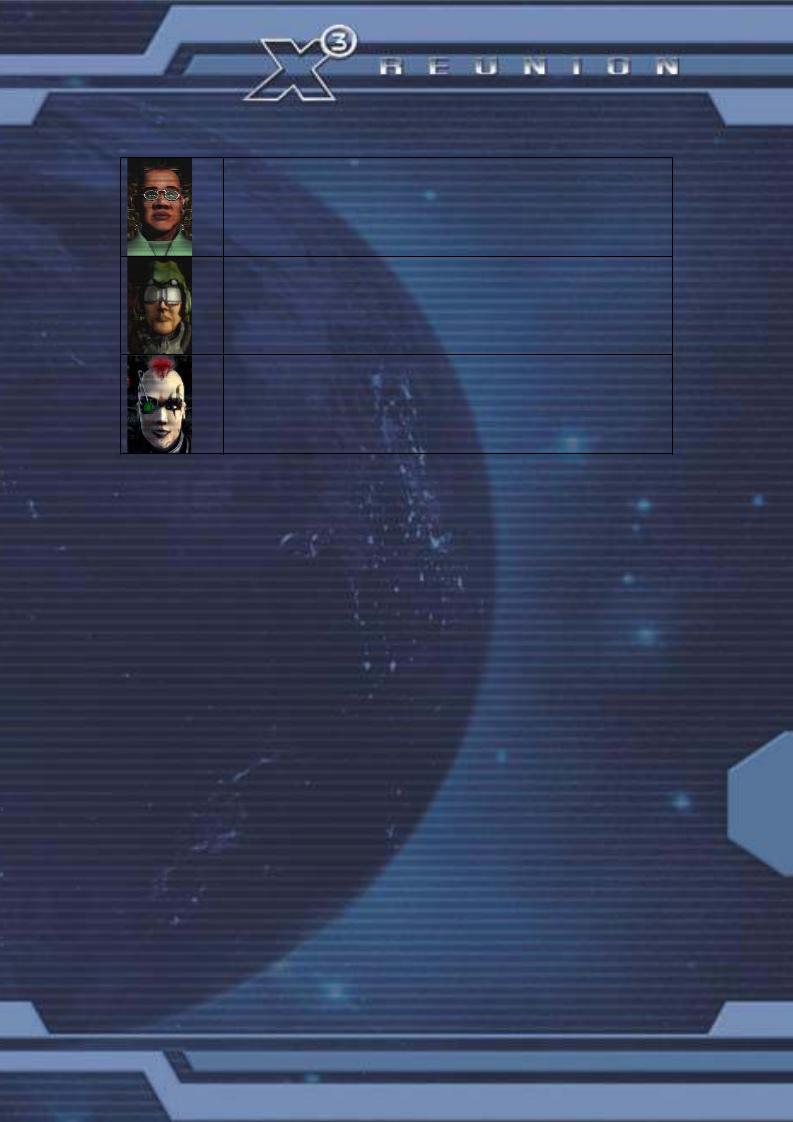
There are a number of optional game starts, which present the player with character-based styles, but do not include the plot storyline. Each has its own differences in game start conditions that have their own unique difficulties and rewards.
Aspiring Explorer
Difficulty: Average. Species Argon. Argon Prime, 12,000c, M5 Discoverer You have the tools and the passion to discover the riches of the myriad worlds around you. Follow your lifelong dreams and uncover the mysteries of the X Universe
Humble Merchant
Difficulty: Not all that hard. Species Argon, Argon Prime, 9,500c, TS Mercury + M5 Discoverer.
Leverage your business skills to master and dominate the trade lanes. Amass the ultimate fortune and spread the fingers of your empire to the far reaches of the stars.
Bankrupt Assassin
Difficulty: Most assuredly hard. Species Argon, Family Pride, 0c, M3 Split Mamba Your combat skills are formidable, but your bank account is not. Your capacity for destruction is your only tool for clawing your way above the rest of the world’s petty scum.
Custom Game
Start your own universe with none of the above-defined game styles; this game will not have the plot storyline, except for the one you create in your own X Universe.
Galaxy Editor
This is for dedicated fans that wish to produce and load custom universes.
Continue
When you want to continue with a saved game, this menu selection will list your saved games. These files are located in the [MyDocuments\Egosoft\X3 \Save] folder.
Simulator
The Simulator / Tutorials section is basically a mini universe where you can try things without having any consequence on your game. Likewise, the Pilot Test Combat is a quick action level where you can test basic combat skills.
Options
This will allow you to adjust several settings within the game. Video will allow you to change some of the in-game features. Sound enables different surround sound and stereo options. Controls enable different controller set up options.
IMPORTANT NOTE: The screen resolution cannot be changed from within the game. If you |
19 |
wish to change the resolution, it should be done at the X³: Reunion start up menu. |
Resolutions less than 1024x768 are not supported because they do not provide sufficient space for the user interface, particularly some of the larger menus. Regardless of the resolution chosen, the game will be displayed at a 4:3 aspect ratio so widescreen formats may look slightly stretched.
Movies
This will play the X3 introduction. Cut scenes may be unlocked here as well as other content added in the future.

Quit
Quits the game, but do you really want to?
“It's human nature to stretch, to go, to see, to understand. Exploration is not a choice, really; it's an imperative”. Michael Collins
TerraCorp Spacefleet Pilot’s Manual
INTRODUCTION
Welcome to TerraCorp, space pilot. You are now a member of the largest spacefleet in the whole of the Argon-controlled territories.
You will find in these pages the basic flight controls of your craft that are based upon the “unified flight-control system” designed by TerraCorp. This enables you to easily move from one ship class to another, while retaining some familiarity with the control mechanisms.
Read and learn these well, for knowledge of the Universe is of great importance, especially if your travels take you outside of Argon-controlled space. Good profit to you and in the words of our founder “Never travel empty, a journey without profit is a journey with no purpose.”
Terracorp – “The History”
In 2912, following an accident which took him far beyond the frontier of Earth, Capt. Kyle William Brennan arrived in the X universe in his experimental gateless jump ship. Kyle became instrumental in the attack on the Xenon mother ship, almost bringing the Xenon race to extinction. His heroic deeds were recognised by the naming of the sector Brennan’s Triumph.
By 2913, Kyle’s well-earned Credits allowed him to create Terracorp as an extension of himself to finance his research and find a way home to earth. In the year of 2934, while he was deeply involved in the tracing of the AP Gunner, he learned about his long lost son, then known as Julian Gardna. Both of their lives then became entangled with the threat of the Kha’ak and the destructive forces inflicted by them. This resulted in Kyle ending up in a coma and Julian Brennan coming to terms with the fact that his valiant role in stopping the Kha’ak threat came with a heavy price, the heroic self-sacrifice made by his closest friend Bret Serra.
Over the last two Jazuras, as a response to the continuing Kha’ak attacks, all the races in the universe have heavily invested in new technologies, while replacing their ships and rebuilding their stations. There has also been the additional benefit of a newfound cooperation between some of the races’ scientists, producing greatly enhanced shield and missile innovations.
Many shipbuilders, now under new pressures never faced since the Xenon war, have awoken from a developmental slumber to produce stunning new ship designs.
As the universe approaches the end of 2935, Julian, having lost all of his factories and most 20 of his ships to the Kha’ak, now has to consider Ban Danna’s request for help again. Many
mysteries begin to unfold when a reunion with an old friend takes Julian on a journey of discovery, which links a mysterious ship with the power to disappear, the ruthless Yaki pirates and a machine left by an ancient race. The fate of more than the known universe relies on the ultimate discovery of the truth by Julian, with all the fighting skills and the strategic resources he can command.
2912 X Beyond The Frontier - 2913 X-Tension - 2934 X2: The Threat - 2935 X³: Reunion
"If you can imagine it, you can achieve it. If you can dream it, you can become it." - William Arthur Ward

TRADE, FIGHT, BUILD, THINK
Trade
While docked at factories or trading centres, you will find various ways of interacting with the other races. Bulletin Boards may have news items about events in the universe, profitable trade opportunities and even entertainment. They will provide many chances for you to take advantage of the dynamic economy by responding to news. There will be additional chances for you to strike good trading deals, carry out missions or haul resources or products for other traders.
Sometimes you might even read about interesting rumours of potential profits that you will have to be quick to respond to, in order to cash in on them. Good opportunists, who are willing to take risks, will also find value in salvaging what others have missed or have seen no Credits in. Despite the risks, there may also be gains to be made from various shady characters that might provide you with new possibilities for wealth and recognition.
Fight
Whether you are a pirate, assassin, warrior or trader, even if you are just minding your own business, the fight will come to you. Having to fight for rewards or just for your own right to exist, you will find the universe a hard place to survive in, let alone prosper and grow. It will be up to you to explain in your own forceful way that you intend to stay.
Pirates will view you as a target, Xenon will just want to terraform you and the Kha’ak will attempt to erase you. If you prove yourself to be a worthy opponent with deadly skills, you will gain recognition from the high and the low, who will want to pay highly for your services to do whatever dirty work they require.
As you enhance your skills, new avenues will open to you, as long as you have improved your ranks and the ships that you own. You may even become one of the few with the extreme fighting ability that can build a force strong enough to take on any enemy.
Build
In between your adventures it would be wise to start developing your empire by building factories and complexes to increase your financial resources. It would be wise to explore all the new and interesting places, and find additional markets for you to increase your status and wealth.
Building and trading in all the sectors of the different races, for instance the Paranid, will provide you access to many of the technologies that only they produce, while also improving your race rank with them at the same time. Spinning your corporate web all over the universe will not only enhance your status with everyone, but will at the same time ensure that whatever perils the universe faces, you will be included in any unstoppable changes it experiences.
Your Credit-making skills will develop over time from your first factory to your multi-sector |
21 |
empires. As you become aware of all the possibilities to improve your profits, you will be able to take your ambitions to new and exciting extremes.
Think
There are many discoveries to be made by exploring sectors to find their hidden mysteries and the possible treasures or secrets that the less observant may have missed. The misty corners of strange and unusual formations will give you the chance to seek and find many new things that could enrich your travels and possibly your Credit account.
On your travels, you will find places or information that could even help you decide to setup a home base, which you can protect and build as your empire grows. Even when many great events have happened, you will find new adventures, challenges and personal goals to enrich your experience.
Your journey and interactions in the universe will affect all that exists to become a reflection of your own ambitions, in wealth, construction and combat. From thousands to millions of Credits, management of corporate strategy, to heroic battles; your successes, skills, and abilities will shape the universe in your own image. The universe is made for you; the challenge is to make it yours.
“Who am I? I am but the sum of my experiences… and today I am more than I was yesterday”. Terrabyte
GETTING TO KNOW YOUR SHIP INTERFACE
The controls of each ship are positioned in the standard layout whichever the vessel, but you will find that the visibility from of all ships to be slightly different dependant on the ships hull design. In this instance the view from the ship, the interface and associated briefings below are taken from the Argon Nova M3 class ship.
The Interactive Assistance System.
This feature of your ship computer will automatically present information about common tasks you may wish to perform for the first time you do something, based on your current location and situation. Data will be streamed to your onboard computer should you encounter species or items requiring further information essential to your survival. If at any time you wish to disable this data-stream, you may do so from the Options-Gameplay menu of your ship interface, by changing ‘Beginner’ to ‘Veteran’.
Main Ship Interface
22
The image above is the whole of the ship interface in view. In the following section you will see different parts of this explained in more detail. There are a number of information screens showing various readouts. These have been summarised into the Overlay for ease of reading.
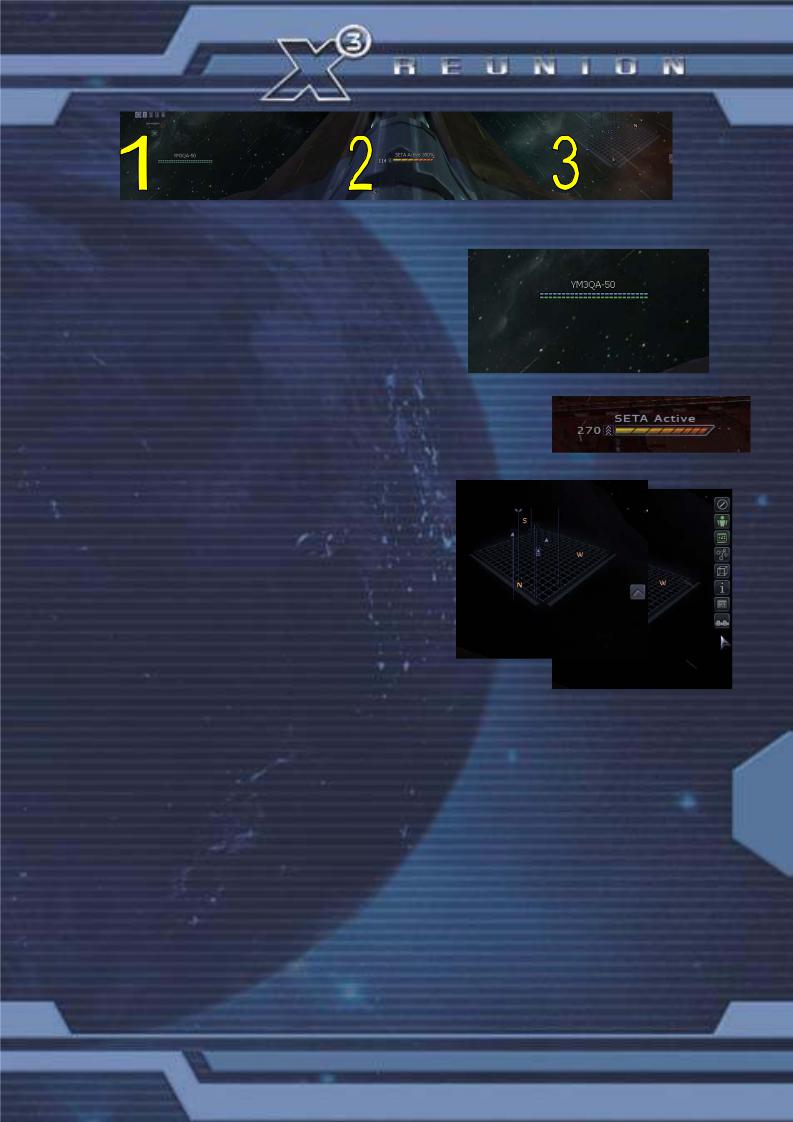
The overlay will also appear on the screen when in any external view as well as the interface. It can be disabled in the options menu. The overlay can be split down into three distinct areas of data.
1.On the bottom left is the Shield and Hull indicators. The top one (Blue) indicates the shield strength. The lower one (Green) shows the hull strength.
Damage to the shields will repair as they recharge, but damage to the hull will slow your ship and will need repairing at a shipyard.
2.The front of the bar shows the digital speed, while the arrow indicates if the direction is forwards or backwards. The bar will actively show the speed and will indicate if SETA is in use. Apart from using the keys, the ship speed can also set by clicking on the speed bar.
3.On the right is the Radar display. This shows the real-time 3-dimensional radar. The Radar can be set to varying scan distances. Clicking on the icon next to the Radar loads the quick access icons. The Radar, sector map and navigation systems all use the same icons.
There is a mini menu available in the bottom right corner of the radar. Double-clicking this icon will open a mini menu, with a list of icons for other menu shortcuts including original mode command console, Quick menu and other items.
Context Menus
When you double-click on any target object, either in the radar circle or on the screen, it executes the first icon of the context menu, which will have opened with the first click. That action is the default for the object you are clicking on. E.g. if it’s a ship, it will cause you to follow that ship, if it’s an enemy it will cause you to attack, if it’s a station it will cause you to dock. Examples of context icons:
Context |
Default Actions |
|
All |
Fly to (default for ships) |
|
|
Dock at (default for stations) |
|
|
Map to mini monitor |
|
|
Attack (RED icon) |
|
Enemies |
Attack (default) |
23 |
|
Fly to (not default with enemies) |
|
Your |
Follow me |
|
Ships |
Protect me |
|
|
Kill enemies |
|
|
Map cockpit to monitor |
|
Station |
Dock at (default) |
|

Radar Symbols
In the interface view you will see the multi– target radar symbols. Grey coloured ones are sector ships. Red ones are enemies. Green ones are your ships and missiles. The three or more blue dots at the side of the symbol indicate the ship status. The current target has a directional arrow as shown on the graphic on the right, which is also pointing in the direction of the ship. Using the [ PgUp ] and [ PgDn ] keys you can change the active target.
You can also select a target using M.O.U.S.E control. To do so, simply right-click to activate the M.O.U.S.E control. Then left-click on the desired target icon. Once more right-click the M.O.U.S.E to restore normal control.
The symbols indicate the class of Stations
and ships.
L.Tow. Sat A.Sat Rock. Astro Mine Station Dron. M1 M2 TL M6 TS M3 M4 M5
|
Flying by M.O.U.S.E |
|
|
In M.O.U.S.E cursor mode, clicking somewhere on the screen (outside any icon areas) will |
|
|
turn off the autopilot if it was on and will then set a direct course towards a spot underneath |
|
|
the M.O.U.S.E cursor location several KM in front of the ship. This means the ship can be |
|
|
turned in steps of 45 degrees (at a 90 degree POV) relatively fast. |
|
|
The M.O.U.S.E is the most effective input device for interacting with the Ship Interface. Apart |
|
|
from being able to direct the ship to fly with double-clicks on ships, factories or anywhere on |
|
|
the screen, it provides command control over all the ship controls and weapon systems. |
|
|
The context menus will respond with the most common actions like: Communications, Map to |
|
|
monitor (only top right monitor), Stop playership (which was executing a command), Protect |
|
|
me (your ships), Enter (One of your ships either from suit or with Transporter device)… and |
|
|
many other actions. |
|
|
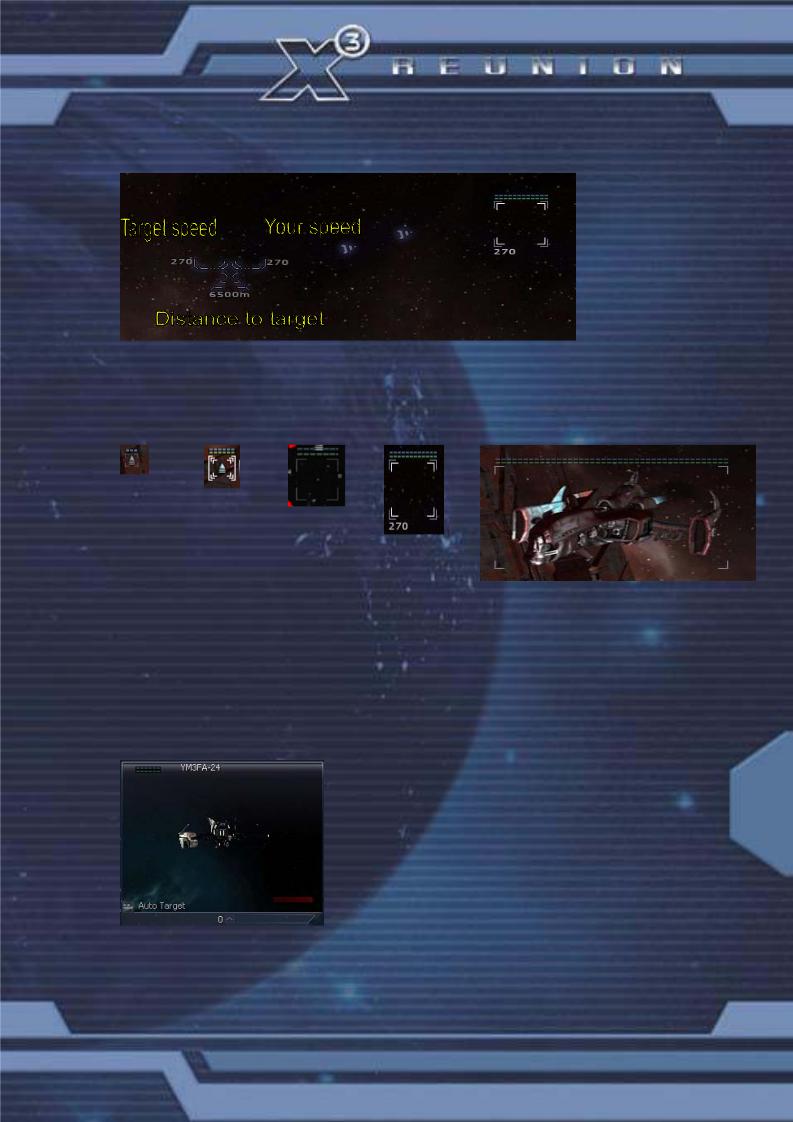
HUD |
|
|
The “head up display” is situated in the middle of your view and has various |
|
24 |
functions to aid your navigation and combat. The two numbers on the top left |
|
are your current speed and selected target speed. |
||
|
||
|
This is an image of an active HUD. |
|
|
The HUD is “active” when you have a target selected. The number in the top |
|
|
right is the target’s current speed and at the bottom is its current distance |
|
|
away from you. Graphic of docking with speed above limit: |
|
|
When an enemy is targeted the same data appears on the HUD, but this |
|
|
time in red. In combat a series of red, decreasing size markers point in the |
|
|
direction of the enemy vessel to aid target acquisition. The target ship is |
|
|
surrounded by the laser-targeting computer indicator (brackets), which |
|
|
calculates where you should fire to hit your foe. |
|
|
This is referred to as ‘leading’ the target. If you fire where your foe is then your shots will miss, |
|
|
as the enemy will have moved by the time your shots get there. So you need to fire ahead of |
the target where it will be when your shots arrive. This is what the laser-targeting computer achieves. It can be disabled in the options menu and like most equipment, upgraded. All enemy objects will appear as red in the Radar.
Below is an active HUD tracking
A single click on a symbol of the target system or on a bracketed object will set the active target and open the context menu for it. A double click will activate the default action in the context menu.
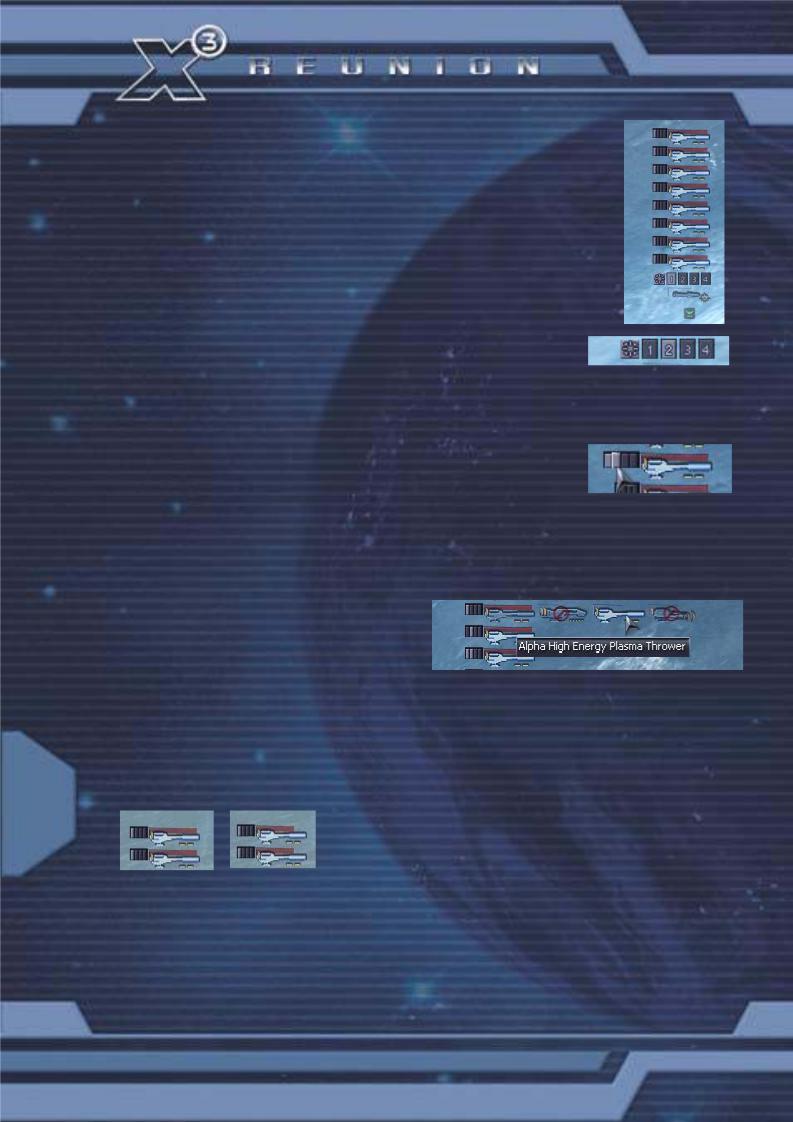
1 |
2 |
3 |
4 |
5 |
Images 1 to 5 show different versions of the bars holding information for tracked objects:
1 - A ship icon as seen in the target brackets. Only has short shield energy bar.
2 - The active target icon as part of the target brackets. Shield and hull + brackets. 3 - A ship on screen and in range but not actively targeted: Shield and hull.
4 - Active target on screen: shield and hull
5 - Ship with surrounding onscreen brackets at max size
The size of brackets marking an object in the players view scales depending on the visible size of the object onscreen. It has a minimum size that is just a little bigger than the brackets around the active target icon in the target system circle and a maximum size for close objects.
You can also open multiple “mini-monitor” views and target them via the function keys (see keyboard section)
that enable you to track and control many objects and/or 25 targets at once.
There are two potential monitors one left one on the right. The left one is always dedicated to auto target; the right one is the only monitor than can be mapped to another action.
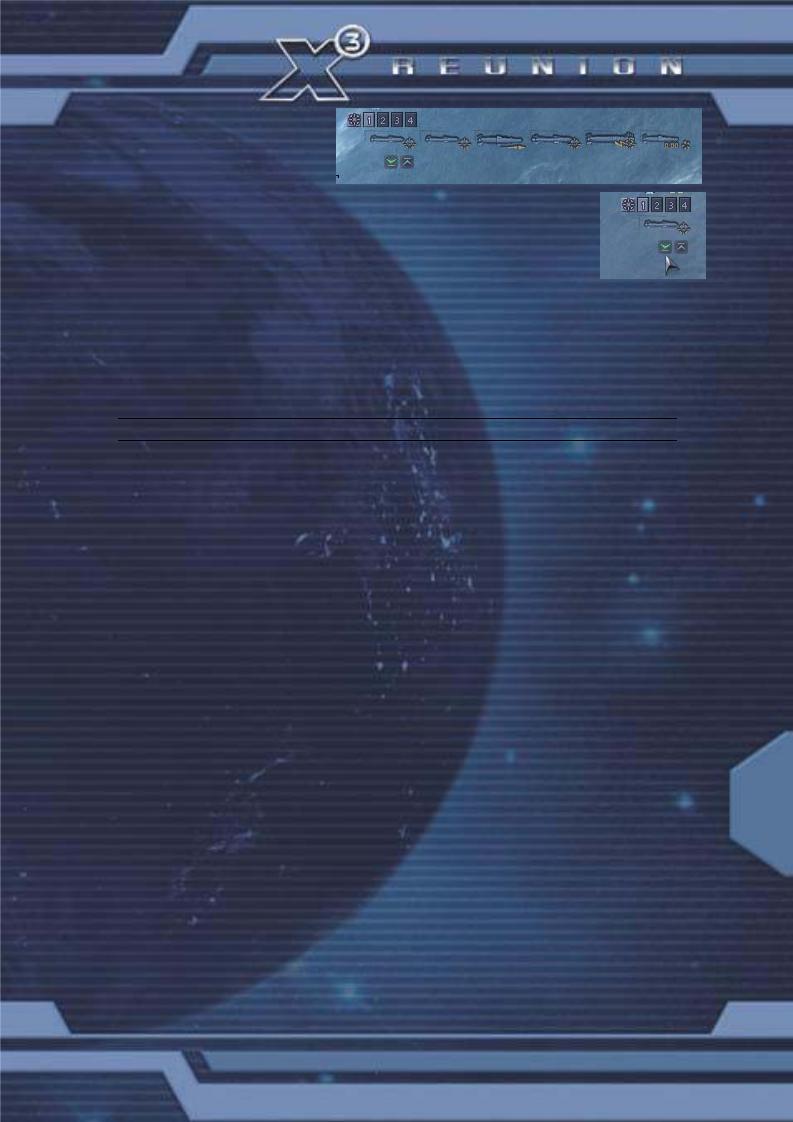
Weapons Control System
The Weapon Control System originally required ships to be docked in order to install lasers into laser slots and then while flying, when docked it would only be possible to use the laser groups to select which combinations of laser to use at any one time. The WCS now has advanced features that allow lasers on board the ship to be installed while flying in space.
In this example with the graphic on the right, there are four weapon groups as listed at the bottom 1,2,3,4, with eight lasers in-group one.
The weapon location grid indicators on the left of each laser show to which group the weapon is allocated.
The group number like the number 2 group on the right as is highlighted on the list of 1 to 4. When group 1 is selected, all lasers that are in-group 1 will fire and those that are not in that group will not fire.
First, click on the weapon location grid indicator to relocate the laser in to another group like the next graphic on the right. By selecting one of these the weapons in that group will now be available by selecting the group by selecting 1,2,3,4.
A weapon can exist in more than one group, but remember if your ship can carry eight lasers, you can have four groups with two lasers, or combinations like two groups with three and a group of two.
It is important to balance your weapons into groups, so you can use different powered lasers against different classes of ships, like light lasers against M5 ships and heavier group of lasers with a M3 or M6. You can even have all of the lasers listed in group four for short powered bursts against a larger more powerful ship.
By clicking on the laser, the currently installed weapon is highlighted in the menu, any weapons that can be installed in that slot are listed normally, and any weapons that on board, but cannot be installed in that slot (either because its too big, or
because there are none left) will be shown with a red symbol over the top of them.
This upgrade now makes it possible to change weapons while in flight; Note, it is important that the groups of lasers are setup carefully, as it won't be quite so easy to enable or disable weapons from the current group in the heat of battle. Here is a possible layout a ship could have……..
Group 1 = 2 A-HEPT; Group 2 = 1 A-HEPT+1ID; Group 3 = 2 A-PAC;
Group 4 = 2 A-PAC+2 B-IRE.
26 |
Weapon Energy Indicators |
As you fire your weapons you will see the red bar above |
each weapon drain. When the bar is back to the original position on the right they will be fully recharged.
Remember that due to laser energy limitations it is important not to fire all of the lasers at once. Higher-class weapons consume a lot of energy. Using lower-class lasers may allow a ship to fire more or less continuously, because the recharge rate will be higher than the energy consumption. So in certain types of combat it may be to your advantage if you use a lower-class of laser in higher-class ships, enabling you to shoot for a much longer time.
Missiles
Just below the icons for the lasers, is the missile icon. It shows the installed missiles and each missile can be clicked on the change the active missiles.
Turret View
If your ship has a turret, you can click on the icon below the missile, and another icon will apear on the right, clicking on that will change your view to the turret weapon.
"I've seen things, you people wouldn't believe, hmmm.
... attack ships on fire off the shoulder of Orion.
I've watched C Beams glitter in the dark near the Tannhauser Gate. All those moments, will be lost in time like tears in rain..."
"... time to die ...”
From the album "Blade Runner" - Vangelis - Tears In Rain
HOW TO START
The next section has the basic details to help you chose which game start to use and to also help you understand where you are, what the universe has out there and how to Trade, Fight, Build and Think in the X Universe.
So when you start a new game, you will find yourself in a small ship flying in a huge universe, like a small boat floating in the middle of a vast ocean, you might be not sure about which direction to go or what to do next. Your goals may not be small either; your aims might even include universal domination, a massive trading empire, be a hero to all, or to be all of these things and more.
These are not small goals for such a basic starting position, but they are all very achievable, this universe was made for you and if you are up to the challenge, you can make it yours.
Game Start Options
There are three main game start options, which also include the Story Plot. There are bonus game starts, some of which are available immediately and others that can be unlocked by achieving various goals within the plot games. The different storyline plot start levels only affect the equipment you start with; they do not affect the rest of the game play. The non-plot starts not only change the ship and Credits you start with but also how friendly or hostile the universe is to you.
The Quickstart is good for those who are starting out in the X universe for the first time and
even those who have played the previous versions as it has good ships that are well 27 equipped to get you off to a good and quicker start to greater riches.
The Normal game is a reasonable good start for those who are familiar with previous the X games and those new players who like not have it too easy as it gives you a basic start ship with some challenge still left for you to achieve.
Finally in the X-treme start, you are given the nearest thing to a spacesuit and a rucksack, and it is aimed at those who like to climb steep and very vertical mountains, but if you are aiming to end up with the X-treme ranks, it is good to start how you intend to carry on and it looks good in your stats.

Quick Start 2 x Salvage insurance |
Quickstart |
Quickstart |
Normal |
X-treme |
Credits |
100,000 |
|
5000 |
450 |
Ship |
Buster |
Mercury |
Buster |
Buster |
Beta Particle Accelerator Cannon |
4x |
|
2x |
|
Beta Impulse Ray Emitter |
|
|
|
2x |
5 MJ Shield |
3x |
2x |
2x |
1x |
Flight Command Software MK2 |
X |
|
|
|
Flight Command Software MK1 |
X |
|
|
|
Trade Command Software MK1 |
X |
X |
|
|
Triplex Scanner |
X |
|
|
|
Duplex Scanner |
|
|
X |
|
Boost Extension |
X |
|
X |
X |
Best Selling Price Locator |
X |
X |
|
|
Best Buys Locator |
X |
X |
|
|
Singularity Engine Time Accelerator |
X |
X |
X |
X |
Video Enhancement Goggles |
X |
|
X |
X |
Engine Tuning |
175.86-175.86 |
75-100 |
163.3-175.86 |
163.3-175.86 |
Cargo Bay |
108-108 |
3000-4000 |
108-108 |
23-108 |
With any of the levels you start there are a few recommended upgrades that are helpful to have installed, above what the ship is equipped with:
Trading system extension, Navigation Command Software
If you are starting Normal and X-treme modes the Best Buys and Best Selling upgrades are also recommended for you to purchase and install.
WHERE ARE YOU?
You start in Argon Prime the main sector of the Argon race, there are four gates North, East, West and South (NEWS). This sector is in the middle of a number of Argon Sectors, which extend to the borders of other races and their territories.
Races and their sectors (What’s it like out there?)
Argon - This is where you start (you are here) in the sector of Argon Prime, which is at the centre of their main territory. Argon sectors are fairly law abiding, well-policed and reasonably safe places to be. The Argon ships have a very industrial and functional look about them, reflecting the nature of the Argon. There is the odd pirate, but fairly active patrol ships let them know they are not welcome. Argon sectors offer a fairly safe haven for you to start your trading, and have nearby pirate sectors for you to develop your combat and ship capturing skills without damaging your good reputation too much.
Boron - Sometimes referred to as the boring Boron, they are in fact a very peaceful underwater race that are allied to the Argon. They are disliked very much by the Split, who are their exact opposites. Boron ships have an organic feel and look to them, often lightly shielded, average weapons but reasonably fast, and despite their good looks, are often cheaper than similar classes of ships elsewhere. There are only a few pirates in these sectors
28 as like the Argon ones they are well patrolled, and pirates find them too mundane for their types of business.
Teladi -Traders by nature, profits and commerce drive their sectors’ interaction with all other races. Their sectors can be infested with pirates and as a result can be both profitable and dangerous places to deal in. Teladi ships are built with other-race technologies, and are designed with profits in mind, having larger than average cargo bays but good shields. Where other races place restrictions on what ships and equipment they will sell you, the Teladi sectors only apply this rule in a limited fashion. You can't directly raise your Teladi rank by killing pirates, as the Teladi do business with them.
Split - The Split sectors can be relatively safe places to trade. Although they are mildly tolerant of some illegal trades such as space flies and slaves, and hence have some minor pirate activity in their sectors, they are not too friendly to anyone, including pirates. Their ships
are usually light on shields, with good weapons and fast. If you want to dock with their stations you will have to get on their good side by proving you are worthy of respect, usually by showing your skill in combat. Try removing some pirates and see how they respond.
Paranid – An arrogant race, who look upon all others as unworthy of their attention. They may choose to raise their opinion of you to a mere unholy miscreant should you catch their good side by killing the odd pirate or two. Doing so might allow you to soil their presence by docking at their stations. Their ship technology is very good, producing fast ships with advanced weapons, but low cargo space. They provide fairly save havens for trading and police their sectors with fleets of ships that remove any hostile forces with speed. Their sectors are like those of the Boron, - in that they are good places for safe trading and advanced equipment.
Pirate - These sectors are lawless territories and wastelands. Do not take them lightly. Being risky places to travel across, ensure your transporters are protected should they choose to navigate through such sectors in their trading ventures. You will not find any police patrols scanning your ship for illegal wares, but this freedom is balanced out by the greater risk of attack. Their ships are generally well equipped with weapons, fast and deadly in packs of Raider, Vanguard, Sentinel, Hauler and Standard fighter class ships.
Xenon - These sectors are only for those who have ships armed to the teeth or fast enough to evade Xenon interceptor craft. Your combat skills should be formidable, your nerve all but unbreakable. In some of their sectors you will find enough Xenon present to test your skills in navigation and evasion. With the ability to calculate intercept and attack vectors far faster than any organic being, your best chance of survival may well be through brute force tempered with a greater than average degree of luck.
Kha’ak - You will find here your place to die, many times over. When your reputation is high enough you will be able to access the Kha’ak sectors through the purchase of sector coordinates. Should you be foolish enough, you may consider jumping to them. Here you can improve your fighting skills and ranks, albeit at great risk to your well-being.
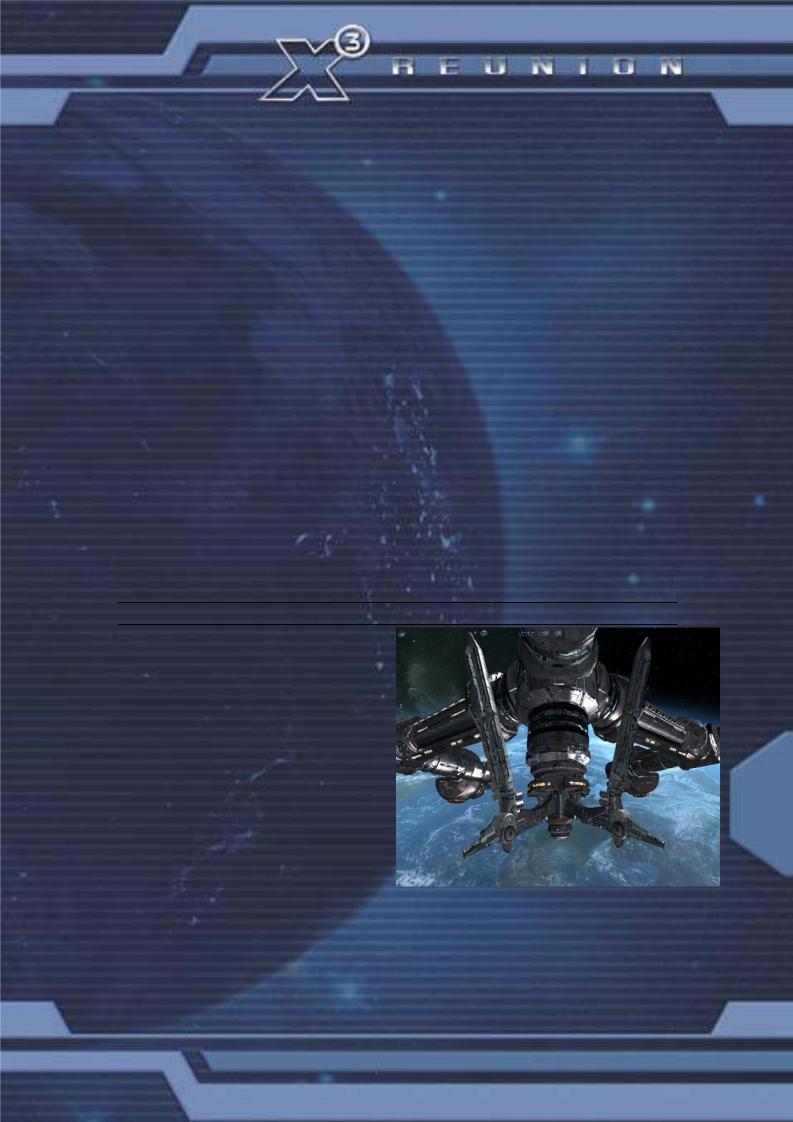
HOW TO DOCK AT STATIONS
Docking with stations
Docking of ships with stations can be completed optionally under manual control (only to be carried out by skilled pilots) or automatically by using the Quick Menu,
[ Target ] [ Dock ] or by keyboard [ Shift+d ] (Docking Computer required) if keys are mapped, or the [ Shift+u ] keys for Auto Pilot. The station’s docking clamps will secure the ship, protected from harm within
its extremely powerful shields. |
29 |
|
|
All stations have implemented the upgrade |
|
to external clamp docking, which though |
|
originally designed to allow larger ships to |
|
dock at all stations, became more widely |
|
adopted when it was made a political issue, with heavy lobbying from the Teladi and Split. |
|
Their disagreement was about the continuously rising costs of repairing internal station |
|
damage, caused by young unskilled pilots who, often intoxicated by space fuel or other illegal |
|
substances, damaged the station while entering or leaving the docking bays. |
|
Many suspect that this is really motivated by the Teladi’s desire to increase internal storage of |
|
all their stations, so they can use large surplus stocks to influence the markets. |
|
Others have suggested that the Teladi and Split realised that this development would result in less ships parked in stations, and this would force stations to be more reliant on free traders, which has been seen to be the case since docking clamp installations became the norm.
The Command Console is one of the most powerful functions within X³: Reunion. Here you will find many features that will allow you to manage your ships and factories. You can choose by default which races are your enemy with the Friend-Foe recognition system. The Command Console is accessed from the Main Menu and then pressing Enter, Ship or by [ Shift+c ] while outside of the menus.
Eventually, you will have to dock at a station, and especially early on, you’ll need to do this frequently. If you have selected a target station, select [ Target ] [ Dock ] which will tell your ship to dock with it.
If you have read the section detailing the keyboard then you will know some of the keyboard short cuts by now. After selecting a Target Station, by pressing the [ Shift+d ] keys will also tell your ship to dock at your target depending on the installed software upgrades your ship has. After this selection, your ship will now start its docking procedure, leaving you free to do other things in the other menus if you want to, such as control other ships and manage factories.
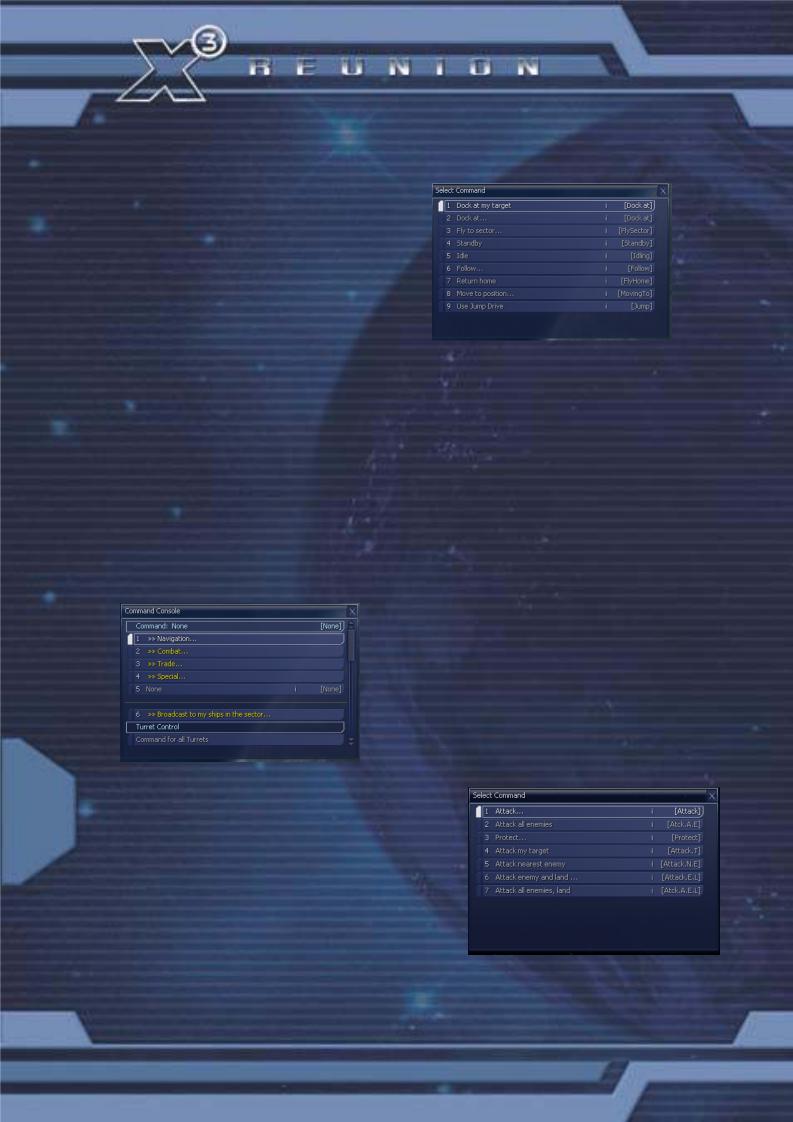
Other Console Commands
By default every ship you acquire (legally or illegally) will have the basic command console software installed that allows you to navigate your vessels. However, there are various upgrades that can be purchased that will enhance the functionality of the console and enable the automation of your fleet of ships.
The graphic shows a ship with the “Trade”, “Special” and “Combat” software extensions installed. Of course, these upgrades can be all installed together.
Once an upgrade has been purchased, your ship will have additional sub-commands available as the following examples show. There are two different (I and II) upgrades that can be acquired for your ships that add functionality in each section. For example there is Combat I and II.
Once a combat upgrade has been acquired you can set 30 the intelligence of each weapon turret (if available),
including missile fire probability, on the ship. Since the larger ships can have many turrets it is entirely possible to establish a mix between missile defence and offensive posture around your vessel. Bear this in mind when you are “shopping” for weapons to mount into your turrets. High powered, slow firing lasers are no match for small nimble fighters and missiles, so mix in lower powered faster firing ones. You will need to seek out the various upgrades, as not all are necessarily available at
the same place, so you will have to travel to other race sectors for some.
"When I examine myself and my methods of thought, I come to the conclusion that the gift of fantasy has meant more to me than my talent for absorbing positive knowledge." - Albert Einstein
 Loading...