


WarBirds III
Draft
Manual
29th May 2002
Copyright © 2002
iEntertainment Network
Copyright Notice
Copyright © 2002 by iEntertainment Network. All rights reserved.
This manual and the WarBirds III program are copyrighted and contain proprietary information. No one may give or sell copies of this manual or other works of iEntertainment Network, to any person or institution, except as provided for by written agreement with the copyright holder.
Disassembly, reverse compilation, and any other form of reverse engineering of the WarBirds III program are unauthorized. Any person/persons reproducing any portion of this program, in any media, for any reason, shall be guilty of copyright violation and criminal liability as provided by law, and shall be subject to civil liability at the discretion of the copyright holder.
Questions or Problems
If you have difficulties with this game and cannot find the solution in this manual, you can also obtain customer service online. We can be reached as follows:
Web site: |
http://www.ient.com/warbirds/ |
Email: |
wbtech@ient.com or wbaccounts@ient.com |
Telephone: |
919 678 8834 12 noon to 8pm Eastern Time on Friday or Saturday |
iEntertainment Network and the iEntertainment Network logo are trademarks of iEntertainment Network. All other companies or products mentioned herein are the property of, and may be trademarks of their respective owners.

Contents
Download & Installation |
9 |
PC System Requirements . . . . . . . . . . . . . . . . . . . . . . . . . . . . . . . . .9
Macintosh System Requirements. . . . . . . . . . . . . . . . . . . . . . . . . . .10
Downloading & Installing . . . . . . . . . . . . . . . . . . . . . . . . . . . . . . . . .11
DirectX 8.1 . . . . . . . . . . . . . . . . . . . . . . . . . . . . . . . . . . . . . . . . . . . .11
Latest Drivers . . . . . . . . . . . . . . . . . . . . . . . . . . . . . . . . . . . . . . . . . .12
Preflight Selections |
13 |
3D Device Selection . . . . . . . . . . . . . . . . . . . . . . . . . . . . . . . . . . . . .13 Setting Up your Game Controllers . . . . . . . . . . . . . . . . . . . . . . . . . .14 Changing the Game Controllers and Actions. . . . . . . . . . . . . . . .15 Selecting a Controller. . . . . . . . . . . . . . . . . . . . . . . . . . . . . . . . . .15 Centering the Joystick, Rudder and Throttle . . . . . . . . . . . . . . . .16 Calibrating your Game Controllers. . . . . . . . . . . . . . . . . . . . . . . .16 Flight & Offline Setup . . . . . . . . . . . . . . . . . . . . . . . . . . . . . . . . . . . .17 Sound Settings . . . . . . . . . . . . . . . . . . . . . . . . . . . . . . . . . . . . . . . . .20 Color Settings . . . . . . . . . . . . . . . . . . . . . . . . . . . . . . . . . . . . . . . . . .21 Video Settings . . . . . . . . . . . . . . . . . . . . . . . . . . . . . . . . . . . . . . . . .22 Stick Force . . . . . . . . . . . . . . . . . . . . . . . . . . . . . . . . . . . . . . . . . . . .23 Customizing the Input Mapper . . . . . . . . . . . . . . . . . . . . . . . . . . . . .24
Contents |
WarBirds Manual |
Flying Basics |
25 |
Selecting an Aircraft or Ground Vehicle . . . . . . . . . . . . . . . . . . . . . . 25 Selecting a Country & Field . . . . . . . . . . . . . . . . . . . . . . . . . . . . . . . 26 Taking Off . . . . . . . . . . . . . . . . . . . . . . . . . . . . . . . . . . . . . . . . . . . . . 27 Autopilot Settings . . . . . . . . . . . . . . . . . . . . . . . . . . . . . . . . . . . . . . . 28 Views . . . . . . . . . . . . . . . . . . . . . . . . . . . . . . . . . . . . . . . . . . . . . . . . 29
3D Cockpits . . . . . . . . . . . . . . . . . . . . . . . . . . . . . . . . . . . . . . . . . 29 Changing Field of View . . . . . . . . . . . . . . . . . . . . . . . . . . . . . . . . 29 Numpad Keys . . . . . . . . . . . . . . . . . . . . . . . . . . . . . . . . . . . . . . . 29 Joystick Hat . . . . . . . . . . . . . . . . . . . . . . . . . . . . . . . . . . . . . . . . . 30 Finding & Attacking Targets . . . . . . . . . . . . . . . . . . . . . . . . . . . . . . . 30 Dogfighting. . . . . . . . . . . . . . . . . . . . . . . . . . . . . . . . . . . . . . . . . . 30 Identifying Targets & Friendlies . . . . . . . . . . . . . . . . . . . . . . . . . . 31 Landing . . . . . . . . . . . . . . . . . . . . . . . . . . . . . . . . . . . . . . . . . . . . . . 31 Bailing . . . . . . . . . . . . . . . . . . . . . . . . . . . . . . . . . . . . . . . . . . . . . 32
Offline Missions |
33 |
Offline Practice. . . . . . . . . . . . . . . . . . . . . . . . . . . . . . . . . . . . . . . . . |
36 |
Flying Online |
39 |
Creating a WarBirds Account. . . . . . . . . . . . . . . . . . . . . . . . . . . . . . 40 Alternative payment methods . . . . . . . . . . . . . . . . . . . . . . . . . . . 40 Logging into an Arena . . . . . . . . . . . . . . . . . . . . . . . . . . . . . . . . . . . 41 Private Arenas . . . . . . . . . . . . . . . . . . . . . . . . . . . . . . . . . . . . . . . . . 42 Viewing the Activity around the Field . . . . . . . . . . . . . . . . . . . . . . . . 43
Using the Radio |
45 |
Message Display . . . . . . . . . . . . . . . . . . . . . . . . . . . . . . . . . . . . . . . 45
Radio Tuning . . . . . . . . . . . . . . . . . . . . . . . . . . . . . . . . . . . . . . . . . . 46
Transmitting a Message. . . . . . . . . . . . . . . . . . . . . . . . . . . . . . . . . . 47
Receiving Messages . . . . . . . . . . . . . . . . . . . . . . . . . . . . . . . . . . . . 47
Ignoring Other Players. . . . . . . . . . . . . . . . . . . . . . . . . . . . . . . . . 47
Game Managers . . . . . . . . . . . . . . . . . . . . . . . . . . . . . . . . . . . . . . . 48
Maneuvering |
49 |
Control Surfaces . . . . . . . . . . . . . . . . . . . . . . . . . . . . . . . . . . . . . . . 49
Trim . . . . . . . . . . . . . . . . . . . . . . . . . . . . . . . . . . . . . . . . . . . . . . . . . 50
Autotrim . . . . . . . . . . . . . . . . . . . . . . . . . . . . . . . . . . . . . . . . . . . . 51
4
WarBirds Manual |
Contents |
Maneuvers . . . . . . . . . . . . . . . . . . . . . . . . . . . . . . . . . . . . . . . . . . . .51
Structural Limits . . . . . . . . . . . . . . . . . . . . . . . . . . . . . . . . . . . . . . . .55
Overspeeding. . . . . . . . . . . . . . . . . . . . . . . . . . . . . . . . . . . . . . . .55
Overstressing . . . . . . . . . . . . . . . . . . . . . . . . . . . . . . . . . . . . . . . .56
Spin Recovery . . . . . . . . . . . . . . . . . . . . . . . . . . . . . . . . . . . . . . . . .56
Engine Management . . . . . . . . . . . . . . . . . . . . . . . . . . . . . . . . . . . .57
Bombing & Gunnery |
59 |
Bombing . . . . . . . . . . . . . . . . . . . . . . . . . . . . . . . . . . . . . . . . . . . . . .59
Executing a Bomb Run . . . . . . . . . . . . . . . . . . . . . . . . . . . . . . . .59
Gunnery . . . . . . . . . . . . . . . . . . . . . . . . . . . . . . . . . . . . . . . . . . . . . .61
Signing-On as a Gunner . . . . . . . . . . . . . . . . . . . . . . . . . . . . . . .61
Jumping Gunner Positions . . . . . . . . . . . . . . . . . . . . . . . . . . . . . .62
Artillery Spotting . . . . . . . . . . . . . . . . . . . . . . . . . . . . . . . . . . . . . . . .63
Firing Artillery . . . . . . . . . . . . . . . . . . . . . . . . . . . . . . . . . . . . . . . .63
Degrees of the Compass . . . . . . . . . . . . . . . . . . . . . . . . . . . . . . .63
Capturing Enemy Airfields & Towns . . . . . . . . . . . . . . . . . . . . . . . . .64
Ground Vehicles |
67 |
Selecting a Ground Vehicle . . . . . . . . . . . . . . . . . . . . . . . . . . . . . . .67 Driving a Ground Vehicle . . . . . . . . . . . . . . . . . . . . . . . . . . . . . . . . .68 Manning a Gun. . . . . . . . . . . . . . . . . . . . . . . . . . . . . . . . . . . . . . .69 Destroying Targets with Paratroopers . . . . . . . . . . . . . . . . . . . . .69 Offline Ground Vehicle Practice . . . . . . . . . . . . . . . . . . . . . . . . . . . .70
Carrier Operations |
71 |
Carrier Takeoffs . . . . . . . . . . . . . . . . . . . . . . . . . . . . . . . . . . . . . . . .71
Carrier Landings . . . . . . . . . . . . . . . . . . . . . . . . . . . . . . . . . . . . . . . .72
Manning a Gun. . . . . . . . . . . . . . . . . . . . . . . . . . . . . . . . . . . . . . .73
Torpedo Attacks . . . . . . . . . . . . . . . . . . . . . . . . . . . . . . . . . . . . . . . .74
Community |
75 |
Training. . . . . . . . . . . . . . . . . . . . . . . . . . . . . . . . . . . . . . . . . . . . . . .75
Squadrons . . . . . . . . . . . . . . . . . . . . . . . . . . . . . . . . . . . . . . . . . . . .76
Squad Maintenance Pages . . . . . . . . . . . . . . . . . . . . . . . . . . . . .76
Scoring . . . . . . . . . . . . . . . . . . . . . . . . . . . . . . . . . . . . . . . . . . . . . . .78
Checking your Score . . . . . . . . . . . . . . . . . . . . . . . . . . . . . . . . . .79
Checking the Bomber and Fighter Rankings . . . . . . . . . . . . . . . .79
Checking Squad Scores. . . . . . . . . . . . . . . . . . . . . . . . . . . . . . . .80
Events. . . . . . . . . . . . . . . . . . . . . . . . . . . . . . . . . . . . . . . . . . . . . . . .80
5
Contents |
WarBirds Manual |
Customizing WarBirds III |
83 |
Loading Customized Aircraft Skins . . . . . . . . . . . . . . . . . . . . . . . . . 83
Customizing Gun Sights & Gauges . . . . . . . . . . . . . . . . . . . . . . . . . 85
Customizing Sounds . . . . . . . . . . . . . . . . . . . . . . . . . . . . . . . . . . . . 86
General Sounds. . . . . . . . . . . . . . . . . . . . . . . . . . . . . . . . . . . . . . 86
Plane Sounds . . . . . . . . . . . . . . . . . . . . . . . . . . . . . . . . . . . . . . . 87
Dot “.” Commands |
89 |
Offline AI Dot Commands . . . . . . . . . . . . . . . . . . . . . . . . . . . . . . . |
. 94 |
Keyboard Commands |
95 |
Apendix A: Cockpit Controls |
99 |
Appendix B: Selection Screens |
105 |
Plane Selection . . . . . . . . . . . . . . . . . . . . . . . . . . . . . . . . . . . . . . . 106
Field Selection . . . . . . . . . . . . . . . . . . . . . . . . . . . . . . . . . . . . . . . . 107
Gunner . . . . . . . . . . . . . . . . . . . . . . . . . . . . . . . . . . . . . . . . . . . . . . 109
Squad/Score Screen . . . . . . . . . . . . . . . . . . . . . . . . . . . . . . . . . . . 110
Launch Squad Website . . . . . . . . . . . . . . . . . . . . . . . . . . . . . . . 111
Apendix C: Setup Screens |
115 |
Stick Screen. . . . . . . . . . . . . . . . . . . . . . . . . . . . . . . . . . . . . . . . . . 116
Flight Screen . . . . . . . . . . . . . . . . . . . . . . . . . . . . . . . . . . . . . . . . . 118
Sound Screen . . . . . . . . . . . . . . . . . . . . . . . . . . . . . . . . . . . . . . . . 120
Colors Screen . . . . . . . . . . . . . . . . . . . . . . . . . . . . . . . . . . . . . . . . 121
Video Screen . . . . . . . . . . . . . . . . . . . . . . . . . . . . . . . . . . . . . . . . . 122
Stick Force Screen. . . . . . . . . . . . . . . . . . . . . . . . . . . . . . . . . . . . . 123
Input Mapper Screen . . . . . . . . . . . . . . . . . . . . . . . . . . . . . . . . . . . 124
Trouble Shooting |
129 |
Cleaning up your System. . . . . . . . . . . . . . . . . . . . . . . . . . . . . . . . 129 Scanning your Hard Drive . . . . . . . . . . . . . . . . . . . . . . . . . . . . . 129 Defragmenting your Hard Drive . . . . . . . . . . . . . . . . . . . . . . . . . 129 Modem Setup. . . . . . . . . . . . . . . . . . . . . . . . . . . . . . . . . . . . . . . . . 130 Setting up a Windows Dial-Up Connection . . . . . . . . . . . . . . . . 130 Optimize your Connection . . . . . . . . . . . . . . . . . . . . . . . . . . . . . 133
6
WarBirds Manual |
Contents |
Known Problems . . . . . . . . . . . . . . . . . . . . . . . . . . . . . . . . . . . . . .135 Poor Frames per Second (fps). . . . . . . . . . . . . . . . . . . . . . . . . .135 Other Programs Running in the Background . . . . . . . . . . . . . . .135 Stuttering . . . . . . . . . . . . . . . . . . . . . . . . . . . . . . . . . . . . . . . . . .136 Flickering Water and Coastline . . . . . . . . . . . . . . . . . . . . . . . . .137 Overriding Processor Detection to Eliminate Exception Crashes137 Loss of Frame Rate while Flying over Towns. . . . . . . . . . . . . . .138 Textures show up as White on a Macintosh. . . . . . . . . . . . . . . .138 Macintosh Radeon and Geforce 2 Cards. . . . . . . . . . . . . . . . . .139 Cursor Keys don't change Views . . . . . . . . . . . . . . . . . . . . . . . .139 Loss of USB Joystick Functionality . . . . . . . . . . . . . . . . . . . . . .139 The W-Buffer . . . . . . . . . . . . . . . . . . . . . . . . . . . . . . . . . . . . . . .139
Customer Service |
141 |
Online. . . . . . . . . . . . . . . . . . . . . . . . . . . . . . . . . . . . . . . . . . . . . |
141 |
Tech Support . . . . . . . . . . . . . . . . . . . . . . . . . . . . . . . . . . . . . . . |
142 |
Billing & Account Information . . . . . . . . . . . . . . . . . . . . . . . . . . . |
142 |
Credits |
143 |
Index |
147 |
7
Contents |
WarBirds Manual |
8

Download & Installation
PC System Requirements
•Pentium II, 400 MHz, 600 MHz recommended.
•128 MB RAM, 384 recommended for best play.
•DirectX 8.0 compatible, or DirectX 8.1 compatible (recommended for best play) sound and video cards with Windows 98SE, ME, 2000, XP drivers, as applicable to your operating system.
•Joystick, mouse and keyboard. A throttle and rudder pedals are recommended. Several manufacturers make models of their flight control systems for the PC.
•14.4K or faster connection to the Internet. To connect via PPP/ SLIP/LAN, you must have Windows Dial-up Networking and TCP/ IP drivers installed (included with Windows).
•16 MB 3D card.
•Recommended 3D cards:
–ATI Rage 128
–ATI Rage Mobility128
–ATI Radeon
–Matrox G400
–NVidia GeForce 256
–NVidia GeForce 2MX
–NVidia GeForce 2
–NVidia GeForce 2 Ultra
–NVidia GeForce 3
–NVidia GeForce 4
–NVidia Quadro
–NVidia Quadro 2 Pr0
–Power VR Kyro II
Download & Installation |
WarBirds III Manual |
Macintosh System Requirements
•PowerPC-based Macintosh or compatible computer, 400 MHz or faster.
•MacOS version 8.6 or higher.
•256 MB RAM required (needs at least 300 MB virtual memory under 9.x).
•OpenGL version 1.2.1 (included in the download).
•A 14.4 K or faster connection to the Internet for online play.
•Joystick, mouse and keyboard. Throttle and Rudder pedals are recommended. Several manufacturers make models of their flight control systems for the Macintosh.
•3D accelerator card with Direct Support for Apple's OpenGL.
•Supported 3D Cards
–ATI Rage 128 VR
–ATI Nexus
–ATI Radeon
–Nvidia GeForce 2MX
–Nvidia GeForce 3
•Mac compatible joysticks tested and supported:
–Saitek Cyborg 3D
–Saitek Cyborg Gold
–Saitek X series (only supported under OS 9.x)
–MacAlly I-Stick
–Gravis Dual control Xtreme
–CH Pro F16 Fighterstick, Pro Throttle, and Pro Pedals ADB (no support for ISP callibrator)
–CH F-16 Combat Stick, CH ProThrottle, CH ProPedals USB Thrustmaster FCS Mk I, Thrustmaster WCS, Thrustmaster RCS ADB
10
WarBirds III Manual |
Download & Installation |
Downloading & Installing
Before installing WarBirds III, close all other applications that are running. After installation is complete, restart the computer so that all the new settings can take effect.
If you have trouble downloading, there is a CD with all the WarBirds III files for only $9.95 (at time of writing), which can be ordered from the Downloads page at http://www.ient.com/warbirds/downloads.html.
1.Download WarBirds III from one of the following sites:
–WarBirds III Web site at http://www.ient.com/warbirds/
–FurBall at http://www.furball.warbirdsiii.com/
2.PC Only: Using Windows Explorer locate the downloaded application, and double-click on it. Follow the instructions on the screen.
3.Mac Only: Using Stuffit Expander, uncompress the downloaded file. It unstuffs into a folder called WarBirds III. Double-click on the WarBirds III Installer file inside this folder. There is also an OpenGL 1.2.1 installer folder. Double-click on the OpenGL 1.2.1 file in this folder.
4.Launch WarBirds III by double-clicking on the WarBirds III application, which is located in the WarBirds III folder.
DirectX 8.1
Many games and other Windows programs use DirectX, a standardized set of tools which allow programs to communicate with and control your system’s hardware. DirectX-based programs use DirectX ‘drivers’ to perform many functions, such as painting graphics to the screen or having your sound card play sound effects.
With new technology constantly being introduced (such as next generation 3D Accelerators), DirectX is updated to support these new technologies, and the hardware manufacturers release new ‘drivers’ for use with the most recent version of DirectX.
We advise that players download and install DirectX 8.1 from MicroSoft at http://www.microsoft.com/directx/homeuser/downloads/
11

Download & Installation |
WarBirds III Manual |
Latest Drivers
We recommend that you download and install the latest drivers for your hardware. This includes your Joystick, Sound card and Video card.
Updated drivers can be obtained from each manufacturer's Web site.
Recommended Video Card Manufacturers
Connect to the Internet, then click on a link below to go to that manufacturer’s Web site.
•NVidia—http://www.nvidia.com/
•Matrox—http://www.matrox.com/
•ATI—http://www.ati.com/
12
Preflight Selections
Close all other applications, toolbars, animated cursors and system tray applets when playing WarBirds III. See “Other Programs Running in the Background” on page 135.
PC Users: Launch WarBirds III from the Windows desktop. Select
Start, then Programs, then iEntertainment Network, then WarBirds III, and then WarBirds III.
Mac Users: Launch WarBirds III for the Macintosh by double-clicking on the WarBirds III application.
3D Device Selection
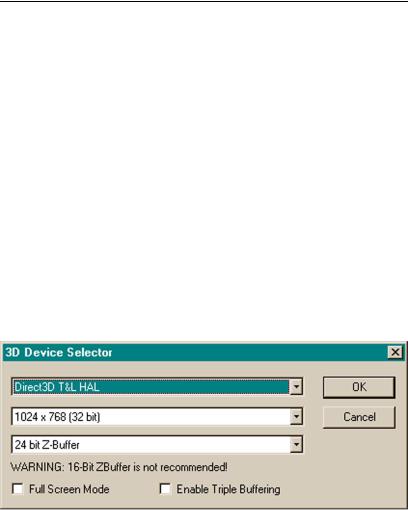
Before launching WarBirds III set your Windows Display Settings to High Color (16 bit) or higher. When WarBirds III is launched, the 3D Device Selector window is displayed.
3D Device Selector Window
Preflight Selections |
WarBirds III Manual |
1.Select an option from the drop-down menu. If you see T&L HAL use it. It means transform and lighting (T&L) calculations are done by the 3D hardware. This is a good thing since it frees up CPU cycles.
2.Select a resolution, this must be the same or less than your Windows setting. 32 is recommended, 16 may cause polygon flashing or tearing.
3.Select one of the Z-Buffer options. Set this to the highest you can, but be aware that some hardware (NVidia) needs to have this match the bit depth you select for resolution.
4.Select Full screen mode to have the WarBirds III window take up the whole of the screen.
5.Click the box to enable triple buffering, if required. Triple Buffering improves the smoothness of the graphics, but it can be system intensive. You may find your framerate drops when it is selected.
6.Click Okay.
Exit the rolling credits screen by pressing Esc or clicking. The Plane Selection screen is displayed with the Main menu on the left.
Setting Up your Game Controllers
WarBirds III automatically configures your Game Controllers, so most players do not need to do anything.
Mac Users using a USB Joystick: Download and install the Mac Joystick Calibrator.
1.Download the file iSP_Calibrator.sit (1.6KB, 6/22/01) from http:// files.warbirdsiii.com/WarBirds/WBIII/ISp_Calibrator.sit.
2.Double-click to unstuff the downloaded file.
3.Double-click on the unstuffed file, ISp Calibrator.
4.Click on the Calibrate button.
5.Follow the instructions on the screen.
The purpose of this utility is to solve Macintosh joystick calibration issues such as getting only 50% throttle input or pitch input. If you see the calibration button grayed out, this means that your joystick does not support calibration via the ISP calibrator. To calibrate your stick you need to use your joystick manufacture's software. This utility is NOT meant for use as an input mapper (programming certain buttons to perform specific functions). To program specific buttons use the
14
WarBirds III Manual |
Preflight Selections |
Input Mapper within the WarBirds III setup dialog. This explains why the button graphics within the calibrator screen display a red crossed circle. WarBirds III does not use Input Sprockets to map functions to keys.
Changing the Game Controllers and Actions
To customize your Game Controllers, select Setup from the Main menu. The Setup screens are displayed, with the default Stick menu at the front. WarBirds III allows you to use multiple joysticks, rudder pedals and a throttle control, with each action on a given controller controlling a particular movement of the aircraft. (See also “Customizing the Input Mapper” on page 24).
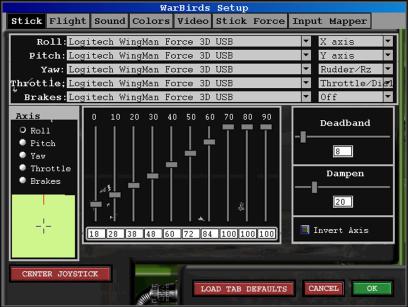
Stick Setup Screen
Selecting a Controller
1.Select a joystick from the drop-down menu alongside Roll in the top part of the Stick screen. That joystick will control the Roll function of the aircraft.
2.Then select the Axis that you want to control the Roll. The default is the X-axis.
3.Repeat steps 1 and 2 with the Pitch, Yaw and Throttle controllers, until each function is controlled by the controller in the way that you prefer.
15
Preflight Selections |
WarBirds III Manual |
Centering the Joystick, Rudder and Throttle
1.The box in the bottom lefthand corner represents the limits of the joystick’s movements along the vertical and horizantol axes, with the cross showing the position of the joystick. Move the stick to the limit of its movement in all directions a couple of times, then click Center Joystick. Repeat if necessary.
2.The red line at the top of the box shows the position of the rudder. If you have a “twisty” joystick, twist the joystick to its full extent in each direction a couple of times, then click Center Joystick.
3.The bar on the right of the box represents the throttle position (assuming you have one). Move the throttle control to maximum and minimum a couple of times, and then select Center Joystick. If you have rudder pedals, move them as far as possible in each direction, and the click Center Joystick.
NOTE: Whenever you fly in WarBirds III, release all controls and then press F12 to center the joystick and ensure precise control.
Calibrating your Game Controllers
1.Select the action you want to calibrate, Roll, Pitch, Yaw, Throttle or Brakes.
2.Select Center Joystick to center the joystick that controls the action you have selected.
3.Adjust the slider controls, deadband and damper until the cross in the calibration square moves with the controller as you want it to.
4.Select OK to return to the Plane selection screen.
16

WarBirds III Manual |
Preflight Selections |
Flight & Offline Setup
To adjust the Flight and Offline Mission options, select Setup from the Main menu, and then the Flight tab. Also see“Offline Missions” on page 33 .
Flight Setup Screen
1.Click to enable or disable the General Settings. When the button is lit that setting is enabled.
–Show Pitch Ladder—Select to have the pitch ladder displayed in the cockpit.
–Show HUD—Select to have the HUD (red text) displayed when flying.
–Show Stickset Messages— Select to be notified that you have swapped stick sets. (see “Customizing the Input Mapper” on page 24 for information regarding Sticksets).
–rShow Radio Bar Buttons— When checked, the Radio bar buttons are displayed (see “Using the Radio” on page 45).
–Show Help Bar—When checked the help buttons are displayed.
17
Preflight Selections |
WarBirds III Manual |
2.Set the percentage of brake power that is used when the brakes are initially engaged and whether to have the differential brakes activated from the rudder or the joystick.
3.Select which mouse button you want to:
–Tune Radio to Player
–Send Check Six message to Player
4.Click to enable or disable the Offline Settings. When the button is lit that setting is enabled.
–Unlimited Ammo— Select to never run out of ammo.
–Invulnerable to Weapons— Select to never have your aircraft damaged when hit by enemy fire.
–Disable Blackouts/Redouts— Select to disable the blackouts and redouts that occur when pulling so many Gs that the blood supply to the brain is affected.
–Disable Structural Limits— Select to stop the plane breaking up when being pushed beyond its limits (see “Structural Limits” on page 55).
–No Cockpit— Select to have no cockpit displayed when flying.
5.Select one of the four offline missions.
–Free Flight— An open arena with no enemy pilots. Practice takeoff, landing, and maneuvering to become familiar with various aircraft.
–Target Drones— An open arena with one drone circling each enemy field. Use to practice shooting down almost sitting targets.
–Air Attack— And the enemy just became better—and more numerous. This mission gives a close approximation to the online dogfighting. Try to shoot down the enemy before they shoot you!
–Bomber Ambush— There is a squadron of Bombers on its way to bomb your airfield. Try to take them out before they arrive.
To practice attacking ground vehicles offline:
a.Select the Bomber Ambush mission.
b.Open the radio bar and enter .offbombermodel ground
c.To return to flying against aircraft, open the radio bar and enter .offbombermodel ground
18
WarBirds III Manual |
Preflight Selections |
6.Select the AI level of your enemies:
–Ace
–Veteran
–Rookie
7.Enter the number of enemies you want flying against you. Zero gives a random number of enemies. There are always an equal number of pilots flying your country as there are enemies, plus yourself and any Wingmen.
8.Enter the number of Wingmen you want flying with you.
9.Select a time of day from the drop-down menu.
–Dawn
–Morning
–Noon
–Afternoon
–Evening
–Dusk
–Night
10.Enter a starting altitude. Zero starts you on the runway.
19
Preflight Selections |
WarBirds III Manual |
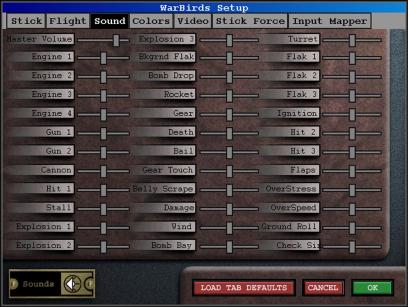
Sound Settings
To adjust the Sound levels, select Setup from the Main menu, and then the Sound tab.
Sound Setup Screen
Move a slider to the right to increase the volume and to the left to decrease it.
20
WarBirds III Manual |
Preflight Selections |
Color Settings
To adjust the Color levels, select Setup from the Main menu, and then the Color tab.
Color Setup Screen
Use the color sliders to change the shade of the icons displayed while flying.
The message box transparency can also be changed by moving the
Msg Box Transparency slider.
21

Preflight Selections |
WarBirds III Manual |
Video Settings
Generally, the video settings affect how WarBirds III looks when you are flying. Upping a setting improves the look, but it also tends to decrease the number of frames per second (fps) your computer can process. For further information about changes you can make to improve your fps, please see “Trouble Shooting” on page 129.
To adjust the Video levels, select Setup from the Main menu, and then the Video tab.
Video Setup Screen
1.Set the Var Level between 250 to 50,000. Higher numbers look better, but may lower frame rate.
2.Set the Texture size. This allows you to limit how much VRAM is used by restricting the size of the textures used. No Limit uses whatever size the original artwork is, the others set the maximum.
3.Select the amount of detail seen on the ground objects. More slows the system down, but the objects on the ground are more detailed and prettier.
4.Select how far away the highest Level Of Detail (LOD) on the aircraft is active. Higher may lower frame rate.
5.Turning off Environmental maps removes the metalic reflection
22
WarBirds III Manual |
Preflight Selections |
effects on some aircraft (P-51D for example). May improve frame rate on some systems if turned off.
6.Select the font size of type in the radio bar and GUI.
7.Select the quality of the appearance of the terrain. Higher slows the sytem down, but is prettier.
8.Select the maximum distance out to render ground clutter. 0 disables it completely. Ground Vehicles beyond your clutter range setting are not displayed.
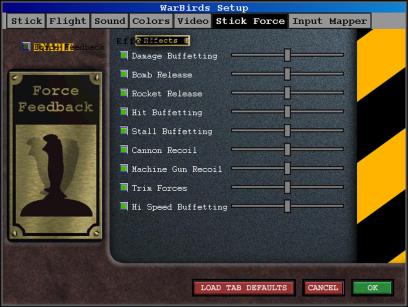
Stick Force
For those with a force feedback joystick, which supports Direct X, these settings can be customized to your personal preferences.
To adjust the Stick Force levels, select Setup from the Main menu, and then the Stick Force tab.
Stick Force Setup Screen
1.Click on the box next to Enable to toggle force feedback on and off.
2.Change the sliders to reflect how much feedback you want for a particular effect.
23

Preflight Selections |
WarBirds III Manual |
Customizing the Input Mapper
WarBirds III allows you to customize which commands are sent by each key on the keyboard, and button or hat on your joystick.
To customize your Input Mapper, select Setup from the Main menu, and then the Input Mapper tab.
Input Mapper Setup Screen
1.Select a Stick Set, 1, 2, 3 or 4. Stick Sets are changed ingame by pressing F5, F6, F7, or F8.
2.Select an action from one of the four drop-down menus, View, Gunnery & Bombing, Flight, or Misc.
3.Select Press to Change Control on one of the four Control sections. Up to four Controls can be set for each action.
4.Press the key or button to perfrom the selected action, or select Hat and choose an option from the drop-down menu. A key or button can be selected to perform more than one action. Setting F to fire both your primary and secondary weapons, for example.
5.Repeat until you have all the stick sets set up with your preferred controls for each action.
To check whether a key or action is already in use, click the Key Look Up button, then press or click the controller button or hat.
24
Flying Basics
Selecting an Aircraft or Ground Vehicle
The Plane Selection screen is the default screen when you first enter the game. If it is not already in view, exit the Setup screens by selecting OK or Cancel, or select the Plane tab from the top of the Selection screens.
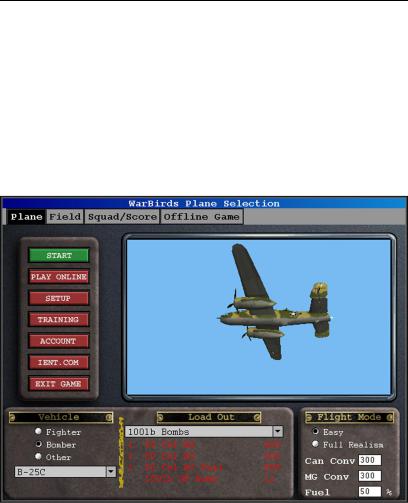
Plane Selection Screen
1.Select Fighter or Bomber in the bottom left, depending on which type of aircraft you want to fly, or Other to drive a ground vehicle.

Flying Basics |
WarBirds III Manual |
2.Then click the drop-down menu to select an aircraft or ground vehicle from the list.
3.Select a Load Out from the drop-down menu, to change the gunnery, rockets, bombs, torpedos and paratroopers carried.
4.Select whether to fly with the Easy or Realistic flight model. Then select the distance at which you want your canon and machine guns to converge, and the percentage of fuel with which your aircraft starts out.
Selecting a Country & Field
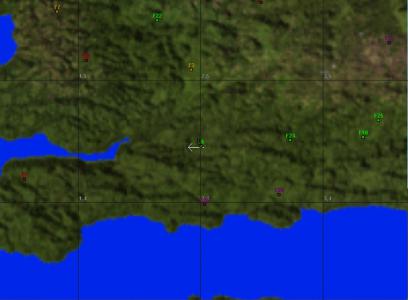
Select the Field tab from the top of the Selection screens. The Field screen is displayed.
Field Selection Screen
1.Select a Terrain from the drop-down menu when flying offline. In the online arenas the map is set by the arena.
–Europe
–Malta
–Tunisia
The “b” terrains are 256x256.
26
WarBirds III Manual |
Flying Basics |
2.Select a Country color from the drop-down menu on the bottom left. Either Red, Green, Gold, or Purple (not all countries are available when flying in certain online arenas).
3.Select a Field on the map by clicking on it, or by selecting it from the drop-down menu. When online, right-click (Ctrl + click for Macs) on Carriers or any drone blips to join as a gunner. Your location is indicated by parentheses, [F5] for example.
• |
Cv: Carrier vehicle |
• |
P: Outpost |
• |
Fs: Small field |
• |
T: Town |
• |
Fm: Medium field |
• |
V: Village |
•Fl: Large field
NOTE: For additional terrains, go to the Downloads page at http:// www.ient.com/warbirds/downloads.html.
Map Controls
•Zoom in and out of the map by using the ] and [ keys, pan using the arrow keys. Or click on the Plus, Minus and arrow buttons on the screen.
•Toggle the floating map by using F1.
•Toggle the reference grid by clicking the Grid button.
Taking Off
These instructions assume that you are flying using the Realistic flight mode. If you have Easy mode selected, takeoff is much easier and some of these steps are not necessary. See Step 4 of Selecting an Aircraft or Ground Vehicle on page 26.
1.Select Fly from the Main menu.
2.You are seated in the cockpit on the airfield. Release all controls and press F12 to center your joystick (this is very important).
3.Ensure that the throttle setting is on zero, and then press Shift + E to start your engine(s).
4.Use = or a throttle control to rev up the engine to about 25 percent of its full power. Using the rudder make your way to the end of the runway, if you are not already there, and start rolling straight down the runway.
27
Flying Basics |
WarBirds III Manual |
5.If the aircraft starts yawing (veering to one side or the other), press A to steer left, or D to steer right (do not hold the keys down). If you have rudder pedals or a twisty joystick, use them or that instead.
6.Increase engine power to full by pressing = or 0, or by moving the throttle control as high as it can go. Press X while gaining speed to trim the aircraft.
7.When the airspeed indicator shows 100 mph or more, ease back on the joystick to lift off.
8.Once airborne, press G to raise the landing gear, and then X to trim the control surfaces.
9.Move the joystick as gently as possible until you have gained some airspeed and altitude, to avoid paper darting the ground.
10.Center the rudder by pressing S, and when heading in the right direction and at the preferred altitude press X to engage the autotrim, which keeps the plane flying straight and level.
Autopilot Settings
Autotrim mode: Press X to engage the autopilot. The plane flies straight and level until X is pressed again or until you take over the controls once more.
Speed mode: Press Shift + X to put the autopilot in speed mode. The autopilot attempts to maintain the speed of the plane, by climbing or descending, as necessary.
Angle mode: Press Ctrl + X to instruct the autopilot to maintain the climb or descent angle of the plane at the moment it was engaged. If necessary, the plane descends to gain the speed to maintain an angle of ascent. Be careful if your plane is descending when you engage Angle mode, or you could crash.
28
WarBirds III Manual |
Flying Basics |
Views
3D Cockpits
Use the View system to look around and keep your situational awareness (SA) high.
There are three view modes to toggle between in the 3D cockpits:
•Snap
•Pan to Snap
•G-Force
Shift + O jumps between the different view systems.
Snap View: The default view is the Snap view. This is when you press a key, or move the joystick hat and the view "snaps" to that position. When you release the key, or joystick hat, the view returns to the front.
Pan to Snap View: Pan to Snap is when pressing a key or joystick hat the view pans around and stops at the view position. For example, pressing 2 on the numpad pans the view from the front to the side and then to the rear.
G-Force View: G-Force view is as Pan to Snap, but the speed at which the view changes is limited by the number of Gs being exerted on the aircraft at the time.
Stickysnap: In addition, the views can be set to "stick". When "stickysnap" is enabled, pressing a key or moving the joystick hat changes the view to that position, and it stays there until another key is pressed, or the hat moved.
Type .stickysnap in the radio bar to enable it and .returnsnap to return to the default.
Changing Field of View
To zoom out (make field of view bigger), press V, to zoom in (make field of view smaller), press Z.
To return to the default field of view, press Ctrl + V or Ctrl + Z.
F4 jumps to gunsight view, F11 jumps to instrument view.
Numpad Keys
•Press 4 and 6 on the numpad to look left and right, respectively.
•Press 2 to look behind you.
•Press 5 to look straight up.
•Pressing different combinations of keys, and using 7, 9, 1 and 3
gives the 45 degree views. |
29 |
Flying Basics |
WarBirds III Manual |
Joystick Hat
•Move to the right to left to look right or left.
•Move down to look behind you.
•Move up to look straight up.
•Move to the quarter views to look in that direction.
•Hold down 5 on the numpad and move the hat to look up in that direction.
Finding & Attacking Targets
Dogfighting
The Map is used to find the nearest action in the air. Each sector on the Map is 20 miles across.
1.Put the aircraft on autopilot by pressing X on the keyboard. The aircraft flies straight and level until either X is pressed again or you take over the controls once more.
2.Press F1 to access the transparent map, F1 again to make it opaque, and again to close the map. Use the zoom keys, Shift + [ and Shift + ] to zoom in and out.
30
 Loading...