


ENGLISH - PAGES 6-9
ESPANOL - PAGINAS 10-13
FRANÇAIS - PAGES 14-17
ITALIANO - PAGINE 18-21
DEUTSCH - SEITEN 22-25
26-29

I m p o r t a n t S a f e t y I n s t r u c t i o n s
This symbol warns the user of dangerous voltage levels localized within the enclosure.
This symbol advises the user to read all accompanying literature for safe operation of the unit.
∆Read, retain, and follow all instructions. Heed all warnings.
∆Only connect the power supply cord to an earth grounded AC receptacle in accordance with the voltage and frequency ratings listed under INPUT POWER on the rear panel of this product.
∆WARNING: To prevent damage, fire or shock hazard, do not expose this unit to rain or moisture.
∆Unplug the power supply cord before cleaning the unit exterior (use a damp cloth only). Wait until the unit is completely dry before reconnecting it to power.
∆Maintain at least 6 inches (15.25 cm)of unobstructed air space behind the unit to allow for proper ventilation and cooling of the unit.
∆This product should be located away from heat sources such as radiators, heat registers, or other products that produce heat.
∆This product may be equipped with a polarized plug (one blade wider than the other). This is a safety feature. If you are unable to insert the plug into the outlet, contact an electrician to replace your obsolete outlet. Do not defeat the safety purpose of this plug.
∆Protect the power supply cord from being pinched or abraded.
∆This product should only be used with a cart or stand that is recommended by the manufacturer.
∆The power supply cord of this product should be unplugged from the outlet when left unused for a long period of time, or during electrical storms.
∆This product should be serviced by qualified service personnel when: the power supply cord or the plug has been damaged; or objects have fallen, or liquid has been spilled onto the product; or the product has been exposed to rain; or the product does not appear to operate normally or exhibits a marked change in performance; or the product has been dropped, or the enclosure damaged.
∆Do not drip nor splash liquids, nor place liquid filled containers on the unit.
∆CAUTION: No user serviceable parts inside, refer servicing to qualified personnel only.
∆Fender® amplifiers and loudspeaker systems are capable of producing very high sound pressure levels which may cause temporary or permanent hearing damage. Use care when setting and adjusting volume levels during use.
∆WARNING: The unit must only be connected to a safety agency certified power source (adapter), approved for use and compliant with applicable local and national regulatory safety requirements.
I n s t r u c c i o n e s d e S e g u r i d a d I m p o r t a n t e s
Este símbolo advierte al usuario que en el interior de la carcasa hay niveles peligrosos de voltaje.
Este símbolo advierte al usuario que lea toda la documentación adjunta para utilizar la unidad con seguridad.
∆Lea las atentamente instrucciones y sígalas al pie de la letra. Tenga en cuenta todas las instrucciones.
∆Conecte únicamente el cable de alimentación eléctrica a una toma de CA de acuerdo con las especificaciones de voltaje y frecuencia que se indican en la potencia de entrada INPUT POWER del panel posterior de este producto.
∆ADVERTENCIA: Para evitar daños, incendios y descargas eléctricas, no exponga esta unidad a la lluvia ni a la humedad.
∆Antes de limpiar el exterior de la unidad, desconecte el cable de alimentación (utilícese únicamente un paño húmedo). Deje que la unidad se seque completamente antes de volver a conectarla a la corriente.
∆Para una ventilación y refrigeración adecuadas, deje un espacio mínimo de 15.25 cm detrás de la unidad.
∆Este producto deberá estar situado lejos de fuentes de calor tales como radiadores, registros de calefacción u otros productos que generen calor.
∆Es posible que este producto esté equipado con un enchufe polarizado (un blade más ancho que el otro). Esta es una función de seguridad. Si no puede introducir el enchufe dentro de la toma de corriente, póngase en contacto con un electricista para que la cambie ya que podría estar anticuada. No anule el propósito de seguridad de este enchufe.
∆Tenga cuidado de que el cable de alimentación no se pinche ni se erosione.
∆Este producto sólo se debe utilizar con el soporte recomendado por el fabricante.
∆El cable de alimentación de este producto deberá estar desconectado de la toma de corriente cuando no se vaya a utilizar durante un período de tiempo largo o en caso de tormenta eléctrica.
∆Este producto deberá ser reparado por personal cualificado si: el cable de alimentación o el enchufe están dañados, ha caído algún objeto o se ha derramado líquido encima, el producto ha estado expuesto a la lluvia, no funciona normalmente o muestra signos de cambio en el rendimiento, ha sufrido algún golpe o la caja esta dañada.
∆Evite que goteen o salpiquen líquidos y no coloque recipientes con líquidos sobre la unidad.
∆PRECAUCIÓN: Contiene piezas cuyo mantenimiento no lo puede realizar el usuario, sino sólo personal cualificado.
∆Los amplificadores y altavoces Fender® pueden producir niveles de presión acústica muy elevados, que pueden provocar daños temporales o permanenetes en el oído. Utilice la precaución al ajustar el volumen nivela.
∆ADVERTENCIA: La unidad sólo se podrá conectar a una fuente de alimentación certificada por un organismo de seguridad (adaptador) cuyo uso esté autorizado y que cumpla los requisitos de seguridad aplicables a nivel local y nacional.

C o n s i g n e s d e S é c u r i t é I m p o r t a n t e s
Ce symbole avertit l'utilisateur de la présence de niveaux de tension à risque dans l'appareil.
Ce symbole conseille à l'utilisateur de lire toute la documentation jointe au produit pour garantir une sécurité de fonctionnement.
∆Veuillez lire attentivement toutes les instructions et vous y conformer. Respectez scrupuleusement tous les avertissements.
∆Connectez le câble d'alimentation électrique à une prise CA mise à la terre selon le voltage et la fréquence indiqués sur le panneau arrière de l'amplificateur sous INPUT POWER.
∆AVERTISSEMENT: Pour éviter l’endommagement de l’appareil, un départ d’incendie, ou un choc électrique, ne l’exposez jamais a l’humidité ou à la pluie.
∆Débranchez le câble d'alimentation avant de nettoyer le boîtier de l'appareil (utiliser un chiffon légèrement humide). Attendez que l'appareil soit complètement sec avant de le rebrancher sur le secteur.
∆Conservez au moins 15.25 cm d'espace derrière l'appareil pour permettre une aération appropriée de celui-ci.
∆Il est conseillé d'entreposer cet appareil loin de toute source de chaleur, telle que des radiateurs, des accumulateurs de chaleur ou autres unités produisant de la chaleur.
∆Cet appareil peut être équipé d'une prise polarisée (une fiche plus large que l'autre). C'est une garantie de sécurité. Si vous ne parvenez pas à insérer la prise dans la sortie, contactez un électricien pour qu'il remplace la sortie. Ne modifiez rien qui puisse supprimer les garanties de sécurité qu'offre cette prise.
∆Veillez à ce que le câble d'alimentation ne soit pas coincé ou abrasé.
∆Cet appareil doit uniquement être utilisé avec un support à roulettes ou un pied conseillé par le fabricant.
∆Le câble d'alimentation de cet appareil doit être débranché de la sortie lorsqu'il reste longtemps sans être utilisé ou en cas d'orage électrique.
∆Les réparations et la maintenance de cet appareil doivent être effectuées par un personnel qualifié dans les cas suivants : le câble d'alimentation ou la prise sont endommagés ; des objets sont tombés sur l'appareil, du liquide a été renversé dessus ou l'appareil a été exposé à la pluie ; l'appareil ne semble pas fonctionner normalement ou vous notez des changements notables dans la performance de l'amplificateur, ou encore le produit est tombé ou l'enceinte est endommagée.
∆Ne placez aucun récipient rempli de liquide sur le produit.
∆ATTENTION: Aucune maintenance ne doit être effectuée pour les pièces situées dans l’appareil. Les réparations et la maintenance doivent être exécutées uniquement par une personne qualifiée.
∆Les niveaux sonores élévés émis par les systèmes d'emplificateur et haut-parleurs Fender® peuvent entraîner des lésions auditives durables. Faites attention lorsque vous réglez ou ajustez le volume lors de l'utilisation des appareils.
∆AVERTISSEMENT: Cet appareil doit être raccordé uniquement à une source d'énergie certifiée par une agence de sécurité (adaptateur), homologuée et conforme aux exigences réglementaires du point de vue de la sécurité au niveau local et national.
I m p o r t a n t i I s t r u z i o n i p e r l a S i c u r e z z a
Questo simbolo indica che si avvisa l'utente della presenza di livelli di tensione pericolosi all'interno della struttura.
Questo simbolo indica che si consiglia all'utente di leggere tutta la documentazione allegata ai fini del funzionamento sicuro dell'unità.
∆Leggere, conservare e seguire le istruzioni. Osservare le avvertenze.
∆Collegare il cavo di alimentazione solo a una presa c.a. con messa a terra conforme ai requisiti di tensione e frequenza indicati sull'etichetta INPUT POWER del pannello posteriore di questo prodotto.
∆AVVERTIMENTO: Per evitare danni, rischi di incendi o scosse elettriche, non esporre questa unità alla pioggia o all'umidità.
∆Scollegare il cavo di alimentazione prima di pulire l'esterno dell'unità (usare solo un panno umido). Attendere che l'unità sia completamente asciutta prima di ricollegarla all'alimentazione.
∆Lasciare almeno 15.25 cm di spazio libero dietro all'unità per consentirne il corretto raffreddamento tramite ventilazione.
∆Questo prodotto va collocato lontano da fonti di calore come radiatori, unità di riscaldamento o altri prodotti che producono calore.
∆Questo prodotto può essere dotato di spina polarizzata (con poli grandi). Si tratta di una misura di sicurezza. Se non si riesce a inserire la spina nella presa, far sostituire la presa obsoleta ad un elettricista. Non eliminare la spina di sicurezza.
∆Proteggere il cavo di alimentazione da danni e abrasioni.
∆Questo prodotto deve essere usato solo con un carrello o con un supporto consigliato dal produttore.
∆Il cavo di alimentazione di questo prodotto deve essere scollegato dalla presa quando il prodotto non viene usato per lunghi periodi o durante le tempeste elettromagnetiche.
∆La manutenzione per il prodotto deve essere eseguita da personale di assistenza qualificato nei casi seguenti: danno del cavo o della spina di alimentazione; caduta di oggetti o di liquido sul prodotto; esposizione del prodotto alla pioggia; funzionamento anomalo del prodotto o marcata variazione delle prestazioni del prodotto; caduta del prodotto; danno della struttura del prodotto.
∆Non disporre alcun contenitore riempito di liquido sul prodotto.
∆ATTENZIONE: Non contiene parti riparabili dall'utente. Fare eseguire la manutenzione soltanto da personale qualificato.
∆I sistemi di amplificazione e gli altiparlanti Fender® sono in grado di produrre livelli di pressione acustica molto alti che possono provocare danni temporanei o permanenti all'udito. Prestare attenzione all'impostazione e regolazione dei livelli di volume durante l'uso.
∆AVVERTIMENTO: L’unità deve essere collegata solo a una sorgente di alimentazione (adattatore) certificata da un ente di sicurezza, approvata per l’uso e conforme ai requisiti di sicurezza di legge locali e nazionali applicabili.

W i c h t i g e S i c h e r h e i t s h i n w e i s e
Dieses Symbol warnt den Benutzer vor gefährlichen Spannungen innerhalb des Gehäuses.
Dieses Symbol bedeutet für den Benutzer, dass er für einen sicheren Betrieb des Geräts die gesamte begleitende Dokumentation lesen muss.
∆Befolgen Sie sämtliche Sicherheitshinweise und bewahren Sie sie auf. Beachten Sie alle Warnungen.
∆Das Netzkabel muss an eine geerdete Netzsteckdose angeschlossen werden, die die auf der Rückseite des Verstärkers unter INPUT POWER angegebene Spannung und Frequenz liefert.
∆WARNUNG: Setzen Sie dieses Gerät niemals Regen oder Feuchtigkeit aus, um Beschädigung, Brandentwicklung und elektrische Schläge zu vermeiden.
∆Ziehen Sie den Netzstecker, bevor Sie das Gehäuse des Geräts reinigen (verwenden Sie zum Reinigen nur ein feuchtes Tuch). Stecken Sie den Netzstecker erst wieder ein, wenn das Gerät vollständig getrocknet ist.
∆Halten Sie hinter dem Gerät einen Freiraum von mindestens 15.25 cm ein, damit eine ausreichende Belüftung gewährleistet ist.
∆Der Verstärker darf nicht in der Nähe von Wärmequellen wie Heizkörpern oder anderen wärmeerzeugenden Geräten aufgestellt werden.
∆Dieses Produkt ist möglicherweise mit einem unvertauschbaren Stecker ausgestattet (unterschiedlich breite Pole). Dabei handelt es sich um eine Sicherheitsvorrichtung. Wenn Sie den Stecker nicht in die Steckdose stecken können, lassen Sie Ihre alte Steckdose von einem Elektriker auswechseln. Zerstören Sie nicht die Sicherheitsfunktion des Steckers.
∆Das Netzkabel darf nicht eingeklemmt oder abgescheuert werden.
∆Das Produkt sollte nur mit vom Hersteller empfohlenen Karren oder Ständern verwendet werden.
∆Bei Gewitter oder wenn das Gerät längere Zeit nicht gebraucht wird, sollte der Netzstecker gezogen werden.
∆In folgenden Fällen sollte das Gerät repariert werden, und zwar ausschließlich von qualifizierten Technikern: Schäden an Netzkabel oder -stecker; Beschädigung durch herabfallende Gegenstände, ausgelaufene Flüssigkeit oder Regen; Funktionsstörungen oder deutlich verändertes Betriebsverhalten; Beschädigung durch Herunterfallen; Schäden am Gehäuse.
∆Setzen Sie das Gerät keiner tropfenden oder spritzenden Flüssigkeit aus; stellen Sie keine mit Flüssigkeit gefüllten Behälter auf dem Gerät ab.
∆VORSICHT: Im Gerät sind keine zu wartenden Teile. Reparaturarbeiten dürfen nur von qualifizierten Technikern durchgeführt werden.
∆Fender®-Verstärker und Lautsprecher können sehr hohe Lautstärkepegel erzeugen, die vorübergehende oder dauerhafte Gehörschäden verursachen können. Gehen Sie beim Einstellen bzw. Regulieren der Lautstärke vorsichtig vor.
∆WARNUNG: Das Gerät darf nur an eine den lokalen und nationalen Sicherheitsvorschriften entsprechende und von einem technischen Sicherheitsdienst abgenommene Stromquelle (Adapter) angeschlossen werden.
∆
∆
∆
∆
∆ 


 1 5 . 2 5 c m


∆
∆
∆
∆
∆
∆
∆
∆
∆
∆
Bassman® 300
Congratulations on your purchase of a Bassman® 300 bass amplifier. Among its many features:
•300 Watts of output power into 2Ω, 4Ω, or 8Ω (selectable) •Two channels for both clean and distortion outputs •Vacuum tube pre-amplifier and power-amplifier design •10-band graphic equalizer and split band compressor
•Footswitch with equalizer, compressor and channel switching
•Low-noise differential effects loop •Tuner out jack for pass-through tuning
•XLR and 1/4 inch line out jacks and a pass-through jack for output to another amplifier or to a mixing console
•All steel chassis for enduring reliability
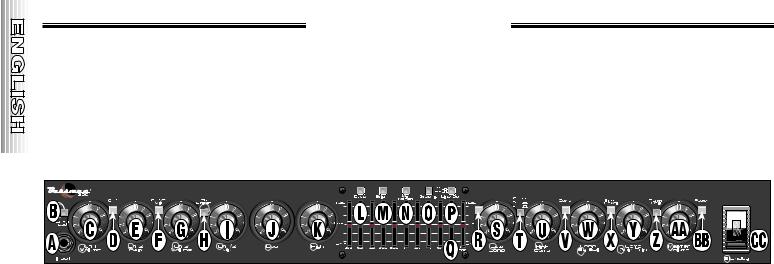
A.INPUT - Plug your electric bass guitar in here.
B.-6 dB PAD - Sensitivity / gain switch for the input signal. Button IN provides a -6dB attenuation useful for electric bass guitars with high output levels, such as basses with active pickups.
C.CH 1 VOLUME - Adjusts the loudness of channel 1.
D.CH 1 LED - Illuminates when channel 1 is active.
E.CH 2 GAIN - Adjusts the channel 2 gain/distortion level.
F.CH 1 / 2 MIX LED - Illuminates when the ch select button is IN indicating the Ch. 1 / Ch. 2 mix is active.
G.CH 2 VOLUME - Adjusts the loudness of channel 2.
H.CH SELECT - When this button is IN, both channel 1 and channel 2 are active. This button is used in conjunction with the CH. 1 / 2 MIX knob. Using the footswitch overrides this switch.
I.CH 1 / 2 MIX - Mixes the channel 1 and channel 2 output levels. At “1”, only channel 1 is in the output mix. At “10”, only channel 2 is in the output mix. By rotating the knob, an optimum mix of both channels may be obtained.
J.LOW - Adjusts the low frequency level of both channels. In its center notched position, the equalization is “flat” with no modification.
K.HIGH - Adjusts the high frequency level of both channels. In its center notched position, the equalization is “flat” with no modification.
L.DEEP - Low frequency boost when this button is IN.
M.BRIGHT - High frequency boost when this button is IN.
N.MID NOTCH - Reduces the mid-frequency tones, giving the amp a “punchy” sound when this button is IN.
O.GRAPHIC - Activates the graphic equalizer when this button is IN. Using the footswitch overrides this switch.
P.LINE OUT - This switch is used in conjunction with the line out jacks on the rear of the 300. When this button is IN, the signal sent from the 300 includes frequency shaping, channel switching and compression. The line out signal does NOT include any effects which may have been added via the effects loop. When the button is OUT the signal is passed through the 300 without any tone shaping or enhancement.
Q.GRAPHIC EQ - The 10 band-pass / band-reject filters are spaced at octave intervals. Move each slider up to boost or down to cut the level of each indicated frequency. The EQ Trim slider will boost or cut the signal level through the graphic EQ with the centered notched position having no affect on the level.
R.GRAPHIC EQ LED - Illuminates when the graphic EQ is active.
S.LOW COMP - Adjusts the compression ratio below 400Hz. Clockwise rotation increases the compression ratio.
T.COMP - When this button is IN the compressors are active. Using the footswitch overrides this switch.
U.HIGH COMP - Adjusts the compression ratio above 400Hz. Clockwise rotation increases the compression ratio.
V.COMP LED - Illuminates when the compressor is active.
W.COMP EQ BAL - Mixes the low and high compressor outputs. When the knob is at “1”, only the low compressor is in the output mix. When the knob is at “10”, only the high compressor is in the output mix. By rotating the knob, an optimum mix of both compressors can be obtained.
X.INPUT LEVEL LED - Always indicates signal level. Glows green above the compressor threshold. Glows red above the pre-amp clipping/distortion threshold.
Y.COMP GAIN TRIM - This knob adjusts gain to compensate for any level imbalance when the compression circuitry has been engaged.
Z.TUNER ONLY - While this button is IN all outputs from the amplifier are muted except to the tuner jack. Useful for quick and silent bass tuning.
AA.MASTER VOLUME - Adjusts the overall volume level of the 300 in conjunction with the gain controls of the active channel(s).
BB.POWER LED - Illuminates when the 300 is ON and receiving power.
CC.STANDBY - When the power switch and this switch are ON, your 300 is ready to perform. In the standby position, power is supplied only to the tube filaments and sound will NOT come out of the amp. Using the standby switch during short breaks eliminates tube warm-up time and will increase tube life.
6
 Rear Panel Controls
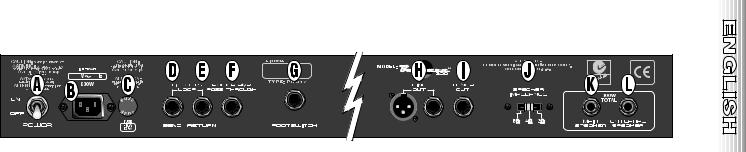
A.POWER - Turns the AC power ON and OFF.
B.LINE CORD - The 300 is equipped with a grounding type IEC supply cord and must be connected to a grounded AC receptacle in accordance with the voltage and frequency ratings as shown on the rear panel of the 300 amplifier.
C.FUSE - In the AC supply of the amplifier the fuse will help to protect the amplifier from an electrical fault. Replace a failed fuse only with one of the same type and rating (See Specification page). If the amplifier repeatedly blows fuses, take the amplifier to an authorized Fender® service center.
D.SEND - This 1/4 inch, unbalanced, differential, TS (tip-sleeve) output jack is designed for output to an external signal processing device.
E.RETURN - This 1/4 inch, balanced, TRS (tip-ring- sleeve) input jack is designed to accept signal from an external signal processing device.
F.POWER AMP PASS THROUGH - This 1/4 inch, unbalanced, differential, TS (tip-sleeve) output jack is designed to send a preamp line-level signal from your “main” 300 amplifier to an “add-on” 300 amplifier for additional output. Use a standard patch cord (1/4” plugs) to connect this jack to the return effects loop jack of the “add-on” 300 forming a “daisy-chain.”
G.FOOTSWITCH - Plug-in connection for the footswitch (P/N 053895). The footswitch enables remote switching of the graphic equalizer, compressors and channels. These switching functions are disabled on the front panel when this jack is used. NOTE: Connect the footswitch with an unshielded speaker type cord rather than a coaxial guitar cord for best results.
H.LINE OUT - Transformer balanced, line-level outputs. Use either the XLR male or 1/4 inch, TRS (tip-ring- sleeve) jacks to feed the 300’s signal to an external power amplifier or sound console. The signal from either of these jacks includes all the tone shaping done by the 300. This includes a bass speaker emulation circuit.
I.TUNER OUT - This 1/4 inch, unbalanced, TS output jack is designed for output to your tuning device (not included).
J.SPEAKER IMPEDANCE - Select a setting that matches the total impedance load of the loudspeaker enclosure(s) connected to the 300. Failure to do so may result in damage to the 300 amplifier. See the chart on this page for a listing of the impedance loads of some common speaker cabinet combinations.
K.MAIN SPEAKER JACK - This is the main speaker plug-in connection. There must ALWAYS be a speaker load connected to this jack when the amplifier is ON to prevent the possibility of damage to the unit. ALWAYS connect or disconnect speakers to your 300 with the power off and the power cord unplugged from the wall.
L.EXTERNAL SPEAKER JACK - Plug-in connection for an additional speaker enclosure. This jack is wired in parallel with the main speaker jack and must only be used when another speaker is also connected to the main speaker jack.
Speaker Cabinets |
LoadΩ |
|
|
1 8Ω Cabinet |
8Ω |
|
|
2 8Ω Cabinets |
4Ω |
|
|
1 4Ω Cabinet |
4Ω |
|
|
2 4Ω Cabinets |
2Ω |
|
|
7
 Tube Bias and Balance Adjustment
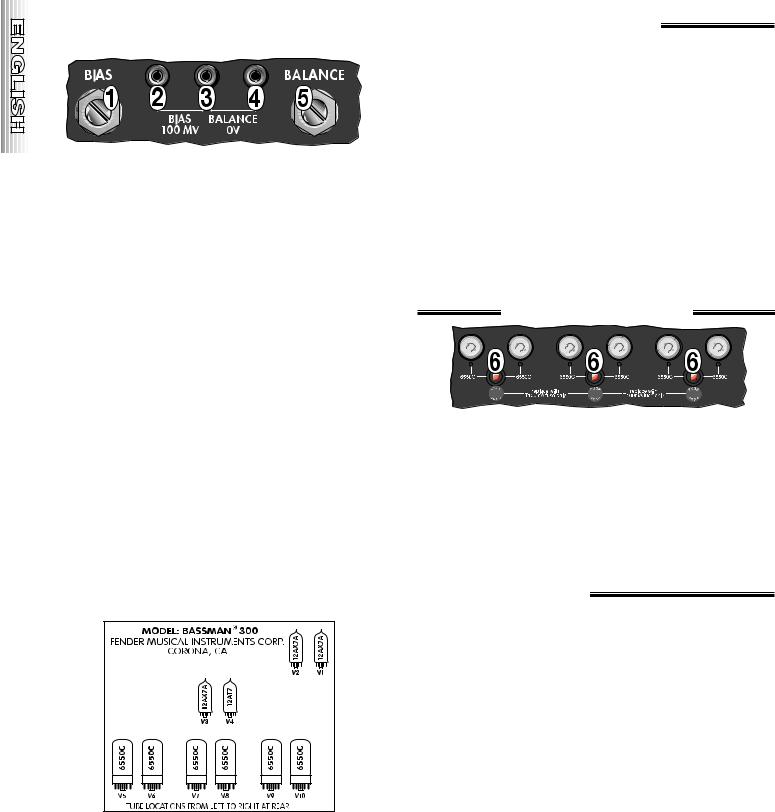
1.BIAS - Used with the bias test points to set the output tube bias.
2.& 3. BIAS 100mV - Test points used to measure output tube bias with a digital voltmeter.
3.& 4. BALANCE 0V - Test points used to measure output tube balance with a digital voltmeter.
5. BALANCE - Used with the balance test points to set the balance between the power amp tube sections.
Output Tube Bias & Balance Adjustment Instructions:
1.Turn on your 300 and let it warm up for at least two minutes with the STANDBY switch in the ON position. Make sure the amplifier is properly connected to a speaker.
2.Remove the bias controls cover box.
3.With a digital voltmeter set to its most sensitive DC voltage scale, measure the voltage between the bias 100mV test points (2 & 3) and with a screwdriver, turn the the bias adjustment for a reading of .1 VDC (100 mVDC).
4.Next, connect the digital voltmeter to the balance 0V test points (3 & 4) and turn the balance for a reading of 0 VDC.
5.Replace the bias controls cover box.
Notes:
•Make bias and balance adjustments ONLY when necessary. If you are unsure about these settings take your amp to the nearest authorized Fender® Service Center.
•Always set bias first, then set balance.
•If the output tubes can not be biased to at least 80mVDC, replace the 6550C output tubes.
•If the output tubes can not be balanced, check the bias setting and/or replace the 6550C output tubes.
•The tube trouble LEDs are NOT indicators of worn tubes. If your tubes are worn and sound weak the LEDs will still glow green. The trouble LEDs turn Red only after tube failure has already occurred. DO NOT WAIT FOR TUBE FAILURE TO REPLACE TUBES. (See Tube Testing & Replacement section).
Tu b e Tr o u b l e L E D s
6. TUBE TROUBLE - These LEDs indicate tube failure or trouble at their corresponding locations. When the LED glows green, the tubes are operating. When the LED glows red, a tube failure has blown the fuse at the corresponding fuse location on the top surface of the chassis. NOTE: It is normal for the LEDs to glow RED when the amp is in standby mode. If a fuse blows, replace it only with one of the same type and rating. If the amplifier repeatedly blows fuses, it should be taken to an authorized Fender® service center.
 Tube Testing & Replacement
Tube life varies depending upon playing style and application. Power tubes have a shorter life than pre-amp tubes which can last for many years. For continued optimum performance from your amplifier, the tubes should ONLY be replaced with the same type tubes as specified above.
IMPORTANT: ALWAYS unplug the amplifier before changing tubes and remember: THE TUBES GET HOT!
A simple way to check if the tubes are worn is to replace the set in your amp with your spare set and listen for improvement. (You carry a spare set of tubes and fuses, don't you?)
•First, replace the OUTPUT tubes with new tubes; re-bias and listen (bias/balance instructions are on the next page).
•Next, re-insert the original output tubes and re-bias. Replace the PRE-AMP tubes with new tubes and listen.
•Finally, try replacing both the output (re-bias) and PREAMP tubes with new tubes and listen.
If there is a marked improvement in the tone of your amp at any point in this procedure, leave the new tubes in your amp and purchase another spare set.
The 300's tube compliment consists of:
•One 12AT7A Tube (part #023531), (tube location V4)
•Three 12AX7WA Tubes (part #013341), (tube locations V1 thru V3.
•Six 6550C Tubes (part #048489), (tube locations V5 thru V10).
8

Specifications
TYPE: |
PR 347 |
|
|
PART NUMBER: |
021-3302-010 (120V, 60Hz) US |
021-3312-010 (110V, 60Hz) TW |
|
|
|||
|
|||
|
021-3332-010 (240V, 50Hz) AUS |
021-3342-010 (230V, 50Hz) UK |
|
|
021-3352-010 (220V, 50Hz) ARG |
021-3362-010 (230V, 50Hz) EUR |
|
|
021-3372-010 (100V, 50Hz) JPN |
021-3392-010 (220V, 60Hz) ROK |
|
POWER REQUIREMENTS: |
900W |
|
|
PREAMP SECTION |
|
|
|
INPUT IMPEDANCE: |
470kΩ |
|
|
FULL POWER SENSITIVITY : |
12mV |
|
|
TONE CONTROLS: |
Treble: +/-15 dB @ 6kHz |
|
|
|
Bass: +/-15 dB @ 40Hz |
|
|
GRAPHIC EQUALIZER: |
+/-12 dB @ 31.5Hz, 63Hz, 125Hz, 250Hz, 500Hz, 1kHz, 2kHz, 4kHz, 8kHz, 16kHz. |
|
|
MID NOTCH: |
-20 dB @ 700Hz |
|
|
LOW BOOST: |
+10 dB @ 40Hz |
|
|
HIGH BOOST: |
+10 dB @ 6kHz |
|
|
COMPRESSOR: |
|
|
|
CROSSOVER: |
400Hz |
|
|
RATIO: |
1:1 Min to 4:1 Max |
|
|
LINE OUT LEVEL: |
+6dB referenced to input (pre), 0dBV (post). |
|
|
|
(transformer balanced) |
|
|
POWER AMPLIFIER SECTION
INPUT IMPEDANCE: |
20kΩ |
POWER OUTPUT: 300W R.M.S. into 2, 4, or 8Ω @ <3% T.H.D.
SENSITIVITY : |
1V R.M.S. (0dBv) |
SPEAKER COMPLEMENT: Designed for use with the Bassman 410H Pro or Bassman 215 Bass Loudspeaker Enclosures
DIMENSIONS: |
Height: 10.1 in |
(25.7 cm) |
|
|
Width: |
25.5 in |
(64.8 cm) |
|
Depth: |
15.6 in |
(40 cm) |
WEIGHT: |
|
75 lb |
34 kg |
Product specifications are subject to change without notice.
9

Bassman® 300
Enhorabuena por haber adquirido el amplificador para bajos Bassman® 300. Entre sus numerosas funciones incluye:
•300 vatios de potencia de salida a 2Ω, 4Ω u 8Ω (seleccionable) •Dos canales para las salidas de distorsión y nitidez
•Diseño de amplificador principal y preamplificador de tubo de vacío
•Compresor de banda dividida y ecualizador gráfico de 10 bandas •Conmutador de pedal con ecualizador, compresor y conmutación de canales
•Bucle de efectos de diferencial de bajo ruido •Conector de salida de afinador para transferir afinación
•Conectores de salida XLR de 1/4 de pulgada y un conector de transferencia para transmitir señales a otro amplificador o a una consola de mezclador
•Chasis con soldadura de acero para obtener una mayor fiabilidad
A.INPUT : Conecte aquí el bajo eléctrico.
B.-6 dB PAD : Conmutador de ganancia / sensibilidad de la señal de entrada. Pulsado hacia dentro proporciona una atenuación de - 6 dB muy útil para bajos con convertidores activos o salidas de nivel de altos.
C.CH 1 VOLUME : Ajusta el volumen del canal 1.
D.CH 1 LED : Se ilumina cuando el canal 1 se encuentra activo.
E.CH 2 GAIN : Ajusta el nivel de distorsión/ganancia del canal 2.
F.CH 1 / 2 MIX LED : Se ilumina cuando el botón de selección de canal está pulsado hacia dentro indicando que la mezcla de los canales 1 y 2 se encuentra activada.
G.CH 2 VOLUME : Ajusta el volumen del canal 2.
H.CH SELECT : Pulsado hacia dentro, activa los canales 1 y 2. Este botón se utiliza junto con el botón de mezcla de canales 1 /
2. Al utilizar el conmutador de pedal se desactiva este conmutador.
I.CH 1 / 2 MIX : Mezcla los niveles de salida de los canales 1 y 2. En la posición “1”, sólo el canal 1 se encuentra en la mezcla de salida. En la posición “10”, sólo el canal 2 se encuentra en la mezcla de salida. Si gira el botón, podrá obtener una mezcla óptima de ambos canales.
J.LOW : Ajusta el nivel de frecuencias bajas de ambos canales. Si el botón se encuentra en la posición central, la ecualización será “plana”, sin modificaciones.
K.HIGH : Ajusta el nivel de frecuencias altas de ambos canales. Si el botón se encuentra en la posición central, la ecualización será “plana”, sin modificaciones.
L.DEEP : Pulsado hacia dentro, activa la amplificación de las frecuencias bajas.
M.BRIGHT : Pulsado hacia dentro, activa la amplificación de las frecuencias altas.
N.MID NOTCH : Pulsado hacia dentro, reduce los tonos de las frecuencias medias, lo que proporciona al amplificador un sonido potente.
O.GRAPHIC : Pulsado hacia dentro, activa el ecualizador gráfico. Al utilizar el conmutador de pedal se desactiva este conmutador.
P.LINE OUT : Este conmutador se utiliza junto con los conectores de salida de la parte posterior del amplificador 300. Cuando este botón se encuentra pulsado hacia dentro, la señal enviada desde el 300 incluye regulación de frecuencias, conmutación de canales y compresión. La señal de salida NO incluye ningún efecto que se haya podido incorporar a través del bucle de efectos. Cuando el botón se encuentra hacia fuera, la señal se transmite sin efectuar mejoras o regulaciones de tono.
Q.GRAPHIC EQ : Los 10 filtros de paso / supresión de banda se separan a intervalos de una octava. Desplace el deslizador hacia arriba para aumentar el nivel de las frecuencias indicadas y hacia abajo para reducirlo. El deslizador de compensación de ecualización EQ Trim aumenta o recorta el nivel de señal a través del ecualizador gráfico sin que la posición central del botón afecte al nivel.
R.GRAPHIC EQ LED : Se ilumina cuando el ecualizador gráfico se encuentra activo.
S.LOW COMP : Ajusta la relación de compresión por debajo de los 400 Hz. Si se gira hacia la derecha, aumenta la relación de compresión.
T.COMP : Pulsado hacia dentro, activa los compresores. Al utilizar el conmutador de pedal se desactiva este conmutador.
U.HIGH COMP : Ajusta la relación de compresión por encima de los 400Hz. Si se gira hacia la derecha, aumenta la relación de compresión.
V.COMP LED : Se ilumina cuando el compresor está activo.
W.COMP EQ BAL : Mezcla las salidas del compresor alto y bajo. Cuando el botón se encuentra en la posición “1”, sólo el compresor bajo se encuentra en la mezcla de salida. Cuando el botón se encuentra en la posición “10”, sólo el compresor alto se encuentra en la mezcla de salida. Si gira el botón, podrá obtener una mezcla óptima de ambos compresores.
X.INPUT LEVEL LED : Se ilumina en verde una vez alcanzado el umbral del compresor. Si se ilumina en rojo, indica la existencia de cortes/distorsión en el preamplificador; para controlarlo, ajuste el control de volumen del canal 1.
Y.COMP GAIN TRIM : Este botón ajusta la ganancia para compensar cualquier desequilibrio de nivel que se produzca al accionar el circuito de compresión.
Z.TUNER ONLY : Mientras que este botón está pulsado, el sonido de todas las salidas del amplificador permanecerá desactivado, excepto en el caso del conector del afinador. Ideal para modular bajos de una forma rápida y silenciosa.
AA.MASTER VOLUME : Ajusta el volumen global del amplificador 300 junto con los controles de ganancia de los canales activos.
BB.POWER LED : Se ilumina cuando el amplificador 300 está activado y recibe alimentación.
CC.STANDBY : Cuando el interruptor de encendido y este conmutador están activados, 300 está preparado para funcionar. En la posición de espera, sólo se suministra potencia a los filamentos de los tubos y se desactiva el sonido del amplificador. Si se utiliza el conmutador de espera en las pausas breves se evitará el sobrecalentamiento y se prolongará la vida de los tubos.
10
 Loading...