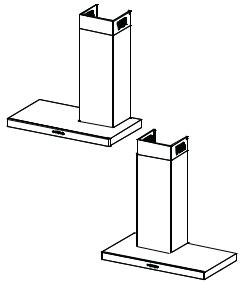
Faber STILO DX/SP A90 User manual

Instructions Manual
Руководство по эксплуатации
Naudojimosi instrukcija Instrukcijas Grāmata Kasutusjuhend

INDEX |
EN |
RECOMMENDATIONS AND SUGGESTIONS |
..................................................................................................................... 3 |
CHARACTERISTICS ............................................................................................................................................................. |
6 |
INSTALLATION...................................................................................................................................................................... |
8 |
USE ...................................................................................................................................................................................... |
11 |
MAINTENANCE ................................................................................................................................................................... |
12 |
УКАЗАТЕЛЬ |
RU |
СОВЕТЫ И РЕКОМЕНДАЦИИ.......................................................................................................................................... |
14 |
ХАРАКТЕРИСТИКИ............................................................................................................................................................ |
17 |
УСТАНОВКА........................................................................................................................................................................ |
19 |
ЭКСПЛУАТАЦИЯ................................................................................................................................................................ |
22 |
УХОД.................................................................................................................................................................................... |
23 |
TURINYS |
LT |
PATARIMAI IR NUORODOS............................................................................................................................................... |
25 |
PRIETAISO APRAŠYMAS .................................................................................................................................................. |
28 |
MONTAVIMAS ..................................................................................................................................................................... |
30 |
NAUDOJIMAS...................................................................................................................................................................... |
33 |
VALYMAS IR PRIEŽIŪRA ................................................................................................................................................... |
34 |
INDEKSS |
LV |
IETEIKUMI UN PRIEKŠLIKUMI........................................................................................................................................... |
36 |
TEHNISKIE DATI ................................................................................................................................................................. |
39 |
UZSTĀDĪŠANA .................................................................................................................................................................... |
41 |
IZMANTOŠANA ................................................................................................................................................................... |
44 |
APKOPE............................................................................................................................................................................... |
45 |
INDEKS |
EE |
SOOVITUSED JA ETTEPANEKUD..................................................................................................................................... |
47 |
OMADUSED......................................................................................................................................................................... |
50 |
PAIGALDAMINE .................................................................................................................................................................. |
52 |
KASUTAMINE...................................................................................................................................................................... |
55 |
HOOLDUS............................................................................................................................................................................ |
56 |
2

RECOMMENDATIONS AND SUGGESTIONS
The Instructions for Use apply to several versions of this appliance. Accordingly, you may find descriptions of individual features that do not apply to your specific appliance.
INSTALLATION
•The manufacturer will not be held liable for any damages resulting from incorrect or improper installation.
•The minimum safety distance between the cooker top and the extractor hood is 650 mm (some models can be installed at a lower height, please refer to the paragraphs on working dimensions and installation).
•Check that the mains voltage corresponds to that indicated on the rating plate fixed to the inside of the hood.
•For Class I appliances, check that the domestic power supply guarantees adequate earthing.
Connect the extractor to the exhaust flue through a pipe of minimum diameter 120 mm. The route of the flue must be as short as possible.
•Do not connect the extractor hood to exhaust ducts
carrying combustion fumes (boilers, fireplaces, etc.).
If the extractor is used in conjunction with non-electrical  2°•
2°•
appliances (e.g. gas burning appliances), a sufficient degree of aeration must be guaranteed in the room in order to prevent the backflow of exhaust gas. The kitchen must have an opening communicating directly
with the open air in order to guarantee the entry of clean air. When the cooker hood is used in conjunction with appliances supplied with energy other than electric, the negative pressure in the room must not exceed 0,04 mbar to prevent fumes being drawn back into the room by the cooker hood.
• The air must not be discharged into a flue that is used for exhausting fumes from appliances burning gas or other
fuels (not applicable to appliances that only discharge the air back into the room).
• In the event of damage to the power cable, it must be replaced by the manufacturer or by the technical service department, in order to prevent any risks.
EN |
|
33 |

•If the instructions for installation for the gas hob specify a greater distance specified above, this has to be taken into account. Regulations concerning the discharge of air have to be fulfilled.
•Use only screws and small parts in support of the hood.
Warning: Failure to install the screws or fixing device in accordance with these instructions may result in electrical hazards.
•Connect the hood to the mains through a two-pole switch having a contact gap of at least 3 mm.
USE
•The extractor hood has been designed exclusively for domestic use to eliminate kitchen smells.
•Never use the hood for purposes other than for which it has been designed.
•Never leave high naked flames under the hood when it is in operation.
•Adjust the flame intensity to direct it onto the bottom of the pan only, making sure that it does not engulf the sides.
•Deep fat fryers must be continuously monitored during use: overheated oil can burst into flames.
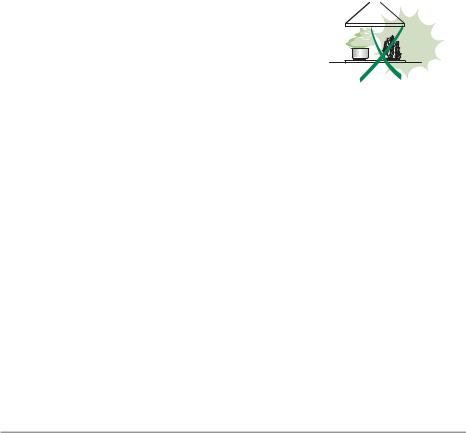
• Do not flambè under the range hood; risk of fire.
• This appliance can be used by children aged from 8 years and above and persons with reduced
physical, sensory or mental capabilities or lack of
experience and knowledge if they have been given supervision or instruction concerning use of the appliance in a safe way and understand the hazards involved. Children shall not play with the appliance. Cleaning and user maintenance shall not be made by children without supervision.
•This appliance is not intended for use by persons (including children) with reduced physical, sensory or mental capabilities, or lack of experience and knowledge, unless they have been given supervision or instruction concerning use of the appliance by a person responsible for their safety.
EN |
|
44 |

•“CAUTION: Accessible parts may become hot when used with cooking appliances.”
MAINTENANCE
•Switch off or unplug the appliance from the mains supply before carrying out any maintenance work.
•Clean and/or replace the Filters after the specified time period (Fire hazard).
•The Grease filters must be cleaned every 2 months of operation, or more frequently for particularly heavy usage, and can be washed in a dishwasher.
•The Activated charcoal filter is not washable and cannot be regenerated, and must be replaced approximately every 4 months of operation, or more frequently for particularly heavy usage.
•"Failure to carry out cleaning as indicated will result in a fire hazard".
•Clean the hood using a damp cloth and a neutral liquid detergent.
The symbol  on the product or on its packaging indicates that this product may not be treated as household waste. Instead it shall be handed over to the applicable collection point for the recycling of electrical and electronic equipment. By ensuring this product is disposed of correctly, you will help prevent potential negative consequences for the environment and human health, which could otherwise be caused by inappropriate waste handling of this product. For more detailed information about recycling of this product, please contact your local city office, your household waste disposal service or the shop where you purchased the product.
EN |
|
55 |

CHARACTERISTICS
Components
Ref. Q.ty Product Components
11 Hood Body, complete with: Controls, Light, Blower, Filters
2 |
1 |
Telescopic Chimney comprising: |
2.1 |
1 |
Upper Section |
2.2 |
1 |
Lower Section |
8 |
1 |
Directional Air outlet Grille ø 125 mm |
9 |
1 |
Reducer Flange ø 150-120 mm |
|
|
|
Ref. |
Q.ty |
Installation Components |
7.2.1 |
2 |
Upper Chimney Section Fixing Bracket |
11 |
7 |
Wall Plugs |
12a |
7 |
Screws 4,2 x 44,4 |
12c |
6 |
Screws 2,9 x 6,5 |
12e |
2 |
Screws 2,9 x 9,5 |
13 |
1 |
washer |
|
|
|
|
Q.ty |
Documentation |
|
1 |
Instruction Manual |
|
12e |
12a |
7.2.1 |
11 |
|
8 |
|
|
|
|
9 |
|
|
|
|
2.1 |
|
12c |
|
|
|
|
|
|
|
2 |
|
|
|
|
2.2 |
|
|
|
|
11 |
|
11 |
|
12a |
|
12a |
|
|
|
|
|
||
|
|
|
|
|
1 |
|
|
|
|
EN |
|
66 |

Dimensions
min. 730 max. 1000
Min. Min. 500mm 650mm
DX
SX
min. 730 max. 1000
Min. Min. 500mm 650mm
EN |
|
77 |

INSTALLATION
Wall drilling and bracket fixing |
|
|
||||
|
|
|
|
1÷2 |
|
|
|
7.2.1 |
|
X |
|
|
|
|
Y |
Y |
|
|
|
|
11 |
|
116 |
116 |
Cappa |
Y |
Z |
|
|
|||||
12a |
|
|
|
90 cm |
200 |
565 |
|
|
Z |
|
120 cm |
350 |
830 |
970 |
690 |
|
|
650 min. |
|
|
•Draw a vertical line on the wall on the right or on the left side depending on the hood model, at 200 mm (90 cm hood version) or at 350 mm (120 mm hood version) taking as a reference point the centre of the hob. Start the line from the ceiling or from other upper limit and finish it at the 650 mm distance from the hob. This line is needed when aligning the brackets.
•Place the 7.2.1 bracket, as indicated, at 1-2 mm from the ceiling or from other upper limit aligning its central point on the vertical reference line.
•Draw the central points of the bracket holes.
•Place the 7.2.1 bracket, as indicated, at X mm under the first bracket (X= upper chimney height) aligning its central point on the vertical reference line.
•Draw the central points of the bracket holes.
•Draw the reference point, as indicated, at 116 mm from the vertical reference point and at 970 mm above the hob.
•Repeat the same procedure on the opposite side.
•Draw the reference point, as indicated, at Z mm (Z= see the table) from the vertical reference point and at 690 mm above the hob.
•Drill ø 8 mm the marked points.
•Insert the 11 plugs into the holes.
•Fix the brackets using the 12a screws (4,2 x 44,4 ) supplied with the hood.
•Screw the 2 12a screws (4,2 x 44,4), supplied with the hood, in the hood body fixing holes. It is necessary to leave a 5-6 mm gap between the wall and the screw head.
EN |
|
88 |

Hood body installation
• Before hooking the hood body it is necessary to tighten 2 Vr
screws placed in the fixing points of the body. |
Vr |
• Hook the hood body on the 12a screws.
• Tighten completely 12a support screws.
• The correct hood body position can be levelled with Vr |
12a |
screws. |
|
• Fix the hood definitively by tightening the 12a screw together with the 13 washer in the security hole.
Connections
DUCTED VERSION AIR EXHAUST SYSTEM
When installing the ducted version, connect the hood to the chimney using either a flexible or rigid pipe ø 150 or 120 mm, the choice of which is left to the installer.
•To install a ø 120 mm air exhaust connection, insert the reducer flange 9 on the hood body outlet.
•Fix the pipe in position using sufficient pipe clamps (not supplied).
•Remove possible charcoal filters.
RECIRCULATION VERSION AIR OUTLET
•Cut a hole ø 125 mm in any shelf that may be positioned over the hood.
•Insert the reducer flange 9 on the hood body outlet.
•Connect the flange to the outlet on the shelf over the hood by using a flexible or rigid pipe ø120 mm.
•Fix the pipe in position using sufficient pipe clamps (not supplied).
•Fix the air outlet grid 8 on the recirculation air outlet by using the 2 screws 12e (2,9 x 9,5) provided.
•Ensure that the activated charcoal filters have been inserted.
ø 150 |
ø 120 |
9
12e
8
ø 125 |
9 |
|
EN |
|
99 |

ELECTRICAL CONNECTION
•Connect the hood to the mains through a two-pole switch having a contact gap of at least 3 mm.
•Remove the grease filters (see paragraph Maintenance) being sure that the connector of the feeding cable is correctly inserted in the socket placed on the side of the fan.
Chimney assembly
Upper exhaust Chimney
•Slightly widen the two sides of the upper chimney and hook them behind the brackets 7.2.1, making sure that they are well seated.
•Secure the sides to the brackets using the 4 screws 12c (2,9 x 9,5) supplied.
Lower exhaust Chimney
•Slightly widen the two sides of the chimney and hook them between the upper chimney and the wall, making sure that they are well seated.
•Fix the lower part laterally to the hood body using the 2 screws 12c (2,9 x 9,5) supplied.
7.2.1 |
12c |
2.1 |
2.2 |
12c |
EN |
|
1 |
|
10 |

USE
|
|
|
|
|
|
|
|
|
|
|
|
|
|
|
|
|
|
|
|
|
|
|
|
|
|
|
|
|
|
|
|
|
|
|
|
|
|
|
|
|
|
|
|
|
|
|
|
|
|
|
|
|
|
|
|
|
|
|
|
|
|
|
|
|
|
|
|
|
|
|
|
|
|
|
|
|
|
|
|
|
|
|
|
|
|
|
|
|
|
|
T1 |
T2 |
T3 |
L |
|||||||
|
|
|
|
|
|
|
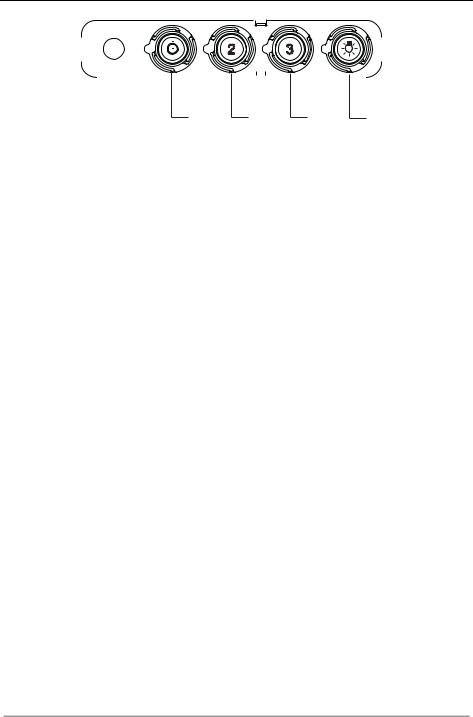
Control panel |
|
|
|
|
|
||||
BUTTON |
LED |
FUNCTIONS |
|
|
|
|
|
|||||||||
T1 |
Speed |
On |
Turns the Motor on at Speed one. |
|
|
|
|
|||||||||
|
|
|
|
|
Turns the Motor off. |
|
|
|
|
|
||||||
T2 |
Speed |
On |
Turns the Motor on at Speed two. |
|
|
|
|
|||||||||
T3 |
Speed |
Fixed |
When pressed briefly, turns the Motor on at Speed three. |
|||||||||||||
L |
Light |
|
|
|
Turns the Lighting System on and off. |
|
|
|
|
|||||||
Warning: Button T1 turns the motor off, after first passing to speed one.
EN |
|
1 |
|
11 |

MAINTENANCE
Grease filters
CLEANING METAL SELFSUPPORTING GREASE FILTERS
•The filters must be cleaned every 2 months of operation, or more frequently for particularly heavy usage, and can be washed in a dishwasher.
•Remove the filters one at a time by pushing them towards the back of the group and pulling down at the same time.
•Wash the filters, taking care not to bend them. Allow them to dry before refitting.
•When refitting the filters, make sure that the handle is visible on the outside.
Activated charcoal filter (Recirculation version)
REPLACING THE ACTIVATED CHARCOAL FILTER
•The filter is not washable and cannot be regenerated, and must be replaced approximately every 4 months of operation, or more frequently for particularly heavy usage.
•Remove the metal grease filters.
•Remove the saturated activated carbon filter by releasing the fixing hooks.
•Fit the new filter by hooking it into its seating.
•Refit the metal grease filters.
EN |
|
1 |
|
12 |

Lighting
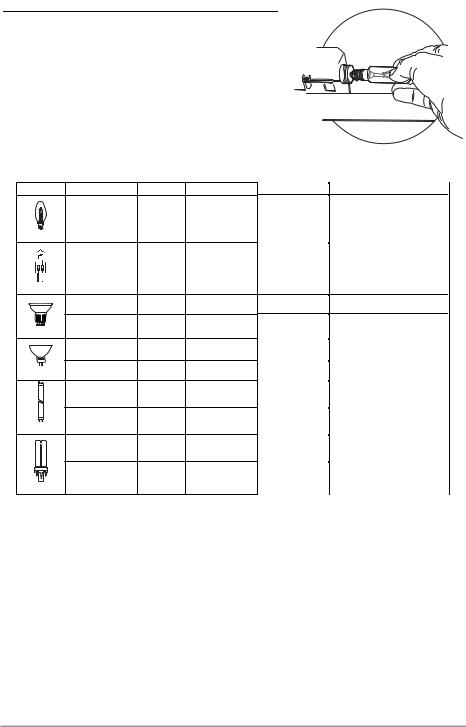
LIGHT REPLACEMENT
28W - 40W incandescent light.
•Remove the screw fixing the Lighting support.
•Pull the Lighting support down.
•Extract the lamp and replace with another of the same type.
•Replace the lighting support in reverse order.
Lamp |
Power (W) |
Socket |
Voltage (V) |
Dimension (mm) |
ILCOS Code |
|
28 |
E14 |
220 – 240 |
104 x 35 |
HSGSB/C/UB-28-220/240-E14 |
|
20 |
G4 |
12 |
33 x 9 |
HSG/C/UB-20-12-G4 |
|
35 |
GU10 |
230 |
51 x 50,7 |
HAGS-35-230-GU10-51/40 |
|
50 |
GU10 |
230 |
51 x 50,7 |
HAGS-35-230-GU10-51/20 |
|
20 |
GU4 |
12 |
40 x 35 |
HRGS-20-12-GU4-35/30 |
|
20 |
GU5.3 |
12 |
46 x 51 |
HRGS-20-12-GU5.3-50/10 |
|
16 |
G13 |
95 |
720 x 26 |
FD--16/40/1B-E--G13--26/720 |
|
18 |
G13 |
57 |
589,8 x 26 |
FD--18/40/1B--E--G13--26/600 |
|
9 |
G23 |
60 (lamp) |
167 x 28 |
FSD-9/27/1B-I-G23 |
|
220-240 (starter) |
||||
|
|
|
|
|
|
|
11 |
G23 |
91 (lamp) |
235,8 x 28 |
FSD-11/40/1B-I-G23 |
|
220-240 (starter) |
||||
|
|
|
|
|
EN |
|
1 |
|
13 |

СОВЕТЫ И РЕКОМЕНДАЦИИ
 ВИнструкцияхпоэксплуатацииописаныразличныемоделиприбора. Поэтомувыможетевстретитьописаниенекоторыххарактеристик, не относящихсякприобретенномувамиприбору.
УСТАНОВКА
•Изготовительненесетответственностьзаубытки, возникающиеврезультате неправильнойустановкиилиэксплуатацииприбора.
•Безопасноерасстояниемеждуварочнойпанельюи всасывающейвытяжкойдолжнобытьнеменее650
мм(некоторыемоделиможноустанавливатьниже; см. раздел, посвященныйрабочимразмерамиоперациям поустановкеприбора).
• Проверьтесоответствиенапряжениясетиуказанному натабличке, закрепленнойвнутривытяжки.
•ДляприборовклассаI проверьте, чтобывэлектрическойсетивашегодома былапредусмотренасоответствующаясистемазаземления.
Соединитевытяжкусдымоходомспомощьютрубыминимальногодиаметра 120 мм. Трубадляотведениядымадолжнабытькакможнокороче.
•Несоединяйтевсасывающуювытяжкусдымоходами, покоторымвыводится дым, образующийсявпроцессегорения(например, отопительныекотлы, каминыипроч.).
•Есливытяжнойаппаратиспользуетсявсочетаниис  2°
2°
приборами, работающиминеотэлектрическоготока (например, газовыеприборы), помещениедолжно хорошопроветриватьсявоизбежаниеобратного
потокаотходящихгазов. Дляпритокавпомещение  свежеговоздуханакухнедолжнобытьпредусмотреновыходящеенаулицу окно. Припользованиикухоннойвытяжкойвсочетаниисприборами, работающиминеотэлектрическоготока, отрицательноедавлениев
помещениинедолжнопревышать0,04 мбарстем, чтобыдымневсасывался вытяжкойобратновпомещение.
•Воизбежаниеопасностивслучаеповреждениякабеляпитания, ондолжен бытьзамененизготовителемилиспециалистамиотделатехнического обслуживания.
RU |
|
1 |
|
14 |

•Есливинструкцияхпоустановкегазовойплитысказано, чторасстояние до вытяжки должно быть больше указанного выше, следует придерживаться предписанных размеров. Соблюдайте все нормативные требования по отведению отработанного воздуха.
•Используйте только винты и метизы, пригодные для установки вытяжки. Предупреждение: использование винтов и зажимных устройств, не соответствующих указаниям данных инструкций, может привести к возникновению опасных ситуаций и к электрическим ударам.
•Соедините вытяжку с сетью питания с помощью двухполюсного выключателя с минимальным разведением контактов 3 мм.
ЭКСПЛУАТАЦИЯ
•Всасывающая вытяжка предназначена только для применения в быту для удаления из кухни запахов от готовки.
•Никогда не пользуйтесь вытяжкой в иных целях, отличных от тех, для которых она предназначена.
•Никогда не оставляйте высокое пламя под вытяжкой, находящейся в работе.
•Регулируйте силу пламени таким образом, чтобы оно оставалось под дном емкости для готовки и не вырывалось за его пределы.
•При готовке во фритюрнице постоянно следите
за ее работой: сильно нагретое масло может воспламениться.
•Не готовьте блюда фламбе под вытяжкой: опасность возникновения пожара.
•Прибором могут пользоваться дети старше 8 лет и лица с ограниченными психическими, физическими и сенсорными
способностями, а также не имеющие достаточного опыта и знаний, но только под присмотром ответственных лиц и при условии, что они обучены безопасной эксплуатации прибора и знают о связанных с его неправильным использованием опасностях. Следите, чтобы дети не играли с прибором. Очистку и уход за прибором должен обеспечивать пользователь, такие действия могут выполнять и дети, но только под надзором взрослых.
RU |
|
1 |
|
15 |

•“ ВНИМАНИЕ: доступные части вытяжки могут сильно нагреваться во время работы газовых приборов.
УХОД
•Перед выполнением любой операции по очистке и уходу выключите или отсоедините прибор от электрической сети.
•Очищайте и/или заменяйте фильтры по истечении указанного периода времени (опасность возникновения пожара).
•Жировые фильтры необходимо очищать раз в 2 месяца работы или чаще в случае очень интенсивного использования прибора; жировые фильтры можно мыть в посудомоечной машине.
•Фильтр на активированном угле нельзя мыть и восстанавливать, его следует менять примерно раз в 4 месяца работы или чаще в случае очень интенсивного использования прибора.
•"Опасность возникновения пожара, если очистка прибора не выполняется в соответствии с инструкциями".
•Очищайте вытяжку влажной тряпкой, смоченной в нейтральном жидком моющем веществе.
Символ  на изделии или на упаковке указывает, что прибор нельзя выбрасывать, как обычный бытовой мусор. Прибор, подлежащий уничтожению, необходимо сдать в специальный сборный пункт для повторного использования электрических и электронных компонентов. Пользователь, правильно сдающий прибор на переработку, помогает предотвратить потенциальные негативные последствия для окружающей среды и для здоровья людей, возникающие в случае неправильного его уничтожения. За более подробной информацией о вторичном использовании прибора обращайтесь в городской совет, в местную службу по переработке отходов или в магазин, где прибор был приобретен.
RU |
|
1 |
|
16 |

ХАРАКТЕРИСТИКИ
Части
Обозн.К-во Части изделия
11 Корпус вытяжки в комплекте с ручками управления, освещением, вентилятором, фильтрами
2 |
1 |
Телескопическая дымовая труба, состоящая из: |
2.1 |
1 |
Верхней дымовой трубы |
2.2 |
1 |
Нижней дымовой трубы |
8 |
1 |
Регулируемая решетка выпуска воздуха ø 125 mm |
9 |
1 |
Переходный фланец ø 150-120 мм |
|
|
|
Обозн.К-во |
Установочные компоненты |
|
7.2.1 |
2 |
Крепежные скобы верхней дымовой трубы |
11 |
7 |
Вкладыши |
12a |
7 |
Винты 4,2 x 44,4 |
12c |
6 |
Винты 2,9 x 6,5 |
12e |
2 |
Винты 2,9 x 9,5 |
13 |
1 |
Шайба |
|
|
|
|
К-во |
Документация |
|
1 |
Руководство по эксплуатации |
|
12e |
12a |
7.2.1 |
11 |
|
8 |
|
|
|
|
9 |
|
|
|
|
2.1 |
|
12c |
|
|
|
|
|
|
|
2 |
|
|
|
|
2.2 |
|
|
|
|
11 |
|
11 |
|
12a |
|
12a |
|
|
|
|
|
||
|
|
|
|
|
1 |
|
|
|
|
RU |
|
1 |
|
17 |

Габариты
min. 730 max. 1000
Min. Min. 500mm 650mm
DX
SX
min. 730 max. 1000
Min. Min. 500mm 650mm
RU |
|
1 |
|
18 |
 Loading...