


 Loading...
SAFETY SYMBOLS
This manual uses the safety symbols below. They denote critical information. Please read them carefully.
WARNING
Failure to abide by the information in a WARNING may result in serious injury and can be life threatening.
CAUTION
Failure to abide by the information in a CAUTION may result in moderate injury and/or property or product damage.
Indicates a prohibited action.
Indicates to ground for safety.
Copyright© 2004 EIZO NANAO CORPORATION All rights reserved. No part of this manual may be reproduced, stored in a retrieval system, or transmitted, in any form or by any means, electronic, mechanical, or otherwise, without the prior written permission of EIZO NANAO CORPORATION.EIZO NANAO CORPORATION is under no obligation to hold any submitted material or information confidential unless prior arrangements are made pursuant to EIZO NANAO CORPORATION's receipt of said information. Although every effort has been made to ensure that this manual provides up-to-date information, please note that EIZO monitor specifications are subject to change without notice.
ENERGY STAR is a U.S. registered mark.
Apple and Macintosh are registered trademarks of Apple Computer, Inc.
VGA is a registered trademark of International Business Machines Corporation.
DPMS is a trademark and VESA is a registered trademark of Video Electronics Standards Association.
Windows is a registered trademark of Microsoft Corporation. PowerManager is a trademark of EIZO NANAO CORPORATION.
ScreenManager, FlexScan and EIZO are registered trademarks of EIZO NANAO CORPORATION in Japan and other countries.
As an ENERGY STAR® Partner, EIZO NANAO CORPORATION has determined that this product meets the ENERGY STAR guidelines for energy efficiency.

English
TABLE OF CONTENTS
PRECAUTIONS . . . . . . . . . . . . . . . . . . . . . . . . . . . . . . . . . . . . . . . . . . . . . . . . . . . 4
1. Introduction . . . . . . . . . . . . . . . . . . . . . . . . . . . . . . . . . . . . . . . . . . . . . . . . . . . 9
1-1. Features . . . . . . . . . . . . . . . . . . . . . . . . . . . . . . . . . . . . . . . . . . . . . . . . . 9
1-2. Package Contents . . . . . . . . . . . . . . . . . . . . . . . . . . . . . . . . . . . . . . . . . . 9
1-3. Controls & Connectors . . . . . . . . . . . . . . . . . . . . . . . . . . . . . . . . . . . . . 10
2. |
CABLE CONNECTION . . . . . . . . . . . . . . . . . . . |
. . . . . . . . . . . . . . . . . . . . . . 12 |
|
|
2-1. |
Before Connecting . . . . . . . . . . . . . . . . . . . |
. . . . . . . . . . . . . . . . . . . . . . 12 |
|
2-2. Connecting the Signal Cable . . . . . . . . . . . |
. . . . . . . . . . . . . . . . . . . . . . 13 |
|
|
2-3. Connecting Two PCs to the Monitor . . . . |
. . . . . . . . . . . . . . . . . . . . . . 16 |
|
3. |
ScreenManager . . . . . . . . . . . . . . . . . . . . . . . . . |
. . . . . . . . . . . . . . . . . . . . . . 18 |
|
|
3-1. How to use the ScreenManager . . . . . . . . . . |
. . . . . . . . . . . . . . . . . . . . . 18 |
|
|
3-2. ScreenManager Adjustments and Settings. |
. . . . . . . . . . . . . . . . . . . . . . 19 |
|
|
3-3. |
Useful Functions . . . . . . . . . . . . . . . . . . . . . |
. . . . . . . . . . . . . . . . . . . . . 21 |
4. |
ADJUSTMENT . . . . . . . . . . . . . . . . . . . . . . . . . . . |
. . . . . . . . . . . . . . . . . . . . . 23 |
|
|
4-1. |
Screen Adjustment . . . . . . . . . . . . . . . . . . . . |
. . . . . . . . . . . . . . . . . . . . . 23 |
|
4-2. |
Displaying Low Resolutions . . . . . . . . . . . . |
. . . . . . . . . . . . . . . . . . . . . 27 |
|
4-3. |
Color Adjustment . . . . . . . . . . . . . . . . . . . . |
. . . . . . . . . . . . . . . . . . . . . 29 |
|
4-4. |
Power-save Setup . . . . . . . . . . . . . . . . . . . . |
. . . . . . . . . . . . . . . . . . . . . 31 |
5. |
MAKING USE OF USB (Universal Serial Bus) . . |
. . . . . . . . . . . . . . . . . . . . . 33 |
|
6. |
ATTACHING AN ARM . . . . . . . . . . . . . . . . . . . . . |
. . . . . . . . . . . . . . . . . . . . . 35 |
|
7. |
TROUBLESHOOTING . . . . . . . . . . . . . . . . . . . . . |
. . . . . . . . . . . . . . . . . . . . . 36 |
|
8. |
CLEANING . . . . . . . . . . . . . . . . . . . . . . . . . . . . . . |
. . . . . . . . . . . . . . . . . . . . . 39 |
|
9. |
SPECIFICATIONS . . . . . . . . . . . . . . . . . . . . . . . . |
. . . . . . . . . . . . . . . . . . . . . 40 |
|
10. |
GLOSSARY . . . . . . . . . . . . . . . . . . . . . . . . . . . . . |
. . . . . . . . . . . . . . . . . . . . . 43 |
|
APPENDIX/ANHANG/ANNEXE . . . . . . . . . . . . . . . . . |
. . . . . . . . . . . . . . . . . . . . . . i |
||
Table of contents 3

English
 PRECAUTIONS
IMPORTANT!
zThis product has been adjusted specifically for use in the region to which it was originally shipped. If operated outside the region to which it was originally shipped, the product may not perform as stated in the specifications.
zTo ensure personal safety and proper maintenance, please read this section and the caution statements on the unit (refer to the figure below).
[Location of the Caution Statements]
 WARNING
If the unit begins to emit smoke, smells like something is burning, or makes strange noises, disconnect all power connections immediately and contact your dealer for advice.
Attempting to use a malfunctioning unit may result in fire, electric shock, or equipment damage.
Do not open the cabinet or modify the unit.
Opening the cabinet or modifying the unit may result in fire, electric shock, or burn.
Refer all servicing to qualified service personnel.
Do not attempt to service this product yourself as opening or removing covers may result in fire, electric shock, or equipment damage.
4 PRECAUTIONS
English
 WARNING
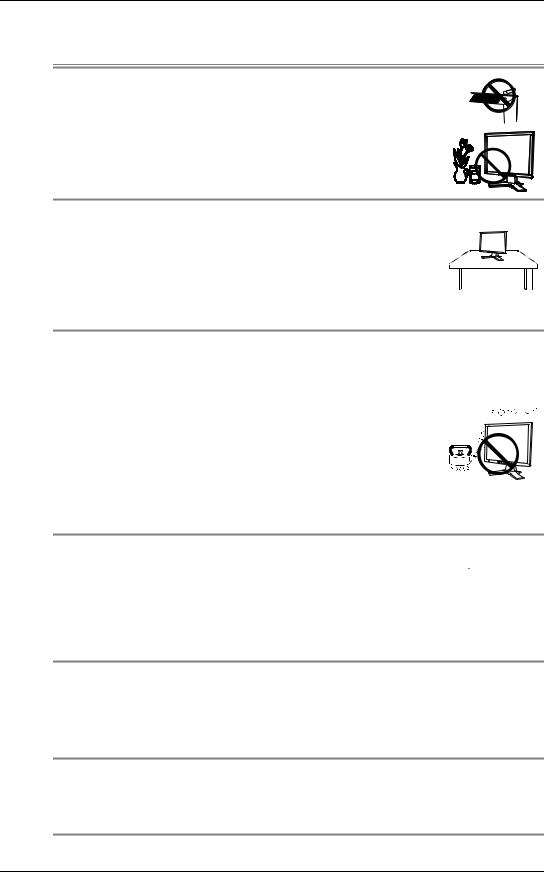
Keep small objects or liquids away from the unit.
Small objects accidentally falling through the ventilation slots into the cabinet or spillage into the cabinet may result in fire, electric shock, or equipment damage. If an object or liquid falls/spills into the cabinet, unplug the unit immediately. Have the unit checked by a qualified service engineer before using it again.
Place the unit at the strong and stable place.
A unit placed on an inadequate surface may fall and result in |
|
injury or equipment damage.If the unit falls, disconnect the power |
|
immediately and ask your dealer for advice. Do not continue using |
OK |
a damaged unit. Using a damaged unit may result in fire or |
|
electric shock. |
|
Set the unit in an appropriate location.
Not doing so may result in fire, electric shock, or equipment damage. z Do not place outdoors.
z Do not place in the transportation system (ship, aircraft, trains, automobiles, etc.)
z Do not place in a dusty or humid environment.
z Do not place in a location where the steam comes directly on the screen.
z Do not place near heat generating devices or a humidifier.
To avoid danger of suffocation, keep the plastic packing bags away from babies and children.
Use the enclosed power cord and connect to the standard power outlet of your country.
Be sure to remain within the rated voltage of the power cord.Not doing so may result in fire or electric shock.
To disconnect the power cord, grasp the plug firmly and pull.
Tugging on the cord may damage and result in fire or electric shock.
PRECAUTIONS 5
English
 WARNING
The equipment must be connected to a grounded main outlet.
Not doing so may cause in fire or electric shock.
Use the correct voltage.
zThe unit is designed for use with a specific voltage only. Connection to another voltage than specified in this User’s Manual may cause fire, electric shock, or equipment damage.
zDo not overload your power circuit, as this may result in fire or electric shock.
Handle the power cord with care.
zDo not place the cord underneath the unit or other heavy objects.
zDo not pull on or tie the cord.
If the power cord becomes damaged, stop using it. Use of a damaged cord may result in fire or electric shock.
Never touch the plug and power cord if it begins to thunder.
Touching them may result in electric shock.
When attaching an arm stand, please refer to the user’s manual of the arm stand and install the unit securely with the enclosed screws.
Not doing so may cause the unit to come unattached, which may result in injury or equipment damage. When the unit is dropped, please ask your dealer for advice. Do not continue using a damaged unit. Using a damaged unit may result in fire or electric shock. When reattaching the tilt stand, please use the same screws and tighten them securely.
Do not touch a damaged LCD panel directly with bare hands.
The liquid crystal which leaks from the panel is poisonous if it enters the eyes or mouth. If any part of the skin or body comes in direct contact with the panel, please wash thoroughly. If some physical symptoms result, please consult your doctor.
Follow local regulation or laws for safe disposal.
The backlight of the LCD panel contains mercury.
6 PRECAUTIONS
English
 CAUTION
Handle with care when carrying the unit.
Disconnect the power cord and cables when moving the unit. Moving the unit with the cord attached is dangerous. It may result in injury.
When handling the unit, grip the bottom of the unit firmly with both hands ensuring the panel faces outward before lifting.
Dropping the unit may result in injury or equipment damage.
OK 


Do not block the ventilation slots on the cabinet.
zDo not place any objects on the ventilation slots.
zDo not install the unit in a closed space.
zDo not use the unit laid down or upside down.
Blocking the ventilation slots prevents proper airflow and may result in fire, electric shock, or equipment damage.
Do not touch the plug with wet hands.
Doing so may result in electrical shock.
Use an easily accessible power outlet.
This will ensure that you can disconnect the power quickly in case of a problem.
Periodically clean the area around the plug.
Dust, water, or oil on the plug may result in fire.
Unplug the unit before cleaning it.
Cleaning the unit while it is plugged into a power outlet may result in electric shock.
If you plan to leave the unit unused for an extended period, disconnect the power cord from the wall socket after turning off the power switch for the safety and the power conservation.
PRECAUTIONS 7

English
LCD Panel
In order to suppress the luminosity change by long-term use and to maintain the stable luminosity, use of a monitor in lower brightness is recommended.
The screen may have defective pixels. These pixels may appear as slightly light or dark area on the screen. This is due to the characteristics of the panel itself, and not the product.
The backlight of the LCD panel has a fixed life span. When the screen becomes dark or begins to flicker, please contact your dealer.
Do not press on the panel or edge of the frame strongly, as this may result in damage to the screen. There will be prints left on the screen if the pressed image is dark or black. If pressure is repeatedly applied to the screen, it may deteriorate or damage your LCD panel. Leave the screen white to decrease the prints.
Do not scratch or press on the panel with any sharp objects, such as a pencil or pen as this may result in damage to the panel. Do not attempt to brush with tissues as this may scratch the LCD panel.
8 PRECAUTIONS

English
1.INTRODUCTION
Thank you very much for choosing an EIZO Color Monitor.
1-1. Features
zDual inputs compliant (DVI-I x 2 connecters)
zDVI (p. 43) Digital input (TMDS (p. 44)) compliant
z[Horizontal scanning frequency] Analog: 30 - 82 kHz
|
Digital: 30 |
- 65 kHz |
[Vertical scanning frequency] |
Analog: 49 - 86 Hz (1280 x 1024: 49 - 76 Hz) |
|
|
Digital: 59 |
- 61 Hz (VGA text: 69 - 71 Hz) |
[Resolution] |
1280 dots x 1024 lines |
|
zSupports to sRGB (p. 44) standard
zSmoothing function incorporated for the adjustment of an enlarged image. (p. 27)
zThe height adjustable stand incorporated
zUltra slim bezel incorporated
zThe Portrait/Landscape display capability
1-2. Package Contents
Please contact your local dealer for assistance if any of the listed items are missing or damaged.
z LCD Monitor |
z Mounting Screws: M4 x 12 (mm) x 4 pcs |
z Power Cord |
z EIZO LCD Utility Disk |
z Signal Cable (FD-C39) |
z User’s Manual |
z Signal Cable (FD-C16) |
z ScreenManager Quick Reference |
z EIZO USB Cable (MD-C93) |
z LIMITED WARRANTY |
NOTE
z Please retain the packing materials for future transference.
1. Introduction 9
English
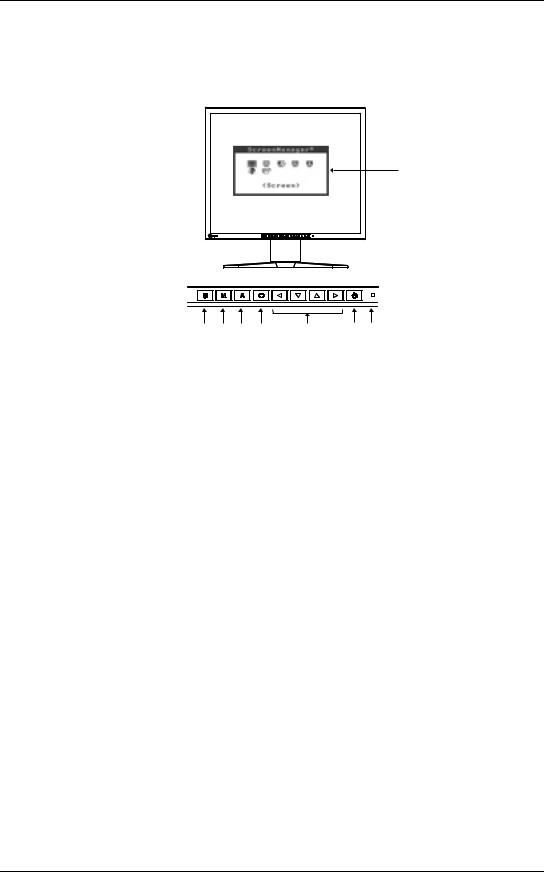
1-3. Controls & Connectors
Front
(1)
(2) |
(3) |
(4) |
(5) |
(6) |
(7) |
(8) |
(1)ScreenManager®
(2)Input Signal Selection Button
(3)Mode Button*1
(4)Auto Adjustment Button
(5)Enter Button
(6)Control Buttons*2 (Left, Down, Up, Right) *3
(7)Power Button
(8)Power Indicator*4
Blue |
Operation |
|
|
Yellow |
Power saving |
|
|
Flashing yellow (2 times for each) |
Power save mode Digital only |
|
|
Off |
Power off |
|
|
*1 Directly pressing the mode button allows you to switch a color mode between “Custom” and “sRGB”. For details about color mode, see page 29.
*2 Directly pressing the control button allows you to adjust screen brightness. If you choosing the “custom” color mode, you also may adjust screen contrast.
*3 These buttons are changed to Up, Left, Right, Down in case of selecting “Portrait” for <Orientation> of ScreenManager <Others> (p. 20).
*4 Blue lighting, when the screen is displayed (Operation mode), is made to non-light, see page 22. Regarding the power indicator for the “Off Timer”, see page 21.
10 1. Introduction
English
Rear
(9) (10) 
Bottom
(11)(12)(13)(14)(15)
(9)Security Lock Slot*5
(10)Height Adjustable Stand (Detachable)*6
(11)Power Connector
(12)DVI-I Input Connector (SIGNAL 1)
(13)DVI-I Input Connector (SIGNAL 2)
(14)USB Port (1 Upstream)
(15)USB Port (2 Downstream)
*5 Allows for connection of a security cable. This lock supports Kensington’s MicroSaver security system. For further information, please consult’
Kensington Technology Group
2855 Campus Drive, San Mateo, CA 94403 USA
Tel.: 800-650-4242, x3348, Intl: 650-572-2700, x3348 Fax: 650-572-9675
http://www.kensington.com
*6 The LCD monitor has the capability of the Portrait/Landscape display (The panel pivots in the clockwise direction 90°.). For the Portrait display, use the software for the portrait. The LCD monitor can be used with an optional arm stand by removing the stand (see page 35).
1. Introduction 11

English
2.CABLE CONNECTION
2-1. Before Connecting
Before connecting your monitor to the PC, change the display screen settings (resolution (p. 44) and frequency) in accordance with the charts below.
NOTE
zWhen your computer and display support VESA DDC, the suitable resolution and the refresh rate are set by just plugging your display into the computer without any manual settings.
Analog Input
Resolution |
Frequency |
Dot Clock |
Remarks |
|||
|
|
|
|
|
|
|
640 |
× |
480 |
67 Hz |
|
Apple Macintosh |
|
|
|
|
|
|
|
|
640 |
× |
480 |
~ 85 Hz |
|
VGA, VESA |
|
|
|
|
|
|
|
|
720 |
× |
400 |
70 Hz |
|
VGA TEXT |
|
|
|
|
|
|
|
|
800 |
× |
600 |
~ 85 Hz |
|
VESA |
|
|
|
|
|
|
|
|
832 |
× |
624 |
75 Hz |
|
Apple Macintosh |
|
|
|
|
|
|
|
|
1024 |
× |
768 |
~ 85 Hz |
135 MHz (Max.) |
VESA |
|
|
|
|
|
|
||
1152 |
× |
864 |
75 Hz |
VESA |
||
|
||||||
|
|
|
|
|
|
|
1152 |
× |
870 |
75 Hz |
|
Apple Macintosh |
|
|
|
|
|
|
|
|
1152 |
× |
900 |
~ 76 Hz |
|
SUN WS |
|
|
|
|
|
|
|
|
1280 |
× |
960 |
75 Hz |
|
Apple Macintosh |
|
|
|
|
|
|
|
|
1280 |
× |
960 |
60 Hz |
|
VESA |
|
|
|
|
|
|
|
|
1280 |
× |
1024 |
~ 75 Hz |
|
VESA |
|
|
|
|
|
|
|
|
Digital Input
Only the following resolutions with frequency can be displayed on this model.
Resolution |
Frequency |
Dot Clock |
Remarks |
||
|
|
|
|
|
|
640 |
× |
480 |
60Hz |
|
VGA |
|
|
|
|
|
|
720 |
× |
400 |
70Hz |
|
VGA TEXT |
|
|
|
|
|
|
800 |
× |
600 |
60Hz |
108 MHz (Max.) |
VESA |
|
|
|
|
|
|
1024 |
× |
768 |
60Hz |
|
VESA |
|
|
|
|
|
|
1280 |
× |
1024 |
60Hz |
|
VESA |
|
|
|
|
|
|
12 2. CABLE CONNECTION
English
2-2. Connecting the Signal Cable
NOTE
z Be sure that the power switches of both the PC and the monitor are OFF.
1.Plug the signal cable into the connector at the rear of the monitor and the other end of the cable into the video connector on the PC.
After connecting, secure the connection with the screw-in fasteners.
Power Cord 
Analog Input
Signal Cable |
Connector |
|
PC |
Signal Cable |
Video Output Connector / |
z |
Standard graphics card |
(FD-C16 enclosed) |
D-Sub mini 15 pin |
z |
Power Macintosh G3 |
|
|
||
|
Input Connector (monitor) / |
|
(Blue & White) / Power |
|
DVI |
|
Mac G4 (VGA) |
Signal Cable |
Video Output Connector / |
z |
Macintosh |
(FD-C16 enclosed) + |
D-Sub 15 pin |
|
|
Macintosh Adapter (Optional) |
Input Connector (monitor) / |
|
|
|
|
|
|
|
DVI |
|
|
Digital Input
Signal Cable |
Connector |
PC |
Signal Cable |
Video Output Connector / |
z Digital graphics board |
(FD-C39 enclosed) |
DVI |
z Power Mac G4/G5 (DVI) |
|
|
|
|
Input Connector (monitor) / |
|
|
DVI |
|
NOTE
zThe monitor is not compatible with a Power Mac G4/G5 ADC (Apple Display Connector)
2.CABLE CONNECTION 13
English
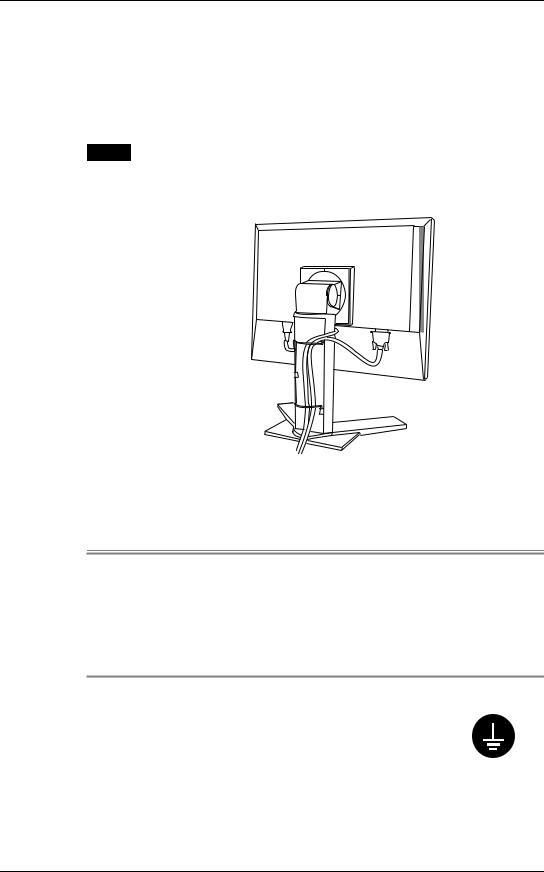
2.Plug the power cord into the power connector on the rear of the monitor.
3.Lead the power cord and signal cable into the cable holder at rear of the monitor.
NOTE
zThe cables are recommended to lead with slight sag for the smooth motion of the stand and the Portrait/Landscape display.
Cable Holder
4.Plug the other end of the power cord into a power outlet.
 WARNING
Use the enclosed power cord and connect to the standard power outlet of your country.
Be sure to remain within the rated voltage of the power cord.
Not doing so may result in fire or electric shock.
The equipment must be connected to a grounded main outlet.
Not doing so may result in fire or electric shock. Not doing so may cause in fire or electric shock.
14 2. CABLE CONNECTION

English
5.Turn on the monitor's Power Button and then turn on the PC's power.
The monitor's power indicator will light up (blue).
If an image does not appear, refer to the “7. TROUBLESHOOTING” (p. 36) for advice.
Whenever finished, turn off the PC and the monitor.
NOTE
zWhen turning on the monitor, the kind of the input signal (Signal1 or 2/Analog or Digital) is displayed for a few seconds on the right top corner of the screen.
zAdjust brightness of the screen depending on the brightness of your environment.
zBe sure to take adequate rests. A 10-minute rest period each hour is suggested.
2. CABLE CONNECTION 15
English
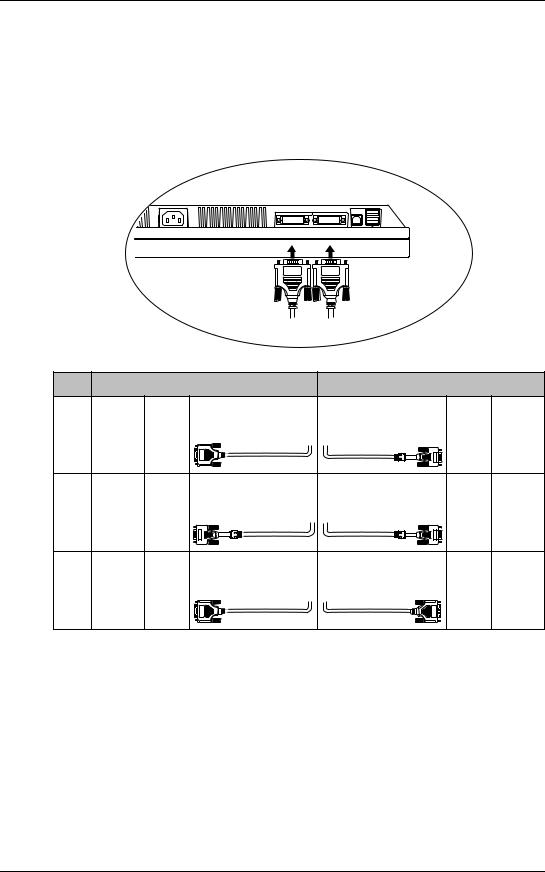
2-3. Connecting Two PCs to the Monitor
Two PCs can be connected to the monitor through the Signal 1 and the Signal 2 on the back of the monitor.
Connecting Examples
DVI-I Input Connector (SIGNAL 1)(SIGNAL 2)
|
|
|
PC 1 |
PC 2 |
|
|
Ex.1 |
Digital |
DVI |
Signal Cable |
Signal Cable |
D-Sub |
Analog |
|
|
|
(FD-C39 enclosed) |
(FD-C16 enclosed) |
mini |
|
|
|
|
|
|
15 pin |
|
Ex.2 |
Analog |
D-Sub |
Signal Cable |
Signal Cable |
D-Sub |
Analog |
|
|
mini |
(FD-C16 enclosed) |
(FD-C16 optional) |
mini |
|
|
|
15 pin |
|
|
15 pin |
|
Ex.3 |
Digital |
DVI |
Signal Cable |
Signal Cable |
DVI |
Digital |
|
|
|
(FD-C39 enclosed) |
(FD-C39 optional)] |
|
|
16 2. CABLE CONNECTION
Loading...