


S117FG
EN
DE
FR
ES
PT
IT
NL
DA
SV
NO
FI
RU
PL
SK
CS
HU
REFRIGERATION
MACAVE
S16FG, S40FGD, S117FG
Wine cabinet
Operating manual . . . . . . . . . . . . . . . . . . . . . 8
Weintemperierschrank
Bedienungsanleitung . . . . . . . . . . . . . . . . .30
Cave à vin double température
Notice d’utilisation . . . . . . . . . . . . . . . . . . .52
Bodega de vino
Instrucciones de uso . . . . . . . . . . . . . . . . . .75
Armário térmico para vinhos
Manual de instruções . . . . . . . . . . . . . . . . .98
IArmadio climatizzato per vino
Istruzioni per l’uso . . . . . . . . . . . . . . . . . . .120
Wijnklimaatkast
Gebruiksaanwijzing. . . . . . . . . . . . . . . . . .142
Vintempereringsskab
Betjeningsvejledning . . . . . . . . . . . . . . . .164
Vintempereringsskåp
Bruksanvisning . . . . . . . . . . . . . . . . . . . . . 186
Vintempereringsskap
Bruksanvisning . . . . . . . . . . . . . . . . . . . . . 207
Viinintemperointikaappi
Käyttöohje . . . . . . . . . . . . . . . . . . . . . . . . .229
Винный шкаф
Инструкция по эксплуатации . . . . . . . . . 251
Piwnica na wino
Instrukcja obsługi . . . . . . . . . . . . . . . . . . . 274
Chladnička na víno
Návod na obsluhu. . . . . . . . . . . . . . . . . . . 297
Vinotéka
Návod k obsluze . . . . . . . . . . . . . . . . . . . . 319
Borhűtő szekrény
Használati utasítás. . . . . . . . . . . . . . . . . . . 341

1
1 2 3 4 5 6 7 8
S16FG, S117FG
MaCave
1
2
3
1
4
2
3
4
5
6
7
S16FG S40FGD S117FG
2
3
5
6
7
1 2 3 4 5 6 7 8
S40FGD
2
MaCave
S16FG
S16FG, S40FGD
S16FG, S117FG
S16FG, S117FG
S16FG, S117FG
S117FG
4
6
S117FG
8
5
7
9
S16FG, S117FG
0
a
3
MaCave
S117FG
S16FG
b
c
ed
f
SG16FG, S40FGD
4
≥575
B
A
715
822–892
820–890
460
50
110
100-
170
MaCave
g
h
i
AB
AB
5

j
1
2
AB
MaCave
k
6
MaCave
l
m
1
1
7

EN
MaCave
Please read this instruction manual carefully before first use, and store it in
a safe place. If you pass on the product to another person, hand over this
instruction manual along with it.
Table of contents
1 Explanation of symbols. . . . . . . . . . . . . . . . . . . . . . . . . . . . . . . . . . . . . . . . . . .9
2 Safety instructions . . . . . . . . . . . . . . . . . . . . . . . . . . . . . . . . . . . . . . . . . . . . . . .9
3 Scope of delivery . . . . . . . . . . . . . . . . . . . . . . . . . . . . . . . . . . . . . . . . . . . . . . 11
4 Accessories . . . . . . . . . . . . . . . . . . . . . . . . . . . . . . . . . . . . . . . . . . . . . . . . . . . 11
5 Intended use . . . . . . . . . . . . . . . . . . . . . . . . . . . . . . . . . . . . . . . . . . . . . . . . . .12
6 Technical description . . . . . . . . . . . . . . . . . . . . . . . . . . . . . . . . . . . . . . . . . . . 12
7 Setting up and connecting the appliance . . . . . . . . . . . . . . . . . . . . . . . . . . . 15
8 Using the appliance . . . . . . . . . . . . . . . . . . . . . . . . . . . . . . . . . . . . . . . . . . . . 18
9 Troubleshooting . . . . . . . . . . . . . . . . . . . . . . . . . . . . . . . . . . . . . . . . . . . . . . 26
10 Maintaining and cleaning the appliance . . . . . . . . . . . . . . . . . . . . . . . . . . . 28
11 Warranty . . . . . . . . . . . . . . . . . . . . . . . . . . . . . . . . . . . . . . . . . . . . . . . . . . . . 28
12 Disposal . . . . . . . . . . . . . . . . . . . . . . . . . . . . . . . . . . . . . . . . . . . . . . . . . . . . . 29
13 Technical data . . . . . . . . . . . . . . . . . . . . . . . . . . . . . . . . . . . . . . . . . . . . . . . . 29
8

EN
MaCave Explanation of symbols
1 Explanation of symbols
WARNING!
!
!
A
I
Safety instruction: Failure to observe this instruction can cause fatal or
serious injury.
CAUTION!
Safety instruction: Failure to observe this instruction can lead to injury.
NOTICE!
Failure to observe this instruction can cause material damage and impair
the function of the product.
NOTE
Supplementary information for operating the product.
2 Safety instructions
The manufacturer accepts no liability for damage in the following cases:
• Faulty assembly or connection
• Damage to the product resulting from mechanical influences and excess voltage
• Alterations to the product without express permission from the manufacturer
• Use for purposes other than those described in the operating manual
2.1 General safety
WARNING!
!
• Before you use the appliance for the first time, check that the operat-
ing voltage matches the mains voltage (see type plate).
• Do not operate the appliance if it is visibly damaged.
• This appliance may only be repaired by qualified personnel. Inade-
quate repairs may cause serious hazards.
Should your appliance need to be repaired, please contact customer
services.
9

EN
Safety instructions MaCave
• This appliance can be used by children aged 8 years or over, as well as
by persons with diminished physical, sensory or mental capacities or a
lack of experience and knowledge, providing they are supervised or
have been taught how to use the appliance safely and are aware of the
resulting risks.
• Electrical appliance are not toys.
Always keep the appliance out of the reach of children.
• Children must be supervised to ensure that they do not play with the
appliance.
• Keep the keys out of the reach of children.
• If this appliance’s connection cable is damaged, it must be replaced
by the manufacturer, customer service or a similarly qualified person in
order to prevent safety hazards.
• Do not store any explosive substances, such as spray cans with propellants, in the appliance.
CAUTION!
!
• Disconnect the appliance from the mains
– Before cleaning and maintenance
– If you will not need to use it for some time
• The appliance should be moved and set up by at least two people.
Otherwise this could lead to back or other injuries.
• Do not place the appliance in direct sunlight or in the vicinity of strong
heat sources (heating appliances, ovens, etc.).
A
10
NOTICE!
• Never pull the plug out of the socket by the connection cable.
• Do not use accessories that have not been recommended by the man-
ufacturer. This can lead to injury and material damage.
EN
MaCave Scope of delivery
2.2 Operating the appliance safely
WARNING!
!
!
A
• Never use the appliance in rooms where flammable materials are
stored or flammable gases have built up. Sparks from the motor could
ignite them.
CAUTION!
• Do not use the appliance with wet hands.
NOTICE!
• Only use the appliance indoors, never outside.
• Never expose the appliance to moisture.
• Keep children and animals at a safe distance when operating the appli-
ance.
• Do not place any electrical devices inside the cooler.
3Scope of delivery
• Wine cabinet
• Water tank
• Key
• Label set
• Door hinge (only S16FG, S117FG)
• Operating manual
4Accessories
Label Ref. number
S16FG S40FGD S117FG
Storage base 9103540117 9103540117 9103540119
Presentation shelves (tilted) – – 9103540121
Label set 9103540116 9103540116 9103540116
Active carbon filter 9103500156 9103500156 9103500156
11

EN
Intended use MaCave
5 Intended use
The appliance is a wine cabinet. It is intended for storing wine and has two separate
adjustable temperature zones. A special beverage mod enables the storage and
cooling of other drinks.
6 Technical description
The wine cabinet comes in three models:
• S16FG:
with capacity for 19 standard Bordeaux bottles
• S40FGD:
with capacity for 52 standard Bordeaux bottles
• S117FG:
with capacity for 141 standard Bordeaux bottles
Factory fitted with shelves.
You can increase the capacity by using the optional accessory of reinforced storage
shelves.
You can find information on storage of bottles in chapter “Storing bottles” on
page 18.
The appliance has two separate adjustable temperature zones.
S16FG, S117FG: The temperature zones are chilled or heated automatically to
reach or maintain the temperature that is set.
S40FGD: The appliance has no heating function.
The temperature can be set in steps of 1 °C or 1 °F using sensor buttons.
The appliance has:
• Sensor buttons: Just touch slightly to select the required function
• automatic defrosting
• a UV impervious door
• An active carbon filter for improving the inner climate
12

EN
MaCave Technical description
• a fan for maintaining a constant inner climate, such as in a wine cellar (dynamic
cooling mode)
• a lockable glass door with a reversible door hinge
• detachable shelves for storing the bottles
• a Sabbath mode
• LED interior lighting with two operating modes
• a temperature memory function: The set temperature is also saved when the unit
is switched off.
• a temperature monitor: A warning signal sounds and the temperature display
flashes if the interior temperature noticeably deviates from the one set
Overview
No. in
fig. 1,
page 2
Label
1
S16FG, S117FG: Upper temperature zone
S40FGD: Left temperature zone
2 Control panel
3 Cooling area divider
4
S16FG, S117FG: Lower temperature zone
S40FGD: Right temperature zone
5Lock
6 Ventilation slots
7 Height-adjustable feet
13
EN
Technical description MaCave
Controls
No. in
fig. 2,
page 2 and
fig. 3,
page 2
1 On/off switch
2 Increases the set temperature of the upper temperature zone by
3 Reduces the set temperature of the upper temperature zone by
4
Symbol Description
1 °C or 1 °F
1 °C or 1 °F
S16FG, S117FG: Display indicates the current temperature
of the upper temperature zone
S40FGD: Display indicates the current temperature of the left
temperature zone
5
S16FG, S117FG: Display indicates the current temperature
of the lower temperature zone
S40FGD: Display indicates the current temperature of the
lower temperature zone
6 Increases the set temperature of the upper temperature zone by
1 °C or 1 °F
7 Reduces the set temperature of the lower temperature zone by
1 °C or 1 °F
8 Switches the interior light on or off
14

EN
MaCave Setting up and connecting the appliance
7 Setting up and connecting the
appliance
7.1 Notes on setting up the appliance
All appliances can be installed on a free-standing basis.
When selecting the location, observe the following instructions:
• The ambient temperature should be in the range specified for your country in the
supplementary “Country versions” booklet. Otherwise, it could mean that the
inner temperature you set cannot be reached or maintained. This could also be
the case if there are extreme fluctuations in the ambient temperature
• The appliance should stand in the coldest part of the room, away from heat
sources (ovens, heating devices or radiators).
• The location must not be damp or wet.
• The appliance must not be exposed to direct sunlight. This can damage the
acrylic coating and lead to higher power consumption.
• The ground must be level and sufficiently stable to bear the appliance at full
capacity.
• The appliance must be sufficiently ventilated. The ventilation slots on the front of
the appliance must not be obstructed.
• Note the information on the electrical connection, see chapter “Information on
electrical connection” on page 17.
• Remove all the inner and outer packaging materials before setting up.
• Make sure the appliance is level by adjusting the feet.
15
EN
Setting up and connecting the appliance MaCave
7.2 Notes on installing the appliance
NOTICE!
A
S16FG and S40FGD can be installed in a kitchen unit under the counter.
S117FG can be installed in a kitchen cabinet.
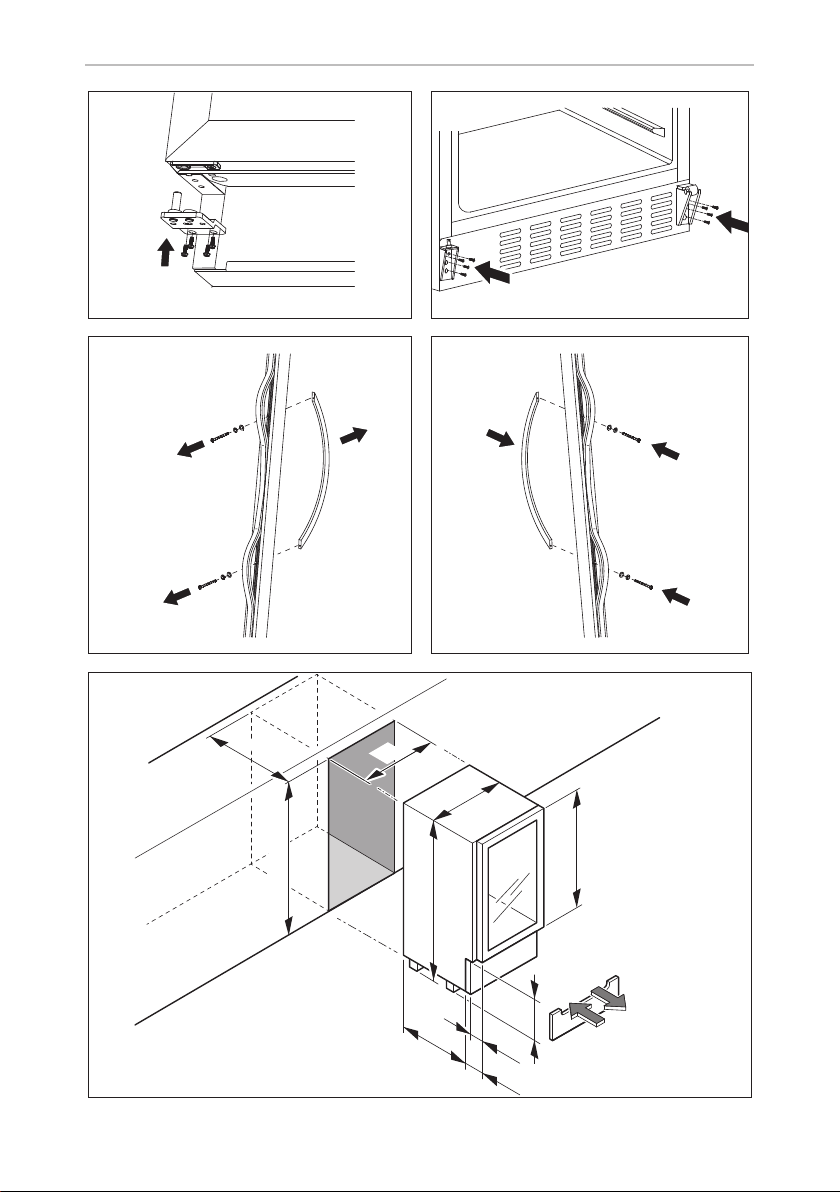
Installing S16FG and S40FGD (fig. f, page 4)
➤ Observe the installation dimensions (in mm):
• Ensure that the ventilation slots remain clear during the installation.
Obstructed ventilation slots lead to increased power consumption
and can damage the appliance.
• Waste heat produced by the appliance must be extracted via a ventilation shaft on the rear.
• The ventilation shaft must have cross-section of at least 200 cm
• Ensure that the power cable is not jammed when pushing the appli-
ance into place.
Width Depth Height
2
.
S16FG
S40FGD
➤ When using skirting board:
Ensure that ventilation openings in the skirting board have a cross-section of at
least 300 cm
Installing S117FG
➤ Observe the installation dimensions (in mm):
S117FG 600 min. 575 1770
300 min. 575 822 – 892
600 min. 575 822 – 892
2
.
Width Depth Height
16

EN
MaCave Setting up and connecting the appliance
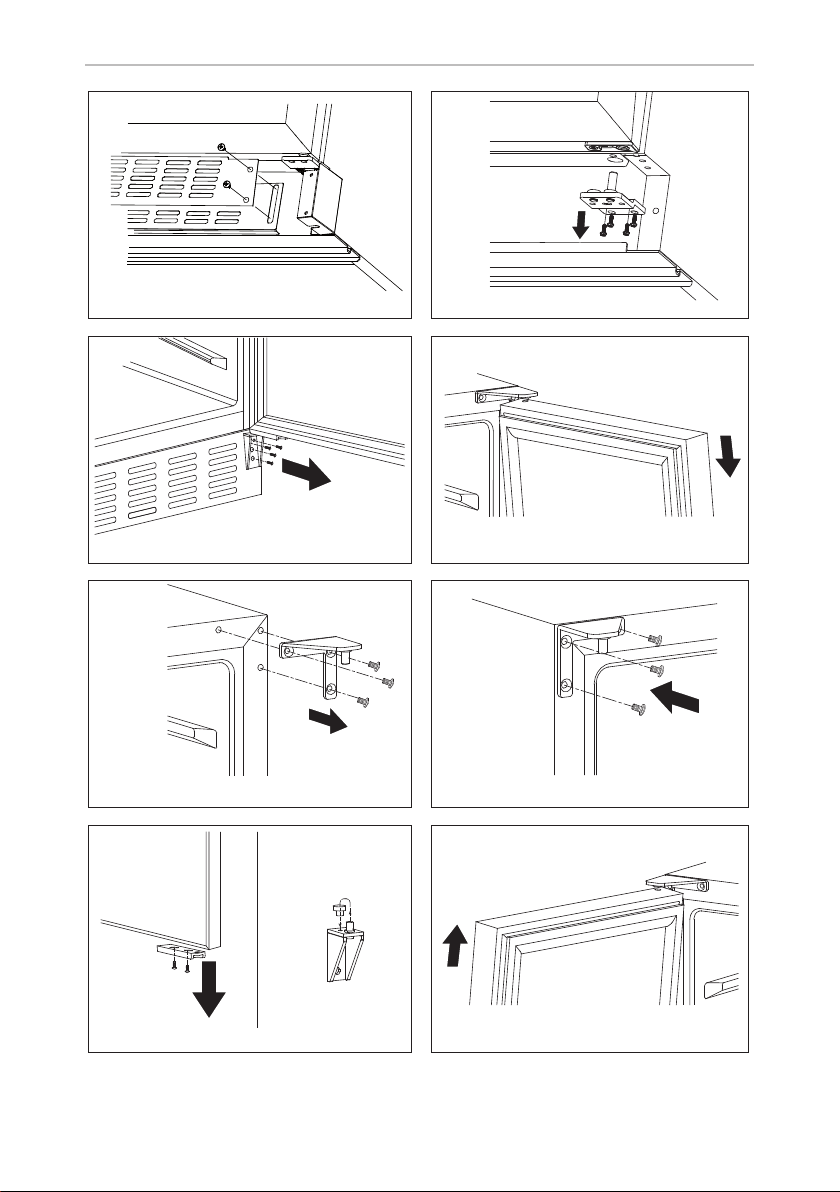
7.3 Reversing the door
You can also change the hinge of the door, so that it opens to the left rather than the
right.
S16FG
➤ Change the door as described in fig. 4, page 3 to fig. b, page 4.
➤ Turn the door by 180°.
➤ Fit the door handle on the other side as described in fig.d, page 4 to fig. e,
page 4.
S117FG
➤ Change the door as described in fig. 6, page 3 to fig. c, page 4.
➤ Fit the door handle on the other side as described in fig.d, page 4 to fig. e,
page 4.
7.4 Information on electrical connection
NOTICE!
A
Leave the appliance to stand upright for about 2 hours after transporting,
before you connect it to the power supply.
Otherwise this could cause faults in the cooling system.
Observe the following when connecting the appliance:
• Connect the appliance to a circuit that is protected with 15 A.
• Check that the voltage specification on the type plate is the same as that of the
power supply.
• If you use an extension cable, this must be approved for the same values as the
appliance, see chapter “Technical data” on page 29.
• Do not use an extension cable or a multiple power socket that can be switched
off with just one switch.
• The cable must rest securely behind the appliance and not be allowed to lie or
hang unprotected.
17

EN
Using the appliance MaCave
8 Using the appliance
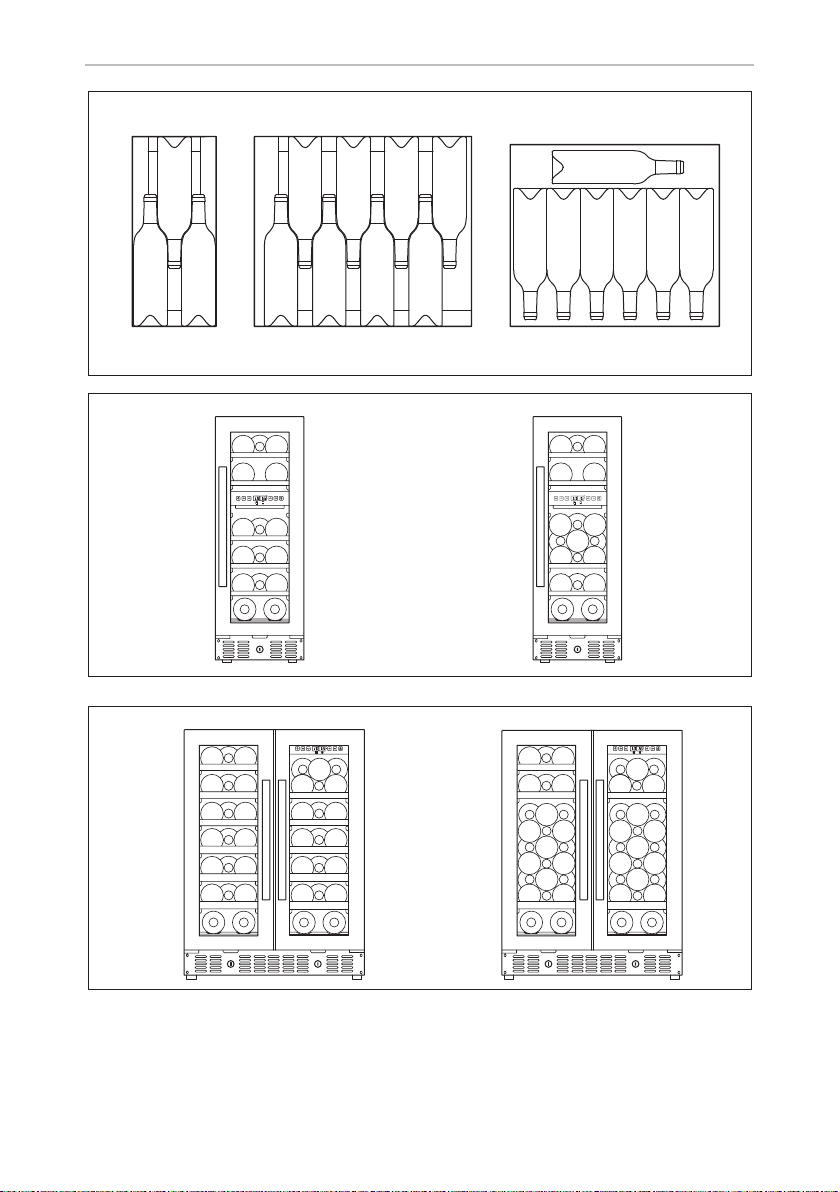
8.1 Storing bottles
NOTICE!
A
Please note the following:
• Only store wine in unopened bottles.
• Do not overload the appliance.
• Do not cover the shelves with aluminium foil or any other objects, as this
obstructs the air circulation.
• If the appliance has been empty for a long time, disconnect it from the power
supply and clean it thoroughly. Leave the door open slightly to allow the air to circulate and prevent condensation, mould or odours from building up.
• After a power cut or if the appliance has been switched off, wait 3 to 5 minutes
before switching on the appliance again.
➤ Position the bottles as shown in fig. g, page 5.
The following variants are possible:
• S16FG:
– with shelves (fig. h A, page 5)
– with storage shelves (accessory) (fig. h B, page 5)
• S40FGD:
– with shelves (fig. i A, page 5)
– with storage shelves (accessory) (fig. i B, page 5)
• S117FG:
– with shelves (fig. j A, page 6)
– with storage shelves (accessory) (fig. j B, page 6)
Be sure to use reinforced storage shelves (accessory) if you want to stack
bottles.
8.2 Energy saving tips
• Do not open the appliance more often than necessary.
• Do not leave the door open for longer than necessary.
• Clean dust and dirt from the condenser at regular intervals.
18

EN
MaCave Using the appliance
8.3 Using the appliance
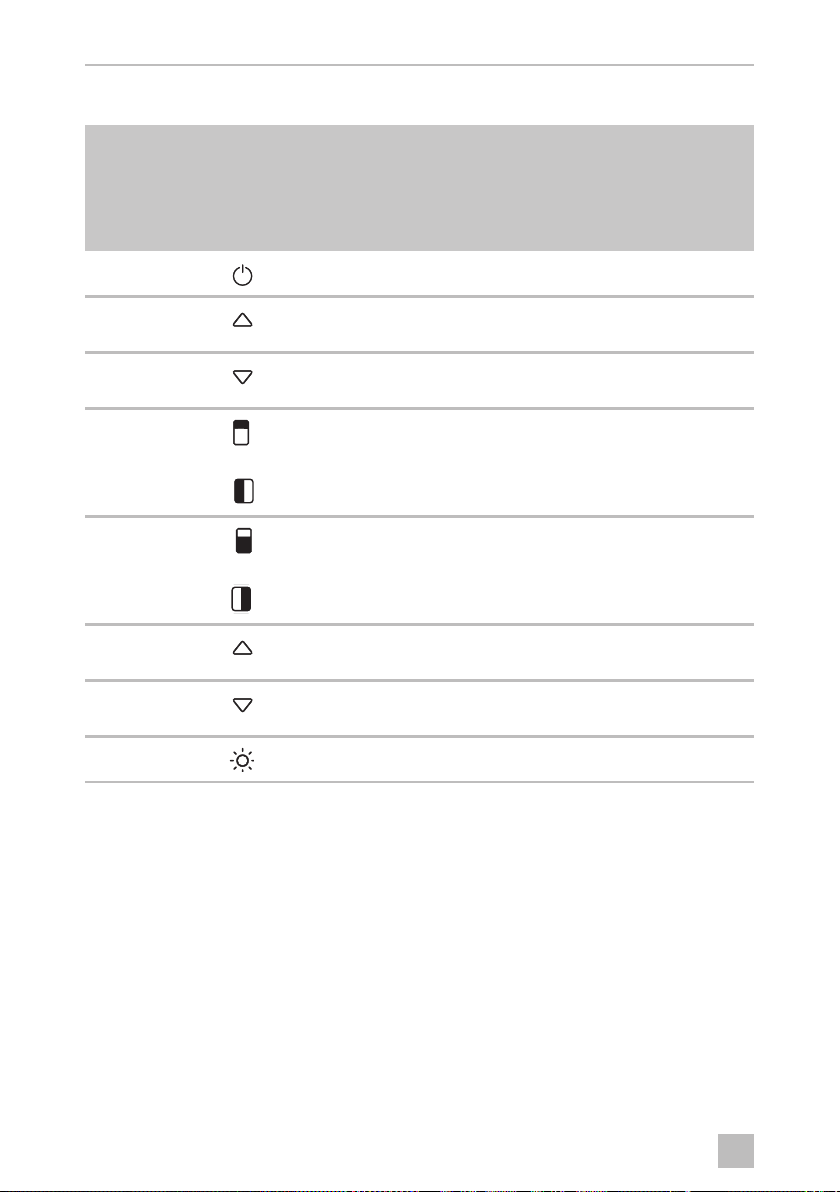
Brief instructions
Function Press the button
Switch the appliance on
Switch the appliance off
Unlock the keypad
Changes the unit (°C / °F)
Indicates the set temperature of the corresponding temperature zone
Increase the temperature in the corresponding temperature
zone by 1 °C or 1 °F
Decreases the temperature in the corresponding temperature zone by 1 °C or 1 °F
Switches off the fan (silent mode)
Switches on the fan (dynamic cooling)
Switches interior light on/off
> 1 s
> 5 s
+ > 5 s
> 5 s
or < 1 s
< 1 s
< 1 s
> 5 s
> 5 s
< 1 s
Sets the unit (°C or °F)
You can select whether the temperature is displayed in Fahrenheit or Celsius.
➤ To do this, press the button for 5 seconds.
✓ The unit is converted and the display shows the temperature in the other unit.
19
EN
Using the appliance MaCave
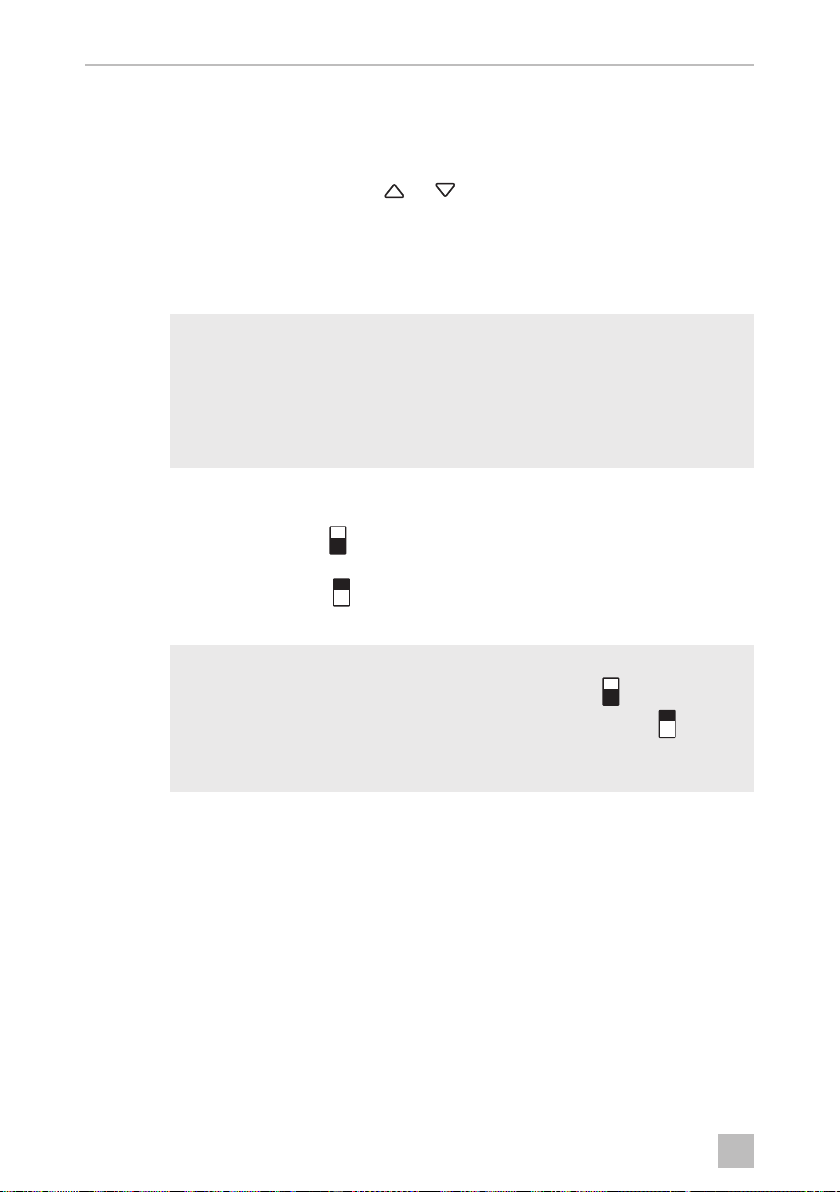
Setting the temperature
S16FG, S40FGD and S117FG have two separate adjustable temperature zones.
The temperature of each zone can be set between 5 °C and 20 °C (41 °F and 68 °F).
➤ Press the corresponding buttons
✓ The display flashes while you make the setting.
✓ Once you have set the temperature, the display shows the current temperature
of the interior for the corresponding temperature zone.
NOTE
I
S16FG, S117FG:
The lower temperature zone is suitable for 13 °C to 20 °C (55 °F to 68 °F) ideal
for storing white and red wines.
The upper temperature zone at a setting of 5 °C to 13 °C (41 °F to 55 °F) is suitable for storing sparkling wine and white wine.
I
When using the appliance for the first time or if it has not been used for a
long time, the inner temperature could differ from the one you have set.
The temperature display flashes as long as this is the case.
Once the set temperature has been reached, the temperature display
lights up constantly.
NOTE
• The temperature for the lower temperature zone must always be
just as high or higher than the upper temperature zone .
• The appliance functions at its best if the difference in temperature
between the two zones is at least 4 °C (39 °F).
or to set the temperature.
20

EN
MaCave Using the appliance
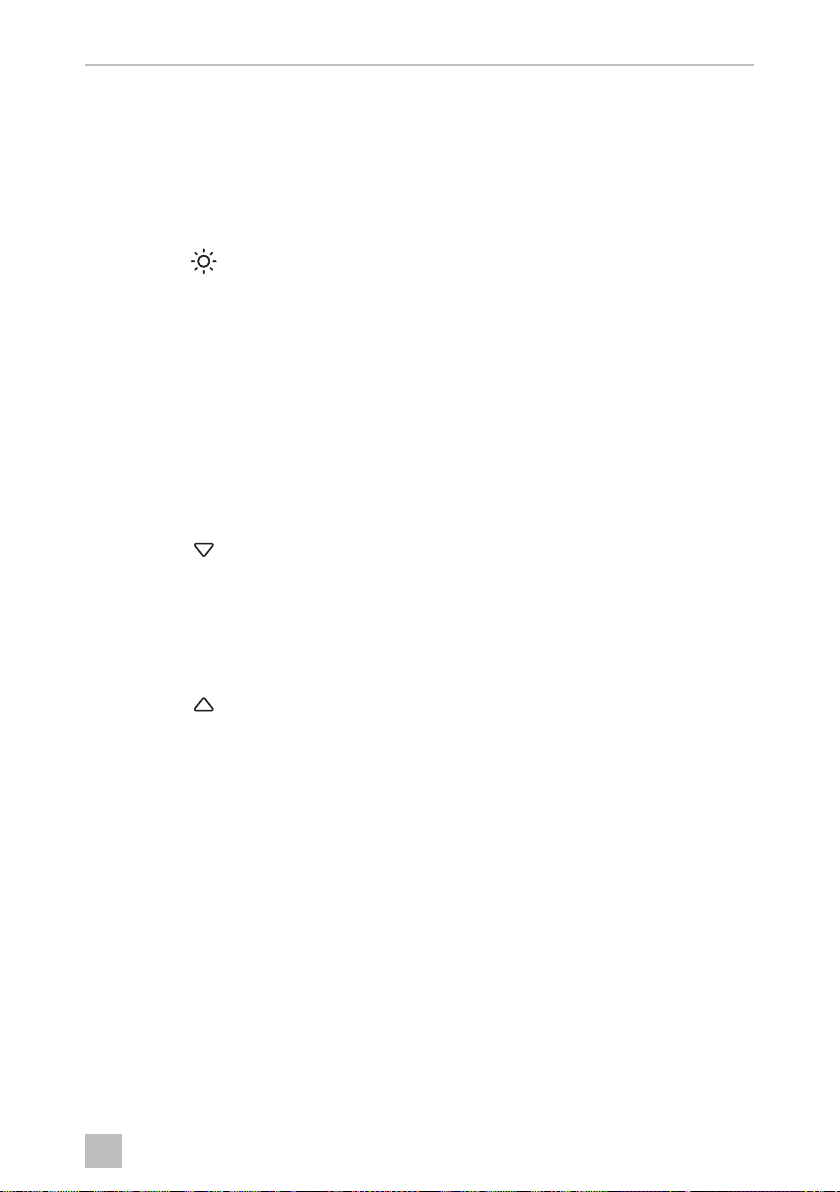
Using beverage mode
The temperature range in beverage mod is between 2 °C and 6 °C
(36 °F and 43 °F).
S16FG, ST117FG: Beverage mode is only possible in the upper temperature
zone .
➤ Press the ,
lower temperature zone.
✓ The temperature indicator flashes 5 times.
S40FGD: Beverage mode is only possible in the left temperature zone .
➤ Press the ,
right temperature zone.
✓ The temperature indicator flashes 5 times.
Checking the set temperature
This is how to display the set temperature:
➤ Press the or button briefly.
✓ The set temperature is shown in the display for 5 seconds.
Then the display shows the current inner temperature again.
NOTE
I
In the event of an interruption to the power supply (power failure, switch
over) the unit saves the previous temperature settings.
and buttons simultaneously for at least 5 seconds for the
and buttons simultaneously for at least 5 seconds for the
21

EN
Using the appliance MaCave
Temperature monitoring
A warning signal sounds and the temperature display flashes:
• if the inner temperature of a zone deviates from the set temperature by more
than 5 °C.
• if the power supply has been disconnected for a long time.
• if the door has not been shut properly.
• if the door is open for more than 60 seconds.
This prevents the temperature from falling or rising too much unnoticed, which could
affect the quality of the wine.
Once the unit has reached the set temperature, the warning signal stops and the
temperature display stops flashing.
To switch off the warning signal prematurely:
➤ Press the
✓ The temperature display flashes until the set temperature is reached. The display
is then illuminated constantly and indicates that the alarm system is active again.
Using the Sabbath mode
In this mode, the display, interior lighting and warning signal for the temperature
monitor are deactivated. The refrigeration continues as usual.
To switch on the Sabbath mode:
➤ Press the
✓ The temperature indicator flashes 4 times. The Sabbath mode is activated. The
Sabbath mode switches off automatically after 96 hours.
To switch off the Sabbath mode:
➤ Press the
✓ The temperature indicator flashes 4 times. The Sabbath mode is deactivated. The
display, interior lighting and warning signal for the temperature monitor are acti-
vated.
button briefly.
and buttons simultaneously for at least 5 seconds.
and buttons simultaneously for at least 5 seconds.
22
EN
MaCave Using the appliance
Setting the LED interior lighting
The unit has two different modes for lighting:
• Standard mode: The interior is illuminated when the door is opened.
• Vitrine mode: The interior is illuminated constantly.
To switch between standard and vitrine modes:
➤ Press the
Switching the fan on/off (dynamic cooling mode/silent mode)
The fan runs normally only when required (silent mode). In silent mode, the fan
switches off when the set temperature is reached.
Switch the fan to dynamic cooling mode to create an homogeneous climate for the
interior of a temperature zone. The fan runs permanently to regulate humidity and
temperature.
This is how to switch on the fan (dynamic cooling mode):
➤ Press the button (> 5 seconds).
✓ 5 acoustic signals are emitted.
The fan is switched on (dynamic cooling mode).
This is how to switch off the fan (silent mode):
➤ Press the button (> 5 seconds).
✓ 3 acoustic signals are emitted.
The fan is switched off (silent mode).
buttons briefly.
23

EN
Using the appliance MaCave
Cabinet shelves
The shelves can be pulled out by a third so that you can reach the wine bottles easily.
The shelves have a limit stop to prevent them from being pulled out too far.
➤ Make sure that the door is fully open when you pull out the shelves on roller-bear-
ings. Otherwise the door seal can be damaged.
Proceed as follows to remove one of the shelves from the guide rail (fig. k, page 6):
➤ Pull the shelf (1) exactly into the position at which shelf recesses are located pre-
cisely above the ledges (2) in the interior of the appliance.
➤ Remove the shelf.
Ensure that the recesses on the shelf fit over the ledges (2) when inserting the shelf.
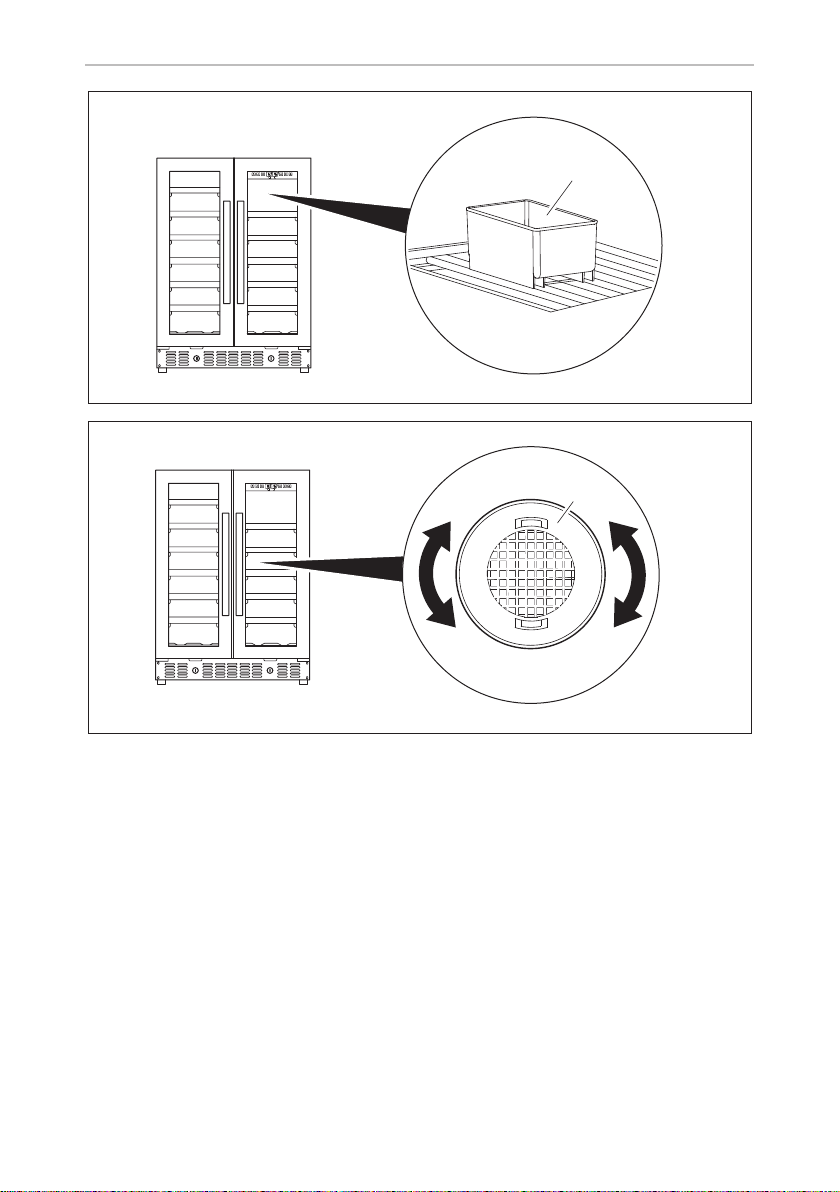
Checking the water level (humidity control)
➤ Regularly check the water level in the water tank (fig. l 1, page 7) on the top
shelf.
➤ Fill the water tank ¾ full with water and place it on the grid on the top shelf.
Make sure that the water tank is securely positioned on the grid so that it cannot
tip over.
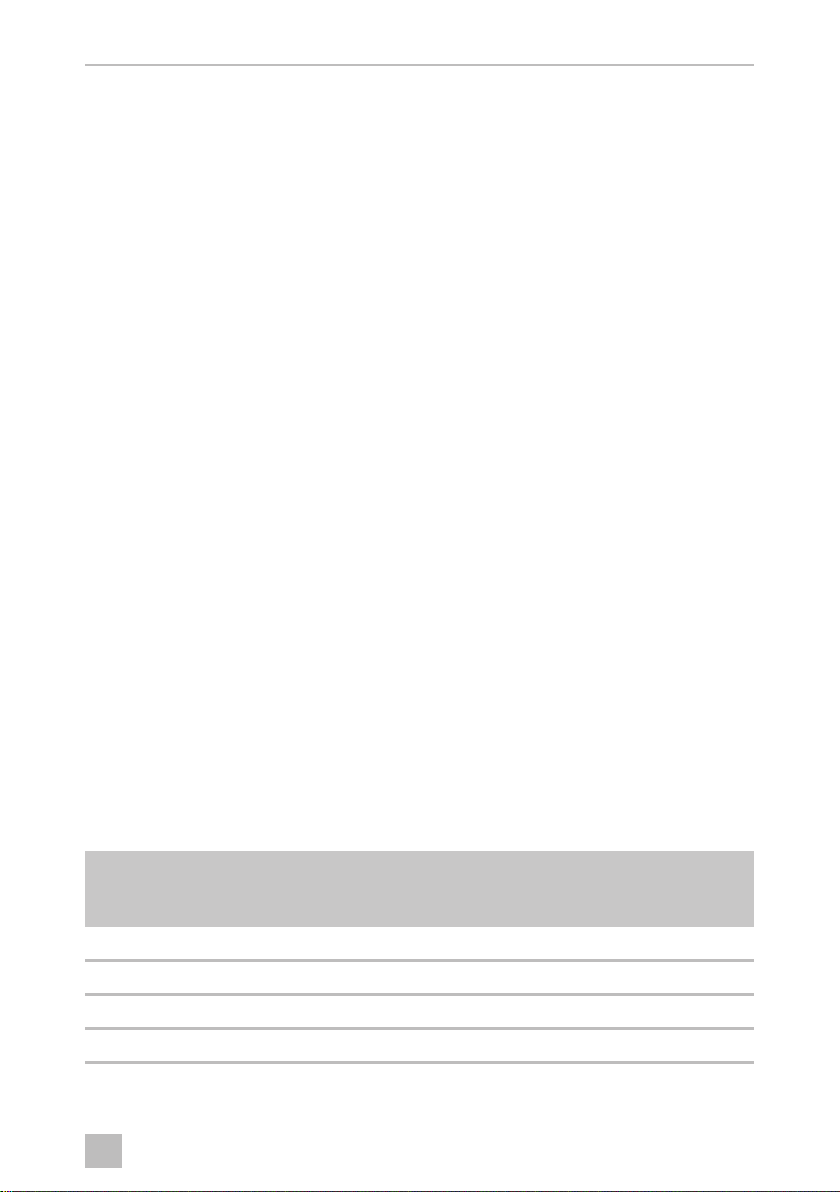
Replacing the active charcoal filter
Replace the active charcoal filter with a new one once a year.
➤ Turn the filter (fig. m 1, page 7) by 90° clockwise or anti-clockwise and remove
it.
➤ Insert a new filter.
➤ Turn the filter 90° clockwise or anti-clockwise until it clicks into position.
24

EN
MaCave Using the appliance
8.4 Procedure in the event of a power failure or if absent
Power failure
A brief power failure will not unduly affect the inner temperature as long as you do
not open the door too frequently.
If the power is off for a long time, carry out the appropriate action to protect the contents of your appliance.
Short periods of absence
➤ Leave the appliance operating if you are absent for less than 3 weeks.
Long periods of absence
➤ If you leave the appliance unused for several months, remove the contents.
➤ Switch off the unit and disconnect it from the power supply.
➤ Clean and dry the insides thoroughly.
➤ Leave the door ajar to prevent odours and mould from forming.
8.5 Moving the appliance
➤ Remove the contents.
➤ Tape down all the shelves.
➤ Turn the adjustable feet right back so that they are not damaged when moving.
➤ Tape the door closed.
➤ Only carry the appliance in an upright position.
Avoid tipping the appliance.
Protect the exterior of the appliance with a blanket or something similar.
25
EN
Troubleshooting MaCave
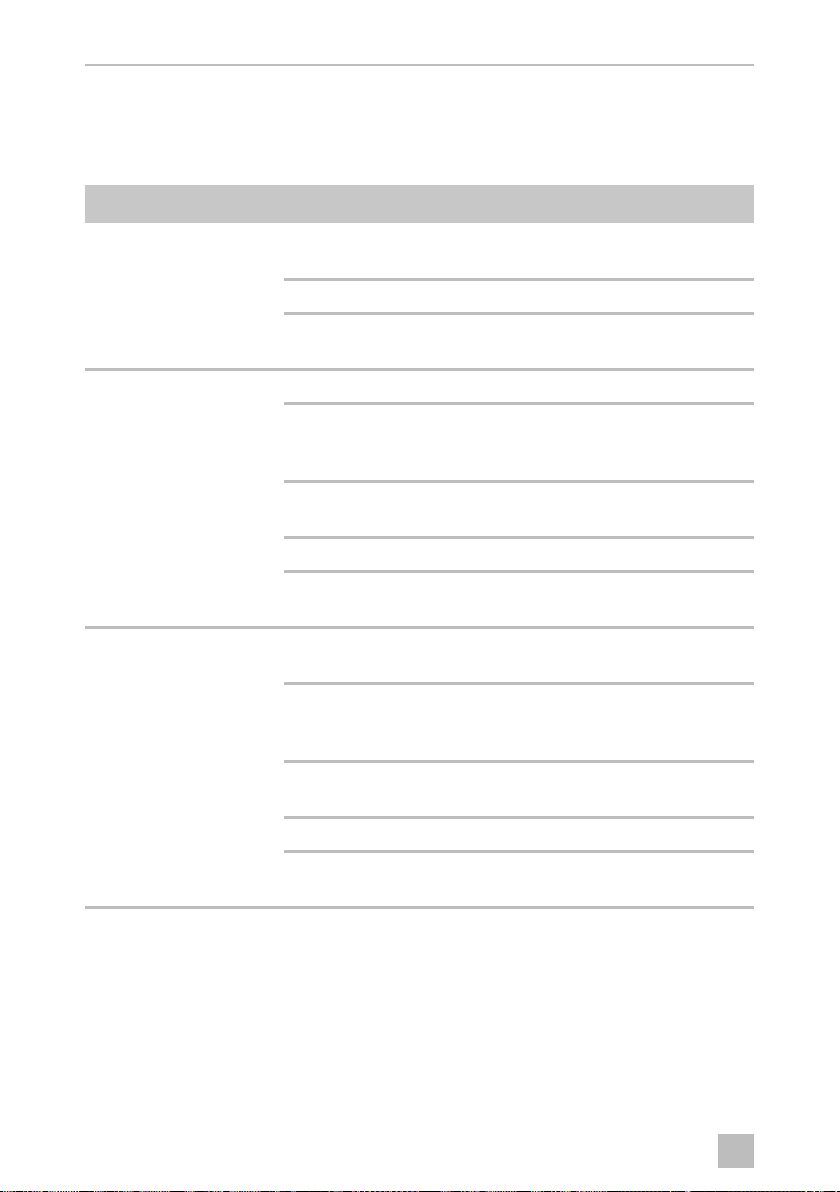
9 Troubleshooting
If you are unable to solve a problem yourself, get in touch with customer services (see
address list overleaf).
Fault Possible cause Remedy
Appliance does not work The appliance is not connected
to a power supply
The appliance is switched off Switch the appliance on
Circuit breaker or fuse has blown Switch on the circuit breaker;
The appliance is not cold
enough
Appliance switches itself
on and off
Temperature is not set properly Check the set temperature
The ambient temperature could
require a higher temperature setting
Door was opened frequently Do not open the door more
Door was not closed properly Close door properly
Door is not hermetically sealed Check the door seal and
Room temperature is higher than
average
The cabinet was recently replenished with new bottles
Door was opened frequently Do not open the door more
Door was not closed properly Close door properly
Connect the appliance
switch on or replace the fuse
Set a higher temperature
often than necessary
clean or replace
Put the appliance in a cooler
place
Leave the appliance to work
for a while until the set temperature has been reached
often than necessary
Door is not hermetically sealed Check the door seal and
clean or replace
26
EN
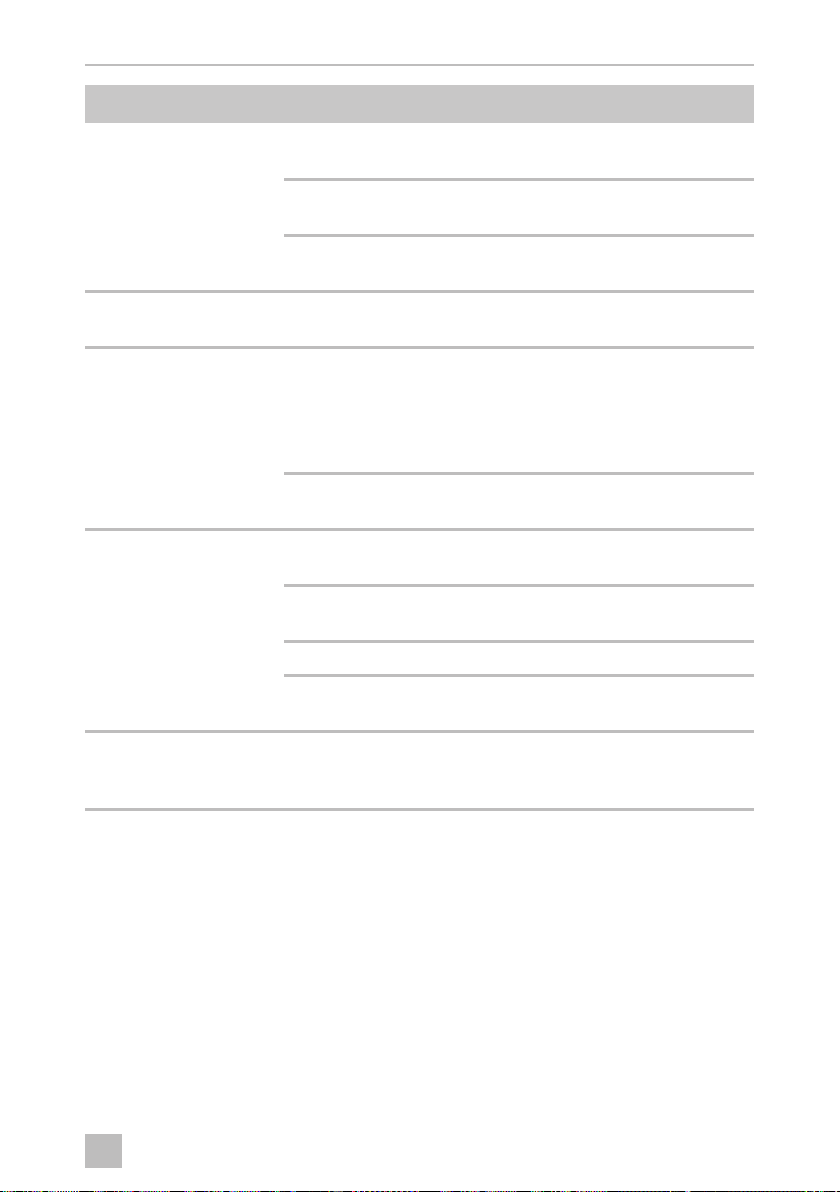
MaCave Troubleshooting
Fault Possible cause Remedy
The light does not work The appliance is not connected
to a power supply
Circuit breaker or fuse has blown Switch on the circuit breaker;
The light was switched off on the
control panel
The appliance vibrates The appliance is not properly
level
The appliance seems to
make a lot of noise
The door does not close
properly
The noise is probably caused by the refrigerant, which is normal. At the end of each cycle, you will hear noises made by the
flow of refrigerant.
If temperature fluctuations occur, the contraction and expansion
of the inner walls may cause popping and cracking noises
The appliance is not properly
level
The appliance is not properly
level
The door hinge was changed
incorrectly
The door seal is dirty Clean the door seal
The shelves are not fitted correctly
Connect the appliance
switch on or replace the fuse
Switch on the light
Level out the appliance with
the adjustable feet
Level out the appliance with
the adjustable feet
Level out the appliance with
the adjustable feet
Check the door hinge and
reassemble correctly
Check the shelves and refit
correctly
LED display shows E1, E2
or E7.
The temperature sensor for the
air temperature inside the appliance shows an error
This can only be repaired by
an authorised repair centre.
27

EN
Maintaining and cleaning the appliance MaCave
10 Maintaining and cleaning the appliance
CAUTION!
!
A
All the shelves can be removed for optimum cleaning, see chapter “Cabinet shelves”
on page 24.
➤ Switch off the appliance and disconnect the plug.
➤ Wash the inside with a solution of warm water and baking powder. This should
be about 2 tablespoons of baking powder to half a litre of water.
➤ Clean the shelves with mild detergent.
➤ Only wipe the control panel with a slightly damp cloth
Always disconnect the plug before you clean and service the appliance.
NOTICE!
• Never clean the appliance under running water or in dishwater. Do
not use abrasive cleaning agents or hard objects during cleaning as
these can damage the appliance.
• Make sure that the air inlet and outlet vents on the unit are free of any
dirt, so that heat from the interior can be released and the unit is not
damaged.
➤ Wash the outside of the appliance with warm water and a mild detergent. Then
wipe it down with clean water and dry the surface with a cloth.
11 Warranty
The statutory warranty period applies. If the product is defective, please contact your
retailer or the manufacturer's branch in your country (see the back of the instruction
manual for the addresses).
For repair and guarantee processing, please include the following documents when
you send in the device:
• A copy of the receipt with purchasing date
• A reason for the claim or description of the fault
28

EN
MaCave Disposal
12 Disposal
➤ Place the packaging material in the appropriate recycling waste bins wherever
possible.
If you wish to finally dispose of the product, ask your local recycling centre
or specialist dealer for details about how to do this in accordance with the
M
applicable disposal regulations.
13 Technical data
S16FG S40FGD S117FG
Voltage: 220 – 240 V/50 Hz
Temperature range: +5 °C to +20 °C /+41 °F to +68 °F
Temperature range in
beverage mode:
Category: 2
Energy efficiency class: A
Power consumption: 139 kWh per year 145 kWh per year 225 kWh per year
Climate class: ST
Noise emission: 39 dBA 42 dBA 46 dBA
+2 °C to +6 °C/+
(at ambient temperature:
+16 °C to +38 °C/+61 °F to +100 °F)
36 °F to +43 °F
Dimensions W x D x H
in mm / in inches
(including handle):
Capacity (standard
Bordeaux type bottles): 16 40 117
Weight: 29 kg/64 lbs 50 kg/110 lbs 92 kg/203 lbs
You can find information about the country versions in the supplementary booklet.
295 x 615 x 820/
11.6 x 24.2 x 32.3
595 x 615 x 820/
23.4 x 24.2 x 32.3
595 x 615 x 1768/
23.4 x 24.2 x 71.3
29

DE
MaCave
Bitte lesen Sie diese Anleitung vor der Inbetriebnahme sorgfältig durch
und bewahren Sie sie auf. Geben Sie sie im Falle einer Weitergabe des
Produktes an den Nutzer weiter.
Inhaltsverzeichnis
1 Erklärung der Symbole . . . . . . . . . . . . . . . . . . . . . . . . . . . . . . . . . . . . . . . . . . 31
2 Sicherheitshinweise . . . . . . . . . . . . . . . . . . . . . . . . . . . . . . . . . . . . . . . . . . . .31
3 Lieferumfang . . . . . . . . . . . . . . . . . . . . . . . . . . . . . . . . . . . . . . . . . . . . . . . . . 33
4 Zubehör. . . . . . . . . . . . . . . . . . . . . . . . . . . . . . . . . . . . . . . . . . . . . . . . . . . . . 33
5 Bestimmungsgemäßer Gebrauch . . . . . . . . . . . . . . . . . . . . . . . . . . . . . . . . 33
6 Technische Beschreibung . . . . . . . . . . . . . . . . . . . . . . . . . . . . . . . . . . . . . . 34
7 Gerät aufstellen und anschließen . . . . . . . . . . . . . . . . . . . . . . . . . . . . . . . . . 37
8 Gerät benutzen . . . . . . . . . . . . . . . . . . . . . . . . . . . . . . . . . . . . . . . . . . . . . . . 40
9 Störungsbeseitigung . . . . . . . . . . . . . . . . . . . . . . . . . . . . . . . . . . . . . . . . . . 48
10 Gerät pflegen und reinigen . . . . . . . . . . . . . . . . . . . . . . . . . . . . . . . . . . . . . 50
11 Gewährleistung. . . . . . . . . . . . . . . . . . . . . . . . . . . . . . . . . . . . . . . . . . . . . . . 50
12 Entsorgung . . . . . . . . . . . . . . . . . . . . . . . . . . . . . . . . . . . . . . . . . . . . . . . . . . .51
13 Technische Daten . . . . . . . . . . . . . . . . . . . . . . . . . . . . . . . . . . . . . . . . . . . . . .51
30
 Loading...