


USER MANUAL
DPH-300S
Dual Mode Cordless VoIP Phone
1

Table of Contents
Table of Contents
PACKAGE CONTENTS ....................................... |
3 |
SYSTEM REQUIREMENTS ................................. |
3 |
FEATURES........................................................... |
6 |
INTRODUCTION .................................................. |
7 |
HARDWARE OVERVIEW .................................... |
9 |
FACTORY RESET .............................................. |
11 |
NETWORK CONNECTIONS.............................. |
13 |
CONFIGURATION.............................................. |
14 |
WEB-BASED CONFIGURATION UTILITY ........ |
14 |
SETUP................................................................ |
16 |
SETUP WIZARD................................................. |
16 |
USING THE CONFIGURATION PAGE............... |
25 |
CHECK YOUR IP ADDRESS ............................. |
44 |
STATICALLY ASSIGN AN IP ADDRESS........... |
45 |
D-Link DPH-300S User Manual |
2 |

Section 1 - Product Overview
Package Contents
•D-Link DPH-300S Cordless IP Telephone
•D-Link DPH-300S Cordless IP Telephone Connector Base
•Power Adapter
•Manual and Warranty on CD
•Quick Installation Guide
•Ethernet Cable (the DPH-300S’s Ethernet port is Auto-MDIX)
Note: Using a power supply with a different voltage rating than the one included with the DPH-300S will cause damage and void the warranty for this product.
System Requirements
•Broadband Internet connection
•Ethernet-Based Cable or DSL Modem
•A multi-port Ethernet router (possibly integrated as part of the Cable or DSL Modem listed above).
•100Mbps of available Internet bandwidth
•Computer with Windows, Macintosh, or Linux-based operating system and an installed Ethernet adapter
•Internet Explorer Version 6.0 or Netscape Navigator Version 6.0 and Above
D-Link DPH-300S User Manual |
3 |

Section 1 - Product Overview
11
IMPORTANT BATTERY SAFETY INSTRUCTIONS
CAUTION: TO REDUCE THE RISK OF FIRE OR INJURY CAUSED BY THE BATTERIES, READ AND FOLLOW THESE INSTRUCTIONS.
1.Use Only AAA, 1.2V 600mAh Ni-MH (Nickel Metal Hydride) batteries supplied by D-Link or D-Link Authorized Distributors.
2.Contact D-Link to purchase replacement batteries if needed.
3.Do not mix old and new batteries in this product.
4.Do not mix different battery types or batteries from different manufacturers in this product.
5.Batteries are intended to be charged while in the handset. Charging with other chargers or in any other manner may cause the batteries to explode.
6.Do not dispose of the batteries in a fire. The batteries may explode. Check with local codes for possible special disposal instructions.
7.Do not open or mutilate the batteries. Released electrolyte is corrosive and may cause damage to the eyes or skin. It may be toxic if swallowed.
8.Exercise care in handling the batteries in order not to short them with conducting materials such as rings, bracelets, keys, or tools. The battery or conductor may overheat and cause burns.
9.Observe proper polarity orientation between the batteries and the battery receptacle of the handset.
10.Be aware that NiMH batteries, regardless of their apparent charge state, may be capable of producing electrical current sufficient to cause injury and property damage.
11.Never expose NiMH batteries to temperatures above 50 °C.
Statement of Liability
D-Link Corporation / D-Link Systems, Inc. does NOT assume any liability for death, injury or damage to equipment or property resulting from the use of this phone in a manner inconsistent with the use for which it was intended. D-Link Corporation / D-Link Systems, Inc, will not be liable for consequences that may result from tampering with the batteries or charger-base or consequences resulting from their use thereafter.
D-Link DPH-300S User Manual |
4 |

Section 1 - Product Overview
** BATTERY CHARGING NOTE **
Before you connect your DPH-300S to the Internet, your network, or your PC, you should install the batteries in the handset and place it on the base station for charging. The batteries need to be charged for at least 12 hours before the first time you use the DPH-300S.
1.Install the batteries.
2.Plug in the power adapter.
3.Put the handset on the base station
4.Wait 12 hours.
D-Link DPH-300S User Manual |
5 |

Section 1 - Product Overview
Features
•User-friendly configuration and diagnostic utilities
•1 Foreign Exchange Office (FXO) POTS port (RJ-11 Jack)
•2 NWay 10/100BASE-TX Fast Ethernet ports for network connections
•Voice Activity Detection (VAD)/Comfort Noise Generation (CNG)
•Silence suppression to reduce bandwidth consumption
•Adaptive jitter buffer for smooth voice reception
•Lost packet recovery ability for improved voice quality
•IP address assignment using DHCP, PPPoE or static configuration
•Support Caller ID function
•Remote configuration and management over the Internet using web browsers
•FSK and DTMF dual mode CLIP (Calling Line Identification Presentation)
•Stores up to 30 calling numbers, in three types
•Stores up to 50 phonebook numbers, up to 12 characters for each name and 12 digits for each number
•LCD displays calling and dialing number
•Barring numbers setting (up to 5 numbers)
•Ringer tone selection − 9 different melodies
•IP and PSTN ringer tone independently configurable
•Ringer volume adjustment − 9 levels
•Handset earpiece volume setting − 9 levels
•Delete single or all records in phonebook
•Redialing and preparation dialing functions
•Page on base unit to look for the handset easily
•Clicking key tone on or off
•GAP compliant
•Speakerphone
D-Link DPH-300S User Manual |
6 |

Section 1 - Product Overview
Introduction
Before you start, your new DPH-300S Dual-mode Cordless Phone will require a connection to the Internet to function. The connection may be directly through a Cable or DSL modem, or it may be through a broadband router. Your DPH-300S phone will enable you to make VoIP (Voice over
Internet Protocol) telephone calls − at zero or a very much reduced cost when compared to regular telephone service − to nearly anywhere, over the
Internet.
D-Link DPH-300S User Manual |
7 |

Section 1 - Product Overview
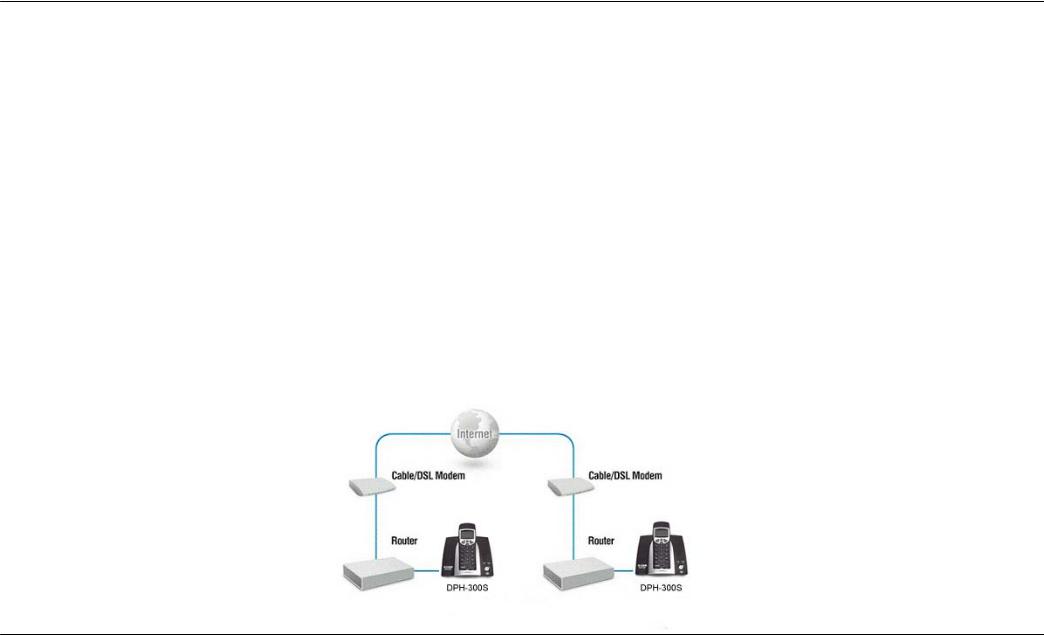
The DPH-300S phone allows you to make and receive calls from both ordinary phone service and from IP telephony over the Internet. The basic diagram shown above outlines how your new dual-mode IP phone works.
D-Link DPH-300S User Manual |
8 |
Section 1 - Product Overview
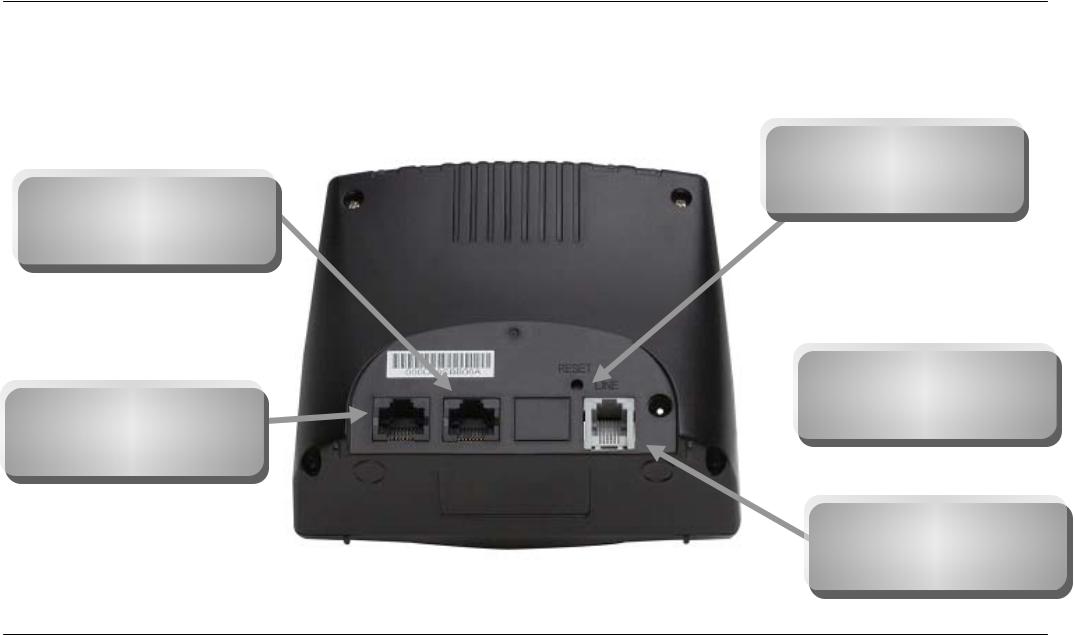
Hardware Overview
Connections
LAN 2 Port
Connect the Ethernet cable from your Cable/DSL modem to this port.
LAN 1 Port
Connect the Ethernet cable from a computer on your LAN to this port.
Reset button
To manually reset, depress button with the power on for at least seven seconds
Power Adapter
Connect your 12V DC, 1.25A power  adapter here.
Phone Connection
Connect to your phones using standard phone cabling.
D-Link DPH-300S User Manual |
9 |
Section 1 - Product Overview
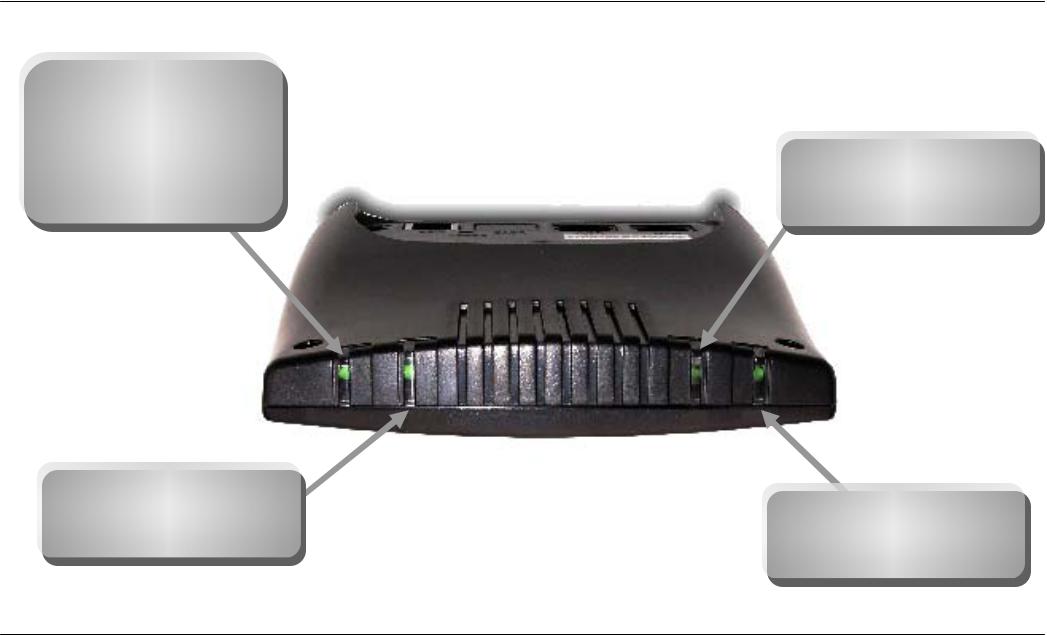
Power/Status
A blinking LED indicates the DPH-300S is functioning properly, but has not yet registered with a VoIP server.
A solid LED indicates the DPH-300S has registered with a VoIP server and is ready for a call.
VoIP
An active LED indicates a VoIP session has been established.
Hardware Overview
LEDs
LAN 2
A solid LED indicates an Ethernet link has been established. The LED will blink when there is activity
LAN 1
A solid LED indicates an Ethernet link has been established. The LED will blink when there is activity
D-Link DPH-300S User Manual |
10 |
Installation
Factory Reset
In order to accomplish a Factory Reset of the DPH-300S, it is necessary to do the following:
1)Remove the handset from the base station.
2)Place the base station face-down on a flat surface (such as a table or desk top).
3)Insert a bent paperclip or a toothpick in the hole for the Factory Reset Button (see the photo on page 7 for the button’s location), and hold the button down.
4)While still holding the button down, unplug the power adapter.
5)Wait 10 seconds, then reconnect the power adapter without letting go of the Factory Reset Button.
6)Once you have restored power, continue holding the Factory Reset Button down for another 10 seconds.
7)Complete! The DPH-300S should have had the following factory default settings restored: IP Address; Call Logs (all).
8)Note that if your DPH-300S is still connected to the Internet, the auto-provisioning process should repeat itself after the factory reset, and the phone should return to a ready-state showing “D-Link” in the handset display and allowing IP calling.
If you need to reset the handset to its original factory default settings, see page 19, HS Setting > Set Default.
D-Link DPH-300S User Manual |
11 |
Installation
Installation
This section will walk you through the installation process. Placement of the router is very important. Do not place the router in an enclosed area such as a closet, cabinet, or in the attic or garage.
Before you Begin
Allow the handset batteries to charge for at least 12 hours before you begin.
Read the Opening Ports on Routers and Gateways section of this manual if you are using the DPH-300S with a router or gateway.
The DPH-300S needs to be setup before use. You can use the Quick Installation Guide (included with the DPH-300S) to perform the hardware installation. There is an easy to use setup Wizard built-in to the DPH-300Sto accomplish the IP address setup. You will need to run the Wizard and enter your Internet connection information in order to use your phone for IP calling only if you do not have access to Dynamic IP Addressing.
Dynamic IP Address is the default setting and requires no user changes.
If you have Dynamic IP Addressing (also called, “DHCP”), check the Quick Installation Guide for information on the physical connection of the
DPH-300S, and skip to page 28 of this document: Auto-provisioning. Otherwise, continue to the next section.
D-Link DPH-300S User Manual |
12 |

Installation
Network Connections
Connection using a Multi-port Router
The DPH-300S can either be connected to an available port on a
Cable/DSL modem multi-port router, with other devices connected to their own ports (as below).
Connection using a Single-port Modem
Or it can be connected to the WAN port of a Cable/DSL modem with a
PC connected to the DPH-300 for Internet access as in the figure below.
Multi-port Router
Connection
Single-port Cable/DSL
Modem Connection
D-Link DPH-300S User Manual |
13 |
Configuration
Configuration
This section will show you how to configure your new D-Link DPH-300S using the web-based configuration utility.
Web-based Configuration Utility
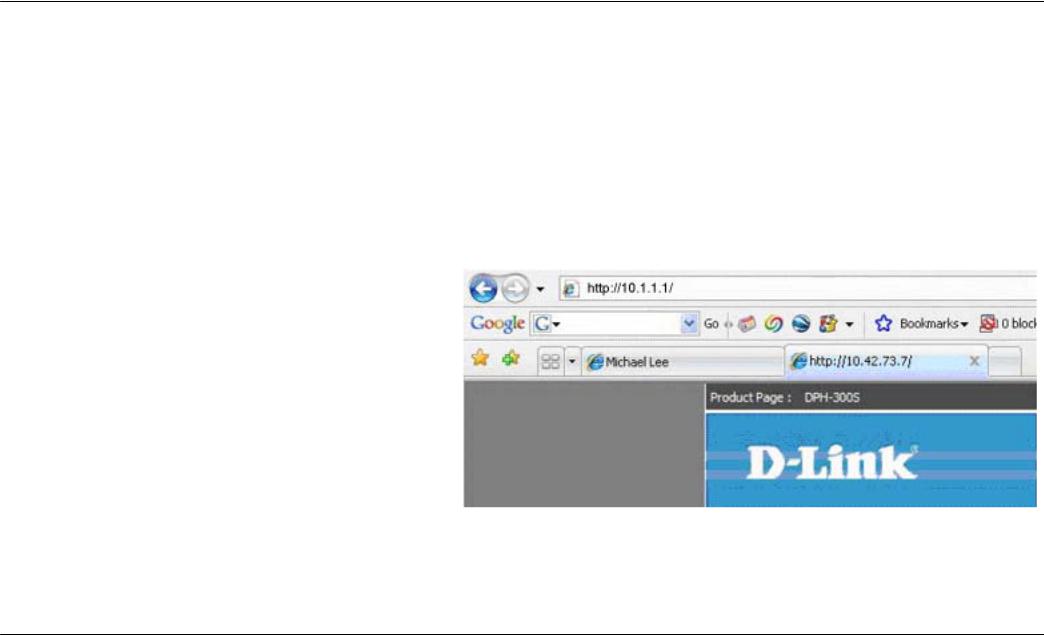
Whenever you want to configure your DPH-300S, you can access the Configuration Menu by opening your PC’s web-browser and typing in the IP Address assigned to the DPH-300S. The DPH-300S has DHCP enabled by default, so its IP Address will be that assigned by the DHCP server on your LAN. This DHCP server is often contained in a multi-port Ethernet router. See your router’s documentation to determine the addresses assigned by its DHCP server. If you do not know the IP address assigned to the DPH-300S (or you do not yet have a multi-port Ethernet router) you can connect to the DPH-300S by the following method:
•Connect the LAN port on the DPH-300S directly to the Ethernet port on your PC.
•Set your PC to have a static IP address of 10.1.1.2 with a subnet mask of 255.0.0.0 and a default gateway of 10.1.1.1
•Switch on the DPH-300S
•Open the web browser on your PC
•Type in the IP Address of the DPH-300S (http://10.1.1.1)
D-Link DPH-300S User Manual |
14 |
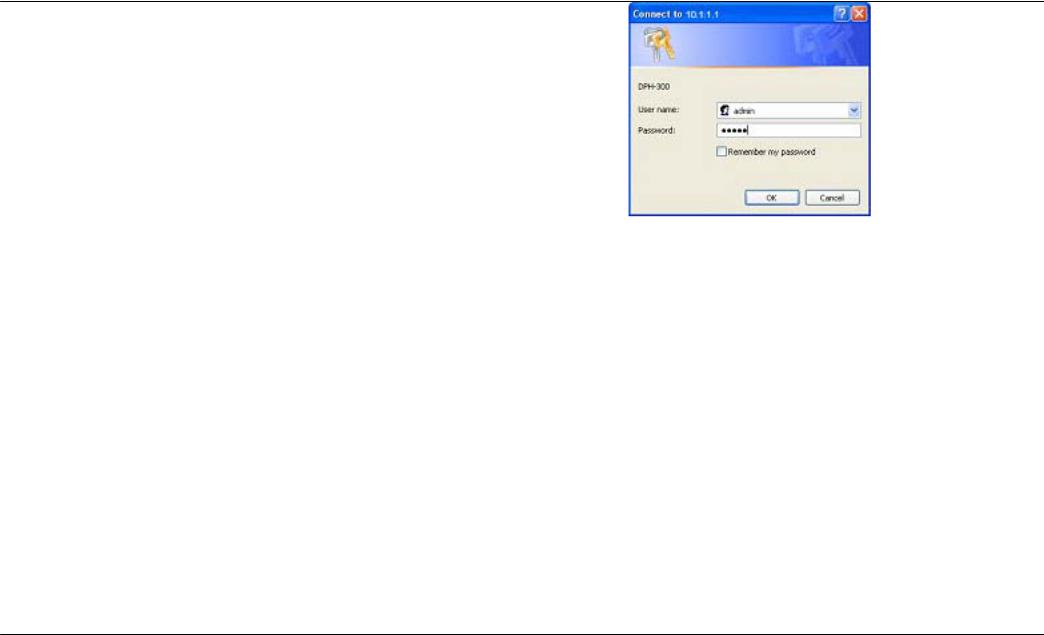
Configuration
•Type admin in the User Name field
•Type admin in the Password field
•Click OK
If you get a Page Cannot be Displayed error, please refer to the Troubleshooting section for assistance.
The Home > Wizard screen will appear. Please refer to the Quick Installation Guide for more information regarding the Setup Wizard.
D-Link DPH-300S User Manual |
15 |
 Loading...