

Page 1
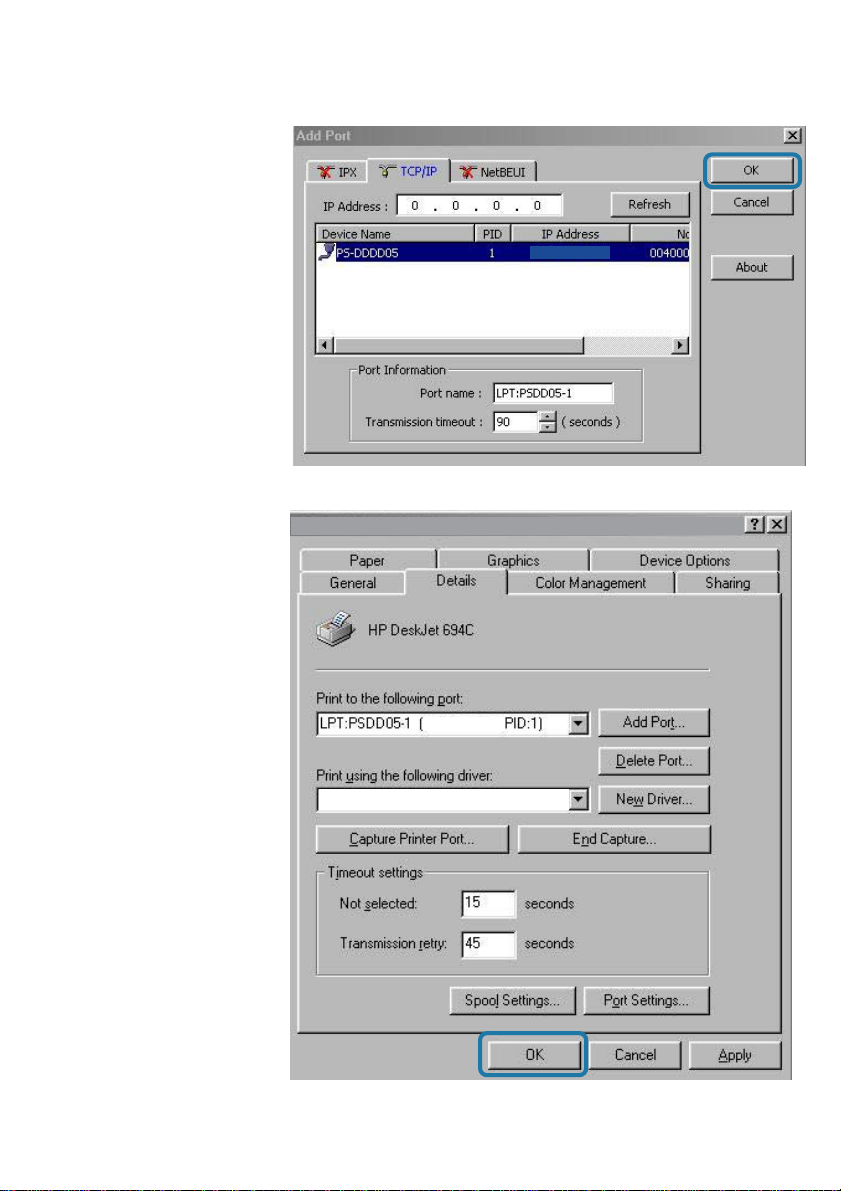
Printing with Windows 98SE/Me (continued)
Select your DP-311P
wireless print server
Click OK
HP LaserJet Series II
Click Apply > OK
192.168.0.10
Y ou have
completed setting
up your printer in
Win 98SE/Me!
192.168.0.10
HP LaserJet Series II
31
Page 2

Setting up Apple Talk or LPR
Printing in Mac OS X
Set the switch to Config mode on the rear panel of the DP-31 1P.
Change your wireless adapter setting to Ad-Hoc or Peer-to-Peer mode. (Open
the Configuration utility for your network adapter and make sure that your
network adapter is set to Ad-Hoc mode in your configuration settings.)
(For D-Link network adapters, you can open the web-based configuration utility
and go to the Site Survey function and select the SSID named WLAN-PS. The
Channel is 1 and WEP is set to Disable. The network adapter will now be in AdHoc mode.)
Change the wireless adapter IP Address so that it is in the same IP Address range
as the DP-311P (192.168.0.x). For instructions on changing the IP Address,
please refer to the Networking Basics section in this manual. The subnet mask is
255.255.255.0.
Restart the computer .
Open your web browser and input the IP Address of your wireless print server.
The default IP Address is 192.168.0.10.
32
Page 3
Setting up Apple Talk or LPR Printing
in Mac OS X (continued)
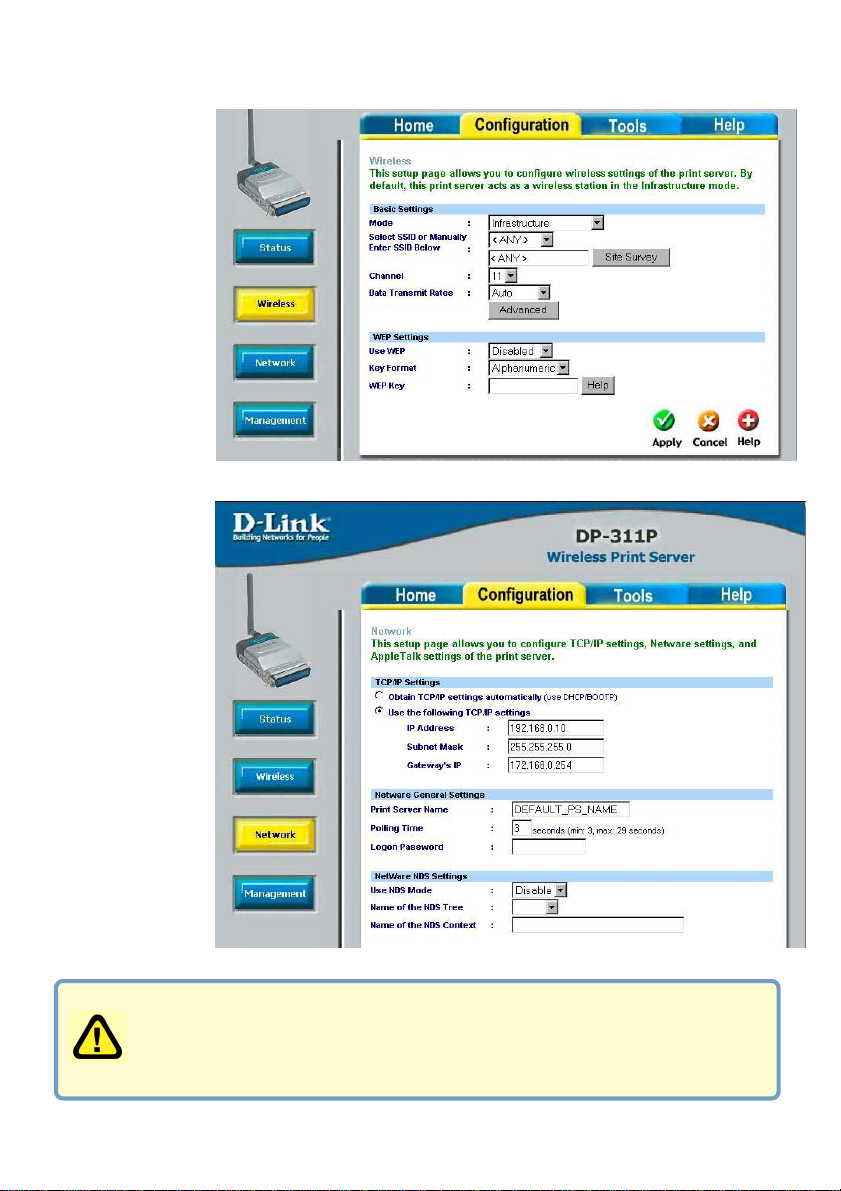
Change the
mode to
Infrastructure.
Input or select
the SSID of your
wireless router or
AP. Input WEP
settings if
applicable.
Change the IP
Address and
change the other
settings of the
DP-31 1P to
conform to your
network.
11
1 After you have configured the DP-31 1P , set the rear panel switch back to
11
Normal mode.
22
2 Change your wireless network adapter settings (IP Address,
22
Infrastructure mode) so that they match your network.
33
Page 4
Setting up Apple Talk or LPR Printing
in Mac OS X (continued)
Note: Mac OS printing is supported by Postscript printers only!
With Mac OSX you can use AppleTalk or LPR printers using IP protocols for printing through
Print Servers. Follow the instructions below for setting up the Print Server.
After attaching the Print Server to your network using the directions provided in the Quick
Installation Guide, change the IP Address of your Macintosh to access the Print Server’s web
configuration.
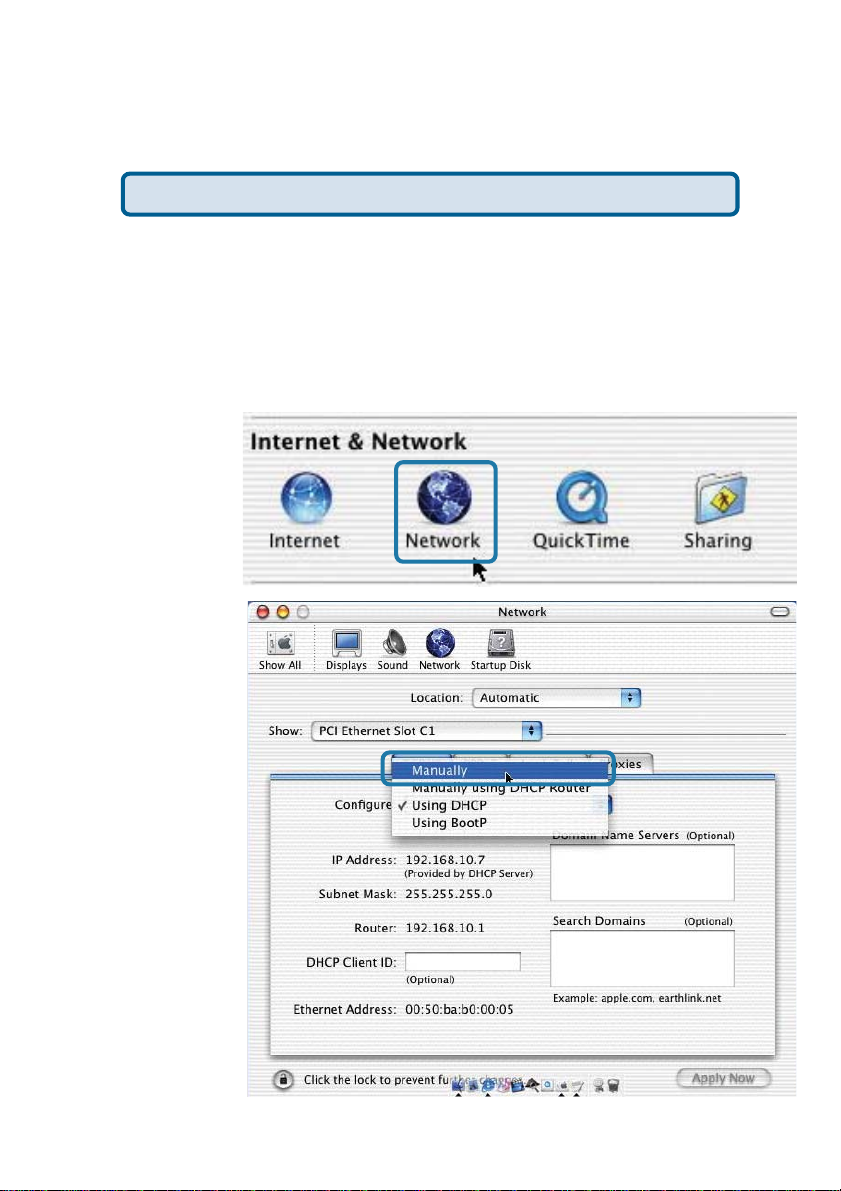
Open your System
Preferences window
and Click Network
At the Configure pulldown menu, select
Manually
34
Page 5
Setting up Apple Talk or LPR Printing
in Mac OS X (continued)
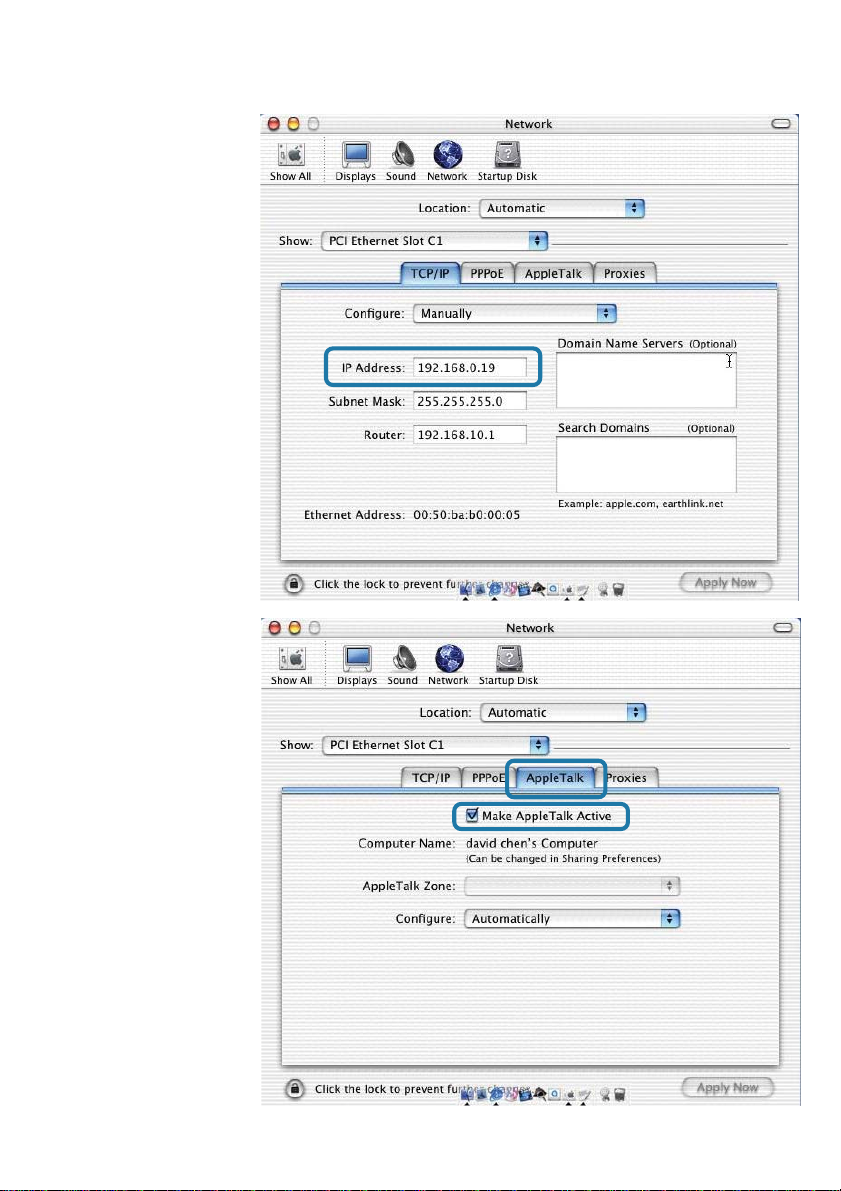
The default IP Address
of the Print Server is
192.168.0.10.
Manually change your
IP Address to
102.168.0.x, where x
is any number
between 1 and 254
(except 10 which is
the IP Address of the
Print Server.) The IP
Addresses and
Subnet Mask shown
here are examples
only
Select the AppleT alk
tab in this window and
check Make AppleTalk
Active
35
Page 6
Setting up Apple Talk or LPR Printing
in Mac OS X (continued)
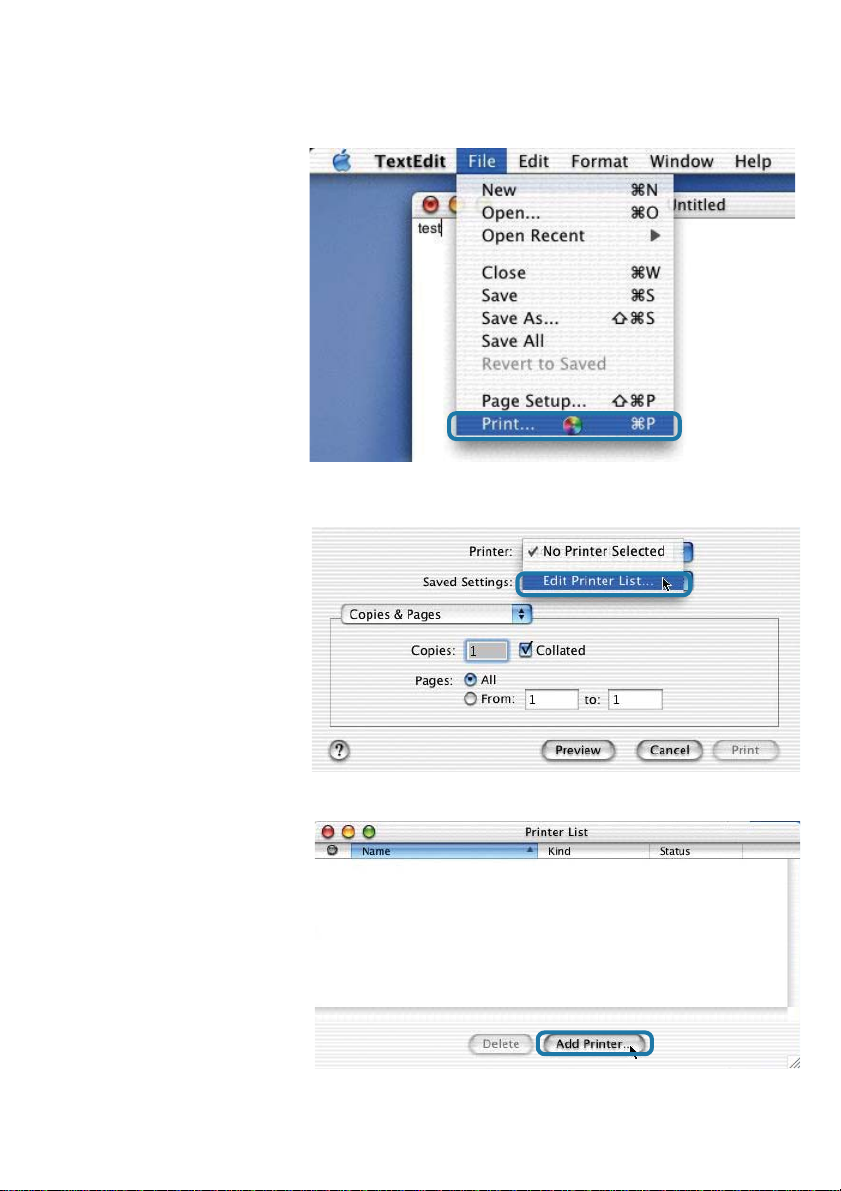
T o print, open a document
and select File > Print from
the menu
Select Edit Printer List
from the Printer dialog
box
Click Add Printer
36
Page 7

Setting up Apple Talk or LPR Printing
in Mac OS X (continued)
Select the printing protocol
preferred, AppleTalk or
LPR Printers using IP
In this example,
AppleT alk has been
selected
AppleT alk protocol:
After selecting
AppleT alk the Port
Name of the Print
Server will be displayed.
The Port Name shown
here is an example only
PS - 1123D6-U1 Laserwriter
Click on the Port to
which the post-script
printer is connected
Then select the printer model from the dialog box displayed here.
Click Add Printer and the Printer Port configuration is complete.
Select the Printer Port just configured in the Print window.
Click Print to print your document
37
Page 8

Setting up Apple Talk or LPR Printing
in Mac OS X (continued)
LPR Printers using IP pro-
tocol:
When you select LPR Printers using IP Protocol, this
window will appear
Type the IP Address of the
Print Server into the LPR
Printer’s Address field
In the Queue Name field, type in the Port Name of the post-script printer that is connected to
the Print Server. The Port Name illustrated here is only an example.
Select the printer model from the dialog box.
In the Queue Name field, type in the Port Name of the post-script printer that is connected to
the Print Server. The Port Name illustrated here is only an example.
ATALK_PS
Select the printer model from the dialog box
Click Add and the process is complete
Close all Print Center windows, select the Printer Port that was just selected
Click Print to print the document.Click Add and the process is complete
38
Page 9

Setting up Apple Talk Printing
in Mac OS 9
Note: Mac OS printing is supported for Postscript printers only!
The AppleT alk network protocol is used with computers using the MacOS operating system.
It can be used for network communications over standard Ethernet or Fast Ethernet using the
EtherT alk transport, or over a proprietary low-speed LocalT alk transport.
Y our Print Server can be used for network printing to PostScript printers. Y ou can print from
any MacOS computer connected to your Ethernet network, either directly using an EtherT alk
connection, or indirectly through a LocalT alk-to-EtherT alk router .
NOTE: The Chooser name of a printer connected to one of the Print Server’s ports is the
same as its Port Name. If you are using AppleTalk printing, you will need to make sure that
every Port Name is unique among all of the network printers in your
AppleT alk zone. The Port Names shown in this manual are examples only.
Setting up the Print Server for AppleTalk Printing
T o set up your Print Server so that it can be used for AppleT alk printing:
Make sure the AppleTalk protocol is enabled in your Macintosh
!
Change the IP Address on one of the computers on your network to 192.168.0.x, where
!
x is any number between 1 1-254
Type 192.168.0.10 into the address field of your web browser. 192.168.0.10 is the
!
default IP Address of the DP-301U
Select the Network tab and scroll to the bottom to the AppleTalk protocol section
!
If your AppleT alk network is divided into AppleT alk zones, you will have to specify which
!
zone the Print Server should be in. Y ou should locate the Print Server in the same zone
as most of the users who will be using it. If your network is not divided into zones, the
AppleT alk Zone field should contain a single asterisk “*”
39
Page 10

Printing from MacOS Client
Workst ations
The exact procedure for selecting a PostScript printer connected to your Print Server may
vary slightly , depending on what printer driver version you are using. The procedure described
below assumes you are using the LaserWriter 8.
T o choose a printer connected to your Print Server as your MacOS
workstation’s default printer ,
Open the Chooser by selecting Chooser from the Apple menu
Select the LaserWriter 8 icon on the left. Make sure that AppleTalk is set
to Active
A list of all networked PostScript printers will be displayed:
Double-click the name of the
Printer Port you wish to use.
The Printer Ports shown are
examples only
40
AT ALK_PS
Page 11

Printing from MacOS Client Workstations (continued)
If you have not previously
set this printer as the
default, your computer will
prompt you for a PostScript
Printer Description file.
Choose Select PPD.
Select the appropriate printer
description file for your printer
Click Open
(If your printer is not listed,
click Generic to use a
generic printer description)
If you wish to access this setting in the future, you can use the Setup button in the
Chooser window
The selected printer will become your computer’s default printer. You may need to choose
Page Setup in any applications you have open
41
Page 12

Networking Basics
Using the Network Setup Wizard in Windows XP
In this section you will learn how to establish a network at home or work, using
Microsoft Windows XP.
Note: Please refer to websites such as
and
http://www .microsoft.com/windows2000 for information about networking
computers using Windows 2000, ME or 98SE.
Go to Start>Control Panel>Network Connections
http://www.homenethelp.com
When this screen appears, Click Next
42
Page 13

Networking Basics (continued)
Please follow all
the instructions in
this window:
In this window,
select the
best description of
your computer.
If your computer
connects to the
internet through a
gateway/router,
select the second
option as shown.
Click Next
43
Page 14

Networking Basics
Enter a Computer
description and a
Computer name
(optional.)
Click Next
(continued)
Enter a Workgroup
name. All computers
on your network
should have the
same Workgroup
name.
Click Next
44
Page 15

Networking Basics
Please wait while
the Network
Setup Wizard
applies the
changes.
When the changes
are complete,
Click Next.
(continued)
Please wait while
the Network
Setup Wizard
configures the
computer.
This may take a
few minutes.
45
Page 16

Networking Basics
In this window, select
the best option. In
this example, Create
a Network
Setup Disk has been
selected.
Y ou will run this disk
on each of the
computers on your
network.
Click Next
(continued)
Insert a disk into the
Floppy Disk Drive, in
this case drive A.
Format the disk if you
wish, and Click Next
46
Page 17

Networking Basics
Please wait while the Network Setup Wizard copies the files.
Please read the information under Here’s how in the screen below. After you
complete the Network Setup Wizard you will use the Network Setup Disk to run
the Network Setup Wizard once on each of the computers on your network. To
continue, Click Next.
(continued)
47
 Loading...