

Page 1

Page 2
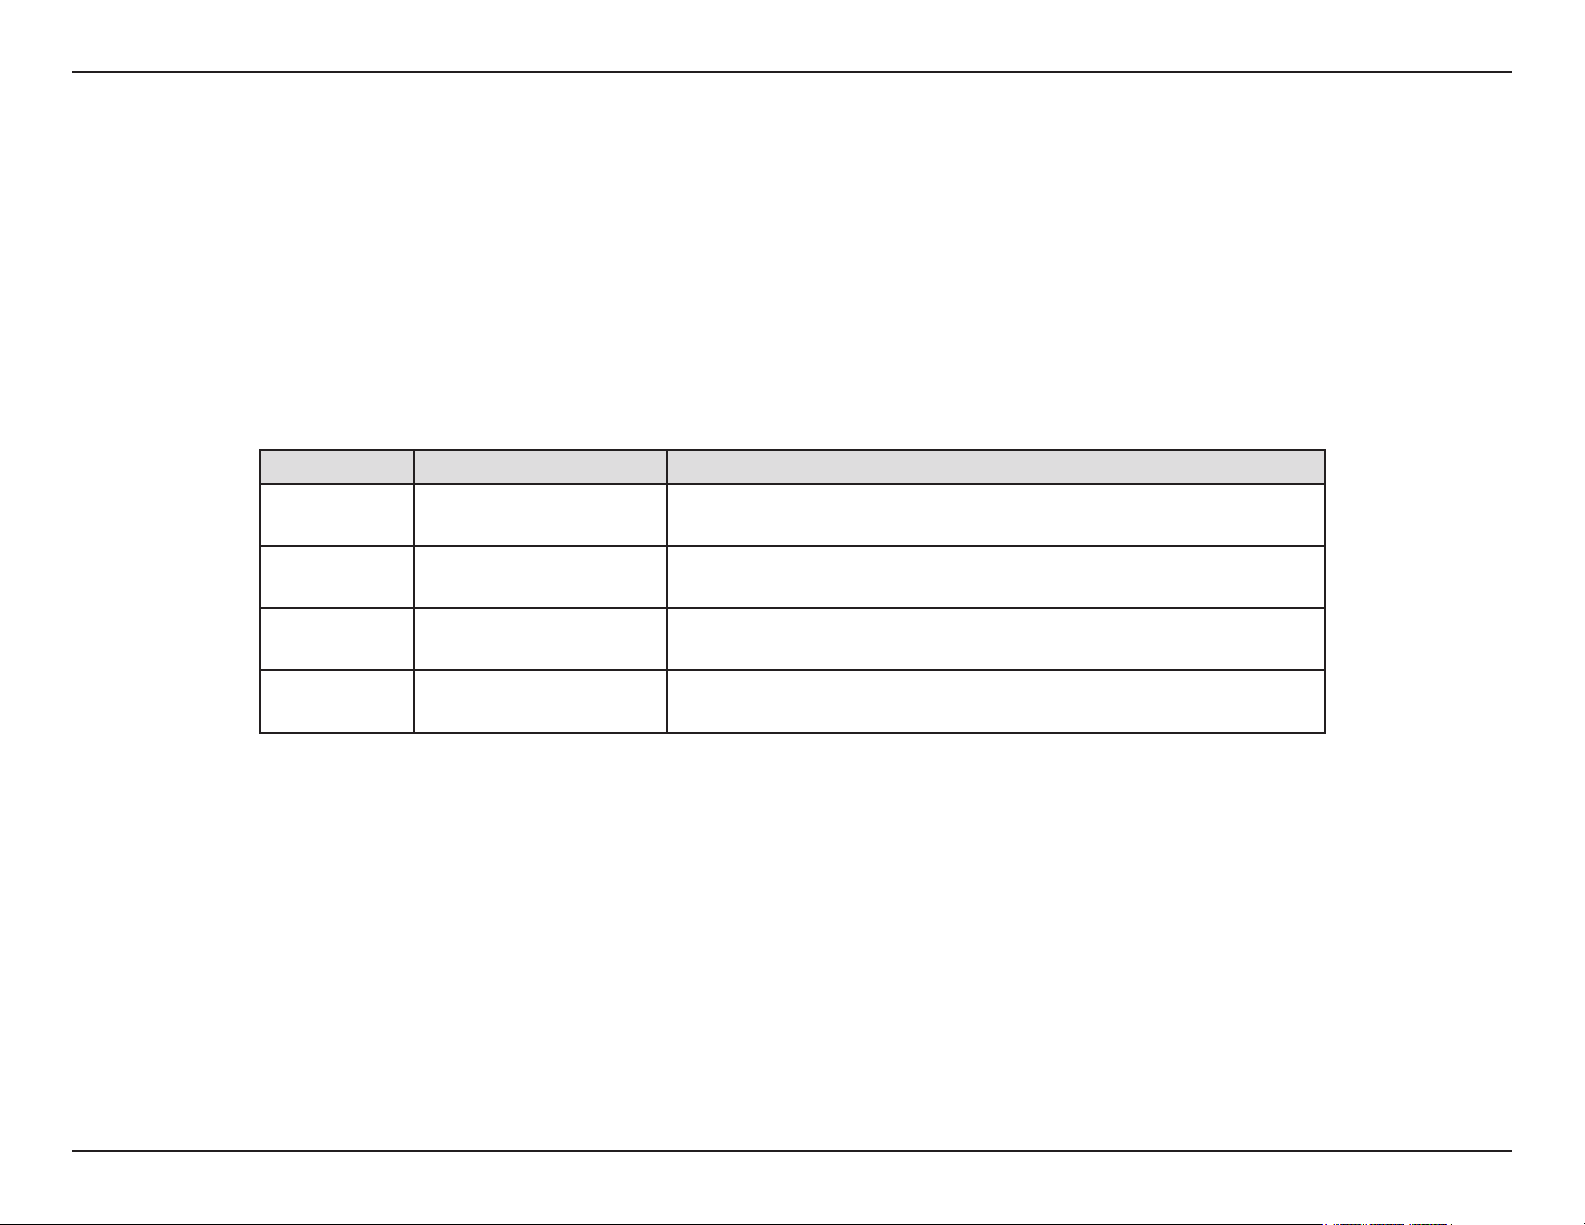
Table of Contents
Manual Overview
D-Link reserves the right to revise this publication and to make changes in the content hereof without obligation to
notify any person or organization of such revisions or changes. Information in this document may become obsolete
as our services and websites develop and change. Please refer to the www.mydlink.com website for the most current
information.
Manual Revisions
Revision Date Description
1.0 July 2, 2010
1.1 April 28, 2011
1.2 May 14, 2012
1.3 December 4, 2012
DCS-210 with rmware version 1.00
DCS-220, DCS-230 with rmware version 1.00
DCS-210 with rmware version 1.00
DCS-220, DCS-230 with rmware version 1.10
DCS-210 with rmware version 1.10
DCS-220, DCS-230 with rmware version 1.20
DCS-210 with rmware version 1.21
DCS-220, DCS-230 with rmware version 1.31
Trademarks
D-Link and the D-Link logo are trademarks or registered trademarks of D-Link Corporation or its subsidiaries in the
United States or other countries. All other company or product names mentioned herein are trademarks or registered
trademarks of their respective companies.
Copyright © 2013 by D-Link Corporation.
All rights reserved. This publication may not be reproduced, in whole or in part, without prior expressed written permission
from D-Link Corporation.
2D-Link D-ViewCam Standard/Professional/Enterprise User Manual
Page 3

Table of Contents
Table of Contents
Product Overview ........................................................ 6
System Requirements ............................................. 6
Introduction ..............................................................7
Key Features ........................................................... 7
Installing Your Network Camera .............................8
Software Installation ................................................... 9
Remote Desktop Viewer Installation ...................... 14
D-ViewCam Standard/Professional/Enterprise Login
18
Activate Software License(s) ................................. 19
Add Camera(s) ...................................................... 20
D-ViewCam Standard/Professional/Enterprise
Interface Overview.....................................................23
Main Console ......................................................... 24
Log Out/Exit Program/Minimize Window ......... 25
Split Screen Options ....................................... 25
Monitor .............................................................26
PTZ Controls ....................................................28
Zoom ................................................................28
Preset ..............................................................28
Focus ............................................................... 28
Auto Login Setup ............................................. 35
Storage ............................................................ 36
Status Display ..................................................37
Miscellaneous .................................................. 37
Audio Preview ..................................................38
Auto Reboot ..................................................... 39
Camera ............................................................ 40
Add Camera .....................................................40
Network Camera / Video Server Setting ........ 41
Camera Parameters ........................................42
OSD (On-Screen Display) Settings ................45
I/O Device ........................................................ 46
PTZ Cong .......................................................47
Hotline ..............................................................49
Address Book ........................................................ 50
Monitor Display ......................................................51
User Account Setting .............................................52
Auto Backup Setting .............................................. 54
License Manager ................................................... 56
Save/Load Conguration ....................................... 57
Network Service ....................................................58
Live Streaming Server ..................................... 58
Remote Playback Server ................................. 62
Conguration ............................................................. 34
General ..................................................................35
Startup ............................................................. 35
Remote Desktop .............................................. 66
Central Management System .......................... 67
About Main Console .............................................. 68
3D-Link D-ViewCam Standard/Professional/Enterprise User Manual
Page 4

Table of Contents
Schedule System ....................................................... 69
Day Mode .............................................................. 70
Load Preset Modes ...............................................71
Insert a New Schedule Manually ........................... 72
Copy Schedule ...................................................... 73
Week Mode ...........................................................73
Adjust the Schedule Settings ........................... 74
Encoding Options .................................................. 75
Record Mode .........................................................76
Encoded Options ................................................... 76
Playback .....................................................................77
Enhancement ........................................................83
General Setting ................................................ 83
Filter Setting .....................................................83
Save Video ............................................................ 84
Snapshot ...............................................................85
Assign an Action Type ..................................... 97
Action Type > Play Sound .............................. 98
Action Type > Send E-mail ............................. 99
Action Type > PTZ Preset Go ........................ 100
Action Type > DI/DO ..................................... 101
Action Type > Send a SMS ..........................102
Action Type > Send to Central Server ........ 102
E-Map ........................................................................ 103
Edit Mode ............................................................104
Add/Edit/Delete Map ...................................... 105
Add/Rotate/Delete Device Indicator ...............106
Operate Mode ...................................................... 108
Device and Map Tree list ............................... 108
Operate Mode/Edit Mode ...............................108
.......................................................................109
Layout Adjustment ...............................................110
Print ....................................................................... 86
Backup ...................................................................86
Log Viewer ............................................................. 87
Unusual Event .................................................87
System Log ......................................................88
Smart Guard System ................................................. 92
Event .....................................................................93
Assign a Camera Event ................................... 93
Alarm Event Conguration ............................... 94
General Motion ................................................ 95
Digital Input ......................................................96
Action ..................................................................... 97
Adjust layout Window ....................................110
Log Viewer ...............................................................111
Unusual Event ..................................................... 112
System Log .......................................................... 113
Export ............................................................114
Backup......................................................................115
Back up Recorded File(s) .................................... 116
Delete Recorded File(s) ....................................... 118
Remote Live Viewer.................................................119
4D-Link D-ViewCam Standard/Professional/Enterprise User Manual
Page 5

Table of Contents
Setting .................................................................120
General Setting .............................................. 120
Server Setting ................................................ 121
Group Setting .................................................122
OSD Setting ...................................................123
Monitor Display Setting ..................................124
Notication Settings ....................................... 125
Server/Group/Camera ......................................... 126
Login/Logout Server ......................................127
Connect/Disconnect Camera .........................127
Log In/Log Out Server ...................................127
Connect/Disconnect Camera .........................127
Play ................................................................128
Stop ...............................................................128
Drop ............................................................... 128
PTZ Control ......................................................... 129
Zoom ..............................................................129
Focus ............................................................. 129
Patrol .............................................................129
E-Map ............................................................ 132
I/O Control .....................................................132
Web View .................................................................. 133
Server IP .............................................................. 133
Utilities......................................................................134
Verication Tool ...................................................134
Overview
.................................135
Verifying Image/Video .........................................136
License Management Tool ................................. 137
Overview .............................................................. 137
Start License Management .................................. 137
DB Tool ................................................................ 143
Repair Database ............................................ 144
Export Conguration ............................................149
Remote Desktop Viewer .....................................150
How to install Remote Desktop Viewer ..........150
How to Start Remote Desktop Viewer ........... 150
Preset/Go .......................................................129
On Screen Menu .................................................130
Enable Move ..................................................130
Enable Digital PTZ .........................................130
Enable Audio .................................................130
Snapshot ........................................................130
Playback ..............................................................131
Add Remote Playback Site ............................ 131
Access Remote Playback Site ....................... 131
Start Monitor ........................................................132
Frequently Asked Questions .................................. 151
Open Source Software Notication .......................185
5D-Link D-ViewCam Standard/Professional/Enterprise User Manual
Page 6
Section 1 - Product Overview
Product Overview
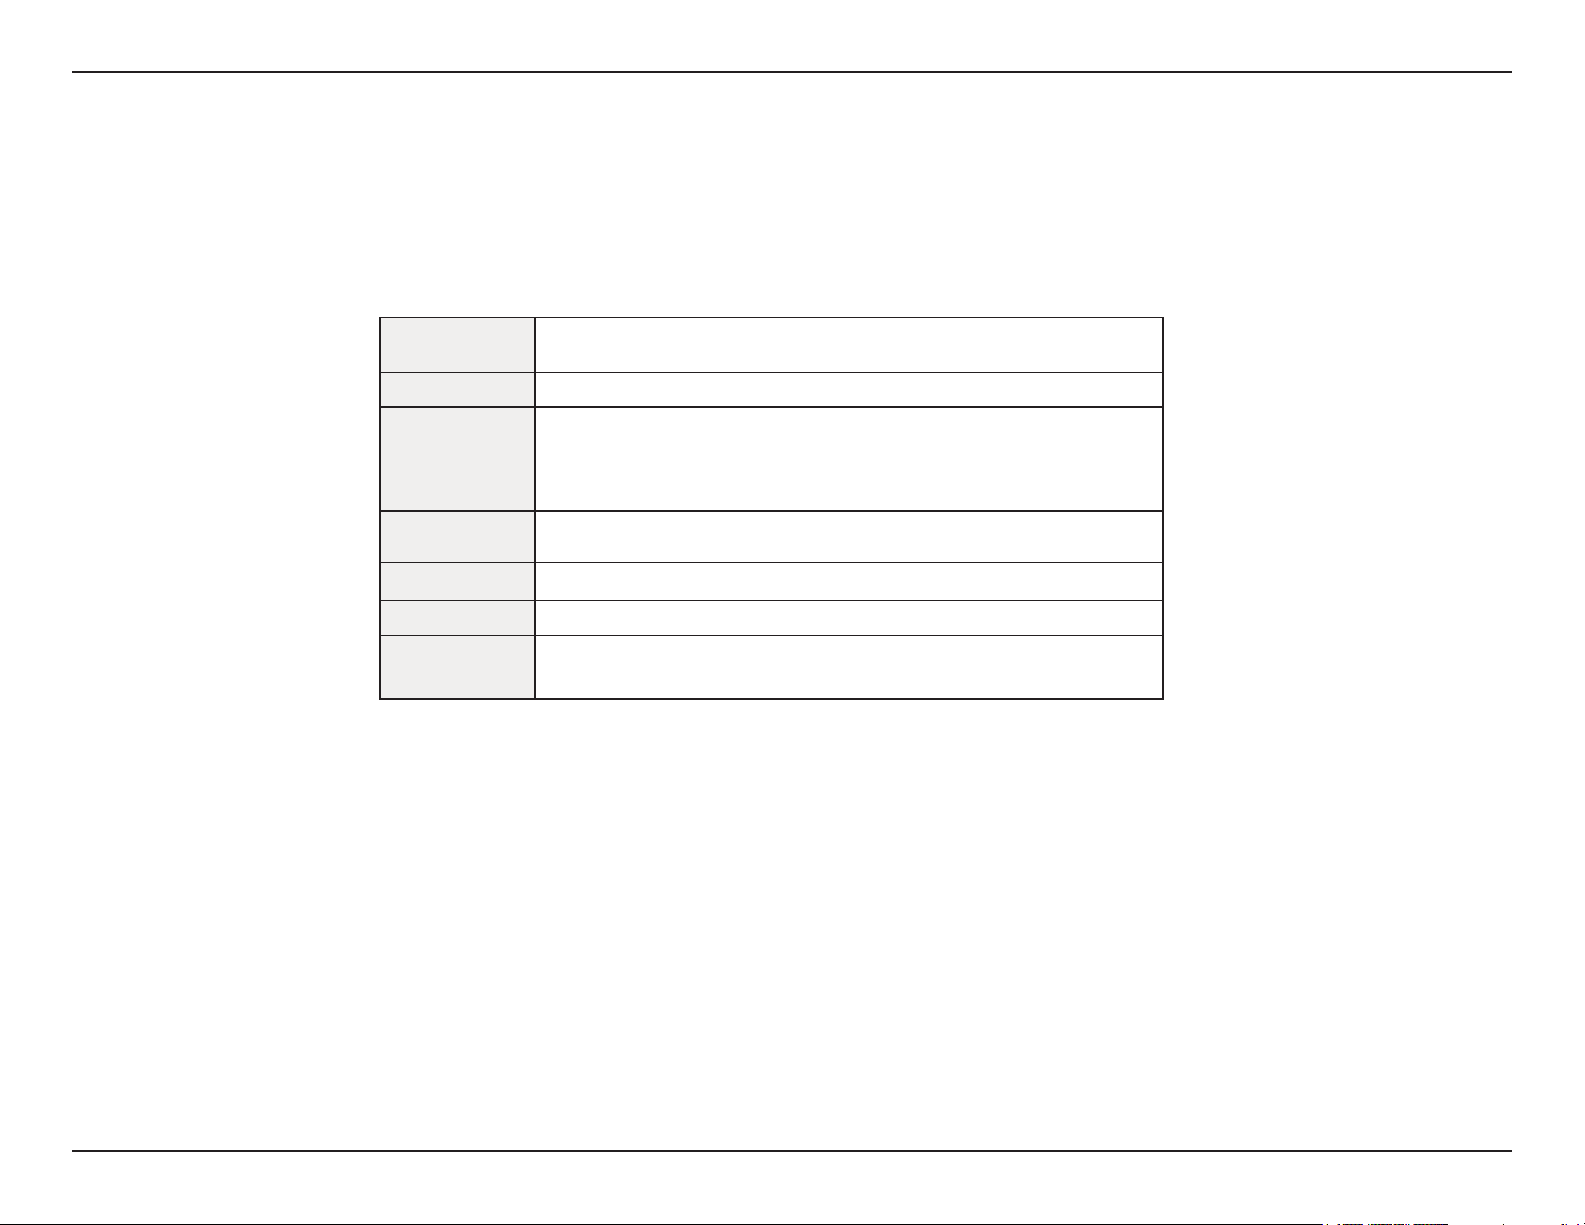
System Requirements
To ensure that your D-ViewCam Standard/Standard/Professional/Enterprise system can maintain high video monitoring
and recording performance, certain minimum system congurations are required.
CPU Intel Core 2 Duo E5300
RAM 2 GB
Intel P55, H55, X58, P45, P43 chip, MB vendor ASUS Gigabyte or MSI
with Intel Chipset recommended
32 bits: Microsoft Windows XP pro SP3/ Vista SP1/ Win 7 SP1
64 bits: Win 7 SP1/ Win Server 2008 R2
Note:
Motherboard
Display card ATI Radeon 4650 or above (ATI Driver V11-2 recommended)
Ethernet 100Base-T or above, Gigabit LAN recommended
Hard Disk 250 GB or above
OS
To determine the minimum hardware requirements for your planned surveillance system if it is not listed in the
above table, please consult the SI (system integrator), the reseller, or D-Link Technical Support.
Note:
Recording video over a long period of time will consume large amounts of disk space. Make sure that you have
enough disk space available if you want to use the recording function. You can still complete the installation even if
you have less than the suggested free disk space.
6D-Link D-ViewCam Standard/Professional/Enterprise User Manual
Page 7

Section 1 - Product Overview
Introduction
Thank you for purchasing D-ViewCam Standard/Professional/Enterprise. This state-of-the-art video management
software is a comprehensive surveillance system designed to centrally manage up to 8/32/64 network cameras, while
displaying real-time information on the screen. This software allows you to build a powerful surveillance system at your
home or small business by using D-Link network cameras and the latest features offered by the D-ViewCam Standard/
Professional/Enterprise software.
Key Features
• D-ViewCam Standard/Professional/Enterprise automatically locates and adds network cameras in the local network
• Storage management for recording les
• Single and multiple video stream monitoring (up to 8/32/64 video channels)
• Two-way audio communication
• Intelligent lter and search capabilities for scheduling recording and/or event recording-
7D-Link D-ViewCam Standard/Professional/Enterprise User Manual
Page 8

Section 1 - Product Overview
Installing Your Network Camera
Before installing D-ViewCam Standard/Professional/Enterprise, please make sure you have installed your D-Link
network camera(s) that will be managed by D-ViewCam Standard/Professional/Enterprise.
Step 1 - Follow the installation procedures that came with your network camera(s) to complete the camera
installation process.
Step 2 - Verify that you are able to view the video images from the network camera (s) by accessing the
camera’s web-based conguration utility. It is recommended that all network cameras be installed in
the same subnet as your management PC running the D-ViewCam Standard/Professional/Enterprise
software.
Step 3 - Please refer to the Add camera(s) section in the next section Software Installation for more
information.
8D-Link D-ViewCam Standard/Professional/Enterprise User Manual
Page 9
Section 2 - Installation
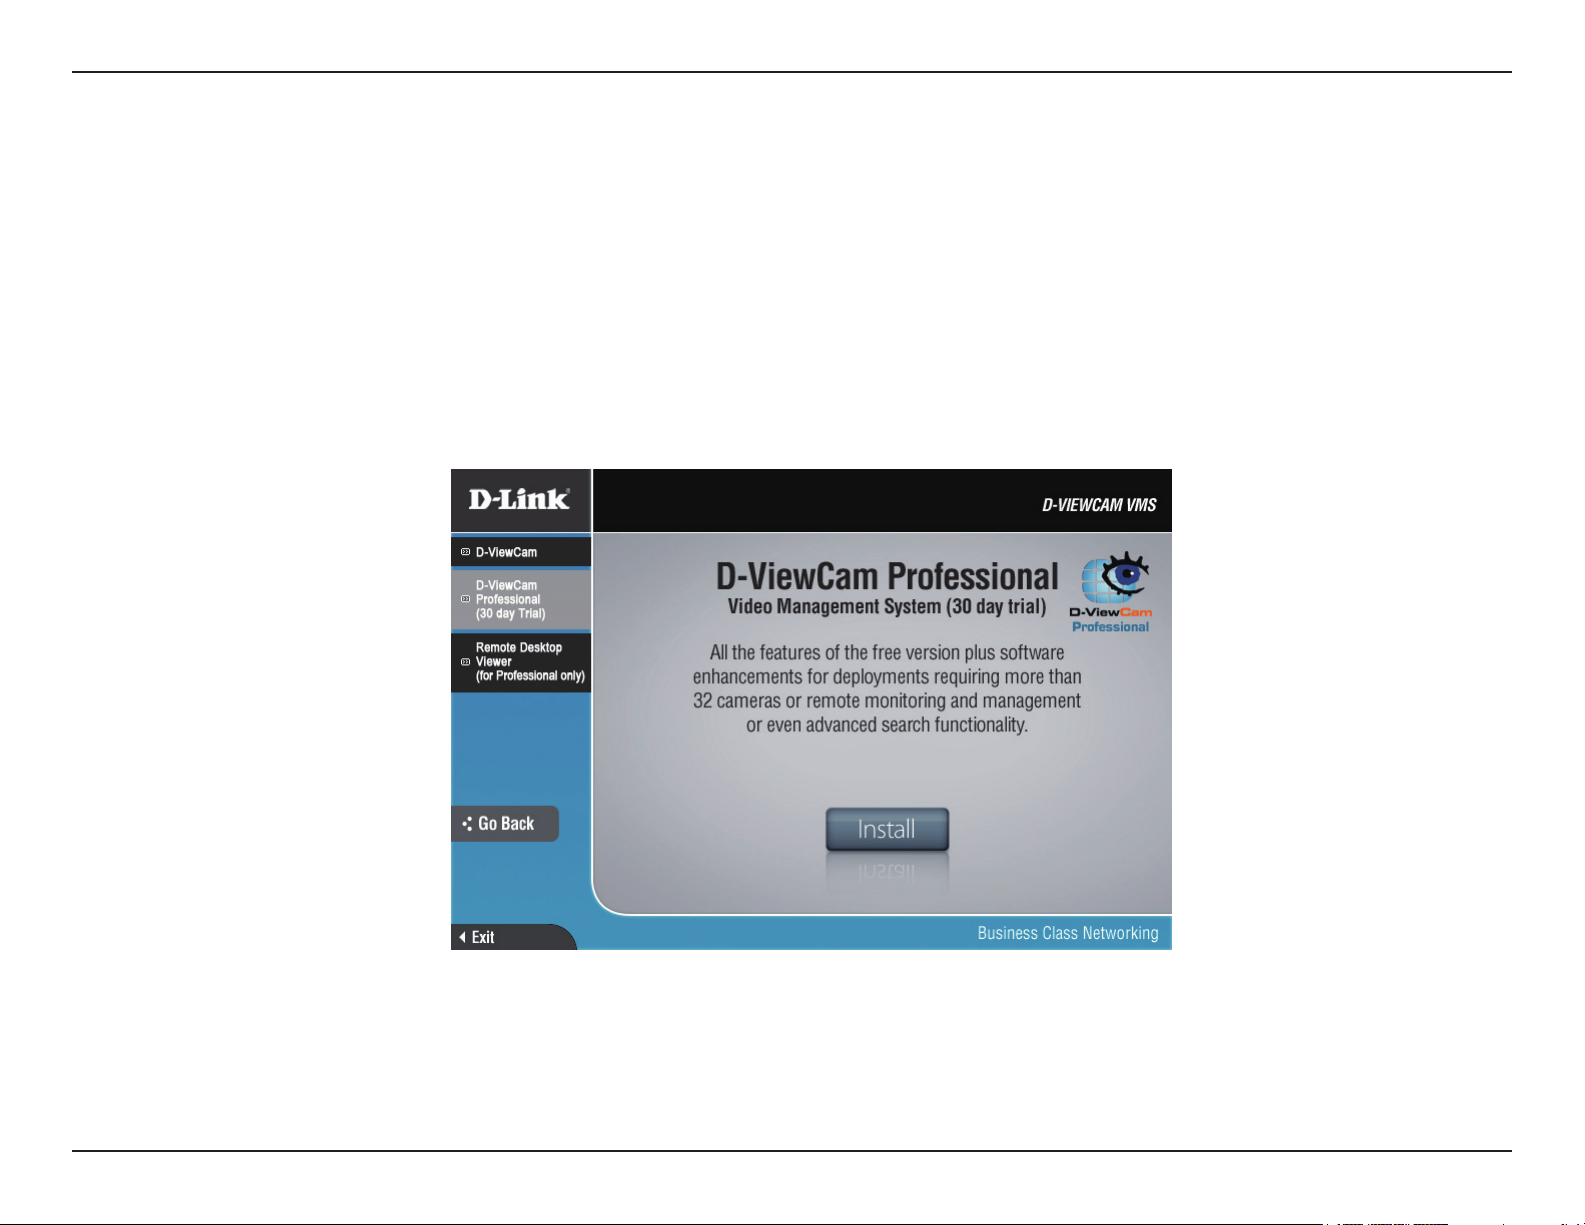
Software Installation
Turn on the computer and insert the CD into the CD-ROM drive. Click “Install D-ViewCam Standard/Professional/Enterprise”
from the menu, and select “D-ViewCam Standard/Professional/Enterprise” to install the VMS (Video Management Software)
software.
®
Step by step instructions are shown below if you are using Windows
displayed for other Windows operating systems.
XP. However, similar instructions and windows are
9D-Link D-ViewCam Standard/Professional/Enterprise User Manual
Page 10
Section 2 - Installation
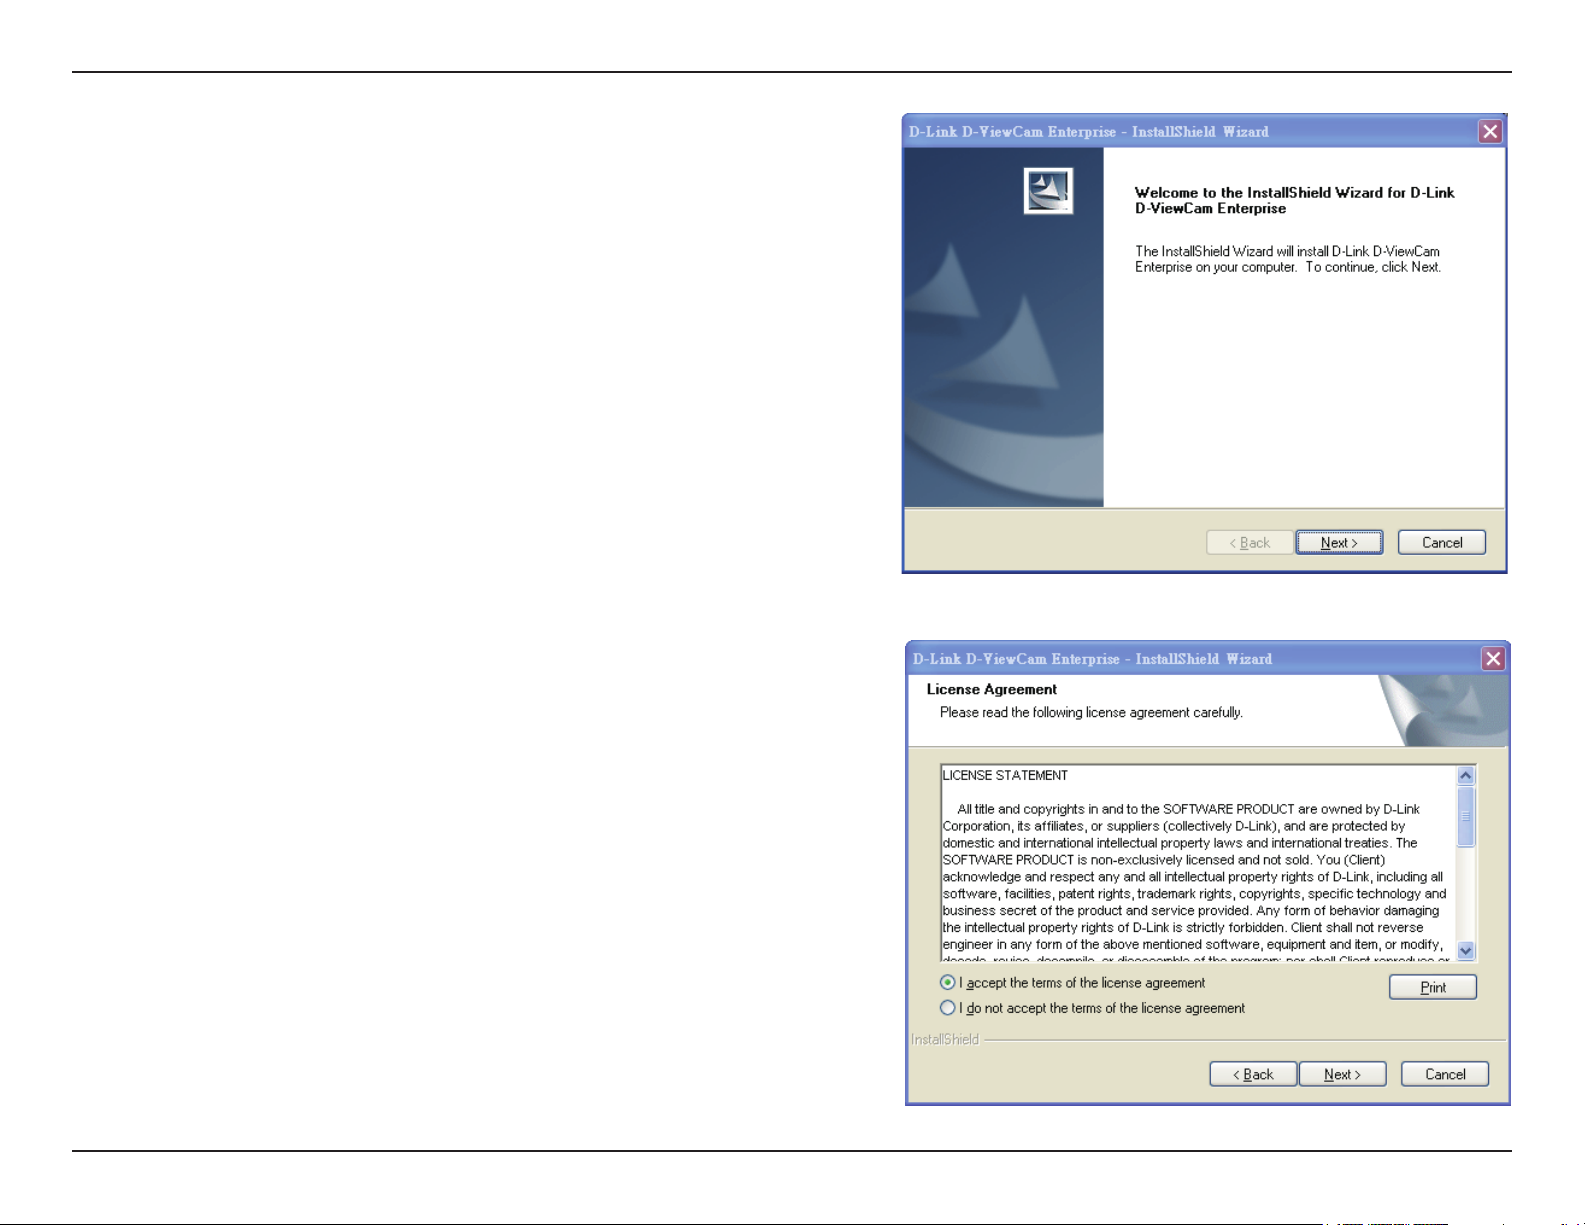
1. Click Next to continue.
2. Click I accept the terms of the license agreement
and then click Next to continue.
10D-Link D-ViewCam Standard/Professional/Enterprise User Manual
Page 11
Section 2 - Installation
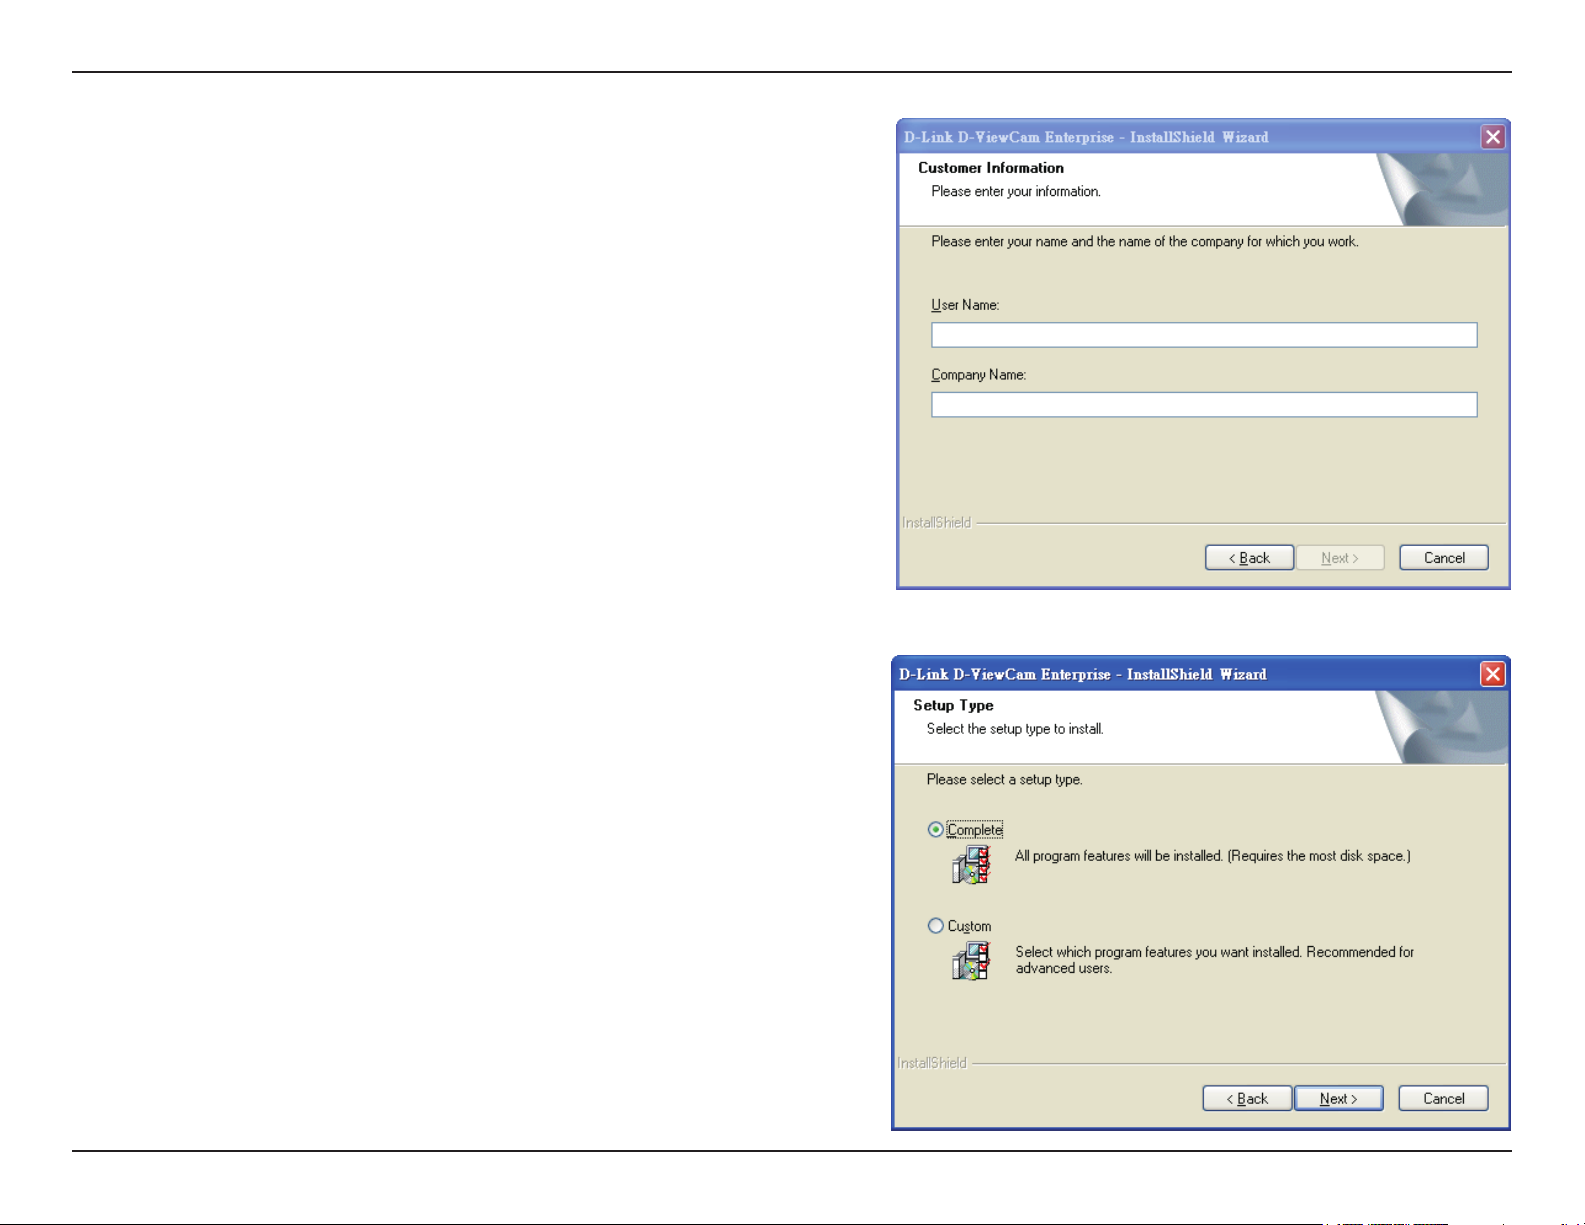
3. Enter your name and company name. Click Next to
continue.
4. Select Complete to install the entire D-ViewCam Standard/
Professional/Enterprise software package or Custom to
choose which programs to install. Click Next to continue.
COMPLETE SETUP TYPE
Select Complete to install all the program features into the
default directory (requires the most disk space) and click
Next to continue.
CUSTOM SETUP TYPE
Select Custom to install the system to a preferred directory.
This option allows you to specify the program feature(s) for
installation, and is recommended for advanced users.
11D-Link D-ViewCam Standard/Professional/Enterprise User Manual
Page 12
Section 2 - Installation
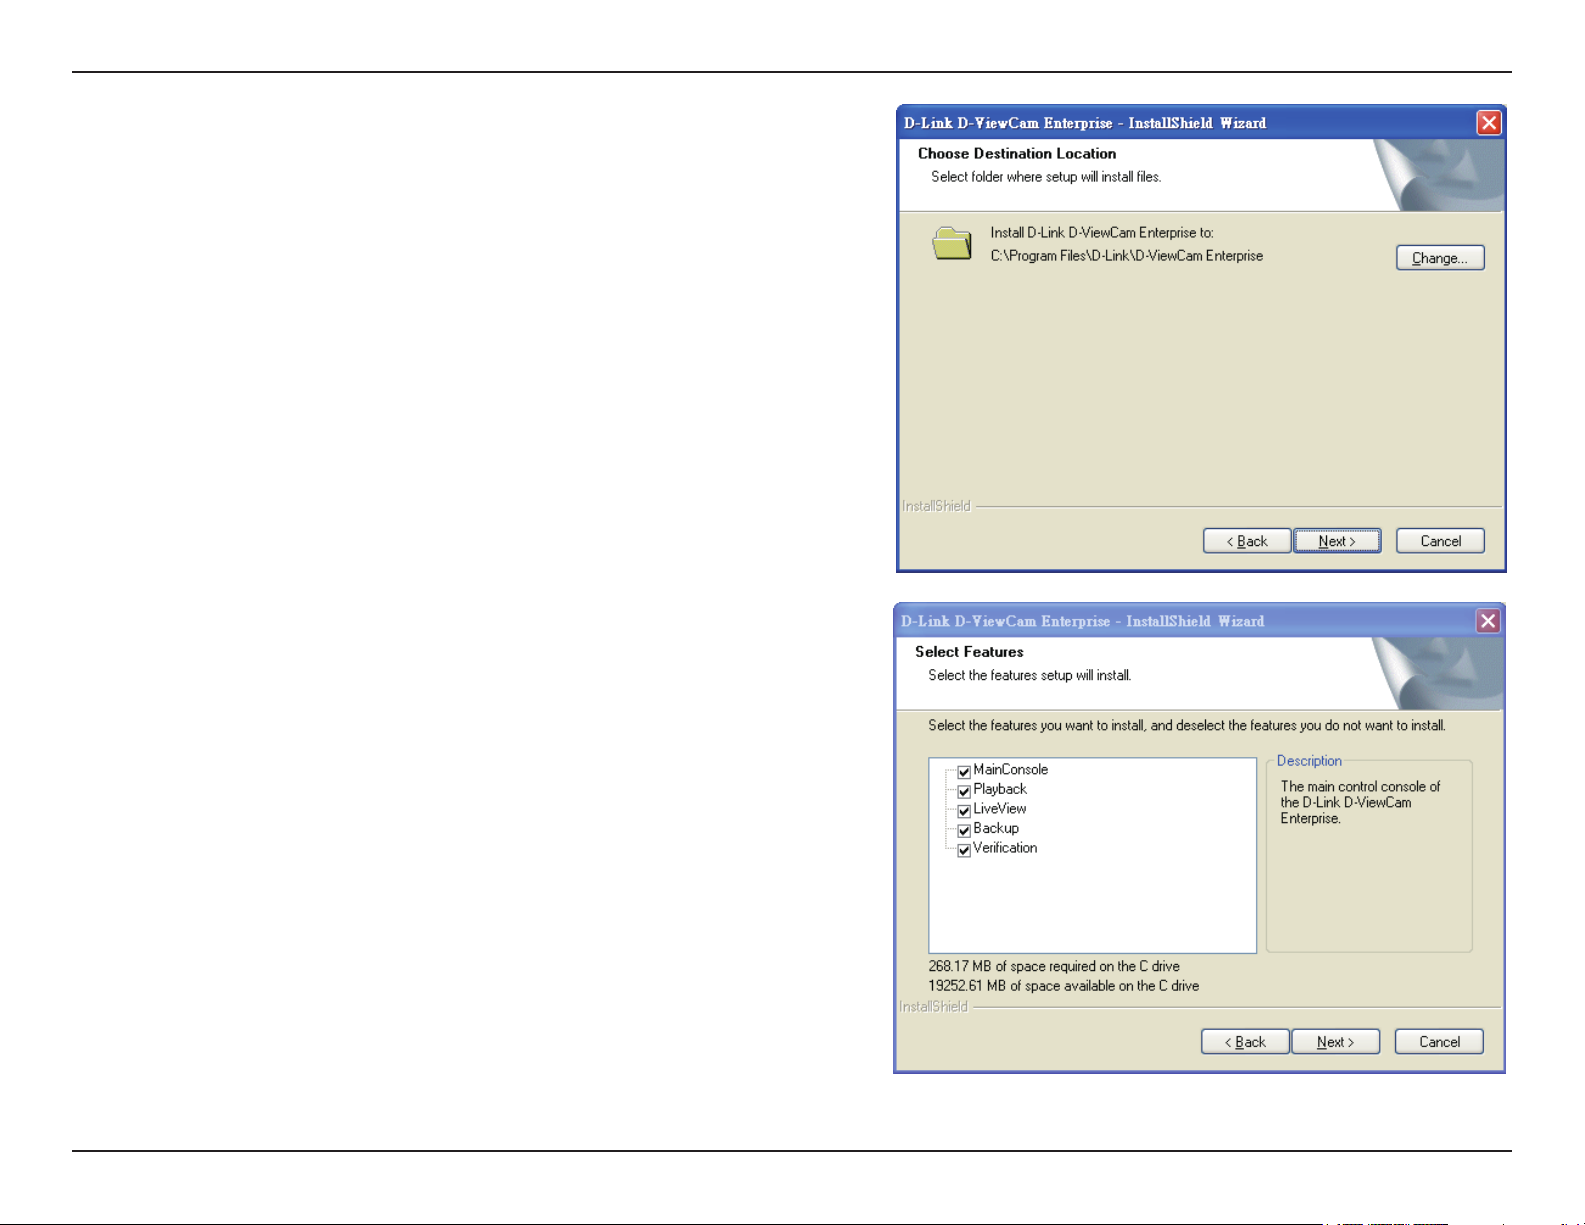
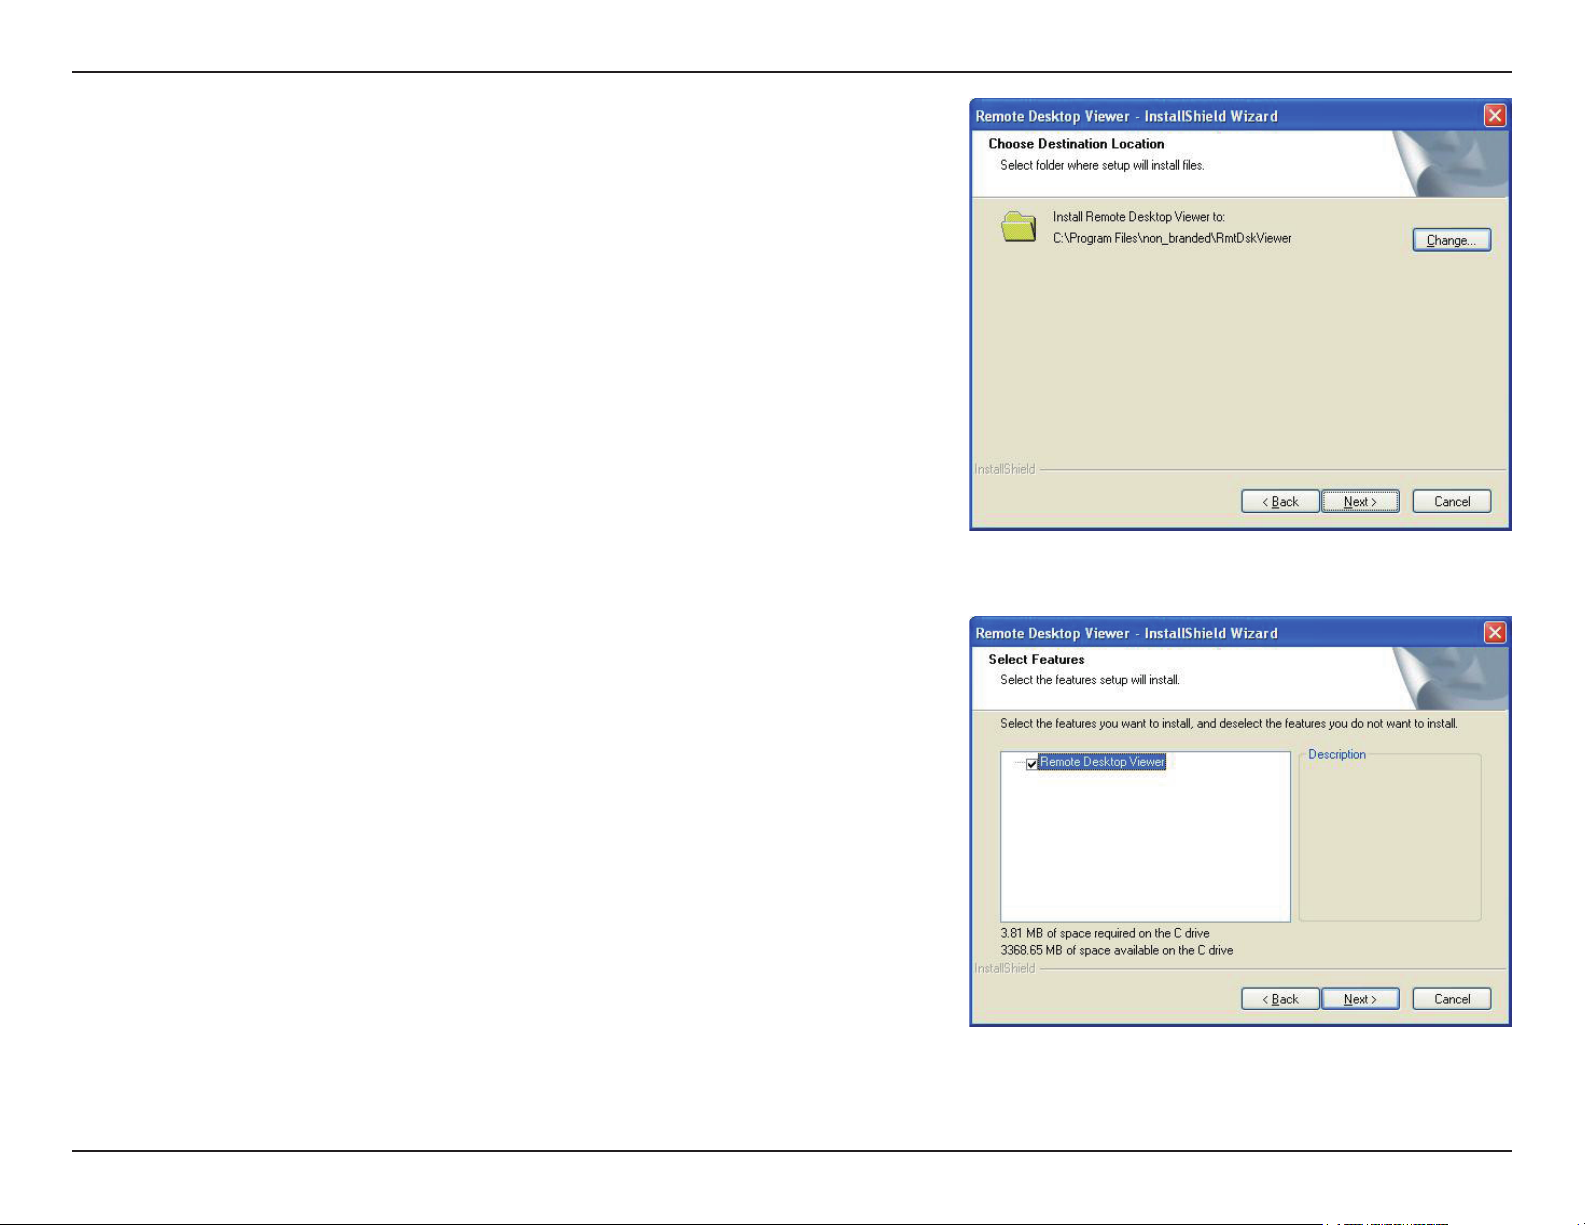
5. Select Custom, and then click Next. The Choose
Destination Location window will appear.
6. To install to this folder click Next. To install to a different
folder, click Change and select another folder.
7. Select the features you want to install and click Next
to continue. The ve main features in the server setup
process are:
• Main Console
• Playback
• LiveView
• Backup
• Verication
12D-Link D-ViewCam Standard/Professional/Enterprise User Manual
Page 13

Section 2 - Installation
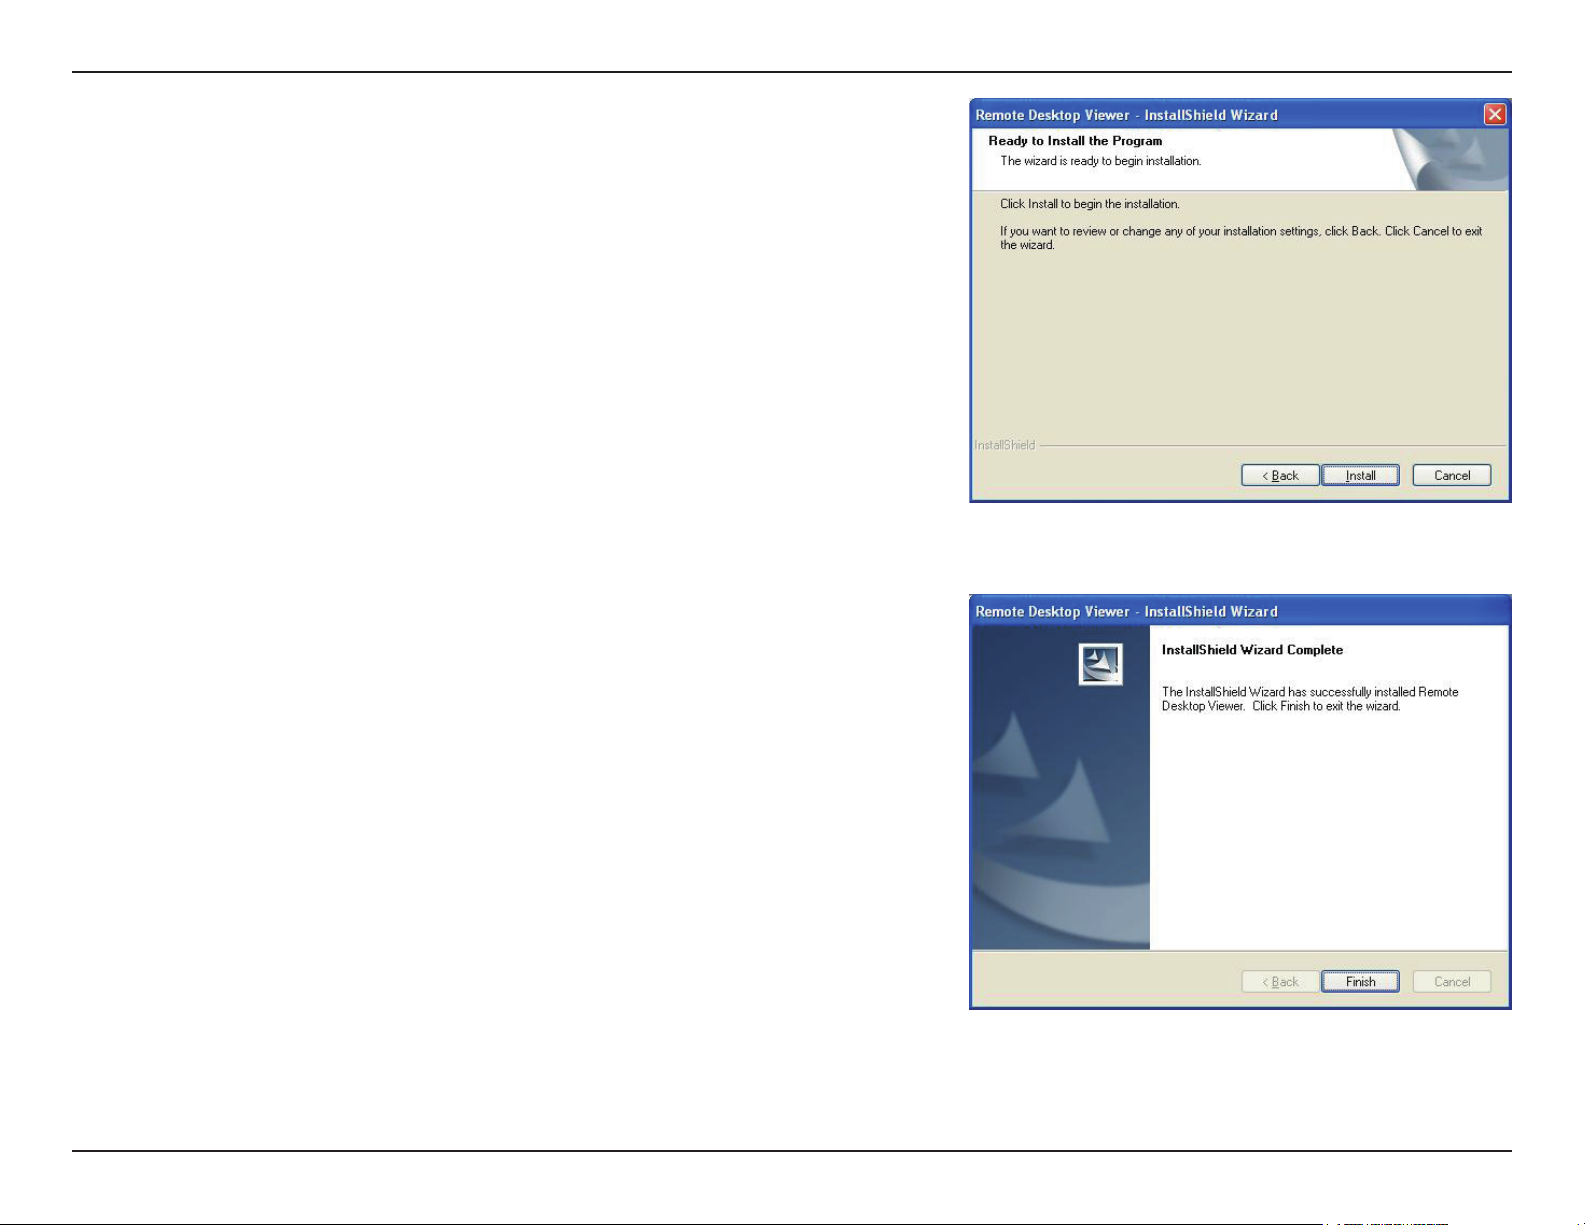
8. Click Install to start the installation.
9. Click Finish to complete the installation.
13D-Link D-ViewCam Standard/Professional/Enterprise User Manual
Page 14
Section 2 - Installation
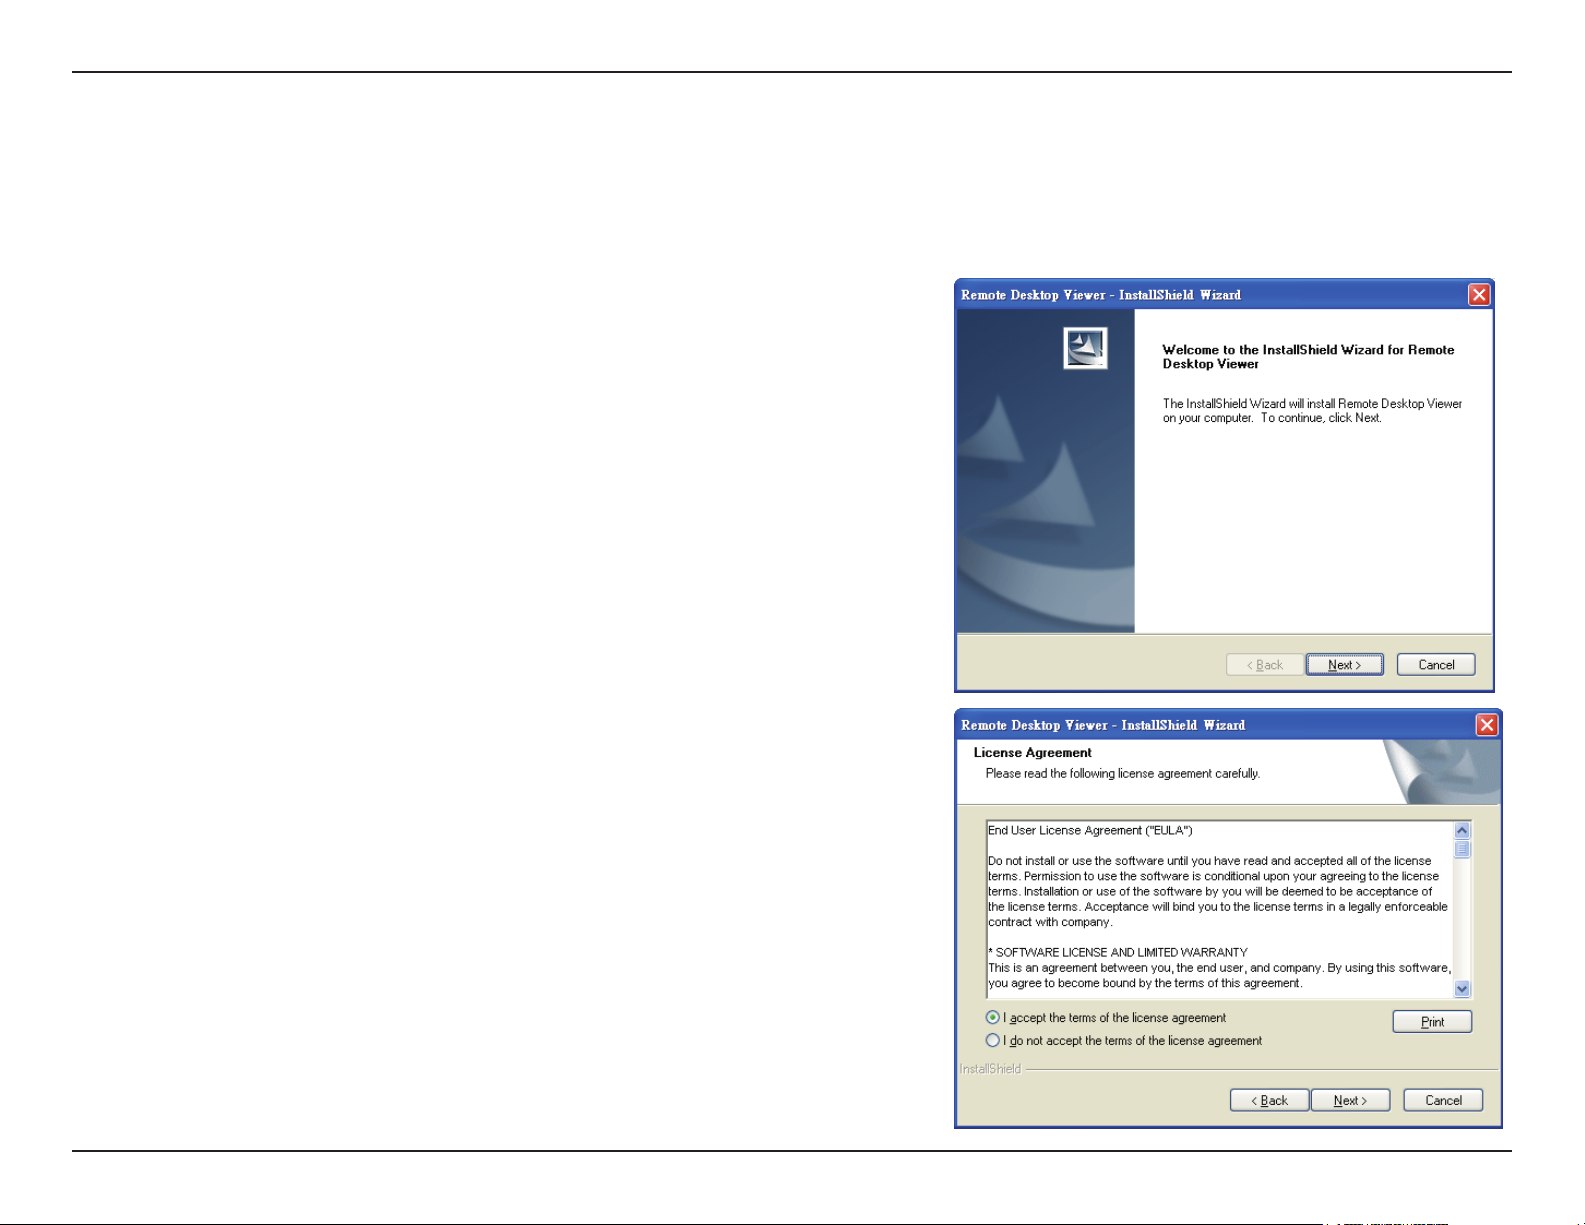
Remote Desktop Viewer Installation
Remote Desktop Viewer allows for remote access to the Main Console and Setup conguration.
1. In the InstallShield Wizard screen, click Remote Desktop
Viewer and then click Next to continue.
2. Select I accept the terms of the license agreement. Click
Next to continue.
14D-Link D-ViewCam Standard/Professional/Enterprise User Manual
Page 15
Section 2 - Installation
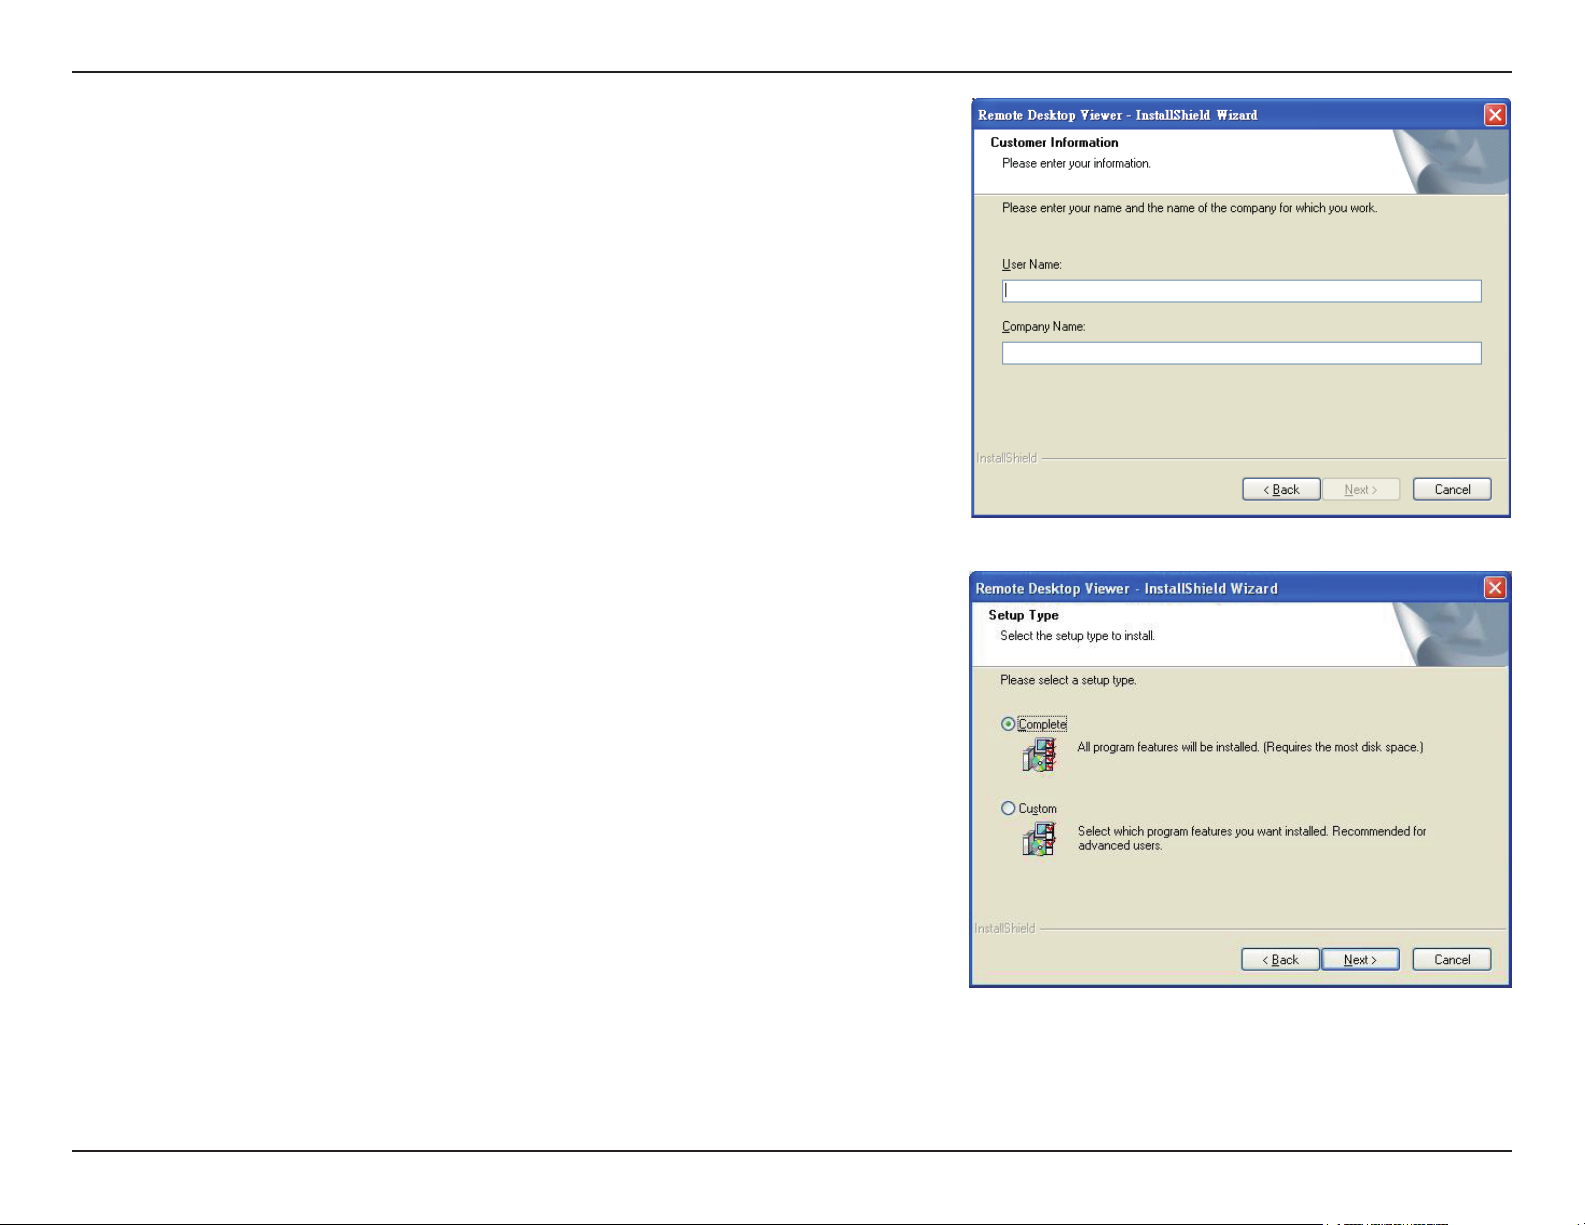
3. Enter the User Name and your Company Name. Click Next
to continue.
4. Select Complete to install the entire package or Custom to
choose which programs to install. Click Next to continue.
COMPLETE SETUP TYPE
Select Complete to install all the program features into the
default directory (requires the most disk space) and click
Next to continue.
CUSTOM SETUP TYPE
Select Custom to change the installation directory and/
or program features. This option is recommended only for
advanced users.
5. Select Custom, and then click Next. The Choose Destination
Location window displays.
15D-Link D-ViewCam Standard/Professional/Enterprise User Manual
Page 16
Section 2 - Installation
6. To install to this folder click Next. To install to a different
folder, click Change and select another folder.
7. Select Remote Desktop Viewer and click Next to
continue.
16D-Link D-ViewCam Standard/Professional/Enterprise User Manual
Page 17
Section 2 - Installation
8. Click Install to start the installation.
9. Click Finish to complete the installation.
17D-Link D-ViewCam Standard/Professional/Enterprise User Manual
Page 18
Section 2 - Installation
D-ViewCam Standard/Professional/Enterprise Login
Once the console loads, enter the User Name and Password and click OK.
18D-Link D-ViewCam Standard/Professional/Enterprise User Manual
Page 19
Section 2 - Installation
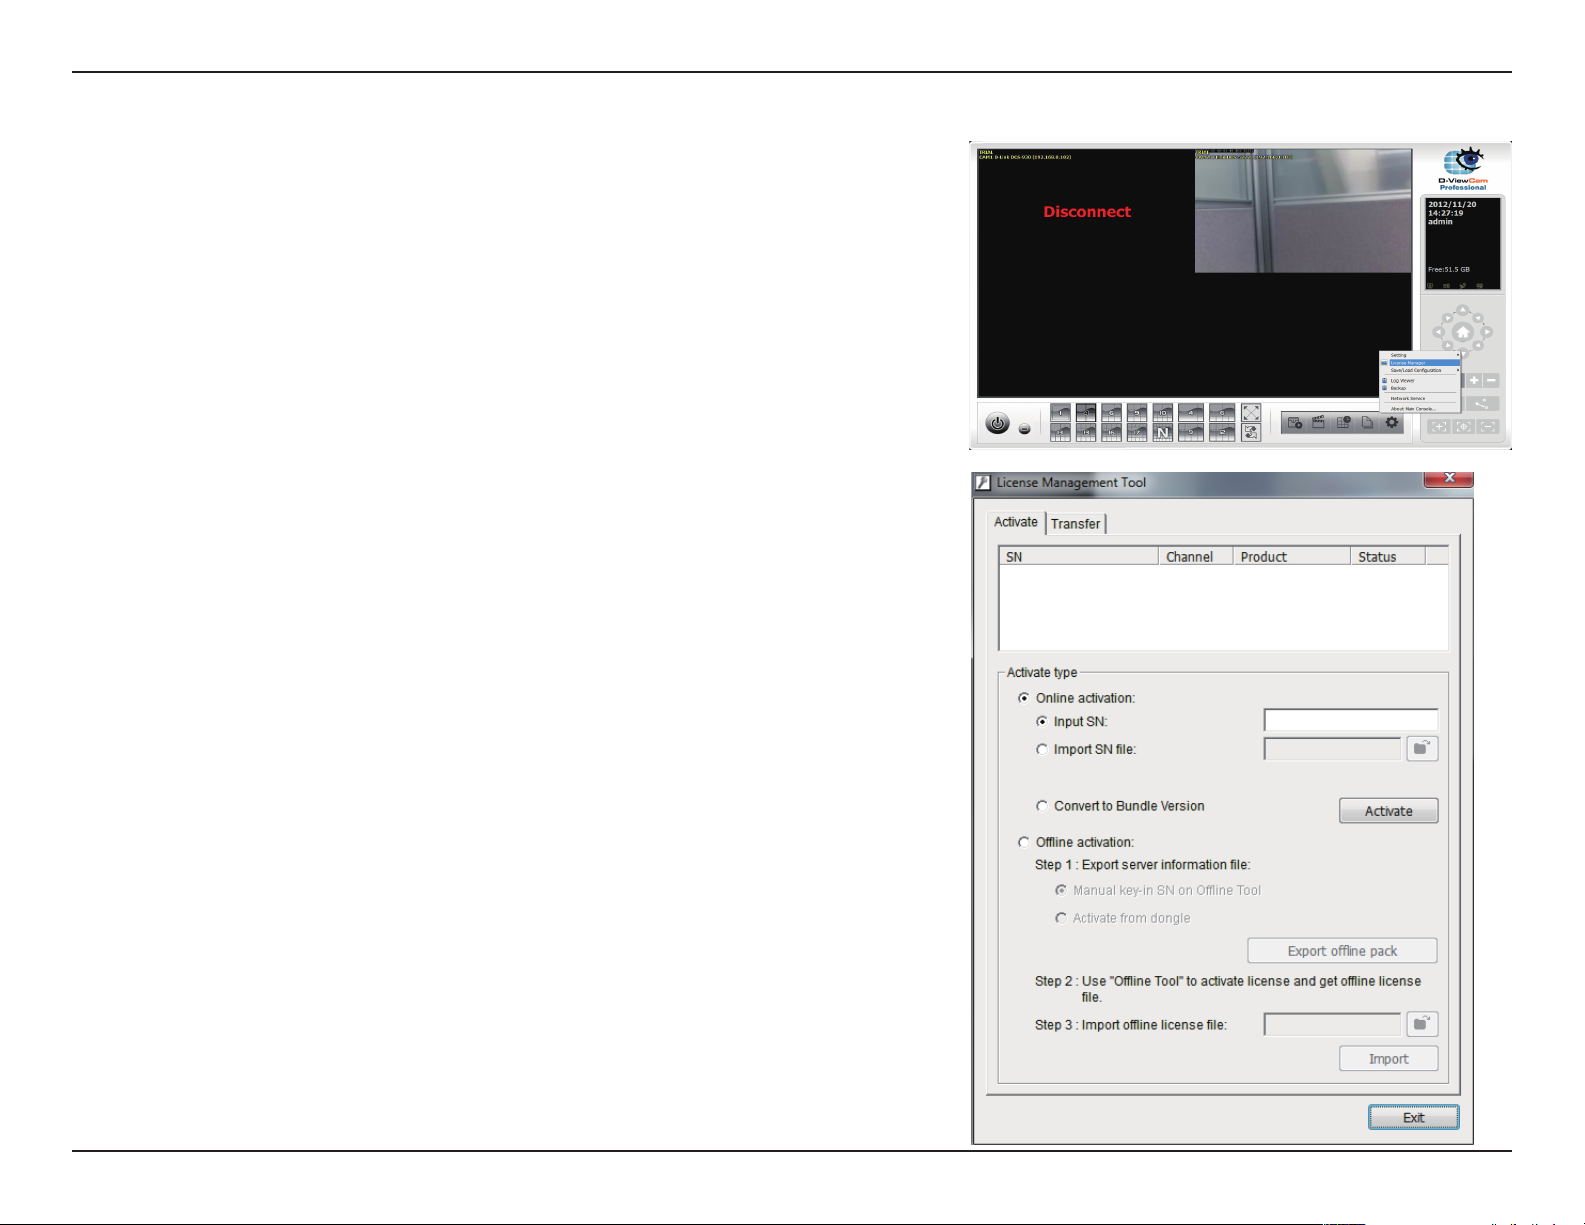
Activate Software License(s)
1. Go to Main Console > General Setting and open
the License Manager tool.
2. Select On line network environment.
3. Select Input SN to enter the Serial Number, Import the SN
le, or Import license le to activate the license.
4. Click Activate. After the software license is activated
successfully, please restart the Main Console.
Note: Please refer to the License Management Tool section for advanced
settings.
19D-Link D-ViewCam Standard/Professional/Enterprise User Manual
Page 20
Section 2 - Installation
Add Camera(s)
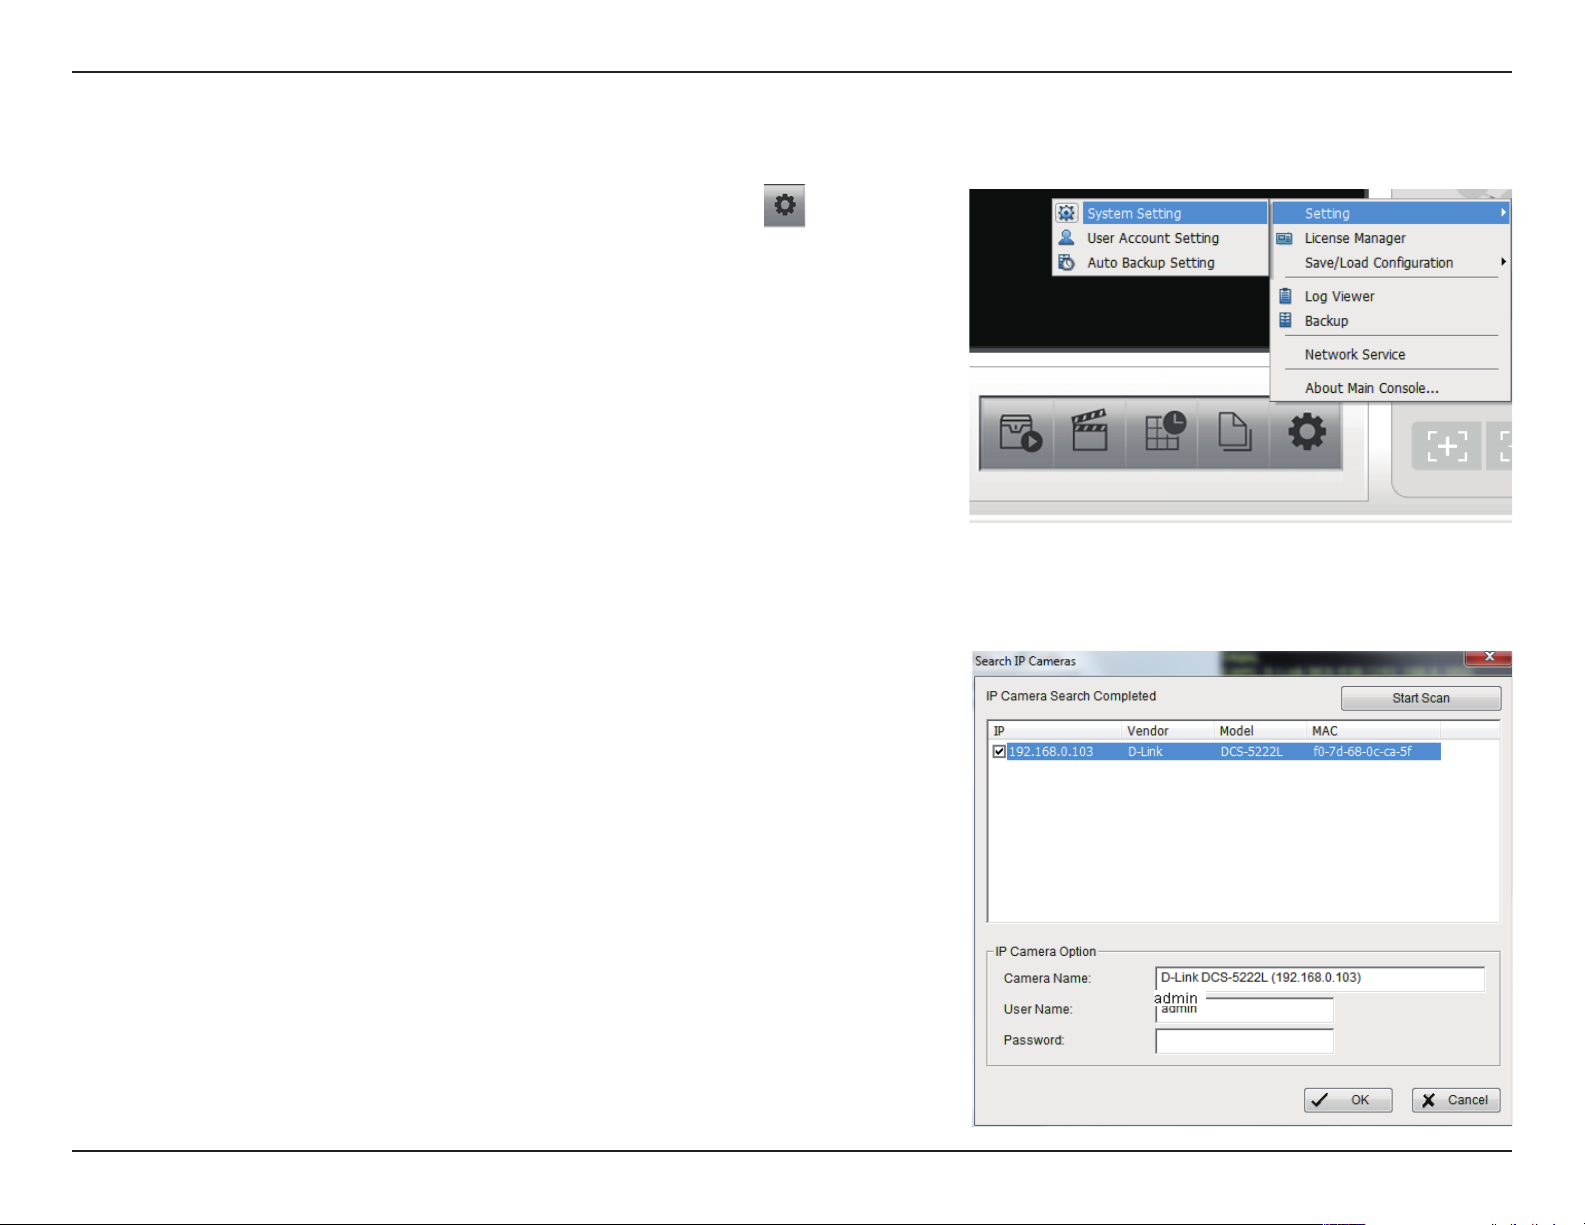
1. Once the console loads, click General Setting , then
click Setting, and select System Setting.
2. Select the Camera tab, then click Search to nd the network
camera (s) that are on your local area network (LAN).
The system automatically searches for all the network
cameras that are on your local area network (LAN).
3. Select a Camera.
Note: If your network cameras support UPnP, follow step 3.
Otherwise, skip to step 5.
20D-Link D-ViewCam Standard/Professional/Enterprise User Manual
Page 21

Section 2 - Installation
4. Select one of the network cameras that are available, enter a
Camera Name and then enter the User Name and Password.
Click OK to add the camera.
5. If your camera(s) does not support UPnP, you can manually
add a camera.
Click Insert to manually add network camera(s) that are on
your local area network (LAN).
21D-Link D-ViewCam Standard/Professional/Enterprise User Manual
Page 22

Section 2 - Installation
6. Enter the following Network information for your camera:
• Name - Enter a name for your camera.
• IP Address - Enter the IP address of this camera.
If you want to use a domain name, then select DNS
and enter the domain name.
• HTTP Port - 80 is the default port.
• User Name - Enter a user name for this camera.
• Password - Enter a password for this camera.
• Protocol - Select TCP, UDP, HTTP, or HTTPS.
Enter the following Device information for your camera:
• Auto Detect - Click to detect the vender and model
information.
• Vendor - Select the vendor’s name from the dropdown menu.
• Camera Model - Select the camera model from the
drop-down menu.
• Video Channel - Select the video channel you want
to assign the camera to.
7. Click OK to add your camera.
22D-Link D-ViewCam Standard/Professional/Enterprise User Manual
Page 23
Section 3 - Conguration
D-ViewCam Standard/Professional/Enterprise
Interface Overview
This section will show you how to start and congure D-ViewCam Standard/Professional/Enterprise.
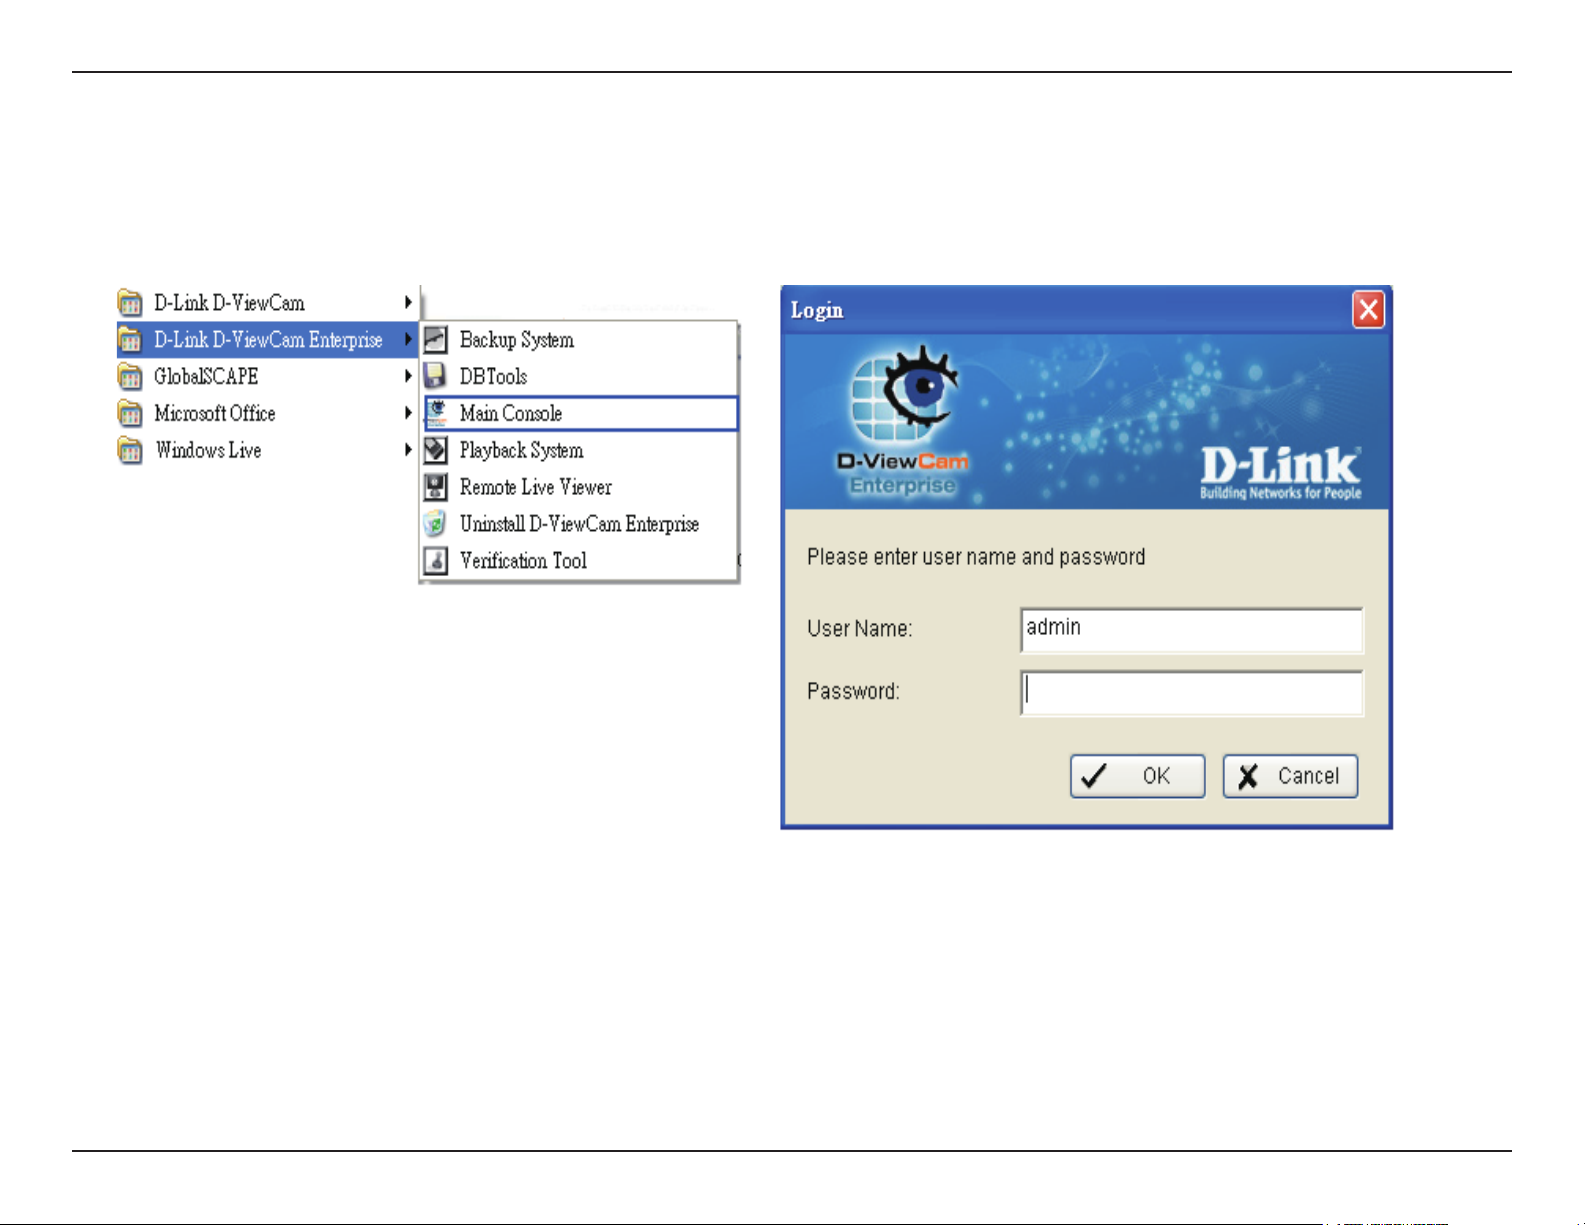
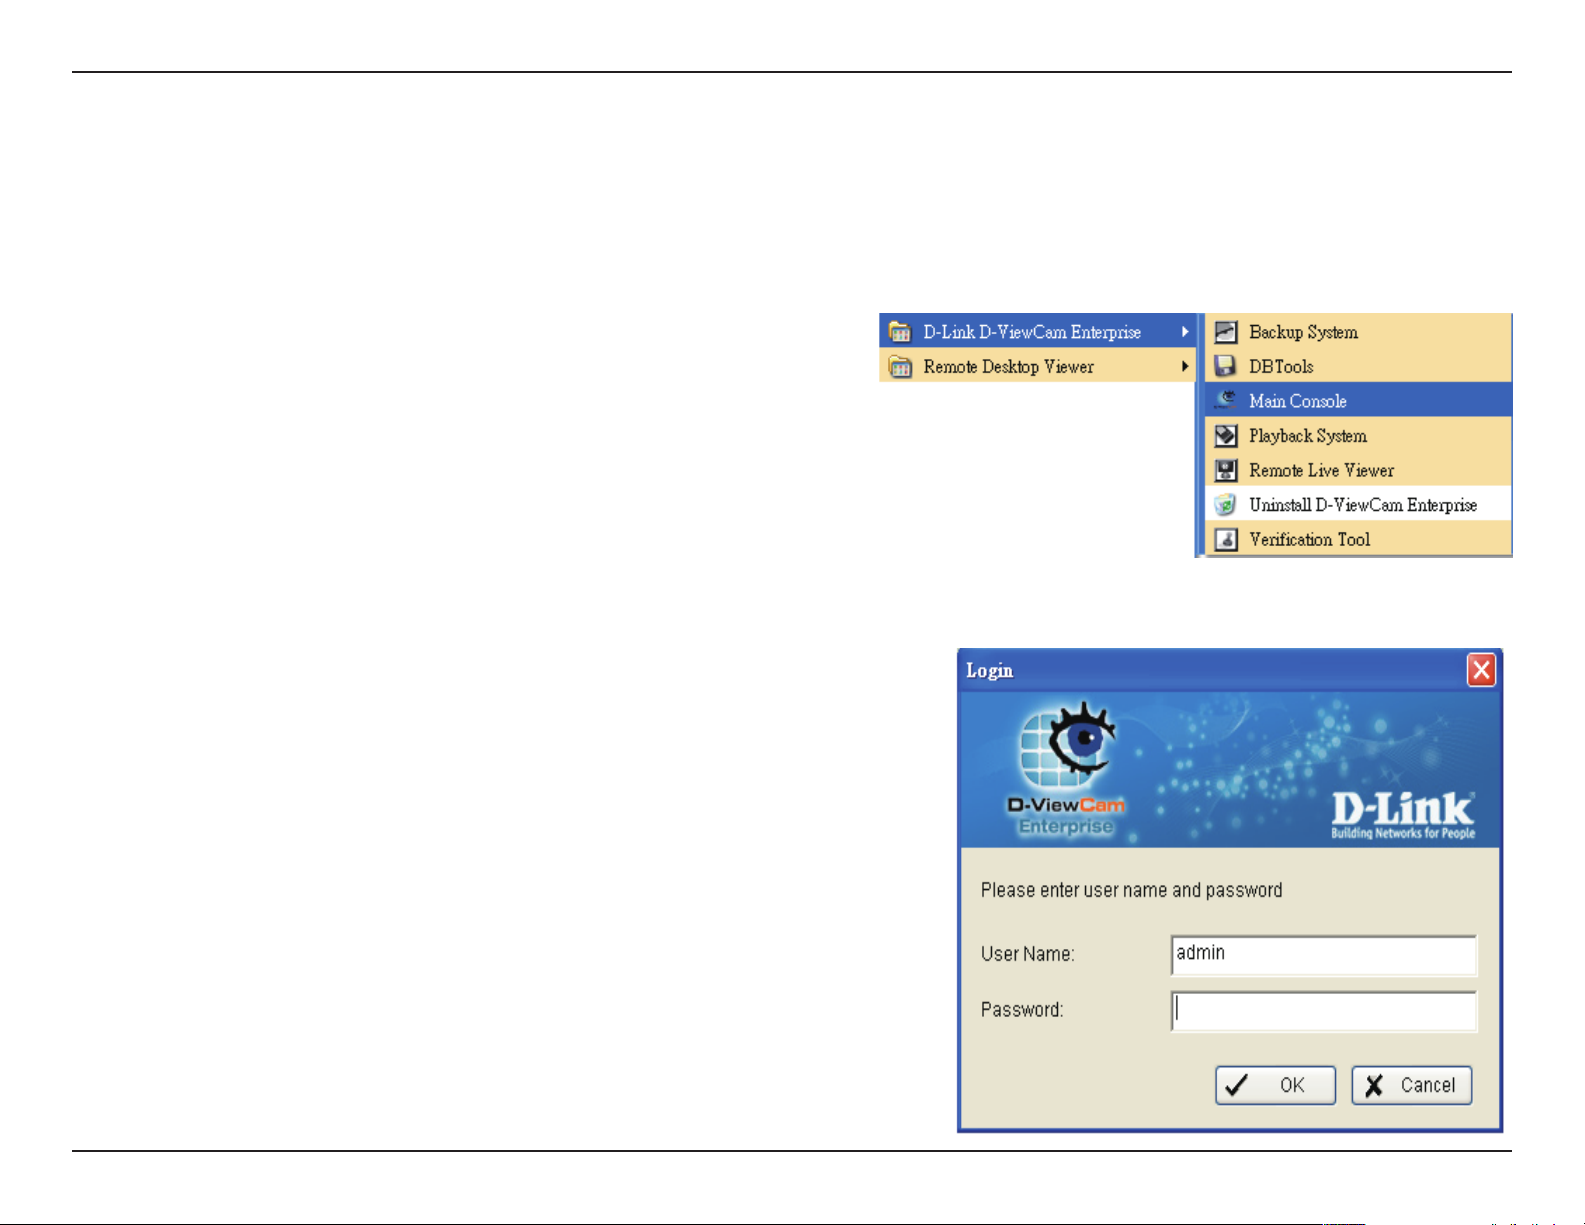
To start D-ViewCam Standard/Professional/Enterprise, go to
Start > All Programs > D-Link D-ViewCam Standard > Main
Console.
or
Start > All Programs > D-Link D-ViewCam Professional > Main
Console.
or
Start > All Programs > D-Link D-ViewCam Enterprise > Main
Console.
Enter Admin as the default username and your password. Click
OK to log into the system.
Note: Refer to the User Account Setting section for User
Account information.
23D-Link D-ViewCam Standard/Professional/Enterprise User Manual
Page 24
Section 3 - Conguration
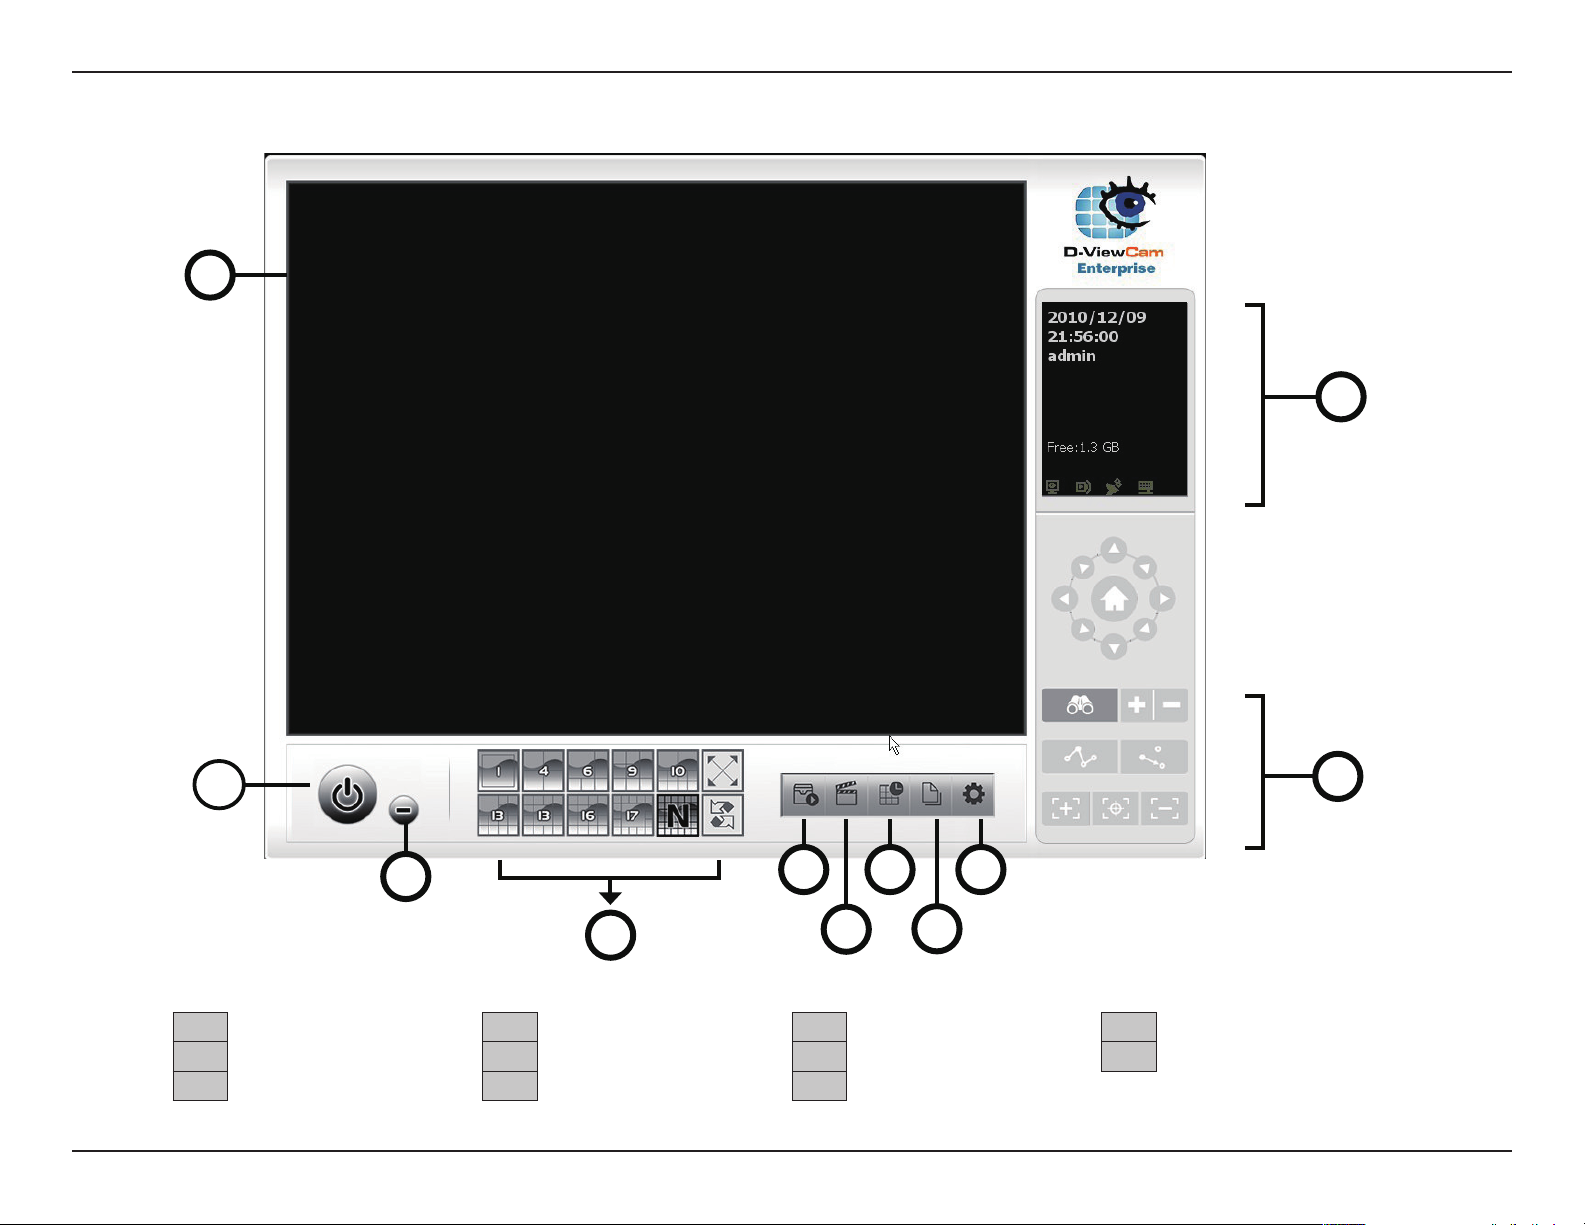
Main Console
1
9
2
3
4
10
1 Main Display Area 4 Monitor 7 Congure Smart Guard System 10 Split Screen Options
2 Log out / Exit Program 5 Playback 8 General Settings 11 PTZ Features
3 Minimize Window 6 Congure Schedule System 9 System Information
5
6
8
7
11
24D-Link D-ViewCam Standard/Professional/Enterprise User Manual
Page 25
Section 3 - Conguration
Log Out/Exit Program/Minimize Window
Click to log the current user out or to close the D-ViewCam Standard/
Professional/Enterprise program.
Click to minimize the window.
Split Screen Options
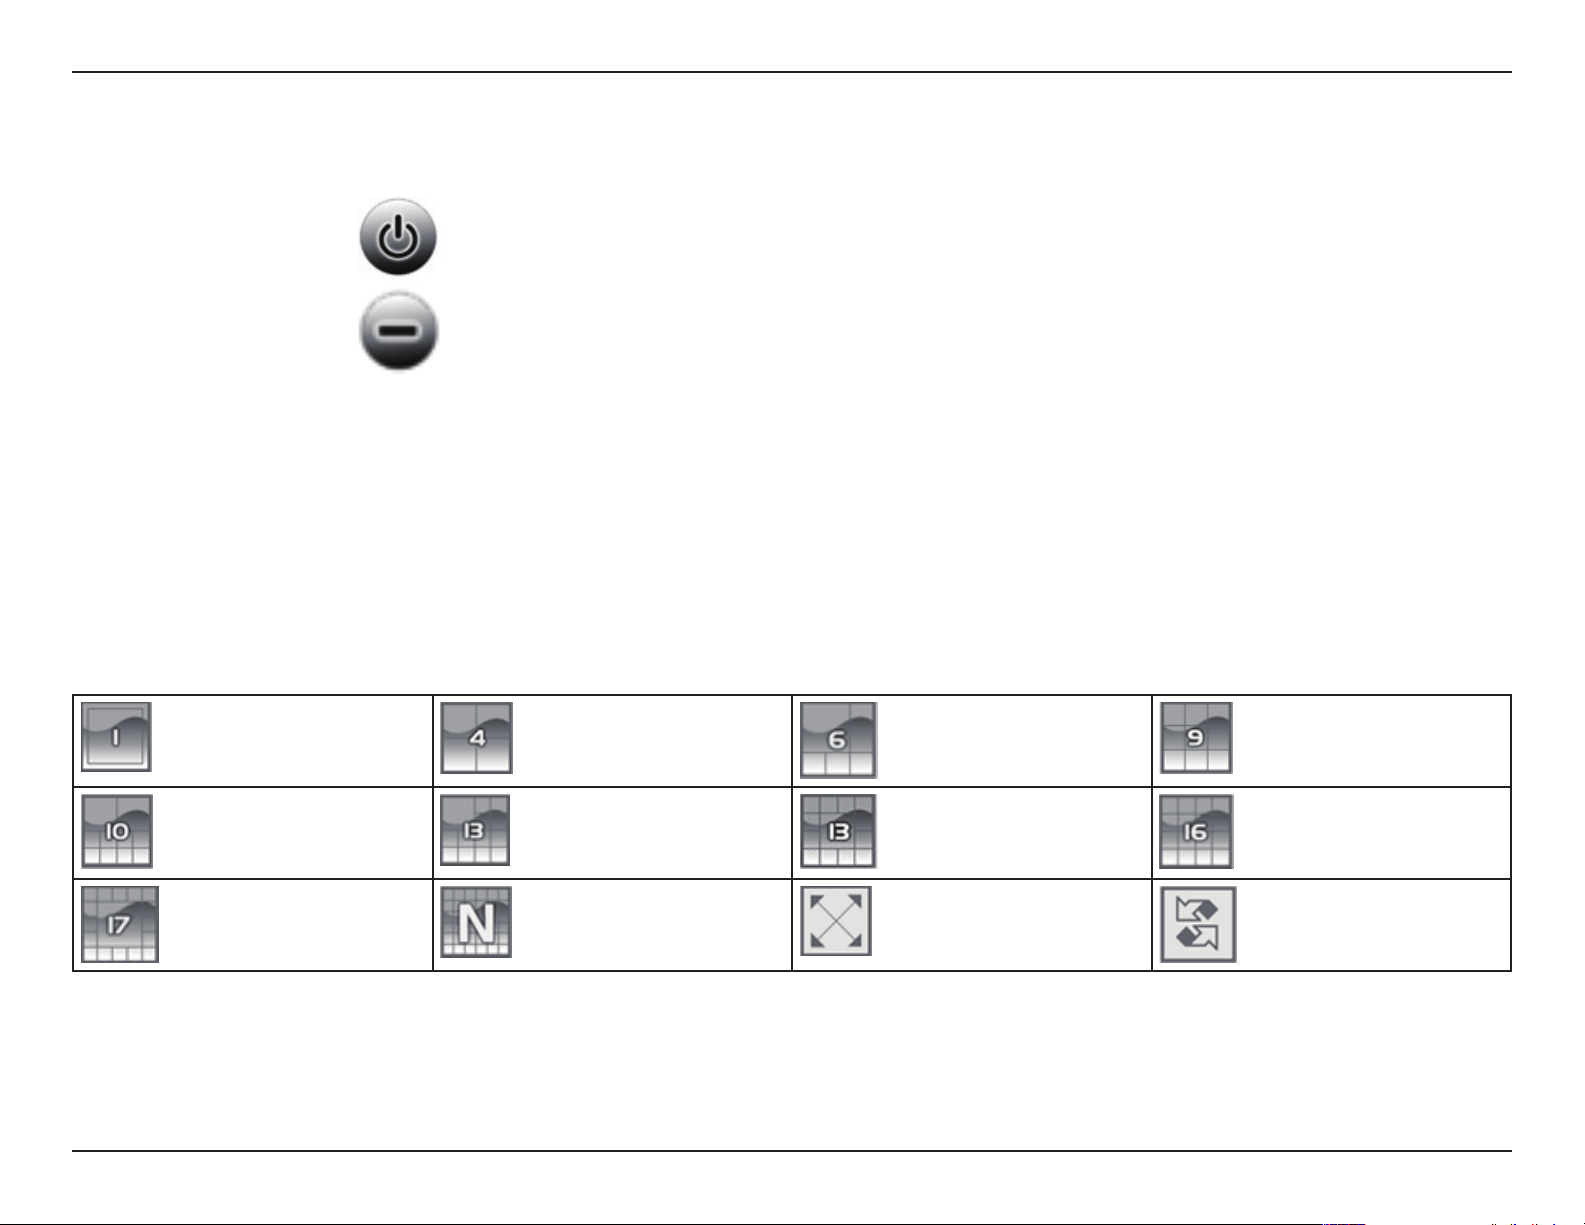
Select a split-screen display layout by clicking on the desired layout icon. The system provides 1, 4, 6, 9, 10, 13, 16, 17 and N split screen
modes. To switch to a single camera display, double-click the camera’s image. To return to the previous conguration screen, press the
Esc key or double-click on the screen again.
Displays 1 screen
Divides into 10 screens
Divides into 17 screens
Divides into 4 screens
Divides into 13 screens
Divides into N screens
Divides into 6 screens
Divides into 13 screens
Switch to full screen
Divides into 9 screens
Divides into 16 screens
Rotate all screens
25D-Link D-ViewCam Standard/Professional/Enterprise User Manual
Page 26
Section 3 - Conguration
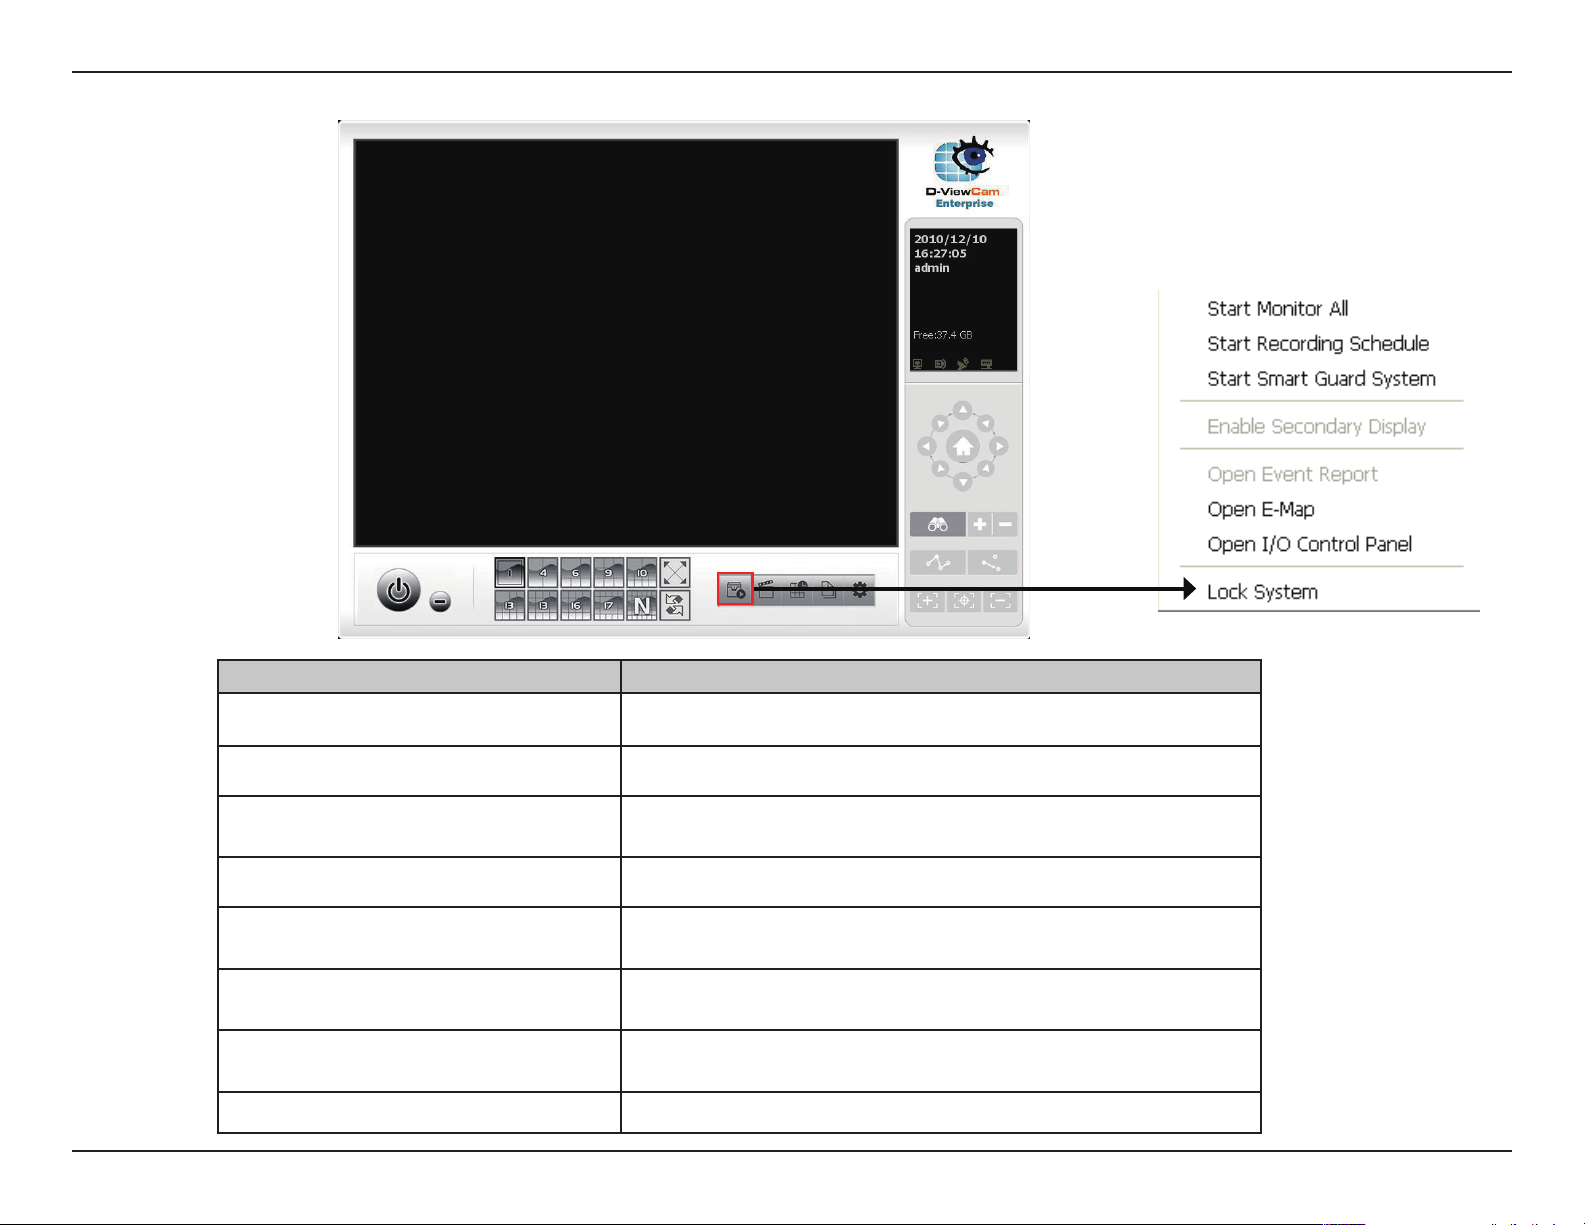
Monitor
Option Function
Start/Stop Monitor All Click to start or stop all monitoring functions.
Start/Stop Recording Schedule Click to start or stop the recording schedule.
Start/Stop Smart Guard System Click to start or stop the smart guard system.
Enable Secondary Display Click to enable secondary monitor display.
Open Event Report Click to open the event report which will log any events.
Open E-Map
Open I/O Control
Lock System Click to lock the system.
Click to open E-Map which monitors all devices with map
indicators.
Click to open the I/O control window, monitor DI/DO, and
manual triggering of DO devices.
26D-Link D-ViewCam Standard/Professional/Enterprise User Manual
Page 27

Section 3 - Conguration
Notes:
1. To automatically activate the Recording Schedule and Smart Guard when the MainConsole starts, go to General Setting > Setting >
System Setting > General > Startup to setup the auto-startup functions.
2. The secondary monitor will still retain and display all the functions (for example Event Report, E-map, Resource Report or IO controls)
that are opened in the Main console, even if you exit the Main Console.
Monitor
Click Start Monitor and select from the menu to start/stop recording schedule or the guard system features. You can also
open monitor tools such as event report, E-Map, I/O control, and system lock.
Playback
Click on this icon to view the Playback Console. You can watch recorded video, search video, adjust the image of the stored
data, save videos/pictures, print images, check log information, event records, and set up recording function. See the Playback
section for details.
Schedule System
Click to organize the recording time schedule and congure recorder settings. See the Schedule System section for details.
Smart Guard System
Click to add/edit type(s) of events that you want to detect and setup action(s) responding to events. See the Smart Guard
System section for details.
General Setting
Select to modify system settings, user account settings, save/ load conguration settings, open license manager, access log
viewer and backup les, and congure network services. See the Conguration section for details.
Note: User Account and License Manager can only be enabled for users with administrator privileges.
27D-Link D-ViewCam Standard/Professional/Enterprise User Manual
Page 28
Section 3 - Conguration
System Information Window
Displays the Current Date, Current Time, Free Disk Space, Network Camera Bitrate, and User Dened Text.
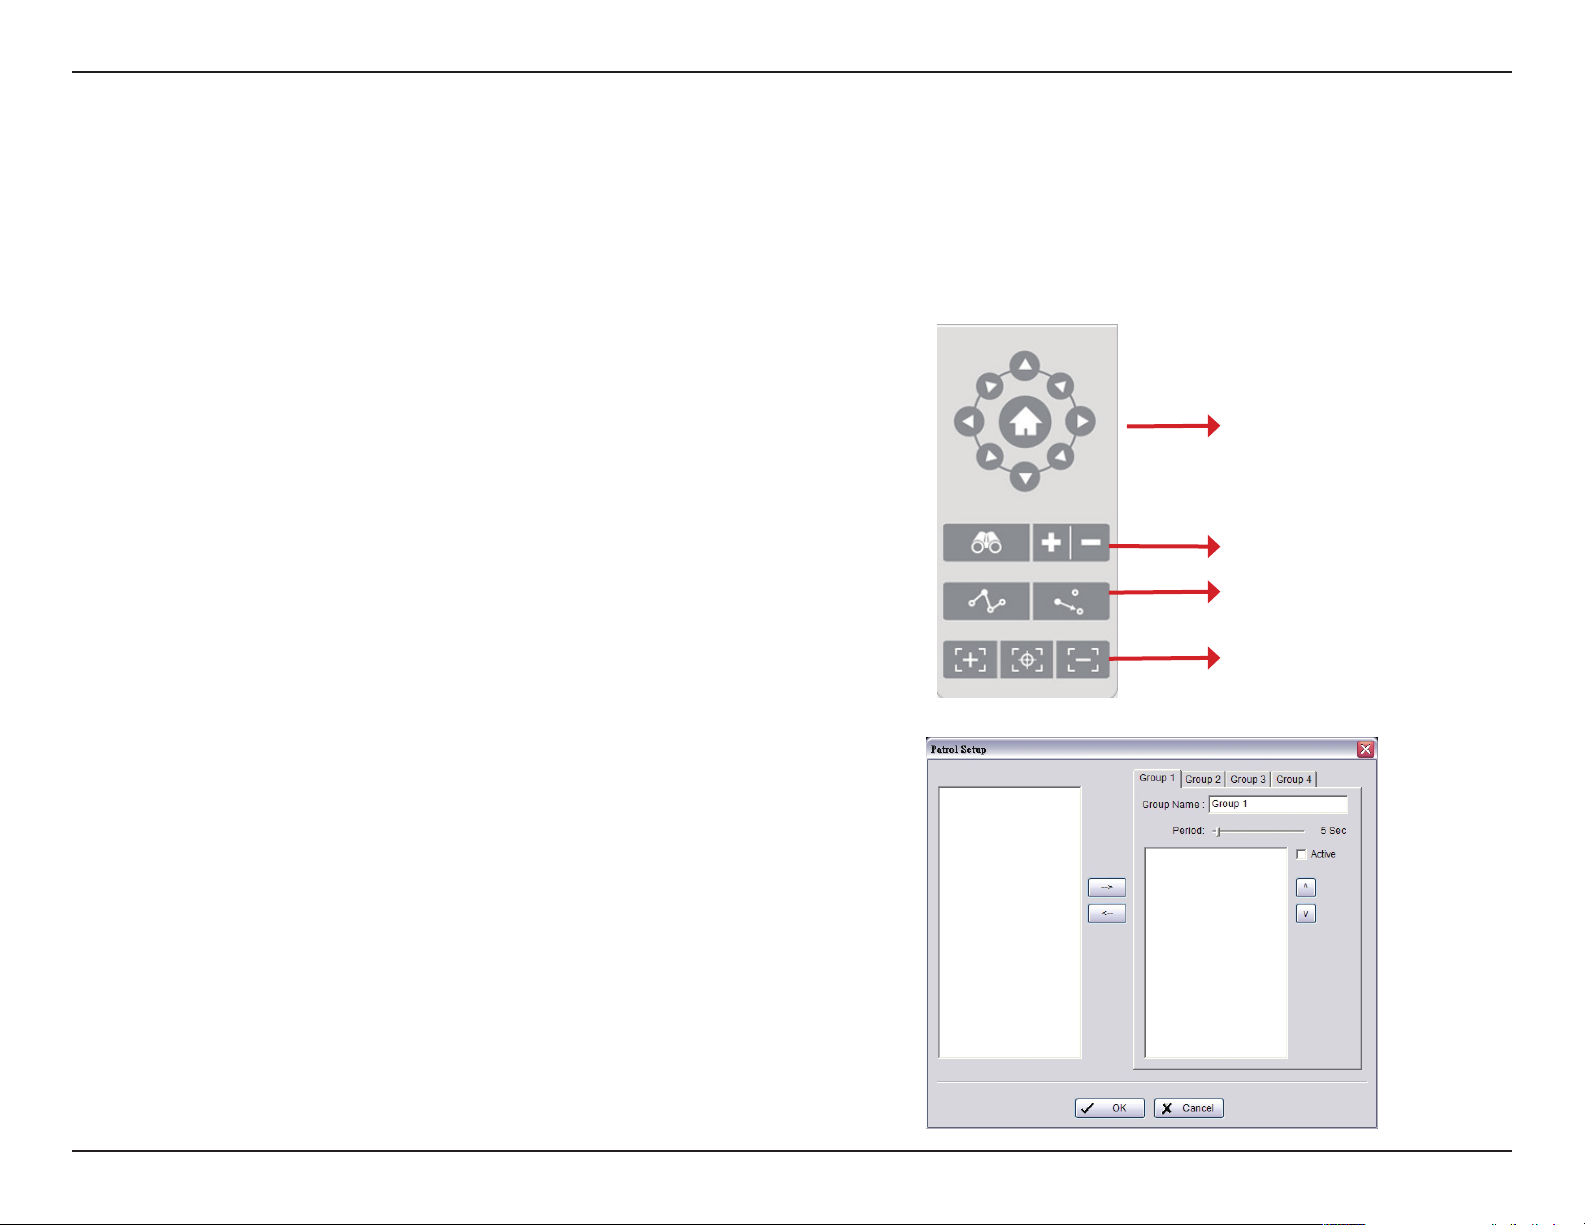
PTZ Features
PTZ Camera Control
Use this function to control the movement of PTZ (pan/tilt/zoom) cameras.
With cameras that support PTZ control, you can move, zoom,
patrol, adjust the focus, and set preset points of the cameras.
Zoom
Click on the + sign to zoom in or click the – sign to zoom out.
Preset/Go
Allows you to adjust the camera view until you are satised. For example,
click Set and set the preset point to 01. Adjust the camera view again and
set the preset point to 02. Repeat the process until all preset points are
set. You can assign a custom name to each preset. Click Go to view the
results of your setting.
Note: To adjust the speed settings of PTZ camera, go to General Setting
> Setting > PTZ Cong.
Patrol
Go to Add Preset Point > Set Patrol to bring up the Patrol Setup dialog.
From the left window, select the camera(s) that you would like to have in
the patrol group. Align the cameras in order in the right window and adjust
the time. Rename the group name if you want. After completing the setup,
check the Active option, and then click OK.
PTZ Controls
Zoom
Preset
Focus
28D-Link D-ViewCam Standard/Professional/Enterprise User Manual
Page 29

Section 3 - Conguration
You can set up up to four groups of auto patrol. To start or stop, click on the Go to Preset Point icon in the Main Console,
and select Start Patrol or Stop Patrol.
Auto Pan
Go to Go to Preset Point and click on Start AutoPan to enable auto pan. Click on Stop AutoPan to stop.
Auto Pan enables the camera to scan an area horizontally from left to right or right to left.
Focus
You can select to focus the camera near, far, or have it auto focus. Click on the + sign to focus near, click on the - sign to
focus far, and click on the center icon to auto focus. To focus near means objects that are closer will be clearer than
the objects that are further away. In contrast, to focus far means objects that are further will be clearer than the objects that
are closer. Click on the Focus icon and select auto focus if you want the system to decide the focus point for you.
29D-Link D-ViewCam Standard/Professional/Enterprise User Manual
Page 30

Section 3 - Conguration
On Screen Menu
Right-click on the camera screen to view the On Screen menu, from which you can quickly adjust the settings of your camera.
Enable Move
With cameras that support PT function, click Enable Move to adjust the current camera’s view by clicking on the display screen. To cancel
this function, right-click on the screen and select Disable Move.
Enable Talk
With cameras that support two-way audio, select Enable Talk.
Connect/ Disconnect
Right-click on the display screen and select Connect/Disconnect to modify the connecting status of the camera.
Show Camera
Select the camera from the Show Camera menu to display video on selected window. A list of cameras will be displayed in the right
column of the monitor display.
Delete Camera
Click Delete Camera to remove a camera from the display window.
30D-Link D-ViewCam Standard/Professional/Enterprise User Manual
Page 31

Section 3 - Conguration
Enable Digital PTZ
To enable the PTZ functions of the camera, select Enable Digital PTZ. Use the mouse wheel or click on the + and – signs to zoom in and
zoom out on the camera. The screen ashing in the video grid indicates the corresponding view of the camera.
Fix Aspect Ratio
Enable Fix Aspect Ratio to view the original ratio video or disable this option to stretch 3:4 to t window.
Snapshot
Select the snapshot function to capture a screen shot of the current video. You can either copy this image to the clipboard or save it. You
may select the OSD option to export the image with date/time and camera number/name information. If the digital PTZ function is enabled,
you can select either Full size or Selected region as your snapshot region.
Manual Record
Select to start recording video.
Toggle Fullscreen
Select to view live video(s) in fullscreen. Press ESC to go back to the original window.
31D-Link D-ViewCam Standard/Professional/Enterprise User Manual
Page 32

Section 3 - Conguration
Duplicate Camera
To duplicate the feed from a camera, right-click on a blank area of the screen and select Duplicate Camera. Select the appropriate camera
to duplicate the feed from. The duplicate view from the camera will then be displayed adjacent to the original view.
32D-Link D-ViewCam Standard/Professional/Enterprise User Manual
Page 33

Section 3 - Conguration
Live Display
Live display allows you to change channels and screen divisions on the Main Console and secondary monitor. Each screen division
will have the same display list, but different sequence. The maximum number of screen divisions supported by the Main Console and
secondary monitor is 64. For example, when using Show/Delete Camera to edit the camera list, the administrator can apply this function
to all different screen divisions. Refer to the On Screen Menu section for more information on Show/Delete Camera.
Note: The camera list of all divisions is the same as the right column of monitor display on General Setting > Setting window. This means,
two monitors could have two different lists.
Action Current Division Other Division
Show camera
(add cam 1)
Duplicate camera
(duplicate cam 2)
Delete camera
(delete cam 2”)
When using mouse to drag camera channel, the sequence change would only apply to original division.
Original Action Current Division Other Division
Drag cam 1 to cam 4
Add to rst free
channel
Add to rst free
channel
Remove cam 2 and
keep channel free
No change in sequence
Right click on the camera screen and get the On Screen Menu, from which you can quickly adjust the setting of camera.
33D-Link D-ViewCam Standard/Professional/Enterprise User Manual
Page 34

Section 3 - Conguration
Click to congure your settings.
Conguration
34D-Link D-ViewCam Standard/Professional/Enterprise User Manual
Page 35

Section 3 - Conguration
General
Go to General Setting > Setting > System Setting >
General.
Startup
Main Console: Select to view the Main Console system at
startup.
Select the functions and network services that should activate
automatically.
Full Screen: Select to launch video in fullscreen.
Auto Login Setup
Auto Login: Select Auto Login and then click Setup to view
the Auto Login Setup window.
Enter the User Account and Password to login automatically
when the system starts. Enable Minimize after login to minimize
the Main Console window after login.
35D-Link D-ViewCam Standard/Professional/Enterprise User Manual
Page 36

Section 3 - Conguration
Storage
Location: Assign a default folder for the system to store data. It is recommend not to save to the system
drive (C:\) to avoid an efciency drop when free storage is low.
New
Delete Highlight a location and then click Delete to remove the le.
Move Item Up
Move Item Down
Enable Disk Load Balancing: If you have more than one drive available for recording, you may check this
to evenly distribute the recording onto multiple drives. This will increase the system efciency.
Automatic Recycle: The system will automatically delete out-dated data to save storage space.
• Recycle when disk space is less than: Select and enter the available space (in MB). When the available
space in the default folder is less than the entered value, the system will begin storing data in another
folder specied in the location list. If all the folders exceed their storage capacity, the system will start
recycling in one hour.
Click to add a new location. Click the ... to browse to a folder. Click
OK to save the location.
Highlight a location and click Move Item Up to move the location
higher in the list.
Highlight a location and click Move Item Down to move the location
lower in the list.
• Only keep video for: Deletes video records that are older than the number of days set. If the default
storage space is exhausted (disc space is less than 1200 MB), the system will start recycling in an hour’s
progress.
• Advanced Recycling Setting: Click Log Recycling to keep specic or all event logs for specied
time interval.
1. Event Log: Delete the event log data that is older than the number of days set.
2. System Log: Delete the system log data that is older than the number of days set.
3. Resource Report: Delete the Resource report data that is older than the number of days set.
36D-Link D-ViewCam Standard/Professional/Enterprise User Manual
Page 37

Section 3 - Conguration
Status Display
Select the information that you wish to display on the Main Console such as Current Date, Current Time, Free Disk Space, Network
Camera Bitrate, and User Dened Text.
Start Remote
Start CMS
service
Playback
service
Start Live
Streaming
service
Start Remote Desktop
service
Miscellaneous
Automatically Popup Event Report: The Event Report will automatically popup when events have been detected. Make sure to stop
the Smart Guard system before you modify this setting, otherwise the modication will not take place.
Minimize to system tray: Enable this option to display an icon in the task bar.
Note: Enter the username and password of the Main Console when you click the minimized icon in the task bar to start monitoring.
Synchronize video frames: Select to prevent tearing that may occur in the video display. However, this will increase the CPU processing
load.
37D-Link D-ViewCam Standard/Professional/Enterprise User Manual
Page 38

Section 3 - Conguration
DDNS Service: Dynamic Domain Name Server (DDNS) allows you to use Live View or Web View
to connect to the Main Console using the Internet even if you have a dynamic IP address.
Click DDNS Service to open the Dynamic DNS Setup window.
Update the following elds - Provider, User name, Password and Host name, and Update period.
Audio Preview
Default Channel: Select the audio channel that you wish to hear from.
Enable Audio on Active Channel: Select the Enable Audio on Active Channel to hear the audio from the selected video channel on
each video grid of the Main Console. The default channel plays if the video channel isn’t selected.
Volume: Use the volume bar to adjust volume.
System plays audio of the default channel System plays audio of the selected channel
38D-Link D-ViewCam Standard/Professional/Enterprise User Manual
Page 39

Section 3 - Conguration
Auto Reboot
Select Enable Auto Reboot and set the day and time to reboot the system.
Note: Please enable Main Console, Auto Login, and other functions in the Startup section to ensure that the system runs normal after auto reboot.
39D-Link D-ViewCam Standard/Professional/Enterprise User Manual
Page 40

Section 3 - Conguration
Camera
Go to General Setting > Setting > System Setting > Camera.
Add Camera
The Search, Insert, Delete and Cong functions are included in the Setting window.
Search: Click Search to open the Search Network Camera window. The system will start scanning automatically once the window is
opened. You may manually stop scanning by clicking Stop Scan.
Enter the user name and password for each Network Camera found and click OK to add it to the camera list.
Drag the mouse to multi-select the cameras and then insert the username and password. The username and password will be applied to all the
selected cameras automatically.
40D-Link D-ViewCam Standard/Professional/Enterprise User Manual
Page 41

Section 3 - Conguration
Insert: Click to open Network Camera / Video Server Setting and add network cameras to the list.
Delete: Click to remove the selected network camera(s) from the system. Click OK to nalize the modication.
Cong: Click to open Network Camera / Video Server Setting. Here, you can modify the network camera settings.
Network Camera / Video Server Setting
Network: Update the elds, including Name, IP Address, Http Port, User Name, Password and Protocol referring to the instructions
provided by the camera manufacturer. Select Use DNS to use domain name instead of IP address.
Device: Choose the network camera manufacturer from the drop-down menu. Click Auto Detect and the model name will be displayed
in the list.
Description: Displays information about the device.
41D-Link D-ViewCam Standard/Professional/Enterprise User Manual
Page 42

Section 3 - Conguration
Camera Parameters
Camera List: Displays all the cameras that are connected to the system. Click the name of the camera to edit the settings.
Camera Name: Name the camera for your convenience.
Go to Web Interface: Go to the web-based interface of your camera to congure the settings (optional).
Camera Settings: Edit the camera’s parameters given by the camera vendor. Refer to the next page for more detailed information.
Video Parameter: Adjust the video’s brightness, contrast, saturation, and color hue values.
42D-Link D-ViewCam Standard/Professional/Enterprise User Manual
Page 43

Section 3 - Conguration
Camera Settings
Video Format: Select the video format for the footage.
Frame Rate: Select the frame per second.
Resolution: Select the resolution.
Bitrate Mode: Select the bitrate mode.
Bitrate: Select the bitrate amount.
43D-Link D-ViewCam Standard/Professional/Enterprise User Manual
Page 44

Section 3 - Conguration
Image Adjustment: Enable image to be ipped or mirrorred.
Audio: Enable microphone or speaker if your camera has these features.
Fish eye Setting (for sh eye cameras only)
Mount Type: Select whether the camera is being mounted on a wall, ceiling, or on a desktop.
Display Mode: Select the display mode from 1O (sheye mode shows the full camera view), 1R (normal mode shows a view similar to a
standard camera), 2P (panoramic mode shows a full 180-degree mode across 2 panels), 1O 3R (multi-view with Fisheye mode shows a
multiple window view with sheye in the top-left panel), and 4R (multi-view).
44D-Link D-ViewCam Standard/Professional/Enterprise User Manual
Page 45

Section 3 - Conguration
OSD (On-Screen Display) Settings
Select the information that you wish to see on the on-screen display. Click Font to select the font style.
45D-Link D-ViewCam Standard/Professional/Enterprise User Manual
Page 46

Section 3 - Conguration
I/O Device
Go to General Setting > Setting > System Setting > I/O Device.
I/O Device Setting:
• Module: Name of the module and ID of the digital input/output device(s) that is connected to your system.
• Device: This column displays the device(s) already installed to the system.
• ID: Select the I/O port.
Input Monitor: The device(s) is turned on if the dot is in red. By triggering the digital input device, the related icon will light up. This is
used to check if the device is correctly connected or not.
Output Monitor: The device(s) is turned on if the dot is in red. By clicking on the icon, you may trigger the digital device connecting to the
system. This can be used to test if the output device is correctly connected.
Device Setting
Name: Insert the name of the device (input and output).
Type: Select the device type from the drop-down menu.
1. N/O: Normal Open
2. N/C: Normal Close
46D-Link D-ViewCam Standard/Professional/Enterprise User Manual
Page 47

Section 3 - Conguration
PTZ Cong
Go to General Setting > Setting > System Setting > PTZ Cong.
Select a PTZ camera from the list to activate the PTZ control function.
Basic Setting
Select the camera model, com port, baud rate, and address of your PTZ camera.
Note: If your camera model is a network camera, the PTZ function will work without the com port, baud rate, and address settings.
Advanced Setting
Adjust the pan speed, tilt speed, and zoom speed settings by dragging the bars.
47D-Link D-ViewCam Standard/Professional/Enterprise User Manual
Page 48

Section 3 - Conguration
Miscellaneous
Patrol Group: Click to setup a patrol group.
From the left window, select the camera(s) that you would like to have in
the patrol group. In the right window, align the cameras in order and adjust
the time. Rename the group name if you want. After completing the setup,
select Active to trigger functions such as Auto-tracking and Login of the
camera, and then click OK.
You can set up to four groups of auto patrol. To start or stop, click Patrol
in the Main Console, and select Start Patrol or Stop Patrol.
User-Dene Preset
Step 1: Enter a Preset Name.
Step 2: Enter the Preset Number.
Step 3: Click OK to save your preset.
Click Add to add a new preset. Select the preset you want
to remove and click Delete, or highlight a preset and change
the preset name and/or preset number and then click Update
to save.
48D-Link D-ViewCam Standard/Professional/Enterprise User Manual
Page 49

Section 3 - Conguration
Hotline
Go to General Setting > Setting > System Setting > Hotline.
Use this window to congure the Hotline settings when an unusual event is detected.
E-Mail: Enter the following information - SMTP server, port, sender’s e-mail address, subject title, body content and SSL for encrypted
transmission. Click Send Test Mail to test the settings.
GSM modem: Set the Port and Baud Rate of the GSM modem device, and then enter PIN code. You can also enter the time for sending
a SMS message. Click Test to send a test SMS message.
Note: The Interval is set to restrict the time period while sending two SMS messages. For example, if you set as 60 min, the SMS sent
between 60 min will be deleted and not sent to the user.
49D-Link D-ViewCam Standard/Professional/Enterprise User Manual
Page 50

Section 3 - Conguration
Address Book
Go to General Setting > Setting > System Setting > Address Book.
Use this window to update name, phone number and e-mail address information. When an unusual event is recorded, an e-mail notication
will be sent out by the system.
50D-Link D-ViewCam Standard/Professional/Enterprise User Manual
Page 51

Section 3 - Conguration
Monitor Display
Go to General Setting > Setting > System Setting > Monitor Display.
Playback Option: Execute Playback feature on the secondary monitor by selecting the Secondary tab. Make sure to adjust your computer
display settings (supports 800x600, 1024x768, 1200x900, 1280x1024 and 1600x1200 monitor resolutions) in advance to avoid system error.
Cameras List: The left column displays a list of all available cameras. Highlight the camera and click --> to move the camera to the right
column. The right column will display the primary and secondary cameras. These cameras will be available for the auto-scan function.
Auto Scan: Activate auto scan to rotate the channels/cameras on the display screen.
For example, you may select to show only 4 sub-screens on the Main Console while having 16 channels connected to the system. With
auto scan function, you will be able to see all the 16 channels. You can set up a primary channel that will always be on the screen and a
secondary channel that has secondary priority.
51D-Link D-ViewCam Standard/Professional/Enterprise User Manual
Page 52

Section 3 - Conguration
User Account Setting
Go to General Setting > Setting > User Account.
Only an administrator can manage user accounts. From the Privilege list, highlight each account to modify.
Note: The system by default, will display the account group’s default privilege profiles. Enter a Name and Password to create a new account, or
click an existed account to modify his/ her privilege.
There are 3 default proles for account groups:
Admin: The Administrator has privileges to all system functions and devices, except add/delete/update privileges of other users.
Power User: A user has limited privileges to system functions and complete privileges for assigned devices.
User: Privileges for all the system functions are forbidden, user can only manage devices.
Add: Click to create a new account after updating the information.
Delete: Click to delete the account.
Default: Click to go back to default privilege settings of a related user group.
Update: Click to save the modications of each account.
52D-Link D-ViewCam Standard/Professional/Enterprise User Manual
Page 53

Section 3 - Conguration
User Account
To create and modify user accounts.
User Name: Enter a name.
Group: Assign a group for each user.
Description: Enter a description.
Password: Enter the password assigned to the user.
Password Confirm: Enter the password again for
conrmation.
Disable User Account: Select to block this account.
Note: Only the default admin account cannot be disabled.
Keep remote login for___minutes: Enter the duration to
auto logoff after logging in from Remote Live Viewer or
Remote Playback.
Privilege
Select to set privileges for each user account.
Function: Set the system conguration, and privileges for
remote access.
Device: Set device privileges for camera, digital output and
client applications.
53D-Link D-ViewCam Standard/Professional/Enterprise User Manual
Page 54

Section 3 - Conguration
Auto Backup Setting
Go to General Setting > Setting > Auto Backup Setting
To congure your system to automatically back up video data.
There are 3 main options in Auto Backup cong:
Enable Schedule Back Up: Check to enable the backup process.
Select Camera(s) to Back Up: Select the camera to back up.
Option: Select options for backup.
• Location: Dene backup route.
• Backup Playback System: Check to backup the playback application with each process.
• Send Mail when Backup Fails: Check to receive an email notication when backup fails. Click Setup for email
conguration. Select one or more contacts from the address book and congure customized message content.
• Recurrence: Choose start time and Recurrence: Daily or Weekly modes.
54D-Link D-ViewCam Standard/Professional/Enterprise User Manual
Page 55

Section 3 - Conguration
There are 4 main elds in Auto Backup Statistic:
Current Backup Status: Displays whether the
backup is underway, idle, or awaiting retry.
Next Backup Start Time: Displays the
scheduled time for next backup process.
Next Retried Process Time: Displays the
scheduled time for next backup retry process.
Last Backup: Displays information
about the most recent backup.
• Last Backup Start: Displays the time
and date the last backup started.
• Last Playback Stop: Displays the time and
date the last backup was completed.
• Backup Video Period: Displays the total
time that the last backup took to complete.
• Backup Size: Displays total le size of last backup.
• Backup Result: Displays the
result of the last backup.
55D-Link D-ViewCam Standard/Professional/Enterprise User Manual
Page 56

Section 3 - Conguration
License Manager
Go to General Setting > License Management in the Main Console to activate the license. The serial number can be found on a sticker,
located inside the CD case.
Note: Please refer to the License Management Tool section for details.
56D-Link D-ViewCam Standard/Professional/Enterprise User Manual
Page 57

Section 3 - Conguration
Save/Load Conguration
The Save/Load Conguration function allows system users to save any specic setting as a .cfg (cong) le. You may save several
different .cfg les at any time.
Save Conguration: To save a specic setting, go to General Setting > Save/Load Conguration > Save. In the popup window,
type in the le name and then save it as a .cfg le.
Load Conguration: To load a specic setting, go to General Setting > Save/Load Conguration > Load. In the popup window,
go to the directory that you saved the .cfg le at, select any one of them and then click OK to load the le.
Note: The Main Console will be automatically shutdown after loading a new configuration. Please re-start the Main Console manually.
57D-Link D-ViewCam Standard/Professional/Enterprise User Manual
Page 58

Section 3 - Conguration
Network Service
There are 4 types of network services: Live Streaming Server, Remote Playback Server, Remote Desktop, and Central Management.
From the Main Console, go to General Setting > Network Service to open the Network Service window.
Live Streaming Server
With Live Streaming, the system allows remote users to log in to a specic computer and view cameras that are connected to it. As a
System Administrator, you can monitor these accounts in order to maintain the efciency of the system.
Main
From the Live Streaming Server window, administrators can view all the clients who have logged in. It also enables
Administrators to view live video from a remote location.
58D-Link D-ViewCam Standard/Professional/Enterprise User Manual
Page 59

Section 3 - Conguration
Client List
Client Count: Shows the number of channels that are connected.
Kill: Highlight an IP address and click Kill to block the client from your
client list.
Kill All: Click to block all the clients that are currently logged in to your
system.
Service
Server Status: Click Start/Stop to turn on/off the server.
Options
To modify this section, click Stop to stop the server.
Port: Assign a port for the client to connect to your system via Remote
Live Viewer. Default port is 5150.
Maximum Connections: Number of connections that are allowed to
connect to the system. The maximum is 128, one camera video counts
as one connection.
Use Default Web Server: Activate the Web server by selecting this box.
Clients will be able to watch live video via Internet Explorer. The default
port for live streaming server is 80.
Save Log: Select to save the current log information to your computer.
Enable Audio: Select this option to enable audio transmission along
with video stream.
59D-Link D-ViewCam Standard/Professional/Enterprise User Manual
Page 60

Section 3 - Conguration
Live Streaming - Black / White List
Enable White List: Select to activate the white list lter. Only IP address from this list is allowed to log in.
Enable Black List: Select to activate the black list lter. The IP address from this list will be blocked.
IP Address: Enter an IP address or two sets of IP address to indicate a series of IP addresses.
Add/Delete: To add the IP address into the list or to remove from the list.
Apply to All Network Servers: Click to apply these settings to both Live Streaming Server and Remote Playback Server.
60D-Link D-ViewCam Standard/Professional/Enterprise User Manual
Page 61

Section 3 - Conguration
Live Streaming - Performance
This window displays the Total bitrate and individual Camera bitrate information.
61D-Link D-ViewCam Standard/Professional/Enterprise User Manual
Page 62

Section 3 - Conguration
Remote Playback Server
With the Remote Playback function, the system allows remote users to log in to a specic computer and withdraw data les that are stored.
As a system administrator, you can monitor the accounts logged in to maintain the system efciency.
Main
This window displays all the clients who are currently logged in and watching a playback video from a remote location.
Client List
User Count: Displays the number of users that are connecting to the system.
Kill: Highlight an IP address and click Kill to block the client from your client list.
Kill All: Click to block all the clients that are currently logged in to your system.
Service
Server Status: Click Start/Stop to turn on/off this service.
62D-Link D-ViewCam Standard/Professional/Enterprise User Manual
Page 63

Section 3 - Conguration
Options
Port: Assign a port for clients to connect to your system via Remote Playback. The default port is 5160.
Maximum Users: Number of connections that are allowed to connect to the system. The maximum is 64.
Note: A single user logged in to the server is considered as one account.
Use Default Web Server: Activate the Web server by selecting this box. Clients will be able to watch live video via Internet
Explorer. The default port is 80.
Save Log: Save the current log information.
Note: Ensure that the server is stopped before making any changes.
63D-Link D-ViewCam Standard/Professional/Enterprise User Manual
Page 64

Section 3 - Conguration
Remote Playback - Black / White List
Enable White List: Select to activate the white list lter. Only IP address from this list is allowed to log in.
Enable Black List: Select to activate the black list lter. The IP address from this list will be blocked.
IP Address: Enter an IP address or two sets of IP address to indicate a series of IP addresses.
Add/Delete: Add the IP address into the list or remove from the list.
Apply to All Network Servers: Click to apply these settings to both Live Streaming Server and Remote Playback.
64D-Link D-ViewCam Standard/Professional/Enterprise User Manual
Page 65

Section 3 - Conguration
Remote Playback - Performance
This window displays the Total bitrate and individual Camera bitrate information.
65D-Link D-ViewCam Standard/Professional/Enterprise User Manual
Page 66

Section 3 - Conguration
Remote Desktop
This window allows remote users to use Remote Desktop Viewer to login and congure the system. Refer to the Remote Desktop Viewer
section to install and use this tool.
Options
Port: Assign a port for Remote Desktop Viewer, so that users can login and congure system.
Disconnect idle client after (300~3600 sec): Auto disconnects an online user who is idle for more than the specied time period.
Authentication: Enable this option to allow only an administrator to login into the system.
Server Status: Click Start/Stop to turn on/off this service.
66D-Link D-ViewCam Standard/Professional/Enterprise User Manual
Page 67

Section 3 - Conguration
Central Management System
This service only supports Central Management System (CMS). With this service, the Main Console will send event information to CMS
and allows the CMS system to control the I/O device from a remote location. To enable this action, go to Congure Smart Guard System
> Action and select Send to Central Server.
Client List
Client Count: Displays the number of CMS Servers that are connected to the system.
Kill: Highlight an IP address and click Kill Client to block the client from your client list.
Kill All: Click to block all the clients logged in to your system.
Server Status: Click Start/Stop to turn on/off this option.
Options
Note: Ensure to stop the server before modifying the settings.
Port: Assign a port for the CMS System to connect to the Main Console system. Default port is 5170.
Maximum Connections: Number of connections from CMS Servers that are allowed to connect to the system. The maximum
is 16.
67D-Link D-ViewCam Standard/Professional/Enterprise User Manual
Page 68

Section 3 - Conguration
About Main Console
Go to General Setting > About Main Console to view the version of your D-ViewCam Standard/Professional/Enterprise software and
model name information.
68D-Link D-ViewCam Standard/Professional/Enterprise User Manual
Page 69

Section 3 - Conguration
Schedule System
Click the Congure Schedule System icon on the Main Console to set up the time duration for video recording.
69D-Link D-ViewCam Standard/Professional/Enterprise User Manual
Page 70

Section 3 - Conguration
Day Mode
Schedule the camera(s) to record video every day at the same time.
There are three ways to setup the time schedule for each camera:
1. Load a preset mode
2. Insert a new schedule manually
3. Copy to other cameras after the manual setup
1
3
2
70D-Link D-ViewCam Standard/Professional/Enterprise User Manual
Page 71

Section 3 - Conguration
Load Preset Modes
The system provides six modes to quickly setup the recording schedule. Click to select the preset mode. Refer to the following
table for denitions of each mode in each series.
Mode Format Time Record FPS Quality Resolution
Regular
Ofce
Shop
Highly Secure
Disk Saving
Minor
M-JPEG
0:00 - 24:00 Always
MPEG-4 Max
M-JPEG
8:00 - 20:00 Always
MPEG-4 Max
M-JPEG
10:00 - 22:00 Always
MPEG-4 Max
M-JPEG
0:00 - 24:00 Always
MPEG-4 Max
M-JPEG
0:00 - 24:00 Motion
MPEG-4 i-frame
M-JPEG
0:00 - 24:00 Motion
MPEG-4 i-frame
Max
Max Max
Max
Max Max
Max
Max Max
Max
Max Max
10
Max Max
5
Max Max
71D-Link D-ViewCam Standard/Professional/Enterprise User Manual
Page 72

Section 3 - Conguration
Insert a New Schedule Manually
Step 1
Left-click and draw the bar you want to add to the time table. The scheduled time will be seen as a grey bar.
3
2
1
4
Step 2
Click Insert and add a new schedule in regular mode, i.e. to record video during the time period you set with 30 FPS, normal video quality,
and normal resolution.
Step 3
Click on the Congure icon or double-click the schedule information to change the settings.
Step 4
Click OK.
72D-Link D-ViewCam Standard/Professional/Enterprise User Manual
Page 73

Section 3 - Conguration
Copy Schedule
You may set up the schedule for each channel/camera by repeating the process above, or simply apply the settings of a single camera
to all the others by clicking the Copy To icon on the top of the display window.
Week Mode
Schedule the camera(s) for each day of the week. In addition, you may assign holidays under the Week Mode.
Default
Follow the same process to setup the schedule for every day in a week.
Holiday
You may assign holidays where the system will work according to the pre-dened Sunday schedule.
Custom
You can assign a particular date(s) for the system to work according to a special schedule(s).
73D-Link D-ViewCam Standard/Professional/Enterprise User Manual
Page 74

Section 3 - Conguration
Adjust the Schedule Settings
You can manually change the settings at any time after you insert or load a schedule.
Option 1: Select the Time Bar and slide the bar to the left or right to change the start and end points.
Option 2: Click Congure or double-click on the schedule information (highlighted in blue) to open the Encoding Options
window and modify the settings.
74D-Link D-ViewCam Standard/Professional/Enterprise User Manual
Page 75

Section 3 - Conguration
Encoding Options
Pre-record/Post-record Time
The pre-record/post-record function lets you save the recording data accordingly. For example, a 5 second pre-record means the system
will start saving the recording 5 seconds prior to the event.
Note: The maximum recording period is 60 seconds.
75D-Link D-ViewCam Standard/Professional/Enterprise User Manual
Page 76

Section 3 - Conguration
Record Mode
Always Record
Select this option to record video continuously.
Record on Motion
Select this option to start recording when motions are detected. Please adjust the Sensitivity, Frame Interval and set up a
detection zone to detect Motion. Frame interval is the interval in the number of frames between each check by D-ViewCam.
To create a detection zone, left-click and drag the mouse to draw a rectangle on the display screen. To setup multiple
detection zones, simply repeat the same process or click All to select the entire detection zone.
Note: The number of detection zones cannot exceed 10.
Encoded Options
Use this option to congure the quality of video. The original video is the original stream from the camera and the encoded video is a
preview of the recording video that correspond to the encode settings.
Keep original video format
Select this option to lower the frame rate but not re-encode the video stream to save Hard Drive usage.
• Adjust MJPEG video frame rate: Use the slider to reduce or increase the frame rate.
Note: The maximum FPS (move the slider to the right) will correspond to the original video stream setup on camera
conguration.
• Keep key-frame only: The System will record only the key frames of the streaming video.
Note: The key frame interval is controlled by each camera manufacturer and cannot be adjusted.
76D-Link D-ViewCam Standard/Professional/Enterprise User Manual
Page 77

Section 3 - Conguration
Playback
The Playback console allows you to watch recorded video, view and/or search for unusual events, and view recorded system information.
10
11
13
14
15
16
17
12
1
2
4
6
3
5
8
9
7
1 Exit Playback 5 Speed 9 Information Window 13 Screen Division 17
2 Minimize Window 6 Play/Rewind/Fast Forward 10 Open Record 14 Enhancement
3 Cue (Start/Stop Point) 7 Zoom 11 Search Mode 15 Setting & Save Video
4 Control (Play/Stop/Pause) 8 Scroll Bar 12 Volume Control 16 Snapshot & Print
B a ck u p & L og
Viewer
77D-Link D-ViewCam Standard/Professional/Enterprise User Manual
Page 78

Section 3 - Conguration
1. Exit: Click to close the Playback window.
2. Minimize: Use this to minimize the Playback console.
3. Cue: When playing video, click on the Cue In/Cue Out icon to set the starting/ending point of a saved video clip. The Cue In and Cue
Out time will be displayed on the Playback Information Window.
4. Control: Use this to play, pause, and stop the video.
5. Speed: Control the speed of the playing video. Click + to speed up and – to slow down.
6. Play/Rewind/Fast Forward: Use this to control the video.
7. Zoom: Use this to zoom in and out of the recorded video.
8. Scroll Bar: Indicates the status of the playing video; drag it to where you want to review.
9. Information Window: Displays video date and time, current video status, cue in/out points’ time, and speed.
10. Open Record: Click to access Date Time.
11. Search Mode: Click to open Intelligent Search Tool.
12. Audio Volume Control: Use this to adjust the sound level.
13. Screen Division: Allocate the sub-screen display by clicking on the desired layout. To switch to a single camera display, double click
on a particular sub-screen. Double click on the screen again to restore the previous screen division layout. To view in fullscreen mode,
right click on the screen to enable Toggle Fullscreen.
14. Enhancement : Click to open the Enhancement window
15. Setting & Save Video: Click to open the Setting window and to open the Save Video window.
16. Snapshot & Print: Click to take a picture and to open the Print window.
17. Backup & Log Viewer: Click to open the Backup window and to open the Log Viewer window.
78D-Link D-ViewCam Standard/Professional/Enterprise User Manual
Page 79

Section 3 - Conguration
Date Time
Go to Playback console and click Open Record to access the Date Time Search Dialog. Here, you can review video records.
Record Display
The record display window displays information about the video clips. These clips can be sorted by
date (calendar view) or title (list view).
Remote Server Site: Select to open Remote Playback Site Management. This site allows
you to access local PC or set up the remote playback server. Use Select Folder to directly
access the recorded data folder or Recent List to access previously browsed recorded folders.
Note: To use Select Folder option you need the Main Console password.
Refresh: To refresh the Record Display window.
Log Viewer: To access the Log Viewer Tool.
Previous Days: To show recorded videos from the previous recording date.
Next Days: To show recorded videos of the next recording date.
79D-Link D-ViewCam Standard/Professional/Enterprise User Manual
Page 80

Section 3 - Conguration
Date Time Period
Select the starting and ending time points to review a video.
Video Preview
Select Enable Preview to preview the selected video.
Event Type
You can change the color of the event by clicking on the color bar and then click the down arrow.
Time Table
• Click to select all channels or to deselect all channels. Finally, utilize the scale bar to modify the time
table.
• Select Show Records to display the time period of recorded data.
80D-Link D-ViewCam Standard/Professional/Enterprise User Manual
Page 81

Section 3 - Conguration
• Select Show Event Log to display the time of event detected.
To Playback Video
Step 1: From the Record Display window, select the date of the recorded video you want to view. The red, green and blue
lines in the time table indicate the available video records.
Note: The Record Display window can be displayed in (a) calendar view or (b) list control view. To modify these
settings, click Settings on the Playback Console.
Step 2: Use color bars to differentiate event types.
Step 3: Highlight the video clip you want to review by left clicking and dragging the time period. You may also utilize the
Start Time and End Time in the Date Time Period section.
Step 4: Select Enable Preview in the Video Preview section to view your video.
Step 5: Click on the camera name to add or remove cameras that you want to playback.
Step 6: Click OK when nished.
81D-Link D-ViewCam Standard/Professional/Enterprise User Manual
Page 82

Section 3 - Conguration
Search Mode
Go to Playback console and click Search Mode to open the Intelligent Search Tool window.
Intelligent Search Tool
Use this tool to detect unusual events that occur during the recording period.
Alarm Event Type
General Motion: Detects all movements in the dened area.
Sensitivity: This slider controls the sensitivity required to trigger the alarm. Slide
the control to the right to increase sensitivity (relatively small movements
will trigger the alarm) or to the left to reduce sensitivity.
Interval: Move the slider control to the right to increase the time interval, so
the alarm will be triggered only when the movement lasts longer; moving
to the left will reduce the time interval.
Dene Detection Zone: Left click and drag, to draw a detection zone on the
video screen. You may dene more than one zone on the screen by repeating
the process.
Stop When Found: Select this option to stop the video when detecting motion
in the detection zone. Unselect this option to keep the video rolling, and to
display all the detected events on the search list. Click on the listed event to
jump to the specic part in the video where motion is detected.
82D-Link D-ViewCam Standard/Professional/Enterprise User Manual
Page 83

Section 3 - Conguration
Enhancement
Go to Playback console and click to open this tool.
General Setting
Select to either apply the lter settings to only active channels or to all channels.
Filter Setting
Visibility: Select to adjust the gamma value of the image to enhance the
image and make it cleaner.
Sharpen: Select and move the slider control to the right to sharpen the image
or to the left to soften the image.
Brightness: Select and move the slider control to the right to make the image
brighter.
Contrast: Select to move the slider control to the right to increase contrast.
Grey Scale: Select to display the video record in grey scale mode. The image
will be displayed in black and white.
Default: Click to restore the default settings.
OK: Click to save to apply your settings.
83D-Link D-ViewCam Standard/Professional/Enterprise User Manual
Page 84

Section 3 - Conguration
Save Video
Go to Playback console and click to open this window.
Step 1: Click on the display screen of the Playback console to choose the camera display that you want to save as a video clip.
Step 2: Click the cue buttons to select the start and end points. The cue in and cue out time will be displayed in the information window.
Cue in Cue out
Step 3: Click the Save Video icon, select the location where you want to save the le to and
enter the le name.
Step 4: Select Export Format from the drop-down list - ASF or AVI.
Step 5: Select a prole from the Use Prole drop-down menu.
Step 6: Select to export (i.e. save) the recorded video with audio, OSD (On-Screen Display),
or export video only.
Step 7: Click OK to save video.
Save Video
84D-Link D-ViewCam Standard/Professional/Enterprise User Manual
Page 85

Section 3 - Conguration
Snapshot
Go to Playback console and click .
Step 1: Click on the camera display window to take a snapshot.
Step 2: Click Save Image when the image you want is displayed on the screen. You may click Pause to freeze the video and use Step
Forward/Step Backward to nd the picture(s) that you want to save.
Step 3: Select OSD to export the image with the date/time and camera number/name displayed. If the digital PTZ function is enabled in
the display view, you can also select Full size or Selected Region as your image region.
Step 4: You have the option to copy the image to the clipboard or save it to your computer. Click Save Image and select the folder you
want to save it to. Select the image format (BMP or JPEG) and click Save.
Note: You may skip step 3 by pre-setting a folder and format to save images.
85D-Link D-ViewCam Standard/Professional/Enterprise User Manual
Page 86

Section 3 - Conguration
Go to Playback console and click to open this window.
Page Setting: Select Original Size or Fit to Page options to print the image.
Select the alignment from the Align Image drop-down list (Top, Center, or
Bottom).
Print Content: Print the image from the selected channel or all the channels
shown on the screen.
Print: Click to print the image.
Backup
Go to Playback console and click to open this window.
Here, you can start a full function Playback Console and load the backup les on any Windows PC. You can monitor real time video and
work on the backup les on separate computers simultaneously.
Step 1: Click Open Record in the Playback console and click Backup.
Step 2: In the Date Time Period section, select the Start Time and End Time for backup.
Step 3: In the Select Camera(s) section, select the camera(s) you want to backup.
Step 4: Click Calculate Size to calculate the size of the backup data.
Step 5: Under Media, select where you would like to save the backup data.
Step 6: Under Option, select the type of data you want to backup.
Step 7: Click Backup to start backup.
2
3
4
5
6
86D-Link D-ViewCam Standard/Professional/Enterprise User Manual
Page 87

Section 3 - Conguration
Log Viewer
Go to Playback console and click to open this window.
Unusual Event
The Smart Guard System displays the history of all the unusual events’.
Step 1: Select the type of events you wish to view or select All from
the drop-down menu to view all types of events. The types
of unusual events include General Motion, Signal Lost,
and Digital Input Triggered.
Step 2: Select the camera channel you wish to view or select All to
view all the available channels.
Step 3: View the events that happened on a particular date or during
a given time period by selecting Search.
Date: Select Date and indicate the date.
DateTime: Select the date and time.
Step 4: Click Search.
Note: The Log Viewer in Date & Time mode will search for all the
unusual events that are recorded. The system, by default searches
the record from the beginning to the end. A link will appear next to
each event. By clicking this link, the video will jump to the point where
an unusual event takes place.
87D-Link D-ViewCam Standard/Professional/Enterprise User Manual
Page 88

Section 3 - Conguration
System Log
There are 29 Log Types in the drop-down menu:
1. Main Console Startup
2. Main Console Shutdown
3. User Login
4. User Login Failed
5. Start Schedule
6. Stop Schedule
7. Execute Recycle
8. Enable Channel
9. Disable Channel
10. Start Smart Guard
11. Stop Smart Guard
12. Modify Smart Guard
13. Modify Schedule
14. Modify Conguration
15.Start Live Streaming Server
16. Stop Live Streaming Server
17. Modify Live Streaming Server
18. Start Remote Playback Server
19. Stop Remote Playback Server
20. Modify Remote Playback Server
21. Network Camera Connection Lost
22. Auto Restart Windows
23. Modify E-Map
24. Start Remote Desktop
25. Stop Remote Desktop
26. Modify Remote Desktop
27. Start Central Management
28. Stop Central Management
29. Modify Central Management
Step 1: Select the type of event or select All from the drop-down menu.
Step 2: View the events that happened on a particular date or during a given time period by selecting search period.
Step 3: Click Search.
Step 4: You can export the data to a text le (.txt) or excel le (.xls). Click Export to, enter the lename, and select the format to export.
88D-Link D-ViewCam Standard/Professional/Enterprise User Manual
Page 89

Section 3 - Conguration
Setting
Go to Playback console and click to open this window.
General
Record Display
List ControlCalendar View
Play
• Play when open: Select this option to start playing the video clip everytime a record is withdrawn.
• Auto skip when record motion only mode: Select to set up the system to automatically skip to the points where motions were
recorded.
• Next interval: Set the interval and click Next on the playback console to fast forward the video.
• Previous interval: Set the interval and click Previous on the playback console to rewind the video.
Capture Image
• Save in clipboard: The image will be saved in the clipboard and can be pasted to other applications.
• Manually save the image le: Select to manually save the image, and the format of the image.
• Automatically save the image le: By pre-setting the URL and the image format, the system will automatically save the image
accordingly, when you click Save in the control panel.
89D-Link D-ViewCam Standard/Professional/Enterprise User Manual
Page 90

Section 3 - Conguration
Miscellaneous
• Synchronize video frames: Select to prevent tearing that may occur in the video display. However, this will increase the CPU
processing load.
OSD
Select Enable Camera OSD to display video information of the recording video. Information includes camera name, camera number, date
and time. Users also can set the font, size, and font color.
90D-Link D-ViewCam Standard/Professional/Enterprise User Manual
Page 91

Section 3 - Conguration
Access Remote Playback Site
Go to Open Record > Date Time in the Playback Main Console and click to access the Remote Playback Site.
91D-Link D-ViewCam Standard/Professional/Enterprise User Manual
Page 92

Section 3 - Conguration
Smart Guard System
Click the Congure Smart Guard System icon to open the Event and Action Conguration window.
Select an event to be detected and set up an Action for the D-ViewCam Standard/Professional/Enterprise system to perform.
Note: To access the Smart Guard Event Report, click Start Monitor > Open Event Report in the Main Console.
92D-Link D-ViewCam Standard/Professional/Enterprise User Manual
Page 93

Section 3 - Conguration
Event
There are 3 sources of events: Camera (video image), Digital Input (device connected to your PC) and System (condition of your
hardware). You can assign multiple events by following the instructions below.
Assign a Camera Event
Step 1: Select a channel from the camera list and click Insert Event .
Step 2: There are two types of events: Signal Lost and General Motion. Select the event you want in the Event Type list and click OK.
Step 3: Congure the Event Type settings. Refer to the next section.
93D-Link D-ViewCam Standard/Professional/Enterprise User Manual
Page 94

Section 3 - Conguration
Alarm Event Conguration
This section describes the basic setting of Signal Lost and General Motion events.
Signal Lost
Enable Event: Select to activate the event.
Life Cycle
• Automatically cancel event when event disappears: The alarm/action
will be cancelled once the event is xed or ends.
• Manually cancel event or event last triggered: The alarm/action will
continue to be active until canceled. To cancel the event, click Start >
Open Event Report > Cancel All Events.
• Cancel event after timeout xx seconds: Select and enter the time (in
seconds) to cancel an event.
• Always Activated: Select to have the event enabled 24 hours a day.
• Activated only in the following period: Select and choose a time
period to have the event active.
94D-Link D-ViewCam Standard/Professional/Enterprise User Manual
Page 95

Section 3 - Conguration
General Motion
Alarm Event Option
• Sensitivity: Click and move the slider control to the right to increase
sensitivity so that a relatively small movement will trigger the alarm.
Move the bar to the left to reduce sensitivity of motion detection.
Setting up an appropriate sensitivity value will reduce the chances
of a false alarm. For example, you can lower the sensitivity to avoid
the alarm being triggered by a tree swinging in the breeze.
• Interval: Click and move the slider control to the right to increase
the interval time so that the alarm will only be triggered when the
movement lasts longer. Move to the left to reduce the interval time.
Region Denition
• Dene detection zone: To detect General Motion, you have to
dene a detection zone. Left-click and drag the mouse to draw a
detection zone. You may dene more than one zone on the screen
by repeating the same process. You can also click All to select the
entire detection zone.
Click Start Simulation and test the function on the preview window.
95D-Link D-ViewCam Standard/Professional/Enterprise User Manual
Page 96

Section 3 - Conguration
Digital Input
Step 1: Select to highlight Digital Input on the event type list and then click Insert Event.
Step 2: Select the device that is connected to your camera(s).
96D-Link D-ViewCam Standard/Professional/Enterprise User Manual
Page 97

Section 3 - Conguration
Action
Assign an Action Type
Insert Action: Select actions that responds to an unusual event.
Step 1: Select an event and click Insert Action.
Step 2: Select one of the ve actions and then click OK.
1. Play Sound
2. Send E-mail
3. PTZ Preset Go
4. DI/DO
5. Send a SMS Message
6. Send to Central Server
Step 3: Congure the Action Type if required.
97D-Link D-ViewCam Standard/Professional/Enterprise User Manual
Page 98

Section 3 - Conguration
Action Type > Play Sound
The system will play an audio .wav le when an unusual event is detected.
Step 1: Select the Play Sound action and then click OK.
Step 2: Select a wave le (.wav) and then click Play Sound to modify the setting.
98D-Link D-ViewCam Standard/Professional/Enterprise User Manual
Page 99

Section 3 - Conguration
Action Type > Send E-mail
When an event is triggered, the system immediately emails the specied recipients. The email contains the type of event, the time it
occurred, and a picture of the event.
Step 1: Select the Send E-mail action and then click OK.
Step 2: From the Select Contactor window select the email address(es) you want to send alerts to.
Click Edit Address Book to add, delete, or edit contacts.
99D-Link D-ViewCam Standard/Professional/Enterprise User Manual
Page 100

Section 3 - Conguration
Action Type > PTZ Preset Go
Use this to trigger the PTZ (pan/tilt/zoom) camera(s)
Step 1: Select the PTZ Preset Go action and then click OK.
Step 2: In the PTZ Preset Go window, select the PTZ camera that is connected
to your system. Then set the start and end preset points, and select the life cycle
for the event. Click Add when you are done to add the preset to the table below.
You may repeat this step to add another preset.
Step 3: When you are nished adding your presets, click OK.
100D-Link D-ViewCam Standard/Professional/Enterprise User Manual
 Loading...