


6/10 |
|
©2010Tousdroitsréservés#960009616R0 |
Español-páginaE1 |
|
arrièredel’aspirateur) (Lecodedefabricationsetrouvesurlapartieinférieure
Codedefabrication: Nºdemodèle:
pouvoirlesconsulter.rapidement Consignezlesrenseignementsci-dessouspour
Glenwillow,Ohio44139 |
|
7005Cochran.Rd |
|
RoyalApplianceMfg |
|
Adressepostale: |
• |
SurInternet:com.dirtdevil.www |
• |
EnregistrementenGarantie |
|
com.dirtdevil.www |
|
.U.(ÉetCanada) |
|
1-800-321-1134 |
|
Pourcelacomposezle: |
|
àrépondreàvos.questions |
|
assemblervotreaspirateuret |
|
àaider vous pouvons Nous •
.aspirateur votre d’utiliser avant instructions ces
attentivement lire Veuillez •
danger.d’étouffement Cesdernièresprésententun comprenddespetites.pièces L’assemblagedel’appareil  AVERTISSEMENT:
Noticed’utilisationetd’entretien MANUELDUPROPRIÉTAIRE
OWNER’S MANUAL
Operating and Servicing
Instructions
 WARNING:
Cleaner assembly may include small parts. Small parts can present a choking hazard.
•Please read these instructions carefully before using your Upright.
•Let us help you put your vacuum together or answer any questions, call:
1-800-321-1134 (USA & Canada) www.dirtdevil.com
Warranty Registration
•Online at: www.dirtdevil.com
•Mail: Royal Appliance Mfg
7005 Cochran Rd. Glenwillow, Ohio 44139
For quick reference, please record your vacuum information below.
Model #: Mfg. Code:
(Mfg. code located on the lower backside of cleaner)
Español - página E1 |
©2010 All rights reserved #960009616 R0 |
|
6/10 |
THIS VACUUM CLEANER IS INTENDED FOR HOUSEHOLD USE ONLY.
IMPORTANT SAFETY INSTRUCTIONS
When you use an appliance, basic precautions should always be followed, including the following:
•READ ALL INSTRUCTIONS BEFORE USING THE APPLIANCE.
•ALWAYS FOLLOW THESE SAFETY INSTRUCTIONS.
•BRING VACUUM CLEANER TO UPRIGHT POSITION WHEN USING THE HOSE
AND ATTACHMENTS.
•DO NOT LEAVE VACUUM CLEANER UNATTENDED WHEN PLUGGED IN.
•REGULARLY CHECK THE FILTER TO CLEAN OR REPLACE.
•WARNING: DO NOT USE SHARP OBJECTS TO CLEAN OUT THE HOSE
SINCE THEY COULD CAUSE DAMAGE.
•OCCASIONALLY REMOVE BRUSH AND CLEAN DEBRIS FROM END CAPS TO KEEP BRUSH ROTATING SMOOTHLY.
•WARNING: THE CORDS, WIRES, AND/OR CABLES SUPPLIED WITH
THIS PRODUCT CONTAINS CHEMICALS, INCLUDING LEAD OR LEAD
COMPOUNDS, KNOWN TO THE STATE OF CALIFORNIA TO CAUSE CANCER AND BIRTH DEFECTS OR OTHER REPRODUCTIVE HARM. WASH HANDS
AFTER USING.
WARNING: TO REDUCE THE RISK OF FIRE, ELECTRIC SHOCK OR INJURY:
•Do not leave appliance when plugged in. Unplug from outlet when not in use and before servicing.
•Do not use outdoors or on wet surfaces. Electrical shock could occur.
•Do not allow to be used as a toy. Close attention is necessary when used by or near children.
•Use only as described in this manual. Use only manufacturer’s recommended attachments.
•Do not use with damaged cord or plug. If appliance is not working as it should, has been dropped, damaged, left outdoors, or dropped into water, return it to a service center for inspection. Call 1-800-321-1134 for the nearest service center.
•Do not pull or carry by cord, use cord as handle, close a door on cord, or pull cord around sharp edges or corners. Do not run appliance over cord. Keep cord away from heated surfaces.
•Do not unplug by pulling on cord. To unplug, grasp the plug, not the cord.
•Do not handle plug or appliance with wet hands.
•Do not put any objects into openings. Do not use with any opening blocked; keep free of dust, lint, hair, and anything that may reduce air flow.
•Keep hair, loose clothing, fingers, and all parts of body away from openings and moving parts.
•Do not pick up anything that is burning or smoking, such as cigarettes, matches,
or hot ashes.
2
|
2 |
laficheetnonsurle.cordon |
|
|
|
|
|
Nedébranchezpasl’appareilentirantsurle.cordonPourledébrancher,tirezsur |
• |
||
|
Tenezlecordonhorsdeportéedessurfaces.chauffées |
|
|
oudesbords.tranchantsÉvitezdepasserl’appareilsurlecordon.d’alimentation |
|
||
gnée,nefermezpasdeportessurlecordonetnetirezpaslecordonsurdescoins |
|
||
-commepoi |
Netirezpasl’appareilparsoncordon,nevousservezpasducordon |
• |
|
Appelezle1-800-321-1134poursavoirquelestlecentrederéparationleplus.proche |
|
||
ous’ilesttombédansl’eau,expédiez-leàuncentrederéparationpourqu’ilsoit.vérifié |
|
||
fonctionnepascommeprévu,s’ilesttombé,s’ilaétéendommagé,laisséàl’extérieur |
|
||
N’utilisezpasl’appareilsilaficheoulecordonestendommagé.Sil’aspirateurne |
• |
||
|
seulementlesaccessoiresrecommandésparle.fabricant |
|
|
Utilisezl’appareilenrespectantàlalettrelesconsignesdece.manuelUtilisez |
• |
||
quandl’appareilestutilisépardesenfantsouàproximitédeceux-.ci |
|
||
Nelaissezpaslesenfantsjoueravec.l’appareilExercezunesurveillanceétroite |
• |
||
|
|
vous.électrocuter |
|
N’utilisezpasl’appareilàl’extérieurousurdessurfaces.mouilléesVouspourriez |
• |
||
lequandiln’estpasutiliséainsiqu’avantdeprocéderàson.entretien |
|
||
Nelaissezjamaisl’appareilsanssurveillancequandilest.branchéDébranchez- |
• |
||
|
ÉLECTRIQUEETDEBLESSURE: |
||
|
RISQUESD’INCENDIE,DEDÉCHARGE |
||
POURRÉDUIRELES |
AVERTISSEMENT: |
||
|
VOUSLESMAINSAPRÈSTOUTE.UTILISATION |
|
|
CONGÉNITALESOUENDOMMAGERLESORGANESDE.REPRODUCTIONLAVEZ- |
|
||
POURSONEFFETCANCÉRIGÈNE,POUVANTENTRAÎNERDESMALFORMATIONS |
|
||
PLOMBOUDESCOMPOSÉSDUPLOMBCONNUPARL’ÉTATDECALIFORNIE |
|
||
AVECCEPRODUITCONTIENNENTDESPRODUITSCHIMIQUESYCOMPRISDU |
|
||
AVERTISSEMENT:LESCORDONS,FILSÉLECTRIQUESET/OUCÂBLEFOURNIS |
• |
||
|
|
SANS.PROBLÈME |
|
QUIENCOMBRENTSESEXTRÉMITÉSAFINQU’ILCONTINUEÀTOURNER |
|
||
ENLEVEZLEROULEAUDETEMPSENTEMPSETNETTOYEZLESSALETÉS |
• |
||
|
LETUYAU:ILSPOURRAIENT.L’ENDOMMAGER |
|
|
AVERTISSEMENT:N’UTILISEZPASD’OBJETSTRANCHANTSPOURNETTOYER |
• |
||
VÉRIFIEZRÉGULIÈREMENTLESFILTRESÀNETTOYEROUÀ.REMPLACER |
• |
||
|
|
.BRANCHÉ |
|
NELAISSEZPASL’APPAREILSANSSURVEILLANCEQUANDILEST |
• |
||
|
LETUYAUETLES.ACCESSOIRES |
|
|
METTREL’ASPIRATEURENPOSITIONVERTICALEQUANDVOUSUTILISEZ |
• |
||
RESPECTEZTOUJOURSÀLALETTRECESCONSIGNESDE.SÉCURITÉ |
• |
||
LISEZTOUTESLESINSTRUCTIONSAVANTD’UTILISER.L’APPAREIL |
• |
||
|
|
desécurité,tellesque: |
|
Lorsquevousutilisezunappareilménager,vousdevezprendrecertainesprécautions |
|||
CONSIGNESDESÉCURITÉIMPORTANTES |
|||
CETAPPAREILAÉTÉCONÇUEXCLUSIVEMENTPOURUNUSAGE.DOMESTIQUE |
|||

3
|
L’aspirateurdoitdemeureràl’arrêtpendantlapériodederefroidissementde30.minutes |
|
||
|
lemoteuraurarefroidietl’aspirateurseradenouveauprêtàêtre.utiliséREMARQUE: |
|
||
|
toute.obstructionVidezlegodetàpoussièreetnettoyezles.filtresAuboutde30minutes, |
|
||
|
d’évacuation,d’aspiration,letuyau,legodetàpoussièreetledeuxièmefiltrepourdétecter |
|
||
|
surchauffe.Sicelaseproduit,arrêtezl’aspirateuretdébranchez-.leExaminezlesystème |
|
||
|
Votreaspirateurestmunid’unprotecteurthermiqueafindecouperlemoteurencasde |
|
||
|
|
|
||
|
laprise.appropriéeNemodifiezjamaisla.fiche |
|
|
|
|
inversez-la.Siellenes’insèretoujourspas,demandezàunélectricienqualifiéd’installer |
|
||
|
rantpolariséequedansun.sensSilafichenes’insèrepascomplètementdanslaprise, |
|
||
|
unetigeestpluslargeque.l’autre)Cettefichenepeutêtreinséréedansuneprisedecou- |
|
||
|
Afinderéduirelesrisquesdechocélectrique,cetappareilestmunid’unefichepolarisée |
|
||
|
AVERTISSEMENT: |
|
|
|
|
VEUILLEZCONSERVERCESINSTRUCTIONS |
|||
|
*NONDISPONIBLE |
|||
|
del’interrupteursituésurla.pédale |
|
|
|
poignéedel’aspirateuràlapositionverticaleet/ouarrêtezl’aspirateuraumoyen |
|
|
|
|
Silesystème*autotracténefonctionnepasdemanièreappropriée,remettrela |
• |
|||
|
Débranchezavantdeconnecterle*Brosse.Power |
• |
||
|
.l’utilisateurLatensionadéquateestindiquéesurlaplaquede.l’appareil |
|
|
|
L’utilisationd’unetensioninadéquatepeutendommagerlemoteuretblesser |
• |
|||
|
pastrébucher.dessus |
|
|
|
Rangezl’aspirateurà.l’intérieurRangezl’aspirateuraprèssonutilisationpourne |
• |
|||
|
N’utilisezjamaisderallongeélectriqueaveccet.aspirateur |
• |
||
|
nettoyerle.plancher |
|
|
|
L’aspirateurdoitêtreenpositionverticalepourpouvoirleverlabrosserotativeet |
• |
|||
|
les.meubles |
|
|
|
Gardezl’aspirateurau.solSeulslesaspirateursàmainpeuventêtreposéssur |
• |
|||
|
n’utilisezpasl’appareilenprésencedeces.matériaux |
|
|
|
N’aspirezpaslesliquidesinflammablesoucombustiblescommel’essence; |
• |
|||
|
Faitesbienattentionquandvousnettoyezlesmarches.d’escalier |
• |
||
|
Éteigneztouteslescommandesavantdedébrancher.l’appareil |
• |
||
|
Nepasutiliserl’aspirateursanssacpoussièreet/oufiltresen.place |
• |
||
|
etlescendres.incandescentes |
|
|
|
Évitezd’aspirertoutobjetquibrûleoufume,commelescigarettes,lesallumettes |
• |
|||
|
l’écartdesouverturesetdespiècesen.mouvement |
|
|
|
Gardezlescheveux,lesvêtementsamples,lesdoigtsettoutepartieducorpsà |
• |
|||
|
euxetdetoutcequipourraitréduireledébit.d’air |
|
|
|
|
sontobstruées;gardezlesouverturesexemptesdepoussière,depeluches,-dechev |
|
|
|
N’insérezpasd’objetsdansles.ouverturesÉvitezd’utiliserl’appareilsilesouvertures |
• |
|||
|
Nemanipulezpaslaficheoul’aspirateuravecdesmains.mouillées |
• |
||
•Do not use without dirt container and filters in place.
•Turn off all controls before unplugging.
•Use extra care when cleaning on stairs.
•Do not use to pick up flammable or combustible liquids, such as gasoline, or use in areas where they may be present.
•Keep the vacuum cleaner on the floor. Only the hand-held vacuum cleaners may be set on furniture.
•Vacuum cleaner must be in the upright position to lift the rotating brush off the carpet when doing above floor cleaning.
•Do not use an extension cord with this vacuum cleaner.
•Store the vacuum cleaner indoors. Put the vacuum cleaner away after use to prevent tripping accidents.
•Using improper voltage may result in damage to the motor and possible injury to the user. Proper voltage is listed on the cleaner plate.
•Unplug before connecting *Power Brush Tool.
•If unintended operation of the *propulsion should occur - Return the cleaner handle to the full upright position and/or turn off power to the cleaner at the foot pedal switch.
*NOT AVAILABLE ON ALL MODELS
SAVE THESE INSTRUCTIONSSUR TOUS MODÉLES
WARNING:
To reduce the risk of electric shock, this appliance has a polarized plug (one blade is wider than the other). This plug will fit in a polarized outlet only one way. If the plug does not fit fully in the outlet, reverse the plug. If it still does not fit, contact a qualified electrician to install the proper outlet. Do not change the plug in any way.
Your cleaner contains a thermal protective device to shut off the motor to avoid overheating.
If this happens, turn switch off and unplug the cleaner. Inspect the exhaust, inlet, and filters for any blockage. Empty the dirt container and clean filters. After approximately 30 minutes the motor will have cooled and the vacuum will be ready to use. NOTE: the cleaner must remain unplugged during the 30 minute cooling period.
3

CONGRATULATIONS
You are now the proud owner of the Dirt Devil®. We trust your new purchase will bring you many years of satisfaction.
Our company has designed and developed this product with you in mind.
We are very proud of our products and hope that you are equally satisfied with their quality and performance.
Thank you for your support of Dirt Devil® products. Visit our website at www.dirtdevil.com
TABLE OF CONTENTS
Safety Instructions . . . . . . . . . . . . . |
. |
. . |
Page 2, 3 |
Features. . . . . . . . . . . . . . . . . |
. |
|
Page 5 |
How to Assemble . . . . . . . . . . . . . |
. |
. . |
Page 6 |
How To Operate . . . . . . . . . . . . . . |
. |
. . |
Page 6, 7 |
Floor/Carpet Cleaning. . . . . . . . . . |
. |
. . |
Page 7 |
Above Floor Cleaning . . . . . . . . . . |
. |
. . |
Page 7 |
Dirt Container & Filter: Removal & Replacement. . |
. |
. . |
Page 8, 9 |
Belt or Brushroll: Removal & Replacement. . . . |
. |
. . |
Page 10 |
Lightbulb: Removal & Replacement. . . . . . . |
. |
. . |
Page 11 |
General Maintenance . . . . . . . . . . . . |
. |
. . |
Page 11 |
Troubleshooting Guide. . . . . . . . . . . . . . . . . . . . . . |
. . |
. . . . |
Page 12 |
LIMITED WARRANTY
To the consumer, Royal Appliance Mfg. Co. warrants this vacuum cleaner to be free of defects in material or workmanship commencing upon the date of the original purchase. Refer to your vacuum cleaner carton for the length of warranty and save your original sales receipt to validate start of warranty period.
If the vacuum cleaner should become defective within the warranty period, we will repair or replace any defective parts free of charge. The complete machine must be delivered prepaid to any ROYAL® Authorized Sales & Warranty Service Station. Please include complete description of the problem, day of purchase, copy of original sales receipt and your name, address and telephone number. If you are not near a Warranty Station, call the factory for assistance at USA & Canada: 1-800-321-1134. Use only genuine Royal® replacement parts.
The warranty does not include unusual wear, damage resulting from accident or unreasonable use of the vacuum cleaner. This warranty does not cover brushes, bags, flat belts, filters and bulbs. This warranty does not cover unauthorized repairs. This warranty gives you specific legal rights and you may also have other rights (Other rights may vary from state to state in the USA).
IMPORTANT: USE ONLY GENUINE ROYAL® REPLACEMENT PARTS. NOTE: RETURN WARRANTY CARD TO REGISTER YOUR CLEANER
4
4
|
|
|
|
|
|
|
|
|
VOTREASPIRATEUR |
|
|
|||||||
|
|
RENVOYEZLAFICHEDEGARANTIEPOURENREGISTRER |
REMARQUE: |
|||||||||||||||
|
|
N’UTILISEZQUELESPIÈCESDERECHANGEROYAL®.AUTHENTIQUES |
IMPORTANT: |
|||||||||||||||
|
|
|
|
|
|
|
||||||||||||
|
|
|
|
|
|
|
||||||||||||
|
|
|
|
|
ayezd’autresdroits(Cesderniersvarientd’étatàétatauseindesÉtats-.Unis) |
|
||||||||||||
|
|
Cettegarantievousoffredesdroitsspécifiquesmaisilsepeutquevous |
couvrepaslesréparationsnon.autorisées |
|
||||||||||||||
|
|
.l’appareilEllenecouvrepasnonpluslesbrosses,lescourroiesplates,lesfiltresetles.ampoulesCettegarantiene |
|
|||||||||||||||
|
|
Cettegarantienecouvrepasl’usureinhabituelle,lesdommagescausésparlesaccidentsouunusageabusifde |
|
|||||||||||||||
|
|
|
|
|
. |
etauxÉTATS-.UNISN’utilisezquelespiècesderechangeRoyal |
|
|||||||||||
|
|
|
|
|
® |
|
|
|
|
|
|
|
|
|
|
|
|
|
|
|
aucuncentrederéparationnesetrouvedansvotrerégion,appelezl’usineau1-800-321-1134,auCANADA |
|
|||||||||||||||
|
|
ladated’achat,unecopiedureçud’achatd’origineainsiquevosnom,adresseetnumérode.téléphoneSi |
|
|||||||||||||||
|
|
Veuillezinclureunedescriptiondétailléeduproblème, |
deventeouderéparationsousgarantiedeROYAL®. |
|
||||||||||||||
|
|
L’appareilentierdoitêtrerenvoyéportpayéàn’importequelpoint |
gratuitementtoutepièce.défectueuse |
|
||||||||||||||
|
|
Sil’appareiltombeenpannependantlapériodecouverteparlagarantie,nousrépareronsouremplacerons |
|
|||||||||||||||
|
|
|
|
|
|
|
|
|
|
|
|
|
|
|
|
|
de.garantie |
|
|
|
duréedelagarantieetconservezvotrereçud’achatd’originepourjustifierladated’entréeenvigueurdelapériode |
|
|||||||||||||||
|
|
Consultezlecartond’emballagedel’appareilpourdéterminerla |
fabricationàcompterdesadated’achat.d’origine |
|
||||||||||||||
|
|
RoyalApplianceMfg..Cogarantitauconsommateurquecetaspirateurestexemptdevicesdematériauoude |
|
|||||||||||||||
|
|
|
|
|
GARANTIELIMITÉE |
|
|
|
|
|
|
|
|
|||||
|
|
|
|
|
|
|
|
|
|
|
|
|
|
|
||||
|
|
|
|
|
|
|
|
|
|
|
|
|
|
|
|
|
|
|
|
|
|
|
|
|
|
|
|
|
|
|
|
|
|
|
|
|
|
|
|
Page12 |
|
|
|
|
|
|
|
|
|
....dépannage |
.......Guide.de. |
|||||
|
|
..Page11 |
............ |
. |
. |
. |
EntretienGénéral |
|||||||||||
|
|
Page11 |
|
|
|
|
...Dépose.et.....remplacement |
Ampoule.: |
||||||||||
|
|
Page10 |
|
|
Courroieetrouleau-brosse:Retraitetréinstallation |
|||||||||||||
|
|
..Page8,9 |
. |
. |
:Retraitetréinstallation |
Godetàpoussièreetfiltre |
||||||||||||
|
|
Page7 |
|
|
|
|
|
.......Nettoyageau-dessusdusol |
||||||||||
|
|
..Page7 |
. |
. |
.... |
.. |
.. |
. |
Nettoyagedusol/tapis. |
|||||||||
|
|
..Page6,7 |
............ |
. |
Utilisationdel’appareil |
|||||||||||||
|
|
Page6 |
............ |
. |
. |
. |
. |
Assemblage. |
||||||||||
|
|
..Page5 |
............ |
Descriptionsdel’appareil |
||||||||||||||
|
|
Page2,3 |
|
|
|
|
|
|
|
|
.de..sécurité |
........Consignes. |
||||||
|
|
|
|
|
TABLEDESMATIÈRES |
|
|
|
|
|
|
|
|
|||||
|
|
|
|
|
|
|
||||||||||||
|
|
|
|
|
VisiteznotresiteWeb:com.dirtdevil.www |
|
||||||||||||
|
|
|
|
|
|
Mercid’utiliserlesproduitsDirtDevil®. |
|
|||||||||||
|
|
|
|
|
|
|
|
|
|
|
|
|
|
|
|
.mance |
|
|
|
|
serezaussisatisfaitquenousdeleurqualitéetdeleurperfor |
|
|||||||||||||||
|
|
Noussommestrèsfiersdenosproduitsetnousespéronsquevous |
|
|||||||||||||||
|
|
|
Nousavonsconçuceproduitpourvousfaciliterla.vie |
|
||||||||||||||
|
|
persuadésquecetappareilvoussatisferapendantplusieurs.années |
|
|||||||||||||||
|
|
.Noussommes |
Vousêtesdésormaisl’heureuxpropriétaired’unDirtDevil |
|
||||||||||||||
|
|
® |
|
|
|
|
|
|
|
|
|
|
|
|
|
|
|
|
|
|
|
|
|
FÉLICITATIONS! |
|
|
|
|
|
|
|
|
|
||||
|
|
|
|
|
|
|
|
|
|
|
|
|
|
|
|
|
|
|
|
|
|
|
|
|
|
|
|
|
|
|
|
|
|
|
|
|
|
5
|
Poignéedetransport |
.30 |
|
Attachespourtuyau |
.29 |
|
Panneauarrière |
.28 |
|
Pédalemarche/arrêt |
.27 |
Pédalededégagementdelapoignée |
.26 |
|
|
Pousser |
.25 |
Dispositifd’enroulementducordon |
.24 |
|
|
Cordond’alimentationlong |
.23 |
|
déclenchementrapide |
|
Dispositifd’enroulementducordonà |
.22 |
|
|
Guideducordon |
.21 |
|
Brosseàépousseter |
.20 |
|
Tuyau |
.19 |
|
Supportdutuyau |
.18 |
|
ARRIÈRE |
|
25 |
25 |
|
|
26 |
|
24 |
27 |
|
|
|
|
23 |
|
|
|
28 |
|
22 |
29 |
|
|
|
|
21 |
30 |
|
20 |
|
|
19 |
|
|
18 |
|
|
|
Poignéederallonge |
.17 |
|
Tuyauderallonge |
.16 |
|
Tuyauinférieur |
.15 |
Fenêtredepassagedelapoussière |
.14 |
|
|
Fenêtrederouleau-brosse |
.13 |
|
Pare-choc |
.12 |
|
Phareavant |
.11 |
|
Levierderéglagedelahauteur |
.10 |
|
godetàpoussière |
|
|
Boutondedégagementrapidedu |
.9 |
|
Godetàpoussièretransparent |
.8 |
|
Chicane |
.7 |
|
Loquetducollecteurdepoussière |
.6 |
|
Rallonge |
.5 |
|
Suceurplat(danslarallonge) |
.4 |
|
BrossePower |
.3 |
|
Poignée |
.2 |
|
Poignéeconfortable |
.1 |
|
AVANT |
|
12 |
|
13 |
|
|
|
11 |
14 |
|
|
10 |
|
|
9 |
15 |
|
|
|
|
8 |
|
|
16 |
|
7 |
|
|
|
|
17 |
|
6 |
|
|
5 |
|
|
4 |
|
|
3 |
|
|
2 |
|
1
|
|
|
|
|
|
ARRIÈRE |
AVANT |
||
|
|
|
||
|
|
CARACTÉRISTIQUES |
||
|
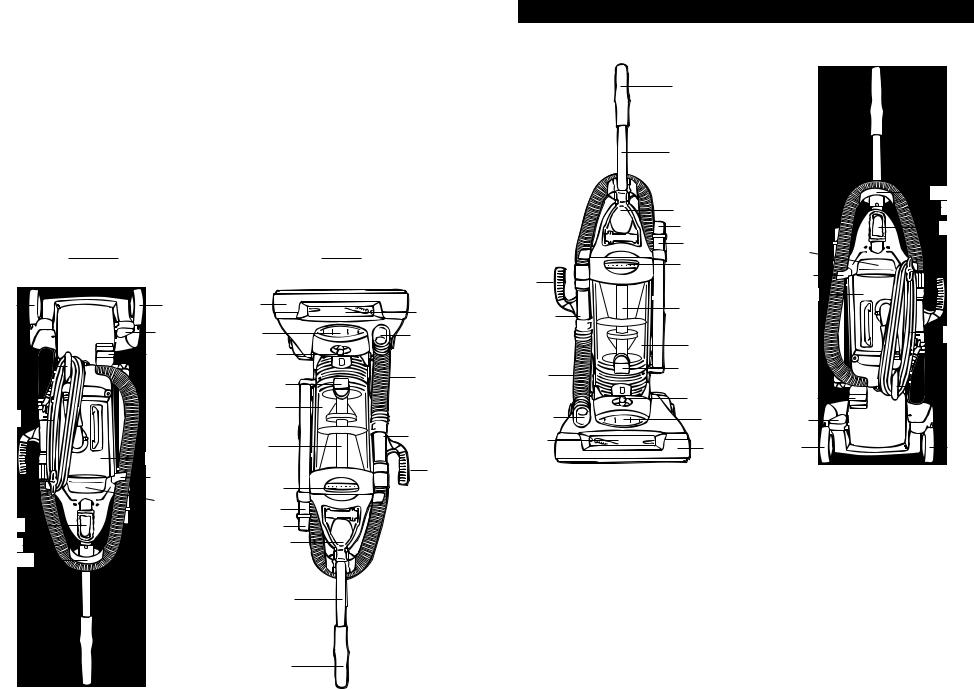
FEATURES |
FRONT VIEW |
BACK VIEW |
1
|
2 |
|
|
|
|
|
18 |
|
3 |
|
19 |
|
4 |
|
20 |
|
5 |
30 |
21 |
|
6 |
||
|
29 |
22 |
|
17 |
|
||
|
|
||
|
28 |
|
|
|
|
|
|
16 |
7 |
|
|
|
|
|
|
|
|
|
23 |
|
8 |
|
|
15 |
9 |
|
|
|
|
24 |
|
|
10 |
27 |
|
|
|
||
14 |
11 |
26 |
|
13 |
12 |
25 |
25 |
|
|||
|
FRONT VIEW |
|
BACK VIEW |
1. |
Handle Grip |
18. |
Hose Caddy |
2. |
Handle |
19. |
Hose |
3. |
Power Brush Tool |
20. |
Dust Brush |
4. |
Crevice Tool (inside |
21. |
Cord Guide |
|
extension wand) |
22. |
Cord Wrap with Quick |
5. |
Extension Wand |
|
Cord Release |
6. |
Dirt Container Release Button |
23. |
Long Power Cord |
7. |
Baffle |
24. |
Lower Cord Wrap |
8. |
See Through Dirt Container |
25. |
Wheels |
9. |
Quick Release Dirt Container |
26. |
Handle Release Pedal |
|
Button |
27. |
On/Off Pedal |
10. |
Height Adjust Lever |
28. |
Back Panel |
11. |
Headlight |
29. |
Hose Clip |
12. |
Bumper |
30. |
Carrying Handle |
13. |
Brush View Window |
|
|
14. |
Clear Dirt Path Window |
|
|
15. |
Lower Hose |
|
|
16. |
Hose Wand |
|
|
17. |
Hose Wand Handle |
5 |
|
|
|
|

HOW TO ASSEMBLE
TOOL REQUIRED: PHILLIPS OR FLAT HEAD SCREWDRIVER
1. |
2. |
2a. |
Remove dirt container |
Attach back panel of cleaner by pushing |
from back panel. |
down into place (Diagram 2). Insert the two |
|
(2) screws into the front of the back panel |
|
and tighten until secure (Diagram 2a). |
3. |
3a. |
Attach lower hose to right side of back panel (Diagram 3). Insert one
(1) screw through the back of the hose to secure (Diagram 3a).
4. |
6. |
Replace dirt container by tilting |
Slide upper handle into Power |
Insert handle fastener into the |
back until it snaps into place. |
Brush Tool caddy. |
back of the Power Brush Tool |
|
|
caddy. |
7.
Insert the one (1) screw into the front and tighten until secure.
SECURE BACK HOSE
1.
Wrap hose around back of hose caddy. Push hose wand down into the right side of cleaner.
6
TOOL STORAGE
1. |
b |
c |
|
a |
|||
|
|
||
BACK |
|
FRONT |
Attach tools: (a) Slide the dust brush onto post on the upper tool caddy with bristles facing out. (b) Clip Power Brush Tool onto the front of the Power Brush Tool caddy. (c)
Slide the extension wand/crevice tool into round slot on the front right side of tool caddy.
supportà.accessoires l’encocherondeducôtédroitdu Glissez(c) Poweràl’avantdeson.support .l’extérieur(b)AttachezleBrosse poilsdelabrossetournésvers àaccessoiressupérieursavecles dansletaquetsituésurlesupport (a)Glissezlabrosseàépousseter Commentfixerlesaccessoires:
AVANT |
|
ARRIÈRE |
|
c |
b |
a |
|
.1 |
|||
|
|
||
|
|
ACCESSOIRES |
|
|
RANGEMENTDES |
||
|
|
|
Brosse.Power |
l’arrièredusupportd’accessoires |
|||
à |
poignée |
de |
Insérezl’attache |
|
|
|
.6 |
tuyaupourlefixer(illustration.3a) .3)Insérezune(1)visparl’arrièredu droitdupanneauarrière(illustration Connectezletuyauinférieuraucôté
.3a |
3. |
6
danssuceurrallonge/
droitde.l’aspirateur rallongedetuyausurlecôté supportde.tuyauInsérezla Enroulezletuyauàl’arrièredu
serrezjusqu’au.bloquage Insérezlavis(1)àl’avantet
|
|
1. |
|
|
LETUYAU |
|
|
POURFIXER |
d’accessoiresBrosse.Power |
||
support |
le |
supérieuredans |
poignée |
la |
Faitesglisser |
.7
|
pour.l’enclencher |
l’arrière |
enl’inclinantvers |
Remettezlegodetàpoussière |
|
|
4. |
fixerle.panneau(illustration.2a) |
|
|
|
|
|
lepanneauarrièreetserrez-lespourbien |
|
|
|
|
|
(Illustration.2)Insérezlesdeux(2)vissur |
|
|
|
.arrière |
|
appuyantverslebaspour.l’enclencher |
poussièredupanneau |
||||
Fixezlepanneauarrièredel’aspirateuren |
à |
godet |
le |
Enlevez |
|
.2a |
2. |
|
|
|
.1 |
TOURNEVISÀPOINTECRUCIFORMEOUÀTÊTEPLATE |
OUTILNÉCESSAIRE: |
||||
ASSEMBLAGE
 Loading...