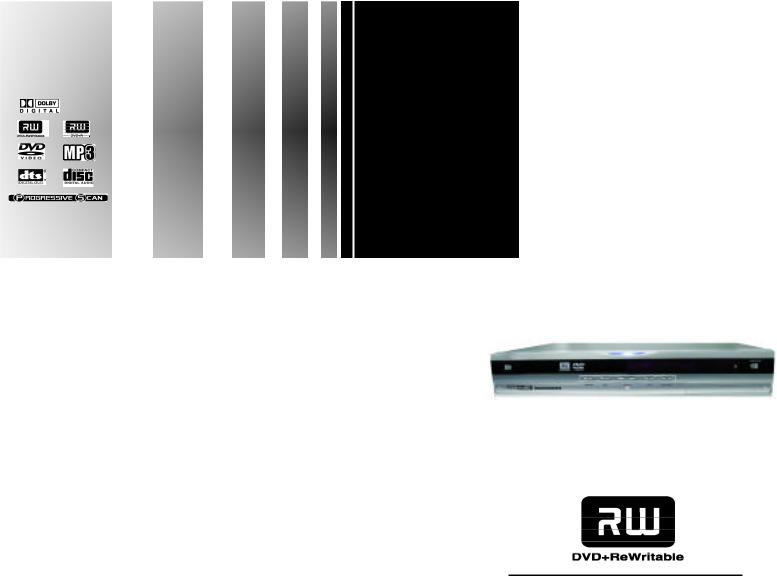
Denver DVR-100 User Manual
Safety Precautions
The lightning flash with an arrowhead symbol within an equilateral triangle is intended to alert the user to the presence of uninsulated "dangerous voltage" within the product's enclosure that may be of sufficient magnitude to constitute a risk of electric shock to persons.
The exclamation point within an equilateral triangle is intended to alert the
!user to the presence of important operating and maintenance (servicing) instructions in the literature accompanying the appliance.
|
|
|
CAUTION |
|
! |
|
|
RISK OF ELECTRIC SHOCK |
|
||
|
|
|
DO NOTOPEN |
|
|
|
|
|
|
||
|
|
|
RISQUE DE CHOC ELECTRIQUE NE |
||
|
AVIS |
|
|||
|
|
PAS OUVRIR |
|
||
|
|
|
|
|
|
CAUTION: TO REDUCE THE RISK OF ELECTRIC SHOCK, DO NOTREMOVE COVER (OR BACK). NO USER-SERVICEABLE PART INSIDE. REFER SERVICING TO QUALIFIED SERVICE PERSONNEL.
WARNING: |
DO NOT EXPOSE THIS APPLIANCE TO RAIN OR MOISTURE, DUE TO THE HIGH RISK OF FIRE |
|
OR ELECTRIC SHOCK, DO NOT OPEN THE CABINET DANGEROUS HIGH VOLTAGES ARE |
|
PRESENT INSIDE THE ENCLOSURE. ONLYQUALIFIED SERVICE PERSONNELSHOULD |
|
ATTEMPT THIS. |
CAUTION: |
TO PREVENT ELECTRIC SHOCK, MATCH WIDE BLADE OF PLUG TO WIDE SLOT, AND |
|
FULLY INSERT. |
ATTENTION: |
POUR EVITER LES CHOCS ELECTRIQUE, INTRODUIRE LALAME LAPLUS LARGE DE LA |
|
FICHE DANS LABORNE CORRESPONDANTE DE LAPRISE ET POUSSER JUSQU' AU FOUD. |
CAUTION: |
This Digital Video Disc Player employs a Laser System. To prevent direct exposure to the laser beam, do not try to open the enclosure. |
|
Visible laser radiation emits when open and interlocks are defeated. |
|
Use of controls or adjustments or performance of procedures other than those specified herein may result in hazardous radiation exposure. |
|
DO NOT STAREINTO BEAM. |
|
To ensure proper use of this product, please read this owner’s manual carefully and retain for future reference. Should the unit require |
|
maintenance, contact an authorized service location, or contact us.Only qualified service personnel should remove the cover. |
FCC NOTICE: |
This equipment has been tested and found to comply with the limits for a Class B digital device. Pursuant with the FCC Rules, Part |
|
15. These limits are designed to provide reasonable protection against harmful interference in a residential installation. |
|
This equipment generates,uses and can radiate radio frequency energy and,if not instlled and used in accordance with the |
|
instructions,may cause harmful interference to radio communication,However,this is no guarantee that interference will not occur |
|
in a particular installation.If this equipment does cause harmful interference to radio or television reception,which can be determined |
|
by turning the equipment off and on,the user is encouraged to try to correct the interference by one of the following measures: |
|
- Reorient or relocate the receiving antenna. |
|
- Increase the separation between the equipment and receiver. |
|
- Connect the equipment into an outlet on a circuit different from that to which the receiver is connected. |
|
- Consult the dealer or an experienced radio/TV technician for help. |
|
FCC Caution:To assure continued compliance,(example-use only shielded interface cables when connecting to computer or |
|
peripheral devices).Any changes or modifications not expressly approved by the party responsible for compliance could |
|
void the user’s authority to operate this equipment. |
WARNING: |
Changes or modifications made to this equipment, not expressly approved by us or parties authorized by us will void all the |
|
manufacture warranties. |
CLASS 1 |
Since it is very usual for DVD movies to be released at different times in different regions of the world, all players have |
|
region codes and disks can have an optional region code. If you load a disk of a different region code to your player, you |
||
LASER PRODUCT |
||
will see the region code notice on the screen. The disk will not play, and should be unloaded. |
||
|
For Customer Use:
In spaces provided below, record the Model and Serial No. located on the rear panel of your DVD video player.
Model No. |
|
Serial No. |
|
Retain this information for future reference.
1
Safety Information
CAUTION: Use of controls or adjustments or performance of procedures other than those specified herein may result in hazardous radiation exposure.
Please carefully study this manual and always keep it available. There are, however, some installation and operation precautions which you should be aware of.
1.Read Instructions - All the safety and operating instructions should be read before the product is operated. 2.Retain Instructions - The safety and operating instructions should be retained for future reference.
3.Heed Warnings - All warnings on the product and in the operating instructions should be adhered to. 4.Follow Instructions - All operating and use instructions should be followed.
5.Cleaning - Unplug this product from the wall outlet before cleaning. Do not use liquid cleaners or aerosol cleaners. Use a damp cloth for cleaning. 6.Attachments - Do not use attachments not recommended by the product manufacturer as they may cause hazards.
7.Water and Moisture - Do not use this product near water - for example, near a bath tub, wash bowl, kitchen sink, or laundry tub; in a wet basement; or near a swimming pool; and the like.
8.Accessories - Do not place this product on an unstable cart, stand, tripod, bracket, or table. The product may fall, causing serious injury to a child or adult, and serious damage to the product. Use only with a cart, stand, tripod, bracket, or table recommended by the manufacturer, or sold with the product. Any mounting of the product should follow the manufacturer’s instructions, and should use a mounting accessory recommended by the manufacturer.
9.Aproduct and cart combination should be moved with care. Quick stops, excessive force, and uneven surfaces may cause the product and cart combination to overturn.
10.Ventilation - Slots and openings in the cabinet are provided for ventilation and to ensure reliable operation of the product and to protect it from overheating, and these openings must not be blocked or covered. The openings should never be blocked by placing the product on a bed, sofa, rug, or other similar surface. This product should not be placed in a built-in installation such as a bookcase or rack unless proper ventilation is provided or the manufacturer’s instructions have been adhered to.
11.Power Sources - This product should be operated only from the type of power source indicated on the marking label. If you are not sure of the type of power supply to your home, consult your product dealer or local power company. For products intended to operate from battery power, or other sources, refer to the operating instructions.
12.Grounding or Polarization - This product may be equipped with a polarized alternatingcurrent line plug (a plug having one blade wider than the other). This plug will fit into the power outlet only one way. This is a safety feature. If you are unable to insert the plug fully into the outlet, try reversing the plug. If the plug should still fail to fit, contact your electrician to replace your obsolete outlet. Do not defeat the safety purpose of the polarized plug.
Alternate Warnings - This product is equipped with a three-wire grounding-type plug, a plug having a third (grounding) pin. This plug will only fit into a grounding-type power outlet. This is a safety feature, If you are unable to insert the plug into the outlet, contact your electrician to replace your obsolete outlet. Do not defeat the safety purpose of the grounding-type plug.
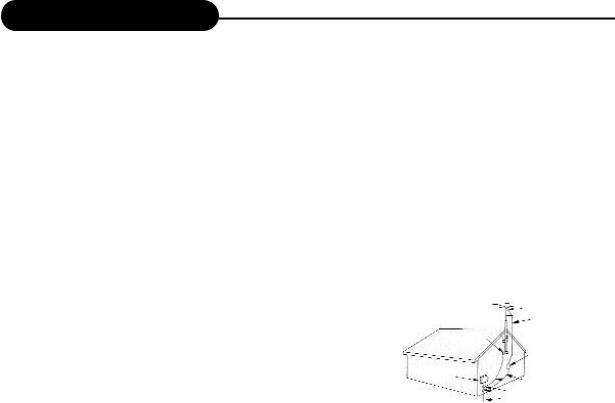
ANTENNA
LEAD
WIRE
ANTENNA DISCHARGE UNIT (NEC SECTION 810-20)
13.Power-Cord Protection - Power-supply cords should be routed so that they are not likely to be walked on or pinched by items placed upon or against them, paying particular attention to cords at plugs, convenience receptacles, and the point where they exit from the product.
14.Protective Attachment Plug - The product is equipped with an attachment plug having overload protection. This is a safety feature. See Instruction Manual for replacement or resetting of protective device. If replacement of the plug is required, be sure the service
technician has used a replacement plug specified by the manufacturer that has the same overload protection as the
GROUNDING CONDUCTORS (NEC SECTION 810-21)
GROUD CLAMP
POWER SERVICE GROUNDING ELECTRODE SYSTEM
(NEC ART 250, PART H)
original plug.
15.Outdoor Antenna Grounding - If an outside antenna or cable system is connected to the product, be sure the antenna or cable system is grounded so as to provide some protection against voltage surges and built-up static charges. Article 810 of the National Electrical Code, ANSI/NFPA 70, provides information with regard to proper grounding of the mast and supporting structure, grounding of the lead-in wire to an antenna discharge unit, size or grounding conductors, location of antenna-discharge unit, connection to grounding electrodes, and requirements for the grounding electrode.
16.Lightning - For added protection for this product during a lightning storm, or when it is left unattended and unused for long periods of time, unplug it from the wall outlet and disconnect the antenna or cable system. This will prevent damage to the product due to lightning and powerline surges.
17.Power Lines - An outside antenna system should not be located in the vicinity of overhead power lines or other electric light or power circuits, or where it can fall into such power lines or circuits. When installing an outside antenna system, extreme care should be taken to keep from touching such power lines or circuits as contact with them might be fatal.
18.Overloading - Do not overload wall outlets, extension cords, or integral convenience receptacles as this can result in a risk of fire or electric shock.
19.Object and Liquid Entry - Never push objects of any kind into this product through openings as they may touch dangerous voltage points or short-out parts that could result in a fire or electric shock. Never spill liquid of any kind on the product.
20.Servicing - Do not attempt to service this product yourself as opening or removing covers may expose you to dangerous voltage or other hazards. Refer all servicing to qualified service personnel.
21.Damage Requiring Service - Unplug this product from the wall outlet and refer servicing to qualified service personnel under the following conditions:
a.When the power-supply cord or plug is damaged.
b.If liquid has been spilled, or objects have fallen into the product.
c.If the product has been exposed to rain or water.
d.If the product does not operate normally by following the operating instructions. Adjust only those controls that are covered by the operating instructions as an improper adjustment of other controls may result in damage and will often require extensive work by a qualified technician to restore the product to its normal operation.
e.If the product has been dropped or damaged in any way, and
f.When the product exhibits a distinct change in performance - this indicates a need for service.
22.Replacement Parts - When replacement parts are required, be sure the service technician has used replacement parts specified by the manufacturer or have the same charateristics as the original part. Unauthorized substitutions may result in fire, electric shock, or other hazards.
23.Safety Check - Upon completion of any service or repairs to this product, ask the service technician to perform saftey checks to determine that the product is in proper operating condition.
24.Wall or Ceiling Mounting - The product should be mounted to a wall or ceiling only as recommended by the manufacturer.
25. Heat - The product should be situated away from heat sources such as radiators, heat registers, stoves or other products (including amplifiers) that produce heat.
2
Introduction
Your Design combines the functionalities of a DVD player and recorder. As a DVD player, you will be able to enjoy full length movies with true cinema picture quality, and stereo or multichannel sound (depending on the disc and your playback system). Unique features of
this player include component video & S-video outputs, progressive scan for greater picture clarity.
What’s more, as a DVD Video Recorder, it has some of the key features that allow you to record programs conveniently such as:
•A complete DVD+RW/DVD+R recorder.
•Preset recording
•Playback of pre-recorded or user-recorded DVDs and CDs
•View, edit and play from a pre-recorded DVD+RW.
UNPACKING
When shipping the player, the original shipping carton and packing comes in handy. For maximum protection, re-pack the unit as it was originally packed at the factory. It is normal for your changer tray to partially open after you have unpacked the unit. This is a feature designed to allow easier access to disc inside the tray during diagnostics.
First check and identify the contents of your player package, as listed below:
-DRX-9000
-Remote control
-RCA cables (3) (1 yellow, 1 red, and 1 white)
-Owner’s manual
-Size AAA batteries (2)
If any item should be damaged or missing, please inform your supplier without delay. Keep the packaging materials as you may need them to transport your player in the future.
WHERE TO PLACE YOUR DVD RECORDER
1. Place the unit on a firm, flat surface.
2. When you place this player near a radio or VCR the playback picture may become poor and/or distorted. In this situation, move the DVD video player away from the other units.
3.Keep away from direct sunlight & domestic heating equipment.
4.If placed in a cabinet, please allow at least 2.5 cm (1 inch) of free space around the player for proper ventilation.
TO OBTAIN A CLEAR PICTURE
This player is a high-tech, precision device. If the optical pick-up lens and disc drive parts are dirty or worn down, the picture quality will become poor. To obtain a clear picture, we recommend regular inspection and maintenance (i.e. cleaning or parts replacement) every 1,000 hours of use depending on the operating environment. For details, please contact your nearest dealer.
3

Table of Contents
Safety Precautions........................... |
1 |
Safety Information ........................... |
2 |
Introduction....................................... |
3 |
Table of Contents ............................. |
4 |
Identification of Controls.................. |
5 |
Connection ........................................ |
7 |
MP3, Progressive Scan.................... |
12 |
Playing Back a Disc ........................ |
13 |
Playing a Normal Disc ........................ |
13 |
Playing a DVD+RW or DVD+R Disc... |
14 |
General Features ............................... |
16 |
Locating a Specific Title, |
|
Chapter or Track............................... |
18 |
Playing Repeatedly.......................... |
20 |
Playing in Random Order................ |
21 |
Selecting Camera Angles, Languages |
|
& Audio Settings ............................. |
22 |
Playing in a Favorite Order ............ |
23 |
Selecting Subtitles .......................... |
24 |
Using the On-screen Display............ |
25 |
Setting the Parental Lock.................. |
26 |
Customizing DVD Function Settings.. 27 |
|
Recording Options ............................ |
28 |
Channel Search .................................. |
28 |
Normal Recording ............................... |
29 |
One-Touch Record .............................. |
30 |
Time Record ........................................ |
31 |
Editing ................................................ |
32 |
Editing a Title of DVD+RW ................. |
32 |
Editing a Disc of DVD+RW or DVD+R... |
35 |
Specifications ................................... |
37 |
Trouble Shooting Guide .................. |
38 |
Limited Warranty .............................. |
39 |
Attachment ....................................... |
40 |
4
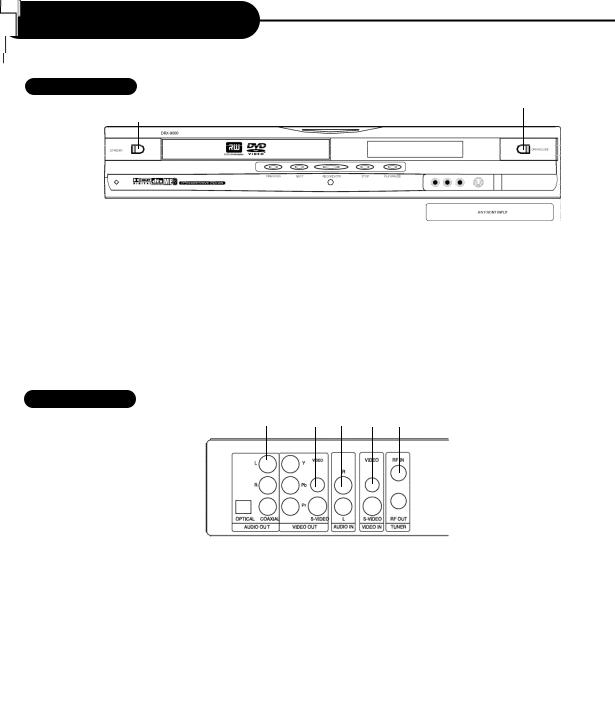
Identification of Controls
FRONT PANEL
11
1
|
|
|
|
|
|
|
|
|
|
|
|
|
9 |
10 |
|
|
|
|
|
|
|
|
|
|
|
|
|
||
|
|
|
|
|
|
|
|
|
|
|
|
|
||
|
2 |
3 |
4 |
5 |
6 |
7 |
8 |
|||||||
1 |
STANDBY |
|
7 |
AUDIO INPUT (FRONT LEFT) |
||||||||||
2 |
PREVIOUS |
|
8 |
AUDIO INPUT (FRONT RIGHT) |
||||||||||
3 |
NEXT |
|
9 |
COMPOSITE VIDEO INPUT (FRONT) |
||||||||||
4 |
RECORD/OTR |
|
10 |
S-VIDEO INPUT (FRONT) |
||||||||||
5 |
STOP |
|
11 |
OPEN/CLOSE |
|
|
|
|
||||||
6 |
PLAY/PAUSE |
|
|
|
|
|
|
|
|
|
|
|
|
|
REAR PANEL
1 2 3 4 5 11
|
|
|
|
|
|
|
|
|
|
|
|
|
|
|
|
|
|
|
|
|
|
|
|
|
6 |
7 |
8 |
9 |
10 |
|
|||||
1 |
AUDIO OUTPUT |
|
|
7 |
DIGITALAUDIO-COAXIAL OUTPUT |
||||||
2 |
COMPONENT VIDEO OUTPUT |
|
|
8 |
S-VIDEO OUTPUT |
||||||
3 |
COMPOSITE VIDEO OUTPUT |
|
|
9 |
S-VIDEO INPUT (REAR) |
||||||
4 |
AUDIO INPUT (REAR LEFT/RIGHT) |
10 |
RF SIGNAL OUTPUT |
||||||||
5 |
COMPOSITE VIDEO INPUT (REAR) |
11 |
RF SIGNAL INPUT |
||||||||
6 |
DIGITALAUDIO-OPTICAL OUTPUT |
|
|
|
|
|
|
|
|||
5
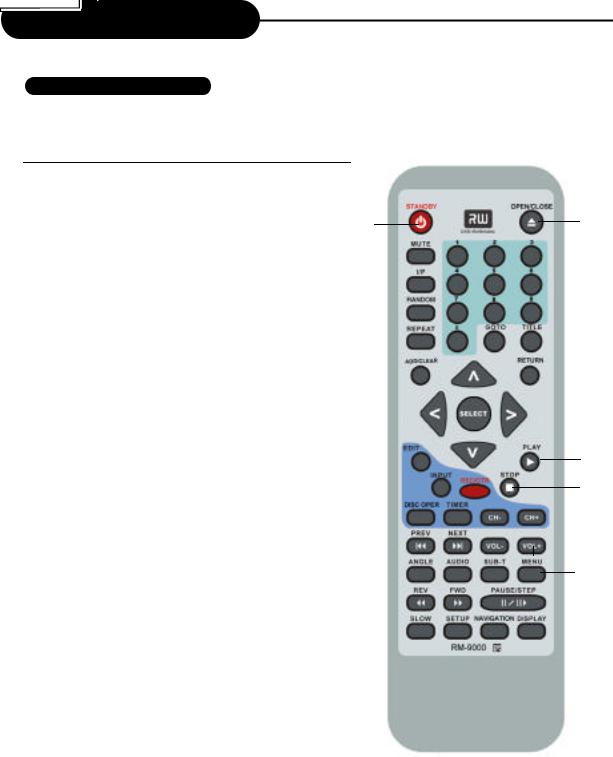
Identification of Controls
REMOTE CONTROL
THE INSTRUCTIONS BELOW DESCRIBE THE FUNCTIONS OF THE REMOTE CONTROL.
1.STANDBY
2.MUTE
3.I/P
(INTERLACE/PROGRESSIVE)
4.RANDOM
5.REPEAT
6.ADD/CLEAR
7.DIRECTION (UP/DOWN/LEFT/RIGHT)
8.SELECT
9.EDIT
10.INPUT
11.REC/OTR (RECORD/ONE-TOUCH RECORD)
12.DISC OPERATION
13.TIMER
14.PREVIOUS
15.NEXT
16.ANGLE
17.AUDIO
18.REVERSE
19.FORWARD
20.SLOW
1
21. |
SETUP |
2 |
|
|
|
|
|
|
22. |
OPEN/CLOSE |
|
|
|
|
|
|
|
3 |
|
|
|
|
|
|
||
23. |
NUMBERS |
|
|
|
|
|
|
|
4 |
|
|
|
|
|
|
||
24. |
TITLE |
|
|
|
|
|
|
|
|
|
|
|
|
|
|||
5 |
|
|
|
|
|
|
||
25. |
GOTO |
|
|
|
|
|
|
|
|
|
|
|
|
||||
|
|
|
|
|
|
|
||
26. |
RETURN |
6 |
|
|
|
|
|
|
|
|
|
|
|
|
|||
|
|
|
|
|
|
|
||
27. |
PLAY |
7 |
|
|
|
|
|
|
|
|
|
|
|
|
|||
8 |
|
|
|
|
|
|
||
|
|
|
|
|
|
|||
28. |
STOP |
|
|
|
|
|
|
|
29. |
CHANNEL- / + |
9 |
|
|
|
|
|
|
|
|
|
|
|
|
|||
10 |
|
|
|
|
|
|||
|
|
|
|
|
|
|
||
30. |
VOLUME - / + |
11 |
|
|
|
|
|
|
|
|
|
|
|
|
|
||
31. |
MENU |
12 |
|
|
|
|
|
|
|
|
|
|
|
|
|||
13 |
|
|
|
|
|
|
||
32. |
SUBTITLE |
14 |
|
|
|
|
|
|
|
|
|
|
|
|
|||
15 |
|
|
|
|
|
|||
33. |
PAUSE/STEP |
16 |
|
|
|
|
|
|
|
|
|
|
|
||||
17 |
|
|
|
|
|
|
||
|
|
18 |
|
|
|
|
|
|
|
|
|
|
|
|
|
||
34. |
DISPLAY |
19 |
|
|
|
|
|
|
|
|
20 |
|
|
|
|
|
|
35. |
NAVIGATION |
21 |
|
|
|
|
|
|
22
 23
23
24
 25
25
26
27
28
29
30
31  32 33
32 33
34
35
6
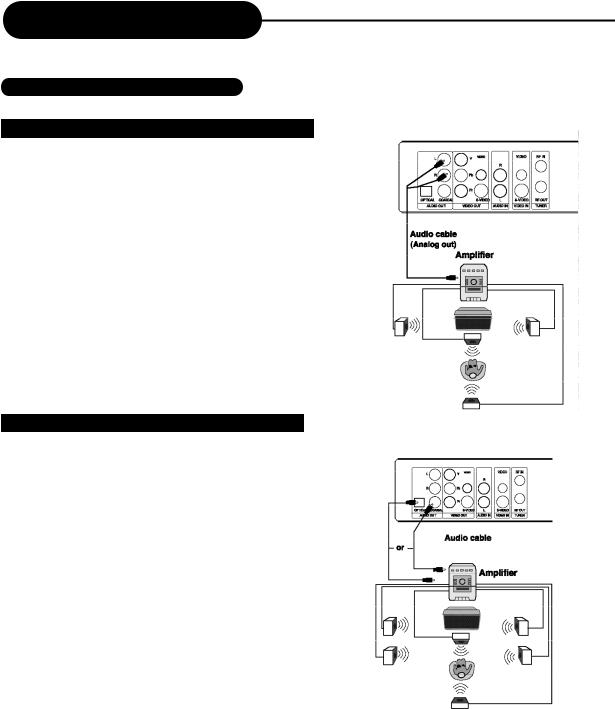
Connection
CONNECTION FOR AUDIO OUTPUT
Dolby Pro Logic Surround Sound (GOOD)
Enjoy Dolby Pro Logic Surround by connecting an amplifier and speaker system (right and left front speakers, a center speaker, and one or two rear speakers).
Enjoying Digital Stereo Sound (BETTER)
Enjoy the dynamic sound of Digital Stereo by connecting an amplifier equipped with a digital audio input and speaker system.
7
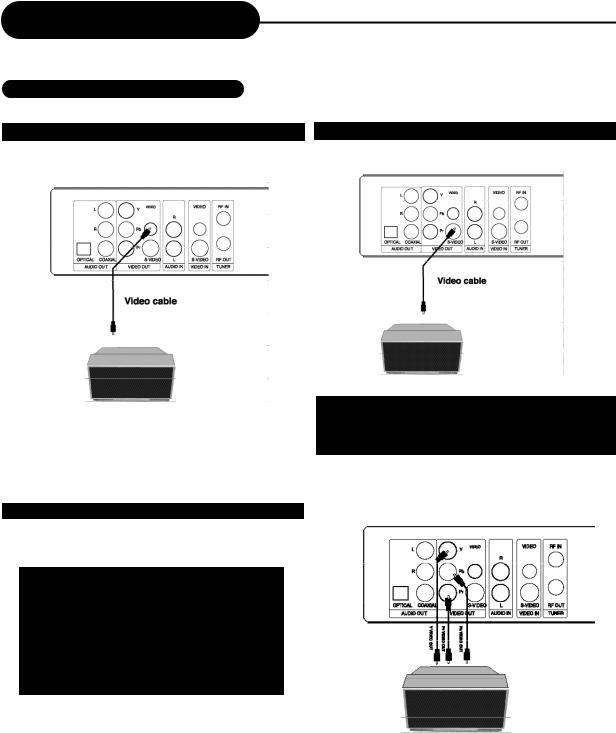
Connection
CONNECTION FOR VIDEO OUTPUT
GOOD |
BETTER |
Connect your recorder with the S-Video cable, if the TV has an S-Video input. Do not connect the yellow video cable if using the S-Video cable.
COMPONENT VIDEO OUTPUT (BEST)
The Component Video input allows you to enjoy the best picture quality from a DVD video disc.
Connect your recorder with Y Video, Pr Video and
Pb Video, if TV has Progressive Scan or Component
Video Input.
During stop status, press I/P button on remote control unit to switch between Progressive Scan or Interlace Scan, or switch these two modes in General Setup from the Setup Menu.
8
Connection
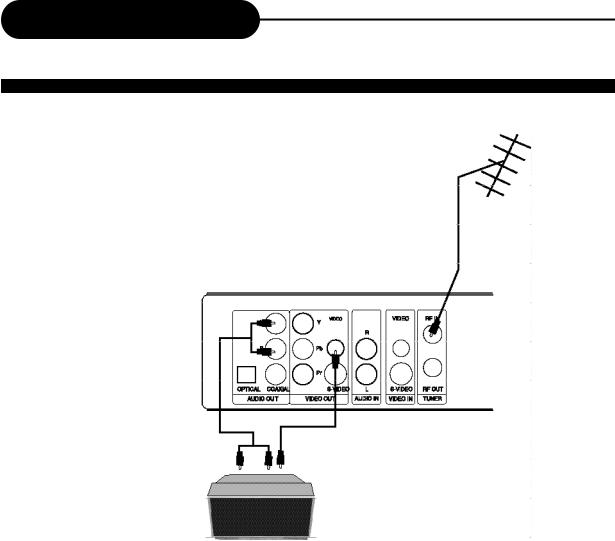
CONNECTION FOR TV TUNER
Signal Input
YOUR RECORDER
Signal Output
NOTE
• Refer to the manual of the connected TV.
• T urn off the power and unplug both units before setting up any connections.
• RF out is signal pass-thru ONLY. Use A/V,S-Video, or Component outputs for playback.
9
Connection
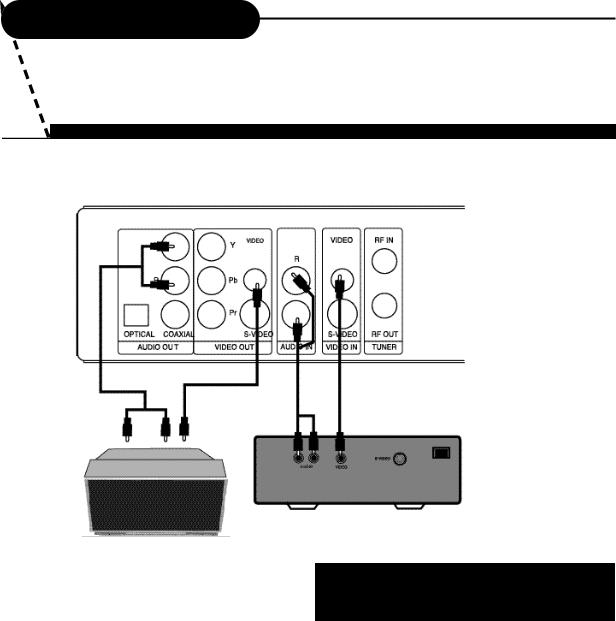
THE DRX-9000 ALLOWS YOU TO ENJOY OR RECORD PROGRAMS WITH SIGNAL FROM AV SYSTEMS SUCH AS VCR, DVD PLAYER, ETC.
CONNECTION FOR AV SIGNAL (A/V REAR INPUT)
YOUR RECORDER
Audio In |
ideo In |
External Signal AV
TV Set
Connect your recorder with the S-Video cable, if the Signal Source has an S-Video input. Do not connect the yellow video cable if using the S-Video cable.
NOTE
•Refer to the manual of the connected system.
•Turn off the power and unplug both units before setting up any connections.
10
Connection
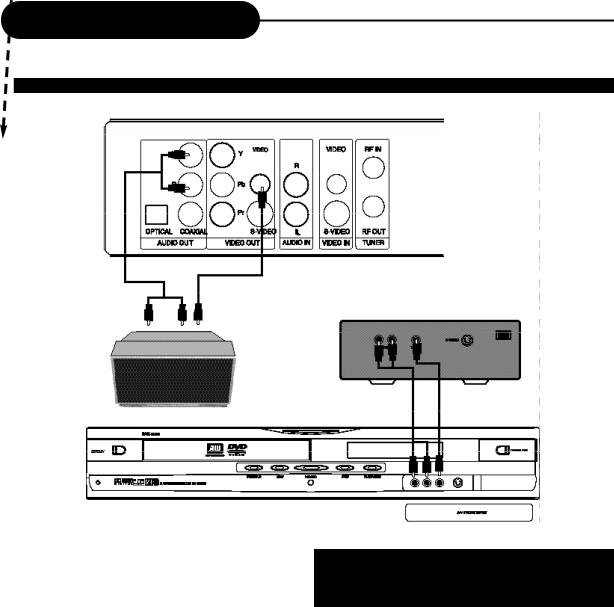
CONNECTION FOR AV SIGNAL (A/V FRONT INPUT)
RECORDER REAR
Audio Out |
Video Out |
EXTERNALSIGNAL AV |
Audio In |
or |
Video In |
RECORDER FRONT |
|
Connect your recorder with the S-Video cable, if the Signal Source has an S-Video input. Do not connect the yellow video cable if using the S-Video cable.
NOTE
•Refer to the manual of the connected system.
•Turn off the power and unplug both units before setting up any connections.
11
 Loading...