

Page 1
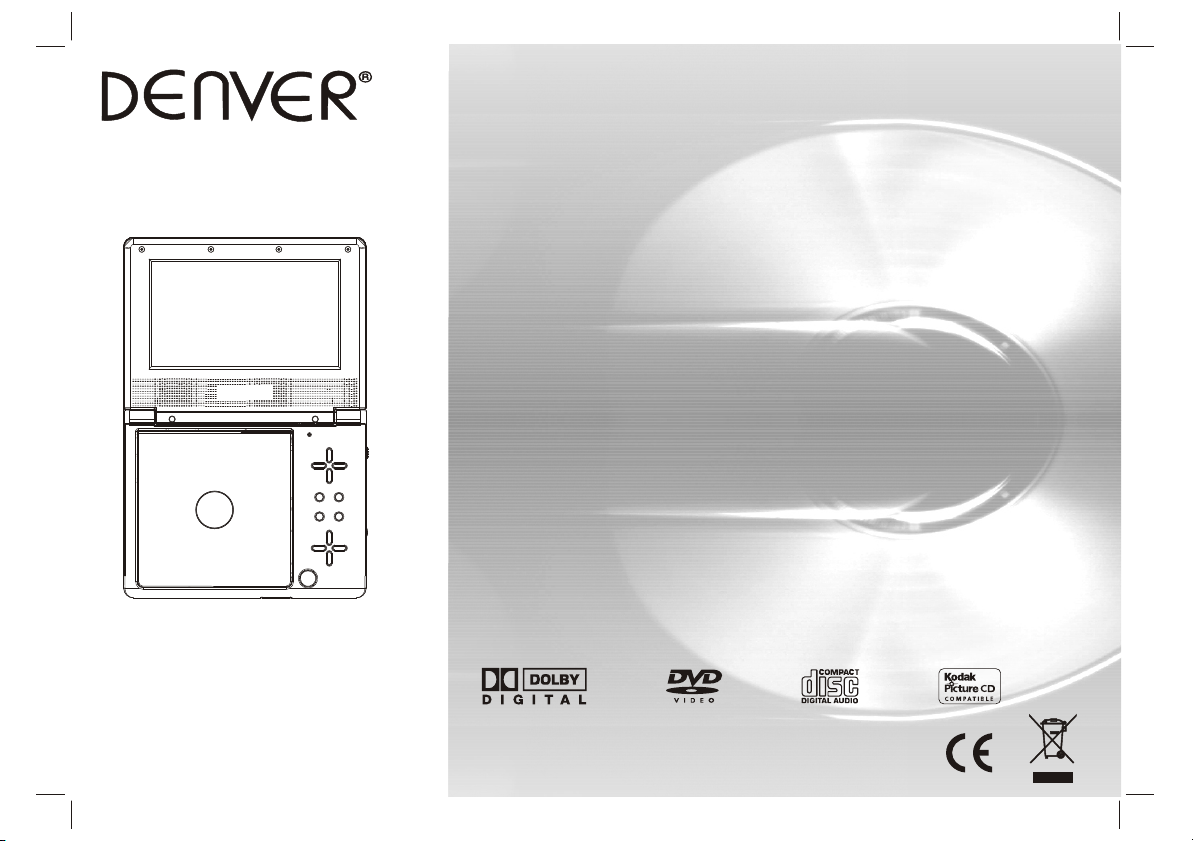
USER'S MANUAL
MT-765
PORTABLE DVD
Before connecting, operating or adjusting this product,
please read this user's manual carefully and completely.
Page 2

Table of Contents
Contents
Table of Contents
Safety Precautions
Before Use(Continued)
Identification of Controls
Main Unit
Remote control unit
Insert the battery
Getting Started
DVD Introduction
Playing a DVD or Video CD(Operation)
Basic operation
Audio CD and WMA Disc Features
Playing an Audio CD or WMA
Playing a JPEG Disc
Playing a MPEG4 Movie Disc
Program playback(not for Picture CD)
DIGITAL CARD and USB Play operation
P1
P2
P3-P4
P5-P7
P5
P6
P7
P7-P9
P7
P8-P9
P10-P14
P10
P11
P11-P12
P12
P13
P14
SETUP Menu Setting
General Operation
General Setup Page
Audio Setup Page
Speaker Setup Page
Dolby Digital Setup
Video Setup Page
Preference Page
Password Setup Page
Parameters and specifications
Troubleshooting tips
Definition of terms
P15-P22
P9-P10
P15
P9-P10
P15-P17
P17
P18-P19
P19
P9-P10
P20
P9-P10
P20-P22
P9-P10
P22
P9-P10
P9-P10P9-P10P9-P10
P23-P24
P9-P10
P25
P26
P9-P10P9-P10
1
Page 3
Safety Precautions
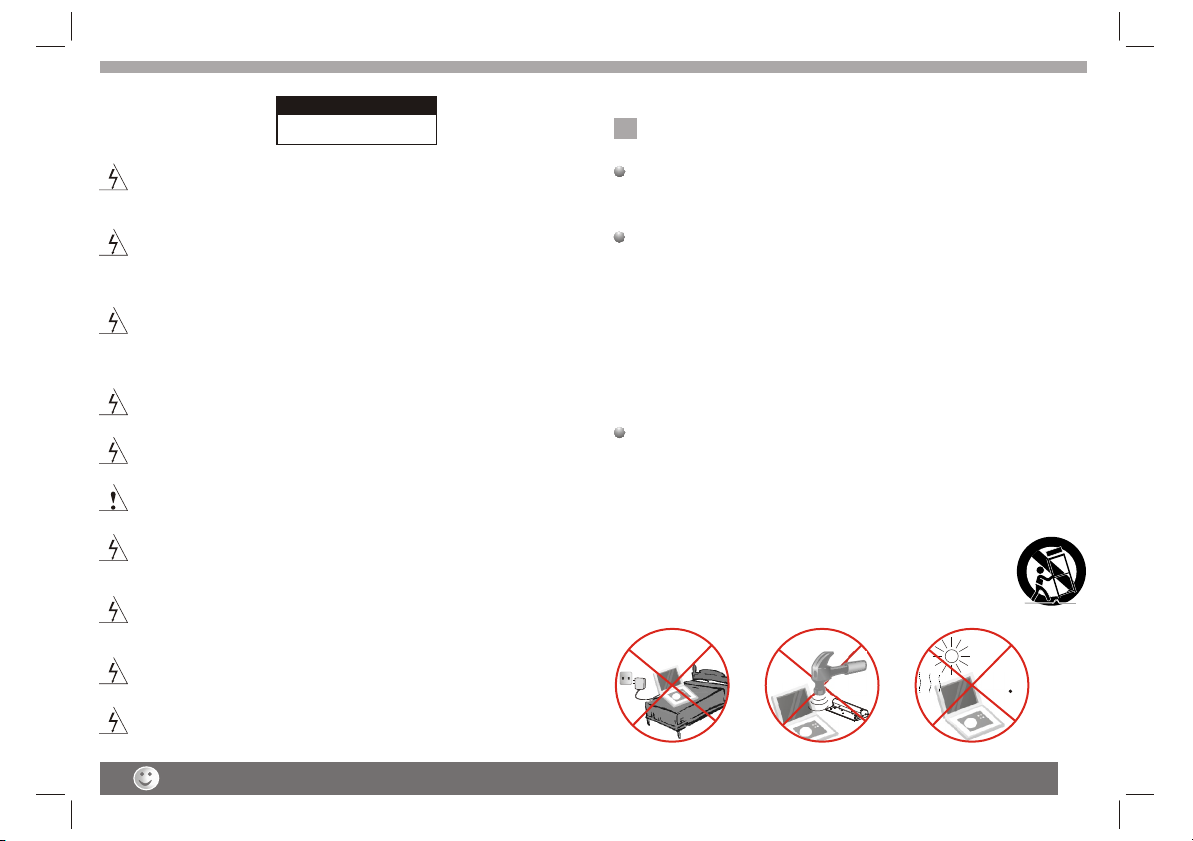
WARNING
RISK OF ELECTRIC SHOCK
DO NOT OPEN
Warning:To reduce the risk of electric shock,do not remove
the cover or back of this product.There are no user-serviceable
parts inside. Refer servicing to qualified service personnel.
Warning: To reduce the risk of fire or electric shock, do not
expose this product to dripping or splashing water,rain, or
moisture. Do not place objects filled with water such as vases,
on the Product.
Warning: This digital video disc player employs a laser system.
Use of controls,adjustments, or the performance of procedures
other than those specified herein may result in hazardous
radiation Exposure.
Warning: To prevent direct exposure to laser beam,do not open
the enclosure.Visible laser radiation when open.
Warning: Never stare directly into the laser beam.
Caution: Do not install this product in a confined space such
as a book case or similar unit.
Warning: when the unit using by child, parents must make sure
to let the child understand all contents in Instruction book how
battery using to guarantee using battery correctly all the time.
Warning: when find battery overheat, swell or dour, please
stop using battery and contact service centre for getting
replacement.
Warning: do not charging battery on the place of insufficient
ventilation such as: mattress, sofa, cushion , soft mat......
Warning: we will not take any responsibility if user incorrectly
use battery, not following our warning instruction label on the
battery case.
N
N
Notes on Copyrights:
It is forbidden by law to copy, broadcast, show,broadcast via
cable, play in public, or rent copyrighted material without
permission.
This product features the copy protection function developed by
Macrovision.Copy protection signals are recorded on some discs.
When recording and playing the pictures of these discs picture
noise will appear.This product incorporates copyright protection
technology that is protected by method claims of certain U.S.
Patents and other intellectual property rights owned by Macrovision
Corporation and other rights owners.Use of this copyright protection
technology must be authorized by Macrovision Corporation, and is
intended for home and other limited viewing uses only unless
otherwise authorized by macrovision Corporation. Reverse
engineering or disassembly is prohibited.
SERIAL NUMBER:
You can find the serial number on the back of the unit.This number
is unique to this unit and not available to others.You should record
requested information here and retain this guide as a permanent
record of your purchase.
Model No. ______________________________
Serial No. ______________________________
Date of Purchase_________________________
charge
strong
impact
over
heat
40 C
Before using the player, please ensure that the local AC voltage is suitable for this unit.
2
Page 4
Before Use(Continued)
Introduction
To ensure proper use of this product, please read this owner's manual
carefully and retain for future reference.
This manual provides information on the operation and maintenance of
your DVD player. Should the unit require service, contact an authorized
service location.
Symbol Used in this Manual
The lightning flash symbol alerts you to the presence of dangerous
voltage within the product enclosure that may constitute a risk of
electric shock.
The exclamation point alerts you to the presence of important
operating and maintenance / servicing instructions.
Indicates hazards likely to cause harm to the unit itself or other
material damage.
Note:
N
N
Indicates special notes and operating features.
Tip:
Indicates tips and hints for making the task easier.A section whose title
has one of the following symbols is applicable only to the disc
represented by the symbol.
DVD
DVD and finalized DVD+R/RW
VCD
Video CDs
CD
Audio CDs
WMA
WMA Discs
JPEG
JPEG Discs
MPEG4
MPEG4 Discs
About the Symbol Display
¡° ¡±may appear on your TV display during operation and indicates
that the function explained in this owner's manual is not available on
that specific DVD video disc.
Notes on Discs
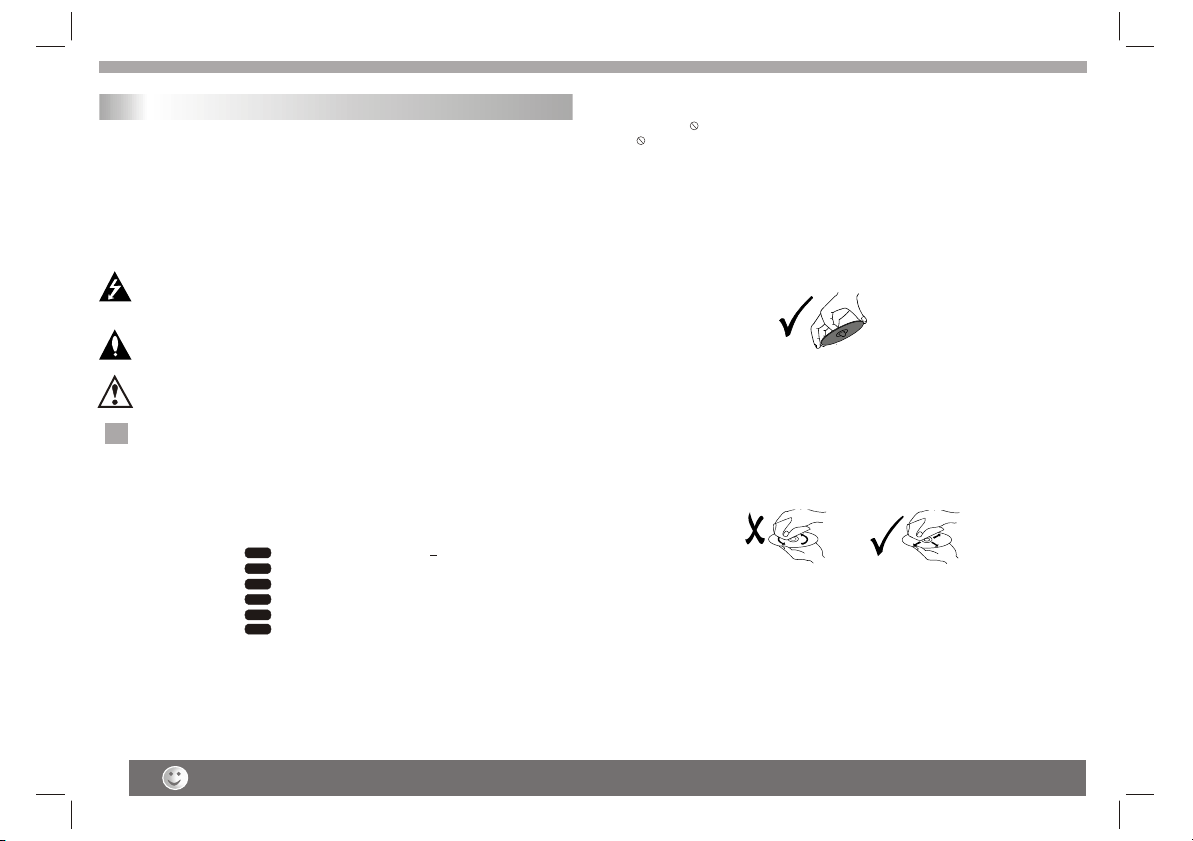
Handling Discs
Do not touch the playback side of the disc. Hold the disc by the edges
so that fingerprints do not get on the surface. Never stick paper or tape
on the disc.
Storing Discs
After playing,store the disc in its case.Do not expose the disc to direct
sunlight or source of heat and never leave it in a parked car exposed
to direct sunlight.
Cleaning Discs
Fingerprints and dust on the disc can cause poor picture quality and
sound distortion. Before playing,clean the disc with a clean cloth.
Wipe the disc from the center out.
Do not use strong solvents such as alcohol,benzine,thinner,
commercially available cleaners, or anti-static spray intended for older
vinyl records.
3
The above items are true of not only this unit but also most of the household electronic products.
Page 5
Before Use (Continued)
Types of Playable Discs
_________________________________________
_________________________________________
_________________________________________
_________________________________________
In addition, this unit plays , DVD -R, DVD +R,DVD -RW,DVD +RW,
Kodak Picture CDs, SVCD, and CD-R / CD-RW that contains audio
titles,WMA,JPEG and MPEG4 files.
_________________________________________
N
DVD
(8 cm / 12 cm disc)
Video CD (VCD)
(8 cm / 12 cm disc)
Audio CD
(8 cm / 12 cm disc)
RW
C0MPATIBLE
Notes:
1.Depending on the conditions of the recording equipment or the
CD-R/RW (or DVD -R, DVD +R,DVD -RW, DVD +RW) disc itself,
someCD-R/RW (or DVD -R, DVD +R, DVD -RW, DVD +RW) discs
cannot be played on the unit.
2.Do not attach any seal or label to either side (the labeled side or
the recorded side) of a disc.
3.Do not use irregularly shaped CDs (e.g., Heartshaped or
octagonal)since they may result in malfunctions.
4.Some playback operations of DVDs and Video CDs may be
intentionally programmed by software manufacturers. This unit
plays DVDS and Video CDs according to disc content designed
by the software manufacturer, therefore some playback features
may not be available or other functions may be added.
This indicates a product feature that is
capable of playing DVD-RW discs
recorded with Video Recording format.
Manufactured under license from Dolby Laboratories."Dolby",
"Pro Logic", and the double-D symbol are trademarks of
Dolby Laboratories.
Region code
This DVD player is designed and manufactured for
playback of region "2"encoded DVD software.
This unit can play only DVD discs labeled "2" or "ALL".
Notes on Region Codes
N
Most DVD discs have a globe with one or more numbers in it clearly
visible on the cover. This number must match your DVD player's
region code or the disc cannot play. If you try to play a DVD with
a different region code from your player,the message "Check
region Code" appears on the TV screen.
2
Dirty disc may cause bad picture.
4
Page 6
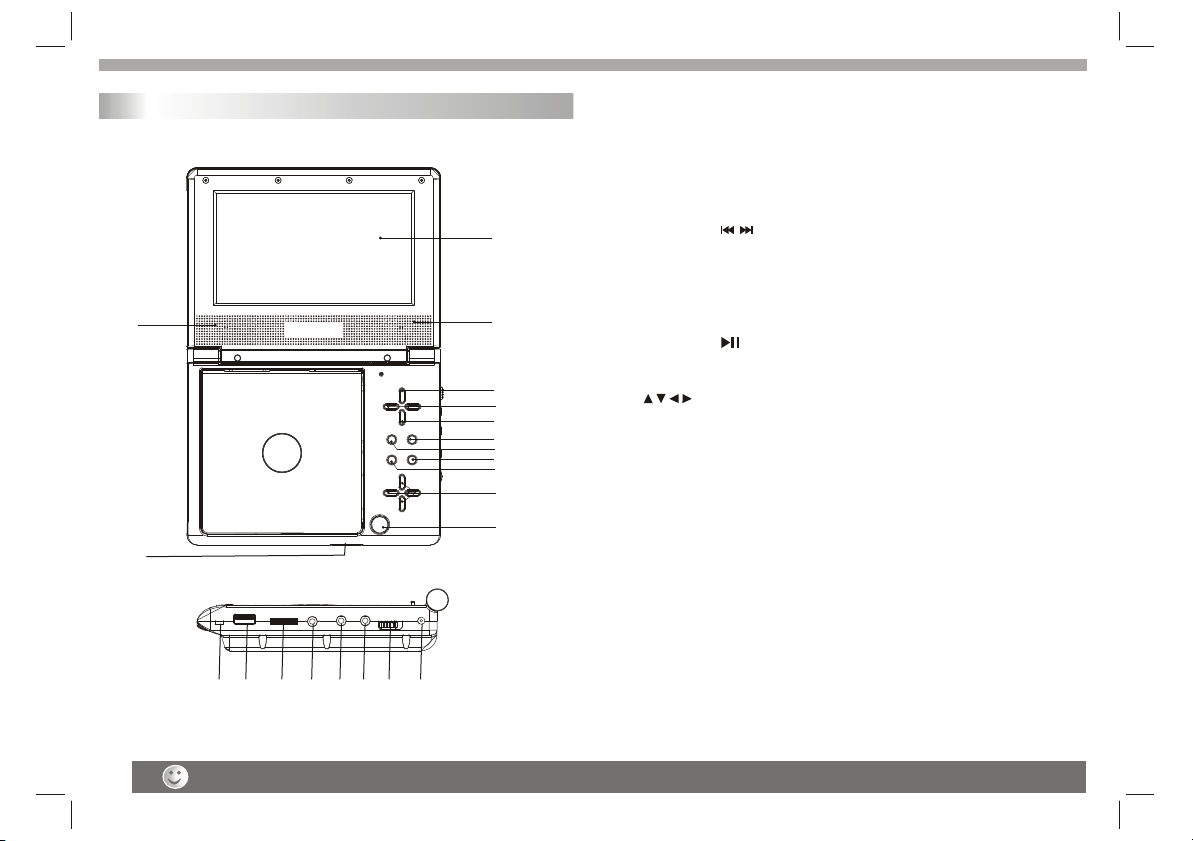
Identification of Controls
Main Unit
2 2
2020
1313
1212
1414 1515 1616 1717 1818 1919
1.TFT screen
2.Speakers
3.SOURCE
Select input source, DVD,card,usb.
1 1
2 2
3 3
44
5 5
66
77
88
99
1010
1111
4.PREV/NEXT
5.SETUP
6.STOP
.
7.MENU
8.PLAY/PAUSE
9. ENTER.
10. (Up/down/Left/right)
Select an item in the menu.
11.Open
12.Power ON/OFF switch
13.USB
14.Volume control
15.Headphone out jacks
16.Digital Audio out(coaxial)
17.AV OUT
18.ON/OFF
19.DC IN 9-12V
20.SD/MS/MMC
5
Weak batteries can leak and severely damage the remote control unit.
Page 7
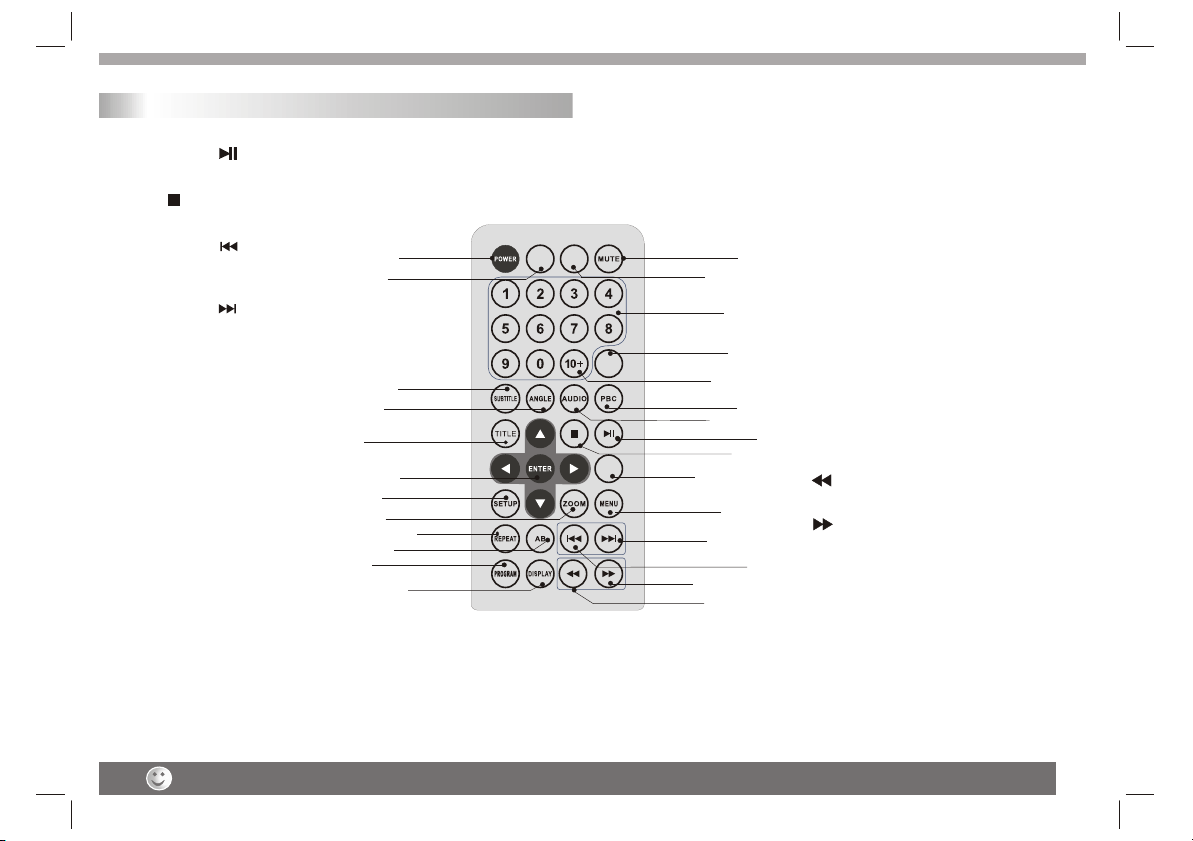
Identification of Controls
Remote control unit
1. PLAY/PAUSE ( )
Starts playback or pause playback.
2. STOP ( )
Stops playback.
3. Reverse Skip ( )
Go to previous chapter / track or to the
beginning.
4. Forward Skip( )
Go to the next chapter / track.
5.ZOOM
Enlarges video image.
6.REPEAT
Repeat chapter, track, title all.
7.A B
Repeat sequence.
8. PROGRAM
Place a track on the program list.
9.MUTE
Disable Audio output.
10.TITLE
Return to DVD title menu.
11.POWER
Switches DVD Player standby mode.
12.0-9 NUMBER BUTTON
Selects numbered items in a menu.
13.ENTER
Confirms menu selection.
Turn off the power and keep AC cord pulled out from the outlet when connecting the systerm.
1010
2626
1818
1919
88
1111
1717
1313
55
77
1515
14. MENU
Accesses menu on a DVD disc.
(Left/right/up/down)
15.DISPLAY
Accesses On-Screen display.
16.AUDIO
Selects an audio language (DVD).
SOURCE
GOTO
2727
STEP
2020
1616
SLOW
2525
1414
6 6
44
2323
2222
17.SUBTITLE
99
Selects a subtitle language.
18.ANGLE
1212
Selects a DVD camera angle if available
19.SETUP
2121
Accesses or removes setup menu.
20.10+ BUTTON
Add 10+ while your selection is more than10.
2424
21.STEP
11
Step the motion in DVD mode.
2 2
22. BUTTON
Fast backward.
23. BUTTON
Fast forward.
33
24. PBC
PBC on/off switch.
25.SLOW
Slow playback
26.GOTO
Goto time point , title or chapter you want in
DVD Mode
27. SOURCE
DVD,USB,card.
6
Page 8
Identification of Controls
Getting Started
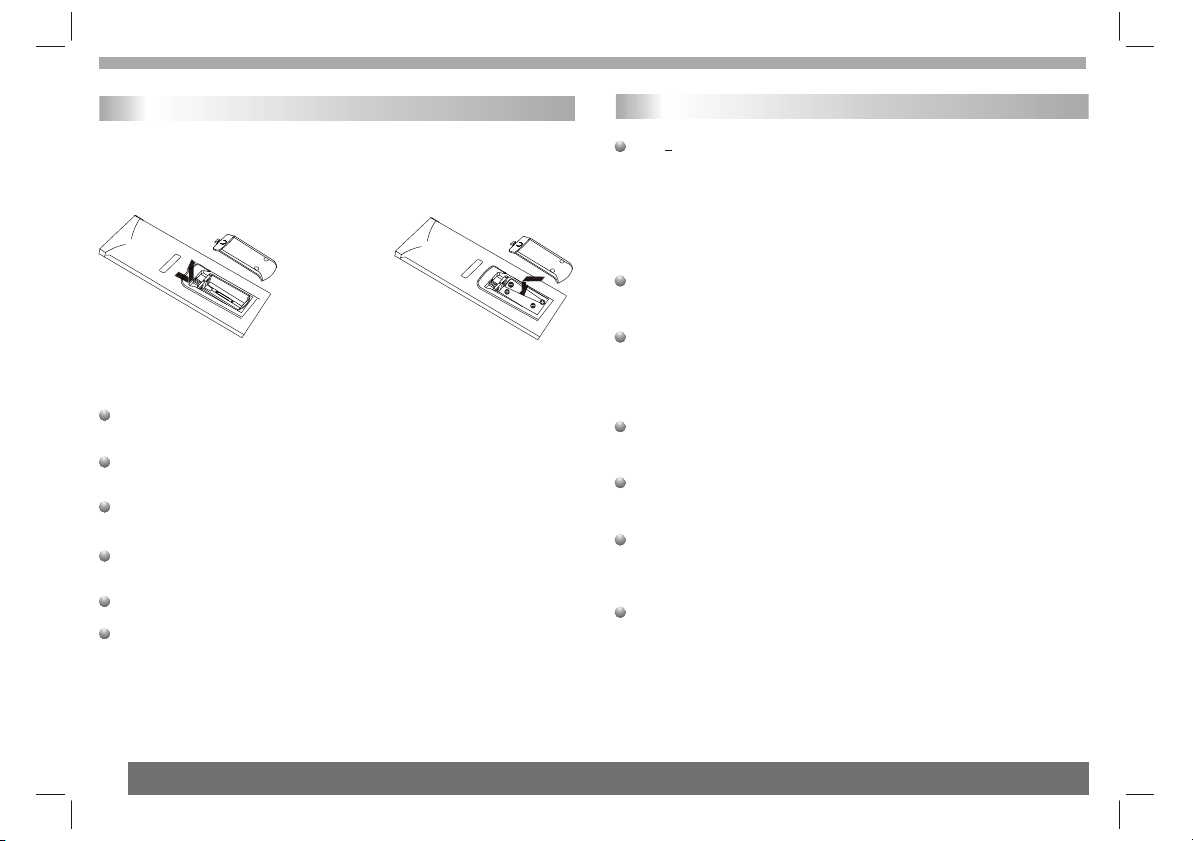
Insert the battery
1.Open the battery door.
2.Insert two AAA size batteries.
1 2
Refer to the drawing, take the back cover of the remote control off
and remove the empty battery receptacle.
Prior to shipping, a separating film was applied to the battery.
Remove this film.
Insert the battery into the receptacle and insert the receptacle into
the remote.
For the best results,aim the remote towards at the player's receiving
window. Stay within 15 feet and angles of 60 degrees or less.
Under normal use the battery will last for one year.
Remove battery during storage or when you are not using the DVD
player for a long time.
DVD Introduction
DVD+R/RW
DVD -R and DVD +R are two different standards for recordable DVD
drives and discs. This format allows information to be recorded onto
the DVD disc only once. DVD +RW and DVD -RW are two standards
for re-writable media, meaning the DVD content can be erased and
re-recorded. Single-sided discs can hold 4.38 gigabytes and
double-sided discs hold twice as much.There are no dual layer
single sided recordable discs.
VCD (Video CD)
A VCD holds up to 74 minutes (650 MB disc) or 80 minutes (700 MB
disc) of MPEG-1 full-motion video along with quality stereo sound.
MPEG
MPEG is an international standard for video and audio compression.
MPEG-1 is used in encoding video for VCD and provides for
multichannel surround sound coding such as PCM, Dolby Digital,
and MPEG audio.
WMA
Windows media audio file. A type of coding / decoding developed by
Microsoft Corp.
JPEG
Joint Pictures Expert Group. JPEG is a compressed file format that
allows you to save images with no limit on the number of colors.
MPEG4
MPEG4 is the name of a revolutionary new video codec.which is based
On the new MPEG-4 compression standard for video.You will be
able to play MPEG4 movies using this DVD player.
Title (DVD video discs only)
A title is generally a distinct section of a DVD disc. For example the
main feature could be title 1, a documentary describing how the film
was made could be title 2, and cast interviews could be title 3. Each
title is assigned a reference number enabling you to locate it easily.
7
Page 9
Getting Started
Playing a DVD or Video CD(Operation)
Playback Setup
1. turn on the power switch at the left side of the product.
2. Press OPEN to open the disc tray and insert your chosen
disc in the tray, with the playback side down.
3. Close the tray. Playback will start automatically.
DVD
Use the buttons to select the title/chapter you want to
view, then press ENTER to start.Press MENU to return to the
menu screen.
VCD
Use the number buttons to select the track you want to view and
press MENU to return to the menu screen. Menu settings and
operating procedures may differ.Follow the instructions on the
each menu screen.
Notes:
N
1.If parental control is set and the disc isn't fit for the rating
setting you must input the password.(See "parental" on page 21).
2.DVDs may have a region code.Your player does not play
discs that have a region code different from your player.
3.Unless stated otherwise,all operations described use the
remote control.Some features may also be available on the
setup menu.
DVD
Moving to another CHAPTER/TRACK
When a title on a disc has more than one chapter or a disc has
more than one track, you can move to another chapter/track as
follows:
1.Press SKIP or briefly during playback to select the next
(or previous)chapter/track or to return to the beginning of the current
chapter/track.
Most of the functions can be controlled by remote control unit.Most of the functions can be controlled by remote control unit.
Most of the functions can be controlled by remote control unit.Most of the functions can be controlled by remote control unit.
2.Press SKIP twice briefly to step back to the previous
chapter/track.
3.To go directly to any chapter during DVD playback, input the
chapter/track number .
Changing the Audio Channel
Press AUDIO repeatedly during playback to hear a different audio
channel (Stereo, Left, or Right).
DVD
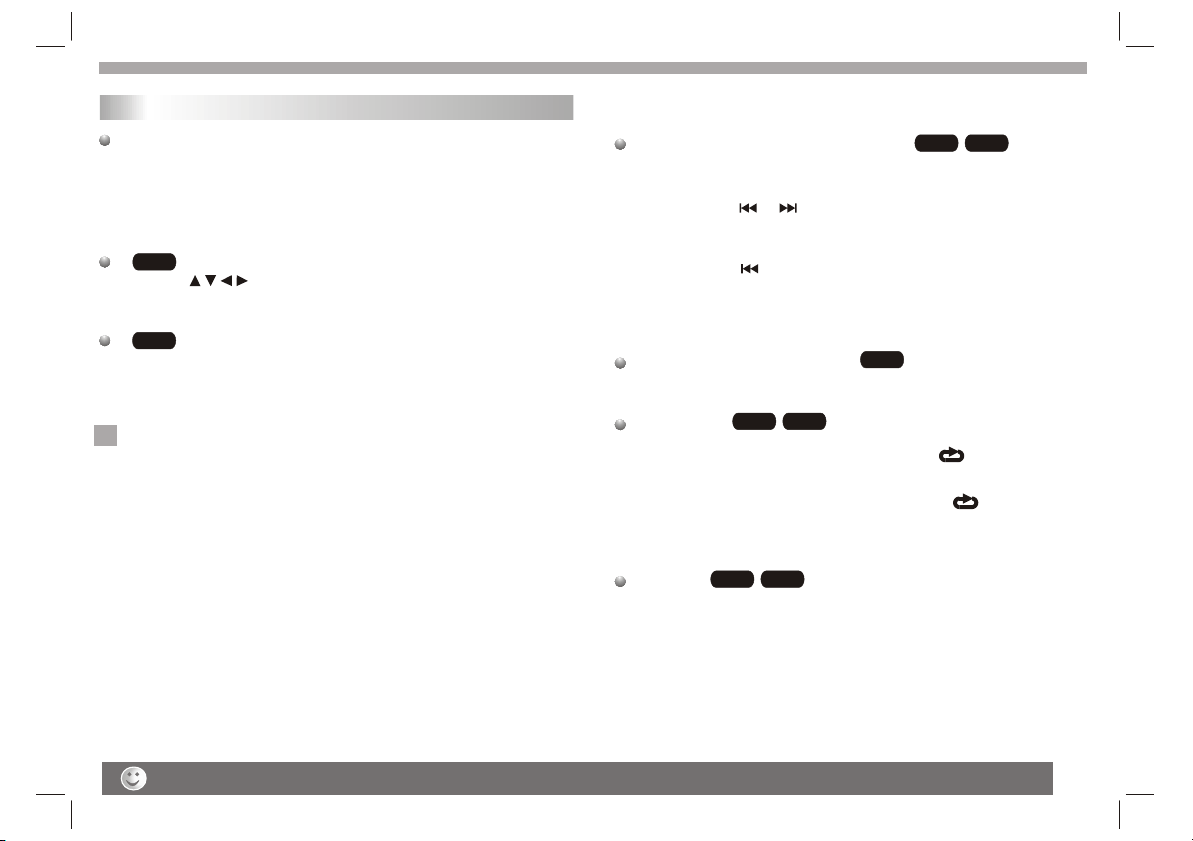
Repeat A-B
To repeat a sequence.
1. Press A-B at your chosen starting point " A". Appears
briefly on the TV screen.
2. Press A-B again at your chosen end point." AB" appears
briefly on the TV screen and the repeat sequence begins.
3. Press A-B again to cancel.
Repeat
You can play a title/chapter/all/track on a disc repeatedly.
Press REPEAT during playback to select a desired repeat mode.
DVD
VCD
VCD
VCD
VCD
Specifications and design are subject to change without prior notice.
8
Page 10
Getting started
Playing a DVD or Video CD(Operation)
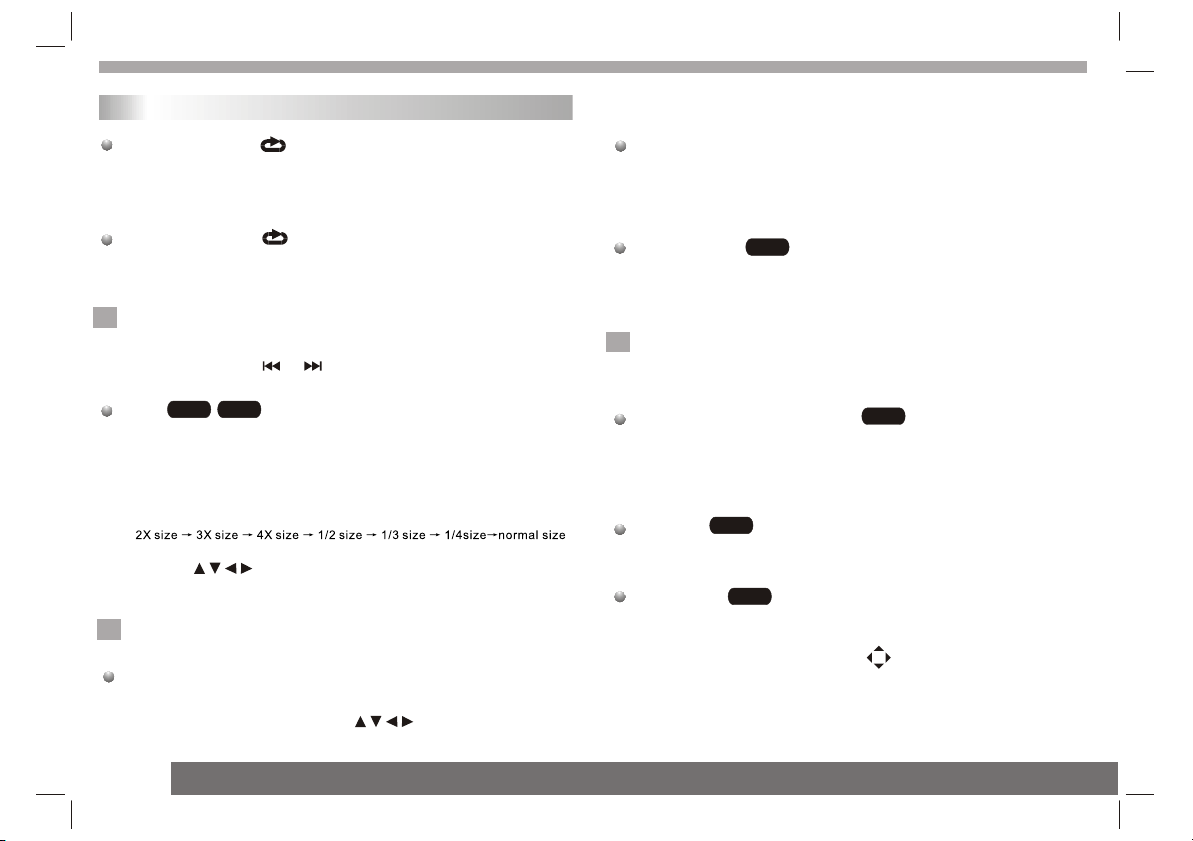
DVD Video Discs - " Repeat Chapter / Title/All"
Chapter: repeats the current chapter. Chapter
Title: repeats the current title.
All : repeats all the tracks on a disc.
Off : does not play repeatedly.
Video CDs, discs - " Repeat Track /All"
Track : repeats the current track
All : repeats all the tracks on a disc.
Off : does not play repeatedly.
Notes:
N
1.On a Video CD with PBC, you must set PBC to Off to use the
repeat function.
2.If you press SKIP ( or ) once during Repeat Chapter(Track)
playback, the repeat playback cancels
DVD
Zoom
Use zoom to enlarge the video image:
1.Press ZOOM during playback or still playback to activate the
Zoom function. The square frame appears briefly in the right bottom
of the picture.
2. Each press of the ZOOM button changes the TV screen in the
following sequence:
3. Use the buttons to move through the zoomed picture.
4. To resume normal playback, press ZOOM button until screen
becomes 1X.
Note:Zoom may not work on some DVDs.
N
Special DVD Features Checking the contents of DVD discs:
Menus DVDs may offer menus that allow you to access special
features. To use the disc menu, press MENU. Input the
corresponding number or use the buttons to highlight
your selection.Then press ENTER.
VCD
DVD MENU
1. Press DVD MENU.If the current title has a menu, the menu appears
on the screen. Otherwise, the disc menu may not appear.
2. The DVD MENU offers features such as camera angles,spoken
language and subtitle options, and chapters for the title.
3. Press DVD MENU to exit.
Camera Angle
If the disc contains scenes recorded at different camera angles, you
can change to a different camera angle during playback. Press
ANGLE repeatedly during playback to select a desired angle. Note
that the number of the current angle appears on screen.
Note:
N
The angle indicator will blink on the TV screen during scenes
recorded at different angles as an indication that angle switching is
possible.
Changing the Audio Language
Press AUDIO repeatedly during playback to hear a different audio
language or audio track.With DVD-RW discs recorded in VR mode
that have both a main and a Bilingual audio channel, you can
switch between Main (L), Bilingual (R), or a mix of both (Main +
Bilingual) by pressing AUDIO.
Subtitles
Press SUBTITLE repeatedly during playback to see the different
subtitle languages.
TITLE button
DVD disc:
Press TITLE button, then the DVD menu or titles available on the disc
will be displayed. Then you can use " " and ENTER button to select
programs.
DVD
DVD
DVD
DVD
9
Page 11
Basic operation
Audio CD and WMA Disc Features
Disc
The DVD player can play CD and WMA formatted recordings
on CD-R,CD-RW,DVD+R and DVD+RW discs.
CD
Audio
Once an Audio CD is inserted it will be played automatically .Its
playblack information will be show on screen,such as chapter
elapse time.
WMA
1. Press to select a folder, and press ENTER to see the folder
contents.
2. Press to select a track then press PLAY or ENTER. Playback
starts.
disc compatibility with this player is limited as
WMA
1.Sampling frequency: within 32 - 48kHz
2.Bit rate: 32 - 192kbps ( ).
The player cannot read an file that has a file
extension other than WMA.
CD-R physical format should be ISO 9660.
If you record WMA files using software that cannot create
a file system (eg. Direct-CD) it is impossible to playback WMA
files.We recommend that you use Easy-CD Creator,which creates
an ISO 9660 file system.
WMA
WMA
( ).
WMA
follows:
File names should have a maximum of 8 letters and must incorporate
an "wma" extension.
They should not contain special letters such as "/? * : < > l "etc.
The total number of files on one disc should be less than 650.
This DVD player requires discs and recordings tomeet certain
technical standards in order to achieve optimal playback quality.
Pre-recorded DVDs are automatically set to these standards. There
are many different types of recordable disc formats(including CD-R
containing or WMA files) and these require certain pre-existing
conditions (see above) to ensure compatible playback.
Customers should note that permission is required in order to
download WMA files and music from the Internet. Our company
has no right to grant such permission. Permission should always be
sought from the copyright owner.
10
Page 12
Basic operation
Playing an Audio CD or WMA
Pause
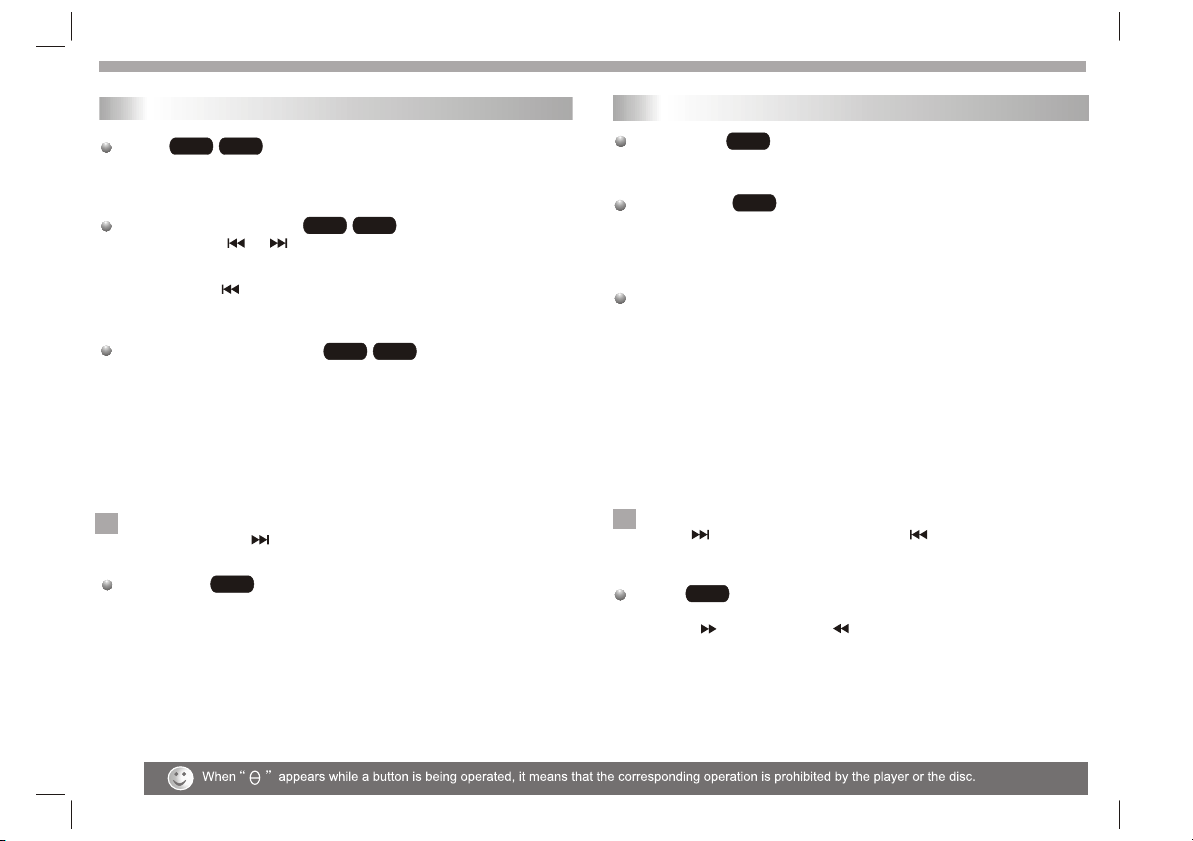
1. Press PLAY/PAUSE during playback.
2. To return to playback, press PLAY/PAUSE again.
Moving to another Track
1. Press SKIP ( or ) briefly during playback to go to the next
(or previous) track or to return to the beginning of the current track..
2. Press SKIP twice briefly to go back to the previous track.
3. You can play any track by inputting its number.
Repeat Track/Folder/All/Off
You can play a track/folder/all on a disc.
1. Press REPEAT when playing a disc. The repeat icon appears.
2. Press REPEAT to select a desired repeat mode.
Track: repeats the current track.(CD)
Folder: repeats the current folder.
All: repeats all the tracks on a disc.(CD)
Off(No display): normal playback.
Note:
N
If you press SKIP ( )once during Repeat Track playback,
the repeat playback cancels.
Repeat A-B
1.To repeat a sequence during disc playback press A-B at your
chosen starting point. The Repeat icon"A"appear on the menu
screen.
2.Press A-B again at your chosen end point.The Repeat icon
"AB" appear on the menu screen, and the sequence begins to
play repeatedly.
3.To exit the sequence and return to normal play,press A-B
again.The Repeat icon disappears from the menu screen.
WMACD
WMACD
WMACD
CD
Playing a JPEG Disc
Slide Show
There are 16 types for slide show.
You can press Program repeatly to select the slide show Mode.
Still Picture
1. Press PLAY/PAUSE during slide show.The player will now go into
PAUSE mode.
2. To return to the slide show, press PLAY/ PAUSE again.
Viewing a JPEG Disc
Using this DVD Player you can view Kodak PICTURE CDs and discs
with JPEG files.
1.Insert a disc and close the tray. The file menu appears on the TV
screen.
2. Press to select a folder, and press ENTER. A list of files in the
folder Appears. If you are in a file list and want to return to the
previous Folder list, use the buttons on the remote to highlight and
press ENTER.
3. If you want to view a particular file, press to highlight a file and
press ENTER or PLAY. Viewing the file proceeding starts.
4.If the DISC you insert is a Kodak Picture CD it will be played
automatically.
NOTE:
N
Press" " to move to the next page , " " to return to previons
folder,and " MENU" return to menu.
Zoom
1.Press 'ZOOM' .
2,Used " " to enlarge,or " " to shorten the picture.
JPEG
JPEG
JPEG
11
Page 13
Basic operation
Playing a JPEG Disc
To rotate picture
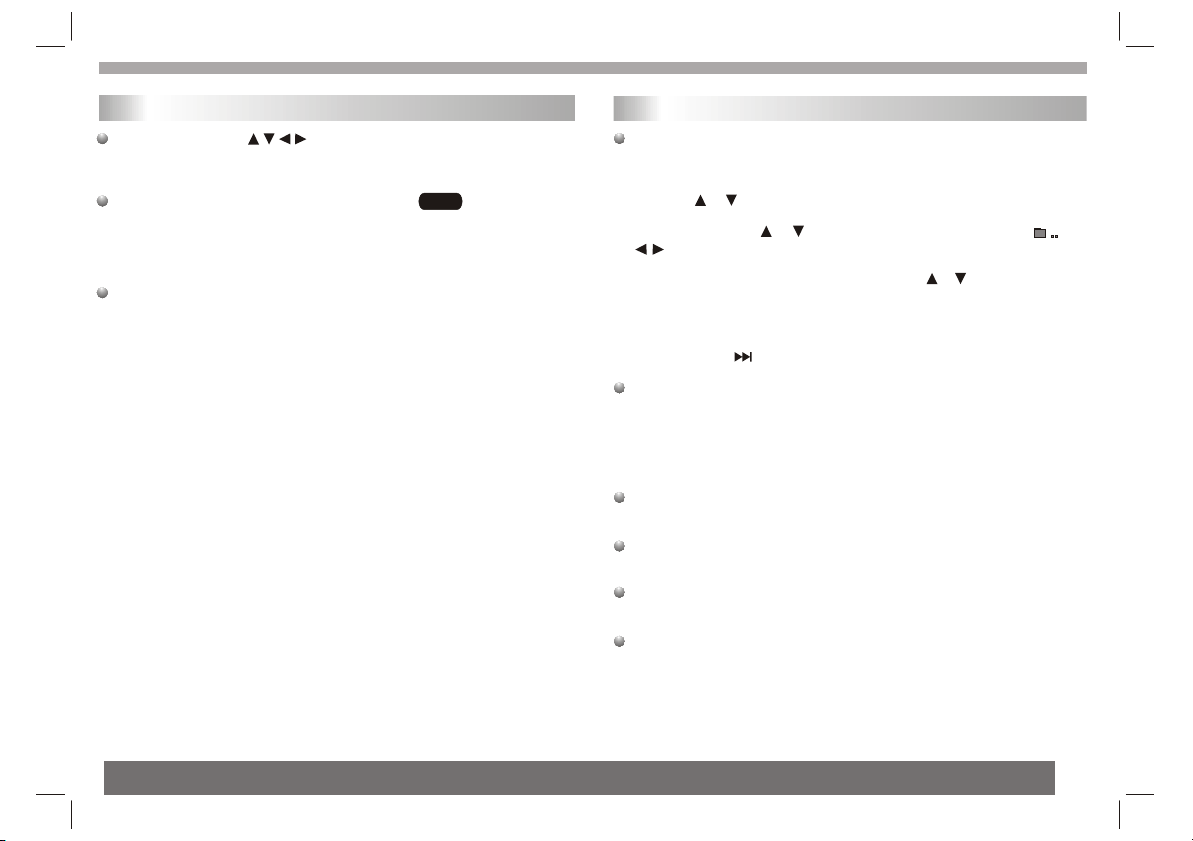
Press or during showing a picture to rotate the picture invert ,mirror,
clockwise ,counter clockwise.
To listen to WMA music watching picture
You can display files while listering to WMA music files
recorded on the same disc.
1.select a WMA desired.
2.select a picture.
JPEG disc compatibility with this player is limited as follows:
1.Depending upon the size and number of JPEG files, it could take
a long time for the DVD player to read the disc¡¯s contents. If you
don¡¯t see an on screen display after several minutes, some of the
files may be too large reduce the resolution of the JPEG files to
less than 2M pixels as 2760 x 2048 pixels and burn another disc.
2.The total number of files and folders on the disc should be less
than 650.Some discs may be incompatible due to a different
recording format or the condition of disc.Ensure that all the
selected files have the." jpg" extensions when copying into the CD
layout. If the files have. "jpg" or. "jpeg" extensions, please rename
them as."jpg" file.File names without."jpg" extension will not be
able to be read by this DVD player. Even though the files are shown
as JPEG image files in Windows Explorer.
JPEG
Playing a MPEG4 Movie Disc
Using this DVD Player you can play MPEG4 disc.
1. Insert a disc and close the tray.The folder menu appears on the
TV screen.
2. Press to select a folder, and press ENTER. A list of files in
the folder appears. If you are in a file list and want to return to the
Folder list,use the or button on the remote to highlight or
button and press ENTER.
3. If you want to view a particular file,press / to highlight a file
and press ENTER or PLAY.
4. Press STOP to exit.
5.Press NEXT to move to the next chapter.
MPEG4 disc compatibility with this player is limited as follows:
1.Available resolution size of the MPEG4 file is under 720x576 (W xH)
pixel.
2.The file name of the MPEG4 subtitle is available by 56 characters.
3.If there is impossible code to express in the MPEG4 file, it may be
displayed as " _ "mark on the display.
If the number of the screen frame is over 30 per second,this
unit may not operate normally.
If the video and audio structure of recorded file is not interleaved,
either video or audio is outputted.
Playable MPEG4 file
".avi ", ".mpg ", ".mpeg".
Playable Audio format
"AC3 ", "PCM ", "WMA ".Sampling frequency:
within 32 - 48kHz (WMA) Bit rate:
32 - 192kbps (WMA)
12
Page 14
Basic operation
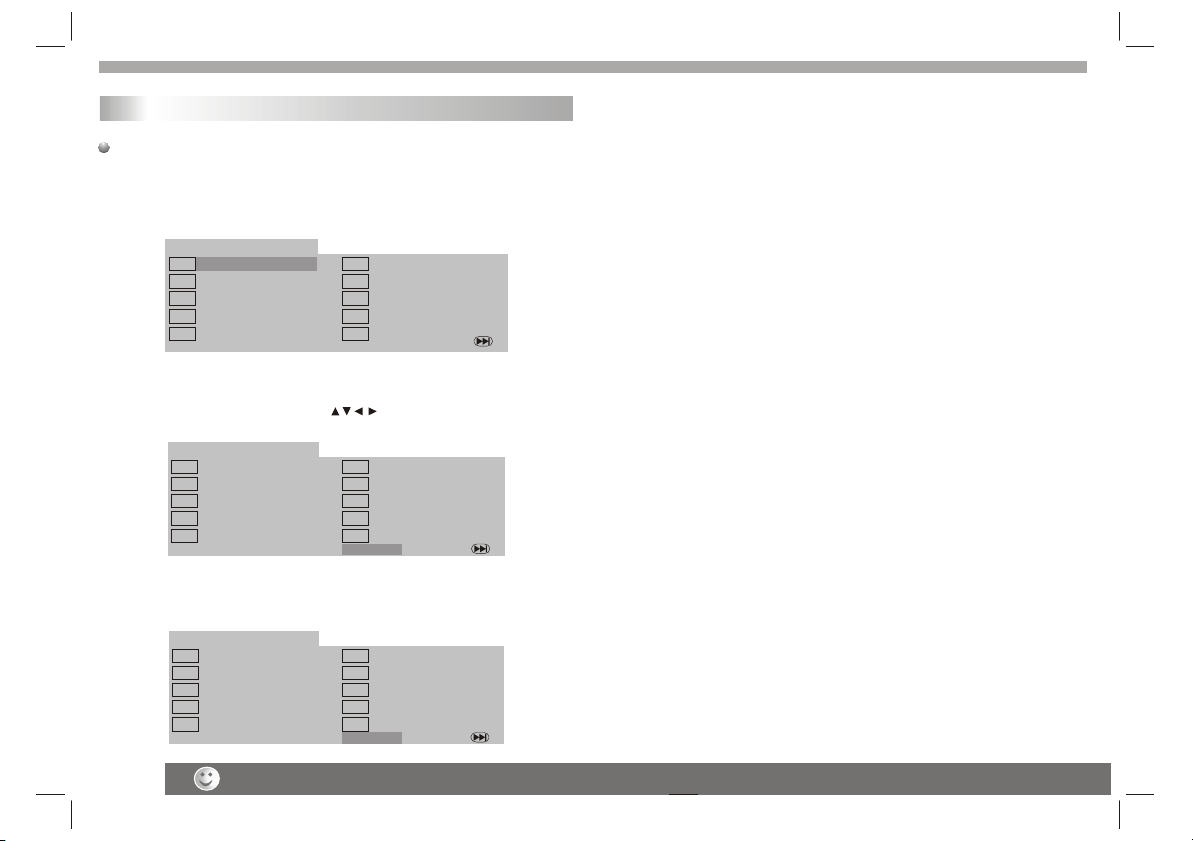
Program playback(not for Picture CD)
DVD
The program function enables you to store your favourite tracks from
any disc in the player memory.
1. Press PROGRAM
The program menu appears.
Program:TT(06)/CH(- -)
TT: CH:
1
TT: CH:
2
TT: CH:
3
TT: CH:
4
TT: CH:
5
2.Use the numerical keypad(0-9) to direct input the titles, tracks or
chapters (single track number with digit '0' in front ,for example '05').
3.Move the cursor by pressing to select START.
Exit
6
7
8
9
10
TT: CH:
TT: CH:
TT: CH:
TT: CH:
TT: CH:
NEXT
Program:TT(06)/CH(- -)
10
Start
TT: CH:
6
TT: CH:
7
TT: CH:
8
TT: CH:
9
TT: CH:
NEXT
TT: 06 CH:01
1
TT: 05 CH:01
2
TT: CH:
3
TT: CH:
4
TT: CH:
5
4. To resume normal playback from programmed playback,Press
PROGRAM and press STOP button on the program menu.
Exit
Program:TT(06)/CH(- -)
10
Stop
TT: CH:
6
TT: CH:
7
TT: CH:
8
TT: CH:
9
TT: CH:
NEXT
TT: 06 CH:01
1
TT: 05 CH:01
2
3
4
5
TT: CH:
TT: CH:
TT: CH:
Exit
Helpful Hint:
- Program can be activated only when a disc is in the DVD player.
- When the program menu appears, the setup menu setting is
forbiddened.
13
When this unit is not used, please turn off the power and leave no disc inside.
Page 15
Basic operation
DIGITAL CARD Play operationand USB
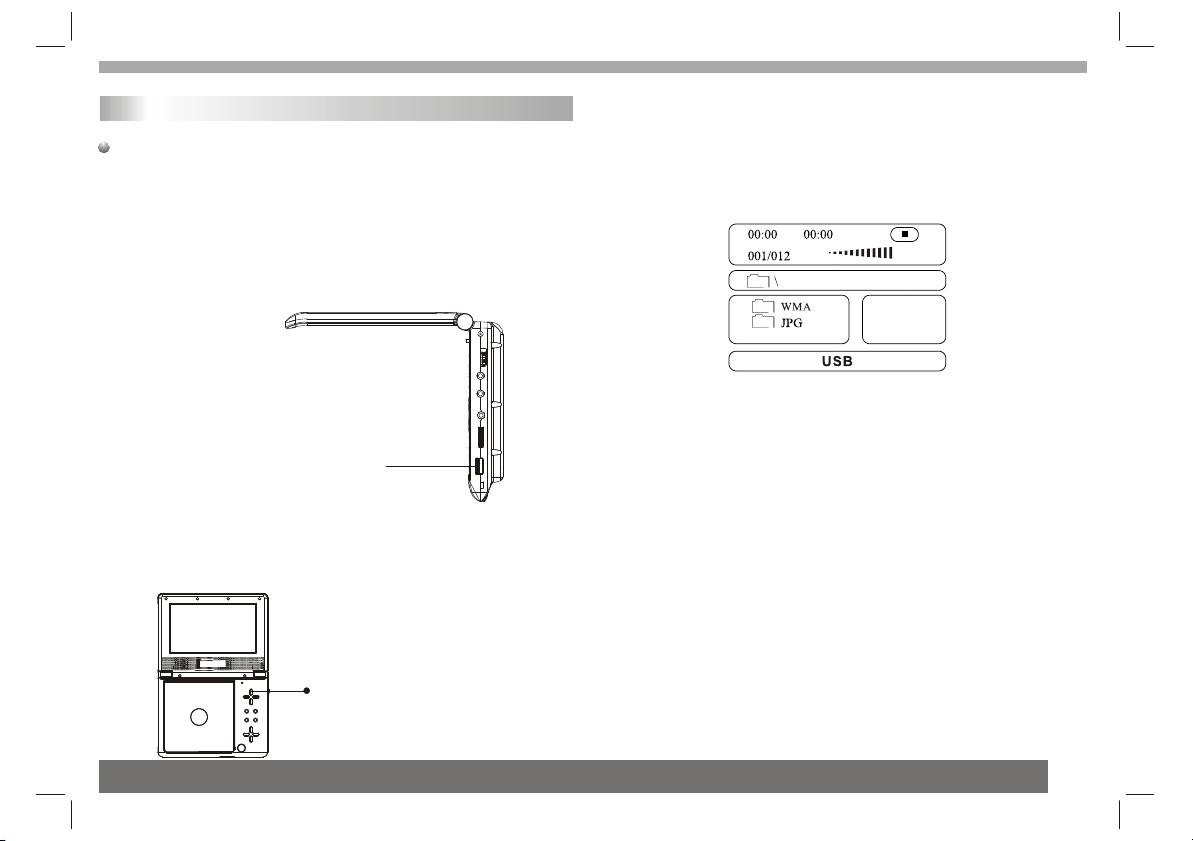
Digital cards (MMC/SD&MS card) and USB with
Pictures (.jpg) may be played and displayed through the unit.
MMC/SD/MS cards may be directly input through the
card reader slot. The USB Socket can be used to supply signals to
the unit from USB sources.
How to select DIGITAL USB/CARD to play
1. Turn the unit on.
2. Insert either a USB source or a Card into the appropriate USB
connection point on the right or the MMC/SD card reader on the left.
USB
3. Press the "SOURCE" button on the units main panel ,select MEDIA
and the units would auto detect the USB/CARD socket.
4. If USB/CARD is selected, the unit will begin to read the CARD or
USB connected to it .
SOURCE
How to play DIGITAL USB/CARD
1. Press "USB/CARD" button on the remote control to switch.
Example:
2. Press "SOURCE" button on the remote control to switch.
If insert cards the screen display¡°CARD¡±
NOTE: According to the content of the USB and DIGITAL CARD,
the display picture will be different.
14
Page 16
SETUP Menu Setting
General Operation&General Setup Page
General Operation
1.Press SETUP to enter the Setup Menu.
2.Press ENTER to the next level submenu or confirm your
selection.
3.Press to enter the submenu or returen to the previous menu
4.Press to highlight the desired menu.
To exit from the menu
Press SETUP The settings will be stored in the player's memory
even if the player is switched off.
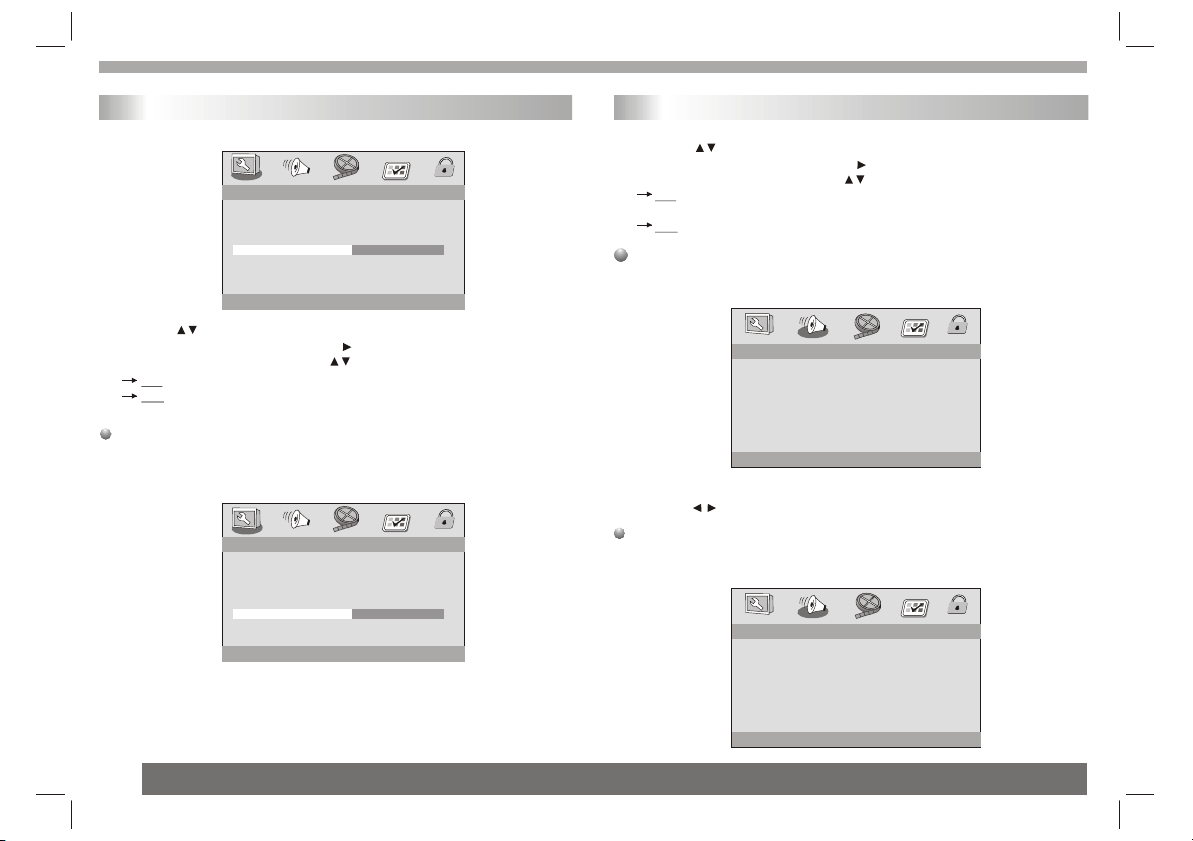
General Setup Page
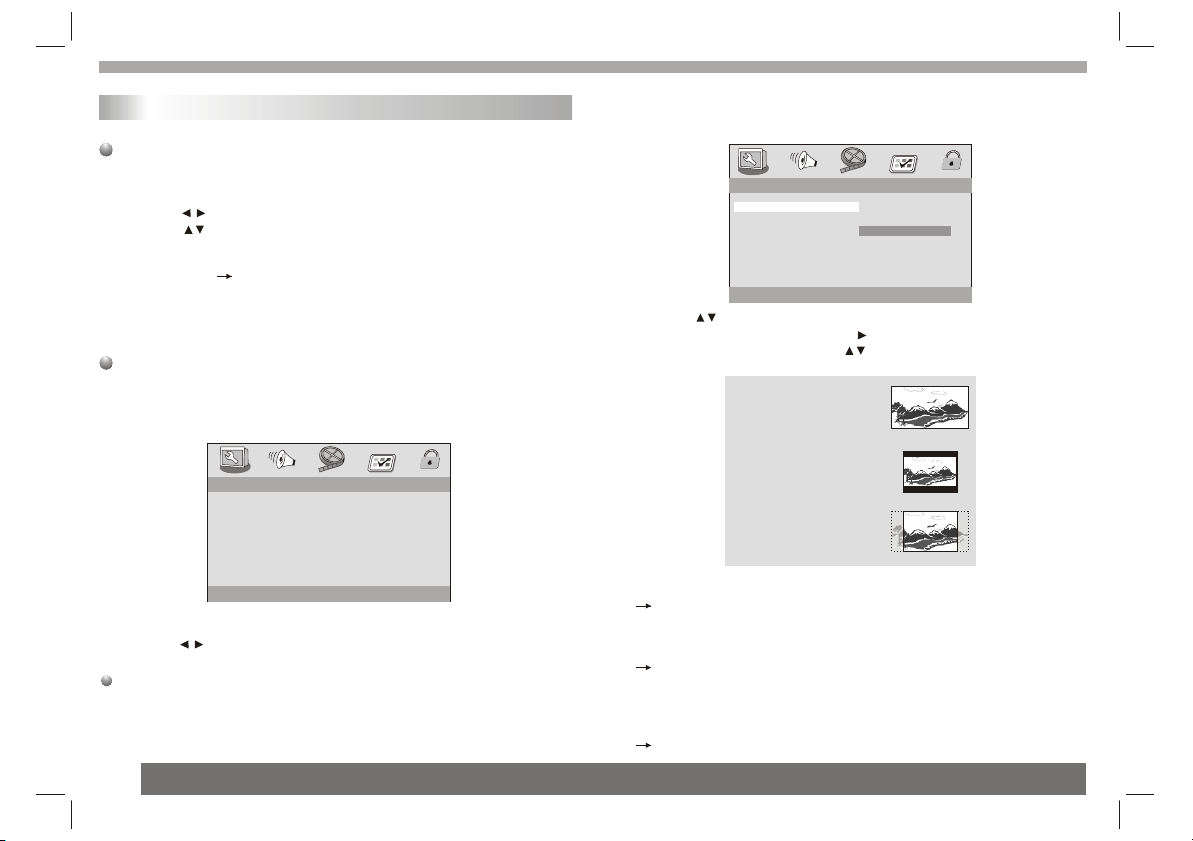
The options included in General Setup page are:" TV Display","Angle
Mark","OSD lang","Captions","Screen Saver".
Follow the steps below:
enter
- - GENERAL SETUP PAGE - -
TV DISPLAY Wide
ANGLE MARK ON
OSD LANGUAGE ENG
CLOSED CAPTIONS ON
SCREEN SAVER ON
- - GENERAL SETUP PAGE - -
TV DISPLAY Wide 4:3 PANSCAN
ANGLE MARK OFF 4:3 LETTERBOX
OSD LANGUAGE ENG 16:9
CLOSED CAPTIONS ON Wide Squeeze
SCREEN SAVER ON
SET TV DISPLAY MODE
1.Press to highlight 'TV Display'.
2.Enter its submenu by pressing .
3.Move the cursor by pressing to highlight the selected item.
16:9
Wide
4:3
Letter Box
4:3
Pan Scan
GOTO GENERAL SETUP PAGE
1.Press SETUP to enter the setup menu.
2.Press to select the 'General Setup page'.
TV Display
Set the aspect ratio of the DVD Player according to the TV you have
connected.
15
Normal/PS
If you have a normal TV and want both sides of the picture to be
trimmed or formatted to fit your TV screen.
Normal/LB
If you have a normal TV. In this case , a wide picture with black
bands on the upper and lower portions of the TV screen will be
displayed.
Wide
If you have a wide-screen TV.
Page 17
SETUP Menu Setting
General Setup Page
Angle Mark
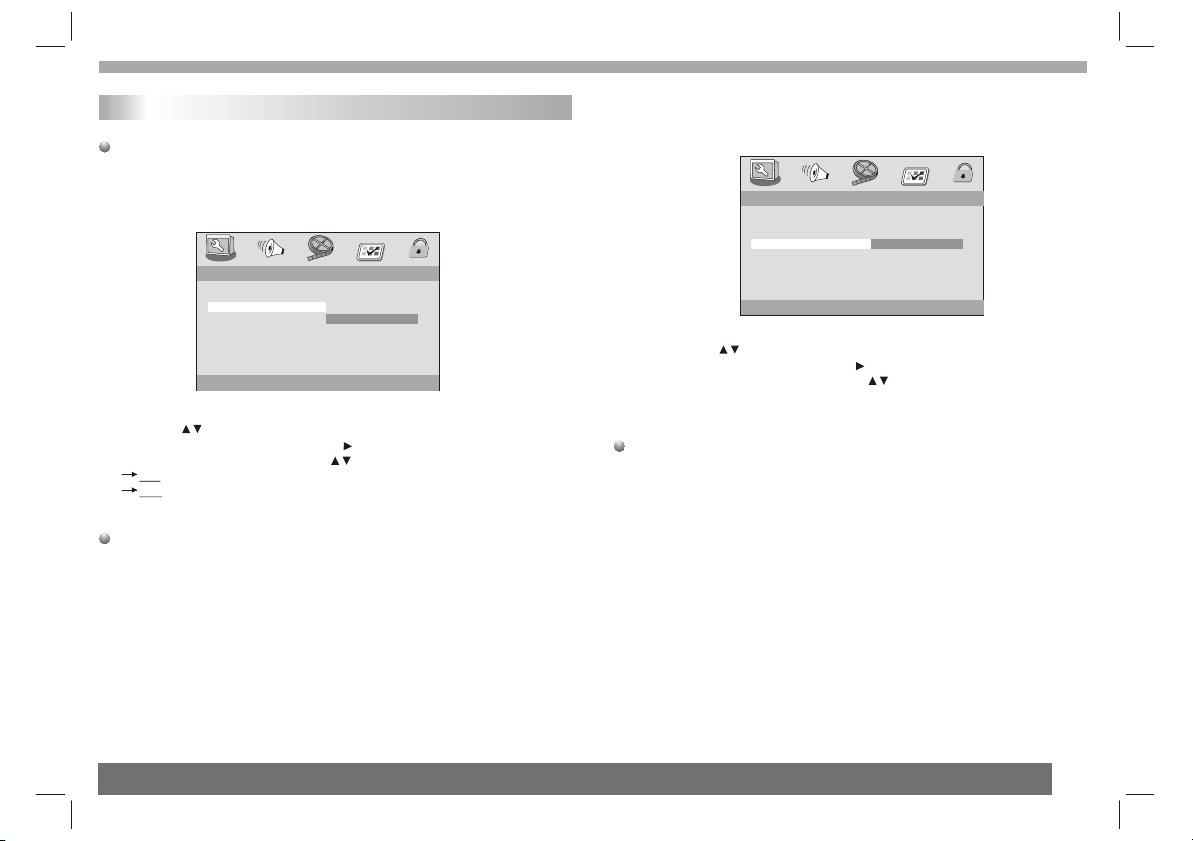
Displays current angle setting information on the right hand corner
of the TFT screen if available on the disc.
- - GENERAL SETUP PAGE - -
TV DISPLAY Wide
ANGLE MARK OFF ON
OSD LANGUAGE ENG OFF
CLOSED CAPTIONS ON
SCREEN SAVER ON
SET ANGLE MARK
1.Press to highlight 'Angle Mark'.
2.Enter its submenu by pressing .
3.Move the cursor by pressing to highlight the selected item.
On:Enable Angle Mark.
Off:Disable the current angle setting display.
OSD Lang
You can select your own preferred language seetings.This DVD
system will automatically switch to the selected language whenever
you load a disc.If the language selected is not available on the disc,
the disc's default language will be used instead. The OSD language
in the system menu will remain once selected.
- - GENERAL SETUP PAGE - -
TV DISPLAY Wide
ANGLE MARK OFF
OSD LANGUAGE ENG
CLOSED CAPTIONS ON
SCREEN SAVER ON
ITALIAN
SPANISH
PORTUGUESE
SET OSD LANGUAGE
1.Press the keys to highlight 'OSD Lang'.
2.Enter its submenu by pressing .
3.Move the cursor by pressing the to highlight the selected item.
4.Select a language and press ENTER.
Closed Captions
Closed captions are data that are hidden in the video signal of some
discs.Captions are different from subtitles because captions hearing
are impaired by showing the sound effects(e.g.,"phone ringing" and
" footsteps"),while subtitles do not.
Before you select this function,please ensure that the disc contains
closed captions information and your TV set also has this function.
ENGLISH
FRENCH
GERMAN
16
Page 18
SETUP Menu Setting
General Setup Page
- - GENERAL SETUP PAGE - -
TV DISPLAY Wide
ANGLE MARK OFF
LANGUAGE ENG
OSD
CLOSED CAPTIONS ON ON
SCREEN SAVER ON OFF
CLOSED CAPTION
1.Press to highlight 'Closed Captions'.
2.Enter its submenu by pressing .
3.Move the cursor by pressing to highlight the selected item.
On:Enable Closed Captions.
Off:Disable Closed Captions.
Screen Saver
This function is used to turn the screen saver On or Off.
- - GENERAL SETUP PAGE - -
TV DISPLAY Wide
ANGLE MARK OFF
OSD LANGUAGE ENG
CLOSED CAPTIONS ON
SCREEN SAVER ON ON
SCREEN SAVER
OFF
Audio Setup Page
1.Press to highlight 'Screen Saver'.
2.Enter its submenu by pressing .
3.Move the cursor by pressing to highlight the selected item.
On:In STOP,PAUSE or No DISC mode,if no actions are performed
about 3 minutes,the Screen Saver will be activated.
Off:Screen Saver is disabled.
Speaker Setup Page
The options included in Speaker Setup Page is 'Downmix'.
'Digital output','Dolby digital'.
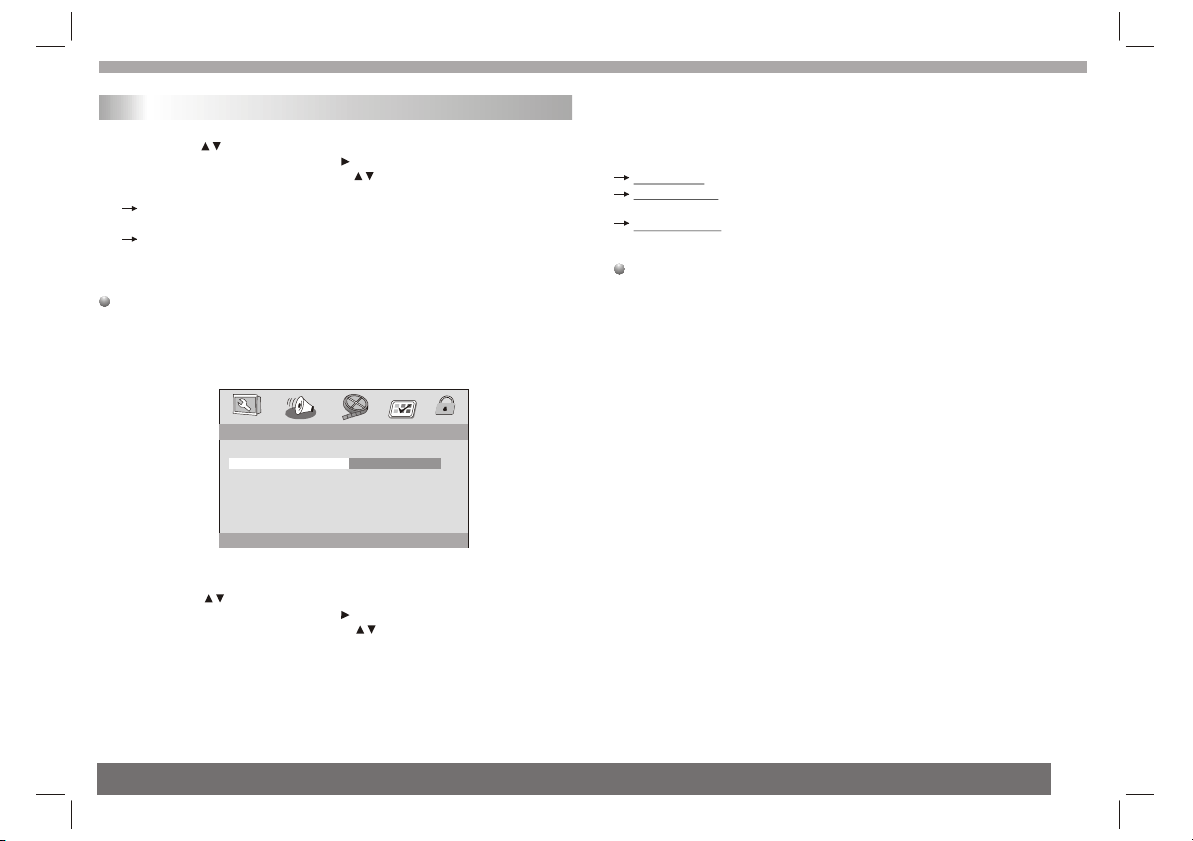
- - AUDIO SETUP PAGE - -
DOWNMIX STR
DIGITAL OUTPUT RAW
DOLBY DIGITAL
GO TO SPEAKER SETUP PAGE
1.Press SETUP.
2.Press to select the 'Audio Setup page'.
Downmix
This options allows you to set the stereo analog output of your
DVD Player.
- - AUDIO SETUP PAGE - -
DOWNMIX
DIGITAL OUTPUT RAW
DOLBY DIGITAL
STR LT/RT
STEREO
17
SET DOWNMIX MODE
Page 19
SETUP Menu Setting
Speaker Setup Page&Dolby Digital Setup
1.Press the keys to highlight 'Downmix'.
2.Enter its submenu by pressing .
3.Move the cursor by pressing the keys to highlight the selected
item.
LT/RT :Select this option if your DVD Player is connected to a
Dolby Pro Logic decoder.
Stereo :Select this option when output delivers sound from only
the two front speakers.
SPDIF Output
The function is used to select the SPDIF Output:SPDIF Off,SPDIF/
RAW,SPDIF/PCM.
- - AUDIO SETUP PAGE - -
DOWNMIX STR
DIGITAL OUTPUT RAW
DOLBY DIGITAL
SETUP SPDIF
1.Press the keys to highlight 'SPDIF Output'.
2.Enter its submenu by pressing .
3.Move the cursor by pressing the keys to highlight the
selected item.
RAW
SPDIF/OFF
SPDIF/RAW
SPDIF/PCM
Set the SPDIF Output according to your optional audio equipment
connection.
SPDIF Off: Turns off the SPDIF output.
SPDIF/RAW: If you have connected your DIGITAL AUDIO OUT
to a multi-channel decoder/receiver.
SPDIF/PCM: Only if your receiver is not capable of decoding
multi-channel audio.
Dolby digital
Goto dolby digital setup page
18
Page 20
SETUP Menu Setting
Dolby Digital Setup
Dolby Digital Setup
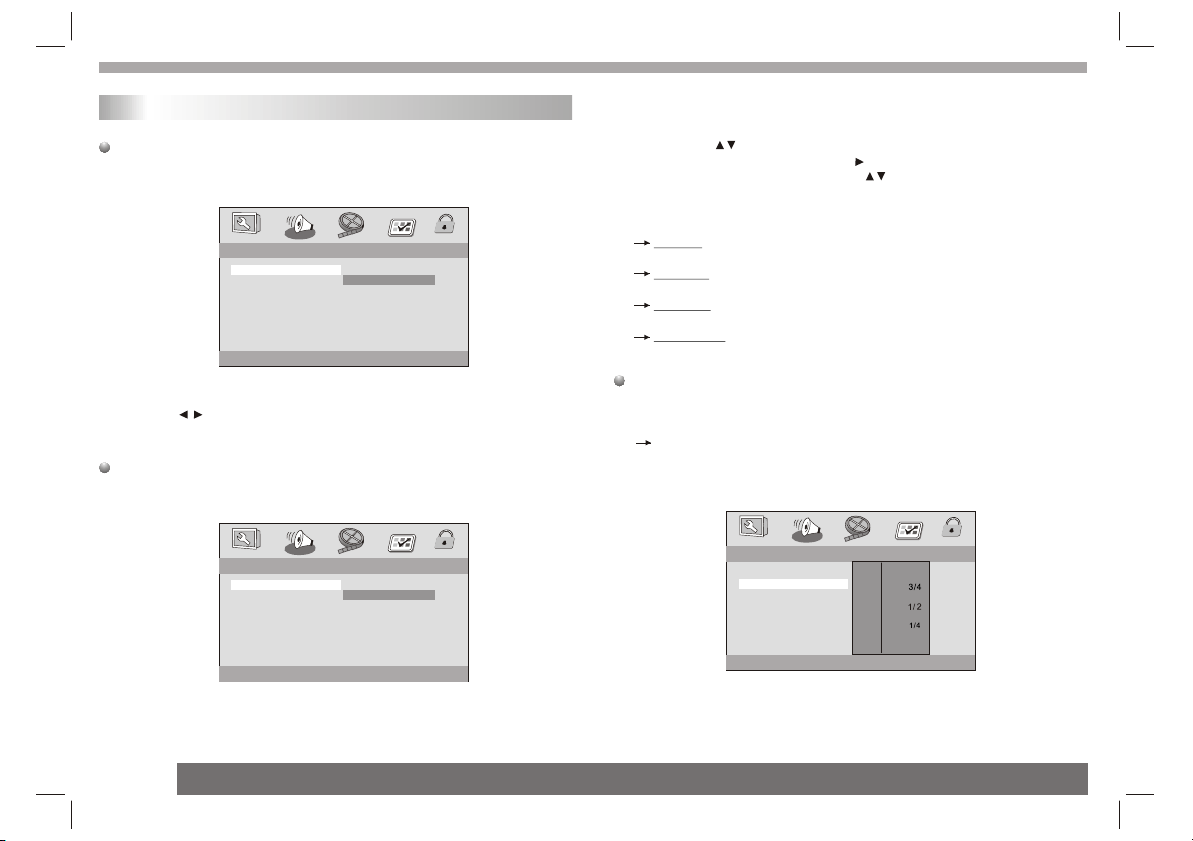
The options included in Dolby Digital Setup are: 'Dual Mono ' and
'Dynamic '.
- - DOLBY DIGITAL SETUP - -
DUAL MONO STR
DYNAMIC
DUAL MONO (1+1) SETUP
1.Press SETUP.
2.Press to select the 'Dolby Digital Setup'.
Dual Mono
- - DOLBY DIGITAL SETUP - -
DUAL MONO STR
DYNAMIC
DUAL MONO (1+1) SETUP
STEREO
L-MONO
R-MONO
MIX-MONO
STEREO
L-MONO
R-MONO
MIX-MONO
1.Press the keys to highlight 'Dual Mono'.
2.Enter its submenu by pressing .
3.Move the cursor by pressing the keys to highlight the selected
item.
To select the setting that matches the number of speakers you have
connected.
Stereo:Left mono sound will send output signals to Left speaker
and Right mono sound will send output signals to Right speaker.
L-Mono:Left mono sound will send output signals to Left speaker
and Right speaker.
R-Mono:Right mono sound will send output signals to Left speaker
and Right speaker.
Mix-Mono:Left and Right mixed mono sound will send output
signals to Left and Right speakers.
Dynamic
To optimize the dynamic sound output high volume outputs are
softened, enabling you to watch your favourite movie without
disturbing others.
The levels for dynamic selection:Full,7/8,3/4,5/8,1/2,3/8,1/4,1/8
and Off.
- - DOLBY DIGITAL SETUP - -
DUAL MONO
DYNAMIC
SET DRC TO 1/8
FULL
-
-
-
-
-
-
-
-
-
-
-
-
-
-
-
-
OFF
-
-
-
19
Page 21
SETUP Menu Setting
Video Setup Page
Video Setup Page
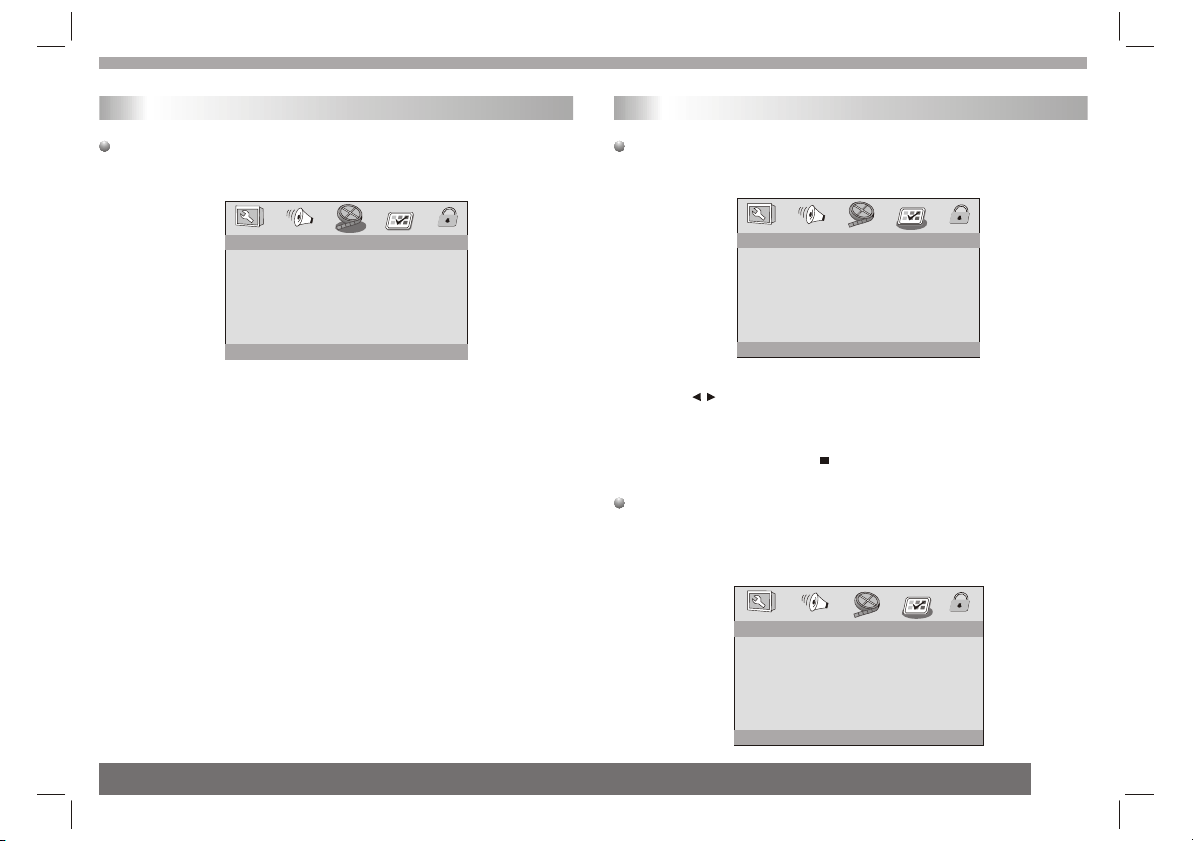
- - VIDEO SETUP PAGE - -
SHARPNESS MID
BRIGHTNESS 00
CONTRAST 00
HUE 00
SATURATION 00
GOTO VIDEO SETUP PAGE
Sharpness,Brightness,Contrast,Hue,Saturation:setting the
video quality.
Preference Page
Preference Page
The options included in Preference page are : 'TV Type','Audio',
'Subtitle','Disc Menu','Parental',and 'Default'.
- - PREFERENCE PAGE - -
TV TYPE PAL
AUDIO ENG
SUBTITLE ENG
DISC MENU ENG
PARENTAL
DEFAULT
GOTO PREFERENCE PAGE
1.Press SETUP.
2.Press to select the 'Preference Page'.
Note:
Some Preference features can be selected only during 'No
Disc' condition or STOP( ) mode.
TV Type
Selecting the colour system that corresponds to your TV when AV
outputs.This DVD Player is compatible with both NTSC and PAL.
In order for a DVD disc to play on this Player,the colour system of
the Disc,the TV and the DVD Player should match.
- - - -PREFERENCE PAGE
TV TYPE PAL
AUDIO
SUBTITLE
DISC MENU
PARENTAL
DEFAULT
SET TV STANDARD
PAL
ENG
ENG
ENG
AUTO
NTSC
20
Page 22
SETUP Menu Setting
Preference Page
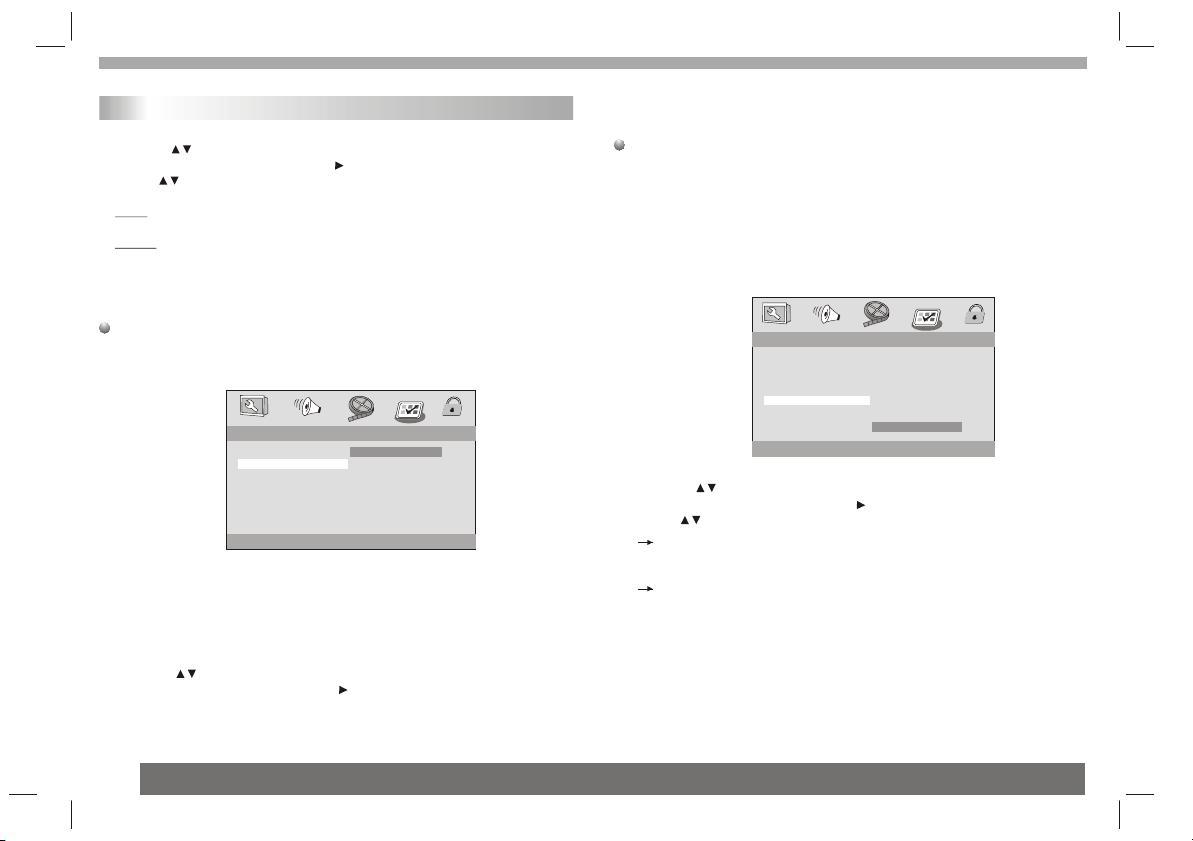
1.Press to highlight 'TV Display'.
2.Enter its submenu by pressing .
3.Use to highlight a TV Type fit for your TV.
PAL - Select this if the connected TV is PAL system.It will change the
video signal of a NTSC disc and output in PAL format.
NTSC-Select this if the connected TV is NTSC system.It will change
the video signal of a PAL disc and output in NTSC format.
Auto:Chang the video signal output automatic according to the
playing disk format.
Audio,Subtitle and Disc menu
These options set the Audio,Subtitle and Disc menu language fit for
you.
- - - -PREFERENCE PAGE
TV TYPE PAL
AUDIO
SUBTITLE
DISC MENU
PARENTAL
DEFAULT
PREFERRED AUDIO LANGUAGE
- 'Audio '(disc 's soundtrack)
- 'Subtitle '(disc 's subtitles)
- 'Disc Menu '(disc 's menu)
1.Press to highlight DVD language options.
2.Enter its submenu by pressing .
3.Select a language and press ENTER.
4.Repeat steps 1~3 for other language settings.
ENG
ENG
ENG
ENGLISH
FRENCH
SPANISH
RUSSIAN
THAI
Parental
Some DVDs may have a parental level assigned to the complete disc
or to certain scenes on the disc.This feature lets you set a playback
limitation level.The rating levels are from 1 to 8 and are country
dependent. You can prohibit the playing of certain discs that are not
suitable for your children or have certain discs played with alternative
scenes.
VCD,SVCD,CD have no level indication,so parental control function
has no effect on those kinds of discs.This applies to most illegal
DVD discs.
- - GENERAL SETUP PAGE - -
TV TYPE
AUDIO
SUBTITLE
DISC MENU
PARENTAL
DEFAULT
SET PARENTAL CONTROL
1.Press to highlight 'Parental' .
2.Enter its submenu by pressing .
3.Use to highlight a rating level for the disc inserted.
DVDs that are rated above the level you selected will not play
unless you enter your four-digit password and choose a higher level
rating.
To disable Parental controls and have all Discs play,choose 'Off'.
Helpful Hint:
- Some DVDs are not encoded with a rating though the movie rating
may be printed on the Disc cover. The rating level feature does not
work for such Discs.
Rating explanations
1 KID SAF
- Kids material;recommended especially for children and viewers
of all ages.
PAL
ENG
ENG
ENG
1 KID SAF
2 G
3 PG
4 PG13
5 PGR
6 R
7 NC17
8 ADULT
21
Page 23
SETUP Menu Setting
Preference Page
2 G
- General Audience;recommended as acceptable for viewers of all
ages.
3 PG
- Parental Guidance suggested.
4 PG13
- Material is unsuitable for children under age 13.
5-6 PG-R
- Parental Guidance-Restricted;recommended that parents restrict
children under 17 from viewing or allow to view only when supervised
by a parent or adult guardian.
7 NC17
- No children under age 17;not recommended viewing for children
under age 17.
8 ADULT
- Mature material;should be viewed only by adults due to graphic
sexual material,violence or language.
Default
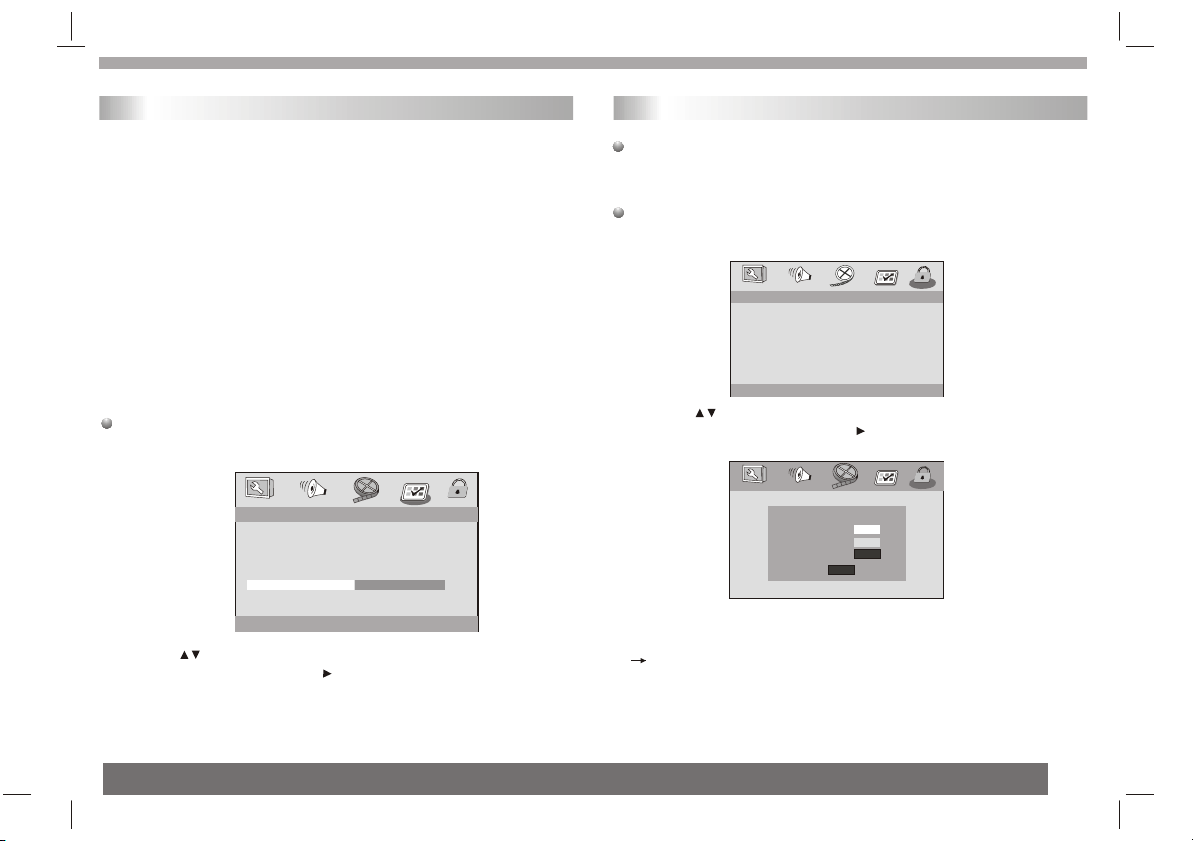
Setting the 'Default ' function will reset all options and your personal
settings to the factory defaults and all your personal settings will be
erased.
- - - -PREFERENCE PAGE
TV TYPE
AUDIO
SUBTITLE
DISC MENU
PARENTAL
DEFAULT
LOAD FACTORY SETTING
1.Press to highlight 'Default ' .
2.Highlight Reset by pressing .
3.Press ENTER to confirm selection.
Caution!
- When this function is activated,all settings will be reset to
factory defaults.
PAL
ENG
ENG
ENG
RESET
Password Setup Page
Password Setup Page
- Password mode: Set password mode on/off. If set to off, change
parental level will not check password.
- Setting new password:
Password
This feature is used for Parental Control.Enter your four digit password
when a hint is displayed on the screen.The default password is 1369.
- - Password Setup Page - -
Password Mode ON
Password
Goto Password Setup Page
1.Press to highlight 'Password '
2.Enter its submenu by pressing .
3.Press ENTER to open the 'New Password ' page.
OLD PASSWORD
NEW PASSWORD
CONFIRM PWD
4. Enter the default password 4-digit code.
5. Enter the new 4-digit code.
6. Enter the new 4-digit code a second time to confirm.
The new 4 digit code will be take effect.
7. Press OK to exit.
Helpful Hints:
- If the password has been changed ,the parental and disc lock
code will also be changed.
- The default password (1369)is always active even the
password has been changed.
OK
22
Page 24
Parameters and specifications
Battery Parameters
Battery Specifications£º
Output£º7.4V
Charge / Discharge Time£º
Standard charge time£º5h ~ 6h
Storage and work circumstances£º
1. Storage circumstances Temperature Humidity
6 months
1 week
2.Work circumstances Temperature Humidity
Standard charge
Standard discharge
-20 C ~ +45 C
-20 C ~ +65 C
0 C ~ +45 C
-20 C ~ +65 C
65+20%
65+20%
65+20%
65+20%
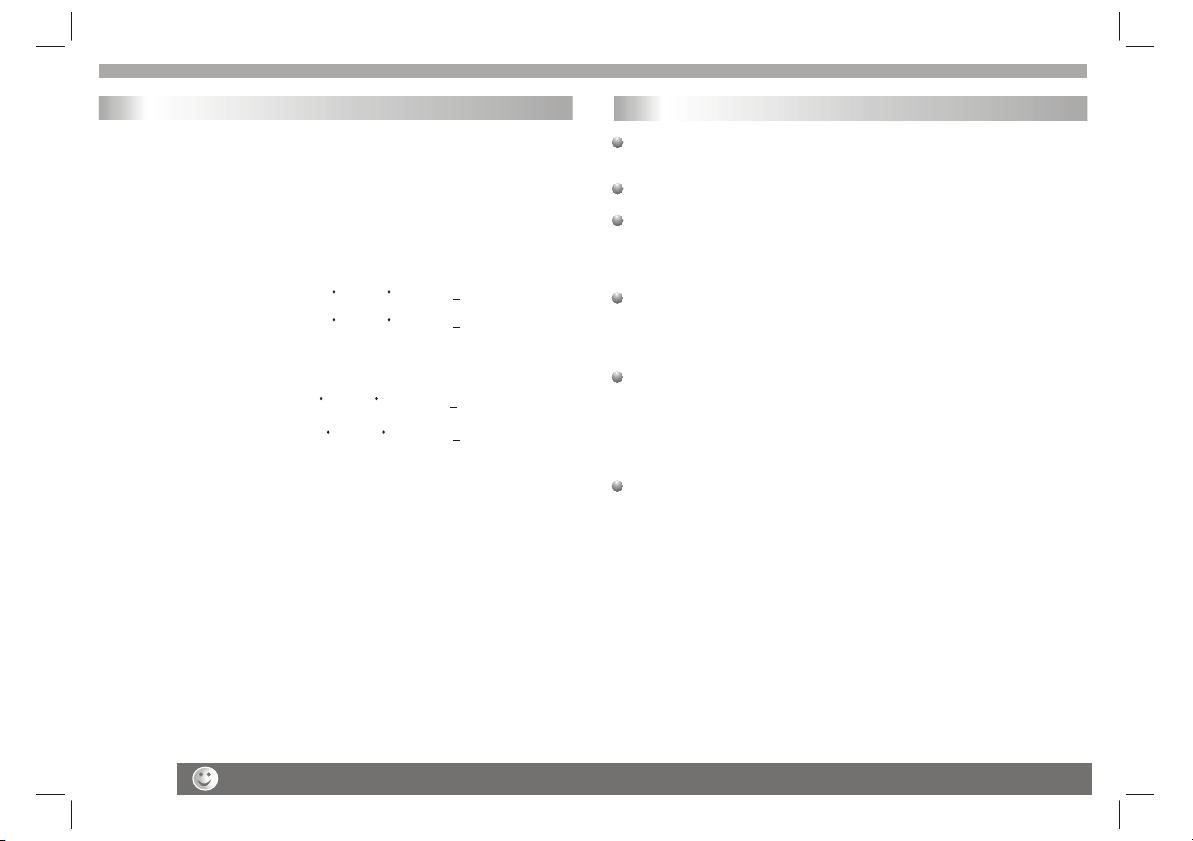
Maintenance and Service
Refer to the information in this chapter before contacting a service
technician.
Handling the unit
When shipping the unit
Please save the original shipping carton and packing materials.
If you need to ship the unit, for maximum protection,re-pack the
unit as it was originally packed at the factory.
Keeping the exterior surfaces clean
Do not use volatile liquids such as insecticide spray near the unit.
Do not leave rubber or plastic products in contact with the unit for a
long period of time. since they leave marks on the surface.
Cleaning the unit
To clean the player, use a soft, dry cloth. If the surfaces are
extremely dirty, use a soft cloth lightly moistened with a mild
detergent solution.
Do not use strong solvents such as alcohol, benzine,or thinner,
as these might damage the surface of the Unit.
Maintaining the unit
The DVD player is a high-tech, precision device. If the optical
pick-up lens and disc drive parts are dirty or worn, the picture
quality could be diminished. Depending on the operating
environment,regular inspection and maintenance are recommended
after every 1,000 hours of use. For details,please contact your
nearest authorized service center.
23
The chargeing time is various acording to the transformation of quantity of electric charge
Page 25
Parameters and specifications
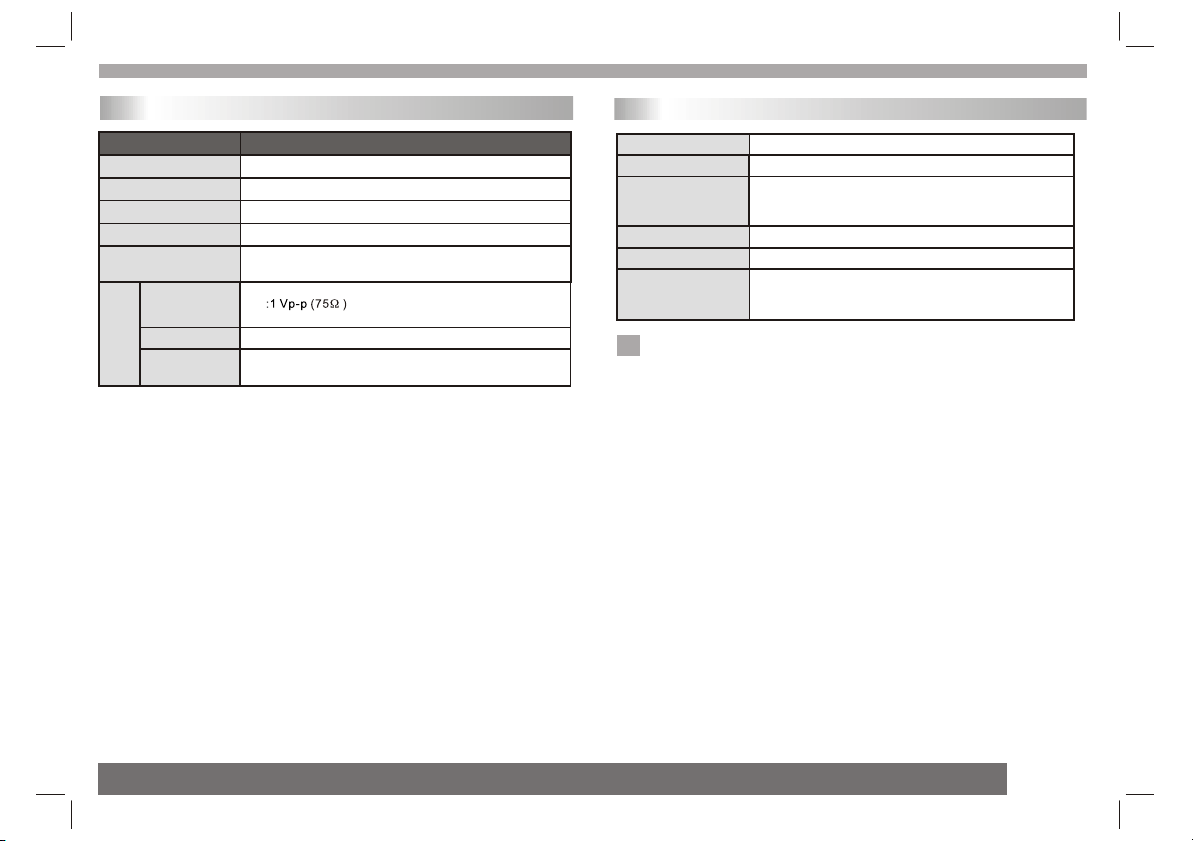
Electronical parameters
ItemItem
Power requirements
Dimensions (Approx.)
Power consumption
Weight (Approx.)
Operating humidity
VIDEO OUT
AUDIO OUT
Output
Audio
: AC 100-240 V , 50/60 Hz
: 200(L)X157(W)X40.3MM
: <10W
: 1.2 kg
: 5 % to 90 %
:1.4 Vrms (1 KHz, 0 dB)
:Speaker:1WX2, output, Coaxial outputHeadphones
Standard requirementStandard requirement
System
Laser
Signal system
Frequency
response
Signal-to-noise ratio
Dynamic range
Accessories
Note: Design and specifications are subject to change prior notice.
N
:Semiconductor laser, wavelength 650 nm
: NTSC / PAL
: 20Hz to 20 kHz(1dB)
:More than 80 dB (ANALOG OUT connectors only)
:More than 85 dB (DVD/CD)
:Remote control, Stereo headphone,
Rechargeable battery,Car cigarette Adapter,
car Bag
24
Page 26

Troubleshooting tips
Troubleshooting tips(Common)
Before calling for service, you can check the following items on
symptoms and solutions
No sound or distorted sound:
Ensure that the equipment is connected properly.
Ensure that the input settings for the TV and stereo system are proper.
No picture:
Ensure that the equipment is connected properly.
Ensure that the input setting for the TV is "video".
Ensure that the LCD is on.
No play:
Condensation has formed : wait about 1 to 2 hours to allow the
player to dry out.
This player can't play discs other than DVDs, and CDs.
The disc may be dirty and require cleaning .
Ensure that the disc is installed with the label side up.
No remote control:
Check the batteries are installed with the correct polarities(+&-).
The batteries are depleted: replace them with new ones.
Point the remote control unit at the remote control sensor and
operate.
Remove the obstacles between the remote control unit and the
remote control sensor.
Operate the remote control unit at a distance of not more than 8
meters from the remote control sensor.
No key operation(by the unit and/or the remote control) is effective:
Turn the unit off and then back to on. Alternatively, turn off the unit,
disconnect the AC power cord and the re-connect it.(The player may
not be operating properly due to lightning, static electricity or some
other external factor.)
Battery does not work
check whether the battery is out of power or in proper connection.
25
Troubleshooting tips(DVD)
Play does not commence even when title is selected:
Confirm the "Rating" settings.
Audio soundtrack and/or subtitle language is not the one selected
at the initial settings:
If the audio soundtrack and/or subtitle language does not exist on
the disc, the language selected at the initial setting will not be seen/
heard.
No subtitles:
Subtitles appear only with discs which contain them.
Alternative audio soundtrack(or subtitle) language fail to be
selected:
An alternative language is not selected with discs which do not contain
more than one language.
In the case of some discs, the alternative language cannot be selected by
operating the AUDIO or SUBTITLE button. Try selecting it from the DVD
menu if one is available.
Angle cannot be changed:
This function is dependent on software availability. Even if a disc has a
number of angles recorded, these angles may be recorded for specific
scenes only.
Page 27

Definition of terms
Definition of terms
Angle
Recorded onto some DVD discs are scenes which have been simultaneously shot from a number of different angles(the same scene is shot
from the front, front the left side, from the right side, etc.). With such discs,
the ANGLE button can be used to view the scene from different angles.
DVD
This refers to a high-density optical disc on which high-quality pictures and
sound have been recorded by means of digital signals. Incorpor-ating a new
video compression technology(MPEG II) and high-density recording
technology, DVD enables esthetically pleasing full-motion video to be
recorded over long periods of time(for instance, a whole movie can be
recorded).
DVD has a structure consisting of two 0.6mm thin discs which are ad-hered
to each other. Since the thinner the disc, the higher the density at which the
information can be recorded, a DVD disc has a greater capacity than a
single 1.2mm thick disc. Since the two thin discs are adhered to each other,
there is the potential to achieve double-sided play sometime in the future for
even longer duration play.
Chapter number
These numbers are recorded on DVD discs. A title is subdivided into many
sections, each of which is numbered, and specific parts of video
presentations can be searched quickly using these numbers.
Subtitles
These are the printed lines appearing at the bottom of the screen which
translate or transcribe the dialogue. They are recorded on DVD discs.
Track number
These numbers are assigned to the tracks which are recorded on CDs.
They enable specific tracks to be located quickly.
26
Page 28

 Loading...