

Page 1
CD PLAYER
CAUTION
RISK OF ELECTRIC SHOCK
DO NOT OPEN
,
CLASS 1
LASER
PRODUCT
,
,,
FIGURE A
EXAMPLE OF ANTENNA GROUNDING
AS PER NATIONAL
ELECTRICAL CODE
ANTENNA
LEAD IN
WIRE
GROUND
CLAMP
ELECTRIC
SERVICE
EQUIPMENT
ANTENNA
DISCHARGE UNIT
(NEC SECTION 810-20)
GROUNDING CONDUCTORS
(NEC SECTION 810-21)
GROUND CLAMPS
POWER SERVICE GROUNDING
ELECTRODE SYSTEM
(NEC ART 250, PART H)
NEC - NATIONAL ELECTRICAL CODE
DN
-
C630
OPERATING INSTRUCTIONS
BEDIENUNGSANLEITUNG
MODE D’EMPLOI
INSTRUCCIONES DE OPERACION
BRUKSANVISNING
POWER
PHONES LEVEL
MIN MAX
FOR ENGLISH READERS PAGE 007 ~ PAGE 025
FÜR DEUTSCHE LESER SEITE 026 ~ SEITE 045
POUR LES LECTEURS FRANCAIS PAGE 046 ~ PAGE 065
PARA LECTORES DE ESPAÑOL PAGINA 066 ~ PAGINA 085
FÖR SVENSKA LÄSARE SIDA 086 ~ SIDA 105
COMPACT DISC PLAYER
STOP CUE
DN-C630
PLAY / PAUSE
OPEN / CLOSE
TIME
SINGLE
REPEAT
PLAY
END MON INDEX
REPEAT
A-B
TRACK
PRESET
MODE
SEARCH
PROG.PLAY
PITCH
PROG. IN
ON / OFF
0%
1
Page 2
IMPORTANT TO SAFETY
CAUTION
RISK OF ELECTRIC SHOCK
DO NOT OPEN
,
CLASS 1
LASER
PRODUCT
,
,,
FIGURE A
EXAMPLE OF ANTENNA GROUNDING
AS PER NATIONAL
ELECTRICAL CODE
ANTENNA
LEAD IN
WIRE
GROUND
CLAMP
ELECTRIC
SERVICE
EQUIPMENT
ANTENNA
DISCHARGE UNIT
(NEC SECTION 810-20)
GROUNDING CONDUCTORS
(NEC SECTION 810-21)
GROUND CLAMPS
POWER SERVICE GROUNDING
ELECTRODE SYSTEM
(NEC ART 250, PART H)
NEC - NATIONAL ELECTRICAL CODE
LABELS
(for U.S.A. model only)
WARNING:
TO PREVENT FIRE OR SHOCK HAZARD, DO NOT EXPOSE THIS
APPLIANCE TO RAIN OR MOISTURE.
CAUTION
:
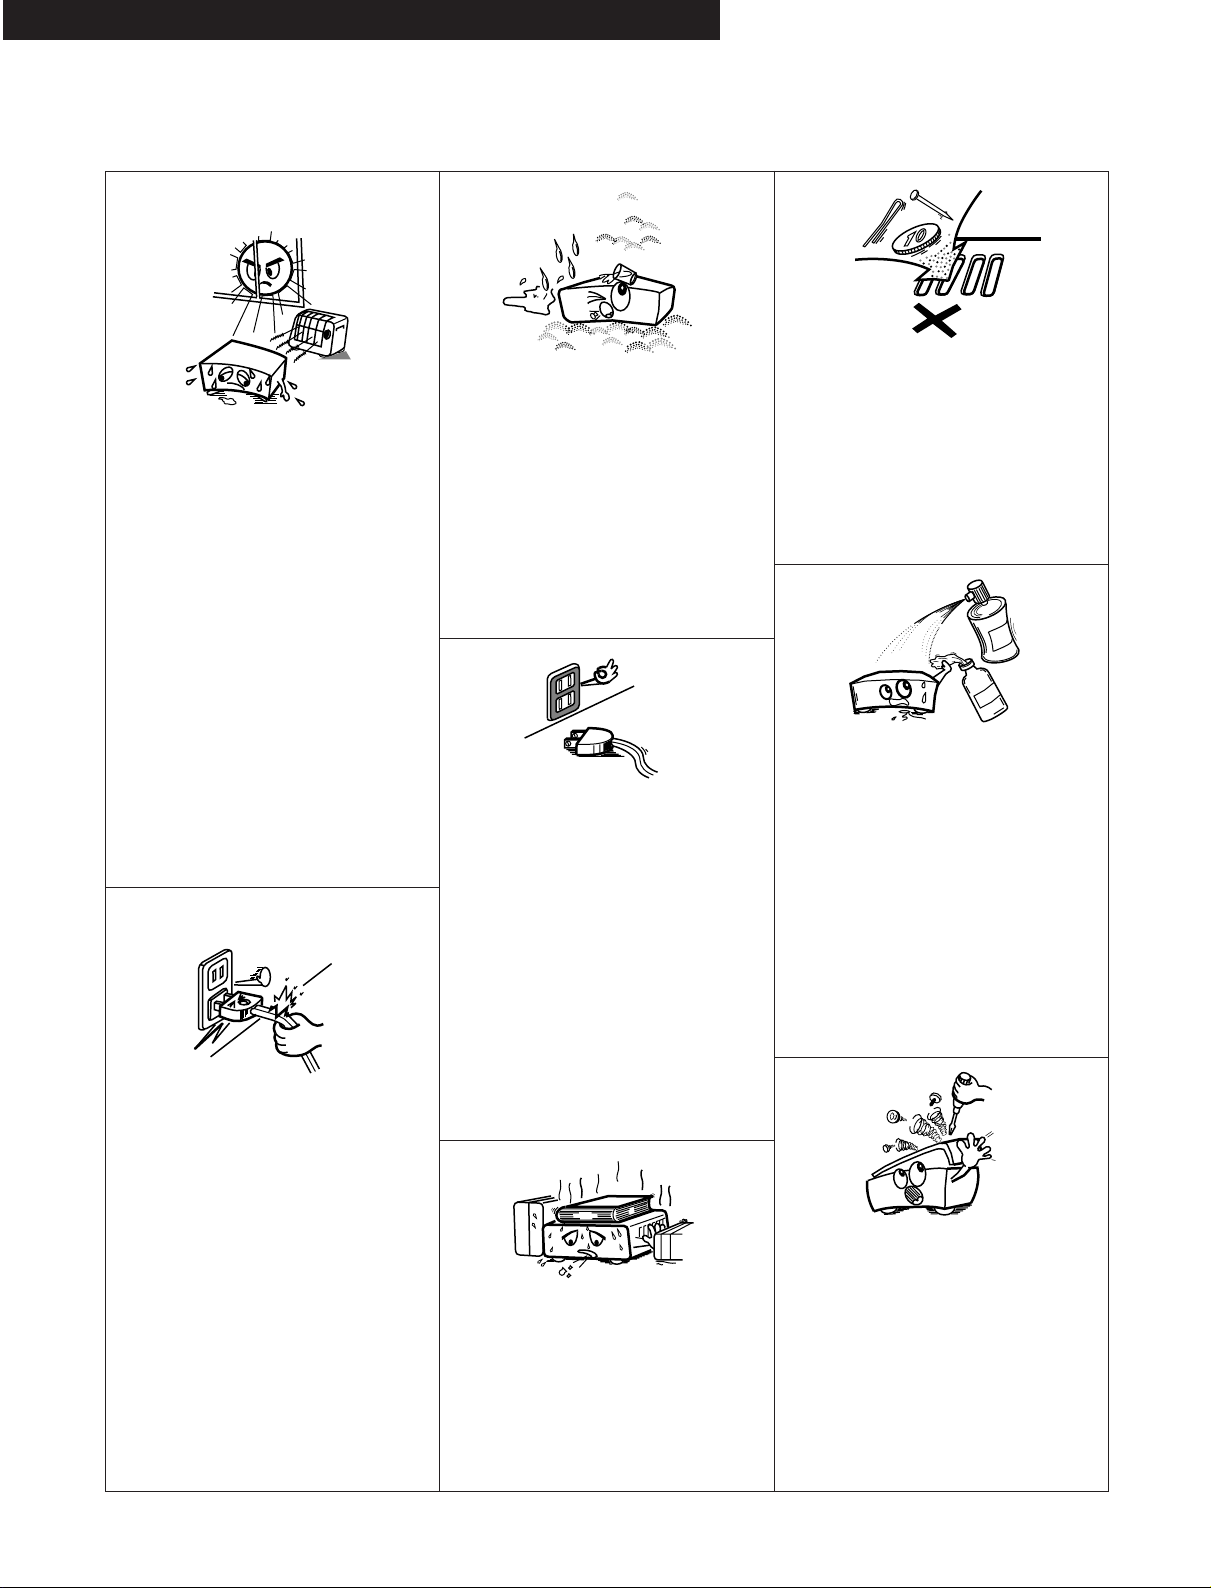
1. Handle the power supply cord carefully
Do not damage or deform the power supply cord. If it is damaged or
deformed, it may cause electric shock or malfunction when used. When
removing from wall outlet, be sure to remove by holding the plug
attachment and not by pulling the cord.
2. Do not open the top cover
In order to prevent electric shock, do not open the top cover.
If problems occur, contact your DENON dealer.
3. Do not place anything inside
Do not place metal objects or spill liquid inside the CD player.
Electric shock or malfunction may result.
Please, record and retain the Model name and serial number of your set
shown on the rating label.
Model No. DN-C630 Serial No.
CAUTION: TO REDUCE THE RISK OF ELECTRIC SHOCK,
DO NOT REMOVE COVER (OR BACK). NO
USER-SERVICEABLE PARTS INSIDE. REFER
SERVICING TO QUALIFIED SERVICE
PERSONNEL.
The lightning flash with arrowhead symbol, within
an equilateral triangle, is intended to alert the
user to the presence of uninsulated “dangerous
voltage” within the product’s enclosure that may
be of sufficient magnitude to constitute a risk of
electric shock to persons.
The exclamation point within an equilateral
triangle is intended to alert the user to the
presence of important operating and maintenance
(servicing) instructions in the literature
accompanying the appliance.
• FOR U.S.A. & CANADA MODEL ONLY
CAUTION
TO PREVENT ELECTRIC SHOCK DO NOT USE THIS (POLARIZED)
PLUG WITH AN EXTENSION CORD, RECEPTACLE OR OTHER
OUTLET UNLESS THE BLADES CAN BE FULLY INSERTED TO
PREVENT BLADE EXPOSURE.
• POUR LES MODELES AMERICAINS ET CANADIENS
UNIQUEMENT
ATTENTION
POUR PREVENIR LES CHOCS ELECTRIQUES NE PAS UTILISER
CETTE FICHE POLARISEE AVEC UN PROLONGATEUR UNE PRISE
DE COURANT OU UNE AUTRE SORTIE DE COURANT, SAUF SI LES
LAMES PEUVENT ETRE INSEREES A FOND SANS EN LAISSER
AUCUNE PARTIE A DECOUVERT.
NOTE:
This CD player uses the semiconductor laser. To allow you to enjoy music at a
stable operation, it is recommended to use this in a room of 5 °C (41 °F) – 35
°C (95 °F).
CERTIFICATION
THIS PRODUCT COMPLIES WITH DHHS RULES 21 CFR
SUBCHAPTER JAPPLICABLE AT DATE OF MANUFACTURE.
CAUTION:
USE OF CONTROLS OR ADJUSTMENTS OR REFORMANCE OF PROCEDURES OTHER THAN THOSE SPECIFIED HEREIN MAY RESULT IN HAZARDOUS RADIATION EXPOSURE.
THE COMPACT DISC PLAYER SHOULD NOT BE ADJUSTED OR
REPAIRED BY ANYONE EXCEPT PROPERLY QUALIFIED SERVICE
PERSONNEL.
This device complies with Part 15 of the FCC Rules. Operation is
subject to the following two conditions : (1) This device may not
cause harmful interference, and (2) this device must accept any
interference received, including interference that may cause
undesired operation.
This Class B digital apparatus meets all requirements of the
Canadian Interference-Causing Equipment Regulations.
Cet appareil numérique de la classe B respecte toutes les
exigences du Règlement sur le matériel brouilleur du Canada.
CLASS 1 LASER PRODUCT
LUOKAN 1 LASERLAITE
KLASS 1 LASERAPPARAT
ADVARSEL: USYNLIG LASERSTRÅLING VED ÅBNING, NÅR
VAROITUS! LAITTEEN KÄYTTÄMINEN MUULLA KUIN TÄSSÄ
VARNING– OM APPARATEN ANVÄNDS PÅ ANNAT SÄTT ÄN I
SIKKERHEDSAFBRYDERE ER UDE AF FUNKTION.
UNDGÅ UDSAETTELSE FOR STRÅLING.
KÄYTTÖOHJEESSA MAINITULLA TAVALLA SAATTAA
ALTISTAA KÄYTTÄJÄN TURVALLISUUSLUOKAN 1
YLITTÄVÄLLE NÄKYMÄMTTÖMÄLLE LASERSÄTEILYLLE.
DENNA
BRUKSANVISNING SPECIFICERATS, KAN ANVÄNDAREN
UTSÄTTAS FÖR OSYNLIG LASERSTRÅLNING SOM
ÖVERSKRIDER GRÄNSEN FÖR LASERKLASS 1.
2
Page 3
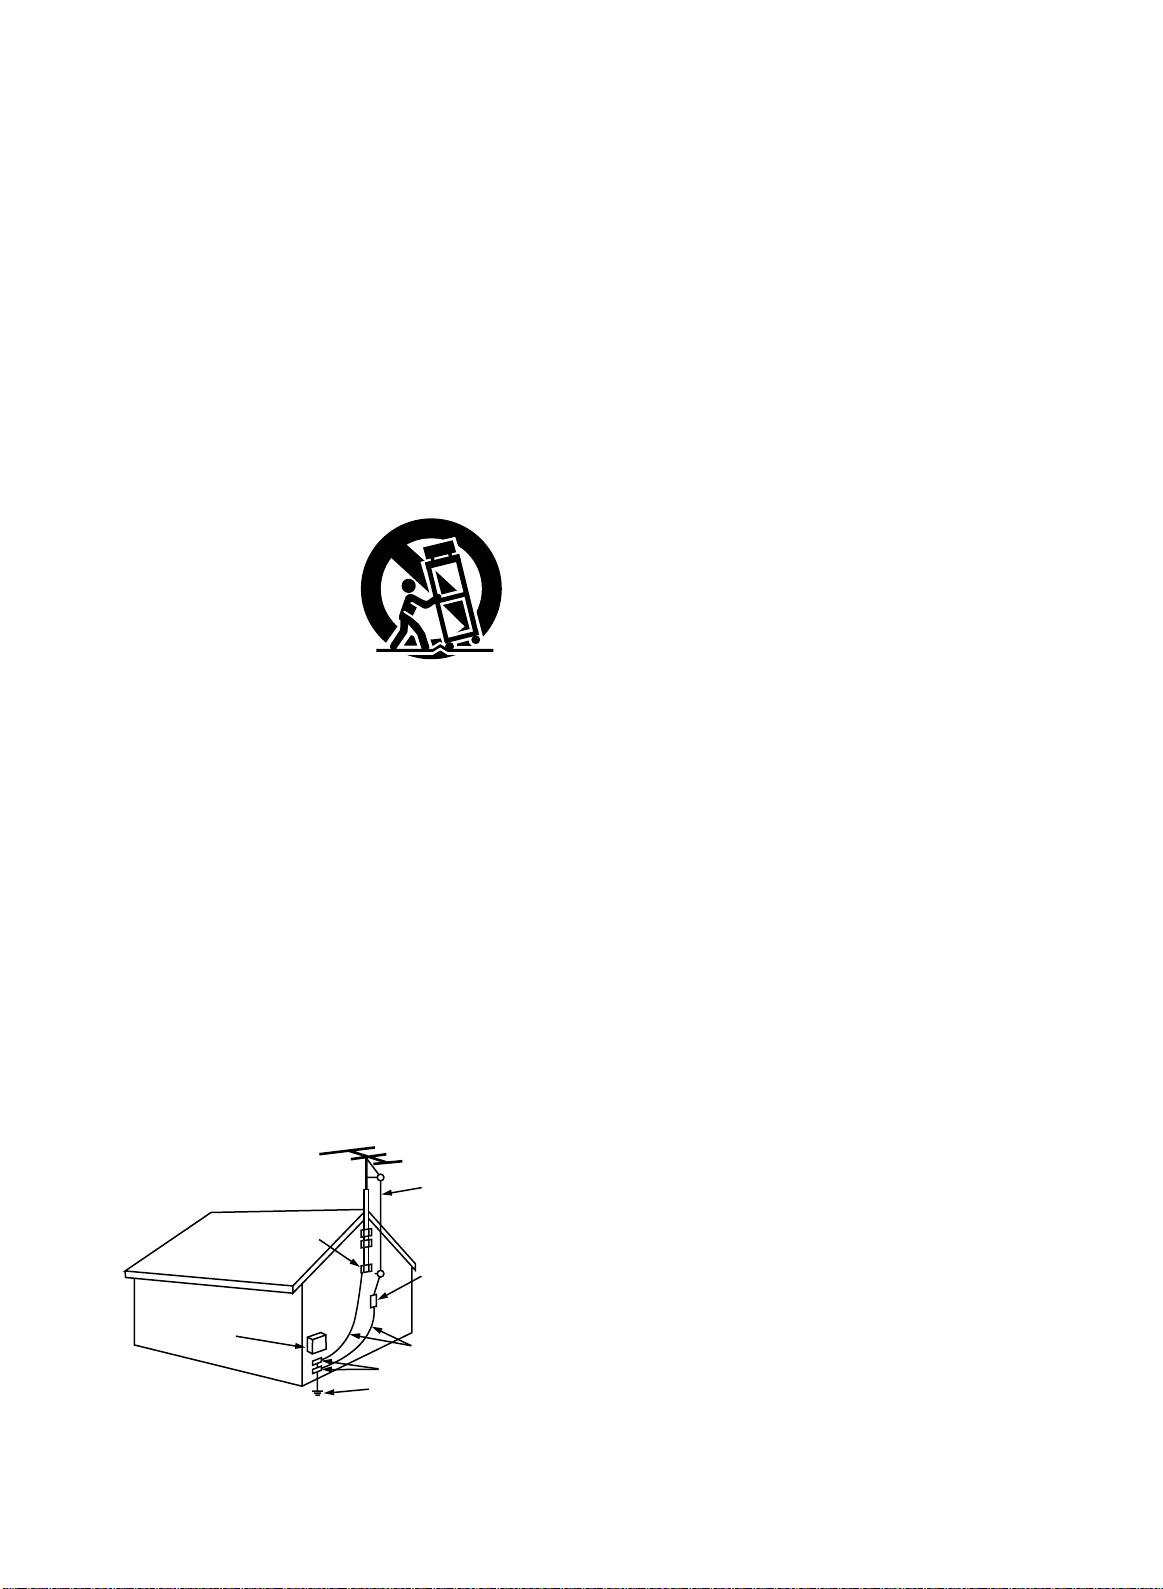
SAFETY INSTRUCTIONS
FIGURE A
EXAMPLE OF ANTENNA GROUNDING
AS PER NATIONAL
ELECTRICAL CODE
ANTENNA
LEAD IN
WIRE
GROUND
CLAMP
ELECTRIC
SERVICE
EQUIPMENT
ANTENNA
DISCHARGE UNIT
(NEC SECTION 810-20)
GROUNDING CONDUCTORS
(NEC SECTION 810-21)
GROUND CLAMPS
POWER SERVICE GROUNDING
ELECTRODE SYSTEM
(NEC ART 250, PART H)
NEC - NATIONAL ELECTRICAL CODE
1. Read Instructions – All the safety and operating
instructions should be read before the applicance is
operated.
2. Retain Instructions – The safety and operating instructions
should be retained for future reference.
3. Heed Warning – All warnings on the applicance and in the
operating instructions should be adhered to.
4. Following Instructions – All opeerating and use instructions
should be followed.
5. Water and Moisture – The appliance should not be used
near water – for example, near a bathtub, washbbowl,
kitchen sink, laundry tub, in a wet basement, or near a
swimming pool, and the like.
6. Carts and Stands – The appliance should be used only with
a cart or stand that is recommended by the manufacturer.
6A. An appliance and cart
combination should be
moved with care.
Quick stops, excessive
force, and uneven
surfaces may cause
the applicance and cart
combination to overturn.
7. Wall or Ceiling Mounting – The appliance should be
mounted to a wall or ceiling only as recommended by the
manufacturer.
8. Ventilation – The appliance should be situated so that its
location or position does not interfere with its proper
ventilation. For example, the appliance should not be
situated on a bed, sofa, rug, or similar surface that may
block the ventilation openings; or, placed in a built-in
installation, such as a bookcase or cabinet that may
impede the flow of air through the ventilation openings.
9. Heat – The appliance should be situated away from heat
sources such as radiators, heat registers, stoves, or other
appliances (including amplifiers) that produce heat.
10. Power Sources – The appliance should be connected to a
power supply only of the type described in the operating
instructions or as marked on the appliance.
11. Grounding or Polarization – Precautions should be taken so
that the grounding or polarization means of an appliance is
not defeated.
12. Power-Cord Protection – Power-supply cords should be
routed so that they are not likely to be walked on or
pinched by items placed upon or against them, paying
particular attention to cords at plugs, convenience
receptacles, and the point where they exit from the
appliance.
14. Cleaning – The appliance should be cleaned only as
recommended by the manufacturer.
15. Power Lines – An outdoor antenna should be located away
from power lines.
16. Outdoor Antenna Grounding – If an outside antenna is
connected to the receiver, be sure the antenna system is
grounded so as to provide some protection against voltage
surges and built-up static charges. Article 810 of the
National Electrical Code, ANSI/NFPA 70, provides
information with regard to proper grounding of the mast
and supporting structure, grounding of the lead-in wire to
an antenna-discharge unit, size of grounding conductors,
location of antenna-discharge unit, connection to grounding
electrodes, and requirements for the grounding electrode.
See Figure A.
17. Nonuse Periods – The power cord of the appliance should
be unplugged from the outlet when left unused for a long
period of time.
18. Object and Liquid Entry – Care should be taken so that
objects do not fall and liquids are not spilled into the
enclosure through openings.
19. Damage Requiring Service – The appliance should be
serviced by qualified service personnel when:
A. The power-supply cord or the plug has been damaged;
or
B. Objects have fallen, or liquid has been spilled into the
appliance; or
C. The appliance has been exposed to rain; or
D. The appliance does not appear to operate normally or
exhibits a marked change in performance; or
E. The appliance has been dropped, or the enclosure
damaged.
20. Servicing – The user should not attempt to service the
appliance beyond that described in the operating
instructions. All other servicing should be referred to
qualified service personnel.
3
Page 4
ENGLISH DEUTSCH FRANCAIS ESPAÑOL SVENSKA
OPEN / CLOSE
COMPACT DISC PLAYER
DN-C630
POWER
PHONES LEVEL
MIN MAX
STOP CUE
PRESET
PLAY / PAUSE
TRACK
PLAY
MODE
END MON INDEX
SEARCH
REPEAT
ON / OFF
PROG.PLAY
A-B
PROG. IN
PITCH
TIME
0%
PROG
PITCH%
REMAIN ELAPSED
SINGLE TOTAL
ALL 1 A - B
REPEAT
°° °
OPEN / CLOSE
COMPACT DISC PLAYER
DN-C630
POWER
PHONES LEVEL
MIN MAX
STOP CUE
PRESET
PLAY / PAUSE
TRACK
PLAY
MODE
END MON INDEX
SEARCH
REPEAT
ON / OFF
PROG.PLAY
A-B
PROG. IN
PITCH
TIME
0%
SINGLE
REPEAT
q
wertyuio!0
!2
q
et
q
o!0 !1 !2!3
er
t
y
ui
w
r
w
!1
!3
!4
!5
!6
!7 !8 !9 @0
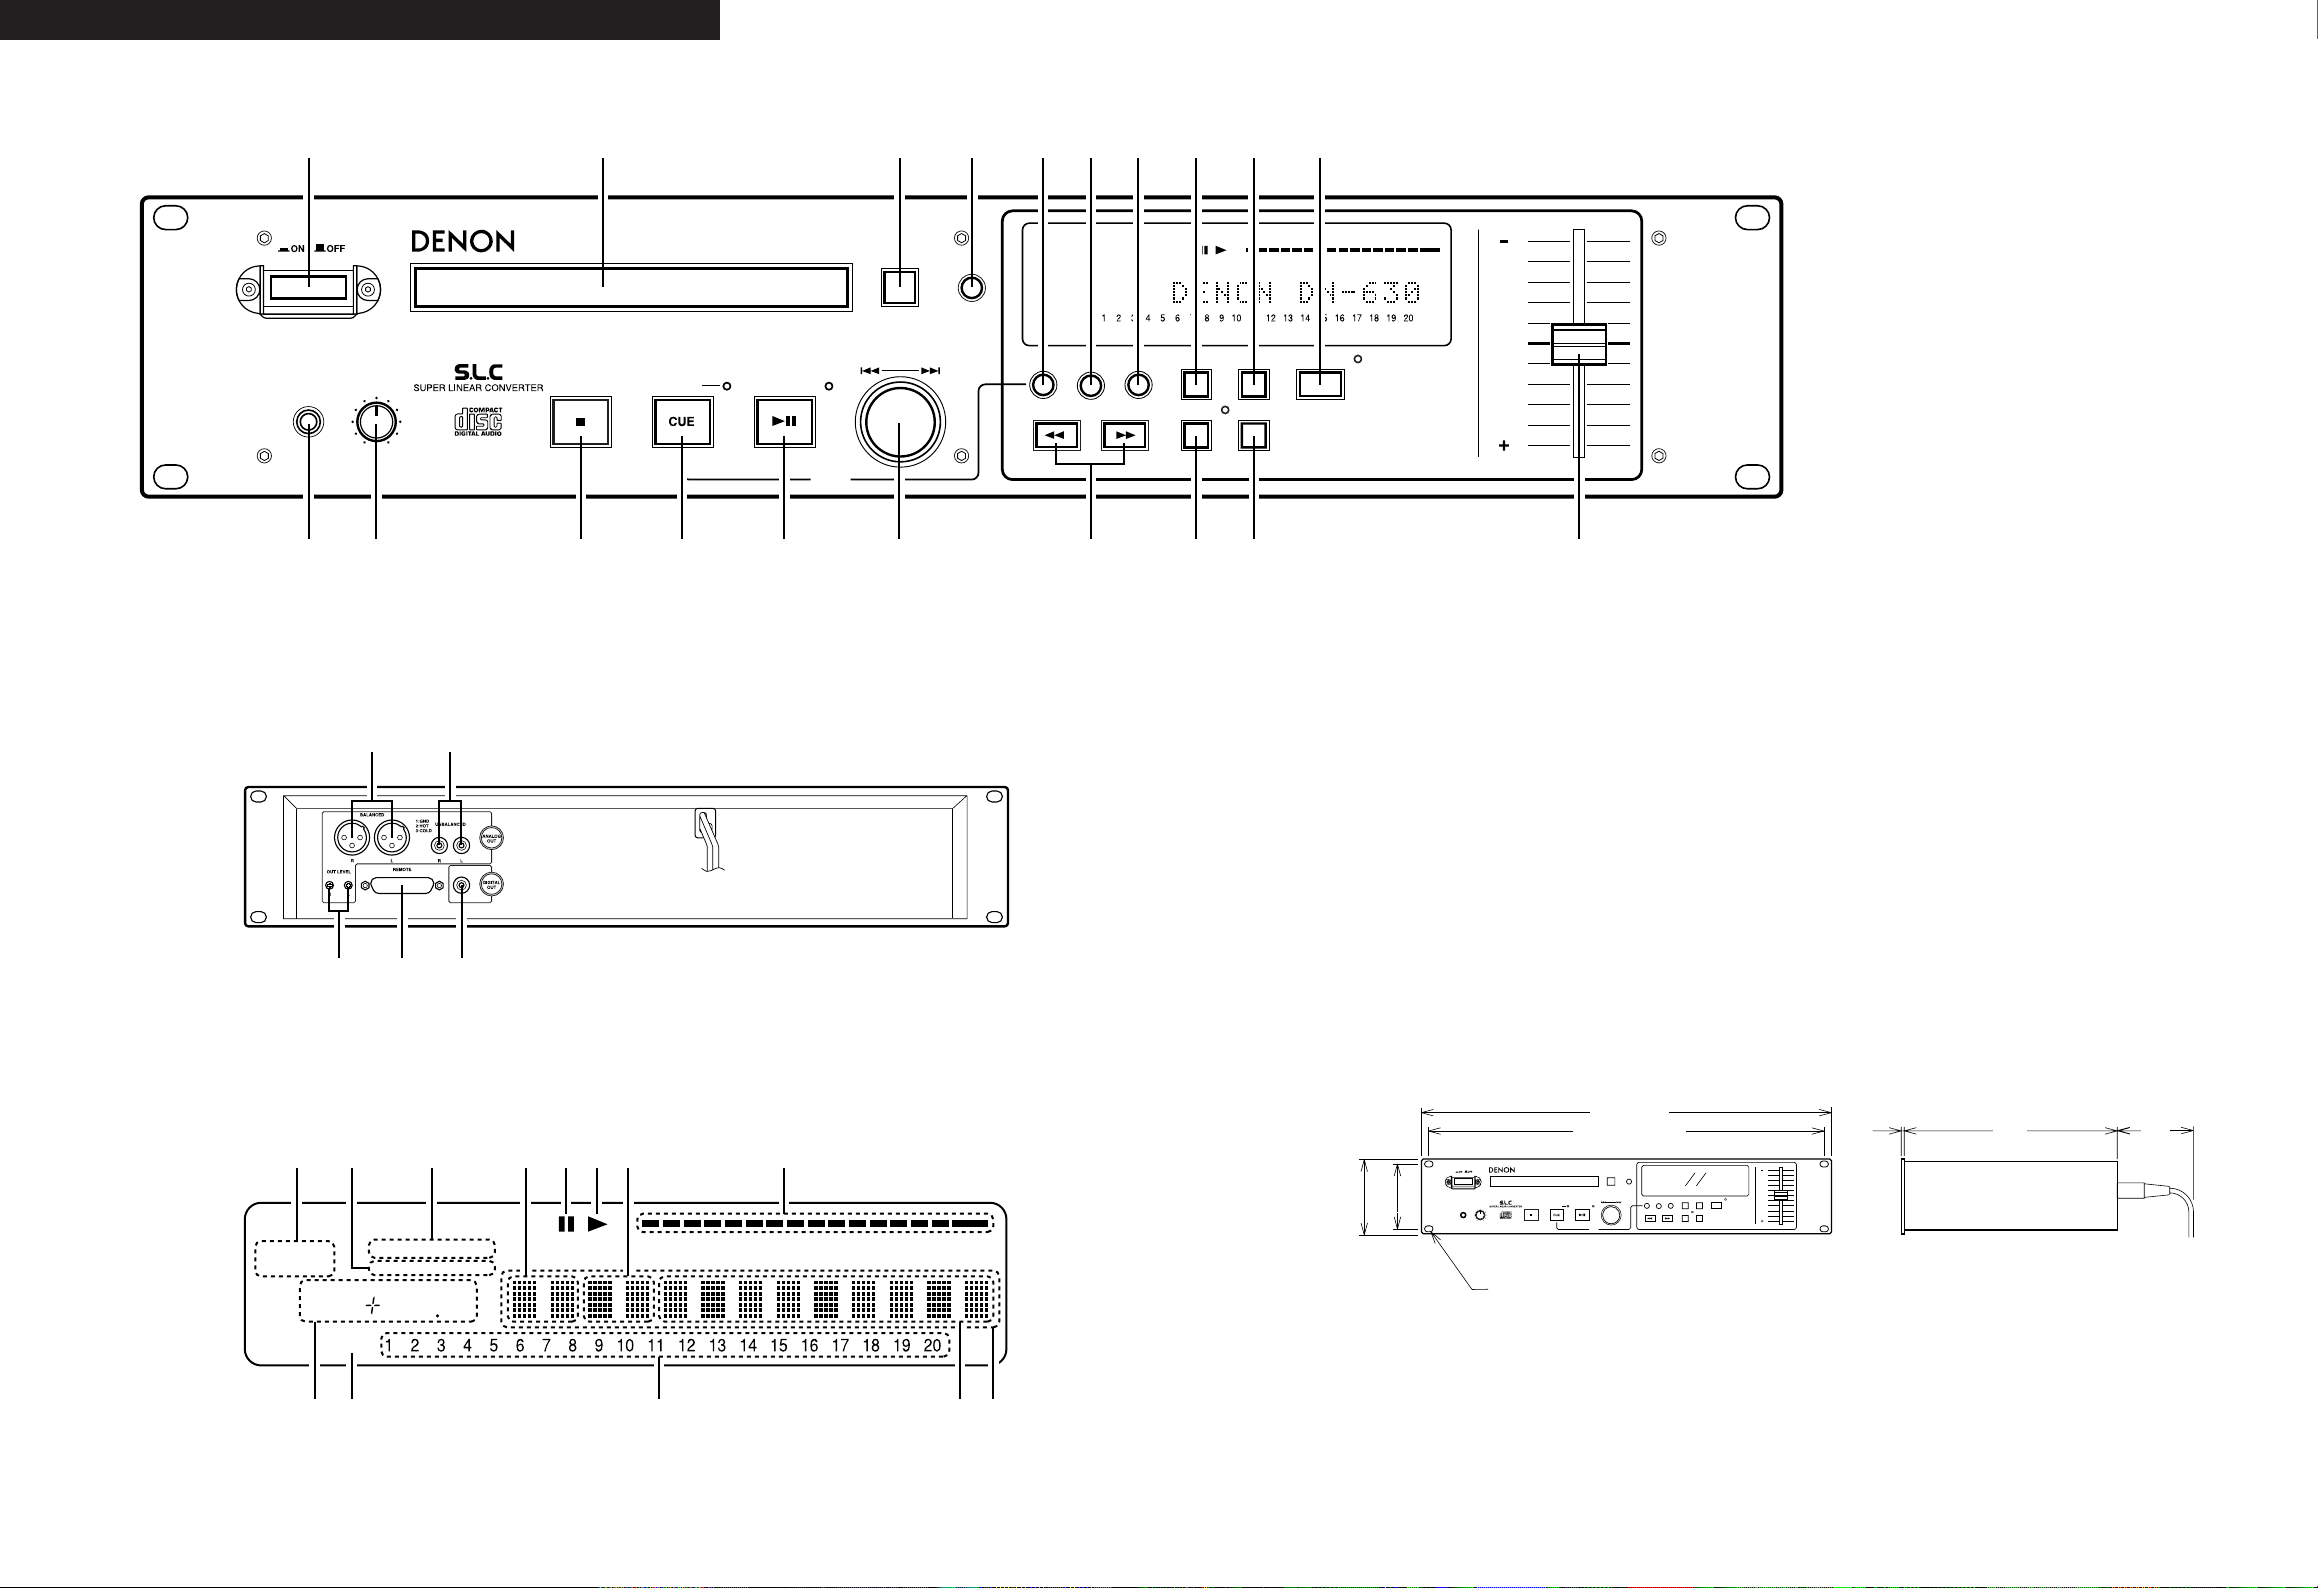
FRONT PANEL / FRONTPLATTE / PANNEAU AVANT / PANEL FRONTAL / FRAMSIDA
REAR PANEL / RÜCKWAND / PANNEAU ARRIERE / PANEL TRASERO / BAKSIDA
DISPLAY WINDOW / DISPLAY-FENSTER / FENETRE D’AFFICHAGE /
PANTALLA DE VISUALIZACION / DISPLAYFÖNSTER
DIMENSIONS / ABMESSUNGEN / DIMENSIONS / DIMENSIÓNES / MÅTT
76.2 (3”)
88 (3-15/32”)
7 x 10 hole
7 x 10 Öffnung
trou de 7 x 10
Orificio de 7 x 10
Hål 7 x 10
482 (19”)
465 (18-5/16”)
2 (5/64”)
250
(9-27/32”)
90
(3-35/64”)
54
Page 5
ENGLISH DEUTSCH FRANCAIS
NOTE ON USE / HINWEISE ZUM GEBRAUCH/OBSERVATIONS RELATIVES A L’UTILISATION
NOTE SULL’USO / NOTAS SOBRE EL USO / ALVORENS TE GEBRUIKEN / OBSERVERA
OBSERVAÇÕES QUANTO AO USO
• Avoid high temperatures.
Allow for sufficient heat dispersion when
installed on a rack.
• Vermeiden Sie hohe Temperaturen.
Beachten Sie, daß eine ausreichend
Luftzirkulation gewährleistet wird, wenn das
Gerät auf ein Regal gestellt wird.
• Eviter des températures élevées
Tenir compte d’une dispersion de chaleur
suffisante lors de l’installation sur une étagère.
• Evitate di esporre l’unità a temperature alte.
Assicuratevi che ci sia un’adeguata dispersione
del calore quando installate l’unità in un mobile
per componenti audio.
• Evite altas temperaturas.
Permite la suficiente dispersión del calor
cuando está instalado en la consola.
• Vermijd hoge temperaturen.
Zorg voor een degelijk hitteafvoer indien het
apparaat op een rek wordt geplaatst.
• Undvik höga temperaturer.
Se till att det finns möjlighet till god
värmeavledning vid montering i ett rack.
• Evite temperaturas altas.
Conceda suficiente dispersão de calor quando o
equipamento for instalado numa prateleira.
• Handle the power cord carefully.
Hold the plug when unplugging the cord.
• Gehen Sie vorsichtig mit dem Netzkabel um.
Halten Sie das Kabel am Stecker, wenn Sie den
Stecker herausziehen.
• Manipuler le cordon d’alimentation avec
précaution.
Tenir la prise lors du débranchement du cordon.
• Manneggiate il filo di alimentazione con cura.
Agite per la spina quando scollegate il cavo
dalla presa.
• Maneje el cordón de energía con cuidado.
Sostenga el enchufe cuando desconecte el
cordón de energía.
• Hanteer het netsnoer voorzichtig.
Houd het snoer bij de stekker vast wanneer
deze moet worden aan- of losgekoppeld.
• Hantera nätkabeln varsamt.
Håll i kabeln när den kopplas från el-uttaget.
• Manuseie com cuidado o fio condutor de
energia.
Segure a tomada ao desconectar o fio.
ESPAÑOL SVENSKA
• Keep the set free from moisture, water, and
dust.
• Halten Sie das Gerät von Feuchtigkeit, Wasser
und Staub fern.
• Protéger l’appareil contre l’humidité, l’eau et
lapoussière.
• Tenete l’unità lontana dall’umidità, dall’acqua e
dalla polvere.
• Mantenga el equipo libre de humedad, agua y
polvo.
• Laat geen vochtigheid, water of stof in het
apparaat binnendringen.
• Utsätt inte apparaten för fukt, vatten och
damm.
• Mantenha o aparelho livre de qualquer
umidade, água ou poeira.
• Unplug the power cord when not using the set
for long periods of time.
• Wenn das Gerät eine längere Zeit nicht
verwendet werden soll, trennen Sie das
Netzkabel vom Netzstecker.
• Débrancher le cordon d’alimentation lorsque
l’appareil n’est pas utilisé pendant de longues
périodes.
• Disinnestate il filo di alimentazione quando
avete l’intenzione di non usare il filo di
alimentazione per un lungo periodo di tempo.
• Desconecte el cordón de energía cuando no
utilice el equipo por mucho tiempo.
• Neem altijd het netsnoer uit het stopkontakt
wanneer het apparaat gedurende een lange
periode niet wordt gebruikt.
• Koppla ur nätkabeln om apparaten inte kommer
att användas i lång tid.
• Desligue o fio condutor de força quando o
aparelho não tiver que ser usado por um longo
período.
* (For sets with ventilation holes)
• Do not obstruct the ventilation holes.
• Die Belüftungsöffnungen dürfen nicht verdeckt
werden.
• Ne pas obstruer les trous d’aération.
• Non coprite i fori di ventilazione.
• No obstruya los orificios de ventilación.
• De ventilatieopeningen mogen niet worden
beblokkeerd.
• Täpp inte till ventilationsöppningarna.
• Não obstrua os orifícios de ventilação.
• Do not let foreign objects in the set.
• Keine fremden Gegenstände in das Gerät
kommen lassen.
• Ne pas laisser des objets étrangers dans
l’appareil.
• E’ importante che nessun oggetto è inserito
all’interno dell’unità.
• No deje objetos extraños dentro del equipo.
• Laat geen vreemde voorwerpen in dit apparaat
vallen.
• Se till att främmande föremål inte tränger in i
apparaten.
• Não deixe objetos estranhos no aparelho.
• Do not let insecticides, benzene, and thinner
come in contact with the set.
• Lassen Sie das Gerät nicht mit Insektiziden,
Benzin oder Verdünnungsmitteln in Berührung
kommen.
• Ne pas mettre en contact des insecticides, du
benzène et un diluant avec l’appareil.
• Assicuratevvi che l’unità non venga in contatto
con insetticidi, benzolo o solventi.
• No permita el contacto de insecticidas, gasolina
y diluyentes con el equipo.
• Laat geen insektenverdelgende middelen,
benzine of verfverdunner met dit apparaat in
kontakt komen.
• Se till att inte insektsmedel på spraybruk,
bensen och thinner kommer i kontakt med
apparatens hölje.
• Não permita que inseticidas, benzina e
dissolvente entrem em contacto com o
aparelho.
• Never disassemble or modify the set in any
way.
• Versuchen Sie niemals das Gerät auseinander
zu nehmen oder auf jegliche Art zu verändern.
• Ne jamais démonter ou modifier l’appareil
d’une manière ou d’une autre.
• Non smontate mai, nè modificate l’unità in
nessun modo.
• Nunca desarme o modifique el equipo de
ninguna manera.
• Nooit dit apparaat demonteren of op andere
wijze modifiëren.
• Ta inte isär apparaten och försök inte bygga om
den.
• Nunca desmonte ou modifique o aparelho de
alguma forma.
6
Page 6

7
ENGLISH
The DN-C630 CD player is a rack mount type CD player designed for use in broadcast stations, for production, etc.
• 19 inch Rack Mountable (Height 2 U)
• Track Search Select knob (Easy track selection)
• Program Play (Max. 25 tracks)
(1) When the PLAY mode is set to Single, the player stands by at the beginning of next track. (at Finish mode Next)
(2) When the PLAY mode is set to Continuous, the playback is continued according to your programmed sequence.
• Play mode and Finish mode
(1) Play mode
q Continuous: Play a whole disc.
w Single: Play a track.
(2) Finish mode (Stop, Next, Recue)
q Stop: Stop after finishing to play a track.
w Next: Standby at the beginning of next track after finishing to play track.
e Recue: After finishing to play a track, standby at the beginning of the track.
• Auto Cue
After a disc is loaded, it is automatically cued to the point where audio starts.
Cueing takes place at the point where audio starts rather than where the track starts. The level at which sound is first detected can be
set between –36 to –72 dB (7 steps).
• End Monitor
Pressing the END MON button during standby instantly previews the end of the track, thus assuring perfect “end point”. The point at
which monitoring starts can be set within a range of 5 to 35 seconds (7 steps) prior to the track’s end.
• End of Message (EOM)
At the end of the track, the time display flashes, providing a visual warning to the operator that the track will end shortly. The point at
which the flashing beings can be set within a range of 0 to 60 seconds (7 steps) prior to the end of the track.
• Pitch Control (±9.9 %, 0.1 % step)
• Index Search
The Select knob can be used to perform an Index Search when the INDEX button is ON. (The index number appear)
• FL Display
• Display of Playback Locations
A bar graph display indicates playback points on the track being played. Elapsed time and Remaining time displays are switched using
the TIME button.
• External control Terminals
Parallel Remote (D-sub 25 pin)
• SUPER LINER CONVERTER (S.L.C.)
This set uses Denon’s unique system for preventing zero-cross distortion, the main cause for decreased sound quality in PCM
playback, thereby recreating sound fields with rich musicality.
MAIN FEATURES
Page 7
8
ENGLISH
CONTENTS
z
PART NAMES AND FUNCTIONS ………………………9, 10
(1) Front Panel …………………………………………………9
(2) Rear Panel …………………………………………………10
(3) Display Window …………………………………………10
x
REMOTE CONTROL CONNECTIONS ………………………11
c
OPENING AND CLOSING THE DISC HOLDER AND
LOADING DISCS ……………………………………………11
v
BASIC OPERATION ………………………………………12, 13
(1) Before Starting Playback …………………………………12
(2) Starting Playback …………………………………………13
(3) Stopping Playback ………………………………………13
(4) PLAY/PAUSE and CUE Operations ……………………13
b
HANDY OPERATIONS …………………………………14 ~ 16
(1) Starting Playback from the Middle of a Track
(Manual Search) …………………………………………14
(2) Playing at a Different Speed (Pitch) ……………………14
(3) Playing Repeatedly (Repeat) ……………………………15
(4) Playing a Specific Section of the Disc (A-B Repeat) …16
n
PROGRAMMED PLAYBACK …………………………17 ~ 19
(1) Inputting the Program ……………………………………17
(2) Changing the Program ………………………………17, 18
(3) Playing Programs …………………………………………18
(4) Presetting Programs ……………………………………19
m
PRESET FUNCTIONS AND OPERATIONS …………20 ~ 23
(1) List of Preset Functions …………………………………20
(2) Presetting Procedure ……………………………………21
(3) Detailed Description of Preset Functions …………22, 23
,
BEFORE SWITCHING OFF THE POWER …………………24
.
COMPACT DISCS ……………………………………………24
⁄0
TROUBLESHOOTING ………………………………………25
⁄1
SPECIFICATIONS ……………………………………………25
Checking the Contents
Check that the carton contains the following items:
Connection cords for signal output (RCA) 1 pc.
Operating instructions (this booklet) 1 pc.
Installing the Units
Mount the units onto your console or rack with 19” EIA rack rails.
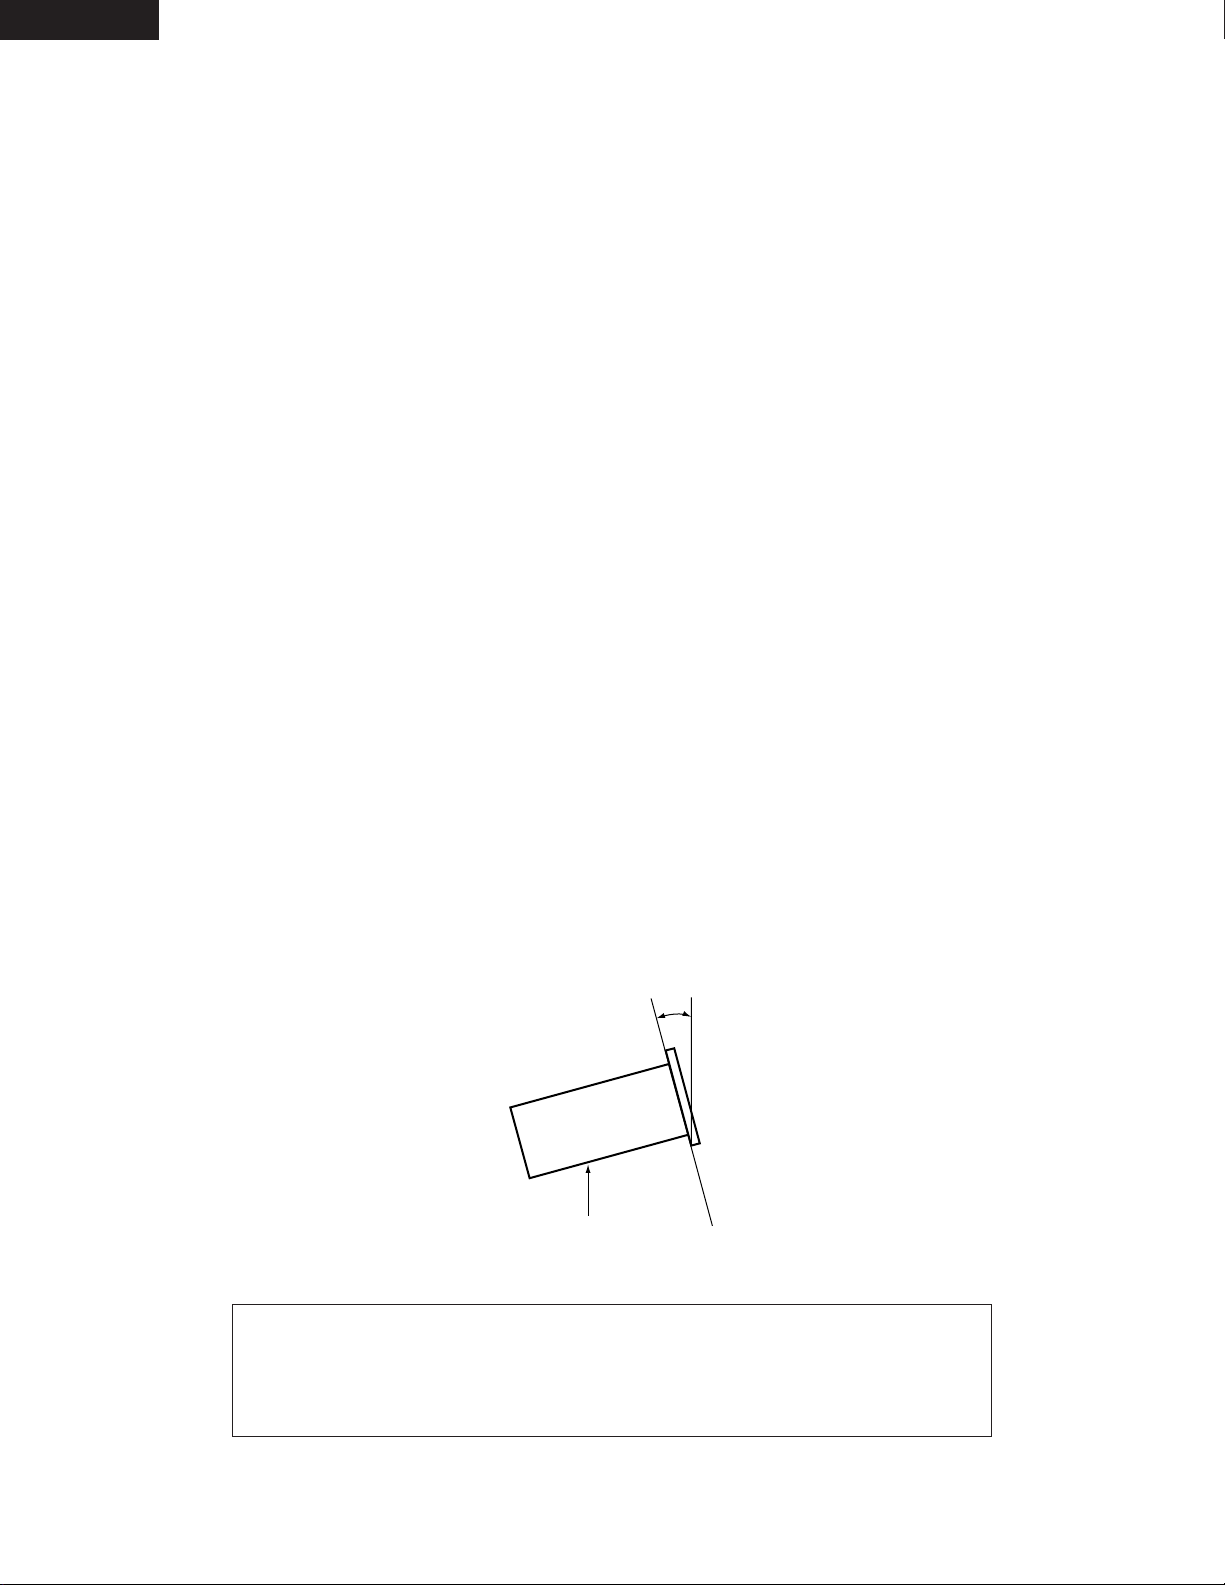
CAUTION:
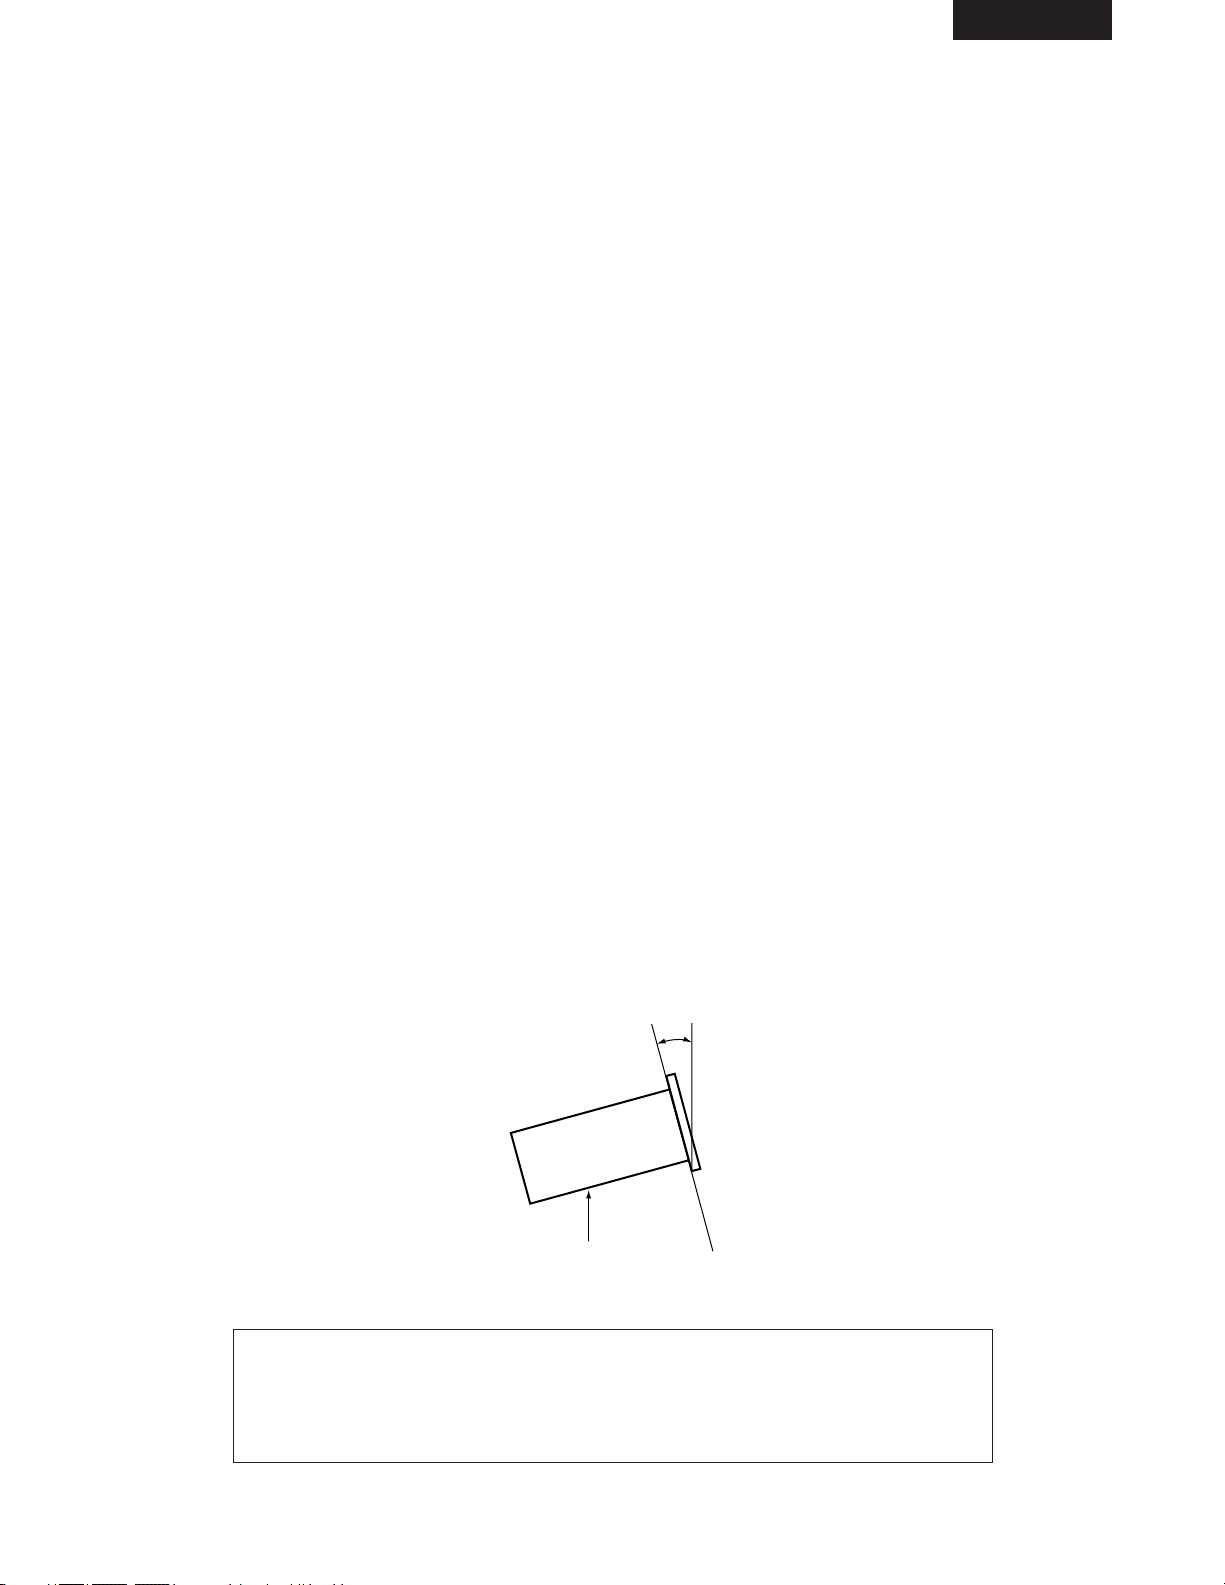
• The DN-C630 will work normally when the player unit is mounted with the front panel within 10 degrees of the vertical plane.
If the unit is tilted excessively, discs may not load or unload properly.
DN-C630
Max. 10°
• DECLARATION OF CONFORMITY
We declare under our sole responsibility that this product, to which this declaration relates,
is in conformity with the following standards:
EN60065, EN55013, EN55020, EN60555-2 and EN60555-3.
Following the provisions of 73/23/EEC, 89/336/EEC and 93/68/EEC Directive.
Page 8

9
ENGLISH
PART NAMES AND FUNCTIONS
(1) Front Panel
q
POWER button
• This turns the set on and off.
w
Disc holder
• Place discs in this holder.
• Press the OPEN/CLOSE button to open and close the
disc holder.
• Load discs firmly inside the slot.
e
OPEN/CLOSE button
• Press this button to open and close the disc holder.
• The disc holder will not open during playback.
r
TIME button
• Press this button to switch the time display between the
remaining time (REMAIN) and the elapsed time
(ELAPSED).
t
PLAY MODE button
• Press this button to switch the play mode.
• Press this button to cancel the track reserved with the
next track reserve function.
y
END MON button
• Press this button in the standby mode to monitor the
end of the track. (End Monitor)
u
INDEX button
• Press this button to set the index select mode, then use
the select knob to select the index number.
• The INDEX number appear when the index select mode
is set.
• Press the button again to return to the track select mode.
i
REPEAT button
• Press this button to set the repeat mode.
• The REPEAT indicator lights when the repeat mode is
set.
• Press the button again to cancel the repeat mode.
o
A-B button
• Press this button to set the A point.
• The A- indicator flashes when the A point is set.
• Press this button when A point is set to set the B point.
• The A-B indicator flashes when the B point is set.
• Press the button again to cancel the A-B repeat mode.
!0
PITCH button
• Press this button to switch to the play speed set with the
Pitch Slider. The PITCH LED flashes.
• When the button is pressed again, the fixed pitch mode
is set and the PITCH LED lights.
• Press the button again to cancel the pitch play mode and
return to normal speed.
!1
PHONES jack
• Connect headphones with an impedance of 30 t0 40
Ω/ohms.
!2
LEVEL control
• Use this to adjust the volume of the headphones.
!3
STOP button
• Press this button to turn all the servo functions off stop.
• Press this button during playback to set the stop mode.
!4
CUE button
• When this button is pressed during the play or pause
mode, the pickup returns to the position at which
playback started and the standby mode is set. (Back
Cue)
• When pressed during playback when the next track has
been programmed, the programmed track is searched
for the standby mode is set.
• The CUE LED lights when the standby mode is set.
• When the button is pressed while pressing the PLAY
MODE button, the preset mode is set.
!5
PLAY/PAUSE button
• Press this button in the standby, pause or manual search
mode to begin playback.
• Press the button in the stop mode to search for the first
track and begin playback.
• The PLAY/PAUSE LED lights during the play mode.
• When the button is pressed during playback, the pause
mode is set. The PLAY/PAUSE LED flashes while the
pause mode is set.
!6
Select knob (TRACK)
• Turn this knob to select the next track (or index number)
to be played.
• Use the INDEX button to choose whether to select
tracks or index numbers.
• Turn the knob clockwise by one click to move one track
(or one index number) forward, counterclockwise by one
click to move one track (or one index number) backward.
• When the knob turned while pressing it in, one click
corresponds to 10 tracks (or 10 index numbers).
• In the preset mode, use this knob to set and enter preset
settings.
• When setting programs, use this knob to select, enter
and check the program.
!7
SEARCH buttons
• These buttons are used to accurately change the
positions where disc play will start.
!8
PROG. PLAY ON/OFF button
• When this button is pressed while the PROG indicator is
lit, the program play mode is set.
• The button will not function during the A-B play mode.
• The PROG. PLAY ON/OFF LED lights during the program
play standby and play modes.
• When the button is pressed during the program play
standby or play mode, the program play mode is cleared.
!9
PROG. IN button
• Press this button to set the program input mode.
• The button will not function during the play mode.
• The PROG indicator flashes when in the program input
mode.
• The PROG indicator lights when a program is set.
@0
Pitch Slider
• Use this slider to adjust the play speed. Slide up to
decrease the play speed, down to increase the play
speed.
1
Page 9
10
ENGLISH
(2) Rear Panel
q
ANALOG OUT (BALANCED) connectors
• These are active balanced outputs using XLR type
connectors.
• Connect these connectors to the balanced analog input
connectors on an amplifier or console.
• Pin layout: 1. Common
2. Hot
3. Cold
• Applicable connector: Cannon XLR-3-31 or equivalent
NOTE: Do not short-circuit the hot or cold pin with the
common pin.
w
ANALOG OUT (UNBALANCED) jacks
• These are unbalanced outputs using RCA type jacks.
• Connect these jacks to the unbalanced analog input jacks
on an amplifier or console.
e
LEVEL L/R controls
• Use these controls to adjust the level of the audio signals
from the ANALOG OUT (BALANCED) connectors.
r
REMOTE connector
• This is a parallel remote connector. Use it to control the
DN-C630 with dry contact circuit connections.
• Applicable connector: 25-pin D-sub (male)
• Connector signal layout:
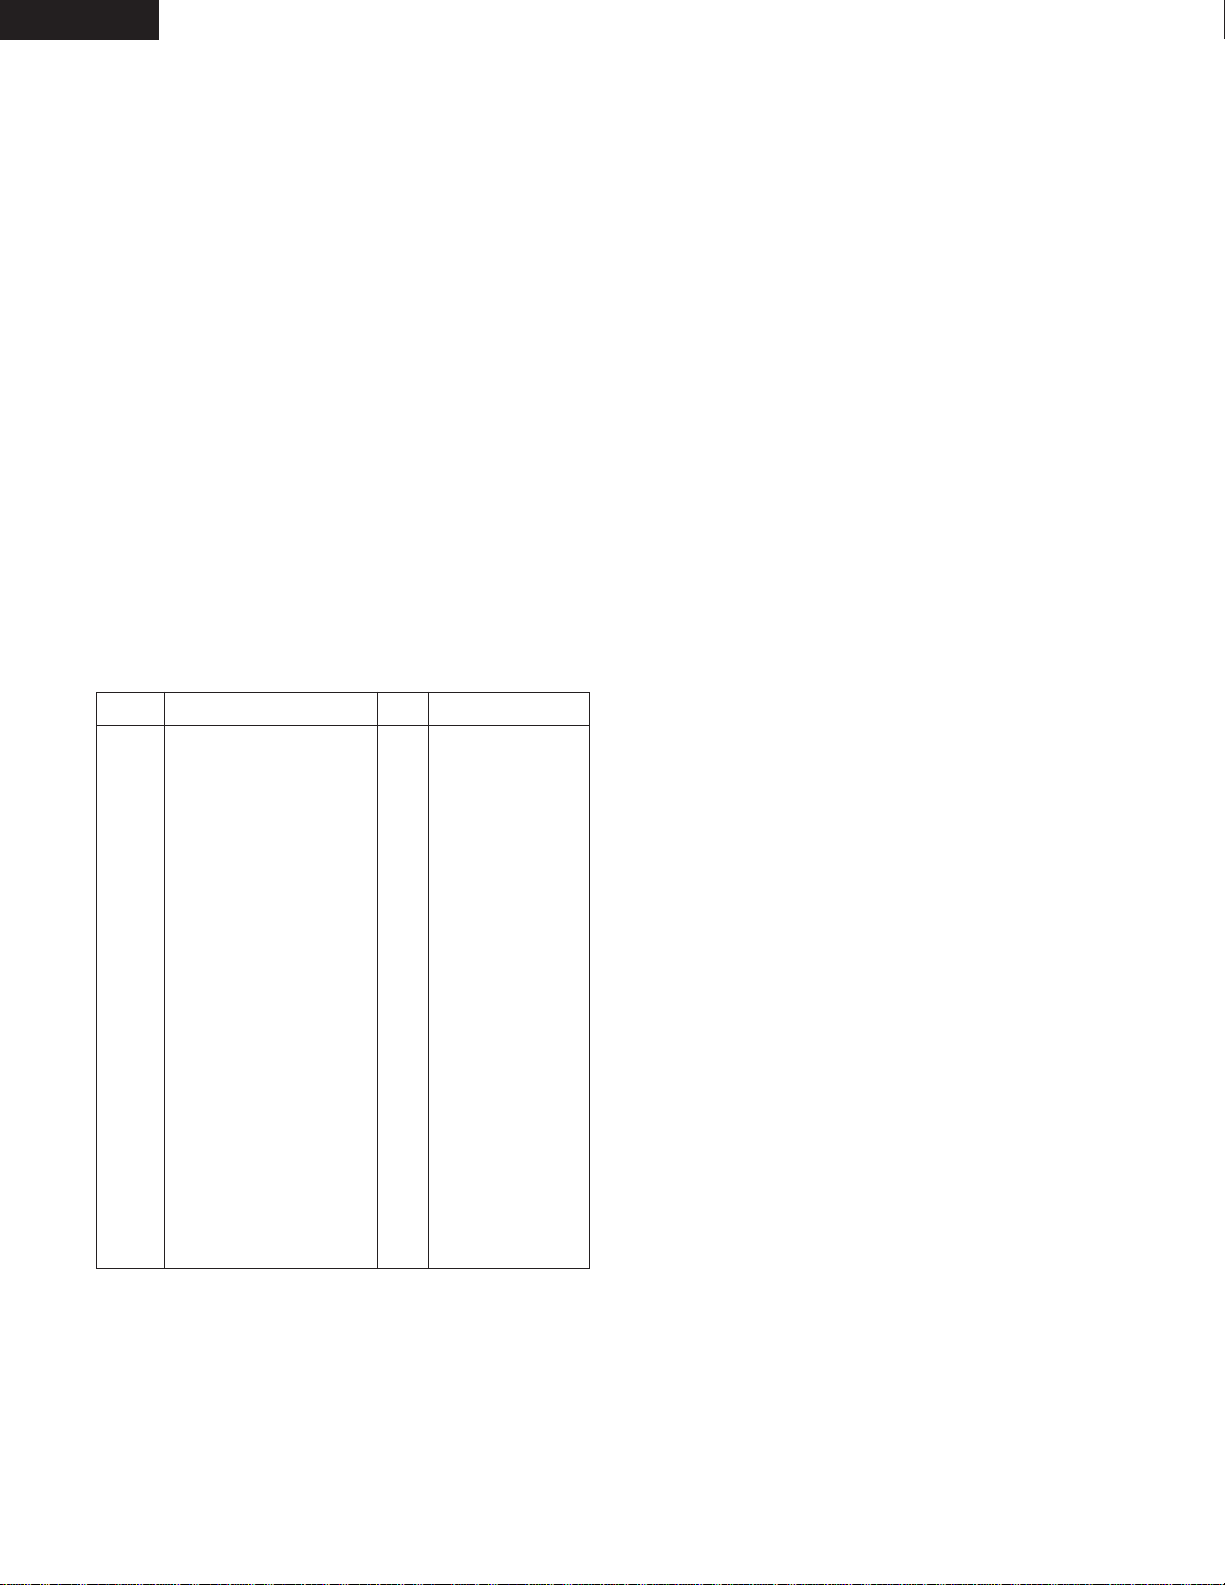
Pin No. Signal name I/O
1
14
2
15
3
16
4
17
5
18
6
19
7
20
8
21
9
22
10
23
11
24
12
25
13
FG
PLAY tally
PLAY command
PAUSE tally
PAUSE command
CUE tally
CUE command
INDEX 2/INDEX 3 tally
TRACK (+) command
Tally common
TRACK (–) command
Reserved
SEARCH (FWD) command
Reserved
SEARCH (REV) command
Reserved
FADER START command
Tally power supply
Command common
Command common
NC
EOM tally
Reserved
Reserved
Reserved
TTL (lol = 20 mA)
HCMOS (li = 3 mA)
TTL (lol = 20 mA)
HCMOS (li = 3 mA)
TTL (lol = 20 mA)
HCMOS (li = 3 mA)
TTL (lol = 20 mA)
HCMOS (li = 3 mA)
HCMOS (li = 3 mA)
HCMOS (li = 3 mA)
HCMOS (li = 3 mA)
PHOTO COUPLER
+5 V, 20 mA
(li =10 mA)
TTL (lol = 20 mA)
–
O
I
O
I
O
I
O
I
–
I
–
I
–
I
–
I
–
–
–
–
O
–
–
–
NOTE: The tally output pin has open collector IC specifications
(Imax. 20 mA, Vmax. 5 V), but the maximum supply
current is 80 mA, so use with a total load current of 80
mA or less.
t
DIGITAL OUT jack
• This is an unbalanced output using an RCA type jack.
• Connect this jack to the unbalanced digital input jack on
an amplifier or console.
• Signal format: Selectable (See Page 22, 9))
(3) Display Window
q
REPEAT indicator
• This lights when the repeat mode is set.
w
Time mode indicators
• “ELAPSED” lights when the elapsed time is displayed.
• “REMAIN” lights when the remaining time is displayed.
e
Play mode indicators
• “SINGLE” lights when in the single track play mode.
• “TOTAL” lights when in the continuous play mode.
r
Track no. display
• This indicates the track number at the current position.
The track number lights during the track search operation
and when switching to the standby mode.
• If the next track is scheduled, that track number flashes
on the track no. display.
t
Play pause indicator
y
Play indicator
u
Index no. display
• Normally “Tr” is displayed. In the index search mode,
the index number is displayed. If the next index is
scheduled, that index number flashes on the index no.
display. The index number also lights during the index
search operation.
i
Playing position display
• This indicates the current position within the track’s total
playing time.
o
Pitch display
• This indicates the set play speed in %.
!0
Program indicator
• This lights when a program is input.
• This flashes when the PROG. IN mode is set.
!1
20 tracks music calendar
• In the single track play mode, only the specified track
lights.
• In the continuous play mode, everything from the
specified track to the last track lights.
• Track numbers are displayed up to track 20. Tracks 21
and on are not displayed.
!2
Playing time display
• This indicates the time of the current position, in minutes
(m), seconds (s) and frames (f).
!3
Character display
• This displays operation messages in the preset and
program modes.
Page 10
11
ENGLISH
REMOTE CONTROL CONNECTIONS
2
OPENING AND CLOSING THE DISC HOLDER AND LOADING DISCS
3
To control the DN-C630 remotely, refer to the example of remote control connections given below.
14
2
23
22
15
3
23
22
16
4
23
7
23
8
23
5
23
9
23
6
23
22
PLAYPAUSECUE
17
22
24
22
INDEX2/INDEX3EOM
FADER SWITCHTRACK(+)TRACK(-)
123456789
10
141516
18
17
242223
The rating of REMOTE connector pin 22 (TALLY POWER SUPPLY) is ) 5 V, 80 mA maximum.
Avoid currents in excess of the rating.
(1) Opening and closing the disc holder
• This operation only works when the power is on.
• Press the OPEN/CLOSE button to open or close the disc holder.
• The disc holders cannot be opened during playback to prevent playback from being interrupted if the OPEN/CLOSE button is
pressed accidentally. Stop playback, then press the OPEN/CLOSE button.
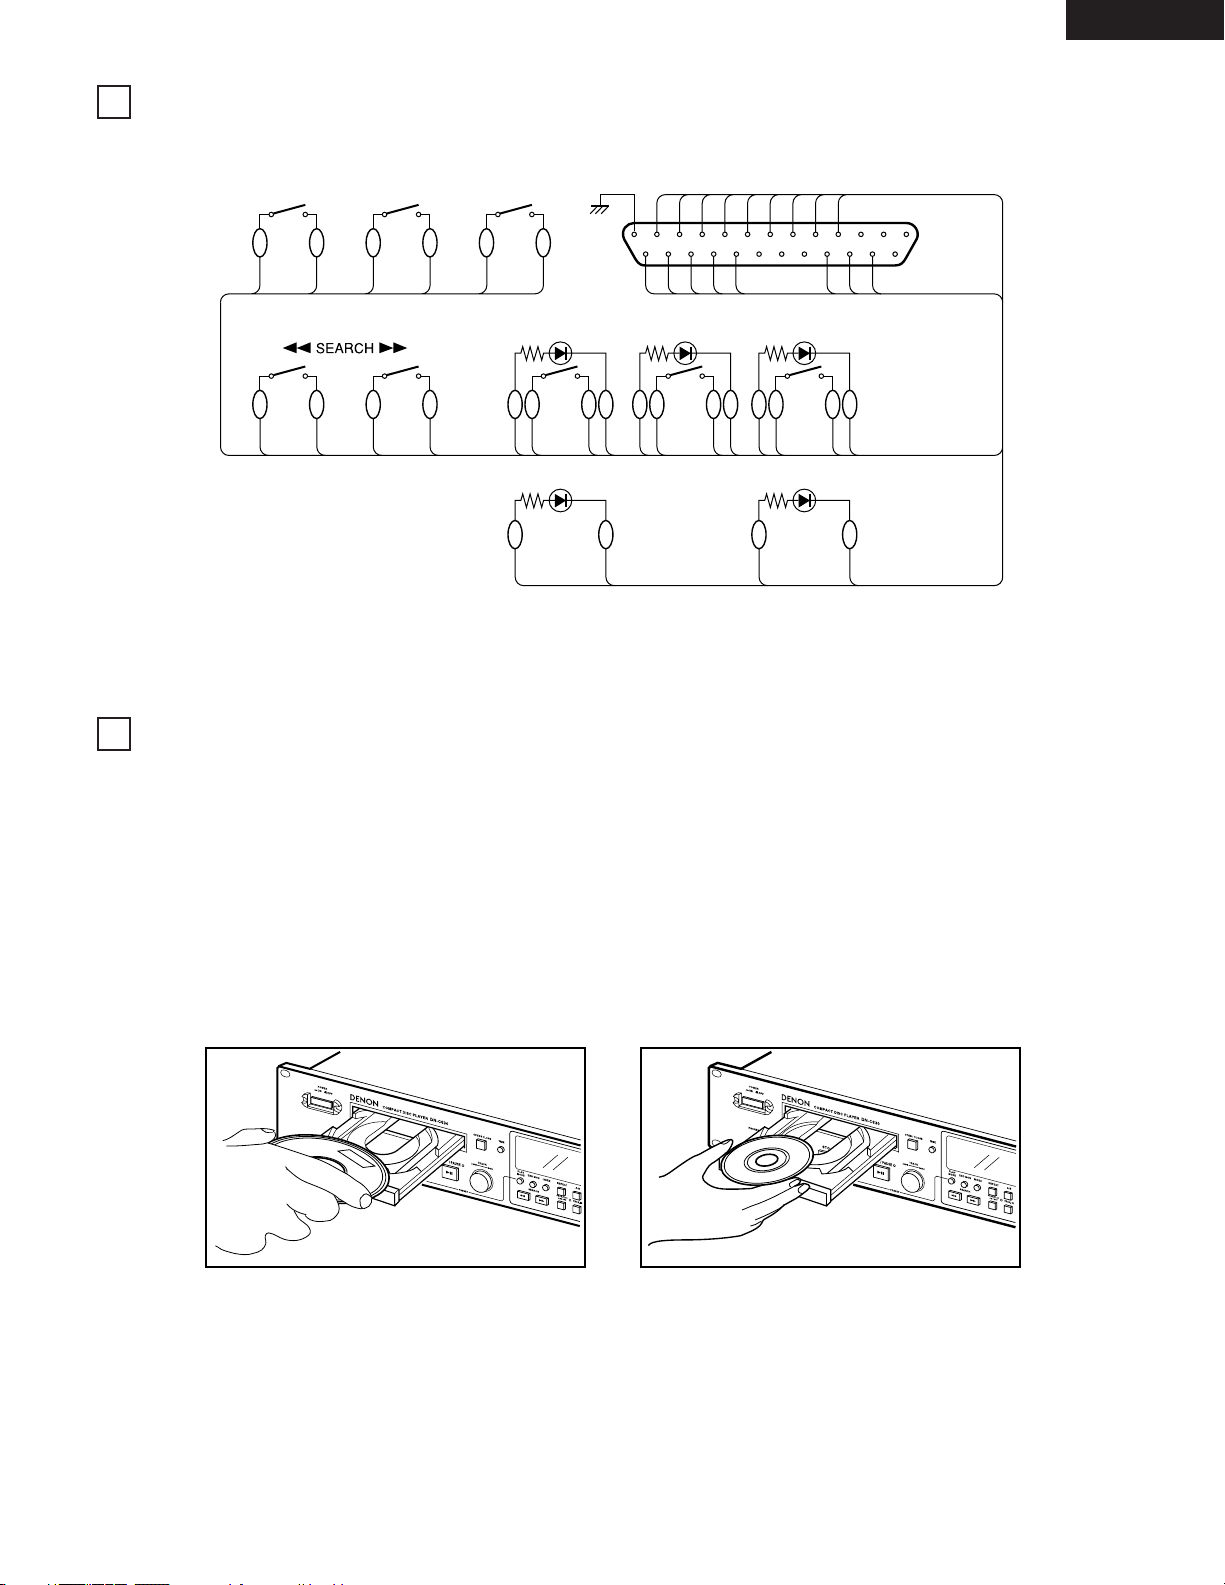
(2) Loading discs
• Hold the disc by the edges and place it in the disc tray. Do not touch the signal surface (the glossy side).
• When using 12 cm discs, place the disc in the outer tray guides, and when using 8 cm discs, place them securely in the inner
guides.
12 cm disc 8 cm disc
CAUTION:
• Do not place any foreign objects in the disc tray, and do not place more than one disc in the disc tray at a time. Doing so may result in
malfunction.
• Do not push the disc tray in manually when the power is off, as this may result in malfunction and damage the player.
Page 11
INDEX
END MON
12
ENGLISH
BASIC OPERATION
4
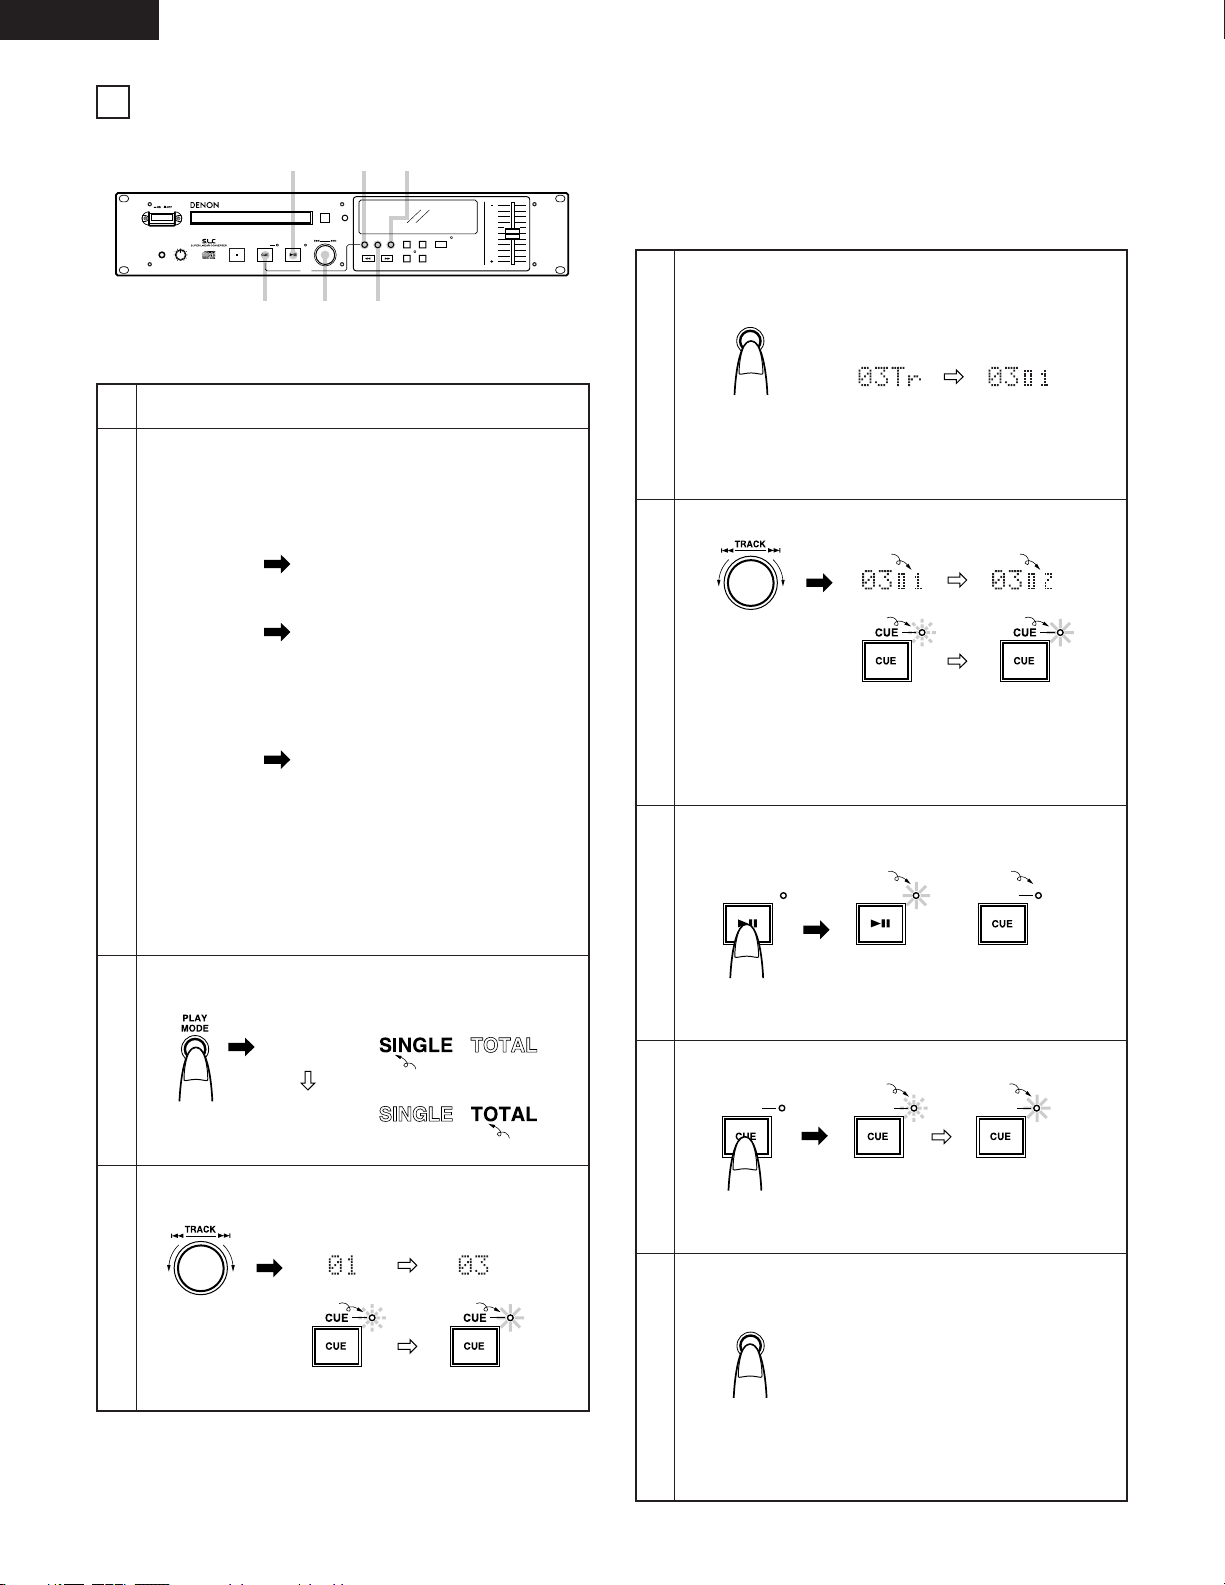
(1) Before Starting Playback
1
Select the track to be played.
Turn the select knob (
8 – 9).
The selected track is cued and the standby mode is set.
NOTE: The track select mode is set when the button is
off.
There is no need to select an index number when
you want to play the track from the beginning.
Turn the select knob (
8 – 9).
The selected index number is cued and the standby mode
is set.
If a non-existent index number is selected,
“
No 02.Index
” appears and the index number
flashes.
5-1
5-2
6-1
6-2
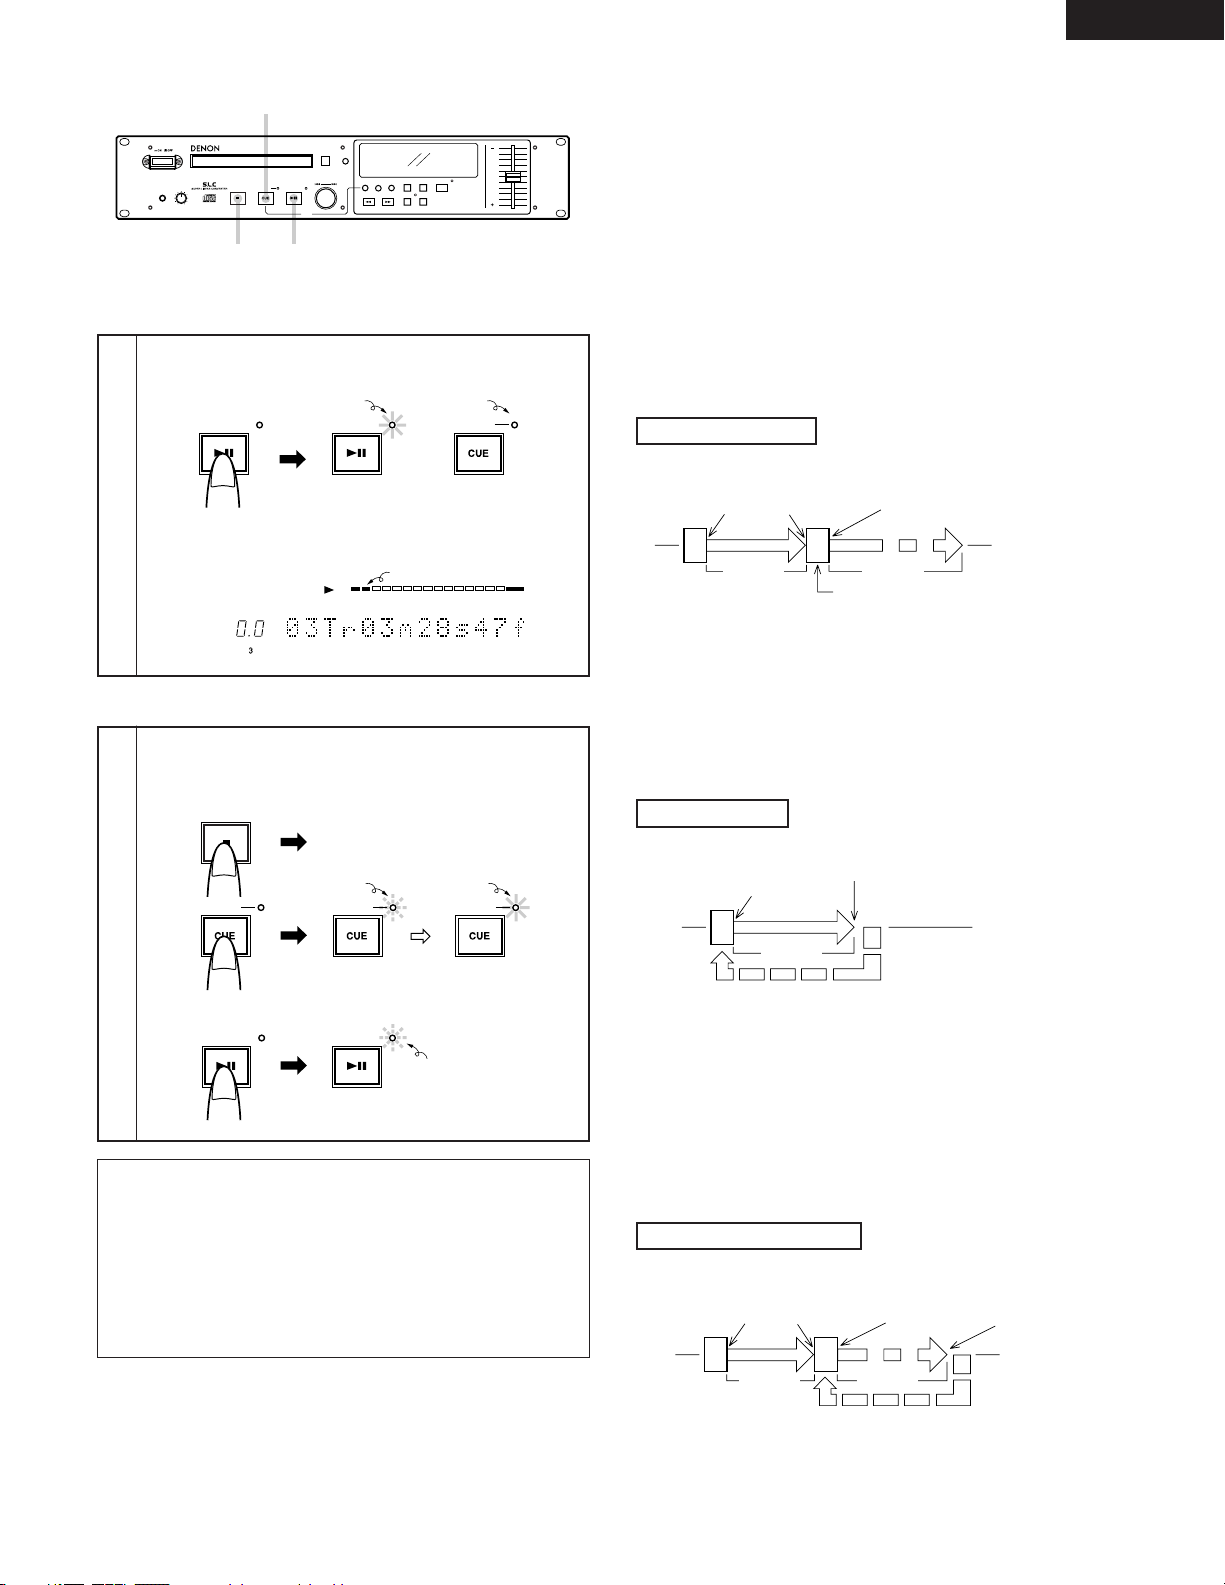
To check the play start position.
Press the PLAY/PAUSE button.
Monitor the playback signals to check the play start
position.
Press the CUE button.
7
To check the play end position.
Press the END MON button.
PLAY / PAUSE
CUE
PLAY / PAUSE
The pickup returns to the play start position and the
standby mode is set. (Back Cue)
CUE
CUECUE
NOTE: If the CUE button is pressed during the end
monitor operation, the end monitor operation is
canceled, the pickup returns to the play start
position and the standby mode is set.
375-1
6-2
6-1
4,5-2
OPEN / CLOSE
COMPACT DISC PLAYER
DN-C630
POWER
PHONES LEVEL
MIN MAX
STOP CUE
PRESET
PLAY / PAUSE
TRACK
PLAY
MODE
END MON INDEX
SEARCH
REPEAT
ON / OFF
PROG.PLAY
A-B
PROG. IN
PITCH
TIME
0%
Load a disc.
3
4
Select the play mode.
Press the PLAY MODE button.
2
Make the presettings according to the usage purpose.
(See page 20.)
NOTE: Step 1 and 2 can be performed in the opposite
order.
Select the play finish mode. (Preset Function)
Finish Stop The stop mode (the servo functions
turn off) is set when playback
finishes.
Finish Next The standby mode is set at the
beginning of the next track when
playback is finished.
* After the final track is played, the
standby mode is set at the
beginning of the first track.
Finish Recue When playback is finished, the
standby mode is set at the position at
which playback was started.
To standby at the point where the sound begins.
(Preset Function)
Set the “CueDet.” Level.
When a track is selected, the position at which the sound
begins is found when a track is cued and the standby
mode is set at that point.
Lit
Lit
Single track
play mode
Continuous
play mode
Flashing during search Lit when standby
To select an index number.
Press the INDEX button.
The index number appear when the index
select mode is set.
The end monitored, then the pickup
returns to the play start position and the
standby mode is set. (End Monitor)
Flashing during search Lit when standby
Index number Index number
Lit Off
LitFlashing
Page 12
13
ENGLISH
(2) Starting Playback
9
9 8,9
OPEN / CLOSE
COMPACT DISC PLAYER
DN-C630
POWER
PHONES LEVEL
MIN MAX
STOP CUE
PRESET
PLAY / PAUSE
TRACK
PLAY
MODE
END MON INDEX
SEARCH
REPEAT
ON / OFF
PROG.PLAY
A-B
PROG. IN
PITCH
TIME
0%
PLAY / PAUSE
CUE
PLAY / PAUSE
PITCH%
REMAIN
SINGLE
(3) Stopping Playback
CUE
PLAY / PAUSE PLAY / PAUSE
CUECUE
STOP
Start playback.
Press the PLAY/PAUSE button.
Playback begins and the playback signals are output.
8
When playback is stopped, the play finish mode set in
step 2 above is set.
Playback can be stopped in the following ways:
9
Lit Off
Flashing (indicates the playback position)
Playback is interrupted and the stop
mode is set.
Playback is interrupted, the pickup
returns to the play start position and
the standby mode is set.
Playback is interrupted and the
pause mode is set at that point.
LitFlashing
Sleep mode
The sleep mode is set if no operation is performed for 30
minutes in the standby, pause or manual search mode.
When in the sleep mode, press the PLAY/PAUSE button to
search for the position before the sleep mode was set and
start playback. Press the CUE button to search for the
position before the sleep mode was set and standby at
that point.
(4) PLAY/PAUSE and CUE Operations
• The operation switches between playback and pause each
time the PLAY/PAUSE button is pressed.
• When the CUE button is pressed during playback, the
pickup returns to the position at which playback was
started.
The diagrams below show playback patterns when the
PLAY/PAUSE and CUE buttons are pressed.
PLAY and PAUSE
When the PLAY/PAUSE button is pressed, playback starts and
proceeds as shown by the arrow on the diagram above.
If the PLAY/PAUSE button is pressed again during playback, the
pause mode is set at that point. Press the PLAY/PAUSE button
again to resume playback.
PLAY/PAUSE
button
pressed
PLAY/PAUSE
button
pressed
PLAY/PAUSE button pressed
Position on disc
Pause mode set at this point
Section
played
Section
played
PLAY and CUE
PLAY, PAUSE and CUE
Back Cue
PLAY/PAUSE
button
pressed
CUE button pressed
Position on disc
Section
played
When the CUE button is pressed after starting playback by
pressing the PLAY/PAUSE button, the pickup returns to the
position at which playback was started and prepares for the next
playback.
Press the PLAY/PAUSE and CUE buttons alternately to start
playback repeatedly from the same position.
This function is called “Back Cue”.
PLAY/PAUSE
button
pressed
PLAY/PAUSE
button
pressed
PLAY/PAUSE
button
pressed
CUE
button pressed
Position on disc
Section
played
Section
played
If the pause mode is set and playback is then resumed, the
position to which the pickup returns with the Back Cue function
changes.
Flashing
Page 13
ENGLISH
13
2
OPEN / CLOSE
COMPACT DISC PLAYER
DN-C630
POWER
PHONES LEVEL
MIN MAX
STOP CUE
PRESET
PLAY / PAUSE
TRACK
PLAY
MODE
END MON INDEX
SEARCH
REPEAT
ON / OFF
PROG.PLAY
A-B
PROG. IN
PITCH
TIME
0%
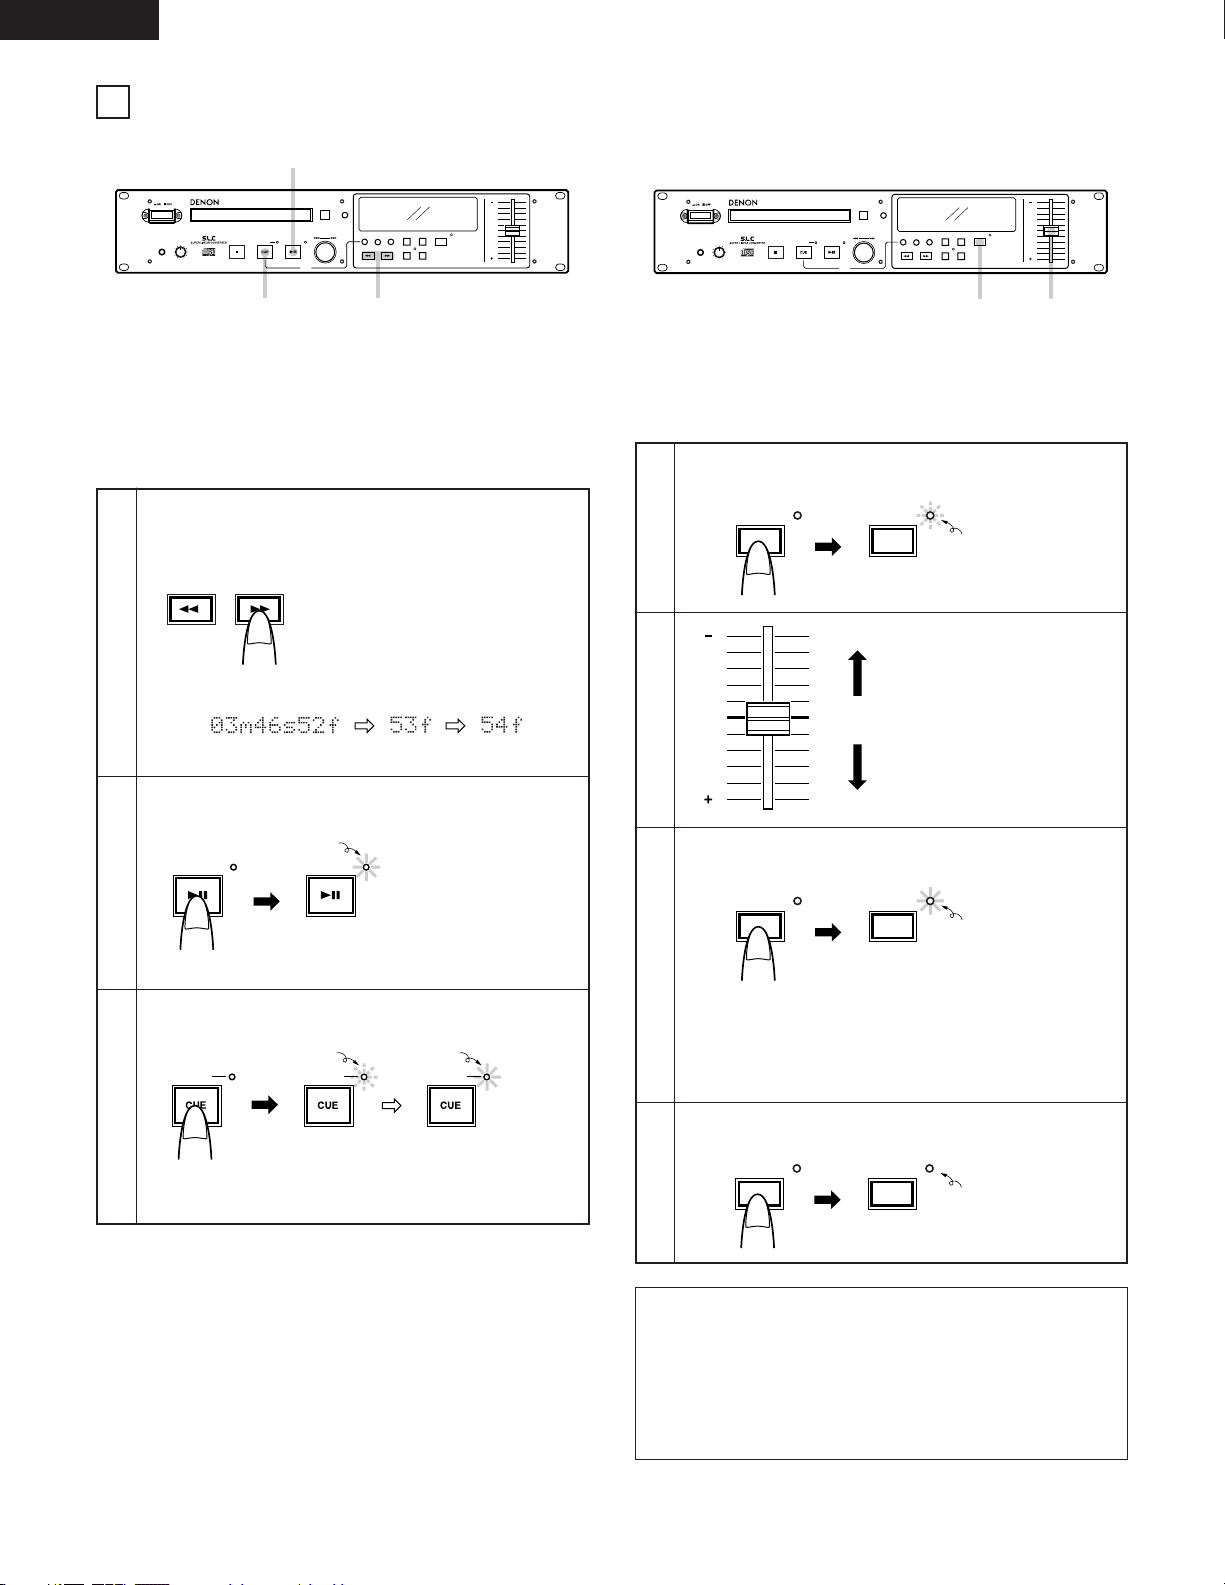
(1) Starting Playback from the Middle of a Track
(Manual Search)
• When a track is selected and the PLAY/PAUSE button is
pressed, playback starts from the beginning of that track.
To start from a different position in the track, use the
procedure described below to find the desired position.
Find the play position.
Press the SEARCH button.
Listen to the sound and find the desired play start position.
SEARCH
PLAY / PAUSE PLAY / PAUSE
CUE
CUECUE
(2) Playing at a Different Speed (Pitch)
• Use this function to play discs at different speed.
• The speed can be changed within the range of –9.9 to
+9.9 %.
1-21-1.2.3
OPEN / CLOSE
COMPACT DISC PLAYER
DN-C630
POWER
PHONES LEVEL
MIN MAX
STOP CUE
PRESET
PLAY / PAUSE
TRACK
PLAY
MODE
END MON INDEX
SEARCH
REPEAT
ON / OFF
PROG.PLAY
A-B
PROG. IN
PITCH
TIME
0%
PITCH PITCH
PITCH PITCH
PITCH PITCH
0%
HANDY OPERATIONS
5
1
To check the play start position.
Press the PLAY/PAUSE button.
Monitor the play signal to check the play start position.
2
Cue the play start position.
Press the CUE button.
The pickup returns to the play start position and the
standby mode is set.
3
Each press the SEARCH button
causes 1 frame to change. Each
frame is 1/75th of a second.
Continuing to press down on the
SEARCH button provides an
automatic change of frames, the
speed of which increases while the
button is pressed.
Lit
Playback start
Set the variable speed mode.
Press the PITCH button.
1-1
The play speed decreases
when the pitch slider is
moved upwards, increases
when the pitch slider is
moved downwards.
Set the speed lock mode.
Press the PITCH button again.
Press the PITCH button again to return to the normal
speed.
The play speed set with the pitch slider is held. In this
state, the play speed will not change even if the pitch
slider is moved.
When the playback speed is preset in the preset mode,
that play speed is set.
1-2
2
3
LitFlashing
Flashing
Play speed down
Play speed up
Lit
Off
NOTE:
When the play speed (PITCH) is set, the display shows the
set pitch, but the disc is played at the standard speed until
the PITCH button is pressed (and the LED is flash).
When the play speed is changed, the sampling frequency
of the digital output signal also changes, so it may not be
possible to receive digital signals.
14
Page 14

15
(3) Playing Repeatedly (Repeat)
1 2.6
3.5
4.55
OPEN / CLOSE
COMPACT DISC PLAYER
DN-C630
POWER
PHONES LEVEL
MIN MAX
STOP CUE
PRESET
PLAY / PAUSE
TRACK
PLAY
MODE
END MON INDEX
SEARCH
REPEAT
ON / OFF
PROG.PLAY
A-B
PROG. IN
PITCH
TIME
0%
SINGLE
TOTAL
PLAY
MODE
REPEAT
1
REPEAT
REPEAT
CUE
CUECUE
PLAY / PAUSE
PITCH%
REMAIN
SINGLE
1
REPEAT
PLAY / PAUSE
CUECUE
Select the play mode.
Press the PLAY MODE button.
1
Select the repeat mode.
Press the REPEAT button.
2
Standby at the play start position.
Press the CUE button.
The pickup returns to the play start position and the
standby mode is set.
3
Start playback.
Press the PLAY/PAUSE button.
Repeat playback starts.
4
Stopping playback.
Playback can be stopped in the following ways:
5
Canceling the repeat mode during playback.
Press the REPEAT button.
The normal play mode resumes and playback continues to
the play end point.
6
To play the single
selected track
repeatedly:
To play all the
tracks on the disc
repeatedly:
To play the single
selected track
repeatedly:
To play all the
tracks on the disc
repeatedly:
Lit
Lit
Lit
Lit
Lit
Lit
LitFlashing
Lit
Off
Lit
Lit
CUE
PLAY / PAUSE PLAY / PAUSE
CUECUE
STOP
Playback is interrupted and the stop
mode is set.
Playback is interrupted, the pickup
returns to the play start position and
the standby mode is set.
Playback is interrupted and the
pause mode is set at that point.
LitFlashing
Flashing
Lit Off
ENGLISH
REPEAT
REPEAT
Page 15
16
ENGLISH
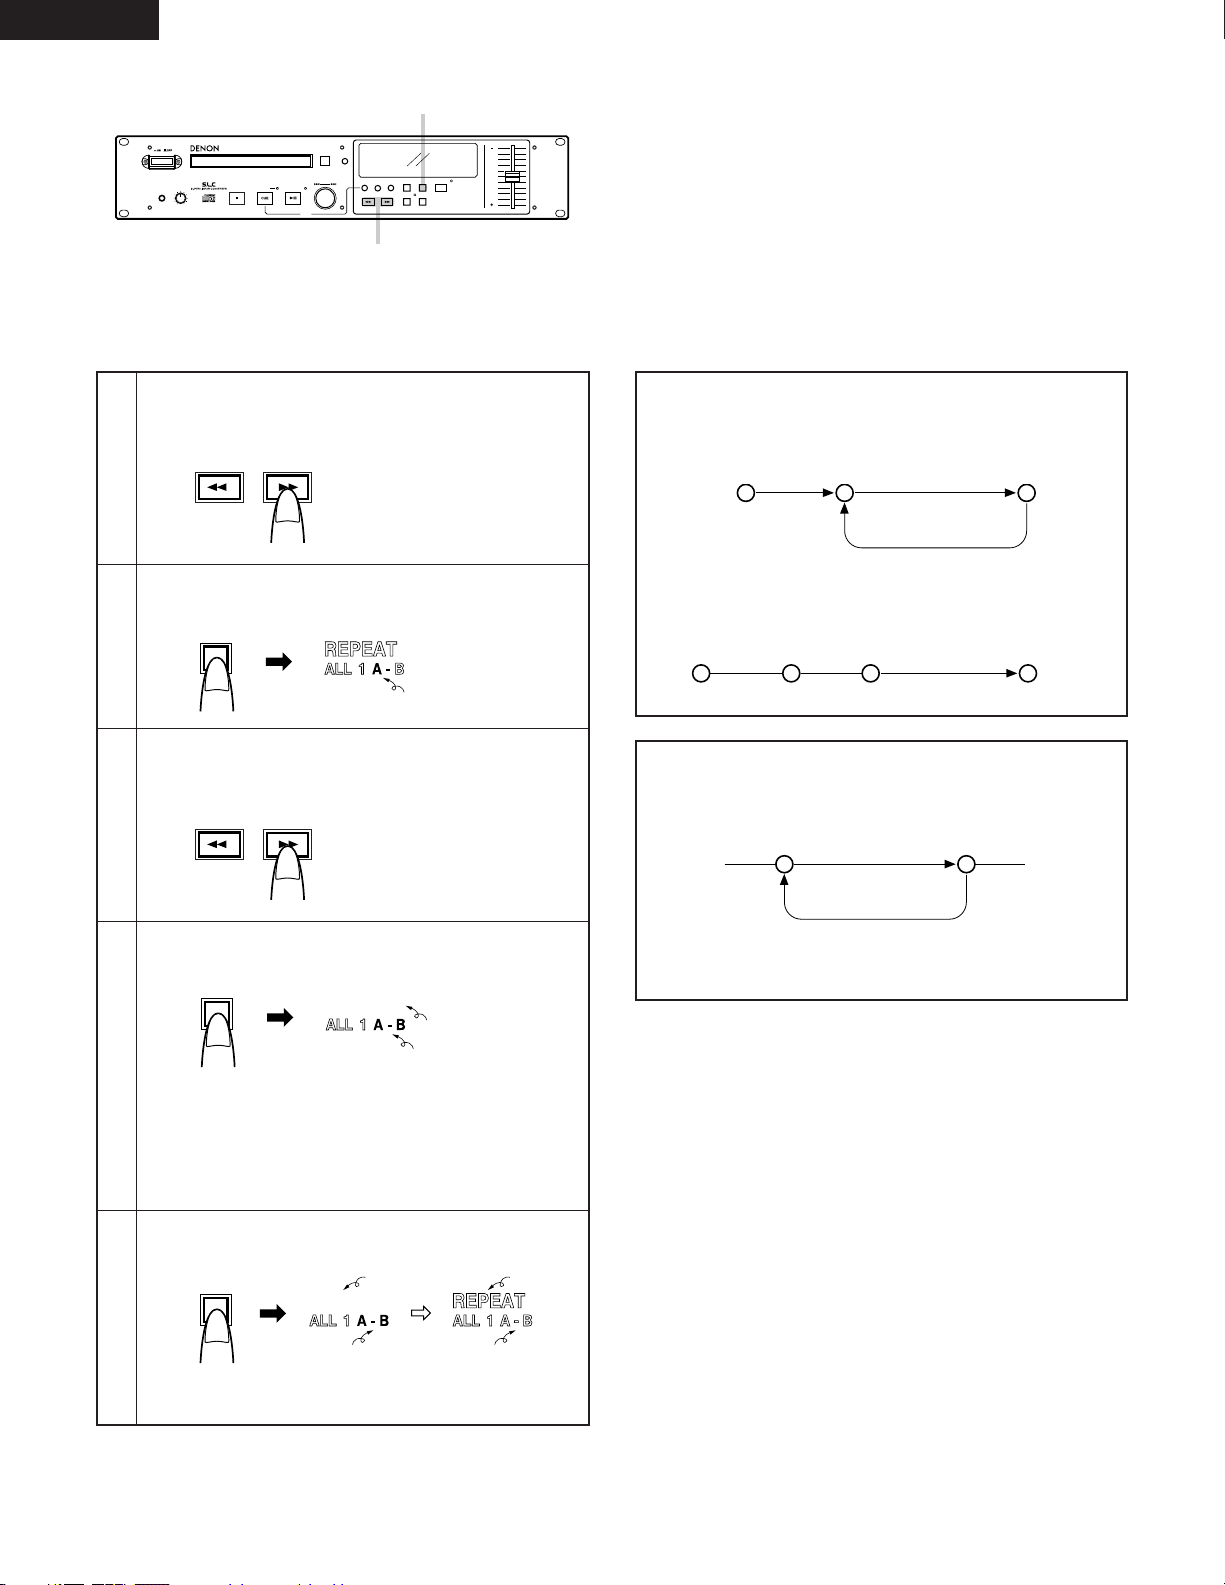
(4) Playing a Specific Section of the Disc (A-B Repeat)
• Use this function to set the play start and positions and
only play the desired section of the disc.
1.3
2.4.5
OPEN / CLOSE
COMPACT DISC PLAYER
DN-C630
POWER
PHONES LEVEL
MIN MAX
STOP CUE
PRESET
PLAY / PAUSE
TRACK
PLAY
MODE
END MON INDEX
SEARCH
REPEAT
ON / OFF
PROG.PLAY
A-B
PROG. IN
PITCH
TIME
0%
A-B
REPEAT
A-B
SEARCH
SEARCH
A-B
REPEAT
Find the play start position (A point).
• Press the SEARCH button(s) to find the desired play
start position.
1
Set the A point.
Press the A-B button.
2
Find the play end position (B point).
• Press the SEARCH button(s) to find the desired play
end position.
3
Set the B point.
Press the A-B button.
The A-B repeat mode is set.
When the B point is set during playback, the A point is
searched for and repeat playback of the A-B section
begins.
If the B point is set in any mode other than the play mode,
the A point is searched for and the standby mode is set.
4
Canceling the A-B repeat mode during playback.
Press the A-B button.
The normal play mode resumes and playback continues to
the play end point.
5
Flashing
Lit
Lit
Lit Off
OffLit
A-B repeat play
If playback is started before the A point, playback
continues to the B point, then returns to the A point for
repeat playback.
NOTE:
• When the B point is before the A point, the section from
the B point to the A point is played repeatedly.
• The end monitor function does not work in the A-B
repeat mode.
If playback is started after the B point, playback continues
to the end of that track and nothing is repeated.
Play start point A point B point
A point B point
A pointB point
Play start point End of track
Section played
Section played repeatedly
Section played repeatedly
Page 16
17
ENGLISH
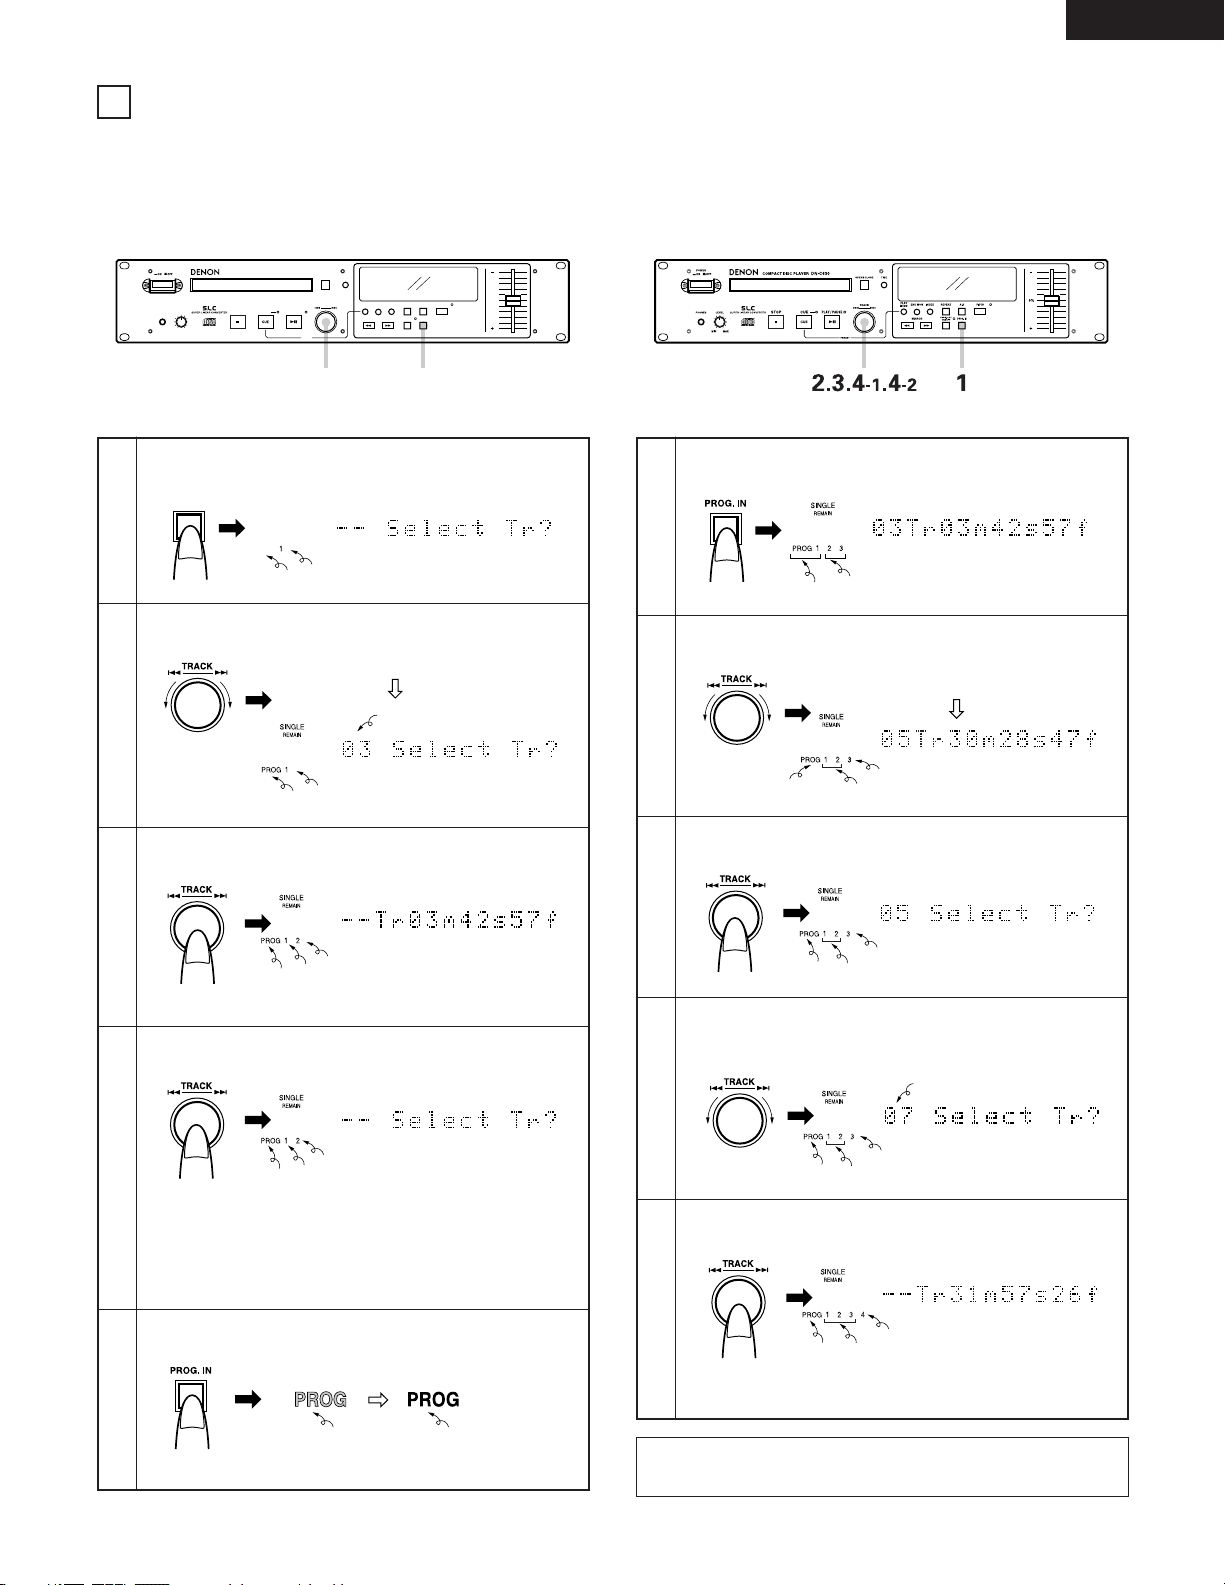
(1) Inputting the Program
2.3.4 1.5
OPEN / CLOSE
COMPACT DISC PLAYER
DN-C630
POWER
PHONES LEVEL
MIN MAX
STOP CUE
PRESET
PLAY / PAUSE
TRACK
PLAY
MODE
END MON INDEX
SEARCH
REPEAT
ON / OFF
PROG.PLAY
A-B
PROG. IN
PITCH
TIME
0%
• The tracks can be programmed to play in a certain order.
• Up to 25 tracks can be programmed.
• Programmed playback is performed according to the play
mode (single or continuous) and finish mode (stop, next or
recue) settings.
PROG. IN
PROG
REMAIN
SINGLE
PROGRAMMED PLAYBACK
6
Set the program input mode.
Press the PROG. IN button.
1
Select the track to be programmed.
Turn the select knob (
8 – 9).
2
Enter the selected track in the program.
Press the select knob.
The number of next step in the program is displayed.
3
Enter the next track in the program.
Press the select knob.
The time display shows the total playing time for the
program.
Repeat steps 2, 3 and 4 to program the tracks in the
desired order.
4
Exit the program input mode.
Press the PROG. IN button.
The set return to the normal mode.
5
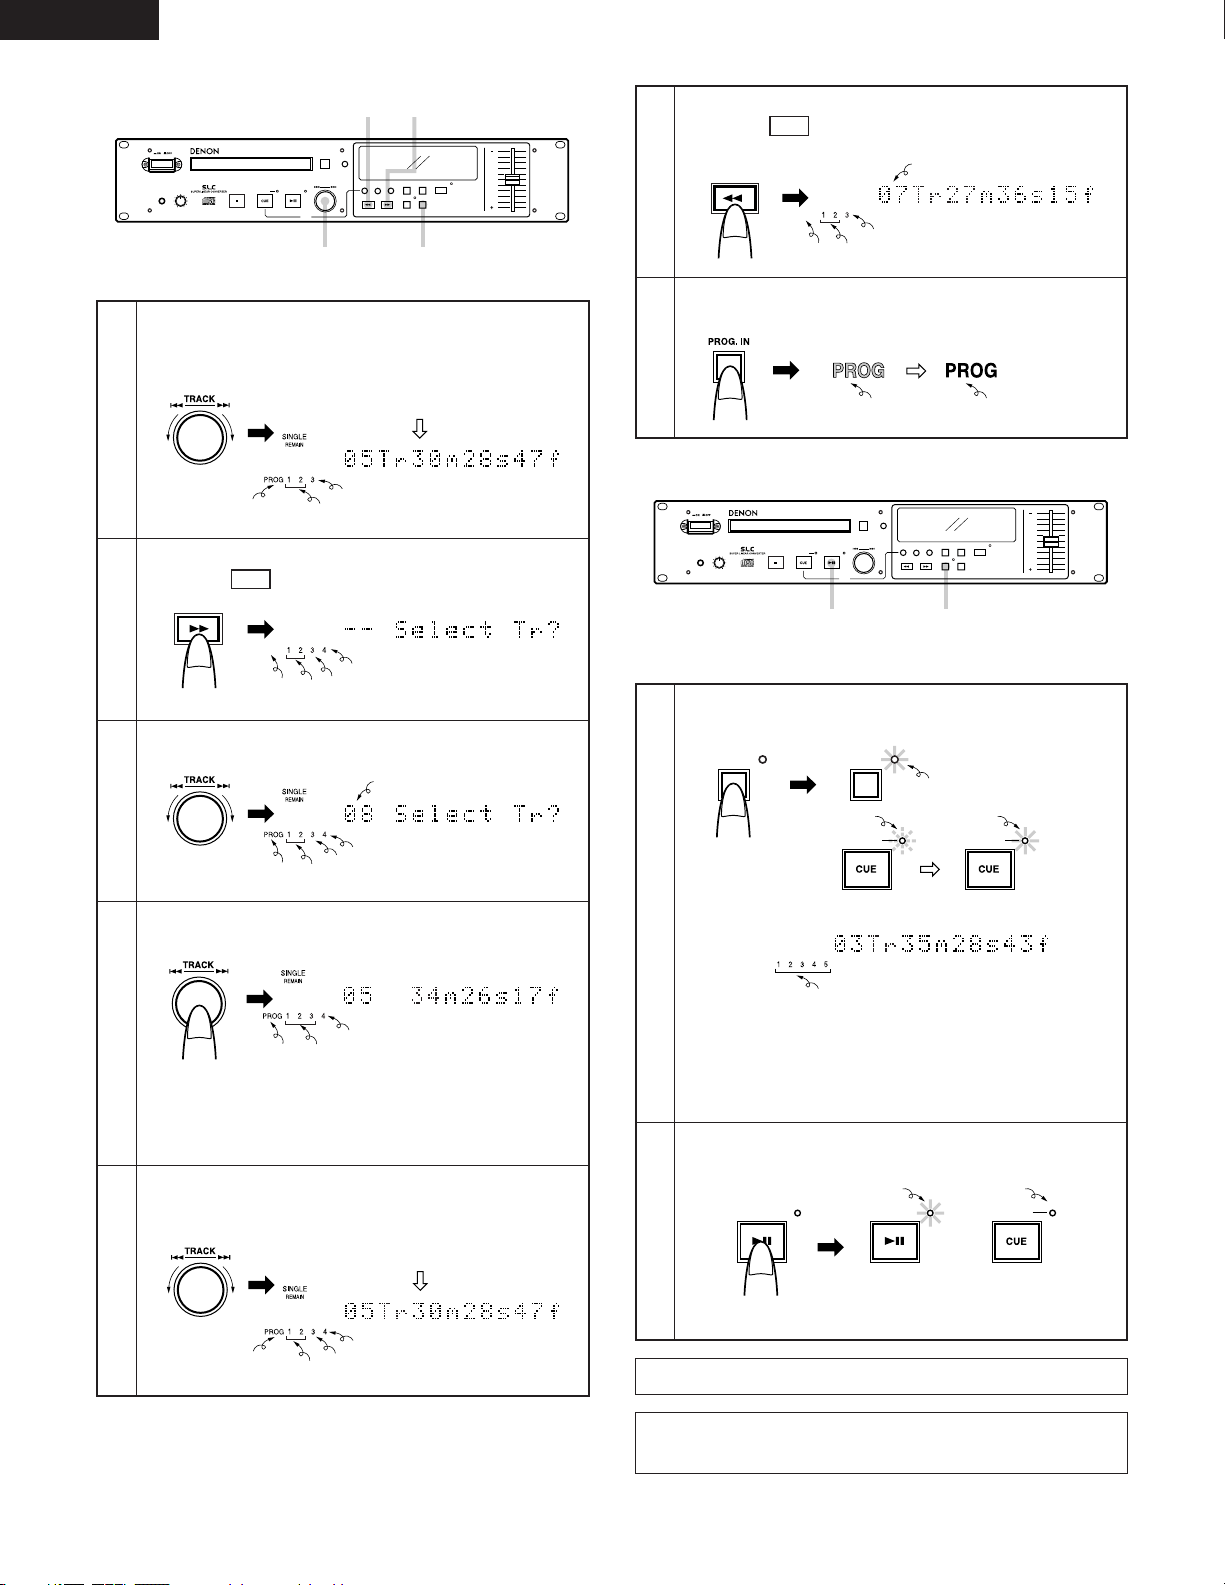
(2) Changing the Program
Set the program edit mode.
Press the PROG. IN button.
1
Select the step number to be edited.
Turn the select knob (
8 – 9).
2
Set the program change mode.
Press the select knob.
3
To change the track:
Select the track to be changed.
Turn the select knob (
8 – 9).
4-1
Enter the selected track.
Press the select knob.
To continue editing the program, repeat steps 2, 3, 4-1 and
4-2.
4-2
Flashing
The step number flashes
Flashing
The step number flashes
Flashing
When track 3 is selected:
Selected track number
Flashing
Lit
Flashing
Flashing
Lit
Flashing
Flashing
Lit
The step numbers lights
Flashing
Flashing
The step number to be edited
flashes
Lit
Flashing
Lit
Flashing
Lit
Flashing
Lit
To edit the third step in the program:
Flashing
Selected track number
The number of the next step in
the program flashing
To exit program editing mode, press the PROG. IN button.
The set returns to the normal mode.
Page 17
18
ENGLISH
6-2 5-2
5-1,5-3,5-4,6-1 7
OPEN / CLOSE
COMPACT DISC PLAYER
DN-C630
POWER
PHONES LEVEL
MIN MAX
STOP CUE
PRESET
PLAY / PAUSE
TRACK
PLAY
MODE
END MON INDEX
SEARCH
REPEAT
ON / OFF
PROG.PLAY
A-B
PROG. IN
PITCH
TIME
0%
PROG
REMAIN
SINGLE
PROG
REMAIN
SINGLE
(3) Playing Programs
ON / OFF
PROG.PLAY
ON / OFF
PROG.PLAY
CUECUE
PROG
TOTAL
21
OPEN / CLOSE
COMPACT DISC PLAYER
DN-C630
POWER
PHONES LEVEL
MIN MAX
STOP CUE
PRESET
PLAY / PAUSE
TRACK
PLAY
MODE
END MON INDEX
SEARCH
REPEAT
ON / OFF
PROG.PLAY
A-B
PROG. IN
PITCH
TIME
0%
Inserting a track in the program.
Select the position at which to insert a track.
Turn the select knob (
8 – 9).
5-1
Set the program insert mode.
Press the button.
7
5-2
Select the track to be inserted.
Turn the select knob (
8 – 9).
5-3
Enter the selected track.
Press the select knob.
To insert more tracks in the program, repeat steps 5-1, 5-
2, 5-3 and 5-4.
(To exit the program insert mode, press the PROG. IN
button.)
5-4
Deleting a track from the program.
Select the step to the deleted.
Turn the select knob (
8 – 9).
6-1
Flashing
Lit
Lit
The step number flashes
Flashing
To insert a track at the third step
in the program:
Flashing
Lit
Flashing
Flashing
Lit
Flashing
Flashing
Lit
Flashing Flashing
Number of selected track
Lit
Delete the track from the program.
Press the button.
6
6-2
Exit the program editing mode.
Press the PROG. IN button.
7
Set the program play mode.
Press the PROG. PLAY button.
In the single mode, only the specified step number is
displayed.
In the continuous mode, everything from the specified
step number to the last step number is displayed.
The first track in the program is cued and the standby
mode is set.
1
Start programmed playback.
Press the PLAY/PAUSE button.
Programmed playback starts.
2
Flashing Lit
Lit
The next step number flashes
Flashing
Number of track at the next step in the program
Lit
Lit
Flashing
PLAY / PAUSE
CUE
PLAY / PAUSE
Lit Off
When the disc is ejected, the set program is cleared.
NOTE:
Programs cannot be input when no disc is loaded.
To delete the track at the third step
Lit
Lit
Page 18
19
ENGLISH
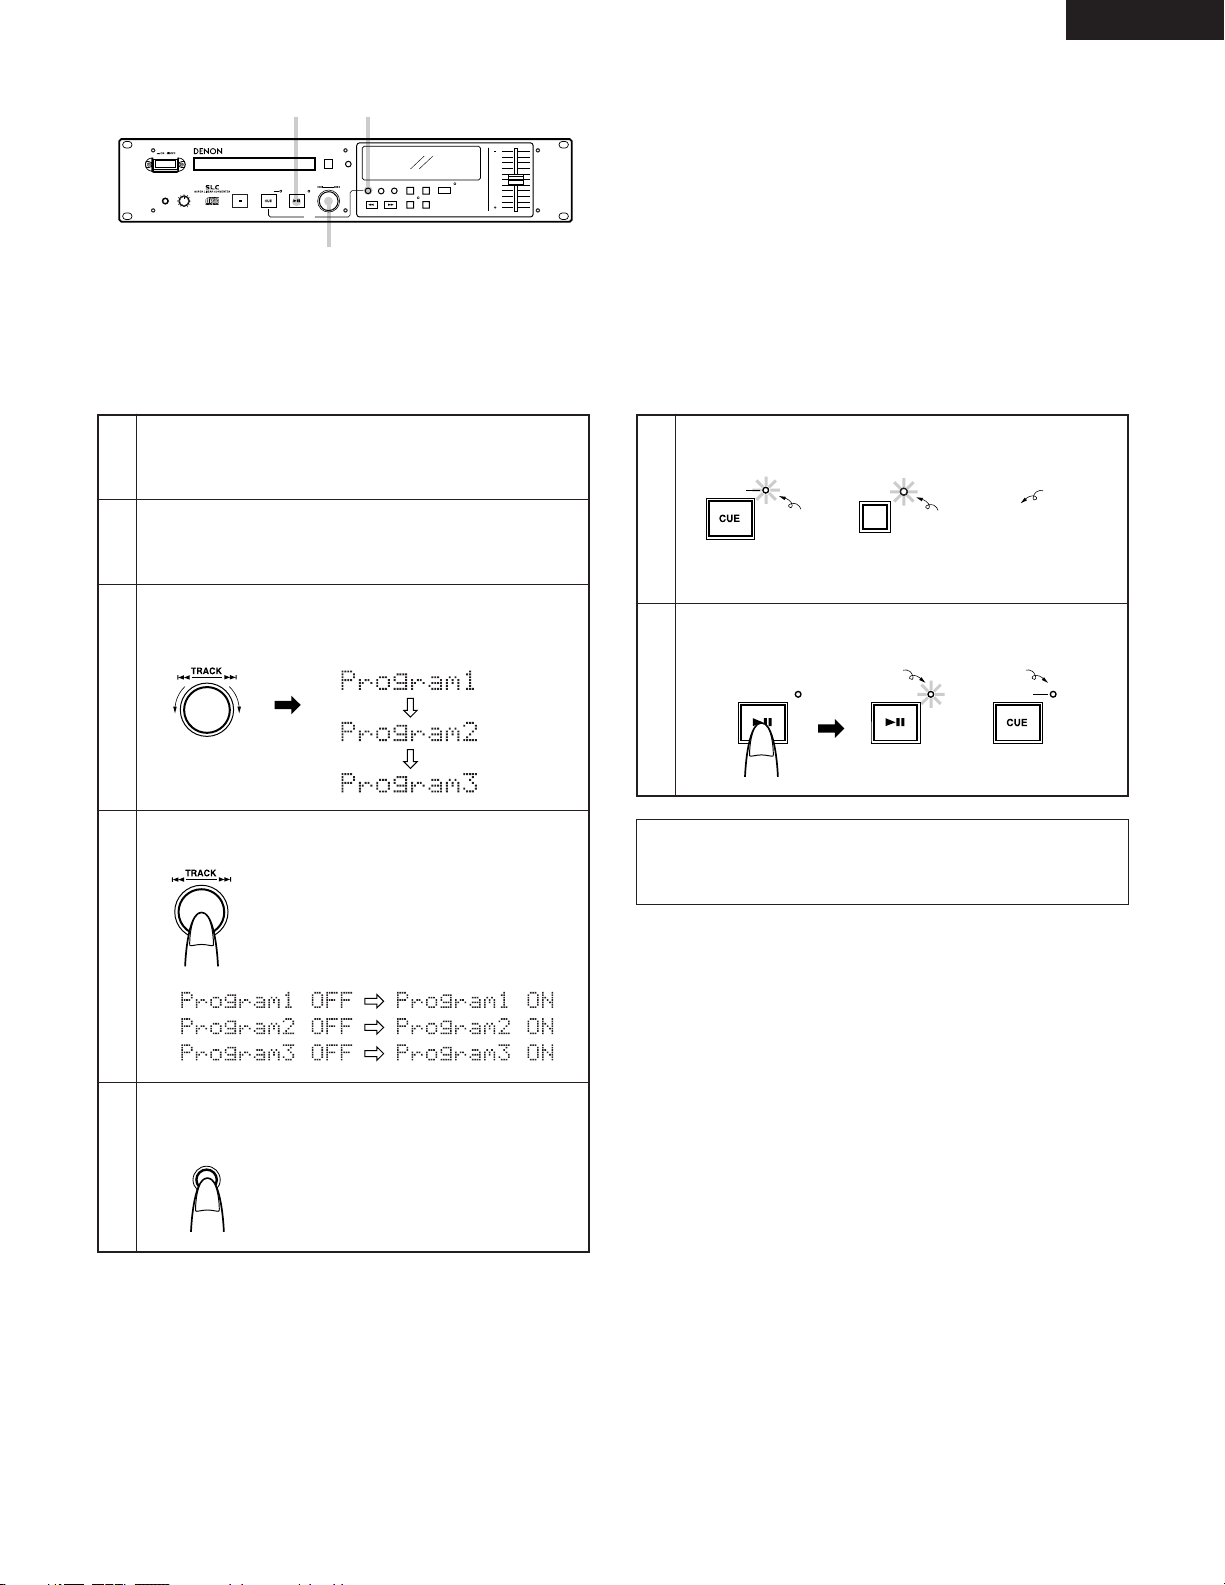
(4) Presetting Programs
• Programs can be stored in the preset memory. When a disc for which a program is preset is loaded, the programmed playback
mode is set automatically.
• Programs can be stored for up to three discs.
4 2-4
2-2,2-3
OPEN / CLOSE
COMPACT DISC PLAYER
DN-C630
POWER
PHONES LEVEL
MIN MAX
STOP CUE
PRESET
PLAY / PAUSE
TRACK
PLAY
MODE
END MON INDEX
SEARCH
REPEAT
ON / OFF
PROG.PLAY
A-B
PROG. IN
PITCH
TIME
0%
PLAY
MODE
The preset setting mode is canceled and the set
return to the normal mode.
CUE
ON / OFF
PROG.PLAY
PROG
Input the program.
Follow the instructions under “(1) Inputting the Program”
to input the program. (See Page 17.)
1
Set the preset mode.
Follow the instructions under “(2) Presetting Procedure”
to set the preset mode. (See Page 21.)
2-1
Select the preset item.
Turn the select knob to select “Program 1” (or “Program
2” or “Program 3”).
2-2
Change the preset setting.
Press the select knob.
2-3
Cancel the preset mode.
Press the PLAY MODE button.
2-4
To play a preset disc:
Load a disc for which a program is preset.
The pickup searches for the first programmed track and
the standby mode is set.
3
Start programmed playback.
Press the PLAY/PAUSE button.
4
Select one of these
The character display changes as follows:
Before change After change
Lit Lit
Lit
PLAY / PAUSE
CUE
PLAY / PAUSE
Lit Off
NOTE:
The playing time may not be displayed properly during
programmed playback of discs without CDR TOCs.
Page 19
20
ENGLISH
PRESET FUNCTIONS AND OPERATIONS
7
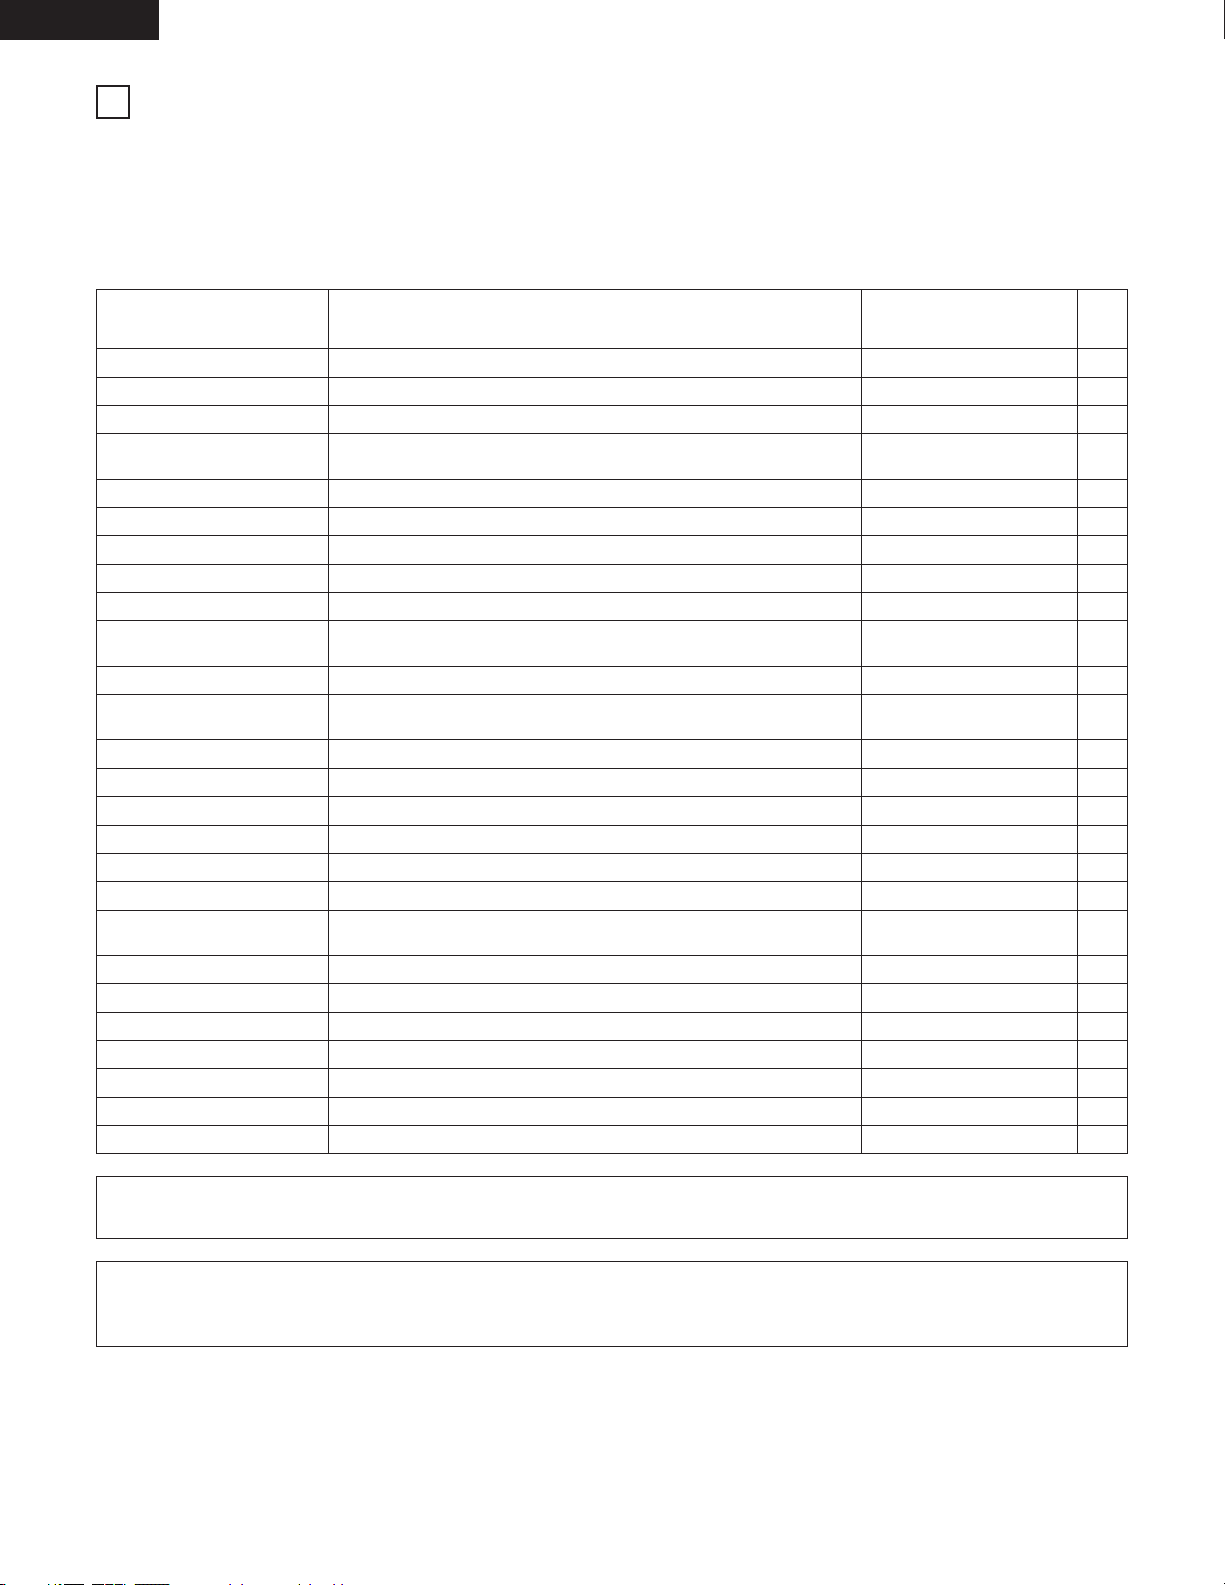
(1) List of Preset Functions
• Functions can be preset using the buttons on the front panel. These presettings are stored in a permanent memory, so they are
not cleared even when the power is turned off.
• The functions shown on the table below can be preset. Set the functions according to the usage purpose to efficiently achieve
even higher quality playback.
• One of the preset functions can be used to display information on this set (microprocessor version).
Preset function type
Preset type
Finish mode
Power on mode
Auto cue
Auto stop
Program 1
Program 2
Program 3
Digital output
Selection of preset type.
Setting of operation when playback ends.
Setting of operation when power is turned on.
Setting of whether or not to automatically stop the servo functions.
Setting of whether or not to play program 1.
Setting of whether or not to play program 2.
Setting of whether or not to play program 3.
Selection of whether or not to output subcodes.
Preset Type 1
Finish Next
Power On Stby
CueDet. –60 dB
Sleep ON
Program 1 OFF
Program 2 OFF
Program 3 OFF
Subcode OFF
1
2
3
4
5
6
7
8
9
End monitor
Setting of whether or not to use the end monitor function and monitor
time setting.
End Mon. 10 s
10
Next track standby
Setting of whether or not to standby at the next track when the CUE
button is pressed during playback.
Next Stb. OFF
12
CDR disc
Selection of whether or not to test play CDR discs which do not include a
TOC.
Normal Disc
19
Parallel remote
Parallel remote
Parallel remote
Parallel remote
Stereo/Mono
Preset clear
Set information
Selection of whether or not to accept parallel remote signals.
Selection of whether or not to output standby tally.
External control tally output signal setting.
Fader start mode selection.
Selection of stereo or monaural playback.
Setting for clearing presets and setting them to the initial values.
Microprocessor version display.
Remote ENA
ST. Tally ON
INDEX 2 Tally
Fader Pause
Stereo
Ini. Preset
Ver. **** (* = number)
20
21
22
23
24
25
26
E.O.M. Setting of whether or not to display the EOM and display time setting. E.O.M. 10 s
11
Next Track Reserve
Fade in time
Play speed
Delay start
Play lock
Frame display
Setting of operation when select knob is turned during playback.
Fade in time setting.
Standard playing speed setting.
Delay start time setting.
Selection of whether or not to inhibit the panel switches during playback.
Selection of whether or not to display frames.
Reserve. OFF
FadeIn OFF
Normal Speed
Delay OFF
Play Lock OFF
FR Disp ON
13
14
15
16
17
18
Description
Character display
(as set upon shipment
from factory)
No.
When presettings are made, the time display set with the TIME button and the play mode set with the PLAY MODE button at that
time are stored in the memory. These modes will be set when the power is next turned on.
NOTE:
For CDR discs without TOCs, there are no pits (signals) at the disc’s lead in and lead out sections, so errors may occur, particularly
when searching for tracks. If an error should occur, open the disc holder, then close it and perform the operation again.
Setting of whether or not to perform the auto cue operation and the
audio startup level.
Page 20
21
ENGLISH
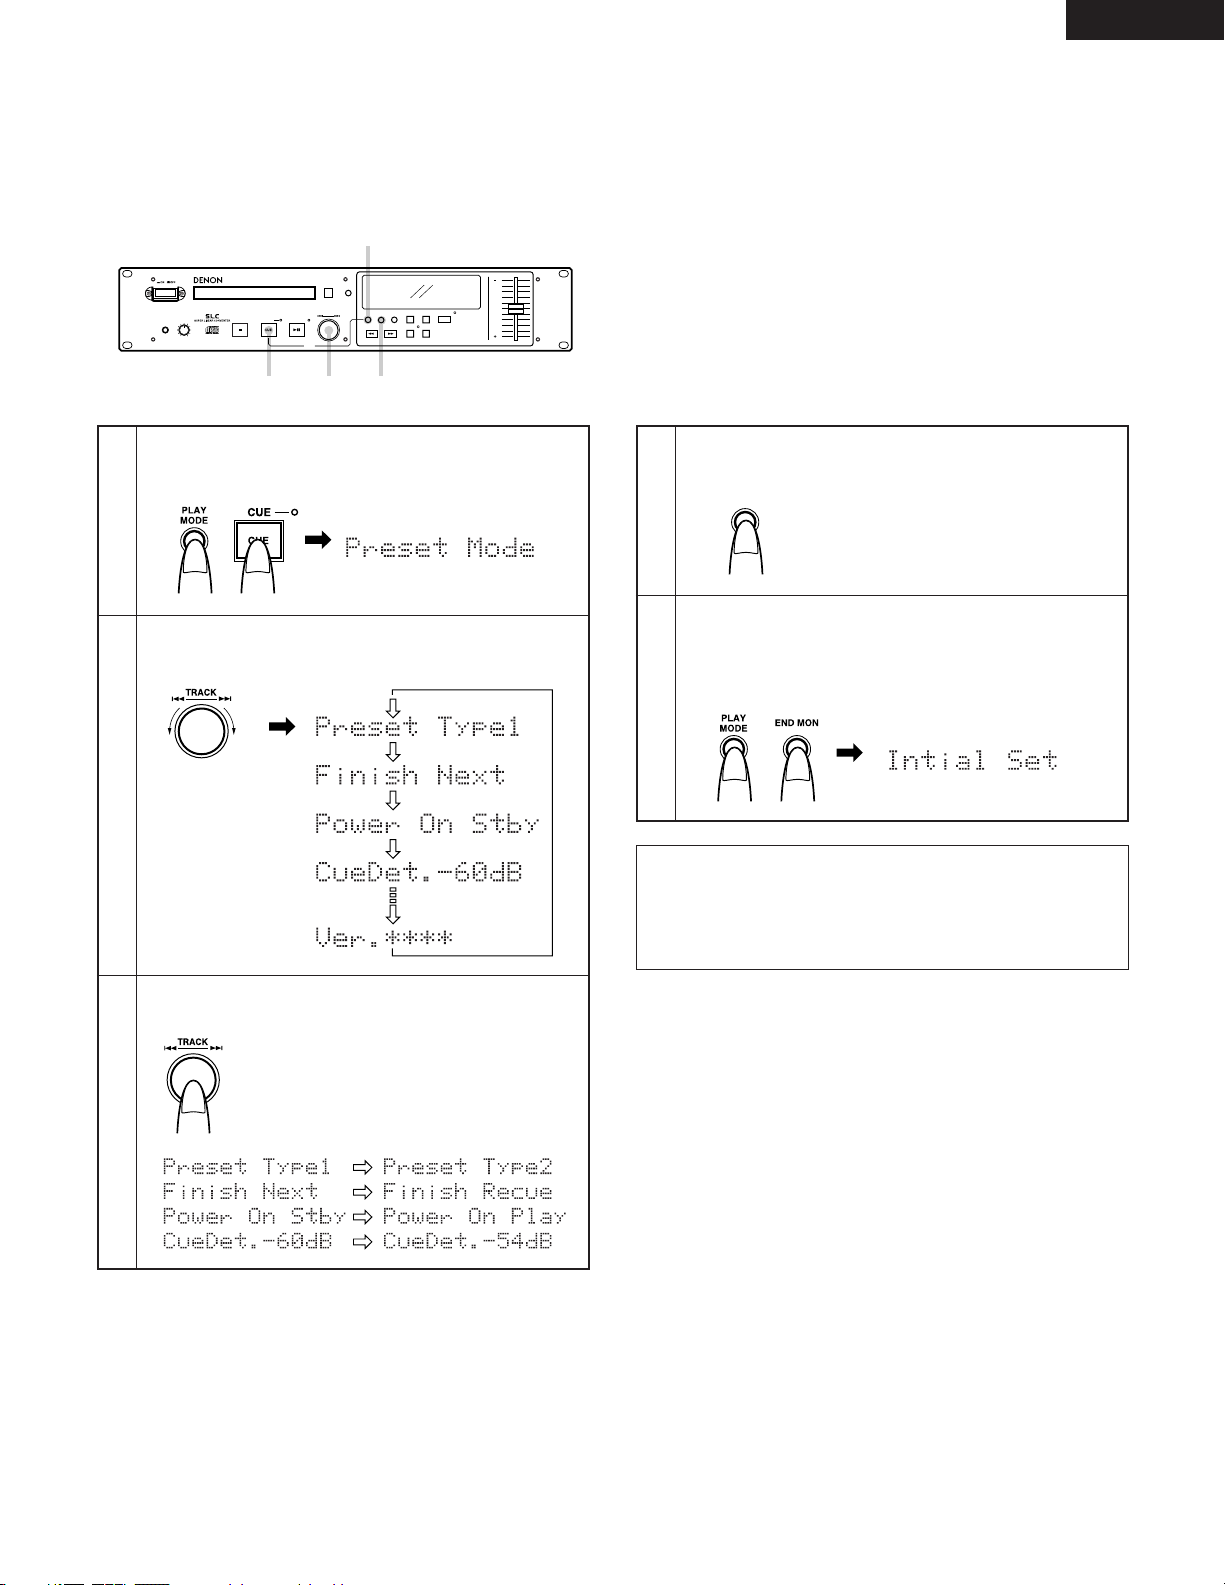
(2) Presetting Procedure
• Functions can be press using the buttons on the front
panel.
• Make the presettings with no disc loaded, in the stop or
standby mode.
2.31 5
1.4.5
OPEN / CLOSE
COMPACT DISC PLAYER
DN-C630
POWER
PHONES LEVEL
MIN MAX
STOP CUE
PRESET
PLAY / PAUSE
TRACK
PLAY
MODE
END MON INDEX
SEARCH
REPEAT
ON / OFF
PROG.PLAY
A-B
PROG. IN
PITCH
TIME
0%
PLAY
MODE
The preset mode is canceled and the set
returns to the previous mode.
The character display changes as
shown below.
Enter the preset mode.
Press the CUE button while pressing the PLAY MODE
button.
1
Select the preset item.
Turn the select knob (
8 – 9).
2
Change the preset values.
Press the select knob.
3
NOTE:
If the message shown below appears, there is a problem
with the preset memory. Contact a serviceperson.
Exit the preset mode.
Press the PLAY MODE button.
4
To set the presettings back to the initial settings (the
settings set upon shipment from the factory), turn the
power on the while holding in both the PLAY MODE and
the END MON buttons. For the initial settings, refer to “(1)
List of preset functions”.
5
Character display
Character display
Turn the knob
clockwise to move in
the direction of the
arrows,
counterclockwise to
move in the opposite
direction.
The character display changes
as shown below.
Before change After change
Initial Error
Page 21

22
ENGLISH
(3) Detailed Description of Preset Functions
(* = initial setting)
1) “Preset Type (*)” (Three different sets (types) of presettings can be made and used for different purposes.)
* Preset Type 1 : Set to preset type 1.
Preset Type 2 : Set to preset type 2.
Preset Type 3 : Set to preset type 3.
2) “Finish (*****)”
Finish Stop : Stop mode is set after playback ends.
* Finish Next : Standby mode is set at next track after playback ends.
Finish Recue : Standby mode is set at playback start position after playback ends.
3) “Power On (****)”
* Power On Stby : Standby mode is set at specified track after TOC is read.
Power On Play : Playback begins in the all repeat mode after TOC is read.
Power On Stop : Stop mode is set after TOC is read.
4) “CueDet. (–**) dB”
CueDet. (–*) dB : Set the audio detection level for cueing. (–72/–66/*–60/–54/–48/–42/–36)
CueDet. OFF : Sound startup position is not cued.
5) “Sleep ON (OFF)”
* Sleep ON : Automatically turn the servo functions off if no button is operated for 30 minutes in the pause, standby
or manual search mode.
Sleep OFF : Do not automatically turn the servo functions off.
6) “Program 1 OFF (ON)”
Program 1 OFF (ON) : Store the contents of program 1 when on. (Initial setting - OFF)
7) “Progam 2 OFF (ON)”
Program 2 OFF (ON) : Store the contents of program 2 when on. (Initial setting - OFF)
8) “Program 3 OFF (ON)”
Program 3 OFF (ON) : Store the contents of program 3 when on. (Initial setting - OFF)
9) “Subcode ON (OFF)”
Subcode ON : Output subcodes with the digital output signals. (consumer SPDIF format)
* Subcode OFF : Do not output subcodes with the digital output signals. (consumer IEC 958 Type I format)
NOTE: 0 sec. start is not possible when the above is set to “Subcode ON”.
10) “End Mon. (**) s”
End Mon. (**) s : Set the end monitor time. (5/*10/15/20/25/30/35)
End Mon. OFF : Do not use the end monitor function.
11) “E.O.M. (**) s” (Output EOM tally signal to remote pin (24))
E.O.M. (**) s : Set the EOM time. (0/5/*10/15/20/30/60)
E.O.M. OFF : Do not use the EOM function.
12) “Next Stb. Off (ON)”
* Next Stb. OFF : Return to the play start position and standby when the CUE button is pressed during playback.
Next Stb. ON : Standby at the beginning of the next track when the CUE button is pressed during playback.
13) “Reserve. OFF (ON)”
* Reserve. OFF : Specified track (index) is searched for immediately when select knob is turned during playback.
Reserve. ON : Track (index) to be searched for is scheduled after playback of current track (index) ends when select
knob is turned during playback.
Press the PLAY MODE button to cancel the reserved track.
Page 22

23
ENGLISH
14) “FadeIn OFF (***s)”
FadeIn OFF (***s) : Set the fade in time. (*OFF/10 m/50 m/0.1/0.5/1/2)
15) “Normal (+/–***%) Speed”
* Normal Speed : Play at normal speed.
(+/–***%) Speed : Play at variable speed. ±(0.2/0.4/0.6/0.8/1.0/1.2/1.4/1.6/1.8/2.0/2.2/2.4/2.6/2.8/3.0)
16) “Delay OFF (***ms)”
Delay OFF (***ms) : Set the time for delayed start after the play start operation. (*OFF/100 m/200 m/300 m)
17) “PlayLock ON (OFF)”
PlayLock ON : Inhibit all operations other than the PLAY/PAUSE, TIME and PLAY MODE buttons during playback.
* PlayLock OFF : Enable all functions during playback.
18) “FR Disp ON (OFF)”
* FR Disp ON : Display the frames on the time display during playback.
FR Disp OFF : Do not display the frames on the time display during playback.
(The frames are displayed in the manual search, standby, pause and end monitor modes.)
19) “CD-R NO TOC ON (OFF)”
* Normal Disc : Play normal CD and CDR discs containing TOCs.
No TOC Disc : Play CDR discs not containing TOCs.
NOTE:
For CDR discs without TOCs, there are no pits (signals) at the disc’s lead in and lead out sections, so errors may occur, particularly
when searching for tracks. If an error should occur, open the disc holder, then close it and perform the operation again.
20) “Remote EMA (INH)”
* Remote ENA : Enable input of control signals to the parallel remote connector.
Remote INH : Inhibit input of control signals to the parallel remote connector.
21) “St. Tally ON (OFF)”
* St. Tally ON : Output standby tally from parallel remote connector.
St. Tally OFF : Do not output standby tally from parallel remote connector.
22) “(******) Tally”
* INDEX 2 Tally : Output index 2 tally signal to remote pin (17).
INDEX 3 Tally : Output index 3 tally signal to remote pin (17).
23) “Fader Pause (Play)”
* Fader Pause : Start playback when remote fader pins (9-10) are short-circuited and pause when pins are open.
Fader Play : Start playback when remote fader pins (9-10) are short-circuited and continue playback when pins are
open.
24) “Stereo (Mono)”
* Stereo : Output L and R stereo signals from the output connector.
Mono : Output mixed L and R signals from the output connector.
25) “Preset Clr ? (Ini. Preset)”
Preset Clr ? : Clear the presettings (set to the initial factory values).
* Ini. Preset : Do not clear the presettings.
26) “Ver. xxxx” : Display the microprocessor version. (“xxxx” is a number.)
Page 23
24
ENGLISH
BEFORE SWITCHING OFF THE POWER
8
When you have finished using the CD player, before switching off the power be sure that the disc holder has been closed with the
OPEN/CLOSE button.
COMPACT DISCS
9
(1) Precautions on handling compact discs
• Do not allow fingerprints, oil or dust to get on the surface of the disc.
If the disc is dirty, wipe it off with a soft dry cloth.
• Do not use benzene, thinner, water, record spray, electrostatic-proof chemicals, or silicone-treated cloths to clean discs.
• Always handle discs carefully to prevent damaging the surface; in particular when removing a disc from its case or returning it.
• Do not bend the disc.
• Do not apply heat.
• Do not enlarge the hole in the center of the disc.
• Do not write on the label (printed side) with a hard-tipped implement such as a pencil or ball point pen.
• Condensation will form if a disc is brought into a warm area from a colder one, such as outdoors in winter. Do not attempt to dry
the disc with a hair dryer, etc.
(2) Precaution on storage
• After playing a disc, always unload it from the player.
• Always store the disc in the jewel case to protect from dirt or damage.
• Do not place discs in the following areas:
1) Areas exposed to direct sunlight for a considerable time.
2) Areas subject to accumulation of dust or high humidity.
3) Areas affected by heat from indoor heaters, etc.
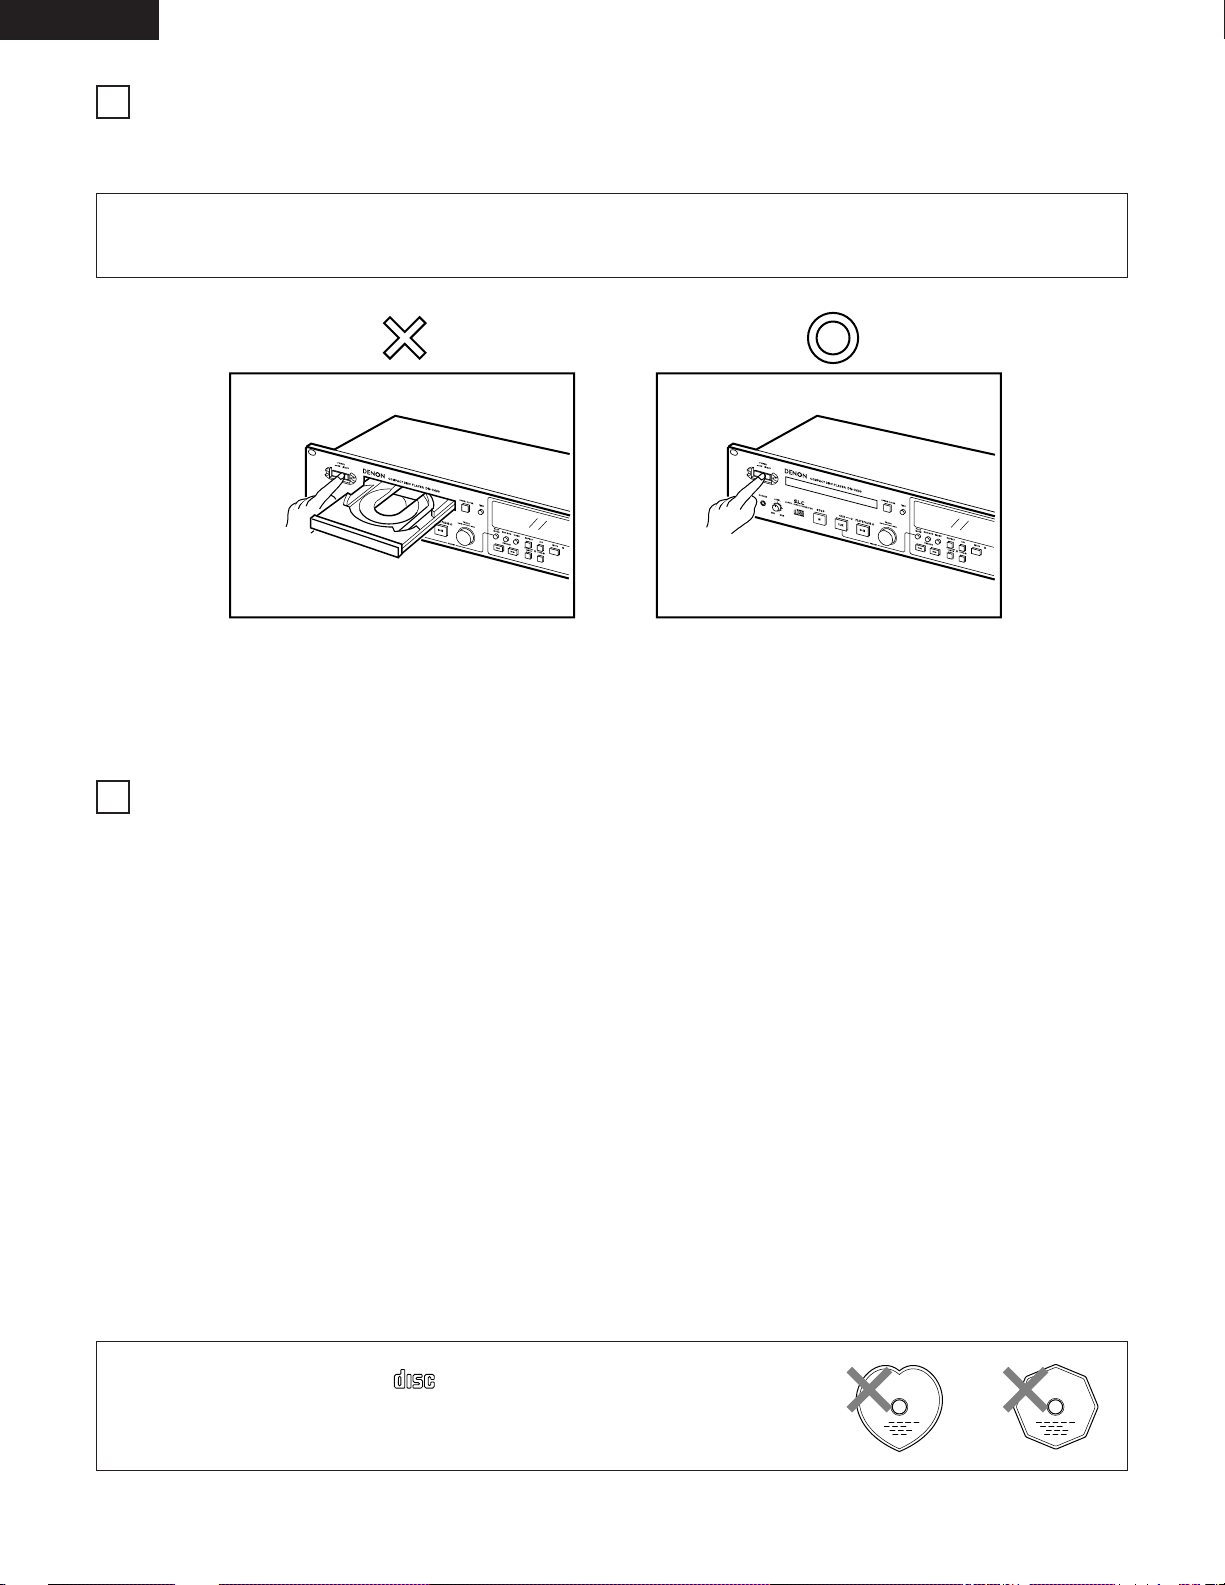
CAUTION:
Do not forcibly close the disc holder when the power is off.
It may damage the unit when it is transported.
Do not switch off the power when the disc
holder is open.
POWER OFF
Switch off the power after the disc holder
has been closed with the OPEN/CLOSE
button.
POWER OFF
NOTE:
Use compact discs that include the mark.
CD’s with special shapes (heart-shaped CD’s, octagonal CD’s etc.) cannot be played on this
set.
Attempting to do so may damage the set. Do not use such CD’s.
DIGITAL AUDIO
COMPACT
Page 24

25
ENGLISH
TROUBLESHOOTING
10
SPECIFICATIONS
11
When you think the player might be broken, please check the following items.
The disc holder does not open or close.
• Is the power switch set to ON ?
• Is the player in the process of playing a disc ?………………………………………………………………………………See page 11
The display still indicates “–” when a disc is loaded.
• Is the disc loaded properly ?
• Is the disc dirty or scratched ?
There is no sound or the sound is distorted.
• Are the output cables connected to the amplifier correctly ?
• Is the adjustment of the amplifier’s controls and switching correct ?
The specified portion of the disc cannot be played back correctly.
• Is the disc dirty or scratched ?
There is a button that doesn’t function.
• Has a preset such as PLAY-LOCK been set ? ………………………………………………………………………………See Page 23
GENERAL
Type: CD Player
Disc type: Standard Compact Discs (12 cm, 8 cm/5”, 3”)
AUDIO SECTION
Channels: 2 channels (Stereo), 1 channel (Mono)
Sampling Frequency: 44.1 kHz
Digital Filter: 18 bit 8-times oversampling Digital filter
Frequency Response: 5 to 20,000 Hz (±1.0 dB)
Total Harmonic Distortion: 0.015 % (1 kHz, 0 dB playback, A filter)
Signal to Noise Ratio: 98 dB (1 kHz, 0 dB playback, A filter)
Channel Separation: 90 dB (1 kHz, 0 dB playback, A filter)
Analog Output: 1 kHz, 0 dB playback
Transfer and Connector: Balanced active, XLR connector
Unbalanced, RCA jack
Output Level: Balanced: +18 dBs, 600 Ω/ohms
Unbalanced: 1.7 Vrms, 10 kΩ/kohms
Output Level Adjust Range: +22 dBs to –20 dBs (Balanced)
Headphone Output: 20 mW (30 to 40 Ω/ohms)
Digital Output
Transfer and Connector: RCA jack
Signal Format: IEC 958 Type I or SPDIF
Output Level: Unbalanced: 0.5 Vp-p, 75 Ω/ohms
Variable Pitch Control: ±9.9 % max.
Audio Start-up Time: 0.01 second less
Frame Search Accuracy: 1 frame (1/75 second)
DIMENSIONS: 482 (W) x 88 (H) x 252 (D) mm
(19.0” x 3-15/32” x 9-55/64”)
WEIGHT: 5.1 kg (11 lbs 4 oz)
POWER CONSUMPTION: 18 W
POWER SUPPLY: AC 120 V 10 %, 60 Hz (U.S.A., Canada and Taiwan R.O.C.)
AC 230 V 10 %, 50 Hz (Europe, Asia, Others)
ENVIRONMENTAL CONDITIONS
Operating Temperature: +5 °C to 35 °C
Humidity: 25 % to 85 %, non condensing
Storage Temperature: –20 °C to 60 °C
REMOTE
Parallel Remote: D-sub 25-pin
* Specifications and design are subject to change without notice for purpose of improvement.
Pin No.
1
2
3
Common
Hot
Cold
Page 25

DEUTSCH
26
Bei dem DN-C630 handelt es sich um einen CD-Spieler, der für die Montage in ein 19”-Rack ausgelegt ist. Dieses Gerät wurde für die
Produktion in Rundfunkanstalten konzipiert.
• 19”-Rack-Montage (Höhe 2 U)
• Titelsuchlauf-Wähler (Einfache Titelanwahl)
• Programmierte Wiedergabe (max. 25 Titel)
(1) Wenn der PLAY-Modus auf “Single” eingestellt ist, setzt sich das Gerät am Anfang des nächsten Titels in Betriebsbereitschaft.
(Wiedergabe-Beendigungsmodus, next)
(2) Wenn der PLAY-Modus auf “Continious” eingestellt ist, wird die Wiedergabe entsprechend der von Ihnen programmierten
Reihenfolge fortgesetzt.
• Wiedergabe- und Wiedergabe-Beendigungsmodus
(1) Wiedergabemodus
q “Continious”: Wiedergabe einer gesamten Disc.
w “Single”: Wiedergabe eines Titels.
(2) Wiedergabe-Beendigungsmodus (Stop, Next, Recue)
q Stop: Stoppt nach der Wiedergabe eines Titels.
w Next: Setzt sich nach der Wiedergabe eines Titels an den Anfang des nächsten Titels.
e Recue: Setzt sich nach der Wiedergabe eines Titels zurück an dessen Anfang.
• Auto Cue
Nach dem Einlegen einer CD wird diese automatisch an die Stelle gebracht, an der der Ton einsetzt.
Das Absuchen findet an dem Punkt statt, an dem der Ton einsetzt oder besser gesagt, an dem der Titel beginnt. Der Pegel, an dem
der Ton zuerst als solcher erkannt wird, ist zwischen –36 und –72dB (7 Stufen) einstellbar.
• Titelende-Überwachung
Die Betätigung der END MON-Taste im Standby-Modus ermöglicht eine sofortige Vorschau auf das Titelende. Dies garantiert einen
perfekten “Endpunkt”. Wann vor dem Titelende die Überwachung beginnen soll, ist innerhalb eines Bereiches von 5 bis 35 Sekunden
(7 Stufen) einstellbar.
• Avisierung des Titelendes (EOM)
Am Ende des Titels blinkt das Zeitdisplay und gibt dem Betreiber damit ein optisches Signal, daß der Titel in Kürze zu Ende ist. Der
Zeitpunkt, an dem das Blinken beginnt, ist innerhalb eines Bereiches von 0 bis 60 Sekunden (7 Stufen) vom Titelende aus gesehen,
einstellbar.
• Tonhöhensteuerung (±9,9 %, 0,1 % Schritt)
• Index-Suchlauf
Bei eingeschalteter INDEX-Taste kann mit diesem Wähler ein Index-Suchlauf durchgeführt werden. (Die Indexnummer erscheint)
• FL Display
• Anzeige der Wiedergabepositionen
Ein Strichdiagramm zeigt den Stand der Wiedergabe des jeweils aktuellen Titels an. Durch Betätigung der TIME-Taste können Sie sich
entweder die bereits verstrichene bzw. die noch verbleibende Zeit anzeigen lassen.
• Externe Steueranschlüsse
Parallele Remote-Schnittstelle (25-pol. D-Sub)
• SUPERLINEAR-KONVERTER (S.L.C.)
Diese Anlage wendet das einzigartige System von Denon zur Verhinderung von Nulldurchgangsverzerrungen an.
Nulldurchgangsverzerrungen sind die Hauptursache für schlechtere Klangqualität bei der PCM-Wiedergabe. Darüber hinaus wird mit
diesem System ein Klangfeld reich an Musikalität erzeugt.
HAUPTMERKMALE
Page 26
DEUTSCH
27
INHALT
z
BEZEICHNUNG DER TEILE UND
DEREN FUNKTIONEN …………………………………28 ~ 30
(1)
Frontplatte
……………………………………………28, 29
(2)
Rückwand
……………………………………………29, 30
(3)
Display-Fenster
……………………………………………30
x
FERNBEDIENUNGSANSCHLÜSSE …………………………31
c
ÖFFNEN UND SCHLIEßEN DER DISCFäCHER UND
EINLEGEN DER DISCS ………………………………………31
v
GRUNDLEGENDER BETRIEB …………………………32, 33
(1) Vor dem Wiedergabestart ………………………………32
(2) Starten der Wiedergabe …………………………………33
(3) Stoppen der Wiedergabe ………………………………33
(4) PLAY/PAUSE und CUE Betriebe ………………………33
b
BEQUEME BEDIENUNG ………………………………34 ~ 36
(1) Starten der Wiedergabe in der Mitte eines Titels
(Manueller Suchlauf) ……………………………………34
(2) Wiedergabe mit unterschiedlichen
Geschwindigkeiten (Tonhöhe) …………………………34
(3) Wiederholung der Wiedergabe
(Wiedergabe-Wiederholung) ……………………………35
(4) Wiedergabe eines bestimmten Disc-Abschnittes
(A-B-Wiederholung) ………………………………………36
n
PROGRAMMIERTE WIEDERGABE …………………37 ~ 39
(1) Eingeben eines Programms ……………………………37
(2) Ändern des Programms ……………………………37, 38
(3) Wiedergabe von Programmen …………………………38
(4) Speichern von Programmen ……………………………39
m
GESPEICHERTE FUNKTIONEN UND BETRIEBE ……40 ~ 43
(1) Auflistung der Speicher-Funktionen ……………………40
(2) Speicherverfahren ………………………………………41
(3) Detaillierte Beschreibung der
gespeicherten Funktionen …………………………42, 43
,
VOR DEM ABSCHALTEN DES STROMES…………………44
.
CD-PLATTEN …………………………………………………44
⁄0
FEHLERSUCHE ………………………………………………45
⁄1
TECHNISCHE DATEN…………………………………………45
Überprüfung des Kartoninhaltes
Bitte überzeugen Sie sich, daß sich die folgenden Teile mit dem Hauptgerät im Karton befinden:
Anschlußkabel für Signalausgang (RCA) 1 Stck.
Bedienungsanleitungen (dieses Handbuch) 1 Stck.
Installation des Gerätes
Stellen Sie das Gerät über Ihrem Steuerpult auf oder installieren Sie es mit Hilfe von 19” EIA-Rackschienen in Ihrem Rack.
VORSICHT:
• Der ordnungsgemäße Betrieb des DN-C630 ist sichergestellt, wenn Sie das Gerät so montieren, daß sich die Frontplatte in
einem 10-Grad-Winkel zur Senkrechtebene befindet. Wenn das Gerät extrem schräg steht, ist das Einlegen von Discs unter
Umständen gar nicht oder nur fehlerhaft möglich.
DN-C630
Max. 10°
• ÜBEREINSTIMMUNGSERKLÄRUNG
Wir erklären unter unserer Verantwortung, daß dieses Produkt, auf das sich diese Erklärung
bezieht, den folgenden Standards entspricht:
EN60065, EN55013, EN55020, EN60555-2 und EN60555-3.
Entspricht den Verordnungen der Direktive 73/23/EEC, 89/336/EEC und 93/68/EEC.
Page 27

DEUTSCH
28
BEZEICHNUNG DER TEILE UND DEREN FUNKTIONEN
(1) Frontplatte
q
POWER-Taste
• Mit dieser Taste wird das Gerät ein- und ausgeschaltet.
w
Disc-Halter
• Legen Sie die Discs in diesen Halter ein.
• Drücken Sie zum Öffnen und Schließen des Disc-Halters
die OPEN/CLOSE-Taste.
• Legen Sie die Discs fest in den Einschub ein.
e
OPEN/CLOSE-Taste
• Drücken Sie diese Taste zum Öffnen und Schließen des
Disc-Halters.
• Der Disc-Halter läßt sich während der Wiedergabe nicht
öffnen.
r
TIME-Taste
• Drücken Sie diese Taste, um auf dem Zeit-Display
entweder die noch verbleibende (REMAIN) oder bereits
verstrichene Zeit (ELAPSED) anzeigen zu lassen.
t
PLAY MODE-Taste
• Drücken Sie diese Taste, um den Wiedergabemodus zu
ändern.
• Diese Taste drücken, um die reservierte Spur mit der
nächsten Spurenreservierungsfunktion aufzuheben.
y
END MON-Taste
• Drücken Sie diese Taste im Standby-Modus, um das
Ende des Titels zu überwachen. (Titelende-
Überwachung)
u
INDEX-Taste
• Drücken Sie diese Taste, um den Index-Wahlmodus
anzuwählen. Das Anwählen der Indexnummer erfolgt
durch Drehen des Wahlschalters.
• Die INDEX-Nummer erscheint, wenn der IndexWahlmodus eingestellt ist.
• Drücken Sie die Taste noch einmal, um zum TitelWahlmodus zurückzukehren.
i
REPEAT-Taste
• Drücken Sie diese Taste, um den Wiederholungsmodus
einzustellen.
• Die REPEAT-Anzeige leuchtet, wenn der
Wiederholungsmodus eingestellt ist.
• Drücken Sie diese Taste noch einmal, um den
Wiederholungsmodus zu entaktivieren.
o
A-B-Taste
• Drücken Sie diese Taste, um den Punkt A einzustellen.
• Die A-Anzeige blinkt, wenn der Punkt A eingestellt ist.
• Drücken Sie diese Taste nach Einstellung von Punkt A,
um den Punkt B einzustellen.
• Die A-B-Anzeige blinkt, wenn der Punkt B eingestellt ist.
• Die Taste noch einmal drücken, um den A-BWiederholungsmodus aufzuheben.
!0
PITCH-Taste
• Drücken Sie diese Taste, um zu der mit dem
Geschwindigkeitsregler eingestellten Wiedergabegeschwindigkeit umzuschalten. Das PITCH LED blinkt.
• Bei nochmaliger Betätigung dieser Taste wird der
festgelegte Geschwindigkeitsmodus eingestellt und das
PITCH LED leuchtet.
• Drücken Sie diese Taste noch einmal, um den Modus für
die Wiedergabe mit hoher Geschwindigkeit zu
entaktivieren und zur normalen Geschwindigkeit
zurückzukehren.
!1
PHONES-Buchse
• Schließen Sie Kopfhörer mit einer Impedanz von 30 bis
40 Ω/Ohm an.
!2
LEVEL-Regler
• Stellen Sie mit diesem Regler die Lautstärke der
Kopfhörer ein.
!3
STOP-Taste
• Drücken Sie diese Taste zum Ausschalten und Anhalten
sämtlicher Servofunktionen.
• Drücken Sie diese Taste während der Wiedergabe zum
Einstellen des Stoppmodus.
!4
CUE-Taste
• Wenn diese Taste aus dem Wiedergabe- oder
Pausemodus heraus gedrückt wird, setzt sich der
Tonabnehmer zurück an die Position, von wo aus die
Wiedergabe gestartet oder der Standby-Modus
eingestellt worden ist. (Back Cue)
• Wenn diese Taste während der Wiedergabe gedrückt
wird, wenn der nächste Titel programmiert worden ist,
startet der Suchlauf nach dem programmierten Titel und
der Standby-Modus ist eingestellt.
• Das CUE LED leuchtet, wenn der Standby-Modus
eingestellt ist.
• Wenn Sie diese Taste betätigen, während Sie die PLAY
MODE-Taste gedrückt halten, ist der Speichermodus
eingestellt.
!5
PLAY/PAUSE-Taste
• Drücken Sie diese Taste aus dem Standby-, Pause- oder
manuellen Suchlauf-Modus heraus, um die Wiedergabe
zu starten.
• Drücken Sie diese Taste aus dem Stoppmodus heraus,
um den Suchlauf nach dem ersten Titel zu starten und
die Wiedergabe zu beginnen.
• Das PLAY/PAUSE LED leuchtet während der
Wiedergabemodus aktiviert ist.
• Bei Betätigung der Taste während der Wiedergabe wird
der Pausemodus eingestellt. Das PLAY/PAUSE LED
blinkt während der Pausemodus eingestellt ist.
1
Page 28

DEUTSCH
29
!6
Wahlschalter
• Wählen Sie durch Drehen dieses Wahlschalters den
nächsten Titel (oder die nächste Indexnummer) an,
der/die wiedergegeben werden soll.
• Bestimmen Sie mit Hilfe der INDEX-Taste, ob Titel oder
Indexnummern angewählt werden soll.
• Drehen Sie den Wahlschalter um einen Klick im
Uhrzeigersinn, um jeweils an den nächsten Titel (die
nächste Indexnummer) zu gelangen und drehen Sie ihn
um einen Klick entgegen dem Uhrzeigersinn, um den
jeweils davorliegenden Titel (oder die davorliegende
Indexnummer) anzuwählen.
• Wird der Knopf gleichzeitig gedrückt und gedreht,
entspricht ein Klick 10 Titeln (bzw. 10 Indexnummern).
• Im Speichermodus können Sie mit Hilfe dieses
Wahlschalters Einstellungen eingeben.
• Bei der Einstellung von Programmen können Sie mit
diesem Wahlschalter Programme anwählen, eingeben
und überprüfen.
!7
Suchlauftasten (SEARCH)
• Mit Hilfe dieser Tasten können Sie die Position, an der
die Disc-Wiedergabe beginnen soll, genau festlegen.
!8
PROG. PLAY ON/OFF-Taste
• Wenn Sie diese Taste drücken, während die PROGAnzeige leuchtet, ist der Programm-Wiedergabemodus
eingestellt.
• Bei aktiviertem A-B-Wiedergabemodus ist diese Taste
außer Funktion.
• Das PROG. PLAY ON/OFF LED leuchtet, wenn der
Standby-Modus für die programmierte Wiedergabe oder
einer der Wiedergabemodi aktiviert ist.
• Wenn diese Taste im Standby-Modus für die
programmierte Wiedergabe oder im Wiedergabemodus
gedrückt wird, ist der Modus für die programmierte
Wiedergabe entaktiviert.
!9
PROG. IN-Taste
• Diese Taste drücken, um in den Programmeingabemodus zu gehen.
• Die Taste hat im Wiedergabemodus keine Funktion.
•
Die PROG-Anzeige blinkt, wenn der Programmeingabemodus
aktiviert ist.
• Die PROG-Anzeige leuchtet, wenn ein Programm eingestellt
ist.
@0
Schieberegler
• Stellen Sie mit diesem Schieberegler die
Wiedergabegeschwindigkeit ein. Schieben Sie den
Regler zum Reduzieren der Wiedergabegeschwindigkeit
nach oben und schieben Sie ihn nach unten, wenn Sie
die Wiedergabegeschwindigkeit erhöhen möchten.
(2) Rückwand
• Nehmen Sie den Anschluß an symmetrische analoge
Eingangsbuchsen eines Verstärkers oder Steuerpultes
vor.
• Pin-Anordnung: 1. Gemeinsam
2. Hot
3. Cold
• Anwendbarer Anschluß: Cannon XLR-3-31 oder
gleichwertig.
HINWEIS: Schließen Sie den heißen bzw. kalten Pin nicht
mit dem Nullpin kurz.
w
ANALOG OUT (UNBALANCED)-Buchsen
• Hierbei handelt es sich um asymmetrische für CinchBuchsen ausgelegte Ausgänge.
• Nehmen Sie den Anschluß an asymmetrische analoge
Eingangsbuchsen eines Verstärkers oder Steuerpultes
vor.
e
LEVEL L/R-Regler
• Stellen Sie mit diesem Regler den Audio-Signalpegel der
ANALOG OUT (BALANCED)-Buchsen ein.
r
REMOTE-Buchse
• Hierbei handelt es sich um eine parallele Schnittstelle für
die Fernsteuerung. Benutzen Sie diese Buchse zur
Steuerung des DN-C630 mit TrockenkontaktSchaltverbindungen.
• Passender Stecker: 25-pol. D-sub (Männchen)
• Anordnung des Anschlußsignals:
Pin-Nr. Signalbezeichnung I/O
1
14
2
15
3
16
4
17
5
18
6
19
7
20
8
21
9
22
10
23
11
24
12
25
13
FG
PLAY tally
PLAY command
PAUSE tally
PAUSE command
CUE tally
CUE command
INDEX 2/INDEX 3 tally
TRACK (+) command
Tally common
TRACK (–) command
Reserved
SEARCH (FWD) command
Reserved
SEARCH (REV) command
Reserved
FADER START command
Tally power supply
Command common
Command common
NC
EOM tally
Reserved
Reserved
Reserved
TTL (lol = 20 mA)
HCMOS (li = 3 mA)
TTL (lol = 20 mA)
HCMOS (li = 3 mA)
TTL (lol = 20 mA)
HCMOS (li = 3 mA)
TTL (lol = 20 mA)
HCMOS (li = 3 mA)
HCMOS (li = 3 mA)
HCMOS (li = 3 mA)
HCMOS (li = 3 mA)
PHOTO COUPLER
+5 V, 20 mA
(li =10 mA)
TTL (lol = 20 mA)
–
O
I
O
I
O
I
O
I
–
I
–
I
–
I
–
I
–
–
–
–
O
–
–
–
HINWEIS: Der Zähler-Ausgangspin hat die Spezifikationen einer
offenen Kollektor-IC (Imax. 20 mA, Vmax. 5 V). Der
maximale Speisestrom beläuft sich jedoch auf 80 mA.
Der gesamte Ruhestrom darf also höchstens 80 mA
betragen.
q
ANALOG OUT (BALANCE)-Buchsen
• Hierbei handelt es sich um aktive symmetrische
Ausgänge, die für die Benutzung von XLR-Steckern
ausgelegt sind.
Page 29

DEUTSCH
30
!1
20 Spuren-Musikkalender
• Im Modus für die Wiedergabe einzelner Titel leuchtet nur
der für die Wiedergabe festgelegte Titel.
• Im Dauerwiedergabemodus leuchten alle Titel vom für
die Wiedergabe festgelegten bis zum letzten Titel.
• Titelnummern werden bis zum 20. Titel angezeigt. Titel
21 und nachfolgende Titel erscheinen nicht im Display.
!2
Spielzeit-Display
• Hier wird die Zeit der aktuellen Position in Minuten (m),
Sekunden (s) und Einheiten (f) angezeigt.
!3
Zeichen-Display
• Hier werden in den Speicher- und Programm-Modi
Betriebsmeldungen angezeigt.
t
DIGITAL OUT (UNBALANCED)-Buchse
• Hierbei handelt es sich um einen asymmetrischen
Ausgang, der für die Benutzung von Cinch-Buchsen
ausgelegt ist.
• Nehmen Sie den Anschluß an eine asymmetrische
digitale Eingangsbuchse eines Verstärkers oder eines
Steuerpultes vor.
• Signalformat: wählbar (Siehe Seite 42, 9))
(3) Display-Fenster
q
REPEAT-Anzeige
• Diese Anzeige leuchtet, wenn der Wiederholungsmodus
eingestellt ist.
w
TIME MODE-Anzeigen
• “ELAPSED” leuchtet, wenn die bereits verstrichene Zeit
angezeigt wird.
• “REMAIN” leuchtet, wenn die noch verbleibende Zeit
angezeigt wird.
e
PLAY MODE-Anzeigen
• “SINGLE” leuchtet, wenn der EinzeltitelWiedergabemodus eingestellt ist.
• “TOTAL” leuchtet, wenn der Dauerwiedergabemodus
aktiviert ist.
r
Titelnummerndisplay
• Hier wird die Titelnummer der gegenwärtigen Position
angezeigt. Die Titelnummer leuchtet während des
Titelsuchlaufbetriebes und beim Umschalten zum
Standby-Modus.
• Wenn die nächste Titelnummer festgelegt wird, blinkt
diese Titelnummer auf dem Titelnummerndisplay.
t
Wiedergabepauseanzeige
y
Wiedergabeanzeige
u
Indexnummern-Display
• Normalerweise wird “Tr” angezeigt. Im IndexSuchmodus wird die Indexnummer angezeigt. Wenn der
nächste Index festgelegt wird, blinkt diese Indexnummer
im Indexnummern-Display. Die Indexnummer leuchtet
auch während des Index-Suchlaufbetriebes.
i
Wiedergabeposition-Display
• Hier wird die aktuelle Position innerhalb der
Gesamtspielzeit des Titels angezeigt.
o
PITCH-Display
• Hier wird die eingestellte Wiedergabe-Geschwindigkeit in
% angezeigt.
!0
PROGRAM Anzeige
• Diese Anzeige leuchtet, wenn ein Programm eingegeben
wird.
• Diese Anzeige blinkt, wenn der PROG. IN-Modus
eingestellt ist.
Page 30
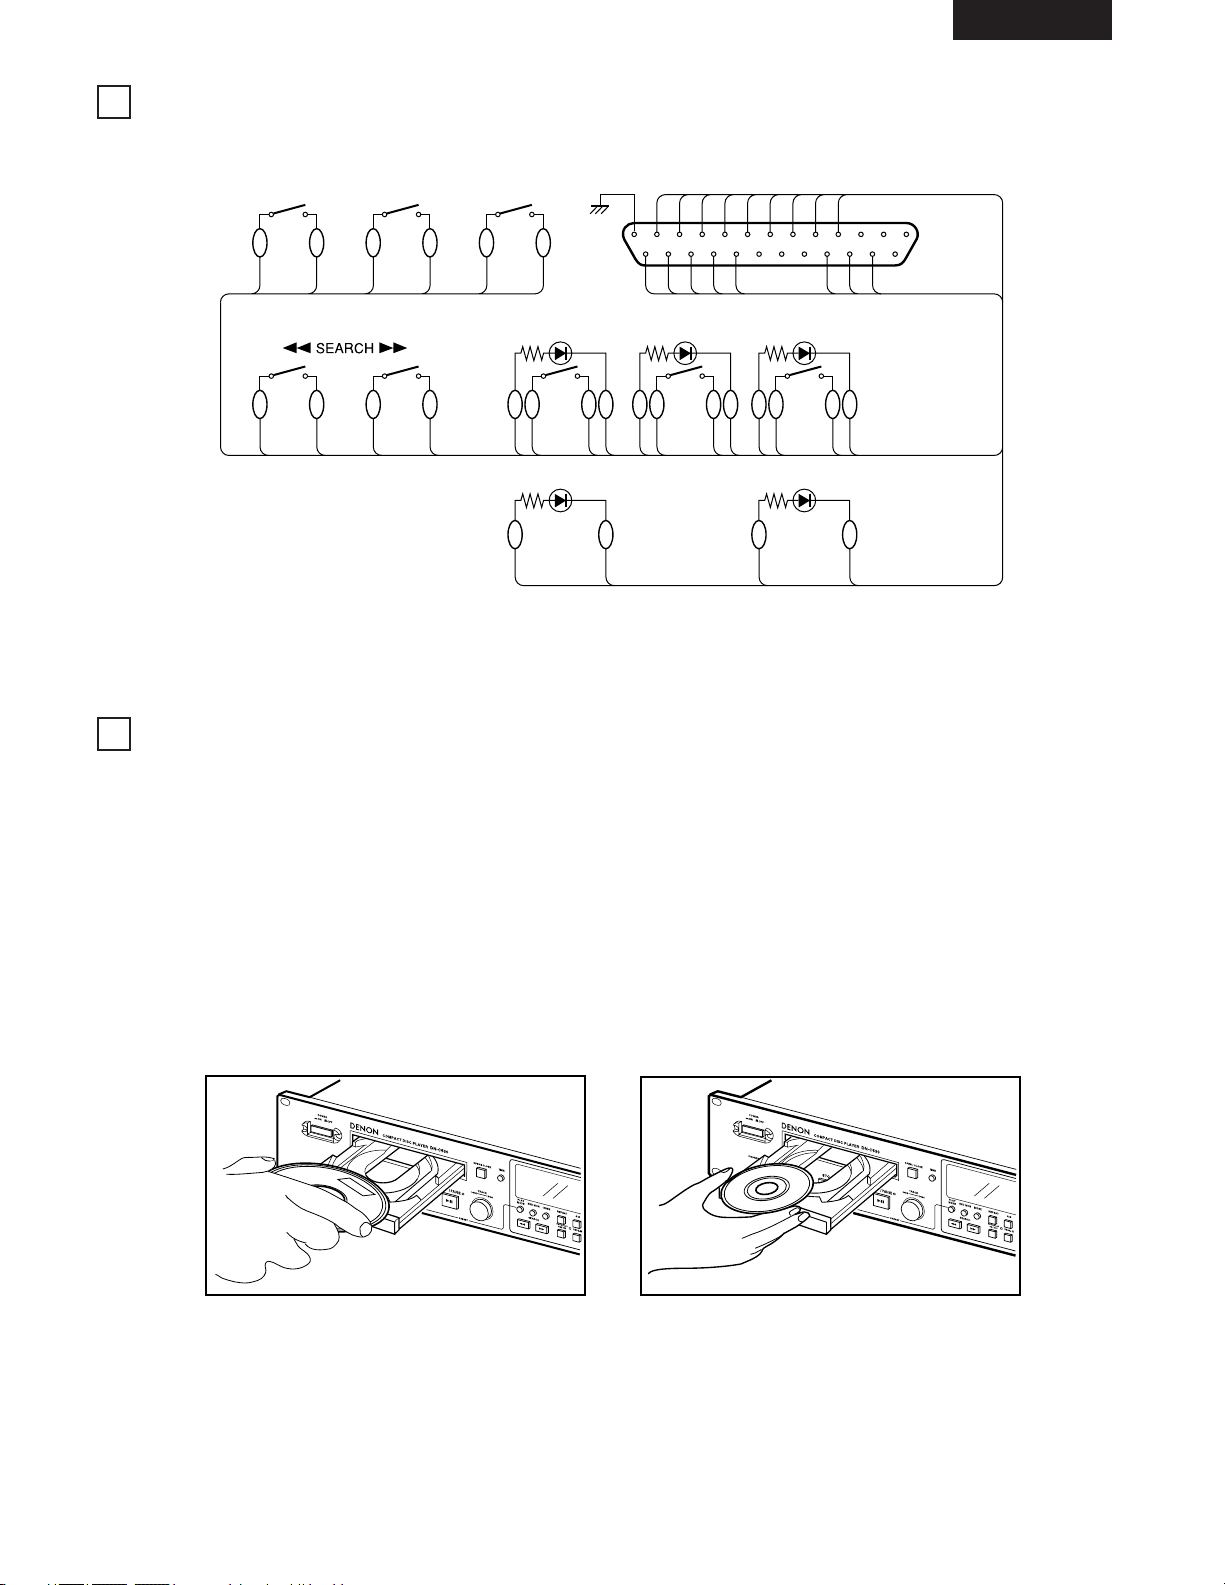
DEUTSCH
31
FERNBEDIENUNGSANSCHLÜSSE
2
ÖFFNEN UND SCHLIEßEN DER DISCFÄCHER UND EINLEGEN DER DISCS
3
Wenn das Gerät DN-C630 fernbedient werden soll, siehe das unten gegebene Beispiel über Fernbedienungs-Anschluß.
14
2
23
22
15
3
23
22
16
4
23
7
23
8
23
5
23
9
23
6
23
22
PLAYPAUSECUE
17
22
24
22
INDEX2/INDEX3EOM
FADER SWITCHTRACK(+)TRACK(-)
123456789
10
141516
18
17
242223
Der Wert des Fernsignal-Anschluß (REMOTE) Pin 22 (TALLY POWER SUPPLY) beträgt +5 V, 80 mA Maximum.
Vermeiden Sie diese Werte übersteigende Ströme.
(1) Öffnen und Schließen der Discfächer
• Diese Funktion kann nur dann ausgeführt werden, wenn die Stromzufuhr eingeschaltet ist.
• Drücken Sie die Öffnen-/Schließen Taste (OPEN/CLOSE) um die Discfächer zu öffnen oder zu schließen.
• Die Discfächer können während der Wiedergabe nicht geöffnet werden. Damit wird verhindert, daß die Wiedergabe nicht
unterbrochen wird, wenn die Öffnen-/Schließen Taste (OPEN/CLOSE) zufällig gedrückt wird. Unterbrechen Sie die Wiedergabe
und drücken dann die Öffnen-/Schließen Taste (OPEN/CLOSE).
(2) Einlegen der Discs
• Halten Sie die Disc am Rand und legen Sie in das Discfach. Berühren Sie nicht die Signal-Oberfläche (spiegelnde Seite).
• Bei der Anwendung von 12 cm Discs, legen Sie die Disc in die äußeren Führungen, und bei der Anwendung von 8 cm Discs,
legen Sie die Disc vorsichtig in die innere Führung.
12 cm CD-Platte 8 cm CD-Platte
VORSICHT:
• Legen Sie niemals fremde Gegenstände in die Discfächer und legen Sie nie mehr als eine Disc auf einmal hinein. Dies kann zu
Fehlfunktionen führen.
• Schieben Sie das Discfach bei abgeschalteter Stromzufuhr nicht mit der Hand hinein, da dies zu Störungen führt und das Gerät
beschädigen kann.
Page 31

DEUTSCH
32
INDEX
END MON
GRUNDLEGENDER BETRIEB
4
(1) Vor dem Wiedergabestart
1
Wählen Sie den Titel für die Wiedergabe an.
Drehen Sie den Wahlschalter (
8 – 9).
Der angewählte Titel wird ausfindig gemacht und der
Standby-Modus ist eingestellt.
HINWEIS: Der Titel-Wahlmodus ist eingestellt, wenn die
Taste ausgeschaltet ist.
Das Anwählen einer Indexnummer ist nicht
erforderlich, wenn Sie den Titel von Anfang an
wiedergeben möchten.
Drehen Sie den Wahlschalter (
8 – 9).
Die angewählte Indexnummer wird ausfindig gemacht und
der Standby-Modus ist eingestellt.
Wenn eine nicht vorhandene Indexnummer angewählt
worden ist, erscheint “
No 02.Index
” und die
Indexnummer blinkt.
5-1
5-2
6-1
6-2
Überprüfen der Wiedergabe-Startposition
Drücken Sie die PLAY/PAUSE-Taste.
Überwachen Sie die Wiedergabesignale, um die
Wiedergabe-Startposition zu überprüfen.
Drücken Sie die CUE-Taste.
7
Überprüfen der Wiedergabe-Endposition
Drücken Sie die END MON-Taste.
PLAY / PAUSE
CUE
PLAY / PAUSE
Der Tonabnehmer setzt sich an die WiedergabeStartposition zurück und der Standby-Modus ist
eingestellt. (Back Cue)
CUE
CUECUE
HINWEIS: Wenn Sie die CUE-Taste während der
Titelende-Überwachung drücken, wird der
Betrieb zur Überwachung des Titelendes
entaktiviert, der Tonabnehmer setzt sich an die
Wiedergabe-Startposition zurück und der
Standby-Modus ist eingestellt.
375-1
6-2
6-1
4,5-2
OPEN / CLOSE
COMPACT DISC PLAYER
DN-C630
POWER
PHONES LEVEL
MIN MAX
STOP CUE
PRESET
PLAY / PAUSE
TRACK
PLAY
MODE
END MON INDEX
SEARCH
REPEAT
ON / OFF
PROG.PLAY
A-B
PROG. IN
PITCH
TIME
0%
Legen Sie eine Disc ein.
3
4
Wählen Sie den Wiedergabemodus.
Drücken Sie die PLAY MODE-Taste.
2
Führen Sie die Speicherungen entsprechend des
Anwendungszweckes aus. (Siehe Seite 40.)
HINWEIS: Die Schritte 1 und 2 können auch in
umgekehrter Reihenfolge ausgeführt werden.
Wählen Sie den Wiedergabe-Beendigungsmodus.
(Voreinstellfunktion)
Finish Stop Nach Beendigung der Wiedergabe
wird der Stoppmodus (die
Servofunktionen schalten sich aus)
eingestellt.
Finish Next Nach Beendigung der Wiedergabe
wird am Anfang des nächsten Titels
der Standby-Modus eingestellt.
* Nach der Wiedergabe des letzten
Titels wird am Anfang des ersten
Titels der Standby-Modus
eingestellt.
Finish Recue Nach Beendigung der Wiedergabe
wird der Standby-Modus an der Stelle
eingestellt, an der die Wiedergabe
gestartet worden ist.
Standby an der Stelle, an der der Ton einsetzt.
(Voreinstellfunktion)
Den “CueDet.”-Pegel einstellen.
Wenn ein Titel angewählt ist, wird die Stelle, an der der
Ton einsetzt durch das Absuchen eines Titels ausfindig
gemacht. An dieser Stelle wird dann der Standby-Modus
eingestellt.
Leuchtet
Leuchtet
EinzeltitelWiedergabemodus
EndloswiedergabeModus
Blinkt während des Suchlaufes Leuchtet im Standby-Modus
Anwählen einer Indexnummer.
Drücken Sie die INDEX-Taste.
Die INDEX-Nummer erscheint, wenn der
Index-Wahlmodus eingestellt ist.
Das Titelende wird überwacht,
anschließend setzt sich der Tonabnehmer
an die Wiedergabe-Startposition zurück
und der Standby-Modus ist eingestellt.
(End Monitor)
Indexnummer Indexnummer
Leuchtet Aus
LeuchtetBlinkt
Blinkt während des Suchlaufes Leuchtet im Standby-Modus
Page 32

DEUTSCH
33
(2) Starten der Wiedergabe
9
9 8,9
OPEN / CLOSE
COMPACT DISC PLAYER
DN-C630
POWER
PHONES LEVEL
MIN MAX
STOP CUE
PRESET
PLAY / PAUSE
TRACK
PLAY
MODE
END MON INDEX
SEARCH
REPEAT
ON / OFF
PROG.PLAY
A-B
PROG. IN
PITCH
TIME
0%
PLAY / PAUSE
CUE
PLAY / PAUSE
PITCH%
REMAIN
SINGLE
(3) Stoppen der Wiedergabe
CUE
PLAY / PAUSE PLAY / PAUSE
CUECUE
STOP
Starten Sie die Wiedergabe.
Drücken Sie die PLAY/PAUSE-Taste.
Die Wiedergabe beginnt und die Wiedergabesignale
werden ausgegeben.
8
Nach Beendigung der Wiedergabe wird der im o.g.
Schritt 2 festgelegte Wiedergabe-Beendigungsmodus
eingestellt.
Die Wiedergabe kann wie folgt beendet werden:
9
Leuchtet Aus
Blinkt (zeigt die Wiedergabeposition an)
Die Wiedergabe wird unterbrochen
und der Stoppmodus ist eingestellt.
Die Wiedergabe wird unterbrochen,
der Tonabnehmer setzt sich zurück
an die Wiedergabe-Startposition und
der Standby-Modus ist eingestellt.
Die Wiedergabe wird unterbrochen
und der Pausemodus wird an dieser
Stelle eingestellt.
LeuchtetBlinkt
Schlafmodus
Der Schlafmodus wird eingestellt, wenn im Standby-,
Pause- oder manuellen Suchlaufmodus innerhalb von 30
Minuten kein Betrieb ausgeführt worden ist.
Drücken Sie aus dem Schlafmodus heraus die
PLAY/PAUSE-Taste, um die Position ausfindig zu machen,
an dem der Schlafmodus aktiviert worden ist und um die
Wiedergabe zu starten. Drücken Sie die CUE-Taste, um an
die Position zu gelangen, die vor Aktivierung des
Schlafmodus eingestellt war und um das Gerät an dieser
Stelle in den Standby-Modus zu setzen.
(4) PLAY/PAUSE und CUE Betriebe
• Bei jedem Druck der PLAY/PAUSE Taste wird zwischen
Wiedergabe- und Pausebetrieb umgeschaltet.
• Wenn die CUE-Taste während der Wiedergabe gedrückt
wird, setzt sich der Tonabnehmer an die Position zurück,
an der die Wiedergabe gestartet wurde.
Die nachfolgenden Diagramme zeigen Wiedergabe-muster,
wenn die PLAY/PAUSE- und CUE Tasten gedrückt sind.
PLAY und PAUSE
Wenn die PLAY/PAUSE-Taste gedrückt ist, startet die
Wiedergabe und wird so ausgeführt wie durch den Pfeil im oben
aufgeführten Diagramm angezeigt.
Bei erneuter Betätigung der PLAY/PAUSE-Taste während der
Wiedergabe, wird an der Stelle der Pausemodus eingestellt.
Drücken Sie die PLAY/PAUSE-Taste noch einmal, um die
Wiedergabe fortzusetzen.
Die
PLAY/PAUSETaste ist gedrückt
Die
PLAY/PAUSETaste ist gedrückt
Die PLAY/PAUSE-Taste ist gedrückt
Position auf
der Disc
An dieser Stelle aktivierter Pausemodus
Wiedergegebener
Abschnitt
Wiedergegebener
Abschnitt
PLAY und CUE
PLAY, PAUSE und CUE
Back Cue
Die
PLAY/PAUSETaste ist gedrückt
Die CUE-Taste ist gedrückt
Position auf
der Disc
Wenn die CUE-Taste gedrückt wird, nachdem Sie zuvor die
Wiedergabe durch Betätigung der PLAY/PAUSE-Taste gestartet
haben, setzt sich der Tonabnehmer an die WiedergabeStartposition zurück und bereitet die nächste Wiedergabe vor.
Drücken Sie abwechselnd die PLAY/PAUSE- und CUE-Tasten,
um die Wiedergabe mehrmals von derselben Position aus zu
starten.
Diese Funktion nennt man “Back Cue”.
Die CUE-Taste
ist gedrückt
Position auf
der Disc
Wenn zunächst der Pausemodus eingestellt und dann die
Wiedergabe fortgesetzt wird, ändert sich die Position, an die sich
der Tonabnehmer mit Hilfe der Back Cue-Funktion zurücksetzt.
Blinkt
Wiedergegebener
Abschnitt
Wiedergegebener
Abschnitt
Wiedergegebener
Abschnitt
Die
PLAY/PAUSETaste ist gedrückt
Die
PLAY/PAUSETaste ist gedrückt
Die
PLAY/PAUSETaste ist gedrückt
Page 33

DEUTSCH
34
13
2
OPEN / CLOSE
COMPACT DISC PLAYER
DN-C630
POWER
PHONES LEVEL
MIN MAX
STOP CUE
PRESET
PLAY / PAUSE
TRACK
PLAY
MODE
END MON INDEX
SEARCH
REPEAT
ON / OFF
PROG.PLAY
A-B
PROG. IN
PITCH
TIME
0%
(1) Starten der Wiedergabe in der Mitte eines Titels
(Manueller Suchlauf)
• Wenn ein Titel angewählt ist und die PLAY/PAUSE-Taste
gedrückt wird, beginnt die Wiedergabe am Anfang dieses
Titels. Wenn Sie die Wiedergabe von einer anderen Stelle
dieses Titels aus starten möchten, verfahren Sie zum
Auffinden der gewünschten Stelle wie nachfolgend
aufgeführt.
Auffinden der Wiedergabe-Position.
Drücken Sie das SEARCH-Rad.
Hören Sie sich die Musik an und machen Sie die
gewünschte Wiedergabe-Startposition ausfindig.
SEARCH
PLAY / PAUSE PLAY / PAUSE
CUE
CUECUE
(2) Wiedergabe mit unterschiedlichen
Geschwindigkeiten (Tonhöhe)
• Mit Hilfe dieser Funktion können Sie Discs mit
unterschiedlichen Geschwindigkeiten abspielen.
• Die Geschwindigkeit kann innerhalb eines Bereiches von
+9,9 bis –9,9 % verändert werden.
1-21-1.2.3
OPEN / CLOSE
COMPACT DISC PLAYER
DN-C630
POWER
PHONES LEVEL
MIN MAX
STOP CUE
PRESET
PLAY / PAUSE
TRACK
PLAY
MODE
END MON INDEX
SEARCH
REPEAT
ON / OFF
PROG.PLAY
A-B
PROG. IN
PITCH
TIME
0%
PITCH PITCH
PITCH PITCH
PITCH PITCH
0%
BEQUEME BEDIENUNG
5
1
Überprüfen der Wiedergabe-Startposition.
Drücken Sie die PLAY/PAUSE-Taste.
Überwachen Sie das Wiedergabesignal, um die
Wiedergabe-Startposition zu überprüfen.
2
Aufsuchen der Wiedergabe-Startposition.
Drücken Sie die CUE-Taste.
Der Tonabnehmer setzt sich an die WiedergabeStartposition zurück und der Standby-Modus ist
eingestellt.
3
Bei jeder Betätigung der SEARCHTaste ändert sich eine Einheit. Jede
Einheit beträgt 1/75 einer Sekunde.
Wenn Sie die SEARCH-Taste
gedrückt halten, ändern sich die
Einheiten automatisch und die
Geschwindigkeit der Rahmen wird
erhöht.
Leuchtet
Die Wiedergabe beginnt
Stellen Sie den Modus für variable Geschwindigkeit ein.
Drücken Sie die PITCH-Taste.
1-1
Die
Wiedergabegeschwindigkeit
verringert sich, wenn der
Geschwindigkeitsregler nach
oben geschoben wird. Wenn
Sie den Regler nach unten
schieben, erhöht sich die
Geschwindigkeit.
Stellen Sie den Modus zum Feststellen der
Geschwindigkeit ein.
Drücken Sie noch einmal die PITCH-Taste.
Drücken Sie noch einmal die PITCH-Taste, um zur
normalen Geschwindigkeit zurückzukehren.
Die mit dem Geschwindigkeitsregler eingestellte
Geschwindigkeit wird gehalten. In diesem Zustand ändert
sich die Wiedergabegeschwindigkeit auch durch Schieben
des Geschwindigkeitsreglers nicht.
Wenn die Wiedergabegeschwindigkeit im VoreinstellModus voreingestellt ist, wird die
Wiedergabegeschwindigkeit eingestellt.
1-2
2
3
LeuchtetBlinkt
Blinkt
Wiedergabegeschwindigkeit verringern
Wiedergabegeschwindigkeit erhöhen
Leuchtet
Aus
HINWEIS:
Wenn die Wiedergabegeschwindigkeit (PITCH) eingegeben worden
ist, erscheint diese auf dem Display. Die Disc wird jedoch solange
mit normaler Geschwindigkeit wiedergegeben, bis die PITCH-Taste
gedrückt wird (und die LED blinkt).
Wenn die Wiedergabegeschwindigkeit verändert ist, verändern sich
auch die Schaltfrequenzen der digitalen Ausgangssignale, so daß
es unmöglich sein kann, digitale Signale zu empfangen.
Page 34

DEUTSCH
35
(3) Wiederholung der Wiedergabe
(Wiedergabe-Wiederholung)
1 2.6
3.5
4.55
OPEN / CLOSE
COMPACT DISC PLAYER
DN-C630
POWER
PHONES LEVEL
MIN MAX
STOP CUE
PRESET
PLAY / PAUSE
TRACK
PLAY
MODE
END MON INDEX
SEARCH
REPEAT
ON / OFF
PROG.PLAY
A-B
PROG. IN
PITCH
TIME
0%
SINGLE
TOTAL
PLAY
MODE
REPEAT
1
REPEAT
REPEAT
CUE
CUECUE
PLAY / PAUSE
PITCH%
REMAIN
SINGLE
1
REPEAT
PLAY / PAUSE
CUECUE
Wählen Sie den Wiedergabemodus an.
Drücken Sie die PLAY MODE-Taste.
1
Wählen Sie den Wiederholungsmodus an.
Drücken Sie die REPEAT-Taste.
2
Bereitschaft an der Wiedergabestartposition.
Drücken Sie die CUE-Taste.
Die Taste leuchtet und der Wiederholungsmodus ist
eingestellt.
3
Starten Sie die Wiedergabe.
Drücken Sie die PLAY/PAUSE-Taste.
Die Wiedergabe-Wiederholung beginnt.
4
Stoppen der Wiedergabe.
Die Wiedergabe kann wie folgt beendet werden:
5
Entaktivieren des Wiederholungsmodus während der
Wiedergabe.
Drücken Sie die REPEAT-Taste.
Der normale Wiedergabemodus wird wieder eingestellt
und die Wiedergabe wird bis zum Wiedergabe-Endpunkt
fortgesetzt.
6
WiedergabeWiederholung des
angewählten
Einzeltitels:
WiedergabeWiederholung
aller sich auf der
Disc befindlichen
Titel:
WiedergabeWiederholung des
angewählten
Einzeltitels:
WiedergabeWiederholung
aller sich auf der
Disc befindlichen
Titel:
Leuchtet
Leuchtet
Leuchtet
Leuchtet
Leuchtet
Leuchtet
LeuchtetBlinkt
Leuchtet
Aus
Leuchtet
Leuchtet
CUE
PLAY / PAUSE PLAY / PAUSE
CUECUE
STOP
Die Wiedergabe wird unterbrochen
und der Stoppmodus ist eingestellt.
Die Wiedergabe wird unterbrochen,
der Tonabnehmer setzt sich an die
Wiedergabe-Startposition zurück und
der Standby-Modus ist eingestellt.
Die Wiedergabe wird unterbrochen
und an dieser Stelle wird der
Pausemodus eingestellt.
LeuchtetBlinkt
Blinkt
Leuchtet Aus
REPEAT
REPEAT
Page 35

DEUTSCH
36
(4) Wiedergabe eines bestimmten Disc-Abschnittes
(A-B Wiederholte)
• Stellen Sie mit Hilfe dieser Funktion die Start- und
Endpunkte der Wiedergabe ein. Es wird dann nur der
gewünschte Disc-Abschnitt wiedergegeben.
1.3
2.4.5
OPEN / CLOSE
COMPACT DISC PLAYER
DN-C630
POWER
PHONES LEVEL
MIN MAX
STOP CUE
PRESET
PLAY / PAUSE
TRACK
PLAY
MODE
END MON INDEX
SEARCH
REPEAT
ON / OFF
PROG.PLAY
A-B
PROG. IN
PITCH
TIME
0%
A-B
REPEAT
A-B
SEARCH
SEARCH
Auffinden der Wiedergabe-Startposition (Punkt A).
• Drücken Sie die SEARCH-Taste(n), um die Position
ausfindig zu machen, an der Sie die Wiedergabe starten
möchten.
1
Geben Sie den Punkt A ein.
Drücken Sie die A-B-Taste.
2
Auffinden der Wiedergabe-Startposition (Punkt B).
• Drücken Sie die SEARCH-Taste(n), um die Position
ausfindig zu machen, an der Sie die Wiedergabe ende
möchten.
3
Geben Sie den Punkt B ein.
Drücken Sie die A-B-Taste.
Der A-B-Wiederholungsmodus ist eingestellt.
Wenn Sie den Punkt B während der Wiedergabe
einstellen, wird nach Punkt A gesucht und die
Wiedergabe-Wiederholung des Abschnittes A-B beginnt.
Wenn Sie den Punkt B in einem beliebigen anderen als
dem Wiedergabe-Modus einstellen, wird nach Punkt A
gesucht und der Standby-Modus ist eingestellt.
4
Blinkt
Leuchtet
Leuchtet
A-B Wiederholte Wiedergabe
Wenn Sie die Wiedergabe vor dem A-Punkt starten, wird
die Wiedergabe bis zum B-Punkt fortgesetzt. Anschließend
setzt sich der Tonabnehmer dann für die WiedergabeWiederholung an den Punkt A zurück.
HINWEIS:
• Wenn Punkt B vor Punkt A ist, wird der Abschnitt von
Punkt B bis zum Punkt A wiederholt wiedergegeben.
• Die Ende-Monitorfunktion arbeitet nicht im A-BWiedergabemodus.
Wenn Sie die Wiedergabe hinter dem B-Punkt starten,
wird die Wiedergabe bis zum Ende des Titels fortgesetzt
und es findet keine Wiedergabe-Wiederholung statt.
Wiedergabe-Startpunkt A-Punkt B-Punkt
A-Punkt B-Punkt
A-PunktB-Punkt
Wiedergabe-Startpunkt Ende des Titels
Wiedergegebener Abschnitt
Die Wiedergabe des Abschnittes
wird laufend wiederholt
Die Wiedergabe des Abschnittes
wird laufend wiederholt
A-B
REPEAT
Entaktivieren des A-B Wiederholungsmodus während
der Wiedergabe.
Drücken Sie die A-B-Taste.
Der normale Wiedergabemodus wird wieder eingestellt
und die Wiedergabe wird bis zum Wiedergabe-Endpunkt
fortgesetzt.
5
Leuchtet Aus
AusLeuchtet
Page 36

DEUTSCH
37
(1) Eingeben eines Programms
2.3.4 1.5
OPEN / CLOSE
COMPACT DISC PLAYER
DN-C630
POWER
PHONES LEVEL
MIN MAX
STOP CUE
PRESET
PLAY / PAUSE
TRACK
PLAY
MODE
END MON INDEX
SEARCH
REPEAT
ON / OFF
PROG.PLAY
A-B
PROG. IN
PITCH
TIME
0%
• Die Titel können für eine Wiedergabe in beliebiger Reihenfolge
programmiert werden.
• Es können bis zu 25 Titel programmiert werden.
• Die programmierte Wiedergabe wird gemäß den Einstellungen des
Wiedergabe-Modus (single (einfach) oder Continuous (endlos)) und
des Beendigungsmodus (Stop, Next (Nächster), Recue
(Wiederaufruf)) ausgeführt.
PROG. IN
PROG
REMAIN
SINGLE
PROGRAMMIERTE WIEDERGABE
6
Stellen Sie den Progamm-Eingabemodus ein.
Drücken Sie die PROG. IN-Taste.
1
Wählen Sie den Titel, den Sie programmieren
möchten, an.
Drehen Sie den Wahlschalter (
8 – 9).
2
Geben Sie den angewählten Titel in das Programm ein.
Drücken Sie den Wahlschalter.
Die Nummer der nächsten Stelle im Programm wird angezeigt.
3
Geben Sie den nächsten Titel in das Programm ein.
Drücken Sie den Wahlschalter.
Auf dem Zeit-Display wird die Gesamtspielzeit für das
Programm angezeigt.
Wiederholen Sie die Schritte 2, 3 und 4, um die Titel in der
von Ihnen gewünschten Reihenfolge zu programmieren.
4
Verlassen Sie den Programm-Eingabemodus.
Drücken Sie die PROG. IN-Taste.
Das Gerät setzt sich in den Normalbetrieb-Modus zurück.
5
(2) Ändern des Programms
Stellen Sie den Programm-Editiermodus ein.
Drücken Sie die PROG. IN-Taste.
1
Wählen Sie die Nummer der Stelle an, die Sie editieren
möchten.
Drehen Sie den Wahlschalter (
8 – 9).
2
Stellen Sie den Programm-Änderungsmodus ein.
Drücken Sie den Wahlschalter.
3
Ändern des Titels:
Wählen Sie den Titel, den Sie ändern möchten, an.
Drehen Sie den Wahlschalter (
8 – 9).
4-1
Geben Sie den angewählten Titel ein.
Drücken Sie den Wahlschalter.
Wiederholen Sie zum Fortsetzen des Editierprogramms
die Schritte 2, 3, 4-1 und 4-2.
4-2
Blinkt
Die Nummer der Stelle blinkt
Blinkt
Die Nummer der Stelle blinkt
Blinkt
Wenn Titel 3 angewählt ist:
Angewählte Titelnummer
Blinkt
Leuchtet
Blinkt
Blinkt
Leuchtet
Blinkt
Blinkt Leuchtet
Die Nummer der Stelle leuchtet
Blinkt
Blinkt
Die Nummer der Stelle, die editiert
werden soll, blinkt
Leuchtet
Blinkt
Leuchtet
Blinkt
Leuchtet
Blinkt
Leuchtet
Editieren des 3. Programmschrittes:
Blinkt
Angewählte Titelnummer
Die Nummer des nächsten
Schrittes im Programm blinkt
Drücken Sie zum Verlassen des Programm-Editiermodus
die PROG. IN-Taste. Das Gerät setzt sich in den
Normalbetrieb-Modus zurück.
Page 37

DEUTSCH
38
6-2 5-2
5-1,5-3,5-4,6-1 7
OPEN / CLOSE
COMPACT DISC PLAYER
DN-C630
POWER
PHONES LEVEL
MIN MAX
STOP CUE
PRESET
PLAY / PAUSE
TRACK
PLAY
MODE
END MON INDEX
SEARCH
REPEAT
ON / OFF
PROG.PLAY
A-B
PROG. IN
PITCH
TIME
0%
PROG
REMAIN
SINGLE
PROG
REMAIN
SINGLE
(3) Wiedergabe von Programmen
ON / OFF
PROG.PLAY
ON / OFF
PROG.PLAY
CUECUE
PROG
TOTAL
21
OPEN / CLOSE
COMPACT DISC PLAYER
DN-C630
POWER
PHONES LEVEL
MIN MAX
STOP CUE
PRESET
PLAY / PAUSE
TRACK
PLAY
MODE
END MON INDEX
SEARCH
REPEAT
ON / OFF
PROG.PLAY
A-B
PROG. IN
PITCH
TIME
0%
Einfügen eines Titels in ein Programm.
Wählen Sie die Stelle an, an die der Titel eingefügt
werden soll.
Drehen Sie den Wahlschalter (
8 – 9).
5-1
Stellen Sie den Programm-Einfügungsmodus ein.
Drücken Sie die -Taste.
7
5-2
Wählen Sie den Titel, den Sie einfügen möchten, an.
Drehen Sie den Wahlschalter (
8 – 9).
5-3
Geben Sie den angewählten Titel ein.
Drücken Sie den Wahlschalter.
Wiederholen Sie die Schritte 5-1, 5-2, 5-3 und 5-4, um
weitere Titel in das Programm einzufügen.
(Zum Verlassen des Programmeingabemodus die PROG.
IN-Taste drücken.)
5-4
Löschen von Titeln aus dem Programm.
Wählen Sie die Stelle, die Sie löschen möchten, an.
Drehen Sie den Wahlschalter (
8 – 9).
6-1
Blinkt
Leuchtet
Leuchtet
Die Nummer der Stelle blinkt
Blinkt
Einfügen eines Titels im dritten
Programmschritt:
Blinkt
Leuchtet
Blinkt
Blinkt
Leuchtet
Blinkt
Blinkt
Leuchtet
Blinkt
Blinkt
Nummer des angewählten Titels
Leuchtet
Löschen Sie den Titel aus dem Programm.
Drücken Sie die -Taste.
6
6-2
Verlassen Sie den Programm-Editiermodus.
Drücken Sie die PROG. IN-Taste.
7
Stellen Sie den Programm-Wiedergabemodus ein.
Drücken Sie die PROG. PLAY-Taste.
Im Modus zur Wiedergabe einzelner Titel wird nur die
festgelegte Schrittnummer angezeigt.
Im Dauerwiedergabemodus wird alles von der
festgelegten Schrittnummer bis hin zur letzten
Schrittnummer angezeigt.
Die erste Spur im Programm wird aufgerufen und der
Bereitschaftsmodus ist eingestellt.
1
Starten Sie die programmierte Wiedergabe.
Drücken Sie die PLAY/PAUSE-Taste.
Die programmierte Wiedergabe beginnt.
2
Blinkt Leuchtet
Leuchtet
Die Nummer der nächsten Stelle
blinkt
Blinkt
Nummer des Titels an der nächsten
Stelle im Programm
Leuchtet
Leuchtet
Blinkt
PLAY / PAUSE
CUE
PLAY / PAUSE
Leuchtet Aus
Mit dem Auswerfen der Disc wird das eingegebene
Programm gelöscht.
HINWEIS:
Programme können nicht eingegeben werden, wenn keine
Disk eingelegt ist.
Löschen des Titels, der sich an der
dritten Stelle befindet
Leuchtet
Leuchtet
Page 38

DEUTSCH
39
(4) Speichern von Programmen
• Programme können im Speicher festgehalten werden. Wenn eine Disc, für die ein Programm gespeichert ist, eingelegt wird, wird
automatisch der Modus für die programmierte Wiedergabe aktiviert.
• Es können Programme für bis zu 3 Discs gespeichert werden.
4 2-4
2-2,2-3
OPEN / CLOSE
COMPACT DISC PLAYER
DN-C630
POWER
PHONES LEVEL
MIN MAX
STOP CUE
PRESET
PLAY / PAUSE
TRACK
PLAY
MODE
END MON INDEX
SEARCH
REPEAT
ON / OFF
PROG.PLAY
A-B
PROG. IN
PITCH
TIME
0%
PLAY
MODE
Der Speicher-Einstellmodus ist entaktiviert und
das Gerät setzt sich in den Normalbetrieb-Modus
zurück.
CUE
ON / OFF
PROG.PLAY
PROG
Geben Sie das Programm ein.
Verfahren Sie zum Eingeben des Programms wie im
Abschnitt “(1) Eingeben eines Programms” beschrieben
(Siehe Seite 37.)
1
Stellen Sie den Speichermodus ein.
Verfahren Sie zum Einstellen des Speichermodus wie im
Abschnitt “(2) Speicherbetrieb” beschrieben (Siehe Seite
41.)
2-1
Wählen Sie die gespeicherte Position an.
Drehen Sie den Wahlschalter zum Anwählen von
“Program 1” (oder “Program 2” oder “Program 3”).
2-2
Ändern von Speicher-Einstellungen.
Drücken Sie den Wahlschalter.
2-3
Entaktivieren Sie den Speichermodus.
Drücken Sie die PLAY MODE-Taste.
2-4
Wiedergabe einer gespeicherten Disc:
Legen Sie eine Disc ein, für die ein Programm
gespeichert ist.
Der Tonabnehmer sucht nach dem ersten programmierten
Titel und der Standby-Modus ist eingestellt.
3
Starten Sie die programmierte Wiedergabe.
Drücken Sie die PLAY/PAUSE-Taste.
4
Wählen Sie eines von
diesen an
Das Zeichen-Display ändert sich wie folgt:
Vor dem Ändern Nach dem Ändern
Leuchtet Leuchtet
Leuchtet
PLAY / PAUSE
CUE
PLAY / PAUSE
Leuchtet Aus
HINWEIS:
Es ist möglich, daß die Wiedergabezeit während der
programmierten Wiedergabe von Discs ohne CDR TOCs
nicht einwandfrei angezeigt wird.
Page 39

DEUTSCH
40
GESPEICHERTE FUNKTIONEN UND BETRIEBE
7
(1) Auflistung der Speicher-Funktionen
• Funktionen können mit Hilfe der Tasten an der Frontplatte des Gerätes gespeichert werden. Diese Einstellungen werden in
einem energieunabhängigem Speicher abgelegt, so daß Sie selbst beim Ausschalten des Gerätes erhalten bleiben.
• Die in nachfolgender Tabelle aufgeführten Funktionen können gespeichert werden. Stellen Sie die Funktionen abhängig vom
Nutzungszweck ein, um eine noch wesentlich bessere Wiedergabequalität zu erreichen.
• Mit einer der Speicherfunktionen können Sie sich Informationen über dieses Gerät anzeigen lassen (Mikroprozessor-Version).
Art der gespeicherten
Funktion
Voreinstell-Typ
Beendigungsmodus
Strom-Einschaltmodus
Automatischer Stop
Programm 1
Programm 2
Programm 3
Digitalausgang
Automatisches Aufrufen
Anwahl der Speicherart.
Betrieb nach Beendigung der Wiedergabe.
Betrieb nach Einschalten des Gerätes.
Einstellung, ob sich die Servofunktionen automatisch ausschalten sollen.
Einstellung, ob das Programm 1 wiedergegeben werden soll.
Einstellung, ob das Programm 2 wiedergegeben werden soll.
Einstellung, ob das Programm 3 wiedergegeben werden soll.
Anwahl, ob die Untercodes ausgegeben werden sollen.
Preset Type 1
Finish Next
Power On Stby
Sleep ON
Program 1 OFF
Program 2 OFF
Program 3 OFF
Subcode OFF
CueDet. –60 dB
1
2
3
5
6
7
8
9
Ende-Monitor
Ein-/Ausschalten der Funktion zur Überwachung des Titelendes und
Einstellung der Überwachungszeit.
End Mon. 10 s
10
4
Bereitschaft nächste Spur
Einstellung, ob sich das Gerät am nächsten Titel in den Standby-Modus
setzen soll, wenn während der Wiedergabe die CUE-Taste gedrückt
worden wird.
Next Stb. OFF
12
CDR-Disc
Wahl, ob die Wiedergabe von CDR-Discs, die kein TOC enthalten,
getestet werden soll oder nicht.
Einstellung zum Löschen von gespeicherten Daten und Rückstellung
dieser Daten auf deren Anfangswerte.
Anzeige der Mikroprozessor-Version.
Normal Disc
19
25
26
Parallelsignal
Parallelsignal
Parallelsignal
Parallelsignal
Stereo/Mono
Voreinstellung löschen
Einstellungsinformation
Auswahl, ob parallele Fernsteuerungssignale akzeptiert werden sollen.
Auswahl, ob Standby-Kennzeichen ausgegeben werden sollen.
Einstellung des extern gesteuerten Additionsausgangssignals.
Auswahl des Fader-Startmodus.
Auswahl, ob die Wiedergabe in stereo oder mono erfolgen soll.
Remote ENA
ST. Tally ON
INDEX 2 Tally
Fader Pause
Stereo
Ini. Preset
Ver. **** (* = number)
20
21
22
23
24
E.O.M.
Ein-/Ausschalten der EOM und Anzeige der Zeiteinstellung.
Einstellung, ob der automatische Cue-Betrieb ausgeführt und der
Tonstartpegel eingestellt werden soll.
E.O.M. 10 s
11
Nächste Spur reservieren
Einblendzeit
Wiedergabegeschwindigkeit
Verzögerungsstart
Wiedergabesperre
Rahmendisplay
Betrieb, wenn der Wähler während der Wiedergabe gedreht wird.
Einstellung der Einblendzeit.
Einstellung der Standard-Wiedergabegeschwindigkeit.
Einstellung der Verzögerungsstartzeit.
Aktivierung-/Entaktivierung der Bedienfeldtasten während der Wiedergabe.
Auswahl, ob Einheiten angezeigt werden sollen.
Reserve. OFF
FadeIn OFF
Normal Speed
Delay OFF
Play Lock OFF
FR Disp ON
13
14
15
16
17
18
Beschreibung
Zeichen-Display
(wie werksseitig vor dem
Versand eingestellt)
Nr.
Wenn Voreinstellungen gemacht wurden, werden zu diesem Zeitpunkt das mit der TIME-Taste eingestellte Zeitdisplay und der mit
der PLAY MODE-Taste eingestellte Wiedergabemodus im Speicher abgelegt. Diese Modi werden beim nächsten Einschalten des
Gerätes aktiviert.
HINWEIS:
Für CDR-Disks ohne TOCs, gibt es keine Löcher (Signale) an den Einführungs- und Ausführungsabschnitten der Disk, so daß
Fehler, besonders bei der Titelsuche, auftreten können. Falls ein Fehler auftritt öffnen Sie das Disk-Fach, dann schließen Sie es
und führen Sie den Vorgang erneut aus.
Page 40

DEUTSCH
41
(2) Speicherverfahren
• Funktionen können mit Hilfe der Tasten an der Frontplatte
des Gerätes gespeichert werden.
• Während des Speicherns sollte keine Disc eingelegt sein
und das Gerät sollte sich im Stopp- oder Standby-Modus
befinden.
2.31 5
1.4.5
OPEN / CLOSE
COMPACT DISC PLAYER
DN-C630
POWER
PHONES LEVEL
MIN MAX
STOP CUE
PRESET
PLAY / PAUSE
TRACK
PLAY
MODE
END MON INDEX
SEARCH
REPEAT
ON / OFF
PROG.PLAY
A-B
PROG. IN
PITCH
TIME
0%
PLAY
MODE
Der Speichermodus ist entaktiviert und das
Gerät setzt sich in den zuvor eingestellten
Modus zurück.
Das Zeichen-Display ändert sich
wie nachfolgend aufgeführt.
Geben Sie den Speichermodus ein.
Betätigen Sie die CUE-Taste, während Sie die PLAY
MODE-Taste gedrückt halten.
1
Wählen Sie die zu speichernde Position an.
Drehen Sie den Wahlschalter (
8 – 9).
2
Ändern Sie die gespeicherten Werte.
Drücken Sie den Wahlschalter.
3
HINWEIS:
Wenn die nachfolgend aufgeführte Meldung erscheint,
liegt eine Störung des Vorwahlspeichers vor. Kontaktieren
Sie einen Kundendienst-Mitarbeiter.
Verlassen Sie den Speichermodus.
Drücken Sie die PLAY MODE-Taste.
4
Um die Voreinstellungen auf die Anfangseinstellungen
zurückzustellen (die Einstellungen, die bei Versand von der
Fabrik eingestellt waren), schalten Sie den Strom ein,
während Sie die PLAY MODE- und die END MON-Taste
gedrückt halten. Für die ursprünglichen Einstellungen,
beziehen Sie sich auf: “(1) Auflistung der SpeicherFunktionen”.
5
Zeichen-Display
Zeichen-Display
Drehen Sie den
Wahlschalter für die
Bewegung in
Pfeilrichtung im
Uhrzeigersinn und für
die Bewegung in
entgegengesetzter
Richtung entgegen
dem Uhrzeigersinn.
Das Zeichen-Display ändert sich
wie nachfolgend aufgeführt.
Vor dem Ändern Nach dem Ändern
Initial Error
Page 41

DEUTSCH
42
(3) Detaillierte Beschreibung der gespeicherten Funktionen
(* = Ausgangsstellung)
1) “Preset Type (*)” (Drei verschiedene Speicherungssätze (Speicherarten) sind möglich und können für unterschiedliche Zwecke
angewendet werden.)
* Preset Type 1 : Stellen Sie auf Speicherart 1.
Preset Type 2 : Stellen Sie auf Speicherart 2.
Preset Type 3 : Stellen Sie auf Speicherart 3.
2) “Finish (*****)”
Finish Stop : Nach Beendigung der Wiedergabe wird der Stoppmodus eingestellt.
* Finish Next : Nach Beendigung der Wiedergabe wird am nächsten Titel der Standby-Modus eingestellt.
Finish Recue : Nach Beendigung der Wiedergabe wird an der Wiedergabe-Startposition der Standby-Modus
eingestellt.
3) “Power On (****)”
* Power On Stby : Nach dem Lesen des TOCs wird der Standby-Modus automatisch am festgelegten Titel eingestellt.
Power On Play : Nach dem Lesen des TOCs beginnt die Wiedergabe im Modus für die Wiedergabe-Wiederholung aller
Titel.
Power On Stop : Nach dem Lesen des TOCs wird der Stoppmodus eingestellt.
4) “CueDet. (–**) dB”
CueDet. (–*) dB : Stellen Sie den Tonerkennungspegel für das Absuchen ein. (–72/–66/*–60/–54/–48/–42/–36)
CueDet. OFF : Die Tonanfangsposition wird nicht abgesucht.
5) “Sleep ON (OFF)”
* Sleep ON : Schaltet den Servofunktionen automatisch aus, wenn im Pause-, Standby- oder manuellen Such-Modus
innerhalb von 30 Minuten keine Taste betätigt wird.
Sleep OFF : Schaltet die Servofunktionen nicht automatisch aus.
6) “Program 1 OFF (ON)”
Program 1 OFF (ON) : Speichert, wenn eingeschaltet, die Inhalte des 1. Programms. (Ausgangseinstellung – OFF)
7) “Progam 2 OFF (ON)”
Program 2 OFF (ON) : Speichert, wenn eingeschaltet, die Inhalte des 2. Programms. (Ausgangseinstellung – OFF)
8) “Program 3 OFF (ON)”
Program 3 OFF (ON) : Speichert, wenn eingeschaltet, die Inhalte des 3. Programms. (Ausgangseinstellung – OFF)
9) “Subcode ON (OFF)”
Subcode ON : Untercodes werden zusammen mit den digitalen Ausgangssignalen ausgegeben. (Verbraucher-SPDIF-
Format)
* Subcode OFF : Es werden keine Untercodes zusammen mit den digitalen Ausgangssignalen ausgegeben.
(Verbraucher-IEC 958-Typ Ⅱ-Format)
HINWEIS: Der 0 Sek.-Start ist nicht möglich, wenn oben die Einstellung “Subcode ON” angewählt worden ist.
10) “End Mon. (**) s”
End Mon. (**) s : Eingabe der Titelende-Überwachungszeit (5/*10/15/20/25/30/35)
End Mon. OFF : Die Überwachungsfunktion ist entaktiviert.
11) “E.O.M. (**) s” (Ausgabe des EOM-Tally-Signals an den Fernsteuer-Pin (24))
E.O.M. (**) s : Eingabe der EON-Zeit. (0/5/*10/15/20/30/60)
E.O.M. OFF : Die EOM-Funktion ist entaktiviert.
12) “Reserve. Off (ON)”
* Reserve. OFF : Kehrt an die Wiedergabe-Startposition zurück und setzt sich nach Betätigung der CUE-Taste während
der Wiedergabe in den Standby-Modus.
Reserve. ON : Setzt das Gerät am Anfang des nächsten Titels in den Standby-Modus, wenn die CUE-Taste während
der Wiedergabe gedrückt worden ist.
Die PLAY MODE-Taste drücken, um die reservierte Spur aufzuheben.
Page 42

DEUTSCH
43
13) “Track Rsv. OFF (ON)”
* Track Rsv. OFF : Sofort nach Drehen des Wählers während der Wiedergabe startet der Suchlauf nach dem festgelegten
Titel (Index).
Track Rsv. ON : Der Titel (Index), nach dem gesucht werden soll, wird nach der Wiedergabe des gegenwärtig
wiedergegebenen Titels festgelegt, wenn Sie den Wähler während der Wiedergabe drehen.
14) “FadeIn OFF (***s)”
FadeIn OFF (***s) : Eingabe der Einblendzeit. (*OFF/10 m/50 m/0,1/0,5/1/2)
15) “Normal (+/–***%) Speed”
* Normal Speed : Wiedergabe mit Normalgeschwindigkeit.
(+/–***%) Speed : Wiedergabe mit variabler Geschwindigkeit. ±(0,2/0,4/0,6/0,8/1,0/1,2/1,4/1,6/1,8/2,0/2,2/2,4/2,6/2,8/3,0)
16) “Delay OFF (***ms)”
Delay OFF (***ms) : Eingabe der Zeit für den verzögerten Wiedergabestart. (*OFF/100 m/200 m/300 m)
17) “PlayLock ON (OFF)”
PlayLock ON : Sperrt während der Wiedergabe alle Betriebstasten mit Ausnahme der PLAY/PAUSE-, TIME- und PLAY
MODE-Tasten.
* PlayLock OFF : Ermöglicht alle Funktionen während der Wiedergabe.
18) “FR Disp ON (OFF)”
* FR Disp ON : Zeigt während der Wiedergabe alle Einheiten auf dem Zeit-Display an.
FR Disp OFF : Während der Wiedergabe werden keine Einheiten auf dem Zeit-Display angezeigt.
(Die Einheiten werden in den Modi für manuellen Suchlauf, bei aktiviertem Standby- oder Pause-Modus
und bei eingestelltem Modus zur Überwachung des Titelendes angezeigt.)
19) “CD-R NO TOC ON (OFF)”
* Normal Disc : Normale CD und CDR-Discs, die TOCs enthalten, wiedergeben.
No TOC Disc : Wiedergabe von CDRs, die keine TOCs enthalten.
HINWEIS:
Für CDR-Disks ohne TOCs, gibt es keine Löcher (Signale) an den Einführungs- und Ausführungsabschnitten der Disk, so daß Fehler,
besonders bei der Titelsuche, auftreten können. Falls ein Fehler auftritt öffnen Sie das Disk-Fach, dann schließen Sie es und führen
Sie den Vorgang erneut aus.
20) “Remote EMA (INH)”
* Remote ENA : Ermöglicht die Bedienung sämtlicher Tasten an der Frontplatte des Gerätes.
Remote INH : Sperrt alle Tasten an der Frontplatte des Gerätes mit Ausnahme der Speichertasten.
21) “St. Tally ON (OFF)”
* St. Tally ON : Gibt Standby-Signale von der parallelen Fernsteuerungs-Schnittstelle aus.
St. Tally OFF : Gibt keine Standby-Signale von der parallelen Fernsteuerungs-Schnittstelle aus.
22) “(******) Tally”
* INDEX 2 Tally : Gibt Index 2 Additionessignale zum Fernsteuerungspin aus (17).
INDEX 3 Tally : Gibt Index 3 Additionessignale zum Fernsteuerungspin aus (17).
23) “Fader Pause (Play)”
* Fader Pause : Startet die Wiedergbe, wenn Fernfaderpins (9-10) kurzgeschlossen worden sind und unterbricht, wenn
die Pins offen sind.
Fader Play : Startet die Wiedergabe, wenn die Fernfaderpins (9-10) kurzgeschlossen worden sind und setzt die
Wiedergabe fort, wenn die Pins offen sind.
24) “Stereo (Mono)”
* Stereo : Gibt L (linke) und R (rechte) Stereosignale von der Ausgangsbuchse aus.
Mono : Gibt gemischte L (linke) und R (rechte) Signale von der Ausgangsbuchse aus.
25) “Preset Clr ? (Ini. Preset)”
Preset Clr ? : Löscht die gespeicherten Einstellungen (und stellt die Ausgangswerte wieder ein).
* Ini. Preset : Löscht die gespeicherten Einstellungen nicht.
26) “Ver. xxxx” : Zeigt die Mikroprozessor-Version an. (“xxxx” ist eine Nummer.)
Page 43

DEUTSCH
44
VOR DEM ABSCHALTEN DES STROMES
8
Wenn Sie den CD-Spieler nicht mehr benutzen wollen, achten Sie vor dem Abschalten des Stromes darauf, daß der Plattenhalter mit der
Öffnen-/Schließen-Taste (OPEN/CLOSE) geschlossen worden ist.
CD-PLATTEN
9
(1) Vorsichtsmaßnahmen zur Handhabung von CD-Platten
• Achten Sie darauf, daß weder Fingerabdrücke, Öl oder Staub auf die Oberfläche der CD-Platte gelangen. Wenn die CD-Platte
verschmutzt ist, beseitigen Sie den Schmutz mit einem weichen trockenen Tuch.
• Verwenden Sie für die Reinigung von CD-Platten niemals Benzin, Farbverdünner, Wasser, Schallplattenspray, elektrostatisch-
sichere Chemikalien oder silikonbehandelte Tücher.
• Handhaben Sie CD-Platten stets sorgfältig, um Beschädigungen der Oberfläche zu vermeiden. Besondere Vorsicht sollten Sie
beim Herausnehmen der CD-Platte aus ihrer dazugehörigen Box und beim Hereinlegen in die Box walten lassen.
• Dehnen Sie CD-Platten nicht.
• Führen Sie den CD-Platten keine Hitze zu.
• Vergrößern Sie nicht das Loch in der Mitte der CD-Platte.
• Beschriften Sie nicht das Etikett (bedruckte Seite) mit einem hartschreibenden Stift wie einem Bleistift oder Kugelschreiber.
• Zu einer Taubildung auf der CD-Platte kommt es dann, wenn das Gerät vom Warmen ins Kalte gebracht wird, wie z.B. im Winter
nach draußen. Versuchen Sie nicht, die CD-Platte mit einem Haarfön o.ä. zu trocknen.
(2) Vorsichtsmaßnahmen zur Aufbewahrung von CD-Platten
• Nehmen Sie die CD-Platte nach der Wiedergabe stets aus dem CD-Spieler heraus.
• Bewahren Sie die CD-Platte stets in ihrer dazugehörigen Box auf, um sie vor Verschmutzung und Beschädigungen zu schützen.
• Bewahren Sie CD-Platten niemals an folgenden Orten auf:
1) An Orten, an denen sie über einen beträchtlichen Zeitraum hinweg direkter Sonnenstrahlung ausgesetzt sind.
2) An Orten mit hoher Staubansammlung oder hoher Luftfeuchtigkeit.
3) An Orten, die durch Wärme von Innenheizungen beeinträchtigt sind.
VORSICHT:
Schließen Sie den Plattenhalter nicht mit Gewalt, wenn der Strom abgeschaltet ist.
Dies kann zu einer Beschädigung des Gerätes während des Transportes führen.
Schalten Sie den Strom nicht ab, wenn der
Plattenhalter geöffnet ist.
Strom aus (POWER OFF)
Schalten Sie den Strom ab, nachdem Sie
den Plattenhalter mit der Öffnen-/SchließenTaste (OPEN/CLOSE) geschlossen
haben.Strom aus
(POWER OFF)
HINWEIS:
Benutzen Sie Compact Discs, die das Zeichen tragen.
Speziell geformte CD’s (herzförmige CDs, achteckige CDs, usw.) können auf dieser Anlage
nicht abgespielt werden.
Der Versuch derartige CDs abzuspielen kann die Anlage beschädigen. Verzichten Sie auf die
Benutzung solcher CDs.
DIGITAL AUDIO
COMPACTCOMPACT
Page 44

DEUTSCH
45
FEHLERSUCHE
10
TECHNISCHE DATEN
11
Wenn Sie den Eindruck haben, daß eine Gerätestörung vorliegt, überprüfen Sie die nachfolgend aufgeführten Punkte.
Der Disc-Halter öffnet oder schließt sich nicht.
• Ist der Netzschalter auf die Position “ON” gestellt worden ?
• Ist der Spieler für die Wiedergabe einer Disc eingestellt worden ? ……………………………………………………Siehe Seite 31
Das Display zeigt auch nach dem Einlegen einer Disc “–” an.
• Ist die Disc richtig eingelegt worden ?
• Ist die Disc verschmutzt oder zerkratzt ?
Es wird kein Ton ausgegeben oder der Ton ist verzerrt.
• Sind die Ausgangskabel richtig an den Verstärker angeschlossen worden ?
• Sind die Regler und Schalter des Verstärkers richtig eingestellt worden ?
Der vorher bestimmte Abschnitt der Disc kann nicht richtig wiedergegeben werden.
• Ist die Disc verschmutzt oder zerkratzt ?
Eine der Tasten ist außer Funktion.
• Ist eine Voreinstellung wie PLAY-LOCK vorgenommen worden ? ……………………………………………………Siehe Seite 43
ALLGEMEINES
Typ: CD-Spieler
Disc -Typ: Standard-Compact Discs (12 cm, 8 cm/5”, 3”)
AUDIOTEIL
Kanäle: 2 Kanäle stereo, 1 Kanal mono
Sampling-Frequenz: 44,1 kHz
Digitalfilter: 18 Bit Achtfach-Oversampling Digitalfilter
Frequenzgang: 5 bis 20.000 Hz (±1,0 dB)
Klirrfaktor: 0,015 % (1 kHz, 0 dB Wiedergabe, A-Filter)
Rauschabstand: 98 dB (1 kHz, 0 dB Wiedergabe, A-Filter)
Kanaltrennung: 90 dB (1 kHz, 0 dB Wiedergabe, A-Filter)
Analogausgang: 1 kHz, 0 dB Wiedergabe
Übertragung und Anschluß: Symmetrisch-aktiv, XLR-Stecker,
asymmetrisch, Cinch-Buchse
Nicht balanciert, RCA-Klinkenstecker
Ausgangspegel: Symmetrisch: +18 dBs, 600 Ω/Ohm
Asymmetrisch: 1,7 Vrms, 10 kΩ/kOhm
Einstellbereich des Ausgangspegels: +22 dBs bis –20 dBs (symmetrisch)
Kopfhörerausgang: 20 mW (30 bis 40 Ω/Ohm)
Digitalausgang
Übertragung und Anschluß: RCA-Klinkenstecker
Signalformat: IEC 958 Typ Ⅱ oder SPDIF
Ausgangspegel: Asymmetrisch: 0,5 Vp-p, 75 Ω/Ohm
Variable Tonhöhensteuerung: max. ±9,9 %
Audio-Anlaufzeit: weniger als 0,01 Sekunden
Genauigkeit des Einheiten-suchlaufes: 1 Einheit (1/75 Sekunde)
ABMESSUNGEN: 482 (B) x 88 (H) x 252 (T) mm
GEWICHT: 5,1 kg
STROMAUFNAHME: 18 W
SPANNUNGSZUFUHR: 120 V Wechselstrom 10 %, 60 Hz (U.S.A., Kanada und Taiwan R.O.C.)
230 V Wechselstrom 10 %, 50 Hz (Europa, Asien u.a.)
BETRIEBSBEDINGUNGEN
Betriebstemperatur: +5 °C bis 35 °C
Luftfeuchtigkeit: 25 % bis 85 %, keine Kondensation
Lagertemperatur: –20 °C bis 60 °C
FERNSTEUERUNG
Parallele Fernsteuerung: 25-pol. D-Sub
* Änderungen der technischen Daten und des Designs zum Zwecke der Verbesserung ohne Ankündigung vorbehalten.
Pin-Nr.
1
2
3
Gemeinsam
Hot
Cold
Page 45

FRANCAIS
46
Le lecteur de CD DN-C630 est un lecteur de CD de type à montage dans un rack conçu pour être utilisé dans les studios de production
sonore, etc.
• Possibilité de montage dans un rack de 19 pouces (hauteur 2 U)
• Bouton sélecteur de recherche de plage (sélection de plage facile)
• Lecture de programme (25 plages max.)
(1) Lorsque le mode PLAY (lecture) est réglé sur Single, le lecteur entre en mode d’attente au début de la plage suivante (au mode de
fin de session suivante).
(2) Lorsque le mode PLAY (lecture) est réglé sur Continuous (continu), la lecture continue en fonction de la séquence programmée.
• Mode de lecture et mode de fin de session
(1) Mode de lecture
q Continue: lecture du disque entier.
w Single: lecture d’une plage.
(2) Mode de fin de session (arrêt, plage suivante, repérage
q Arrêt: arrêt après la fin de lecture d’une plage.
w Suivant: attente au début de la plage suivante après la fin de lecture d’une plage.
e Repérage: après la fin de lecture d’une plage, attente au début de la plage.
• Repérage automatique
Après le chargement d’un disque, le repérage est fait automatiquement au point où l’audio commence.
Le repérage a lieu au point où l’audio commence au lieu du début de la plage. Le niveau où le son est détecté pour la première fois
peut être régle entre –36 à –72 dB (7 pas).
• Contrôle de fin de plage
Le fait d’appuyer sur la touche END MON (contrôle de fin de plage) en mode d’attente, déclenche la prélecture de la fin de la plage et
détermine ainsi le point final. Le point où le contrôle commence peut être réglé dans une plage de 5 à 35 secondes (7 pas) avant la fin
de la plage.
• Fin de message (EOM)
A la fin de la plage, l’affichage de temps clignote, procurant un avertissement visuel à l’opérateur comme quoi la plage va bientôt être
terminée. La section pendant laquelle le clignotement a lieu avant la fin de la plage peut être réglée dans une fourchette de 0 à 60
secondes (7 niveaux).
• Contrôle de la vitesse (±9,9 %, par pas de 0,1 %)
• Recherche d’index
Le bouton du sélecteur peut être utilisé pour effectuer une recherche d’index lorsque la touche INDEX est enfoncée. (Le numéro
d’index apparaît)
• Affichage FL
• Affichage des emplacements de lecture
Un affichage à barres indique les points de lecture de la plage en cours de lecture. L’affichage du temps écoulé et du temps restant
peut être commuté à l’aide de la touche TIME (temps).
• Bornes de commandes externes
Télécommande en parallèle (connecteur D-sub à 25 broches)
• CONVERTISSEUR SUPER-LINEAIRE (S.L.C.)
Cet appareil utilise le système de prévention contre la distorsion transversale nulle propre à Denon, la cause principale de baise de
qualité sonore en lecture PCM, et recrée de cette manière des champs sonores d’une musicalité riche.
PRINCIPALES CARACTERISTIQUES
Page 46

FRANCAIS
47
TABLE DES MATIERES
z
NOMENCLATURE ET FONCTIONS …………………48 ~ 50
(1) Panneau avant ………………………………………48, 49
(2) Panneau arrière ……………………………………………49
(3) Fenêtre d’affichage ………………………………………50
x
CONNEXIONS DE TELECOMMANDE ……………………51
c
OUVERTURE ET FERMETURE DU RéCEPTACLE DE
DISQUE ET CHARGEMENT DE DISQUES ………………51
v
FONCTIONNEMENT DE BASE …………………………52, 53
(1) Avant de commencer la lecture …………………………52
(2) Démarrage de la lecture …………………………………53
(3) Arrêt de la lecture …………………………………………53
(4) PLAY/PAUSE (lecture/pause) et CUE (repérage) ……53
b
OPERATIONS PRATIQUES ……………………………54 ~ 56
(1) Démarrage de la lecture au milieu d’une plage
(Recherche manuelle) ……………………………………54
(2) Lecture à une vitesse différente (Pitch) ………………54
(3) Lecture répétitive (Répétition) …………………………55
(4) Lecture d’une section spécifique du disque
(Répétition A-B)……………………………………………56
n
LECTURE PROGRAMMEE ……………………………57 ~ 59
(1) Introduction de programmes ……………………………57
(2) Changement de programme ………………………57, 58
(3) Lecture de programmes …………………………………58
(4) Préréglage des programmes ……………………………59
m
FONCTIONS PREREGLEES ET
FONCTIONNEMENT ……………………………………60 ~ 63
(1) Liste des fonctions préréglées …………………………60
(2) Procédure de préréglage …………………………………61
(3) Description détaillée des fonctions préréglées……62, 63
,
AVANT D’ETEINDRE L’APPAREIL …………………………64
.
DISQUES COMPACTS ………………………………………64
⁄0
DEPISTAGE DES PANNES …………………………………65
⁄1
CARACTERISTIQUES TECHNIQUES ………………………65
Points de vérification
Vérifier que le carton contient les articles suivants:
Câbles de connexion pour sortie de signal (RCA) 1
Mode d’emploi (cette notice) 1
Installation du lecteur
Monter ce lecteur sur votre console ou meuble à l’aide des rails de 19” EIA.
ATTENTION:
• Le DN-C630 fonctionne normalement lorsque le lecteur de CD est monté avec le panneau avant faisant un angle de 10 degrés
par rapport au plan vertical. Si le lecteur est trop incliné, les disques risquent de ne pas être chargés correctement.
DN-C630
Max. 10°
• DECLARATION DE CONFORMITE
Nous déclarons sous notre seule responsabilité que l’appareil, auquel se réfère cette
déclaration, est conforme aux standards suivants:
EN60065, EN55013, EN55020, EN60555-2 et EN60555-3.
D’après les dispositions de la Directive 73/23/EEC, 89/336/EEC et 93/68/EEC.
Page 47

FRANCAIS
48
NOMENCLATURE ET FONCTIONS
(1) Panneau avant
q
Touche POWER (alimentation)
• Cette touche allume et éteint le lecteur.
w
Réceptacle de disque
• Placer les disques dans ce réceptacle.
• Appuyer sur la touche OPEN/CLOSE (ouverture/
fermeture) pour ouvrir et fermer le réceptacle de disque.
• Charger les disques fermement dans la fente d’insertion.
e
Touche OPEN/CLOSE (ouverture/fermeture)
• Appuyer sur cette touche pour ouvrir et fermer le
réceptacle de disque.
• Le réceptacle de disque ne s’ouvre pas pendant la
lecture.
r
Touche TIME (temps)
• Appuyer sur cette touche pour commuter l’affichage de
temps entre le temps restant (REMAIN) et le temps
écoulé (ELAPSED).
t
Touche PLAY MODE (mode de lecture)
• Appuyer sur cette touche pour changer de mode de
lecture.
• Appuyer sur cette touche pour annuler la plage réservée
avec la fonction de réservation de la plage suivante.
y
Touche END MON (contrôle de fin de plage)
• Appuyer sur cette touche en mode d’attente pour
contrôler la fin de la plage. (Contrôle de fin de plage)
u
Touche INDEX
• Appuyer sur cette touche pour régler le mode de
sélection d’index, ensuite utiliser le sélecteur pour
sélectionner le numéro d’index.
• Le numéro d’INDEX apparaît lorsque le mode de
sélection d’index est réglé.
• Appuyer à nouveau sur cette touche pour retourner au
mode de sélection de plage.
i
Touche REPEAT (répétition)
• Appuyer sur cette touche pour régler le mode de
répétition.
• Le voyant REPEAT éclaire lorsque le mode répétition est
allumé.
• Appuyer à nouveau sur cette touche pour annuler le
mode de répétition.
o
Touche A-B
• Appuyer sur cette touche pour fixer le point A.
• Le voyant A- clignote lorsque le point A est fixé.
• Appuyer sur cette touche lorsque le point A est fixé pour
fixer le point B.
• L’indicateur A-B clignote lorsque le point B est fixé.
• Appuyer à nouveau sur cette touche pour annuler le
mode de répétition A-B.
!0
Touche PITCH (vitesse)
• Appuyer sur cette touche pour passer à la vitesse de
lecture réglée à l’aide de la glissière de réglage de
vitesse.
• Le voyant LED PITCH clignote. Lorsque cette touche est
à nouveau enfoncée, le mode vitesse fixe est activé et le
voyant LED PITCH clignote.
• Appuyer à nouveau sur cette touche pour annuler le
mode de lecture à vitesse variable et retourner à la
vitesse normale.
!1
Prise PHONES (casque)
• Connecter un casque d’une impédance de 30 à 40
Ω/ohms à cette prise.
!2
Commande LEVEL (niveau)
• Utiliser cette commande pour régler le volume du
casque.
!3
Touche STOP (arrêt)
• Appuyer sur cette touche pour couper toutes les servo
fonctions et arrêter le lecteur.
• Appuyer sur cette touche pendant la lecture pour régler
le mode d’arrêt.
!4
CUE (repérage)
• Lorsque cette touche est enfoncée en mode de lecture
ou de pause, le capteur retourne à la position dans
laquelle la lecture a commencé et le mode d’attente est
réglé. (Repérage en arrière)
• Lorsque cette touche est enfoncée pendant la lecture
lorsque la plage suivante a été programmée, la plage
programmée est recherchée et le mode d’attente est
réglé.
• Le voyant LED CUE éclaire lorsque le mode d’attente est
activé.
• Lorsque cette touche est enfoncée pendant que la
touche PLAY MODE (mode de lecture) est enfoncée, le
mode préréglé est réglé.
!5
PLAY/PAUSE (lecture/pause)
• Appuyer sur cette touche en mode d’attente, de pause
ou de recherche manuelle pour commencer la lecture.
• Appuyer sur cette touche en mode d’arrêt pour chercher
la première plage et commencer la lecture.
• Le voyant LED PLAY/PAUSE éclaire en mode de lecture.
• Lorsque cette touche est enfoncée pendant la lecture, le
mode de pause est réglé. Le voyant LED PLAY/PAUSE
clignote lorsque le mode de pause est activé.
!6
Bouton du sélecteur
• Tourner ce bouton du sélecteur pour sélectionner la
plage suivante (ou le numéro d’index) à lire.
• Utiliser la touche INDEX pour choisir s’il faut sélectionner
les numéros d’index ou de plage.
• Tourner le bouton d’un cran dans le sens des aiguilles
d’une montre pour avancer d’une plage (ou d’un numéro
d’index), le tourner d’un cran dans le sens contraire des
aiguilles d’une montre pour reculer d’une plage (ou d’un
numéro d’index).
• Lorsque le bouton est tourné tout en l’enfonçant, un cran
correspond à 10 plages (ou 10 numéros d’index).
• En mode préréglé, utiliser ce bouton pour régler et entrer
les préréglages.
• Lors du réglage des programmes, utiliser ce bouton pour
sélectionner, entrer et vérifier le programme.
1
Page 48

FRANCAIS
49
!7
Touches SEARCH
• Ces touches sont utilisées pour précisément changer
l’endroit où la lecture du disque doit commencer.
!8
Touche PROG. PLAY ON/OFF
(lecture de programme activée/désactivée)
• Lorsque cette touche est enfoncée alors que le voyant
PROG est allumé, le mode de lecture programmée est
activé.
• La touche ne fonctionne pas pendant le mode de lecture
A–B.
• Le voyant LED PROG. PLAY ON/OFF éclaire en modes
d’attente de lecture programmée et de lecture.
• Lorsque cette touche est enfoncée pendant le mode
d’attente de lecture de programme ou le mode de
lecture, le mode de lecture de programme est annulé.
!9
Touche PROG. IN (entrée de programme)
• Appuyer sur cette touche pour régler le mode d’entrée
de programme.
• La touche ne fonctionne pas pendant le mode de lecture.
• Le voyant PROG clignote en mode d’entrée de
programme.
• Le voyant PROG éclaire lorsqu’un programme est réglé.
@0
Glissière de réglage de vitesse
• Utiliser cette glissière pour régler la vitesse de lecture. La
faire glisser vers le haut pour diminuer la vitesse de
lecture, et vers le bas pour augmenter la vitesse de
lecture.
(2) Panneau arrière
q
Connecteurs ANALOG OUT (BALANCE)
(sortie analogique symétrique)
• Ce sont des sorties symétriques utilisant des
connecteurs de type XLR.
• Connecter ces connecteurs aux connecteurs d’entrée
analogique symétrique d’un amplificateur ou d’une
console.
• Agencement de la broche: 1. Commun
2. Hot
3. Cold
• Connecteur approprié: Cannon XLR-3-31 ou équivalent
REMARQUE: Ne pas court-circuiter la broche du point
chaud ou froid avec la broche de masse.
w
Prises ANALOG OUT (UNBALANCED)
(sortie analogique asymétrique)
• Ce sont des sorties asymétriques utilisant des prises de
type RCA.
• Connecter ces prises aux prises d’entrée analogique
asymétrique d’un amplificateur ou d’une console.
e
Commandes LEVEL L/R (niveau G/D)
• Utiliser ces commandes pour régler le niveau des
signaux audio provenant des connecteurs ANALOG OUT
(BALANCED) (sortie analogique symétrique).
r
Connecteur REMOTE (télécommande)
• C’est un connecteur de télécommande en parallèle.
L’utiliser pour commander le DN-C630 avec des
connexions de circuit à contact sec.
• Connecteur approprié: connecteur D-sub à 25 broches
(mâle)
• Agencement du signal su connecteur:
No. de
broche
Nom du signal I/O
1
14
2
15
3
16
4
17
5
18
6
19
7
20
8
21
9
22
10
23
11
24
12
25
13
FG
PLAY tally
PLAY command
PAUSE tally
PAUSE command
CUE tally
CUE command
INDEX 2/INDEX 3 tally
TRACK (+) command
Tally common
TRACK (–) command
Reserved
SEARCH (FWD) command
Reserved
SEARCH (REV) command
Reserved
FADER START command
Tally power supply
Command common
Command common
NC
EOM tally
Reserved
Reserved
Reserved
TTL (lol = 20 mA)
HCMOS (li = 3 mA)
TTL (lol = 20 mA)
HCMOS (li = 3 mA)
TTL (lol = 20 mA)
HCMOS (li = 3 mA)
TTL (lol = 20 mA)
HCMOS (li = 3 mA)
HCMOS (li = 3 mA)
HCMOS (li = 3 mA)
HCMOS (li = 3 mA)
PHOTO COUPLER
+5 V, 20 mA
(li =10 mA)
TTL (lol = 20 mA)
–
O
I
O
I
O
I
O
I
–
I
–
I
–
I
–
I
–
–
–
–
O
–
–
–
REMARQUE: La broche de sortie tally a les spécifications du CI à
collecteur ouvert (I max. 20 mA, V max. 5 V), mais
l’alimentation maximum en courant est de 80 mA,
par conséquent, l’utiliser avec un courant de
charge total de 80 mA ou moins.
t
Prise DIGITAL OUT (UNBALANCED)
(sortie numérique asymétrique)
• C’est une sortie asymétrique utilisant une prise de type
RCA.
• Connecter cette prise à la prise d’entrée numérique
asymétrique d’un amplificateur ou d’une console.
• Format du signal: sélectionnable (Voir page 62, 9))
Page 49

FRANCAIS
50
(3) Fenêtre d’affichage
q
Voyant REPEAT
• Celui-ci éclaire lorsque le mode de répétition est réglé.
w
Indicateurs TIME MODE (mode de temps)
• “ELAPSED” s’allume lorsque le temps écoulé est
affiché.
• “REMAIN” s’allume lorsque le temps restant est affiché.
e
Indicateurs PLAY MODE (mode de lecture)
• “SINGLE” s’allume en mode de lecture d’une plage
unique.
• “TOTAL” éclaire en mode de lecture continue.
r
Affichage du no. de plage
• Celui-ci indique le numéro de la plage à la position
actuelle. Le numéro de plage éclaire pendant l’opération
de recherche de plage et lors de la commutation en
mode d’attente.
• Si la plage suivante est programmée, ce numéro de
plage clignote sur l’affichage des nos. de plage.
t
Voyant de pause de lecture
y
Voyant de lecture
u
Affichage de no. d’index
• Normalement, “Tr” est affiché. Dans le mode de
recherche d’index, le numéro d’index est affiché. Si
l’index suivant est programmé, ce numéro d’index
clignote sur l’affichage des nos. d’index.
i
Affichage de la position de lecture
• Cet affichage indique la position actuelle dans la limite du
temps total de lecture de la plage.
o
Affichage PITCH
• Cet affichage indique la vitesse de lecture réglée en %.
!0
Voyant PROGRAM (programme)
• Celui-ci éclaire lorsqu’un programme est entré.
• Celui-ci clignote lorsque le mode PROG. IN est réglé.
!1
Calendrier musical de 20 plages
• En mode de lecture d’une seule plage, seulement la
plage spécifiée éclaire.
• En mode de lecture continue, toutes les plages de la
plage spécifiée à la dernière plage clignotent.
• Les numéros de plages sont affichés jusqu’à la plage 20.
Les plages 21 et suivantes ne sont pas affichées.
!2
Affichage de la durée de lecture
• Cet affichage indique le temps de la position actuelle, en
minutes (m), secondes (s) et trames (f).
!3
Affichage de caractères
• Cet affichage affiche les messages des modes préréglés
et du mode de programme.
Page 50

FRANCAIS
51
CONNEXIONS DE TELECOMMANDE
2
OUVERTURE ET FERMETURE DU RÉCEPTACLE DE DISQUE ET CHARGEMENT DE
DISQUES
3
Pour faire fonctionner le DN-C630 par télécommande, se reporter à l’exemple de connexions de télécommande cité ci-dessous.
14
2
23
22
15
3
23
22
16
4
23
7
23
8
23
5
23
9
23
6
23
22
PLAYPAUSECUE
17
22
24
22
INDEX2/INDEX3EOM
FADER SWITCHTRACK(+)TRACK(-)
123456789
10
141516
18
17
242223
La puissance nominale de la broche 22 du connecteur de télécommande (REMOTE) (TALLY POWER SUPPLY) est de +5 V, 80 mA
maximum.
Eviter des surtensions dépassant la valeur nominale.
(1) Ouverture et fermeture du réceptacle de disque
• Cette opération ne fonctionne que lorsque l’appareil est allumé.
• Appuyer sur la touche d’ouverture/fermeture (OPEN/CLOSE) pour ouvrir ou refermer le réceptacle de disque.
• Les réceptacles de disque ne peuvent pas être ouverts pendant la lecture pour éviter que la lecture soit interrompue si la touche
d’ouverture/fermeture (OPEN/CLOSE) est enfoncée accidentellement. Arrêter la lecture, ensuite appuyer sur la touche
d’ouverture/fermeture (OPEN/CLOSE).
(2) Chargement de disques
• Tenir le disque par ses bords et le placer dans le tiroir de disque. Ne pas toucher la surface du signal (la face brillante).
• Lorsque des disques de 12 cm sont utilisés, placer le disque dans les guides de tiroir extérieur, et lorsque des disques de 8 cm
sont utilisés, les placer correctement dans les guides de tiroir intérieur.
Disque de 12 cm Disque de 8 cm
ATTENTION:
• Ne pas placer des objets étrangers dans le tiroir de disque, et ne pas placer plus d’un disque dans le tiroir de disque à la fois. Sinon,
un fonctionnement défectueux risque de se produire.
• Ne pas enfoncer manuellement le tiroir de disque lorsque l’appareil est éteint, car cela risque de provoquer un fonctionnement
défectueux ou d’endommager le lecteur.
Page 51

FRANCAIS
52
INDEX
END MON
FONCTIONNEMENT DE BASE
4
(1) Avant de commencer la lecture
1
Sélectionner la plage à lire.
Tourner le bouton du sélecteur (
8 – 9).
La plage sélectionnée est repérée et le mode d’attente est
réglé.
REMARQUE: Le mode de sélection de plage est réglé
lorsque la touche est désactivée.
Il n’est pas nécessaire de sélectionner un
numéro d’index lorsqu’on veut lire la plage à
partir du début.
Tourner le bouton du sélecteur (
8 – 9).
Le numéro d’index sélectionné est repéré et le mode
d’attente est réglé.
Si un numéro d’index non-existant est sélectionné, “
No
02.Index
” (pas de sélection d’index) apparaît et le
numéro d’index clignote.
5-1
5-2
6-1
6-2
Pour vérifier la position de démarrage de lecture
Appuyer sur la touche PLAY/PAUSE (lecture/pause).
Contrôler les signaux de lecture pour vérifier la position de
démarrage de lecture.
Appuyer sur la touche CUE (repérage).
7
Pour vérifier la position de fin de lecture
Appuyer sur la touche END MON (contrôle de fin de
plage).
PLAY / PAUSE
CUE
PLAY / PAUSE
Le capteur retourne à la position de démarrage de lecture
et le mode d’attente est réglé. (Repérage en arrière)
CUE
CUECUE
REMARQUE: Si la touche CUE (repérage) est enfoncée
pendant l’opération de contrôle de fin de
plage, cette opération est annulée, le
capteur retourne à la position de démarrage
de lecture et le mode d’attente est réglé.
375-1
6-2
6-1
4,5-2
OPEN / CLOSE
COMPACT DISC PLAYER
DN-C630
POWER
PHONES LEVEL
MIN MAX
STOP CUE
PRESET
PLAY / PAUSE
TRACK
PLAY
MODE
END MON INDEX
SEARCH
REPEAT
ON / OFF
PROG.PLAY
A-B
PROG. IN
PITCH
TIME
0%
Charger un disque.
3
4
Sélectionner le mode de lecture.
Appuyer sur la touche PLAY MODE (mode de lecture).
2
Effectuer les préréglages en fonction de l’utilisation
prévue. (Voir page 60.)
REMARQUE: Les étapes 1 et 2 peuvent être effectuées
dans l’ordre opposé.
Sélectionner le mode de fin de lecture.
(Fonction de préréglage)
Finish Stop Le mode d’arrêt (les servo fonctions
sont coupées) est réglé lorsque la
lecture se termine.
Finish Next Le mode d’attente est réglé au début
de la plage suivante lorsque la lecture
est terminée.
* Après la lecture de la fin de la plage,
le mode d’attente est réglé au
début de la première plage.
Finish Recue Lorsque la lecture est terminée, le
mode d’attente est réglé à la position
où la lecture a commencé.
Pour effectuer une attente au point où le son
commence. (Fonction de préréglage)
Régler le niveau “CueDet.”.
Lorsqu’une plage est sélectionnée, la position à laquelle le
son commence est repérée lorsqu’une plage est repérée
et le mode d’attente est réglé à ce point.
Allumé
Allumé
Mode de lecture
d’une plage
unique
Mode de
lecture en
continu
Clignote pendant la recherche Allumé en mode d’attente
Pour sélectionner un numéro d’index.
Appuyer sur la touche INDEX.
Le numéro d’INDEX apparaît lorsque le
mode de sélection d’index est réglé.
La fin de la plage est contrôlée, ensuite le
capteur retourne à la position de
démarrage de lecture et le mode d’attente
est réglé. (Contrôle de fin de plage)
Clignote pendant la recherche Allumé en mode d’attente
Numéro d’index Numéro d’index
Allumé Eteint
AlluméClignote
Page 52

FRANCAIS
53
(2) Démarrage de la lecture
9
9 8,9
OPEN / CLOSE
COMPACT DISC PLAYER
DN-C630
POWER
PHONES LEVEL
MIN MAX
STOP CUE
PRESET
PLAY / PAUSE
TRACK
PLAY
MODE
END MON INDEX
SEARCH
REPEAT
ON / OFF
PROG.PLAY
A-B
PROG. IN
PITCH
TIME
0%
PLAY / PAUSE
CUE
PLAY / PAUSE
PITCH%
REMAIN
SINGLE
(3) Arrêt de la lecture
CUE
PLAY / PAUSE PLAY / PAUSE
CUECUE
STOP
Démarrer la lecture.
Appuyer sur la touche PLAY/PAUSE (lecture/pause).
La lecture commence et les signaux de lecture sont
envoyés.
8
Lorsque la lecture est arrêtée, le mode de fin de
lecture réglé à l’étape 4 ci-dessus est réglé.
La lecture peut être arrêtée selon l’une des méthodes
suivantes:
9
Allumé Eteint
Clignote (indique la position de lecture)
La lecture est interrompue et le
mode d’arrêt est réglé.
La lecture est interrompue, le
capteur retourne à la position de
démarrage de lecture et le mode
d’attente est réglé.
La lecture est interrompue et le
mode de pause est réglé à ce point.
AlluméClignote
Mode de sommeil
Le mode de sommeil est réglé si aucune opération n’est
effectuée pendant 30 minutes en mode d’attente, de
pause ou de recherche manuelle.
En mode de sommeil, appuyer sur la touche PLAY/PAUSE
(lecture/pause) pour chercher la position avant le réglage
du mode de sommeil et commencer la lecture. Appuyer
sur la touche CUE (repérage) pour chercher la position
avant le réglage du mode de sommeil et l’attente à ce
point.
(4) PLAY/PAUSE (lecture/pause) et CUE (repérage)
• Chaque fois que la touche PLAY/PAUSE (lecture/pause)
est enfoncée, l’opération commute entre le mode de
lecture et de pause.
• Lorsque la touche CUE (repérage) est enfoncée pendant
la lecture, le capteur retourne à la position dans laquelle la
lecture a démarré.
Les schémas ci-dessous indiquent les courbes de lecture
lorsque les touches PLAY/PAUSE (lecture/pause) et CUE
(repérage) sont enfoncées.
PLAY (lecture) et PAUSE
Lorsque la touche PLAY/PAUSE (lecture/pause) est enfoncée, la
lecture commence et a lieu comme indiqué par la flèche sur le
schéma ci-dessus.
Si la touche PLAY/PAUSE (lecture/pause) est enfoncée à
nouveau pendant la lecture, le mode de pause est réglé à ce
point. Appuyer à nouveau sur la touche PLAY/PAUSE
(lecture/pause) pour reprendre la lecture.
Touche
PLAY/PAUSE
(lecture/pause)
enfoncée
Touche
PLAY/PAUSE
(lecture/pause)
enfoncée
Touche PLAY/PAUSE (lecture/pause)
enfoncée
Position sur le
disque
Le mode de pause est réglé à ce point
Section
lue
Section
lue
PLAY (lecture) et CUE (repérage)
PLAY (lecture), PAUSE et CUE (repérage)
Repérage en arrière
Touche
PLAY/PAUSE
(lecture/pause)
enfoncée
Touche CUE (repérage) enfoncée
Position sur le disque
Section
lue
Lorsque la touche CUE (repérage) est enfoncée après le
démarrage de la lecture lorsque la touche PLAY/PAUSE
(lecture/pause) est enfoncée, le capteur retourne à la position
dans laquelle la lecture a démarré et prépare la lecture suivante.
Appuyer sur la touche PLAY/PAUSE (lecture/pause) et CUE
(repérage) alternativement pour commencer la lecture répétitive
à partir de la même position.
Cette fonction est appelée “repérage en arrière”.
Touche
PLAY/PAUSE
(lecture/pause)
enfoncée
Touche
PLAY/PAUSE
(lecture/pause)
enfoncée
Touche
PLAY/PAUSE
(lecture/pause)
enfoncée
Touche CUE
(repérage) enfoncée
Position sur le
disque
Section
lue
Section
lue
Si le mode de pause est réglé et la lecture reprend ensuite, la
position dans laquelle le capteur retourne avec la fonction de
repérage en arrière change.
Clignote
Page 53

FRANCAIS
54
13
2
OPEN / CLOSE
COMPACT DISC PLAYER
DN-C630
POWER
PHONES LEVEL
MIN MAX
STOP CUE
PRESET
PLAY / PAUSE
TRACK
PLAY
MODE
END MON INDEX
SEARCH
REPEAT
ON / OFF
PROG.PLAY
A-B
PROG. IN
PITCH
TIME
0%
(1) Démarrage de la lecture au milieu d’une plage
(Recherche manuelle)
• Lorsque la plage est sélectionnée et la PLAY/PAUSE
(lecture/pause) est enfoncée, la lecture commence à partir
du début de cette plage. Pour commencer à partir d’une
position différente de la plage, utiliser la procédure décrite
ci-dessous pour trouver la position désirée.
La position de démarrage de lecture.
Tourner la molette SEARCH (recherche).
Ecouter le son et trouver la position désirée de démarrage
de lecture.
SEARCH
PLAY / PAUSE PLAY / PAUSE
CUE
CUECUE
(2) Lecture à une vitesse différente (Pitch)
• Utiliser cette fonction pour lire des disques à différentes
vitesses.
• La vitesse peut être modifiée dans une plage de –9,9 à
+9,9 %.
1-21-1.2.3
OPEN / CLOSE
COMPACT DISC PLAYER
DN-C630
POWER
PHONES LEVEL
MIN MAX
STOP CUE
PRESET
PLAY / PAUSE
TRACK
PLAY
MODE
END MON INDEX
SEARCH
REPEAT
ON / OFF
PROG.PLAY
A-B
PROG. IN
PITCH
TIME
0%
PITCH PITCH
PITCH PITCH
PITCH PITCH
0%
OPERATIONS PRATIQUES
5
1
Pour vérifier la position de démarrage de lecture.
Appuyer sur la touche PLAY/PAUSE (lecture/pause).
Contrôler le signal de lecture pour vérifier la position de
démarrage de lecture.
2
Repérer la position de démarrage de lecture.
Appuyer sur la touche CUE (repérage).
Le capteur retourne à la position de démarrage de lecture
et le mode d’attente est réglé.
3
Chaque pression sur la touche
SEARCH commande le changement
d’un cadre. Chaque bloc représente
1/75ème de seconde.
Une pression continue sur la touche
SEARCH entraîne un changement
automatique des blocs, dont la
vitesse augmente lorsque la touche
est enfoncée.
Allumé
La lecture commence
Activer le mode de vitesse variable.
Appuyer sur la touche PITCH (vitesse).
1-1
La vitesse de lecture
diminue lorsque la glissière
est déplacée vers le haut, et
augmente lorsque la
glissière est déplacée vers
le bas.
Activer le mode de blocage de la vitesse.
Appuyer à nouveau sur la touche PITCH.
Appuyer à nouveau sur la touche PITCH pour revenir à la
vitesse normale.
La vitesse de lecture établie à l’aide de la glissière de
réglage de la vitesse est maintenue. Dans ces conditions,
la vitesse de lecture ne change pas même si la glissière de
réglage de la vitesse est déplacée.
Lorsque la vitesse de lecture est préréglée en mode de
préréglage, cette vitesse de lecture est réglée.
1-2
2
3
AlluméClignote
Clignote
Diminution vitesse
de lecture
Augmentation vitesse
de lecture
Allumé
Eteint
REMARQUE:
Lorsque la vitesse de lecture (PITCH) est réglée, l’affichage
indique la vitesse réglée, mais le disque est lu à la vitesse
standard jusqu’à ce que la touche PITCH (vitesse) soit
enfoncée (et la LED est clignote).
Lorsque la vitesse de lecture est modifiée, la fréquence
d’échantillonage du signal de sortie numérique change
aussi, et il peut donc y avoir des risques de ne pas recevoir
les signaux numériques.
Page 54

FRANCAIS
55
(3) Lecture répétitive (Répétition)
1 2.6
3.5
4.55
OPEN / CLOSE
COMPACT DISC PLAYER
DN-C630
POWER
PHONES LEVEL
MIN MAX
STOP CUE
PRESET
PLAY / PAUSE
TRACK
PLAY
MODE
END MON INDEX
SEARCH
REPEAT
ON / OFF
PROG.PLAY
A-B
PROG. IN
PITCH
TIME
0%
SINGLE
TOTAL
PLAY
MODE
REPEAT
1
REPEAT
REPEAT
CUE
CUECUE
PLAY / PAUSE
PITCH%
REMAIN
SINGLE
1
REPEAT
PLAY / PAUSE
CUECUE
Sélectionner le mode de lecture.
Appuyer sur la touche PLAY MODE (mode de lecture).
1
Sélectionner le mode de répétition.
Appuyer sur la touche REPEAT (répétition).
2
Attente en position de départ de lecture.
Appuyer sur la touche CUE (repérage).
Le capteur retourne à la position de démarrage de lecture
et le mode d’attente est réglé.
3
Commencer la lecture.
Appuyer sur la touche PLAY/PAUSE (lecture/pause).
La lecture répétitive commence.
4
Arrêt de lecture.
La lecture peut être arrêtée selon l’une des méthodes
suivantes:
5
Annulation du mode de répétition pendant la lecture.
Appuyer sur la touche REPEAT (répétition).
Le mode de lecture normale est repris et la lecture
continue jusqu’au point de fin de lecture.
6
Pour lire la plage
unique sélectionnée
répétitivement:
Pour lire toutes les
plages sur le disque
répétitivement:
Pour lire la plage
unique sélectionnée
répétitivement:
Pour lire toutes les
plages sur le disque
répétitivement:
Allumé
Allumé
Allumé
Allumé
Allumé
Allumé
AlluméClignote
Allumé
Eteint
Allumé
Allumé
CUE
PLAY / PAUSE PLAY / PAUSE
CUECUE
STOP
La lecture est interrompue et le
mode d’arrêt est réglé.
La lecture est interrompue, le
capteur retourne à la position de
démarrage de lecture et le mode
d’attente est réglé.
La lecture est interrompue et le
mode de pause est réglé à ce point.
Allumé
Clignote
Clignote
Allumé Eteint
REPEAT
REPEAT
Page 55

FRANCAIS
56
(4) Lecture d’une section spécifique du disque
(Répétée de A-B)
• Utiliser cette fonction pour régler les positions de
démarrage et de fin de lecture et lire uniquement la
section désirée du disque.
1.3
2.4.5
OPEN / CLOSE
COMPACT DISC PLAYER
DN-C630
POWER
PHONES LEVEL
MIN MAX
STOP CUE
PRESET
PLAY / PAUSE
TRACK
PLAY
MODE
END MON INDEX
SEARCH
REPEAT
ON / OFF
PROG.PLAY
A-B
PROG. IN
PITCH
TIME
0%
A-B
REPEAT
A-B
SEARCH
SEARCH
A-B
REPEAT
Repérer la position de démarrage de lecture (point A).
• Appuyer sur la/les touche(s) SEARCH pour trouver
l’endroit de départ de la lecture souhaité.
1
Régler le point A.
Appuyer sur la touche A-B.
2
Repérer la position de fin de lecture (point B).
• Appuyer sur la/les touche(s) SEARCH pour trouver
l’endroit de fin de la lecture souhaité.
3
Régler le point B.
Appuyer sur la touche A-B.
Le mode de répétition A-B est activé.
Lorsque le point B est fixé pendant la lecture, le point A
est recherché et la lecture répétée de la section A-B
commence.
Si le point B est fixé dans n’importe quel mode autre que
le mode de lecture, le point A est recherché et le mode
d’attente est activé.
4
Annulation du mode de répétition A-B pendant la
lecture.
Appuyer sur la touche A-B.
Le mode de lecture normale est repris et la lecture
continue jusqu’au point de fin de lecture.
5
Clignote
Allumé
Allumé
Allumé Eteint
EteintAllumé
Lecture répétée de A-B
Si la lecture a commencé avant le point A, la lecture
continue jusqu’au point B, ensuite le capteur retourne au
point A pour la lecture répétitive.
REMARQUE:
• Lorsque le point B est avant le point A, la section est lue
du point B vers le point A répétitivement.
• La fonction de contrôle de fin ne fonctionne pas en
mode de répétition A-B.
Si la lecture a démarré après le point B, la lecture continue
jusqu’à la fin de cette plage et rien n’est répété.
Point de début de
lecture
Point A Point B
Point A Point B
Point APoint B
Point de début
de lecture
Fin de plage
Section lue
Section lue
répétitivement
Section lue
répétitivement
Page 56

FRANCAIS
57
(1) Introduction de programmes
2.3.4 1.5
OPEN / CLOSE
COMPACT DISC PLAYER
DN-C630
POWER
PHONES LEVEL
MIN MAX
STOP CUE
PRESET
PLAY / PAUSE
TRACK
PLAY
MODE
END MON INDEX
SEARCH
REPEAT
ON / OFF
PROG.PLAY
A-B
PROG. IN
PITCH
TIME
0%
• Les plages peuvent être programmées pour la lecture dans un
certain ordre.
• Jusqu’à 25 plages peuvent être programmées.
• La lecture programmée est effectuée en fonction des réglages
des modes de lecture (single ou continue) et de fin de session
(arrêt, plage suivante, repérage).
PROG. IN
PROG
REMAIN
SINGLE
LECTURE PROGRAMMEE
6
Régler le mode d’entrée de programme.
Appuyer sur la touche PROG. IN (entrée de programme).
1
Sélectionner la plage à programmer.
Tourner le bouton du sélecteur (
8 – 9).
2
Entrer la plage sélectionnée du programme.
Appuyer sur le bouton du sélecteur.
Le numéro de l’étape suivante du programme est affiché.
3
Entrer la plage suivante du programme.
Appuyer sur le bouton du sélecteur.
L’affichage de temps indique le temps total de lecture du
programme.
Répéter les étapes 2, 3 et 4 pour programmer les plages
dans l’ordre désiré.
4
Quitter le mode d’entrée de programme.
Appuyer sur la touche PROG. IN (entrée de programme).
Le lecteur retourne au mode normal.
5
(2) Changement de programme
Régler le mode de modification de programme.
Appuyer sur la touche PROG. IN (entrée de programme).
1
Sélectionner le numéro de l’étape à modifier.
Tourner le bouton du sélecteur (
8 – 9).
2
Régler le mode de changement de programme.
Appuyer sur le bouton du sélecteur.
3
Pour modifier la plage:
Sélectionner la plage à modifier.
Tourner le bouton du sélecteur (
8 – 9).
4-1
Entrer la plage sélectionnée.
Appuyer sur le bouton du sélecteur.
Pour continuer la modification du programme, répéter les
étapes 2, 3, 4-1 et 4-2.
4-2
Clignote
Le numéro de l’étape clignote
Clignote
Le numéro de l’étape clignote
Clignote
Lorsque la plage 3 est sélectionnée:
Numéro de plage
sélectionnée
Clignote
Allumé
Clignote
Clignote
Allumé
Clignote
Clignote
Allumé
Le numéro de l’étape s’allume
Clignote
Clignote
Le numéro de l’étape à modifier
clignote
Allumé
Clignote
Allumé
Clignote
Allumé
Clignote
Allumé
Pour modifier la troisième étape du
programme:
Clignote
Numéro de plage sélectionné
Le numéro de l’étape suivante
du programme clignote
Pour quitter le mode de modification de programme, appuyer
sur la touche PROG. IN (entrée de programme). Le lecteur
retourne au mode normal.
Page 57

FRANCAIS
58
6-2 5-2
5-1,5-3,5-4,6-1 7
OPEN / CLOSE
COMPACT DISC PLAYER
DN-C630
POWER
PHONES LEVEL
MIN MAX
STOP CUE
PRESET
PLAY / PAUSE
TRACK
PLAY
MODE
END MON INDEX
SEARCH
REPEAT
ON / OFF
PROG.PLAY
A-B
PROG. IN
PITCH
TIME
0%
PROG
REMAIN
SINGLE
PROG
REMAIN
SINGLE
(3) Lecture de programmes
ON / OFF
PROG.PLAY
ON / OFF
PROG.PLAY
CUECUE
PROG
TOTAL
21
OPEN / CLOSE
COMPACT DISC PLAYER
DN-C630
POWER
PHONES LEVEL
MIN MAX
STOP CUE
PRESET
PLAY / PAUSE
TRACK
PLAY
MODE
END MON INDEX
SEARCH
REPEAT
ON / OFF
PROG.PLAY
A-B
PROG. IN
PITCH
TIME
0%
Insertion d’une plage dans le programme.
Sélectionner la position d’insertion d’une plage.
Tourner le bouton du sélecteur (
8 – 9).
5-1
Régler le mode d’insertion de programme.
Appuyer sur la touche .
7
5-2
Sélectionner la plage à insérer.
Tourner le bouton du sélecteur (
8 – 9).
5-3
Entrer la plage sélectionnée.
Appuyer sur la touche de sélection.
Pour insérer plusieurs plages dans le programme, répéter
les étapes 5-1, 5-2, 5-3 et 5-4.
(Pour sortir du mode d’insertion de programme, appuyer
sur la touche PROG. IN)
5-4
Effacement de plages du programme.
Sélectionner l’étape à effacer.
Tourner le bouton du sélecteur (
8 – 9).
6-1
Clignote
Allumé
Allumé
Le numéro de l’étape clignote
Clignote
Pour insérer une plage à la
troisième étape du programme:
Clignote
Allumé
Clignote
Clignote
Allumé
Clignote
Clignote
Allumé
Clignote Clignote
Numéro de la plage
sélectionnée
Allumé
Effacer cette plage du programme.
Appuyer sur la touche .
6
6-2
Quitter le mode de modification de programme.
Appuyer sur la touche PROG. IN (entrée de programme).
7
Régler le mode de lecture de programme.
Appuyer sur la touche PROG. PLAY (lecture de
programme).
En mode simple, seul le numéro de niveau spécifié est
affiché.
En mode continu, tous les numéros de niveaux du numéro
de niveau spécifié au dernier numéro de niveau sont
affichés.
La première plage du programme est recherchée et le
mode d’attente est activé.
1
Commencer la lecture programmée.
Appuyer sur la touche PLAY/PAUSE (lecture/pause).
La lecture programmée commence.
2
Clignote
Allumé
Allumé
Le numéro de l’étape suivante
clignote
Clignote
Numéro de la plage de l’étape suivante du programme
Allumé
Allumé
Clignote
PLAY / PAUSE
CUE
PLAY / PAUSE
Allumé
Clignote
Lorsque le disque est éjecté, le programme réglé est
effacé.
REMARQUE:
L’entrée des programmes n’est pas possible lorsqu’aucun
disque n’est chargé.
Pour effacer la plage à la troisième étape
Allumé
Allumé
Page 58

FRANCAIS
59
(4) Préréglage des programmes
• Les programmes peuvent être mémorisés dans la mémoire préréglée. Lorsqu’un disque pour lequel un programme est préréglé
est chargé, le mode de lecture programmée est réglé automatiquement.
• Des programmes peuvent être mémorisés pour trois disques.
4 2-4
2-2,2-3
OPEN / CLOSE
COMPACT DISC PLAYER
DN-C630
POWER
PHONES LEVEL
MIN MAX
STOP CUE
PRESET
PLAY / PAUSE
TRACK
PLAY
MODE
END MON INDEX
SEARCH
REPEAT
ON / OFF
PROG.PLAY
A-B
PROG. IN
PITCH
TIME
0%
PLAY
MODE
Le mode préréglé est annulé et le lecteur
retourne au mode normal.
CUE
ON / OFF
PROG.PLAY
PROG
Introduction de programmes.
Suivre les instructions sous “(1) Introduction de
programmes” pour introduire le programme. (Voir page
57.)
1
Régler le mode préréglé.
Suivre les instructions sous “(2) Procédure de préréglage”
pour régler le mode préréglé. (Voir page 61.)
2-1
Sélectionner l’élément préréglé.
Tourner le bouton du sélecteur pour sélectionner
“Program 1” (ou “Program 2” ou “Program 3”).
2-2
Changer le réglage préréglé.
Appuyer sur le bouton du sélecteur.
2-3
Annulation du mode préréglé.
Appuyer sur la touche PLAY MODE (mode de lecture).
2-4
Pour lire un disque préréglé:
Charger un disque pour lequel un programme est
préréglé.
Le capteur cherche la première plage programmée et le
mode d’attente est réglé.
3
Commencer la lecture programmée.
Appuyer sur la touche PLAY/PAUSE (lecture/pause).
4
Sélectionner un de ces
programmes
L’affichage de caractères change comme suit:
Avant le changement Après le changement
Allumé Allumé
Allumé
PLAY / PAUSE
CUE
PLAY / PAUSE
Allumé
Clignote
NOTA :
La durée de lecture ne peut pas être affichée correctement
en lecture programmée de disque CDR sans table des
matières.
Page 59

FRANCAIS
60
FONCTIONS PREREGLEES ET FONCTIONNEMENT
7
(1) Liste des fonctions préréglées
• Fonctions qui peuvent être préréglées à l’aide des touches du panneau avant. Ces préréglages sont mémorisés dans une
mémoire permanente, par conséquent elles ne peuvent pas être effacées, même si le lecteur est éteint.
• Les fonctions indiquées sur le tableau ci-dessous peuvent être préréglées. Régler les fonctions en fonction de l’usage prévu pour
atteindre efficacement une qualité de lecture plus élevée.
• Une des fonctions préréglées peut être utilisée pour afficher l’information sur ce lecteur (version microprocesseur).
Type de fonction préréglée
Type de préréglage
Mode de finition
Recherche avant automatique
Mode de démarrage à la mise
sous tension
Arrêt automatique
Programme 1
Programme 2
Programme 3
Sortie numérique
Sélection du type préréglé.
Réglage de commande lorsque la lecture se termine.
Réglage de commande lorsque l’appareil est sous tension.
Réglage d’arrêt automatique des servo fonctions.
Réglage de lecture du programme 1.
Réglage de lecture du programme 2.
Réglage de lecture du programme 3.
Sélection de sortie des sous-codes.
Preset Type 1
Finish Next
Power On Stby
CueDet. –60 dB
Sleep ON
Program 1 OFF
Program 2 OFF
Program 3 OFF
Subcode OFF
1
2
3
4
5
6
7
8
9
Contrôle de fin
Réglage de l’utilisation de la fonction de contrôle de fin de plage et
réglage du temps de contrôle.
End Mon. 10 s
10
Attente plage suivante
Réglage d’attente à la plage suivante lorsque la touche CUE (repérage)
est enfoncée pendant la lecture.
Next Stb. OFF
12
Disque CDR
Sélection du test ou non de la lecture de disques CDR qui ne
comprennent pas de table des matières (TOC).
Normal Disc
19
Extérieur parallèle
Extérieur parallèle
Extérieur parallèle
Extérieur parallèle
Stéréo/Mono
Annulation de préréglage
Informations fixes
Sélection d’acceptation de signaux de télécommande en parallèle.
Sélection d’envoi tally en attente.
Réglage du signal de sortie tally à commande externe.
Sélection du mode de démarrage du fader.
Sélection de lecture stéréo ou mono.
Réglage pour effacer les préréglages et réglage aux valeurs initiales.
Affichage version microprocesseur.
Remote ENA
ST. Tally ON
INDEX 2 Tally
Fader Pause
Stereo
Ini. Preset
Ver. **** (* = number)
20
21
22
23
24
25
26
E.O.M. Réglage d’affichage EOM et réglage du temps d’affichage. E.O.M. 10 s
11
Temps de fondu
Vitesse de lecture
Démarrage avec retard
Verrouillage de lecture
Affichage de cadres
Réserve de plage suivante
Réglage de la durée de fondu en entrée.
Réglage de la vitesse de lecture standard.
Réglage du délai de démarrage retardé.
Sélection du blocage des commutateurs de panneau pendant la lecture.
Sélection d’affichage des trames.
Réglage de commande lorsque le bouton de sélection est tourné pendant
la lecture.
FadeIn OFF
Normal Speed
Delay OFF
Play Lock OFF
FR Disp ON
Reserve. OFF
14
15
16
17
18
13
Description
Affichage de caractères
(réglé au départ de l’usine)
No.
Lorsque des préréglages sont effectués, l’affichage du temps réglé à l’aide de la touche TIME et le mode de lecture réglé à l’aide
de la touche PLAY MODE à ce moment sont enregistrés dans la mémoire. Ces modes seront activés lorsque l’appareil sera à
nouveau mis sous tension.
REMARQUE:
Sur les disques sans table des matières (TOCS), il n’y a pas de microcuvettes (signaux) aux sections initiale et finale du disque.
Des erreurs peuvent donc se produire, tout particulièrement en cherchant des plages. En cas d’erreur, ouvrir le compartiment à
disque, puis le fermer et effectuer à nouveau l’opération.
Réglage du choix d’exécution ou non de la commande de recherche
automatique avant et du niveau de démarrage audio.
Page 60

FRANCAIS
61
(2) Procédure de préréglage
• Fonctions pouvant être préréglées à l’aide des touches du
panneau avant.
• Effectuer les préréglages sans disque, en mode d’arrêt ou
d’attente.
2.31 5
1.4.5
OPEN / CLOSE
COMPACT DISC PLAYER
DN-C630
POWER
PHONES LEVEL
MIN MAX
STOP CUE
PRESET
PLAY / PAUSE
TRACK
PLAY
MODE
END MON INDEX
SEARCH
REPEAT
ON / OFF
PROG.PLAY
A-B
PROG. IN
PITCH
TIME
0%
PLAY
MODE
Le mode préréglé est annulé et le lecteur
retourne au mode précédent.
L’affichage de caractères change
comme indiqué ci-dessous.
Entrer en mode préréglé.
Appuyer sur la touche CUE (repérage) tout en appuyant
sur la touche PLAY MODE (mode de lecture).
1
Sélectionner l’élément préréglé.
Tourner le bouton du sélecteur (
8 – 9).
2
Modifier les valeurs préréglées.
Appuyer sur le bouton du sélecteur.
3
REMARQUE:
Si le message indiqué ci-dessous apparaît, il y a un problème
avec la mémoire préréglée. Prendre contact avec le service
après-vente.
Quitter le mode préréglé.
Appuyer sur la touche PLAY MODE (mode de lecture).
4
Pour remettre les préréglages aux réglages par défaut
(réglages effectués à l’usine), mettre l’appareil sous
tension et appuyer sur les touches PLAY MODE et END
MON. Pour les réglages par défaut, se référer à la section
“(1) Liste des fonctions préréglées”.
5
Affichage de caractères
Affichage de caractères
Tourner le bouton
dans le sens des
aiguilles d’une montre
pour aller dans la
direction des flèches,
la tourner dans le
sens contraire des
aiguilles d’une montre
pour aller dans la
direction opposée.
L’affichage de caractères change
comme indiqué ci-dessous.
Avant le changement Après le changement
Initial Error
Page 61

FRANCAIS
62
(3) Description détaillée des fonctions préréglées
(* = réglage initial)
1) “Preset Type (*)” (Trois jeux (types) différents de préréglages peuvent être effectués et utilisés pour différentes applications.)
* Preset Type 1 : Régler au type préréglé 1.
Preset Type 2 : Régler au type préréglé 2.
Preset Type 3 : Régler au type préréglé 3.
2) “Finish (*****)”
Finish Stop : Le mode d’arrêt est activé une fois que la lecture est terminée.
* Finish Next : Le mode d’attente est activé à la plage suivante une fois que la lecture est terminée.
Finish Recue : Le mode d’attente est activé à l’endroit de départ de la lecture une fois que la lecture est terminée.
3) “Power On (****)”
* Power On Stby : Le mode d’attente est réglé à la plage spécifiée lorsque la table des matière (TOC) est lue.
Power On Play : La lecture commence dans tous les modes de répétition lorsque la table des matière (TOC) est lue.
Power On Stop : Le mode d’arrêt est activé lorsque la table des matière (TOC) est lue.
4) “CueDet. (–**) dB”
CueDet. (–*) dB : Régler le niveau de détection audio pour le repérage. (–72/–66/*–60/–54/–48/–42/–36)
CueDet. OFF : La position de démarrage sonore n’est pas recherchée.
5) “Sleep ON (OFF)”
* Sleep ON : Couper automatiquement les servo fonctions si aucune touche n’est utilisée pendant 30 minutes en
mode de pause, d’attente ou de recherche manuelle.
Sleep OFF : Ne pas couper automatiquement les servo fonctions.
6) “Program 1 OFF (ON)”
Program 1 OFF (ON) : Mémoriser le contenu du programme 1 lorsque la fonction est activée. (Réglage initial – OFF)
7) “Progam 2 OFF (ON)”
Program 2 OFF (ON) : Mémoriser le contenu du programme 2 lorsque la fonction est activée. (Réglage initial – OFF)
8) “Program 3 OFF (ON)”
Program 3 OFF (ON) : Mémoriser le contenu du programme 3 lorsque la fonction est activée. (Réglage initial – OFF)
9) “Subcode ON (OFF)”
Subcode ON : Envoyer les sous-codes avec les signaux de sortie numérique (format consommateur SPDIF).
* Subcode OFF : Ne pas envoyer les sous-codes avec les signaux de sortie numérique (format consommateur de type II
IEC 958).
REMARQUE: le démarrage à 0 sec. n’est pas possible lorsque la fonction ci-dessus est réglée sur “Subcode ON” (sous-code
activé).
10) “End Mon. (**) s”
End Mon. (**) s : Régler la durée de contrôle de fin de plage. (5/*10/15/20/25/30/35)
End Mon. OFF : Ne pas utiliser la fonction EOM.
11) “E.O.M. (**) s” (Signal de sortie EOM vers la broche de télécommande (24))
E.O.M. (**) s : Régler la durée EOM. (0/5/*10/15/20/30/60)
E.O.M. OFF : Ne pas utiliser la fonction EOM.
12) “Next Stb. Off (ON)”
* Next Stb. OFF : Retourner à la position de démarrage de lecture et d’attente lorsque la touche CUE (repérage) est
enfoncée pendant la lecture.
Next Stb. ON : Attente au début de la plage suivante lorsque la touche CUE (repérage) est enfoncée pendant la lecture.
Page 62

FRANCAIS
63
13) “Reserve. OFF (ON)”
* Reserve. OFF : La plage spécifiée (index) est immédiatement recherchée lorsque le bouton de sélection est tourné
pendant la lecture.
Reserve. ON : La plage (index) spécifiée à rechercher est programmée lorsque la lecture de la plage actuelle (index) se
termine alors que le bouton de sélection est tourné pendant la lecture.
Appuyer sur la touche PLAY MODE pour annuler la plage réservée.
14) “FadeIn OFF (***s)”
FadeIn OFF (***s) : Régler la durée de fondu en entrée. (*OFF/10 m/50 m/0,1/0,5/1/2)
15) “Normal (+/–***%) Speed”
* Normal Speed : Lecture à vitesse normale.
(+/–***%) Speed : Lecture à vitesse variable. ±(0,2/0,4/0,6/0,8/1,0/1,2/1,4/1,6/1,8/2,0/2,2/2,4/2,6/2,8/3,0)
16) “Delay OFF (***ms)”
Delay OFF (***ms) : Régler le temps du démarrage retardé après le démarrage de la lecture. (*OFF/100 m/200 m/300 m)
17) “PlayLock ON (OFF)”
PlayLock ON : Bloquer toutes les opérations autres que l’activation des touches PLAY/PAUSE (lecture/pause), TIME
(temps) et PLAY MODE (mode de lecture) pendant la lecture.
* PlayLock OFF : Activer toutes les fonctions pendant la lecture.
18) “FR Disp ON (OFF)”
* FR Disp ON : Afficher les trames sur l’affichage de temps pendant la lecture.
FR Disp OFF : Ne pas afficher les trames sur l’affichage de temps pendant la lecture.
(Les trames sont affichées en mode de recherche manuelle, d’attente, de pause et de contrôle de fin
de plage.)
19) “CD-R NO TOC ON (OFF)”
* Normal Disc : Lecture de CD et CDR normaux contenant une table des matières (TOC).
No TOC Disc : Lecture de disques CDR sans table de matières (TOC).
REMARQUE:
Sur les disques sans table des matières (TOCS), il n’y a pas de microcuvettes (signaux) aux sections initiale et finale du disque. Des
erreurs peuvent donc se produire, tout particulièrement en cherchant des plages. En cas d’erreur, ouvrir le compartiment à disque,
puis le fermer et effectuer à nouveau l’opération.
20) “Remote EMA (INH)”
* Remote ENA : Activer l’entrée des signaux de commande dans le connecteur de télécommande en parallèle.
Remote INH : Bloquer l’entrée des signaux de commande dans le connecteur de télécommande en parallèle.
21) “St. Tally ON (OFF)”
* St. Tally ON : Envoyer le tally d’attente du connecteur de télécommande en parallèle.
St. Tally OFF : Ne pas envoyer le tally d’attente du connecteur de télécommande en parallèle.
22) “(******) Tally”
* INDEX 2 Tally : Envoyer le signal de l’index 2 à la broche de télécommande (17).
INDEX 3 Tally : Envoyer le signal de l’index 3 à la broche de télécommande (17).
23) “Fader Pause (Play)”
* Fader Pause : Commencer la lecture lorsque les broches du fader télécommandé (9-10) sont court-circuitées et faire
une pause lorsque les broches sont ouvertes.
Fader Play : Commencer la lecture lorsque les broches du fader télécommandé (9-10) sont court-circuitées et
continuer la lecture lorsque les broches sont ouvertes.
24) “Stereo (Mono)”
* Stereo : Envoyer les signaux stéréo G et D du connecteur de sortie.
Mono : Envoyer les signaux G et D mixtes du connecteur de sortie.
25) “Preset Clr ? (Ini. Preset)”
Preset Clr ? : Effacer les préréglages (réglés aux valeurs par défaut au départ de l’usine).
* Ini. Preset : Ne pas effacer les préréglages.
26) “Ver. xxxx” : Afficher la version du microprocesseur version. (“xxxx” correspond à un numéro.)
Page 63

FRANCAIS
64
AVANT D’ETEINDRE L’APPAREIL
8
Lorsque l’utilisation du lecteur CD est terminé, avant d’éteindre l’appareil, s’assurer que le réceptacle de disque a été fermé au moyen
de la touche d’ouverture/fermeture (OPEN/CLOSE).
DISQUES COMPACTS
9
(1) Précautions de manipulation de disques compacts
• Ne pas laisser des traces de doigt, de la graisse ou de la poussière sur la surface du disque compact.
Si le disque est sale, l’essuyer avec un chiffon doux et sec.
• Ne pas utiliser du benzène, un diluant, de l’eau, un aérosol pour disques, des produits chimiques antistatiques ou des tissus
traités au silicone pour nettoyer les disques.
• Prendre toujours des précautions lors de la manipulation de disques pour éviter d’endommager la surface, en particulier lors du
retrait du disque de son boîtier et lors de sa remise en place.
• Ne pas plier le disque.
• Ne pas appliquer de la chaleur.
• Ne pas agrandir le trou au centre du disque.
• Ne pas écrire sur l’étiquette (face imprimée) avec un objet pointu tel qu’un crayon ou un stylo à bille.
• Une condensation peut avoir lieu sur la surface du disque s’il est amené d’un endroit froid, comme l’extérieur pendant l’hiver
dans une pièce chaude. Ne jamais essayer de sécher le disque avec un sèche-cheveux, etc.
(2) Précautions de conservation
• Après la lecture du disque, toujours l’éjecter du lecteur CD.
• Laisser le disque toujours dans le boîtier pour le protéger contre la saleté et éviter de l’endommager.
• Ne pas placer les disques dans les endroits suivants:
1) Endroits exposés en plein soleil pendant une longue durée.
2) Endroits soumis à une accumulation de poussière ou un taux d’humidité élevé.
3) Endroits exposés à des températures élevées près des radiateurs, etc.
ATTENTION:
Ne pas forcer la fermeture du réceptacle de disque lorsque l’appareil est éteint.
Cela pourrait endommager l’appareil lors de son transport.
Ne pas éteindre l’appareil lorsque le
réceptacle de disque est ouvert.
Eteint (POWER OFF)
Eteindre l’appareil après la fermeture du
réceptacle de disque au moyen de la touche
d’ouverture/fermeture (OPEN/CLOSE).
Eteint (POWER OFF)
REMARQUE:
Utiliser des disques compacts portant le logo .
Des CD avec des formes spéciales (CD en forme de coeur, des CD octogonaux, etc.) ne
peuvent pas être lus sur cet appareil.
Le fait de l’essayer, risque d’endommager le lecteur. Ne pas utiliser de tels CD.
DIGITAL AUDIO
COMPACTCOMPACT
Page 64

FRANCAIS
65
DEPISTAGE DES PANNES
10
CARACTERISTIQUES TECHNIQUES
11
Lorsqu’on pense qu’il y a un problème avec le lecteur, vérifier les points suivants.
Le réceptacle de disque ne se ferme ou ne s’ouvre pas.
• Le lecteur est-il sous tension (ON) ?
• Le lecteur est-il en cours de lire le disque ? …………………………………………………………………………………Voir page 51
L’affichage indique toujours “–” lorsqu’un disque est chargé.
• Le disque est-il chargé correctement ?
• Le disque est-il sale ou rayé ?
Il n’y a pas de son ou le son est déformé.
• Les câbles de sortie sont-ils connectés correctement à l’amplificateur ?
• Le réglage des commandes de l’amplificateur et des commutateurs est-il correct ?
La section spécifiée du disque ne peut pas être lue correctement.
• Le disque est-il sale ou rayé ?
Une touche ne fonctionne pas.
• Un préréglage, par exemple le verrouillage de lecture (PLAY-LOCK) a-t-il été réglé ? …………………………………Voir page 63
GENERALITES
Type: Lecteur de CD
Type de disques: Disques compacts standard (12 cm, 8 cm/5”, 3”)
SECTION AUDIO
Canaux: 2 Canaux (stéréo), 1 canal (mono)
Fréquence d’échantillonnage: 44,1 kHz
Filtre numérique: Filtre numérique à suréchantillonnage octuple à 18 bits
Réponse en fréquence: 5 à 20.000 Hz (±1,0 dB)
Distorsion harmonique totale: 0,015 % (à 1 kHz, lecture 0 dB, filtre A)
Rapport signal/bruit: 98 dB (à 1 kHz, lecture 0 dB, filtre A)
Séparation des canaux: 90 dB (à 1 kHz, lecture 0 dB, filtre A)
Sortie analogique: (à 1 kHz, lecture 0 dB, filtre A)
Transfert et connecteur: Active symétrique, connecteur XLR
Asymétrique, prise RCA
Niveau de sortie: Symétrique: +18 dB, 600 Ω/ohms
Asymétrique: 1,7 Vrms, 10 kΩ/kohms
Plage de réglage du niveau de sortie: +22 dBs à –20 dB (symétrique)
Sortie au casque: 20 mW (30 à 40 Ω/ohms)
Sortie numérique
Transfert et connecteur: Prise RCA
Format du signal: Type II IEC 958 ou SPDIF
Niveau de sortie: Asymétrique: 0,5 Vc-c, 75 Ω/ohms
Commande de pitch variable: ±9,9 % max.
Délai de démarrage audio: 0,01 seconde en moins
Précision de recherche de trame: 1 trame (1/75 secondes)
DIMENSIONS: 482 (L) x 88 (H) x 252 (P) mm
POIDS: 5,1 kg
CONSOMMATION ELECTRIQUE: 18 W
ALIMENTATION: CA 120 V 10 %, 60 Hz (U.S.A., Canada et Taiwan R.O.C.)
CA 230 V 10 %, 50 Hz (Europe, Asie, Autres pays)
ENVIRONNEMENT
Température de fonctionnement: +5 °C à 35 °C
Humidité: De 25 % à 85 %, sans condensation
Température de stockage: –20 °C à 60 °C
TELECOMMANDE
Télécommande en parallèle: D-sub à 25 broches
* Ces spécifications sont sujettes à changements sans préavis pour amélioration.
No. de broche.
1
2
3
Commun
Hot
Cold
Page 65

ESPAÑOL
66
El reproductor de discos compactos DN-C630 es un reproductor de CDs del tipo de montaje en rack diseñado para ser utilizado en
emisoras, en producción, etc.
• Montaje en Rack de 19 pulgadas (2 U [unidades] de alto)
• Perilla Selectora de Búsqueda de Pista (fácil selección de pistas)
• Reproducción de Programa (25 pistas máximo)
(1) Cuando el modo PLAY (de reproducción) se ajusta a Single (una sola pista), el reproductor se queda en espera al comienzo de la
pista siguiente (en Next de modo Finish).
(2) Cuando el modo PLAY se ajusta a Continuous (continuo), la reproducción continúa de acuerdo con la secuencia que usted haya
programado.
• Modo Play (reproducción) y modo Finish (terminar)
(1) Modo Play
q Continuous: Reproduce el disco completo
w Single: Reproduce una pista
(2) Modo Finish (Stop, Next, Recue)
q Stop: se detiene después de haber reproducido una pista.
w Next: queda en espera al comienzo de la pista siguiente después de haber reproducido la pista.
e Recue: Después de haber reproducido una pista, queda en espera al comienzo de tal pista.
• Auto Cue (señalización automática)
Después de la carga de un disco, éste es automáticamente señalizado en el punto en que comienza el audio.
La señalización tiene lugar en el punto en que comienza el audio y no donde comienza la pista. El nivel al que se detecta por primera
vez el sonido se puede regular entre –36 y –72 dB (7 pasos).
• End Monitor (monitorización del final de pista)
Si se pulsa el botón END MON durante el modo en espera, se visualizará instantáneamente el final de la pista, asegurándose así un
“punto final” perfecto. El punto en el que comienza la monitorización puede ajustarse dentro de una gama que va de 5 a 35 segundos
(7 pasos) anteriores al final de la pista.
• Fin de Mensaje (EOM)
Al final de la pista, la pantalla de visualización del tiempo parpadeará, lo que proporciona al operador una advertencia visual de que la
pista terminará en breve. El punto en el que comienza el parpadeo puede ser ajustado dentro de un margen que va de 0 a 60
segundos (7 pasos) anteriores al final de la pista.
• Control de Tono (±9,9 %, 0,1 % paso)
• Búsqueda de Índice
La perilla Selectora puede ajustarse para que realice una Búsqueda de Índice cuando el botón INDEX está en la posición ON
(activado). (aparece el número de índice)
• FL Display
• Visualización de los puntos de reproducción
Un visualizador gráfico de barra indica los puntos de reproducción de la pista que se está reproduciendo. La visualización del tiempo
transcurrido y el tiempo restante se consigue pulsando el botón TIME.
• Terminales externos de control
Remoto en paralelo (D-sub 25 puntas)
• SUPER LINER CONVERTER (S.L.C.)
Este equipo utiliza el sistema original de Denon para evitar la distorsión de cruce cero, la causa principal de la disminución de calidad
del audio en la reproducción PCM, por lo que recrea campos sonoros de gran musicalidad.
CARACTERÍSTICAS PRINCIPALES
Page 66

ESPAÑOL
67
INDICE
z
NOMBRE Y FUNCIÓN DE LAS PIEZAS………………68 ~ 70
(1) Panel frontal …………………………………………68, 69
(2) Panel trasero ………………………………………………69
(3) Pantalla de visualización …………………………………70
x
CONEXIONES PARA CONTROL REMOTO ………………71
c
APERTURA Y CIERRE DEL PORTADISCO Y
CARGA DE DISCOS …………………………………………71
v
MANEJO BÁSICO ………………………………………72, 73
(1) Antes de comenzar la reproducción ……………………72
(2) Comienzo de la reproducción ……………………………73
(3) Parada de la reproducción ………………………………73
(4) Operaciones de PLAY/PAUSE y CUE …………………73
b
OPERACIONES ÚTILES ………………………………74 ~ 76
(1) Comienzo de la Reproducción desde la
Mitad de una Pista (Manueller Suchlauf) ………………74
(2) Reproducción a una velocidad distinta (Tono) …………74
(3) Reproducción repetida (Repetida) ………………………75
(4) Reproducción de una sección específica del disco
(A-B Repetida) ……………………………………………76
n
REPRODUCCIÓN PROGRAMADA……………………77 ~ 79
(1) Introducción del programa ………………………………77
(2) Cambio del programa ………………………………77, 78
(3) Reproducción de programas ……………………………78
(4) Preajuste de programas …………………………………79
m
FUNCIONES Y OPERACIONES DE PREAJUSTE……80 ~ 83
(1) Lista de las funciones de Preajuste ……………………80
(2) Procedimiento de Preajuste ……………………………81
(3) Descripción Detallada de las Funciones de
Preajuste ………………………………………………82, 83
,
ANTES DE DESCONECTAR LA ALIMENTACION A LA
UNIDAD ………………………………………………………84
.
LOS DISCOS COMPACTOS …………………………………84
⁄0
LOCALIZACION DE FALLOS ………………………………85
⁄1
ESPECIFICACIONES …………………………………………85
Comprobación del contenido de la caja de embalaje
Compruebe que la caja de embalaje contiene los siguientes artículos:
Cables de conexión para la salida de señal (RCA) 1 pieza
Instrucciones de funcionamiento (este manual) 1 pieza
Instalación de la unidad
Monte la unidad sobre su mesa de mezclas o en el rack con entradas de rack EIA de 19 pulgadas.
PRECAUCIÓN:
• El DN-C630 funciona con normalidad cuando la unidad reproductora se monta con el panel frontal dentro de los 10 grados del
plano vertical. Si la unidad es inclinada excesivamente, puede ocurrir que los discos no se carguen o descarguen
correctamente en la unidad.
DN-C630
Max. 10°
• DECLARACIÓN DE CONFORMIDAD
Declaramos bajo nuestra exclusiva responsabilidad que este producto al que hace
referencia esta declaración, está conforme con los siguientes estándares:
EN60065, EN55013, EN55020, EN60555-2 y EN60555-3.
Siguiendo las provisiones de las Directivas 73/23/EEC, 89/336/EEC y 93/68/EEC.
Page 67

ESPAÑOL
68
NOMBRE Y FUNCIÓN DE LAS PIEZAS
(1) Panel frontal
q
Botón POWER (de encendido)
• Este botón enciende y apaga la unidad.
w
Porta discos
• Coloque el disco en esta bandeja.
• Pulse el botón OPEN/CLOSE (abrir/cerrar) para abrir y
cerrar el porta discos.
• Cargue el disco firmemente dentro de la ranura.
e
Botón OPEN/CLOSE (abrir/cerrar)
• Pulse este botón para abrir y cerrar el porta discos.
• El porta discos no se puede abrir durante la
reproducción.
r
Botón TIME (tiempo)
• Pulse este botón para activar la visualización de tiempos
entre el tiempo restante (REMAIN) y el tiempo
transcurrido (ELAPSED).
t
Botón PLAY MODE (modo reproducción)
• Pulse este botón para activar el modo reproducción.
• Pulse este botón para cancelar la pista reservada con la
función de reserva de la siguiente pista.
y
Botón END MON (monitorización del final de pista)
• Pulse este botón en el modo en espera para monitorizar
el final de una pista. (Monitorización final)
u
Botón INDEX (índice)
• Pulse este botón para activar el modo de índice, luego
utilice la perilla de selección para seleccionar el número
de índice.
• El número de INDEX aparece cuando se ajusta el modo
de selección de índice.
• Pulse el botón otra vez para volver al modo de selección
de pista.
i
Botón REPEAT (repetición)
• Pulse este botón para ajustar el modo de repetición.
• Cuando está ajustado el modo de repetición se iluminará
el indicador REPEAT.
• Pulse el botón una vez más para cancelar el modo de
repetición.
o
Botón A-B
• Pulse este botón para ajustar el punto A.
• Cuando se ajusta el punto A parpadeará el indicador A-.
• Pulse este botón cuando ya esté ajustado el punto A,
para ajustar el punto B.
• La indicación A-B parpadea cuando se ajusta el punto B.
• Pulse este botón nuevamente para cancelar el modo de
repetición A-B.
!0
Botón PITCH (tono)
• Pulse este botón para conmutar la velocidad de
reproducción ajustada con el Control Deslizante de
Velocidad. A continuación parpadeará el diodo LED
PITCH.
• Cuando se pulsa el botón otra vez, queda ajustado el
modo de velocidad fijo y se ilumina el diodo LED PITCH.
• Vuelva a pulsar este botón para cancelar el modo de
reproducción PITCH y volver a la velocidad normal.
!1
Toma PHONES (de auriculares)
• Conecte auriculares que tengan una impedancia de 30 a
40 Ω/ohmios.
!2
Control LEVEL (de nivel)
• Utilice este botón para ajustar el volumen de los
auriculares.
!3
Botón STOP (de parada)
• Pulse este botón para apagar todas las funciones servo y
pararlos.
• Pulse este botón durante la reproducción para activar el
modo de parada.
!4
Botón CUE (búsqueda)
• Cuando se pulsa este botón durante el modo de
reproducción o de pausa, el lector retorna a la posición
en la que comenzó la reproducción y se activa el modo
en espera. (búsqueda hacia atrás)
• Cuando se pulsa este botón durante la reproducción y se
ha programado la pista siguiente, la pista programada es
buscada y se activa el modo en espera.
• Cuando se ajusta el modo en espera se ilumina el diodo
LED CUE.
• Cuando se pulsa el botón a la vez que se pulsa el botón
PLAY MODE, se activa el modo de preajuste.
!5
Botón PLAY/PAUSE (reproducción/pausa)
• Pulse este botón en los modos de espera, pausa o de
búsqueda manual para comenzar la reproducción.
• Pulse este botón en el modo de parada para buscar la
primera pista y comenzar la reproducción.
• Durante el modo de reproducción se iluminará el diodo
LED PLAY/PAUSE.
• Cuando se pulsa el botón durante la reproducción, queda
ajustado el modo de pausa. Mientras se ajusta el modo
pausa, parpadeará el diodo LED PLAY/PAUSE.
!6
Perilla de Selección
• Gire esta perilla para seleccionar la pista siguiente (o el
número de índice) que vaya a reproducir.
• Utilice el botón INDEX para elegir si va a seleccionar
pistas o números de índice.
• Gire la perilla en el sentido de las agujas del reloj un
“click” para moverse una pista (o un número de índice)
hacia adelante, y en el sentido contrario a las agujas del
reloj un “click” para moverse una pista ( o un número de
índice) hacia atrás.
• Cuando se gira esta perilla a la vez que es pulsada hacia
adentro, un “click” corresponde a 10 pistas (ó 10
números de índice).
• En el modo de preajuste, utilice esta perilla para activar e
introducir ajustes preajustados.
• Al ajustar programas, utilice esta perilla para seleccionar,
introducir y comprobar los programas.
!7
Botones SEARCH (Búsqueda)
• Estos botones se utilizan para cambiar con precisión las
posiciones en que comenzará la reproducción del disco.
1
Page 68

ESPAÑOL
69
!8
Botón ON/OFF de PROG. PLAY (activación/
desactivación de la reproducción de programa)
• Cuando se pulsa este botón mientras esté iluminado el
indicador PROG se ajustará el modo de reproducción de
programa.
• No se puede hacer funcionar este botón durante el modo
de reproducción A-B.
• Durante el modo de espera de reproducción de programa
y el modo de reproducción se iluminará el diodo LED
PROG. PLAY ON/OFF.
• Cuando se pulsa el botón durante el modo de
reproducción de programa, en espera o reproducción, se
borra el modo de reproducción de programa.
!9
Botón PROG. IN
• Presione este botón para ajustar el modo de entrada de
programa.
• El botón no funcionará durante el modo de reproducción.
• Cuando esté activado el modo entrada de programa se
iluminará el indicador PROG.
• Cuando se ajusta un programa se iluminará el indicador
PROG.
@0
Control Deslizante de Velocidad
• Utilice este control deslizante para ajustar la velocidad de
reproducción. Deslícelo hacia arriba para disminuir la
velocidad de reproducción y hacia abajo para aumentar la
velocidad de reproducción.
r
Conector REMOTE (remoto)
• Este es un conector remoto paralelo. Utilícelo para
controlar el DN-C630 con conexiones de circuito de
contacto seco.
• Conector aplicable: 25 puntas D-sub (macho)
• Disposición de la señal del conector:
NOTA: La punta de salida con marcas tiene especificaciones de
colector abierto IC (Imáx. 20 mA, Vmáx. 5 V), pero la
alimentación máxima de corriente es de 80 mA, por lo
que debe utilizarse con una corriente de carga total de 80
mA o menos.
(2) Panel trasero
q
Conectores ANALOG OUT
salida analógica (balanceada)
• Estas son salidas activas balanceada que utiliza
conectores de tipo XLR.
• Conecte esta tomas a los conectores de entrada
analógica balanceada de un amplificador o de la mesa de
mezclas.
• Disposición del contacto: 1. Común
2. Hot
3. Cold
• Conector aplicable: Canon XLR-3-31 o equivalente
NOTA: No cortocircuitar la punta positiva o negativa con la
punta común.
w
Tomas ANALOG OUT (sin balancear)
• Estas son salidas sin balancear que utilizan tomas del
tipo RCA.
• Conecte estas tomas a las tomas de entrada analógica
sin balancear de un amplificador o de una mesa de
mezcla.
e
Controles LEVEL L/R (de nivel izquierdo y derecho)
• Utilice estos controles para ajustar el nivel de las señales
de audio provenientes de los conectores ANALOG OUT
(balanceada).
N° de
punta
Nombre de la señal I/O
1
14
2
15
3
16
4
17
5
18
6
19
7
20
8
21
9
22
10
23
11
24
12
25
13
FG
PLAY tally
PLAY command
PAUSE tally
PAUSE command
CUE tally
CUE command
INDEX 2/INDEX 3 tally
TRACK (+) command
Tally common
TRACK (–) command
Reserved
SEARCH (FWD) command
Reserved
SEARCH (REV) command
Reserved
FADER START command
Tally power supply
Command common
Command common
NC
EOM tally
Reserved
Reserved
Reserved
TTL (lol = 20 mA)
HCMOS (li = 3 mA)
TTL (lol = 20 mA)
HCMOS (li = 3 mA)
TTL (lol = 20 mA)
HCMOS (li = 3 mA)
TTL (lol = 20 mA)
HCMOS (li = 3 mA)
HCMOS (li = 3 mA)
HCMOS (li = 3 mA)
HCMOS (li = 3 mA)
PHOTO COUPLER
+5 V, 20 mA
(li =10 mA)
TTL (lol = 20 mA)
–
O
I
O
I
O
I
O
I
–
I
–
I
–
I
–
I
–
–
–
–
O
–
–
–
t
Toma DIGITAL OUT
salida digital (sin balancear)
• Esta es una salida no balanceada que utiliza una toma
RCA.
• Conecte esta toma al conector de entrada digital no
balanceada de un amplificador o de la mesa de mezclas.
• Formato de la señal: seleccionable (véase la página 82,
9))
Page 69

ESPAÑOL
70
(3) Pantalla de visualización
q
Indicación REPEAT
• Se enciende cuando se ajusta el modo de repetición.
w
Indicadores de TIME MODE (modo tiempo)
• Cuando se visualiza el tiempo transcurrido se ilumina
“ELAPSED”.
• Cuando se visualiza el tiempo que resta, se ilumina
“REMAIN”.
e
Indicadores de PLAY MODE (modo reproducción)
• Cuando se está en el modo de reproducción de una sola
pista (single) se ilumina “SINGLE”.
• Cuando está activado el modo de reproducción continua
se iluminará “TOTAL”.
r
Visualización de número de pista
• Esta pantalla indica el número de pista en la posición
actual. Durante la operación de búsqueda de pista y
cuando se conmuta al modo en espera se iluminará el
número de pista.
• Si se programa la pista siguiente, en la pantalla de
visualización de número de pista parpadeará el número
de pista.
t
Indicador de pausa de reproducción
y
Indicador de reproducción
u
Visualización de número de índice
• Normalmente se visualiza “Tr”. En el modo de búsqueda
del índice, se visualiza el número de índice. Si se
programa el índice siguiente, tal número de índice
parpadeará en la pantalla de visualización de número de
índice. El número de índice también parpadeará durante
la operación de búsqueda de índice.
i
Visualización de posición de reproducción
• Esta visualización indica la posición actual dentro del
tiempo total de reproducción de la pista.
o
Visualización PITCH (tono)
• Esta visualización indica la velocidad de reproducción
ajustada en %.
!0
Indicador PROGRAM
• Se ilumina cuando se introduce un programa.
• Este parpadea cuando se ajusta el modo PROG. IN.
!1
Calendario musical de 20 pistas
• En el modo de reproducción de pista individual, sólo se
iluminará la pista especificada.
• En el modo de reproducción continua, se iluminarán
todas las pistas desde la pista especificada hasta la
última pista.
• Los números de pistas se iluminan hasta la pista 20. Las
pistas 21 y subsiguientes no se pueden visualizar.
!2
Visualización del tiempo de reproducción
• Esta visualización indica el tiempo de la posición actual,
en minutos (m), segundos (s) y fracciones (f).
!3
Visualización de caracteres
• Esta visualización muestra los mensajes de operaciones
en los modos de preajuste y programa.
Page 70

ESPAÑOL
71
CONEXIONES PARA CONTROL REMOTO
2
APERTURA Y CIERRE DEL PORTADISCO Y CARGA DE DISCOS
3
Para controlar el DN-C630 a distancia, remítase al ejemplo de conexiones para control remoto dado a continuación.
14
2
23
22
15
3
23
22
16
4
23
7
23
8
23
5
23
9
23
6
23
22
PLAYPAUSECUE
17
22
24
22
INDEX2/INDEX3EOM
FADER SWITCHTRACK(+)TRACK(-)
123456789
10
141516
18
17
242223
El valor nominal del pin 22 del conector REMOTO (REGISTRO DEL SUMINISTRO ENERGETICO) es de +5 V, 80 mA como máximo.
Evite las corrientes que superen este valor nominal.
(1) Apertura y cierre del portadisco
• Esta operación sólo puede efectuarse mientras la alimentación a la unidad está conectada.
• Para abrir o cerrar el portadisco, presione el botón de apertura/cierre (OPEN/CLOSE).
• Los portadiscos no pueden abrirse durante la reproducción; esto es para evitar interrupciones en la reproducción en caso de que
el botón de apertura/cierre (OPEN/CLOSE) sea presionado en forma accidental. Detenga primero la reproducción, y presione
luego el botón de apertura/cierre (OPEN/CLOSE).
(2) Carga de discos
• Tome el disco por los bordes y colóquelo en la bandeja portadisco. No toque la superficie de las señales (el lado brillante).
• Al usar un disco de 12 cm, coloque el disco en las guías exteriores de la bandeja; al usar un disco de 8 cm, posiciónelo en forma
segura en las guías interiores.
Disco de 12 cm Disco de 8 cm
PRECAUSION:
• No coloque ningún objeto extraño en la bandeja portadisco. No cargue más de un disco en la bandeja a la vez; esto podría causar mal
funcionamiento.
• No empuje manualmente la bandeja portadisco cuando la alimentación a la unidad esté desconectada; esto podría causar mal
funcionamiento y provocar daños al reproductor.
Page 71

ESPAÑOL
72
INDEX
END MON
MANEJO BÁSICO
4
(1) Antes de comenzar la reproducción
1
Seleccione la pista a reproducir.
Gire la perilla de selección (
8 – 9).
La pista seleccionada se señala y se activa el modo en
espera.
NOTA: Cuando el botón está desactivado, se activa el
modo de selección de pista.
No hay necesidad de seleccionar un número de
índice cuando se desea reproducir la pista desde
el principio.
Gire la perilla de selección (
8 – 9).
El número índice se señala y se activa el modo en espera.
Si se selecciona un número de índice no existente,
aparece “
No 02.Index
” (no hay selección de índice) y
parpadea el número de índice.
5-1
5-2
6-1
6-2
Para comprobar la posición de comienzo de la
reproducción
Pulse el botón PLAY/PAUSE.
Monitorice las señales de reproducción para comprobar la
posición de comienzo de la reproducción.
Pulse el botón CUE.
7
Para comprobar la posición final de reproducción
Pulse el botón END MON (monitorización del final).
PLAY / PAUSE
CUE
PLAY / PAUSE
El lector vuelve a la posición de comienzo de la
reproducción y se activa el modo en espera. (señalización
hacia atrás)
CUE
CUECUE
NOTA: Si se pulsa el botón CUE durante la operación de
monitorización del final, tal operación se cancela, el
lector vuelve a la posición de comienzo de la
reproducción y se activa el modo en espera.
375-1
6-2
6-1
4,5-2
OPEN / CLOSE
COMPACT DISC PLAYER
DN-C630
POWER
PHONES LEVEL
MIN MAX
STOP CUE
PRESET
PLAY / PAUSE
TRACK
PLAY
MODE
END MON INDEX
SEARCH
REPEAT
ON / OFF
PROG.PLAY
A-B
PROG. IN
PITCH
TIME
0%
Carga de un disco.
3
4
Seleccione el modo de reproducción.
Pulse el botón PLAY MODE (modo reproducción).
2
Realice los preajustes de acuerdo con el propósito de
uso. (véase la página 80.)
NOTA: Los pasos 1 y 2 se pueden realizar en orden
inverso.
Seleccione el modo de finalización de la reproducción.
(función de preajuste)
Finish Stop El modo de parada (las funciones
servo se apagan) se activa cuando
termina la reproducción.
Finish Next El modo en espera se activa al
comienzo de la pista siguiente al
terminar la reproducción.
* Después de ejecutarse la última
pista, se activa el modo en espera
en la posición donde comenzó la
reproducción.
Finish Recue Cuando termina la reproducción, se
activa el modo en espera en la
posición en la que había comenzado
la reproducción.
Para detenerse en espera en el punto donde comienza
el sonido. (función de preajuste)
Ajuste el nivel “CueDet”.
Cuando se selecciona una pista, se puede encontrar la
posición en donde comienza el sonido al señalizar la pista y
el modo en espera se activa en ese punto.
Se ilumina
Se ilumina
Modo de
reproducción
de una sola pista
Modo de
reproducción
continua
Parpadea durante la búsqueda
Se ilumina cuando está en espera
Para seleccionar un número de índice
Pulse el botón INDEX.
El número de INDEX aparece cuando se
ajusta el modo de selección de índice.
Se monitoriza el final, luego el lector
vuelve a la posición de comienzo de la
reproducción y se activa el modo en
espera. (Monitorización del final)
Número de índice Número de índice
Se ilumina
Se apaga
Se ilumina
Parpadea
Parpadea durante la búsqueda
Se ilumina cuando está en espera
Page 72

ESPAÑOL
73
(2) Comienzo de la reproducción
9
9 8,9
OPEN / CLOSE
COMPACT DISC PLAYER
DN-C630
POWER
PHONES LEVEL
MIN MAX
STOP CUE
PRESET
PLAY / PAUSE
TRACK
PLAY
MODE
END MON INDEX
SEARCH
REPEAT
ON / OFF
PROG.PLAY
A-B
PROG. IN
PITCH
TIME
0%
PLAY / PAUSE
CUE
PLAY / PAUSE
PITCH%
REMAIN
SINGLE
(3) Parada de la reproducción
CUE
PLAY / PAUSE PLAY / PAUSE
CUECUE
STOP
Comenzar la reproducción.
Pulse el botón PLAY/PAUSE.
Comienza la reproducción y se da salida a las señales de
reproducción.
8
Cuando se detiene la reproducción, se activa el modo
de fin de reproducción establecido en el paso 4
anterior.
La reproducción se puede detener de las siguientes
maneras:
9
Se ilumina
Se apaga
Parpadea (indica la posición de reproducción)
La reproducción se interrumpe y se
activa el modo de parada.
Se interrumpe la reproducción, el
lector vuelve a la posición de
comienzo de la reproducción y se
activa el modo en espera.
Se interrumpe la reproducción y se
activa el modo pausa en ese punto.
Se ilumina
Parpadea
Modo Sleep (dormir)
El modo dormir se activa si no se realiza ninguna operación
durante 30 minutos en el modo en espera, pausa o de
búsqueda manual.
Cuando esté en el modo dormir, pulse el botón
PLAY/PAUSE para buscar la posición anterior a la
activación del modo dormir y comience la reproducción.
Pulse el botón CUE para buscar la posición anterior a la
activación del modo dormir y quedar en espera en ese
punto.
(4) Operaciones de PLAY/PAUSE y CUE
• La operación alterna entre la reproducción y la pausa cada
vez que se pulsa el botón PLAY/PAUSE.
• Cuando se pulsa el botón CUE durante la reproducción, el
lector vuelve a la posición en la que comenzó la
reproducción.
Los diagramas que figuran a continuación muestran
esquemas de reproducción cuando se pulsan los botones
PLAY/PAUSE y CUE.
PLAY y PAUSE (reproducción y pausa)
Cuando se pulsa el botón PLAY/PAUSE, la reproducción
comienza y sigue tal como lo muestra la flecha del diagrama
anterior.
Si se pulsa otra vez el botón PLAY/PAUSE durante la
reproducción, se activa el modo pausa en ese punto. Pulse el
botón PLAY/PAUSE nuevamente para reanudar la reproducción.
Botón
PLAY/PAUSE
pulsado
Botón
PLAY/PAUSE
pulsado
Botón PLAY/PAUSE pulsado
Posición en el disco
Modo pausa activado en este punto
Sección
reproducida
Sección
reproducida
PLAY y CUE (reproducción y señalización)
PLAY, PAUSE y CUE
Señalización hacia atrás
Botón
PLAY/PAUSE
pulsado
Botón CUE pulsado
Posición en el disco
Cuando se pulsa el botón CUE después de comenzar la
reproducción mediante la pulsación del botón PLAY/PAUSE, el
lector vuelve a la posición en la cual comenzó la reproducción y
se prepara para la siguiente reproducción.
Pulse los botones PLAY/PAUSE y CUE alternativamente para
comenzar la reproducción repetidamente desde la misma
posición.
Esta función se denomina “Back Cue” (señalización hacia atrás)
Botón CUE
pulsado
Posición en el
disco
Si se activa el modo pausa y luego se reanuda la reproducción, la
posición a la que vuelve el lector con la función Back Cue
(señalización hacia atrás) cambia.
Parpadea
Sección
reproducida
Sección
reproducida
Sección
reproducida
Botón
PLAY/PAUSE
pulsado
Botón
PLAY/PAUSE
pulsado
Botón
PLAY/PAUSE
pulsado
Page 73

ESPAÑOL
74
13
2
OPEN / CLOSE
COMPACT DISC PLAYER
DN-C630
POWER
PHONES LEVEL
MIN MAX
STOP CUE
PRESET
PLAY / PAUSE
TRACK
PLAY
MODE
END MON INDEX
SEARCH
REPEAT
ON / OFF
PROG.PLAY
A-B
PROG. IN
PITCH
TIME
0%
(1) Comienzo de la Reproducción desde la Mitad de una
Pista (Manueller Suchlauf)
• Cuando se selecciona una pista y se pulsa el botón
PLAY/PAUSE, la reproducción comienza desde el
comienzo de tal pista. Para comenzar desde una posición
diferente en la pista, utilice el procedimiento que se
describe a continuación para determinar la posición
deseada.
Determinar la posición de la reproducción.
Gire el dial SEARCH.
Escuche el sonido y determine la posición de comienzo de
reproducción deseada.
SEARCH
PLAY / PAUSE PLAY / PAUSE
CUE
CUECUE
(2) Reproducción a una velocidad distinta (Tono)
• Utilice esta función para reproducir discos a diferentes
velocidades.
• Se puede cambiar la velocidad en una gama que va de
–9,9 a +9,9 %.
1-21-1.2.3
OPEN / CLOSE
COMPACT DISC PLAYER
DN-C630
POWER
PHONES LEVEL
MIN MAX
STOP CUE
PRESET
PLAY / PAUSE
TRACK
PLAY
MODE
END MON INDEX
SEARCH
REPEAT
ON / OFF
PROG.PLAY
A-B
PROG. IN
PITCH
TIME
0%
PITCH PITCH
PITCH PITCH
PITCH PITCH
0%
OPERACIONES ÚTILES
5
1
Para comprobar la posición de comienzo de la
reproducción.
Pulse el botón PLAY/PAUSE.
Monitorice la señal de reproducción para comprobar la
posición de comienzo de reproducción.
2
Señalar la posición de comienzo de la reproducción.
Pulse el botón CUE.
El lector vuelve a la posición de comienzo de la
reproducción y se activa el modo en espera.
3
Cada vez que se pulsa el botón
SEARCH se produce el cambio de un
fotograma. Cada fotograma consiste
en un 1/75 de segundo. Si se sigue
pulsando el botón SEARCH, se
produce un cambio automático de
fotogramas, cuya velocidad
aumentará mientras se mantenga
pulsado el botón.
Se ilumina
La reproducción
comienza
Ajusta el modo de velocidad variable.
Pulse el botón PITCH.
1-1
La velocidad de
reproducción disminuye
cuando el control
deslizante de velocidad se
mueve hacia arriba, y
aumenta cuando el control
deslizante de velocidad se
mueve hacia abajo.
Ajusta el modo de bloqueo de velocidad.
Pulse el botón PITCH otra vez.
Pulse el botón PITCH nuevamente para volver a la
velocidad normal.
La velocidad de reproducción ajustada con el control
deslizante de velocidad se mantiene. En este estado, la
velocidad de reproducción no cambiará ni aún moviendo el
control deslizante de velocidad.
Cuando se predetermina la velocidad de reproducción en
el modo de preajuste, tal velocidad será la que quede
ajustada.
1-2
2
3
Se iluminaParpadea
Parpadea
Disminución de la velocidad
de reproducción
Aumento de la velocidad de
reproducción
Se ilumina
Se apaga
NOTA:
Cuando se activa la velocidad de reproducción (PITCH), la
pantalla de visualización muestra el tono ajustado, pero el
disco se reproduce a la velocidad normal hasta que se pulse
el botón PITCH (y el LED se ilumine).
Cuando se cambia la velocidad de reproducción, también
cambia la frecuencia de muestreo de la señal de salida digital,
por lo que no es posible recibir señales.
Page 74

ESPAÑOL
75
(3) Reproducción repetida (Repetida)
1 2.6
3.5
4.55
OPEN / CLOSE
COMPACT DISC PLAYER
DN-C630
POWER
PHONES LEVEL
MIN MAX
STOP CUE
PRESET
PLAY / PAUSE
TRACK
PLAY
MODE
END MON INDEX
SEARCH
REPEAT
ON / OFF
PROG.PLAY
A-B
PROG. IN
PITCH
TIME
0%
SINGLE
TOTAL
PLAY
MODE
REPEAT
1
REPEAT
REPEAT
CUE
CUECUE
PLAY / PAUSE
PITCH%
REMAIN
SINGLE
1
REPEAT
PLAY / PAUSE
CUECUE
Selección del modo de reproducción.
Pulse el botón PLAY MODE.
1
Selección del modo de repetición.
Pulse el botón REPEAT.
2
Modo de espera en la posición de inicio de la
reproducción.
Pulse el botón CUE.
El lector vuelve a la posición de comienzo de reproducción
y se ajusta el modo en espera.
3
Comienzo de la reproducción.
Pulse el botón PLAY/PAUSE.
Comienza la reproducción de repetición.
4
Detención de la reproducción.
La reproducción se puede detener de las siguientes
maneras:
5
Cancelación del modo de repetición durante la
reproducción.
Pulse el botón REPEAT.
Se reanuda el modo normal de reproducción y la
reproducción continúa hasta el punto final de
reproducción.
6
Para reproducir la
pista individual
seleccionada de
manera
repetidamente:
Para reproducir
todas las pistas
del disco
repetidamente:
Para reproducir la
pista individual
seleccionada de
manera
repetidamente:
Para reproducir
todas las pistas
del disco
repetidamente:
Se ilumina
Se ilumina
Se ilumina
Se ilumina
Se ilumina
Se ilumina
Se ilumina
Parpadea
Se ilumina
Se apaga
Se ilumina
Se ilumina
CUE
PLAY / PAUSE PLAY / PAUSE
CUECUE
STOP
Se interrumpe la reproducción y se
ajusta el modo de parada.
Se interrumpe la reproducción, el
lector vuelve a la posición de
comienzo de reproducción y se
ajusta el modo en espera.
La reproducción se interrumpe y se
ajusta el modo de pausa en ese
punto.
Se ilumina
Parpadea
Parpadea
Se ilumina
Se apaga
REPEAT
REPEAT
Page 75

ESPAÑOL
76
(4) Reproducción de una sección específica del disco
(A-B Repetida)
• Utilice esta función para ajustar las posiciones de
comienzo y final de la reproducción y que sólo se
reproduzca la porción deseada del disco.
1.3
2.4.5
OPEN / CLOSE
COMPACT DISC PLAYER
DN-C630
POWER
PHONES LEVEL
MIN MAX
STOP CUE
PRESET
PLAY / PAUSE
TRACK
PLAY
MODE
END MON INDEX
SEARCH
REPEAT
ON / OFF
PROG.PLAY
A-B
PROG. IN
PITCH
TIME
0%
A-B
REPEAT
A-B
SEARCH
SEARCH
Determinar la posición de comienzo de reproducción
(punto A).
• Pulse los botones SEARCH para buscar la posición
deseada de comienzo de la reproducción.
1
Ajustar el punto A.
Pulse el botón A-B.
2
Determinar la posición de comienzo de reproducción
(punto B).
• Pulse los botones SEARCH para buscar la posición
deseada de final de la reproducción.
3
Ajustar el punto B.
Pulse el botón A-B.
Se ajusta el modo repetición A-B.
Cuando se ajusta el punto B durante la reproducción, se
realizará la búsqueda del punto A y comenzará la repetición
de reproducción de la sección A-B.
Si se ajusta el punto B en cualquier modo que no sea el
modo de reproducción, se realizará la búsqueda del punto
A y se ajustará el modo en espera.
4
Parpadea
Se ilumina
Se ilumina
A-B Reproducción repetida
Si la reproducción comienza antes del punto A, la
reproducción continúa hasta el punto B, luego vuelve al
punto A para repetir la reproducción.
NOTA:
• Cuando el punto B se encuentra antes del punto A, la
sección que va desde el punto B al punto A se
reproduce repetidamente.
• En el modo de repetición entre los puntos A-B la función
de cancelación del monitor no funciona.
Si la reproducción comienza después del punto B, la
reproducción continúa hasta el final de esa pista y no se
repite nada.
Punto de comienzo
de la reproducción
Punto A Punto B
Punto A Punto B
Punto APunto B
Punto de comienzo
de la reproducción
Final de la pista
Sección reproducida
Sección reproducida
repetidamente
Sección reproducida
repetidamente
A-B
REPEAT
Cancelación del modo de A-B repetición durante la
reproducción
Pulse el botón A-B.
Se reanuda el modo normal de reproducción y la
reproducción continúa hasta el punto final de
reproducción.
5
Se ilumina
Se apaga
Se apaga
Se ilumina
Page 76

ESPAÑOL
77
(1) Introducción del programa
2.3.4 1.5
OPEN / CLOSE
COMPACT DISC PLAYER
DN-C630
POWER
PHONES LEVEL
MIN MAX
STOP CUE
PRESET
PLAY / PAUSE
TRACK
PLAY
MODE
END MON INDEX
SEARCH
REPEAT
ON / OFF
PROG.PLAY
A-B
PROG. IN
PITCH
TIME
0%
• Se pueden programar las pistas para que sean reproducidas
en un orden determinado.
• Se pueden programar hasta 25 pistas.
• La reproducción programada se realiza de acuerdo con los
ajustes del modo de reproducción (sencillo o continuo) y del
modo terminar (parada, siguiente o re-marcado).
PROG. IN
PROG
REMAIN
SINGLE
REPRODUCCIÓN PROGRAMADA
6
Ajustar el modo de entrada de programa.
Pulse el botón PROG. IN.
1
Selección de la pista a programar.
Gire la perilla de selección (
8 – 9).
2
Introducir la pista seleccionada en el programa.
Pulse la perilla de selección.
Se visualiza el número del paso siguiente en el programa.
3
Introducir la pista siguiente en el programa.
Pulse la perilla de selección.
El visualizador de tiempo muestra el tiempo total de
reproducción del programa.
Repita los pasos 2, 3 y 4 para programar las pistas en el
orden deseado.
4
Salida del modo de entrada de programa.
Pulse el botón PROG. IN.
La unidad vuelve al modo normal.
5
(2) Cambio del programa
Activar el modo de edición de programa.
Pulse el botón PROG. IN.
1
Selección del número de paso a editar.
Gire la perilla de selección (
8 – 9).
2
Activar el modo de cambio de programa.
Pulse la perilla de selección.
3
Para cambiar la pista:
Seleccione la pista a cambiar.
Gire la perilla de selección (
8 – 9).
4-1
Introducir la pista seleccionada.
Pulse la perilla de selección.
Para continuar con la edición del programa, repita los
pasos 2, 3, 4-1 y 4-2.
4-2
Parpadea
Parpadea el número de paso
Parpadea
Parpadea el número de paso
Parpadea
Cuando se selecciona la pista 3:
Número de pista seleccionado
Parpadea
Se ilumina
Parpadea
Parpadea
Se ilumina
Parpadea
Parpadea
Se ilumina
Se ilumina el número de paso
Parpadea
Parpadea
Parpadea el número de paso a
editar
Se ilumina
Parpadea
Se ilumina
Parpadea
Se ilumina
Parpadea
Se ilumina
Para editar el tercer paso del programa:
Parpadea
Número de pista seleccionado
El número del siguiente paso en
el programa parpadea
Para salir del modo de edición de programa, pulse el botón
PROG. IN La unidad vuelve al modo normal.
Page 77

ESPAÑOL
78
6-2 5-2
5-1,5-3,5-4,6-1 7
OPEN / CLOSE
COMPACT DISC PLAYER
DN-C630
POWER
PHONES LEVEL
MIN MAX
STOP CUE
PRESET
PLAY / PAUSE
TRACK
PLAY
MODE
END MON INDEX
SEARCH
REPEAT
ON / OFF
PROG.PLAY
A-B
PROG. IN
PITCH
TIME
0%
PROG
REMAIN
SINGLE
PROG
REMAIN
SINGLE
(3) Reproducción de programas
ON / OFF
PROG.PLAY
ON / OFF
PROG.PLAY
CUECUE
PROG
TOTAL
21
OPEN / CLOSE
COMPACT DISC PLAYER
DN-C630
POWER
PHONES LEVEL
MIN MAX
STOP CUE
PRESET
PLAY / PAUSE
TRACK
PLAY
MODE
END MON INDEX
SEARCH
REPEAT
ON / OFF
PROG.PLAY
A-B
PROG. IN
PITCH
TIME
0%
Inserción de una pista en el programa.
Seleccione la posición en la que insertar una pista.
Gire la perilla de selección (
8 – 9).
5-1
Activar el modo de inserción de programa.
Pulse el botón .
7
5-2
Selección de la pista a insertar.
Gire la perilla de selección (
8 – 9).
5-3
Introducir la pista seleccionada.
Pulse el botón de selección.
Para insertar más pistas en el programa, repita los pasos
5-1, 5-2, 5-3 y 5-4.
(Para salir del modo de inserción del programa, presione el
botón PROG. IN.)
5-4
Borrado de pistas del programa.
Seleccione el paso a borrar.
Gire la perilla de selección (
8 – 9).
6-1
Parpadea
Se ilumina
Se ilumina
Parpadea el número de paso
Parpadea
Para insertar una pista en el tercer
paso del programa:
Parpadea
Se ilumina
Parpadea
Parpadea
Se ilumina
Parpadea
Parpadea
Se ilumina
Parpadea
Parpadea
Número de la pista
seleccionada
Se ilumina
Borrar la pista determinar del programa.
Pulse el botón .
6
6-2
Salida del modo de edición de programa.
Pulse el botón PROG. IN.
7
Activar el modo de reproducción de programa.
Pulse el botón PROG. PLAY.
En el modo individual sólo se visualizará en pantalla el
número de paso especificado.
En el modo continuo se visualizará cualquier número de
paso que vaya desde el número de paso especificado
hasta el último número de paso.
Se busca la primera pista del programa en el modo de
señal sonora y se ajusta el modo de espera.
1
Comienzo de la reproducción programada.
Pulse el botón PLAY/PAUSE.
Comienza la reproducción programada.
2
Parpadea Se ilumina
Se ilumina
Parpadea el número de paso
siguiente
Parpadea
Número de pista en el paso siguiente del
programa
Se ilumina
Se ilumina
Parpadea
PLAY / PAUSE
CUE
PLAY / PAUSE
Se ilumina
Se apaga
Cuando se expulsa un disco, se borra el programa
ajustado.
NOTA:
No pueden introducirse programas cuando no se ha
cargado ningún disco.
Para borrar la pista en el paso tercero
Se ilumina
Se ilumina
Page 78

ESPAÑOL
79
(4) Preajuste de programas
• Los programas pueden ser almacenados en la memoria de preajuste. Cuando se carga un disco para el que se ha preajustado un
programa, el modo de reproducción programada se activa automáticamente.
• Se pueden almacenar programas de hasta tres discos.
4 2-4
2-2,2-3
OPEN / CLOSE
COMPACT DISC PLAYER
DN-C630
POWER
PHONES LEVEL
MIN MAX
STOP CUE
PRESET
PLAY / PAUSE
TRACK
PLAY
MODE
END MON INDEX
SEARCH
REPEAT
ON / OFF
PROG.PLAY
A-B
PROG. IN
PITCH
TIME
0%
PLAY
MODE
Se cancela el modo de ajuste de preajuste y la
unidad vuelve al modo normal.
CUE
ON / OFF
PROG.PLAY
PROG
Introducir el programa.
Siga las instrucciones que figuran en “(1) Introducción del
Programa” para introducir el programa. (Véase la página
77.)
1
Activar el modo de preajuste.
Siga las instrucciones que figuran en “(2) Procedimiento
de Preajuste” para ajustar el modo de preajuste. (Véase la
página 81.)
2-1
Seleccionar el artículo de preajuste.
Gire la perilla de selección para seleccionar “Program 1”
(“Program 2” o “Program 3”).
2-2
Cambiar el ajuste de preajuste.
Pulse la perilla de selección.
2-3
Cancelar el modo de preajuste.
Pulse el botón PLAY MODE.
2-4
Para reproducir un disco preajustado:
Cargue un disco para el que se haya preajustado un
programa.
El lector busca la primera pista programada y se activa el
modo en espera.
3
Comienza la reproducción programada.
Pulse el botón PLAY/PAUSE.
4
Seleccionar uno de
estos
El visualizador de caracteres cambia de la
siguiente manera:
Antes de cambio Después de cambio
Se ilumina Se ilumina
Se ilumina
PLAY / PAUSE
CUE
PLAY / PAUSE
Se ilumina
Se apaga
NOTA:
El tiempo de reproducción puede que no se visualice
correctamente durante la reproducción de discos sin índice
(TOC) de CD-R.
Page 79

ESPAÑOL
80
FUNCIONES Y OPERACIONES DE PREAJUSTE
7
(1) Lista de las funciones de Preajuste
• Las funciones pueden preajustarse mediante los botones situados en el panel frontal. Estos preajustes son almacenados en una
memoria permanente, por lo que no se borran ni siquiera cuando se apaga la corriente.
• Las funciones que aparecen en la tabla que figura a continuación pueden ser preajustadas. Ajuste las funciones de acuerdo con el
propósito de utilización para conseguir eficazmente una reproducción de calidad aún superior.
• Una de las funciones de preajuste puede ser utilizada para visualizar información sobre este equipo (la versión con
microprocesador).
Tipo de función de preajuste
Tipo de preajuste
Modo de acabado
Modo alimentación activada
Detención automática
Programa 1
Programa 2
Programa 3
Salida digital
CUE automático
Selección del tipo de preajuste.
Ajuste de una operación cuando termina la reproducción.
Ajuste de una operación cuando se activa la alimentación.
Ajuste de parada o no parada automática de las funciones servo.
Ajuste de reproducir o no el programa 1.
Ajuste de reproducir o no el programa 2.
Ajuste de reproducir o no el programa 3.
Selección de dar salida o no a sub-códigos.
Preset Type 1
Finish Next
Power On Stby
Sleep ON
Program 1 OFF
Program 2 OFF
Program 3 OFF
Subcode OFF
CueDet. –60 dB
1
2
3
5
6
7
8
9
Cancelación del monitor
Ajuste sobre si utilizar o no la función de monitorización del final y
monitorizar el ajuste de tiempo.
End Mon. 10 s
10
4
Modo de espera de la
siguiente pista
Ajuste sobre si se establece o no la espera en la pista siguiente cuando
se pulsa el botón CUE durante la reproducción.
Next Stb. OFF
12
Disco CDR
Selección de la realización de prueba de una reproducción a los discos
CDR que no incluyen TOC (índice de contenidos).
Normal Disc 19
Señales remotas paralelas
Señales remotas paralelas
Señales remotas paralelas
Señales remotas paralelas
Estéreo/monoaural
Borrado de preajustes
Información de ajustes
Selección sobre si aceptar o no señales remotas en el paralelo.
Selección sobre si dar salida o no a marcas en espera.
Ajuste de control externo de la señal de salida con marcas.
Selección del modo de comienzo con fundido.
Selección de reproducción estéreo o manual.
Ajuste para borrar preajustes y ajustarlos a los valores iniciales.
Visualización de la versión de microprocesador.
Remote ENA
ST. Tally ON
INDEX 2 Tally
Fader Pause
Stereo
Ini. Preset
Ver. **** (* = number)
20
21
22
23
24
25
26
E.O.M.
Ajuste sobre si visualizar o no el EOM y visualizar el ajuste de tiempo.
Ajuste para realizar o no la operación de indicación automática y del nivel
de audio durante el arranque.
E.O.M. 10 s
11
Reserva de la siguiente pista
Hora del desvanecimiento del
sonido
Velocidad de la reproducción
Inicio de la dilación
Bloqueo de reproducción
Visualización de cuadros
Ajuste de una operación cuando se gira el mando de selección durante la
reproducción.
Ajuste del tiempo de fundido de salida.
Ajuste de velocidad de reproducción normal.
Ajuste del comienzo del tiempo de retardo.
Selección de inhibir o no los interruptores del panel durante la reproducción.
Selección de mostrar o no las fracciones.
Reserve. OFF
FadeIn OFF
13
14
Normal Speed
Delay OFF
Play Lock OFF
FR Disp ON
15
16
17
18
Descripción
Visualización de caracteres
(según ajuste al salir
de fábrica)
N°.
Cuando se realizan preajustes, la visualización del tiempo ajustada con el botón TIME y el modo de reproducción ajustado con el
botón PLAY MODE en ese momento, son almacenados en la memoria. La próxima vez que se active la alimentación estos serán
los modos que se queden ajustados.
NOTA:
Para los discos CDR sin TOC, no hay ninguna señal en las secciones de entrada y salida, por lo que podrían producirse errores,
sobre todo en la búsqueda de pistas. Si se produjera algún error, abra el porta discos, luego ciérrelo y vuelva a realizar la operación.
Page 80

ESPAÑOL
81
(2) Procedimiento de Preajuste
• Las funciones pueden ser preajustadas mediante los
botones situados en el panel frontal.
• Realice los preajustes sin que haya ningún disco cargado,
en el modo parada o en espera.
2.31 5
1.4.5
OPEN / CLOSE
COMPACT DISC PLAYER
DN-C630
POWER
PHONES LEVEL
MIN MAX
STOP CUE
PRESET
PLAY / PAUSE
TRACK
PLAY
MODE
END MON INDEX
SEARCH
REPEAT
ON / OFF
PROG.PLAY
A-B
PROG. IN
PITCH
TIME
0%
PLAY
MODE
El modo de preajuste es cancelado y el equipo
vuelve al modo anterior.
La visualización de caracteres
cambia tal como se muestra a
continuación.
Introducir el modo de preajuste.
Pulse el botón CUE a la vez que pulsa el botón PLAY
MODE.
1
Seleccionar el artículo de preajuste.
Gire la perilla de selección (
8 – 9).
2
Cambiar los valores de preajuste.
Pulse la perilla de selección.
3
NOTA:
Si apareciera el mensaje que se muestra a continuación,
quiere decir que hay un problema con la memoria de
preajuste. Póngase en contacto con una persona del
servicio técnico.
Salir del modo de preajuste.
Pulse el botón PLAY MODE.
4
Para devolver los preajustes a los ajustes iniciales (los
ajustes que vienen de fábrica) encienda la alimentación
mientras sostiene los botones PLAY MODE y END MON.
Sobre los ajustes iniciales, consulte “(1) Lista de las
funciones de Preajuste”).
5
Visualización de caracteres
Visualización de caracteres
Gire la perilla en el
sentido de las agujas
del reloj para moverse
en la dirección de las
flechas, en sentido
contrario a las agujas
del reloj para moverse
en la dirección
opuesta.
La visualización de caracteres cambia tal
como se muestra a continuación.
Antes de cambio Después de cambio
Initial Error
Page 81

ESPAÑOL
82
(3) Descripción Detallada de las Funciones de Preajuste
(* = ajuste inicial)
1) “Preset Type (*)” (Se pueden realizar y utilizar tres ajustes (tipos) diferentes de preajuste para distintos propósitos.)
* Preset Type 1 : Ajuste a tipo de preajuste 1.
Preset Type 2 : Ajuste a tipo de preajuste 2.
Preset Type 3 : Ajuste a tipo de preajuste 3.
2) “Finish (*****)”
Finish Stop : El modo de parada se ajusta una vez finalizada la reproducción.
* Finish Next : El modo en espera se ajusta en la siguiente pista después de finalizada la reproducción.
Finish Recue : El modo en espera se ajusta en la posición de inicio de reproducción después de finalizada la
reproducción.
3) “Power On (****)”
* Power On Stby : El modo en espera se ajusta en la pista especificada después de la lectura del índice TOC.
Power On Play : La reproducción comienza en el modo repetición de todas las pistas después de la lectura del índice
TOC.
Power On Stop : El modo de parada se ajusta después de la lectura del índice TOC.
4) “CueDet. (–**) dB”
CueDet. (–*) dB : Ajusta el nivel de detección de audio para la señalización. (–72/–66/*–60/–54/–48/–42/–36)
CueDet. OFF : La posición de sonido al arranque no es indicada.
5) “Sleep ON (OFF)”
* Sleep ON : Los funciones servo se apagan automáticamente si no se pulsa ningún botón durante 30 minutos en el
modo de pausa, espera o búsqueda manual.
Sleep OFF : No apaga automáticamente los funciones servo.
6) “Program 1 OFF (ON)”
Program 1 OFF (ON) : Almacena el contenido del programa 1 cuando está activado. (Ajuste inicial – OFF)
7) “Progam 2 OFF (ON)”
Program 2 OFF (ON) : Almacena el contenido del programa 2 cuando está activado. (Ajuste inicial – OFF)
8) “Program 3 OFF (ON)”
Program 3 OFF (ON) : Almacena el contenido del programa 3 cuando está activado. (Ajuste inicial – OFF)
9) “Subcode ON (OFF)”
Subcode ON : Da salida a sub-códigos con las señales de salida digital (formato SPDIF del consumidor).
* Subcode OFF : No da salida a sub-códigos con las señales de salida digital (formato de Tipo II IEC 958 del consumidor).
NOTA: El comienzo de 0 segundos no es posible cuando lo anterior se ajusta a “Subcode ON”.
10) “End Mon. (**) s”
End Mon. (**) s : Ajusta el tiempo de monitorización del final. (5/*10/15/20/25/30/35)
End Mon. OFF : No utiliza la función de monitorización del final.
11) “E.O.M. (**) s” (Da salida a la señal de anotación EOM al contacto remoto (24))
E.O.M. (**) s : Ajusta el tiempo EOM. (0/5/*10/15/20/30/60)
E.O.M. OFF : No utiliza la función EOM.
12) “Next Stb. Off (ON)”
* Next Stb. OFF : Vuelve a la posición de comienzo de la reproducción y se queda en espera cuando se pulsa el botón
CUE durante la reproducción.
Next Stb. ON : Se queda en espera al comienzo de la pista siguiente cuando se pulsa el botón CUE durante la
reproducción.
Page 82

ESPAÑOL
83
13) “Reserve. OFF (ON)”
* Reserve. OFF : La pista especificada (índice) es buscada inmediatamente al girar el mando de selección durante la
reproducción.
Reserve. ON : La pista (índice) que ha de buscarse, se programa después de que termine la reproducción de la pista
actual (índice) al girar el mando de selección durante la reproducción.
Pulse el botón PLAY MODE para cancelar la pista reservada.
14) “FadeIn OFF (***s)”
FadeIn OFF (***s) : Ajusta el tiempo de fundido de entrada. (*OFF/10 m/50 m/0,1/0,5/1/2)
15) “Normal (+/–***%) Speed”
* Normal Speed : Reproduce a velocidad normal.
(+/–***%) Speed : Reproduce a velocidad variable. ±(0,2/0,4/0,6/0,8/1,0/1,2/1,4/1,6/1,8/2,0/2,2/2,4/2,6/2,8/3,0)
16) “Delay OFF (***ms)”
Delay OFF (***ms) : Ajusta el tiempo para el comienzo retardado después de la operación de comienzo de la reproducción.
(*OFF/100 m/200 m/300 m)
17) “PlayLock ON (OFF)”
PlayLock ON : Inhibe todas las operaciones que no sean las de los botones PLAY/PAUSE, TIME y PLAY durante la
reproducción.
* PlayLock OFF : Posibilita todas las funciones durante la reproducción.
18) “FR Disp ON (OFF)”
* FR Disp ON : Muestra las fracciones en el visualizador de tiempo durante la reproducción.
FR Disp OFF : No muestra las fracciones en el visualizador de tiempo durante la reproducción.
(Las fracciones son visualizadas en los modos de búsqueda manual, en espera, pausa, y monitorización
del final).
19) “CD-R NO TOC ON (OFF)”
* Normal Disc : Reproduzca CDs normales y discos CDR que contengan TOCs.
No TOC Disc : Reproduce discos CDR que no contengan TOCS.
NOTA:
Para los discos CDR sin TOC, no hay ninguna señal en las secciones de entrada y salida, por lo que podrían producirse errores, sobre
todo en la búsqueda de pistas. Si se produjera algún error, abra el porta discos, luego ciérrelo y vuelva a realizar la operación.
20) “Remote EMA (INH)”
* Remote ENA : Posibilita la entrada de señales de control al conector remoto del paralelo.
Remote INH : Inhibe la entrada de señales de control al conector remoto del paralelo.
21) “St. Tally ON (OFF)”
* St. Tally ON : Da salida a marcas en espera desde el conector remoto del paralelo.
St. Tally OFF : No da salida a marcas en espera desde el conector remoto del paralelo.
22) “(******) Tally”
* INDEX 2 Tally : Da salida a la señal marcada de índice 2 a la punta remota (17).
INDEX 3 Tally : Da salida a la señal marcada de índice 3 a la punta remota (17).
23) “Fader Pause (Play)”
* Fader Pause : Comienza la reproducción cuando las puntas del fundidor remoto (9-10) son corto-circuitadas y se queda
en pausa cuando las puntas son abiertas.
Fader Play : Comienza la reproducción cuando las puntas del fundidor remoto (9-10) son corto-circuitadas y continúa
la reproducción cuando las puntas son abiertas.
24) “Stereo (Mono)”
* Stereo : Da salida a las señales estéreo L y R del conector de salida.
Mono : Da salida a las señales mezcladas L y R del conector de salida.
25) “Preset Clr ? (Ini. Preset)”
Preset Clr ? : Borra los preajustes (se ajusta a los valores iniciales de fábrica).
* Ini. Preset : No borra los preajustes.
26) “Ver. xxxx” : Muestra la versión de microprocesador. (“xxxx” es un número)
Page 83

ESPAÑOL
84
ANTES DE DESCONECTAR LA ALIMENTACION A LA UNIDAD
8
Cuando haya terminado de usar el reproductor CD, antes de desconectar la alimentación, asegúrese de cerrar el portadisco usando el
botón de apertura/cierre (OPEN/CLOSE).
LOS DISCOS COMPACTOS
9
(1) Cuidados a tener durante la manipulación de los discos compactos
• No deje huellas digitales en los discos ni permita que se ensucien con polvo o aceite. Si el disco está sucio, límpielo con un paño
suave y seco.
• No use bencina, diluyente, agua, pulverizadores para discos, productos químicos antiestática ni paños tratados con silicona para
limpiar los discos.
• Trate siempre los discos con cuidado para evitar dañar su superficie; especialmente al extraer o introducir un disco en su caja
protectora.
• No doble los discos.
• No aplique calor a los discos.
• No agrande el orificio central del disco.
• No escriba en la etiqueta (lado impreso) con un implemento puntiagudo, como ser un lápiz o un bolígrafo.
• Al trasladar un disco desde un ambiente frío (por ejemplo, desde el exterior en invierno) a uno cálido, se producirá la
condensación de agua en su superficie. Cuando se produzca condensación, no intente secar el disco con un secador de pelo, etc.
(2) Precauciones relativas al almacenamiento de los discos
• Después de reproducir un disco, extráigalo siempre del reproductor.
• Para evitar que los discos se ensucien o dañen, guárdelos siempre en sus cajas protectoras.
• No deje los discos en los siguientes lugares:
1) Lugares que queden expuestos a la luz directa del sol por períodos prolongados de tiempo.
2) Lugares donde se acumule polvo o que tengan altos niveles de humedad.
3) Lugares afectados por el calor generado por calefactores interiores, etc.
PRECAUCION:
No cierre el portadisco por la fuerza cuando la alimentación a la unidad esté desconectada.
De lo contrario, la unidad podría dañarse al ser transportada.
No desconecte la alimentación a la unidad
cuando el portadisco esté abierto.
ALIMENTACION DESCONECTADA
Desconecte la alimentación a la unidad
después de cerrar el portadisco con el
botón de apertura/cierre (OPEN/CLOSE).
ALIMENTACION DESCONECTADA
NOTA:
Use discos compactos con la marca .
En este equipo no es posible reproducir CDs con formas especiales (CDs con forma de
corazón, CDs octagonales, etc.).
Si intenta hacerlo, el equipo podrá resultar dañado. No use este tipo de CDs.
DIGITAL AUDIO
COMPACTCOMPACT
Page 84

ESPAÑOL
85
LOCALIZACION DE FALLOS
10
ESPECIFICACIONES
11
Cuando tenga motivos para suponer que el lector puede estar estropeado, compruebe lo siguiente.
El soporte del disco ni se abre ni se cierra.
• ¿ Está el interruptor de encendido colocado en ACTIVADO (ON) ?
• ¿ Está el lector leyendo un disco ? …………………………………………………………………………………Consulte la página 71
En el visualizador sigue apareciendo la indicación “–” cuando ya ha sido cargado un disco.
• ¿ Ha sido cargado el disco adecuadamente ?
• ¿ Está el disco sucio o rayado ?
No se produce sonido o el sonido está distorsionado.
• ¿ Están los cables de salida conectados correctamente al amplificador ?
• ¿ Es correcto el ajuste de los controles del amplificador y de los interruptores ?
La parte especificada del disco no se puede reproducir correctamente.
• ¿ Está el disco sucio o rayado ?
Hay un botón que no funciona.
• ¿ Se ha fijado un preajuste como por ejemplo Bloqueo de la reproducción (PLAY-LOCK) ? ………………Consulte la página 83
GENERAL
Tipo: Reproductor de CD
Tipo de disco: Discos Compactos Normales (12 cm, 8 cm/5”, 3”)
SECCIÓN DE AUDIO
Canales: 2 canales (Estéreo), 1 canal (Mono)
Frecuencia de muestreo: 44,1 kHz
Filtro digital: Filtro Digital de 18 bits de 8 veces el sobremuestreo
Respuesta de frecuencia: 5 a 20.000 Hz (±1,0 dB)
Distorsión Armónica Total: 0,015% (1 kHz, reproducción 0 dB, filtro A)
Relación Señal a Ruido: 98 dB (1 kHz, reproducción 0 dB, filtro A)
Separación de canales: 90 dB (1 kHz, reproducción 0 dB, filtro A)
Salida analógica: 1 kHz, reproducción 0 dB
Transferencia y conector: Conector XLR activo balanceado
Toma RCA no balanceada
Nivel de salida: Balanceado:+18 dBs, 600 Ω/ohmios
No balanceado: 1,7 Vrms, 10 kΩ/kohmios
Gama de ajuste del nivel de salida: +22 dBs a –20 dBs (balanceado)
Salida de auriculares: 20 mW (30 a 40 Ω/ohmios)
Salida digital
Transferencia y conector: Toma RCA
Formato de señal: IEC 958 Tipo II o SPDIF
Nivel de salida: No balanceado: 0,5 Vp-p, 75 Ω/ohmios
Control variable de tono: ±9,9 % máximo
Tiempo de arranque de audio: menos de 0,01 segundos
Precisión de búsqueda de fracción: 1 fracción (1/75 de segundo)
DIMENSIÓNES: 482 (Ancho) x 88 (Alto) x 252 (Prof) mm
PESO: 5,1 kg
CONSUMO DE CORRIENTE: 18 W
FUENTE ALIMENTACIÓN: CA 120 V 10 %, 60 Hz (E.E.U.U., Canadá y Taiwan R.O.C.)
CA 230 V 10 %, 50 Hz (Europa, Asia y otros)
CONDICIONES AMBIENTALES
Temperatura de funcionamiento: +5 °C a 35 °C
Humedad: 25 % a 85 %, sin condensación
Temperatura de almacenamiento: –20 °C a 60 °C
REMOTO
Remoto de paralelo: D-sub 25 puntas
* Las especificaciones y el diseño están sujetos a cambios sin previo aviso a los efectos de mejoras.
N° de punta.
1
2
3
Común
Hot
Cold
Page 85

SVENSKA
86
CD-spelaren DN-C630 är avsedd för montering i rack på radiostationer, i inspelningsstudier mm.
• Avsedd för montering i 19-tums rack (höjd 2 U)
• Spårsökningskontroll för enkel, snabb åtkomst
• Programmerad avspelning (max. 25 spår)
(1) När avspelningsläget ställs på Enkel, kopplas standby-läget in när nästa spår nås.
(2) När avspelningsläget ställs på Kontinuerlig görs avspelningen oavbrutet av alla inprogrammerade spår.
• Avspelningsläge och slutläge
(1) Avspelningsläge
q Kontinuerlig: hela skivan spelas.
w Enkel: ett spår spelas.
(2) Slutläge (stopp, nästa, omtagning)
q Stopp: stopp när ett spår spelats färdigt.
w Nästa: Standby vid början av nästa spår då det aktuella spåret spelats färdigt.
e Omtagning: När ett spår spelats klart, ställs spelaren i standby vid början av samma spår.
• Auto cue
När en skiva läggs i söker spelaren automatiskt upp den punkt där ljudet börjar.
Cueing görs till den punkt där ljudet börjar till skillnad från där spåret börjar. Man kan reglera cueing-nivån mellan –36 och –72 dB (i 7
steg).
• End Monitor
Om du trycker på END MON-tangenten i standby-läget kan du kontrollyssna till spårets slut och på så sätt få ett perfekt slut på spåret.
Punkten där End Monitor börjar kan ställas in på 5 till 35 sekunder (i 7 steg) från spårets slut.
• End of Message (EOM)
Tidsdisplayen börjar blinka vid spårets slut för att varna om att spåret snart är slut. Punkten där blinkningen börjar kan ställas in på
mellan 0 och 60 sekunder (i 7 steg) från spårets slut.
• Tonhöjdskontroll (±9,9 % i 0,1 % steg)
• Indexsökning
Kontrollratten kan användas för indexsökning när INDEX-tangenten står i läge ON. (Indexnumret visas)
• Fluorescerande display
• Visning av avspelningspunkten
En stavmätare visar avspelningspunkten i det aktuella spåret. Med hjälp av TIME-tangenten kan man välja mellan visning av spelad tid
och resterande tid.
• Terminaler för extern kontroll
Parallellutgång för fjärrstyrning (25-polig D-Sub kontakt)
• SUPER LINEAR CONVERTER (S.L.C.)
CD-spelaren använder Denons SLC-omvandlare, en unik lösning för eliminering av nollkorsdistorsion. Denna typ av distorsion är den
vanligaste orsaken till försämrad ljudkvalitet vid PCM-avspelning. Resultatet är rik musikalisk återgivning av hela ljudspektret.
HUVUDEGENSKAPER
Page 86

SVENSKA
87
INNEHÅLLSFÖRTECKNING
z
DELARNAS NAMN OCH FUNKTIONER ………………88, 90
(1) Framsida ………………………………………………88, 89
(2) Baksida ……………………………………………………89
(3) Displayfönster ……………………………………………90
x
FJÄRRSTYRNINGSANSLUTNINGAR ………………………91
c
ÖPPNING/STÄNGNING AV SKIVHÅLLAREN, HUR MAN
LÄGGER I SKIVOR ……………………………………………91
v
GRUNDBRUK ……………………………………………92, 93
(1) Innan avspelningen startas ………………………………92
(2) Starta avspelningen ………………………………………93
(3) Stoppa avspelningen ……………………………………93
(4) PLAY/PAUSE- och CUE-manövrering …………………93
b
PRAKTISKA FUNKTIONER ……………………………94 ~ 96
(1) Starta avspelningen mitt i ett spår
(manuell sökning) …………………………………………94
(2) Ändra avspelningens hastighet (tonhöjdskontroll) ……94
(3) Repeterad avspelning (repetition) ………………………95
(4) Avspelning av ett särskilt avsnitt på skivan
(A-B repetition) ……………………………………………96
n
PROGRAMMERAD AVSPELNING ……………………97 ~ 99
(1) Programmering ……………………………………………97
(2) Ändra ett program ……………………………………97, 98
(3) Spela programmet ………………………………………98
(4) Förinställa program ………………………………………99
m
FÖRINSTÄLLNING AV FUNKTIONER
OCH PROCEDURER…………………………………101 ~ 103
(1) Förteckning över förinställningsfunktioner ……………100
(2) Förinställning ……………………………………………101
(3) Detaljerad förklaring av
förinställningsfunktionerna ………………………102, 103
,
INNAN STRÖMMEN SLÅS AV ……………………………104
.
COMPACT DISC-SKIVOR …………………………………104
⁄0
FELSÖKNING ………………………………………………105
⁄1
SPECIFIKATIONER …………………………………………105
Kontroll av innehållet:
Kontrollera att lådan innehåller fÖljande delar:
Anslutningskabel för ljudsignaler (RCA-kontakter) 1 st.
Bruksanvisning (denna handbok) 1 st.
Montering av enheten
Montera spelaren i ett rack med 19-tums EIA-skenor.
FÖRSIKTIGT:
• DN-C630 kan monteras i racket inom en vinkel av 10° från vertikalplanet. Om apparaten lutar för mycket kan det vara omöjligt
att sätta i eller ta ut skivor. If the unit is tilted excessively, discs may not load or unload properly.
DN-C630
Max. 10°
• KONFORMITETSINTYG
Härmed intygas på vårt hela ansvar att denna apparat, för vilken detta intyg gäller, uppfyller
följande standard:
EN60065, EN55013, EN55020, EN60555-2 samt EN60555-3.
I enlighet med bestämmelserna i direktiv 73/23/EEG, 89/336/EEG och 93/68/EEG.
Page 87

SVENSKA
88
DELARNAS NAMN OCH FUNKTIONER
(1) Framsida
q
Strömbrytare (POWER)
• Slår på och stänger av strömmen.
w
Skivhållare
• Lägg skivan på denna hållare.
• Tryck på OPEN/CLOSE-tangenten för att öppna resp.
stänga hållaren.
• Se till att skivan läggs i mitten av hållaren.
e
Öppnings-/stängningstangent (OPEN/CLOSE)
• Tryck på denna tangent för att öppna och stänga
skivhållaren.
• Skivhållaren kan inte öppnas under pågående avspelning.
r
Tidstangent (TIME)
• Tryck på denna tangent för att växla mellan visning av
resterande tid (REMAIN) och spelad tid (ELAPSED) på
displayen.
t
Tangent för avspelningssätt (PLAY MODE)
•
Tryck på denna tangent för att välja önskat avspelningssätt.
• Tryck på denna tangent för a cancellera spåret som
reserverats med Nästa spår-funktionen.
y
Kontrollyssningstangent för spårets slut
(END MON)
•
Tryck på denna tangent i standby-läget för att kontrollyssna
påÊspårets slut. (End Monitor)
u
INDEX-tangent
• Tryck på denna tangent för att koppla in läget för
indexsökning, och använd sedan kontrollratten för att
välja ett önskat indexnummer.
• INDEX-numret visas när läget för val av index väljs.
• Tryck en gång till på tangenten när du vill återgå till
spårsökningsläget.
i
Repetitionstangent (REPEAT)
• Tryck på denna tangent för att koppla in läget för
repeterad avspelning.
• REPEAT-indikatorn tänds när repetitionsläget kopplas in.
• Tryck en gång till på tangenten när du vill koppla ur
repetitionsläget.
o
A-B-tangent
• Tryck på tangenten för att bestämma A-punkten.
• A-indikatorn blinkar när A-punkten har bestämts.
• Efter att A-punkten har bestämts, tryck på tangenten en
gång till för att bestämma B-punkten.
• A-B-indikatorn blinkar när B-punkten anges.
• Tryck en gång till på tangenten när du vill avbryta A-Brepetition.
!0
Tonhöjdstangent (PITCH)
• Tryck på denna tangent när du vill reglera avspelningens
hastighet med tonhöjdsreglaget. PITCH-indikatorn
blinkar.
• När du trycker en gång till bestäms en fast tonhöjd och
PITCH-indikatorn lyser med fast sken.
• Tryck en gång till på tangenten när du vill koppla ur
tonhöjdskontrolläget och återgå till normal
avspelningshastighet.
!1
Hörlursuttag (PHONES)
• Anslut hörlurar med 30 till 40 Ω/ohm impedans till detta
uttag.
!2
Nivåkontroll (LEVEL)
• Använd denna kontroll för att reglera ljudstyrkan i
hörlurarna.
!3
Stopptangent (STOP)
• Tryck på denna tangent för att koppla ur alla
servofunktioner.
• Tryck på tangenten under pågående avspelning för att
avbryta avspelningen.
!4
CUE-tangent
• Om du trycker på denna tangent i avspelnings- eller
pausläget återgår pickupen till den punkt där
avspelningen började och standby-läget kopplas in.
(Back Cue)
• Om du trycker på tangenten under avspelning då ett nytt
spår har inprogrammerats, går pickupen till början av det
inprogrammerade spåret där standby-läget kopplas in.
• CUE-indikatorn lyser när standby-läget är inkopplat.
• Om du trycker på tangenten samtidigt som PLAY MODEtangenten hålls intryckt, kopplas förinställningsläget in.
!5
Avspelnings-/paustangent (PLAY/PAUSE)
• Tryck på denna tangent för att starta avspelningen i läget
för standby, paus eller manuell sökning.
• Trycker du på tangenten i stoppläget går pickupen till
första spåret där avspelningen börjar.
• PLAY/PAUSE-indikatorn lyser under avspelning.
• Om du trycker på tangenten under pågående avspelning
kopplas pausläget in. PLAY/PAUSE-indikatorn blinkar när
pausläget är inkopplat.
!6
Kontro.5llratt (TRACK)
• Vrid på ratten för att välja önskat spår (eller index).
• Använd INDEX-tangenten för att välja rattens funktion,
dvs om den skall välja spår- eller indexnummer.
• Vrid ratten medsols ett klick för att gå framåt ett spår
(eller indexnummer) och motsols för att flytta bakåt ett
spår (eller indexnummer).
• Om du vrider på ratten samtidigt som den trycks in
motsvarar ett klick 10 spår (eller 10 indexnummer).
• Ratten används i förinställningsläget för att välja och
acceptera olika förinställningar.
• Vid programmering används ratten för att välja spår och
kontrollera programmet.
1
Page 88

SVENSKA
89
q
Analoga utgångar, symmetriska
(ANALOG OUT (BALANCED)
• Detta är balanserade utgångar avsedda för XLRkontakter.
• Anslut utgångarna till balanserade analoga ingångar på en
förstärkare eller mixningskonsol.
• Stiftuppsättning: 1. Gemensam
2. Hot
3. Cold
• Kontakt: Cannon XLR-3-31 eller motsvarande
OBSERVERA: Kortslut inte det varma eller kalla stiftet med
det gemensamma stiftet.
w
Analoga utgångar, osymmetriska (ANALOG OUT
(UNBALANCED))
• Detta är obalanserade utgångar avsedda för RCAkontakter.
• Anslut utgångarna till balanserade analoga ingångar på en
förstärkare eller mixningskonsol.
e
Nivåkontroller för höger/vänster kanal (LEVEL L/R)
• Använd dessa kontroller för att reglera nivån på ANALOG
OUT (BALANCED)-utgångarna.
(2) Baksida
!7
Söktangenter (SEARCH)
• Dessa tangenter används för att exakt bestämma var
avspelningen skall börja.
!8
Till/från-tangent för programmerad avspelning
(PROG. PLAY ON/OFF)
• Programläget kopplas in om du trycker på denna tangent
när PROG-indikatorn lyser.
• Tangenten har ingen funktion under A-B-repetition.
• PROG. PLAY ON/OFF-tangenten lyser under standby och
avspelning i programläget.
• Programläget cancelleras om du trycker på tangenten
under standby eller avspelning i programläget.
!9
Programmeringstangent (PROG. IN)
•
Tryck på denna tangent för att gå in i programmeringsläget.
• Tangenten har ingen funktion i avspelningsläget.
• PROG-indikatorn blinkar i programmeringsläget.
•
PROG-indikatorn lyser när ett program har inprogrammerats.
@0
Tonhöjdsreglage
• Använd detta skjutreglage för att reglera
avspelningshastigheten. Skjut reglaget uppåt för att
sänka hastigheten och nedåt för att öka den.
r
Fjärrstyrningsanslutning (REMOTE)
• Detta är en parallellkopplad fjärrstyrningsanslutning. Den
används för att styra DN-C630 via torrkontaktsanslutning.
• Kontakt: 25-polig D-sub (hane)
• Stiftuppsättning:
Stifr nr. Signalanmn I/O
1
14
2
15
3
16
4
17
5
18
6
19
7
20
8
21
9
22
10
23
11
24
12
25
13
FG
PLAY tally
PLAY command
PAUSE tally
PAUSE command
CUE tally
CUE command
INDEX 2/INDEX 3 tally
TRACK (+) command
Tally common
TRACK (–) command
Reserved
SEARCH (FWD) command
Reserved
SEARCH (REV) command
Reserved
FADER START command
Tally power supply
Command common
Command common
NC
EOM tally
Reserved
Reserved
Reserved
TTL (lol = 20 mA)
HCMOS (li = 3 mA)
TTL (lol = 20 mA)
HCMOS (li = 3 mA)
TTL (lol = 20 mA)
HCMOS (li = 3 mA)
TTL (lol = 20 mA)
HCMOS (li = 3 mA)
HCMOS (li = 3 mA)
HCMOS (li = 3 mA)
HCMOS (li = 3 mA)
PHOTO COUPLER
+5 V, 20 mA
(li =10 mA)
TTL (lol = 20 mA)
–
O
I
O
I
O
I
O
I
–
I
–
I
–
I
–
I
–
–
–
–
O
–
–
–
OBSERVERA: Tally-utstiftet följer specifikationen för öppna
uppsamlingskretsar (Imax. 20 mA, Vmax. 5 V),
men max. försörjningsspänning är 80 mA. Använd
därför en total lastspänning på 80 mA eller
mindre.
t
Digitalutgång (DIGITAL OUT)
• Detta är en obalanserad utgång avsedd för RCAkontakter.
• Anslut utgången till en obalanserad digitalingång på en
förstärkare eller mixningskonsol.
• Signalformat: Valbart (se sid 102, 9))
Page 89

SVENSKA
90
(3) Displayfönster
q
Repeteringsindikator (REPEAT)
• Indikatorn tänds när repeteringsläget väljs.
w
Tidslägesindikatorer
• “ELAPSED” lyser när spelad tid visas på displayen.
• “REMAIN” lyser när resterade tid visas på displayen.
e
Indikatorer för avspelningssätt
• “SINGLE” lyser när avspelning görs av ett enkelt spår
endast.
• “TOTAL” lyser under kontinuerlig avspelning.
r
Spårnummerdisplay
• Visar spårnumret där pickupen befinner sig.
Spårnumret är tänt under spårsökning samt när standbyläget är inkopplat.
• Spårnumret blinkar på displayen när detta spårnummer
har bestämts för avspelning.
t
Indikator för avspelningspaus
y
Avspelningsindikator
u
Indexnummerdisplay
• Vanligtvis visas “Tr”. I läget för indexsökning visas
indexnumret. Indexnumret blinkar på displayen när detta
indexnummer har bestämts för avspelning. Indexnumret
är tänt under indexnummersökning.
i
Display för avspelningsläge
• Visar aktuellt läge i spårets totala speltid.
o
Tondhöjdsdisplay
• Visar den valda avspelningshastigheten i %.
!0
Programindikator
• Tänds när ett program matas in.
• Indikatorn blinkar när PROG. IN-läget är inkopplat.
!1
Melodikalender över 20 spår
• I läget för ett enkelt spår lyser endast det valda
spårnumret.
• I läget för kontinuerlig avspelning lyser alla spårnummer
från det första till det sista.
• Kalendern kan endast visa 20 spårnummer. Spårnummer
på 21 eller mer visas ej.
!2
Display för avspelningstid
• Denna display visar vid det aktuella pickup-läget i minuter
(m), sekunder (s) och rutor (f)
!3
Teckendisplay
• Visar meddelande i förinställnings- och programmeringslägena.
Page 90

SVENSKA
91
FJÄRRSTYRNINGSANSLUTNINGAR
2
ÖPPNING/STÄNGNING AV SKIVHÅLLAREN, HUR MAN LÄGGER I SKIVOR
3
Se exemplet över kopplingar för fjärrstyrning nedan om du önskar fjärrstyra DN-C630.
14
2
23
22
15
3
23
22
16
4
23
7
23
8
23
5
23
9
23
6
23
22
PLAYPAUSECUE
17
22
24
22
INDEX2/INDEX3EOM
FADER SWITCHTRACK(+)TRACK(-)
123456789
10
141516
18
17
242223
REMOTE-anslutningens stift 22 (TALLY POWER SUPPLY) får drivas med högst 5 V, 80 mA. Undvik spänningar som överstiger denna
specifikation.
(1) Öppna/stänga skivhållaren
• Hållaren kan endast öppnas resp. stängas när strömmen är på.
• Tryck på OPEN/CLOSE-tangenten för att öppna eller stänga hållaren.
• Skivhållaren kan inte öppnas under pågående avspelning. Detta för att motverka att avspelningen avbryts oavsiktligt om någon
råkar trycka på OPEN/CLOSE-tangenten. Stoppa först avspelningen, och tryck sedan på OPEN/CLOSE-tangenten.
(2) Lägga i en skiva
• Håll skivan i kanten och lägg den mitt på skivhållaren. Rör inte signalytan (den glansiga ytan).
• 12 cm skivor skall passas in med det yttra spåret i hållaren medan CD-singlar på 8 cm skall passas in med det inre spåret i
hållaren.
12 cm skiva 8 cm skiva
FÖRSIKTIGT:
• Lägg inte främmande föremål på hållaren och lägg inte i mer än en skiva åt gången, eftersom detta kan orsaka felfunktion.
• Tryck inte på hållaren när strömmen är av, eftersom detta kan orsaka felfunktion och skada spelaren.
Page 91

SVENSKA
92
INDEX
END MON
GRUNDBRUK
4
(1) Innan avspelningen startas
1
Välj spåret som skall spelas.
Vrid på kontrollratten (
8 – 9).
Det valda spåret söks upp och standby-läget kopplas in.
OBSERVERA: Läget för spårsökning väljs när denna
tangent är urkopplad. Du behöver inte välja
något indexnummer om du vill spela spåret
från dess början.
Vrid på kontrollratten
(
8 – 9).
Det valda indexnumret söks upp och standby-läget kopplas
in.
Om det valda indexnumret inte existerar, visas “
No
02.Index
” och indexnumret blinkar.
5-1
5-2
6-1
6-2
Kontroll av avspelningens startläge.
Tryck på PLAY/PAUSE-tangenten.
Lyssna till avspelningen för att kontrollera startläget.
Tryck på CUE-tangenten.
7
Kontroll av avspelningens slut.
Tryck på END MON-tangenten.
PLAY / PAUSE
CUE
PLAY / PAUSE
Pickupen återgår till avspelningens startläge där standbyläget kopplas in. (Back Cue)
CUE
CUECUE
OBSERVERA: Om du trycker på CUE-tangenten under
End Monitor-momentet avbryts
kontrollavlyssningen, och pickupen återgår
till avspelningens startläge där standbyläget kopplas in.mode is set.
375-1
6-2
6-1
4,5-2
OPEN / CLOSE
COMPACT DISC PLAYER
DN-C630
POWER
PHONES LEVEL
MIN MAX
STOP CUE
PRESET
PLAY / PAUSE
TRACK
PLAY
MODE
END MON INDEX
SEARCH
REPEAT
ON / OFF
PROG.PLAY
A-B
PROG. IN
PITCH
TIME
0%
Lägg i en skiva.
3
4
Välj avspelningssätt.
Tryck på PLAY MODE-tangenten.
2
Välj eventuella förinställningar som önskas. (Se sid
100.)
OBSERVERA: Steg 1 och 2 kan också utföras i omvänd
ordning.
Välj avspelningsslut. (Förinställningsfunktion)
Finish Stop Stoppläget (där alla servofunktioner
kopplas ur) kopplas in när avspelningen
är klar.
Finish Next Standby-läget kopplas in vid början av
nästa spår då avspelningen av ett
spår är klar.
* När sista spåret har spelats, kopplas
standby-läget in vid början av den
första melodin.
Finish Recue När avspelningen är klar, kopplas
standby-läget in vid början av det spår
som just spelats.
Standby-läge vid den punkt där ljudet börjar.
(Förinställningsfunktion)
Ställ in “CueDet.” nivån.
När du väljer ett spår ställs pickupen vid den punkt där
ljudet börjar. Standby-läget kopplas in vid denna punkt.
Lyser
Lyser
Avspelning av
ett enkelt spår
Kontinuerlig
avspelning
Blinkar under sökning Lyser vid standby
Val av ett indexnummer.
Tryck på INDEX-tangenten.
INDEX-numret visas när läget för val av
index väljs.
Slutet av spåret spelas, och därefter
återgår pickupen till avspelningens
startläge där standby-läget kopplas in.
(End Monitor)
Blinkar under sökning Lyser vid standby
Indexnummer Indexnummer
Lyser Släckt
LyserBlinkar
Page 92

SVENSKA
93
(2) Starta avspelningen
9
9 8,9
OPEN / CLOSE
COMPACT DISC PLAYER
DN-C630
POWER
PHONES LEVEL
MIN MAX
STOP CUE
PRESET
PLAY / PAUSE
TRACK
PLAY
MODE
END MON INDEX
SEARCH
REPEAT
ON / OFF
PROG.PLAY
A-B
PROG. IN
PITCH
TIME
0%
PLAY / PAUSE
CUE
PLAY / PAUSE
PITCH%
REMAIN
SINGLE
(3) Stoppa avspelningen
CUE
PLAY / PAUSE PLAY / PAUSE
CUECUE
STOP
Starta avspelningen.
Tryck på PLAY/PAUSE-tangenten.
Avspelningen börjar samtidigt som signalerna sänds
vidare.
8
När avspelningen stoppas kopplas avspelningsslutet
enligt steg 2 ovan in.
Avspelningen kan stoppas på följande sätt:
9
Lyser Släckt
Blinkar (visar avspelningsläget)
Avspelningen avbryts och stoppläget
kopplas in.
Avspelningen avbryts och pickupen
återgår till avspelningens startläge
där standby-läget kopplas in.
Avspelningen avbryts och pausläget
kopplas in vid denna punkt.
LyserBlinkar
Väntläge
Väntläget kopplas in om du inte gör någonting under 30
minuter i läget för standby, paus eller manuell sökning.
I väntläget kan du trycka på PLAY/PAUSE-tangenten för att
söka efter den punkt där väntläget kopplades in och starta
avspelningen härifrån. Tryck på CUE-tangenten för att söka
efter den önskade punkten innan väntläget kopplades in
och ställa spelaren i standby-läge vid denna punkt.
(4) PLAY/PAUSE- och CUE-manövrering
• Varje gång du trycker på PLAY/PAUSE-tangenten växlar
spelaren mellan avspelning och pausläge.
• Om du trycker på CUE-tangenten under pågående
avspelning återgår pickupen till den punkt där
avspelningen började.
Schemat nedan visar de olika avspelningsmönstren då du
trycker på PLAY/PAUSE- eller CUE-tangenten.
AVSPELNING och PAUS
När du trycker på PLAY/PAUSE-tangenten börjar avspelningen
och fortsätter som pilarna i schemat visar.
Om du trycker en gång till på PLAY/PAUSE-tangenten, dvs under
avspelningen, kopplas pausläget in vid den punkten. Tryck åter
på PLAY/PAUSE-tangenten när du vill fortsätta avspelningen.
PLAY/PAUSE
-tangenten
trycks in
PLAY/PAUSE
-tangenten
trycks in
PLAY/PAUSE-tangenten trycks in
Punkt på skivan
Pausläget kopplas in vid denna punkt
Avsnitt som
spelas
Avsnitt som
spelas
AVSPELNING och CUE
AVSPELNING, PAUS och CUE
Back Cue
PLAY/PAUSEtangenten trycks in
CUE-tangenten trycks in
Punkt på skivan
Avsnitt
som spelas
När du trycker på CUE-tangenten då avspelningen startats med
PLAY/PAUSE-tangenten, återgår pickupen till den punkt där
avspelningen startades och spelaren ställs i beredskap för nästa
avspelning.
Tryck växelvis på PLAY/PAUSE-tangenten och CUE-tangenten för
att starta avspelningen upprepade gånger från samma punkt.
Denna funktion kallas “Back Cue”.
PLAY/PAUSE
-tangenten
trycks in
PLAY/PAUSE
-tangenten
trycks in
PLAY/PAUSE
-tangenten
trycks in
CUE-tangenten
trycks in
Punkt på skivan
Avsnitt
som spelas
Avsnitt
som spelas
Om pausläget kopplas in och du sedan fortsätter avspelningen
ändras punkten till vilken pickupen går tillbaka med Back Cuefunktionen.
Blinkar
Page 93

SVENSKA
94
13
2
OPEN / CLOSE
COMPACT DISC PLAYER
DN-C630
POWER
PHONES LEVEL
MIN MAX
STOP CUE
PRESET
PLAY / PAUSE
TRACK
PLAY
MODE
END MON INDEX
SEARCH
REPEAT
ON / OFF
PROG.PLAY
A-B
PROG. IN
PITCH
TIME
0%
(1) Starta avspelningen mitt i ett spår
(manuell sökning)
• Om du väljer ett spår och trycker på PLAY/PAUSEtangenten startar avspelningen från början av detta spår.
För att börja från en annan punkt i spåret, skall du följa
nedanstående anvisningar för att söka upp den önskade
punkten.
Sök upp startpunkten.
Tryck på SEARCH-tangenten.
Lyssna till ljudet och sök upp den önskade punkten.
SEARCH
PLAY / PAUSE PLAY / PAUSE
CUE
CUECUE
(2) Ändra avspelningens hastighet (tonhöjdskontroll)
•
Använd denna funktion för att spela skivor med olika
hastigheter.
•
Hastigheten kan regleras från –9,9 % till +9,9 %.
1-21-1.2.3
OPEN / CLOSE
COMPACT DISC PLAYER
DN-C630
POWER
PHONES LEVEL
MIN MAX
STOP CUE
PRESET
PLAY / PAUSE
TRACK
PLAY
MODE
END MON INDEX
SEARCH
REPEAT
ON / OFF
PROG.PLAY
A-B
PROG. IN
PITCH
TIME
0%
PITCH PITCH
PITCH PITCH
PITCH PITCH
0%
PRAKTISKA FUNKTIONER
5
1
Kontroll av avspelningens startpunkt.
Tryck på PLAY/PAUSE-tangenten.
Lyssna till avspelningen för att kontrollera startläget.
2
Återgå till startläget (cue).
Tryck på CUE-tangenten.
Pickupen återgår till avspelningens startpunkt där standbyläget kopplas in.
3
Varje gång du trycker på SEARCHtangenten ändras punkten med en
ruta. 1 ruta motsvarar 1/75 sekund.
Om du håller tangenten intryckt
ändras rutorna kontinuerligt.
Sökhastigheten ökar ju länge tid
tangenten hålls intryckt.
Lit
Avspelningen börjar
Aktivera hastighetsregleringen.
Tryck på PITCH-tangenten.
1-1
Avspelningshastigheten
sänks när
tonhöjdsreglaget skjuts
uppåt och ökar när
reglaget skjuts nedåt.
Lås avspelningshastigheten.
Tryck en gång till på PITCH-tangenten.
Tryck åter på PITCH-tangenten när du vill återgå till normal
hastighet.
Avspelningshastigheten som ställs in med tonhöjdsreglaget
låses fast. I detta läge ändras in hastigheten även om du
justera tonhöjdsreglaget.
Om avspelningshastigheten förinställts i förinställningsläget,
används istället denna hastighet.
1-2
2
3
LyserBlinkar
Blinkar
Sänker
avspelningshastigheten
Ökar
avspelningshastigheten
Lyser
Släckt
OBSERVERA:
Om du ändrar avspelningshastigheten visas inställd
hastighetsavvikelse på displayen, men skivan spelas inte
med den nya hastigheten förrän du trycker på PITCHtangenten (och indikatorn blinkar).
När avspelningshastigheten ändras, påverkas även
samplingsfrekvensen på den digitala utsignalen, och det
kan ibland vara omöjligt att ta emot de digitala signalerna
från spelaren.
Page 94

SVENSKA
95
(3) Repeterad avspelning (repetition)
1 2.6
3.5
4.55
OPEN / CLOSE
COMPACT DISC PLAYER
DN-C630
POWER
PHONES LEVEL
MIN MAX
STOP CUE
PRESET
PLAY / PAUSE
TRACK
PLAY
MODE
END MON INDEX
SEARCH
REPEAT
ON / OFF
PROG.PLAY
A-B
PROG. IN
PITCH
TIME
0%
SINGLE
TOTAL
PLAY
MODE
REPEAT
1
REPEAT
REPEAT
CUE
CUECUE
PLAY / PAUSE
PITCH%
REMAIN
SINGLE
1
REPEAT
PLAY / PAUSE
CUECUE
Välj önskat avspelningssätt.
Tryck på PLAY MODE-tangenten.
1
Välj repetitionssätt.
Tryck REPEAT-tangenten.
2
Standby vid den punkt där avspelningen börjar.
Tryck på CUE-tangenten.
Pickupen återgår till avspelningens startläge där standbyläget kopplas in.
3
Starta avspelningen.
Tryck på PLAY/PAUSE-tangenten.
Repeterad avspelning börjar.
4
Stoppa avspelningen.
Avspelningen kan avbrytas på följande sätt:
5
Urkoppling av repetitionsläget under avspelning.
Tryck på REPEAT-tangenten.
Normal avspelning fortsätter och pågår till avspelningens
slutpunkt.
6
För upprepad
avspelning av
aktuellt spår.
För upprepad
avspelning av hela
skivan.
För upprepad
avspelning av
aktuellt spår.
För upprepad
avspelning av hela
skivan.
Lyser
Lyser
Lyser
Lyser
Lyser
Lyser
LyserBlinkar
Lyser
Släckt
Lyser
Lyser
CUE
PLAY / PAUSE PLAY / PAUSE
CUECUE
STOP
Avspelningen avbryts och stoppläget
kopplas in.
Avspelningen avbryts och pickupen
återgår till avspelningens startläge
där standby-läget kopplas in.
Avspelningen avbryts och pausläget
kopplas in vid denna punkt.
LyserBlinkar
Blinkar
Lyser Släckts
REPEAT
REPEAT
Page 95

SVENSKA
96
(4) Avspelning av ett särskilt avsnitt på skivan
(A-B repetition)
•
Använd denna funktion för att bestämma en start- och en
stoppunkt för ett särskilt avsnitt på skivan som du vill spela.
1.3
2.4.5
OPEN / CLOSE
COMPACT DISC PLAYER
DN-C630
POWER
PHONES LEVEL
MIN MAX
STOP CUE
PRESET
PLAY / PAUSE
TRACK
PLAY
MODE
END MON INDEX
SEARCH
REPEAT
ON / OFF
PROG.PLAY
A-B
PROG. IN
PITCH
TIME
0%
A-B
REPEAT
A-B
SEARCH
SEARCH
A-B
REPEAT
Bestäm en startpunkt (A-punkten).
•
Använd SEARCH-tangenterna för att hitta den önskade
startpunkten.
1
Ange A-punkten.
Tryck på A-B-tangenten.
2
Bestäm stoppunkten (B-punkten).
•
Använd SEARCH-tangenterna för att hitta den önskade
stoppunkten.
3
Ange B-punkten.
Tryck på A-B-tangenten.
A-B-repetitionsläget är nu inställt.
När B-punkten har angetts under avspelningen, återgår
pickupen till A-punkten och repeterad avspelning av A-Bavsnittet börjar.
Om B-punkten ställs in från ett annat läge än avspelning,
söks A-punkten därpå upp och standby-läget kopplas in vid
A-punkten.
4
Hur man kopplar ur A-B-repetitionsläget under
avspelning.
Tryck på A-B-tangenten.
Normal avspelning fortsätter och pågår till avspelningens
slut.
5
Blinkar
Lyser
Lyser
Lyser Släckt
SläcktLyser
A-B-repetitionsavspelning
Om avspelningen startas före A-punkten, görs avspelning
till B-punkten, där pickupen återgår till A-punkten.
Avspelningen upprepas på detta sätt.
OBSERVERA:
•
Om B-punkten ligger före A-punkten, upprepas
avspelningen mellan B-punkten och A-punkten.
• End monitor-funktionen kan inte användas tillsammans
med A-B repetering.
Om avspelningen startas efter B-punkten, fortsätter
avspelningen till spårets slut och ingenting upprepas.
Avspelningens
startpunkt
Avspelningens
startpunkt
A-punkt B-punkt
A-punkt B-punkt
A-punktB-punkt
End of track
Avsnitt som
Avsnitt som repeteras
Avsnitt som repeteras
Page 96

SVENSKA
97
(1) Programmering
2.3.4 1.5
OPEN / CLOSE
COMPACT DISC PLAYER
DN-C630
POWER
PHONES LEVEL
MIN MAX
STOP CUE
PRESET
PLAY / PAUSE
TRACK
PLAY
MODE
END MON INDEX
SEARCH
REPEAT
ON / OFF
PROG.PLAY
A-B
PROG. IN
PITCH
TIME
0%
•
Du kan programmera spår på skivan för avspelning i en bestämd
ordning.
•
Upp till 25 spår kan inprogrammeras.
•
Programmerad avspelning görs enligt det valda avspelningssättet
(dvs enspårs- eller kontinuerlig avspelning) samt slutläge (dvs.
stopp, nästa eller omtagning).
PROG. IN
PROG
REMAIN
SINGLE
PROGRAMMERAD AVSPELNING
6
Aktivera programmeringsläget.
Tryck på PROG. IN-tangenten.
1
Välj ett spår som skall inprogrammeras.
Vrid på kontrollratten
(
8 – 9).
2
Bekräfta spårnumret.
Tryck på kontrollratten.
Nästa stegnummer i programmet visas.
3
Välj ett nytt spår som skall inprogrammeras.
Tryck därefter på kontrollratten.
Tidsdisplayen visar programmets totala speltid.
Upprepa steg 2, 3 och 4 för att programmera in fler spår i
önskad ordning.
4
Avsluta programmeringen.
Tryck på PROG. IN-tangenten.
Spelaren återgår därmed till normal funktion.
5
(2) Ändra ett program
Aktivera programmeringsläget.
Tryck på PROG. IN-tangenten.
1
Välj stegnumret du vill ändra.
Vrid på kontrollratten
(
8 – 9).
2
Utför programändringen.
Tryck på kontrollratten
3
För att ändra spårnumret:
Välj det nya spårnumret.
Vrid på kontrollratten
(
8 – 9).
4-1
Bekräfta spårnumret.
Tryck på kontrollratten.
Fortsätt göra ändringar i programmet enligt steg 2, 3, 4-1,
och 4-2 ovan.
4-2
Blinkar
Stegnumret blinkar
Blinkar
Stegnumret blinkar
Blinkar
Vid val av spår 3:
Valt spårnummer
Blinkar Lyser
Blinkar
Blinkar
Lyser
Blinkar
Blinkar Lyser
Stegnumret tänds
Blinkar
Blinkar
Stegnumret som skall ändras
blinkar
Lyser
Blinkar
Lyser
Blinkar
Lyser
Blinkar
Lyser
För att ändra steg 3 i programmet:
Blinkar
Valt spårnummer
Nästa stegnummer i
programmet blinkar
Tryck åter på PROG. IN-tangenten när du vill avsluta
programredigeringsläget. Spelaren återgår då till normal
funktion.
Page 97

SVENSKA
98
6-2 5-2
5-1,5-3,5-4,6-1 7
OPEN / CLOSE
COMPACT DISC PLAYER
DN-C630
POWER
PHONES LEVEL
MIN MAX
STOP CUE
PRESET
PLAY / PAUSE
TRACK
PLAY
MODE
END MON INDEX
SEARCH
REPEAT
ON / OFF
PROG.PLAY
A-B
PROG. IN
PITCH
TIME
0%
PROG
REMAIN
SINGLE
PROG
REMAIN
SINGLE
(3) Spela programmet
ON / OFF
PROG.PLAY
ON / OFF
PROG.PLAY
CUECUE
PROG
TOTAL
21
OPEN / CLOSE
COMPACT DISC PLAYER
DN-C630
POWER
PHONES LEVEL
MIN MAX
STOP CUE
PRESET
PLAY / PAUSE
TRACK
PLAY
MODE
END MON INDEX
SEARCH
REPEAT
ON / OFF
PROG.PLAY
A-B
PROG. IN
PITCH
TIME
0%
Sätta in ett nytt spår i programmet.
Välj den punkt där du vill sätta in ett nytt spår.
Vrid på kontrollratten
(
8 – 9).
5-1
Aktivera stegnummerinsättning.
Tryck på -tangenten.
7
5-2
Välj spåret som skall sättas in.
Vrid på kontrollratten
(
8 – 9).
5-3
Bekräfta det valda spåret.
Tryck på kontrollratten.
För att sätta in fler spår i programmet, upprepa steg 5-1, 5-
2, 5-3 och 5-4 ovan.
(Tryck på PROG. IN-tangenten när du vill avbryta
stegnummerinsättningsläget.)
5-4
Radera ett spår i programmet.
Välj det stegnummer du vill radera.
Vrid på kontrollratten
(
8 – 9).
6-1
Blinkar
Lyser
Lyser
Stegnumret blinkar
Blinkar
Blinkar
För att sätta in ett nytt spår som
tredje steg i programmet:
Blinkar
Lyser
Blinkar
Blinkar
Lyser
Blinkar
Lyser
Blinkar Blinkar
Valt spårnummer
Lyser
Radera spåret från programmet.
Tryck på -tangenten.
7
6-2
Avsluta programredigeringsläget.
Tryck på PROG. IN-tangenten.
7
Koppla in läget för programmerad avspelning.
Tryck på PROG. PLAY-tangenten.
I avspelningsläget för enkelt spår, visas endast det
stegnummer som anges.
I läget för kontinuerlig avspelning, visas alla stegnummer
från det första till det sista i programmet.
Första spåret i programmet söks upp och standby-läget
kopplas in.
1
Starta programmerad avspelning.
Tryck på PLAY/PAUSE-tangenten.
Programmerad avspelning börjar.
2
Blinkar
Lyser
Lyser
Nästa stegnummer blinkar
Blinkar
Spårnumret hos nästa steg i programmet
Lyser
Lyser
PLAY / PAUSE
CUE
PLAY / PAUSE
Lyser Lyser
Programmet raderas när skivhållaren öppnas.
OBSERVERA:
Programmering är inte möjlig när det inte finns någon skiva
i spelaren.
För att radera spåret i tredje stegnummer
Lyser
Lyser
Blinkar
Page 98

SVENSKA
99
(4) Förinställa program
• Man kan lagra program i förinställningsminnet. När du därefter lägger i en skiva för vilken du redan lagrat ett program, kopplas läget för
programmerad avspelning automatiskt in.
• Du
kan lagra program för upp till tre skivor.
4 2-4
2-2,2-3
OPEN / CLOSE
COMPACT DISC PLAYER
DN-C630
POWER
PHONES LEVEL
MIN MAX
STOP CUE
PRESET
PLAY / PAUSE
TRACK
PLAY
MODE
END MON INDEX
SEARCH
REPEAT
ON / OFF
PROG.PLAY
A-B
PROG. IN
PITCH
TIME
0%
PLAY
MODE
CUE
ON / OFF
PROG.PLAY
PROG
Programmera ett program.
Följ anvisningarna under “(1) Programmering” för att skapa
ett program. (Se sid 97.)
1
Aktivera förinställningsläget.
Följ anvisningarna under “(2) Förinställning” för att koppla
in förinställningsläget. (Se sid 101.)
2-1
Välj en förinställningspunkt.
Vrid på kontrollratten tills “Program 1” (eller “Program 2”
eller “Program 3”) visas.
2-2
Bekräfta valet.
Tryck på kontrollratten.
2-3
Avsluta förinställningsläget.
Tryck på PLAY MODE-tangenten.
2-4
Avspelning av en skiva som har ett förinställt
program:
Sätt i skivan för vilken ett program har förinställts.
Pickupen söker upp det första spåret i programmet och
kopplar in standby-läget.
3
Starta programmerad avspelning.
Tryck på PLAY/PAUSE-tangenten.
4
Välj ett av dessa alternativ
Teckendisplayen visar följande:
Innan ändringen Efter ändringen
Lyser Lyser
Lyser
PLAY / PAUSE
CUE
PLAY / PAUSE
Lyser Släckt
Förinställningsläget avslutas och spelaren
återgår till normal funktion.
OBSERVERA:
Det kan inträffa att speltiden inte visas korrekt under
programmerad avspelning av CD-ROM-skivor utan
innehållsförteckning (TOC).
Page 99

SVENSKA
100
FÖRINSTÄLLNING AV FUNKTIONER OCH PROCEDURER
7
(1) Förteckning över förinställningsfunktioner
• Du kan förinställa särskilda funktioner med tangenterna på spelarens frontpanel. Förinställningarna lagras i ett minne, som behåller
informationen även om strömmen stängs av.
• Funktionerna i tabellen nedan kan förinställas. Om du väljer de funktioner du ofta använder, kan du ytterligare effektivisera
spelarens bruk.
• En av förinställningsfunktionerna kan användas till att visa information om spelaren (mikroprocessor-versionen).
Förinställd funktionstyp
Förinställningstyp
Finish-läge
Strömpåslagningsläge
Auto cue
Auto-stopp
Program 1
Program 2
Program 3
Digitalutgång
Val av förinställningstyp.
Nästa funktion när avspelningen är klar.
Funktion när strömmen slås på.
In- eller urkoppling av automatiskt stopp av servofunktionerna.
In- eller urkoppling av avspelning av Program 1.
In- eller urkoppling av avspelning av Program 2.
In- eller urkoppling av avspelning av Program 3.
In- eller urkoppling av sändning av subkoder.
Preset Type 1
Finish Next
Power On Stby
CueDet. –60 dB
Sleep ON
Program 1 OFF
Program 2 OFF
Program 3 OFF
Subcode OFF
1
2
3
4
5
6
7
8
9
End monitor
In- eller urkoppling av End Monitor-funktionen samt tidsinställningen för
End Monitor.
End Mon. 10 s
10
Standby vid nästa spår
In- eller urkoppling av standby-läge vid nästa spår när CUE-tangenten
trycks in under avspelning.
Next Stb. OFF
12
CDR-skiva
Väljer om spelaren skall testspela CDR-skivor utan TOC
(innehållsförteckning).
Inställning för nollställning av förinställningar och återgång till
grundinställningarna.
Visning av mikroprocessorns versionsnummer.
Normal Disc
19
Parallell fjärrstyrning
Parallell fjärrstyrning
Parallell fjärrstyrning
Parallell fjärrstyrning
Stereo/Mono
In- eller urkoppling av acceptering av parallella fjärrstyrningssignaler.
In- eller urkoppling av sändning av utgående TALLY-signal.
Inställning för TALLY-utsignal för yttre kontroll.
Fader start-lägesval.
Val av stereo- eller monoavspelning.
Remote ENA
ST. Tally ON
INDEX 2 Tally
Fader Pause
Stereo
20
21
22
23
24
E.O.M. In- eller urkoppling av EOM och displayens tidsinställning. E.O.M. 10 s
11
Reservera nästa spår
Fade in-tid
Avspelningshastighet
Fördröjd start
Avspelningslås
Visning av rutor
Funktionsval för kontrollratten när den vrids under avspelning.
Fade in-tidsinställning.
Normal avspelningshastighet-inställning.
Tid för fördröjd start av avspelningen.
In- eller urkoppling av frontpanelens tangenter under avspelning.
In- eller urkoppling av visning av tidsrutor.
Reserve. OFF
FadeIn OFF
Normal Speed
Delay OFF
Play Lock OFF
FR Disp ON
13
14
15
16
17
18
Beskrivning
Teckendisplay
(fabriksinställning)
Nr.
När förinställningarna görs lagras samtidigt den aktuella tidsvisningen som bestämts med TIME-tangenten och avspelningssättet
som bestämts med PLAY MODE-tangenten i minnet. Dessa lägen väljs nästa gången strömmen slås på.
OBSERVERA:
På CDR-skivor utan TOC (innehållsförteckning) finns det inga fördjupningar i skivans början och slut, vilket gör att felfunktion lätt
kan uppstå, särskilt när man söker efter spår. Om ett fel uppstår, öppna skivhållaren, stäng den igen och pröv att utföra samma
moment en gång till.
In- eller urkoppling av Auto Cue och ljudstartnivån.
Ini. Preset
Ver. **** (* = number)
25
26
Nollställ förinställningar
Versionsinformation
Page 100

SVENSKA
101
(2) Förinställning
• Du kan förinställa olika funktioner med hjälper av
tangenterna på frontpanelen.
• Förinställning måste ske när det inte finns någon skiva i
spelaren och stopp- eller standby-läget är inkopplat.
2.31 5
1.4.5
OPEN / CLOSE
COMPACT DISC PLAYER
DN-C630
POWER
PHONES LEVEL
MIN MAX
STOP CUE
PRESET
PLAY / PAUSE
TRACK
PLAY
MODE
END MON INDEX
SEARCH
REPEAT
ON / OFF
PROG.PLAY
A-B
PROG. IN
PITCH
TIME
0%
PLAY
MODE
Förinställningsläget avslutas och spelaren
återgår till föregående funktion.
Teckendisplayen ändras som
visas.
Aktivera förinställningsläget.
Tryck på CUE-tangenten samtidigt som PLAY MODEtangenten hålls intryckt.
1
Välj en förinställningspunkt.
Vrid på kontrollratten
(
8 – 9).
2
Ändra förinställningspunkten.
Tryck på kontrollratten.
3
OBSERVERA:
Om meddelandet nedan visas har det uppstått ett problem
i förinställningsminnet. Kontakta i så fall en
serviceverkstad.
Avsluta förinställningsläget.
Tryck på PLAY MODE-tangenten.
4
Du kan nollställa förinställningarna till grundinställningarna,
dvs. fabriksinställningen, genom att slå på strömmen
samtidigt som PLAY MODE- och END MON-tangenterna
hålls intryckta. Grundinställningarna finns i avsnittet “(1)
Förteckning över förinställningsfunktioner”.
5
Teckendisplay
Teckendisplay
Vrid ratten medsols
för att flytta i pilarnas
riktning eller motsols
för att flytta i den
andra riktningen.
Teckendisplayen ändras som
visas
Innan ändringen Efter ändringen
Initial Error
 Loading...