

Page 1
PROFESSIONAL BUSINESS COMPANY
●
For purposes of improvement, specifications and design are subject to change without notice.
●
Please use this service manual with referring to the operating instructions without fail.
●
Some illustrations using in this service manual are slightly different from the actual set.
Ver. 1
SERVICE MANUAL
MODEL JP E3 E2 EK E2A E2C E1K EUT
DN-S700
33
TABLE TOP SINGLE CD/MP3 PLAYER
X0457 V.01 DE/CDM 0909
Page 2
SAFETY PRECAUTIONS
The following check should be performed for the continued protection of the customer and service technician.
LEAKAGE CURRENT CHECK
Before returning the unit to the customer, make sure you make either (1) a leakage current check or (2) a line to chassis
resistance check. if the leakage current exceeds 0.5 milliamps, or if the resistance from chassis to either side of the power
cord is less than 460 kohms, the unit is defective.
LASER RADIATON
Caition - Class 1M visible and invisible laser radiation when open.
Do not view directly optical instruments.
CAUTION
Please heed he points listed below during servicing and inspection.
Heed the cautions!
Spots requiring particular attention when servicing, such
as the cabinet, parts, chassis,etc., have cautions indicated
on labels. be sure to heed these causions and the cautions
indicated in the handling instructions.
Caution concerning electric shock!
(1) An AC voltage is impressed on this set, so touching
internal metal parts when the set is energized could
cause electric shock. Take care to avoid electric
shock, by for example using an isolating transformer
and gloves when servicing while the set is energized,
unplugging the power cord when replacing parts, etc.
(2) Tere are high voltage parts inside. Handle with extra
care when the set is energized.
Caution concerning disassembly and
assembly!
Through great care is taken when manufacturing parts
from sheet metal, there may in some rare cases be burrs
RQWKHHGJHVRISDUWVZKLFKFRXOGFDXVHLQMXU\LI¿QJHUV
are moved across them. Use gloves to protect your hands.
Only use designated parts!
The set's parts have specific safety properties (fire
resistance, voltage resistance, etc.). For replacement parts,
be sure to use parts which have the same poroperties. In
particular, for the important safety parts that are marked
z
on wiring diagrams and parts lists, be sure to use the
designated parts.
Be sure to mount parts and arrange the wires
as they were originally!
For safety seasons, some parts use tape, tubes or other
insulating materials, and some parts are mounted away
from the surface of printed circuit boards. Care is also
taken with the positions of the wores omsode amd clamps
are used to keep wires away from heating and high voltage
parts, so be sure to set everything back as it was originally.
◎
◎
◎
◎
◎
Inspect for safety after servicing!
Check that all screws, parts and wires removed or
disconnected for servicing have been put back in their
original positions, inspect that no parts around the area that
has been serviced have been negatively affected, conduct
an inslation check on the external metal connectors and
between the blades of the power plug, and otherwise
check that safety is ensured.
(Insulation check procedure)
Unplug the power cord from the power outlet, disconnect
the antenna, plugs, etc., and turn the power switch on.
Using a 500V insulation resistance tester, check that the
inplug and the externally exposed metal parts (antenna
terminal, headphones terminal, input terminal, etc.) is
0ȍRUJUHDWHU,ILWLVOHVVWKHVHWPXVW EHLQVSHFWHGDQG
repaired.
◎
Many of the electric and structural parts used in the set
have special safety properties. In most cases these
properties are difficult to distinguish by sight, and using
replacement parts with higher ratings (rated power and
withstand voltage) does not necessarily guarantee that
safety performance will be poreserved. Parts with safety
properties are indicated as shown below on the wiring
diagrams and parts lists is this service manual. Be sure to
replace them with parts with the designated part number.
(1) Schematic diagrams ......Indicated by the zmark.
(2) Parts lists ......Indicated by the z mark.
Using parts other than the designated
SDUWVFRXOGUHVXOWLQ HOHFWULF VKRFN ¿UHV
or other dangerous situations.
Concerning important safety
parts
CAUTION
2
DN-S700
Page 3
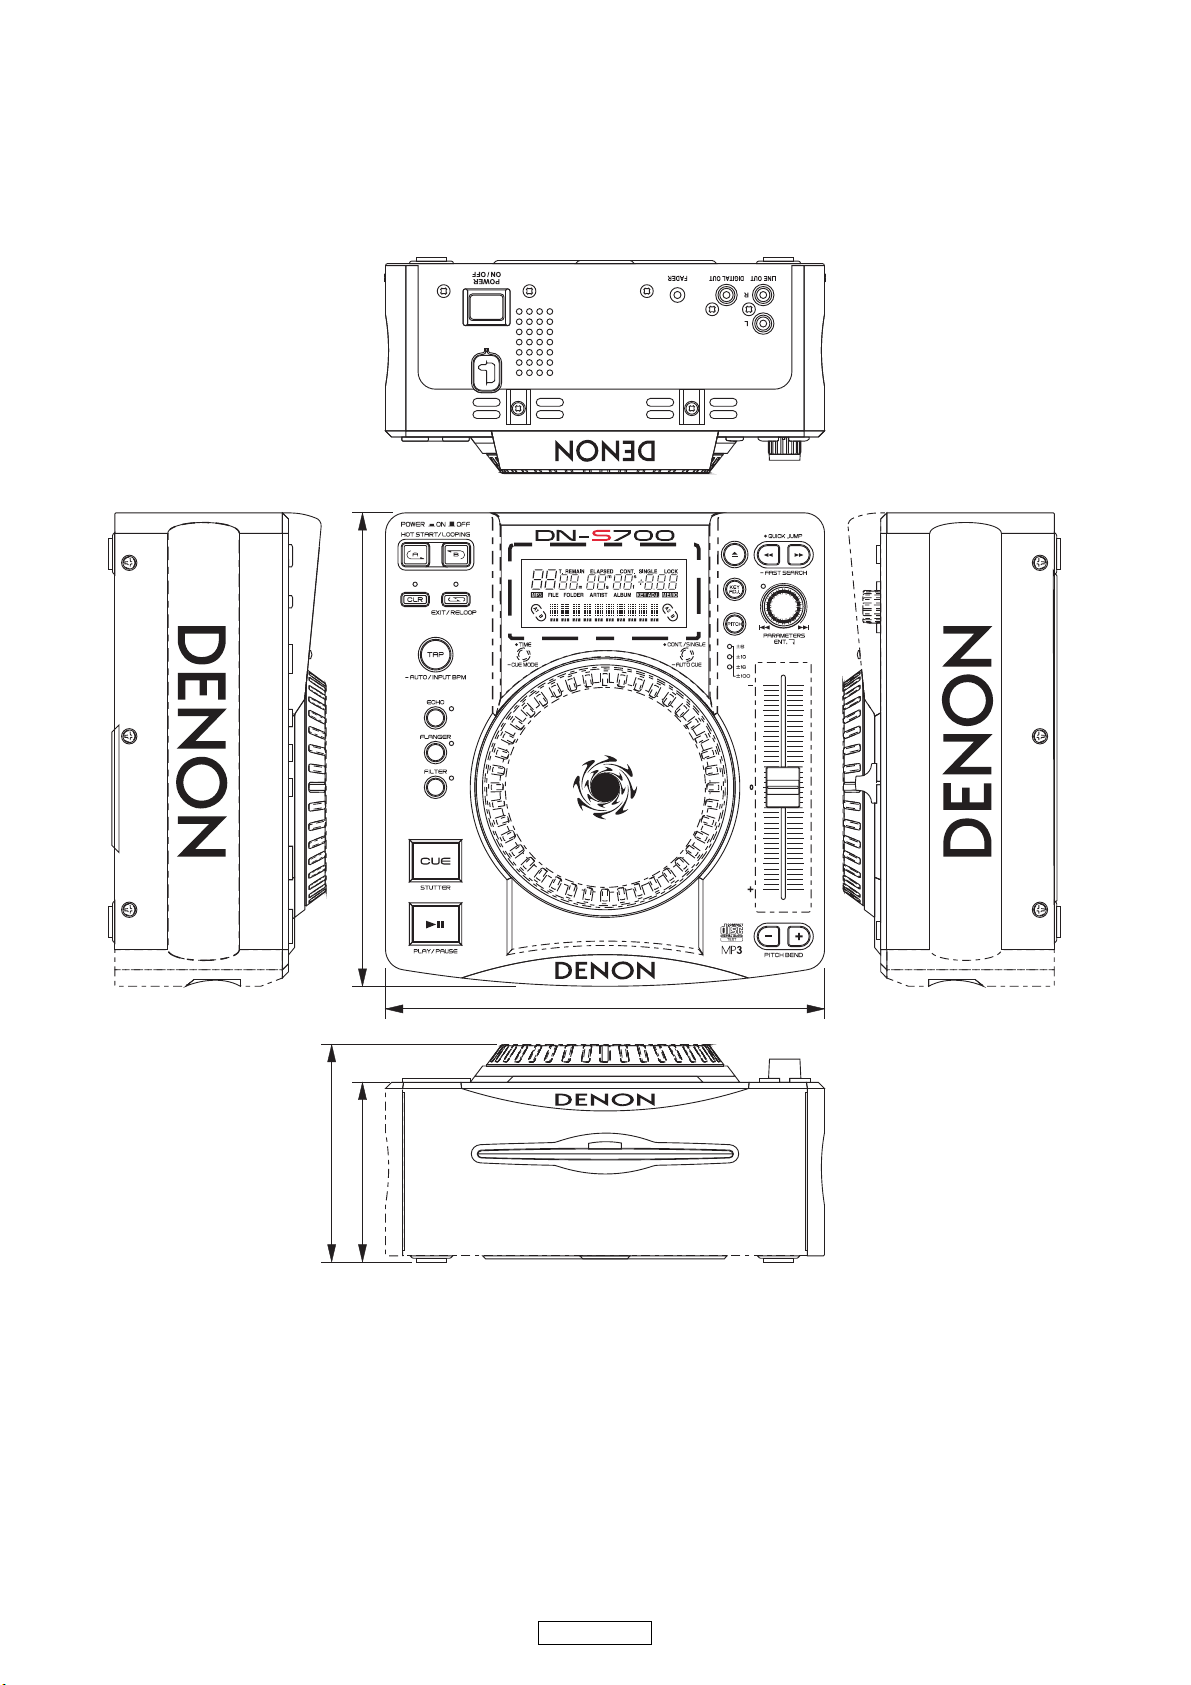
DIMENSION
215 m m
232 m m88 m m
106.5 m m
3
DN-S700
Page 4
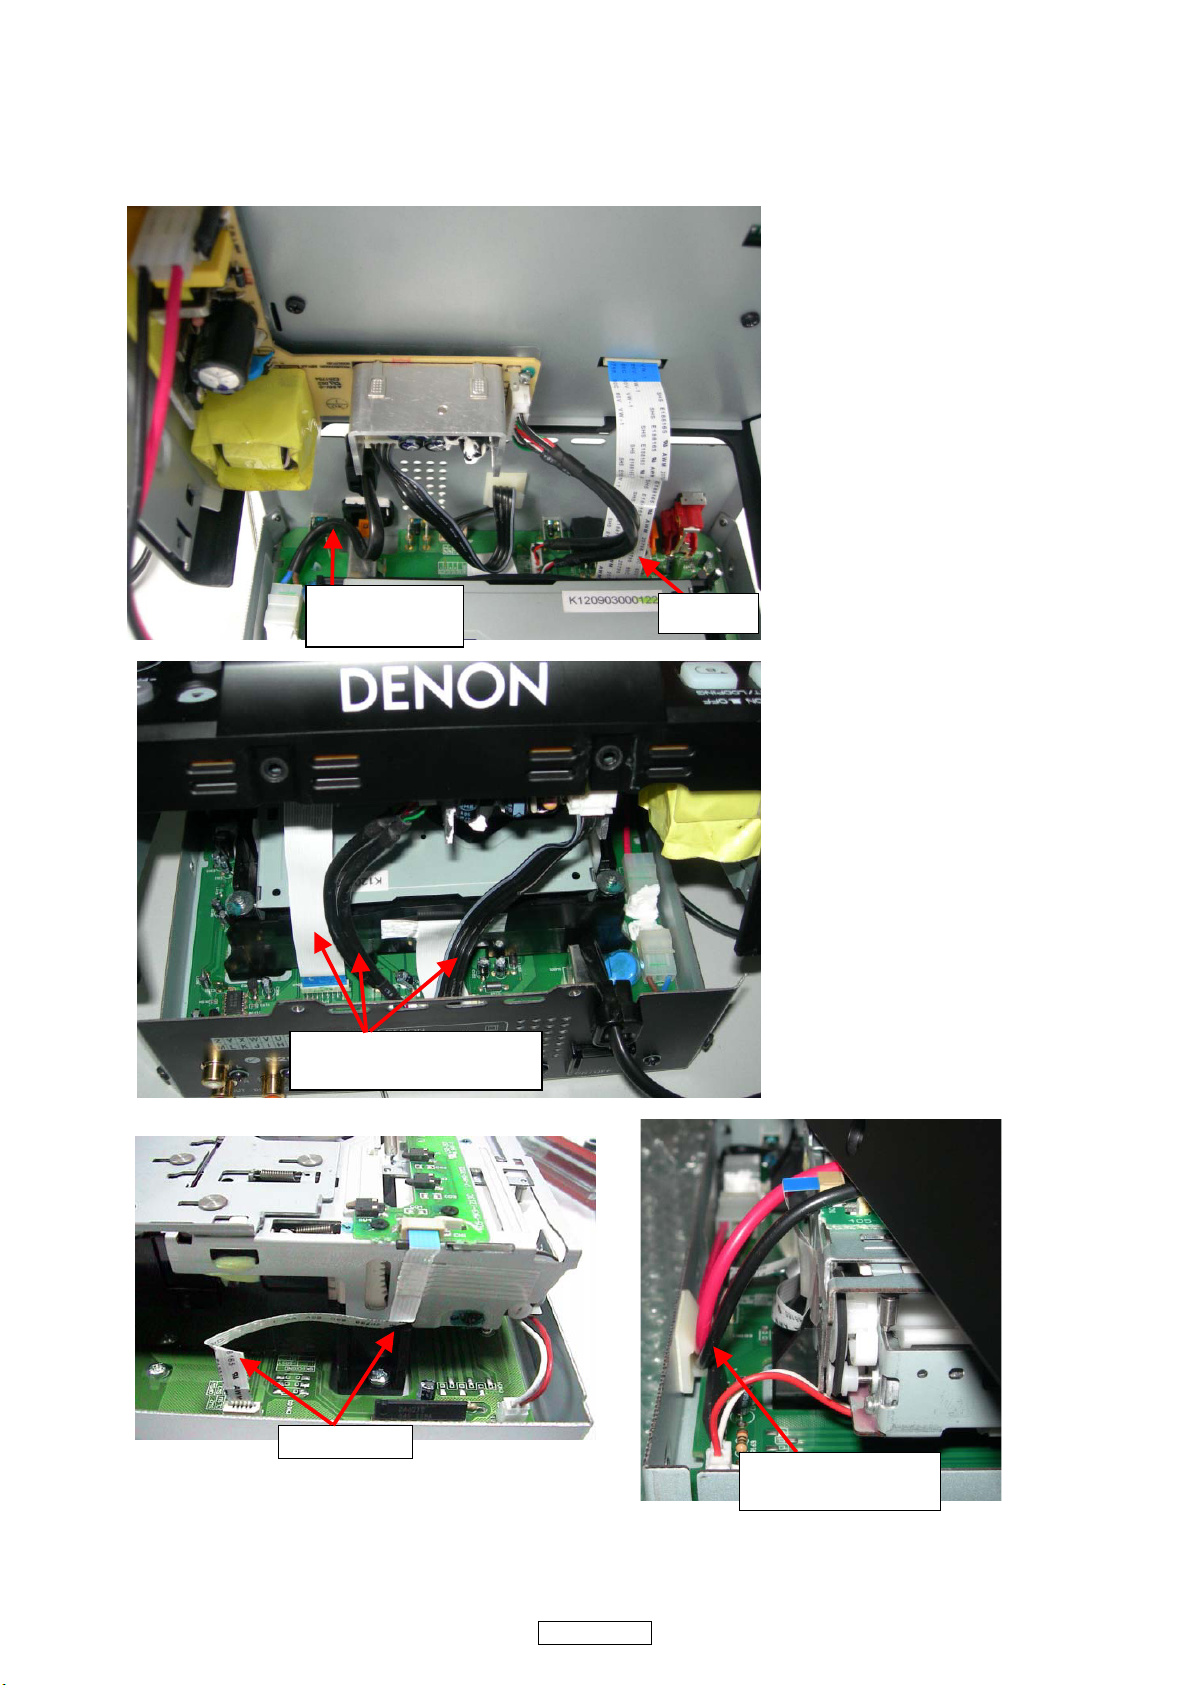
WIRE ARRANGEMENT
Bending line
AC power cord
on the switch
Put 2P wires into the
WIRE MOUNT
Wires bended inside, not
outside the cabinet
Flat cable
If wire bundles are untied or moved to perform adjustment or parts replacement etc., be sure to rearrange them neatly as they
were originally bundled or placed afterward.
Otherwise, incorrect arrangement can be a cause of noise generation.
4
DN-S700
Page 5
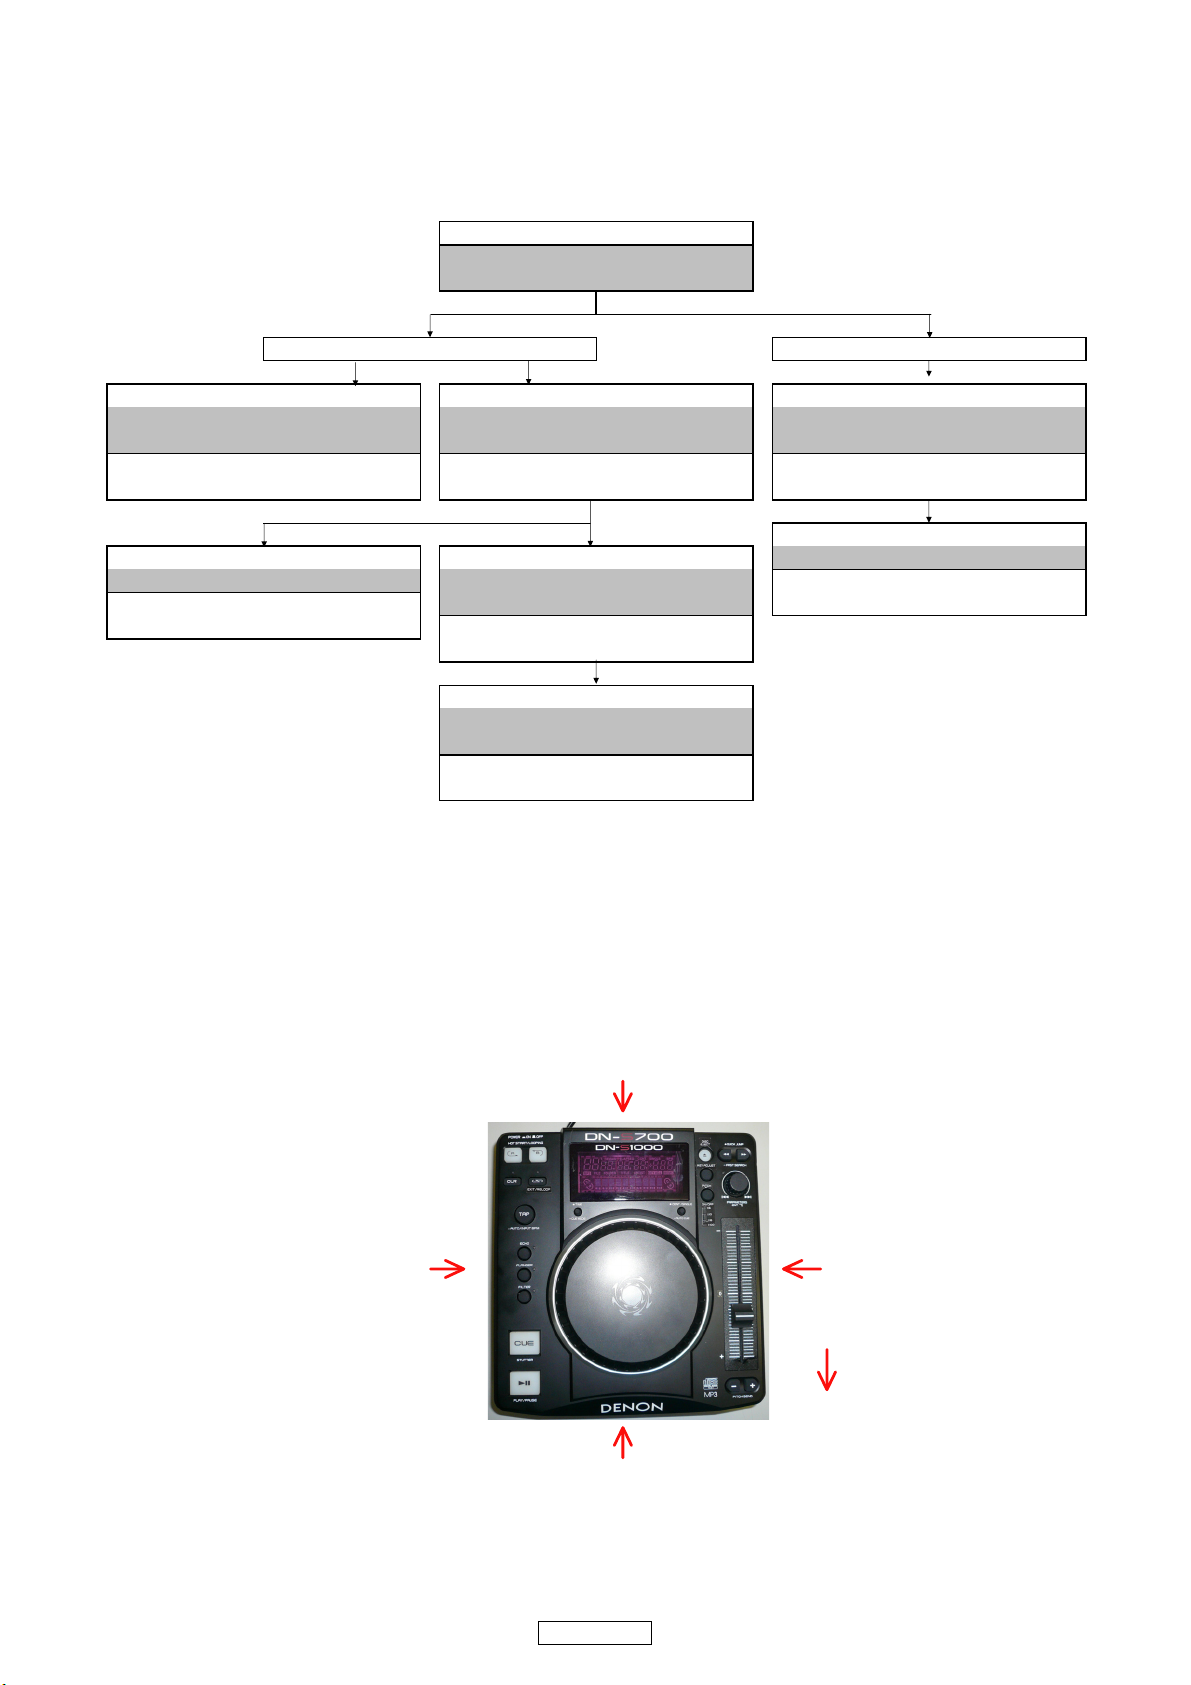
DISASSEMBLY
and "EXPLODED VIEW"
TOP
VFD/CONTROL PCB ASS'Y
(Ref. No. of EXPLODED VIEW : 7) (Ref. No. of EXPLODED VIEW : 5)
MAIN PCB ASS'Y
Refer to "EXPLODED VIEW"
BOTTOM
SLOT-IN FEEDER MECHA ASS'Y
Refer to "DISASSEMBLY 6.SLOT-IN FEEDER
MECHA ASS'Y and "EXPLODED VIEW"
SLOT-IN FEEDER MECHA ASS'Y
TURNTABLE FRAME
(Ref. No. of EXPLODED VIEW : 12)
PCB ASS'Y and "EXPLODED VIEW"
CD DOOR FRAME ASS'Y
Refer to "EXPLODED VIEW"
TURNTABLE ASS'Y
Refer to "DISASSEMBLY 4.TURNTABLE ASS'Y
TURNTABLE FRAME
SWITCHING POWER
(Ref. No. of EXPLODED VIEW : 8-2)
CD DOOR FRAME ASS'Y
and "EXPLODED VIEW"
(Ref. No. of EXPLODED VIEW : 3)
TOP / BOTTOM
Refer to "DISASSEMBLY 1.TOP / BOTTOM"
VFD/CONTROL PCB ASS'Y
Refer to "DISASSEMBLY 3.VFD/CONTROL
SWITCHING POWER
Refer to "DISASSEMBLY 2.SWITCHING POWER
and "EXPLODED VIEW"
Refer to "DISASSEMBLY 5.TURNTABLE FRAME
and "EXPLODED VIEW"
MAIN PCB ASS'Y
(Ref. No. of EXPLODED VIEW : 6)
TURNTABLE ASS'Y
(Ref. No. of EXPLODED VIEW : 2)
The viewpoint of each photograph
(Photografy direction)
[View from above]
Front side
Direction of photograph: B
Direction of photograph: D
Direction of photograph: C
Direction of photograph: A
• Disassemble in order of the arrow of the figure of following flow.
• In the case of the re-assembling, assemble it in order of the reverse of the following flow.
• In the case of the re-assembling, observe "attention of assembling" it.
About the photos used for descriptions in the “DISASSEMBLY” section.
• The direction from which the photographs used herein were photographed is indicated at "Direction of photograph: ***" at
the left of the respective photographs.
• Refer to the table below for a description of the direction in which the photos were taken.
• Photographs for which no direction is indicated were taken from above the product.
5
DN-S700
Page 6
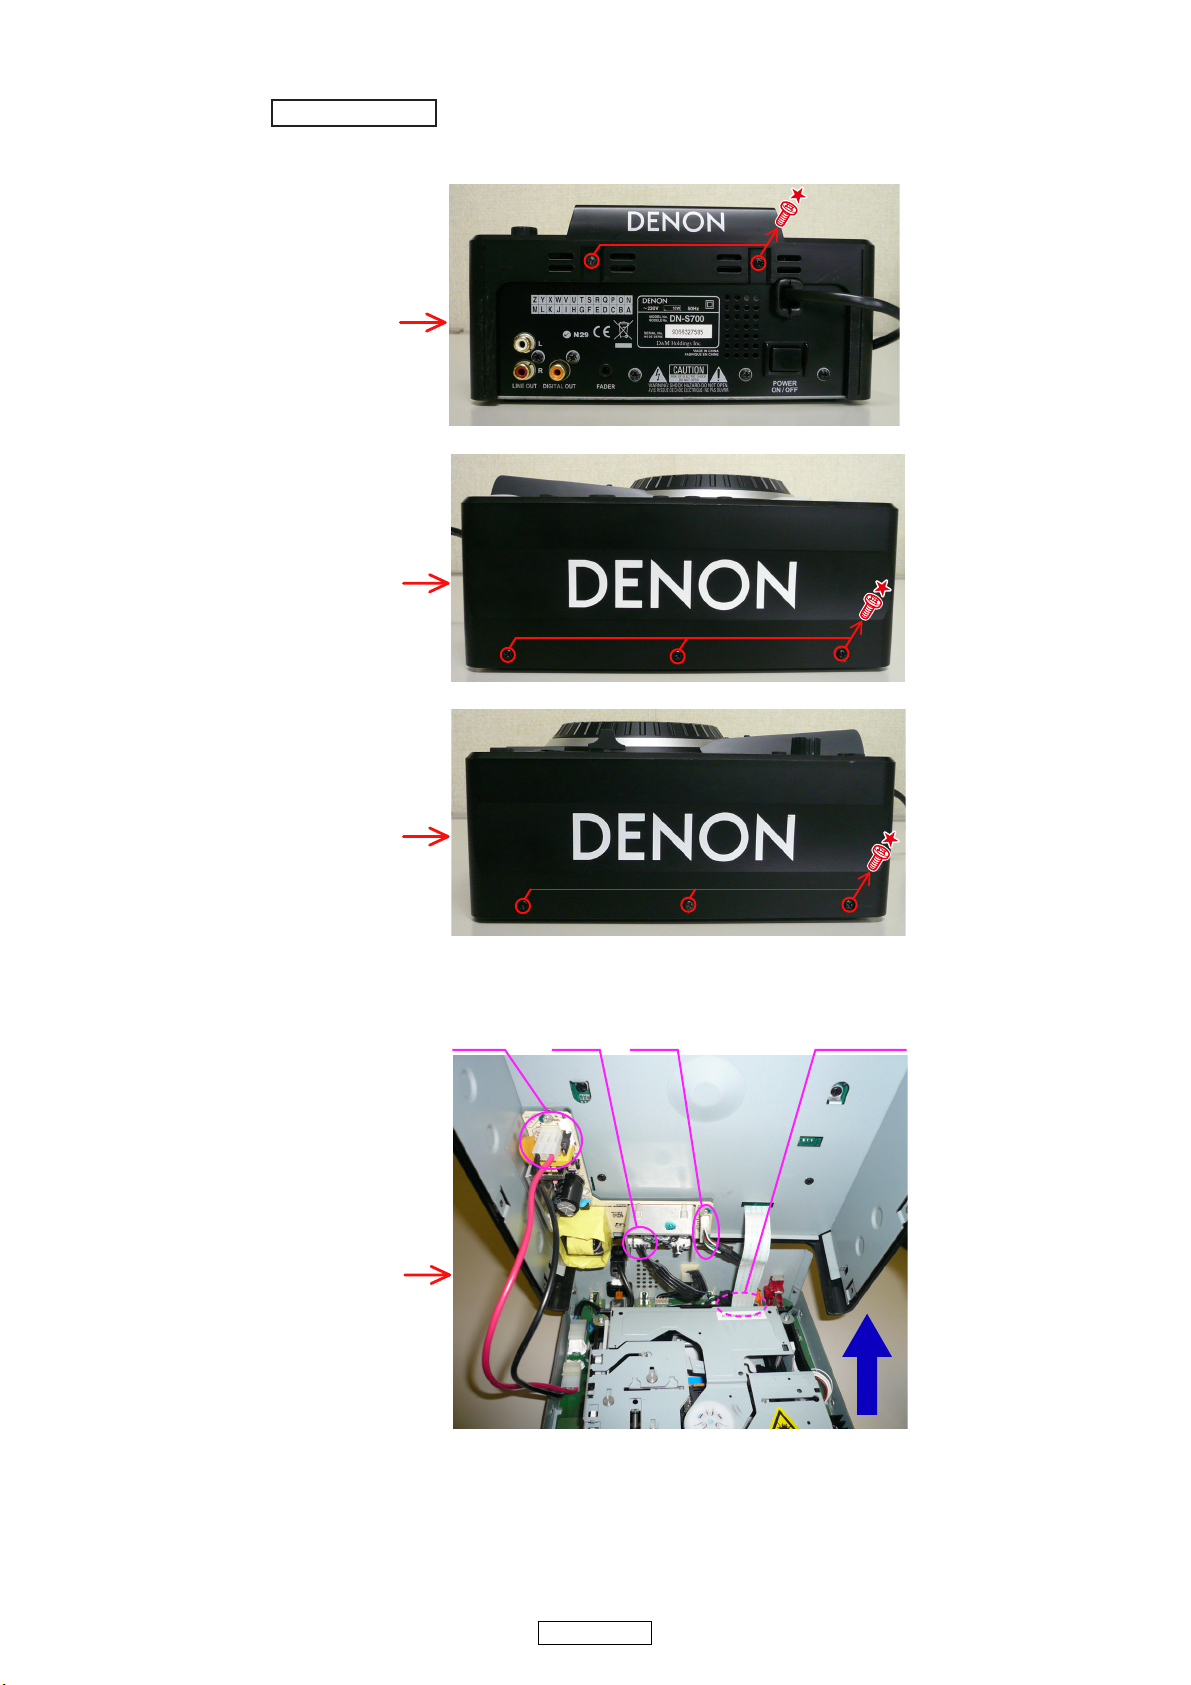
1. TOP / BOTTOM
Proceeding : TOP / BOTTOM
Direction of photograph: B
Direction of photograph: C
Direction of photograph: D
CN1 CN3 CN2 FFC cable
Direction of photograph: A
(1) Remove the screws.
(2) Disconnect the connector wires and FFC cable.
<Attention of assembling>
Rearrange the wiring of the wire. Refer to the WIRE ARRANGEMENT (4 page).
6
DN-S700
Page 7
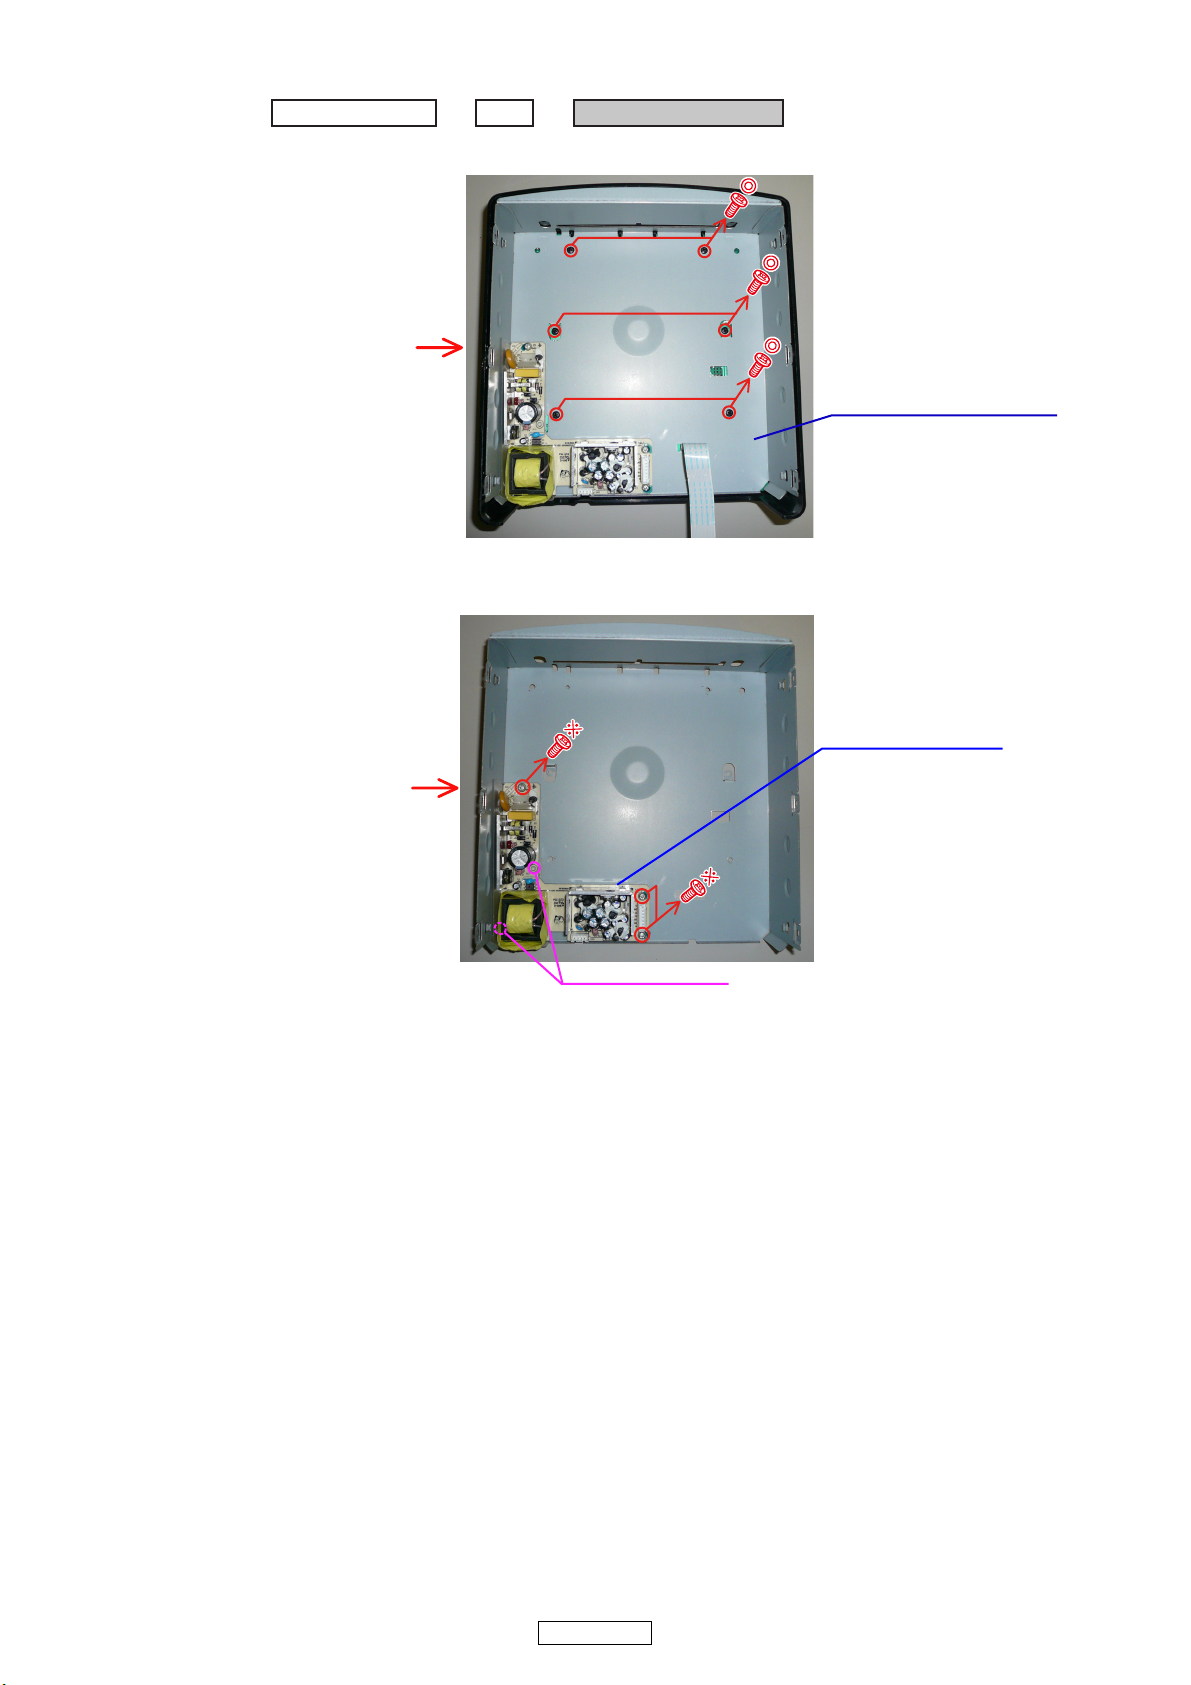
2. SWITCHING POWER
TOP / BOTTOMProceeding :
TOP
→
SWITCHING POWER
→
ISOLATION COVER ASS'Y
Direction of photograph: B
SWITCHING POWER
SPACER SUPPORT
Direction of photograph: B
(1) Remove the screws, then detach the ISOLATION COVER ASS'Y.
(2) Remove the screws
DN-S700
7
Page 8
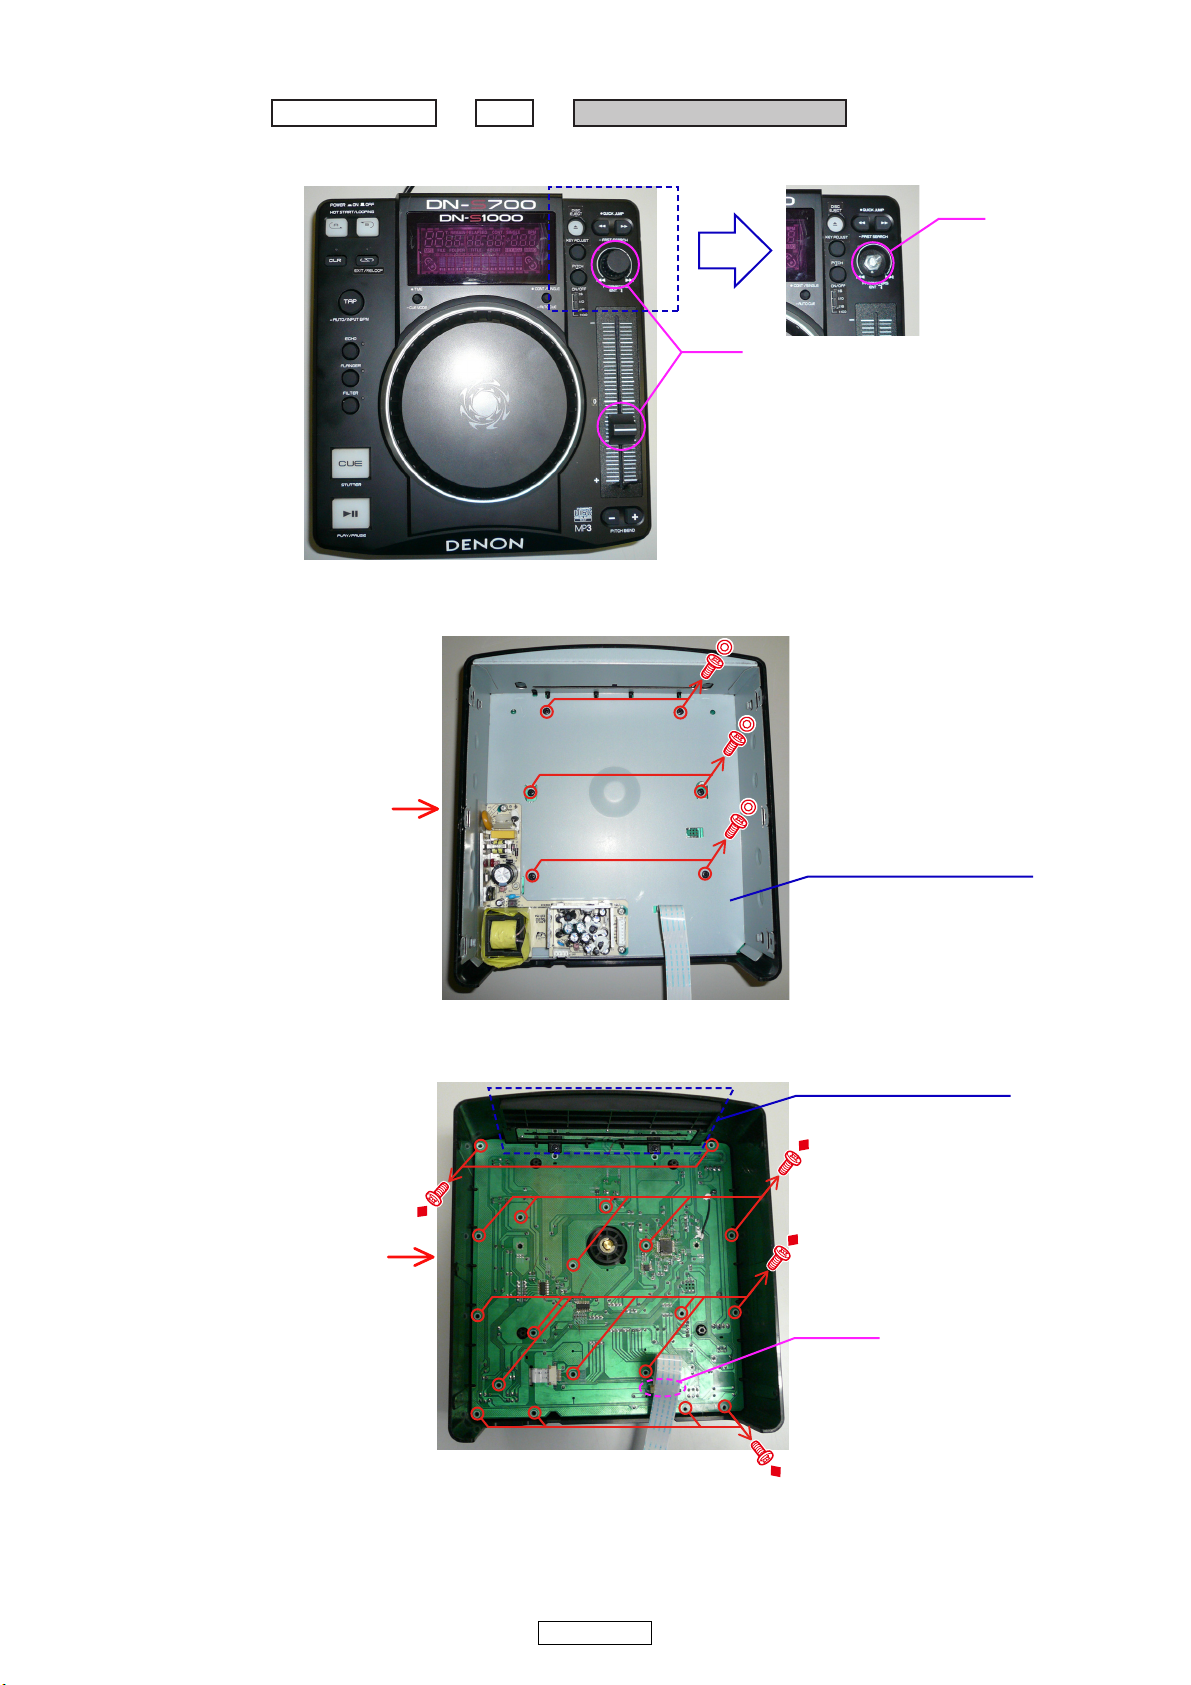
3. VFD/CONTROL PCB ASS'Y
TOP / BOTTOMProceeding :
TOP
→
VFD/CONTROL PCB ASS'Y
→
KNOB
NUT
ISOLATION COVER ASS'Y
Direction of photograph: B
Direction of photograph: B
FFC cable
CD DOOR FRAME ASS'Y
(1) Pull up the KNOB, then remove the NUT.
(2) Remove the screws, then detach the ISOLATION COVER ASS'Y.
(3) Disconnect the FFC cable, then remove the screws.
8
DN-S700
Page 9
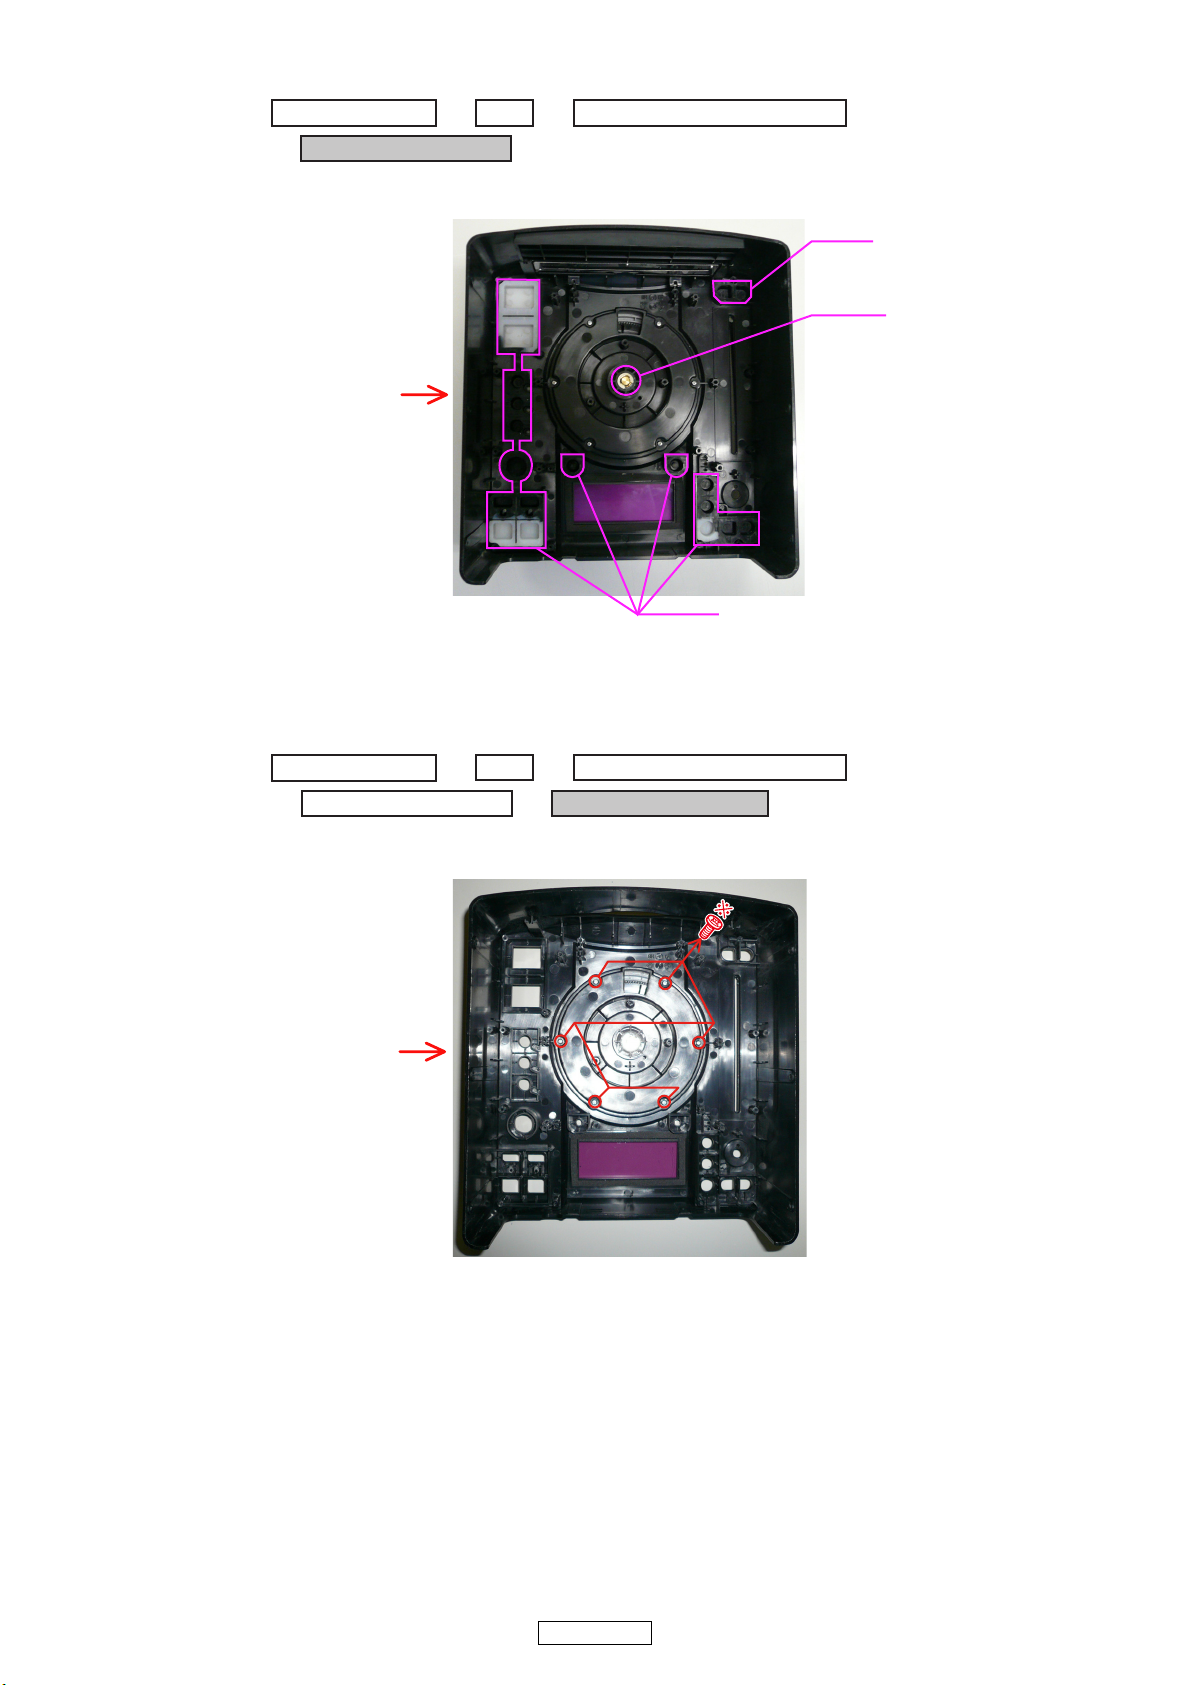
4. TURNTABLE ASS'Y
TOP / BOTTOMProceeding :
TOP
→
VFD/CONTROL PCB ASS'Y
→
TURNTABLE ASS'Y
→
Direction of photograph: B
KNOB
KNOB
E RING
TOP / BOTTOMProceeding :
TOP
→
VFD/CONTROL PCB ASS'Y
→
TURNTABLE ASS'Y
→
TURNTABLE FRAME
→
Direction of photograph: B
(1) Detach the KNOB, then remove the E RING..
5. TURNTABLE FRAME
(1) Remove the screws.
9
DN-S700
Page 10
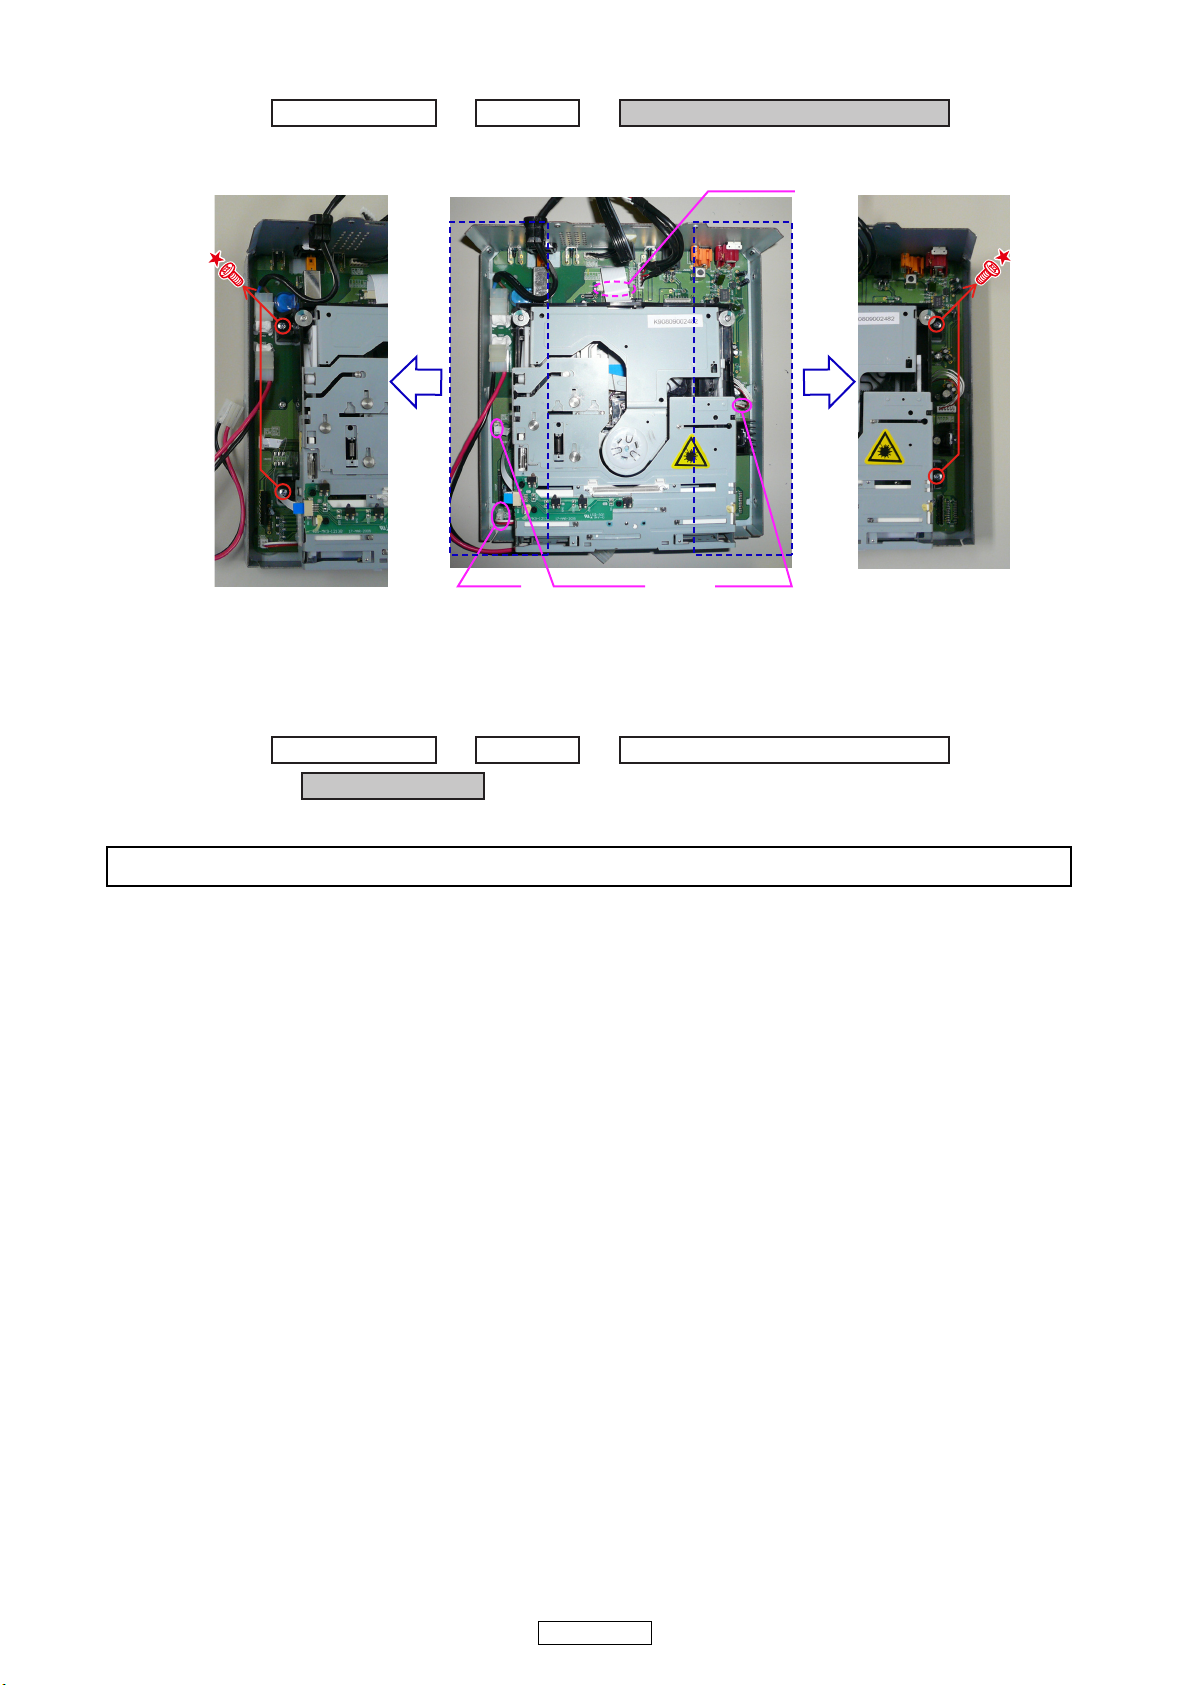
6. SLOT-IN FEEDER MECHA ASS'Y
TOP / BOTTOMProceeding :
BOTTOM
→
SLOT-IN FEEDER MECHA ASS'Y
→
CN102
FFC cable
CN11 FFC cable
TOP / BOTTOMProceeding :
BOTTOM
→
SLOT-IN FEEDER MECHA ASS'Y
→
MAIN PCB ASS'Y
→
Please refer to "EXPLODED VIEW" for the disassembly method of MAIN PCB ASS’Y.
(1) Disconnect the FFC cable and connector wires, then remove the screws.
7. MAIN PCB ASS'Y
10
DN-S700
Page 11
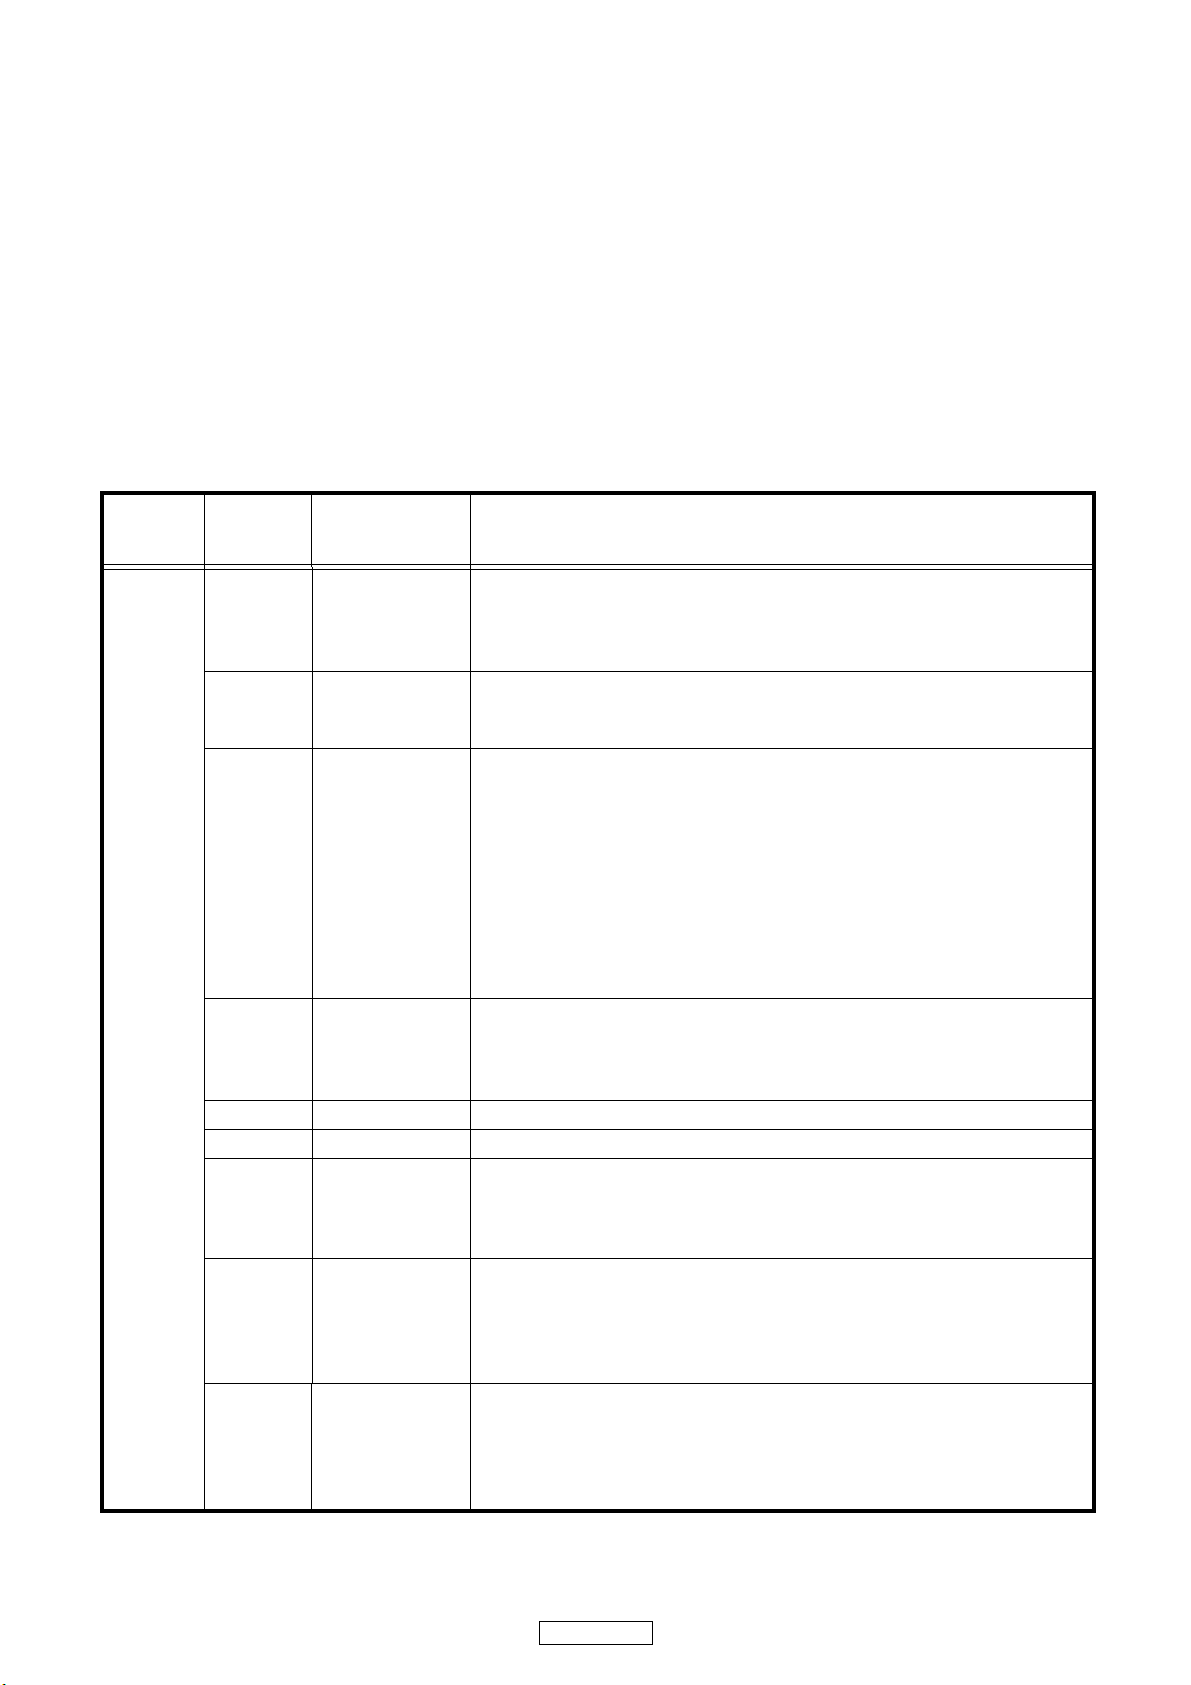
SERVICE MODE
CONFIRMING THE SERVO
What is Service Program
Service program is a special program intended for confirming servo functions etc.
This manual use as DN-S700
Required Measuring Implement
Reference disc (TCD784 or CO-74176)
1. Contents of Service Program
Turn on the power while pressing both B button and the PARAMETER knob to set the service mode of DN-S700. The various
check items can be selected with the PARAMETER knob, the various test items can be selected with the A, B,
and BEND buttons. Press either the PARAMETER knob or PLAY/PAUSE button to start the check or test and display the result.
To eject the disc, press the DISC EJECT button.
To cancel the service mode, turn the power off.
EXIT /RELOOP
PARAMETER
knob
Process No.
(TRACK
Indication)
01
02
03
04 "Fo_Gain"
05 "Tr_Gain" Select the tracking gain. Default : 2. The operation is the same as for the Fo Gain.
06 "Block_Error" The block error rate is displayed.
07 "PU._Clean"
08
09
Function
(Character-display)
µcom Version
check
(Version No.)
"TR_Signal"
"HF_Signal"
Automatic Servo
Adjustment call
(Servo Data)
Error Code Check
(Error Data)
Total Running Time
(Total Time)
Contents
A PARAMETER knob is pushed and a version is checked.
1. System µcom version No. : "Sys_XXXX"
2. DSP soft version No. : "Dsp_XXXX"
3. Servo version No. : "Ser_XXXX"
Press the PARAMETER knob to turn the tracking servo off.
When the tracking servo is off, press the PARAMETER knob to turn the tracking
servo on.
Press the PARAMETER knob to start automatic servo adjustment. When the
adjustment is completed, the adjustment data is displayed. The data can be
selected by turning the scratch disc.
1. Disc check, CD/CD-RW
2. Focus gain data
3. Focus balance data
4. Focus offset data
5. Tracking gain data
6. Tracking balance data
7. Tracking offset data
Select the focus gain. Default : 7. Select the data with the jog wheel, then press
the PARAMETER knob to enter it. The higher the value, the higher the gain, while
the lower the value, the lower the gain. The gain value enables
* Do not change this without instruction from engineering.
When the PARAMETER knob is pressed, the pickup moves towards the outer
edge of the disc. The pickup lens becomes visible through the slit in the CD mechanism plate. The lens can be cleaned using a cotton swab, etc.
(Perform this operation with the top panel/cover removed and the disc ejected.)
During normal operation, the error code for the error that occurred is displayed.
Turn the disc to select up to 10 sets of error data stored in the memory. (See the
error code table for a description of the error codes.)
・Press the PARAMETER knob to set the error data clear mode. ("Err Clear?" is
displayed.) Press the PARAMETER knob again to clear all the error data.
The total operating time of the spindle motor is displayed. A total of 65,535 hours
can be counted, in units of hours.
NOTE: If the power is turned off after 59 minutes or less, that hour is not counted.
・Press the PARAMETER knob to set the total time clear mode. ("Time Clear?" is
displayed.) Press the PARAMETER knob again to clear the total time.
±
8.
11
DN-S700
Page 12
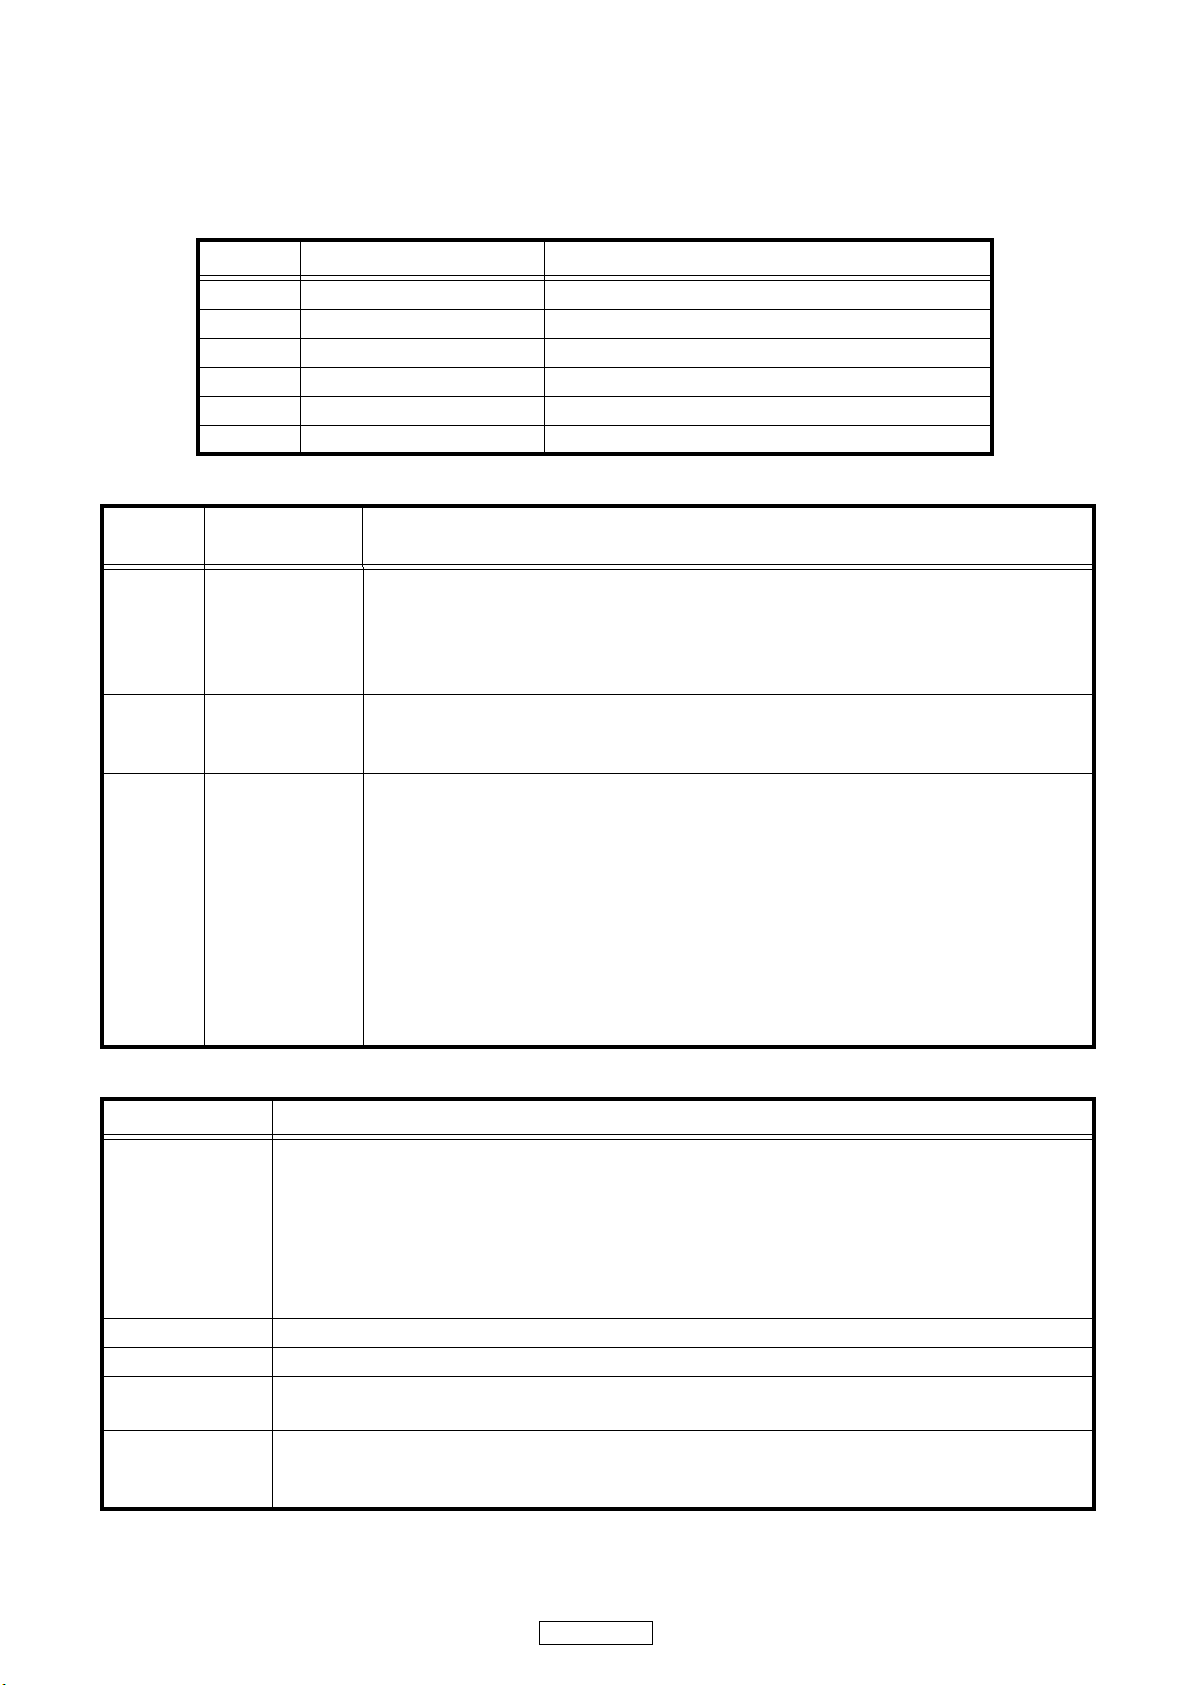
CUE button FLT all light check performed while button pressed.
BEND- button FLT all off check performed while button pressed.
The disc loading/eject roller turns. The dirt can be cleaned off the roller by gently pressing a cotton swab with
"Isopropyl alcohol", against the roller.
(Perform this operation with the top panel/cover removed and the disc ejected.)
Servo automatic adjustment read-out value
Adjustment Item Adjustment Value indication at character portions.
1 Focus Gain 10 ~ 127
2 Focus Balance -50 ~ +50
3 Focus Offset 1 ~ 3
4 Tracking Gain 10 ~ 127
5 Tracking Balance -50 ~ +50
6 Tracking Offset 1 ~ 3
2. TEST MODE
A button
B button
EXIT /
RELOOP
button
Function
(Character-display)
Heat Run Test
H/R1 Normal
Chucking Test
H/R2 Tray
System check
Sys. Check
Press button A1, then press the PLAY/PAUSE button to start the test.
The disc is ejected, loaded and played repeatedly.
For discs containing 20 tracks or less, all the tracks are played.
For discs containing 21 tracks or more, only the first and last tracks on the disc are played.
If an error occurs, the error code is displayed and the stop mode is set.
Press button A2, then press the PLAY/PAUSE button to start the test.
The disc load/eject, servo input and TOC reading operations are performed repeatedly.
If an error occurs, the error code is displayed and the stop mode is set.
Press button EXIT/RELOOP, then press the PLAY/PAUSE button to start the system check.
Once the check is completed, the results are displayed.
1. The system µcom and DSP communications are checked.
2. Reading and writing SDRAM of DSP are checked.
3. Reading and writing SDRAM of servo DSP are checked.
4. Communications between the system µcom and servo DSP are checked.
5. The CD drive operation is checked. (Inner edge switch detection is performed.)
6. The CD drive operation is checked. (Disc detection is performed.)
Once all the checks are completed, the results are displayed on the character display. The
numbers of the checks in items 1 to 6 above that were OK are displayed. If one of the checks
was not OK, the number of that item is not displayed.
Contents
3. Error Code Table (Appears only at Heat Run and Chucking Test function)
Error Code Contents
Automatic Adjustment Error
E1 00
E1 01
E1 03
E1 04
E1 05
E1 06
E2 02 Servo down during automatic Adjustment
E3 00 Unable to read TOC
E4 00
E4 01
E5 00
E5 01
E5 02
Unable to detect disk
Unable to adjust tracking offset
Unable to adjust focus fine gain
Unable to actuate focus
Unable to actuate tracking
Unable to adjust tracking fine gain
Unable to close the disc holder in the regular time
Unable to open the disc holder in the regular time
The inner SW dose not turn on
Slider error
The inner SW dose not turn off
12
DN-S700
Page 13
Error Indication
TR MIN SEC FRAM CHARACTER
displays the track No. in
which error occurred.
Displays the time at which error occurred.
H ****Operation count
E ****Error code
4. µcom update
With the DN-S700, the servo μcom, system μcom and DSP can be updated from a disc.
(1) Creating the update disc
Use the procedure described below to create the disc for updating the servo system microprocessor and DSP.
① Store the update file on a CD-R or CD-RW disc in ISO9660 Mode 1 format, then finalize the disc.
・Do not record any other software or data on the disc containing the update software.
・Do not change the file names - use the file names as distributed.
(2) Updating the servo, system µcom and DSP
① Turn on the power and load the disc created in (1) above.
When the update disc is detected, "Version Up" is displayed. Use PARAMETER knob to select servo, system or DSP to
update. And "xxxx → yyyyy" and "Push Play!" are displayed by turns.
xxxx : Old Version No., yyyy : New Version No.
② Press the PLAY/PAUSE button. "Update" is displayed and the updating procedure starts.
As updating proceeds, the playback position indicator lights in order from left to right.
NOTE: In some extremely rare cases, the updating procedure is not completed. If the updating procedure has not finished
after three minutes, there could be a problem. Turn off the power and repeat the operation from step (2) ① .
Depending on the problem that occurred, it may happen that no other operations can be performed. If this happens,
MC9S08 IC103 must be replaced. Software must be pre-recorded on the IC103. (When ordering the IC103, order
the more recent system microprocessor version number.)
③ When updating is completed, "Success" is displayed and the disc is ejected.
④ Power off and power on, repeat the operation from step(2) ① to update remaining firmware.
13
DN-S700
Page 14
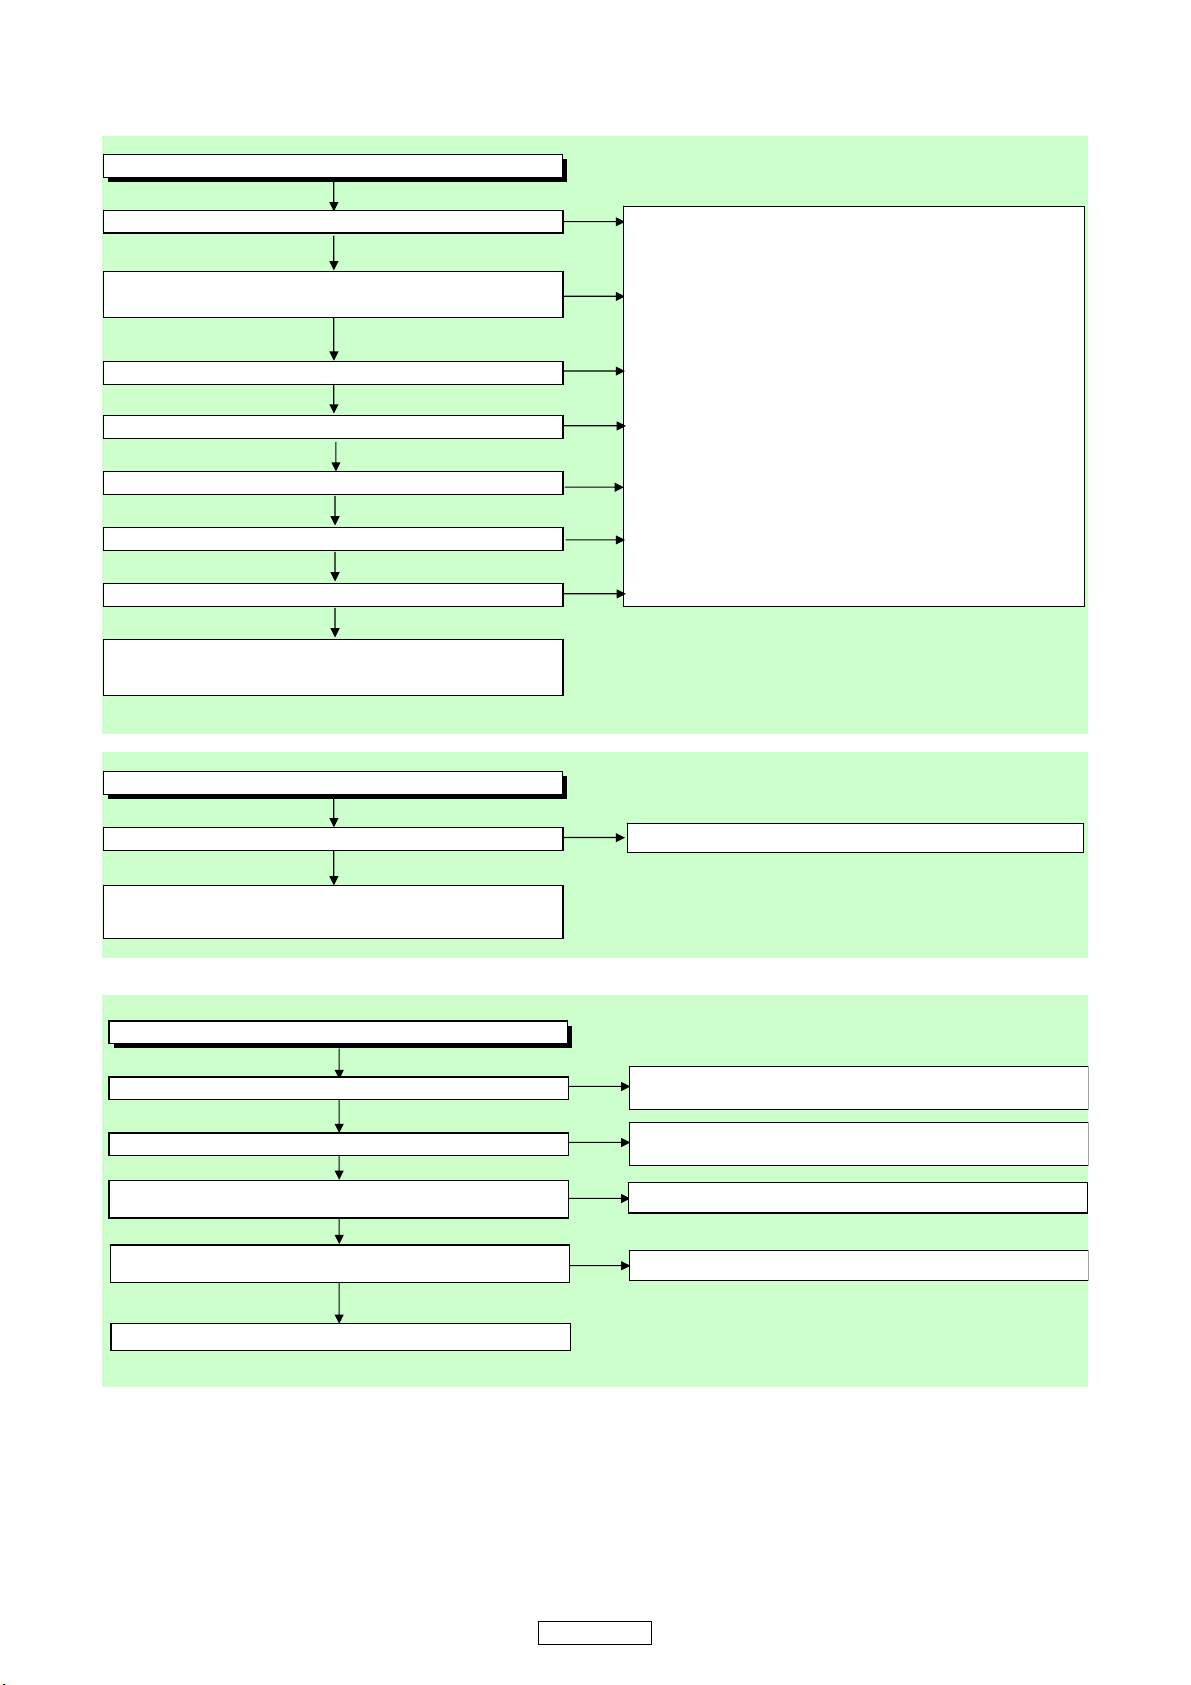
TROUBLE SHOOTING
㪝㪣㪦㪮㩷㪚㪟㪘㪩㪫㩷㪥㪦㪅㪈䇭㩿㪤㪘㪠㪥㪆㪧㪦㪮㪜㪩㩷㪬㪥㪠㪫㪀
㪝㪣㪦㪮㩷㪚㪟㪘㪩㪫㩷㪥㪦㪅㪉䇭㩿㪤㪘㪠㪥㪆㪧㪦㪮㪜㪩㩷㪬㪥㪠㪫㪀
㪝㪣㪦㪮㩷㪚㪟㪘㪩㪫㩷㪥㪦㪅㪊㩷㩿㪧㪘㪥㪜㪣㩷㪬㪥㪠㪫㪀
䇭㪫㪿㪼㩷㫇㫆㫎㪼㫉㩷㪺㪸㫅㫅㫆㫋㩷㪹㪼㩷㫋㫌㫉㫅㪼㪻㩷㫆㫅㪅
䇭㪠㫊㩷㫋㪿㪼㩷㪽㫌㫊㪼㩷㫅㪸㫆㫉㫄㪸㫃䋿
㪥㫆
㪰㪼㫊
㪠㫊㩷㫅㫆㫉㫄㪸㫃㩷㫊㫋㪸㫋㪼㩷㫉㪼㫊㫋㫆㫉㪼㪻㩷㫎㪿㪼㫅㩷㫆㫅㪺㪼㩷㫌㫅㫇㫃㫌㪾㪾㪼㪻
㫇㫆㫎㪼㫉㩷㪺㫆㫉㪻㩷㫀㫊㩷㫇㫃㫌㪾㪾㪼㪻㩷㪸㪾㪸㫀㫅㩷㪸㪽㫋㪼㫉㩷㫊㪼㫍㪼㫉㪸㫃㩷㫊㪼㪺㫆㫅㪻㫊㪖
㪰㪼㫊
㪥㫆
㪚㪿㪼㪺㫂㩷㫀㪽㩷㫋㪿㪼㫉㪼㩷㫀㫊㩷㪸㫅㫐㩷㫃㪼㪸㫂㩷㫆㫉㩷㫊㪿㫆㫉㫋㪄㪺㫀㫉㪺㫌㫀㫋㫀㫅㪾㩷㫆㫅㩷㫋㪿㪼
㫇㫉㫀㫄㪸㫉㫐㩷㫆㫉㩷㫊㪼㪺㫆㫅㪻㫃㫐㩷㪺㫀㫉㪺㫌㫀㫋㩷㪺㫆㫄㫇㫆㫅㪼㫅㫋㩷㫆㪽㩷㪪㪮㪠㪫㪚㪟㪠㪥㪞㩷㪧㪦㪮㪜㪩
㪪㪬㪧㪧㪣㪰㩷㪬㪥㪠㪫㪃㩷㪸㫅㪻㩷㫉㪼㫇㫃㪸㪺㪼㩷㫀㫋㩷㫀㪽㩷㪻㪼㪽㪼㪺㫋㫀㫍㪼㪅
㩷㩷㪠㫊㩷㫋㪿㪼㩷㪂㪎㪭㩷㫃㫀㫅㪼㩷㫍㫆㫃㫋㪸㪾㪼㩷㫅㫆㫉㫄㪸㫃㪖
㪰㪼㫊
㪥㫆
㪚㪿㪼㪺㫂㩷㫋㪿㪼㩷㫋㪿㪼㩷㫇㪼㫉㫀㫇㪿㪼㫉㫐㩷㪺㫀㫉㪺㫌㫀㫋㩷㫆㪽㩷㪤㪘㪠㪥㩷㪸㫅㪻㩷㪧㪘㪥㪜㪣㪃㩷㪸㫅㪻
㫉㪼㫇㫃㪸㪺㪼㩷㫀㫋㩷㫀㪽㩷㪻㪼㪽㪼㪺㫋㫀㫍㪼㪅
䇭㪂㪊㪅㪊㪭㩷㫀㫊㩷㫅㫆㫋㩷㫆㫌㫋㫇㫌㫋㫋㪼㪻㪅
㩷㩷㪠㫊㩷㫋㪿㪼㩷㪂㪌㪭㩷㫃㫀㫅㪼㩷㫍㫆㫃㫋㪸㪾㪼㩷㫅㫆㫉㫄㪸㫃㪖
㪰㪼㫊
㪥㫆
䇭㪪㪼㪼㩷㪝㪣㪦㪮㩷㪚㪟㪘㪩㪫㩷㪥㪦㪅㪈㩷㪓㪫㪿㪼㩷㫇㫆㫎㪼㫉㩷㪺㪸㫅㫅㫆㫋㩷㪹㪼㩷㫋㫌㫉㫅㪼㪻㩷㫆㫅㪅㪕
㪚㪿㪼㪺㫂㩷㪠㪚㪊㪇㪈㩷㪸㫅㪻㩷㫋㪿㪼㩷㫇㪼㫉㫀㫇㪿㪼㫉㫐㩷㪺㫀㫉㪺㫌㫀㫋㪃㩷㪸㫅㪻㩷㫉㪼㫇㫃㪸㪺㪼㩷㫀㫋
㫀㪽㩷㪻㪼㪽㪼㪺㫋㫀㫍㪼㪅
㪫㪿㪼㩷㪻㫀㫊㫇㫃㪸㫐㩷㩿㪭㪝㪛㪀㩷㪻㫆㪼㫊㩷㫅㫆㫋㩷㫃㫀㪾㪿㫋㩷㫌㫇㪅
㪠㫊㩷㪌㪭㩷㫍㫆㫃㫋㪸㪾㪼㩷㫊㫌㫇㫇㫃㫀㪼㪻㩷㫋㫆㩷㪍㪇㫇㫀㫅㫊㩿㪭㪛㪛㪀㩷㫆㪽㩷㪠㪚㪉㪇㪌㪖
㪰㪼㫊
㪥㫆
㪚㪿㪼㪺㫂㩷㫋㪿㪼㩷㪂㪌㪭㩷㫃㫀㫅㪼㩷㪸㫅㪻㩷㫊㪼㫉㫍㫀㪺㪼㩷㫀㫋㩷㫀㪽㩷㪻㪼㪽㪼㪺㫋㫀㫍㪼㪅
㪠㫊㩷㫋㪿㪼㫉㪼㩷㫍㫆㫃㫋㪸㪾㪼㩷㫊㫌㫇㫇㫃㫀㪼㪻㩷㫋㫆㩷㪍㪈㫇㫀㫅㫊㩿㪩㪜㪪㪜㪫㪀㩷㫆㪽㩷㪠㪚㪉㪇㪌㪖
㪠㫊㩷㪄㪊㪉㪭㩷㫍㫆㫃㫋㪸㪾㪼㩷㫊㫌㫇㫇㫃㫀㪼㪻㩷㫋㫆㩷㪌㪌㫇㫀㫅㫊㩿㪟㪭㪉㪀㩷㫆㪽㩷㪠㪚㪉㪇㪌㪖
㪰㪼㫊
㪥㫆
㪚㪿㪼㪺㫂㩷㫋㪿㪼㩷㪟㪭䋨㪄㪊㪉㪭䋩㫃㫀㫅㪼㩷㪸㫅㪻㩷㫊㪼㫉㫍㫀㪺㪼㩷㫀㫋㩷㫀㪽㩷㪻㪼㪽㪼㪺㫋㫀㫍㪼㪅
㪰㪼㫊
㪥㫆
㪘㫉㪼㩷㫋㪿㪼㩷㪽㫀㫃㪸㫄㪼㫅㫋㩷㫍㫆㫃㫋㪸㪾㪼㩷㫊㫌㫇㫇㫃㫀㪼㪻㩷㪹㪼㫋㫎㪼㪼㫅㩷㪈㫇㫀㫅㫊
㪸㫅㪻㩷㪋㪋
㫇
㫀㫅㫊㩷㫆㪽㩷㫋㪿㪼㩷㪭㪝㪛㪉㪇㪈㪖
㪰㪼㫊
㪥㫆
㪚㪿㪼㪺㫂㩷㫋㪿㪼㩷㪝㪈㪆㪝㪉㩷㫃㫀㫅㪼㩷㪸㫅㪻㩷㫊㪼㫉㫍㫀㪺㪼㩷㫀㫋㩷㫀㪽㩷㪻㪼㪽㪼㪺㫋㫀㫍㪼㪅
㪠㫊㩷㫋㪿㪼㫉㪼㩷㫍㫆㫃㫋㪸㪾㪼㩷㫊㫌㫇㫇㫃㫀㪼㪻㩷㫋㫆㩷㪍㪈㫇㫀㫅㫊㩿㪩㪜㪪㪜㪫㪀㩷㫆㪽㩷㪠㪚㪉㪇㪌㪖
㪚㪿㪼㪺㫂㩷㫋㪿㪼㩷㪩㪜㪪㪜㪫㩷㫃㫀㫅㪼㩷㪸㫅㪻㩷㫊㪼㫉㫍㫀㪺㪼㩷㫀㫋㩷㫀㪽㩷㪻㪼㪽㪼㪺㫋㫀㫍㪼㪅
㩷㩷㪠㫊㩷㫋㪿㪼㩷㪂㪌㪭㩷㫃㫀㫅㪼㩷㫍㫆㫃㫋㪸㪾㪼㩷㫅㫆㫉㫄㪸㫃㪖
㪥㫆
㩷㩷㪠㫊㩷㫋㪿㪼㪄㪏㪭㩷㫃㫀㫅㪼㩷㫍㫆㫃㫋㪸㪾㪼㩷㫅㫆㫉㫄㪸㫃㪖
䇭㪠㫊㩷㫋㪿㪼㩷㪄㪊㪉㪭㩷㫃㫀㫅㪼㩷㫍㫆㫃㫋㪸㪾㪼㩷㫅㫆㫉㫄㪸㫃㪖
㪰㪼㫊
㪰㪼㫊
㪰㪼㫊
䇭㪘㫉㪼㩷㫋㪿㪼㩷㪘㪚㪈㩷㪸㫅㪻㩷㪘㪚㪉䋨㪊㪅㪌㪭㪀㪭㩷㫃㫀㫅㪼㩷㫍㫆㫃㫋㪸㪾㪼㩷㫅㫆㫉㫄㪸㫃㪖
㪰㪼㫊
㪥㫆
㪥㫆
㪥㫆
14
DN-S700
Page 15
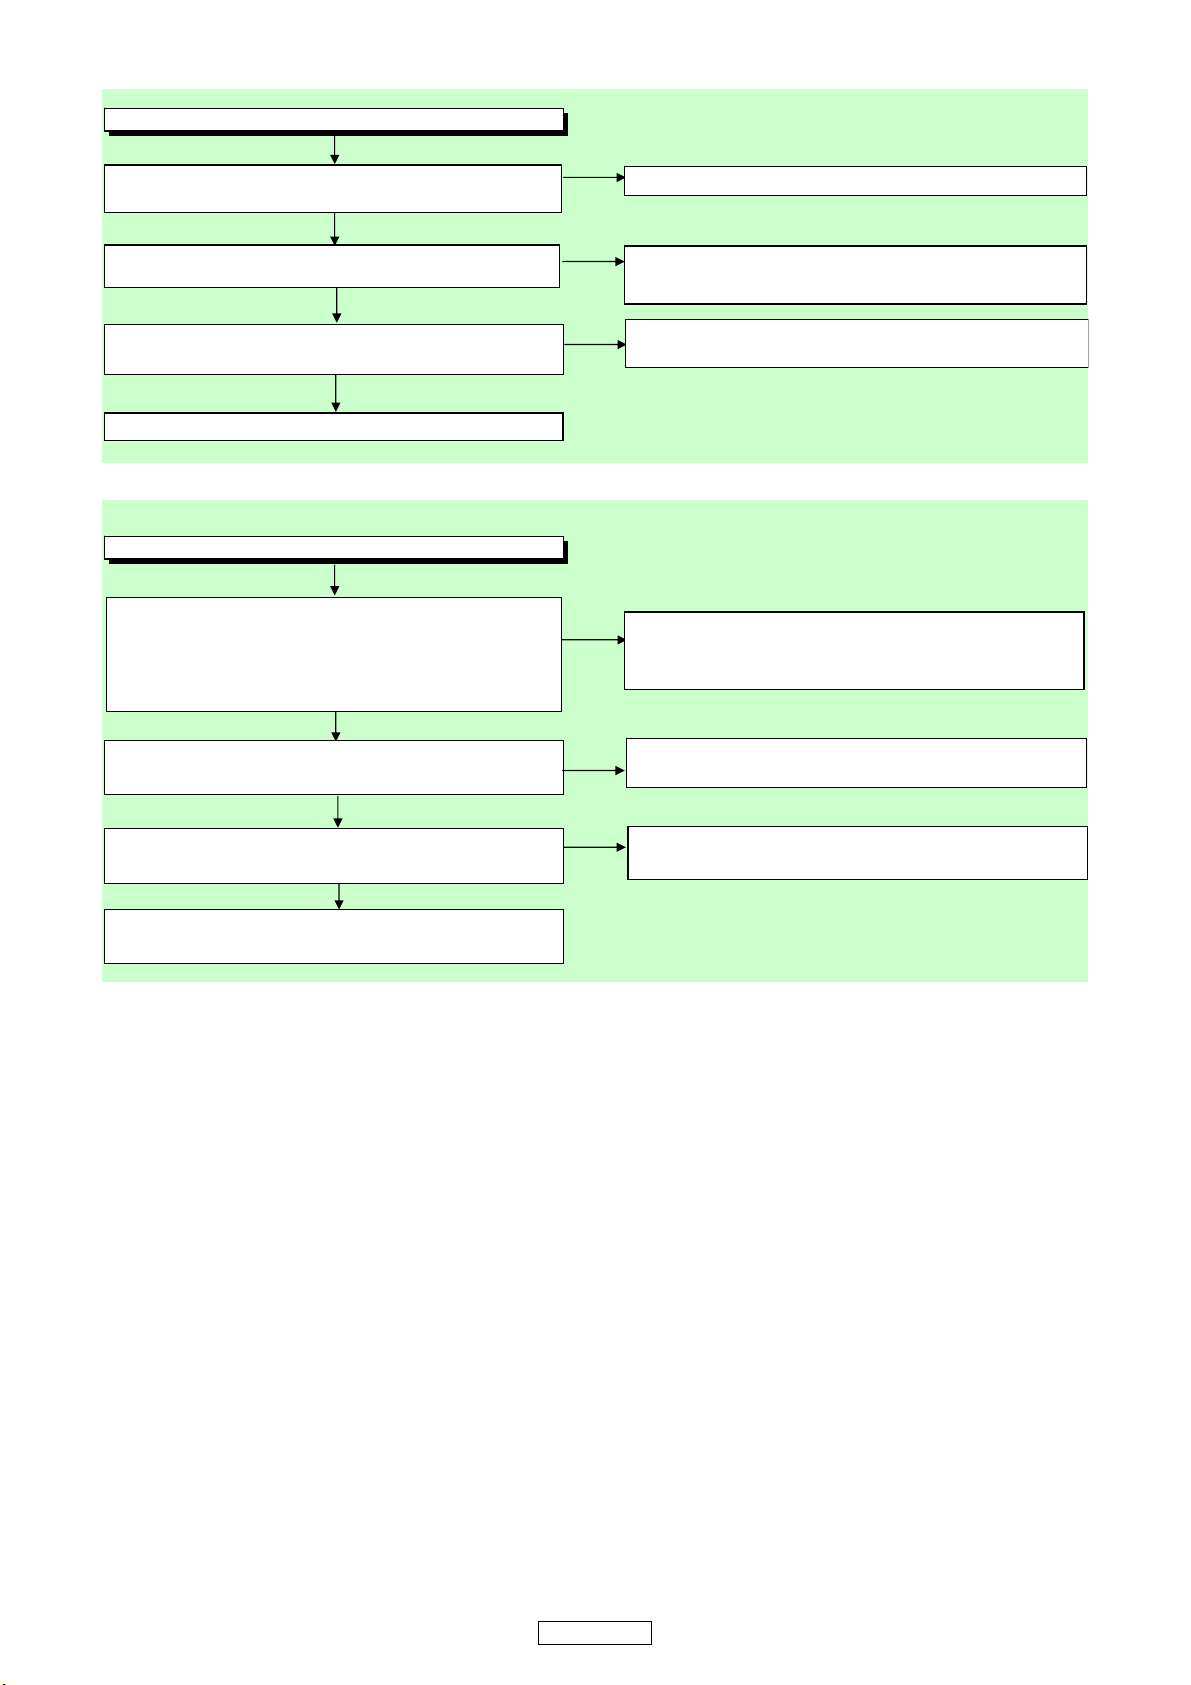
㪝㪣㪦㪮㩷㪚㪟㪘㪩㪫㩷㪥㪦㪅㪋䇭㩿㪧㪘㪥㪜㪣㩷㪬㪥㪠㪫㪀
㪝㪣㪦㪮㩷㪚㪟㪘㪩㪫㩷㪥㪦㪅㪌䇭㩿㪤㪘㪠㪥㪆㪧㪦㪮㪜㪩㩷㪬㪥㪠㪫㪀
䇭㪫㪿㪼㩷㫂㪼㫐㩷㫆㫇㪼㫉㪸㫋㫀㫆㫅㩷㫀㫊㩷㫅㫆㫋㩷㪽㫌㫅㪺㫋㫀㫆㫅㫀㫅㪾㪅
䇭㪙㫆㫋㪿㩷㪽㫌㫅㪺㫋㫀㫆㫅㫊㩷㫆㪽㩷㫇㫀㪺㫋㫌㫉㪼㩷㪸㫅㪻㩷㫊㫆㫌㫅㪻㩷㪻㫆㩷㫅㫆㫋㩷㫆㫇㪼㫉㪸㫋㪼㩷㫅㫆㫉㫄㪸㫃㫃㫐㪅
㪫㪿㪼㩷㪫㪜㪪㪫㩷㪚㪛㩷㩷㫀㫅㩷㫎㪿㫀㪺㪿㩷㫋㪼㫊㫋㩷㫊㫀㪾㫅㪸㫃㩷㩿㪤㪧㪊㪃㪮㪘㪭㪀㩷㫆㪽㩷㪈㫂㪟㫑㪆㪇㪻㪙㩷㫀㫊
㫎㫉㫀㫋㫋㪼㫅㩷㫀㫊㩷㫇㫉㪼㫇㪸㫉㪼㪻㪅㩷㪮㫀㫋㪿㩷㫋㪿㪼㩷㪫㪜㪪㪫㩷㪚㪛㩷㫇㫃㪸㫐㪹㪸㪺㫂㩷㫄㫆㪻㪼㪃㩷㫎㫀㫋㪿㩷㫋㪿㪼
㫋㪼㫊㫋㩷㫊㫀㪾㫅㪸㫃㩷㫆㪽㩷㪈㫂㪟㫑㪆㪇㪻㪙㩷㫀㫋㩷㫉㪼㫇㪼㪸㫋㫊㩷㪹㪼㫋㫎㪼㪼㫅㩷㪙㩷㪽㫉㫆㫄㩷㪘㩷㪸㫅㪻㩷㫇㫌㫋㫊
㫀㫅㩷㫇㫃㪸㫐㪹㪸㪺㫂㩷㫊㫋㪸㫋㪼㪅
㪘㫉㪼㩷㫋㪿㪼㩷㪸㫌㪻㫀㫆㩷㫊㫀㪾㫅㪸㫃㫊㩷㫆㫌㫋㫇㫌㫋㫋㪼㪻㩷㫋㫆㩷㪎㫇㫀㫅㩿㪩㪺㪿㪀㩷㪸㫅㪻㩷㪈㫇㫀㫅㩿㪣㪺㪿㪀㩷㫆㪽
㪠㪚㪈㪇㪏㪖
㪰㪼㫊
㪥㫆
㪚㪿㪼㪺㫂㩷㫋㪿㪼㩷㫀㫅㫇㫌㫋㩷㫊㫀㪾㫅㪸㫃㩷㪽㫉㫆㫄㩷㪚㪈㪍㪎㩷㪸㫅㪻㩷㪚㪈㪍㪏㩷㫋㫆㩷㪠㪚㪈㪇㪏㪃㩷㪸㫅㪻㩷㫋㪿㪼㫀㫉
㫇㪼㫉㫀㫇㪿㪼㫉㫐㪃㩷㪸㫅㪻㩷㫊㪼㫉㫍㫀㪺㪼㩷㫀㫋㩷㫀㪽㩷㪻㪼㫋㪼㪺㫋㫀㫍㪼㪅
㪮㪿㪼㫅㩷㫋㪿㪼㩷㫀㫅㫇㫌㫋㩷㫊㫀㪾㫅㪸㫃㩷㫀㫊㩷㪺㫆㫉㫉㪼㪺㫋㪃㩷㪠㪚㪈㪇㪏㩷㫀㫊㩷㫉㪼㫇㫃㪸㪺㪼㪻㪅
㪘㫉㪼㩷㫋㪿㪼㩷㪸㫌㪻㫀㫆㩷㫊㫀㪾㫅㪸㫃㫊㩷㫆㫌㫋㫇㫌㫋㫋㪼㪻㩷㫋㫆㩷㪎㫇㫀㫅㩿㪣㪺㪿㪀㩷㪸㫅㪻㩷㪈㫇㫀㫅㩿㪩㪺㪿㪀㩷㫆㪽
㪠㪚㪈㪇㪏㪖
䇭㪚㪿㪼㪺㫂㩷㫇㪼㫉㫀㫇㪿㪼㫉㫐㩷㪺㫀㫉㪺㫌㫀㫋㩷㪠㪚㪈㪇㪏㪃㩷㪸㫅㪻㩷㫊㪼㫉㫍㫀㪺㪼㩷㫀㫋㩷㫀㪽㩷㪻㪼㪽㪼㪺㫋㫀㫍㪼㪅
㪮㪿㪼㫅㩷㫋㪿㪼㩷㫇㪼㫉㫀㫇㪿㪼㫉㫐㩷㪺㫀㫉㪺㫌㫀㫋㩷㫀㫊㩷㪺㫆㫉㫉㪼㪺㫋㪃㩷㪠㪚㪈㪇㪏㩷㫀㫊㩷㫉㪼㫇㫃㪸㪺㪼㪻㪅
㪰㪼㫊
㪠㫊㩷㪤㪬㪫㪜㩷㫉㪼㫃㪼㪸㫊㪼㪻㪃㩷㪸㫅㪻㩷㪿㪸㫊㩷㪹㪼㪼㫅㩷㫋㪿㪼㩷㪫㪩㪏㪇㪍㩷㪺㫆㫃㫃㪼㪺㫋㫆㫉㩷㩿㪤㪬㪫㪜
㪻㫉㫀㫍㪼㩷㫊㫀㪾㫅㪸㫃㪀㩷㪣㩿㪄㪐㪭㪀㪖
䇭㪚㪿㪼㪺㫂㩷㪨㪈㪇㪋㩷㪸㫅㪻㩷㫋㪿㪼㩷㫇㪼㫉㫀㫇㪿㪼㫉㫐㩷㪺㫀㫉㪺㫌㫀㫋㪃㩷㪸㫅㪻㩷㫊㪼㫉㫍㫀㪺㪼㩷㫀㫋㩷㫀㪽
㪻㪼㪽㪼㪺㫋㫀㫍㪼㪅
㪰㪼㫊
䇭㪚㪿㪼㪺㫂㩷㫇㪼㫉㫀㫇㪿㪼㫉㫐㩷㪺㫀㫉㪺㫌㫀㫋㩷㪽㫉㫆㫄㩷㪎㫇㫀㫅㩷㪸㫅㪻㩷㪈㫇㫀㫅㩷㫋㫆㩷㪡㪢㪈㪇㪈㩷㫆㪽㩷㪠㪚㪈㪇㪏㪃
㪸㫅㪻㩷㫉㪼㫇㫃㪸㪺㪼㩷㫀㫋㩷㫀㪽㩷㪻㪼㪽㪼㪺㫋㫀㫍㪼㪅
㪰㪼㫊
㪥㫆
㪘㫉㪼㩷㫋㪿㪼㩷㪺㫆㫅㫋㪸㪺㫋㩷㫇㫆㫀㫅㫋㩷㪸㫅㪻㩷㫋㪿㪼㩷㫀㫅㫊㫋㪸㫃㫃㪸㫋㫀㫆㫅㩷㫊㫋㪸㫋㪼㩷㫆㪽㩷㫋㪿㪼㩷㫋㪸㪺㫋
㫊㫎㫀㫋㪺㪿㪼㫊㩷㫅㫆㫉㫄㪸㫃㪖
㪩㪼㪄㫀㫅㫊㫋㪸㫃㫃㩷㫋㪿㪼㩷㫊㫎㫀㫋㪺㪿㪼㫊㩷㪺㫆㫉㫉㪼㪺㫋㫃㫐㩷㫆㫉㩷㫉㪼㫇㫃㪸㪺㪼㩷㫋㪿㪼㩷㫇㫆㫆㫉㩷㫊㫎㫀㫋㪺㪿㪅
㪰㪼㫊
㪥㫆
㪛㫆㪼㫊㩷㪣㪜㪛㩷㫃㫀㪾㪿㫋㩷㪺㫆㫉㫉㪼㪺㫋㫃㫐㩷㪖
㪚㪿㪼㪺㫂㩷㫋㪿㪼㩷㪠㪚㪉㪇㪊䇮㪠㪚㪉㪇㪋㩷㪸㫅㪻㩷㫋㪿㪼㫀㫉㩷㫇㪼㫉㫀㫇㪿㪼㫉㫐㪃㩷㪸㫅㪻㩷㫊㪼㫉㫍㫀㪺㪼㩷㫀㫋㩷㫀㪽
㪻㪼㫋㪼㪺㫋㫀㫍㪼㪅
㪰㪼㫊
㪥㫆
㪮㪿㪼㫅㩷㫇㫉㪼㫊㫊㫀㫅㪾㩷㪼㪸㪺㪿㩷㫊㫎㫀㫋㪺㪿㪼㫊㪃㩷㪻㫆㩷㫋㪿㪼㩷㫍㫆㫃㫋㪸㪾㪼㩷㫆㪽㩷㪼㪸㪺㪿㩷㫇㫀㫅㩷㫆㪽
㪠㪚㪉㪇㪈㩿㫊㪿㫆㫎㫅㩷㪹㪼㫃㫆㫎㪀㩷㫀㫅㪺㫉㪼㪸㫊㪼㪖
㪚㪿㪼㪺㫂㩷㫋㪿㪼㩷㫊㫎㫀㫋㪺㪿㪼㫊㩷㪸㫅㪻㩷㫋㪿㪼㫀㫉㩷㫇㪼㫉㫀㫇㪿㪼㫉㫐㪃㩷㪸㫅㪻㩷㫊㪼㫉㫍㫀㪺㪼㩷㫀㫋㩷㫀㪽
㪻㪼㫋㪼㪺㫋㫀㫍㪼㪅
㪩㪼㫇㫃㪸㪺㪼㩷㪠㪚㪉㪇㪈㪅
㪥㫆
㪥㫆
15
DN-S700
Page 16
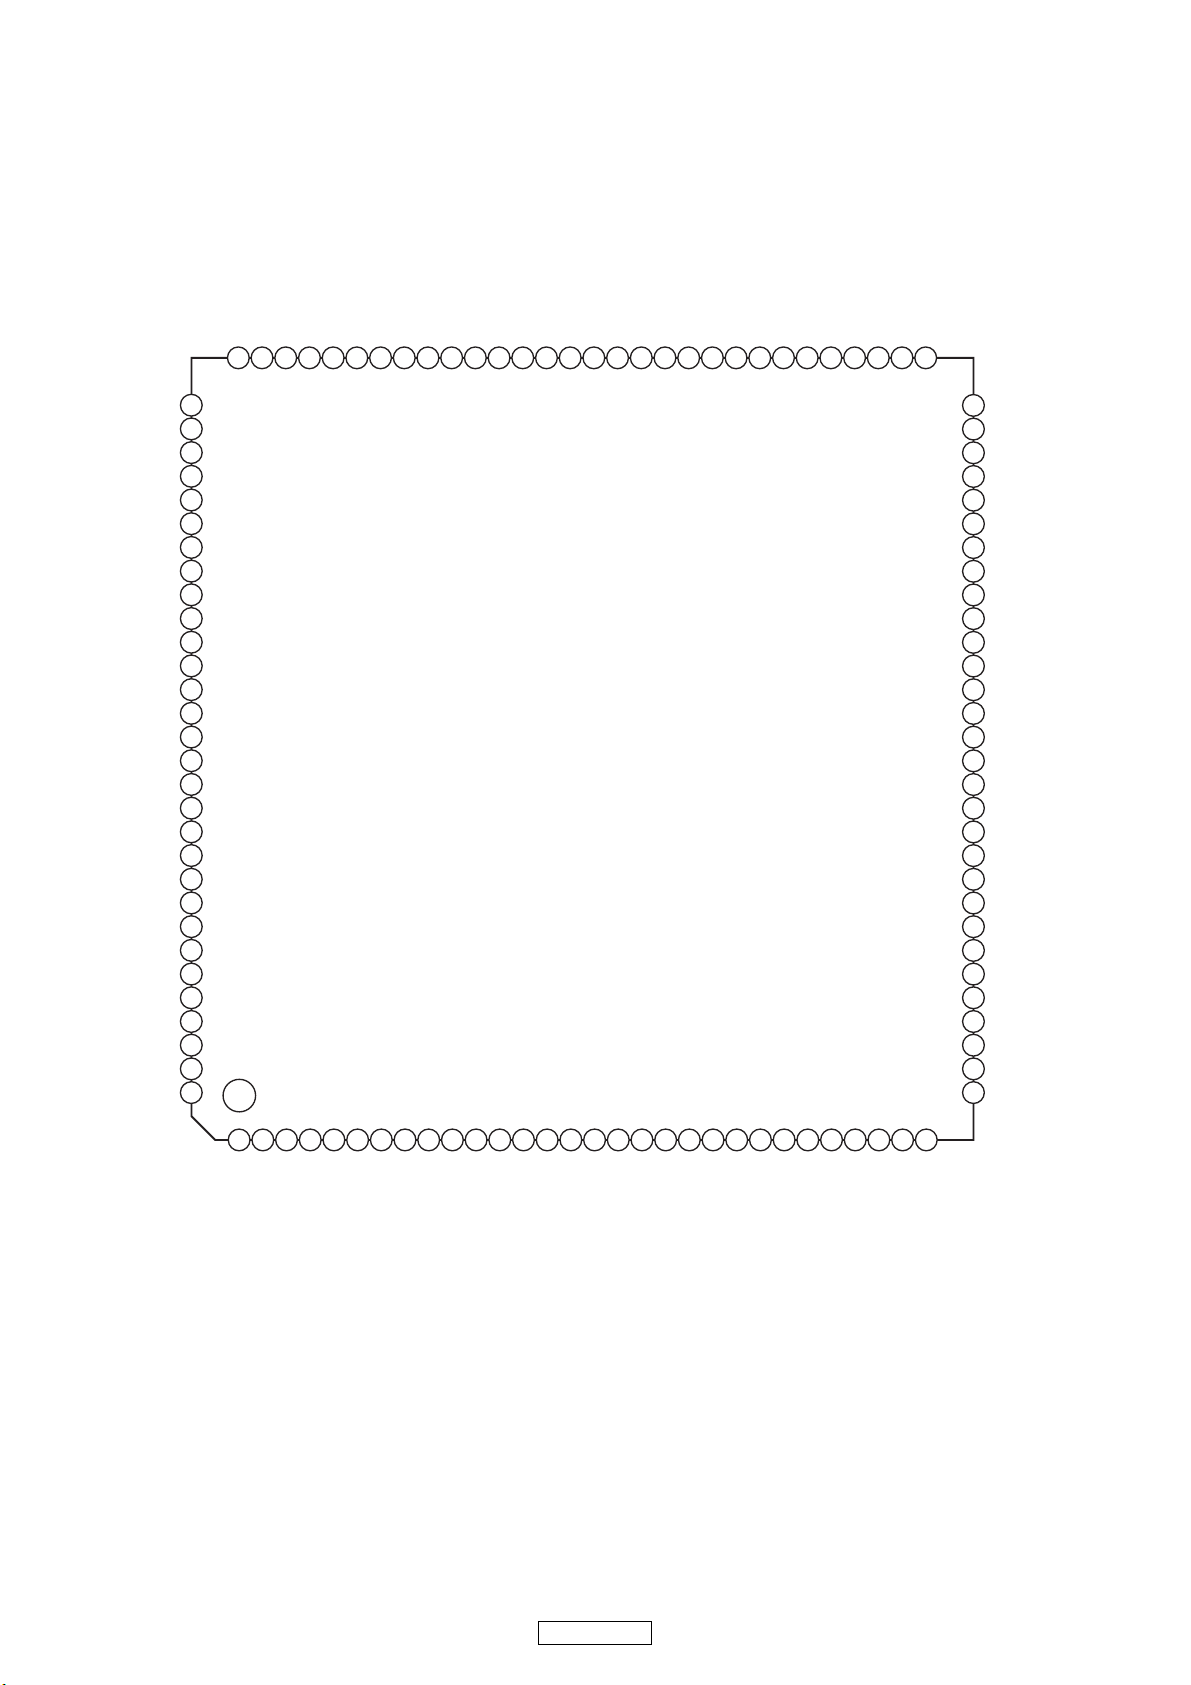
SEMICONDUCTORS
36
35
34
31
32
33
2 3 4 5 6 7 8 9 10 11 12 13 14 15 16 17 18 19 20 21 22 23 24 25 26 27 28 29 301
40
39
38
37
41
42
43
44
45
46
47
48
49
50
51
52
53
54
55
56
57
58
59
60
70 69 68 67 63646566 61627172
97
96
95
94
91
92
93
99
98
737481828384 7576777888 87 86 85 79808990
100
101
102
103
104
105
106
107
108
109
110
111
112
113
114
115
116
117
118
119
120
RMUT
IOV
DD
0
NC
AV
DD
2
AOUT2
VREFR
AV
SS
2
AV
SS
1
VREFL
AOUT1
AV
DD
1
XV
DD
XTAI
XTAO
XVSSNC
IOV
SS
2
TES1
TEST
DOUT
IOV
DD
2
EMPHI
EMPH
V
DD
BCK
PCMD
VSSLRCK
LRCKI
PCMDI
LMUT
BCKI
NC
NC
XTSL
DDCR
IOV
SS
0
AV
SS
5
XTACN
DDVRSEN
SQSO
DDVROUT
SQCK
AV
DD
5
SBSO
PCO
EXCK
FILI
XRST
FILO
SYSM
CLTV
DATA
AV
SS
3
V
SS
VCTL
XLAT
VPCO
CLOK
ASYO
V
DD
ASYI
SENS
BIAS
SCLK
AV
DD
3
ATSK
RFACI
WFCK
RFACO
XUGF
AV
SS
4
XPCK
RFC
GFS
NC
C2PO
PD
SCOR
LD
V
DD
EQ_IN
C4M
AC_SUM
WDCK
PDSENS
COUT
RFDCO
NC
AV
DD
4
MIRR
DFCT
FOK
V
SS
LOCK
MDP
SSTP
IOV
SS
1
SFDR
SRDR
TFDR
TRDR
FFDR
FRDR
IOV
DD
1
AV
DD
0
AV
SS
0
NC
E
F
TEI
TEO
FEI
FEO
VC
A
B
C
D
NC
Only major semiconductors are shown, general semiconductors etc. are omitted to list.
The semiconductor which described a detailed drawing in a schematic diagram are omitted to list.
1. IC’s
CXD3059 (IC101)
16
DN-S700
Page 17
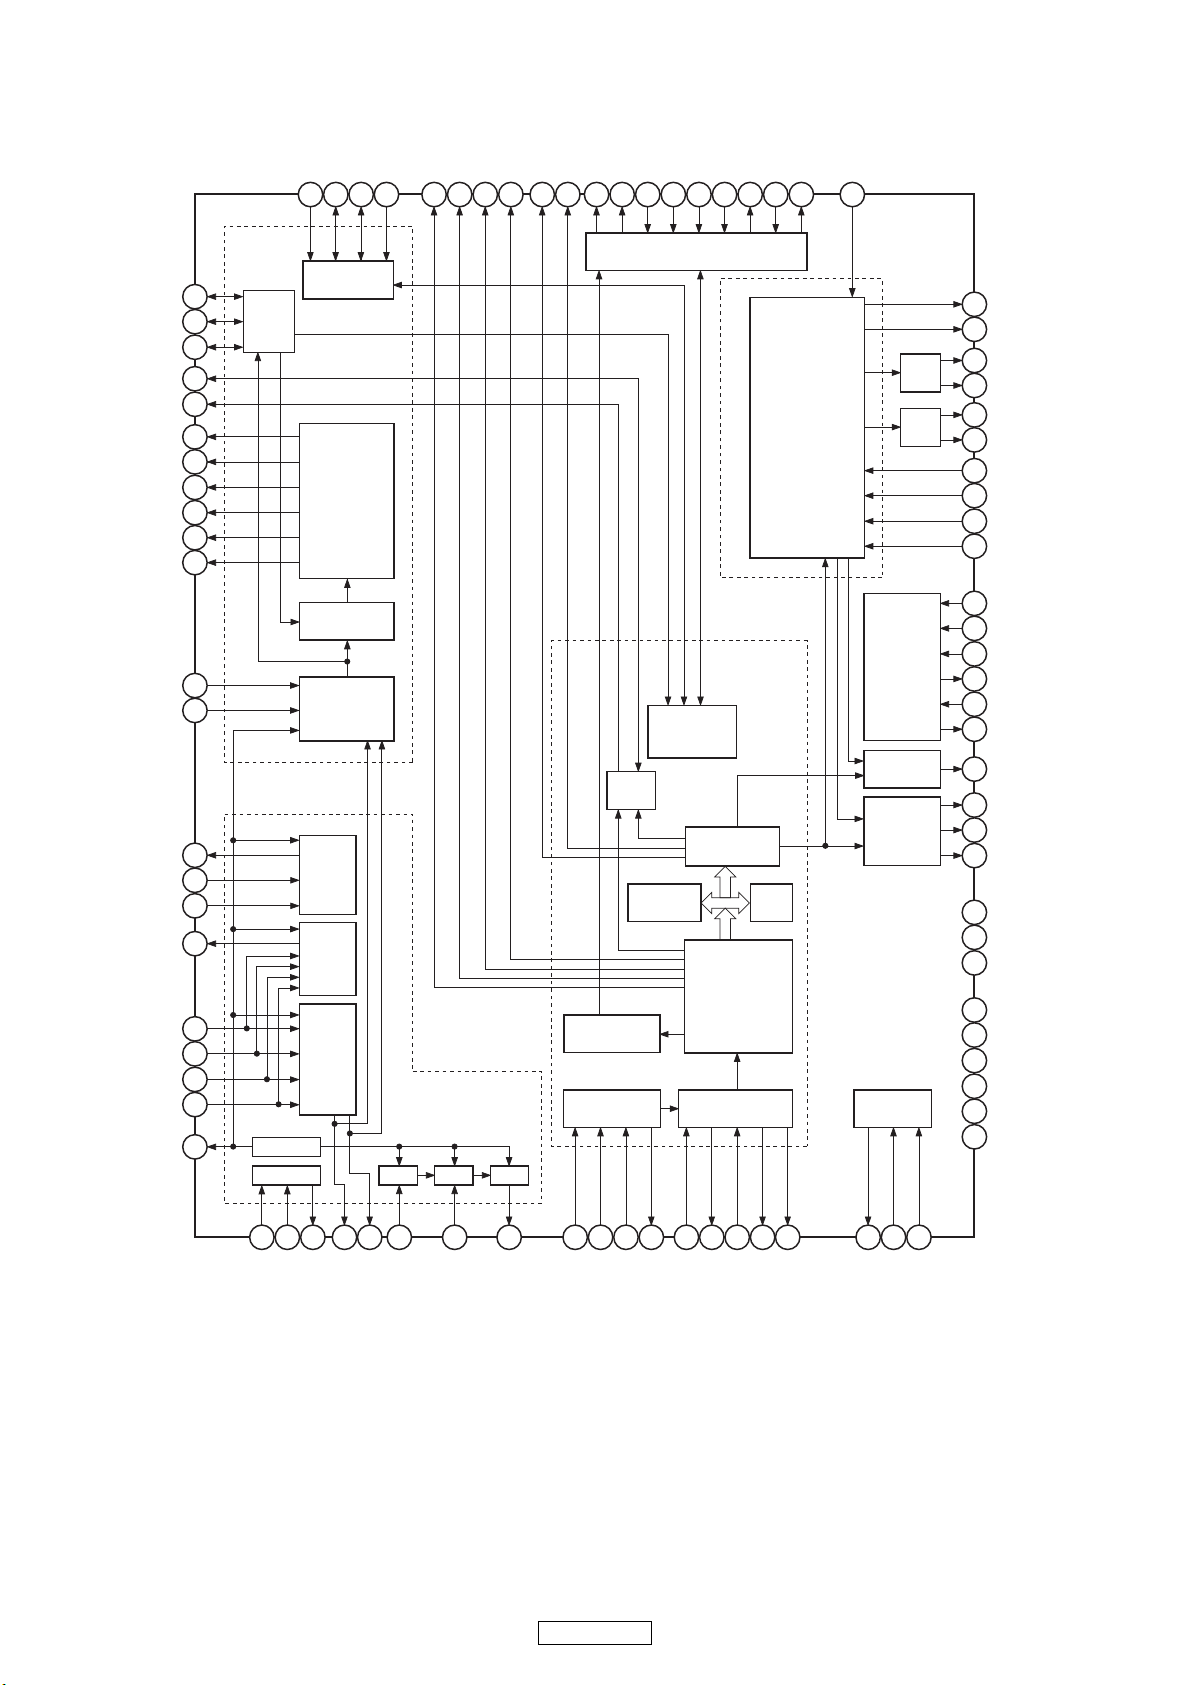
CXD3059 Block diagram
Bass Boost Block
CD Signal
Processor
Block
RFamp Block
SERVO
Block
MIRR
DFCT
FOK
SERVO
Interface
PWM
Generator
DAC
SERVO
DSP
A/D
Converter
TE
FE
VC
APC ATT EQ AMP
CPU Interface
Servo
Auto
Sequencer
Digital
CLV
D/A
Interface
EFM
Demodulator
Sub Code
Processor
Asymmetry
Corrector
Digital
PLL
DC/DC
Converter
Error
Corrector
32K
RAM
LPF
LPF
Clock
Generator
Digital
OUT
Selector
SSTP
COUT
ATSK
GFS
XUGF
WFCK
EMPH
WDCK
C2PO
SCOR
SENS
CLOK
XLAT
DATA
EXCK
SBSO
AOUT2
VREFR
LMUT
RMUT
VREL
AOUT1
EMPHI
LRCKI
PCMDI
BCKI
XTACN
XTSL
XTAI
BCK
PCMD
LRCK
XRST
TES1
TEST
AVDD0 to 5
AVSS0 to 5
IOVDD0 to 2
IOVSS0 to 2
V
DD
V
SS
MIRR
DFCT
FOK
TEO
E
F
FEO
A
B
C
VC
SFDR
SRDR
TFDR
TRDR
FFDR
FRDR
TEI
FEI
LOCK
MDP
XTAO
VCTL
VPCO
DOUT
SQCK
SQSO
SCLK
SYSM
D
PD
PDSENS
LD
RFACI
BIAS
ASYI
DDVROUT
DDVRSEN
DDCR
ASYO
CLTV
FIFO
FILI
PCO
XPCK
RFDCO
AC_SUM
EQ_IN
RFC
RFACO
SUM
DN-S700
17
Page 18
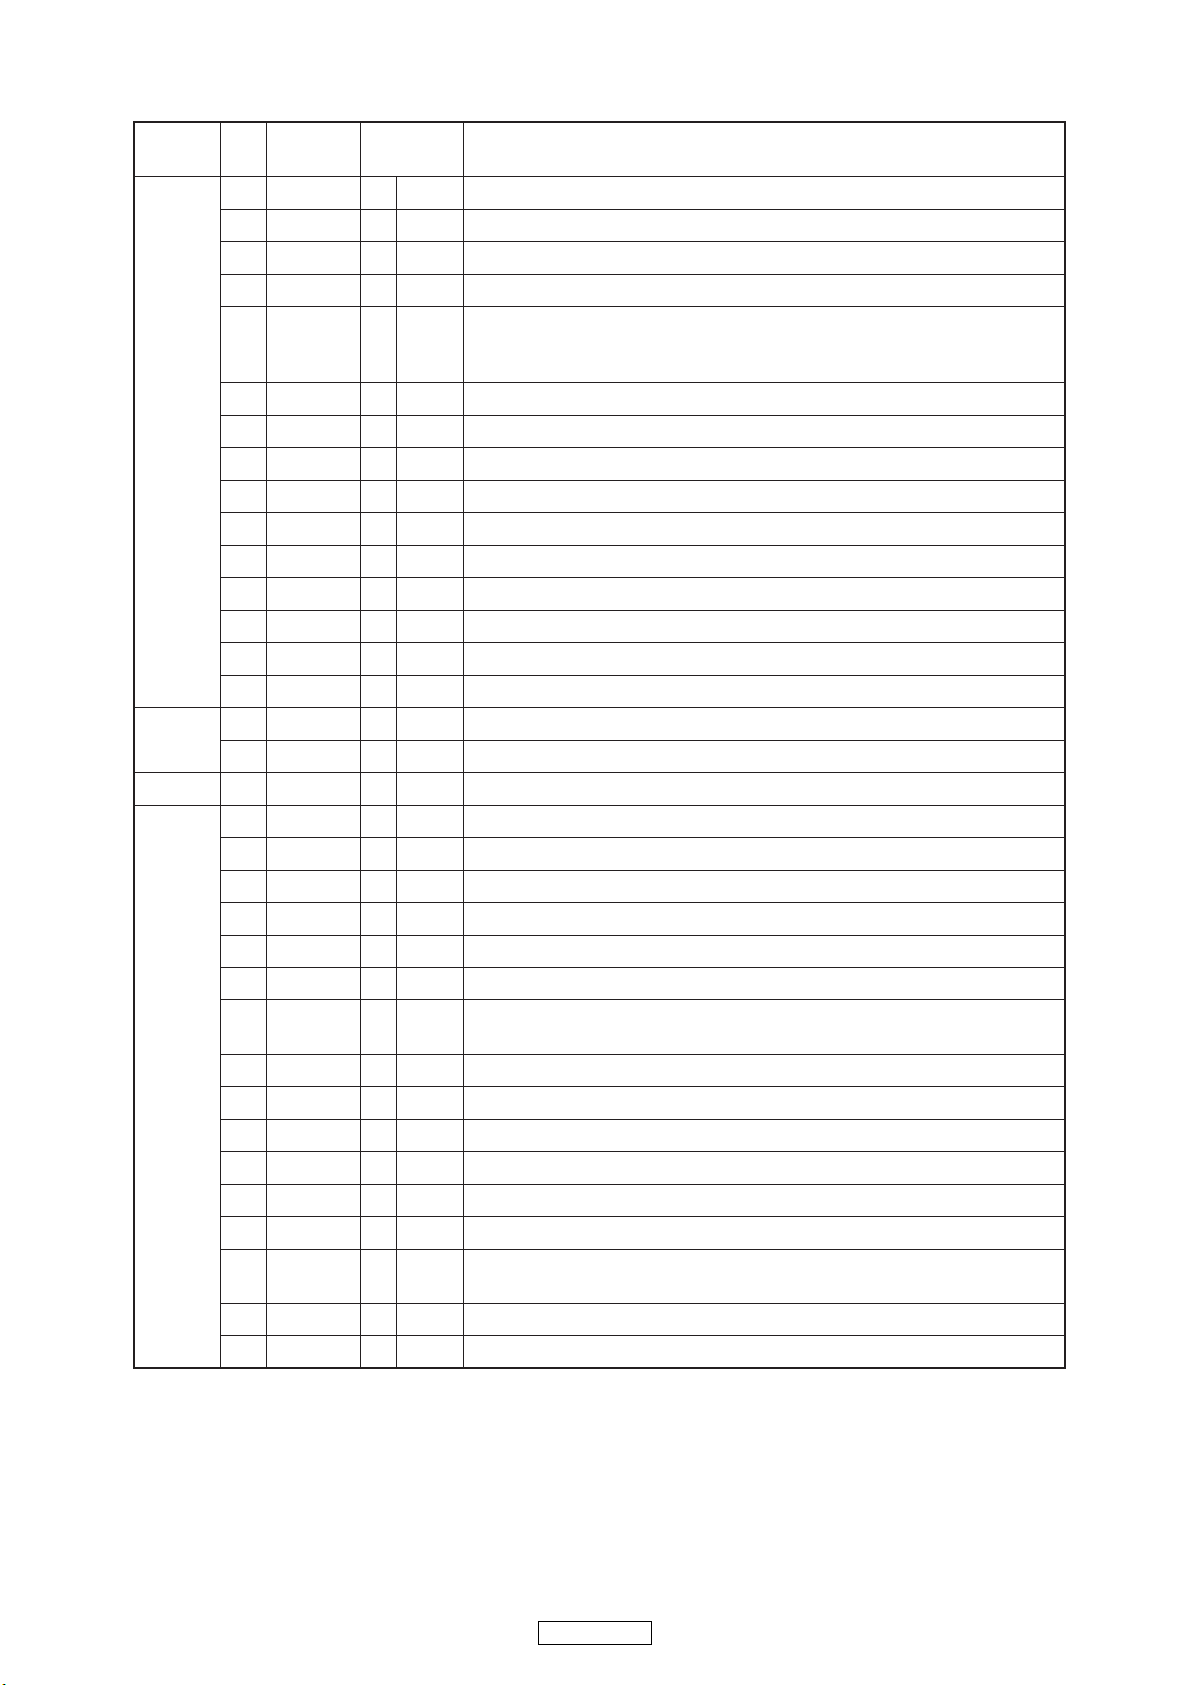
CXD3059 Pin discription
Pin
No.
Symbol I/O Description
1
2
3
4
5
6
7
8
9
10
11
12
13
14
15
16
17
18
19
20
21
22
23
24
25
26
27
28
29
30
31
32
33
34
MIRR
DFCT
FOK
V
SS
LOCK
MDP
SSTP
IOV
SS1
SFDR
SRDR
TFDR
TRDR
FFDR
FRDR
IOV
DD1
AV
DD0
AV
SS0
NC
E
F
TEI
TEO
FEI
FEO
VC
A
B
C
D
NC
AV
DD4
RFDCO
PDSENS
AC_SUM
I/O
I/O
I/O
—
I/O
O
I
—
O
O
O
O
O
O
—
—
—
—
I
I
I
O
I
O
I/O
I
I
I
I
—
—
I/O
I
O
Mirror signal input/output.
Defect signal input/output.
Focus OK signal input/output.
Internal digital GND.
GFS is sampled at 460Hz; when GFS is high, this pin outputs a high
signal. If GFS is low eight consecutive samples, this pin outputs low.
Or this pin inputs when LKIN = "1".
Spindle motor servo control output.
Disk innermost detection signal input.
I/O digital GND.
Sled drive output.
Sled drive output.
Tracking drive output.
Tracking drive output.
Focus drive output.
Focus drive output.
I/O digital power supply.
Analog power supply.
Analog GND.
E signal input.
F signal input.
Tracking error signal input to DSSP block.
Tracking error signal output from RF amplifier block.
Focus error signal input to DSSP block.
Focus error signal output from RF amplifier block.
Center voltage output from RF amplifier block.
Center voltage input to DSSP block by command switch.
A signal input.
B signal input.
C signal input.
D signal input.
Analog power supply.
RFDC signal output.
RFDC signal input to DSSP block by command switch.
Reference voltage pin for PD.
RFAC summing amplifier output.
Power
supply
1, 0
1, 0
1, 0
—
1, 0
1, Z, 0
—
1, 0
1, 0
1, 0
1, 0
1, 0
1, 0
—
—
—
—
—
—
Analog
Digital
I/O = 3.3V
Internal =
2.5V
A/D
3.3V
—
RFamp
3.3V
18
DN-S700
Page 19
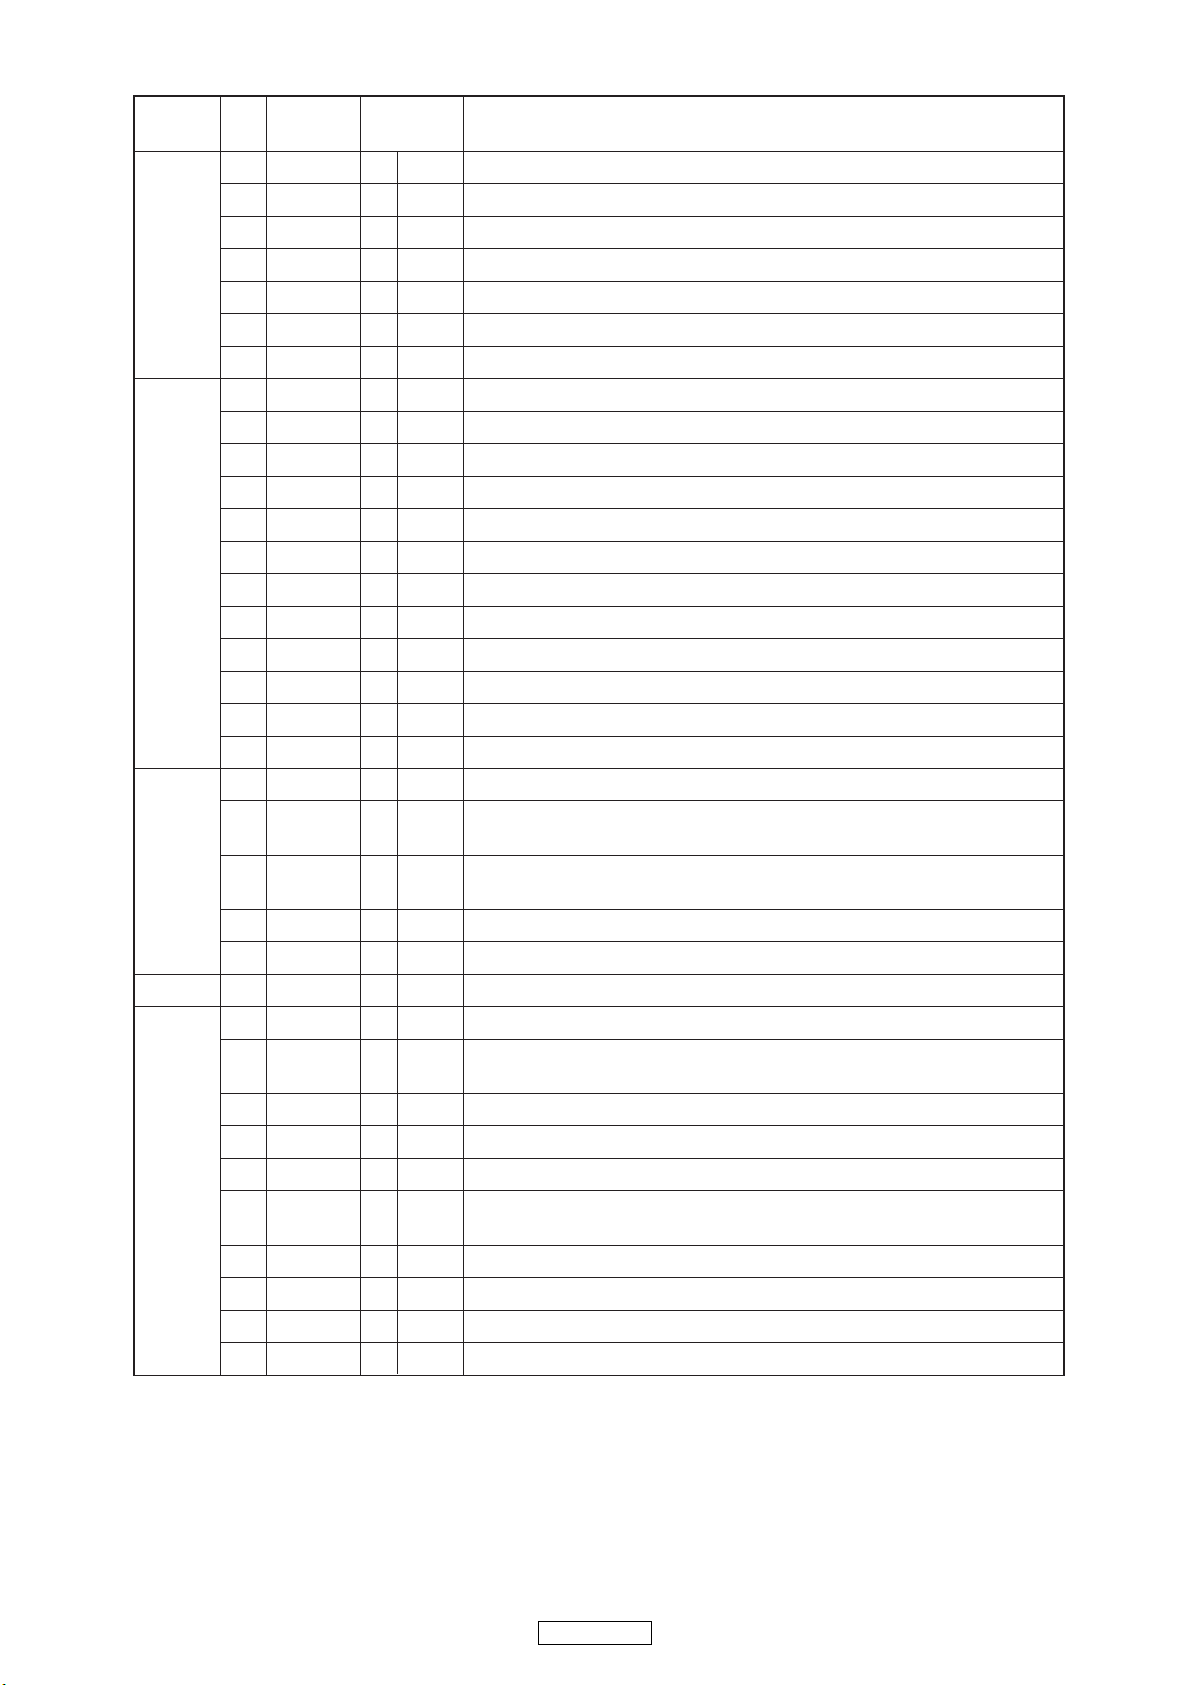
Pin
No.
Symbol I/O Description
35
36
37
38
39
40
41
42
43
44
45
46
47
48
49
50
51
52
53
54
55
56
57
58
59
60
61
62
63
64
65
66
67
68
69
EQ_IN
LD
PD
NC
RFC
AV
SS4
RF ACO
RF ACI
AV
DD3
BIAS
ASYI
ASYO
VPCO
VCTL
AV
SS3
CLTV
FILO
FILI
PCO
AV
DD5
DDVROUT
DDVRSEN
AVSS5
DDCR
NC
BCKI
PCMDI
LRCKl
LRCK
V
SS
PCMD
BCK
V
DD
EMPH
EMPHI
I
O
I
—
I
—
O
I
—
I
I
O
O
I
—
I
O
I
O
—
O
I
—
I
—
I
I
I
O
—
O
O
—
O
I
Equalizer circuit input.
APC amplifier output.
APC amplifier input.
Equalizer cut-off frequency adjustment pin.
Analog GND.
RFAC signal output.
RFAC signal input or EFM signal input.
Analog power supply.
Asymmetry circuit constant current input.
Asymmetry comparator voltage input.
EFM full-swing output. (Low = V
SS, High = VDD)
Wide-band EFM PLL charge pump output.
Wide-band EFM PLL VCO2 control voltage input.
Analog GND.
Multiplier VCO1 control voltage input.
Master PLL (slave = digital PLL) filter output.
Master PLL filter input.
Master PLL charge pump output.
Analog power supply.
DC/DC converter output.
Leave open when not using.
DC/DC converter output voltage monitor pin.
Connect to analog power supply when not using.
Analog GND.
Test pin. Normally GND.
D/A interface bit clock input.
D/A interface serial data input.
(2's COMP, MSB first)
D/A interface LR clock input.
D/A interface LR clock output. f = Fs
Internal digital GND.
D/A interface serial data output.
(2's COMP, MSB first)
D/A interface bit clock output.
Internal digital power supply.
High when the playback disc has emphasis, low it has not.
High when de-emphasis is ON, low when input OFF.
Power
supply
—
—
—
1, 0
1, Z, 0
—
Analog
1, Z, 0
—
—
—
1, 0
—
1, 0
1, 0
—
1, 0
RFamp
3.3V
ASYM
3.3V
DC/DC
3.3V
—
Digital
I/O = 3.3V
Internal =
2.5V
19
DN-S700
Page 20
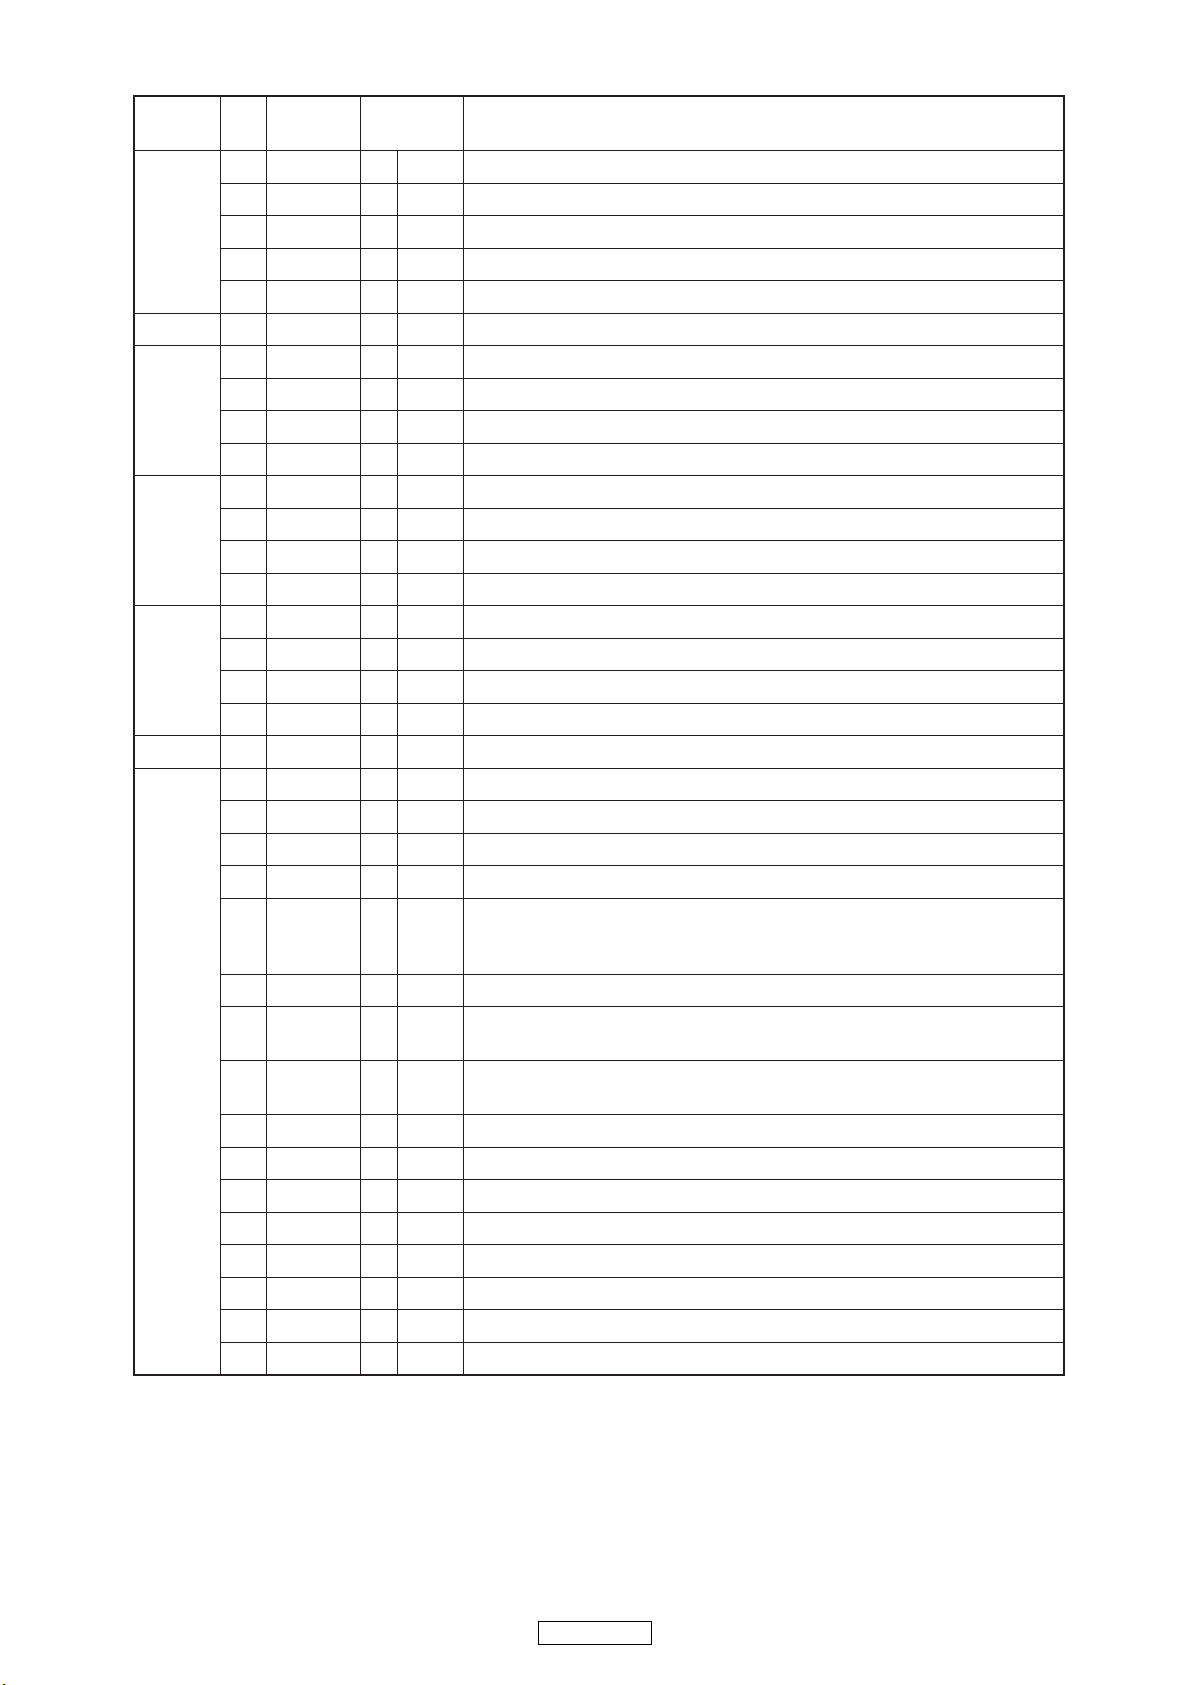
Pin
No.
Symbol I/O Description
70
71
72
73
74
75
76
77
78
79
80
81
82
83
84
85
86
87
88
89
90
91
92
93
94
95
96
97
98
99
100
101
102
103
104
IOV
DD2
DOUT
TEST
TES1
IOVss2
NC
XV
SS
XTAO
XTAI
XV
DD
AVDD1
AOUT1
VREFL
AV
SS1
AV
SS2
VREFR
AOUT2
AV
DD2
NC
IOV
DD0
RMUT
LMUT
NC
XTSL
IOV
SS0
XTACN
SQSO
SQCK
SBSO
EXCK
XRST
SYSM
DA TA
V
SS
XLAT
—
O
I
I
—
—
—
O
I
—
—
O
O
—
—
O
O
—
—
—
O
O
—
I
—
I
O
I
O
I
I
I
I
—
I
I/O digital power supply.
Digital Out output.
Test pin. Normally GND.
Test pin. Normally GND.
I/O digital GND.
Master clock GND.
Crystal oscillation circuit output.
Crystal oscillation circuit input.
Master clock power supply.
Analog power supply.
Lch analog output.
Lch reference voltage.
Analog GND.
Analog GND.
Rch reference voltage.
Rch analog output.
Analog power supply.
I/O digital power supply.
Rch "0" detection flag.
Lch "0" detection flag.
Crystal selection input.
Low when the crystal is 16.9344MHz;
high when the crystal is 33.8688MHz.
I/O digital GND.
Oscillation circuit control.
Self-oscillation when high, oscillation stop when low.
Subcode Q 80-bit and PCM peak and level data output.
CD TEXT data output.
SQSO readout clock input.
Subcode P to W serial output.
SBSO readout clock input.
System reset. Reset when low.
Mute input. Muted when high.
Serial data input from CPU.
Internal digital GND.
Latch input from CPU. The serial data is latched at the falling edge.
Power
supply
—
1, 0
—
—
—
—
—
—
—
—
—
—
1, 0
1, 0
—
—
1, 0
1, 0
—
X'tal
2.5V
Digital
I/O = 3.3V
Internal =
2.5V
—
Lch
3.3V
Rch
3.3V
—
Digital
I/O = 3.3V
Internal =
2.5V
20
DN-S700
Page 21
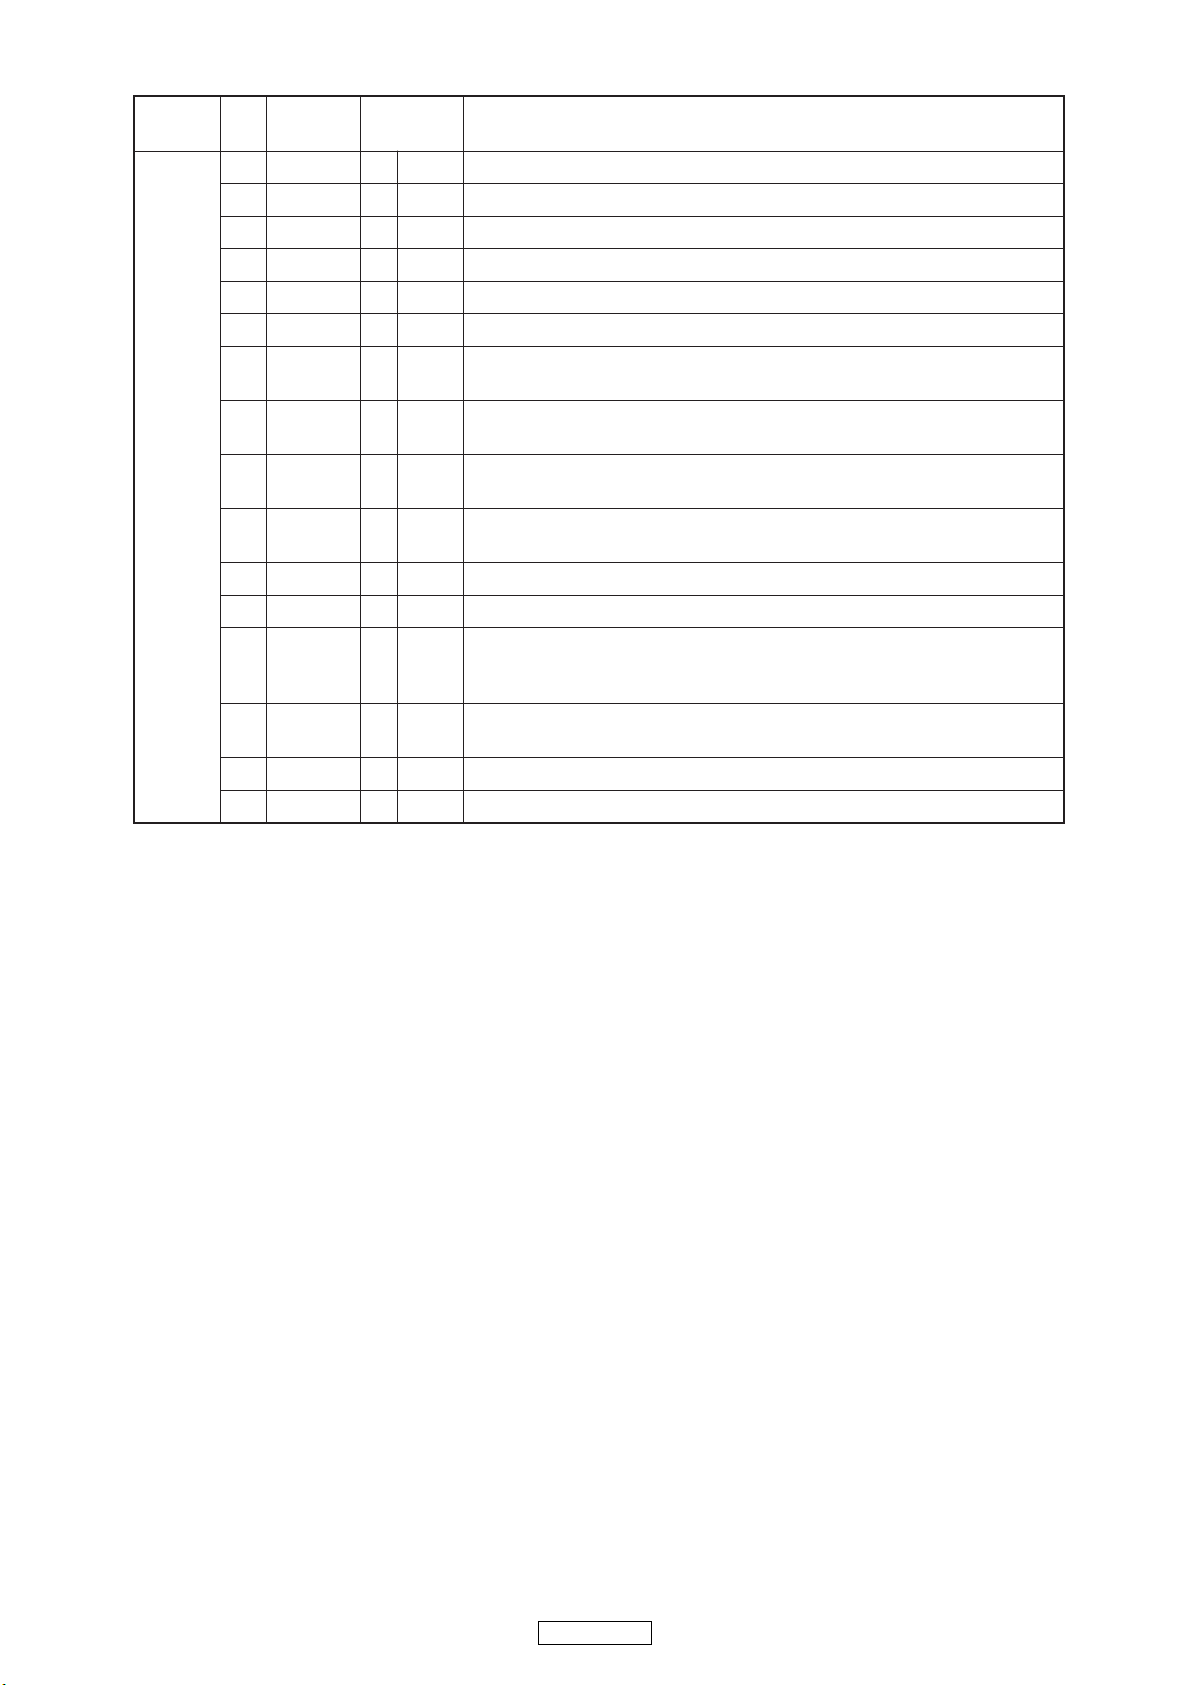
Pin
No.
Symbol I/O Description
105
106
107
108
109
110
111
112
113
114
115
116
117
118
119
120
CLOK
V
DD
SENS
SCLK
ATSK
WFCK
XUGF
XPCK
GFS
C2PO
SCOR
V
DD
C4M
WDCK
COUT
NC
I
—
O
I
I/O
O
O
O
O
O
O
—
O
O
I/O
—
Serial data transfer clock input from CPU.
Internal digital power supply.
SENS output to CPU.
SENS serial data readout clock input.
Anti-shock input/output.
WFCK output.
XUGF output.
Output MNT0, RFCK, SOUT by command switch.
XPCK output.
Output MNT1, SOCK by command switch.
GFS output.
Output MNT2, XROF, XOLT by command switch.
C2PO output.
Output MNT3, GTOP by command switch.
High output when the subcode sync, S0 or S1, is detected.
Internal digital power supply.
4.2336MHz output.
1/4 frequency-division output of the V16M in CAV-W mode and
variable pitch mode.
Word clock output. f = 2Fs.
GRSCOR output by command switch.
Track number count signal input/output.
Power
supply
—
1, 0
1, 0
1, 0
1, 0
1, 0
1, 0
1, 0
1, 0
—
1, 0
1, 0
1, 0
—
Digital
I/O = 3.3V
Internal =
2.5V
Notes)
• PCMD is a MSB first, two's complement output.
• GTOP is used to monitor the frame sync protection status. (High: sync protection window released.)
• XUGF is the frame sync obtained from the EFM signal, and is negative pulse. It is the signal before sync
protection.
• XPCK is the inverse of the EFM PLL clock. The PLL is designed so that the falling edge and the EFM
signal transition point coincide.
• The GFS signal goes high when the frame sync and the inser tion protection timing match.
• RFCK is derived from the cr ystal accuracy, and has a cycle of 136µs.
• C2PO represents the data error status.
• XROF is generated when the 32K RAM exceeds the ±28 frame jitter margin.
• C4M is a 4.2336MHz output that changes in CAV-W mode and variable pitch mode.
• FSTO is the 2/3 frequency-division output of the XTAI pin.
• SOUT is the serial data output inside the ser vo block.
• SOCK is the serial data readout clock output inside the servo block.
• XOLT is the serial data latch output inside the servo block .
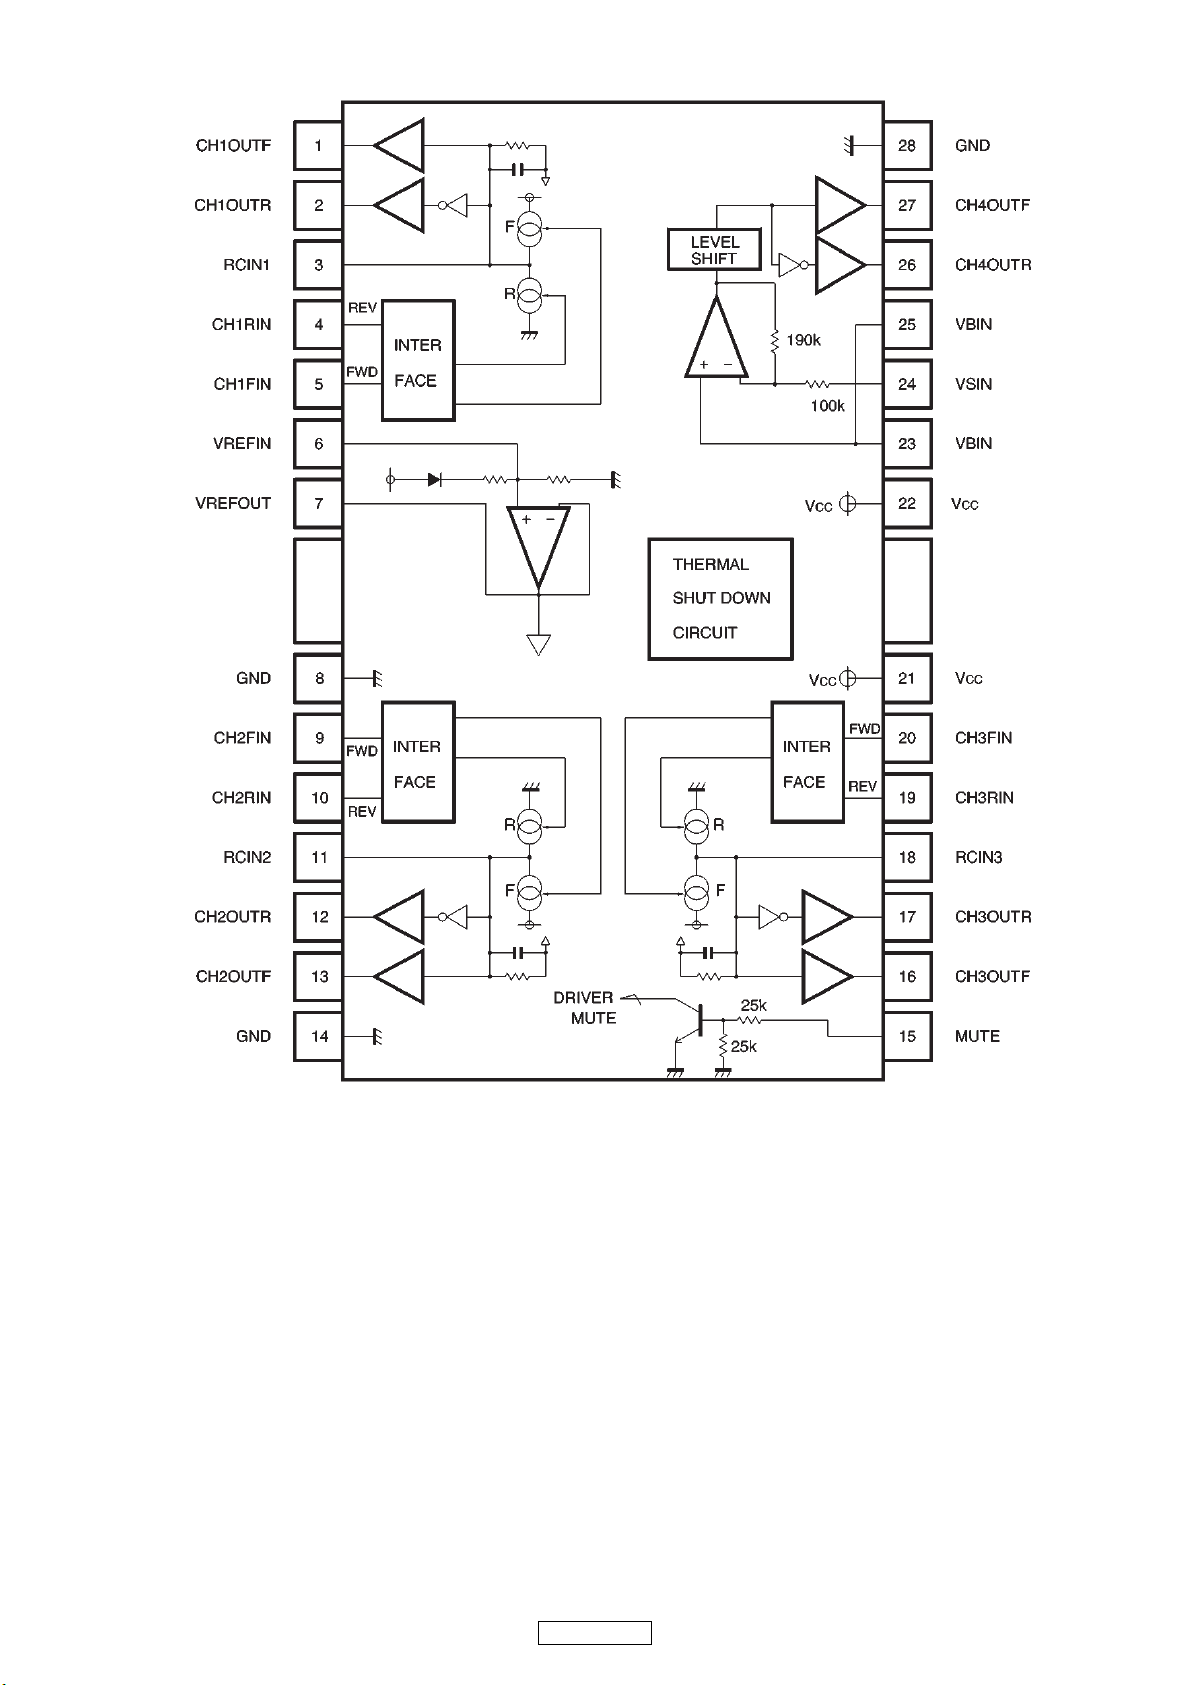
BA6392FP (IC102)
21
DN-S700
Page 22
22
DN-S700
Page 23
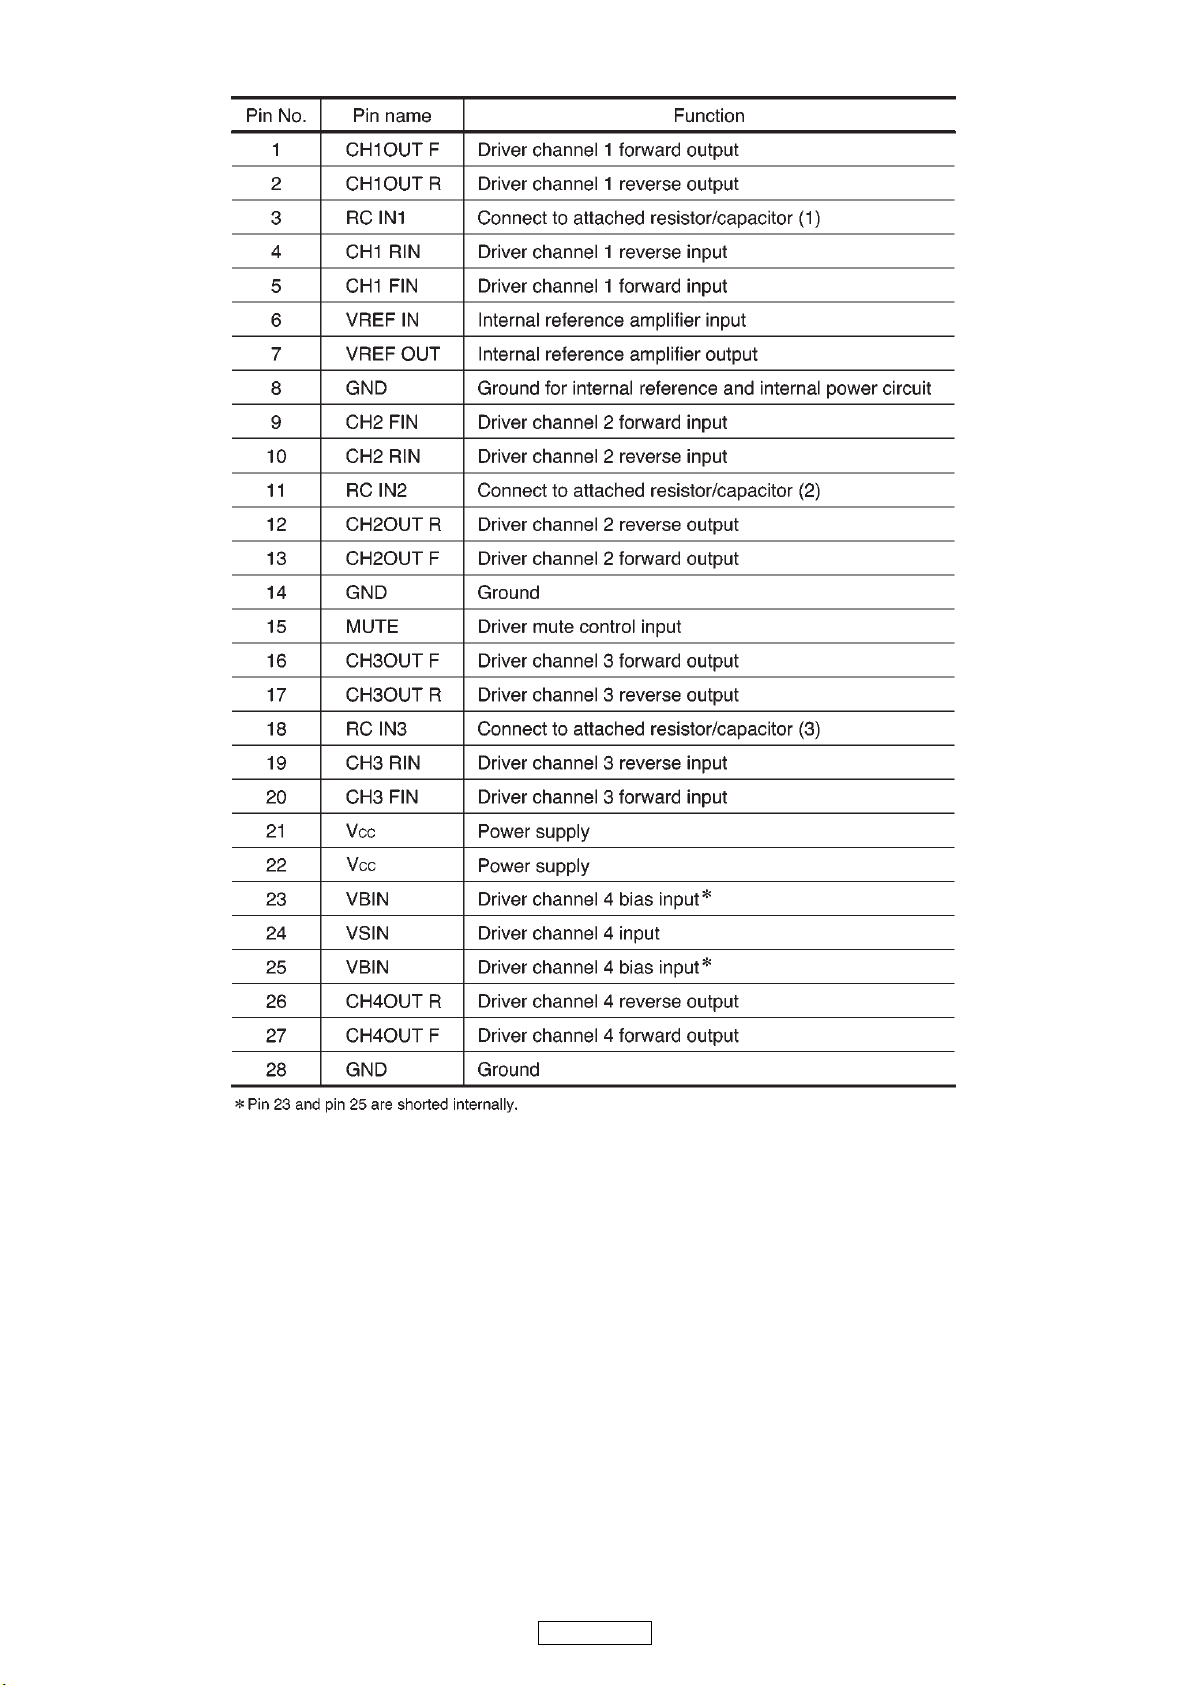
BA6392FP Pin discription
23
DN-S700
Page 24
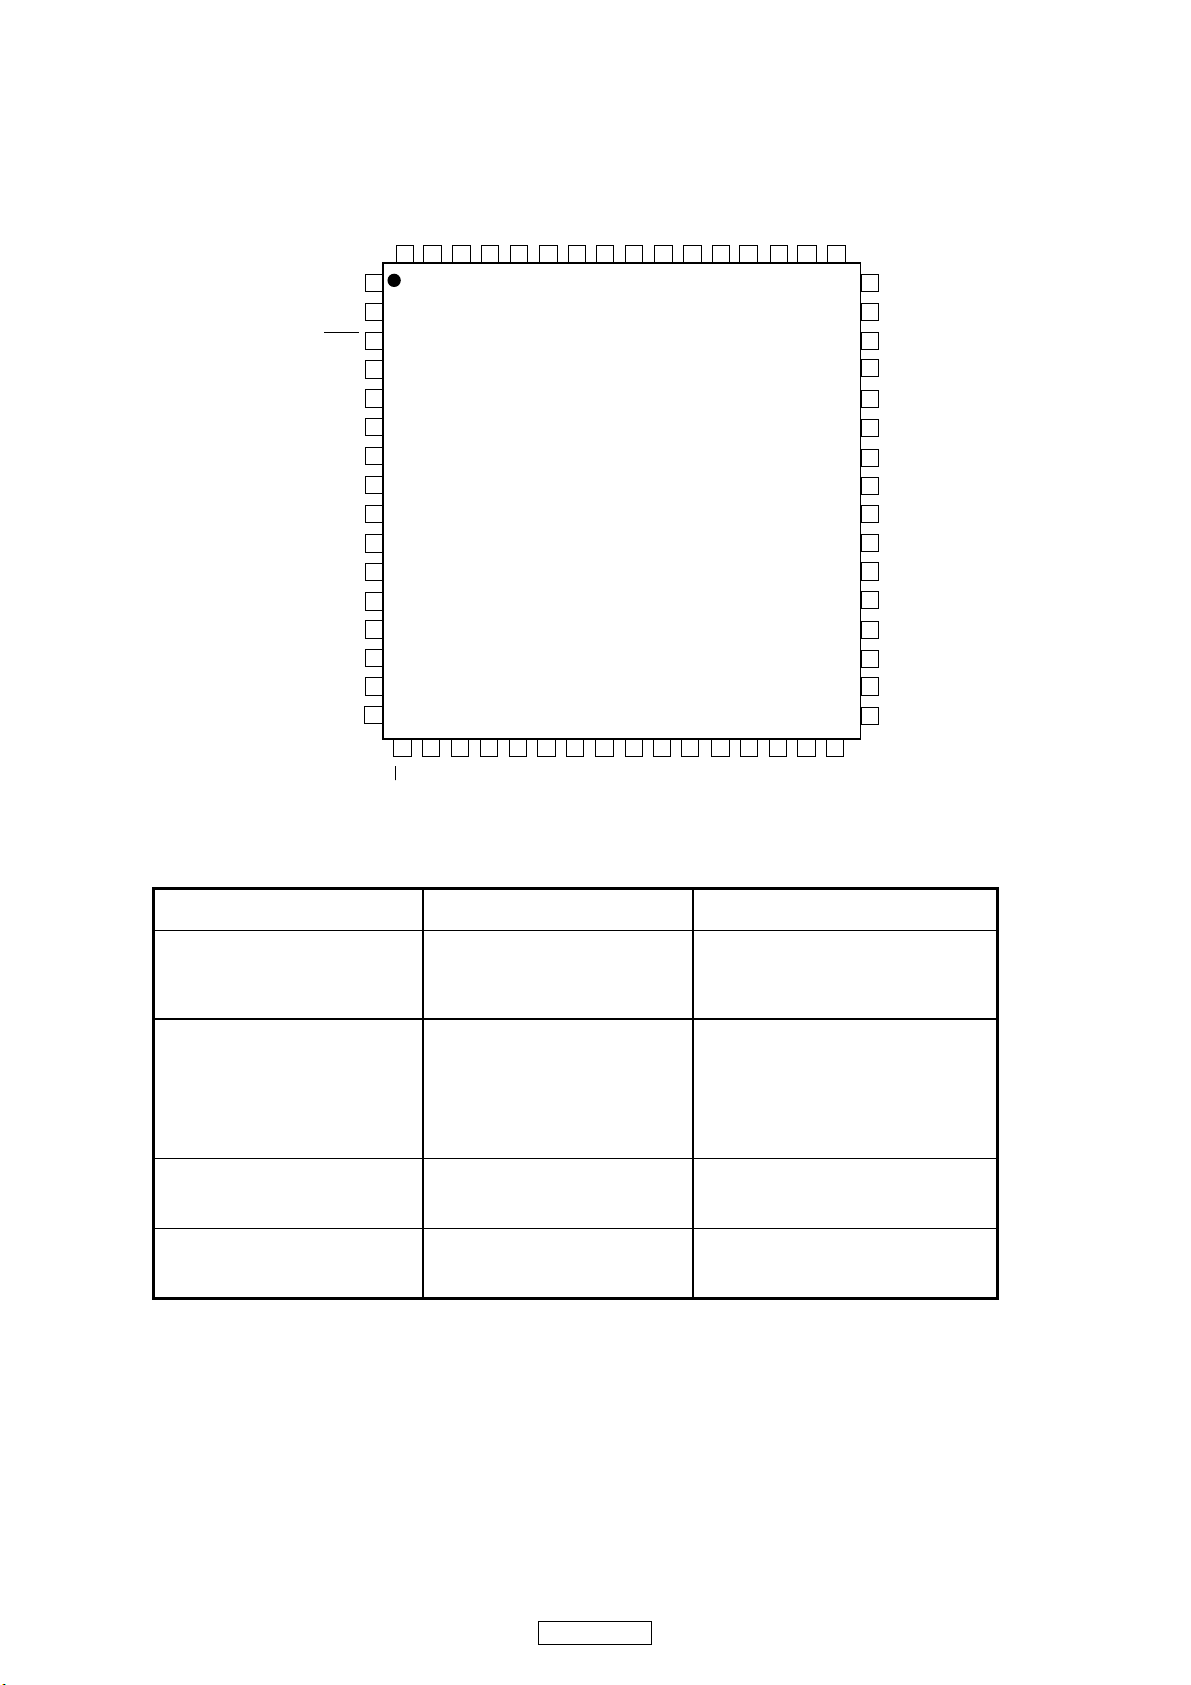
MC9S08AW32CPUE (IC103, 201)
PTF2/TPM1CH4
1
2
3
4
5
6
7
8
RESET
PTF0/TPM1CH2
PTF3/TPM1CH5
PTF4/TPM2CH0
PTC6
PTF7
PTG2/KBI1P2
PTG1/KBI1P1
PTG0/KBI1P0
V
DD
V
SS
PTE7/SPSCK1
PTE6/MOSI1
PTB7/AD1P7
PTD0/AD1P8
PTD1/AD1P9
V
DDAD
V
SSAD
PTB1/AD1P1
PTB6/AD1P6
PTD5/AD1P13
V
REFH
PTC5/RxD2
PTG5/XTAL
BKGD/MS
V
REFL
PTG3/KBI1P3
PTD6/TPM1CLK/AD1P14
PTD7/KBI1P7/AD1P15
43
42
41
40
39
38
18
19
20 21 22
23
505152535455
17
32
33
49
48
64
9
PTF5/TPM2CH1
10
PTF6
11
PTE0/TxD1
16
PTE3/TPM1CH1
PTA024PTA125PTA2
26
PTA3
27
PTB5/AD1P5
37
PTB4/AD1P4
36
PTB3/AD1P3
35
PTB2/AD1P2
34
PTG6/EXTAL
56
V
SS
57
PTC0/SCL1
58
PTC1/SDA1
59
PTF1/TPM1CH3
12
PTE1/RxD1
13
14
15
PTE2/TPM1CH0
PTA4
28 29 30 31
PTD2/KBI1P5/AD1P10
44
45
46
PTD3/KBI1P6/AD1P11
47
PTC3/TxD2
63 62 61
PTC2/MCLK
60
PTC4
IRQ
PTE4/SS1
PTE5/MISO1
PTA5
PTA6
PTB0/AD1P0
PTA7
PTD4/TPM2CLK/AD1P12
PTG4/KBI1P4
64-Pin QFP
64-Pin LQFP
SYMPTOM POSSIBLE CAUSE CORRECTION ACTION
The power fails to switch on
when the POWER switch is set to
on
Poor power plug connection at the
AC outlet
Insert the power plug firmly into the
AC outlet
No output
1) Improper outlet cable
connections
2) Improper amplifier operation
3) Improper setup of input cable
Connection and switch
1) Connect the output cable correctly
2) Check amplifier setup
3) Correct the position of input cable
and switch correctly
Hum Loose cable connections Firmly connect all audio plugs
Line / Phono switch reversed Poor power plug connection Connection the input cable correctly
DN-S700
24
Page 25
MC9S08AW32CPUE Terminal Function
Pin No. Pin Name I/O I/O Function
1 PC3B' O LINE6 FADER CONTROL OUT
2IRQ
3 RESET
4 PWM1' O CH 1 VCA CONTROL
5 PWM2' O CH 2 VCA CONTROL
6 PWM3' O CH 3 VCA CONTROL
7 PWM4' O CH 4 VCA CONTROL
8 PC4A' O LINE8 FADER CONTROL OUT
9 PC4B' O LINE8 FADER CONTROL OUT
10 JDET I EFFECT SEND/RETURN IN
11 CHFS I CH FADER START SW IN
12 PRE/POST I PRE/POST SW INPUT
13 CFSA/TX I CROSS FADER START A SW IN
14 CFSB/RX I CROSS FADER START B SW IN
15 KFXON I EFFECTS ON IN
16 - 17 CE1 O LC78211,LC78212,LC78213 CONTROL PIN
18 CE2 O LC78211,LC78212,LC78213 CONTROL PIN
19 DI O LC78211,LC78212,LC78213 CONTROL PIN
20 CL O LC78211,LC78212,LC78213 CONTROL PIN
21 VSS
22 VDD
23 DS O Level Meter LED CONTROL OUT
24 STCP O Level Meter LED CONTROL OUT
25 SHCP O Level Meter LED CONTROL OUT
26 1A I CF ASSIGN1 IN
27 1B I CF ASSIGN1 IN
28 2A I CF ASSIGN2 IN
29 2B I CF ASSIGN2 IN
30 3A I CF ASSIGN3 IN
31 3B I CF ASSIGN3 IN
32 4A I CF ASSIGN4 IN
33 4B I CF ASSIGN4 IN
34 LM1 I CH1 Level Meter A/D IN
35 LM2 I CH2 Level Meter A/D IN
36 LM3 I CH3 Level Meter A/D IN
37 LM4 I CH4 Level Meter A/D IN
38 LML I LCH Level Meter A/D IN
39 LMR I RCH Level Meter A/D IN
40 KEY2 I CUE KEY A/D IN
41 CF I CROSS FADER VR A/D IN
42 KEY1 I CUE1 DUCK MIC KEY A/D IN
43 DIMMER I DUCK LEVEL A/D IN
44 VDDAD
45 VSSAD
46 CHF1 I CH1 FADER VR A/D IN
47 CHF2 I CH2 FADER VR A/D IN
48 CDOUT' O IC DATA OUT
49 CCLK' O IC CLK
50 CHF3 I CH3 FADER VR A/D IN
51 CHF4 I CH4 FADER VR A/D IN
52 CDIN' I IC DATA IN
53 /CSAD I IC DATA IN
54 VREFH AD5V
55 VREFL ADGND
56 BKGD
57 XTAL
58 XTAL
59 VSS
60 PC1A' O LINE2 FADER CONTROL OUTPUT
61 PC1B' O LINE2 FADER CONTROL OUTPUT
62 PC2A' O LINE4 FADER CONTROL OUTPUT
63 PC2B' O LINE4 FADER CONTROL OUTPUT
64 PC3A' O LINE6 FADER CONTROL OUTPUT
25
DN-S700
Page 26
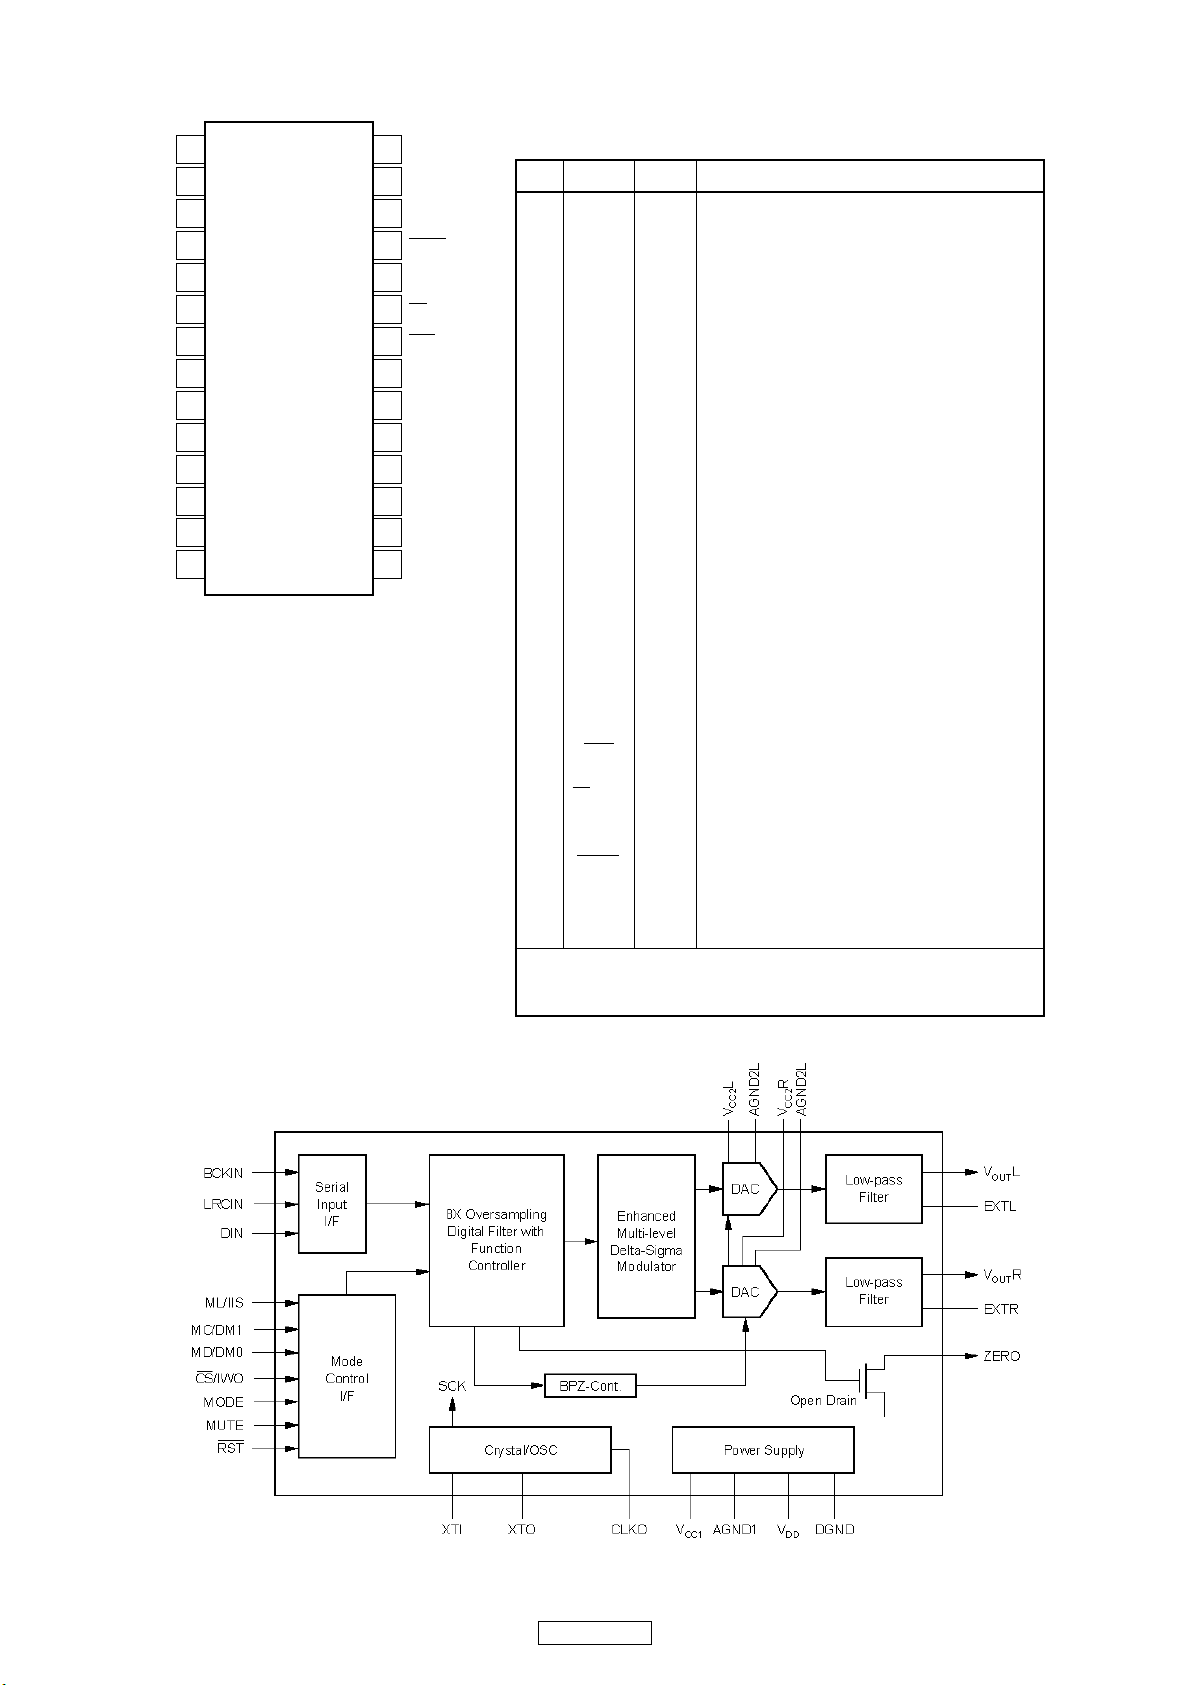
PCM1716 (IC105)
LRCIN
DIN
BCKIN
CLKO
XTI
XTO
DGND
V
DD
VCC2R
AGND2R
EXTR
NC
V
OUT
R
AGND1
ML/IIS
MC/DM1
MD/DM0
MUTE
MODE
CS/IWO
RST
ZERO
V
CC
2L
AGND2L
EXTL
NC
V
OUT
L
V
CC
1
1
2
3
4
5
6
7
8
9
10
11
12
13
14
28
27
26
25
24
23
22
21
20
19
18
17
16
15
PCM1716E
PIN NAME I/O DESCRIPTION
1 LRCIN IN Left and Right Clock Input. This clock is equal to
the sampling rate - f
S
.
(1)
2 DIN IN Serial Audio Data Input
(1)
3 BCKIN IN Bit Clock Input for Serial Audio Data.
(1)
4 CLKO OUT Buffered Output of Oscillator. Equivalent to
System Clock.
5 XTI IN Oscillator Input (External Clock Input)
6 XTO OUT Oscillator Output
7 DGND — Digital Ground
8V
DD
— Digital Power +5V
9V
CC
2R — Analog Power +5V
10 AGND2R — Analog Ground
11 EXTR OUT Rch, Common Pin of Analog Output Amp
12 NC — No Connection
13 V
OUT
R OUT Rch, Analog Voltage Output of Audio Signal
14 AGND1 — Analog Ground
15 V
CC
1 — Analog Power +5V
16 V
OUT
L OUT Lch, Analog Voltage Output of Audio Signal
17 NC — No Connection
18 EXTL OUT Lch, Common Pin of Analog Output Amp
19 AGND2L — Analog Ground
20 V
CC
2L — Analog Power +5V
21 ZERO OUT Zero Data Flag
22 RST IN Reset. When this pin is low, the DF and
modulators are held in reset.
(2)
23 CS/IWO IN Chip Select/Input Format Selection. When this
pin is low, the Mode Control is effective.
(3)
24 MODE IN
Mode Control Select. (H: Software, L: Hardware)
(2)
25 MUTE IN Mute Control
26 MD/DM0 IN Mode Control, DATA/De-emphasis Selection 1
(2)
27 MC/DM1 IN Mode Control, BCK/De-emphasis Selection 2
(2)
28 ML/I2S IN Mode Control, WDCK/Input Format Selection
(2)
NOTES: (1) Pins 1, 2, 3; Schmitt Trigger input. (2) Pins 22, 24, 25, 26, 27,
28; Schmitt Trigger input with pull-up resister. (3) Pin 23; Schmitt Trigger
input with pull-down resister.
PIN ASSIGNMENTS
26
DN-S700
Page 27
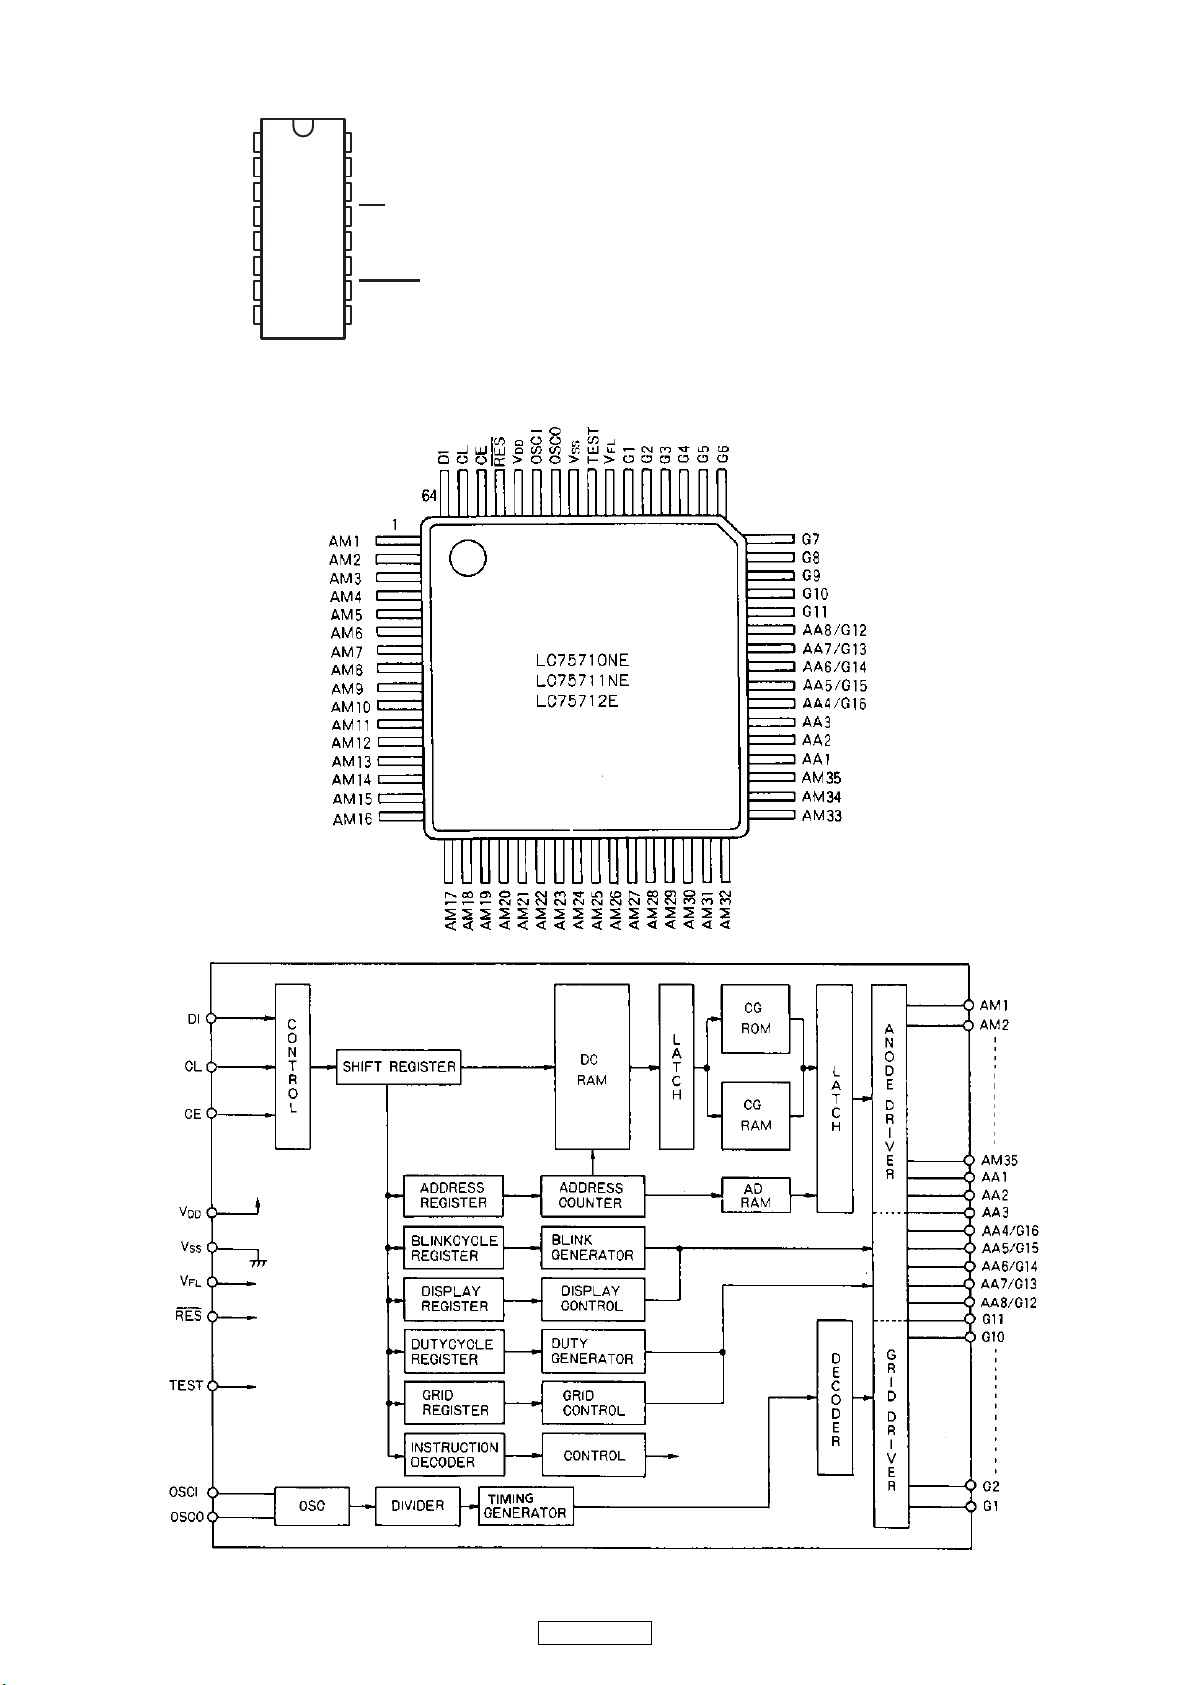
74AHC595DR (IC203, 204)
1
2
3
4
5
6
7
8
16
15
14
13
12
11
10
9
Q
B
Q
C
Q
D
Q
E
Q
F
Q
G
Q
H
GND
V
CC
Q
A
SER
OE
RCLK
SRCLK
SRCLR
Q
H′
LC75710NE (IC205)
27
DN-S700
Page 28
SCF5249LAG120 (U1)
PLL
Frequency
Synthesizer
Serial Audio
Interface
3 x I
2
S Rx
2 x I
2
STx
SPDIF/EBU
Transmitter
CD ROM
Block
Decoder
Encoder
CD Text
Interface
QSPI
SPDIF/EBU
Receiver
IDE
Interface
Flash
Media
Interface
I Addr Gen
Instr Buf
I Fetch
AGen& Ex
Dec&Sel Op
8K
byte
I-Cache
B
u
s
C
o
n
t
r
o
l
SDRAM
Cntr
& Chip
Selects
Timers
DUART
DMA
M-bus
(I
2
C)
Debug
Module
96K
Byte
SRAM
General
Purpose
I/O
EMAC
ColdFire V2
12-bit ADC
144 QFP
Pin
Number
Name Type Description
01 SCL/QSPI_CLK I/O IIC clock/QSPI clock pin function
select is PLLCR(11)
02 CS0 O static chip select 0
03 A21 O SDRAM address / static adr
04 A11 O SDRAM address / static adr
05 A10 O SDRAM address / static adr
06 A9 O SDRAM address / static adr
07 A18 O SDRAM address / static adr
08 A17 O SDRAM address / static adr
09 BCLK/GPIO10 I/O sdram clock output
Pin discription
DN-S700
28
Page 29
10 SCLK_OUT/GPIO15 I/O MemoryStick/SD
11 BCLKE O sdram clock enable output
12 SDA/QSPI_DIN I/O IIC data/QSPI data in function select
is PLLCR(11)
13 DATA24 I/O data
14 A22 O SDRAM address / static adr
15 SDUDQM O SDRAM UDQM
16 EF/GPIO19 I/O error flag input
17 DATA25 I/O data
18 DATA26 I/O data
19 DATA27 I/O data
20 PAD-GND PAD-GND
21 DATA28 I/O data
22 DATA29 I/O data
23 SDATA3/GPIO56 I/O SD interface data line
24 DATA30 I/O data
25 BUFENB1/GPIO57 I/O external buffer 1 enable
26 DATA31 I/O data
27 CORE-VDD CORE-VDD
28 A13 O SDRAM address / static adr
29 CORE-GND CORE-GND
30 A23 O SDRAM address / static adr
31 A14 O SDRAM address / static adr
32 A15 O SDRAM address / static adr
33 A16 O SDRAM address / static adr
34 PAD-VDD PAD-VDD
35 A19 O SDRAM address / static adr
144 QFP
Pin
Number
Name Type Description
29
DN-S700
Page 30
36 A20 O SDRAM address / static adr
37 TEST2 I test
38 SDRAM-CS1 O SDRAM chip select out 1
39 SDATA1_BS1/GPIO9 I/O Memory Stick / SD
40 SDRAS O SDRAM RAS
41 SDCAS O SDRAM CAS
42 SDWE O SDRAM write enable
43 SDLDQM O SDRAM LDQM
44 GPIO5 I/O GPIO5
45 QSPI_CS0/GPIO29 I/O QSPI chip select 0
46 QSPI_DOUT/GPIO26 I/O QSPI data out
47 GPIO6 I/O GPIO6
48 DATA21 I/O data
49 DATA19 I/O data
50 QSPI_CS2/GPIO21 I/O QSPI chip select 2
51 DATA20 I/O data
52 DATA22 I/O data
53 DATA18 I/O data
54 DATA23 I/O data
55 DATA17 I/O data
56 PADD-VDD PAD-VDD
57 DATA16 I/O data
58 CFLG/GPIO18 I/O CFLG input
59 EBUOUT1/GPO36 O audio interfaces EBU out 1
60 CORE-GND CORE-GND
61 EBUIN3/ADIN0/GPI38 I audio interfaces EBU in 3 / AD
convertor input0
144 QFP
Pin
Number
Name Type Description
30
DN-S700
Page 31
62 EBUIN2/GPI37 I audio interfaces EBU in 2
63 CORE-VDD CORE-VDD
64 SCL2/GPIO3 I/O IIS2 clock line
65 RSTI I Reset
66 TOUT1/ADOUT/GPO35 O timer output 1 / AD output
67 LRCK2/GPIO44 O audio interfaces EBU out 1
68 OE O Output Enable
69 SDA2/GPIO55 I/O IIS2 data
70 SDATAO2/GPO41 O audio interfaces serial data output 2
71 SCLK2/GPIO48 I/O audio interfaces serial clock 2
72 PAD-GND PAD-GND
73 TEST3 I test
74 SDATAO1/GPIO25 I/O audio interfaces serial data output 1
75 LRCK1 I/O audio interfaces word clock 1
76 LRCK4/GPIO46 I/O audio interfaces word clock 4
77 SDATAI4/GPI42 I audio interfaces serial data in 4
78 SCLK1 I/O audio interfaces serial clock 1
79 SCLK4/GPIO50 I/O audio interfaces serial clock 4
80 TA/GPIO20 I/O Transfer acknowledge
81 SDATAI1 I audio interfaces serial data in 1
82 EBUIN1/GPI36 I audio interfaces EBU in 1
83 PLLGRDVDD PLLGRDVDD
84 PLLGRDGND PLLGRDGND
85 PLLPADGND PLLPADGND
86 PLLPADVDD PLLPADVDD
87 PLLCOREGND PLLCOREGND
88 PLLCOREVDD PLLCOREVDD
144 QFP
Pin
Number
Name Type Description
31
DN-S700
Page 32
89 IDE-DIOW/GPIO14 I/O ide diow
90 CRIN I crystal
91 IDE-DIOR/GPIO13 I/O ide dior
92 IDE-IORDY/GPIO16 I/O ide iordy
93 MCLK1/GPO39 O Audio master clock output 1
94 MCLK2/GPO42 O Audio master clock output 2
95 XTRIM/GPO38 O audio interfaces X-tal trim
96 TRST/DSCLK I Debug / interrupt monitor output 2
97 CORE-VDD CORE-VDD
98 RW_B O Bus write enable
99 TMS/BKPT I JTAG/debug
100 CORE-GND CORE-GND
101 TCK I JTAG
102 PAD-GND PAD-GND
103 PST3/GPIO62 I/O debug
104 CNPSTCLK/GPO63 O debug
105 PST1/GPIO60 I/O debug
106 PAD-VDD PAD-VDD
107 PST2/GPIO61 I/O debug
108 PST0/GPIO59 I/O debug
109 TDI/DSI I jtag/debug
110 TEST0 I test
111 TIN0/GPI33 I timer input 0
112 HI-Z I jtag
113 DDATA3/GPIO4 I/O debug
114 TOUT0/GPO33 O timer output 0
115 DDATA1/GPIO1 I/O debug
144 QFP
Pin
Number
Name Type Description
32
DN-S700
Page 33
SCF5249 Integrated ColdFire® Microprocessor Data Sheet, Rev. 3
Freescale Semiconductor
116 DDATA2/GPIO2 I/O debug
117 CTS2_B/ADIN3/GPI31 I second UART clear /
AD input 3
118 DDATA0/GPIO0 I/O debug
119 RXD2/GPI28/ADIN2 I second UART receive data input /
AD input 2
120 TDSO O JTAG/debug
121 RTS2_B/GPO31 O second UART request to send
122 SDATAI3/GPI41 I audio interfaces serial data input 3
123 CTS1_B/GPI30 I first UART clear to send
124 TXD2/GPO28 O second UART transmit data output
125 RTS1_B/GPO30 O first UART request to send
126 EBUIN4/ADIN1/GPI39 I audio interfaces EBU input 4 / AD
input 1
127 TXD1/GPO27 O first UART transmit data output
128 128 RXD1/GPI27 I first UART receive data input
129 CS1/GPIO58 I/O chip select 1
130 CORE-GND CORE-GND
131 A1 O SDRAM address / static adr
132 TIN1/GPIO23 I/O Timer input 1
133 A2 O address
134 A3 O address
135 PAD-GND PAD-GND
136 A4 O address
137 A6 O address
138 A5 O address
139 A8 O address
140 A7 O address
144 QFP
Pin
Number
Name Type Description
141 CORE-VDD CORE-VDD
142 A12 O address
143 TEST1 I test
144 PAD-VDD PAD-VDD
33
DN-S700
Page 34
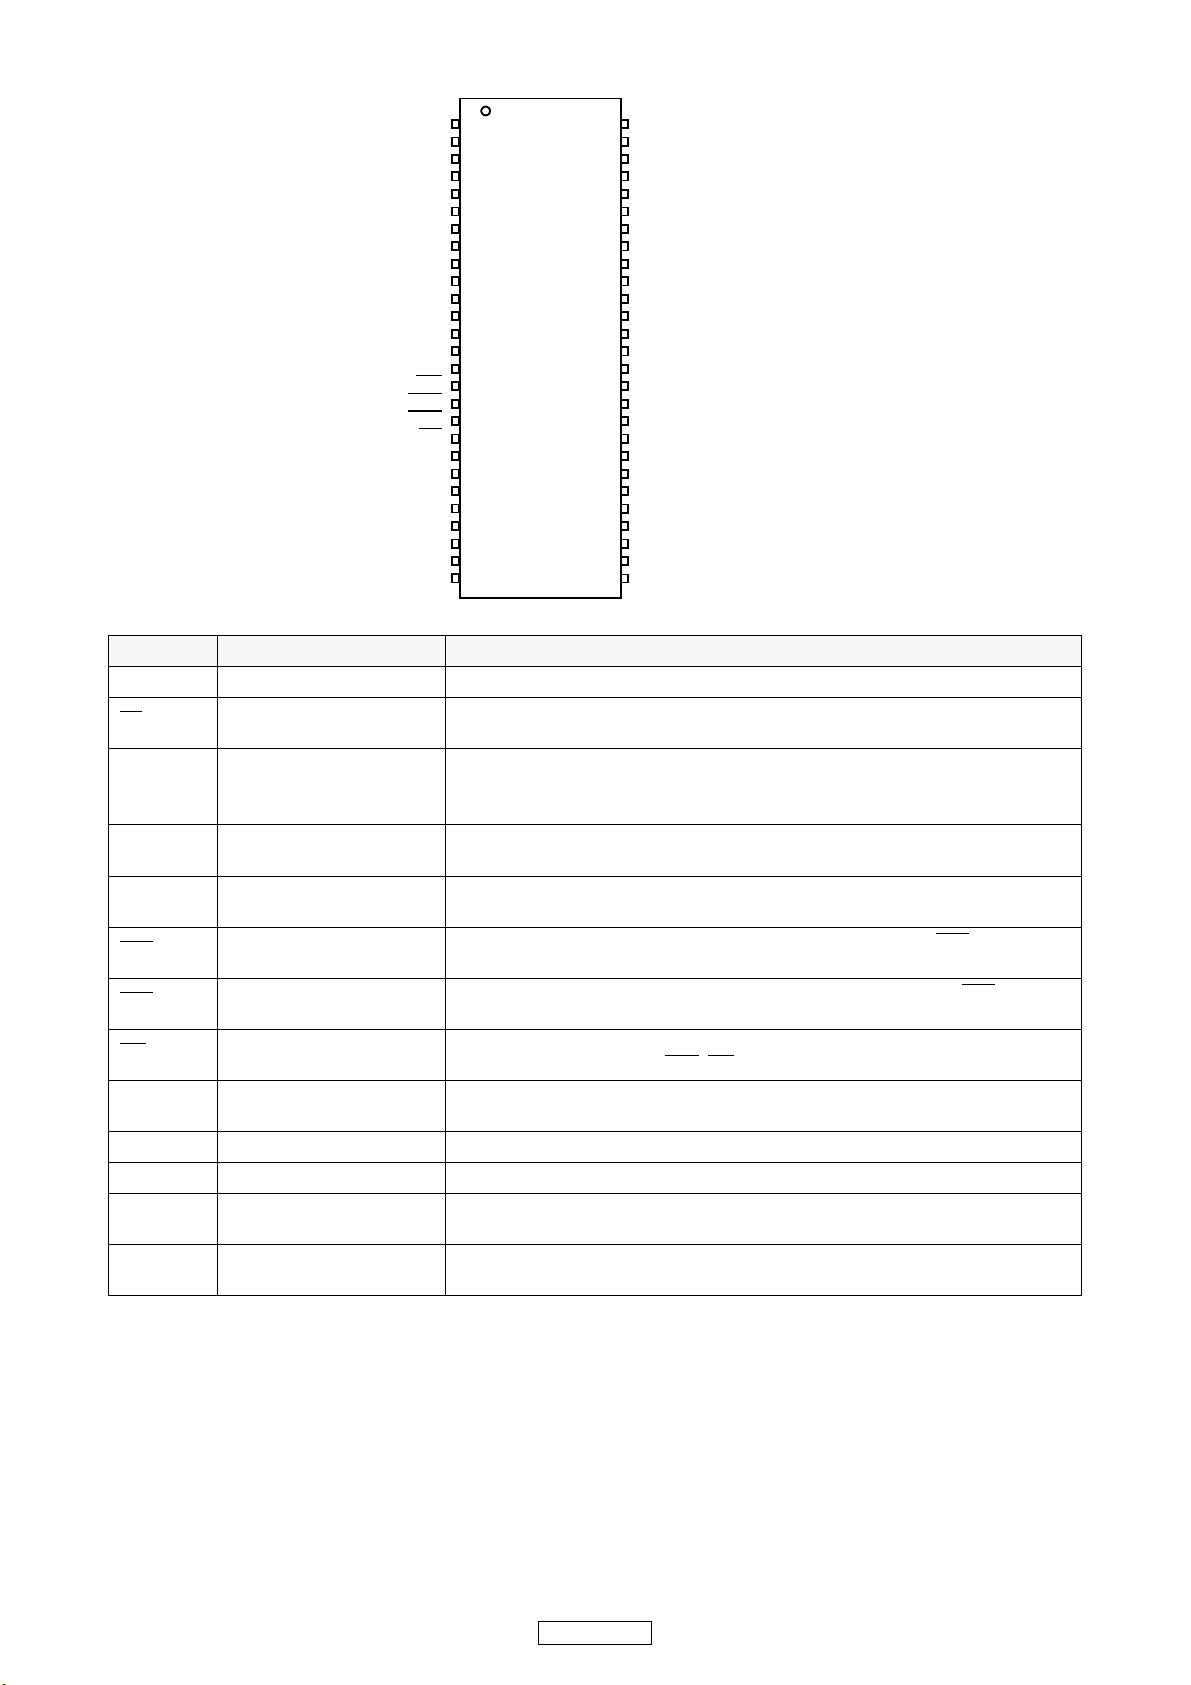
K4S641632D (U2)
V
DD
DQ0
V
DDQ
DQ1
DQ2
V
SSQ
DQ3
DQ4
V
DDQ
DQ5
DQ6
V
SSQ
DQ7
V
DD
LDQM
WE
CAS
RAS
CS
BA0
BA1
A10/AP
A0
A1
A2
A3
V
DD
1
2
3
4
5
6
7
8
9
10
11
12
13
14
15
16
17
18
19
20
21
22
23
24
25
26
27
54
53
52
51
50
49
48
47
46
45
44
43
42
41
40
39
38
37
36
35
34
33
32
31
30
29
28
V
SS
DQ15
V
SSQ
DQ14
DQ13
V
DDQ
DQ12
DQ11
V
SSQ
DQ10
DQ9
V
DDQ
DQ8
V
SS
N.C/RFU
UDQM
CLK
CKE
N.C
A11
A9
A8
A7
A6
A5
A4
V
SS
54Pin TSOP (II)
(400mil x 875mil)
(0.8 mm Pin pitch)
PIN FUNCTION DESCRIPTION
Pin Name Input Function
CLK System clock Active on the positive going edge to sample all inputs.
CS
Chip select
Disables or enables device operation by masking or enabling all inputs except
CLK, CKE and L(U)DQM
CKE Clock enable
Masks system clock to freeze operation from the next clock cycle.
CKE should be enabled at least one cycle prior to new command.
Disable input buffers for power down in standby.
A
0
~ A
11
Address
Row/column addresses are multiplexed on the same pins.
Row address : RA
0
~ RA11, Column address : CA0 ~ CA
7
BA0 ~ BA1Bank select address
Selects bank to be activated during row address latch time.
Selects bank for read/write during column address latch time.
RAS
Row address strobe
Latches row addresses on the positive going edge of the CLK with RAS
low.
Enables row access & precharge.
CAS
Column address strobe
Latches column addresses on the positive going edge of the CLK with CAS
low.
Enables column access.
WE
Write enable
Enables write operation and row precharge.
Latches data in starting from CAS
,WE active.
L(U)DQM Data input/output mask
Makes data output Hi-Z, t
SHZ
after the clock and masks the output.
Blocks data input when L(U)DQM active.
DQ
0
~
15
Data input/output Data inputs/outputs are multiplexed on the same pins.
V
DD/VSS
Power supply/ground Power and ground for the input buffers and the core logic.
V
DDQ/VSSQ
Data output power/ground
Isolated power supply and ground for the output buffers to provide improved noise
immunity.
N.C/RFU
No connection
/reserved for future use
This pin is recommended to be left No Connection on the device.
34
DN-S700
Page 35
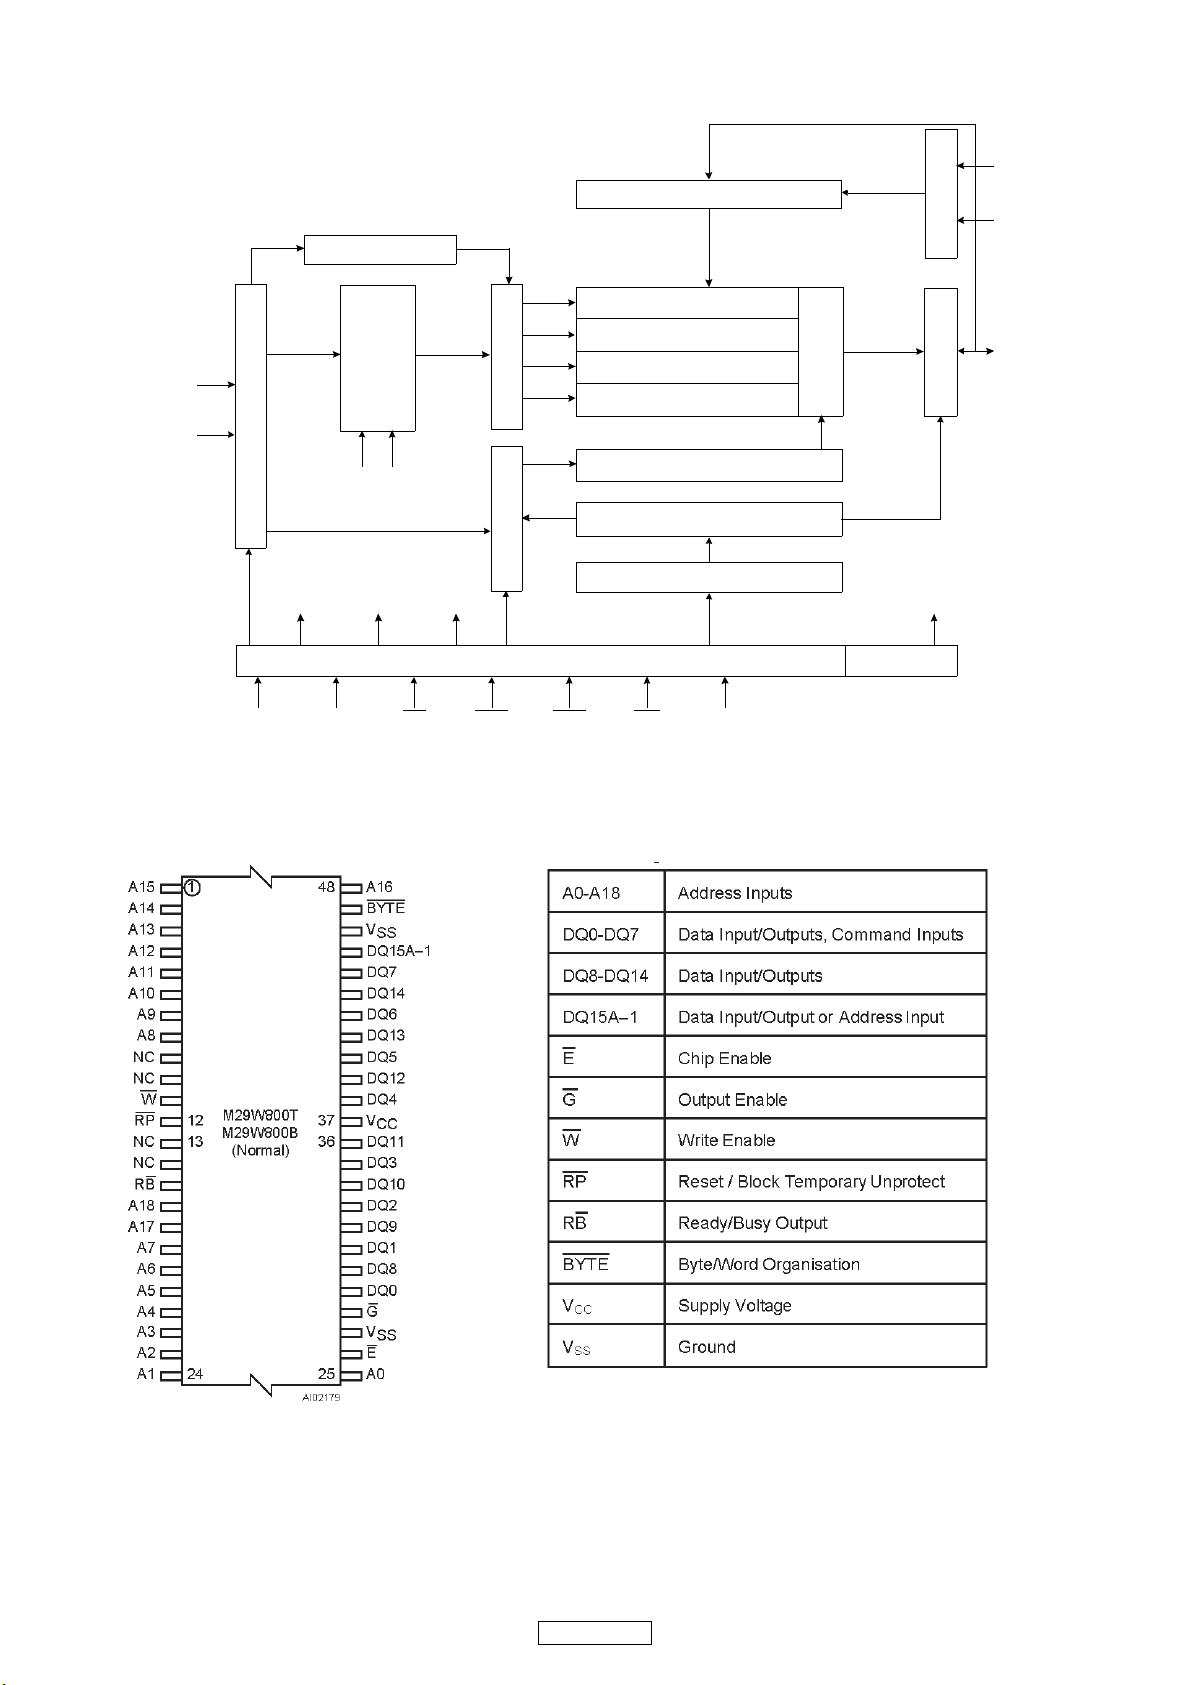
K4S641632D Block diagram
Bank Select
Data Input Register
1M x 16
1M x 16
Sense AMP
Output BufferI/O Control
Column Decoder
Latency & Burst Length
Programming Register
Address Register
Row Buffer
Refresh Counter
Row Decoder Col. Buffer
LRAS
LCBR
LCKE
LRAS LCBR LWE LDQM
CLK CKE CS
RAS CAS WE L(U)DQM
LWE
LDQM
DQi
CLK
ADD
LCAS LWCBR
1M x 16
1M x 16
Timing Register
M29W800DB (U3)
35
DN-S700
Page 36
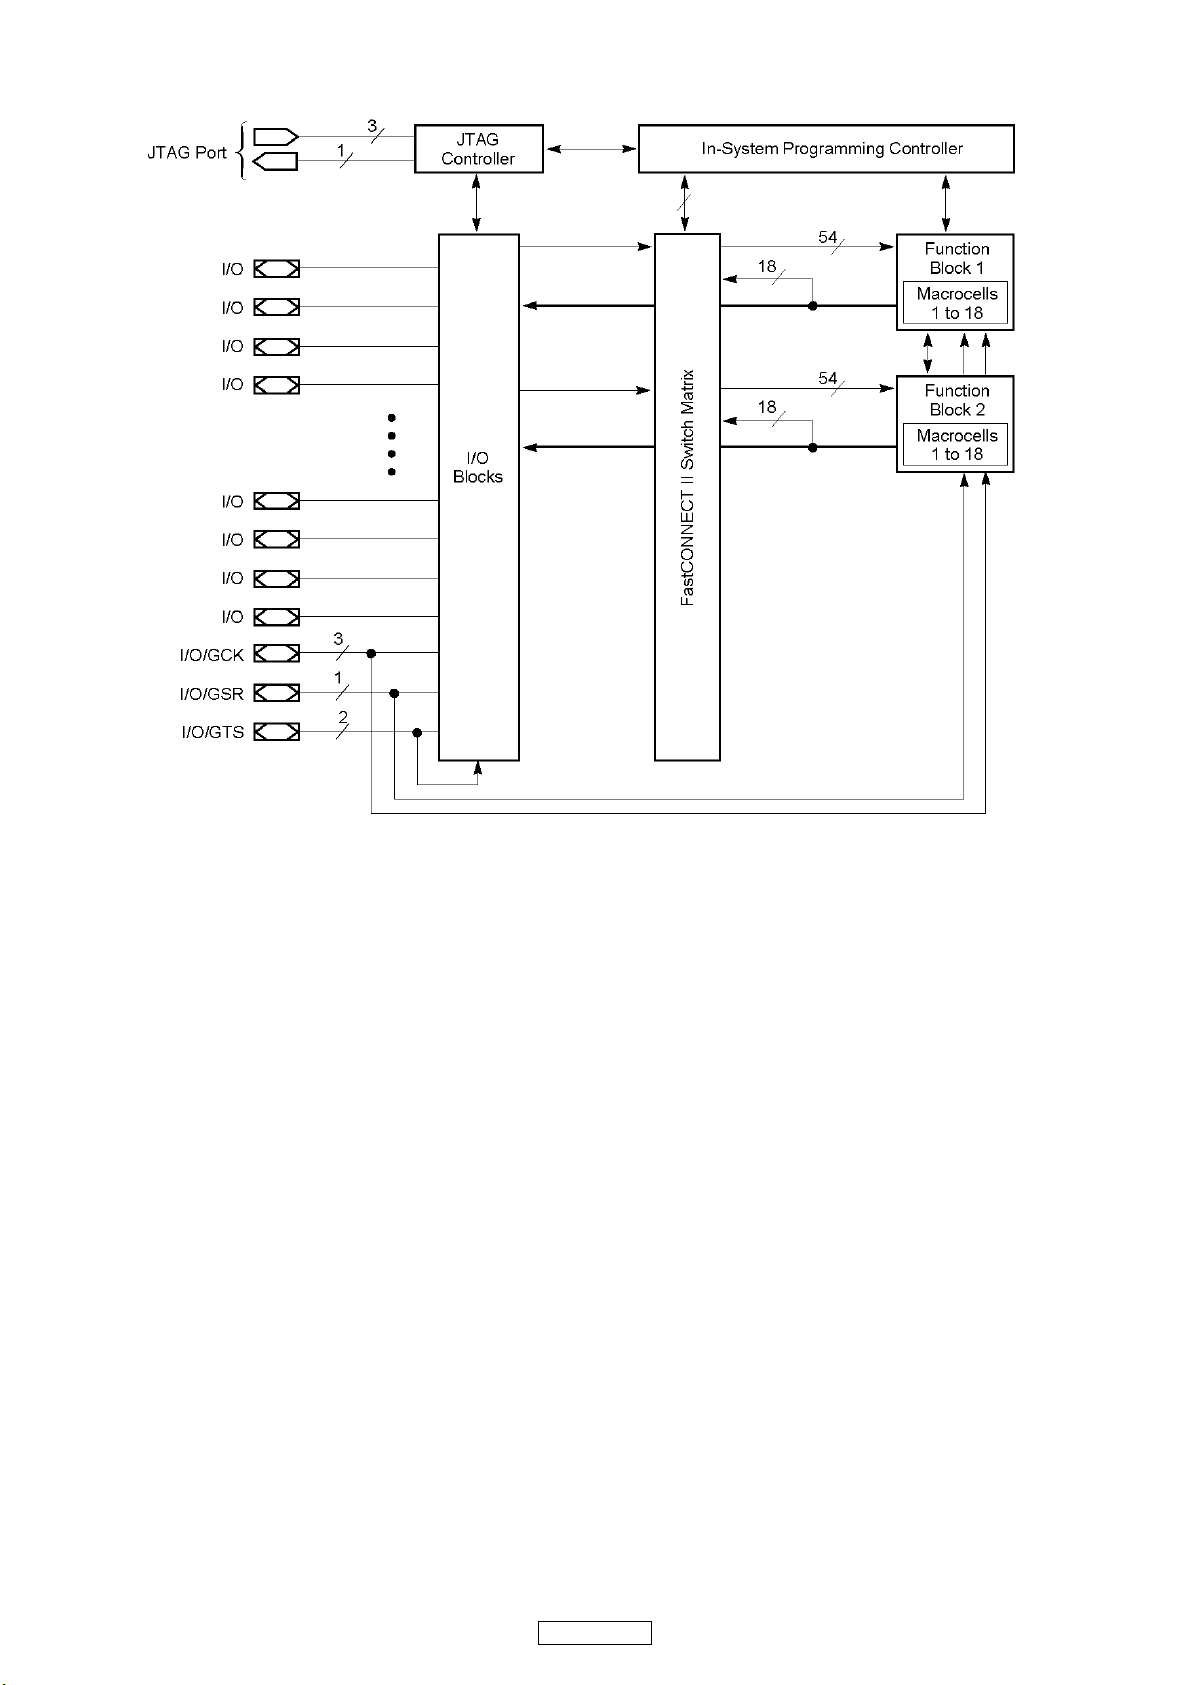
XC9536-10-VQ44C (U8)
36
DN-S700
Page 37
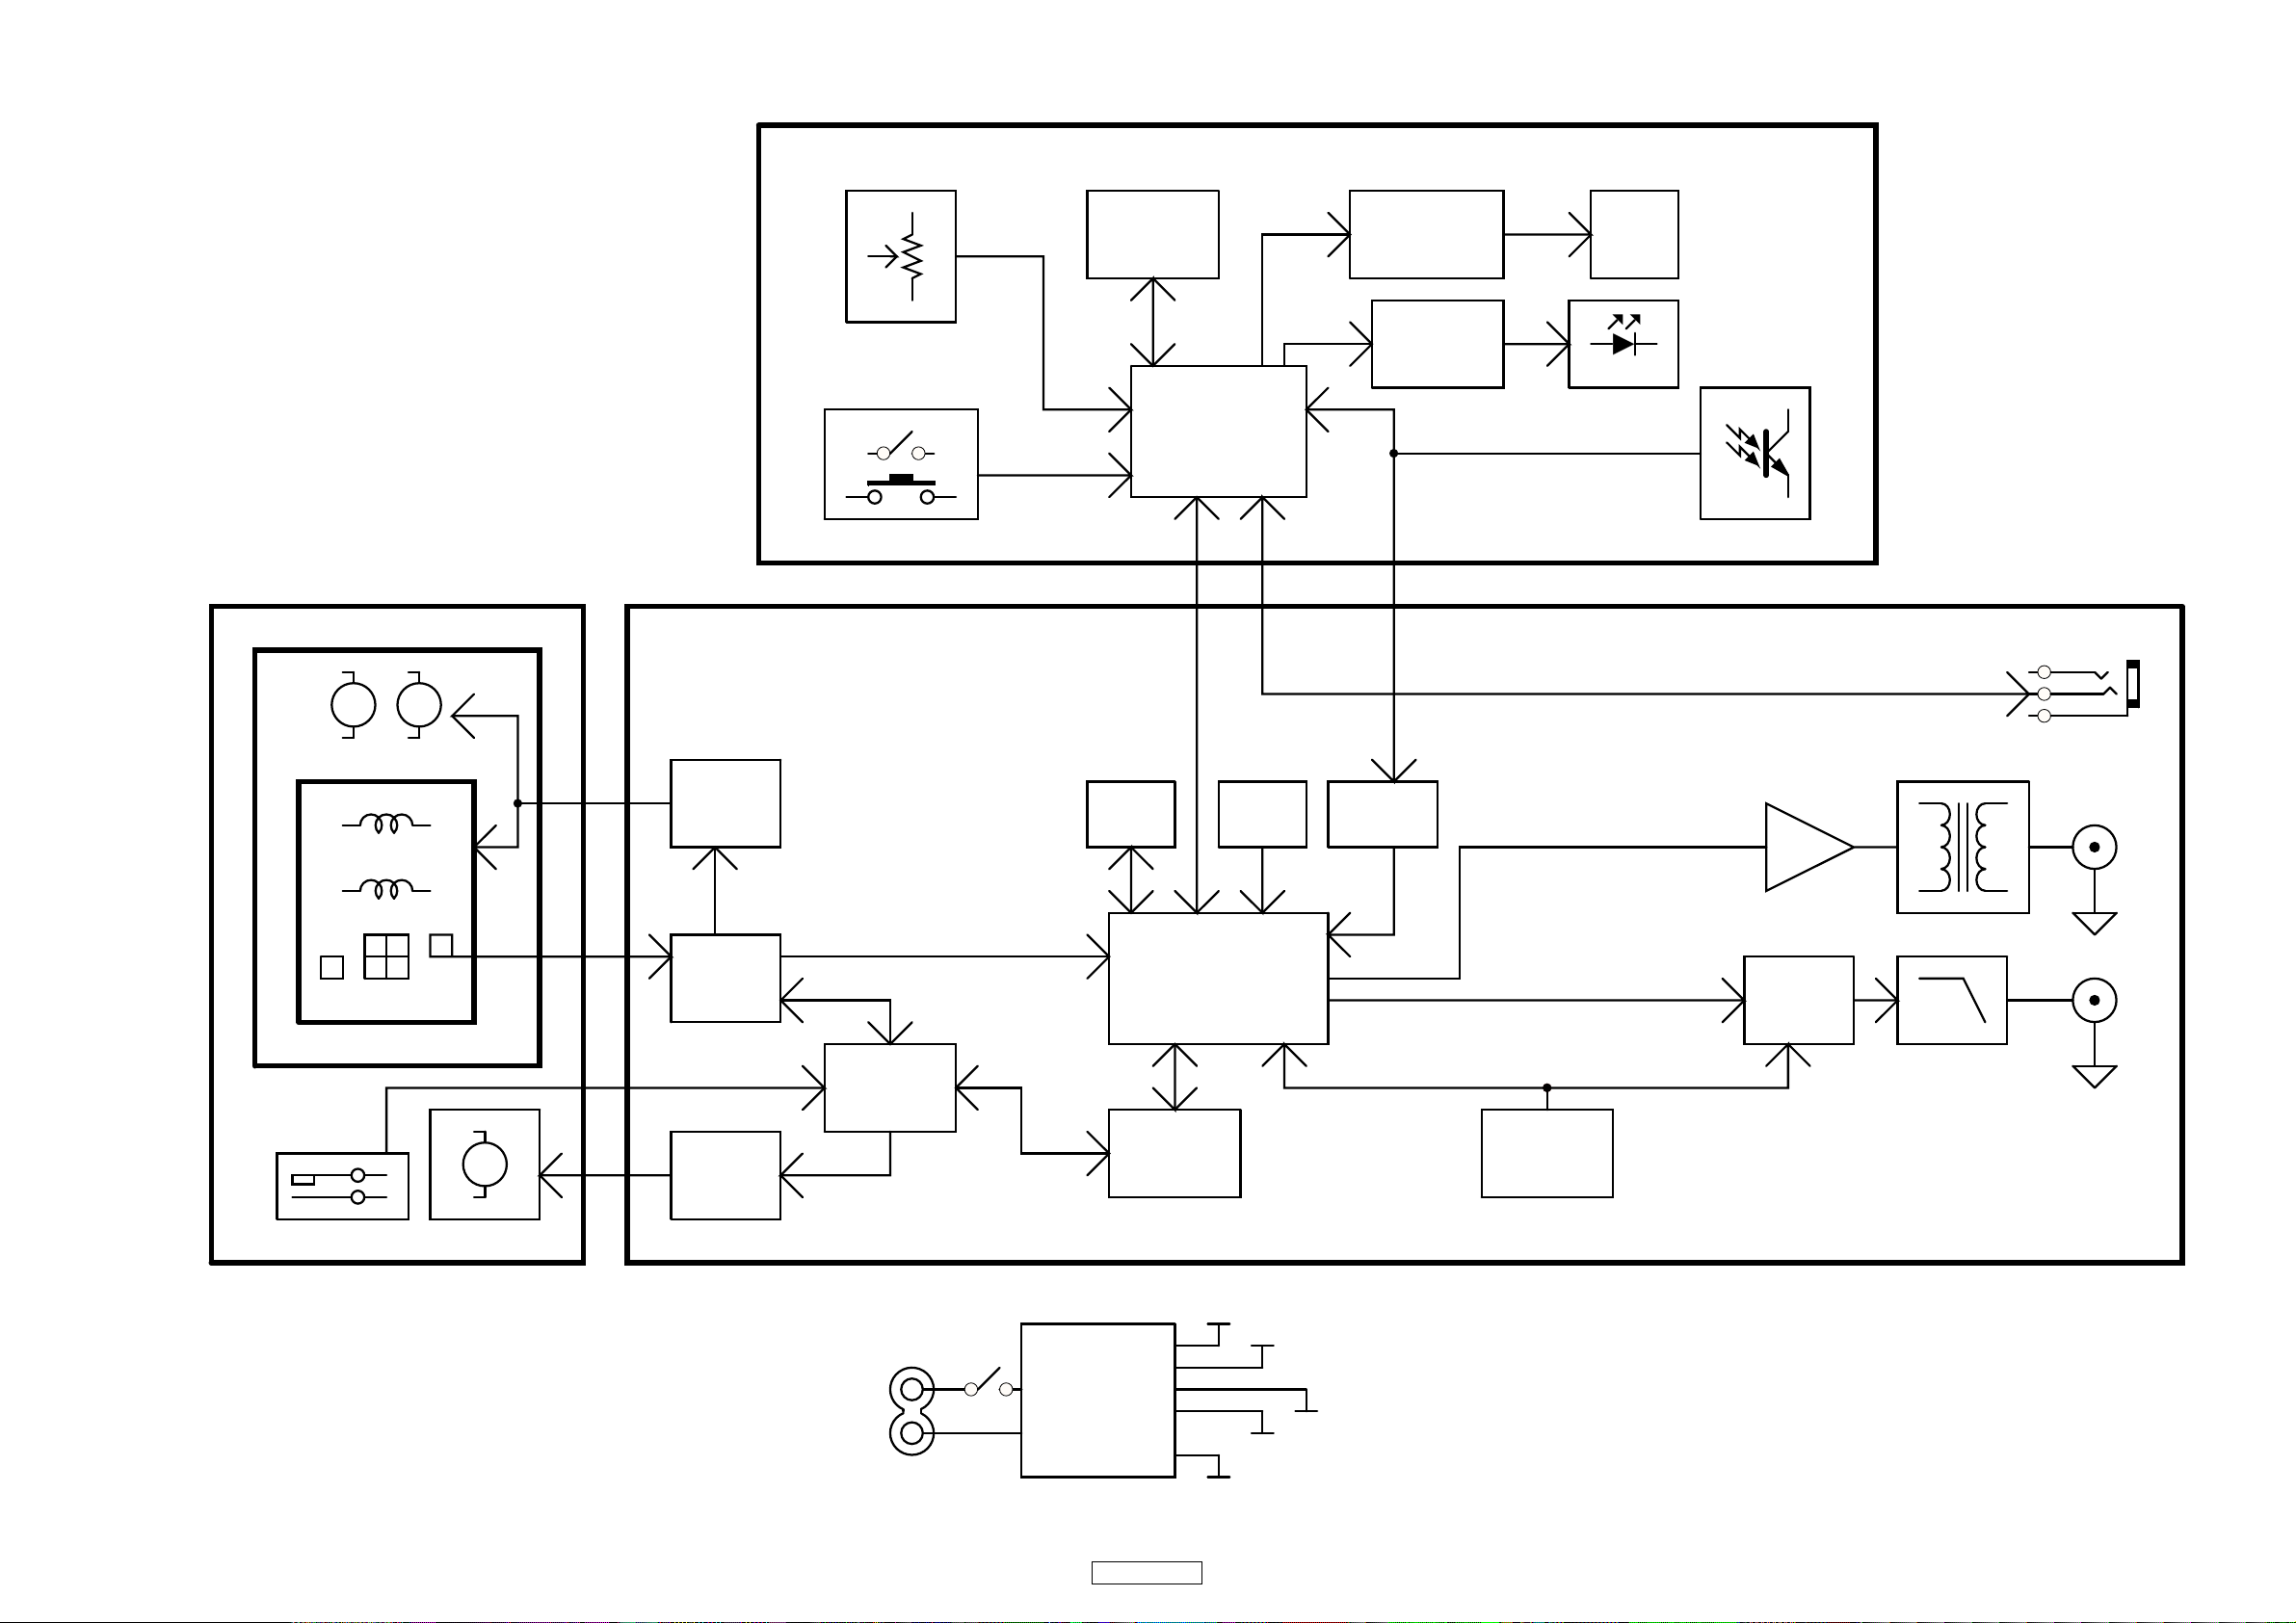
BLOCK DIAGRAM
L
3
R
2
G
1
5V
-8V
AUDI O OUT
POWER
SUPPLY
1 2
POWER SW.
7V
AC IN
CD PICK UP
CD DSP
DRI VER
TRACK ING
FOCUS
M
-
+
SLED
M
-
+
DI SC
M
-
+
LOADI N G
SWI TCHES
DRI VER
DRI VE UNI T
CD LOADER
DSP
ROMRAM
UI CPU
VF D DRIVER
VF D
3 1
2
FADER
CXD3059
BA6392F P
BA6218
MCF 5249
M29W8004641632
CONTROL PCB
MC9S08AW32
74HC14
BUF FER
WHEEL
SERVO PCB
P.I .
D. OUT
LED DRIVER
74595
BUF FER
LPF
FADER
DAC
PCM1716
1 2
KEY, ENCODER
LED
-32V
SWI TCHI NG
LC75710NE
CL OCK
74HCU04
SERVO CPU
MC9S08AW32
AC3.5V
CPL D
XC9536
RS
2
32
ISO. TX.
EEPROM
AT93C46
74HC04
37
DN-S700
Page 38
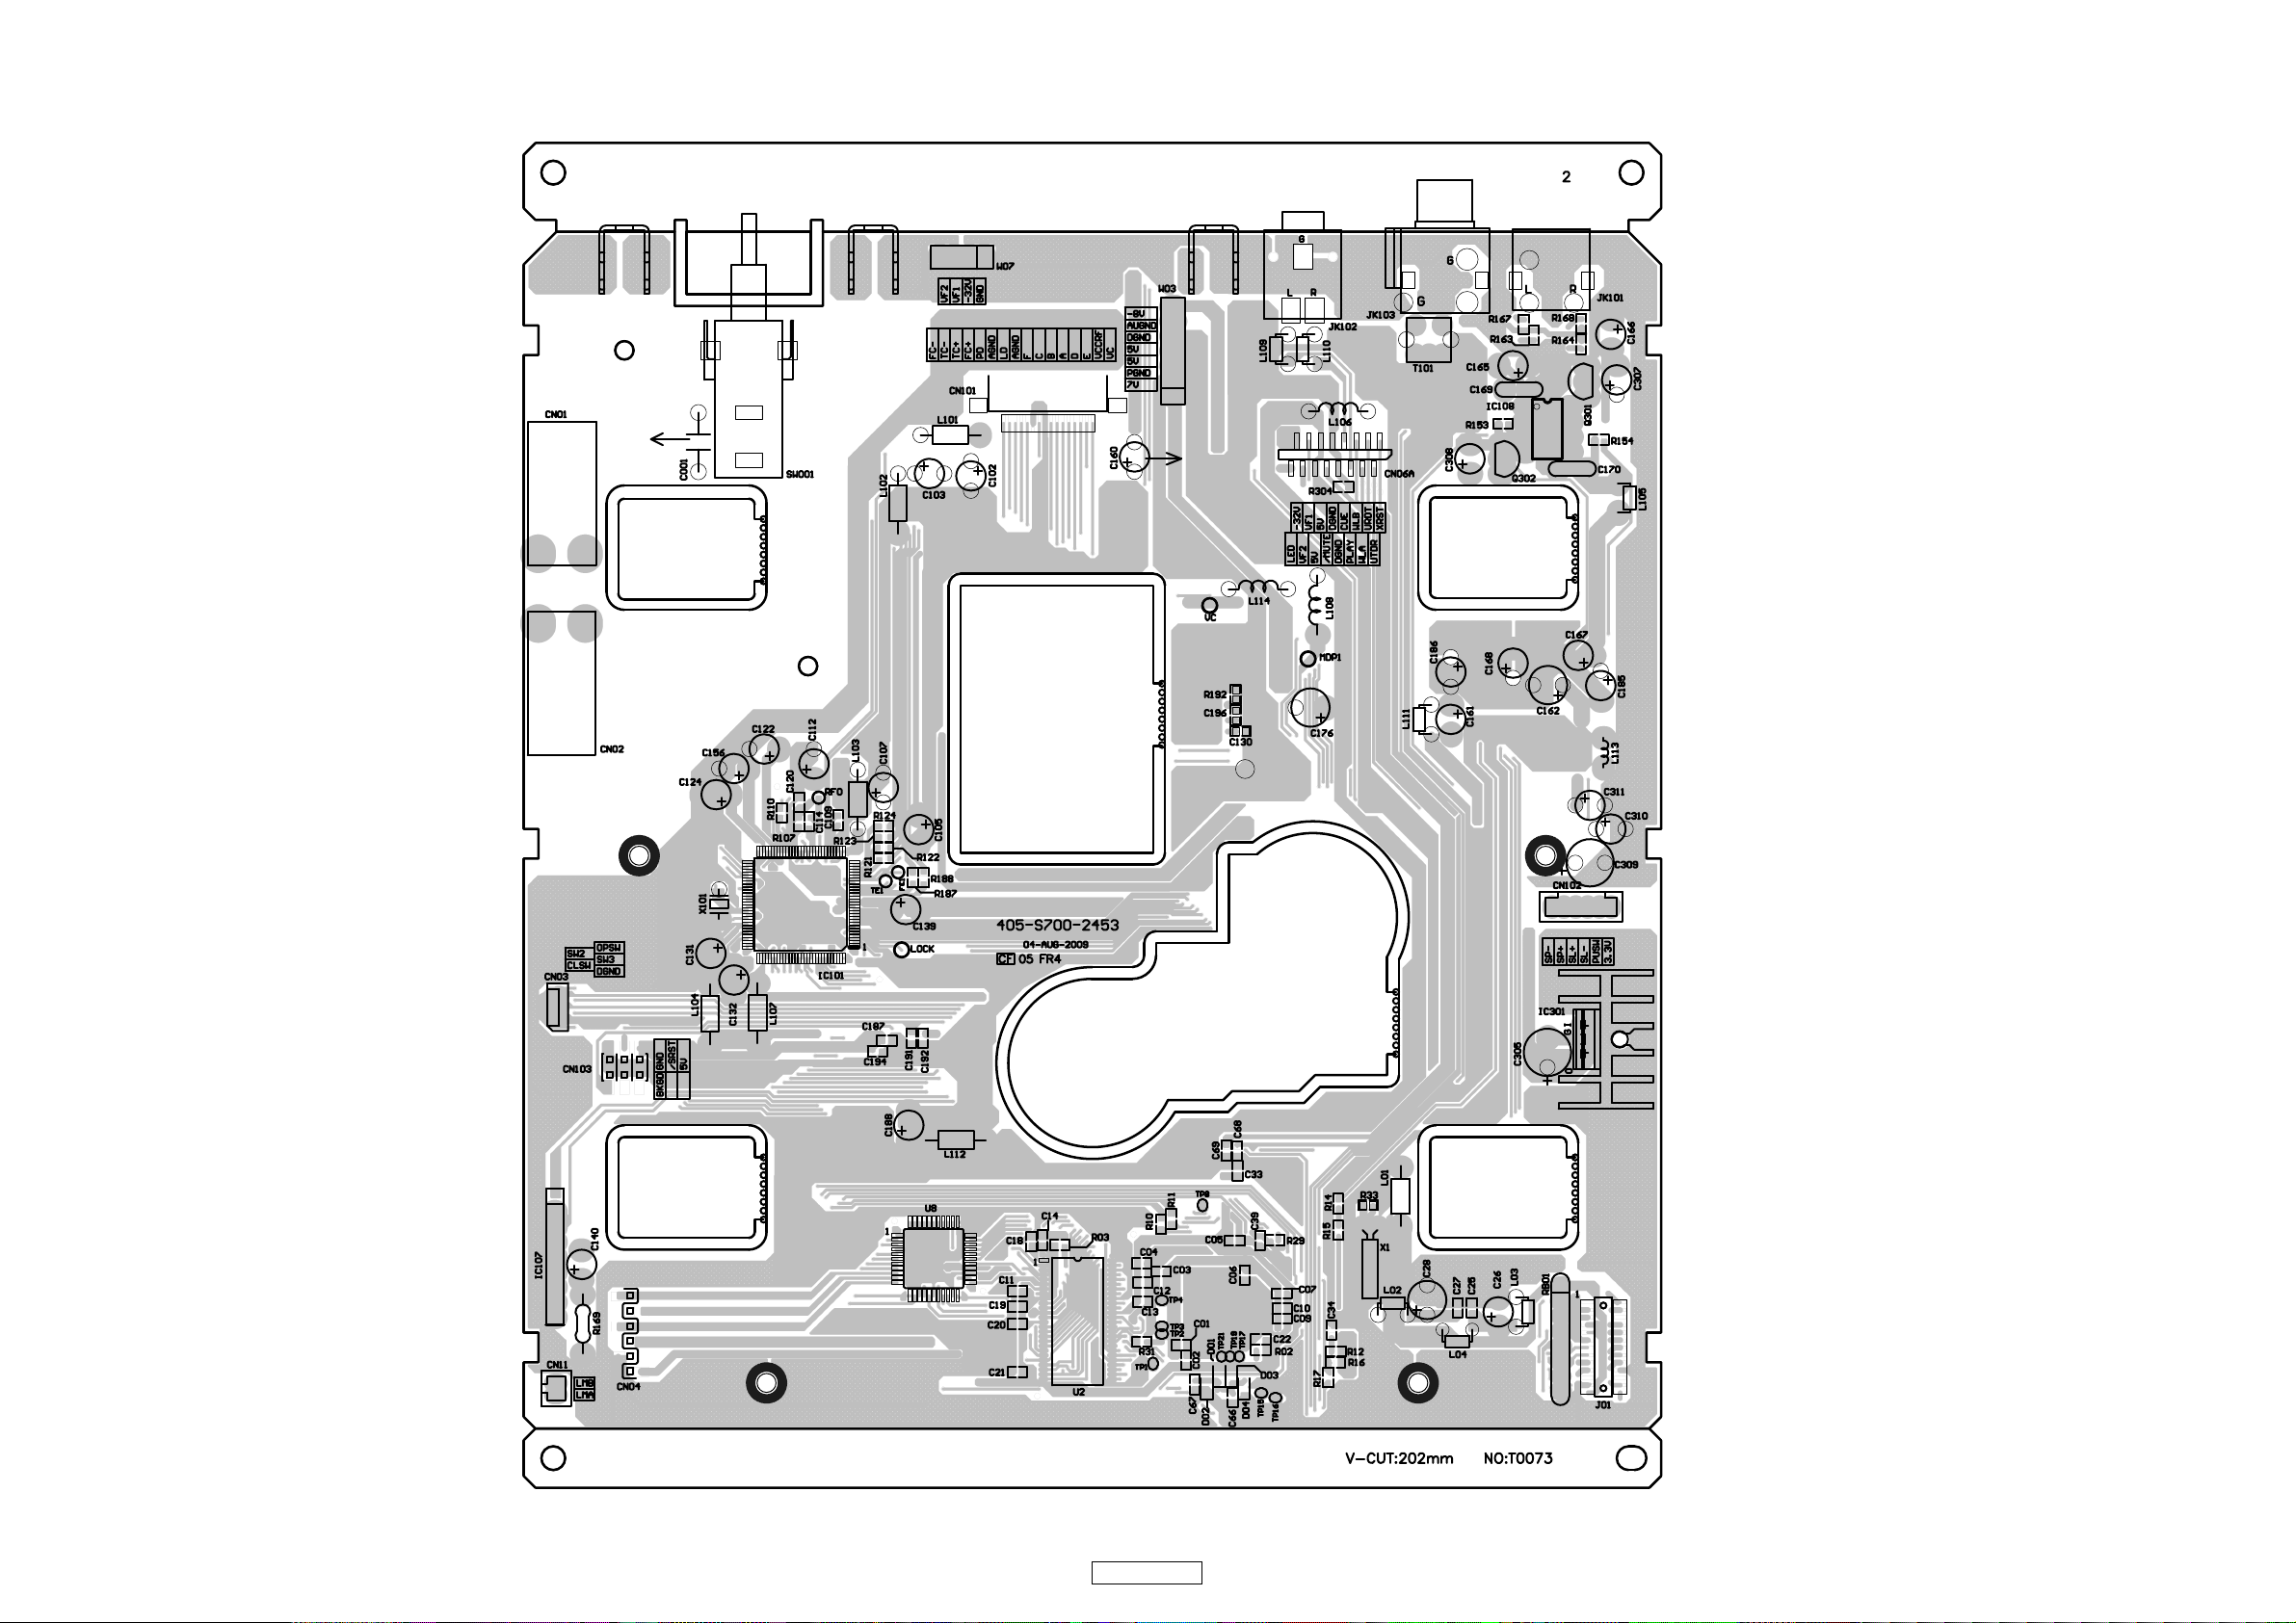
PRINTED WIRING BOARDS
COMPONENT SIDE
MAIN PCB UNIT (1/2)
38
DN-S700
Page 39
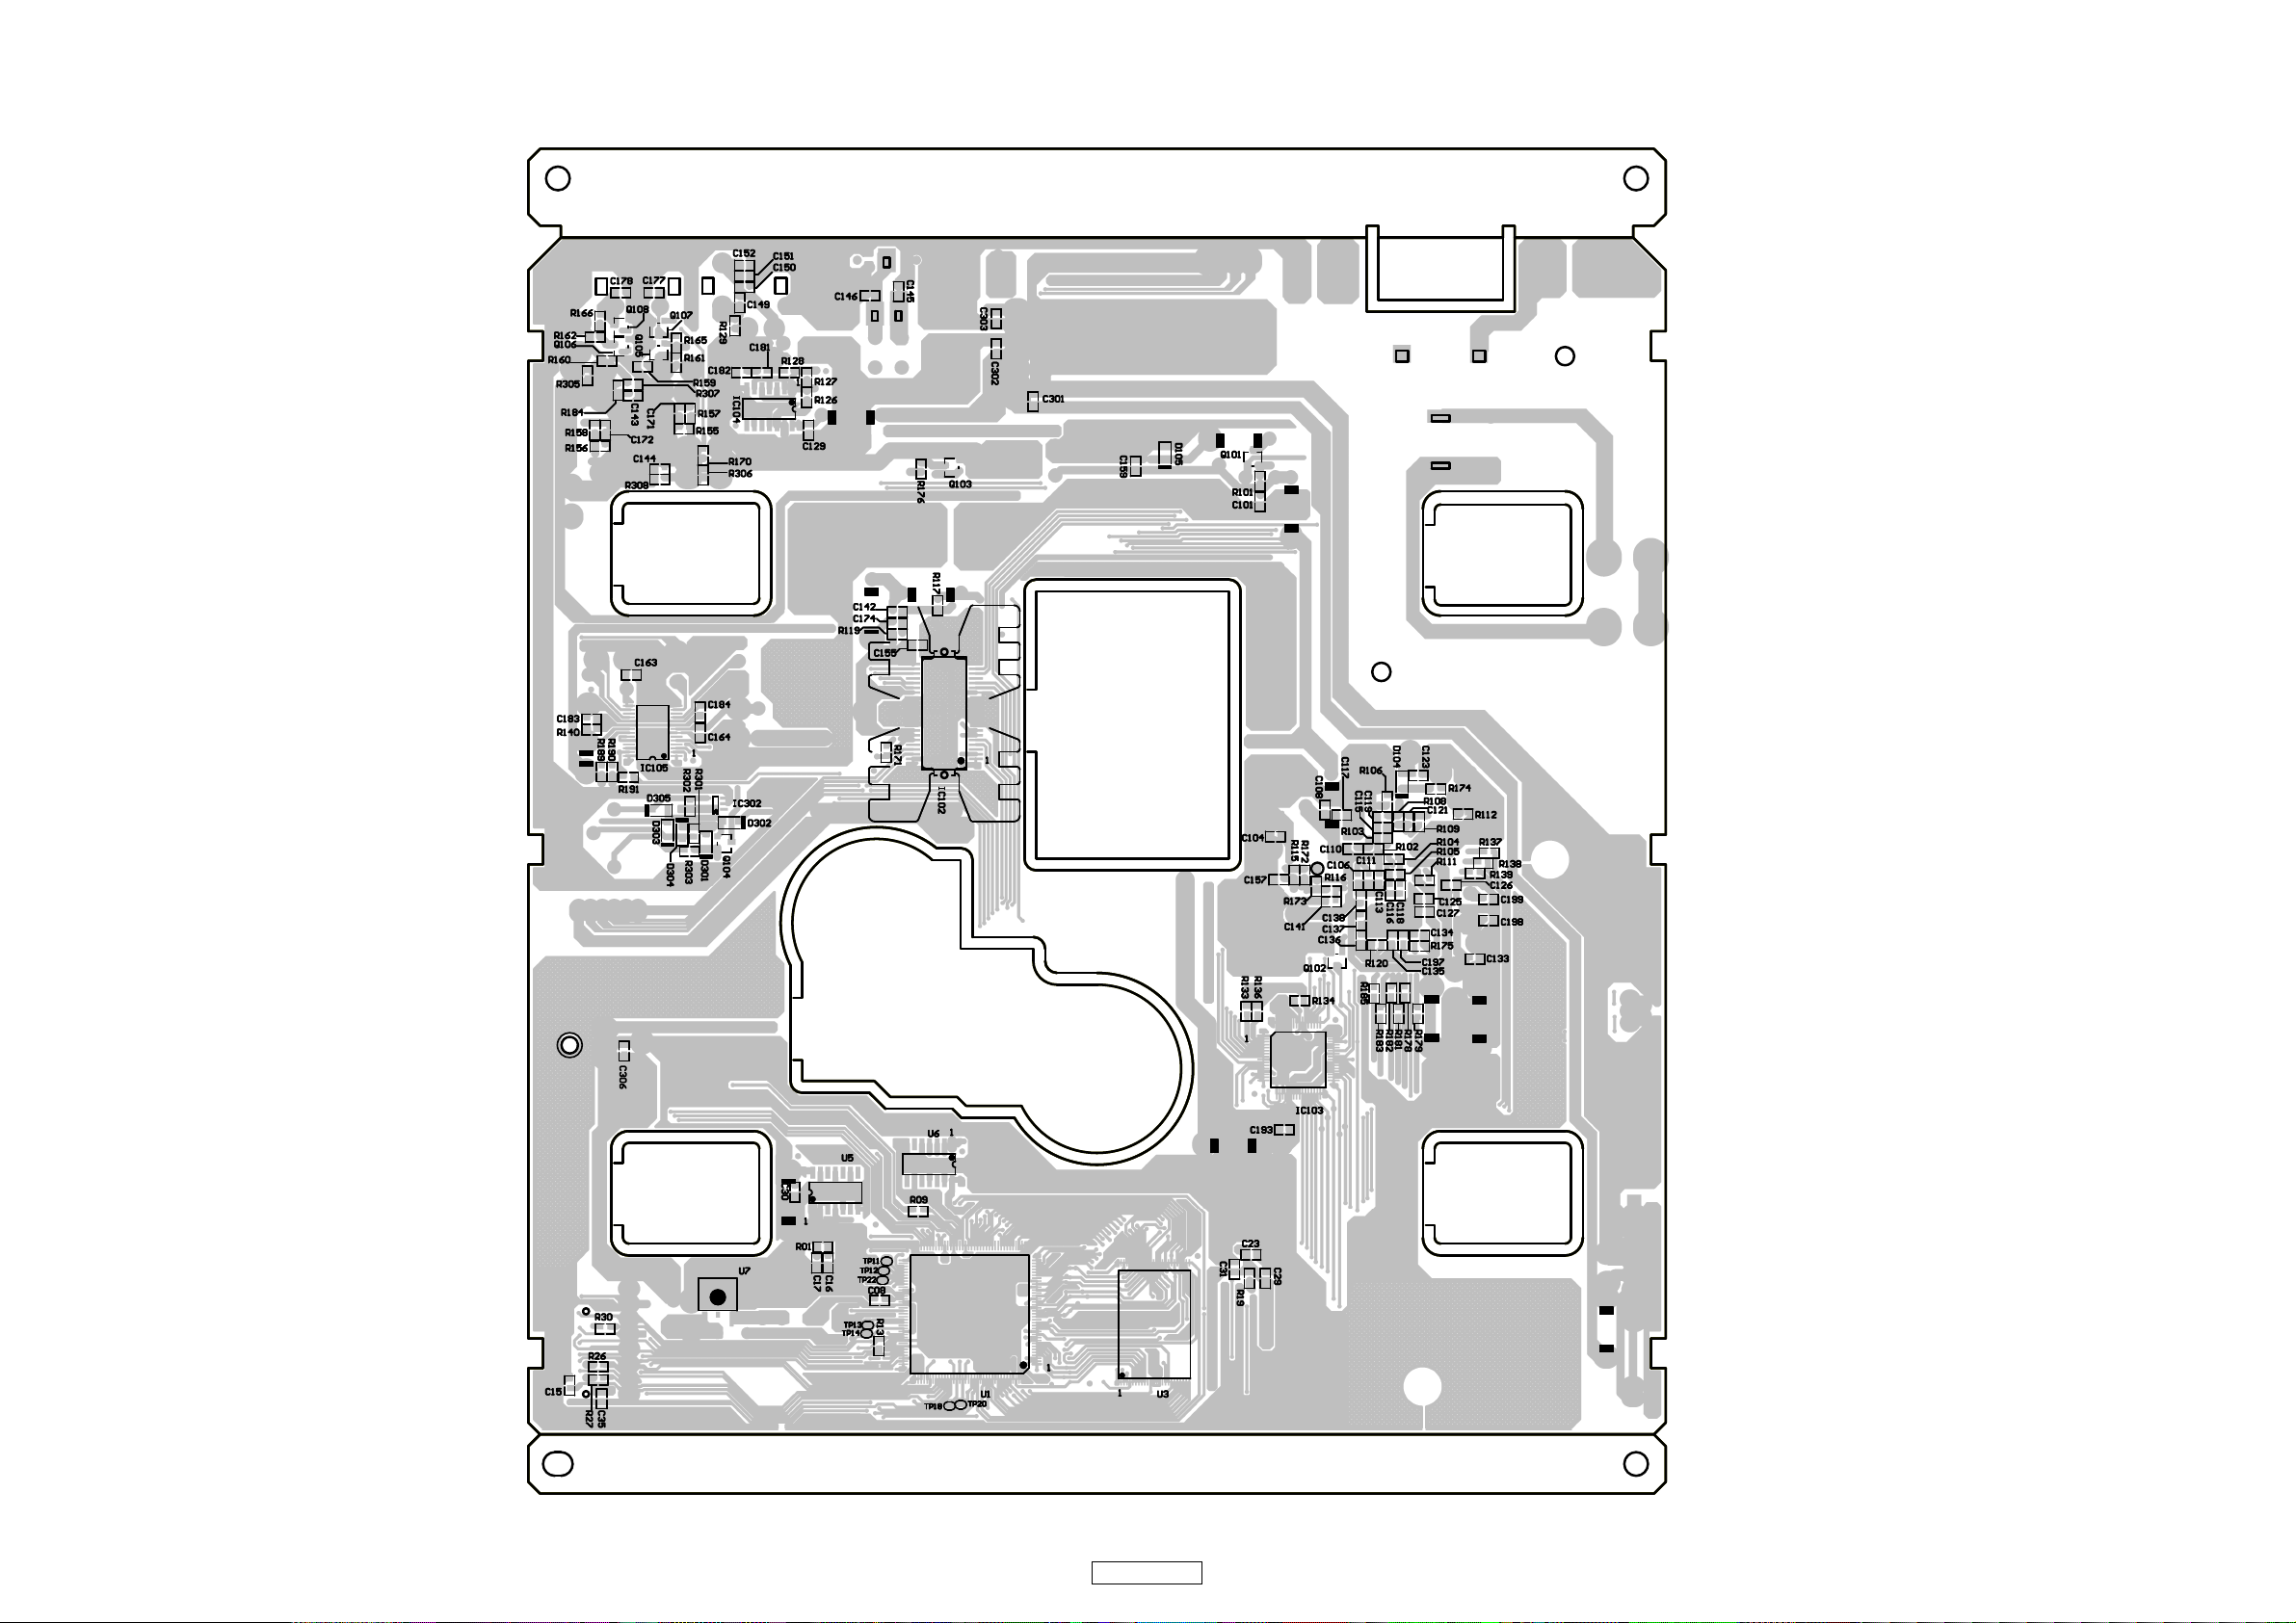
MAIN PCB UNIT (2/2)
FOIL SIDE
39
DN-S700
Page 40
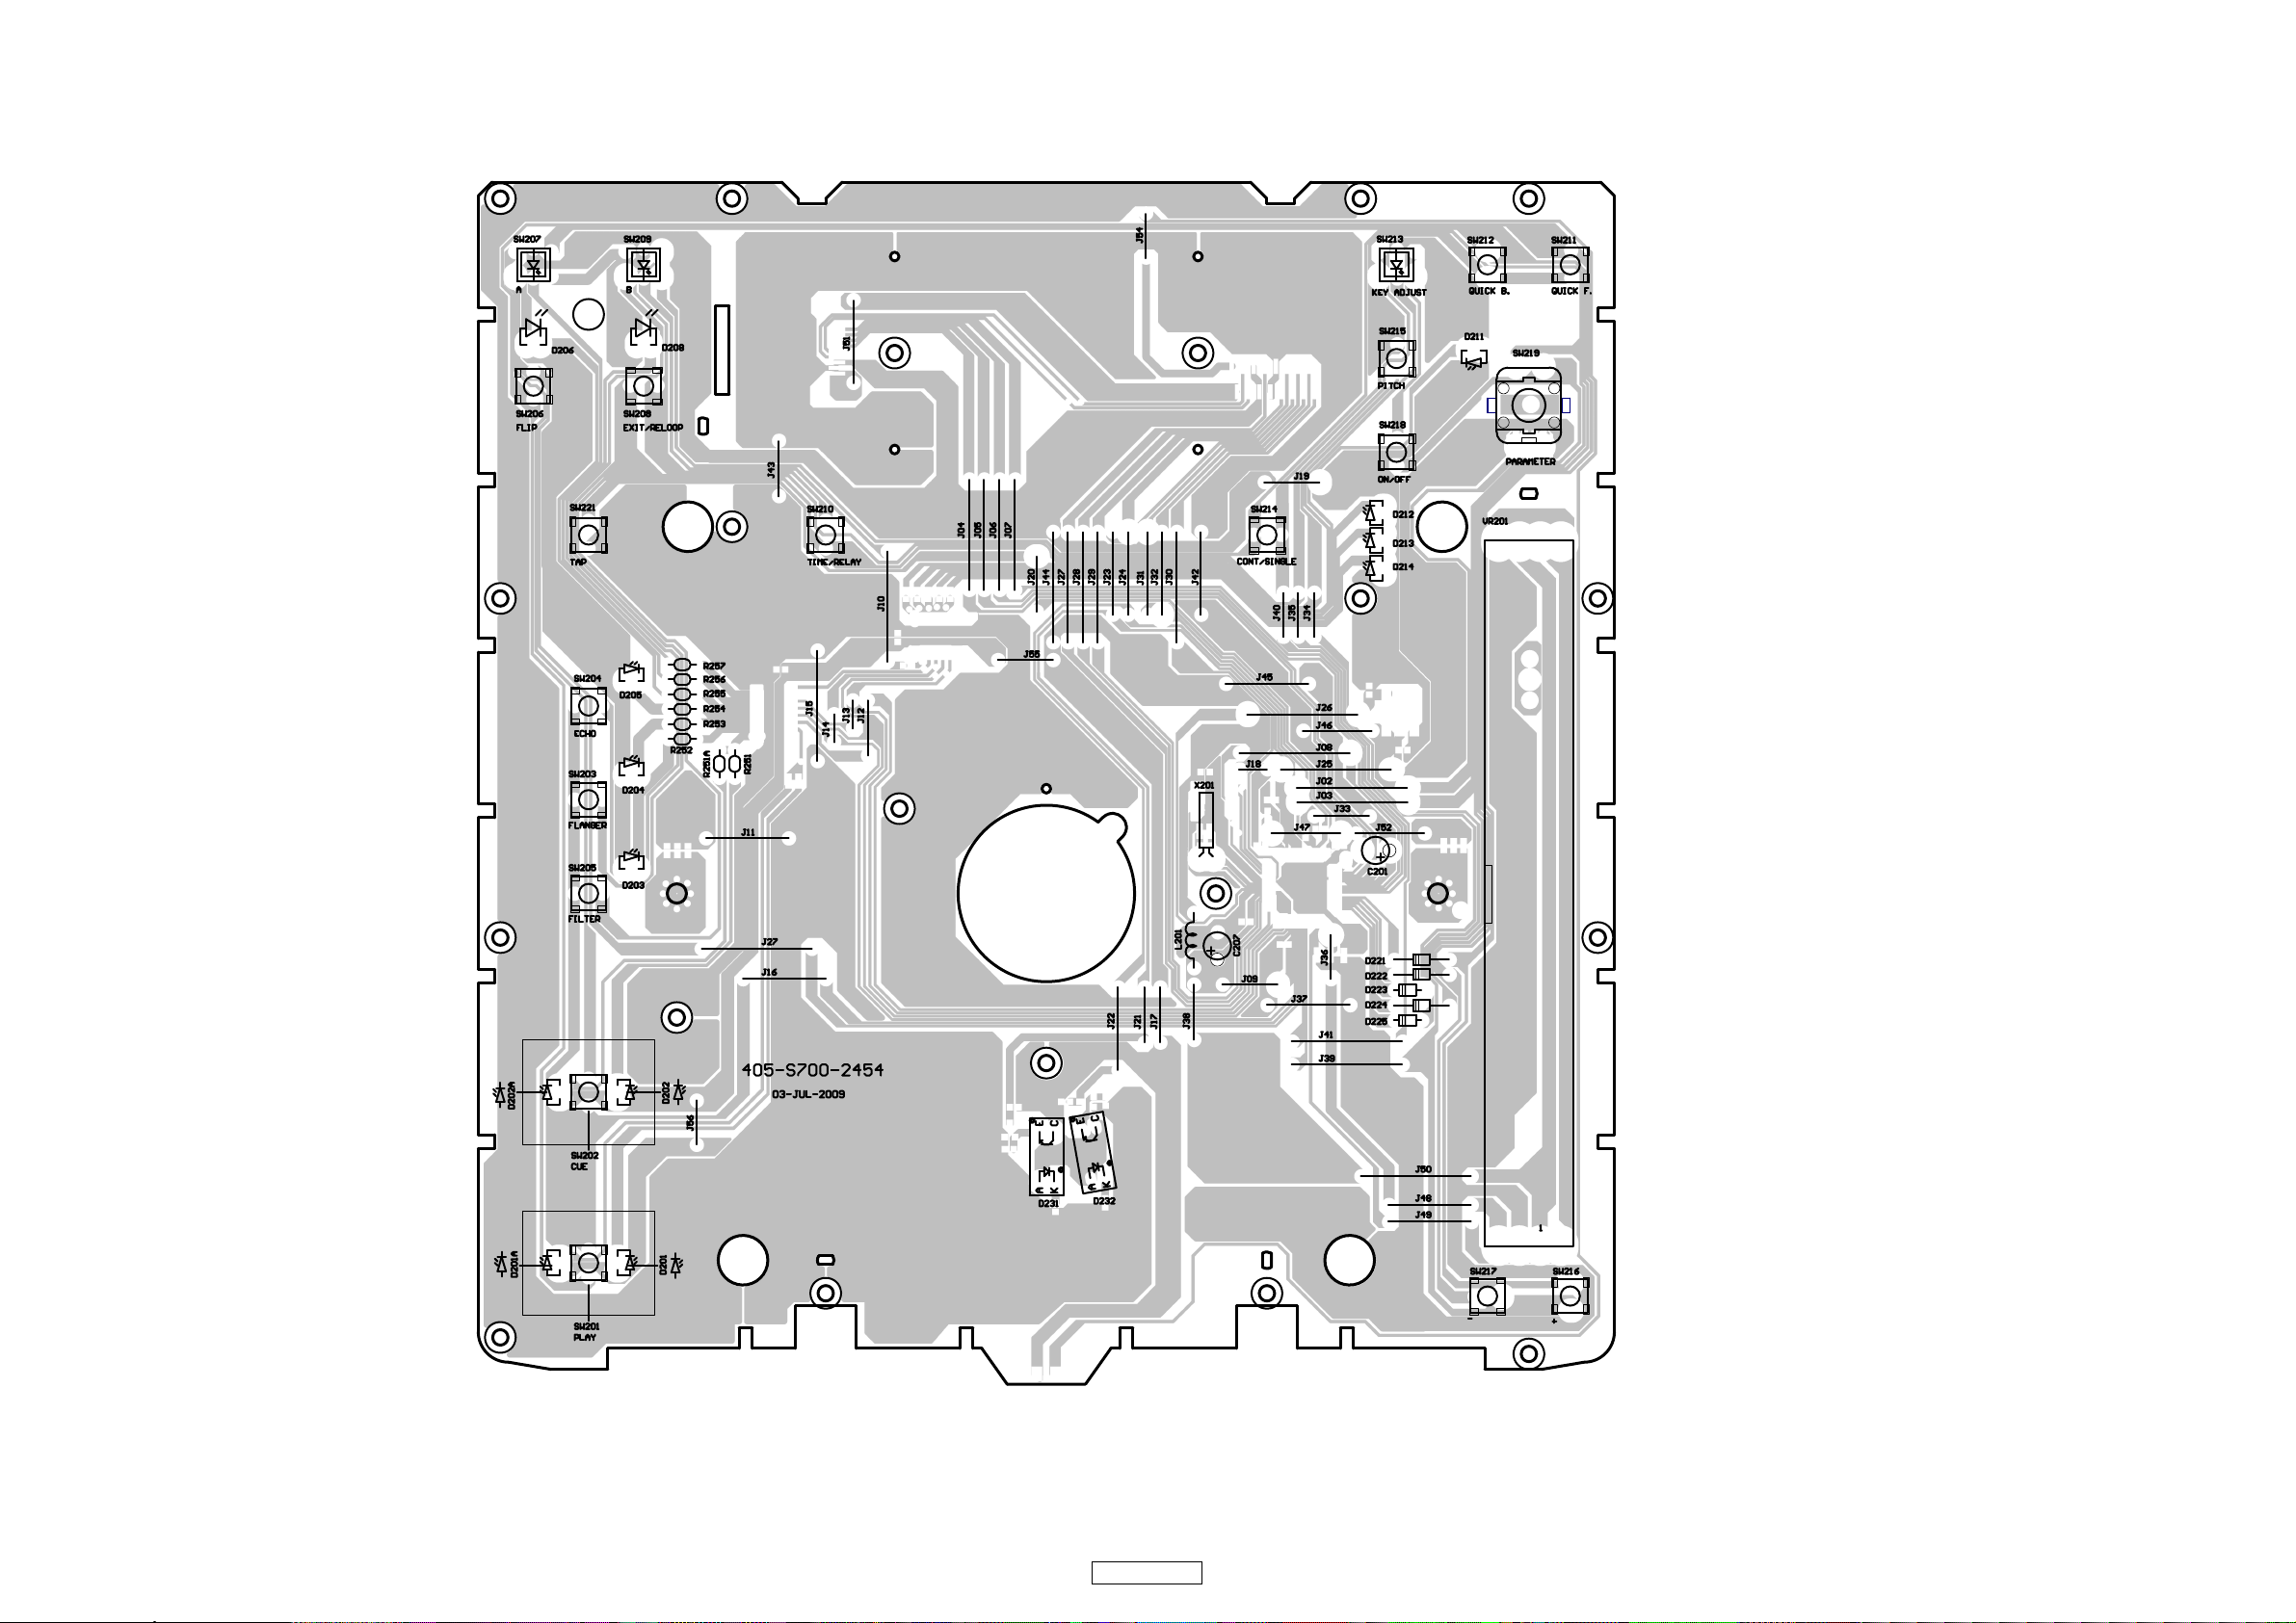
CONTROL PCB UNIT (1/2)
COMPONENT SIDE
40
DN-S700
Page 41
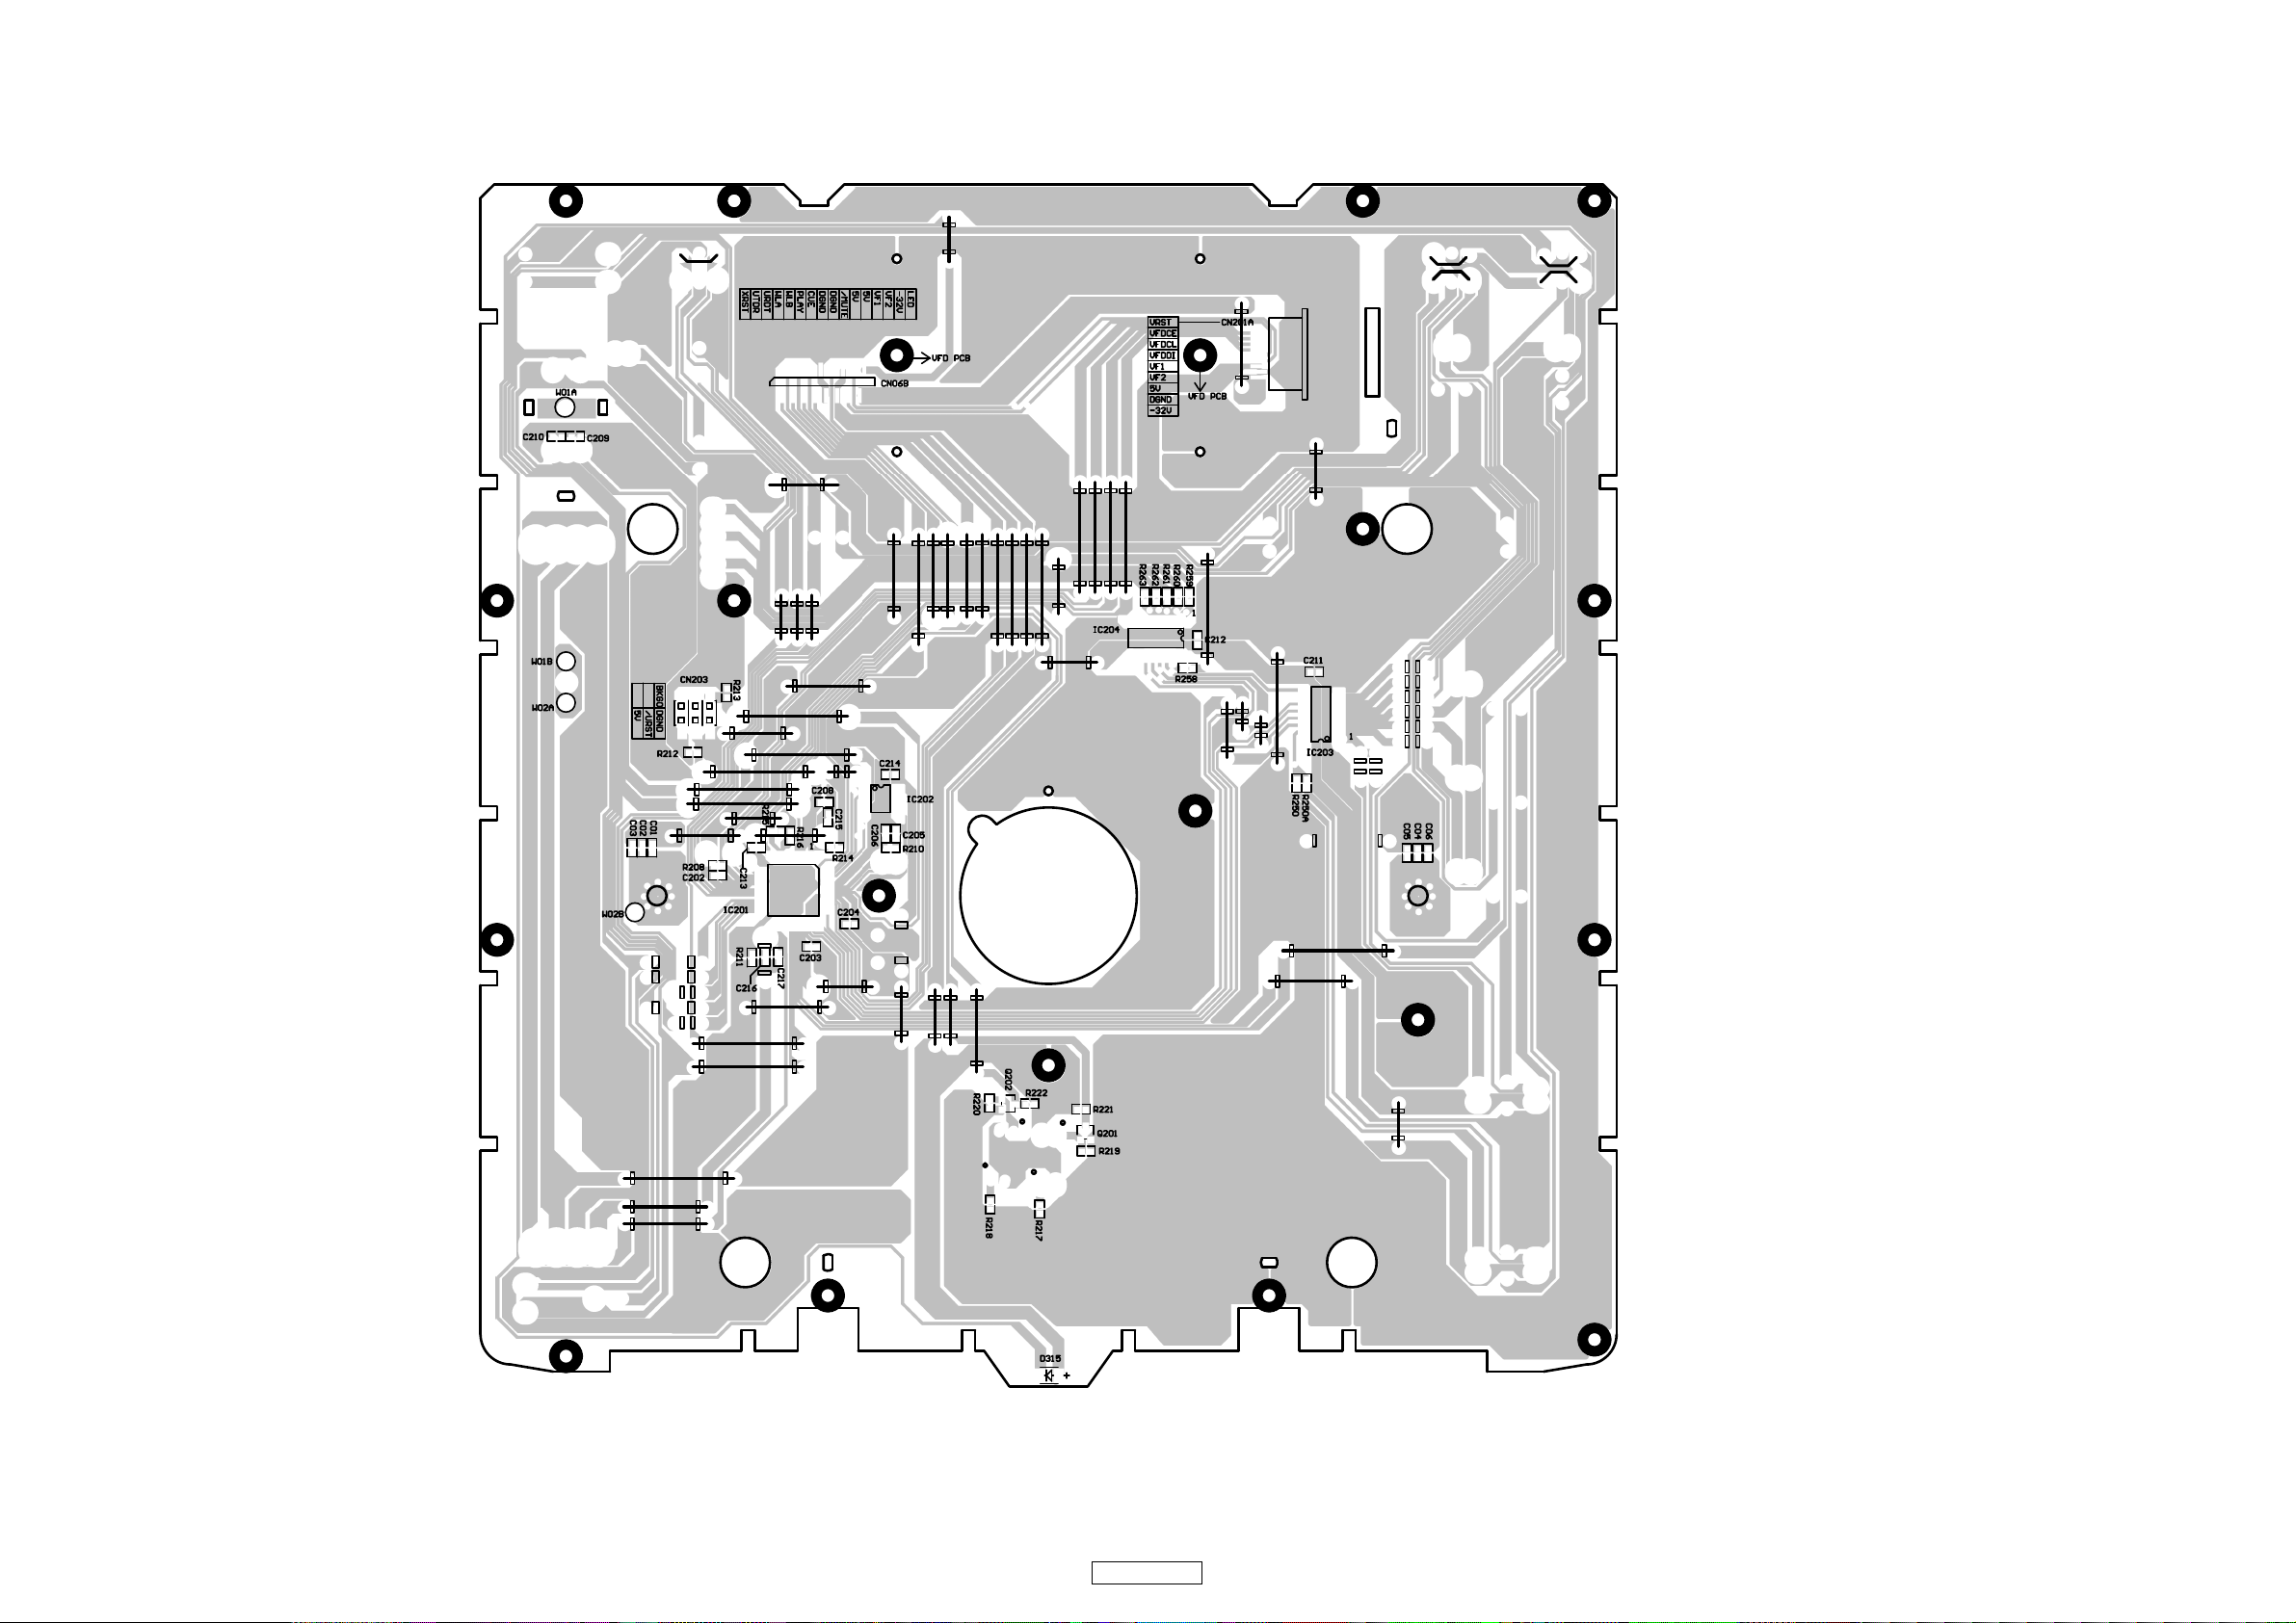
CONTROL PCB UNIT (2/2)
FOIL SIDE
41
DN-S700
Page 42
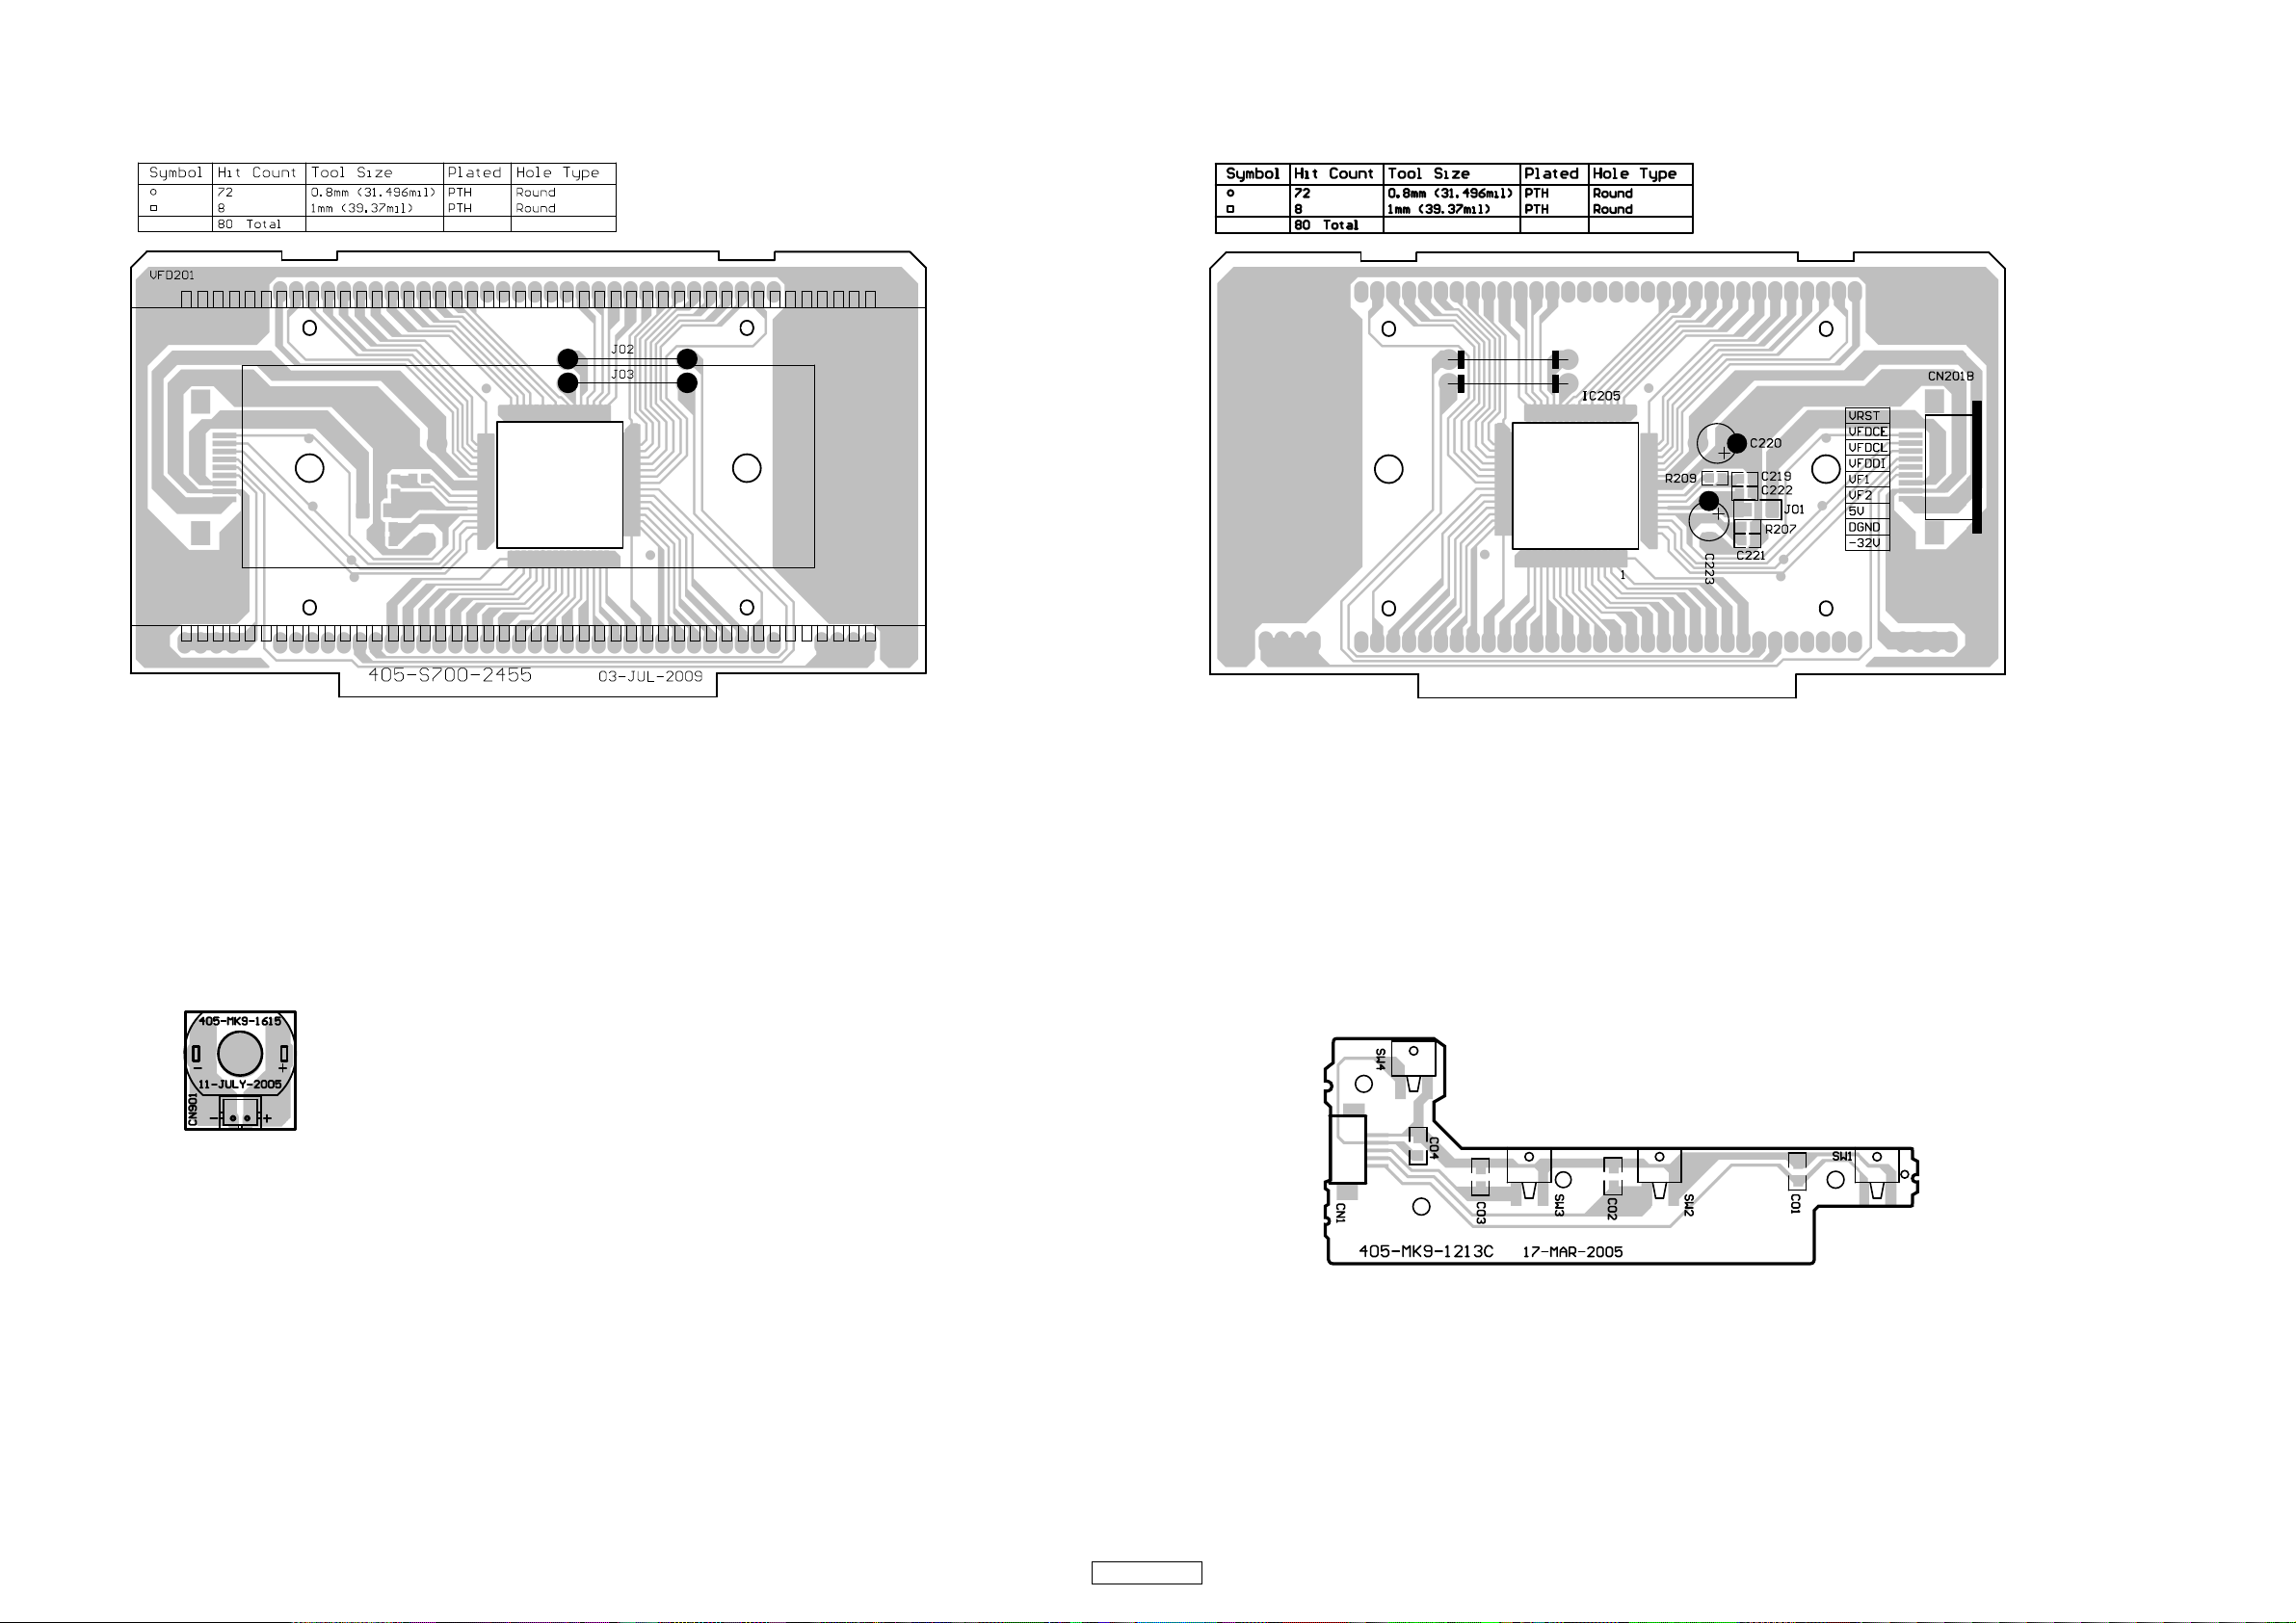
VFD PCB UNIT
COMPONENT SIDE
FOIL SIDE
COMPONENT SIDE
MOTOR PCB UNIT SW PCB UNIT
42
DN-S700
Page 43
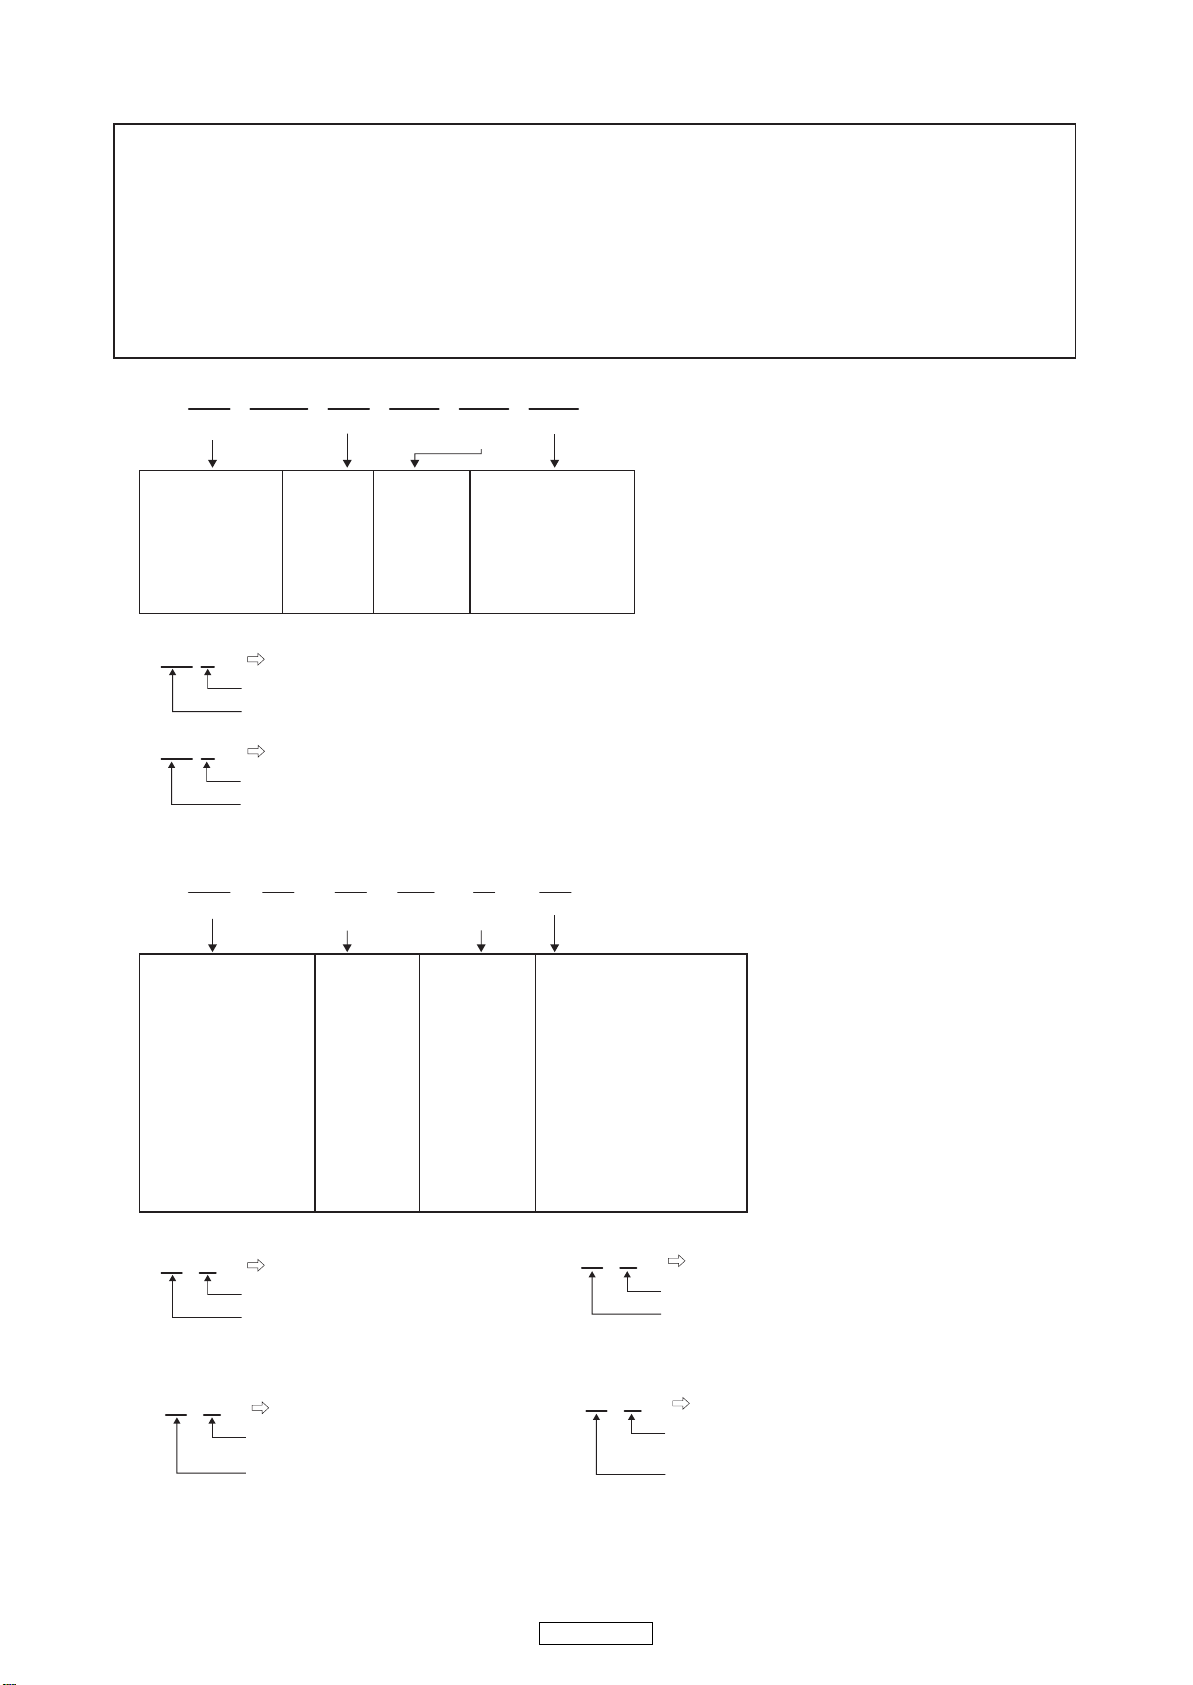
NOTE FOR PARTS LIST
Parts for which "nsp" is indicated on this table cannot be supplied.
When ordering of part, clearly indicate "1" and "I" (i) to avoid mis-supplying.
Ordering part without stating its part number can not be supplied.
Not including General-purpose Carbon Chip Resistor in the P.W.Board parts list. (Refer to the Schematic Diagram for those parts.)
Parts marked with this symbol z have critical characteristics.
Use ONLY replacement parts recommended by the manufacturer.
Not including General-purpose Carbon Film Resistor in the P.W.Board parts list. (Refer to the Schematic Diagram for those parts.)
Part indicated with the mark "★" is not illustrated in the exploded view.
WARNING:
1.
2.
3.
4.
5.
6.
● Resistors
RD : Carbon
RC : Composition
RS : Metal oxide film
RW: winding
RN : Metal film
RK : Metal mixture
P : Pulse-resistant type
NL : Low noise type
NB : Non-burning type
FR : Fuse-resistor
F : Lead wire forming
2B : 1/8 W
2E : 1/4 W
2H : 1/2 W
3A : 1 W
3D : 2 W
3F : 3 W
3H : 5 W
F:±1%
G:±2%
J:±5%
K:±10%
M:±20%
Ex.: RN
Type
14K
Shape
and performance
2E
Power
182
Resistance
G
Allowable
error
FR
Others
* Resistance
1800ohm=1.8kohm18
2
Indicates number of zeros after effective number.
2-digit effective number.
1.2ohm1R 2
2-digit effective number, decimal point indicated by R.
1-digit effective number.
: Units: ohm
● Capacitors
CE : Aluminum foil
electrolytic
CA : Aluminium solid
electrolytic
CS : Tantalum electrolytic
CQ : Film
CK : Ceramic
CC : Ceramic
CP : Oil
CM: Mica
CF : Metallized
CH : Metallized
HS : High stability type
BP : Non-polar type
HR : Ripple-resistant type
DL : For change and discharge
HF : For assuring high requency
U : UL part
C : CSA part
W : UL-CSA part
F : Lead wire forming
0J : 6.3 V
1A : 10 V
1C : 16 V
1E : 25 V
1V : 35 V
1H : 50 V
2A : 100 V
2B : 125 V
2C : 160 V
2D : 200 V
2E : 250 V
2H : 500 V
2J : 630 V
F:±1%
G:±2%
J:±5%
K:±10%
M:±20%
Z:±80%
: - 20%
P : +100%
C:±0.25pF
D:±0.5pF
= : Others
Ex.: CE
Type
04W
Shape
and performance
1H
Dielectric
strength
3R2
CapacityMAllowable
error
BP
Others
・ Units:μF.
2200μF22
2
Indicates number of zeros after effective number.
2-digit effective number.
・ Units:μF.
2.2μF2R
2
2-digit effective number, decimal point indicated by R
1-digit effective number.
* Capacity (electrolyte only)
・ When the dielectric strength is indicated in AC,"AC" is included after the dieelectric strength value.
* Capacity (except electrolyte)
・ Units:pF
2200pF=0.0022μF22
2
Indicates number of zeros after efective number.
(More than 2)
2-digit effective number.
・ Units:pF
220pF22
1
2-digit effective number.
Indicates number of zeros after effective numver.
(0 or 1)
43
DN-S700
Page 44
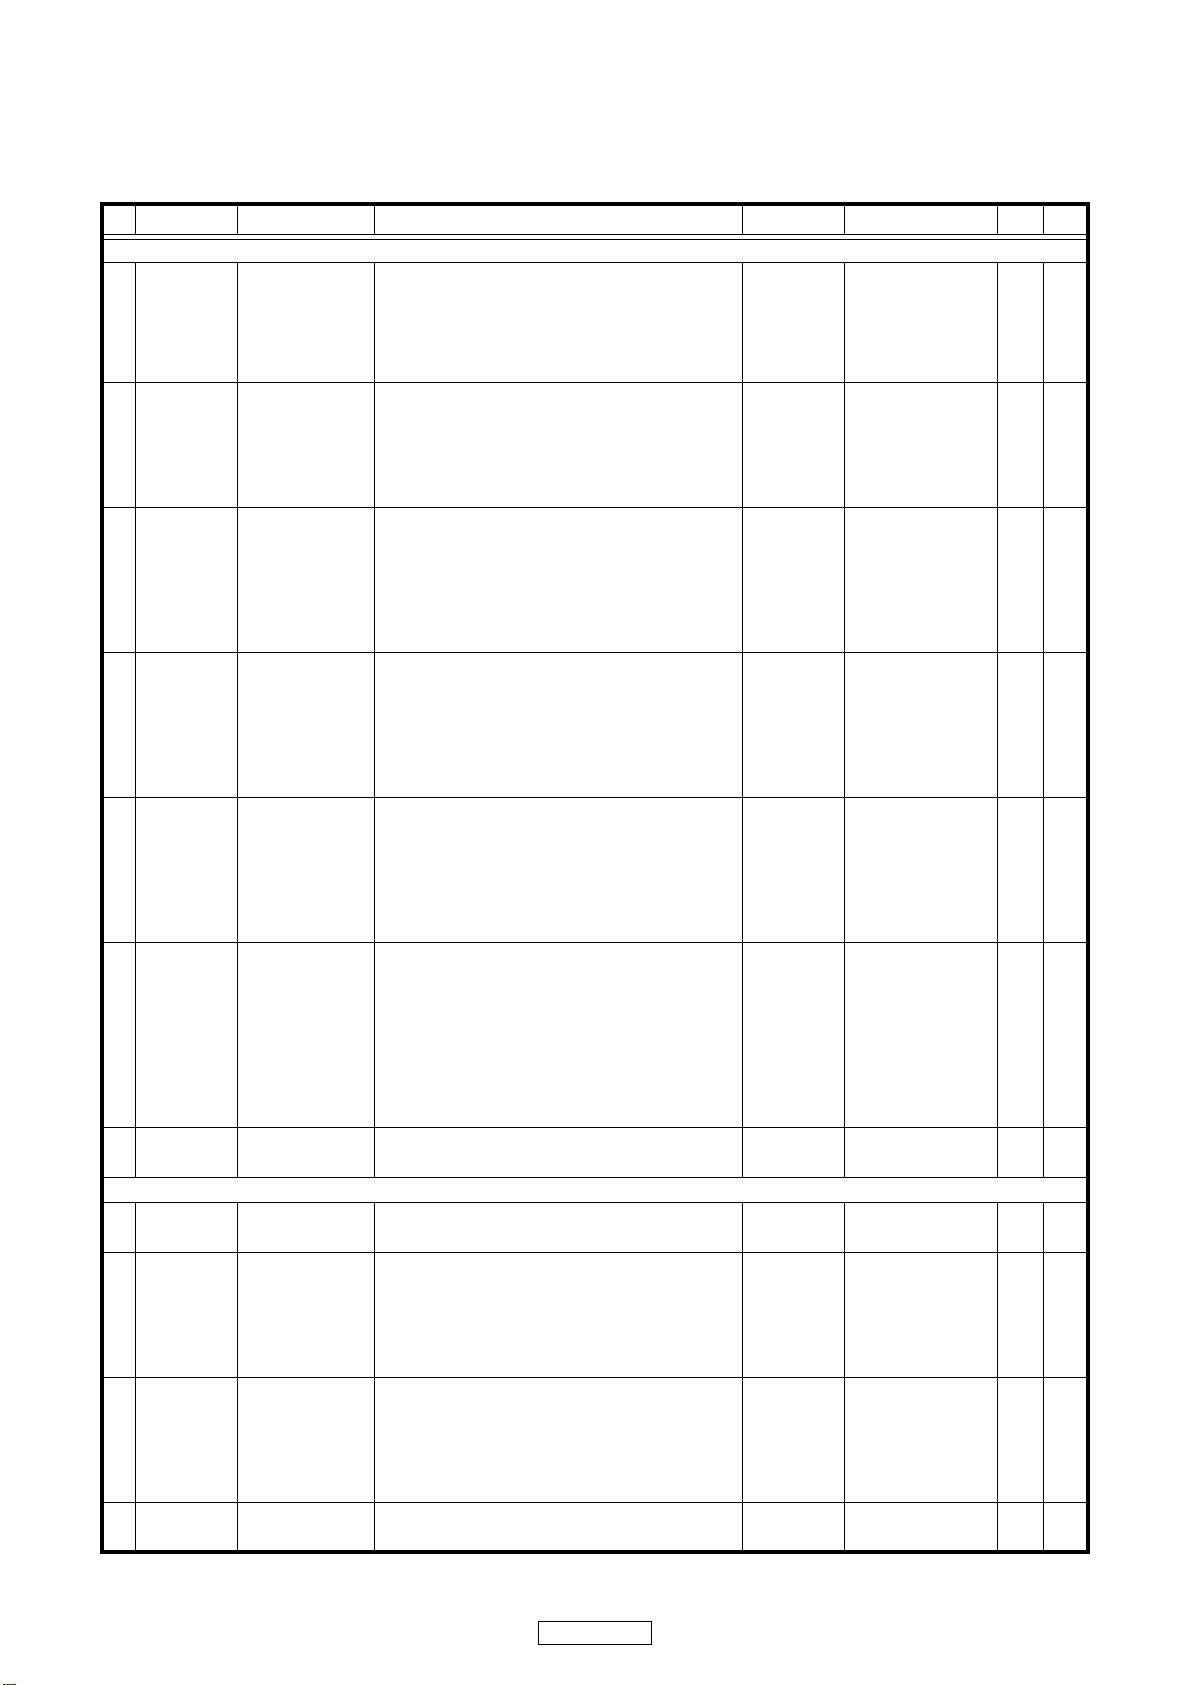
PARTS LIST OF P.W.B. UNIT
* Parts for which "nsp" is indicated on this table cannot be supplied.
* The parts listed below are for maintenance only, might differ from the parts used in the unit in appearances or dimensions.
MAIN PCB ASS'Y
Ref. No. Part No.
SEMICONDUCTORS GROUP
IC101 00D9410045805
IC102 00D9410045902
IC103 941239001650S
IC104 00D9580076209
IC105 00D2622490902
IC107 941239001620S
IC108 941239001590S
IC301 941239001610S
IC302 00D9410045601
Q101 00D9587057302
Q102 00D9410046503
Q103 00D9587057700
Q104 90M-BA001610R
Q105-108 00D9410046406
Q301 00D9580055107
Q302 00D9587057603
D01-04 00D9410046901
D104,105 00D9410046901
D301-305 00D9410046901
Part Name
IC(CXD3059) 417-385-760
IC(BA6392FPE2,28PINMHSOP TYPE) 417-CDN24-340
SERVO IC ASS'Y
(MC9S08AW32CPUE,LQFP)
IC(74HC04/74HC04DT,SOP-14) 417-DCM370E3-378
IC(PCM1716E,28PIN,SOP) 417-DCM270X-327A
REVERSIZLE MOTOR DRIVER(BA6218/BA6418N) 417-KC720-049
IC(BA15218,DIP-8) 417-AK4-644
IC(BA033T/FP 3.3V TO220FP 3PIN) 417-HV3500K-253
IC(BD4745G/BD4745G-TR,SMP5) 417-HDJ2000-503
TRANSISTOR
(2SA1037AKT146R/2SA1037AKR)
TRANSISTOR(DTC124EKAT146/DTC124EKA) 416-CDN88-044
TRANSISTOR(DTC114EKAT146,SMT3) 416-HDJ2460-234
CHIP TRANSISTOR(DTA124TKAT146) 416-HDJ9700-210
TRANSISTOR(2SC4695) 416-DAIA-273
TRANSISTOR
(2SA1015/2SA1015-GR,TAPING)
TRANSISTORS(2SC3330U-AC) 416-DJ1900-023
SWITCHING DIODE(1SS355) 414-CD1000-075
SWITCHING DIODE(1SS355) 414-CD1000-075
SWITCHING DIODE(1SS355) 414-CD1000-075
Remarks Q'ty New
704-S700-8519
416-CDN88-045
416-KE200X-021
U1 00D9410048909
U2 00D9410049005
U3 941239001640S
U5 00D9580048800
U6 00D9580076209
U7 00D9410049209
U8 90M-HC109690R
RESISTORS GROUP
R01 nsp
R02,03 nsp
R09-11 nsp
R12 nsp
R14,15 nsp
R16 nsp
R19 nsp
R26,27 nsp
R29 nsp
R30,31 nsp
R33 nsp
R101 nsp
R102 nsp
R103 nsp
IC(SCF5249LAG120,QFP TQ-144) 417-MCDS4-736
IC(K4S641632E-TC/K4S641632F/
K4S641632H-TC75,TSOP-54)
BUFFER IC ASS'Y
(M29W800B70N6.SMD)
IC(TC74HCU04AFN/
TC74HCU04FAN(ELP.M)SOP-14)
IC(74HC04/74HC04DT,SOP-14) 417-DCM370E3-378
IC(BA18BC0FP-E2,3PIN,TO-252-3,SMD) 417-MCDS4-737
BUFFER IC ASS'Y(CHECK SUM:73E4/1)
(XC9536XL-10VQ44C,SMD)
CHIP RESISTOR(1M OHM,1/10W,0603,J,TP ,50V) 412-CDVD2001-546
CHIP RESISTOR(4.7K OHM,1/10W, 0603,J,TP,50V) 412-CDVD2001-523
CHIP RESISTOR(220 OHM,1/10W,0603 ,J,TP 50V) 412-CDVD2001-521
CHIP RESISTOR(0 OHM,1/10W, 0603,J,TP,50V) 412-CDVD2001-552
CHIP RESISTOR(100 OHM,1/10W, 0603,J,TP,50V) 412-CDVD2001-530
CHIP RESISTOR(0 OHM,1/10W, 0603,J,TP,50V) 412-CDVD2001-552
CHIP RESISTOR(10K OHM,1/10W,0603,J,TP ,50V) 412-CDVD2001-534
CHIP RESISTOR(10K OHM,1/10W,0603,J,TP ,50V) 412-CDVD2001-534
CHIP RESISTOR(270 OHM,1/10W,0603,J,TP ,50V) 412-007USB-698
CHIP RESISTOR(0 OHM,1/10W, 0603,J,TP,50V) 412-CDVD2001-552
CHIP RESISTOR(470 OHM,1/10W, 0603,J,TP,50V) 412-CDVD2001-545
CHIP RESISTOR(22 OHM,1/10W,0603,F,TP ,50V) 412-CDVD2001-554
CHIP RESISTOR(11KOHM,1/10W,J,TP 0603,50V) 412-900-1012
CHIP RESISTOR470K OHM,1/10W, 0603,J,TP,50V) 412-007USB-707
417-CDN88-501
704-S700-8518
417-DJ150-419
704-M510-5564
44
DN-S700
Page 45
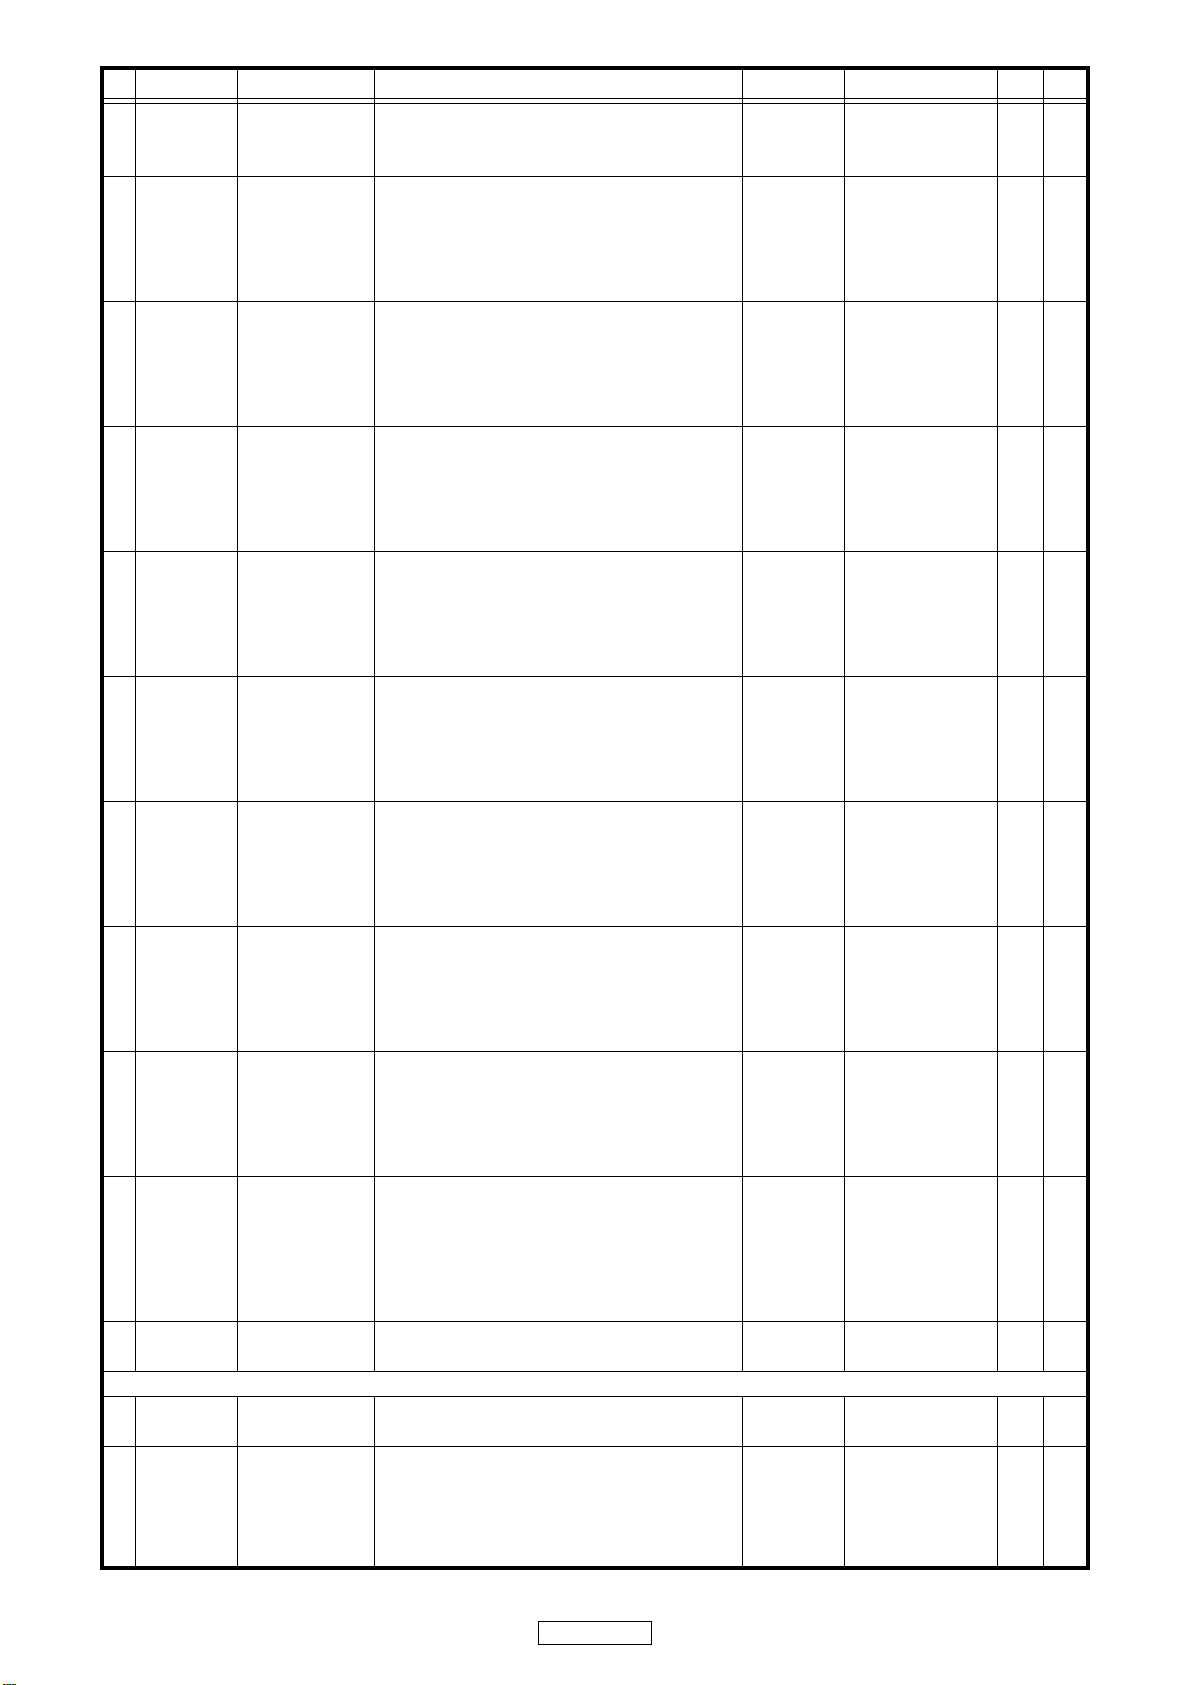
Ref. No. Part No.
R104 nsp
R105 nsp
R106,127 nsp
R107 nsp
R108 nsp
R109 nsp
R110 nsp
R111 nsp
R112 nsp
R115,116 nsp
R117 nsp
R119 nsp
R120 nsp
R121-124 nsp
R126 nsp
R128 nsp
R129 nsp
R133,134 nsp
R136 nsp
R137-139 nsp
R140 nsp
R153,154 nsp
R155,156 nsp
R157,158 nsp
R159-170 nsp
R161,162 nsp
R163,164 nsp
R165,166 nsp
R167,168 nsp
R169 nsp
R171-173 nsp
R174 nsp
R175 nsp
R176 nsp
R178,179 nsp
R181-183 nsp
R184 nsp
R185 nsp
R187,188 nsp
R189-R191 nsp
R192 nsp
R301 nsp
R302 nsp
R303 nsp
R304-306 nsp
R307,308 nsp
Part Name
CHIP RESISTOR(10K OHM,1/10W,0603,J,TP ,50V) 412-CDVD2001-534
CHIP RESISTOR(100K OHM,1/10W,0603 ,J,TP ,50V)
CHIP RESISTOR(1M OHM,1/10W,0603,J,TP ,50V) 412-CDVD2001-546
CHIP RESISTOR470K OHM,1/10W, 0603,J,TP,50V) 412-007USB-707
CHIP RESISTOR(3.3K OHM,1/10W, 0603,J,TP,50V) 412-007USB-699
CHIP RESISTOR(1K OHM,1/10W, 0603,J,TP,50V) 412-CDVD2001-540
CHIP RESISTOR(4.7K OHM,1/10W, 0603,J,TP,50V) 412-CDVD2001-523
CHIP RESISTOR(0 OHM,1/10W, 0603,J,TP,50V) 412-CDVD2001-552
CHIP RESISTOR470K OHM,1/10W, 0603,J,TP,50V) 412-007USB-707
CHIP RESISTOR(15K OHM,1/10W,0603,J,TP ,50V) 412-007USB-687
CHIP RESISTOR(10K OHM,1/10W,0603,J,TP ,50V) 412-CDVD2001-534
CHIP RESISTOR(150K OHM,1/10W,0603,J,TP ,50V) 412-007USB-688
CHIP RESISTOR(47K OHM,1/10W,0603,J,TP ,50V) 412-CDVD2001-532
CHIP RESISTOR(10K OHM,1/10W,0603,J,TP ,50V) 412-CDVD2001-534
CHIP RESISTOR(1K OHM,1/10W, 0603,J,TP,50V) 412-CDVD2001-540
CHIP RESISTOR(22 OHM,1/10W,0603,F,TP ,50V) 412-CDVD2001-554
CHIP RESISTOR(68OHM,1/10W,J,TP 0603,50V) 412-900-1016
CHIP RESISTOR(10K OHM,1/10W,0603,J,TP ,50V) 412-CDVD2001-534
CHIP RESISTOR(10K OHM,1/10W,0603,J,TP ,50V) 412-CDVD2001-534
CHIP RESISTOR(220 OHM,1/10W,0603 ,J,TP 50V) 412-CDVD2001-521
CHIP RESISTOR(10 OHM,1/10W,J,TP 0603,50V) 412-810-966
CHIP RESISTOR(10K OHM,1/10W,0603,J,TP ,50V) 412-CDVD2001-534
CHIP RESISTOR(5.6K OHM,1/10W,0603,J,TP ,50V) 412-007USB-701
CHIP RESISTOR(39K OHM,1/10W,0603,J,TP ,50V) 412-007USB-706
CHIP RESISTOR(100K OHM,1/10W,0603 ,J,TP ,50V)
CHIP RESISTOR(150 OHM,1/10W,0603,J,TP ,50V) 412-CD900-795
CHIP RESISTOR(2.7K OHM,1/10W,V,J,TP,50V) 412-007USB-677
CHIP RESISTOR(150 OHM,1/10W,0603,J,TP ,50V) 412-CD900-795
CHIP RESISTOR(2.7K OHM,1/10W,V,J,TP,50V) 412-007USB-677
CARBON FILM RESISTOR(10 OHM,1/4W,J,T-52) 412-BJ2300I-468
CHIP RESISTOR(0 OHM,1/10W, 0603,J,TP,50V) 412-CDVD2001-552
CHIP RESISTOR(22 OHM,1/10W,0603,F,TP ,50V) 412-CDVD2001-554
CHIP RESISTOR(100 OHM,1/10W, 0603,J,TP,50V) 412-CDVD2001-530
CHIP RESISTOR(220 OHM,1/10W,0603 ,J,TP 50V) 412-CDVD2001-521
CHIP RESISTOR(100 OHM,1/10W, 0603,J,TP,50V) 412-CDVD2001-530
CHIP RESISTOR(100 OHM,1/10W, 0603,J,TP,50V) 412-CDVD2001-530
CHIP RESISTOR(10 OHM,1/10W,J,TP 0603,50V) 412-810-966
CHIP RESISTOR(100 OHM,1/10W, 0603,J,TP,50V) 412-CDVD2001-530
CHIP RESISTOR(10K OHM,1/10W,0603,J,TP ,50V) 412-CDVD2001-534
CHIP RESISTOR(220 OHM,1/10W,0603 ,J,TP 50V) 412-CDVD2001-521
CHIP RESISTOR(4.7OHM,1/10W,J,TP 0603,50V) 412-007USB-676
CHIP RESISTOR(100K OHM,1/10W,0603 ,J,TP ,50V)
CHIP RESISTOR(10K OHM,1/10W,0603,J,TP ,50V) 412-CDVD2001-534
CHIP RESISTOR(220 OHM,1/10W,0603 ,J,TP 50V) 412-CDVD2001-521
CHIP RESISTOR(10K OHM,1/10W,0603,J,TP ,50V) 412-CDVD2001-534
CHIP RESISTOR(39K OHM,1/10W,0603,J,TP ,50V) 412-007USB-706
Remarks Q'ty New
412-CDVD2001-537
412-CDVD2001-537
412-CDVD2001-537
RB01 90M-BW000420R
CAPACITORS GROUP
C001 nsp
C01-14, nsp
C16,C17 nsp
C18-23 nsp
C25 nsp
C26 00D9587054907
THICK FILM RESISTOR NETWORKS
(10K OHM,1/8W J,RA TYPE,7R8P)
AC SAFETY CAPACITOR(0.01uF/250V,M,BULK,Y5V)
CHIP CAPACITOR(0.1uF/50V,Z,0603 TYPE,Y5V) 413-DCM280-773
CHIP CAPACITOR(15pF/50V,J,0603 TYPE,NPO) 413-007USB-781
CHIP CAPACITOR(0.1uF/50V,Z,0603 TYPE,Y5V) 413-DCM280-773
CHIP CAPACITOR(0.1uF/50V,Z,0603 TYPE,Y5V) 413-DCM280-773
ELEC. CAPACITOR
℃
(100uF/10V,M,105
,TAPING 5*7,MINI)
412-DJ1-420
413-S250-747
413-HMA2200-5017
45
DN-S700
Page 46
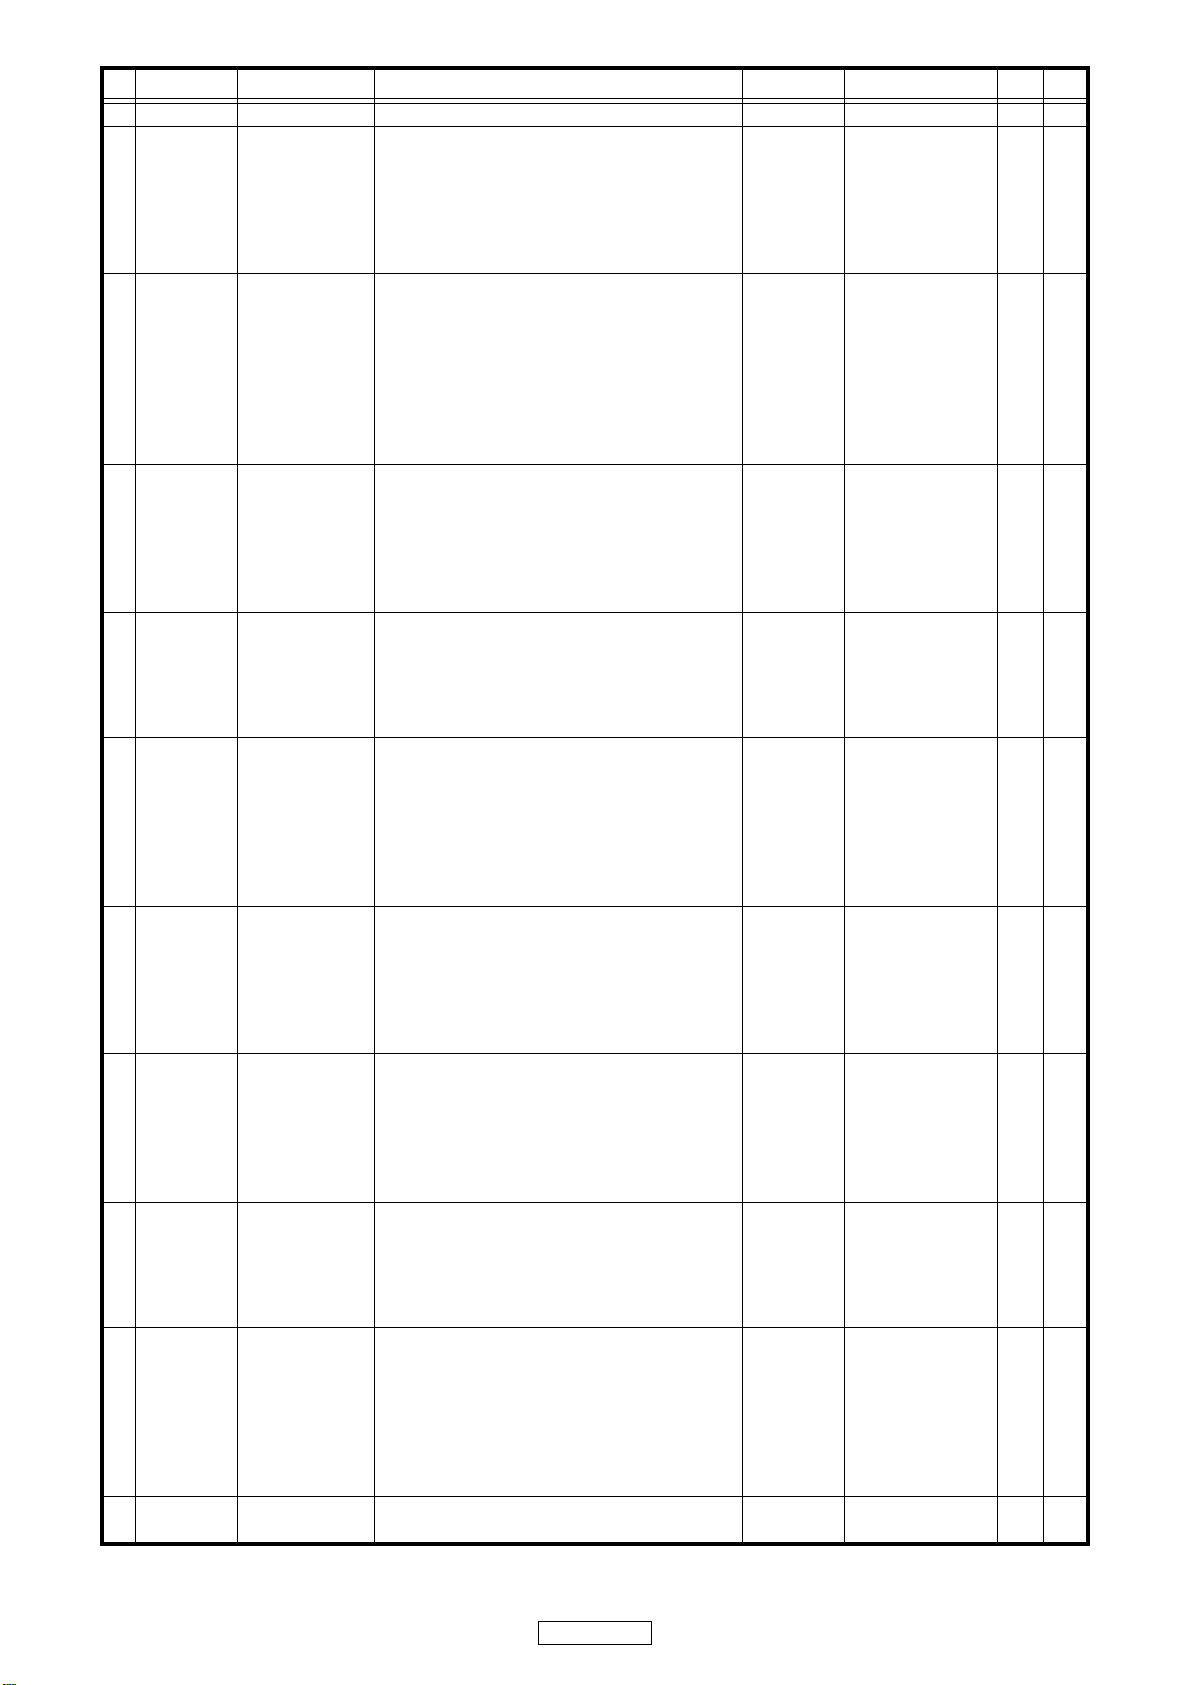
Ref. No. Part No.
C27 nsp
C28 00D9587032709
C29-31 nsp
C33 nsp
C39 nsp
C66-69 nsp
C101 nsp
C102,103 00D9587054907
C104 nsp
C105 00D9587054907
C107 00D9587056400
C108 nsp
C109-111 nsp
C112 00D9587056400
C113 nsp
C114 nsp
C115 nsp
C116 nsp
C117 nsp
C118 nsp
C119 nsp
C120,121 nsp
C122 00D9587056400
C123 nsp
C124 00D9587056206
C125-127 nsp
C129,130 nsp
C131,132 00D9587056303
C133-136 nsp
C137 nsp
C138 nsp
C139 00D9587056400
C140 941134001550S
C141 nsp
C142 nsp
C143,144 nsp
C145,146 nsp
C149 nsp
C150 nsp
C151 nsp
C152 nsp
C155 nsp
C156 00D9587054907
C157 nsp
C159 nsp
C160 00D9587054907
C161 00D9587056303
Part Name
CHIP CAPACITOR(0.1uF/50V,Z,0603 TYPE,Y5V) 413-DCM280-773
ELEC. CAPACITOR
(220uF/10V,M,105
CHIP CAPACITOR(0.1uF/50V,Z,0603 TYPE,Y5V) 413-DCM280-773
CHIP CAPACITOR(0.1uF/50V,Z,0603 TYPE,Y5V) 413-DCM280-773
CHIP CAPACITOR(0.1uF/50V,Z,0603 TYPE,Y5V) 413-DCM280-773
CHIP CAPACITOR(470pF/50V,J,0603 TYPE,NPO) 413-007USB-786
CHIP CAPACITOR(0.1uF/50V,Z,0603 TYPE,Y5V) 413-DCM280-773
ELEC. CAPACITOR
(100uF/10V,M,105
CHIP CAPACITOR(0.1uF/50V,Z,0603 TYPE,Y5V) 413-DCM280-773
ELEC. CAPACITOR
(100uF/10V,M,105
ELEC. CAPACITOR
(22uF/16V,M,105
CHIP CAPACITOR(0.1uF/50V,Z,0603 TYPE,Y5V) 413-DCM280-773
CHIP CAPACITOR(0.1uF/50V,Z,0603 TYPE,Y5V) 413-DCM280-773
ELEC. CAPACITOR
(22uF/16V,M,105
CHIP CAPACITOR(0.1uF/50V,Z,0603 TYPE,Y5V) 413-DCM280-773
CHIP CAPACITOR(330pF/50V,J,0603 TYPE,NPO) 413-900-925
CHIP CAPACITOR(100pF/50V,J,0603 TYPE,NPO) 413-DCM280-767
CHIP CAPACITOR(0.01uF/50V,K,0603 TYPE,X7R) 413-DCM280-771
CHIP CAPACITOR(0.1uF/50V,Z,0603 TYPE,Y5V) 413-DCM280-773
CHIP CAPACITOR(1000pF/50V,K,0603 TYPE,X7R) 413-DCM280-768
CHIP CAPACITOR(1500pF/50V,K,0603 TYPE,X7R) 413-DCM280-769
CHIP CAPACITOR(0.1uF/50V,Z,0603 TYPE,Y5V) 413-DCM280-773
ELEC. CAPACITOR
(22uF/16V,M,105
CHIP CAPACITOR(0.1uF/50V,Z,0603 TYPE,Y5V) 413-DCM280-773
ELEC. CAPACITOR
(1uF/50V,M,105
CHIP CAPACITOR(0.1uF/50V,Z,0603 TYPE,Y5V) 413-DCM280-773
CHIP CAPACITOR(0.1uF/50V,Z,0603 TYPE,Y5V) 413-DCM280-773
ELEC. CAPACITOR
(10uF/25V,M,105
CHIP CAPACITOR(0.1uF/50V,Z,0603 TYPE,Y5V) 413-DCM280-773
CHIP CAPACITOR(0.1uF/50V,Z,0603 TYPE,Y5V) 413-DCM280-773
CHIP CAPACITOR(0.1uF/50V,Z,0603 TYPE,Y5V) 413-DCM280-773
ELEC. CAPACITOR
(22uF/16V,M,105
ELEC. CAPACITOR(10uF/25V,M,105℃,TAPING 4*7)
CHIP CAPACITOR( 220pF/50V,0603,TYPE NPO) 413-007USB-787
CHIP CAPACITOR(0.01uF/50V,K,0603 TYPE,X7R) 413-DCM280-771
CHIP CAPACITOR(0.1uF/50V,Z,0603 TYPE,Y5V) 413-DCM280-773
CHIP CAPACITOR(1000pF/50V,K,0603 TYPE,X7R) 413-DCM280-768
CHIP CAPACITOR(47pF/50V,J,0603 TYPE,NPO) 413-007USB-784
CHIP CAPACITOR(0.01uF/50V,K,0603 TYPE,X7R) 413-DCM280-771
CHIP CAPACITOR(0.1uF/50V,Z,0603 TYPE,Y5V) 413-DCM280-773
CHIP CAPACITOR(1000pF/50V,K,0603 TYPE,X7R) 413-DCM280-768
CHIP CAPACITOR(0.1uF/50V,Z,0603 TYPE,Y5V) 413-DCM280-773
ELEC. CAPACITOR
(100uF/10V,M,105
CHIP CAPACITOR( 220pF/50V,0603,TYPE NPO) 413-007USB-787
CHIP CAPACITOR(0.1uF/50V,Z,0603 TYPE,Y5V) 413-DCM280-773
ELEC. CAPACITOR
(100uF/10V,M,105
ELEC. CAPACITOR
(10uF/25V,M,105
℃
,TAPING 6.3*7,MINI)
℃
,TAPING 5*7,MINI)
℃
,TAPING 5*7,MINI)
℃
,TAPING 4*7,MINI)
℃
,TAPING 4*7,MINI)
℃
,TAPING 4*7,MINI)
℃
,TAPING 4*7,MINI)
℃
,TAPING 4*7,MINI)
℃
,TAPING 4*7,MINI)
℃
,TAPING 5*7,MINI)
℃
,TAPING 5*7,MINI)
℃
,TAPING 4*7,MINI)
Remarks Q'ty New
413-HT801K-192
413-HMA2200-5017
413-HMA2200-5017
413-SPPW3-236
413-SPPW3-236
413-SPPW3-236
413-SPPW3-234
413-SPPW3-235
413-SPPW3-236
413-DV300-5155
413-HMA2200-5017
413-HMA2200-5017
413-SPPW3-235
46
DN-S700
Page 47
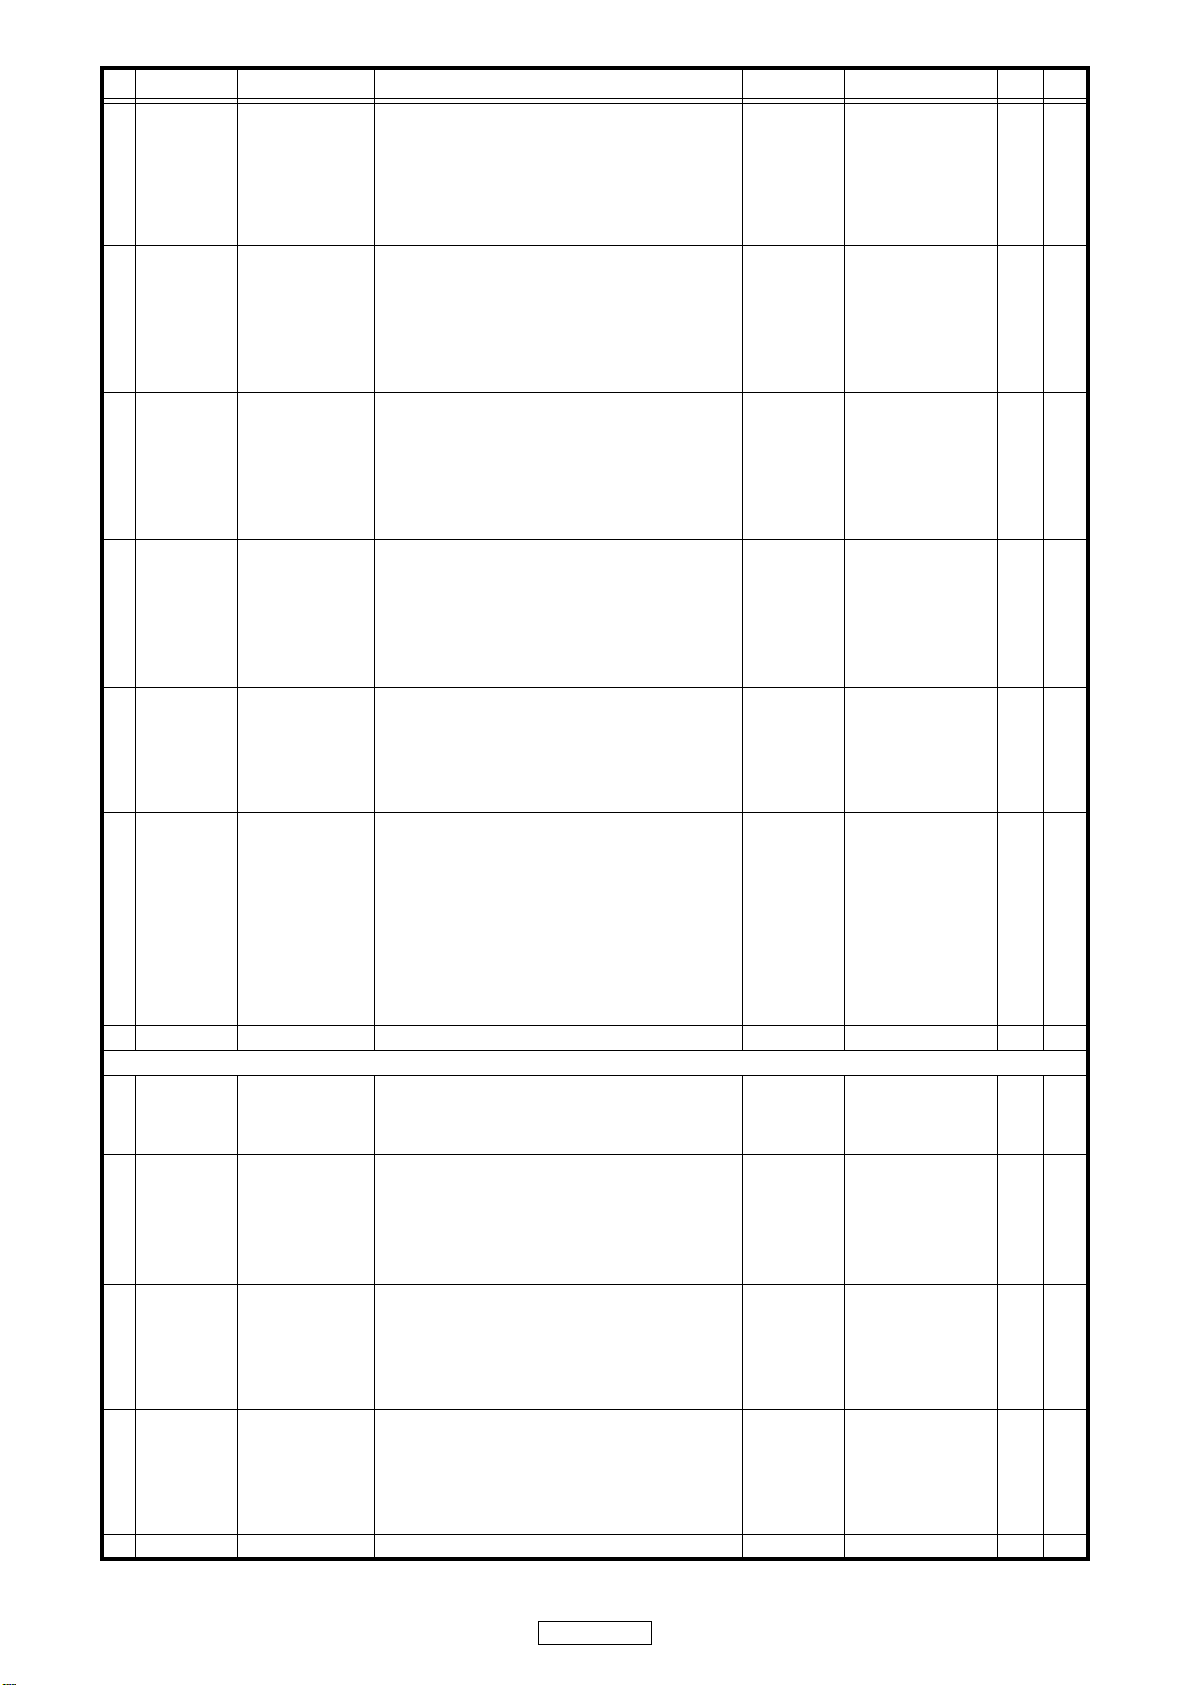
Ref. No. Part No.
C162 00D9587032709
C163,164 nsp
C165-168 00D9587056303
C169,170 941139001560S
C171,C172 nsp
C174 nsp
C176 00D9587032709
C177,178 nsp
C181 nsp
C182 nsp
C183 nsp
C184 nsp
C185,186 00D9587056303
C187 nsp
C188 00D9587054907
C191 nsp
C192 nsp
C193,194 nsp
C196 nsp
C197 nsp
C198,C199 nsp
C301-303 nsp
C305 941134001540S
C306 nsp
C307,308 00D9587056303
C309 941134000530S
C310 00D9587056400
C311 00D9587030701
Part Name
ELEC. CAPACITOR
(220uF/10V,M,105
CHIP CAPACITOR(0.1uF/50V,Z,0603 TYPE,Y5V) 413-DCM280-773
ELEC. CAPACITOR
(10uF/25V,M,105
POLYESTER CAPACITOR(0.0012uF/50V,J,TAPING) 413-HV3423K-343
CHIP CAPACITOR(82pF/50V,J,0603 TYPE,NPO) 413-007USB-827
CHIP CAPACITOR(0.022uF/50V,K,0603 TYPE,X7R) 413-DCM280-794
ELEC. CAPACITOR
(220uF/10V,M,105
CHIP CAPACITOR(1000pF/50V,K,0603 TYPE,X7R) 413-DCM280-768
CHIP CAPACITOR(0.1uF/50V,Z,0603 TYPE,Y5V) 413-DCM280-773
CHIP CAPACITOR( 220pF/50V,0603,TYPE NPO) 413-007USB-787
CHIP CAPACITOR(0.1uF/50V,Z,0603 TYPE,Y5V) 413-DCM280-773
CHIP CAPACITOR(0.1uF/50V,Z,0603 TYPE,Y5V) 413-DCM280-773
ELEC. CAPACITOR
(10uF/25V,M,105
CHIP CAPACITOR(0.1uF/50V,Z,0603 TYPE,Y5V) 413-DCM280-773
ELEC. CAPACITOR
(100uF/10V,M,105
CHIP CAPACITOR(0.1uF/50V,Z,0603 TYPE,Y5V) 413-DCM280-773
CHIP CAPACITOR(0.01uF/50V,K,0603 TYPE,X7R) 413-DCM280-771
CHIP CAPACITOR(0.1uF/50V,Z,0603 TYPE,Y5V) 413-DCM280-773
CHIP CAPACITOR(0.33uF/16V,Z,0603 TYPE,Y5V) 413-007USB-782
CHIP CAPACITOR(0.1uF/50V,Z,0603 TYPE,Y5V) 413-DCM280-773
CHIP CAPACITOR(10pF/50V,J,0603 TYPE,NPO) 413-007USB-780
CHIP CAPACITOR(0.1uF/50V,Z,0603 TYPE,Y5V) 413-DCM280-773
ELEC. CAPACITOR ( 47UF/16V M BULK L=7mm ) 413-007USB-828
CHIP CAPACITOR(0.1uF/50V,Z,0603 TYPE,Y5V) 413-DCM280-773
ELEC. CAPACITOR
(10uF/25V,M,105
ELEC. CAPACITOR
(470uF/10V,M, 105
ELEC. CAPACITOR
(22uF/16V,M,105
ELEC. CAPACITOR
(2.2uF/50V,M,105
℃
,TAPING 6.3*7,MINI)
℃
,TAPING 4*7,MINI)
℃
,TAPING 6.3*7,MINI)
℃
,TAPING 4*7,MINI)
℃
,TAPING 5*7,MINI)
℃
,TAPING 4*7,MINI)
℃
,TAPING 8*12)
℃
,TAPING 4*7,MINI)
℃
,TAPING 4*7,MINI)
Remarks Q'ty New
413-HT801K-192
413-SPPW3-235
413-HT801K-192
413-SPPW3-235
413-HMA2200-5017
413-SPPW3-235
413-HT8015-169
413-SPPW3-236
413-DV300-5156
OTHER PARTS GROUP
CN01,02 nsp
CN03 941644001890S
CN06A 00D9587048706
CN101 00D9410047308
CN102 nsp
CN11 nsp
L01 00D9580016900
L02-04 90M-FC900450R
L101-104 00D9580016900
L105 90M-FC900450R
L106 941115001080S
L107 00D9580016900
L108 941119001530S
L109 90M-FC900450R
L110 90M-FC900450R
L111 90M-FC900450R
L112 00D9580016900
L113 941115001080S
3P SOCKET(CKM3961WR-3P,90°WHITE,PINW NC)
5P FFC SOCKET 404-9700-2017
16P FFC CONNECTOR(180°)
SOCKET(16PIN P=1.0mm SMD FPC 2T-16P) 404-HV3423K-583
6P SOCKET(CKM2001WV-6P 180°WHITE)
2P SOCKET(CKM2001WV-2P,180°WHITE)
BEAD CORE(TB36-863445NP T-26mm) 415-HV3500K-090
BEAD(RH03506BT-B-N,TAPING RT) 415-DCM370E3-134
BEAD CORE(TB36-863445NP T-26mm) 415-HV3500K-090
BEAD(RH03506BT-B-N,TAPING RT) 415-DCM370E3-134
INDUCTOR(10uH,AL0204ST-100K-S-A,TAPING) 415-HMD5000-097
BEAD CORE(TB36-863445NP T-26mm) 415-HV3500K-090
INDUCTOR(100MH J 0707-444-W077) 415-HT8015-040
BEAD(RH03506BT-B-N,TAPING RT) 415-DCM370E3-134
BEAD(RH03506BT-B-N,TAPING RT) 415-DCM370E3-134
BEAD(RH03506BT-B-N,TAPING RT) 415-DCM370E3-134
BEAD CORE(TB36-863445NP T-26mm) 415-HV3500K-090
INDUCTOR(10uH,AL0204ST-100K-S-A,TAPING) 415-HMD5000-097
404-BEAT6-1598
404-900-2077
404-3113-052A
404-HP1010K-257A
47
DN-S700
Page 48
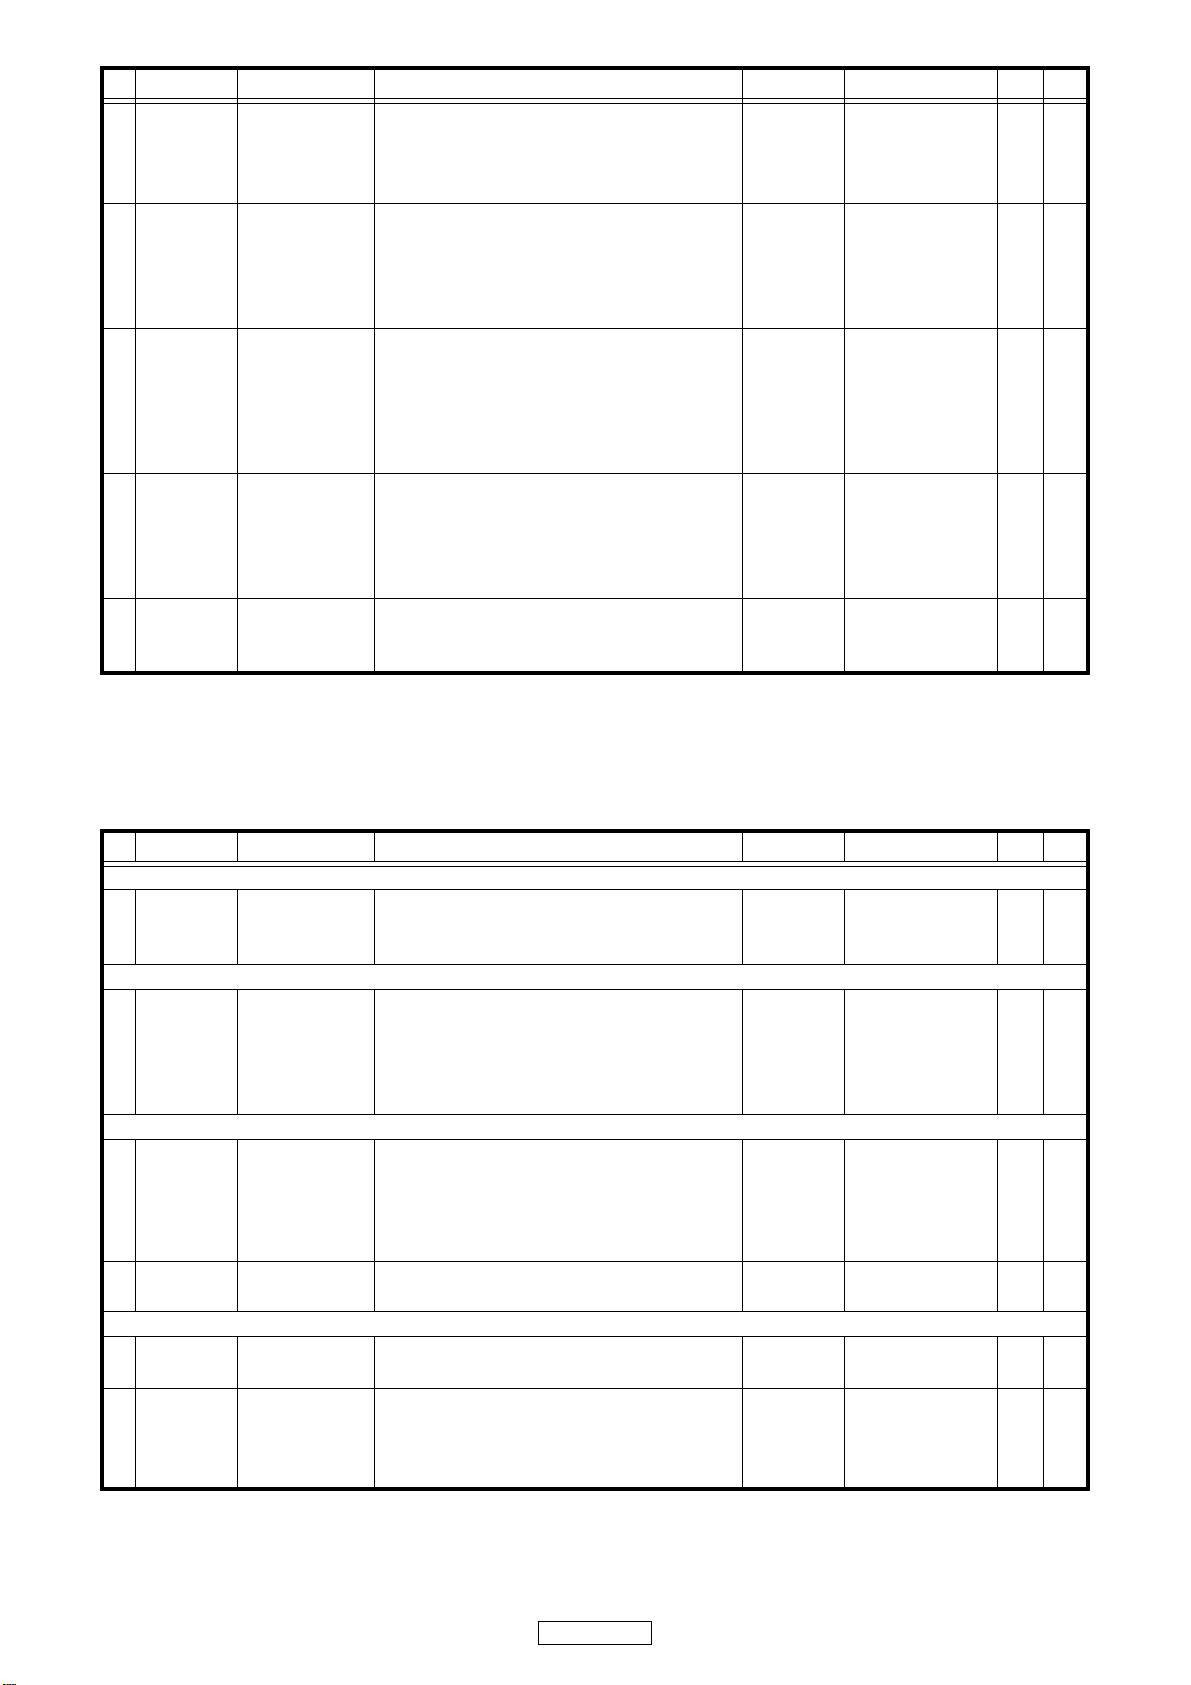
Ref. No. Part No.
L114 941119001530S
Part Name
INDUCTOR(100MH J 0707-444-W077) 415-HT8015-040
Remarks Q'ty New
JK101 00D9587037102
JK102 00D9587037306
JK103 00D9587068100
z SW001 941661000320S
T101 00D9580020705
W03 941612001880S
W07 941612002040S
X1 00D9580015600
X101 941142001970S
nsp
nsp
nsp
nsp
nsp
nsp
2P RCA JACK(RJ-1060B*09-0520A) 420-100-189
HEADPHONE JACK(φ3.5,2K6A/-3537*01-030)
1P RCA JACK(RJ-1081*31-0541A) 420-ST150-157
POWER SW(SDDLB1177U-HF3) 403-C304-218
COIL(P-7GB) 415-RCC955A-091
7P 2.5 CONNECTOR WIRE(UL2725#26 L=120 +/+) 404-S700-3239
4P2.5 CONNECTOR WIRE
(L=150mm, AWM2877 AWG26)
CRYSTAL( 16.9344MHz ) 427-KC710-019
CERAMIC RESONATOR(33.86MHz) 427-MH2-122
IC HEATSINK 300-700-1726
IC HEATSINK FIXED PLATE 300-700-1727
PIN 300-K1000-1521
HEAT SINK(AL) 425-KMD3500-016A
CNR COVER(HU-12-ULY) 504-CDC2050-105
SCREW(3*L8) 602-HP1010K-175
420-HDJ7100-063
404-QFX19-1552
VFD PCB ASS'Y
Ref. No. Part No. Part Name Remarks Q'ty New
SEMICONDUCTORS GROUP
IC205 00MHC10381030
RESISTORS GROUP
R207 nsp
R209 nsp
J01 nsp
CAPACITORS GROUP
C219 nsp
C220 941134002020S
C221 nsp
C223 00D9587054907
OTHER PARTS GROUP
CN201B 00D9587049608
IC(LC75710NE-E,QFP-64/QIP) 417-MCDS4-739
CHIP RRESISTOR(20K OHM,1/10W,0603,J,TP ,50V) 412-DCM280-726
CHIP RESISTOR(10K OHM,1/10W,0603,J,TP ,50V) 412-CDVD2001-534
CHIP RESISTOR(0 OHM,1/8W,1206,J,TP ,150V) 412-DJ3000-414
CHIP CAPACITOR(30pF/50V,J,0603 TYPE,NPO) 413-007USB-783
ELEC. CAPACITOR(10uF/35V,M,TAPING 4*7,MINI) 413-810-919
CHIP CAPACITOR(0.01uF/50V,K,0603 TYPE,X7R) 413-DCM280-771
ELEC. CAPACITOR
(100uF/10V,M,105 ,TAPING 5*7,MINI)
9P FFC CONNECTOR(90°)
413-HMA2200-5017
404-900-2092
VFD201 00D3938076006
nsp
nsp
VFD(86*40*9mm) 410-S700-360
VFD BRACKET 100-700-2674
VFD SHEET 612-700-327
48
DN-S700
Page 49
Control PCB ASS'Y
Ref. No. Part No. Part Name Remarks Q'ty New
SEMICONDUCTORS GROUP
IC201 941239001660S
IC202 941239001600S
IC203,204 00D9587058709
CONTROL IC ASS'Y
(MC9S08AW32CPUE,LQFP)
IC(AT93C46DN-SH-B) 417-HDJ2460-657A
IC(74AHC595DR,SOP-16) 417-HDJ9800-643
704-S700-8520
Q201,202 00D9410046503
D201 941263001070S
D201 nsp
D201A nsp
D201A 941263001070S
D202 941263001060S
D202 nsp
D202A nsp
D202A 941263001060S
D203-205 00D9587051706
D203-206 nsp
D206 00D9580041807
D208 00D9587051706
D208 nsp
D211 00D9587051706
D211-214 nsp
D212-214 00D9587051706
D221-225 00D9580042806
D231,232 941269001670S
D315 941263002010S
RESISTORS GROUP
R206 nsp
R208 nsp
R210 nsp
R211 nsp
R212-214 nsp
R217,218 nsp
R219 nsp
R220 nsp
R221,222 nsp
R250 nsp
R250A nsp
R251 nsp
R251A nsp
R252-255 nsp
R256 nsp
R257 nsp
R258,259 nsp
R260,261 nsp
R262,263 nsp
TRANSISTOR(DTC124EKAT146/DTC124EKA) 416-CDN88-044
LED(LTL1CHKGKNN,GREEN) 410-TT2A3SL-250
LED HOLDER(LED3-1A-B,H=1.5mm,BLACK) 504-HDJ2000-097
LED HOLDER(LED3-1A-B,H=1.5mm,BLACK) 504-HDJ2000-097
LED(LTL1CHKGKNN,GREEN) 410-TT2A3SL-250
LED(LTL1CHJEDNN,RED) 410-DJ5000-253
LED HOLDER(LED3-1A-B,H=1.5mm,BLACK) 504-HDJ2000-097
LED HOLDER(LED3-1A-B,H=1.5mm,BLACK) 504-HDJ2000-097
LED(LTL1CHJEDNN,RED) 410-DJ5000-253
LED (6224-10ID-A,RED ) 410-CD6000-122
LED HOLDER(LED3-1A-B,H=1.5mm,BLACK) 504-HDJ2000-097
LED ( GREEN ) 410-CD6000-124
LED (6224-10ID-A,RED ) 410-CD6000-122
LED HOLDER(LED3-1A-B,H=1.5mm,BLACK) 504-HDJ2000-097
LED (6224-10ID-A,RED ) 410-CD6000-122
LED HOLDER(LED3-1A-B,H=1.5mm,BLACK) 504-HDJ2000-097
LED (6224-10ID-A,RED ) 410-CD6000-122
SWITCHING DIODE(1SS133,300mw,55V,T-77) 414-3113-005
SENSOR(LTH-301-07u) 417-HDJ2000-411
CHIP LED(JA-3020B,3*2,BLUE) 410-S700-375
CHIP RESISTOR(10K OHM,1/8W,J,TP 1206,150V) 412-810-967
CHIP RESISTOR(2.2K OHM,1/10W,0603,J,TP ,50V) 412-007USB-693
CHIP RESISTOR(1M OHM,1/10W,0603,J,TP ,50V) 412-CDVD2001-546
CHIP RESISTOR(0 OHM,1/10W, 0603,J,TP,50V) 412-CDVD2001-552
CHIP RESISTOR(10K OHM,1/10W,0603,J,TP ,50V) 412-CDVD2001-534
CHIP RESISTOR(560 OHM,1/10W,0603,J,TP ,50V) 412-CDVD2001-549
CHIP RESISTOR(15K OHM,1/10W,0603,J,TP ,50V) 412-007USB-687
CHIP RESISTOR(15K OHM,1/10W,0603,J,TP ,50V) 412-007USB-687
CHIP RESISTOR(10K OHM,1/10W,0603,J,TP ,50V) 412-CDVD2001-534
CHIP RESISTOR(22 OHM,1/10W,0603,F,TP ,50V) 412-CDVD2001-554
CHIP RESISTOR(22 OHM,1/10W,0603,F,TP ,50V) 412-CDVD2001-554
CARBON FILM RESISTOR(330 OHM,1/6W,J,T-26) 412-KM300-118
CARBON FILM RESISTOR(330 OHM,1/6W,J,T-26) 412-KM300-118
CARBON FILM RESISTOR(470 OHM,1/6W,J,T-26) 412-3113-056
CARBON FILM RESISTOR(560 OHM,1/6W,J,T-26) 412-KT346-112
CARBON FILM RESISTOR(470 OHM,1/6W,J,T-26) 412-3113-056
CHIP RESISTOR(560 OHM,1/10W,0603,J,TP ,50V) 412-CDVD2001-549
CHIP RESISTOR(470 OHM,1/10W, 0603,J,TP,50V) 412-CDVD2001-545
CHIP RESISTOR(470 OHM,1/10W, 0603,J,TP,50V) 412-CDVD2001-545
CAPACITORS GROUP
C201 00D9587054907
C202-204 nsp
C205,206 nsp
ELEC. CAPACITOR
(100uF/10V,M,105
CHIP CAPACITOR(0.1uF/50V,Z,0603 TYPE,Y5V) 413-DCM280-773
CHIP CAPACITOR(22pF/50V,J,0603 TYPE,NPO) 413-CR701-5161
℃
,TAPING 5*7,MINI)
413-HMA2200-5017
49
DN-S700
Page 50
Ref. No. Part No. Part Name Remarks Q'ty New
C207 00D9587054907
C208 nsp
C209,210 nsp
C211,212 nsp
C213 nsp
C214 nsp
C215-217 nsp
C222 nsp
C223 00D9587054907
OTHER PARTS GROUP
CN06B 00D9587048706
CN201A 00D9587049608
ELEC. CAPACITOR
(100uF/10V,M,105
CHIP CAPACITOR(0.1uF/50V,Z,0603 TYPE,Y5V) 413-DCM280-773
CHIP CAPACITOR(0.01uF/50V,K,0603 TYPE,X7R) 413-DCM280-771
CHIP CAPACITOR(0.1uF/50V,Z,0603 TYPE,Y5V) 413-DCM280-773
CHIP CAPACITOR(0.01uF/50V,K,0603 TYPE,X7R) 413-DCM280-771
CHIP CAPACITOR(0.1uF/50V,Z,0603 TYPE,Y5V) 413-DCM280-773
CHIP CAPACITOR(0.01uF/50V,K,0603 TYPE,X7R) 413-DCM280-771
CHIP CAPACITOR(0.1uF/50V,Z,0603 TYPE,Y5V) 413-DCM280-773
ELEC. CAPACITOR
(100uF/10V,M,105
16P FFC CONNECTOR(180°)
9P FFC CONNECTOR(90°)
℃
,TAPING 5*7,MINI)
℃
,TAPING 5*7,MINI)
413-HMA2200-5017
413-HMA2200-5017
404-900-2077
404-900-2092
L201 941115001080S
SW201-206 941662001910S
SW207 941263001990S
SW208 941662001910S
SW209 941263001990S
SW210 941662001940S
SW211,212 941662001910S
SW213 941263002000S
SW214 941662001940S
SW215-218 941662001910S
SW219 941667001950S
SW221 941662001910S
VR201 941674002030S
W01A-W01B nsp
W02A-W02B nsp
X201 00D9580044008
941606001840S
nsp
nsp
INDUCTOR(10uH,AL0204ST-100K-S-A,TAPING) 415-HMD5000-097
TACT SW(SFKHVBL3725,TAPING,H=7mm) 403-CDJ3300-195
SW LED(TSSW-YELLOW,220GF+/-50GF) 403-810-225A
TACT SW(SFKHVBL3725,TAPING,H=7mm) 403-CDJ3300-195
SW LED(TSSW-YELLOW,220GF+/-50GF) 403-810-225A
TACT SW(2P,H=7) 403-S700-363
TACT SW(SFKHVBL3725,TAPING,H=7mm) 403-CDJ3300-195
TSSW-YELLOW/GREEN LED 403-CDJ3300-198A
TACT SW(2P,H=7) 403-S700-363
TACT SW(SFKHVBL3725,TAPING,H=7mm) 403-CDJ3300-195
ENCODER 403-S700-354
TACT SW(SFKHVBL3725,TAPING,H=7mm) 403-CDJ3300-195
VR & VR CUSHION ASS'Y 704-S700-8776
GROUND WIRE(UL1007#26,L=50±5mm,BLACK)
GROUND WIRE(UL1007#26,L=50±5mm,BLACK)
CRYSTAL(5.5296MHz) 427-DM1000-046
9P 1.0 FFC CABLE(L=60mm,+/-) 406-M1055-876
SCREW(WPTP,2.6*8,C-1018,É’6.5) 602-4-559
VR CUSHION(0.5t,BLACK) 612-HDJ9700-015
406-F200-001
406-F200-001
SW PCB ASS'Y
Ref. No. Part No. Part Name Remarks Q'ty New
OTHER PARTS GROUP
SW1 941662001930S LEAF SW
SW2,3 941662001920S LEAF SW
SW4 941662001930S LEAF SW
CN1 941644001900S
5P 1.0 FFC SOCKET(52271-0579,SMD90°)
50
DN-S700
403-MK9-259
403-MK9-258
403-MK9-259
404-MK11-3155
Page 51

---MEMO---
51
DN-S700
Page 52
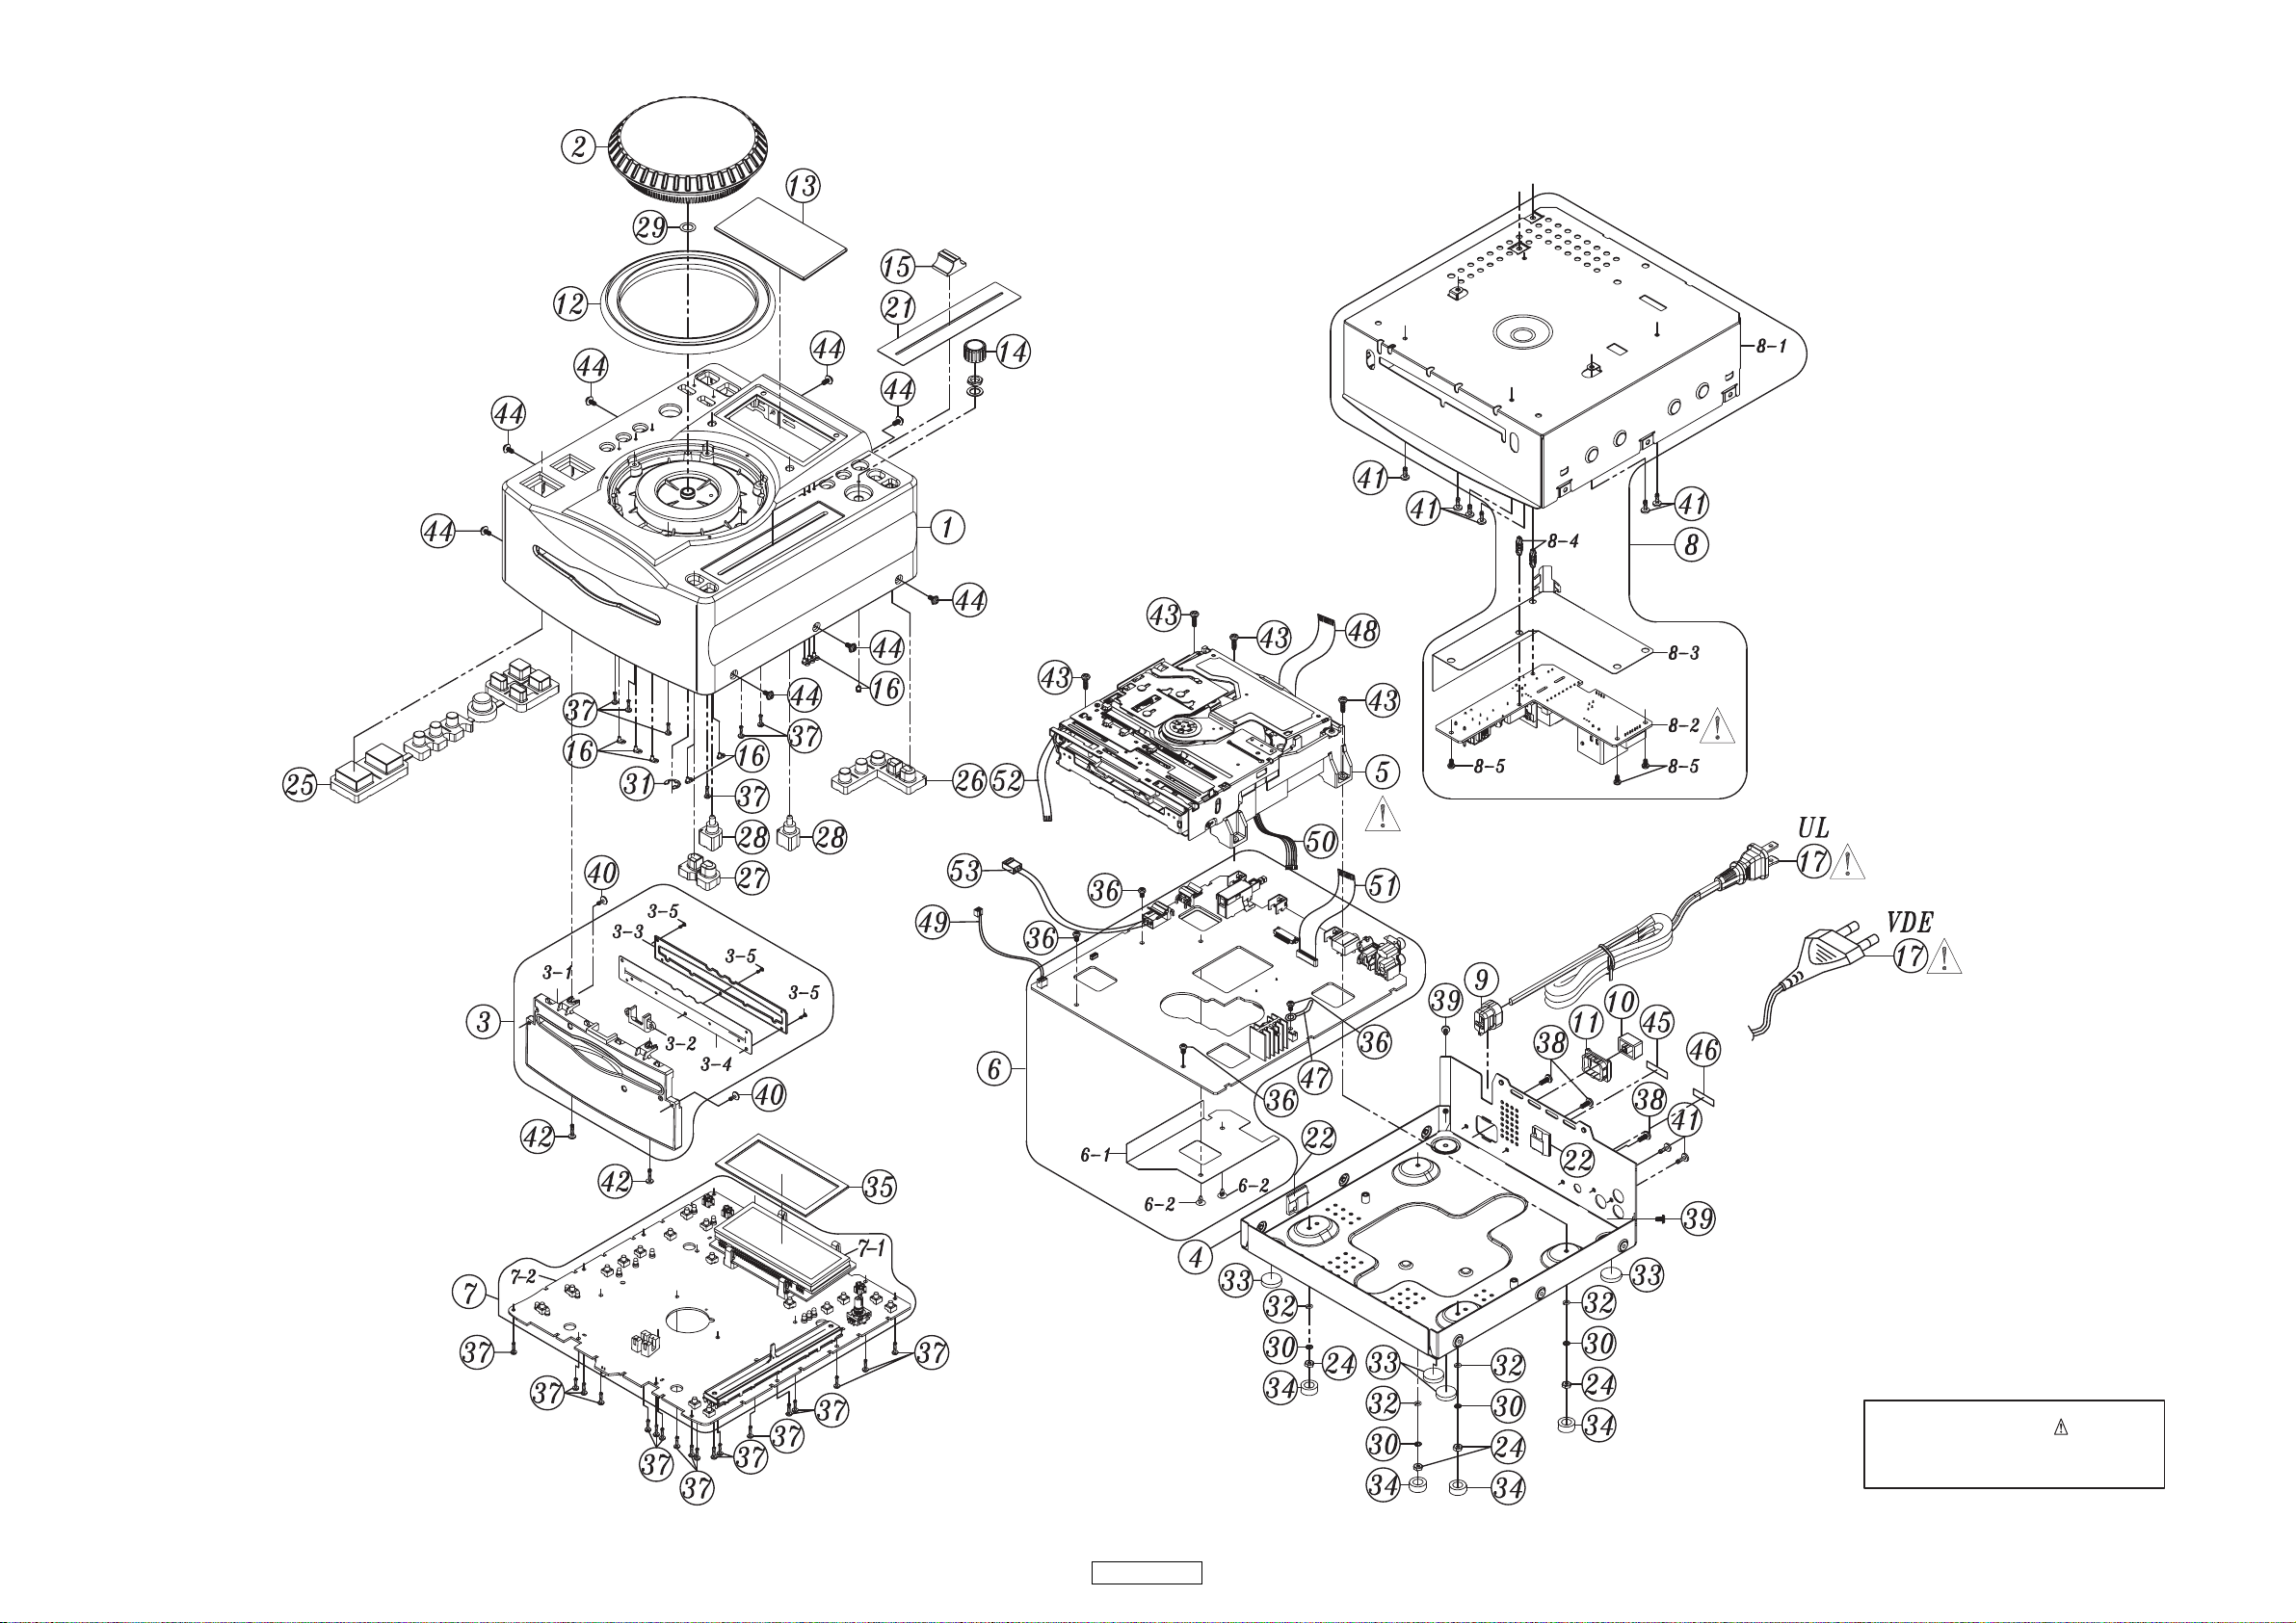
EXPLODED VIEW
Parts marked with this symbol have critical
characteristics.
Use ONLY replacement parts recommended by
the manufacturer.
WARNING:
52
DN-S700
Page 53
PARTS LIST OF EXPLODED VIEW
* Parts for which "nsp" is indicated on this table cannot be supplied.
*
P.W.B. ASS'Y for which "nsp" is indicated on this table cannot be supplied. When repairing the P.W.B. ASS'Y, check the board parts table and order replacement parts
* The parts listed below are for maintenance only, might differ from the parts used in the unit in appearances or dimensions.
Note: The symbols in the column "Remarks" indicate the following destinations.
E3: U.S.A. & Canada model E2: Europe mode
Ref. No. Part No. Part Name Remarks Q'ty New
1 941403001690D CHASSIS ASS'Y E2
1 941403001700D CHASSIS ASS'Y E3
2 941419001750D TURNTABLE ASS'Y
3 nsp CD DOOR FRAME ASS'Y
3-1 nsp CD DOOR FRAME
3-2 nsp CD DOOR LENS
3-3 nsp CHAMMY PLATE
3-4 941432001760D DUSTPROOF CHAMMY
3-5 nsp SCREW(BTP,2*5,MC)
4 nsp BASE ASS'Y E2
4 nsp BASE ASS'Y E3
z 5 941302001680D SLOT-IN FEEDER MECHA ASS'Y
6 nsp MAIN PCB ASS'Y
6-1 nsp ISOLATION SHEET
6-2 nsp CANOE CLIPS(MB-1S,WHITE,H=6.1mm)
7 nsp VFD/CONTROL PCB ASS'Y
7-1 nsp VFD PCB ASS'Y
7-2 nsp CONTROL PCB ASS'Y
8nsp
8-1 nsp ISOLATION COVER ASS'Y
z 8-2 941102001510S SWITCHING POWER
8-3 nsp ISOLATION SHEET
8-4 nsp SPACER SUPPORT
8-5 nsp SCREW(3*5 P=0.5)
9 nsp CORD BUSH
10 00D9410057301 POWER KNOB
11 nsp KNOB PROTECTOR
12 941419001460D TURNTABLE FRAME
13 941416001470D WINDOWS
14 941412001480D JOG TUNING KNOB
15 00D1131951014 PUSH BUTTON
16 941481001490D LED LENS
z 17 00D9587051502 AC POWER CORD(L=2000mm,VDE TYPE) E2
z 17 00D9587051405 AC POWER CORD(L=2000mm,UL TYPE) E3
21 00D1462365007 VR DECORATION
22 nsp WIRE MOUNT(FW-2-3M,WHITE)
24 nsp NUT(M3*P0.5)
25 941411001710D KNOB
26 941411001720D KNOB
27 941411001730D 2 KEY KNOB
28 941412001740D CIRCULAR KNOB
29 nsp
30 nsp
31 nsp E RING
32 nsp
33 00D9587045107
34 nsp PROTECTIONMAT
35 nsp CUSHION
36 nsp SCREW(3*5 P=0.5)
TRANSFORMER & ISOLATION COVER ASS'Y 704-S700-8522
PULLEY WASHER(φ11.6*76*0.25t)
WASHER(φ5.5*3*0.7t)
WASHER(φ8*3.2*1t,NI)
FOOT(PORON,BLACK,φ15*3t)
701-700-4549
701-700E3-4549
701-700-4550
701-700-4639
100-700-2675
100-700-2676
300-700-1709
612-700-329
602-A700-494
703-700E2-1244
703-700E3-1244
704-MK12-8326
704-S700-8515
501-700-2221
504-HF6011-5011
704-S700-8521
704-S700-8516
704-S700-8517
703-700-1245
411-S700-757
501-700-2220
504-S700-256
602-B300-041
100-HC1421FR-991
100-HDJ2000-1641
100-HDJ2000-1642
100-700-2673
100-700-2677
100-700-2678
100-700-2679
100-700-2680
409-900-140
409-900-139
501-700-2222
504-ST100-118
601-A100-004
604-700-502
604-700-503
604-700-504
604-700-505
606-F200-003
606-B300-039
606-DJ3000-105
606-Q2221-122
612-HV3500K-055
612-700-326
612-700-328
602-B300-041
1
1
1
1
1
1
1
1
3
1
1
1
1
1
2
1
1
1
1
1
1
1
2
3
1
1
1
1
1
1
1
9
1
1
1
2
4
1
1
1
2
1
4
1
4
4
4
1
4
.
53
DN-S700
Page 54
Ref. No. Part No. Part Name Remarks Q'ty New
37 nsp SCREW(SAE1018,PTP,M2.6*L8)
38 nsp
39 nsp
40 nsp
41 nsp
42 nsp
43 nsp
44 nsp SCREW(WSTP,3*6)
45 nsp
45 nsp
46 nsp
47 nsp WINDING FIXTURE(SPTE t=0.3 WC-1A)
48 941606001830S FFC WIRE(16PIN L=150mm AWM20696) MECHA TO CN101
49 nsp 2P 2.0 CONNECTOR WIRE MECHA TO CN11
50 nsp 6P 2.0 CONNECTOR WIRE
51 941606001850S FFC CABLE(16P 1.0 L=150+/-) CN06A TO CN06B
52 941606001860S FFC CABLE(5P 1.0 L=115 ,+/-) MECHA TO CN03
53 nsp 3N2P CONNECTOR WIRE CN02 TO CN1
SCREW(SAE1018,ISOB,φ3*L8*P0.5)
SCREW(SAE1018,BTB,φ3*L5)
SCREW(SAE1018,WPTP,φ2.6*L6,CAPφ6.5)
SCREW(SAE1018,PTB,φ3*L8)
SCREW(SAE1018,PTB,φ2.6*L10)
SCREW(SAE1018,ISOB,φ3*L10*P0.5)
SHIPPING LABEL-Serial No.(24*8mm,t=0.1mm)
SHIPPING LABEL-Serial No.(24*8mm,t=0.1mm)
SHIPPING LABEL-DATE No.(24*8mm,t=0.1mm)
E2
E3
E3
MECHA TO CN102 404-S700-3233
602-SL24F-099
602-HP1010K-178
602-QMX2BPM-322
602-ST150-434
602-DJ5500-452
602-MK8-604
602-ISOB3010-622
602-WSTP3006-672B
701-DS700E2-3655
701-DS700E3-3655
701-DS700E3-3655
300-HM510B-224
406-HDJ201-405
404-S700-3231
406-S700-1096
406-S700-1097
404-S700-3234
24
3
2
2
8
2
4
8
1
1
1
1
1
1
1
1
1
1
54
DN-S700
Page 55
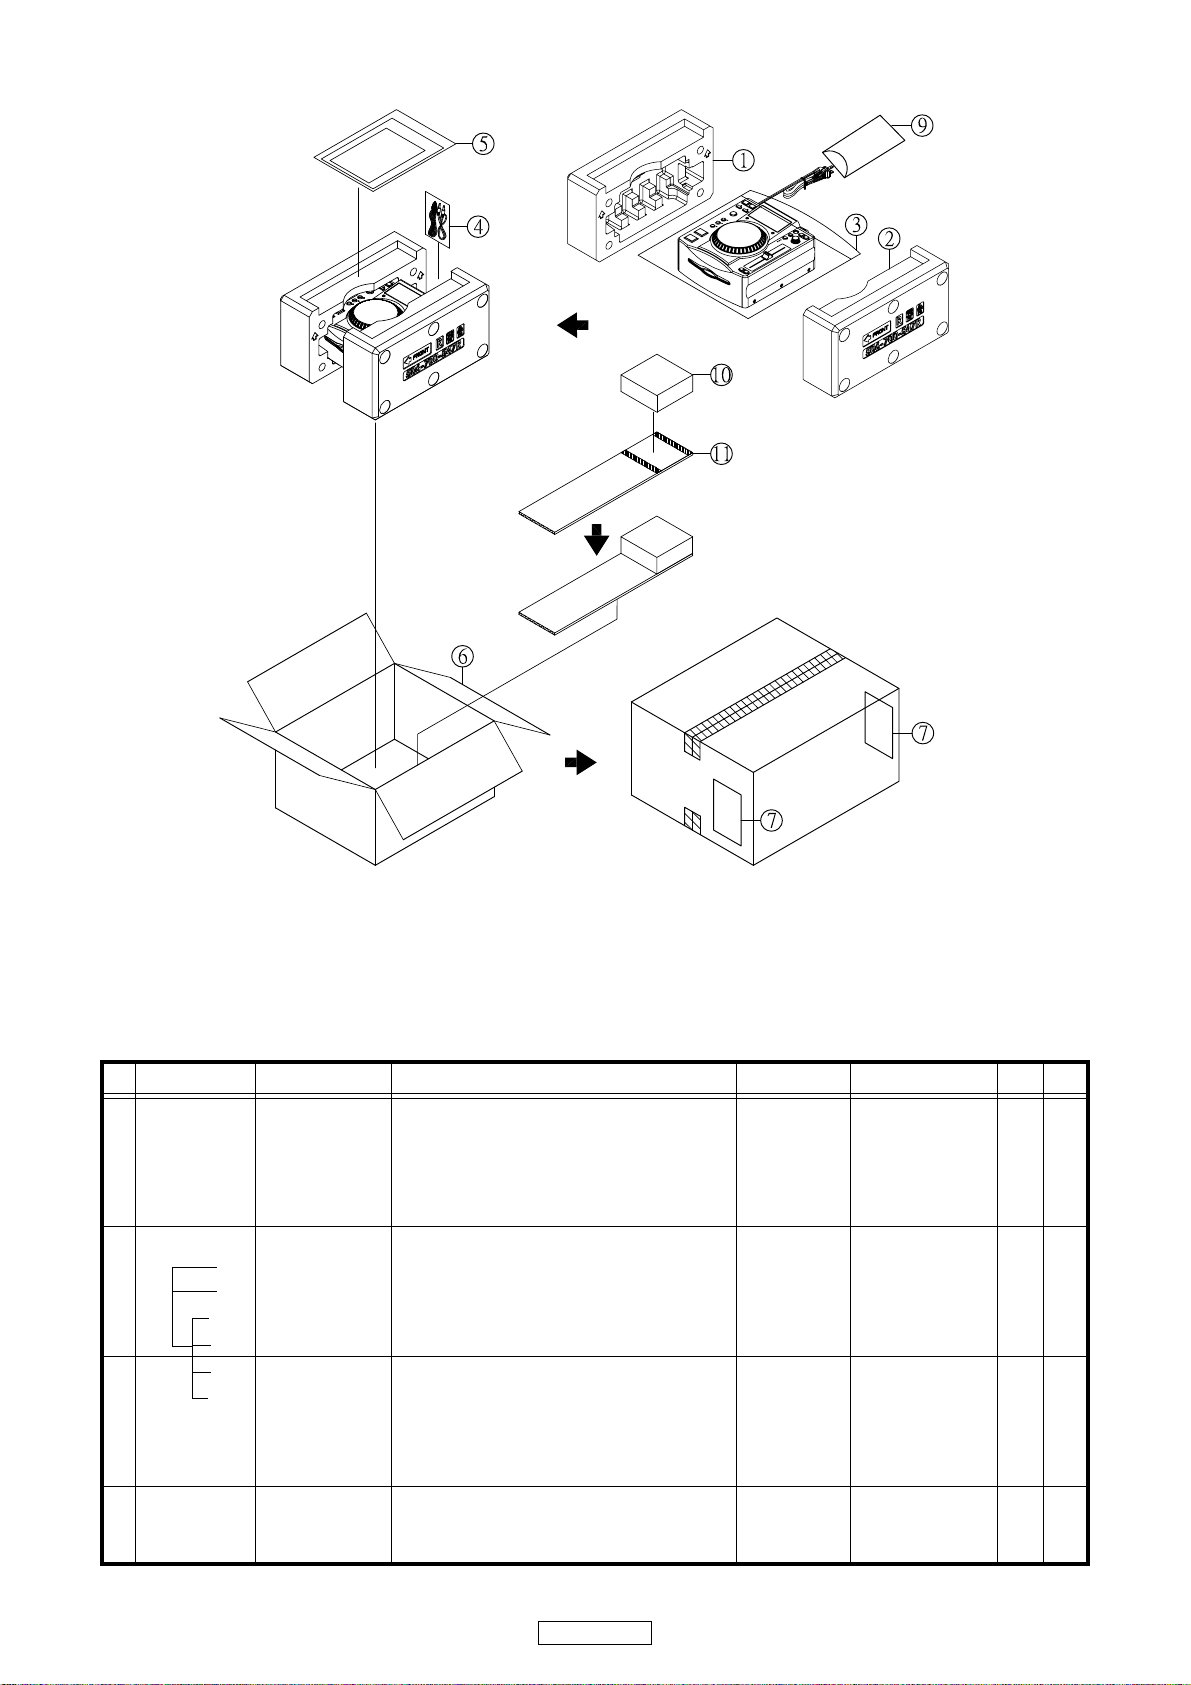
PACKING VIEW
PARTS LIST OF PACKING & ACCESSORIES
* Parts for which "nsp" is indicated on this table cannot be supplied.
* The parts listed below are for maintenance only, might differ from the parts used in the unit in appearances or dimensions.
Note: The symbols in the column "Remarks" indicate the following destinations.
E3 : U.S.A. & Canada model E2 : Europe mode
Ref. No. Part No. Part Name Remarks Q'ty New
1 941533001780D POLYFOAM L
2 941533001790D POLYFOAM R
3 941535001810D SOFT BAG(325*360+30mm)
4 00D9587051201 3.5mm STEREO CORD-NI
4 941612001870S 2P RCA CORD(L=1500mm)
4 nsp POLYBAG(120*250mm)
5 nsp I/B ASS'Y E2
5 nsp I/B ASS'Y E3
5-1 941541001450P INSTRUCTION MANUAL ((DNS700E2/E3)
5-2 nsp SERVICE SHEET(515-0996-001)
5-3 nsp WARRANTY CARD(515-0966-206) E3
5-4 00D9580039505 PE BAG(240*340mm)
6 941531001770D GIFT BOX
7 nsp SHIPPING LABEL(86*137mm,t=0.1mm) E2
7 nsp SHIPPING LABEL(86*137mm,t=0.1mm) E3
9 nsp POLYBAG((PE-HD,150*300mm,t=0.04mm)
10 941533001800D POLYFOAM C
11 941537001820D PASTEBOARD
506-700-547L
506-700-547R
509-700-263
408-900-065
408-S700-099
505-HM500A-049
701-DS700E2-4637
701-DS700E3-4638
502-DS700E2-2778
502-300E2-1771A
502-100E3-1772A
505-DJ2500H-014
507-700-3091
701-DS700E2-3655
701-DS700E3-3655
505-BJ1900AC-093
506-700-574
507-700-3130
1
1
1
1
1
1
1
1
1
1
1
1
1
2
2
1
1
1
55
DN-S700
Page 56
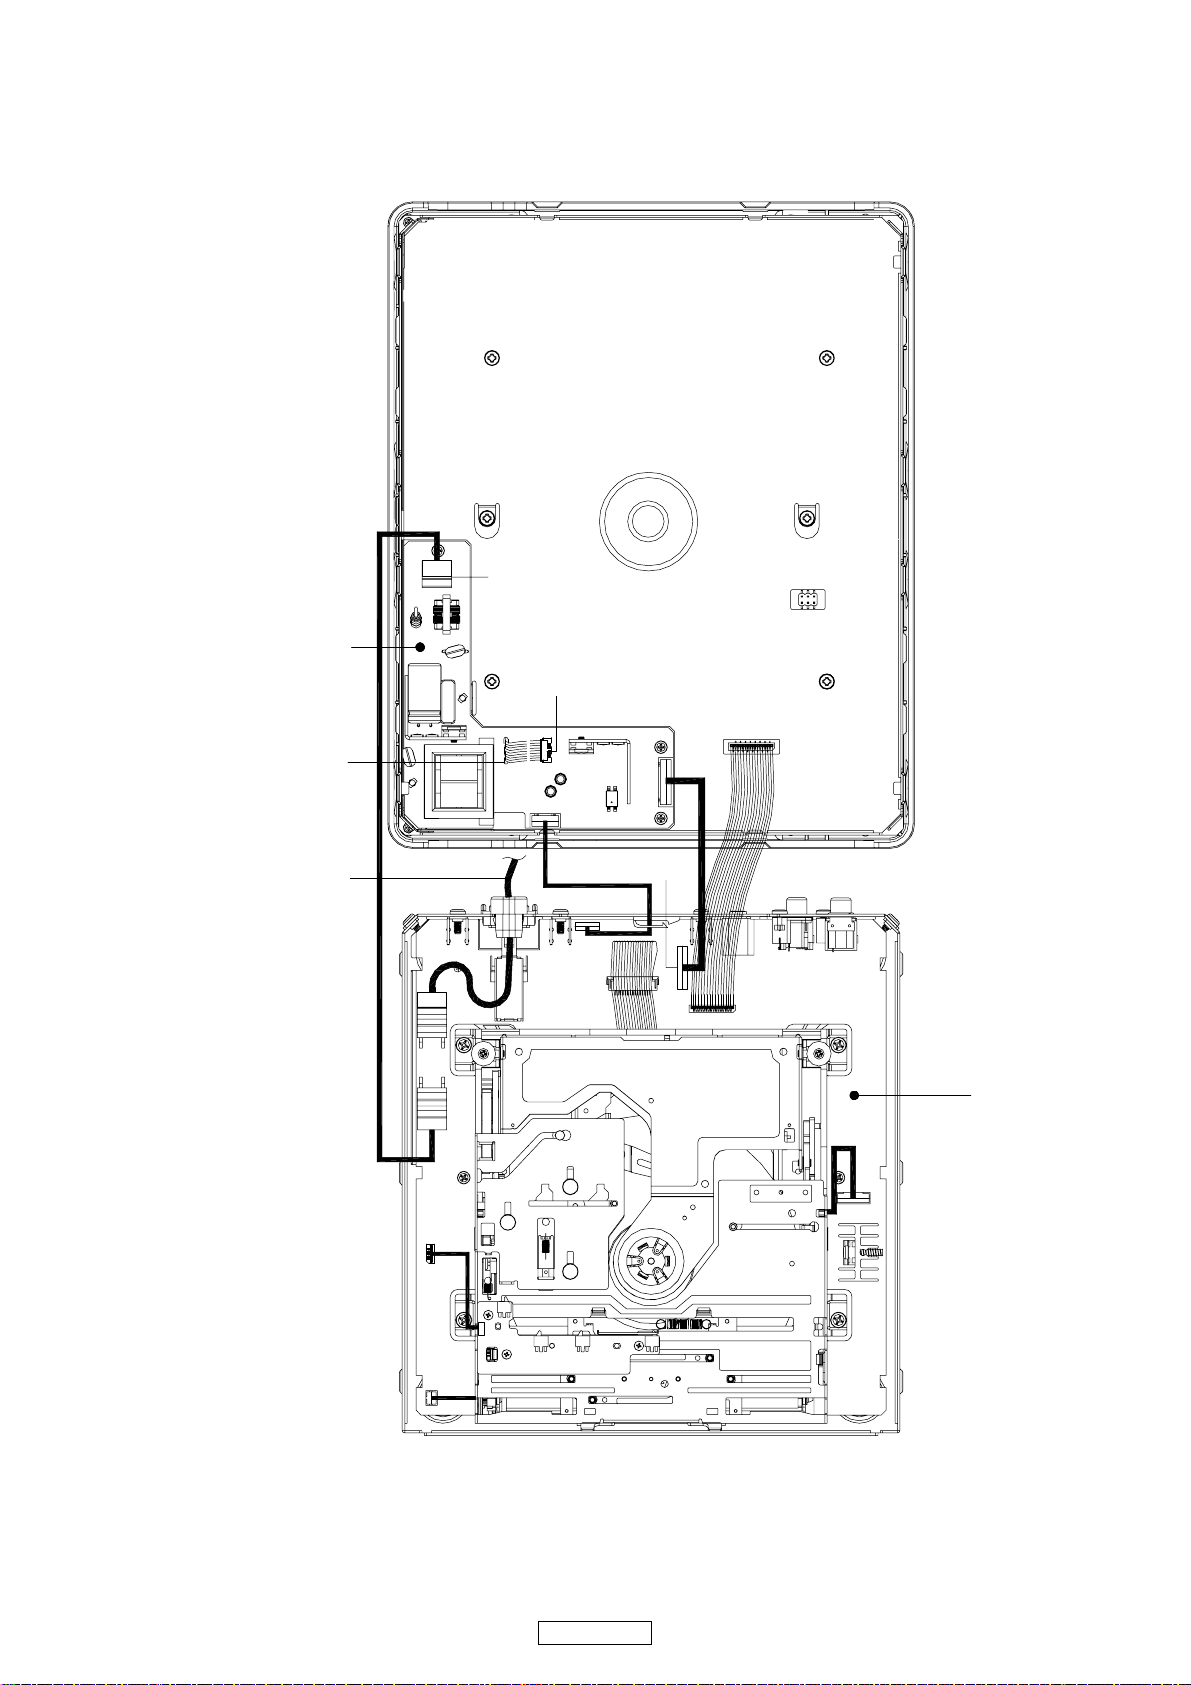
WIRING DIAGRAM
CN01
CN02
W07
CN06A
CN102
CN03
CN11
CN1
CN2
CN3
W03
CN06B
CN1
CN101
CONTROL PCB
MAIN PCB
SWITCHING POWER
CN201A
CONTROL PCB CN201A
TO VFD PCB CN201B
AC POWER CORD
56
DN-S700
Page 57

---MEMO---
57
DN-S700
Page 58

NOTE FOR SCHEMATIC DIAGRAM
WARNING:
Parts marked with this symbol z have critical characteristics.
Use ONLY replacement parts recommended by the manufacturer.
CAUTION:
Before returning the unit to the customer, make sure you
make either (1) a leakage current check or (2) a line to chassis
resistance check. If the leakage current exceeds 0.5 milliamps,
or if the resistance from chassis to either side of the
power cord is less than 460 kohms, the unit is defective.
WARNING:
DO NOT return the unit to the customer until the problem is
located and corrected.
NOTICE:
ALL RESISTANCE VALUES IN OHM. k=1,000 OHM
M=1,000,000 OHM
ALL CAPACITANCE VALUES IN MICRO FARAD.
P=MICRO-MICRO FARAD
EACH VOLTAGE AND CURRENT ARE MEASURED AT
NO SIGNAL INPUT CONDITION.
CIRCUIT AND PARTS ARE SUBJECT TO CHANGE
WITHOUT PRIOR NOTICE.
58
DN-S700
Page 59
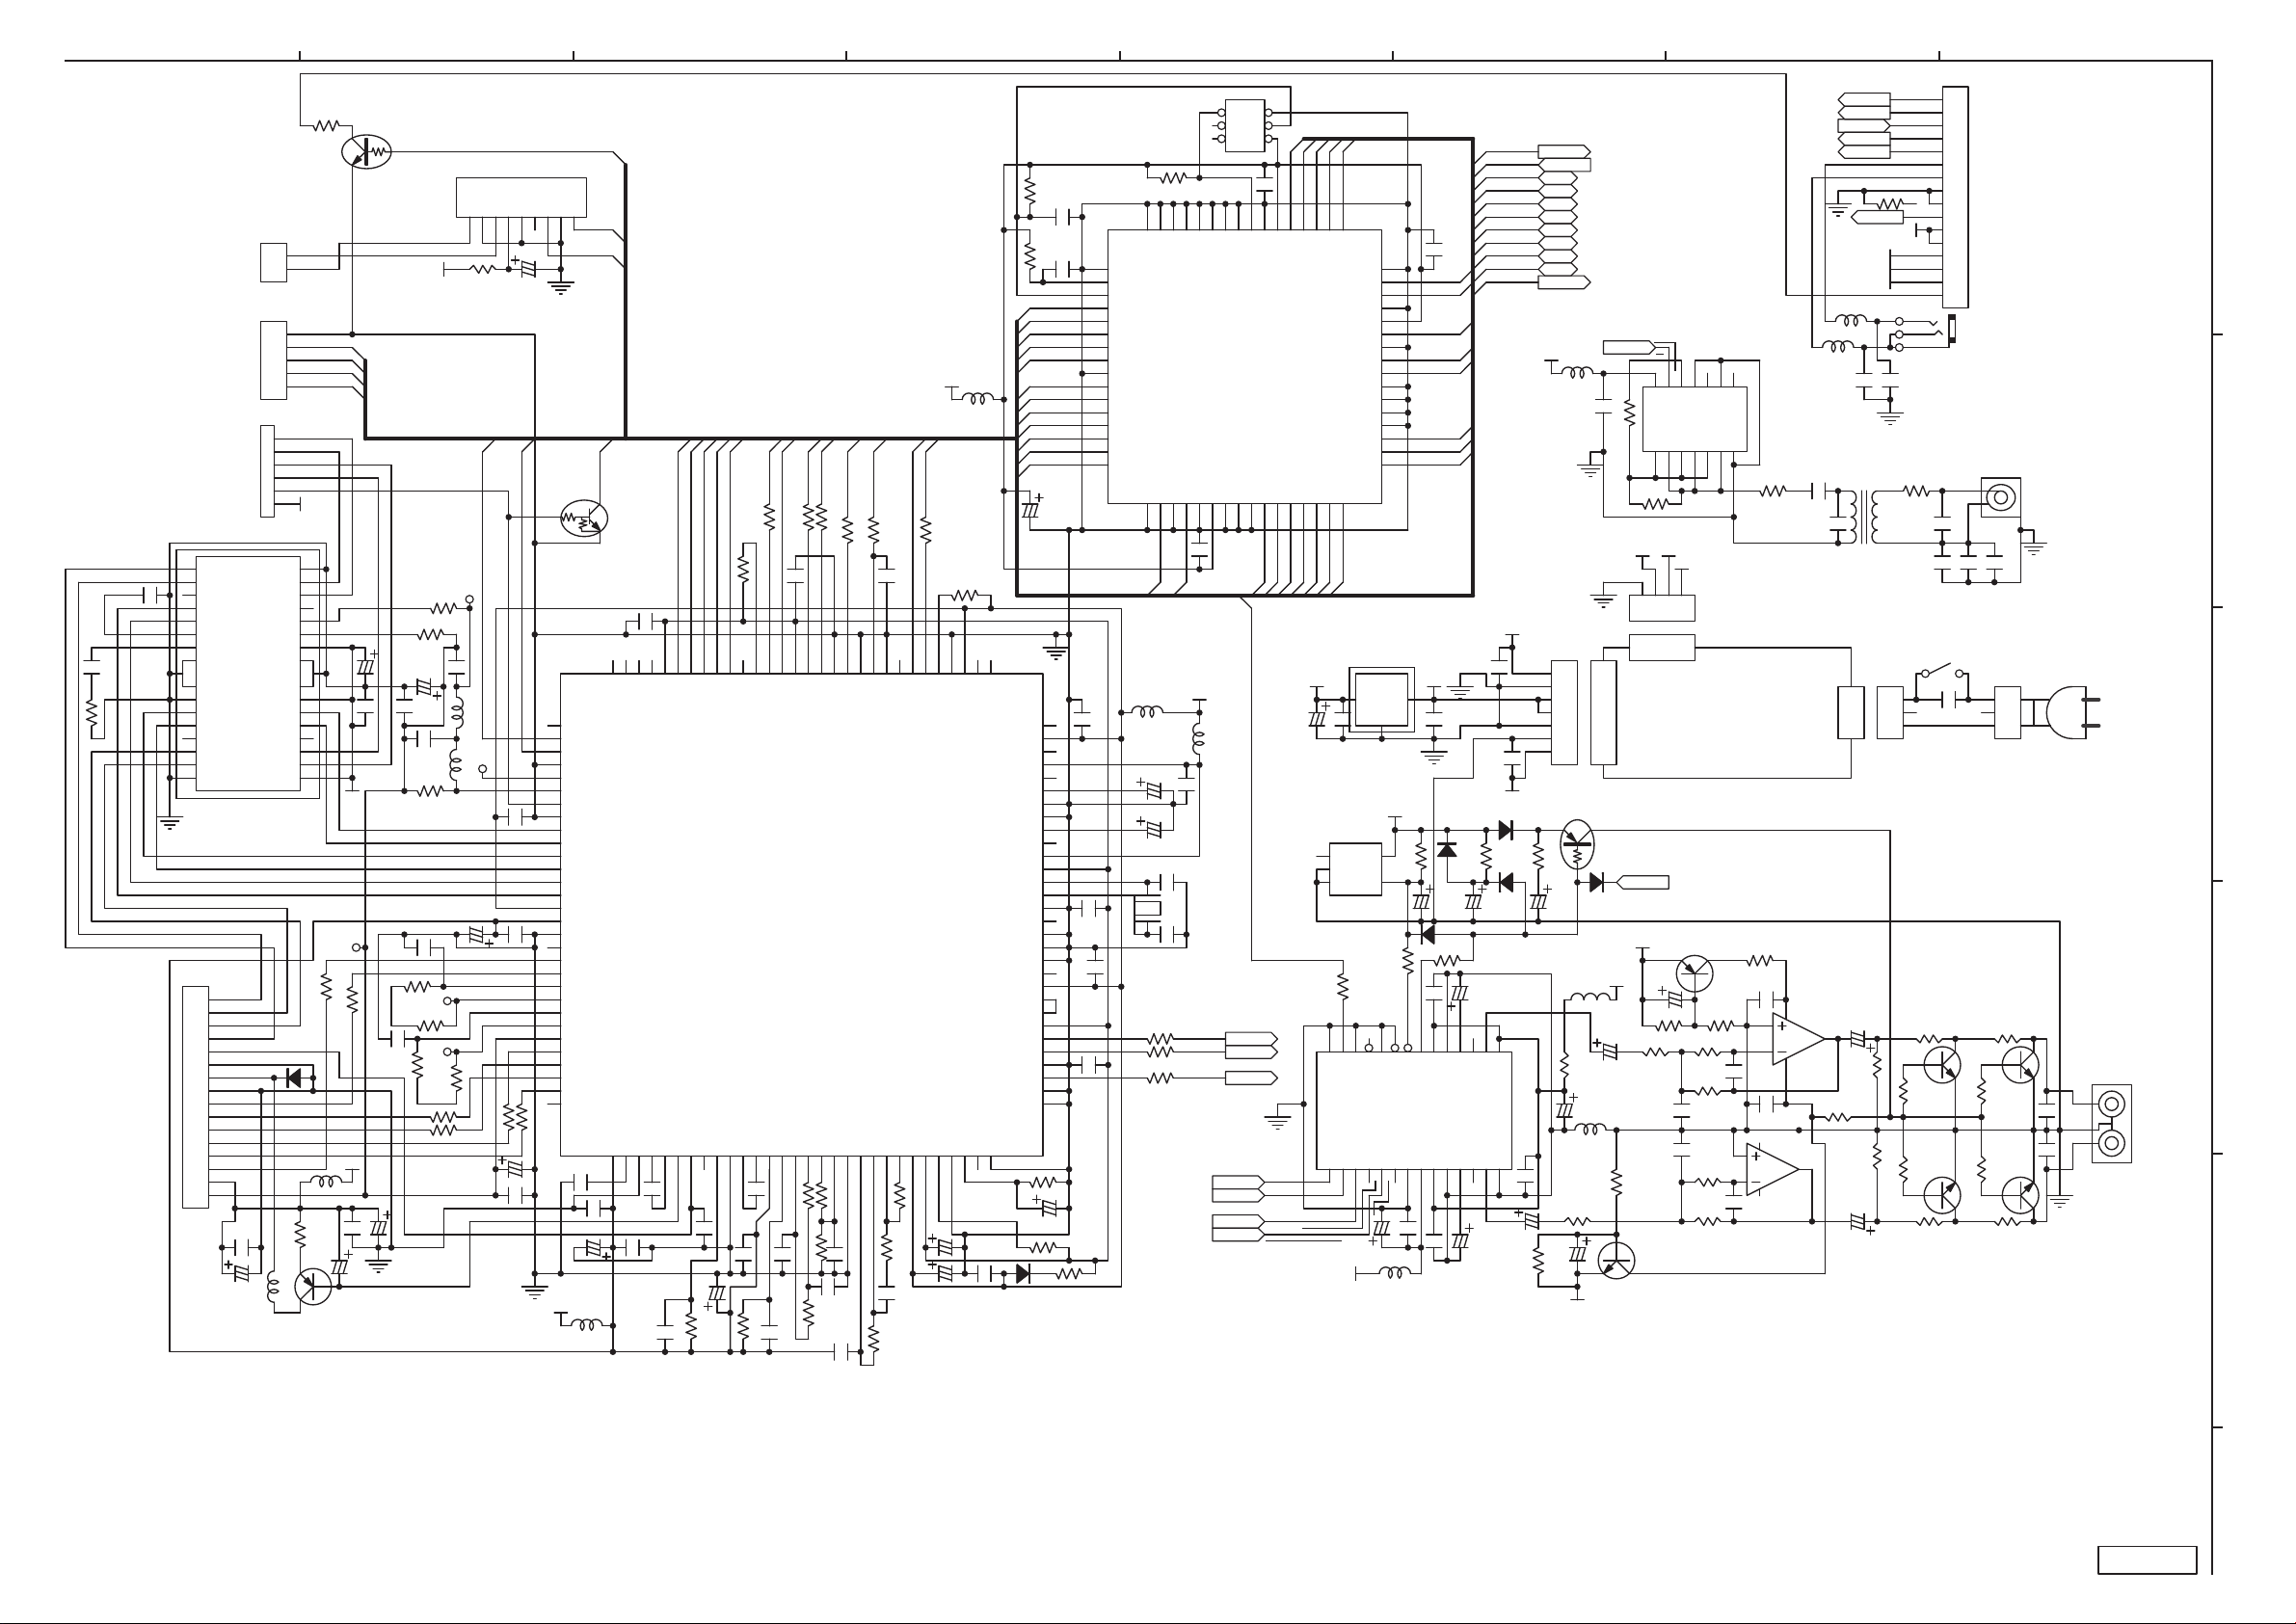
C196
R192
0.33
4.7
C130
0.1
TO PU
CN11
TO MK11 LOADER
2P
CN03
TO MK11 LOADER
5P
CN102
1
2
IC102
BA6392FP
FCTC+
TCFC+
PD
VR
LD
F
C
B
A
D
E
VC
L101
FB
3
4
5
6
6P
GND
F_DRV
R_DRV
VBIN
VBIN
VCC
VCC
OUT
R_DRV
F_DRV
MUTE
TO MECH.
1
F_DRV
2
R_DRV
3
OUT
4
(-)
5
(+)
6
VREFIN
7
VREFO
29 30
8
GND
9
(+)
10
(-)
11
OUT
12
R_DRV
13
F_DRV
14
GND
P
CN101
16
15
14
13
12
11
10
9
8
7
6
5
4
3
2
1
16P FFC
C159
0.1
C160
100/10
1
2
5
4
3
2
1
SPSP+
SL+
SLPUSW
(-)
(+)
(-)
D105
1SS132
R101
R176
220
LMA
LMB
DGND
CLSW
SW3
SW2
OPSW
3.3V
28
27
26
25
24
23
22
21
20
19
18
17
16
15
R188
L102
VCC-RF
C101
0.1
22
Q101
A933
C176
220/10
7V
VC
10K
3.3V
FB
100/10
Q103
C114TS
C155
0.1
10K
R187
C103
220P
C141
R119
150K
C175(NC)
100/10
C173(NC)
C142
R117
10K
C157
220P
R115
15K
R116
15K
R123 10K
R122 10K
C102
100/10
A
0.1
0.01
TE1
R172
FE1
7V
R171
0
10/.25W
MDP1
L108
100uF
L114
100uF
C137
C139
22/16
0
R173
C105
100/10
C104
9
R169
DFCT
C174
.022
LOCK
0.1
0
0.1
C138
0.1
10K
R121
3.3V-3
C140
10/16
FOK
R124
10K
C117
IC107
BA6218
1
2
3
4
5
6
7
8
9
10
11
12
13
14
15
16
17
18
19
20
21
22
23
24
25
26
27
28
29
30
NC
0.1
A
3.3V
O/C LED
BIN1CND12AIN3NC4CND25VCC6AOUT7CURR8BOUT
LMD-
LMD+
P
GFS
C2PO
119
COUT
0.1
C108
0.1
0.1
118
C110
0.1
WDCK
117
116
C4M
SCOR
115
114
113
GFS
VDD
C2PO
SCOR
C111
0.1
C112
22/16
R102
11K
/PUSW
Q102
C124ES
C136
120
NC
MIRR
DFCT
FOK
VSS
LOCK
MDP
SSTP
IOVSS1
SFDR
SRDR
TFDR
TRDR
FFDR
FRDR
IOVDD1
AVDD0
AVSS0
NC
E
F
TEI
TEO
FEI
FEO
VC
A
B
C
D
NC
AVDD431RFDCO32PDSENS33AC_SUM34EQ_IN35LD36PD37NC38RFC39AVSS440RFACO41RFACI42AVDD343BIAS44ASYI45ASYO46VPCO47VCTL48AVSS349CLTV50FILO51FILI52PCO53AVDD554DDVROUT55DDVRSEN56AVSS557DDCR58NC59BCK1
C106
C109
C107
22/16
L103
FB
XPCK
112
XPCK
XUGF
R120
111
XUGF
R103
470K
47K
110
WFCK
C114
C113
109
SCLK
R185
108
ATSK
0.1
C115
100P
SENS
R183
100
C135
106
107
VDD
SENS
SCLK
IC101
CXD3059
330P
R104
C116
CLOK
100
0.1
105
10K
0.01
XLAT
R182
104
CLOK
R106
R105
100K
100
103
VSS
XLAT
1M
C118
1000P
C119
1500P
DATA
R181
102
DATA
R107
C120
R178
100
101
SYSM
470K
0.1
CDRST
100
R110
R109
XRST
100
C197
0.1
99
EXCK
4.7K
R108
3.3K
98
SBSO
1K
C121
0.1
87654321
CN06A
XRST
UTDR
URDT
WLA
WLB
PLAY
CUE
R304
10K
/MUTE
5V
3
L
2
R
1
G
C145
1000P
CHASSIS
R129
68
C149
47P
C150
0.01
POWER SW.
1
2
3
R161
150
R163
2.7K
2.7K
R164
R162
150
SW001
C001
.01/250
Q105
D1468
Q106
D1468
1
2
3
4
5
6
7
8
TO CONTROL PCB
9
10
11
12
13
14
15
16
16P
JK102
RELAY
JK103
DOUT
1
2
C151
0.1
R165
R167
R168
R166
150
C152
1000P
CN01
1
2
3
2P
150
2.7K
2.7K
C177
1000P
C178
1000P
G
CHASSIS
AC CORD
Q107
D1468
Q108
D1468
W01
JK101
L
3
21R
AUDIO OUT
CHASSIS
A
B
C
D
E
C181
0.1
C182
220P
IC108A
7
L110
FB
C146
1000P
1
R170
100K
XRST
UTDR
URDT
WLA
WLB
D
L109
T101
1
3
D.OUT TX
C165
10/25
R159
100K
R160
100K
C166
10/25
/MUTE
VF1
VF2
-32V
FB
5
4
CN02
2P
1
3
5
BKGD
R134
R133
10K
R136
10K
5V
L112
FB
SQCK
SQSO
R179
100
R175
100
97
96
SQSO
SQCK
2.5V
C122
22/16
91
93
92
95
NC
XTSL
IOVSS094XTACN
60
C124
C156
100/10
C123
0.1
5V-1
LMUT
RMUT
IOVDD0
AVDD2
AOUT2
VREFR
AVSS2
AVSS1
VREFL
AOUT1
AVDD1
XVDD
XTAO
IOVSS2
DOUT
IOVDD2
EMPH1
EMPH
PCMD
LRCK
LRCKI
PCMDI
1/50
NC
XTAI
XVSS
NC
TES1
TEST
VDD
BCK
VSS
D104
1SS132
C191
0.1
C192
0.01
/SRST
CLSW
SW3
SW2
OPSW
DEEMP
O/C LED
LMD+
LMDCLOK
XLAT
DATA
CDRST
C188
100/10
D
90
89
88
87
86
85
84
83
82
81
80
79
78
77
76
75
74
73
72
71
70
69
68
67
66
65
64
63
62
61
R174
C126
R111
22
C134
C127
0.1
0.1
C125
0.1
R112
470K
0
1
PTC4
2
IRQ
3
/RST
4
PTF0
5
PTF1
6
PTF2
7
PTF3
8
PTF4
9
PTC6
10
PTE0
11
PTF5
12
PTF6
13
PTE0/TXD1
14
PTE1/RXD1
15
PTE2
16
PTE3
0.1
3.3V-1
10K
64
62
59
58
57
VSS
PTC060PTC161PTC2
PTC3/TXD263PTC5/RXD2
PTE417PTE518PTE619PTE720VSS21VDD22PTG023PTG124PTG225PTA026PTA127PTA228PTA329PTA430PTA531PTA6
SQSO
L107
FB
L104
C132
10/25
C131
10/25
X101
33.86M(CER)
R139 220
R138 220
R137
SQCK
3.3V
FB
C198
10P
C199
10P
220
LRCK
PTG6/EXTAL
IC103
MC9S08AW32
C193
0.1
C133
0.1
3.3V-2
BCK
DD
LRCK2
DB2
BCK2
16.9M1
C187
0.1
56
PTG5/XTAL
DEEMP
BCK
DD
LRCK
HEADER 3X2
4
6
GFS
FOK
XUGF
55
53
54
VREFL
VREFH
BKGD/MS
D1D2D3
D4D5D6
D0
3.3V 5V
C305
330/10
1
2
R191
220
D
LRCK2
DB2
BCK2
16.9M1
C2PO
XPCK
49
PFG4
PTG3
AD11
PTD4/AD1250PTD5/AD1351PTD6/AD1452PTD7/AD15
AD10
VSSAD
VDDAD
AD9
AD8
AD7
AD6
AD5
AD4
AD3
AD2
AD1
AD0
PTA7
32
IC301
BA33
O
C306
0.1
IC302
BD4745G
NC
VCC
SUB
GND3VO
C311
2.2/50
R190
24
26MC27ML28
25
MD
MUTE
PCM1716
LRCK1DATA2BCK3CLKO4XTI5XTO6DGND7VDD8VCC2R9AGND2R10EXTR11NC12ROUT13AGND1
C161
10/25
L111
5V
48
47
46
45
44
43
42
41
40
39
38
37
36
35
34
33
G
5V
5
4
220
MODE
IC105
FB
R302
10K
23
CS
I
22
C164
/PUSW
SENS
SCLK
ACKS
ACKB
D7
C183
21
RST
0.1
DFCT
SCOR
C302
1SS132
1SS132
0.1
20
ZERO
C184
0.1
C194
0.1
0.1
D304
C310
22/16
D305
19
VCC2L
P
A
AGND2L
R301
100K
18
EXTL
C301
0.1
C303
R189
220
C185
10/25
17
NC
C186
10/25
ACKS
ACKB
D7
D6
D5
D4
D3
D2
D1
D0
SCOR
0.1
D301
1SS132
D303
1SS132
16
15
LOUT
14
C168
10/25
7V
PGND
GND
-8V
VCC1
0.1
R306
10K
7V
5V
C163
-8V
R303
220
470/10
ACKS
ACKB
D7
D6
D5
D4
D3
D2
D1
D0
SCOR
5V
W03
1
2
3
4
5
6
7
C309
C308
10/25
L106
10uH
7P
C129
0.1
R140
10
R154
10K
-8V
D
D
D302
1SS132
L113
10uH
C162
220/10
L105
FB
R308
39K
DOUT
14
13
VDD
IC104
74HC04
1K
R126
1A11Y22A32Y43A53Y6GND
R127
1M
VF2-32V
VF1
123
4
W07
4P
SWITCHING
POWER SUPPLY
MODULE
AC100-240V INPUT
OUTPUT: DC7V/1A,5V/1.5A,-5V/0.2A
-32V/0.2A, AC3.5V/0.2A
Q104
A124TS
/MUTE
Q301
7V
A1015
C307
5V
10/25
C167
10/25
Q302
C1815
10K
R153
C169
.0012
C170
.0012
R305
10K
R155
5.6K
R157
39K
R156
5.6K
R158
39K
R307
39K
C144
4Y84A95Y105A116Y126A
7
C143
5
6
R184
10
0.1
C171
82P
15218
C172
82P
R128
22
3
2
0.1
IC108B
84
15218
CN103
2
SCHEMATIC DIAGRAMS (1/4)
SERVO UNIT
DN-S700
F
Page 60
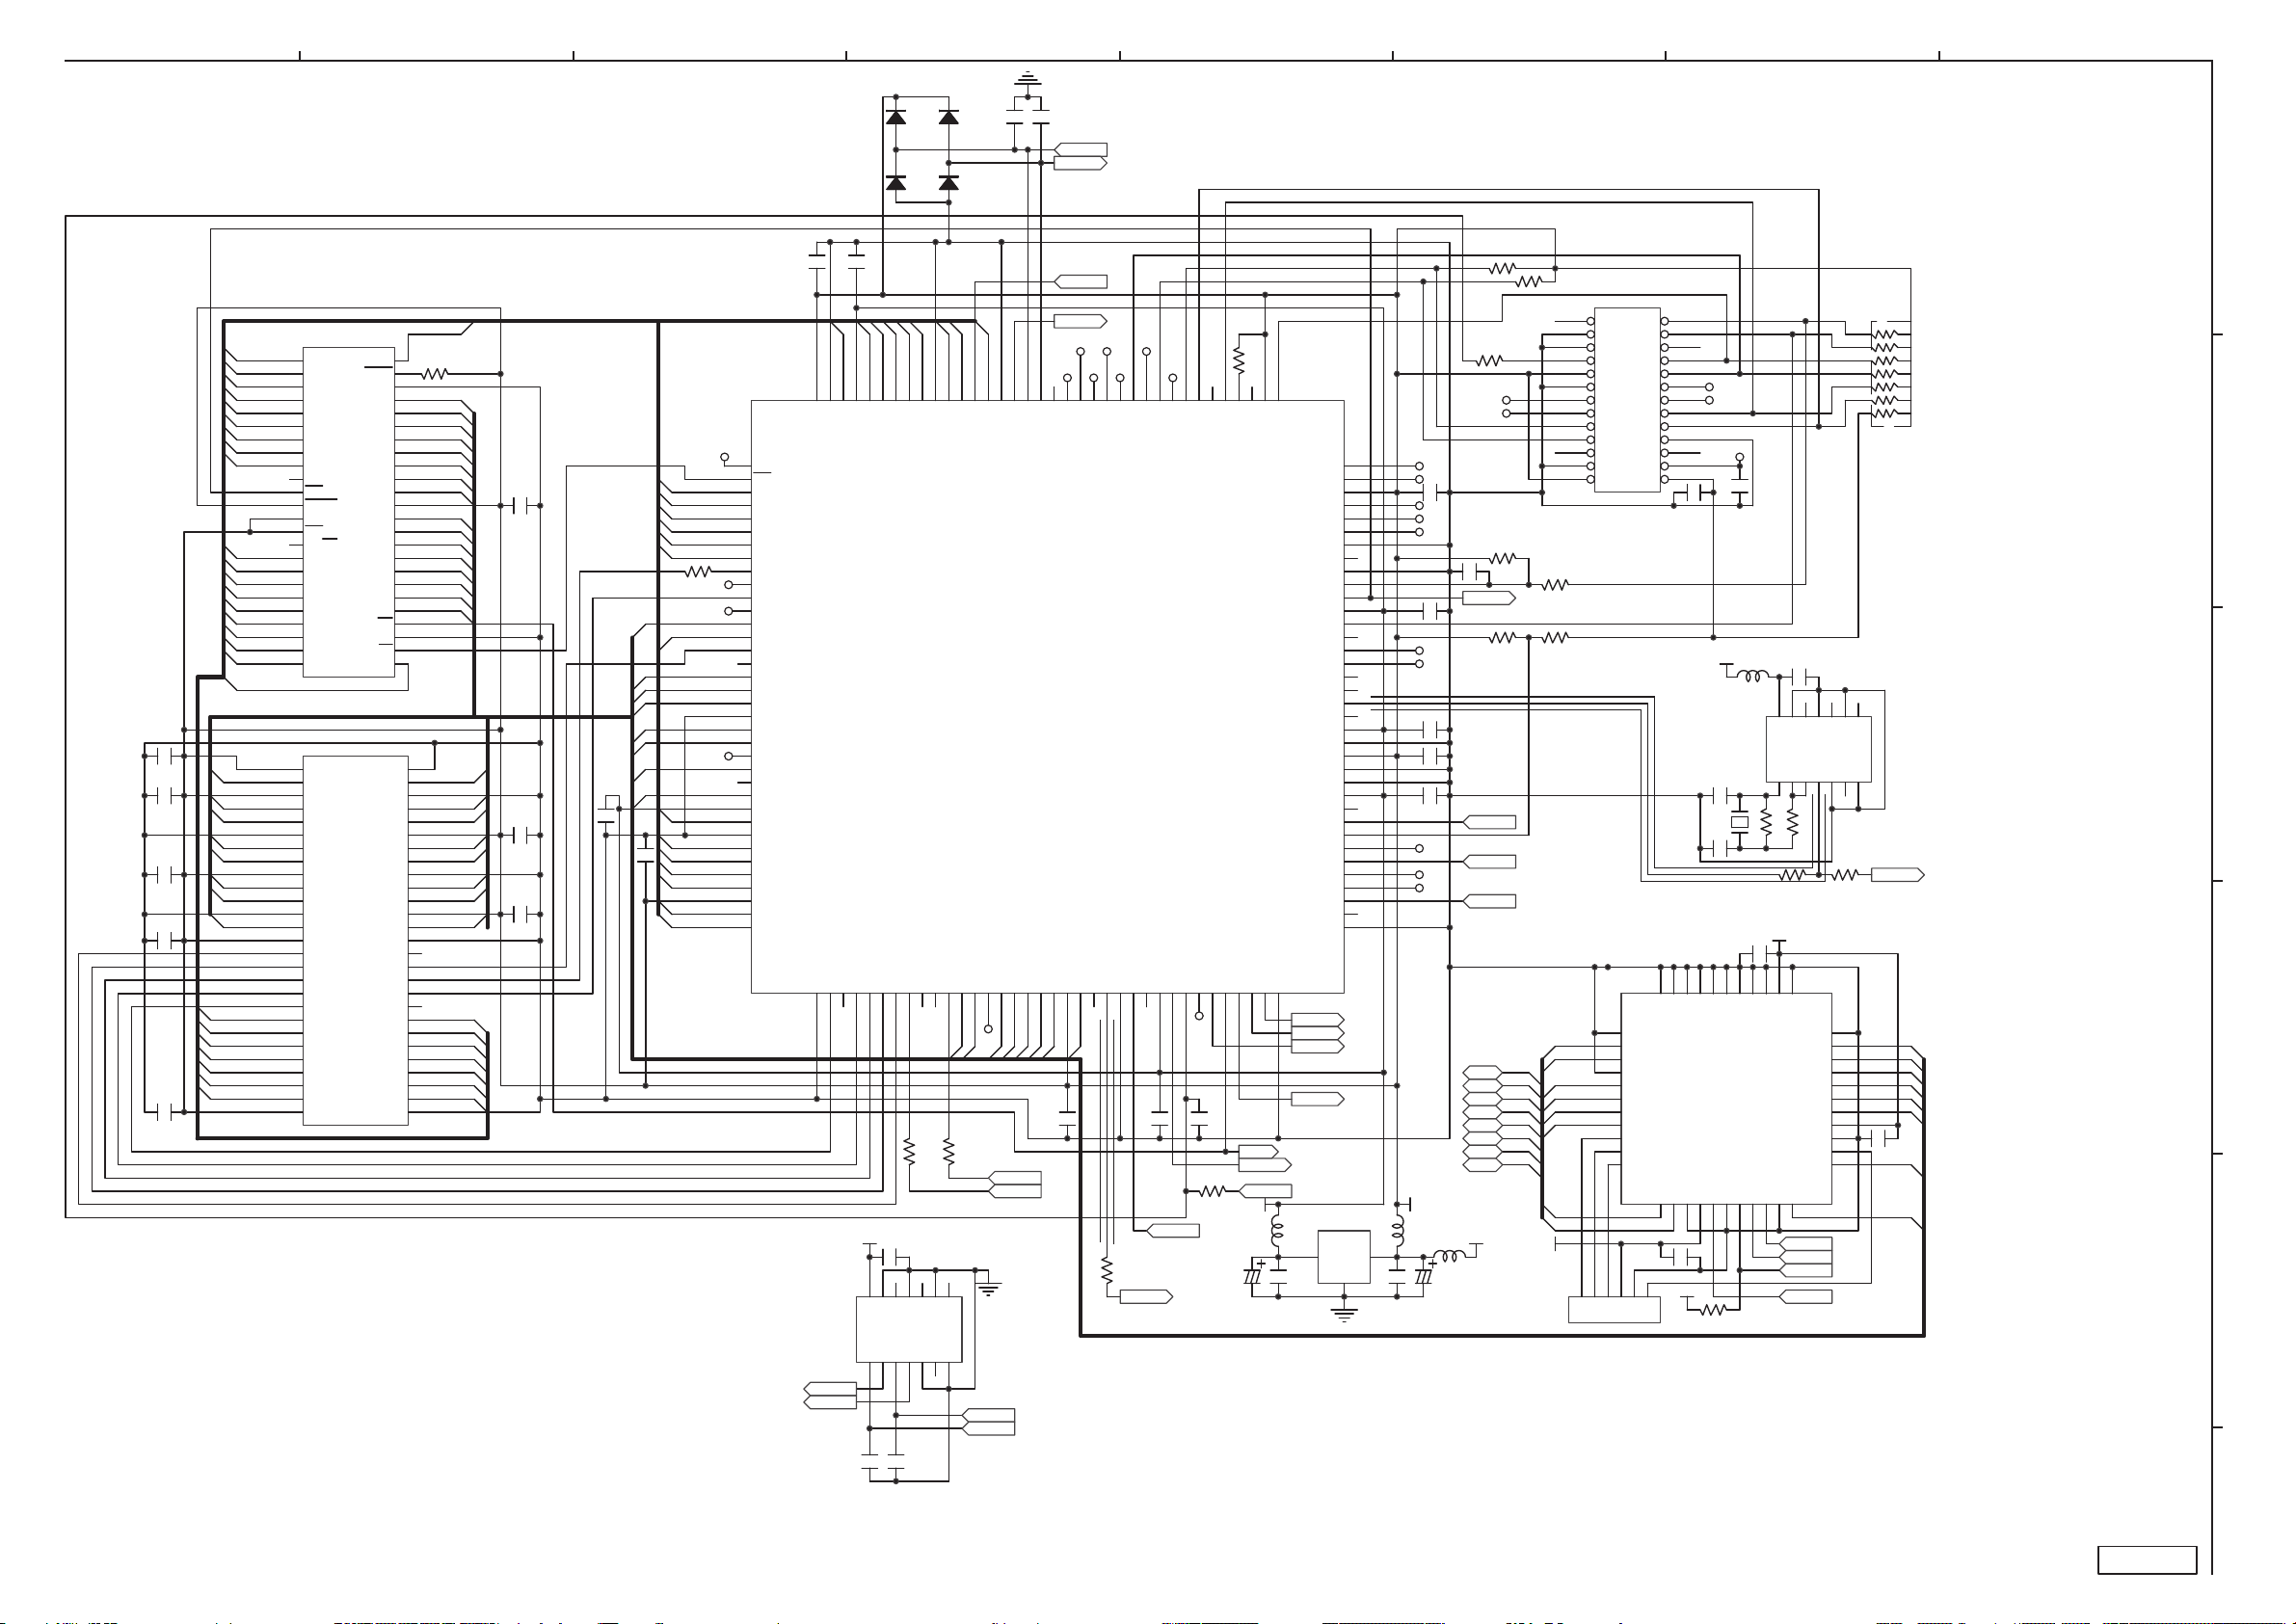
C14
C18
C19
C20
0.1
87654321
D
1SS132
A3
PAD-GND
7
D03
D04
1SS132
A2
133A3134
132
A2
D19
D21
R11
220
ACKS
SCOR
4Y84A95Y105A116Y126A
TIN1/GPIO23
TP8
WLA
WLB
C67
470P
A1
131
A1
130
D20
ACKS
SCOR
C66
470P
/CS1
TP21TP19
128
129
126
127
CORE-GND
CS1/GPIO58
RXD1/GPI27
TXD1/GPO27
EBUIN4/ADIN1/GPI39
U1
SCF5249LAG120
D17
D18
D22
D23
C05
0.1
D
UTDR
URDT
/WLB
/CS1
TP18
TP TP
TP17
122
123
125
124
TXD2/GPO28
CTS1_B/GPI30
RTS1_B/GPO30
SDATAI3/GPI41
D16
R09
220
121
120
RTS2_B/GPO31
119
TDSO
C06
0.1
DOUT
TP15
118
RXD2/GPI28/ADIN2
/WLA
A
R26
10K
R27
10K
J01(NC)
2
1
4
/RST
R13
0(NC)
R17
0(NC)
D0
D1
D2
D3
D4
D5
D6
D7
6
3
5 6
7
8
9
10
11
12
13
14
15
16
17
18
19
20
22
21
24
23
26
25
HEADER 13X2
1
GCK3
2
2
3
3
4
GND
5
5
6
6
7
7
8
8
9
TD1
10
TMS
11
TCK
12345
DSI
DSO
DDATA3
DDATA1
TA
C35
NC
C17
15P
C16
15P
42
44
GCK143GCK2
XC9536-10-VQ44
121213131414VCC5V151616GND17181819192020212122
C29
0.1
D3.3V
TPE
TPD
TPC
TPB
TPA
TP14
TP13
TP22
TP12
TP11
100/10
L03
FB
C26
C22
0.1
R30
TPD'
TPE'
DDATA2
DDATA0
R/W
DD
BCK
LRCK
D0
D1
D2
D3
D4
D5
D6
D7
3.3V
0
R12
0
C34
0.1(NC)
R16
0
D0
D1
D2
D3
D4
D5
D6
D7
D3.3V
CN04
JTAG
R02
4.7K
111
113
115
116
114
117
TOUT0/GPO33
DDATA1/GPIO1
DDATA2/GPIO2
DDATA0/GPIO0
CTS2_B/ADIN3/GPI31
TP10
C39
0.1
/OE
ACKB
R29
270
220/10
109
112
110
HI-Z
TEST0
TDI/DSI
TIN0/GP133
PST0/GPIO59
PST2/GPIO61
DDATA3/GPIO4
PST1/GPIO60
VNPSTCLK/GPO63
PST3/GPIO62
CORE-GND
CORE-VDD
TRST/DSCLK
XTRIM/GPO38
MCLK2/GPO42
MCLK1/GPO39
IDE-IORDY/GPIO16
IDE-DIOR/GPIO13
IDE-DIOW/GPIO14
PLLCOREVDD
PLLCOREGND
PLLPADVDD
PLLPADGND
PLLGRDGND
PLLGRDVDD
EBUIN1/GPI36
SCLK4/GPIO50
SDATAI4/GPI42
SDATAO1/GPIO25
72
GPO55
/OE
ACKB
XRST
1.8V
C28
PAD-VDD
PAD-GND
TCK
TMS/BKPT
RW_B
CRIN
SDATAI1
TA/GPIO20
SCLK1
LRCK4
LRCK1
TEST3
BCK2
DB2
LRCK2
GPO55
U7
L02
BA18C0FP
FB
O
C27
0.1
108
107
106
105
104
103
102
101
100
99
98
97
96
95
94
93
92
91
90
89
88
87
86
85
84
83
82
81
80
79
78
77
76
75
74
73
G
R/W
C09
0.1
C10
0.1
C08
0.1
C07
0.1
D3.3V
L04
FB
I
C25
0.1
D
TPA'
TPC'
D3.3V
16.9344M
TPB'
X1
C23
0.1
L01
FB
U5
R01
1M
R19
10K
BKPT
DSCLK
C15
NC
D3.3V
36
3737383839394040414142
GTS1
13
14
VDD
74HCU04
1A11Y22A32Y43A53Y6GND
470
R33
R15
100
U8
34
35
GTS2
VCC5V
GSR
VCC3.3V
GND
TD0
22
GPO55
R/W
/CS1
/OE
C30
32
31
30
29
28
27
23
RB01
10KX7
B
0.1
4Y84A95Y105A116Y126A
C
7
R14
100
16.9M1
33
D31
32
D30
31
D29
30
D28
29
D27
28
D26
27
26
C31
25
24
0.1
D25
23
D24
D
E
SCHEMATIC DIAGRAMS (2/4)
SERVO (DSP) UNIT
D01
1SS132
D02
1SS132
C02
0.1
CE
A0
VSS
DQ15
DQ14
DQ13
DQ12
DQ11
DQ10
DQ9
DQ8
VSS
NC
CLK
CKE
NC
A11
VSS
A17
48
47
46
45
44
43
42
41
40
39
38
37
36
35
34
33
32
31
30
29
28
27
26
25
A9
A8
A7
A6
A5
A4
R03
4.7K
D31
D23
D30
D22
D29
D21
D28
D20
D27
D19
D26
D18
D25
D17
D24
D16
54
53
D31
52
51
D30
50
D29
49
48
D28
47
D27
46
45
D26
44
D25
43
42
41
40
39
38
37
36
35
A20
A18
34
33
A17
32
A9
31
A10
30
A11
29
A12
28
C11
0.1
C03
0.1
C12
0.1
C04
C13
42D32D
0.1
0.1
R31
0
D24
D30
A21
A11
A10
A9
A18
A17
TP2
TP3
A22
D25
D26
D27
D28
D29
TP4
D31
A13
A23
A14
A15
A16
A19
A20
TP1
1
SCL/QSPI_CLK
2
CS0
3
A21
4
A11
5
A10
6
A9
7
A18
8
A17
9
BCLK/GPIO10
10
SCLK_OUT/GPIO15
11
BCLKE
12
SDA/QSPI_DIN
13
DATA24
14
A22
15
SDUDQM
16
EF/GPIO19
17
DATA25
18
DATA26
19
DATA27
20
PAD-GND
21
DATA28
22
DATA29
23
SDATA3/GPIO56
24
DATA30
25
BUFFNB1/GPIO57
26
DATA31
27
CORE-VDD
28
A13
29
CORE-GND
30
A23
31
A14
32
A15
33
A16
34
PAD-VDD
35
A19
36
A20
U3
A16
1
A15
A15
2
A14
A14
3
A13
A13
4
A12
A12
5
A11
A11
6
A10
A10
7
A9
A9
8
A8
A20
9
A19
10
NC
11
WE
12
RESET
13
NC
14
WP
15
RY/BY
A19
16
A18
A18
17
A17
A8
18
A7
A7
19
A6
A6
20
A5
A5
21
A4
A4
22
A3
A3
23
A2
24
A2
A1
AM29W800DB
A1
0.1
0.1
0.1
C21
0.1
D16
D17
D18
D19
D20
D21
D22
A22
A21
A19
A16
A15
A14
A13
U2
1
VCC
2
DQ0
3
VCCQ
4
DQ1
5
DQ2
6
VSSQ
7
DQ3
8
DQ4
9
VCCQ
10
DQ5
11
DQ6
12
VSSQ
13
DQ7
14
VCC
15
DQML
16
/WE
17
/CAS
18
/RAS
19
/CS
20
A13
21
A12
22
A10
23
A0
24
A1
25
A2
26
A3
27
VCC
K4S641632D
A16
BYTE
VSS
DQ15
DQ7
DQ14
DQ6
DQ13
DQ5
DQ12
DQ4
VDD
DQ11
DQ3
DQ10
DQ2
DQ9
DQ1
DQ8
DQ0
OE
VSS
VSSQ
VCCQ
VSSQ
VCCQ
DQMU
C01
0.1
A12
141
142
144
143
A12
TEST1
PAD-VDD
CORE-VDD
TEST237SDCS138SDATA1_BS1/GPIO939SDRAS40SDCAS41SDWE42SDLDQM43GPIO544QSPI_CS0/GPIO2945QSPI_DOUT/GPIO2646GPIO647DATA2148DATA1949QSPI_CS2/GPIO2150DATA2051DATA2252DATA1853DATA2354DATA1755PAD-VDD56DATA1657CFLG/GPIO1858EBUOUT1/GPO3659CORE-GND60EBUIN3/ADIN0/GPI3861EBUIN2/GPI3762CORE-VDD63SCL2/GPIO364RSTI65TOUT1/ADOUT/GPO3566LRCK2/GPIO4467OE68SDA2/GPO5569SDATAO2/GPO4170SCLK2/GPIO4871PAD-GND
D3.3V
U6
74HC14
/WLB
/WLA
C69
470P
A4A5A6A7A8
136A6137A5138A8139A7140
135
A4
R10
220
C33
0.1
13
14
VDD
1A11Y22A32Y43A53Y6GND
C68
470P
DN-S700
F
Page 61
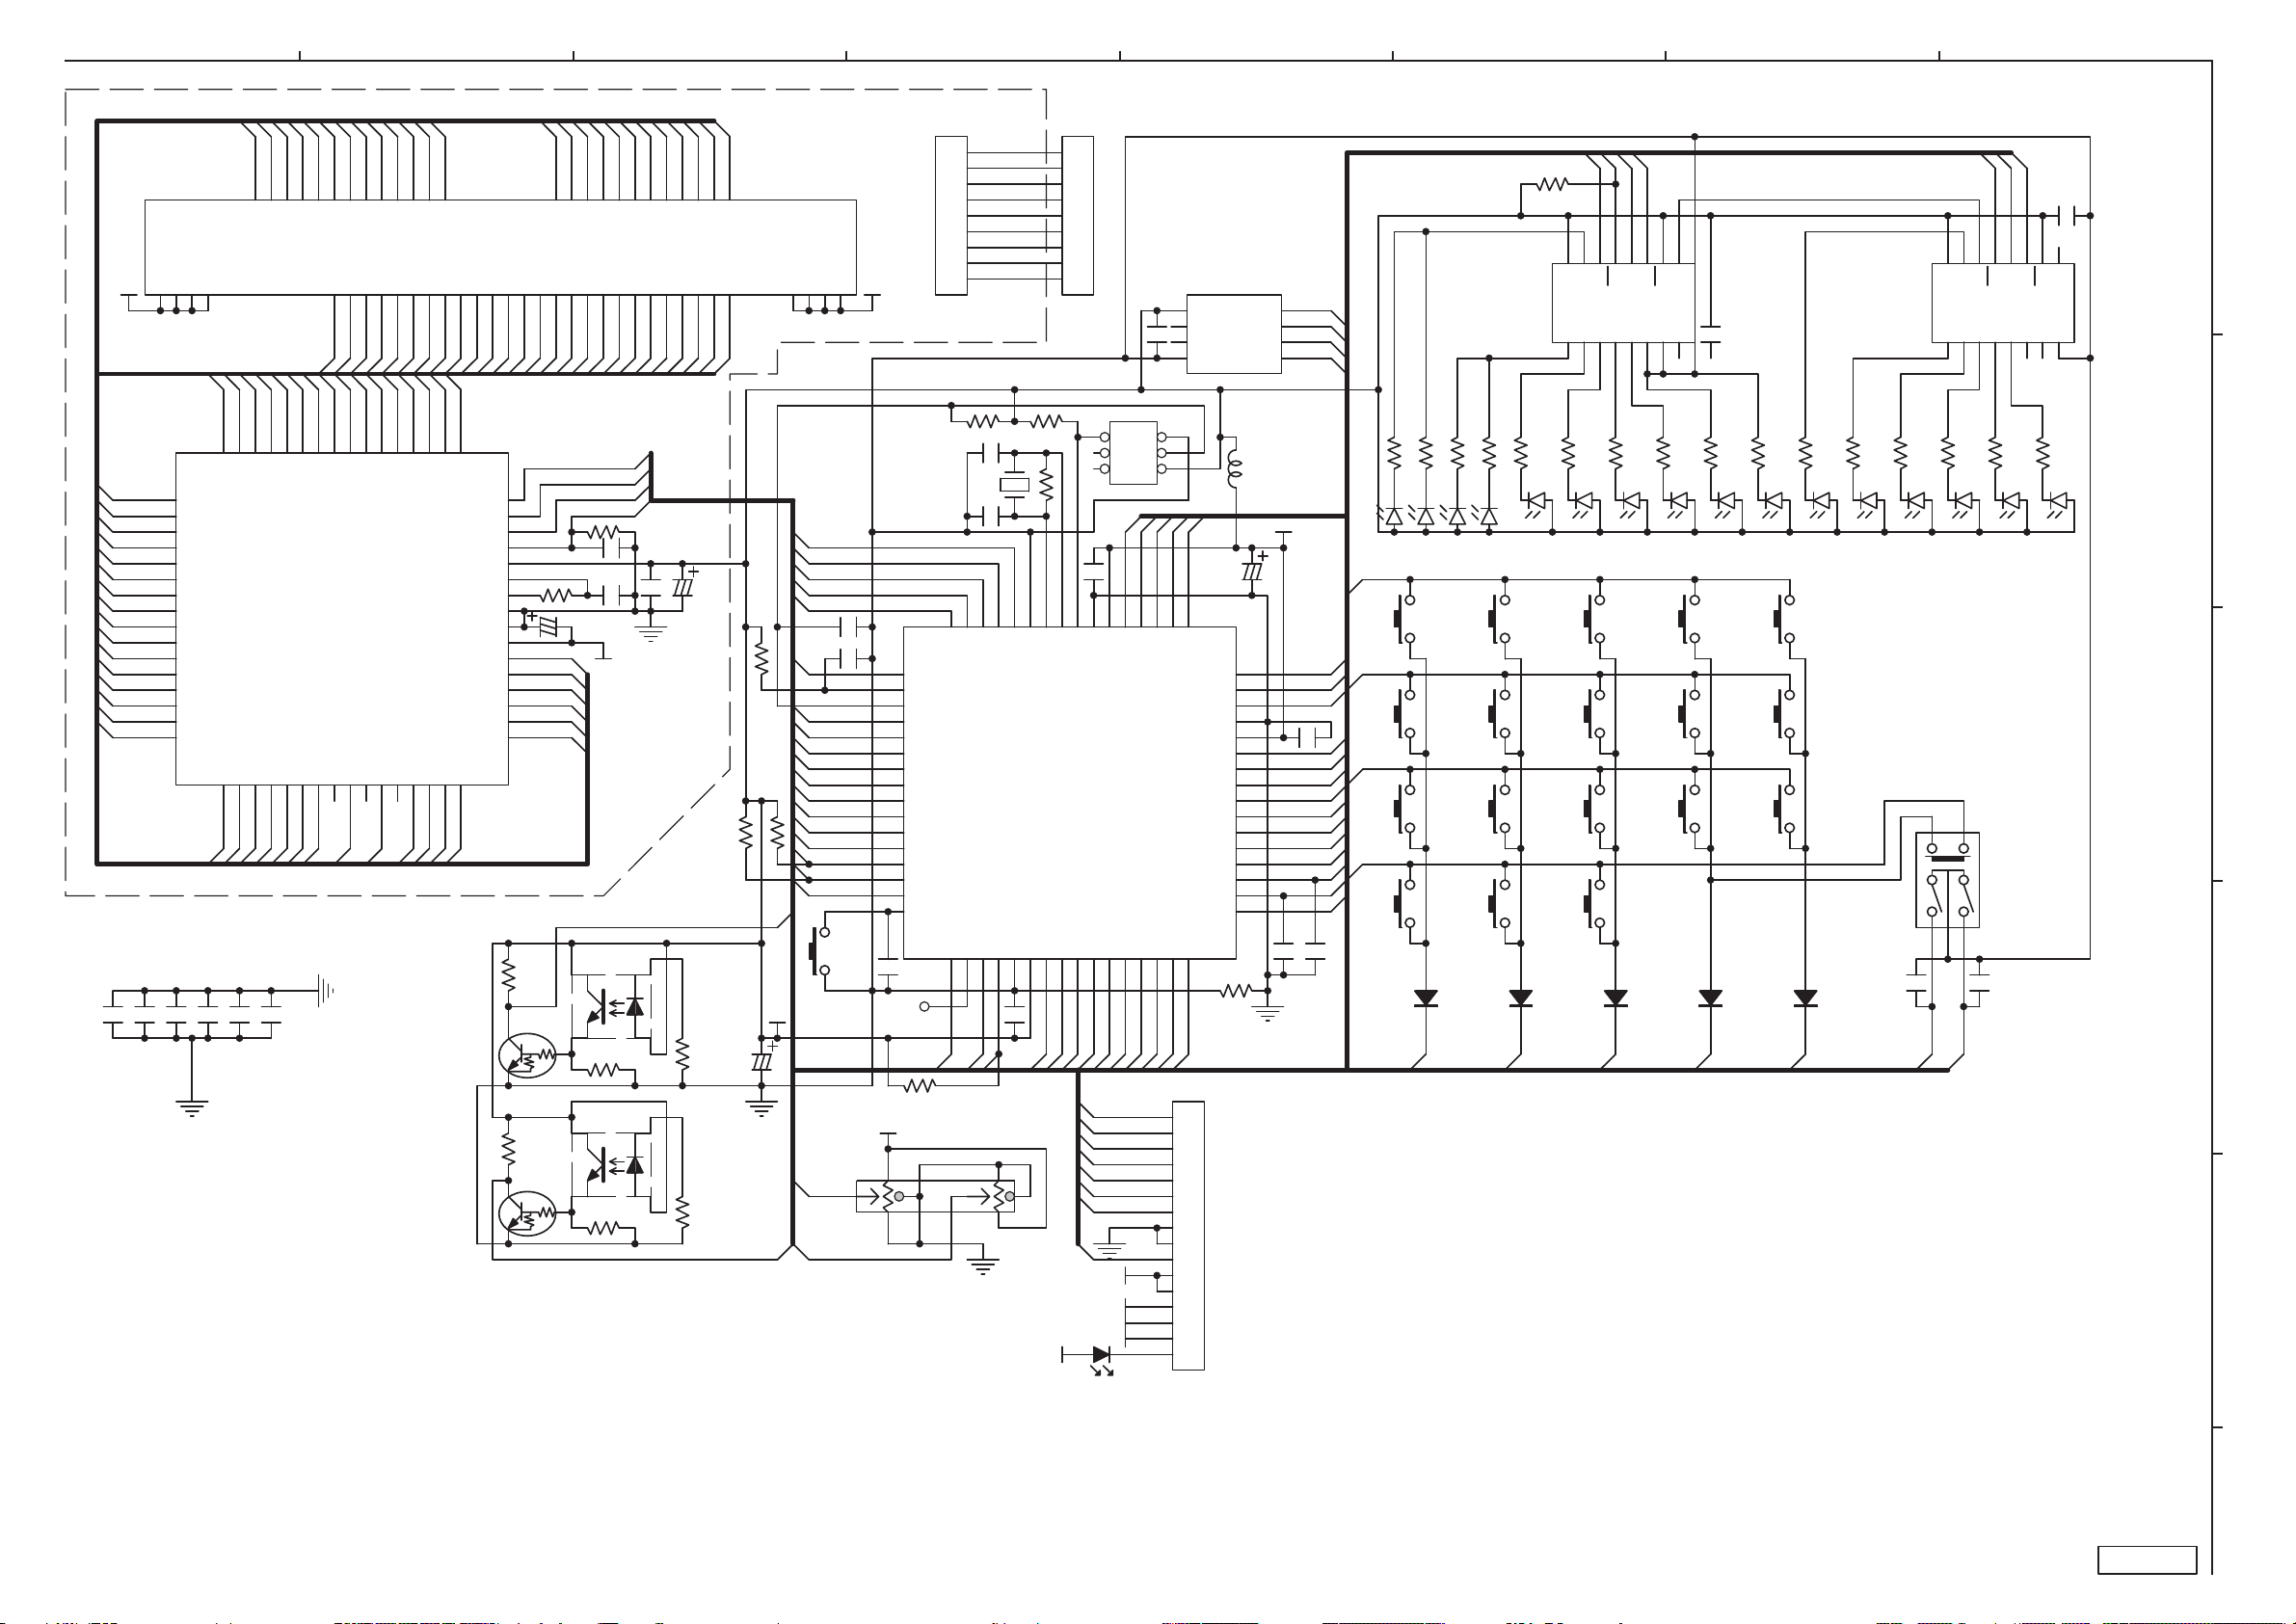
405-S700-2455
87654321
VF2
F11F12F13F1
17
1S17
AM17
1S18
18
AM18
1S19
19
AM19
1S20
20
AM20
1S21
21
AM21
1S22
22
AM22
1S23
23
AM23
1S24
24
AM24
1S25
25
AM25
1S26
26
AM26
1S27
27
AM27
1S28
28
AM28
1S29
29
AM29
1S30
30
AM30
1S31
31
AM31
1S32
32
AM32
C02NCC03NCC04NCC05
C01
NC
1G1
1G2
1G3
1G4
79
80
81
82
G10
G11
G12
G13
4
1S11
1S12
1S13
1S14
1S15
1S16
16
AM3333AM3434AM3535AA136AA237AA338AA4/G16
1S35
1S33
1S34
1S36
1S37
1S38
C06
NC
NC
CHASSIS
1S11
1S12
64
63
62
61
60
59
R209 10K
58
57
56
55
54
53
52
51
50
49
R221
10K
R222
10K
C221
1G1
1G2
1G3
1G4
1G5
1G6
IS36
63
1S13
15K
1S35
1S34
1S14
1S15
VFDDI
VFDCL
VFDCE
VRST
0.01
30P
C220
10/35
-32V
D231
3 4
R219
3 4
R220
15K
1S33
1S16
R207
C219
P.I.
D232
P.I.
1S32
1S17
20K
1S31
1S18
C222
1S30
1S19
0.1
2
1
2
1
1S28
1S29
1S20
1S21
C223
100/10
D
1G8
1G9
1G10
1S2
1S3
1S1
1S5
1S6
1S7
5
6
7
AM6
AM7
AM8
AA6/G14
AA7/G13
AA8/G12
42
43
1G12
1G12
1G14
1G16
G170G271G372G473G574G675G776G877G9
1S4
1S5
1S6
1S2
1S3
1S4
2
3
4
AM2
AM3
AM4
AM5
G1144G1045G946G847G7
1G8
1G9
1G10
C124ES
Q202
C124ES
1S7
1S1
1
AM1
OSCO
TEST
48
1G7
Q201
1S8
1S9
IC205
DI
CL
CE
/RES
VDD
OSCI
VSS
VFL
G1
G2
G3
G4
G5
G6
1S10
1G5
1G6
1G7
78
P3712P3813P114P215P316P417P518P619P720P821P922P1023P1124P1225P1326P1427P1528P1629P1730P1831P1932P2033P2134P2235P2336P24
IS37
IS38
1S8
1S9
1S10
8
9
AM9
AM1010AM1111AM1212AM1313AM1414AM1515AM16
LC75710NE
AA5/G15
39
40
41
1G14
1G16
DGND
1S27
1S22
R215
R217
560
R218
560
52S142S1
1S26
37
1S23
NC
WLA
C201
100/10
WLB
P2552P2653P2754P2855P2956P3057P3158P3259P3360P3461P3562P36
R214
10K
R216
VFD201
VFD DN-S700
F241F242F243F2
C208
NC
5V
D
VF1
44
XRST
0.1
C215 0.01
WLA
WLB
ENCA
10
11
12
TAP
SW221
TAP
VR201
10KB
13
14
15
16
AD5V
UTDR
URDT
AD1
AD0
CN201B
X201
5.5296M
1
PTC4
2
IRQ
3
/RST
4
PTF0
5
PTF1
6
PTF2
7
PTF3
8
PTF4
9
PTC6
PTE0
PTF5
PTF6
PTE0/TXD1
PTE1/RXD1
PTE2
PTE3
C213
0.01
TP
VRST
1
VFDCE
2
VFDCL
3
VFDDI
4
VF1
5
VF2
6
5V
7
DGND
8
-32V
9
R212
10K
C205
22P
C206
22P
64
62
PTC3/TXD263PTC5/RXD2
PTE417PTE518PTE619PTE720VSS21VDD22PTG023PTG124PTG225PTA026PTA127PTA228PTA329PTA430PTA531PTA6
VFDDI
VFDCL
C202
R208
2.2K
PITCH
AD
CN201A
1
2
3
4
5
6
7
8
9
R213
10K
R210
1M
59
57
58
VSS
PTC060PTC161PTC2
PTG5/XTAL
PTG6/EXTAL
IC201
MC9S08AW32
DI
0.1
5V
CN203
1
3
5
HEADER 3X2
BKGD
0.1
C204
PLAY
55
56
54
53
VREFL
VREFH
BKGD/MS
VFDCE
XRST
UTDR
URDT
WLA
WLB
PLAY
CUE
D
/MUTE
5V
VF1
VF2
-32V
D315
O/C
C214
0.1
/URST
2
4
6
CS
CUE
51
52
PTD6/AD14
PTD7/AD15
IC202
8
VCC
7
DC
6
ORG
5
GND
AT93C46
C207
100/10
/MUTE
49
50
PFG4
PTG3
AD11
PTD4/AD12
PTD5/AD13
AD10
VSSAD
VDDAD
AD9
AD8
AD7
AD6
AD5
AD4
AD3
AD2
AD1
AD0
PTA7
32
R211
CN06B
1
2
3
4
5
6
7
TO SERVO PCB
8
9
10
11
12
13
14
15
16
16P
C216
0
L201
10uH
48
47
46
45
44
43
42
41
40
39
38
37
36
35
34
33
0.01
CS
SK
DI
DO
AD5V
/OE
1
2
3
4
SHCP
STCP
KR1
KR2
KR3
KR4
AD1
AD0
AD
CS
SK
DI
DO
DS
C203
0.1
C217
0.01
PLAY
KR1
KR2
KR3
KR4
D221
1SS132
R250
D201
470
R250A
D201A
SW201
PLAY
KS1
470
470
R251
D202
CUE
SW206
FLIP
SW211
QUICK F.
SW216
+
D222
1SS132
R251A
D202A
IC203
74595
R252
470
FILTER
KS2
SW202
CUE
R206
10K
15
16
VCC
Q11Q22Q33Q44Q55Q66Q77GND
470
R253
D204
D203
FLANGER
SW207
A
SW212
QUICK B.
SW217
-
D223
1SS132
/OE
DS
14
Q0
OE13DS
470
R254
D205
ECHO
SW203
FLANGER
SW208
EXIT/RELOOP
SW213
KEY ADJUST
KS3
STCP
SHCP
10
11
12
STCP
SHCP
470
R255
SW218
ON/OFF
1SS132
9
MR
8
470
D206
FILP
D224
DSO
C211
0.1
470
470
R256
R257
D208
D207
A
EXIT/RELOOP
SW204
ECHO
SW209
B
SW214
CONT/SINGLE
D225
1SS132
KS4
470
R259
R258
D209
B
KEY ADJUST
SW205
FILTER
SW210
TIME/RELAY
SW215
PITCH
KS5
470
D210
IC204
74595
R260
C209
.01
470
D211
PITCH
16
SW219
2
3 4
ENCA
/OE
STCP
SHCP
C212
0.1
10
Q0
14
C210
.01
12
OE13DS
R262
470
D213
10
11
9
MR
STCP
SHCP
8
R263
470
D214
16
15
VCC
Q11Q22Q33Q44Q55Q66Q77GND
R261
470
D212
6
5
1
ENCB
A
DSO
B
C
D
E
SCHEMATIC DIAGRAMS (3/4)
CONTROL UNIT
VFD UNIT
DN-S700
F
Page 62
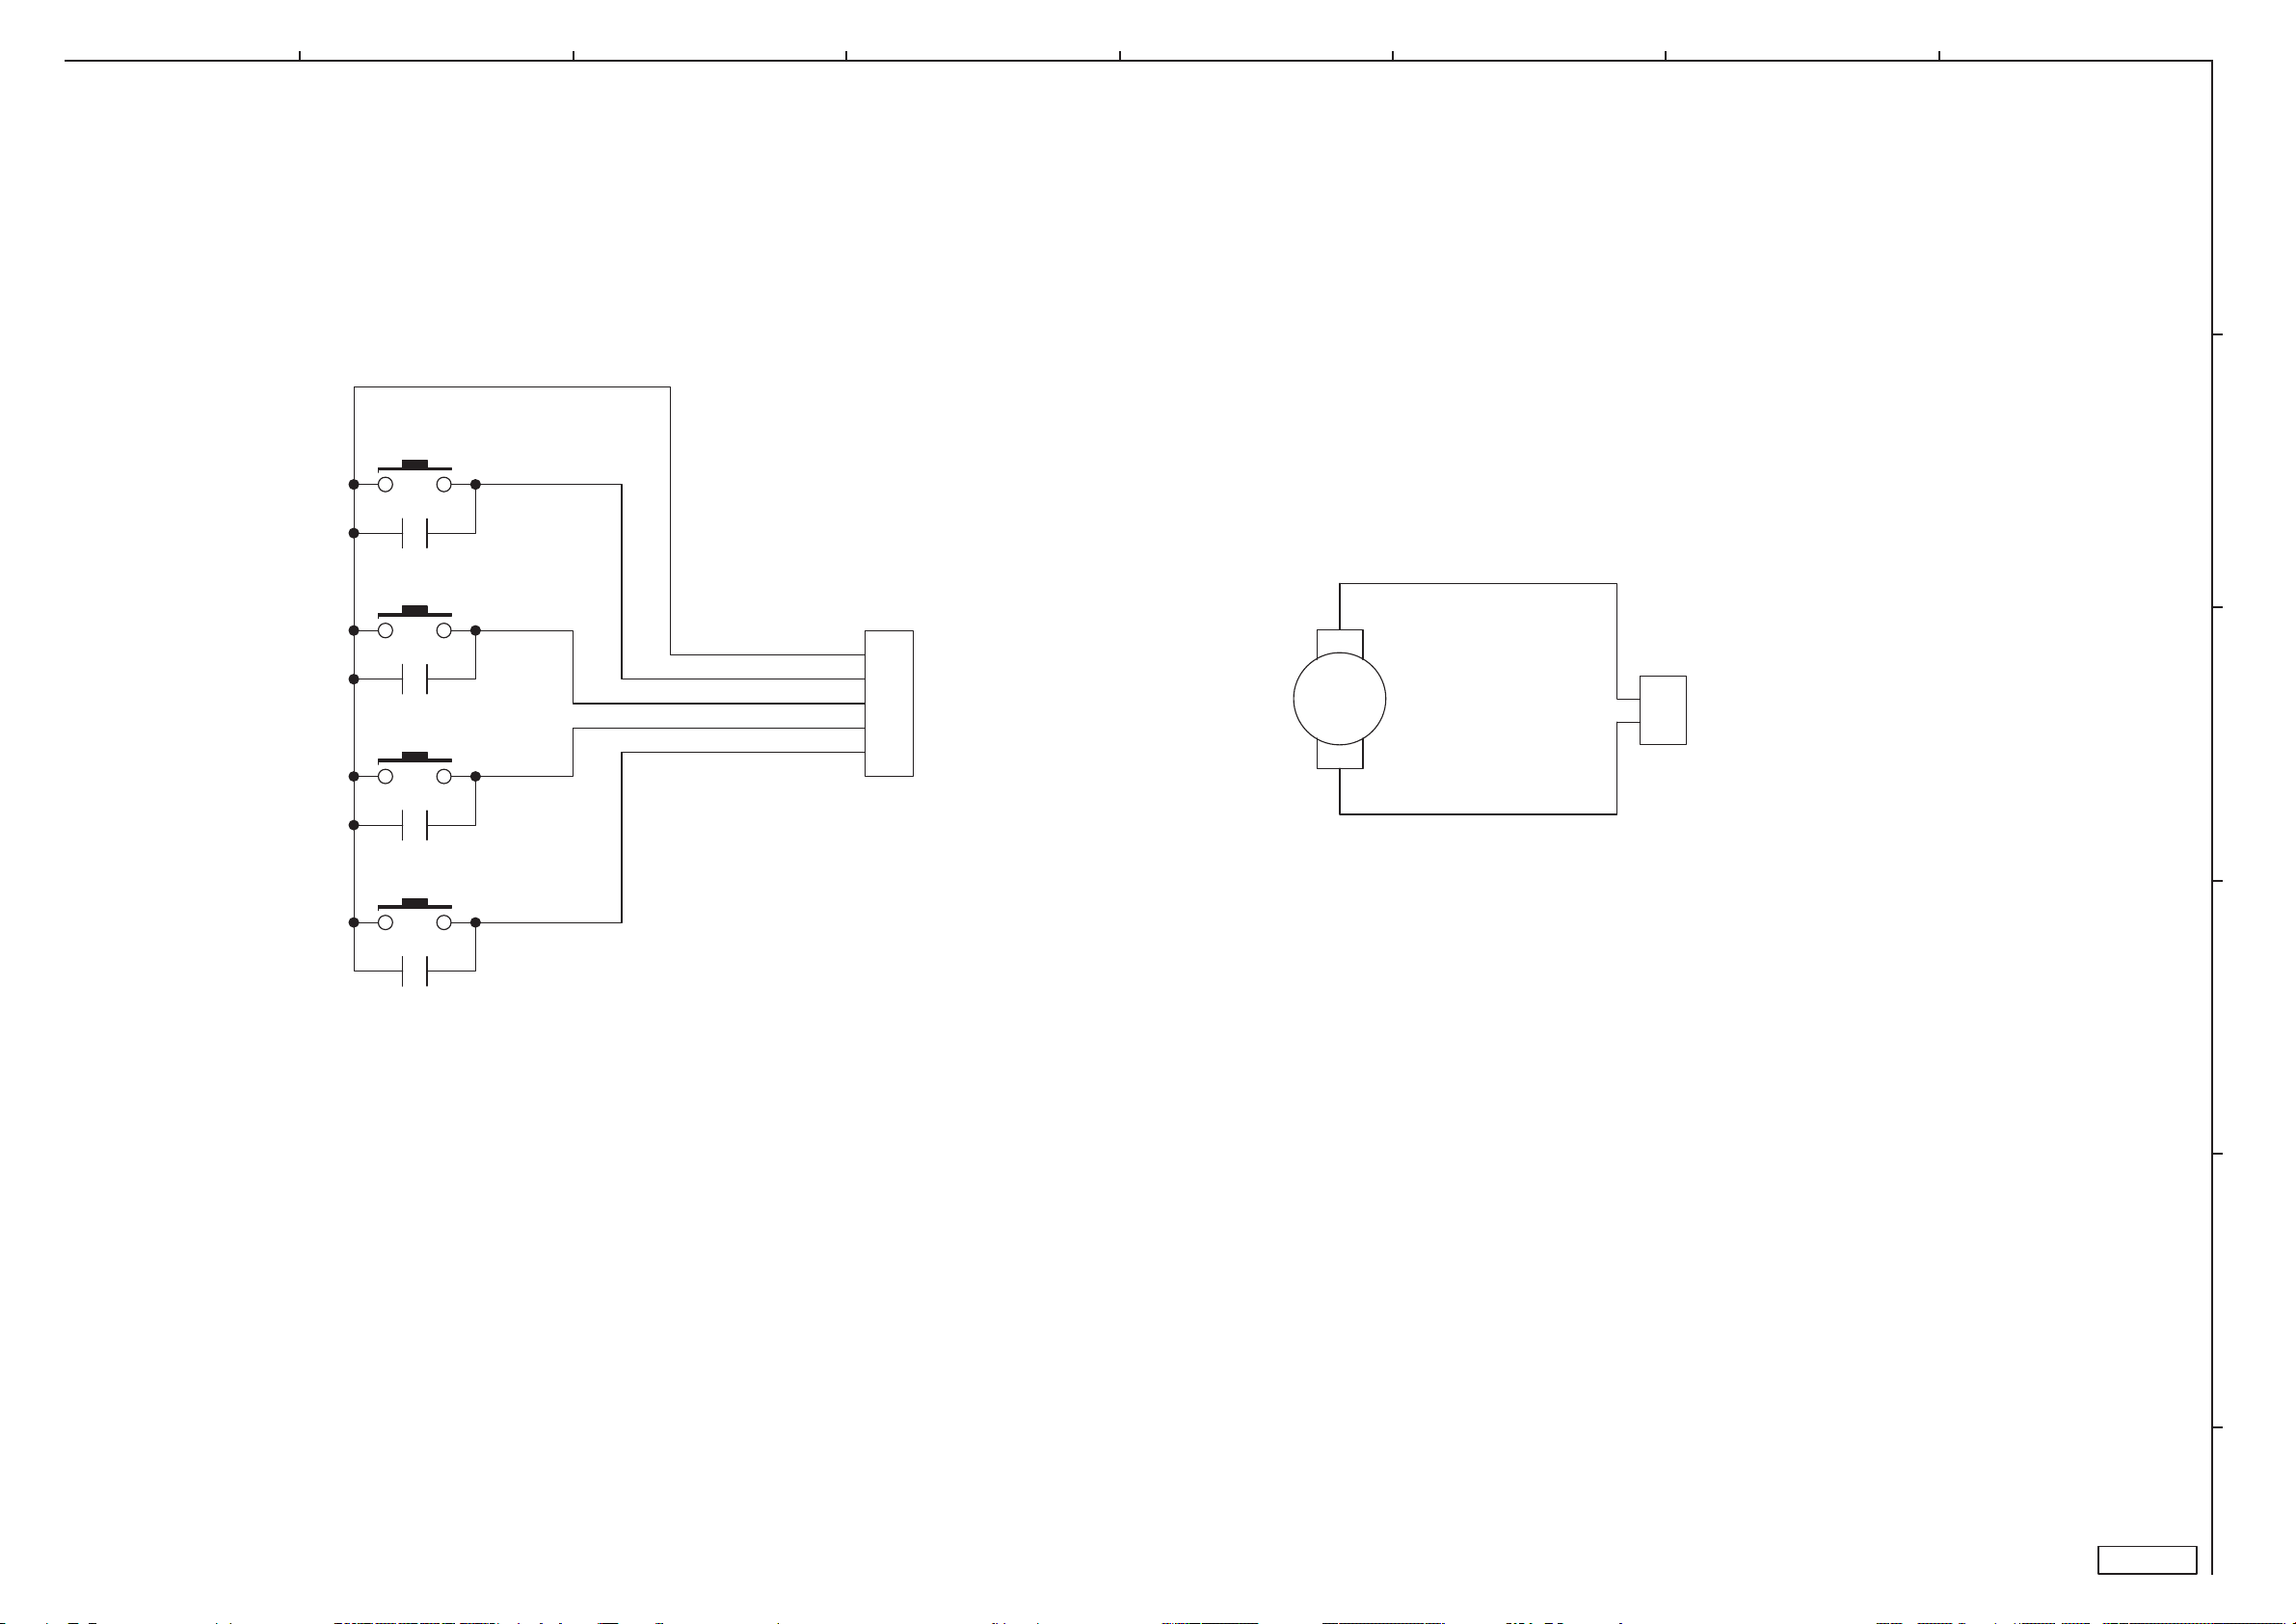
SW04
SW03
SW02
C04
0.1
C03
0.1
C02
GND
SW4
SW3
SW2
SW1
CN01
1
2
3
4
5
CON5
MOTOR
87654321
A
B
+
CN901
A
-
1
2
2P
C
SW01
0.1
C01
0.1
SWITCH UNIT
MOTOR UNIT
D
E
SCHEMATIC DIAGRAMS (4/4)
SWITCH UNIT
MOTOR UNIT
DN-S700
F
 Loading...